

Page 1
Page 2
INSTRUCTION MANUAL
GUIDE D'UTILISATION
Internet Radio
Webra dio
R227
Help Line: 1-800-263-2244
Ligne d’assista nce:1 -800-2 63-2 244
Mon-Fri , 9AM-5PM (E astern )
Du lundi au vendre di, de 9h 17h (h eure de l’Est)à
SANYO Canada Inc.
www.s anyo.c a
ENGLISH US-1~U S-27
FRANÇAIS FR -1~F R-27
Page 3
SAFETY PRECAUTIONS
TO PREVENT FIRE OR SHOCK HAZARD, DO NOT USE THIS PLUG WITH AN EXTENSION CORD, RECEPTACLE OR OTHER
OUTLET UNLESS THE BLADES CAN BE FULLY INSERTED TO PREVENT BLADE EXPOSURE. TO PREVENT FIRE OR SHOCK
HAZARD, DO NOT EXPOSE THIS APPLIANCE TO RAIN OR MOISTURE.
CAUT ION
RISK OF ELECTRIC SHOCK
DO NOT OPEN
CAUTION: TO REDUCE THE RISK OF ELECTRIC
SHOCK, DO NOT REMOVE COVER(OR BACK). NO
US ER - SERV IC E ABLE PA RTS IN SIDE. R EFER
SERVICING TO QUALIFIED SERVICE PERSONNEL.(The
Caution Marking and Rating Plate is located at the bottom
enclosure of the unit.)
DANGEROUS VOLTAGE
The lightning fash with arrowhead symbol
within an equilateral triangle is intended to alert
the user to the presence of uninsulated
dangerous voltage withi n the product’s
enclosure that may be of sufficient magnitude
to constitute a risk of electric shock to persons.
ATTENTION
The exclamation point within an equilateral
triangle is intended to alert the user to the
prese nce of i mp ortant oper atin g and
maintenance (servicing) instructions in the
literature accompanying the appliance.
FCC WARNING:
This equipment may generate or use radio frequency
energy. Changes or modifications to this equipment
may caus e ha rm ful inter fe rence unles s th e
modifications are expressly approved in the instruction
manual. The user could lose the authority to operate
this equipment if an unauthorized change or
modification is made.
Changes or modifications to this unit not expressly
approved by the party responsible for compliance
could void the user’s authority to operate the
equipment.
Shielded cables must be used this unit to ensure
compliance with Class B FCC limits.
Caution: To maintain compliance with the FCC’s RF
exposure guidelines place the base unit at least 20 cm
from the nearby persons.
Use only the supplied antenna. Unauthorized
antennas, modifications, or attachments could damage
the transmitter and may violate FCC regulations.
SURGE PROTEC TORS :
It is recommended to use a surge protector for AC
connection. Lightning an d power surges ARE NOT
covered under warranty for this product.
INFORMATION:
This equipment has been tested and found to comply with
the limits for a Class B digital device, pursuant to Part 15
of the FCC Rules. These limits are designed to provide
reasonable protection against harmful interference in a
residential installation. This equipment generates, uses
and can radiate radio frequency energy and, if not
installed and used in accordance with the instructions,
may cause harmful interference to radio communications.
However, there is no guarantee that interference will not
occur in a particular installation. If this equipment does
cause harmful interference to radio or television reception,
which can be determined by turning the equipment off
and on, the user is encouraged to try to correct the
interference by one or more of the following measures:
● Reorient or relocate the receiving antenna.
● Increase the separation between the equipment and
receiver.
● Connect the equipment into an outlet on a circuit
different from that to which the receiver is connected.
● Consult the dealer or an experienced radio / TV
technician for help.
This device complies with Part 15 of the FCC Rules.
Operation is subject to the following two conditions:
(1) this device may not cause harmful interference, and
(2) this device must accept any interference received,
including interference that may cause undesired operation.
IMPORTANTES MESURES DE SÉCURITÉ
Certaines mesures de sécurité doivent être prises pendant
l’utilisation de matérial équipment afin de réduire les risques
d’incendie, de choc électrique et de blessures. En voici
quelquesunes:
1. Ne pas utiliser l’appareil près de l’eau, p.ex., près d’une
baignoire, d’un lavabo, d’un évier de cuisine, d’un bac
à laver, dans un sous-sol humide ou près d’une piscine.
2. Éviter d’utiliser le équipment (sauf s’il s’agit d’un
appareil sans fil) pendant un orage électrique. Ceci
peut présenter un risque de choc électrique causé
par la foudre.
3. Utiliser seulement le cordon d’alimentation et le type
de piles indiqués dans ce manuel. Ne pas jeter les
piles dans le feu: elles peuvent exploser. Se conformer
aux règlements pertinents quant à l’élimination des
piles.
CONSERVER CES INSTRUCTIONS
US- 1
Page 4

IMPORTANT SAFETY INSTRUCTIONS
1.) Read t hese instructions.
2.) Keep t hese instructions.
3.) Heed a ll warnings.
4.) Foll ow all instructions.
5.) Do not u se this apparatus near wate r.
6.) Clea n only with dry cloth.
7.) Do not b lock any ventilation open ings. Install in accordan ce with the manufacturer’s
instru ctions.
8.) Do not i nstall near any heat source s such as radiators, heat reg isters, stoves, or other
appara tus(including amplifi ers) that produce heat.
9.) Do not d efeat the safety purpose of t he polarized or grounding -type plug. A polarized plug has
two blad es with one wider than the othe r. A grounding type plug has two bla des and a third
ground ing prong. Th e wide blade or the third prong i s provided for you r safety. If the p rovided
plug doe s not fit into your outlet, con sult an electrician for rep lacement of the obsolete ou tlet.
10.) Pro tect the power cord from bein g walked on or pinched partic ularly at plugs, convenie nce
recept acles, and the point where th ey exit from the apparatus.
11.) Only use attachme nts/accessories speci fied by the manufacturer.
12.) Use o nly with a cart, stand, tripo d, bracket, or table specif ied by
the manu facturer, or sold with the app aratus. When a cart is used,
use caut ion when moving the cart/ap paratus combination to av oid
injury f rom tip-over.
13.) Unp lug this apparatus during l ightning storms or when unu sed for long periods of time.
14.) Ref er all servicing to qualifi ed service personnel. Ser vicing is required when the a pparatus
has been d amaged in any way, such as power-supply cor d or plug is damaged , liquid ha s
been spi lled or objects have fallen i nto the apparatus, the appa ratus has been exposed to rai n
or moist ure, does not operate norma lly, or has been d ropped.
15.) The app aratus sh all not be exposed t o drippin g or splashing and t hat no objects filled with
liquid s, such as vases, shall be plac ed on apparatus.
16.) Mai n plug is used as disconnect de vice and it should remain rea dily operable du ring inte nded
use. In or der to disconnect the appar atus from the mains complet ely, the mains p lug should
be disco nnected form the mains sock et outlet completely.
When usi ng your equipment, basic sa fety precautions should a lways be followed to reduce t he
risk of fi re, electric shock and inju ry to persons, including th e following:
17.) Avoid us ing a equipment during an ele ctrical storm. There may be a remote risk of
electr ic shock from lightning.
18.) Use o nly the power cord and batter ies indicated in this manua l. Do not dispose of batterie s
in a fire. They may explo de. Check with local codes fo r possible special dispos al instructions.
US- 2
Page 5

In troduc tion
Thank you for choosing this S ANYO product which has been designed and manufactured to giv e
you many y ears of trouble-free serv ice.
Due to the relatively new concept of a standalone interne t r adio, please take tim e t o r ead thes e
instru ctions they have been writt en to ensure you get the very bes t from your purchase.
Patien ce
Intern et Radio is a fast-growing but young phenomenon, and is only going to get better as time
goes by. So metimes a conn ection, station, or network glitch may frustrate you, but working through
the issu e will be well worth the effort.
Reach us t oll-free Canada-wide at 8 00-263-2244, 9-5 easter n time, weekdays for assist ance.
Power so urce
● 100-24 0V AC 60/50Hz.
Servic ing
● This uni t contains no user servicea ble parts. Refer to qualifi ed service personnel.
● Consul t your d ealer if you are ever in doubt abo ut the installa tion, oper ation or safety of this
produc t.
US- 3
Page 6

Co ntents
Introd uction……………………………………………………… …………………………………..... . 3
Conten ts......................... ....... ................... ....... .......................... ............... .. .. .. .. .. .. .. .. 4
Overvi ew......................... .......................... ....... ................... ....... .......................... .........6
Intern et radio front, side and rear v iew………………………………………… …………………….. 6
Remote c ontrol top view…………………… ………………………………....……… …………….. … 7
Summar y of Controls.. . .. . ... . .. . .. . .. . . .. . .. . .. . .. . . .. . .. . .. . .. . . .. . .. . .. . ... . .. . .. . .. . ... . .. . .. . .. . ... . .7
Displa y overview…………………………… ………………………………………………… ……….... 8
Instal lation…………………………………………………… …………………………………..…….. .9
Remote C ontrol Battery………………… ………………………………………………… ………..…1 0
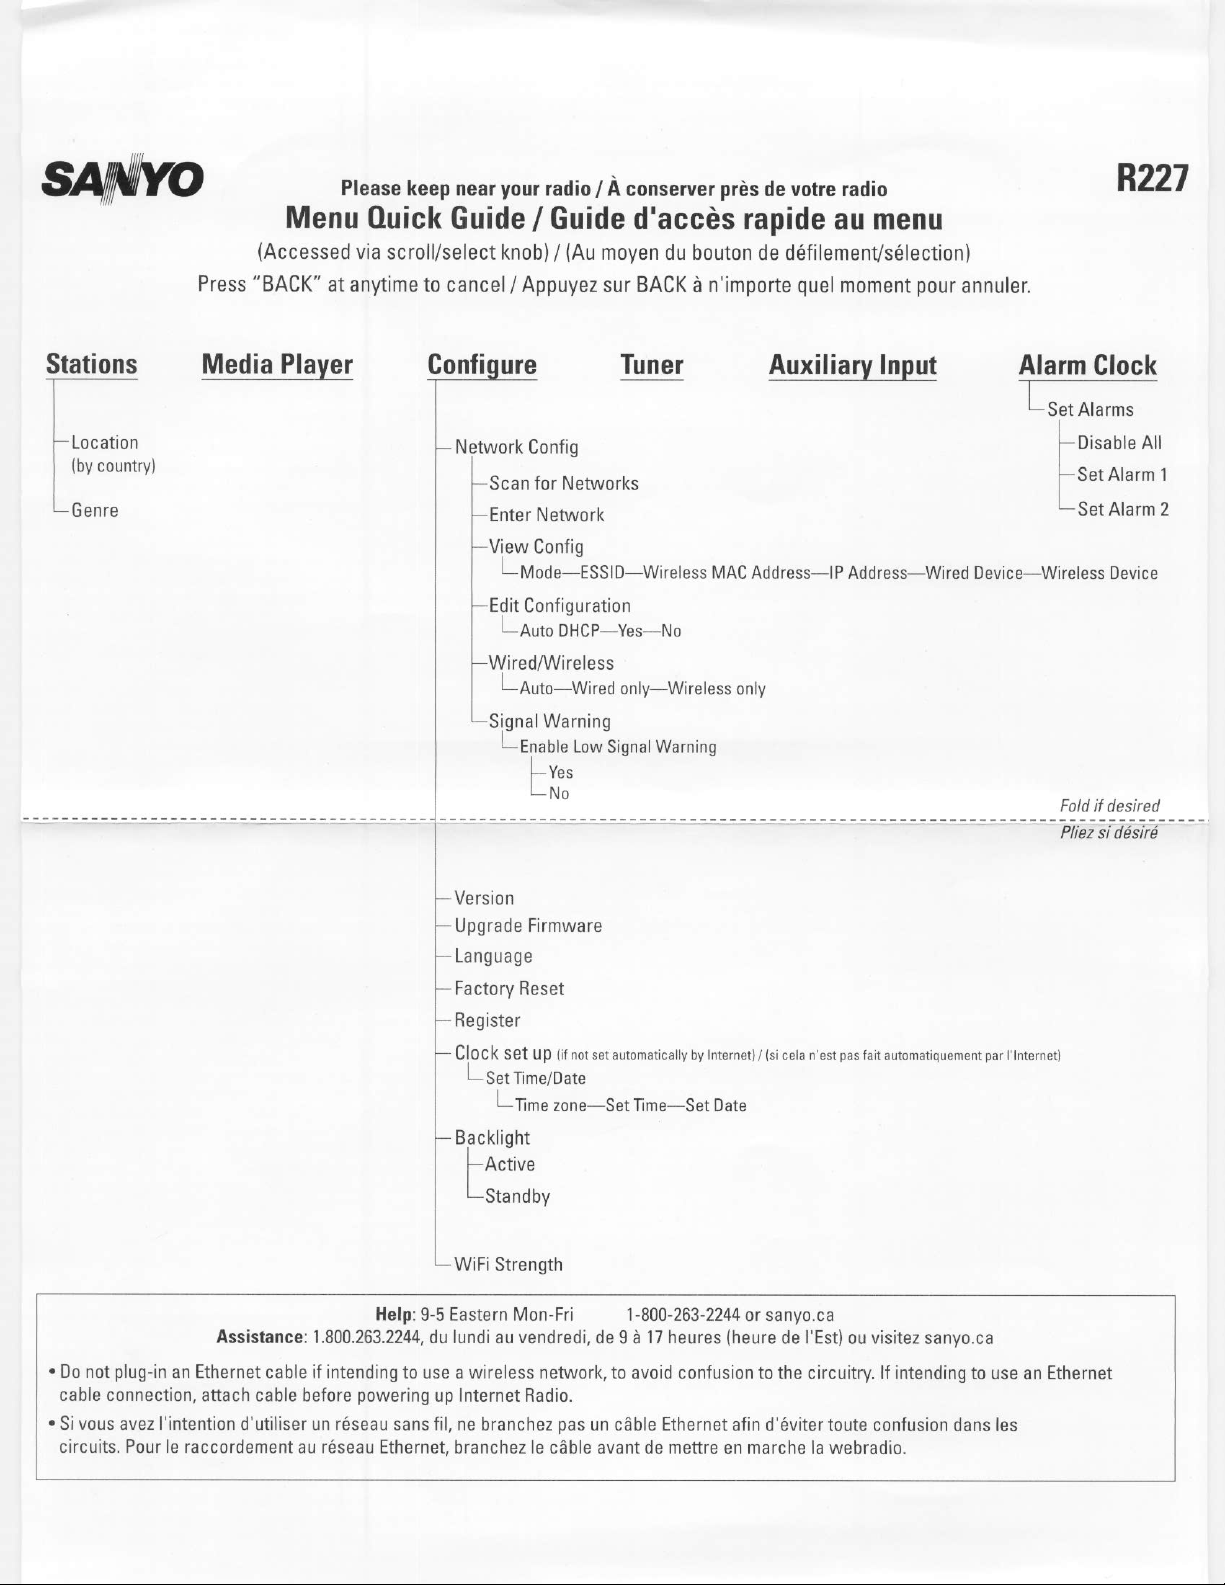
Config ure menu..................... ....... ................... ....... .......................... .......................... 1 0
Choosi ng the option you want from the C onfigure menu. .. . .. . .. . .. . . .. . .. . .. . .. . . .. . .. . .. . .. . . .. . 10
<Netwo rk Config>. .. . . .. . .. . .. . ... . .. . .. . .. . ... . .. . .. . .. . ... . .. . .. . .. . . .. . .. . .. . .. . . .. . .. . .. . .. . . .. . .. . . 10
<Versio n>.. . .. . .. . . .. . .. . .. . .. . . .. . .. . .. . ... . .. . .. . .. . ... . .. . .. . .. . . .. . .. . .. . .. . . .. . .. . .. . .. . . .. . .. . .. . .. . 10
<Upgra de Firmware>. . .. . .. . ... . .. . .. . .. . ... . .. . .. . .. . ... . .. . .. . .. . . .. . .. . .. . .. . . .. . .. . .. . .. . . .. . .. . .. . .11
<Langu age>.. . . .. . .. . .. . .. . . .. . .. . .. . ... . .. . .. . .. . ... . .. . .. . .. . . .. . .. . .. . .. . . .. . .. . .. . .. . . .. . .. . .. . .. . . .. 11
<Facto ry Reset>.. . .. . .. . .. . ... . .. . .. . .. . . .. . .. . .. . .. . . .. . .. . .. . .. . . .. . .. . .. . .. . . .. . .. . .. . ... . .. . .. . .. . .. 11
<Regis ter>.. . . .. . .. . .. . .. . . .. . .. . .. . ... . .. . .. . .. . ... . .. . .. . .. . ... . .. . .. . .. . . .. . .. . .. . .. . . .. . .. . .. . .. . . .. . .11
<Clock S et Up>.. . . .. . .. . .. . .. . . .. . .. . .. . ... . .. . .. . .. . ... . .. . .. . .. . ... . .. . .. . .. . . .. . .. . .. . .. . . .. . .. . .. . .. .11
<Backl ight>. . .. . ... . .. . .. . .. . . .. . .. . .. . .. . . .. . .. . .. . .. . . .. . .. . .. . .. . . .. . .. . .. . ... . .. . .. . .. . ... . .. . .. . .. . ..11
<WiFi St rength>.. . .. . .. . .. . ... . .. . .. . .. . . .. . .. . .. . .. . . .. . .. . .. . .. . . .. . .. . .. . .. . . .. . .. . .. . ... . .. . .. . .. . ...11
Intern et Radio Connection Requirements ................... ....... .......................... ................11
What you n eed before you can use your Int ernet radio.. . .. . . .. . .. . .. . .. . . .. . .. . .. . .. . . .. . .. . .. . .. . 11
Steps fo r connecting your Internet radio to yo ur wireless network..... ..........................12
Step 1 - Pow er up the Internet radio.. . .. . . .. . .. . .. . ... . .. . .. . .. . ... . .. . .. . .. . ... . .. . .. . .. . . .. . .. . .. . ..12
Step 2 Sca n for a wireless network conn ection. .. . .. . .. . . .. . .. . .. . .. . . .. . .. . .. . ... . .. . .. . .. . ... . .. . 12
Step 3 Con nect to the wireless networ k. .. . ... . .. . .. . .. . ... . .. . .. . .. . ... . .. . .. . .. . . .. . .. . .. . .. . . .. . . 13
Choosi ng a radio st ation to listen to........ ....... ................... ....... .......................... .........14
Changi ng the volume.. . .. . . .. . .. . .. . .. . . .. . .. . .. . .. . . .. . .. . .. . ... . .. . .. . .. . ... . .. . .. . .. . ... . .. . .. . .. . . .. 14
Preset ting your favorite intern et radio stations……………… ……………………………………. 15
Playin g a preset internet radio sta tion.. . . .. . .. . .. . .. . . .. . .. . .. . ... . .. . .. . .. . ... . .. . .. . .. . . .. . .. . .. . .. .15
Reques ting a internet station tha t is currently unavailabl e. .. . ... . .. . .. . .. . . .. . .. . .. . .. . . .. . .. . .. . 15
Intern et Station which enable you t o choose what you listen to. . .. . .. . . .. . .. . .. . .. . . .. . .. . .. . .. . . 15
Trouble shooting.................. ....... ................... ....... ................... ....... .......................... ...16
Media Pl ayer Operation………………… ………………...……………………………...……. ..….16
Set up you r Windows PC to allow the radio t o access your audio files via W indows Shares.. . 16
Locati ng audio files via Windows Sh ares... .. . .. . .. . . .. . .. . .. . ... . .. . .. . .. . ... . .. . .. . .. . . .. . .. . .. . .. . 16
Listen ing to a single shared track. .. . .. . .. . ... . .. . .. . .. . . .. . .. . .. . .. . . .. . .. . .. . .. . . .. . .. . .. . .. . . .. . .. . .17
Listen ing to a complete shared albu m. .. . ... . .. . .. . .. . . .. . .. . .. . .. . . .. . .. . .. . .. . . .. . .. . .. . .. . . .. . .. . .. 17
Queuin g up tracks for playback late r. .. . ... . .. . .. . .. . ... . .. . .. . .. . . .. . .. . .. . .. . . .. . .. . .. . .. . . .. . .. . .. . 17
Queuin g up albums for playback late r. .. . ... . .. . .. . .. . . .. . .. . .. . .. . . .. . .. . .. . .. . . .. . .. . .. . .. . . .. . .. . .. 17
Contro lling playback. . ... . .. . .. . .. . ... . .. . .. . .. . ... . .. . .. . .. . . .. . .. . .. . .. . . .. . .. . .. . .. . . .. . .. . .. . ... . .. . .17
US- 4
Page 7

Browsi ng the list of tracks current ly queued u p for playback......... ....... ................... .... 18
Removi ng tracks from the queue.. . ... . .. . .. . .. . ... . .. . .. . .. . ... . .. . .. . .. . . .. . .. . .. . .. . . .. . .. . .. . .. . . ..18
Playin g tracks in random order.. . ... . .. . .. . .. . ... . .. . .. . .. . . .. . .. . .. . .. . . .. . .. . .. . .. . . .. . .. . .. . .. . . .. . .18
Playin g tracks in the queue repeate dly. . .. . .. . .. . . .. . .. . .. . .. . . .. . .. . .. . .. . . .. . .. . .. . .. . . .. . .. . .. . ... . 18
Set up a Win dows PC to allow the Internet r adio to access your audio fil es via a Upnp
server. . . .. . .. . .. . .. . . .. . .. . .. . .. . . .. . .. . .. . ... . .. . .. . .. . ... . .. . .. . .. . . .. . .. . .. . .. . . .. . .. . .. . .. . . .. . .. . .. . .. 18
Locati ng and playing media files using the rad io and Upnp.................... ...................... 19
Queuin g up UPnP track s for playback lat er.. . .. . .. . ... . .. . .. . .. . . .. . .. . .. . .. . . .. . .. . .. . .. . . .. . .. . .. . .19
Queuin g up UPnP albums for playback lat er.. . .. . .. . . .. . .. . .. . .. . . .. . .. . .. . .. . . .. . .. . .. . .. . . .. . .. . .. 19
Contro lling playback later.. . ... . .. . .. . .. . ... . .. . .. . .. . . .. . .. . .. . .. . . .. . .. . .. . .. . . .. . .. . .. . .. . . .. . .. . .. . 19
Browsi ng the list of tracks current ly queued u p for playback.......... ....... ................... ...19
Removi ng UPnP track s from the queue. . .. . .. . ... . .. . .. . .. . . .. . .. . .. . .. . . .. . .. . .. . .. . . .. . .. . .. . .. . . .. 20
Playin g UPnP tracks i n random order. . .. . .. . ... . .. . .. . .. . . .. . .. . .. . .. . . .. . .. . .. . .. . . .. . .. . .. . .. . . .. . . 20
Playin g UPnP tracks i n the queue repeat edly……… …………………………………………….. ..20
Settin g the clock................... .......................... ....... ................... ....... .......................... ..20
Settin g the sleep timer................ .......................... .......................... ....... ................... ...21
Settin g the alarms.................. .......................... .......................... ....... ................... ....... 22
Playin g FM Radio…………………………………………………… …………………….………….. 24
Preset ting your favorite FM radio s tations……………………………… …………………………. 24
Playin g a preset FM radio station…… ………………………………………………… ……………. 24
Option al Connections…………………………………… ………………………………………….. 25
Auxili ary Jack ……………………………….. ....... ................... .....…… ………………...………..25
Headph one Jack ……………………………….. ....... ................... ……………………...……….. 25
Line Out J ack………..…………………………… …………... ................... ....... ...……...………..25
Cabine t Cleaning.................. .......................... ....... ................... ....... .......................... . 2 5
Specif ications.................. .......................... .......................... ....... ................... ....... ......26
Licens e Information............... .......................... .......................... ....... ................... ....... 26
Warra nty………………………………………… ………………………………………………… …… 27
US- 5
Page 8
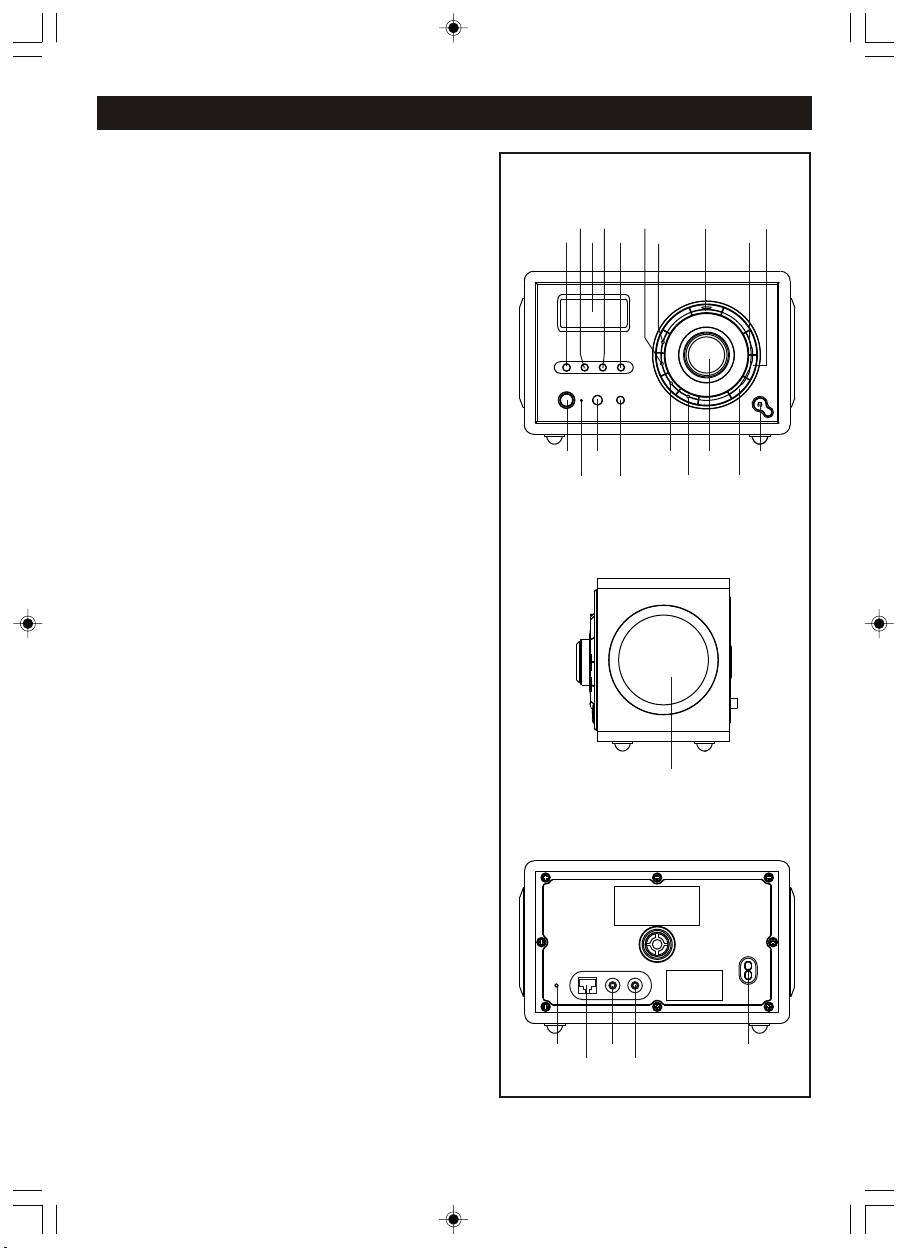
Overview
1. SLEEP BUTTON
2. SEEK ▼ BUTTON
3. LCD DISPLAY
4. SEEK ▲/BROWSE BUTTON
5. BACK BUTTON
6. RADIO P2/ / RADIO P6 BUTTON
7. RADIO P1/ / RADIO P5/■ BUTTON
8. SNOOZE BUT T ON
9. VOLU ME + B UT TO N
10. VOLUM E - BU TT ON
11. HEADP HO NE J AC K
12. REPLY BUT T ON
13. SELECT BUTTON / SCROLL ▲/▼ CONTROL
14. RADIO P4/MEDIA MODE / RADIO P8 BUTTON
15. RADIO P3/ / RADIO P7 BUTTON
16. SHIF T BU TT ON
17. IR SENS OR
►/ II
I◄
►I
Internet radio front view
234
1
18 16
6
5
7
1719
15
14
Internet radio side view
20
8
13
12
10
9
11
18. STA ND BY IN DI CAT OR
19. STA ND BY/ ON B UT TO N
20. SPEAK ER
21. FM ANTE NN A
22. NETWORK JACK
23. AUX IN JACK
24. LINE OUT JACK
25. AC SOCK ET
US- 6
Internet radio rear view
23
21
22
24
25
Page 9
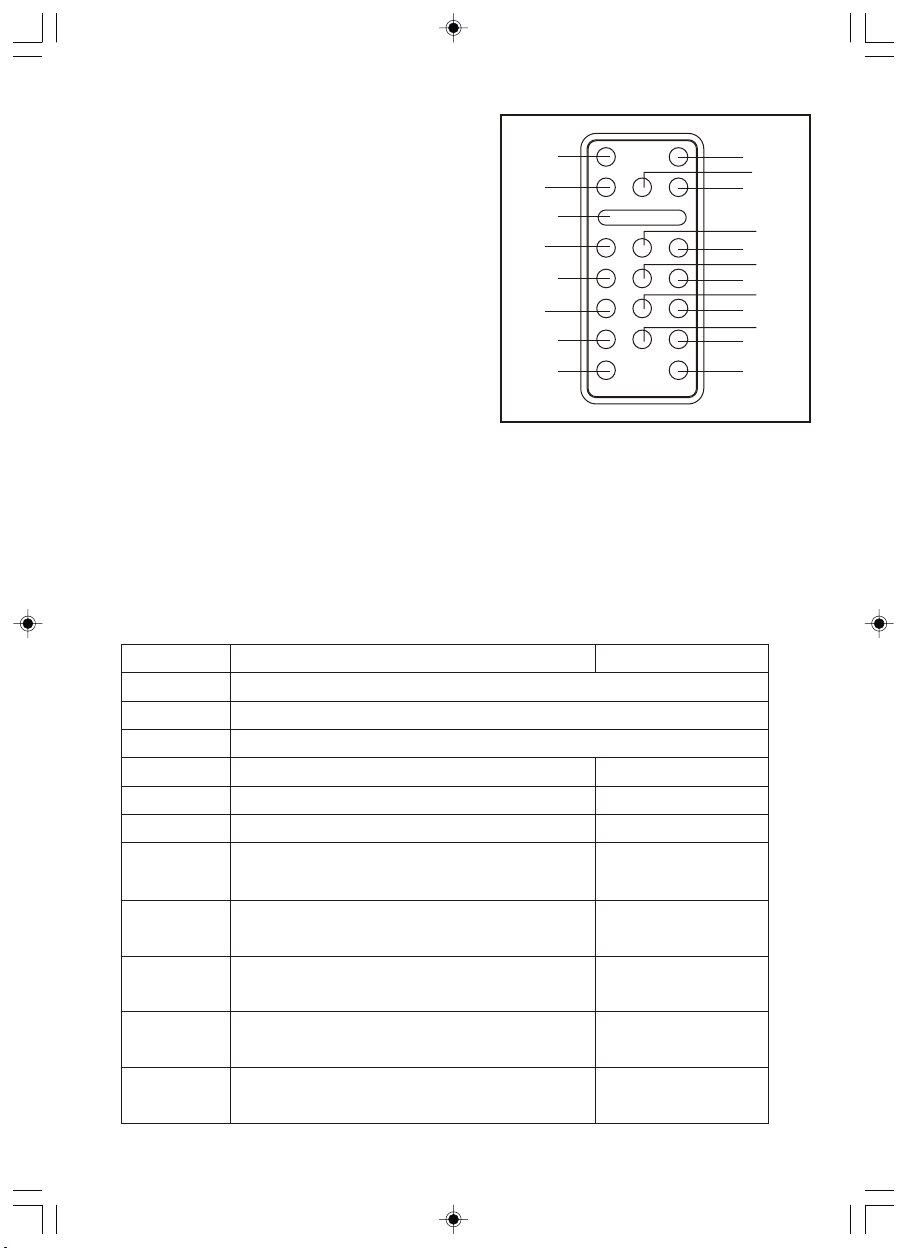
Remote control top view
1. STANDBY/ON BUTTON
2. BACK BUTTON
3. SNOOZE BUTTON
4. RADIO P1/ BUTTON
I◄
5. RADIO P4/ME DIA MODE BUTTON
6. RADIO P7 BUTTON
7. SCROLL ▲ BUTTO N
8. SCROLL ▼ BUTTO N
9. SLEEP BUTTON
10. SELECT BUTTON
11. RE PLY BUTTON
12. RADIO P2/ BUTTON
13. RADIO P3/ BUT TO N
►/ II
►I
14. RADIO P5/■ BU TTON
15. RADIO P6 BUT TON
1
2
3
4
5
6
7
8
9
11
13
15
17
19
20
10
12
14
16
18
16. SEEK ▲/BROW SE BUTTO N
17. RADIO P8 BUT TON
18. SEEK ▼ BUTTON
19. VOLUME + BUT TON
20. VOLUME - BUT TON
Remote sensor
To oper ate the unit wit h the remote con trol, point the remote at the Re mote Sensor on the front o f
the main unit and press the appropriate button . The remote control has an effective operat ing
range of a pproximately 20 feet and an a ngle of no more than 30°.
NOTE: Br ight sunlight may interfe re with the operation of the re mote control.
Summary of Controls - Unit and Remote
Control
STAN DB Y/ON Press t o tu rn o n/off t he I nt ernet Radio
SEL EC T
SCROL L▲/▼
Bro ws e
Reply
Back
Internet Rad io mode
Turn the knob to c ha ng e options. Pr es s th e knob to SELEC T
Press ▲ o r ▼ to s el ect options w he n us ing the remot e co nt rol
No func ti on
For f ut ur e ap plication s. N o fu nction at pre se nt . No fu nc ti on a t present
Go ba ck t o pr ev ious menu pag e
Media Player m ode
Displ ay Q ue ue informat io n
P1
P2
P3
P4
P5
Press a nd h ol d to save Prese t st at ion P1, Press t o lo ad
prese t st at ion P1
Press a nd h ol d to save Prese t st at ion P2, Press t o lo ad
Prese t st at ion P2
Press a nd h ol d to save Prese t st at ion P3, Press t o lo ad
Prese t st at ion P3
Press a nd h ol d to save Prese t st at ion P4, Press t o lo ad
Prese t st at ion P4
Press a nd h ol d to save Prese t st at ion 5, Press to l oa d
Prese t st at ion P5
Pre vi ou s Tra ck
Play/ Pa us e
Next Tra ck
Repea t On /O ff,
Shuff le On/Off
Sto p
US- 7
Page 10
Control
Internet Rad io mode
Media Player m ode
P6
P7
P8
SHIFT
Vol +/-
Seek ▲
Seek ▼
SLEEP
SNOOZ E
Most of the fu nctions of thi s unit can be operated by pressing the buttons on t he front panel or the
corres ponding buttons on the remo te control handset.
Press a nd h ol d to save Prese t st at ion 6, Press to l oa d
Prese t st at ion P6
Press a nd h ol d to save Prese t st at ion 7, Press to l oa d
Prese t st at ion P7
Press a nd h ol d to save Prese t st at ion 8, Press to l oa d
Prese t st at ion P8
Press s hi ft b utton then pr es s P1 t o change P1 or P5 ,
P2 or P6. .e tc
Incre as e vo lume by press in g +, D ecrease vol um e by p ressing -
Tune up FM radio s ta ti on by pressin g ▲, tu ne d own by
press in g ▼
Press t hi s bu tton to set the s le ep t imer (15/30 /6 0/ 90 min)
Press t hi s bu tton to turn on t he s no oze functio n (9 m in s)
Bro ws e
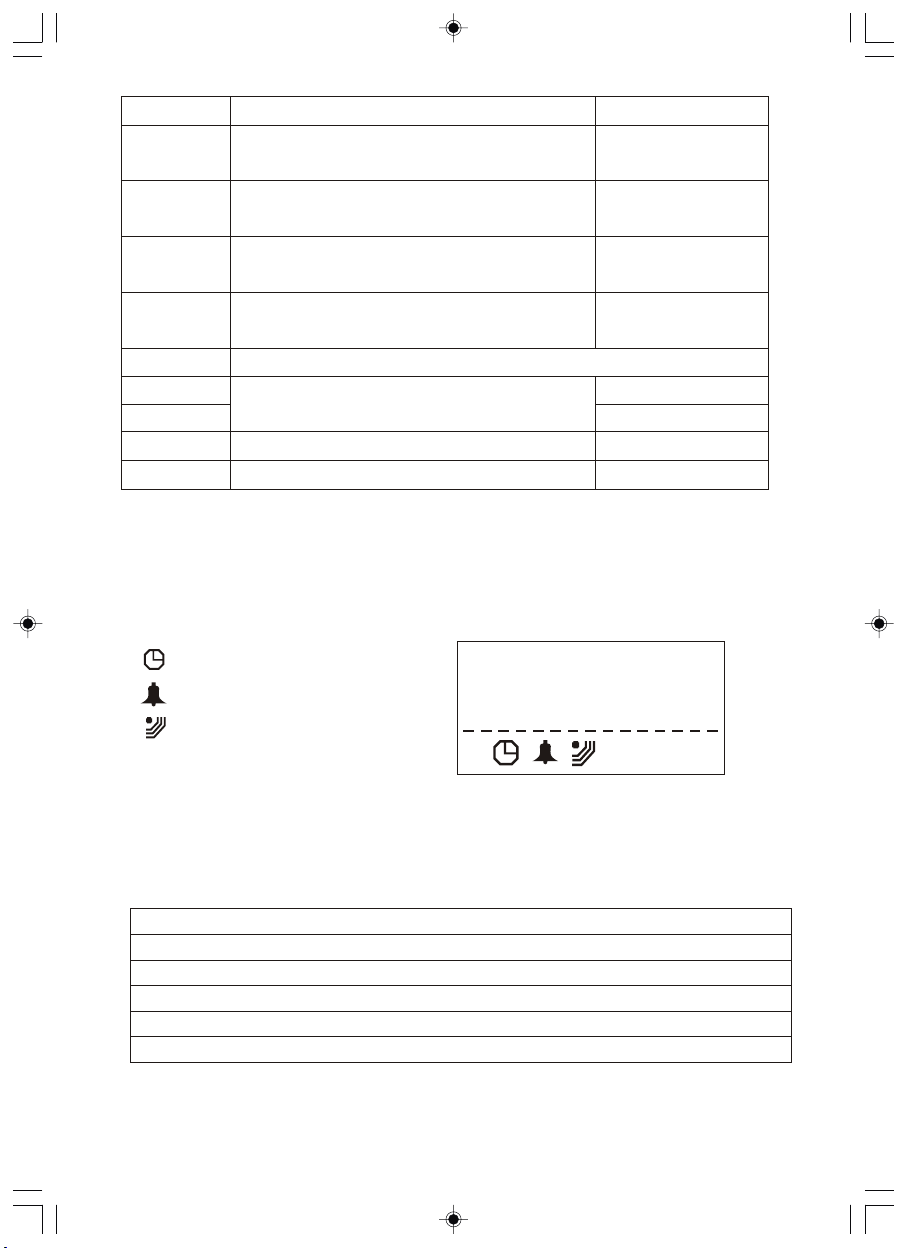
Display overview
Icons ar e displayed on the bottom row o f the display. The m eaning of these icons is expl ained
below.
Sleep timer.
Alarm set indicator
11:00
AM
Internet Radio
Snooze
Zz
Zz
Remark s:
Time will show in the middl e of display(at its maximum siz e)when unit is turned Off.
When uni t is turn ON, the time informat ion will be shown at the bottom o f the display.
Display list:
Stations
Media Player
Configure
Tuner
Auxiliary Input
Alarm Clock
US- 8
Page 11
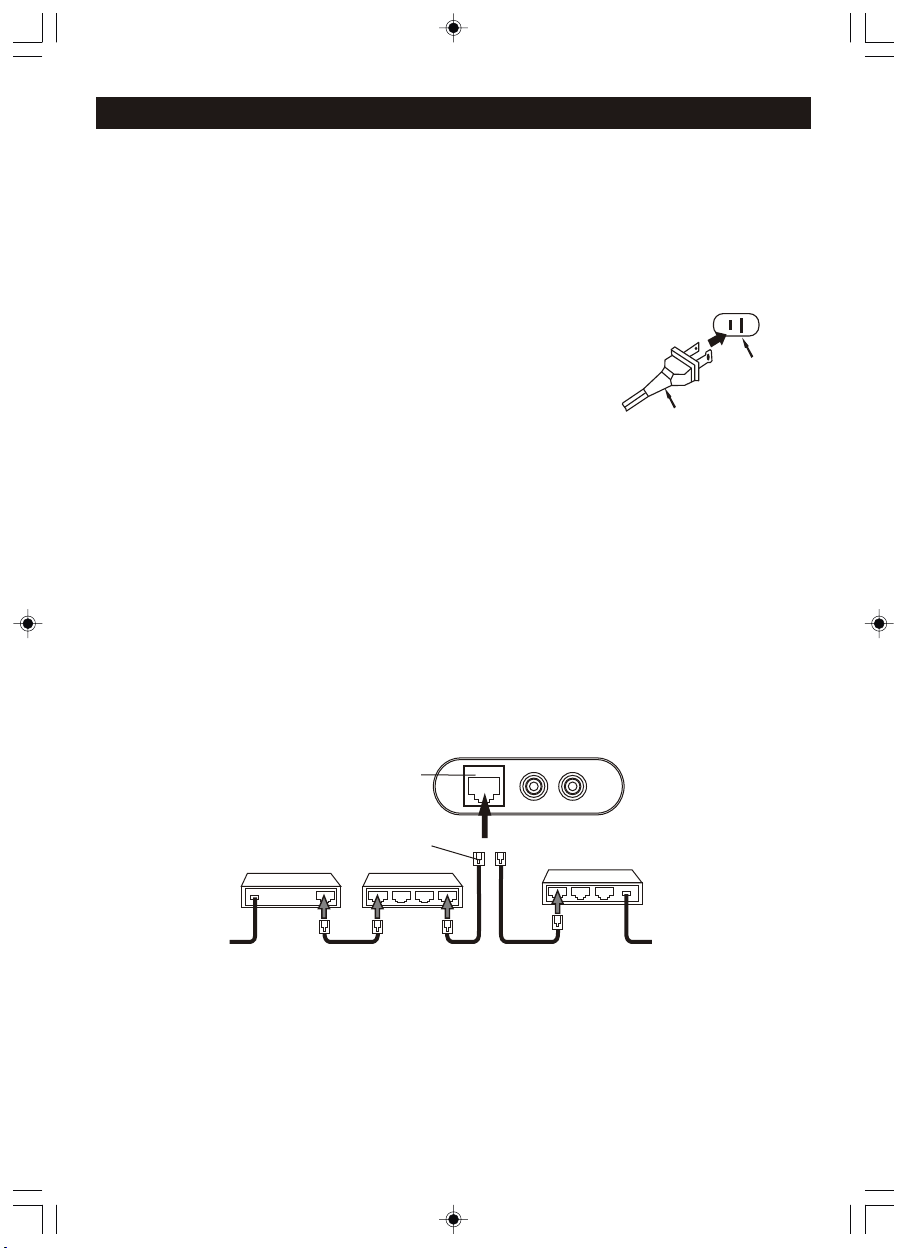
In stalla tion
If th is Int ernet radio has been moved from a cold place to a war m plac e, DO NOT plug it in f or 2-3
hours (e.g. from a cold car to a warm room). There i s a possibil ity that moi sture may have
conden sed i n the Internet radio, this can caus e damage to your Internet radio. To avoid damag e
please unpa ck your Internet radio and allow it to stand at room temperature fo r 2-3 hours be fore
use. This wi ll help any m oisture evapor ate and pre vent unnecessa ry damage to your Internet ra dio.
AC CONNE CTION
Unwind the AC cord and extend it to its full l ength. Inse rt the AC plug
into any convenient 100-240V 60/50Hz house hold outle t. Please note
that this unit is equipp ed with a p olari zed AC plu g which h as one blade
wider than the ot her. This is a s afety feature to r educe the likeli hood of
electr ic sho ck. This polarized AC plug will only fit in a pola rized A C
outlet . If you find that yo u cannot insert this p lug into your ou tlet, you
may ha ve an obsolete non polarized ou tlet. P lease do not try to defeat
this safety feature by using a non-polarized adapter or by filing the
wider bl ade to make it fit into your ou tlet. If this plug d oes not fit into
AC Plug
your ou tlet, you s hould contact a qualified lic ensed electri cian to
replac e your obsolete outlet.
IMPORTANT NOTES:
● Before m oving or lifting the unit, ma ke sure the AC plug is disconnec ted from the power source.
● In case of malfunction due to elec trostatic discharge, just reset the product (reco nnect of
power source may be req uired) to resume normal operation. Sh ould any trouble occur,
remove t he power source and refer to qu alified personnel.
● If there is a pow er failure or the AC cord is discon nected for a short period of time, the clock
time will not be kept. When the power is r esumed or the AC cord is connected again, the clock
time will be reset from the inter net connection. If the internet connecti on is down or not
availa ble the clock can be set manual ly.
RJ-45 JA CK (if not using a wireless rou ter)
Insert t he RJ-45 connector into the R J-45 jack on the unit.
AC Outlet
RJ-45 Jack
Bro adband mo dem
(with integra ted ro uter)
OR
Bro adband
service
Bro adband
service
Bro adband
modem
RJ-45 Connec to r
Route r
Conne ct e th ern et
Use a co mmercia lly avai lable straight LAN cable (Cat egory 5/CAT 5 or better with RJ-45
connec tor).
Do not plug-in an etherne t cable if intendin g to use a wireless network, to avoid confusion to the
circui try. If inten ding to use an eth ernet conne ction, attach c able to both m odem/wired router and
radio be fore powering up radio.
US -9
Page 12
REMOTE C ONTROL BATTERY
1. P ress firmly on the batt ery cover and t hen rotate
it in counter clo ckwise dir ection, the cover will
come off.
2. Place the battery (CR2032) into the batter y
compar tment acco rding to the polarity mark ings,
with the “ +” sign facing up.
3. Place back the battery cov er, press down slightly
and rota te it in cl ockwise direction until it is firm ly
closed .
Note: R emove the battery fro m the remote c ontrol if
not i n use for a lon g period o f time . When the batte ry
become s wea k, the remote control wil l not fu nction
proper ly. Replace wi th new battery.
BATTERY PRECAUTIONS
Follow t hese precautions when usi ng a battery in this device:
1.
Warning -Danger of explosion if batte ry is incorrectly rep laced. Replace onl y w ith the same o r
equiva lent type.
2.
Use only t he size and type of battery spe cified.
3.
Be sure to follo w the cor rect pol arity when installing the battery as indicated in the Battery
Compar tment. A reversed battery may c ause damage to the device.
4.
If the devic e i s n ot to be used for a long period of time, remove the bat tery to preve nt damage
or injur y from possible battery lea kage.
5.
Do not try to recharge a batte ry not intended to be r echarged; it can overheat a nd rupture.
(Follo w battery manufacturer' s directions.)
6.
Batter y shall not be exposed to exces sive heat such as sunshine, f ire or the like.
** Battery Included **
Co nfigur e Menu
Choosi ng the opti on you want from the Configur e menu
1. Press t he SELECT but ton.
(Note: if yo u make a mistak e at a ny point, press the BACK button to go back to the p revious
screen .)
2. Turn the knob unti l 'Configure' is displaye d
3. P ress the SELECT button.
4. Turn the knob unti l the display shows the optio n you want.
5. P ress the SELECT button to choose the option shown on the display. The options are
explai ned below.
<Netwo rk Config>
Enable s you to scan ag ain for connection to another wirel ess netwo rk, or to manually
config ure the network pa rameters. Use th is if you t ake the Internet r adio to another building
where yo u want to use it.
<Versio n>
Displa ys the version numbers of the v arious parts of software on y our Internet radio.
US -10
Page 13

<Upgra de Firmware>
Use this option to download new firmware for the radio from th e R eciva port al on the Intern et.
If ther e is ne w firmware ava ilable, then t he radio will p rompt you if you want to download it or
not.
Note, at this stage, yo u can press the radio's BACK button t o cancel the radios, beginnin g a
firmwa re upgrade. A f irmware u pgrade may take several m inutes, s o do not switch off the
power to the radio until the operation is complete otherwise the radio may bec ome
perman ently damaged.
<Langu age>
Allows y ou to change the display lang uage.
<Facto ry Reset>
Puts all the settings back to thei r def aults as they were when they left the factory. If y ou
perfor m a factory re set on your radio, you will lose all your presets and your wireles s n etwork
connec tion.
<Regis ter>
This wi ll displa y a key that can be used to regist er the radio (recommended) on the S ANYO
Reciva C ustomer portal: h ttp://www.reciva.com / . Registe ring enables you to request a
statio n or podcast to be added to just yo ur unit.
<Clock S et Up>
Select ing this option can set the clo ck of the unit.
IMPORTANT: the first t ime you connect this internet radio to AC outlet, this unit wil l
automa tically set the ti me zone to Zone 2 which is the initial d efault setting. If you do not live in
this time zo ne, you must change the default zone disp lay to your own zon e. You o nly do this
one time a nd the unit will remember the n ew default zone.
<Backl ight>
Select ing this option enables you t o choose the Internet radio 's backlight brightness .
1. After se lecting the 'Backlight' m enu item, the radio will disp lay its list of two menu modes:
● The 'active' state is w hen the unit is “ON”.
● 'Stand by' is the state when the radio h as been turned off.
2. Rotat e the knob to highlight the des ired menu mode and press SELE CT.
3. The radio will now d isplay the current backlight value for this menu mo de. You can alter this
value by r otating the knob to increas e or decrease it.
<WiFi St rength>
The strength of the WiFi signa l will be displayed. Str ength should be over 60% for stable
stream ing. Relocate this radio or re-orie nt the wireless rou ter, or buy a wireless booster if
necess ary.
In ternet R adio Co n necti on Requi remen t s
What you n eed before you can use your Internet rad io
Before y ou can use your Internet radi o, you need the following:
* A broadband Int ernet connection.
* If wireless operation is desired - a wireless access point (Wi-Fi) connected to your broad band
Intern et, preferably via a router.
* I f your wireless ne twork is co nfigured to use Wired Equiv alent Privacy (WEP) or Wi-F i
protec ted Access (WPA) data encryption then you ne ed to know the WPA passcode so you can
get the In ternet radio to communica te with the network.
* If you r wi reless network is config ured for “trusted produc ts” you will need to enter th e ra dio's
MAC address int o your wi reless access po int. To find th e radio's MAC address use menu items
as follo ws: Configure->Networ k Config->View Config->MA C Address
* To enter the MAC address into your wir eless access point, you must read the inst ruction s
suppli ed with the wireless access p oint.
The Interne t radio should work anywh ere w ithin the specified range of the wirel ess a ccess poin t
device .
Before y ou continue, make sure that y our wireless access point i s powered up and connected to
your bro adband Internet. To get this part o f the syste m working you must read the ins tructions
suppli ed with the wireless access p oint.
US -11
Page 14
St eps for co nnect i ng your r adio to y o ur wire l ess net work
Step 1-P ower up the radio
First, connect the AC power. In use, the radio can be switched on or off with the standby button ,
the disp lay on the front of the radio wil l light up and say:
SANYO
After a fe w seconds, this will change t o show:
Initializing network
After a fe w seconds, this will change t o show:
< Scan for networks >
Enter network
View Config
Step 2 Sca n for a wireless network connection
When the d isplay says<Scan for netw orks>, press the SELECT button.
(Note: if you make a mistak e at any point, press the BACK button to go back to the previ ous
screen .)
The radi o will now scan for all availab le wireless networks and wi ll display:
Scanning
If it can' t find one then the display wil l say:
No networks
Found
If thi s happens then you will have to get yo ur wireless access point workin g. See the instruct ions
suppli ed with it.
When the rad io finds your wireless network, it displays the ESSID f or the access point on the
screen this is a name that is allocated to th e a ccess poin t b y the person who set up the network
for exam ple:
< My Home Network >
US -12
Page 15
It i s possible , and in some locations highly likely, that your radio wi ll find more than one wireless
access po int, in which case you can cho ose which one you want to conn ect to. Turn the knob on
the radi o to see the ESSID of each access p oint the radio has found.
Step 3 Con nect to the wireless network
When t he ESSID for the acces s point you want is disp layed on the screen, press the SELECT
button . If your network is not config ured to need an encryption co de, the screen should say:
Connecting to network
Then:
Network OK
If the scr een displays either:
Enter WEP key
Or:
Enter WPA key
Then the networ k is using one of the encryption s ystems: Wired Equival ent Privacy (WEP) or WiFi Protected A ccess (WPA). You ther efore need to enter the correct WE P or WPA code or “Key”
into the r adio to get it to communicate w ith your network.
Only the person who set up the network in the first pl ace kno ws this code; if that person is not
you then y ou need to find out what it is.
After 3 seconds, the display goes into the cod e entry mode. To e nter the code , use the knob to
select each character of the code in turn , pressing the SELECT button after each character.
Note that WEP and W PA codes are sensitive to upper and lower case characters so you must
enter th em exactly.
Use the BA CK button to erase incorrec t characters.
After the final character, use the knob t o select the <END> character a nd pre ss the SELEC T
button .
The radio should n ow be able to connect to the network. I f the disp lay shows “Invalid key” or
“Netwo rk Error”, an incorrect pas sword has probably been ent ered.
US -13
Page 16

Ch oosing a r adio st a tion to l isten t o
Quick- Listen: “WFUV” fo r Preset station 1 a nd “CKUA” for Preset station 2 were programmed at
the factory - 1 each fr om the US an d Canada fo r your immediate li stening enjoyment. ( You can
reset th em at any time. See page 15.)
Statio n searching: Follow next st eps.
1. Press t he SELECT but ton . Choose Stations and pre ss SELECT button.
(Note: if you make a mistake at an y point, press t he BACK button to go back to the previou s
screen .)
< Stations >
Media Player
Configure
2. Turn the k nob to choose from<Locati on> or <Genre>.
<Locat ion> enables you to cho ose from the radio stations pro vided by any country which you
choose f rom a list.
<Genre > ena bles you t o cho ose r adio stations acc ording to their content, for example Classic
Rock. Sp ort, News, etc.
3. P ress the SELECT button to choose the optio n you want.
<Locat ion>
1.Turn the kn ob until th e display shows the region you want (or sel ect 'All' t o display all
countr ies),
2. P ress the SELECT button.
3. Turn the knob unti l the display shows the count ry you want.
4. P ress the SELECT button.
5. Turn the knob unti l the display shows the stati on you want.
6. P ress the SELECT button and wait u ntil the radio connects to th at statio n.
Note that some rad io stations do not broa dcast 24 hours per day, and some stations are not
always o n line.
If this station has on demand content (that is, it gives the option of listen ing to programs which
have alr eady been broadcast), see “ Stations which enable you t o choose what you listen to”.
<Genre >
1. Turn the knob un til the display sho ws the type of content you want , then press the SELECT
button .
2. Turn the knob unti l the display shows the stati on you want.
3. P ress the SELECT button and wait u ntil the radio connects to th at statio n.
Changi ng the volume
When a radio station is playing, you can change the volume simply by using Volume + and
Volume buttons located on the unit or on the remote control. The vol ume bar will appear on
displa y to show the volume change lev el.
US -14
Page 17
Preset ting your favorite intern et radio stations
Up to maxi mum 8 stations can be stored in m emory with this unit.
While a radio station is playin g, hol d down one of the preset button s (num bered 1 to 8) until the
screen s ays
Assigned to preset #
Where # is the number of the button you held down.
Preset s 1 and 2 were programmed at the fa ctory and can be reset.
To ass ign a ra dio statio n to one of the prese ts numbere d 5 to 8, press SHIFT and then press an d
hold one of th e preset keys. When you ar e using the rem ote contr ol, simpl y press and hold the
desire d preset number button.
Playin g a preset internet radio sta tion
When an i nternet radio i s playing, brie fly p ress the preset button (1 to 4) for the station you want
or al so pre ss SHIFT butto n for station 5 to 8. (Note , do not ho ld the button down. If you do the n
the stat ion currently playing wil l overwrite the one stored in t he preset; be careful.)
Reques ting an internet station that is curre ntly unavailable
If you wa nt to listen to a particular radio station which is curren tly not available online, you can
visit the Reciva website at ht tp://ww w.reciva.com/ and put in a request t o add the station to the
list.
Intern et stations which enable you to choose w hat you listen to
Some int ernet radio stations can pr ovide a number of options ass ociated with their statio n; for
exampl e, some stations enable you t o listen to programmes that h ave already been broadcas t.
When you s elect a radio station that ha s this facility, the station does not start p laying
immedi ately, but ins tead the display shows:
< Live >
On Demand
1. Turn the k nob to choose <Live> or <On Dem and>, then press the SELECT button.
If you cho ose <Live> then the radio pla ys the current output from th is station as normal.
If you cho ose <On Dem and> then more screens are dis played where you choose what you
want to li sten to.
What is d isplaye d will depend on the sta tion you have chosen t he followin g steps ar e only a
guide.
2. Wh en you choos e <On Demand>, the display s hows t he names of the programmes. Turn th e
knob to ch oose the program you want, th en press the SELECT button.
3. When you h ave chosen the programme you want to listen to, either it will just start playi ng, or
the display may s how a list of days for you choose from use the knob to s et the day the
progra me was broadcast, then pres s the SELECT bu tton.
4. After you have chosen the day, you may be able to cho ose th e Star t Time. Set the St art Tim e
using th e knob and press the SELECT button.
5. Progra mmes which en able you to choo se the time also en able you to fast -forwar d a nd rewind
to the p art you w ant while the radio is playing. Th e elapse time is displayed. Usi ng the Sk ip +
(P3) or Sk ip - (P1) button to skip forwar d or backward in 30 second inte rvals.
US -15
Page 18

Tr oubles hooti n g
You may fin d it useful to visit the help sectio n on the webpage of our associates at Reciva:
http:/ /radio.reciva.com/
This model has a b uilt-in wire less interne t capability. If you have troubl e connecting to your
wirele ss network, these steps may h elp to resolve the problem:
1. Confi rm that a Wi-Fi conn ected PC can acces s the Internet (i. e. can browse the we b) using the
same net work.
2. Check that a DHCP server is availabl e, or that you ha ve configured a static IP address on the
radio. To configure the DHCP, you must read the instructions supplied with the wireless
access p oint.
3. Check that your firewall is not blocking any outgoing p orts. As a min imum the radio needs
access to UDP and TCP ports 80,554,175 5,5000 and 7070 . To configure the Access Port
Contro l, you must read the instruct ions supplied with the wire less access point.
4. Chec k your access p oint does not r estrict conne ctions to particular MAC addresses. You can
view t he radio's M AC address u sing the men u item Confi gure-> Netwo rk Config-> View
Config -> MAC address.
5. If y ou have an encrypted network, check that you have entered the correct key or passphrase
into the r adio. Remember that text- format keys are case sensit ive. See pages 19-20.
If your radio can connect to the network su ccessfully, but is unable to pla y particular s tations, it
may be due t o one of the following causes :
1. The station is not broadcas ting at this tim e of the day (remem ber it may be locat ed in a
differen t time zone ).
2. The station has reac hed the maximum allowed num ber of simultane ous liste ners.
3. The station is not bro adcasting anymore.
4. The link on the radio is o ut of date.
5. The Internet conne ction between the server (o ften in a different country) an d you is slow.
Try tur ning your radio off and on again. I f unsuccessful, unplug an d replug power cord. If still n ot
helpfu l, use a PC (if available) to che ck play back of the stream via th e broadcaster's web site.
If you can p lay back the station with a PC, u se the form at
http:/ /www.reciva.com/stat ions/add_station.as p to notify us so that we can chang e the stati on
data tha t is used by the radio.
Me dia Pla y er
NOTE: This function i s for more advanced users.
The built-in Media Player allows you to play unprotected aud io files (AAC, AIFF, MP3, RM,
WAV, WMA) including itunes , and playl ists (M3U) stored on a networked PC(not Mac). It has
been ver ified to work on Windows 2000 a nd Windows XP.
Set up you r Windows PC to allow the radio to ac cess your audio files via Windows Shares
1. Plea se ensur e that your P C is available on the network for your Internet radi o, then, using
Window s Explorer, locate the folde r where your audio files are st ored.
2. R ight click on the folder.
3. S elect 'Properties'.
4. C lick on 'Sharing '.
5. S elect “Share this folder on t he network” and “Allow netw ork user to change m y files”.
Locati ng audio fi les via Win dows Shar es
1. Power u p the radio.
2. Wait f or “Stations” to b e displayed on the radio , or press the BACK button repeate dly until
“Stati ons” is displayed.
TM
US -16
Page 19

3. Turn the knob unti l the radio display shows “Me dia Player”.
4. P ress the SELECT button and turn t he knob until “Windows Shar es” is displayed.
5. P ress the SELEC T b utton, turn th e knob until “S can for PCs” is displayed and press SELECT
again.
6. T he radi o will no w displ ay “Finding PCs”, once the radio has finished, turn the knob to
highli ght the correct PC.
7. P ress the SELECT button. The radio will searc h for shared folders.
8. Turn the knob to hig hlight the correct shared f older and press SELECT.
9. T he radio will disp lay 'File Scan…' a s it scans through t he media files in th e shared folder. Text
on the bottom row of the display will chang e to indicate that the file scan i s in progre ss. If you
have a lar ge number of audio files this c ould take several minutes t o complete.
10. Once the radio has finished sc anning, it will display 'By Album ' You can now browse through
the scanned media files, which will n ow be organized “By Album”,” By Artist ” and “Playlists” if
availa ble.
Note that the first time the file scan is don e a fil e calle d 'reci va_media_cache' is written to the
folder w here the audio files are stor ed. This is in or der to speed up subs equent fi le scans.
Listen ing to a sing le shared track
1. Turn the k nob until 'By Artist' is displ ayed.
2. P ress the SELECT button.
3. Turn the knob unti l the required artist is disp layed.
4. P ress the SELECT button.
5. Turn the knob unti l the required album name is di splay.
6. P ress the SELECT button. '<Add t o Queue>' w ill be displayed .
7. Turn the knob unti l the required track is displ ayed.
8. P ress the SELECT button. The track will begin p laying.
Listen ing to a complete shared album
1. Turn the k nob until 'By Artist' is displ ayed.
2. P ress the SELECT button.
3. Turn the knob unti l the required artist is disp layed.
4. P ress the SELECT button.
5. Turn the knob unti l the required album name is di splayed.
6. P ress the SELECT button. '<Add t o Queue>' w ill be displayed .
7. P ress the SELECT button. The album will begin p laying.
Queuin g up tracks for playback late r
1. Highl ight the required track.
2. P ress the SELECT button. 'Tra ck Added To Queue' will be displayed .
Queuin g up albums f or playback later
1. Highl ight the required album.
2. Press t he SELECT but ton.
3. Turn the k nob until '<Add To Queue>' is displ ayed.
4. Press t he SELECT but ton. 'Tracks Add ed to Queue' will be displaye d.
Contro lling pla yback
1. Use the S TOP button to sto p playback.
2. U se th e PLAY / PAUS E but ton to either pause a curre ntly playing trac k or to re start a currently
paused t rack or to restart a stopped tr ack.
3. U se the SKIP TO PREVIOUS TRACK but ton to start playback of the previous track in the
queue.
4. U se the SKIP TO NEXT TR ACK button to start playbac k of the next track in the queue.
US -17
Page 20

Br owsing t he list o f t racks c urren t ly queu e d up for pl aybac k
1. Press t he BROWSE button. The currently playin g track name will be displaye d.
2. Turn the knob to see w hich tracks are queued up for p layback.
3. I f you want to jump to a particular place i n the queue th en press the S ELECT button when the
requir ed track is displayed.
Removi ng tracks from the queue
1. Pre ss the BROWSE button. The curre ntly play ing track name wil l be displayed.
2. Turn the knob to sel ect the track you want to remov e from the queue.
3. P ress and hold the STOP button for 2 seconds and th e radio will display: 'Dele te Track?'
4. Turn the knob to hig hlight 'Yes' or 'N o'.
5. P ress SELECT to confirm whethe r you actually want to delete t he track fr om the queue.
6. I f 'Yes' was select ed then 'Removed From Queue ' will be displayed.
7. To remove all tracks from the qu eue, keep pressing BACK until the 'Media Player ' menu item
is select ed, press S ELECT and then turn the knob to select 'Cle ar Queue' and press SELECT
again.
Playin g tracks in random order
1. Sel ect the individu al tracks a s described prev iously.
2. N avigate to top-level menu i tem 'Media Playe r' using th e SELECT and BACK buttons.
3. P ress the SELECT button.
4. Turn the knob unti l 'Playback Mode' is displa yed.
5. P ress the SELECT button.
6. Turn the knob unti l 'Shuffle' i s display.
7. P ress the SELECT button.
8. Turn the knob to sel ect YES/NO to c onfirm that shuffle mode shou ld be enabled.
Playin g tracks in the queue repeate dly
1. Sel ect the individu al tracks a s described prev iously.
2. N avigate to top-level menu i tem 'Media Playe r' using th e SELECT and BACK buttons.
3. P ress the SELECT button.
4. Turn the knob unti l ' Playback Mode' is display ed.
5. P ress the SELECT button.
6. Turn the knob unti l 'Repeat' is displayed.
7. P ress the SELECT button.
8. Turn the knob to sel ect YES/NO to c onfirm that repeat mode sho uld be enabled.
Set up a Windows PC to allow the radio to acces s your audio files via a UPnP server
1. I f y our PC is runnin g M icrosoft W indows XP, then you can us e Windows Med ia Connect to ac t
as yo ur UPn P (Unive rsal Plug and Play) me dia se rver 1.0. Windows Media Player 11 may be
downlo aded from Microsoft' s website and inst alled by following the instr uctions de tailed in its
instal lation wizard.
2. Once installed, Windows Media Player 11 wil l creat e a library from all th e media f iles availab le
to i t on you r PC. To add new media files to the libra ry, select “File>A dd to Li brary..> Advanced
Option s”, click “Add” and choose th e files you wish to add and click “ OK”.
3. You will now need to connect yo ur Internet radio to Win dows Media Player 11 and configure it
to allow the radio to access your media library. In order to do this, you will nee d to do t he
follow ing:
a)Keep pressi ng BACK to get to the radio's top-le vel men u and then turn the rotary knob to
select “ Media Player”.
b) Pr ess SELECT an d then turn the knob t o highlig ht “UPnP Servers”.
c) P ress SELECT and the radio w ill scan for all available UP nP servers. Note, thi s may take a
few second s for the radio to comple te i ts scan and befor e th e sc an has completed, the radio
will disp lay “EMPTY ”. The radio will con tinue to disp lay “EMPTY” if no UPnP servers are
found.
d) Af ter a s uccessful scan, sel ect you UPnP ser ver, by rotating the knob i f there is more than one
UPnP server, and then press SE LECT (n ote, your radio will di splay “Access Denied” a t thi s
stage) .
US -18
Page 21

4. Your PC w ill now prompt you that a device has attempted to connect to your UPnP server. In
order to all ow the radio to have access to the m edia file s, you will nee d to c lick the “Library”
tab from Wind ows Media Player 11 and select the “Media Sha ring…” item to open the “Me dia
Sharin g” window.
5. From the “Med ia Shari ng” window, the radio will be lis ted as an unknown device. Click on the
unknow n device listed, then click t he “Allow” button and then cl ick “OK”.
Lo cating a nd play i ng medi a files u s ing the r adio and U PnP
Once the U PnP server is c onfigured to share media fi les with the Internet radio , you can play the
files by d oing the following on the rad io:
a. Keep pressing BACK to get to the radio's to p-level menu and then tur n the kno b to select
'Media P layer'.
b. P ress SELECT and then turn the kno b to highlight 'UPNP Servers'.
c. Pre ss S ELECT and th e ra dio will scan for all available U PnP servers. This may take a few
second s for the rad io comple te its scan a nd before t he scan has complete d, the radi o will
displa y '(Empty)'. The radio will con tinue to di splay '(Empty) ' if no UPnP serv ers are found.
d. A fter a succ essful scan, selec t y our UPnP server, by rotating the knob if there is more than
one UPnP ser ver, and tha n press SELECT.
e. T he ra dio will now list the media categori es av ailable from the UPnP server, e.g. 'Music',
'Playl ists' e tc. Turn the knob to s elect w hich ca tegory you wis h to browse, press SELECT
and turn the k nob to highlight a sub cat egory and press SELECT aga in. For example, you
could se lect 'Music' and then 'Albu m'
f. Turn th e knob to highligh t the media files that you wish t o play and press SELECT.
g. T he radio will display “ Add to Q ueue”, press SE LECT and the ra dio will add the tracks to its
queue an d begin playing them automa tically.
Queuin g up UPnP track s for playback later
1. Highl ight the required track.
2. Press t he SELECT but ton. 'Track Adde d To Queue' will be d isplayed.
Queuin g up UPnP album s for playback later
1. Highl ight the required album.
2. Press t he SELECT but ton.
3. Turn the k nob until '(Add To Queue)' is displ ayed.
4. Press t he SELECT but ton. 'Tracks Add ed to Queue' will be displaye d.
Contro lling pla yback
1. Use the S TOP button to sto p playback.
2. Use the P LAY/PAUSE butto n to either p ause a currently p laying tr ack or to restart a currently
paused t rack or to restart a stopped tr ack.
Br owsing t he list o f t racks c urren t ly queu e d up for pl aybac k
1. Press t he BROWSE button. The currently playin g track name will be displaye d.
2. Turn t he knob to see which tracks are q ueued up for playback.
3. If you want to jump to a particular pla ce in the queu e t hen press t he SELECT button when the
requir ed track is displayed.
4. It is important to no te here that media files scanned fro m th e ra dio's “Windows Share s”
functi on can also be added to the radio 's queue.
5. U se the SKIP TO PREVIOUS TRACK but ton to start playback of the previous track in the
queue.
6. U se the SKIP TO NEXT TR ACK button to start playbac k of the next track in the queue.
US -19
Page 22

Removi ng UPnP track s from the queue
1. Press t he BROWSE button. The currently playin g track name will be displaye d.
2. Turn the k nob to select the track you wan t to remove from the queue.
3. Press a nd hold the STO P bu tton for 2 seconds.
4. Turn the k nob to highlight 'Yes' or 'No'.
5. Press S ELECT to conf irm whether you actually wa nt to delete the track from the q ueue.
6. If 'Yes' was selected the n 'Removed From Queue' will b e displayed.
7. To remo ve all track s from the queue, keep pressin g BACK until the 'Media Player' menu item
is select ed, press S ELECT and then turn the knob to select 'Cle ar Queue' and press SELECT
again.
Playin g UPnP tracks i n random order
1. Selec t the individual tracks as de scribed previously.
2. Navig ate to top-level menu item 'M edia Player' using the SELE CT and BACK but tons.
3. Press t he SELECT but ton.
4. Turn the k nob until 'Playback Mode' i s displayed.
5. Press t he SELECT but ton.
6. Turn the k nob until 'Shuffle' is displa y.
7. Press t he SELECT but ton.
8. Turn the k nob to select YES/NO to confirm that shuffle m ode should be enabled.
Playin g UPnP tracks i n the queue repeatedly
1. Selec t the individual tracks as de scribed previously.
2. Navig ate to top-level menu item 'M edia Player' using the SELE CT and BACK but tons.
3. Press t he SELECT but ton.
4. Turn the k nob until ' Playback Mode' is d isplayed.
5. Press t he SELECT but ton.
6. Turn the k nob until 'Repeat' is displ ayed.
7. Press t he SELECT but ton.
8. Turn the k nob to select YES/NO to confirm that repea t mode should be enabled.
Note:
1. If the shared folders contain more songs than t he Inte rnet Ra dio mem ory lim it, it will display
“Too many fi les”
2. Repea tedly pressing button P4 wi ll toggle the Repeat and Shuffl e modes.
Se tting th e clock
1. Press t he SELECT but ton. (Note: if you make a mista ke at any point, press the BACK b utton
go back to t he previous screen.)
2. Turn the knob unti l the display says <Configu re>
Stations
Media Player
< Configure >
3. P ress the SELECT button.
4. Turn the k nob until the display says <C lock Setup>
Register
< Clock Setup >
Backlight
US -20
Page 23

5. Turn the k nob until the display says <S et Time>.
< Set Time / Date >
6. Befor e setting Time and Date, you nee d to choose the correct time zo ne. There are 7 t ime
zones to c hoose.
7. A fter setting the time zone, y ou need to set the time.
8. P ress the SELECT button.
Set Time
10:30 AM
9. Turn the knob unti l the hour setting is correct , then press the SELECT button.
Set Time
10:03 AM
10.Turn the knob until th e minute setting is correct , then pres s the SELECT button.
Set Date
01 Jan 2008
11.Then we can continu e to set the date, month and year.
Finall y, the display r eturns to the Set Time/Date mo de.
After finished setting, when the unit is turned on, the tim e information will always sh ow on
bottom right hand corner of the display. When the unit pow er is o ff, the t ime information wil l
show in th e middle of the display at its ma ximum size.
Se tting Sl eep Ti m er
Select ing this option will enable t he radio to switch itself off after a set peri od.
1. Press the Sleep b utton, the display will show “Sleep Timer 15 minutes” and the radi o will
contin ue to play as normal for 15 minut es and go into standby mode aut omatically.
2. To increas e the a mount of time that the radio will play before shu tting off, press the Sleep
button aga in to change the disp lay to t he desired sleep time. When Sleep button is pressed
each tim e, the sleep timer prolongs 1 5 minutes, up to a maximum of 90 mi nutes.
3. To turn the radio on again , simply press the S tandby bu tton.
US -21
Page 24

Se tting th e alarm s
1. Press t he SELECT but ton. (Note: if you make a mista ke at any point, press the BACK b utton to
go back to t he previous screen.)
2. Turn the knob unti l the display says <Alarm Clo ck>.
Tuner
Auxiliary Input
< Alarm Clock >
3. P ress the SELECT button.
4. Turn the knob unti l the display says <Set Alarms >.
< Set Alarms >
5. There are three opti ons to choose from:
Disabl e All : a quick way to disable both al arms, when choose this opti on, both alarm will be OFF
Alarm 1: f or setting, enable or disab le alarm 1, factory default i s “ 1.OFF 12:00 AM”
Alarm 2: f or setting, enable or disab le alarm 2, factory default i s “2 OFF 12:00 AM”
< Disable all >
1. OFF 12:00 AM
2. OFF 12:00 AM
6. Press t he SELECT but ton to confirm your selecti on.
Set Alarm
12:00 AM
7. Turn the k nob until the hour setting is c orrect, then press the SELE CT button.
Set Alarm
07 : 06 AM
8. Turn the k nob until the minute settin g is correct, then press the SE LECT button .
US -22
Page 25

9. There are five alarm m odes to select for either ala rm. The alarm modes are:
Once: Ala rm will turn on once
Everyd ay: Alarm will turn on all 7 days
Weekly: Ala rm will tur n on once every week
Weekdays : Alarm will o nly turn on Monday t hrough Fr iday
Weekends : Alarm will o nly turn on Saturd ay and Sund ay
Once
Every Day
Weekly
10.The re are three wake up options fo r either alarm:
Wake to B uzzer
Wake to I nternet Radio
Wake to F M Radio
Note :
1. You are una bl e to c ho ose wake to in terne t ra dio if t he re i s no pre set st ation bei ng s et o r yo u
are no t cu rrent ly list en ing to th e in terne t radio
2. En sure t he vol um e has b een se t to th e desi re d leve l when choos in g wake to int er net ra dio or
FM rad io
Buzzer
Internet Radio
FM Tuner
Once inf ormation is all set, the alar m icon appears on bottom left h and side of the display.
Checki ng the Wake up Times a nd Alarm Mode
For chec king the alarm informatio n, select Alarm Clock, then Se t Alarms. If alarm is set,
inform ation will be shown in follow ing sequence “ Alarm/ alarm ti me/alarm mode/wake up
option ”.
For exam ple, when alarm 1 is set at 9:30a m, turns on everyday, wake to buzzer, alarm 2 is s et at
10:30a m, turns on everyday, wake to buzzer, displa y will show:
Dis able All
1. 9: 30 AM Dail y Buzze r
2. 10 :30 AM Dai ly Buzz er
Moreov er, if alarm has been set, alarm icon is s hown on the display during Standby mode . Clock
inform ation is shown at its maximum s ize during Standby mode.
Radio will p lay for about 1 hour after ala rm start and then shut off. Press th e standby button to
stop ear lier. Press again to turn on man ually.
AM
11:00
US -23
Page 26

Snooze /Repeat Alarm
After the alarm turns “On” in the morning, you can press the Snooze button on unit's front panel
or on remo te control for a few extra minu tes sleep.
The alar m will stop for approximate ly 9 minutes and then comes “On ” again.
AM
11:00
Zz
Pl aying FM R adio
This Int ernet radio also has an FM tune r; you will be able to access sta ndard FM stations from it.
1. Press t he SELECT but ton. (Note: if you make a mista ke at any point, press the BACK b utton to
go back to t he previous screen.)
2. Turn the k nob until the display says <Tuner>.
Media Player
Configure
< Tuner >
3. Press t he SELECT but ton.
Turn th e knob to choose you r desired station. When a str ong FM ster eo signal is recei ved,
Stereo a ppears on display. Or press Seek up/down to s earch for a strong signal sta tion.
98.5 MHz
Stereo
4. Use VOL UME + or - buttons to adjust the de sired volume level.
5. U nravel the FM antenna wire at t he back of the cabinet and posi tion for best reception.
Preset ting your favorite FM radio s tations
Up to maxi mum 8 FM stations can be stored i n memory with this unit.
While an FM radio s tation is playing, hold down one of the preset buttons (number ed 1 to 8) un til
the scre en says
Assigned to preset #
Where # is the number of the button you held down.
To assign a FM radio station to one of the presets numbe red 5 to 8, press SH IFT a nd then pre ss
and hold o ne of the preset keys.
Playin g a preset FM radio station
When a FM ra dio stations is playing, b riefly press the preset button (1 to 4) or t ogether with the
SHIFT bu tton for the pres et stations 5 to 8 for t he FM station you want. (No te, do not h old the
button down. If you do then the station currently playing will overwrite the one store d in the
preset ; be careful.)
US -24
Page 27

Op tional c onnec t ions
AUXILI ARY JACK
You can connect an extern al source to this unit, suc h as an MP3 or CD player, etc. Connect an
audio cable (not included) fro m the AU X IN jack at the back of this uni t to th e external unit's AU X
OUT jack. This will allow y ou to amplify the external un it's sound through this uni t's speakers.
1. Press the SELECT button. (Not e: if you make a mistake at any point, press the BACK button
go back to t he previous screen.)
2. Turn the kn ob until the displ ay says <Au xiliary Input>
Tu ne r
< Au xi li ar y Inp ut >
Al ar m Cl oc k
3. Press the SE LECT button .
Au x In
4. Connect the external unit's AUDIO OUT jack on the rear of the unit v ia an audio cable (not
includ ed). Turn on the ext ernal unit, s et its volume control (if there is one) to mid-position at
first and operate it as usual. Dist ortion will result if the external unit's vol ume setting is too
high.
5. The s ound will be heard through th is unit's speaker.
6. U se VOLUME + or - buttons on this un it to adjust the desired volu me level.
7. When finished listen ing, turn off the power of the external unit. Press SELECT or BACK
button on this unit to go back to ma in menu for FM or Internet listening, especially if wake
alarms a re programmed.
NOTES:
● Wh en connecti ng the external unit, refer to the owner's ma nual of th e external unit, as well
as this ma nual.
● Examples of External Audio Sources that can be c onnected to this unit are: Portable MP3
Player, C assette Player, Mini Disc Pl ayer, DVD player..etc
HEADPH ONE JACK
For private listening, connect 3.5mm (32 ohm) stere o headphones (not included) to this j ack.
The spea kers are automatically di sconnected when the headp hone plug is inserted in the ja ck.
IMPORTANT:
Excess ive sound pressure from ear phones and headphones can c ause hearing loss.
LINE OUT J ACK
A st ereo line out jack is located o n the back of the unit, which enables the c onnection to an
extern al audio system.
Ca binet Cl eanin g
Use only a soft cloth on the high-gloss cabinet surface. Do not use a paper towe l to avoid
scratc hing.
US -25
Page 28

Sp ecifi c ation s
Power Su pply: AC 100-240V~60/50H z
Output P ower: 2W x2
Unit Dim ension: 220(L) x 112.5(W) x 135(H)mm
Weight: 1.9 kg
Radio Se ction
Tuning ranges: FM 87.5 -1 08 MHz
Aerial s: Wire antenna (FM)
Genera l
Terminal s-Output: 3.5mm stereo he adphone
Line Out : 3.5mm Jack
Aux In: 3. 5mm Jack
*** Sp ec ifica ti ons sub ject to c ha nge wit ho ut noti ce * **
Li cense In forma t ion
This product contains software licensed und er vers ion 2 of the GNU P ublic L icense and version 2.1
of the G NU Less er Publ ic Lice nse. The source code for this so ftware is available from
http:/ /www.reciva.com/gpl
This product inclu des te chnology owned by Microsoft Corporation and under a license from
Micros oft Licens ing GP. Use or dis tribution of such techn ology outside of this prod uct is prohib ited
withou t a license from Microsoft Co rporation and/or Micros oft Licensing, GP as applicab le.
US -26
Page 29

SANYO COMFORT WARRANTY
CONSUMER PRODUCTS
WARRANTY APPLICATION
New, unused SANYO products purchased through
a SANYO authorized dealer in Canada are
warranted against manufacturing defects in
materials and workmanship for ONE YEAR from
the date of purchase by the original retail
purchaser for non-commercial use. This Warranty
only applies in favour of the original retail
purchaser of the warranted product.
SANYO CANADA INC.’S RESPONSIBILITY
During the warranty period, SANYO Canada Inc.
will repair, or at our option, replace a product
which shows evidence of a manufacturing defect
in materials or workmanship. Replacement PARTS
are warranted for the remaining portion of the
warranty period.
WHAT IS NOT COVERED
(a) Products purchased outside Canada.
(b) Products purchased in a used condition.
(c) Problems due to product set up and
installation.
(d) Adjustments that are outlined in the
Operating Manual.
(e) Accessory items including antenna,
batteries.
(f) Damage in or due to transportation.
(g) Damage due to improper maintenance,
improper wiring, accident, abuse, misuse
or negligence.
(h) Damage caused by lightning and power
surges.
(i) The cost of removal and reinstallation of a
product designed for automobile use.
(j) The rubber seal of the water-proof digital
movie camera.
ORIGINAL RETAIL PURCHASER’S
RESPONSIBILITY
You, the original retail purchaser, must present
your original, dated bill of sale together with this
Warranty to SANYO Canada Inc. or to an
authorized SANYO Service Depot when you make
a claim under this Warranty.
You, the original retail purchaser, are responsible
for any costs of TRANSPORTING the product to
and from SANYO Canada Inc. or an authorized
SANYO Service Depot. You also are responsible
for the cost of any MAINTENANCE necessary in
respect of the product.
WARRANTY BECOMES VOID
This Warranty becomes void if the product’s serial
numbers are altered or removed or if any repair to
the product is made other than by SANYO Canada
Inc. or by an authorized SANYO Service Depot.
LIMITATIONS
(a) SANYO Canada Inc. reserves the right to
change or improve the design of the model
of the product warranted hereunder
without incurring any obligation to make
any modifications to or to install any
improvement in or on the product.
(b) In no event shall SANYO Canada Inc. or
any of its Authorized Dealers be liable for
special or consequential damage arising
from the use of this product.
STATUTORY WARRANTIES
The above provisions do not preclude the operation of any applicable provincial statute which in
certain circumstances may not allow some of the
limitations and exclusions described in this
Warranty. Where any terms of this Warranty are
prohibited by such a statute, they shall be
deemed null and void but the remainder of this
Warranty shall remain in effect.
HOW TO OBTAIN WARRANTY SERVICE
Please contact SANYO at:
SANYO Canada Inc.
1-300 Applewood Cres.
Concord, Ontario L4K 5C7
1-800-263-2244
www.sanyo.ca
US -27
Page 30

FR-1
Page 31

CONSIGNES DE SÉCURITÉ IMPORTANTES
1. Lisez les instructions.
2. Conservez les instructions.
3. Respectez les avertissements.
4. Suivez les instructions.
5. N’utilisez pas cet appareil à proximité de l’eau.
6. Nettoyez l’appareil avec un chiffon sec.
7. N’obstruez pas les orifices de ventilation.
8. Placez l’appareil à l’écart des sources de chaleur comme les radiateurs, registres de
chauffage, cuisinières ou autres dispositifs (y compris les amplificateurs) qui dégagent de la
chaleur.
9. Ne tentez pas de neutraliser le dispositif de sécurité de la fiche de courant alternatif polarisée
ou une fiche de mise à la terre. Une fiche de courant alternatif polarisée est munie de deux
lames dont une lame est plus large que l’autre. Une fiche de mise à la terre est dotée de deux
lames et d’une troisième lame de mise à la terre. Cette troisième lame ou la lame plus large
sert de protection. Si vous ne pouvez pas insérer cette fiche à fond dans la prise,
adressez-vous à un électricien qualifié pour qu’il remplace votre prise désuète.
10. Installez les cordons d’alimentation de façon à ce qu’ils ne se trouvent pas écrasés ou
pincés surtout au niveau de la fiche, prise de courant et à l’endroit où ils sont reliés à l’appareil.
11. N’utilisez que des accessoires ou pièces recommandés par le fabriquant.
12. Débranchez l’appareil de la prise de courant pendant un orage ou s’il est
inutilisé pendant de longue périodes.
13. Confiez les réparations à un technicien qualifié. L’appareil doit être réparé
en présence des conditions suivantes : le cordon d’alimentation ou sa
fiche est endommagé; un liquide a été renversé sur l’appareil ou un objet
a pénétré dans l’appareil; l’appareil a été exposé à la pluie ou à l’humidité;
l’appareil ne fonctionne pas normalement; ou l’appareil a été échappé.
Lorsque vous utilisez un appareil, vous devez toujours suivre des consignes de sécurité de
base afin de réduire les risques d’incendie, de secousse électrique ou de blessures, dont les
suivantes :
14. Placez l’appareil uniquement sur un chariot, un support, un trépied, une console ou une table
recommandé par le fabricant ou vendu avec l’appareil. Si vous utilisez un chariot, déplacez
avec précaution l’ensemble appareil et chariot pour éviter toute blessure.
15. Évitez d’utiliser l’appareil pendant un orage électrique. La foudre peut causer une secousse
électrique.
16. N’utilisez que le cordon d’alimentation et les piles mentionnées dans ce guide d’utilisation. Ne
jetez pas les piles dans le feu, car elles risquent d’exploser. Vérifiez les règlements locaux
pour connaître la façon appropriée de vous défaire des piles.
17. Avertissement : Pour réduire les risques d’incendie ou de secousse électrique, n’exposez pas
l’appareil à la pluie ou à l’humidité.
18. Cet appareil ne doit pas être exposé au dégouttement ou aux éclaboussures; ne placez
aucun récipient contenant un liquide, par exemple un vase, sur l’appareil.
19. La fiche principale sert au débranchement de l’appareil et doit être fonctionnelle pendant
l’utilisation prévue. Débranchez l’appareil de la prise de courant alternatif en saisissant la fiche
principale.
20. Laissez une distance minimale de 3 cm autour de l’appareil afin d’assurer une ventilation
adéquate. Ne couvrez pas les orifices de ventilation avec des articles tels qu’un journal, une
nappe, des rideaux ou autres.
21. Ne placez aucune source de flamme nue sur l’appareil, telle qu’une chandelle allumée.
FR-2
Page 32

Introduction
Merci d’avoir choisi cet appareil SANYO qui a été conçu et fabriqué pour vous procurer des
années durant de plaisir d’écoute.
En raison du concept relativement nouveau de cette webradio autonome, nous vous
recommandons de lire attentivement le présent guide d’utilisation et les instructions qu’il
renferme afin d’optimiser le rendement de cet appareil.
Soyez patient!
Bien que très en demande, la technologie de cette webradio est un phénomène assez récent
qui est appelé à évoluer avec le temps. Il peut arriver qu’un problème survienne au niveau du
réseau, de la station de radio ou du raccordement de l’appareil, ce qui peut causer quelques
frustrations; cependant, avec un peu de patience, tout finira par rentrer dans l’ordre.
En cas de problèmes, vous pouvez nous joindre partout au Canada au numéro sans frais
800.263.2244, du lundi au vendredi, de 9 heures à 17 heures, heure de l’Est.
Alimentation
z CA de 120 volts, 60 Hz
.
Entretien
z Cet appareil ne contient aucune pièce réparable par l’utilisateur. Veuillez confier toute
réparation à un technicien qualifié.
z Si vous avez des doutes sur le type d’alimentation, l’installation, le fonctionnement de cet
appareil ou les consignes de sécurité, communiquez avec votre marchand..
FR-3
Page 33

Table des matières
Introduction……………………………………………………………………………………………..……3
Table des matières………………………………………………………………………………….………4
Vue d’ensemble…………………………………………………………………………………….………..6
Vue avant et arrière de la webradio…………………………………..…………………………….………6
Vue de dessus de la télécommande………………………………………..…………………………..… 7
Résumé des commandes……………………………………………………………………………………7
Vue d’ensemble de l’écran………………………………………………………..…………………………8
Installation………………………………………………………………………..…………………………. 9
Pile de la télécommande………………………………………………………………………………..….10
Menu de configuration……………………………………………………………………………………10
Choix de l’option désirée à partir du menu de configuration……………………………………………10
< Network Config > (Configuration du réseau)………………………………………………………...…10
<Version>……………………………………………………………………………………………...……..10
< Upgrade Firmware > (Micrologiciel de mise à jour)…………………………………………...……….11
<Language> (Langue)………………………………………………………………………….........……..11
<Factory Reset> (Remise à l’état initial)……………………………………………………………..……11
<Register> (Inscription)………………………………………………………………………………..……11
<Clock Set Up> (Réglage de l’horloge)…………………………………………………………………...11
<Backlight> (Rétroéclairage)……………………………………………………………………………….11
<WiFi Strength> (Signal Wi-Fi)…………………………………………………………………………….11
Connexion de la webradio……………………………………………………………………………….11
Exigences requises avant d’utiliser la webradio…………………………………………………………11
Connexion de la webradio au réseau local sans fil…………………………………………………12
Étape 1 – Mise en marche de la webradio………………………………………………………………12
Étape 2 – Recherche d’une connexion au réseau local sans fil……………………………………….12
Étape 3 – Connexion au réseau local sans fil……………………………………………………………13
Sélection de la station radio à écouter……………………………………………………………………14
Réglage du volume………………………………………………………………………………………….14
Préréglage de vos stations webradio préférées…………………………….…………………………...15
Écoute d’une station webradio préférée…………………………………………………………………15
Demande d’une station webradio non disponible présentement………………………………………15
Stations webradio vous permettant de choisir ce que vous désirez écouter…………………………15
Guide de dépannage………………………………………………………………………………………16
Lecteur multimédia…………………………………...……………………………...………………….…..16
Installation de l’ordinateur pour permettre à la radio d’accéder aux fichiers son sur Windows Shares…..16
Repérage de fichiers son sur Windows Shares..………………………………………………………...16
Écoute d’une seule plage partagée………………………………………………………………………..17
Écoute d’un album partagé complet……………………………………………………………………….17
Mise en file d’attente de plages à écouter plus tard……………………………………………………..17
Mise en file d’attente d’albums à écouter plus tard………………………………………………………17
Contrôle de l’écoute…………………………………………………………………………………………17
FR-4
Page 34

Navigation dans la liste des plages à écouter présentement dans la file d’attente ……..…..18
Élimination de plages de la file d’attente………………………………………………………………..18
Écoute aléatoire des plages………………………………………………………………………………18
Écoute répétée de plages de la file d’attente……………………………………………………………18
Installation de l’ordinateur pour permettre à la webradio d’accéder aux fichiers son sur un serveur UpnP.....18
Repérage et écoute de fichiers à contenu multimédia sur la radio et le serveur UpnP...........19
Mise en file d’attente des plages UPnP à écouter plus tard……………………………………………19
Mise en file d’attente des albums UPnP à écouter plus tard…………………………………………..19
Contrôle de l’écoute………………………………………………………………………………………...19
Navigation dans la liste des plages à écouter présentement dans la file d’attente……….…..19
Élimination des plages UPnP de la file d’attente…………………………………………………………20
Écoute aléatoire des plages UPnP………………………………………………………………………..20
Écoute répétée des plages UPnP de la file d’attente…………………………………………….……..20
Réglage de l’horloge………………………………………………………………………………………20
Réglage de la minuterie d’arrêt différé…………………………………………………………………21
Réglage des alarmes………………………………………………………………………………………22
Écoute d’une station radio FM…………………….…………………………………….….………….. 24
Préréglage de vos stations radio FM préférées………………………………………………………… 24
Écoute d’une station radio FM préréglée…………………………………………………………………24
Connexions optionnelles……………………………………………………………………………………25
Prise auxiliaire ……………………………………………………………………………...………...…..25
Prise d’écouteur ………………….……………………………………………………….......……………25
Prise de sortie de ligne…………………………………………………………………….....…………….25
Nettoyage du boîtier……………………………….………………………………………......………….25
Fiche technique...............................................................................................................................26
Licence d’utilisation…....................................................................................................................26
Garantie……………………………………………………………………………………...………………27
FR-5
Page 35

VUE D’ENSEMBLE
1. Bouton d’arrêt différé (SLEEP)
2. Bouton de recherche en marche arrière
(SEEK DOWN)
3. Affichage
4. Bouton de recherche en marche
avant/navigation (SEEK UP/BROWSE)
5. Bouton de retour (BACK)
6. Bouton de radio P2-P6 – lecture/pause
(Media PLAY/PAUSE)
7. Bouton de radio P1-P5 – arrêt/évitement
en marche arrière (Media Stop/SKIP-)
8. Bouton de répit (SNOOZE)
9. Commande de volume +
10. Commande de volume-
11. Prise d’écouteurs (PHONES)
12. Bouton de réponse (REPLY)
13. Commande de sélection/défilement
(SELECT/SCROLL)
14. Bouton de radio P4-P8 – mode
multimédia (Media MODE)
15. Bouton de radio P3-P7 – évitement en
marche avant (Media SKIP+)
16. Bouton de déplacement (SHIFT)
17. Télécommande
18. Indicateur Marche/Arrêt (STANDBY
INDICATOR)
19. Bouton de mise en attente (STANDBY)
20. Haut parleur (SPEAKER)
21. Antenne FM (FM ANTENNA)
22. Prise de réseau (NETWORK)
23. Prise de ligne (AUX IN)
24. Prise de sortie (LINE OUT)
25. Prise CA
1234567
18
16
23
21
22
24
151719
20
8
9
13 11
1214
25
10
FR-6
Page 36

Vue de dessus de la télécommande
1. Bouton de mise en attente (STANDBY)
2. Bouton de retour (BACK)
3. Bouton de répit (SNOOZE)
4. Bouton de radio P1/évitement en marche
arrière (Radio P1/SKIP-)
5. Bouton de radio P4/mode (P4/MODE)
6. Bouton de radio P7
7. Bouton de défilement en marche avant
(SCROLL UP)
8. Bouton de défilement en marche arrière
(SCROLL DOWN)
9. Bouton d’arrêt différé (SLEEP)
10. Bouton de sélection (SELECT)
11. Bouton de réponse (REPLY)
12. Bouton de radio P2/lecture/pause
(P2/PLAY/PAUSE)
13. Bouton de radio P3/évitement en marche avant
(P3/SKIP+)
14. Bouton de radio P5/arrêt (P5/STOP)
15. Bouton de radio P6
16. Bouton de recherche avant/navigation (SEEK
UP/BROWSE)
17. Bouton de radio P8
18. Bouton de recherche en marche arrière (SEEK
DOWN)
19. Bouton de volume+
20. Bouton de volume-
TÉLÉCOMMANDE
Pour faire fonctionner l’appareil à l’aide de la télécommande, il suffit de diriger celle-ci vers le capteur
de télécommande situé à l’avant de l’appareil et d’appuyer sur la touche appropriée. La
télécommande a une portée de fonctionnement d’environ 20 pieds et un angle maximum de 30
degrés.
REMARQUE : La lumière directe du soleil peut interférer avec le fonctionnement de la
télécommande.
Résumé des commandes (appareil et télécommande)
Commande Mode Webradio Mode Lecteur multimédia
STANDBY Sert à mettre en marche/arrêter la webradio
SELECT Tournez le bouton pour modifier les options. Appuyez sur le bouton pour sélectionner une option.
SELECT▲/▼ Appuyez sur ▲ ou ▼pour sélectionner une option lors de l’utilisation de la télécommande.
Browse Aucune fonction. Affiche le contenu de la file d’attente.
Reply Pour des applications futures. Pas de fonction pour le moment. Pas de fonction pour le moment.
Back Pour retourner au menu précédent.
P1
P2
P3
P4
P5
Appuyez sur ce bouton et tenez-le enfoncé pour sauvegarder la station préréglée P1; appuyez
sur ce bouton pour télécharcher la station préréglée P1.
Appuyez sur ce bouton et tenez-le enfoncé pour sauvegarder la station préréglée P2; appuyez
sur ce bouton pour télécharcher la station préréglée P2.
Appuyez sur ce bouton et tenez-le enfoncé pour sauvegarder la station préréglée P3; appuyez
sur ce bouton pour télécharcher la station préréglée P3.
Appuyez sur ce bouton et tenez-le enfoncé pour sauvegarder la station préréglée P4; appuyez
sur ce bouton pour télécharcher la station préréglée P4.
Appuyez sur ce bouton et tenez-le enfoncé pour sauvegarder la station préréglée P5; appuyez
sur ce bouton pour télécharcher la station préréglée P5.
Plage précédente
Lecture/Pause
Plage suivante
Écoute répétée et aléatoire
activée/désactivée
Arrêt
FR-7
Page 37

Commande Mode Webradio Mode Lecteur multimédia
P6
P7
P8
SHIFT Appuyez sur ce bouton puis sur P1 pour passer de P1 à P5, de P2 à P6, etc.
Vol +/- Appuyez sur VOLUME+ pour augmenter le volume et sur VOLUME- pour le baisser.
Seek + Browse
Seek -
SLEEP Appuyez sur ce bouton pour régler la minuterie d’arrêt différé (15/30/60/90 minutes).
SNOOZE Appuyez sur ce bouton pour activer la fonction de répit (9 minutes).
La plupart des fonctions de cet appareil peuvent être activées en appuyant sur les boutons du panneau en avant ou sur les
boutons correspondants de la télécommande même.
Vue d’ensemble de l’écran
Les icônes apparaissent au bas de l’écran. Voici leur signification.
Remarques :
L’heure apparaît au centre de l’écran (grandeur maximale) lorsque l’appareil est éteint.
Lorsque l’appareil est en marche, l’heure apparaît au bas de l’écran.
Liste d’affichage:
Appuyez sur ce bouton et tenez-le enfoncé pour sauvegarder la station préréglée P6; appuyez sur ce bouton pour télécharcher la station
préréglée P6.
Appuyez sur ce bouton et tenez-le enfoncé pour sauvegarder la station préréglée P7; appuyez sur ce bouton pour télécharcher la station
préréglée P7.
Appuyez sur ce bouton et tenez-le enfoncé pour sauvegarder la station préréglée P8; appuyez sur ce bouton pour télécharcher la station
préréglée P8.
Appuyez sur SEEK+ pour syntoniser une station radio FM en marche avant et sur SEEK- pour
une station radio en marche arrière.
Minuterie d’arrêt différé
Sonnerie d’alarme
Webradio
Zz Répit
Stations
Medi a Player
Configure
Tuner
Auxiliary Input
Alarm C lock
FR-8
Page 38

Installation
Si la webradio est transportée de l’extérieur à l’intérieur (ou d’un endroit froid dans un endroit chaud),
ATTENDEZ 2 à 3 heures avant de la brancher. Il se peut que de la condensation se soit formée dans
la webradio, ce qui risque de l’endommager. Pour éviter ceci, déballez la webradio puis laissez-la
reposer à la température ambiante de 2 à 3 heures avant de l’utiliser. Cela permettra à la
condensation de s’évaporer et ne causera ainsi aucun dommage à l’appareil.
RACCORDEMENT AU COURANT ALTERNATIF (CA)
Déroulez le cordon d’alimentation CA à sa pleine longueur. Insérez la fiche CA dans une prise de
courant murale de 120 volts, 60 Hz.
Cet appareil est doté d’une fiche CA polarisée dont une lame est plus large
que l’autre. Ceci est un dispositif de sécurité visant à réduire les risques de
secousse électrique. Cette fiche CA polarisée s’insère dans une prise
murale que d’une seule façon. Si cette fiche ne s’insère pas à fond dans la
prise de courant, il se peut que la prise de courant soit désuète ou ne soit
pas conçue pour recevoir une fiche polarisée. Ne tentez pas de neutraliser
le dispositif de sécurité en recourant à un adaptateur non polarisé ou en
limant la lame plus large pour qu’elle puisse s’insérer dans la prise de
courant. Si la fiche ne s’insère pas dans la prise de courant, veuillez
consulter un électricien qualifié pour remplacer cette prise de courant.
REMARQUES IMPORTANTES :
Avant de déplacer ou de soulever l’appareil, débranchez la fiche CA de la prise de courant.
•
• Si l’appareil fonctionne mal en raison d’une décharge électrostatique, débranchez-l
branchez-le à nouveau. S’il ne fonctionne toujours pas, débranchez-le et communiquez avec un
électricien qualifié.
• e courant ou du débranchement du cordon d’alimentation CA pendant une
Lors d’une panne d
brève période de temps, les données de l’horloge disparaîtront de l’écran. Lorsque le courant
reviendra et que vous rebrancherez le cordon d’alimentation, les données de l’horloge seront
restituées à partir de la connexion à l’internet. Par contre, si la connexion à l’internet est rompue
ou n’est pas disponible, vous pouvez régler l’horloge manuellement (voir page 20).
PRISE RJ-45 (si vous n’utilisez pas un routeur sans fil)
Insérez le connecteur RJ-45 dans la prise RJ-45 de l’appareil.
e et
Utilisez un câble de réseau local droit offert commercialement (catégorie 5/CAT 5 ou avec connecteur
RJ-45).
e branchez pas un câble Ethernet si vous avez l’intention d’utiliser un réseau sans fil afin de ne pas
N
créer de confusion dans les circuits. Si vous avez l’intention d’utiliser une connection Ethernet, reliez
le câble au routeur-modem/routeur filaire et à la radio avant de mettre la radio sous tension.
FR-9 FR-10
Page 39

PILE DE LA TÉLÉCOMMANDE
. Appuyez fermement sur le couvercle de
1
compartiment à piles et tournez-le vers la
gauche pour le retirer.
2. 032) dans le
Insérez la pile (CR2
compartiment en respectant la polarité (le
signe « + » doit être dirigé vers le haut).
3. yez
Pour remettre le couvercle, appu
légèrement sur celui-ci et tournez-le vers la
droite jusqu’à ce qu’il soit fermement en
place.
marque : Retirez les piles de la télécommande
Re
lorsque celle-ci n’est pas utilisée pendant une
période prolongée. La télécommande ne
fonctionnera pas convenablement lorsque les
piles sont faibles. Insérez alors des piles neuves.
PRÉCAUTIONS À PRENDRE AVEC LA PILE
euillez prendre les précautions suivantes lorsque vous utilisez une pile avec cet appareil.
V
1. Avertissement – Danger d’explosion si la pile n’est pas remplacée correctemen
uniquement une pile de même marque ou d’un type équivalent.
2.
Utilisez uniquement une pile de format et de type spécifiés.
3. Respectez la polarité (signes + et -) indiquée dans le logemen
pile. Si vous insérez une pile à polarité inversée, cela risque d’endommager l’appareil.
4. iter tout
Si vous n’utilisez pas l’appareil pendant une période prolongée, retirez la pile pour év
dommage ou blessure causé par une fuite possible de la pile.
5. ur être rechargée, car elle peut
Ne tentez pas de recharger une pile qui n’est pas conçue po
surchauffer et se rompre. (Veuillez suivre les directives du fabricant de la pile.)
6. u ou autre.
N’exposez pas la pile à une chaleur excessive, c.-à-d. les rayons du soleil, un fe
Pile incluse
t. Utilisez
t de piles lorsque vous insérez une
Menu de configuration
Choix de l’option désirée à partir du menu de configuration
1. Appuyez sur SELECT (8).
(Remarque : Si vous faites u
2.
Tournez le bouton jusqu’à ce que « Configure » (Configurer) apparaisse à l’écran.
3. Appuyez sur SELECT.
4. Tournez le bouton jusqu
5. Appuyez sur SELECT pour sélectionner l’option affichée à l’écran. Voici la li
brève description.
Network Config> (Configuration du réseau)
<
Permet de rechercher une connexion su
manuellement les paramètres du réseau. Servez-vous de cette option si vous utilisez la webradio
dans un autre édifice.
<V rsion>
e
Affiche le
s numéros de version des diverses parties du logiciel de la webradio.
ne erreur, appuyez sur BACK pour retourner à l’écran précédent.)
’à ce que l’option désirée apparaisse à l’écran.
ste des options et une
r une autre réseau local sans fil ou de configurer
Page 40

Upgrade Firmware> (Micrologiciel de mise à jour)
<
Sert à télécharger un nouveau micrologiciel po
l’Internet. Si un nouveau micrologiciel est disponible, la radio vous demandera si vous désirez le
télécharger. À noter qu’à cette étape, vous pouvez appuyer sur BACK pour annuler la mise à jour du
micrologiciel par la radio. Une mise à jour prend habituellement quelques minutes; assurez-vous de ne
pas éteindre la radio tant que la mise à jour ne sera pas terminée. Sinon, cela peut endommager la radio
de façon permanente.
<Language> (
Permet de changer la
<Factory
Remet tous les réglages à leur valeu
vous effectuez une remise à l’état initial sur la webradio, vous perdrez tous les préréglages et la
connexion au réseau local sans fil.
<Register>
Une clé s’affiche et p
<
Clo
Permet de régler l’horloge de l’appare
IMPORTANT : La première fois que vou
automatiquement le fuseau horaire 2 (réglage initial par défaut). Si vous ne vivez pas dans ce fuseau
horaire, vous devez changer ce fuseau horaire pour celui dans lequel vous vivez. Vous n’avez à le
changer qu’une seule fois, car l’appareil le gardera en mémoire.
<Backligh
Permet de choisir la lumino
1. Sélectionnez l’option « Backlight » au menu. L’appareil afficher
« Active » (Actif), lorsque l’appareil est en marche; et
« Standby » (En attente), lorsque l’appareil est éteint.
2. Tournez le bouton pour surligner le mode désiré, puis a
3. L’appareil affiche la valeur actuelle du rétroéclairage pour le mode choisi. Vo
iFi S
<W
La force du signal Wi-Fi s’affi
stable. Pour ce faire, déplacez la radio, redirigez le routeur sans fil ou achetez un suramplificateur sans
fil au besoin.
Langue)
Reset> (Remise à l’état initial)
(Inscription)
www.sanyo.ca. L’inscription de la radio (qui est recommandée) vous permet de faire ajouter une
station ou un balado sur votre appareil.
ck Set Up> (Réglage de l’horloge)
t> (Rétroéclairage)
cette valeur (l’augmenter ou la diminuer) en tournant le bouton.
trength> (Signal Wi-Fi)
langue d’affichage.
r par défaut, c.-à-d. la valeur qui leur a été attribuée à l’usine. Si
eut être utilisée pour inscrire la webradio sur le portail client Reciva de SANYO :
il.
sité du rétroéclairage de la webradio.
che. Ce signal doit être supérieur à 60 % afin d’assurer un flux de données
ur la webradio à partir du portail SANYO Reciva sur
s branchez la webradio sur une prise CA, l’appareil adoptera
a deux modes de menus :
ppuyez sur SELECT.
us pouvez changer
Connexion de la webradio
Exigences requises avant d’utiliser la webradio
Avant de pouvoir utiliser la webradio, assurez-vous d
* une connexion à haut débit à Internet
* un point d’accès sans fil (Wi-Fi) connect
d’un routeur, pour le fonctionnement sans fil
* le code de passe WPA pour établir la communication entre la webradio et le réseau si votre réseau local
sans fil est configuré pour utiliser une clé de chiffrement de données WEP (Wired Equivalent Privacy) ou
WAP (Wi-Fi Protected Access)
*
l’adresse MAC de la webradio. Si votre réseau local sans fil est configuré pour les « produits sécurisés »,
vous devez entrer cette adresse au point d’accès sans fil. Pour trouver cette adresse, procédez comme
suit à partir du menu : Configure->Network Config->View Config->MAC Address (Configuration->
Configuration réseau->Voir configuration->Adresse MAC)
Veuillez lire les instructions fournies pour le point d’accès sans fil pour entrer l’adresse MAC au point
*
d’accès sans fil.
La çue pour fonctionner n’importe où à l’intérieur de la plage spécifiée pour le point
webradio est con
d’accès sans fil.
Avant de continue
à haut débit à Internet. Pour que cette partie du système puisse fonctionner, veuillez lire les instructions
fournies pour le point d’accès sans fil.
r, assurez-vous que votre point d’accès sans fil est en marche et branché sur votre accès
é à l’accès à haut débit à Interne
’avoir ce qui suit :
t, de préférence par l’entremise
FR-11
Page 41

Connexion de la webradio au réseau local sans fil
Étape 1 – Mise en marche de la webradio
Tout d’abord, branchez la radio sur une prise de courant CA. Une fois ce raccordement effectué, il
suffit d’utiliser le bouton STANDBY par la suite pour mettre la radio en marche et pour l’arrêter.
L’écran à l’avant de l’appareil s’allume et affiche ce qui suit :
SANYO
Au bout de quelques secondes, le message
suivant s’affichera :
Initializing network
Puis, le message suivant s’affichera :
< Scan for networks >
Enter network
View Config
Étape 2 – Recherche d’une connexion au réseau local sans fil
Lorsque le message <Scan for networks> (Recherche réseau) s’affiche, appuyez sur SELECT.
(Remarque : Si vous faites une erreur, appuyez sur BACK pour retourner à l’écran précédent.)
La radio effectuera une recherche pour trouver tous les réseaux locaux sans fil disponibles et
affichera le message suivant :
Scanning
Si elle ne peut pas trouver un ré
seau, l’affichage indique :
No networks
Found
Lorsque ce message apparaît, vous devez faire fonctionner le point d’accès sans fil (voir les
instructions fournies).
Lorsque la radio trouve votre réseau local sans fil, le mot « ESSID » du point d’accès apparaît à
l’écran. « ESSID » est un
exemple :
nom assigné au point d’accès par la personne qui établit le réseau. Par
< My Home Network >
FR-12
Page 42

ans certains endroits, il se peut que la radio trouve plus d’un point d’accès sans fil. Dans un tel cas,
D
ous pouvez choisir celui auquel vous voulez être connecté. Tournez le bouton de la radio pour voir
v
chaque point d’accès sans fil qui a été trouvé.
Étape 3 – Connexion au réseau local sans fil
Lorsque le nom ESSID du point d’accès que vo
Si votre réseau n’est pas configuré pour utilise
affichera :
us désirez est affiché à l’écran, appuyez sur SELECT.
r un code de chiffrement de données, l’écran
Connecting to network
Puis ce qui suit :
Network OK
Si l’écran affiche soit :
Enter WEP key
Ou:
Enter WPA key
cela signifie que le réseau utilise l’un des systèmes de ch
(Wired Equivalent Privacy) ou WAP (Wi-Fi Protected Access). Dans ce cas, vous devez entrer le
code WEP ou WAP approprié pour établir la communication entre la webradio et le réseau.
Seule la personne qui établit le réseau connaît ce code. Si vous n’êtes pas cette personne, vous
devez obtenir ce renseignement. Au bout de trois secondes, l’écran passe au mode d’entrée du
code. Pour entrer le code, utilisez le bouton pour sélectionner chaque caractère du code et appuyez
sur SELECT après avoir entré chaque caractère. Les codes WEP et WAP sont sensibles aux lettres
majuscules et minuscules. Entrez-les correctement.
Appuyez sur BACK pour effacer les caractères erronés. Une fois le dernier caractère entré, utilisez
le bouton pour sélectionner <END> (Fin), puis appuye
La radio devrait maintenant pouvoir se connecter au réseau. Si le message « Invalid Key » (Touche
invalide) ou « Network Error » (Erreur de réseau) apparaît à l’écran, c’
mauvais mot de passe.
FR-13
iffrement de données suivants : WEP
z sur SELECT.
est que vous avez entré le
Page 43

Sélection de la station radio à écouter
Écoute rapide – Les préréglages 1 et 2 ont été établis à l’usine, un chacun provenant du Canada et
des États-Unis pour vous permettre d’écouter la radio immédiatement. (Vous pouvez les
reprogrammer en tout temps. Reportez-vous la page 15.)
Recherche d’une station de radio : Suivez les étapes suivantes.
1. Appuyez sur SELECT. Sélectionnez les stations radio et appuyez sur SELECT.
(Remarque : Si vous faites une erreur, appuyez sur BACK pour retourner à l’écran précédent.)
< Stations >
Media Player
Configure
2. Tournez le bouton pour choisir l’option <Location> ou <Genre>.
<Location> permet de choisir les stations radio offertes par les pays identifiés sur la liste.
<Genre> permet de choisir les stations radio en fonction de leur contenu, par exemple, musique
classique, rock, sport, nouvelles, etc.
3. Appuyez sur SELECT pour sélectionner l’option que vous désirez.
<Location>
1. Tournez le bouton jusqu’à ce que la région que vous désirez apparaisse à l’écran (ou
sélectionnez « All » pour afficher tous les pays).
2. Appuyez sur SELECT.
3. Tournez le bouton jusqu’à ce que le pays que vous désirez apparaisse à l’écran.
4. Appuyez sur SELECT.
5. Appuyez sur le bouton jusqu’à ce que la station que vous désirez apparaisse à l’écran.
6. Appuyez sur SELECT et attendez que la radio se raccorde à cette station.
Remarque : Certaines stations radio ne diffusent pas d’émissions 24 heures par jour tandis que
d’autres ne sont pas toujours en ligne.
Si la station sélectionnée offre un contenu sur demande (c.-à-d. elle offre la possibilité d’écouter des
émissions qui ont déjà été diffusées), reportez-vous à la section Stations webradio vous perm ettant
de choisir ce que vous désirez écouter.
<Genre>
1. Tournez le bouton jusqu’à ce que le contenu que vous désirez apparaisse à l’écran, puis appuyez
sur SELECT.
2. Appuyez sur le bouton jusqu’à ce que la station que vous désirez apparaisse à l’écran.
3. Appuyez sur SELECT et attendez que la radio se raccorde à cette station.
Remarque : Si la station sélectionnée offre un contenu sur demande (c.-à-d. elle offre la
possibilité d’écouter des émissions qui ont déjà été diffusées), reportez-vous à la section St ations
webradio vous permettant de choisir ce que vous désirez écouter.
Réglage du volume
Pendant que vous écoutez une station radio, vous pouvez changer le volume en appuyant sur les
boutons Volume + et Volume- qui se trouvent sur l’appareil ou sur la télécommande. La barre du
volume s’affichera à l’écran pour montrer le niveau de volume.
FR-14
Page 44

Préréglage de vos stations webradio préférées
Vous pouvez programmer un maximum de 8 stations radio dans la mémoire de l’appareil. Pendant
que vous écoutez une station radio, appuyez et tenez enfoncé l’un des boutons de préréglage (de 1
à 8) jusqu’à ce que l’écran affiche
Assigned to preset #
Les préréglages 1 et 2 ont été établis à l’usine et peuvent être reprogrammés.
Pour assigner une station radio à l’un des préréglages de 5 à 8, appuyez sur SHIFT, puis appuyez et
tenez enfoncé l’un des boutons de préréglage. Si vous utilisez la télécommande, appuyez
simplement sur le bouton de préréglage désiré et tenez-le enfoncé.
Écoute d’une station webradio préréglée
Lorsque vous écoutez une station webradio, appuyez brièvement sur le bouton de préréglage (de 1
à 4) de la station désirée ou appuyez sur SHIFT pour une station de 5 à 8. (Remarque : Ne tenez
pas le bouton enfoncé, car la station en cours de lecture aura priorité sur la station préréglée; faites
attention.)
Demande d’une station webradio non disponible présentement
Si vous désirez écouter une statio radio précise qui n’est pas disponible en ligne, visitez le site
Reciva au
Stations webradio vous permettant de choisir ce que vous désirez écouter
Certaines stations webradio offre un certain nombre d’options. Par exemple, certaines stations
permettent d’écouter des émissions qui ont déjà été diffusées. Lorsque vous sélectionnez une
station radio qui offre cette option, la station ne commencera pas à diffuser cette émission
immédiatement. L’écran affichera ce qui suit :
http://www.reciva.com/ et faites une demande pour ajouter cette station à la liste.
Le symbole # correspond au numéro du bouton que vous tenez
enfoncé.
< Live >
On Dem and
1. Tournez le bouton pour sélectionner <Live> (En direct) ou <On Demand> (Sur demande), puis
appuyez sur SELECT. Si vous sélectionnez <Live>, la radio joue l’émission présentement
diffusée par cette station. Si vous sélectionnez <On Demand>, des écrans supplémentaires
s’afficheront vous permettant de choisir ce que vous désirez écouter. Le contenu à l’affichage
varie selon la station choisie. Les étapes suivantes ne servent que de guide.
2. Lorsque vous sélectionnez <On Demand>, le nom des émissions s’affiche à l’écran. Tournez
alors le bouton pour choisir l’émission désirée, puis appuyez sur SELECT.
3. Après avoir choisi l’émission désirée, celle-ci commencera à jouer ou l’écran affichera la liste
des jours à choisir. Utilisez le bouton pour régler le jour de diffusion de l’émission, puis appuyez
sur SELECT.
4. Une fois le jour choisi, vous serez en mesure de choisir l’heure du début de la diffusion. Utilisez
le bouton pour régler l’heure du début, puis appuyez sur SELECT.
5. Les émissions qui permettent de choisir l’heure permettent également d’avancer ou de reculer
rapidement vers la partie que vous désirez pendant que la radio est en marche. Le temps écoulé
s’affiche. Appuyez sur SKIP+ (P3) ou SKIP- (P1) pour avancer ou reculer rapidement par
intervalle de 30 secondes.
FR-15
Page 45

Guide de dépannage
N’hésitez pas à consulter la section Aide sur le document Web de nos associés chez Reciva :
http://radio.reciva.com/
Cet appareil est capable d’accéder à l’Internet mobile. Si vous éprouvez des difficultés lors de la
connexion à votre réseau local sans fil, les étapes suivantes peuvent vous aider à régler le problème.
1. Assurez-vous qu’un ordinateur personnel connecté à un réseau local sans fil Wi-Fi peut avoir accès
à l’Internet (c.-à-d. il peut naviguer sur l’Internet) au moyen du même réseau.
2. Assurez-vous qu’un serveur DHCP est disponible ou que vous avez configuré une adresse IP
statique sur la radio. Pour configurer le serveur DHCP, veuillez lire les instructions fournies pour le
point d’accès sans fil.
3. Vérifiez que le coupe-feu ne bloque pas les ports de sortie. La radio doit avoir accès aux ports UDP
et TCP 80,554,1755,5000 et 7070 (exigences requises). Pour configurer la porte d’accès, veuillez
lire les instructions fournies pour le point d’accès sans fil.
4. Le point d’accès ne doit pas limiter les connexions à des adresses MAC particulières. Pour voir
l’adresse MAC de la radio, utilisez l’option du menu suivante : Configure-> Network Config-> View
Config-> MAC address (Configuration->Configuration réseau->Voir configuration->Adresse MAC).
5. Si vous possédez un réseau chiffré, assurez-vous d’avoir entré la bonne touche ou phrase de
passe dans la radio. N’oubliez pas que les touches de format alphabétique sont sensibles aux
lettres majuscules et minuscules (voir pages 19-20).
Si la connexion au réseau est réussie, mais qu’il soit impossible d’écouter des stations radio
précises, veuillez vérifier les points suivants :
1. La station ne diffuse aucune émission à ce moment précis de la journée (il se peut qu’elle soit
située dans un fuseau horaire différent).
2. La station a atteint le nombre maximum d’auditeurs simultanés.
3. La station ne diffuse plus d’émissions.
4. Le lien sur la radio est périmé.
5. La connexion entre le serveur (qui se trouve souvent dans un autre pays) et vous est lente.
Éteignez et rallumez la radio, ou débranchez et i nsérez la fiche CA. Si cela ne suffit pas, utilisez un
ordinateur (si disponible) pour faire jouer le flux de données par le biais du site Internet du
radiodiffuseur.
Si vous pouvez écouter la station au moyen d’un ordinateur, veuillez nous le faire savoir en utilisant
le formulaire qui se trouve au http:
/www.reciva.com/stations/add_station.asp . Nous pourrons ainsi
modifier les données de la station utilisées par la radio.
Lecteur multimédia
REMARQUE : Cette fonction est réservée aux utilisateurs plus avancés.
Le lecteur multimédia incorporé permet d’écouter des fichiers son non protégés (AAC, AIFF, MP3,
RM, WAV, WMA) itunes
ordinateur (sauf un “Mac”) interconnecté en réseau. Cet appareil supporte les systèmes
d’exploitation Windows 2000 et Windows XP.
Installation de l’ordinateur pour permettre à la radio d’accéder aux fichiers son sur Windows Shares
1. Assurez-vous que l’ordinateur est connecté au réseau de la webradio. À l’aide du logiciel
Windows Explorer, repérez le dossier dans lequel les fichiers son sont sauvegardés.
2. Cliquez à droite sur le dossier.
3. Sélectionnez « Properties » (Propriétés).
4. Cliquez sur « Sharing » (Partage).
5. Sélectionnez « Share this folder on the network » (Partager ce fichier sur le réseau) et « Allow
network user to change my files » (Autoriser l’utilisateur du réseau à changer mes fichiers).
Repérage de fichiers son sur Windows Shares
1. Mettez la radio en marche.
TM
inclus, ainsi que des listes d’écoute (M3U), sauvegardés dans un
FR-16
Page 46

2. Attendez jusqu’à ce que « Stations » apparaisse à l’écran, ou appuyez plusieurs fois sur BACK
jusqu’à ce que « Stations » s’affiche.
3. Tournez le bouton jusqu’à ce que « Media Player » (Lecteur multimédia) apparaisse à l’écran.
4. Appuyez sur SELECT et tournez le bouton jusqu’à ce que « Windows Shares » apparaisse à
l’écran.
5. Appuyez sur SELECT, tournez le bouton jusqu’à ce que « Scan for PCs » (Recherche
d’ordinateurs) apparaisse à l’écran et appuyez à nouveau sur SELECT.
6. « Finding PCs » (Ordinateur trouvé) apparaît à l’écran. Une fois que la radio a terminé, tournez le
bouton pour surligner le bon ordinateur.
7. Appuyez sur SELECT; la radio cherchera les utilisateurs partagés.
8. Tournez le bouton pour surligner le bon dossier partagé et appuyez sur SELECT.
9. « File Scan…» (Recherche de dossiers) apparaît à l’écran pendant que l’appareil recherche les
fichiers à contenu multimédia dans le dossier partagé. Le texte figurant au bas de l’écran change
pour indiquer que la recherche des fichiers s’effectue. Si vous avez un grand nombre de fichiers
son, la recherche prendra plusieurs minutes.
10. Une fois la recherche terminée, « By Album » (Par album) s’affichera. Vous êtes maintenant en
mesure de naviguer dans ces fichiers à contenu multimédia, lesquels sont classés par album (By
Album), par interprète (By Artist) et listes d’écoute (Playlists), si disponible.
Remarque : La première fois que s’effectue la recherche des fichiers, un fichier intitulé
<reciva_media_cache> s’inscrit au dossier dans lequel les fichiers son sont sauvegardés. Ceci
permet d’accélérer tout processus ultérieur de recherche de fichiers.
Écoute d’une seule plage partagée
1. Tournez le bouton jusqu’à ce que « By Artist » (Par interprète) s’affiche.
2. Appuyez sur SELECT.
3. Tournez le bouton jusqu’à ce que l’interprète désiré s’affiche.
4. Appuyez sur SELECT.
5. Tournez le bouton jusqu’à ce que le nom de l’album désiré s’affiche.
6. Appuyez sur SELECT. « Add to Queue » (Ajouter à la file d’attente) s’affiche.
7. Tournez le bouton jusqu’à ce que la plage désirée s’affiche.
8. Appuyez sur SELECT et la plage commencera à jouer.
Écoute d’un album partagé complet
1. Tournez le bouton jusqu’à ce que « By Artist » (Par interprète) s’affiche.
2. Press the SELECT button.
3. Tournez le bouton jusqu’à ce que l’interprète désiré s’affiche.
4. Appuyez sur SELECT.
5. Tournez le bouton jusqu’à ce que le nom de l’album désiré s’affiche.
6. Appuyez sur SELECT. « Add to Queue » (Ajouter à la file d’attente) s’affiche.
7. Appuyez sur SELECT et l’album commencera à jouer.
Mise en file d’attente de plages à écouter plus tard
1. Surlignez la plage désirée.
2. Appuyez sur SELECT. « Track Added to Queue » (Plage ajoutée à la file d’attente) s’affiche.
Mise en file d’attente d’albums à écouter plus tard
1. Surlignez l’album désiré.
2. Appuyez sur SELECT.
3. Tournez le bouton jusqu’à ce que « Add to Queue » (Ajouter à la file d’attente) s’affiche.
4. Appuyez sur SELECT. « Albums Added to Queue » (Albums ajoutés à la file d’attente) s’affiche.
Contrôle de l’écoute
1. Appuyez sur STOP pour mettre fin à l’écoute.
2. Appuyez sur PLAY/PAUSE pour arrêter momentanément l’écoute de la plage courante, pour
recommencer l’écoute d’une plage momentanément arrêtée ou pour recommencer l’écoute
d’une plage qui avait été arrêtée.
3. Appuyez sur SKIP- pour commencer l’écoute de la plage précédente dans la file d’attente.
4. Appuyez sur SKIP+ pour commencer l’écoute de la prochaine plage dans la file d’attente.
FR-17
Page 47

Navigation dans la liste des plages à écouter prés enteme nt dans la file d’attente
1. Appuyez sur BROWSE. Le nom de la plage actuellement en train d’être écoutée s’affiche.
2. Tournez le bouton pour voir les plages à écouter qui sont dans la file d’attente.
3. Si vous désirez passer à une plage particulière dans la file d’attente, appuyez sur SELECT lorsque cette
plage s’affiche.
Élimination de plages de la file d’attente
1. Appuyez sur BROWSE. Le nom de la plage actuellement en train d’être écoutée s’affiche.
2. Tournez le bouton pour sélectionner la plage que vous désirez éliminer de la file d’attente.
3. Appuyez sur STOP et tenez-le enfoncé pendant 2 secondes. « Delete Track? » (Effacer plage?)
s’affiche.
4. Tournez le bouton pour surligner « Yes » ou « No ».
5. Appuyez sur SELECT pour confirmer votre choix.
6. Si vous avez sélectionné « Yes », alors « Remove From Queue » (Éliminer de la file d’attente) s’affiche.
7. Pour éliminer toutes les plages de la file d’attente, continuez à appuyer sur BACK jusqu’à ce que l’option
« Media Player » (Lecteur multimédia) soit sélectionné, puis appuyez sur SELECT. Tournez le bouton
pour sélectionner « Clear Queue » (Vider la liste d’attente) et appuyez à nouveau sur SELECT.
Écoute aléatoire des plages
1. Sélectionnez les plages individuelles selon la marche à suivre susmentionnée.
2. Appuyez sur SELECT et BACK pour vous déplacer jusqu’à l’option de menu supérieure « Media Player
» (Lecteur multimédia).
3. Appuyez sur SELECT.
4. Appuyez sur le bouton jusqu’à ce que « Playback Mode » (Mode d’écoute) s’affiche.
5. Appuyez sur SELECT.
6. Appuyez sur le bouton jusqu’à ce que « Shuffle » (Mélanger) s’affiche.
7. Appuyez sur SELECT.
8. Tournez le bouton pour sélectionner « YES/NO » et confirmer que le mode d’écoute aléatoire doit être
activé.
Écoute répétée de plages de la file d’attente
1. Sélectionnez les plages individuelles selon la marche à suivre susmentionnée.
2. Appuyez sur SELECT et BACK pour vous déplacer jusqu’à l’option de menu supérieure « Media
Player » (Lecteur multimédia).
3. Appuyez sur SELECT.
4. Appuyez sur le bouton jusqu’à ce que « Playback Mode » (Mode d’écoute) s’affiche.
5. Appuyez sur SELECT.
6. Appuyez sur le bouton jusqu’à ce que « Repeat » (Écoute répétée) s’affiche.
7. Appuyez sur SELECT.
8. Tournez le bouton pour sélectionner « YES/NO » et confirmer que le mode d’écoute répétée doit
être activé.
Installation de l’ordinateur pour permettre à la webradio d’accéder aux fichiers son sur un
serveur UPnP
1. Si votre ordinateur utilise le logiciel Microsoft Windows XP, servez-vous de Windows Media
Connect à titre de serveur multimédia 1.0 UPnP (Universal Plug and Play). Vous pouvez
télécharger Windows Media Player 11 à partir du site Internet de Microsoft. Pour l’installer, suivez
les instructions fournies dans l’Assistant installation.
2. Une fois installé, le Windows Media Player 11 créera une bibliothèque à partir de tous les fichiers
à contenu multimédia disponibles sur votre ordinateur. Pour ajouter de nouveaux fichiers à
contenu multimédia dans la bibliothèque, sélectionnez « File>Add to Library..> Advanced Options
» (Fichier>Ajouter à la bibliothèque…> Options avancées). Cliquez sur « Add » (Ajouter),
sélectionnez les fichiers que vous désirez ajouter et cliquez sur « OK ».
3. Vous devez maintenant connecter votre webradio au Windows Media Player 11 et le configurer
pour permettre à la radio d’accéder à la bibliothèque à contenu multimédia. Pour ce faire,
procédez de la manière suivante :
a) Tenez enfoncé le bouton BACK pour atteindre le menu supérieur; tournez le bouton pour
sélectionner « Media Player » (Lecteur multimédia).
b) Appuyez sur SELECT puis tournez le bouton pour surligner « UPnP Servers » (Serveurs UPnP).
FR-18
Page 48

c) Appuyez sur SELECT et la radio recherche tous les serveurs UPnP disponibles. Ceci peut
prendre quelques secondes. Pendant ce temps, « EMPTY» (Vide) s’affiche. Cette mention
continuera à s’afficher si la radio ne trouve aucun serveur UPnP.
d) Une fois la recherche réussie, sélectionnez le serveur UPnP en tournant le bouton s’il y a plus
d’un serveur UPnP. Appuyez ensuite sur SELECT. (À noter que la mention « Access Denied »
(Accès refusé) s’affichera à ce moment.)
4. L’ordinateur vous informera qu’un appareil a tenté de se brancher sur votre serveur UPnP. Afin de
permettre à la radio d’accéder aux fichiers à contenu multimédia, cliquez sur « Library »
(Bibliothèque) du Windows Media Player 11. Sélectionnez l’option « Media Sharing… » (Partage
de lecteur multimédia…) pour ouvrir cette fenêtre.
5. À partir de la fenêtre « Media Sharing… » (Partage de lecteur multimédia…), la radio sera
identifiée comme appareil inconnu. Cliquez sur « Unknown Device » (Dispositif inconnu); cliquez
sur « Allow » (Autoriser), puis sur « OK ».
Repérage et écoute de fichiers à contenu multimédia sur la radio et le serveur UPnP
Une fois que le serveur UPnP est configuré pour partager des fichiers à contenu multimédia avec la
webradio, vous pouvez écouter les fichiers en procédant ainsi :
a. Tenez enfoncé le bouton BACK pour atteindre le menu supérieur de la radio, puis tournez le
bouton pour sélectionner « Media Player » (Lecteur multimédia).
b. Appuyez sur SELECT et tournez le bouton pour surligner « UPnP Servers » (Serveurs UPnP).
c. Appuyez sur SELECT et la radio recherche tous les serveurs UPnP disponibles. Ceci peut
prendre quelques secondes. Pendant ce temps, « EMPTY » (Vide) s’affiche. Cette mention
continuera à s’afficher si la radio ne trouve aucun serveur UPnP.
d. Une fois la recherche réussie, sélectionnez le serveur UPnP en tournant le bouton s’il y a plus
d’un serveur UPnP. Appuyez ensuite sur SELECT.
e. La radio énumérera les catégories à contenu multimédia disponibles sur votre serveur UPnP
(p. ex. « Music » (Musique), « Playlists » (Listes d’écoute), etc.). Tournez le bouton pour
sélectionner la catégorie dans laquelle vous désirez naviguer. Appuyez sur SELECT et tournez
le bouton pour surligner une sous-catégorie et appuyez à nouveau sur SELECT. Par exemple,
vous pouvez sélectionner « Music », puis « Album ».
f. Tournez le bouton pour surligner les fichiers à contenu multimédia que vous désirez écouter et
appuyez sur SELECT.
g. « Add to Queue » (Ajouter à la file d’attente) s’affiche. Appuyez sur SELECT; la radio ajoutera
ces plages dans la file d’attente et commencera à les faire jouer automatiquement.
Mise en file d’attente des plages UPnP à écouter plus tard
1. Surlignez la plage désirée.
2. Appuyez sur SELECT. « Track Added to Queue » (Plage ajoutée à la file d’attente) s’affiche.
Mise en file d’attente des albums UPnP à écouter plus tard
1. Surlignez l’album désiré.
2. Appuyez sur SELECT.
3. Tournez le bouton jusqu’à ce que « Add to Queue » (Ajouter à la file d’attente) s’affiche.
4. Appuyez sur SELECT. « Albums Added to Queue » (Albums ajoutés à la file d’attente) s’affiche.
Contrôle de l’écoute
1. Appuyez sur STOP pour arrêter l’écoute.
2. Appuyez sur PLAY/PAUSE pour arrêter momentanément l’écoute d’une plage, pour
recommencer l’écoute d’une plage momentanément arrêtée ou pour recommencer l’écoute d’une
plage qui avait été arrêtée.
Navigation dans la l iste des plage s à é cou ter pré sente ment dans la file d’a ttente
1. Appuyez sur BROWSE. Le nom de la plage actuellement en train d’être écoutée s’affiche.
2. Tournez le bouton pour voir les plages à écouter qui sont dans la file d’attente.
3. Si vous désirez passer à une plage particulière dans la file d’attente, appuyez sur SELECT
lorsque cette plage s’affiche.
FR-19
Page 49

4. Il est important de noter que les fichiers à contenu multimédia faisant l’objet d’une recherche à
l’aide de la fonction « Windows Shares » peuvent être ajoutés dans la file d’attente de la radio.
5. Appuyez sur SKIP- pour commencer l’écoute de la plage précédente dans la file d’attente.
6. Appuyez sur SKIP+ pour commencer l’écoute de la prochaine plage dans la file d’attente.
Élimination des plages UPnP de la file d’attente
1. Appuyez sur BROWSE. Le nom de la plage actuellement en train d’être écoutée s’affiche.
2. Tournez le bouton pour sélectionner les plages que vous désirez éliminer de la file d’attente.
3. Appuyez sur STOP et tenez-le enfoncé pendant 2 secondes.
4. Tournez le bouton pour surligner « Yes » ou « No ».
5. Appuyez sur SELECT pour confirmer votre choix.
6. Si vous avez sélectionné « Yes », alors « Removed From Queue » (Éliminer de la file d’attente)
s’affiche.
7. Pour éliminer toutes les plages de la file d’attente, continuez à appuyer sur BACK jusqu’à ce que
l’option « Media Player » (Lecteur multimédia) soit sélectionné, puis appuyez sur SELECT.
Tournez le bouton pour sélectionner « Clear Queue » (Vider la file d’attente) et appuyez à
nouveau sur SELECT.
Écoute aléatoire des plages UPnP
1. Sélectionnez les plages individuelles selon la marche à suivre susmentionnée.
2. Appuyez sur SELECT et BACK pour vous déplacer jusqu’à l’option de menu supérieure « Media
Player » (Lecteur multimédia).
3. Appuyez sur SELECT.
4. Appuyez sur le bouton jusqu’à ce que « Playback Mode » (Mode d’écoute) s’affiche.
5. Appuyez sur SELECT.
6. Appuyez sur le bouton jusqu’à ce que « Shuffle » (Mélanger) s’affiche.
7. Appuyez sur SELECT.
8. Tournez le bouton pour sélectionner « YES/NO » et confirmer que le mode d’écoute aléatoire a
été activé.
Écoute répétée des plages UPnP de la file d’attente
1. Sélectionnez les plages individuelles selon la marche à suivre susmentionnée.
2. Utilisez SELECT et BACK pour vous déplacer jusqu’à l’option de menu supérieure « Media
Player » (Lecteur multimédia).
3. Appuyez sur SELECT.
4. Appuyez sur le bouton jusqu’à ce que « Playback Mode » (Mode d’écoute) s’affiche.
5. Appuyez sur SELECT.
6. Appuyez sur le bouton jusqu’à ce que « Repeat » (Écoute répétée) s’affiche.
7. Appuyez sur SELECT.
8. Tournez le bouton pour sélectionner « YES/NO » et confirmer que le mode d’écoute répétée doit
être activé.
Remarques :
1. Si les dossiers partagés contiennent un plus grand nombre de chansons que le nombre limite
permis sur la mémoire de la webradio, « Too many files » (Trop de fichiers) s’affiche.
2. Le fait d’appuyer plusieurs fois sur le bouton P4 fera alterner les modes d’écoute répétée et
aléatoire.
Réglage de l’horloge
1. Appuyez sur SELECT. (Remarque : Si vous faites une erreur, appuyez sur BACK pour retourner à
l’écran précédent.)
2. Tournez le bouton jusqu’à ce que « Configure » (Configurer) s’affiche.
Stations
Media Player
< Configure >
FR-20
Page 50

3. Appuyez sur SELECT.
4. Tournez le bouton jusqu’à ce que « Clock Setup » (Mise à l’heure de l’horloge) s’affiche.
Register
< Clock Setup >
Backlight
5. Tournez le bouton jusqu’à ce que « Set Time » (Régler l’heure) s’affiche.
< Set Time / Date >
6. Avant de régler l’heure et la date, vous devez choisir le fuseau horaire approprié. Il existe
7fureaux horaires.
7. Une fois le fuseau horaire sélectionné, vous devez régler l’heure.
8. Appuyez sur SELECT.
Set Time
:30 AM10
9. Tournez le bouton jusqu’à ce que le réglage de l’heure soit correct, puis appuyez sur SELECT.
Set Time
10: AM03
10. Tournez le bouton jusqu’à ce que le réglage des minutes soit correct, puis appuyez sur SELECT.
Set Date
Jan 200801
11. Procédez au réglage de la date, du mois et de l’année.
En dernier lieu, l’écran retourne au mode de réglage de l’heure et de la date.
Une fois le réglage terminé, ces données apparaîtront toujours dans le coin inférieur droit de l’écran
lorsque l’appareil est mis sous tension. Lorsque l’appareil est hors tension, ces données
apparaissent au milieu de l’écran et à leur pleine grandeur.
Réglage de la minuterie d’arrêt différé
Cette option permet à la radio de se mettre sous et hors tension à un moment prédéterminé.
1. Appuyez sur SLEEP. « Sleep Timer 15 minutes » (Minuterie d’arrêt différé 15 minutes) s’affiche.
La radio continue de jouer normalement pendant 15 minutes puis passe automatiquement au
mode d’attende.
2. Pour allonger la période pendant laquelle la radio continuera à jouer avant de se mettre hors
tension, appuyez à nouveau sur SLEEP pour modifier l’heure à l’écran. Chaque fois que vous
appuyez sur SLEEP, la minuterie augmente de 15 minutes à la fois, jusqu’à un maximum de 90
minutes.
3. Pour mettre la radio sous tension une fois de plus, appuyez simplement sur STANDBY.
FR-21
Page 51

Réglage des alarmes
1. Appuyez sur SELECT. (Remarque : Si vous faites une erreur, appuyez sur BACK pour retourner à
l’écran précédent.)
2. Tournez le bouton jusqu’à ce que « Alarm Clock» (Réveil) s’affiche.
Tuner
xi li ar y Inp ut
Au
< Alarm Clock >
3. Appuyez sur SELECT.
4. Tournez le bouton jusqu’à ce que « Set Alarms » (Régler les alarmes) s’affiche.
< Se t Alarms >
5. Vous avez maintenant 3 options :
Disable All (Désactiver tout) : pour désactiver les deux alarmes; les alarmes s’éteindront.
Alarm 1 (Alarme 1) : pour régler, activer ou désactiver l’alarme 1; la valeur établie à l’usine est «
1.OFF 12:00 AM » (1. DÉSACTIVÉE 12:00 AM).
Alarm 2 (Alarme 2) : pour régler, activer ou désactiver l’alarme 2; la valeur établie à l’usine est «
2.OFF 12:00 AM » (2. DÉSACTIVÉE 12:00 AM).
< Disabl e all >
1. OFF 1 2: 00 AM
2. OFF 1 2: 00 AM
6. Appuyez sur SELECT pour confirmer votre choix.
Set Ala rm
:00 AM12
7. Tournez le bouton jusqu’à ce que le réglage de l’heure soit correct, puis appuyez sur SELECT.
Set Ala rm
07 : AM06
8.Tournez le bouton jusqu’à ce que le réglage des minutes soit correct, puis appuyez sur SELECT.
FR-22
Page 52

9. Chaque alarme comporte cinq modes, à savoir :
(Tous les jours) : l’alarme se met en marche
7 jours par semaine
Weekly (Une fois par semaine) : l’alarme se met en marche une fois par semaine
Weekdays (Tous les jours de la semaine) : l’alarme se met en marche seulement du lundi au vendredi
Weekends (Toutes les fins de semaine) : l’alarme se met en marche seulement le samedi et le dimanche
Once
Every Day
Weekly
10. Il existe également trois options de réveil pour chaque alarme :
Wake to Buzzer (Réveil au son de l’avertisseur)
Wake to Internet Radio (Réveil au son de la webradio)
Wake to FM Radio (Réveil au son de la radio FM)
Remarques :
1. Il vous sera impossible de choisir le réveil au son de la webradio si aucune station n’a été
préréglée ou si vous n’êtes pas en train d’écouter la webradio.
2. Assurez-vous que le volume a été réglé au niveau désiré lorsque vous choisissez l’option de
réveil au son de la webradio ou de la radio FM.
Buzzer
Internet Radio
FM T uner
Une fois tous ces renseignements établis, l’icône de l’alarme apparaît dans le coin inférieur gauche
de l’écran.
Vérification des heures de réveil et du mode d’alarme
Pour vérifier ces informations, sélectionnez ALARM CLOCK puis SET ALARMS. Si l’alarme a été
réglée, les renseignements apparaîtront dans l’ordre suivant : <Alarm/alarm time/alarm mode/wake
up option> (Alarme/heure de l’alarme/mode d’alarme/option de réveil). Par exemple, l’alarme 1 est
réglée à 9 h 30 et se mettra en marche tous les jours au son de l’avertisseur; l’alarme 2 est réglée à
10 h 30 et se mettra en marche tous les samedis et dimanches au son de l’avertisseur. L’écran
affichera ce qui suit :
Disable All
1. 9:3 0 AM Daily Buzzer
2. 10:30 AM Daily Buzzer
De plus, si l’alarme a été réglée, l’icône de l’alarme apparaît à l’écran au mode d’attente. Les
renseignements sur l’horloge apparaissent à leur grandeur maximum au mode d’attente.
La radio se fera entendre pendant une heure environ après le début de la mise en marche de
l’alarme, puis s’arrêtera. Appuyez sur STANDBY pour la mettre hors tension plus tôt. Appuyez à
nouveau sur ce bouton pour la mettre sous tension manuellement.
FR-23
Page 53

Répit/alarme répétée
Lorsque l’alarme retentit le matin, appuyez sur SNOOZE sur le panneau de dessus de l’appareil ou
sur la télécommande pour dormir pendant quelques minutes supplémentaires. L’alarme s’arrêtera
pendant environ 9 minutes, puis retentira à nouveau par la suite.
Z
z
Écoute d’une station radio FM
Cette webradio est également dotée d’un syntonisateur FM qui vous permettra d’accéder aux
stations radio FM standard.
1. Appuyez sur SELECT. (Remarque : Si vous faites une erreur, appuyez sur BACK pour retourner à
l’écran précédent.)
2. Tournez le bouton jusqu’à ce que « Tuner » (Syntonisateur) s’affiche.
Media Player
Configure
< Tuner >
3. Appuyez sur SELECT.
Tournez le bouton pour sélectionner la station radio désirée. Lorsqu’un signal FM stéréo clair est reçu,
<Stereo> s’affiche. Dans le cas contraire, appuyez sur SEEK+/- pour chercher un signal fort.
98.5 MHz
Stereo
4. Appuyez sur VOLUME+/- pour régler le volume au niveau désiré.
5. Déployez l’antenne FM située à l’arrière de l’appareil et tournez-la pour obtenir la meilleure
réception qui soit.
Préréglage de vos stations radio FM préférées
Vous pouvez sauvegarder un maximum de 8 stations radio FM dans la mémoire de l’appareil. Lors
de l’écoute d’une station FM, tenez enfoncé l’un des boutons de préréglage (de 1 à 8) jusqu’à ce que
l’écran suivant apparaisse.
Assigned to preset #
Pour assigner une station radio FM à l’un des préréglages de 5 à 8, appuyez sur SHIFT, puis tenez
enfoncé l’un des boutons de préréglage.
Écoute d’une station radio FM préréglée
Lorsque vous écoutez une station radio FM, appuyez brièvement sur le bouton de préréglage (de 1
à 4) de la station FM désirée ou appuyez sur SHIFT pour une station préréglée de 5 à 8. (Remarque :
Ne tenez pas le bouton enfoncé, car la station en cours d’écoute aura priorité sur la station préréglée;
faites attention.)
Le symbole # correspond au numéro du bouton que vous
tenez enfoncé.
FR-24
Page 54

A
C elles
onnexions optionn
PRISE AUXILIAIRE
Vous pouvez connecter à la webradio un appareil externe (lecteur MP3, lecteur de CD, etc.). Branchez
un câble audio (non fourni) de la prise AUX IN de la radio à la prise AUX OUT de l’appareil externe.
Ceci permettra d’amplifier le son provenant de l’appareil externe au moyen du haut-parleur de la radio.
1. Appuyez sur SELECT. (Remarque : Si vous faites une erreur, appuyez sur BACK pour retourner à
l’écran précédent.)
2. Tournez le bouton jusqu’à ce que « Auxiliary Input » (Entrée auxiliaire) s’affiche.
3. Appuyez sur SELECT.
4. Connectez un câble audio (non fourni) de la prise AUDIO OUT de l’appareil externe à la prise
AUX IN de la radio. Mettez en marche l’appareil externe; réglez le volume à la position médiane et
faites-le fonctionner normalement. Si le volume de l’appareil externe est trop élevé, cela créera de
la distorsion.
5. Le son proviendra du haut-parleur de l’appareil.
6. Appuyez sur VOLUME +/- pour régler le volume au niveau désiré.
7. Une fois l’écoute terminée, mettez l’appareil externe hors tension. Appuyez sur SELECT ou
BACK pour retourner au menu principal et écoutr une station FM ou une station webradio, surtout
si les alarmes de réveil sont programmées.
Remarques:
‧ Lors du branchement de l’appareil externe, reportez-vous au guide d’utilisation de cet appareil,
ainsi qu’au présent manuel.
‧ Voici des exemples d’appareils audio externes qui peuvent être branchés sur la webradio : lecteur
MP3 portatif, lecteur de cassette, lecteur de mini-disque, lecteur de DVD, etc.
PRISE D’ÉCOUTEUR
Pour une écoute en privé, branchez des écouteurs stéréo (non fournis) de 3,5 mm (32 ohms) sur la
prise de sortie. Lorsque vous insérez la fiche des écouteurs dans cette prise, les haut-parleurs se
débranchent automatiquement.
IMPORTANT:
Un son excessivement fort provenant des écouteurs peut endommager votre ouïe.
PRISE DE SORTIE DE LIGNE
Une prise de sortie de ligne se trouve au dos de l’appareil pour vous permettre de relier la radio à une
chaîne stéréo externe.
Tuner
< Auxiliary Input >
Alarm Clock
ux In
Nettoyage du boîtier
N’utilisez qu’un linge doux pour nettoyer la surface très brillante du boîtier. N’utilisez pas de serviette en
papier, car cela pourrait égratigner la surface.
FR-25
Page 55

Fiche technique
Dimensions (l x h x p) : 220 x 112.5 x 135 mm
Poids : 2 kg
tSec ion Radio
me de syntonisation Gam : FM 87,5 – 108 MHz
tè
Sys me d’antenne : Antenne filaire (FM)
énéralités
G
aut-parleur : 36,6 mm x 2,75 (8 ohms)
H
orne de sortie : Écouteurs stéréo de 3,5 mm
B
limentation : CA de 120 volts, 60 Hz
A
rise d’entrée auxiliaire : Prise RCA de 3,5 mm
P
es spécifications peuvent changer sans préavis.
L
Licence d’utilisation
t a
Ce ppareil contient un logiciel sous licence du GNU Public License (version 2) et du GNU Lesser
li
Pub c License (version 2.1). Le code source de ce logiciel est disponible sur
Cet
appareil fait usage de la technologie de Microsoft Corporation et est sous license de Microsoft
Licen
sing GP. Tout usage ou distribution de cette technologie pour tout autre produit est formellement
rd ou) de Microsoft Licensing GP, le cas échéant.
inte it sans l’autorisation de Microsoft Corporation et(
FR-26
http://www.reciva.com/gpl
Page 56

GARANTIE DE FIABILITÉ SANYO
PRODUITS GRAND PUBLIC
APPLICATION DE LA GARANTIE
Les appareils SANYO, achetés au détail, neuts et non
utilisés, chez un marchand autorisé SANYO au Canada
sont garantis contre tous défauts de fabrication et de
matériaux, pour une période d’UN AN à partir de la date
d’achat par l’acheteur à des fins non commerciales. La
présente garantie s’applique uniquement à l’acheteur au
détail initial de l’appareil garanti.
OBLIGATIONS DE SANYO CANADA INC.
Durant la période de garantie, SANYO Canada Inc.
réparera ou, à sa disceétion, remplacera tout appareil
présentant effectivement un défaut de matériel ou de
fabrication. Les PIÈCES de remplacement sont garanties
jusqu’à l’expiration de la garantie initale de l’appareil.
LA GARANTIE NE COUVRE PAS
(a) Les appareils achetés à l’extérieur du Canada.
(b) Les appareils achetés usagés.
(c) Les problèmes résultant de l’installation et des
réglages initiaux.
(d) Les réglages décrits dans le manuel
d’instructions.
(e) Les accessoires, y compris antenne et piles.
(f) Les dommages subis durant le transport ou y
étant attribuables.
(g) Les dommages dus à un entretien incorrect,
à un mauvais montage, à un accident, à un
mauvais traitement, à un usage non approprié
ou à la négligence.
(h) Les dommages causés par la foudre ou par
une surtension.
(i) Les frais d’enlèvement et de réinstallation
d’un appareil conçu pour les véhicule
automobiles.
(j) Le joint en caoutchouc de la caméra numérique
étanche.
OBLIGATIONS DE L’ACHETEUR AU DÉTAIL
INITIAL
Vous, l’acheteur au détail initial, devez présenter votre
facture originale datée et cette garantie à SANYO
Canada Inc. ou à un centre de service SANYO autorisé
lorsque vous désirez vous prévaloir du recours en
garantie.
Vous assumez tous les frais de TRΛNSPORT
occasionnés par l’expédition de l’appareil à SANYO
Canada Inc. ou à un centre de service SANYO autorisé
et par son retour. Vous assumez aussi tous les frais
d’ENTRETIEN que l’appareil pourrait nécessiter.
INVALIDATION DE LA GARANTIE
La présente garantie devient invalide si les numéros de
série de l’appareil sont modifiés ou effacés ou si
l’appareil a été réparé par quiconque autre que SANYO
Canada Inc. ou un centre de service SANYO autorisé.
RESTRICTIONS
(a) SANYO Canada Inc. se réserve le droit de
modifier ou d’améliorer le concept du modèle
de l’appareil faisant l’objet de la présente
garantie sans avoir l’obligation de modifier
de quelque façon que ce soit ou d’installer
quelque amélioration que ce soit dans ou sur
l’appareil de l’acheteur.
(b) SANYO Canada Inc. ou ses détaillants
autorisés ne seront en aucun cas tenus
responsables des dommages spéciaux ou
indirects résultant de l’utilisation de cet
appareil.
GARANTIES STATUTAIRES
Les dispositions qui précèdent n’empêchent
aucunement l’application de lois provinciales qui, dans
certaines circonstances, peuvent interdire certaines des
restrictions et exclusions figurant dans la présente
garantie. Dans un tel cas, les conditions ainsi interdites
en vertu de ces lois seront nulles et non avenues, mais
le reste de la présente garantie demeurera en vigueur.
COMMENT SE PRÉVALOIR DU RECOURS EN
GARANTIE
Veuillez joindre SANYO Canada Inc. à l’adresse
suivante:
SANYO Canada Inc.
1-300 Applewood Cres.
Concord, ON L4K 5C7
1-800-263-2244
www.sanyo.ca
FR-27
Page 57

CODE NO.:112114700
SANYO Electric Co., Ltd.
Printed in China
 Loading...