

Page 1

s
Instruction Manual
Doc Number D5140
Part Number D301719X012
May 2012
ControlWave®
MRMS-IC Configuration Manual
Remote Automa ti on Solution
www.EmersonProcess.com/Remote
Page 2

This page is intentionally left blank
Page 3

ControlWave MRMS-IC Configuration Manual (D5140)
Contents
Chapter 1 – Getting Started 1-1
1.1 What is MRMS-IC? ................................................................................................................... 1-1
1.2 Before You Begin ...................................................................................................................... 1-1
1.3 Installing MRMS-IC Software .................................................................................................... 1-2
1.4 Starting MRMS-IC Software ...................................................................................................... 1-6
1.4.1 MRMS_IC IP Startup ..................................................................................................... 1-6
1.4.2 MRMS_IC Serial Startup ............................................................................................... 1-7
1.4.3 Logging Onto the ControlWave Micro ........................................................................... 1-7
1.5 Accessing Pages of the MRMS_IC Application ........................................................................ 1-8
1.6 Entering Data in Fields of the MRMS_IC Application ............................................................... 1-9
Chapter 2 – Configuring Inputs and Outputs (I/O Tab) 2-1
2.1 I/O Tab ...................................................................................................................................... 2-1
2.2 I/O Usage .................................................................................................................................. 2-2
2.2.1 Discrete Inputs (DI) ....................................................................................................... 2-5
2.2.2 Discrete Outputs (DO) ................................................................................................... 2-5
2.2.3 Analog Inputs (AI) ......................................................................................................... 2-6
2.2.4 Analog Outputs (AO) ..................................................................................................... 2-7
2.2.5 High Speed Counters (HSC) ......................................................................................... 2-8
2.2.6 Ultrasonic Flow Meters (UFM) ...................................................................................... 2-9
2.2.7 Multi-variable Transmitters (Transducers) .................................................................. 2-10
2.3 Local DLM ............................................................................................................................... 2-12
2.4 Customer Modbus Slave ......................................................................................................... 2-14
2.4.1 Signal List Grid ............................................................................................................ 2-17
2.4.2 Floating Point Format .................................................................................................. 2-19
2.5 Generic Modbus Master .......................................................................................................... 2-20
2.6 Load/Save Configuration ......................................................................................................... 2-25
2.6.1 Performing I/O Array Operations. ............................................................................... 2-26
2.6.2 Creating a Recipe ....................................................................................................... 2-27
2.6.3 Saving the Recipe ....................................................................................................... 2-28
2.6.4 Recalling a Saved Recipe, and Sending Its Values to the Controller ......................... 2-29
2.7 Time Set/Daylight Saving Time ............................................................................................... 2-29
Chapter 3 – Configuring Stations and Runs (Measurement Tab) 3-1
3.1 Measurement Tab ..................................................................................................................... 3-2
3.2 Status/Configuration .................................................................................................................. 3-3
3.2.1 Site Configuration Data Tab (Site Configuration) ......................................................... 3-4
3.2.2 MVT Common Settings Tab (Site Configuration).......................................................... 3-7
3.2.3 Station Summaries Tab (Site Configuration) ................................................................ 3-8
3.2.4 Station Configuration Tab (Station Configuration) ...................................................... 3-10
3.2.5 Station Data Tab (Station Configuration) .................................................................... 3-15
3.2.6 Run Configuration Tab ................................................................................................ 3-16
3.2.7 Alarm Configuration Tab (Run Configuration) ............................................................. 3-21
3.2.8 Linearization Config Tab (Run Configuration) ............................................................. 3-23
3.2.9 PV/GQ Averages Tab (Run Configuration) ................................................................. 3-24
3.2.10 Orifice Tab (Run Configuration) .................................................................................. 3-25
3.2.11 Turbine Tab (Run Configuration) ................................................................................ 3-29
3.2.12 Auto-Adjust Tab (Run Configuration) .......................................................................... 3-32
3.2.13 Ultrasonic Tab (Run Configuration) ............................................................................ 3-34
3.2.14 PD Tab (Run Configuration) ........................................................................................ 3-37
Issued: May-2012 Contents iii
Page 4

ControlWave MRMS-IC Configuration Manual (D5140)
3.3 View Local Archives ................................................................................................................ 3-39
3.3.1 Selecting Logs to View ................................................................................................ 3-39
3.4 Collect Local Logs ................................................................................................................... 3-40
3.4.1 Selecting Archives for Collection ................................................................................ 3-40
3.4.2 Collecting a Single Archive ......................................................................................... 3-40
3.4.3 Collecting Multiple Archives ........................................................................................ 3-40
3.4.4 Log Collection Parameters .......................................................................................... 3-40
3.5 View Audit Log ........................................................................................................................ 3-43
3.5.1 Data Storage Parameters dialog box .......................................................................... 3-44
3.5.2 Search Data Collection Criteria dialog box ................................................................. 3-45
3.6 Maintenance Mode .................................................................................................................. 3-46
3.6.1 Site Tab ....................................................................................................................... 3-46
3.6.2 Station Tab .................................................................................................................. 3-49
3.6.3 Run Tab ...................................................................................................................... 3-51
3.6.4 PVs Tab ...................................................................................................................... 3-53
3.6.5 AI Maintenance Tab .................................................................................................... 3-54
3.7 Gas Chromatograph Configuration ......................................................................................... 3-56
3.7.1 General ....................................................................................................................... 3-56
3.7.2 Current Tab (Gas Chromatograph Configuration) ...................................................... 3-61
3.7.3 Component Tab (Gas Chromatograph Configuration) ................................................ 3-65
3.7.4 Delta Limit Tab (Gas Chromatograph Configuration) ................................................. 3-67
3.7.5 Normalization Tab (Gas Chromatograph Configuration) ............................................ 3-68
3.7.6 Custom Tab (Gas Chromatograph Configuration) ...................................................... 3-69
3.8 Summary Pages ...................................................................................................................... 3-70
3.8.1 Measurement Tab ....................................................................................................... 3-70
3.8.2 Alarm Tab .................................................................................................................... 3-71
3.9 Limits Page (Gas Composition Allowable Ranges) ................................................................ 3-72
3.10 Daily Run Corrected and Uncorrected Volume ....................................................................... 3-73
Chapter 4 – Sampler (Control Tab) 4-1
4.1 Sampler ..................................................................................................................................... 4-1
4.1.1 List 29 ............................................................................................................................ 4-4
Appendix E - Troubleshooting E-1
Index IND-1
iv Contents Issued: May-2012
Page 5

ControlWave MRMS-IC Configuration Manual (D5140)
Chapter 1 – Getting Started
This chapter discusses how to install the MRMS-IC application and
provides some general information about how to use it.
In This Chapter
1.1 What is MRMS-IC? .......................................................................... 1-1
1.2 Before You Begin ............................................................................. 1-1
1.3 Installing MRMS-IC Software .......................................................... 1-2
1.4 Starting MRMS-IC Software ............................................................ 1-6
1.4.1 MRMS_IC IP Startup ............................................................ 1-6
1.4.2 MRMS_IC Serial Startup ...................................................... 1-7
1.4.3 Logging Onto the ControlWave Micro .................................. 1-7
1.5 Accessing Pages of the MRMS_IC Application ............................... 1-8
1.6 Entering Data in Fields of the MRMS_IC Application ...................... 1-9
1.1 What is MRMS-IC?
1.2 Before You Begin
Multi-Run Multi-Station (MRMS) software with Industry Canada (IC) /
Measurement Canada approvals is a software application that allows the
ControlWave Micro controller to manage up to six (6) natural gas
measurement stations.
The MRMS-IC application consists of:
A ControlWave project file (*.PRO) pre-programmed for multi-run
multi-station natural gas measurement.
A customized flash configuration profile (*.FCP) file that configures
the ports, audit, and archive parameters of the ControlWave Micro
for the MRMS_IC.
A TechView session. This includes the TechView session file
(*.TVS), associated *.INI files, and a set of HTM menus customized
for the MRMS-IC application. You use these menus to configure the
application.
You must install the ControlWave Micro controller on site and
connect field devices to its I/O modules. For information on
ControlWave Micro hardware, see document CI-ControlWave
Micro.
You must install OpenBSI 5.7 software including TechView on your
PC workstation. You must also install the latest service pack and
patches (Service Pack 2, Patch D). See the OpenBSI Utilities
Manual (D5081), the BSI_Config User’s Manual (D5128), and the
TechView User Manual (D5131) for details on installation
requirements.
Issued: May-2012 Getting Started 1-1
Page 6

ControlWave MRMS-IC Configuration Manual (D5140)
You must connect the PC workstation to the ControlWave Micro
controller. You can communicate using a serial cable or an Ethernet
cable. Cable diagrams are included in CI-ControlWave Micro.
The ControlWave Micro must be running a flash configuration
profile file (*.FCP) compatible with MRMS-IC software. For
information on updating FCP files, see Chapter 5 of the OpenBSI
Utilities Manual (D5081).
The ControlWave Micro must be running the ControlWave project
(*.PRO) file configured for the MRMS-IC. See Chapter 7 of the
OpenBSI Utilities Manual (D5081) for information on downloading
a ControlWave project (*.PRO) file.
Note: If you ordered your ControlWave Micro with MRMS-IC
software pre-installed, the FCP and PRO files are already loaded
when the unit ships from the factory.
1.3 Installing MRMS-IC Software
Note: MRMS_IC runs on the following Windows operating systems:
Windows XP
1. Double-click on the MRMS-IC application icon.
2. Click Next on the welcome screen of the installer.
Click “Next”
Figure 1-1. MRMS_IC Installer – Welcome Screen
1-2 Getting Started Issued: May-2012
Page 7
ControlWave MRMS-IC Configuration Manual (D5140)
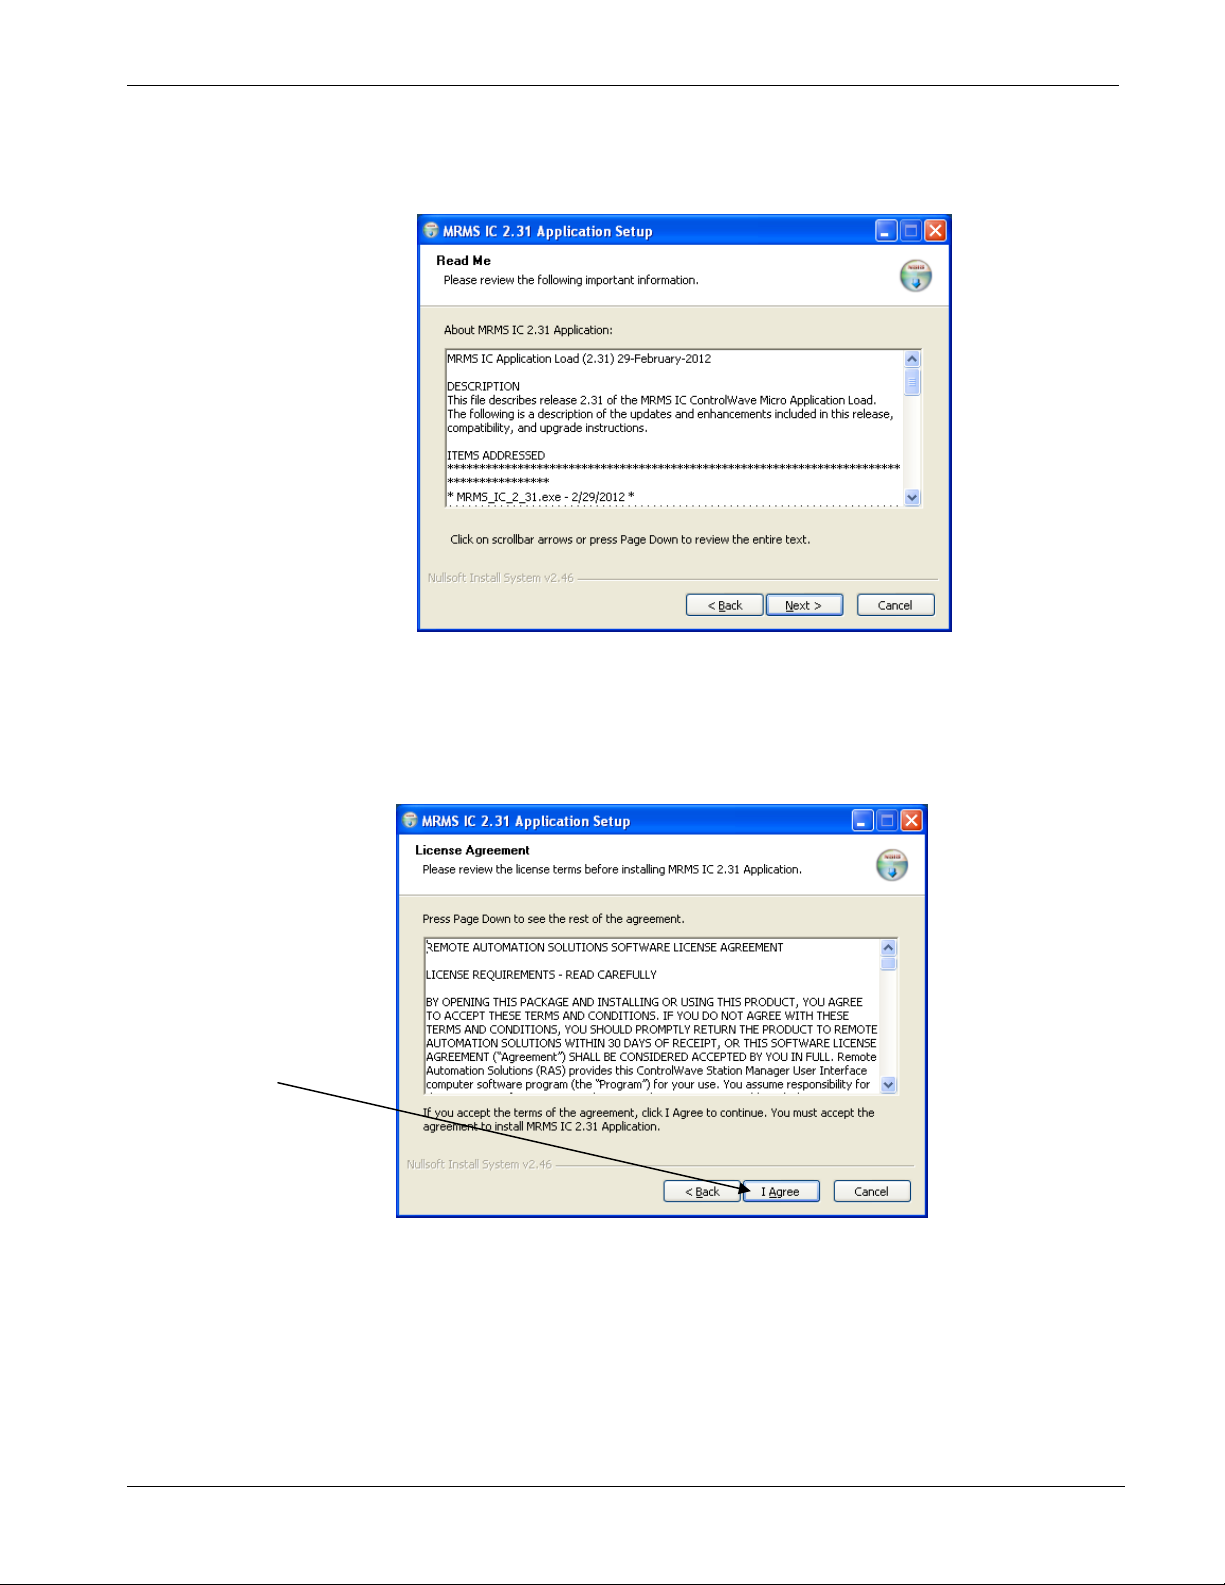
3. The next screen includes a “Read Me” file which describes the
changes since the last release of MRMS IC. Click Next after you
review the changes.
Click I Agree
Figure 1-2. Read Me Page
4. Review the license agreement and click the I Agree button to
proceed with the installation or Cancel to abort the installation
process.
Figure 1-3. License Agreement page
Issued: May-2012 Getting Started 1-3
Page 8

ControlWave MRMS-IC Configuration Manual (D5140)
Figure 1-4. Installation in Progress
5. The installation begins. If you see the following message box,
click OK to confirm that you have the proper OpenBSI version
installed.
Click OK
Figure 1-5. Confirm OpenBSI Version
6. At the completion of the installation, click Next.
1-4 Getting Started Issued: May-2012
Page 9

Click Next
ControlWave MRMS-IC Configuration Manual (D5140)
Figure 1-6. Installation Completion
7. Now click Finish to exit the installer.
Click Finish
Figure 1-7. Exit the Installer
Issued: May-2012 Getting Started 1-5
Page 10

ControlWave MRMS-IC Configuration Manual (D5140)
1.4 Starting MRMS-IC Software
You start the MRMS_IC software by invoking the proper TechView
file. There are two ways to do this:
Starting MRMS_IC from
the Start Programs
Menu
Starting MRMS_IC from
an icon
1.4.1 MRMS_IC IP Startup
For an IP connection, click: Start > Programs > MRMS_IC >
MRMS_IC_IP_tvs
For a serial connection, click: Start > Programs > MRMS_IC >
MRMS_IC_Serial_tvs
From a desktop icon, similar to those below, or from the
\MRMS_IC\SUPPORT folder, double-click the IP or serial TVS file,
depending upon your type of connection.
Figure 1-8. MRMS_IC TVS file icons
For IP communication, see Section 1.4.1 MRMS_IC IP Startup.
For serial communication see Section1.4.2 MRMS_IC Serial Startup.
Note: Although you can view data through an IP connection, the
MRMS-IC application only allows configuration changes when
you establish a physical serial connection to serial
communication port 1 on the ControlWave Micro.
Once you start the TVS file for IP operation, TechView opens the
Runtime Configuration Parameters dialog box:
Figure 1-9. IP Runtime Parameters
1. Ignore the number of runs; this parameter does not apply for
1-6 Getting Started Issued: May-2012
Page 11

MRMS-IC.
2. Enter the IP address of the ControlWave Micro IP port to
which you are connected.
3. Click OK.
4. Log onto the ControlWave Micro as described in Section 1.4.3.
1.4.2 MRMS_IC Serial Startup
Once you start the TVS file for serial operation, TechView opens the
Runtime Configuration Parameters dialog box:
ControlWave MRMS-IC Configuration Manual (D5140)
Figure 1-10. Serial Runtime Parameters
1. Ignore the number of runs; this parameter does not apply to
MRMS-IC.
2. Enter the BSAP local address of the ControlWave Micro to
which you are connected.
3. Select the serial communication port on the PC which you are
using to communicate with the ControlWave Micro.
4. Select the baud rate on the serial communication line.
5. Click OK.
6. Log onto the ControlWave Micro as described in Section 1.4.3.
1.4.3 Logging Onto the ControlWave Micro
In the SignOn to RTU dialog box, enter a Username / Password
combination that allows full access to the ControlWave Micro, then
click the SignOn button.
Issued: May-2012 Getting Started 1-7
Page 12

ControlWave MRMS-IC Configuration Manual (D5140)
y
Figure 1-11. Logging onto the ControlWave Micro
1.5 Accessing Pages of the MRMS_IC Application
To access various pages of the MRMS_IC application, click on the tab
for the function you want to configure, then click on the buttons which
appear on that tab. By default, the I/O tab appears first.
Click on the tab you want to access, then
click on an
of the buttons for that tab
Tabs
Buttons
Figure 1-12. Tabs and Buttons in MRMS_IC
The next several chapters describe the functions available on each tab of
the application.
1-8 Getting Started Issued: May-2012
Page 13

ControlWave MRMS-IC Configuration Manual (D5140)
You need not configure all the features of the application; only those
that you need for your particular purpose and measurement needs.
1.6 Entering Data in Fields of the MRMS_IC Application
Whenever you select a field and enter data, or select from a drop-down
menu, you must press the [Enter] key to confirm and save your choice.
To exit a field without entering data, press the [Esc] key.
Issued: May-2012 Getting Started 1-9
Page 14

This page is intentionally left blank
Page 15

ControlWave MRMS-IC Configuration Manual (D5140)
Chapter 2 – Configuring Inputs and Outputs (I/O Tab)
This chapter discusses configuring the MRMS-IC application to accept
field inputs and outputs (I/O). This is accomplished from the MRMSIC’s I/O tab.
Note: Although you can view data through an IP connection, the
MRMS-IC application only allows configuration changes when
you establish a physical serial connection to serial
communication port 1 on the ControlWave Micro.
In This Chapter
2.1 I/O Tab ............................................................................................. 2-1
2.2 I/O Usage ......................................................................................... 2-2
2.2.1 Discrete Inputs (DI) .............................................................. 2-5
2.2.2 Discrete Outputs (DO) .......................................................... 2-5
2.2.3 Analog Inputs (AI) ................................................................. 2-6
2.2.4 Analog Outputs (AO) ............................................................ 2-7
2.2.5 High Speed Counters (HSC) ................................................ 2-8
2.2.6 Ultrasonic Flow Meters (UFM) ............................................. 2-9
2.2.7 Multi-variable Transmitters (Transducers) ......................... 2-10
2.3 Local DLM ...................................................................................... 2-12
2.4 Customer Modbus Slave ............................................................... 2-14
2.4.1 Signal List Grid ................................................................... 2-17
2.4.2 Floating Point Format ......................................................... 2-19
2.5 Ultrasonic Data .............................................................................. 2-20
2.6 Load/Save Configuration ............................................................... 2-25
2.6.1 Performing Array Read or Write Operations. ..................... 2-26
2.6.2 Creating a Recipe ............................................................... 2-27
2.6.3 Changing Floating Point Format of Values in the Recipe .. 2-28
2.6.4 Saving the Recipe .............................................................. 2-28
2.6.5 Recalling a Saved Recipe, and Sending Its Values to the
Controller .......................................................................... 2-29
2.7 Generic Modbus Master ................................................................ 2-29
2.8 Time Set/Daylight Saving Time ..................................................... 2-29
2.1 I/O Tab
Click the I/O tab to display the various I/O options you can configure.
We’ll discuss each of these in the sections that follow.
To configure an
I/O function or
feature, click on
its button.
Figure 2-1. I/O Tab in MRMS-IC
Issued: May-2012 Configuring Inputs and Outputs (I/O Tab) 2-1
Page 16

ControlWave MRMS-IC Configuration Manual (D5140)
2.2 I/O Usage
When you click the button on
the I/O tab, the I/O Usage page displays a graphical representation of
the ControlWave Micro, showing each of the I/O modules detected by
the MRMS-IC. If MRMS-IC cannot detect a particular module or an I/O
slot is empty, its graphic shows “Not Present.” MRMS-IC only uses
Mixed I/O modules.
Click on the graphical
representation of a module
to configure its I/O.
I/O modules
Figure 2-2. I/O Usage Screen Showing I/O Modules Detected
When you move the cursor over the CPU module, an Expansion
Communication (ECOM) module, or any I/O module, you’ll see a
yellow box on the screen. To configure I/O, follow these steps:
1. From the I/O tab, click the I/O Usage button.
2. Position the cursor over the I/O module you want to configure; a
yellow box indicates the cursor position on any configurable
module.
3. Click on the module you want to configure. This opens a screen
showing the possible choices for I/O. The Mixed I/O Module
shows multiple types of I/O (see Figure 2-3).
2-2 Configuring Inputs and Outputs (I/O Tab) Issued: May-2012
Page 17

ControlWave MRMS-IC Configuration Manual (D5140)
Figure 2-3. Mixed I/O Module
4. The I/O assignments in the MRMS-IC application are fixed
based on the I/O slot. Because you can have an expanded
communication module (ECOM) in either I/O slot 1 or 2, I/O
designations begin with the right-most slot and go in reverse
order. In other words, the mixed I/O module in I/O slot 6 holds
user DI1, whereas the mixed I/O module in I/O slot 1 holds user
DI6.
5. Configuration is limited based on the I/O type. Refer to the sub-
sections that follow.
Note: You may have noticed that when the cursor is left hovered over
an IO point, the graphics to the left display the applicable
connection points for direct and remote IO.
Issued: May-2012 Configuring Inputs and Outputs (I/O Tab) 2-3
Page 18
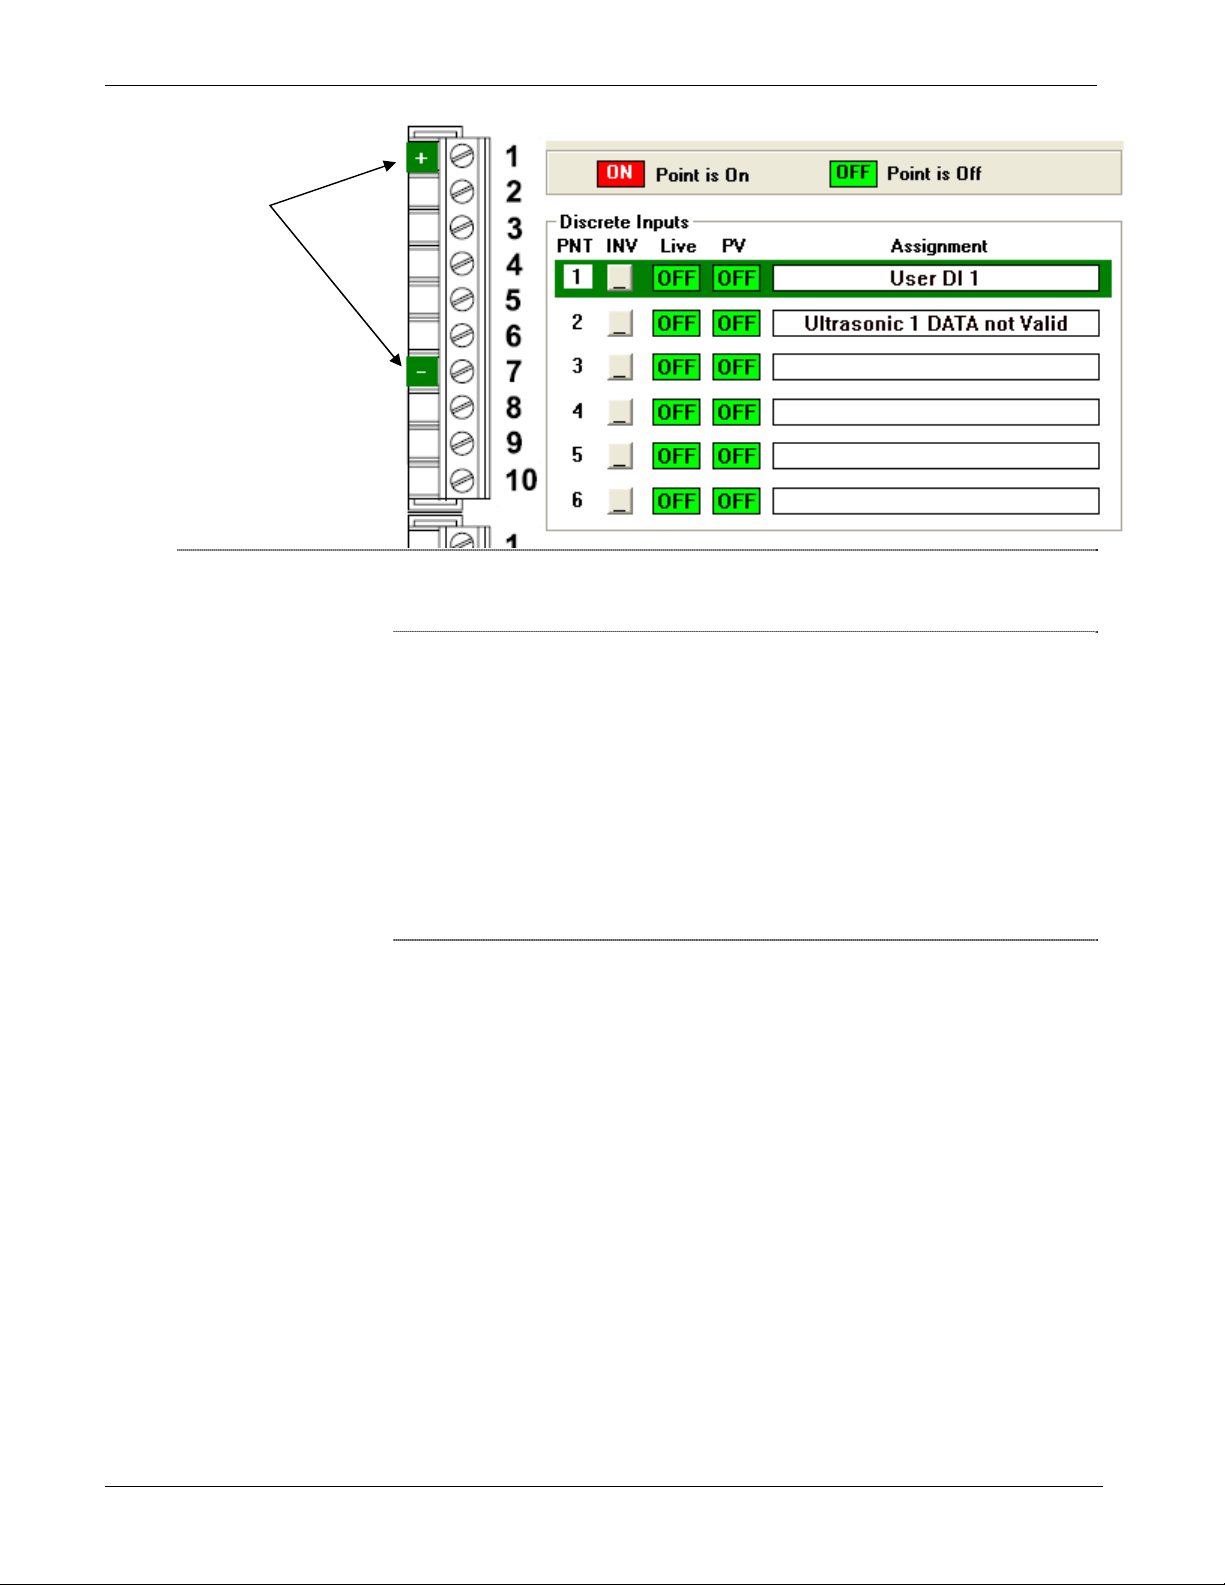
ControlWave MRMS-IC Configuration Manual (D5140)
Graphic displays
location of
physical I/O
connections for
an I/O point,
when you hover
the cursor over
the PNT.
Figure 2-4. Connection Points for Physical I/O
Notes:
The MRMS-IC application only uses Mixed I/O modules.
Depending upon your particular configuration, you might not use all
the inputs or outputs in a particular meter run or station.
If you have I/O that comes from an ultrasonic flow meter or a multi-
variable transmitter that communicates with the MRMS-IC through
a communication port, instead of an I/O module, you configure it
from the UFM or Transducer pages, discussed later in this chapter.
To return to the I/O Usage page from any page underneath it, click
the Go Back link.
2-4 Configuring Inputs and Outputs (I/O Tab) Issued: May-2012
Page 19

2.2.1 Discrete Inputs (DI)
Discrete inputs (DIs) include the following fields:
Field Description
PNT
INV If you click this box for a given I/O point so that “Y” is
Live
ControlWave MRMS-IC Configuration Manual (D5140)
This read-only field displays the I/O point number.
displayed, MRMS-IC inverts the real-live field value and
uses the inverted value as the process value. For
example, if the Live value of discrete I/O point 5 is OFF,
and INV is selected for that point, PV is set ON and that’s
what MRMS-IC uses for control and processing.
This read-only field shows the actual ON/OFF status of
this discrete input point.
PV
Assignment
2.2.2 Discrete Outputs (DO)
Discrete outputs (DOs) include the following fields:
Field Description
PNT
Points that are ON show in red.
Points that are OFF show in green.
This read-only field shows the value of the process
variable (PV) used in MRMS-IC. This matches the Live
value unless you invert the input using INV.
Points that are ON show in red.
Points that are OFF show in green.
This read-only field shows details of the fixed I/O
assigned to this point.
This read-only field displays the I/O point number.
PV
Assignment
This read-only field shows the value of the process
variable (PV) MRMS-IC will output to the field device.
This read-only field shows details of the fixed I/O
assigned to this point.
Issued: May-2012 Configuring Inputs and Outputs (I/O Tab) 2-5
Page 20

ControlWave MRMS-IC Configuration Manual (D5140)
A
2.2.3 Analog Inputs (AI)
Analog inputs (AIs) include the following fields:
Field Description
PNT
This read-only field displays the I/O point number.
PV
Zero
Span Enter the value that, when added to the Zero value,
Units
Assignment
Use Stacked DP
Transmitter / Use
Single DP Transmitter
Only button
This read-only field shows the calculated value of the
analog input process variable (PV) based on the
configured Zero and Span.
If the value shows in red, the value is
questionable
connection, a communication problem with the field
device, data timeout or some other problem that could
cause the value to be invalid.
Enter the value that the process variable should read
when the AI field input is 4mA. Press [Enter] to save
your selection.
represents what the process variable should display
when the AI field input is 20m
your selection.
For example, if Zero is 5 and Span is 20, then:
If the AI field input is:
4mA 5
20mA 25
12mA 15
The engineering units for this process variable. Click in
the field and select the proper units from the drop-down
menu. Press [Enter] to save your selection.
This read-only field shows details of the fixed I/O
assigned to this point.
This button toggles I/O assignments based on whether
you use a single DP transmitter, or stacked DP
transmitters.
To use stacked, click the Use Stacked DP Transmitter
and assignments change to stacked; the label on the
button then changes to Use Single DP Transmitter
Only.
To use a single DP transmitter, click the Use Single DP
Transmitter and assignments change to single; the label
on the button then changes to Use Stacked DP
Transmitter.
. This could indicate no
. Press [Enter] to save
PV will be:
2-6 Configuring Inputs and Outputs (I/O Tab) Issued: May-2012
Page 21

2.2.4 Analog Outputs (AO)
Analog outputs (AOs) include the following fields:
Field Description
PNT
ControlWave MRMS-IC Configuration Manual (D5140)
This read-only field displays the I/O point number.
PV
Zero
Span Enter the value that, when added to the Zero value,
Units
Assignment
This read-only field shows the calculated value of the
analog output process variable (PV) based on the
configured Zero and Span. This value will be sent to the
field device.
Enter the value that the process variable should read
when the AO field output is 4mA. Press [Enter] to save
your selection.
represents what the process variable should display
when the AO field output is 20mA. Press [Enter] to save
your selection.
For example, if Zero is 5 and Span is 20, then:
If PV is:
5 4mA
25 20mA
10 8mA
The engineering units for this process variable. Click in
the field and select the proper units from the drop-down
menu. Press [Enter] to save your selection.
This read-only field shows details of the fixed I/O
assigned to this point.
The AO field output is:
Issued: May-2012 Configuring Inputs and Outputs (I/O Tab) 2-7
Page 22

ControlWave MRMS-IC Configuration Manual (D5140)
2.2.5 High Speed Counters (HSC)
High speed counters (HSC) include the following fields:
Field Description
PNT
This read-only field displays the I/O point number. The
number varies depending upon the type of I/O module.
Counts
Time Stamp
Assignment
Use AutoAdjust / Use
Single HSC Input button
This read-only field displays the number of counts since
the last power cycle.
This read-only field displays the timestamp of the last
sample from the HSC module. The timestamp is the
number of milliseconds since boot.
This read-only field shows details of the fixed I/O
assigned to this point.
This button toggles I/O assignments based on whether
you use a single HSC input, or you use Auto Adjust
which requires two HSC inputs.
To use auto adjust, click the Use AutoAdjust and
assignments change to show two HSC inputs; the label
on the button then changes to Use Single HSC Input.
To use a single HSC input, click the Use Single HSC
Input and assignments change to a single HSC; the
label on the button then changes to Use AutoAdjust.
2-8 Configuring Inputs and Outputs (I/O Tab) Issued: May-2012
Page 23

ControlWave MRMS-IC Configuration Manual (D5140)
2.2.6 Ultrasonic Flow Meters (UFM)
If you have one or more ultrasonic flow meters, click the UFMs link on
the top of the I/O Usage page to call up the UFM page.
Figure 2-5. Ultrasonic Flow Meter (UFM) Configuration
Configure the following fields for your ultrasonic flow meter.
Field Description
Enabled/Disabled
Port
Address Enter the address of the UFM here. Press [Enter] to
Type
Issued: May-2012 Configuring Inputs and Outputs (I/O Tab) 2-9
Click this button to enable communication from this UFM
to the MRMS-IC.
Use the dropdown menu to specify the ControlWave
Micro serial communication port which connects to this
UFM. Press [Enter] to save the selection.
save the selection.
Use the drop-down menu to select the type of UFM.
Press [Enter] to save your selection.
Page 24

ControlWave MRMS-IC Configuration Manual (D5140)
2.2.7 Multi-variable Transmitters (Transducers)
If you have one or more multi-variable transmitters, click the
Transducers link on the top of the I/O Usage page to call up the
Transducers page.
The Transducers page shows the first three multi-variable transmitters
(MVTs). If you want to view a different group of three MVTs, click the
button corresponding to the range of MVTs (1-3 or 4-6) on the top of
the screen.
Figure 2-6. Transducers Page (Multi-Variable Transmitters)
Each MVT includes the following fields:
Field Description
Enabled/Disabled
Communication
Protocol
(BSAP/MODBUS)
Port
2-10 Configuring Inputs and Outputs (I/O Tab) Issued: May-2012
Click this button to enable communication from this
MVT to the MRMS-IC.
Click the BSAP/MODBUS button to toggle the method
used to communicate with this MVT between BSAP
protocol and MODBUS protocol.
Use the dropdown menu to specify the ControlWave
Micro serial communication port which connects to this
MVT. Press [Enter] to save the selection.
Page 25

ControlWave MRMS-IC Configuration Manual (D5140)
Address Enter the address of the MVT here. Press [Enter] to
save the selection.
Xmtr Type
Register Set
Comm Stats
% Good
Good Polls
Bad Polls
Reset
Current Status
Tag Name
Serial Number
Time Stamp
DP
SP
Use the drop-down menu to select the type of data
coming from this MVT. Choose either:
: Data from this type:
Type
GP/T gage pressure and temperature
DP/P/T differential pressure, static pressure, and
temperature
T temperature
Press [Enter] to save your selection.
This field applies only to MODBUS communication.
Click either 7xxx or 4xxxx to select the MODBUS
register set used by this MVT.
This read-only field shows the percentage of
successful communication transactions with this MVT.
This read-only field shows the number of good poll
messages in communications with this MVT.
This read-only field shows the number of bad poll
messages in communications with this MVT.
This button resets the communication statistics in the
%Good, Good Polls, and Bad Polls fields.
These read-only fields display the most recent status
messages from this MVT.
This read-only field shows the tag name from this
MVT. (BSAP only)
This read-only field shows the serial number from this
MVT. (MODBUS only)
This read-only field shows the time stamp of the most
recent value received from this MVT.
This read-only field shows the most recent differential
pressure reading from this MVT.
This read-only field shows the most recent static
Issued: May-2012 Configuring Inputs and Outputs (I/O Tab) 2-11
Page 26
ControlWave MRMS-IC Configuration Manual (D5140)
A
FT
Units
Zero
Span
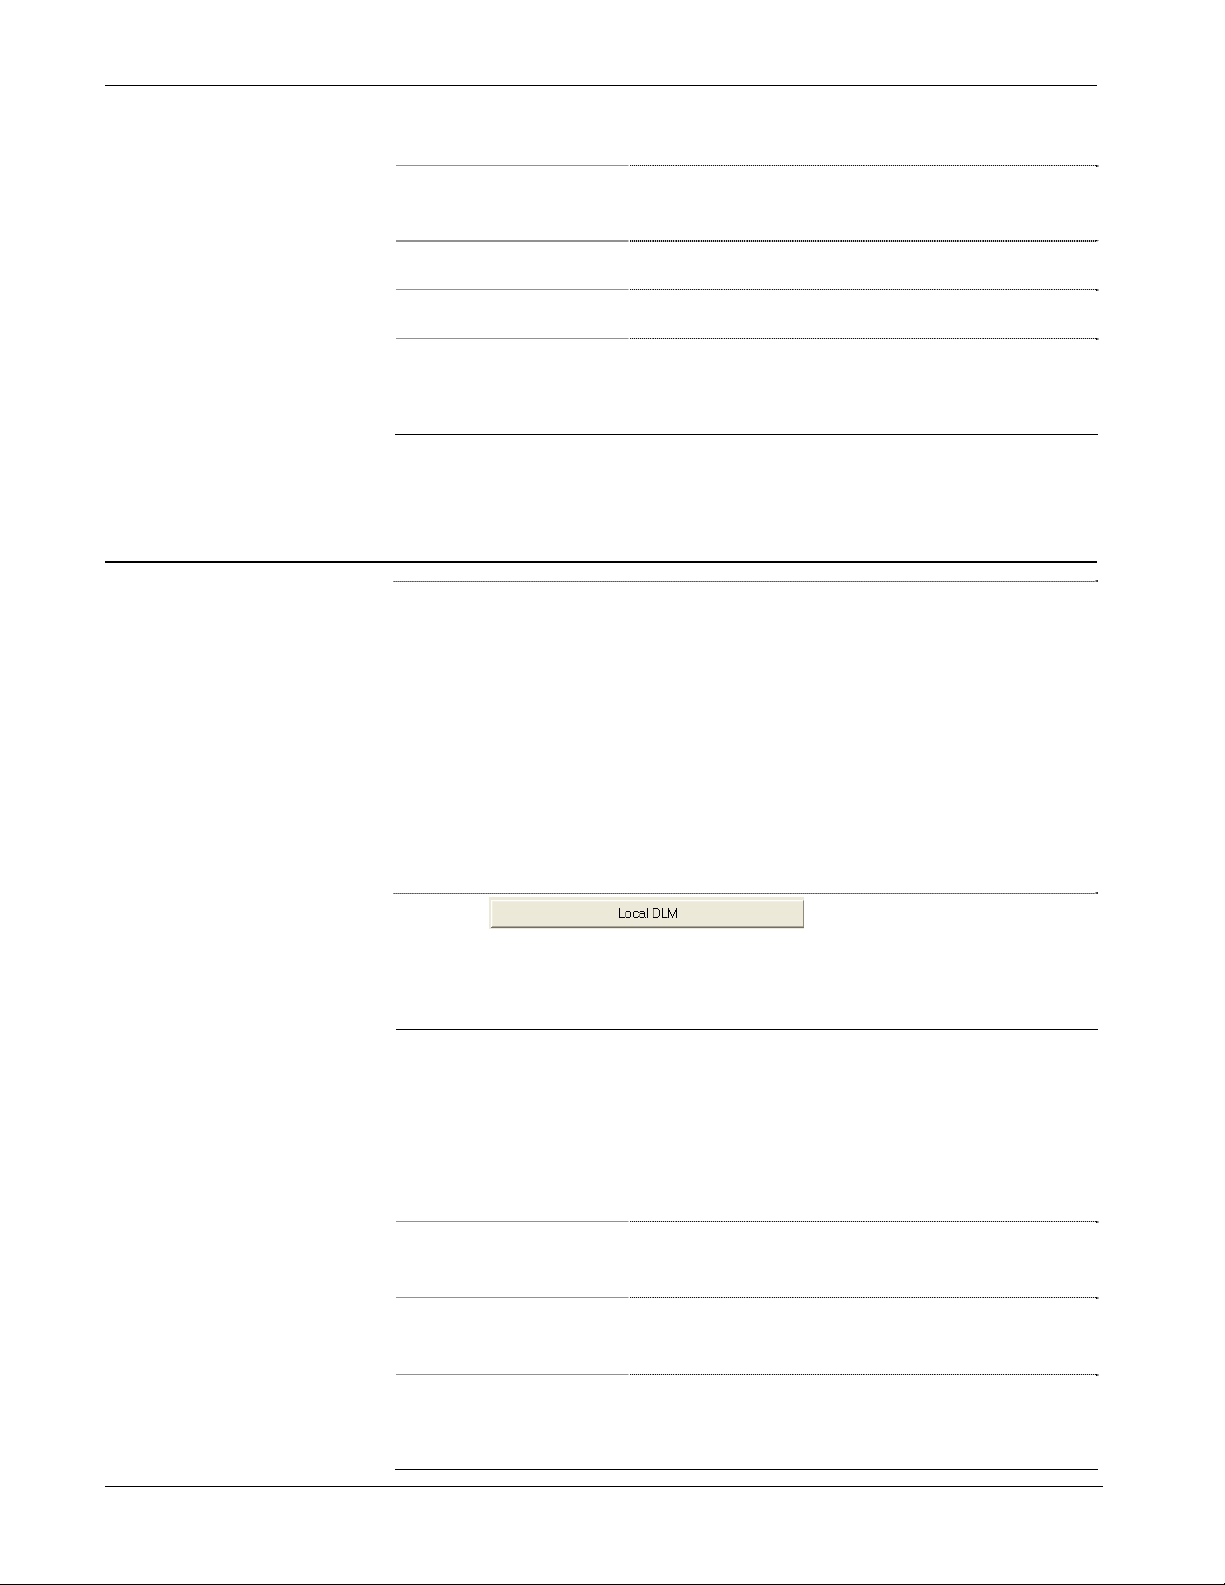
2.3 Local DLM
Notes:
The local Data Line Monitor (DLM) provides details about low-
level communication messages sent through a selected serial port
used by the MRMS-IC.
pressure reading from this MVT.
This read-only field shows the most recent
temperature reading from this MVT.
This read-only field shows the engineering units for this
variable.
This read-only field shows the value for this variable
when the MVT receives a 4mA field input.
This read-only field shows the value that, when added
to the Zero value, represents what the process
variable should display when the field input to the MVT
is 20mA.
Typically, you would only use the local DLM if you are a very
advanced user and need to perform communication troubleshooting
for a particular port.
The local DLM only displays the first 80 characters of a message.
The local DLM only captures messages approximately every half
second, therefore, it can miss some messages.
Click the button on the I/O tab to
activate the Data Line Monitor function. The DLM includes the
following fields:
Field Description
Monitor Port
TX Data
Use the dropdown menu to select the ControlWave
Micro serial communication port you want the DLM to
monitor. Press [Enter] to save the selection.
Note:
the monitor port, you can copy data from the window to
the clipboard. You can then paste this data into
another file for off-line review.
This read-only field shows the most recent message
transmitted through this port.
fter you collect the data, if you select “None” for
RX Data
window The window shows successive messages detected by
2-12 Configuring Inputs and Outputs (I/O Tab) Issued: May-2012
This read-only field shows the most recent message
received through this port.
the DLM. Most recent messages appear at the top;
you can use the scroll bar to adjust the window to
show earlier messages.
Page 27

ControlWave MRMS-IC Configuration Manual (D5140)
Figure 2-7. Local DLM
Issued: May-2012 Configuring Inputs and Outputs (I/O Tab) 2-13
Page 28
ControlWave MRMS-IC Configuration Manual (D5140)
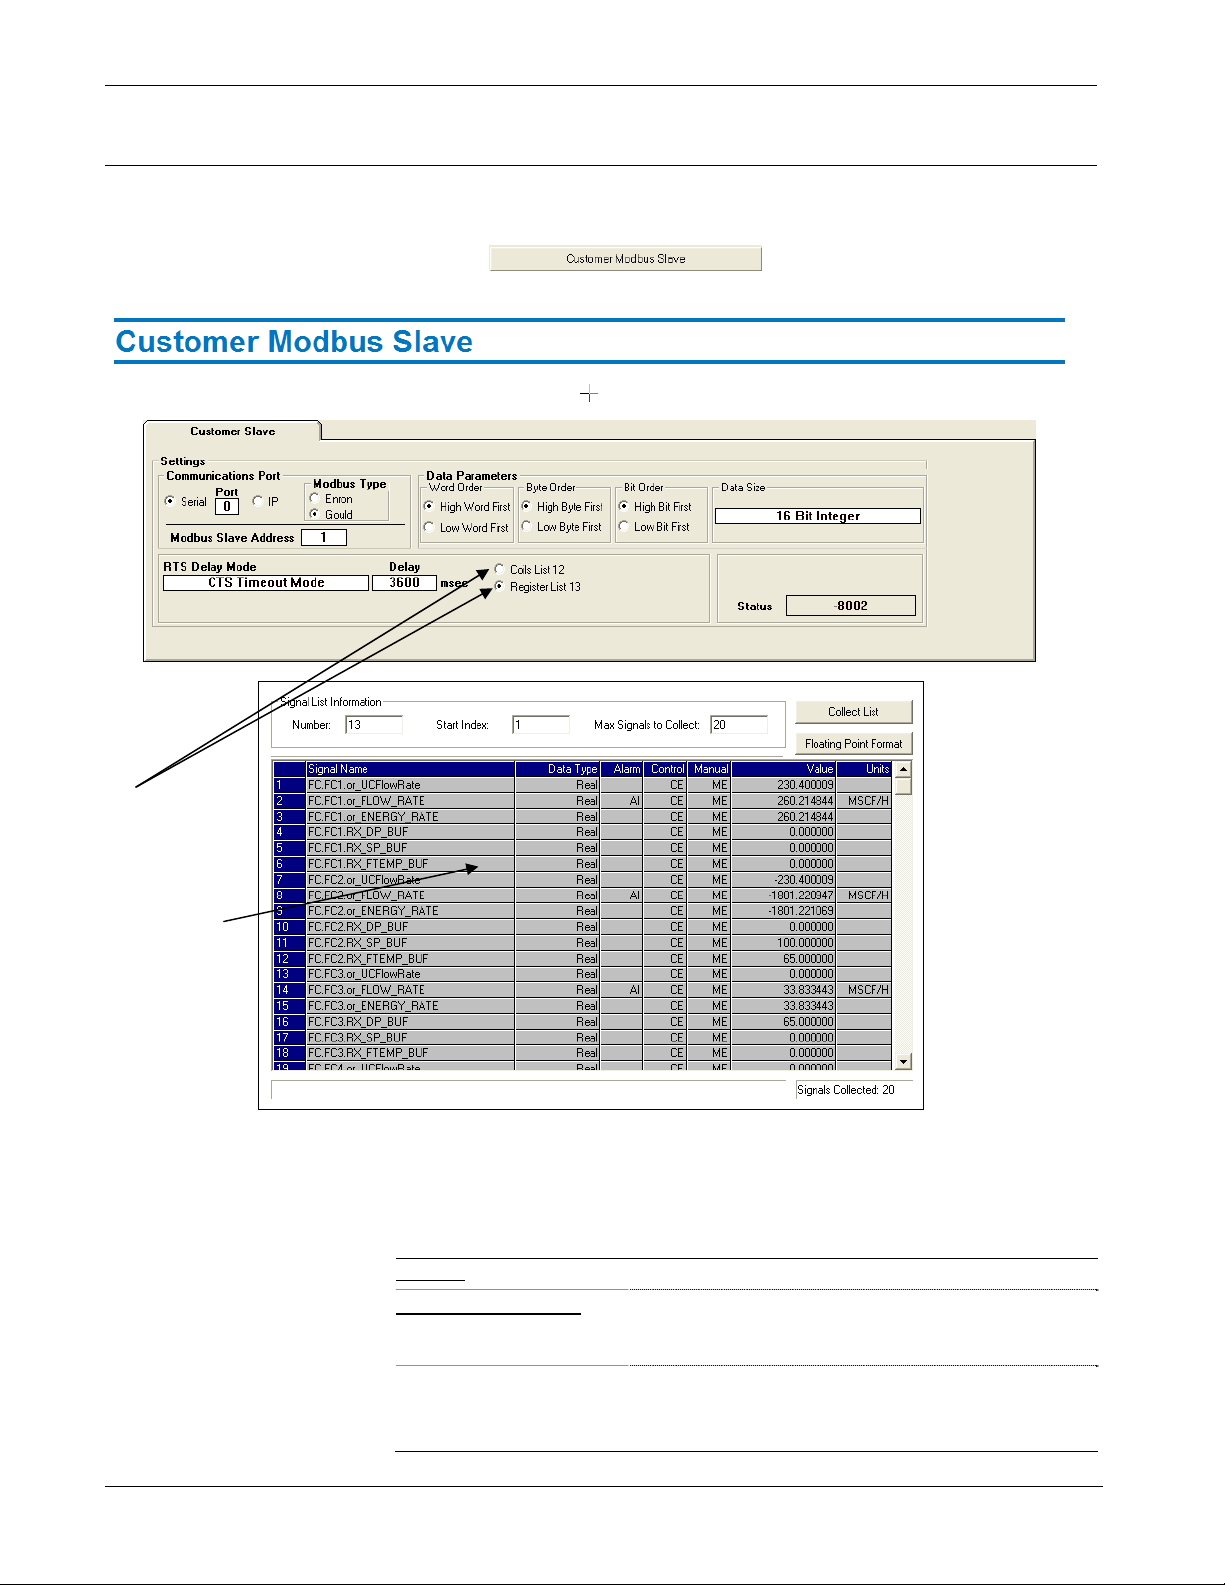
2.4 Customer Modbus Slave
MRMS-IC supports a single Modbus slave session you can configure to
provide a Modbus slave interface to the controller.
Click the button on the I/O tab to bring up
the Customer Modbus Slave page.
You can
view either
coils or
registers in
the Signal
List grid.
Figure 2-8. Customer Slave Page
This page includes the following fields:
Field Description
Settings
Communications Port
Serial Click the Serial selection to use serial Modbus
2-14 Configuring Inputs and Outputs (I/O Tab) Issued: May-2012
Modbus communications can use either serial or IP
communications.
communication, and specify the port you want to
use. (See Port).
Page 29

ControlWave MRMS-IC Configuration Manual (D5140)
Field Description
Port
IP Click the IP selection to use IP Modbus (Open
Modbus Slave Address
Modbus Type
Specify the serial communication port on the
ControlWave Micro you want to use for Modbus slave
communication. Use the following code:
Enter this
1 COM1
2 COM2
3 COM3
4 COM4
5 COM5
6 COM6
7 COM7
8 COM8
9 COM9
10 COM10
11 COM11
Press [Enter] to save the selection.
Modbus) communication.
Enter the Modbus slave address. If the local slave
address you enter has already been assigned to
either the SCADA Enron Modbus slave interface, or
any of the other Customer Modbus Slave sessions,
you will see a Loc Addr Conflict message. Modify
the Modbus Slave Address as required to resolve
the conflict.
: To select this serial CW Micro port:
Enron If you want to communicate using Enron Modbus,
click this selection.
Gould If you want to communicate using Gould Modbus,
click this selection.
Data Parameters
Word Order Choose the data word order to match the data word
order used by the Modbus Master that
communicates with this Modbus Slave.
High Word First
Low Word First
Byte Order Choose the data byte order to match the data byte
Issued: May-2012 Configuring Inputs and Outputs (I/O Tab) 2-15
Click this to specify that the high word is first.
Click this to specify that the low word is first.
Page 30

ControlWave MRMS-IC Configuration Manual (D5140)
Field Description
High Byte First
order used by the Modbus Master that
communicates with this Modbus Slave.
Click this to specify that the high byte is first.
Low Byte First
Bit Order Choose the data bit order to match the data bit order
High Bit First
Low Bit First
Data Size
Click this to specify that the low byte is first.
used by the Modbus Master that communicates with
this Modbus Slave.
Click this to specify that the high bit is first.
Click this to specify that the low bit is first.
Select the appropriate data format for Modbus
Register data from the drop down menu. The
available selections are:
Single Bit – Each Register will include a single bit
Byte Data – Each Register will include a single byte
16 Bit Integer – Each Register will include a single
16-bit integer
32 Bit Int., 1 Reg., Cnt*1, Adr*1 – Each Register
will include a 32-bit double integer.
32 Bit Float, 1 Reg., Cnt*1, Adr*1 – Each Register
will include a 32-bit floating point number
32 Bit Int., 2 Reg., Cnt*2, Adr*2 – Two registers will
be used for each 32-bit double integer. The
MODBUS Master must poll two registers for each 32
bit integer.
32 Bit Float, 2 Reg., Cnt*2, Adr*2 – Two registers
will be used for each 32-bit floating point number.
The MODBUS Master must poll two registers for
each 32 bit number.
32 Bit Int., 2 Reg., Cnt*2, Adr*1 - Two registers will
be used for each 32-bit double integer. The
MODBUS Master must poll a single register for each
32 bit integer.
32 Bit Float, 2 Reg., Cnt*2, Adr*1 - Two registers
will be used for each 32-bit floating point number.
The MODBUS Master must poll a single register for
each 32 bit number.
Press [Enter] to save the selection.
If you don’t make a selection, the field shows Not Set.
2-16 Configuring Inputs and Outputs (I/O Tab) Issued: May-2012
Page 31

ControlWave MRMS-IC Configuration Manual (D5140)
A
Field Description
RTS Delay Mode
Select from one of two modes for the Ready-to-Send
(RTS) delay mode.
Message Delay Mode raises RTS, a delay timer starts. The length of the
delay is determined by the value in the Delay Time
field. No message is sent until after this delay
expires. The value of CTS does not affect the
operation of this mode.
CTS Timeout Mode - After the Modbus slave port
raises RTS, it uses the Delay Time value as the
maximum time to wait for CTS to be received from
the master. If the Modbus slave port receives CTS at
any time before this time expires, the port starts to
transmit the message. If the Modbus slave port does
not receive a CTS from the master prior to the
expiration of the Delay Time, it does not respond to
the master and instead reports an error.
Press [Enter] to save the selection.
Delay msec Specify the Delay (in milliseconds) used by the RTS
Delay Mode and CTS Timeout Mode.
Coils List 12
Each Modbus slave session has two dedicated lists,
one for Modbus Registers and the other for Modbus
Coils. To display coils in the signal list grid, click this
button. See Section 2.4.1 for instructions on using
the signal list grid.
fter the Modbus Slave port
Register List 13
Status
2.4.1 Signal List Grid
The Signal List grid displays lists of variables included in the MRMSIC application.
Each Modbus slave session has two dedicated lists,
one for Modbus Registers and the other for Modbus
Coils. To display registers in the signal list grid, click
this button. See Section 2.4.1 for instructions on
using the signal list grid.
This read-only field displays a status code indicating
the health of the Modbus slave communications.
If you see any code other than 0 here or see an error
message above the code, see Appendix E – Errors
and Troubleshooting for more information.
Issued: May-2012 Configuring Inputs and Outputs (I/O Tab) 2-17
Page 32

ControlWave MRMS-IC Configuration Manual (D5140)
Figure 2-9. Signal List Grid Control
Field Description
Signal List Information
The list window shows the contents of lists within the
application.
Number
Max Signals to Collect
Start Index
Collect List
Floating Point Format
Signal Name
Data Type
Alarm
Specifies the number of the list. In some cases,
pushing a button elsewhere on the page fills in this
number; in other cases, you must enter a list number
directly.
Specifies the number of list items to retrieve into the
grid control. Depending upon how many list items
are collected, you may need to use a scroll bar to
view them.
Normally, the signal list grid displays variables
beginning with the first variable in the list. If you want
to skip further into the list, enter the number of the
first list item you want to see in this field, and the grid
starts displaying from that item forward.
Click this button to force the Signal List grid to collect
the specified list now.
Click this to specify the Floating Point Format dialog
box. See Figure 2-10
Shows the variable name for this list item, or its
descriptor.
Shows the variable type, such as Real or Boolean.
If this variable is an alarm, and this shows “AI” it
indicates the variable is alarm inhibited. If this shows
“AE” it indicates that the variable is alarm enabled.
Control
2-18 Configuring Inputs and Outputs (I/O Tab) Issued: May-2012
If this shows “CI” it indicates the variable is control
inhibited. If this shows “CE” it indicates that the
variable is control enabled.
Page 33

ControlWave MRMS-IC Configuration Manual (D5140)
Field Description
Manual
If this shows “MI” it indicates the variable is manual
inhibited. If this shows “ME” it indicates that the
variable is manual enabled.
Value
Units
Signals Collected
Shows the current value of the variable.
Shows the engineering units (if specified) for this
variable.
Displays a count of the number of variables collected
into the signal list grid.
2.4.2 Floating Point Format
The floating point format is the way floating point (real) numbers
display within a screen in the MRMS-IC application.
To change this format, you click the button on a
page, to call up the Float Format dialog box.
Figure 2-10. Floating Point Format dialog box
Field Description
Width
Precision
Exponent
OK
Cancel
Choose the total number of characters in the field
(including the decimal point) used to display a
floating point number.
Choose the number of places to the right of the
decimal point which the floating point number should
show.
Select one of these formats:
e show number in exponential notation
f show number in floating point notation
g allow application to choose the “best fit” format
for this number.
Click this to save your entries and exit the dialog
box.
Click this to discard your entries and exit the dialog
Issued: May-2012 Configuring Inputs and Outputs (I/O Tab) 2-19
Page 34

ControlWave MRMS-IC Configuration Manual (D5140)
Field Description
2.5 Generic Modbus Master
Click the button on the I/O tab to
activate the Generic Modbus page. There are multiple pages for Modbus
Master 1 (MB1) to Modbus Master 5 (MB5). You click on a tab to call
up the appropriate Modbus Master.
box.
Figure 2-11. Generic Modbus Master
This page includes the following fields:
Field Description
Settings
Communications Port
Modbus communications can use either serial or IP
communications.
2-20 Configuring Inputs and Outputs (I/O Tab) Issued: May-2012
Page 35

ControlWave MRMS-IC Configuration Manual (D5140)
Field Description
Serial Click the Serial selection to use serial Modbus
communication, and specify the port you want to
use. (See Port).
Port
IP Click the IP selection to use IP Modbus (Open
Specify the serial communication port on the
ControlWave Micro you want to use for Modbus
master communication. Use the following code:
Enter this
1 COM1
2 COM2
3 COM3
4 COM4
5 COM5
6 COM6
7 COM7
8 COM8
9 COM9
10 COM10
11 COM11
Press [Enter] to save the selection.
Modbus) communication.
: To select this serial CW Micro port:
IP Address
Modbus Slave Address
Data Parameters
Word Order Choose the data word order to match the data word
High Word First
Low Word First
Byte Order Choose the data byte order to match the data byte
If you want to use IP Modbus (Open Modbus), enter
the IP address of the port used by this master.
Enter the Modbus slave address. If the local slave
address you enter has already been assigned to
either the SCADA Enron Modbus slave interface, or
any of the other Customer Modbus Slave sessions,
you will see a Loc Addr Conflict message. Modify
the Modbus Slave Address as required to resolve
the conflict.
order used by the Modbus Slave that communicates
with this Modbus Master.
Click this to specify that the high word is first.
Click this to specify that the low word is first.
order used by the Modbus Slave that communicates
with this Modbus Master.
Issued: May-2012 Configuring Inputs and Outputs (I/O Tab) 2-21
Page 36

ControlWave MRMS-IC Configuration Manual (D5140)
Field Description
High Byte First
Click this to specify that the high byte is first.
Low Byte First
Bit Order Choose the data bit order to match the data bit order
High Bit First
Low Bit First
Data Size
Click this to specify that the low byte is first.
used by the Modbus Slave that communicates with
this Modbus Master.
Click this to specify that the high bit is first in a byte
of data..
Click this to specify that the low bit is first in a byte of
data.
Select the appropriate data format for Modbus
Register data from the drop down menu. The
available selections are:
Single Bit – Each Register will include a single bit
Byte Data – Each Register will include a single byte
16 Bit Integer – Each Register will include a single
16-bit integer
32 Bit Int., 1 Reg., Cnt*1, Adr*1 – Each Register
will include a 32-bit double integer.
Function Code
32 Bit Float, 1 Reg., Cnt*1, Adr*1 – Each Register
will include a 32-bit floating point number
32 Bit Int., 2 Reg., Cnt*2, Adr*2 – Two registers will
be used for each 32-bit double integer. The
MODBUS Master must poll two registers for each 32
bit integer.
32 Bit Float, 2 Reg., Cnt*2, Adr*2 – Two registers
will be used for each 32-bit floating point number.
The MODBUS Master must poll two registers for
each 32 bit number.
32 Bit Int., 2 Reg., Cnt*2, Adr*1 - Two registers will
be used for each 32-bit double integer. The
MODBUS Master must poll a single register for each
32 bit integer.
32 Bit Float, 2 Reg., Cnt*2, Adr*1 - Two registers
will be used for each 32-bit floating point number.
The MODBUS Master must poll a single register for
each 32 bit number.
Press [Enter] to save the selection.
If you don’t make a selection, the field shows Not Set.
Select the Modbus function from the drop-down menu.
2-22 Configuring Inputs and Outputs (I/O Tab) Issued: May-2012
Page 37

ControlWave MRMS-IC Configuration Manual (D5140)
Field Description
Press [Enter] to save the selection.
RTS Delay Mode
Delay msec Specify the Delay (in milliseconds) used by the RTS
Time Out msec
Select from one of two modes for the Ready-to-Send
(RTS) delay mode.
Message Delay Mode - After the Modbus Master
port raises RTS, a delay timer starts. The length of
the delay is determined by the value in the Delay
field. No message is sent until after this delay
expires. The value of CTS does not affect the
operation of this mode.
CTS Timeout Mode - After the Modbus Master port
raises RTS, it uses the Delay value as the maximum
time to wait for CTS to be received from the slave. If
the Modbus Master port receives CTS at any time
before this time expires, the port starts to transmit
the message. If the Modbus master port does not
receive a CTS from the slave prior to the expiration
of the Delay it does not respond to the slave and
instead reports an error.
Press [Enter] to save the selection.
Delay Mode and CTS Timeout Mode. Press [Enter]
to save the selection.
Specify the time (in milliseconds) that the Modbus
master must wait for a response from the Modbus
slave before the master declares that the slave timed
out. Press [Enter] to save the selection.
Collection Rate msec
Start Register
Issued: May-2012 Configuring Inputs and Outputs (I/O Tab) 2-23
Specify the interval (in milliseconds) between poll
attempts by the Modbus master. Press [Enter] to
save the selection.
Specify the starting address for coil or register
operations. The address transmitted to the Slave is
one less than the value specified here. For example,
the address 7031 is sent as 7030 for Function code
Page 38

ControlWave MRMS-IC Configuration Manual (D5140)
Field Description
3. Press [Enter] to save the selection.
Register Count
Disabled/Enabled If this shows Disabled, click on it to enable the
Status
List Number
Specify the number of coils or registers the Master
should read. The value can range from 1 to 2000 for
coils or 1 to 125 for 16-bit registers, or 1 to 62 for 32bit registers. Press [Enter] to save the selection.
Modbus Master.
This read-only field displays a status code indicating
the health of the Modbus master communications.
If you see any code other than 0 here or see an error
message above the code, see Appendix E – Errors
and Troubleshooting for more information.
Shows the number of the list you can open in
DataView to see the collected Modbus data.
2-24 Configuring Inputs and Outputs (I/O Tab) Issued: May-2012
Page 39

2.6 Load/Save Configuration
The Load/Save Configuration feature provides a way to save and restore
MRMS-IC configuration data. It uses the Data Array Save/Restore
utility and the recipe utility to accomplish the read/write operations.
Click the button on the I/O
tab to activate the Load/Save Configuration page.
ControlWave MRMS-IC Configuration Manual (D5140)
Figure 2-12. Load/Save Configuration
Issued: May-2012 Configuring Inputs and Outputs (I/O Tab) 2-25
Page 40

ControlWave MRMS-IC Configuration Manual (D5140)
2.6.1 Performing I/O Array Operations.
1. Enter a valid username/password combination for the controller
that has full privileges in the RTU User Name and RTU
Password fields.
Figure 2-13. Array Read / Write
2. To read values from the I/O array in the controller and store
those values in a PC disk file, click Save I/O Configuration to
Disk.
3. The Data Array Save/Restore utility starts.
Note: Allow the Data Array/Save Restore utility to run by itself; you
need not enter any values unless it generates an error.
2-26 Configuring Inputs and Outputs (I/O Tab) Issued: May-2012
Page 41
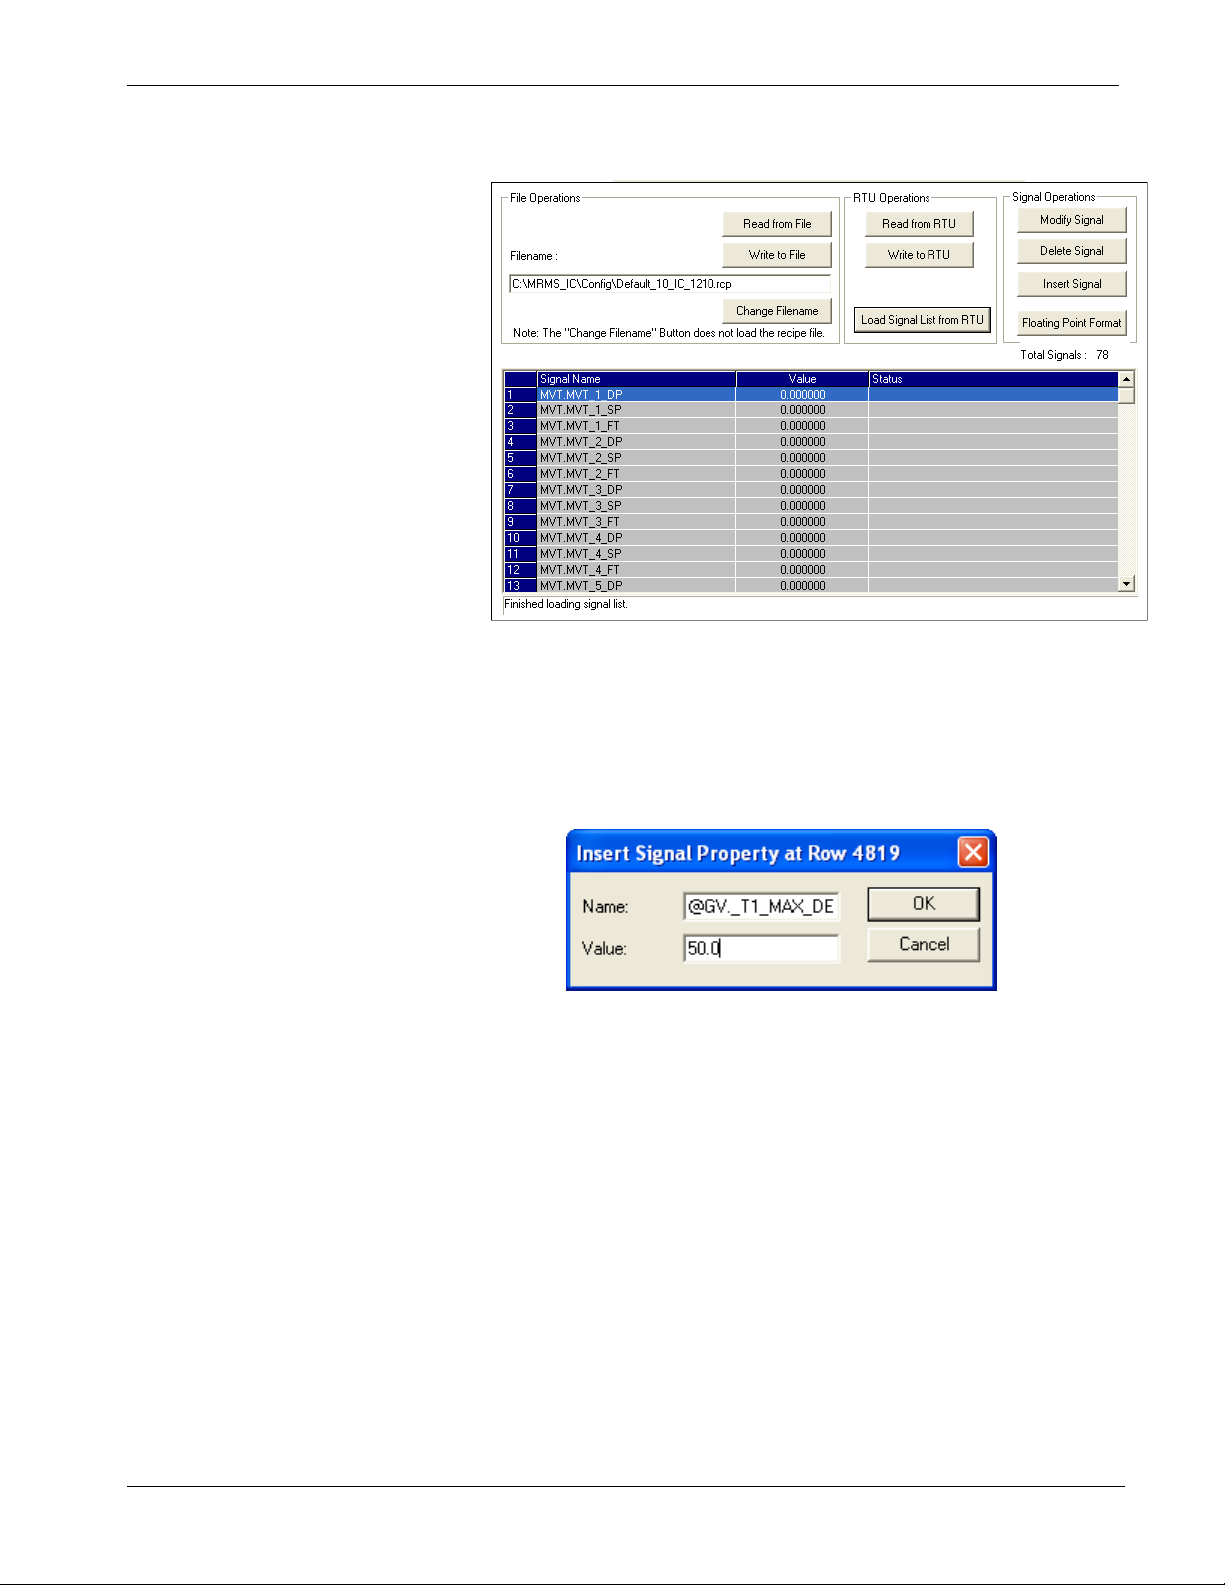
2.6.2 Creating a Recipe
ControlWave MRMS-IC Configuration Manual (D5140)
Figure 2-14. Recipe
To create a recipe you must first specify the variables you want included
in the recipe. One way to do this is to either right-click on the grid in the
center of the Recipe page and choose "Insert Signal" from the pop-up
menu, or click the Insert Signal button.
Figure 2-15. Insert Signal Property dialog box
In either case, a dialog box opens and you can enter the variable's name.
If desired, you can also enter a value for the variable. Click OK when
you are finished. Repeat for each additional variable.
If you don't enter values for the variable when you insert it you can load
the current values in the MRMS-IC for all variables in the recipe by
clicking on Read From RTU.
Issued: May-2012 Configuring Inputs and Outputs (I/O Tab) 2-27
Page 42

ControlWave MRMS-IC Configuration Manual (D5140)
Another way to specify variables for the recipe is to load the variables
from the list. To do this, click the Load Signal List from RTU button,
then specify the number of the signal list and click OK.
Figure 2-16. Signal List to Load
If, as you are creating the recipe, you decide you want to change a
variable or value for a particular entry, either right click on the entry
and choose "Edit Signal" from the pop-up menu, or click the Modify
Signal button. Make changes, as desired, and click OK.
If you want to delete a variable in the recipe, either right-click on the
line for that variable and choose "Delete Signal" from the pop-up
menu, or click the Delete Signal button. You will be prompted to
confirm the deletion.
For information on changing the floating point format of values in the
recipe, see Section 2.4.2.
2.6.3 Saving the Recipe
Type the path and filename for your recipe file in the "Filename" field
or click Change Filename to select a recipe from the default recipe
area. Standard recipe files are stored with a file extension of (.RCP).
You also have the option of saving the file as a .CFG file (which is
intended for use with Coastal Flow Measurement Inc. Flow-Cal™
software.)
Figure 2-17. Edit Signal Property
2-28 Configuring Inputs and Outputs (I/O Tab) Issued: May-2012
Page 43

ControlWave MRMS-IC Configuration Manual (D5140)
Figure 2-18. Saving the Recipe
Once you have specified the path and filename, click on the Write to
File button; answer Yes to the confirmation prompt, and the control
writes the recipe to the specified file.
2.6.4 Recalling a Saved Recipe, and Sending Its Values to the
Controller
To recall a recipe which you have saved previously, use the Change
Filename button to locate it, or type its path and filename in directly in
the "Filename" field. Finally, click the Read From File button, and the
recipe will be brought into the web page.
Once the recipe file has been loaded, you can send the recipe values to
the controller by clicking on the Write to RTU button; answer Yes to
the confirmation prompt, and the control writes the recipe to the
controller
2.7 Time Set/Daylight Saving Time
Click the button on the I/O tab to
open the Time Set/Daylight Saving Time page.
Issued: May-2012 Configuring Inputs and Outputs (I/O Tab) 2-29
Page 44

ControlWave MRMS-IC Configuration Manual (D5140)
Figure 2-19. Time Set/Daylight Saving Time page
Field Description
Current RTU Date and
Time
Current PC Date and
Time
Clear Registers Click this button to set all six time registers (Year,
Load Registers with the
RTUs Date/Time
Load Registers with the
PCs Date/Time
Year
Month
Day
This read-only field shows the current date and time
setting at the controller.
This read-only field shows the current date and time
at the PC workstation.
Month, Day, Hour, Minutes and Seconds) to zero.
Click this button to store the controller time in the six
time registers.
Click this button to store the PC workstation time in the
six time registers.
This time register holds a year value. You can set it
by typing in a value, or you can load it by one of the
buttons.
This time register holds a month value. You can set
it by typing in a value, or you can load it by one of
the buttons.
This time register holds a day value. You can set it
by typing in a value, or you can load it by one of the
buttons.
2-30 Configuring Inputs and Outputs (I/O Tab) Issued: May-2012
Page 45

ControlWave MRMS-IC Configuration Manual (D5140)
Field Description
Hour
Minutes
Seconds
Set RTU Date/Time with
Register Values
This time register holds an hour value. You can set it
by typing in a value, or you can load it by one of the
buttons.
This time register holds a minute value. You can set
it by typing in a value, or you can load it by one of
the buttons.
This time register holds a seconds value. You can
set it by typing in a value, or you can load it by one
of the buttons.
Click this button to update the controller’s date and
time with the values currently in the time registers.
Issued: May-2012 Configuring Inputs and Outputs (I/O Tab) 2-31
Page 46

This page is intentionally left blank
Page 47

ControlWave MRMS-IC Configuration Manual (D5140)
Chapter 3 – Configuring Stations and Runs (Measurement
Tab)
Note: Although you can view data through an IP connection, the MRMS-
IC application only allows configuration changes when you
establish a physical serial connection to serial communication port
1 on the ControlWave Micro.
This chapter discusses configuring the stations and meter runs for the
MRMS-IC application as well as all the measurement functions for the
various meter runs. This is accomplished from the MRMS-IC
Measurement tab.
In This Chapter
3.1 Measurement Tab ........................................................................................................ 3-2
3.2 Status/Configuration ..................................................................................................... 3-3
3.2.1 Site Configuration Data Tab (Site Configuration) ..................................... 3-4
3.2.2 MVT Common Settings Tab (Site Configuration) ..................................... 3-7
3.2.3 Station Summaries Tab (Site Configuration) ............................................ 3-8
3.2.4 Station Configuration Tab (Station Configuration).................................. 3-10
3.2.5 Station Data Tab (Station Configuration) ............................................... 3-15
3.2.6 Run Config Tab (Run Configuration) ...................................................... 3-16
3.2.7 Alarm Configuration Tab (Run Configuration) ........................................ 3-21
3.2.8 Linearization Config Tab (Run Configuration) ........................................ 3-23
3.2.9 PV/GQ Averages Tab (Run Configuration) ............................................ 3-24
3.2.10 Orifice Tab (Run Configuration).............................................................. 3-25
3.2.11 Turbine Tab (Run Configuration) ............................................................ 3-29
3.2.12 Auto-Adjust Tab (Run Configuration) ..................................................... 3-32
3.2.13 Ultrasonic Tab (Run Configuration) ........................................................ 3-34
3.2.14 PD Tab (Run Configuration) ................................................................... 3-37
3.3 View Local Archives ................................................................................................... 3-39
3.3.1 Selecting Logs to View ........................................................................... 3-39
3.4 Collect Local Logs ...................................................................................................... 3-40
3.4.1 Selecting Archives for Collection ............................................................ 3-40
3.4.2 Collecting a Single Archive ..................................................................... 3-40
3.4.3 Collecting Multiple Archives .................................................................... 3-40
3.4.4 Log Collection Parameters ..................................................................... 3-40
3.5 View Audit Log ........................................................................................................... 3-43
3.5.1 Data Storage Parameters dialog box ..................................................... 3-44
3.5.2 Search Data Collection Criteria dialog box ............................................. 3-45
3.6 Maintenance Mode ..................................................................................................... 3-46
3.6.1 Site Tab .................................................................................................. 3-46
3.6.2 Station Tab ............................................................................................. 3-49
3.6.3 Run Tab .................................................................................................. 3-51
3.6.4 PVs Tab .................................................................................................. 3-53
3.6.5 AI Maintenance Tab................................................................................ 3-54
3.7 Gas Chromatograph Configuration ............................................................................ 3-56
3.7.1 General ................................................................................................... 3-56
3.7.2 Current Tab (Gas Chromatograph Configuration) .................................. 3-61
3.7.3 Component Tab (Gas Chromatograph Configuration) ........................... 3-65
3.7.4 Delta Limit Tab (Gas Chromatograph Configuration) ............................. 3-67
3.7.5 Normalization Tab (Gas Chromatograph Configuration) ........................ 3-68
Issued: May-2012 Configuring Stations and Runs (Measurement Tab) 3-1
Page 48

ControlWave MRMS-IC Configuration Manual (D5140)
3.7.6 Custom Tab (Gas Chromatograph Configuration) ................................. 3-69
3.8 Summary Pages ......................................................................................................... 3-70
3.8.1 Measurement Tab................................................................................... 3-70
3.8.2 Alarm Tab ............................................................................................... 3-71
3.9 Limits Page (Gas Composition Allowable Ranges) ................................................... 3-72
3.10 Daily Run Corrected and Uncorrected Volume .......................................................... 3-73
3.1 Measurement Tab
Click the Measurement tab to display the measurement options you can
configure. We’ll discuss each of these in the sections that follow.
Figure 3-1. Measurement Tab in MRMS-IC
Click on the
button to
configure or view
a particular
function
3-2 Configuring Stations and Runs (Measurement Tab) Issued: May-2012
Page 49

3.2 Status/Configuration
When you click the button on the
Measurement tab, MRMS-IC opens up a tree structure that shows the site
and lists the stations and meter runs.
ControlWave MRMS-IC Configuration Manual (D5140)
Calling up pages for
configuring the site,
station, or meter run
Double-click on items in the tree to bring up configuration pages for
the site, station, or meter run.
Click on the site name to call
up pages for
site. If no site name exists
yet, click on “Unnamed
Site.”
Click on the “Station n”
name to call up pages for
configuring the station.
Click on the “Run n” name
to call up pages for
configuring the meter run.
configuring the
Figure 3-2. Selecting the Site, Stations, and Runs
Issued: May-2012 Configuring Stations and Runs (Measurement Tab) 3-3
Page 50

ControlWave MRMS-IC Configuration Manual (D5140)
3.2.1 Site Configuration Data Tab (Site Configuration)
The Site Configuration Data tab shows basic information about the site.
Figure 3-3. Site Configuration data tab
Field Description
Site Name
Software
Program Name
Revision
PLC Firmware These fields refer to the ControlWave internal system
The site refers to the geographical location or an
organizational name associated with this MRMS-IC
controller. You might name the site after the RTU
node name or a place. Enter a name and press the
[Enter] key to save your entry.
This read-only field shows the name of the MRMS-IC
software installed on the RTU.
This read-only field shows the revision of the MRMSIC software running on the RTU.
The revision is in the format V.v Rnn
Where:
V is the major version number
v is the minor version number
Rnn is the revision build number, if this is
a revision release of the software.
firmware that controls operation the ControlWave
Micro.
3-4 Configuring Stations and Runs (Measurement Tab) Issued: May-2012
Page 51

ControlWave MRMS-IC Configuration Manual (D5140)
r
r
Major
Minor
OBSI Version Reserved for future use.
Load Versions The load version fields let you compare the revisions of
RAM: Name
RAM: Date
BOOTFILE: Name
BOOTFILE: Date
Status This read-only field shows Match if the name and date
PLC Time This read-only field shows the current date and time
This read-only field shows the major revision numbe
of the system firmware running in the ControlWave
Micro.
This read-only field shows the minor revision numbe
of the system firmware running in the ControlWave
Micro.
the ControlWave project stored in flash (ControlWave
bootproject) and the revision of the ControlWave
project currently executing in SDRAM.
This read-only field shows the name of the
ControlWave project executing in the ControlWave
Micro’s SDRAM.
This read-only field shows the date and time stamps of
the ControlWave project executing in the ControlWave
Micro’s SDRAM. Dates use the format mm/dd/yyyy
where mm is the two-digit month (01 to 12), dd is the
two-digit day (01 to 31), and yyyy is the four-digit year.
Timestamps are in the format hh:mm:ss where hh is
the 2-digit hour (0 to 23), mm is the 2-digit minute (0 to
59) and ss is the two-digit second (0 to 59).
This read-only field shows the name of the
ControlWave bootproject stored in FLASH at the
ControlWave Micro.
This read-only field shows the date and time stamps of
the ControlWave bootproject stored in FLASH at the
ControlWave Micro. Dates use the format mm/dd/yyyy
where mm is the two-digit month (01 to 12), dd is the
two-digit day (01 to 31), and yyyy is the four-digit year.
Timestamps are in the format hh:mm:ss where hh is
the 2-digit hour (0 to 23), mm is the 2-digit minute (0 to
59) and ss is the two-digit second (0 to 59).
of the ControlWave project executing in SDRAM is
identical to that for the bootproject stored in FLASH.
If this field shows Mismatch this indicates that the
ControlWave project executing in SDRAM is not the
same as the bootproject.
This is an error condition because if the unit restarts for
any reason, the bootproject overwrites the project
executing in SDRAM on restart and you will lose the
SDRAM project.
stamps of the ControlWave Micro’s real time clock.
Dates use the format mm/dd/yyyy where mm is the
two-digit month (01 to 12), dd is the two-digit day (01 to
31), and yyyy is the four-digit year. Timestamps are in
the format hh:mm:ss where hh is the 2-digit hour (0 to
23), mm is the 2-digit minute (0 to 59) and ss is the
two-digit second (0 to 59).
Issued: May-2012 Configuring Stations and Runs (Measurement Tab) 3-5
Page 52

ControlWave MRMS-IC Configuration Manual (D5140)
PLC Identification This read-only field identifies boot PROM firmware
Power These fields show information about power status at
installed in the ControlWave Micro. To use the
MRMS-IC application, your boot PROM firmware
must have the prefix CWM.
the ControlWave Micro.
DC
Detected I/O These fields show the types of I/O modules detected
Slot n
Total Points These fields show the total number of different types of
AIs
AOs
DIs
DOs
HSCs
RTDs
TCs
This read-only field shows the DC voltage level at
the ControlWave Micro’s power supply sequencer
module (PSSM).
by the MRMS-IC as being installed in the ControlWave
Micro.
This read-only field shows details of the installed I/O
module that the MRMS-IC detects in this ControlWave
Micro slot. The slot number from 1 to 14 refers to slots
in the base and expansion housings.
I/O points from all the I/O modules detected by the
MRMS-IC application.
This read-only field shows the total number of analog
inputs residing across all I/O modules detected by the
MRMS-IC application.
This read-only field shows the total number of analog
outputs residing across all I/O modules detected by the
MRMS-IC application.
This read-only field shows the total number of discrete
inputs residing across all I/O modules detected by the
MRMS-IC application. Note: This count includes all
possible DIs, including a DI/DO point configured as a
DO.
This read-only field shows the total number of discrete
outputs residing across all I/O modules detected by the
MRMS-IC application. Note: This count includes all
possible DOs, including a DI/DO point configured as a
DI.
This read-only field shows the total number of high
speed counter inputs residing across all I/O modules
detected by the MRMS-IC application.
This read-only field shows the total number of
resistance temperature device inputs residing across
all I/O modules detected by the MRMS-IC application.
This read-only field shows the total number of
thermocouple inputs residing across all I/O modules
detected by the MRMS-IC application.
3-6 Configuring Stations and Runs (Measurement Tab) Issued: May-2012
Page 53

ControlWave MRMS-IC Configuration Manual (D5140)
3.2.2 MVT Common Settings Tab (Site Configuration)
This page configures details for the multivariable transmitter/transducer
(MVT).
Figure 3-4. MVT Common Settings tab
Field Description
Collect Process
Variable (PV) Data
every msecs
Collect Diagnostic Data
every msecs
Indicate
Communications
Failure when No
Response after
msecs
Maximum Monitor
Count
Enter how often (in milliseconds) the ControlWave
Micro should collect process variable (PV) data. For
natural gas measurement in custody transfer
applications, the API requires updates no less
frequent than 1.0 seconds (1,000 milliseconds). The
ControlWave Micro can communicate with up to
eight (8) MVTs per second using a single RS-485
port at 19,200 baud. Press the [Enter] key to save
your entry.
Enter how often to collect diagnostic data from the
MVT (in milliseconds). You should not set the
interval of this collection to be very short, because it
may interfere with the higher priority PV data
collection. Press the [Enter] key to save your entry.
Enter the period (in milliseconds) that the MRMS-IC
application waits before declaring that a loss in
communications to the MVT constitutes a
communications timeout.
Enter the maximum number of polls that the MRMS-IC
application uses to count good/bad polls and
determine the %good.
Issued: May-2012 Configuring Stations and Runs (Measurement Tab) 3-7
Page 54

ControlWave MRMS-IC Configuration Manual (D5140)
3.2.3 Station Summaries Tab (Site Configuration)
Figure 3-5. Station Summaries tab
Note: Fields appear grayed out if the station is not configured.
Field Description
Station n Identifies one of the six stations.
Flow Rate Fwd
Flow Rate Rev
Energy Rate Fwd
This read-only field shows the instantaneous flow
rate at this station. If this station supports bidirectional flow, this is the instantaneous forward
flow rate when flow is in the forward direction (odd)
or is the instantaneous reverse flow rate (even).
This read-only field shows the instantaneous reverse
flow rate from the corresponding bi-directional even
numbered station when flow is in the reverse
direction. (Odd stations only.)
This read-only field shows the instantaneous energy
rate at this station. If this station supports bidirectional flow, this is the instantaneous forward
energy rate when flow is in the forward direction
(odd) or is the instantaneous reverse energy rate
(even).
Energy Rate Rev
Today’s Volume Fwd
3-8 Configuring Stations and Runs (Measurement Tab) Issued: May-2012
This read-only field shows the instantaneous reverse
energy rate from the corresponding bi-directional even
numbered station when flow is in the reverse direction.
(Odd stations only.)
This read-only field shows today’s accumulated flow
total (volume). If this station supports bi-directional
flow, this is the accumulated forward flow total when
flow is in the forward direction (odd) or is the
Page 55

ControlWave MRMS-IC Configuration Manual (D5140)
accumulated reverse flow total (even).
Today’s Volume Rev
Today’s Energy Fwd
Today’s Energy Rev
This read-only field shows today’s accumulated flow
total from the corresponding bi-directional even
numbered station when flow is in the reverse direction.
(Odd stations only.)
This read-only field shows today’s accumulated energy
total. If this station supports bi-directional flow, this is
the accumulated forward energy total when flow is in
the forward direction (odd) or is the accumulated
reverse energy total (even).
This read-only field shows today’s accumulated energy
total from the corresponding bi-directional even
numbered station when flow is in the reverse direction.
(Odd stations only.)
Issued: May-2012 Configuring Stations and Runs (Measurement Tab) 3-9
Page 56

ControlWave MRMS-IC Configuration Manual (D5140)
3.2.4 Station Configuration Tab (Station Configuration)
MRMS-IC supports up to six individual stations.
Figure 3-6. Station Configuration tab
Field Description
Station Name
Station Common Settings
Atmospheric Pressure
Value, Units
Base Pressure Value,
Units
The station refers to a natural gas measurement
station with one or more associated meter runs. Enter
a name and press the [Enter] key to save your entry.
Enter the standard atmospheric (barometric) pressure
for the station in the Value field and press [Enter] to
save your entry. Then select the desired Units of
measure from the drop-down menu and press [Enter]
to save your selection. The default is 14.7 PSI. Note:
Units are absolute pressure units.
Enter the base pressure that the MRMS-IC
application should use when it performs AGA
calculations in the Value field and press [Enter] to
save your entry. Then select the desired Units of
measure from the drop-down menu and press [Enter]
to save your selection. The default is 14.73 PSI
3-10 Configuring Stations and Runs (Measurement Tab) Issued: May-2012
Page 57

ControlWave MRMS-IC Configuration Manual (D5140)
(absolute).
Base Temperature
Value, Units
Contract Hour
Flowing Units You can select units for corrected flow (Flow),
Flow Rate Units
Enter the base temperature that the MRMS-IC
application should use when it performs AGA
calculations in the Value field and press [Enter] to
save your entry. Then select the desired Units of
measure from the drop-down menu and press [Enter]
to save your selection. The default is 60 Deg F.
The contract hour determines the start of the gas day.
This is when the current day totals and averages get
rolled over to the previous day totals and averages.
The contract hour is based on a 24 hour clock; 1 PM
is 13, 2 PM is 14, and so on. Midnight is 00. Enter the
desired contract hour and press [Enter] to save your
entry. The default is 9 (9AM).
Uncorrected (UC) Flow, and Energy rates for the
combined station flow and energy rates
independently of the meter run rates.
Select the desired units of measure for the corrected
flow rate from the drop-down menu and press [Enter] to
save your selection.
Flow rate units include:
MSCF/YEAR Thousands of Standard Cubic Feet
per Year
MSCF/DAY
MSCF/HOUR Thousands of Standard Cubic Feet
MSCF/MIN
MSCF/SEC
E3M3/YEAR Thousands of Standard Cubic Meters
E3M3/DAY
E3M3/HOUR Thousands of Standard Cubic Meters
E3M3/MIN Thousands of Standard Cubic Meters
E3M3/SEC
MMSCF/YEAR Millions of Standard Cubic Feet per
MMSCF/DAY Millions of Standard Cubic Feet per
MMSCF/HOUR Millions of Standard Cubic Feet per
Thousands of Standard Cubic Feet
per Day
per Hour
Thousands of Standard Cubic Feet
per Minute
Thousands of Standard Cubic Feet
per Second
per Year
Thousands of Standard Cubic Meters
per Day
per Hour
per Minute
Thousands of Standard Cubic Meters
per Second
Year
Day
Hour
Issued: May-2012 Configuring Stations and Runs (Measurement Tab) 3-11
Page 58

ControlWave MRMS-IC Configuration Manual (D5140)
MMSCF/MIN Millions of Standard Cubic Feet per
MMSCF/SEC Millions of Standard Cubic Feet per
E6M3/YEAR Millions of Standard Cubic Meters per
E6M3/DAY Millions of Standard Cubic Meters per
E6M3/HOUR Millions of Standard Cubic Meters per
E6M3/MIN
E6M3/SEC
Energy Rate Units
Energy Rate Time
Units
Select the desired units of measure for the energy rate
from the drop-down menu and press [Enter] to save
your selection.
Energy rate units include:
MMBTU Millions of British Thermal Units
MJ Megajoules
KJ Kilojoules
J Joules
ERG Ergs
KCAL Kilocalories
CAL Calories
CHU Centigrade Heat Unit
KWH Kilowatt Hour
QUAD
THERM Therms
TONTNT Tons of TNT
TONCOAL Tons of coal
MMMBTU Billions of British Thermal Units
GJ Gigajoules
Select the desired units of time to associate with the
energy rate units from the drop-down menu and press
[Enter] to save your selection.
Minute
Second
Year
Day
Hour
Millions of Standard Cubic Meters per
Minute
Millions of Standard Cubic Meters per
Second
short scale quadrillion British Thermal
Units
UC Flow Rate Units
3-12 Configuring Stations and Runs (Measurement Tab) Issued: May-2012
Select the desired units of measure for the uncorrected
flow rate from the drop-down menu and press [Enter] to
save your selection.
Uncorrected flow rate units include:
MACF/YEAR Thousands of Actual Cubic Feet per
Year
Page 59

ControlWave MRMS-IC Configuration Manual (D5140)
Gas Chromatograph
MACF/DAY
Thousands of Actual Cubic Feet per
Day
MACF/HOUR Thousands of Actual Cubic Feet per
Hour
MACF/MIN
MACF/SEC
Thousands of Actual Cubic Feet per
Minute
Thousands of Actual Cubic Feet per
Second
E3M3/YEAR Thousands of Cubic Meters per Year
E3M3/DAY Thousands of Cubic Meters per Day
E3M3/HOUR Thousands of Cubic Meters per Hour
E3M3/MIN Thousands of Cubic Meters per
Minute
E3M3/SEC Thousands of Cubic Meters per
Second
MMACF/YEAR Millions of Actual Cubic Feet per Year
MMACF/DAY Millions of Actual Cubic Feet per Day
MMACF/HOUR Millions of Actual Cubic Feet per Hour
MMACF/MIN Millions of Actual Cubic Feet per
Minute
MMACF/SEC Millions of Actual Cubic Feet per
Second
E6M3/YEAR Millions of Cubic Meters per Year
E6M3/DAY Millions of Cubic Meters per Day
E6M3/HOUR Millions of Cubic Meters per Hour
E6M3/MIN Millions of Cubic Meters per Minute
E6M3/SEC
Millions of Cubic Meters per Second
BTU Saturation
Setting
Chromatograph Data
Set
Compressibility Calc
Gross Method
Click the Dry BTU button if you want MRMS-IC to
use the dry BTU value from the gas chromatograph,
or click the Sat. Wet BTU button if you want MRMSIC to use the saturated (wet) BTU value from the gas
chromatograph.
Enter the chromatograph data set you want to use and
press [Enter] to save your entry. Specify 0 if you want
to set this on a per run basis.
Use the drop-down menu to select the calculation you
want MRMS-IC to use for compressibility, and press the
[Enter] key to save your selection.
If you choose AGA8 Gross for your compressibility
calculations select the gross method here from the
drop-down menu, and press the [Enter] key to save
your selection.
Choices include:
SG, CO2, N2 The MRMS-IC application performs
calculations using inputs of relative
density (specific gravity or SG), and
the mole fractions of nitrogen (N2)
Issued: May-2012 Configuring Stations and Runs (Measurement Tab) 3-13
Page 60

ControlWave MRMS-IC Configuration Manual (D5140)
HV, SG, CO2 The MRMS-IC application performs
Note: MRMS-IC ignores the method setting for
calculations other than AGA8 Gross.
Calculations Uses
Averaging
Averaging Method
Upon Flow Failure Use
This setting determines whether the MRMS-IC
application uses “In Use” or “Fixed” gas
chromatograph data if the gas chromatograph (GC)
fails. A GC failure could include a communication
failure, a range problem and so on.
Click the Fixed - Scheduled button to use fixed data
during a GC failure, or the GC button to use in-use
GC data during a GC failure.
Use the drop-down menu to select the averaging
method you want MRMS-IC to use, and press the
[Enter] key to save your selection.
This setting determines whether the MRMS-IC
application uses a flow weighted average, or a
straight average during a no flow condition. Click the
Flow Weighted button to use a flow weighted
average when there is no flow. Click the Straight
Average button to use a straight average when there
is no flow.
and carbon dioxide (CO2).
calculations using inputs of the
heating value (HV), the relative
density (specific gravity or SG), and
the mole fraction of carbon dioxide
(CO2).
3-14 Configuring Stations and Runs (Measurement Tab) Issued: May-2012
Page 61

ControlWave MRMS-IC Configuration Manual (D5140)
3.2.5 Station Data Tab (Station Configuration)
The current station Flow and Energy rates are indicated here. The flow
rate is in units of MSCF per hour and the energy rate is in units of
MMBTU per hour.
Station
Accumulations
Forward / Reverse
The current hour, contract day and contract month, and the previous
hour, contract day and contract month accumulations are displayed
here, in units of MSCF and MMBTU.
When configuring for bidirectional flow, the stations must be paired (1
and 2; 3 and 4; or 5 and 6).
The odd-numbered stations (1, 3, or 5) are the “forward” flowing
stations, and the even-numbered stations (2, 4, or 6) are the “reverse”
flowing stations.
When a pair of stations is configured for bidirectional flow, the Station
Summary screen for the odd-numbered (forward) stations will indicate
flow and energy rates in the “forward” column when flow is in the
“forward” direction, and will indicate flow and energy rates in the
“reverse” column when flow is in the “reverse” direction.
However, the Station Summary screen for the even-numbered (reverse)
stations, will indicate flow and energy rates in the “forward” column
when flow for the combined station is in the “reverse” direction, and
will always indicate no flow or energy rate in the “reverse” column.
Figure 3-7. Station Data tab
Issued: May-2012 Configuring Stations and Runs (Measurement Tab) 3-15
Page 62

ControlWave MRMS-IC Configuration Manual (D5140)
r
3.2.6 Run Configuration Tab
Figure 3-8. Run Configuration tab
Field Description
Run ID
Measurement Type
Chromatograph Data Set
Direction
PVs
Enter a name and press the [Enter] key to save you
entry. The generic Run ID of Run 1 will be replaced
by the user specific Run ID.
Select the measurement type from the drop-down
menu.
The chromatograph stream used for measurement
of this run may be assigned at the Station level, or
at the Run level.
If a chromatograph stream is assigned at the
Station level, the user will be unable to assign the
stream at the run level.
If the chromatograph stream is assigned as 0 at
the Station level, the user will be able to assign the
stream at the run level.
If the run being configured has been assigned to a
station configured as a forward flowing station, this
will be indicated on this screen as “Forward”, and the
PV’s section will be grayed out.
If the run being configured has been assigned to a
station configured as a reverse flowing station, this
will be indicated on this screen as “Reverse.” It will
then be possible to configure the PVs (Process
Variables) section. The user may then select
3-16 Configuring Stations and Runs (Measurement Tab) Issued: May-2012
Page 63

ControlWave MRMS-IC Configuration Manual (D5140)
between Isolated and Non-Isolated PVs.
Isolated PV is used when the forward run and
reverse run each are using different Input
Sources.
Non-Isolated PV is used when the forward run
and reverse run are using the same Input
Sources.
Station Assignment
Static Pressure and
Flowing Temperature
Source
MVT#
To assign the run to a station, click on the Station
Assignment box.
Select a station from the drop down menu, and
press [Enter]. (Note, if the Station ID has been
changed on the Station Configuration screen, the
user defined Station Name will appear in the drop
down menu, instead of the generic Station Name.)
After assigning a run to a station, the run will
appear under the station in the Site Tree.
Every type of measurement requires a static
pressure measurement and a temperature
measurement.
The source for these measurements may come
from either Analog Inputs via the I/O cards
(Hardware AI) or via serial communications to the
Multi-Variable Transmitters (MVT).
The selection of the source is made by clicking on
the button.
If MVT is chosen, the user may select from any of
the 12 MVTs.
Issued: May-2012 Configuring Stations and Runs (Measurement Tab) 3-17
Page 64

ControlWave MRMS-IC Configuration Manual (D5140)
Override/Live
Value
Units
Flowing Units
The user may override the measurement values in
use by selecting Override instead of Live
When Override is selected, the user may enter the
desired value for the measurement to be used.
When Live is selected, the Value will be driven by
the appropriate input value.
Note: the action of changing from Live to Override
or Override to Live is entered in the Audit trail.
When in Override, any changes made to the Value
are entered in the Audit Trail.
Note: These overrides are done at the Run
Measurement level, not at the I/O level. Because
of this, care needs to be taken when overriding
runs configured for bidirectional measurement,
because the logic overriding the measurement
values occurs after the logic for routing the
measurement inputs to the proper run.
The static pressure and flowing temperature
values in use are shown here.
When “Live” is selected via the “Override/Live”
button, this value is the value coming from the
Static Pressure or Flowing Temperature Source.
When “Override” is selected via the “Override/Live”
button, this value may be entered by the user, and
the entered value will be used in the measurement
calculation.
The units for the measurement inputs come from
the input source.
Flow Rate and Energy Rate units may be
assigned on a per run basis.
Flow Rate Units
MSCF/YEAR
MSCF/DAY
MSCF/HOUR
MSCF/MIN
MSCF/SEC
E3M3/YEAR
E3M3/DAY
E3M3/HOUR
E3M3/MIN
E3M3/SEC
MMSCF/YEAR
MMSCF/DAY
MMSCF/HOUR
MMSCF/MIN
MMSCF/SEC
3-18 Configuring Stations and Runs (Measurement Tab) Issued: May-2012
Page 65

ControlWave MRMS-IC Configuration Manual (D5140)
E6M3/YEAR
E6M3/DAY
E6M3/HOUR
E6M3/MIN
E6M3/SEC
where:
MSCF – Thousands of Standard Cubic Feet
MMSCF – Millions of Standard Cubic Feet
E3M3 – Thousands of Cubic Meters
E6M6 – Millions of Cubic Meters
MIN – Minutes
SEC - Seconds
Uncorrected (UC) Flow Rate Units
MACF/YEAR
MACF/DAY
MACF/HOUR
MACF/MIN
MACF/SEC
E3M3/YEAR
E3M3/DAY
E3M3/HOUR
E3M3/MIN
E3M3/SEC
MMACF/YEAR
MMACF/DAY
MMACF/HOUR
MMACF/MIN
MMACF/SEC
E6M3/YEAR
E6M3/DAY
E6M3/HOUR
E6M3/MIN
E6M3/SEC
where:
ACF – Actual Cubic Feet
E3M3 – Thousands of Cubic Meters
E6M3 –Millions of Cubic Meters
Energy Rate Units
MMBTU
MJ
KJ
J
ERG
KCAL
CAL
CHU
KWH
QUAD
THERM
TONTNT
TONCOAL
MMMBTU
GJ
Issued: May-2012 Configuring Stations and Runs (Measurement Tab) 3-19
Page 66

ControlWave MRMS-IC Configuration Manual (D5140)
where:
MMBTU – Millions of British Thermal Units
MJ – Mega joules
KJ – Kilojoules
J – Joules
ERG – Ergs
KCAL – Kilocalories
CAL – Calories
CHU - Celsius-heat unit
KWH – Kilowatt Hours
QUAD - short-scale quadrillion
THERM – Therms
TONTNT – Tons of TNT
TONCOAL – Tons of Coal
MMMBTU – Billions of BTU
GJ – Gigajoules
Energy Rate Time Units:
YEAR
DAY
HOUR
MIN
SEC
3-20 Configuring Stations and Runs (Measurement Tab) Issued: May-2012
Page 67
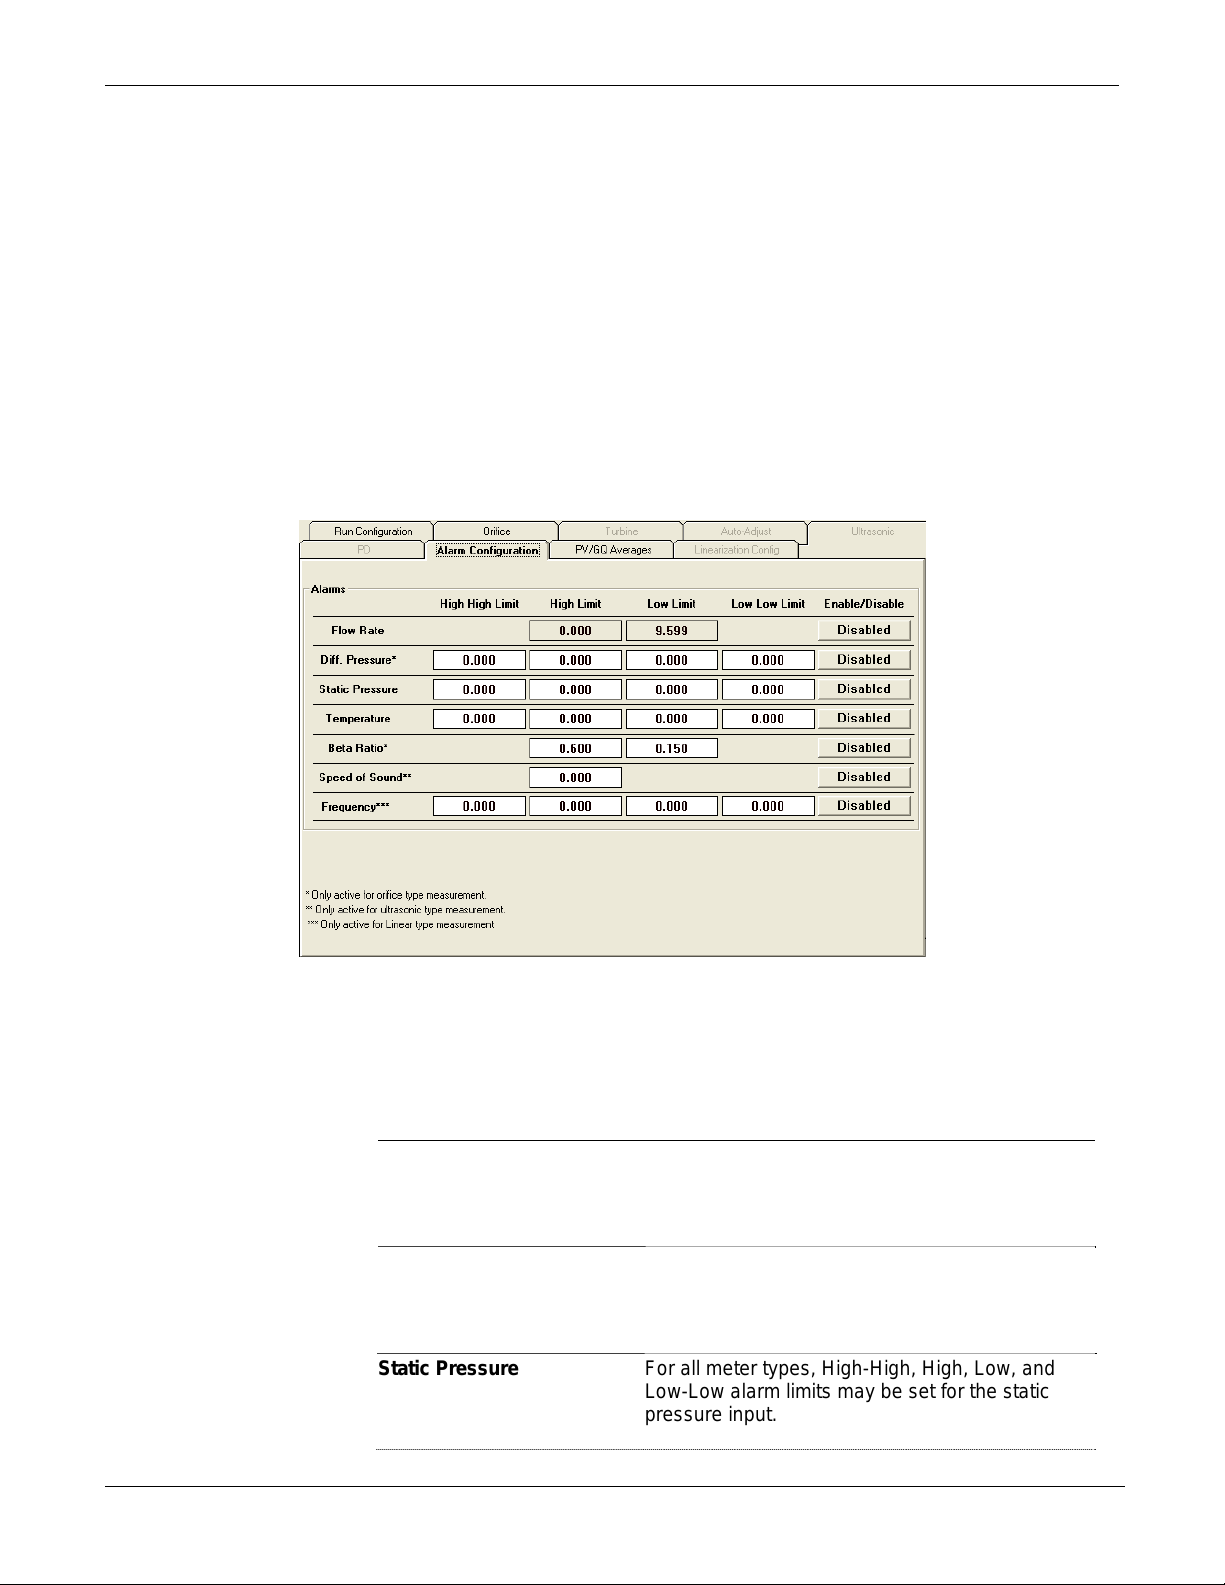
ControlWave MRMS-IC Configuration Manual (D5140)
3.2.7 Alarm Configuration Tab (Run Configuration)
The MRMS-IC program allows for certain items to be configured as
alarms.
When an item is configured as an alarm, then any time the value goes into
or out of the alarm state, an entry will be made in the Audit Trail.
In addition, if the MRMS-IC controller is being used in a BSAP network,
then these alarms will be reported to the SCADA host, if the SCADA host
supports BSAP alarms.
To configure the alarm limits for run specific data, click on the Alarm
Configuration Tab
This screen opens.
Figure 3-9. Alarm Configuration tab
The following items may be configured for alarms.
Field Description
Flow Rate
Diff Pressure
Static Pressure
Issued: May-2012 Configuring Stations and Runs (Measurement Tab) 3-21
The High and Low Limits for the flow rate are
automatically calculated, based on the Maximum
and Minimum flow rates through the meter run.
For an orifice meter only, High-High, High, Low,
and Low-Low alarm limits may be set for the
differential pressure input.
For all meter types, High-High, High, Low, and
Low-Low alarm limits may be set for the static
pressure input.
Page 68

ControlWave MRMS-IC Configuration Manual (D5140)
Temperature
Beta Ratio
Speed of Sound
Frequency
Enabled/Disabled
For all meter types, High-High, High, Low, and
Low-Low alarm limits may be set for the flowing
temperature input.
For an orifice meter only, High and Low alarm limits
may be set for the calculated beta ratio.
For an ultrasonic meter only, the High alarm limit
for the deviation between the speed of sound as
calculated using AGA 10 and the speed of sound
reported from the ultrasonic meter may be
configured.
For linear meter types (ultrasonic, turbine,
AutoAdjust, and positive displacement (PD)
meters, High-High, High, Low, and Low-Low alarm
limits may be set for the frequency input.
An alarm may be Enabled or Disabled via the
Enable/Disable button. By default, the alarms are
disabled. When an alarm is disabled, no entries
are made into the Audit Trail if the value goes in to
or out of alarm.
3-22 Configuring Stations and Runs (Measurement Tab) Issued: May-2012
Page 69

ControlWave MRMS-IC Configuration Manual (D5140)
3.2.8 Linearization Config Tab (Run Configuration)
The MRMS-IC program allows for the linearization of the frequency
outputs of turbine meters.
To configure the linearization table, click on the Linearization Config Tab
This screen opens.
Figure 3-10. Linearization Config tab
This linearization table must be configured by the user. Click the Push to
Edit Values button to makes your entries. For up to 12 points, the user
must enter an uncorrected flow rate in units of Actual Cubic Feet per hour,
and an associated correction factor (C factor). The MRMS-IC program
will interpolate between any two points on this table to calculate the C
Factor for a specific flow rate. When you finish making your entries, click
the Push to Confirm and Lock Values button.
Caution
If the user does not configure all 12 points, then the last non-zero entry
for ACF/H will be used as the last correction factor. Any uncorrected
flow rate above this point will use the correction factor for this point,
there will be no interpolation performed.
Issued: May-2012 Configuring Stations and Runs (Measurement Tab) 3-23
Page 70

ControlWave MRMS-IC Configuration Manual (D5140)
3.2.9 PV/GQ Averages Tab (Run Configuration)
The MRMS-IC program calculates and displays averages for the process
values used for measurement, and the gas quality data used by the
measurement for each run.
To view the averages for the process variables and gas quality data, click
on the PV/GQ Averages Tab. This screen will appear.
Figure 3-11. PV/GQ Averages tab
The averaging method for the differential pressure is always flowdependent time-weighted linear averaging.
The averaging method for the static pressure and flowing temperature may
be any of the API averaging methods.
The averaging method for the gas quality data is always time-weighted
linear averaging.
3-24 Configuring Stations and Runs (Measurement Tab) Issued: May-2012
Page 71

ControlWave MRMS-IC Configuration Manual (D5140)
3.2.10 Orifice Tab (Run Configuration)
To configure a run as an orifice meter, click on the Measurement Type on
the Run Configuration tab and select Orifice from the drop down menu,
then press Enter.
Click on the Orifice tab, and the following screen opens.
Figure 3-12. Orifice tab
Field Description
Settings
Orifice Diameter
Pipe Diameter
Issued: May-2012 Configuring Stations and Runs (Measurement Tab) 3-25
The Orifice Diameter in use is displayed in the
“Settings” section of this screen. To change the
orifice diameter, see the “Plate Change” section.
The pipe diameter change may be made by clicking
on the box with the pipe diameter value in it and
entering the desired pipe diameter value. When the
new value of the pipe diameter is entered, a new
beta ratio will be calculated and displayed in the
“Plate Change” section.
Page 72

ControlWave MRMS-IC Configuration Manual (D5140)
Low Flow Cutoff
Pressure Tap Location
Differential Pressure
Source
MVT#
The low flow cutoff is the minimum value for
differential pressure where measurement will be
performed. If the differential pressure drops below
this value, the measured flow goes to zero.
The user may change the low flow cutoff value by
clicking on the box with the low flow cutoff value and
entering a new value, and clicking OK.
The user may change the units that the low flow
cutoff value is measured, by clicking on the units
box, and selecting the desired units from the drop
down menu.
The user may change the pressure tap location by
clicking on Pressure Tap Location button.
The source for the Differential Pressure
measurement may come from either Analog Inputs
via the I/O cards (Hardware AI) or via serial
communications to the Multi-Variable Transmitters
(MVT).
The selection of the source is made via the
Hardware AI/MVT button on the screen:
If MVT is chosen, the user may select from any of 12
MVTs.
Default AI / Stacked DP
Override / Live
3-26 Configuring Stations and Runs (Measurement Tab) Issued: May-2012
The user may select from either the default AI (as
specified in the Run x Differential Pressure field on
the I/O configuration page) or a pair of stacked
transmitters (Stacked DP x Lo/Hi selections the on
I/O configuration page).
The user may override the measurement values in
use by selecting Override instead of Live
When Override is selected, the user may enter the
desired value for the measurement to be used.
When Live is selected, the Value will be driven by
the appropriate input value.
Note: the action of changing from Live to Override or
Page 73

ControlWave MRMS-IC Configuration Manual (D5140)
Override to Live is entered in the Audit trail. When in
Override, any changes made to the Value are
entered in the Audit Trail.
Note: This override is done at the Run Measurement
level, not at the I/O level. Because of this, care
needs to be taken when overriding runs configured
for bidirectional measurement, because the logic
overriding the measurement values occurs after the
logic for routing the measurement inputs to the
proper run.
Value
Units
Stacked Transmitters
Set Point
Dead Band
Current Rate
Plate Change To change the orifice diameter, the user must
The differential pressure value in use is shown here.
When “Live” is selected via the “Override/Live”
button, this value is the value coming from the
Differential Pressure Source.
When “Override” is selected via the “Override/Live”
button, this value may be entered by the user, and
the entered value will be used in the measurement
calculation.
The units for the measurement inputs come from the
input source.
Stacked Transmitters operate such that one
transmitter measures at a low range of
measurement, and a second transmitter measures
at a higher range. These selections are not available
if you choose “Default AI.”
When using Stacked Transmitters, the user must
enter a set point where the measurement will
transition from the low range transmitter to the high
range transmitter.
A deadband may be entered, that will prevent the
measurement from switching back and forth between
the high and low transmitters.
The current flow and energy rates are displayed on
this screen. The units of flow and energy rates are
set from the Run Configuration page.
change the Plate Change mode from Normal
(Inactive) to Plate Change (Active)
While the Plate Change mode is Active, the
Differential Pressure, Static Pressure and
Temperature values are frozen.
Elapsed Time
Issued: May-2012 Configuring Stations and Runs (Measurement Tab) 3-27
While the Plate Change mode is Active, the elapsed
time is displayed.
Page 74

ControlWave MRMS-IC Configuration Manual (D5140)
New Orifice Diameter
The new orifice diameter and orifice diameter units
may be entered here.
Beta Ratio
Min/Max Rates for this
Run
The orifice diameter in use does not change until the
plate change mode changes from “Plate Change
(Active)” to “Normal (Inactive)”.
The Orifice Diameter in use appears in the Settings
section
The beta ratio is the orifice diameter divided by the
pipe diameter.
The beta ratio is displayed on this screen. If the beta
ratio is out of range, it will appear in red text. The low
limit for the beta ratio is 0.15 and the high limit for
the beta ratio is 0.60.
The minimum and maximum flow rates for an orifice
run are calculated outputs of the AGA3I. The DP
minimum is always 10 inches and the DP maximum
is equal to the DP span
3-28 Configuring Stations and Runs (Measurement Tab) Issued: May-2012
Page 75
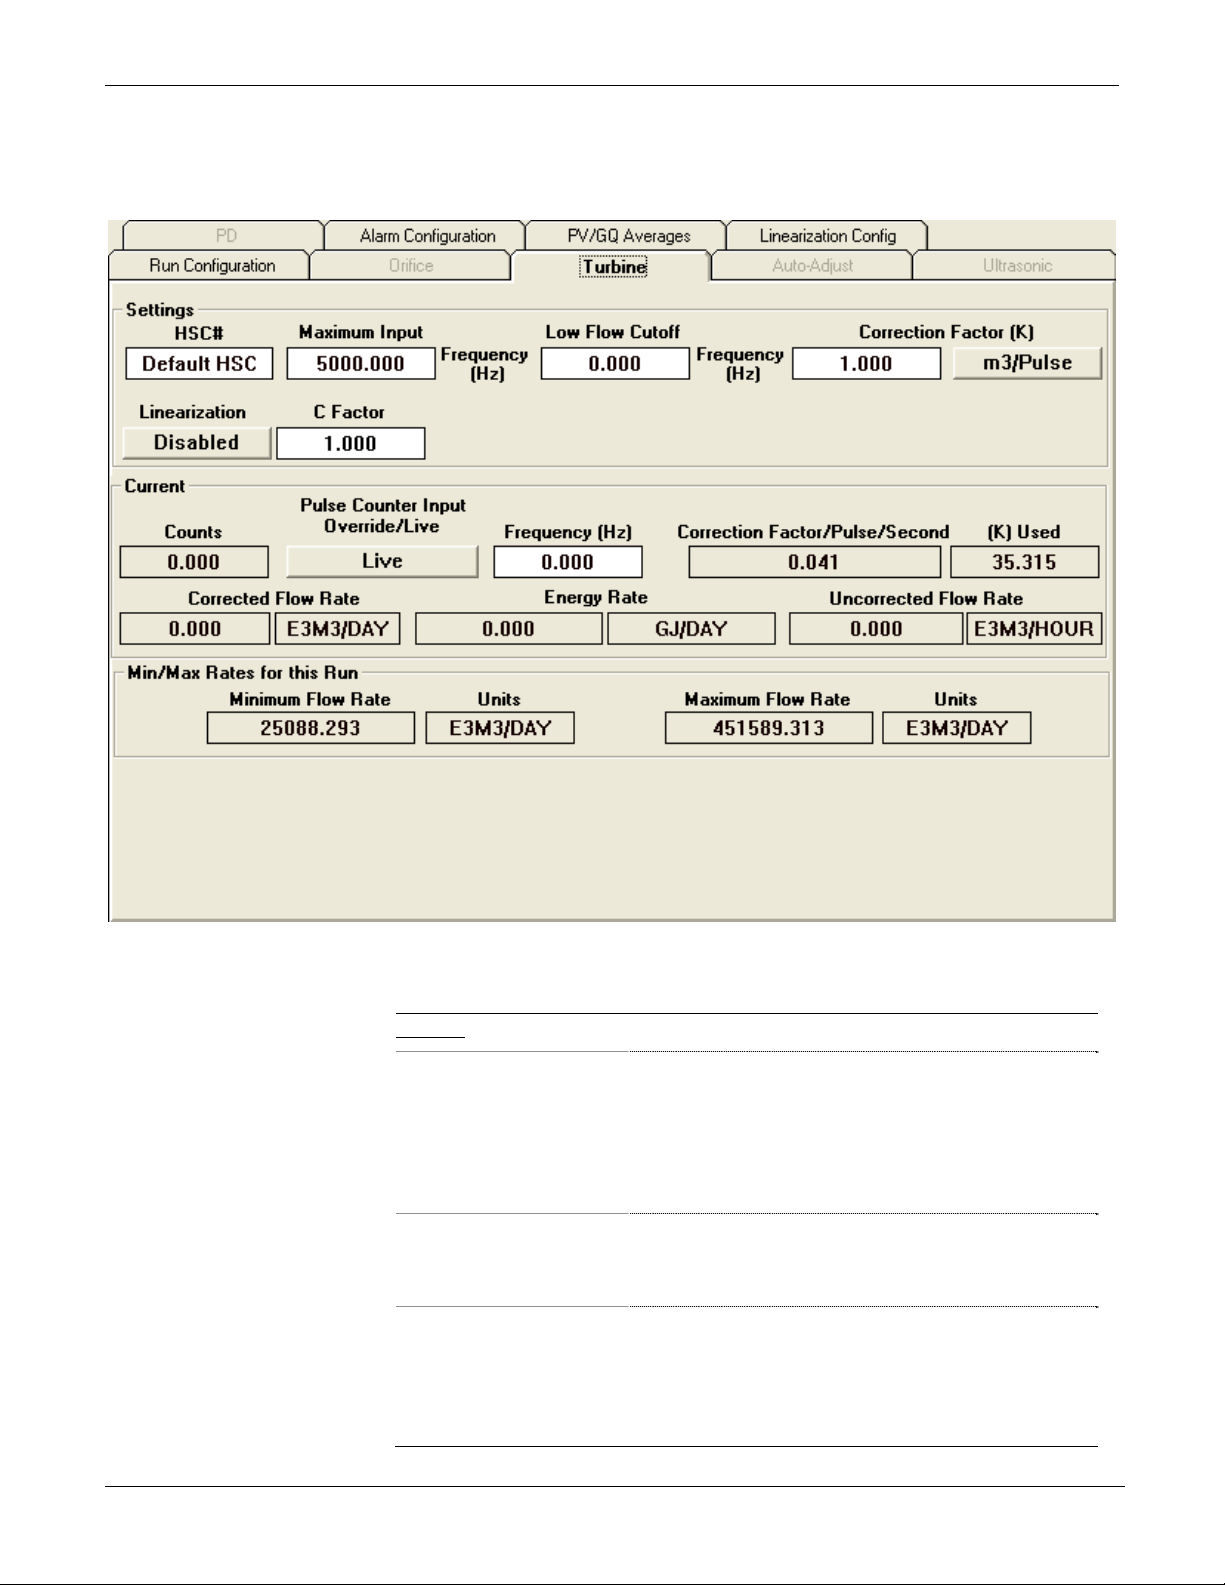
ControlWave MRMS-IC Configuration Manual (D5140)
3.2.11 Turbine Tab (Run Configuration)
Click on the Turbine tab, and the following screen opens.
Figure 3-13. Turbine tab
Field Description
Settings
HSC#
Maximum Input
Low Flow Cutoff
The source for the High Speed Counter (HSC)
comes from a High Speed Counter Input via the I/O
cards. The user may select from the Default HSC
(this would be the “Run X AGA7 Hz” selection from
the I/O configuration page), or from a Shared Hz
input.
The maximum input is used to calculate the
minimum and maximum flow rates through the meter
run.
The low flow cutoff is the minimum frequency that
will still be considered valid for flow measurement. If
the frequency of the inputs from the high speed
counter fall below this number, volume will not be
measured.
Issued: May-2012 Configuring Stations and Runs (Measurement Tab) 3-29
Page 76

ControlWave MRMS-IC Configuration Manual (D5140)
Correction Factor (K)
Linearization Enabled /
Disabled
C Factor
Current
Counts
Pulse Counter Input
Override / Input
Frequency (Hz)
Correction Factor /
Pulse/ Second
The correction factor represents either the volume
(in Cubic Feet) per pulse, or the number of pulses
per volume (in Cubic Feet).
The K factor value is entered as shown in the box
below, while the K factor units are selected by using
the pushbutton. This information is available from
the turbine meter data plate.
Enables/disables use of the linearization table.
The current linearization factor being used.
The “Counts” value represents the total number of
events (pulses) in the most recent execution cycle
coming from the High Speed Counter Input.
The user may override the measurement values in
use by selecting Override instead of Live
When Override is selected, the user may enter the
desired value for the frequency to be used.
When Live is selected, the Value will be driven by
the appropriate high speed counter input value.
Note: The action of changing from Live to Override
or Override to Live is entered in the Audit trail. When
in Override, any changes made to the Value are
entered in the Audit Trail.
Note: This override is done at the Run Measurement
level, not at the I/O level. Because of this, care
needs to be taken when overriding runs configured
for bidirectional measurement, because the logic
overriding the measurement values occurs after the
logic for routing the measurement inputs to the
proper run.
The frequency value in use is shown here.
When “Live” is selected via the “Override/Live”
button, this value is the value coming from the HSC
input.
When “Override” is selected via the “Override/Live”
button, this value may be entered by the user. The
entered value will be used in the measurement
calculation.
This is the correction factor calculated by the AGA 7
equation.
This correction factor multiplied by the frequency will
3-30 Configuring Stations and Runs (Measurement Tab) Issued: May-2012
Page 77

ControlWave MRMS-IC Configuration Manual (D5140)
provide the corrected flow rate.
(K) Used
Corrected Flow Rate,
Energy Rate,
Uncorrected Flow Rate
Min / Max Rates for this
Run
The AGA 7 calculation requires the K factor to be
input in units of Cubic Feet/Pulse. The (K) Used
value always represents the K factor in the units of
Cubic Feet/Pulse.
The current corrected flow, energy rate, and
uncorrected flow rate are displayed on this screen.
The units of flow and energy rates are set from the
Run Configuration page.
The minimum and maximum flow rates for a turbine
meter run are calculated as follows:
Minimum Flow Rate = max frequency * AGA7 Factor
* (Min /100)
Maximum Flow Rate = max frequency * AGA7
Factor * (Max/100)
Where: Min defaults to 5
Max defaults to 90
Issued: May-2012 Configuring Stations and Runs (Measurement Tab) 3-31
Page 78

ControlWave MRMS-IC Configuration Manual (D5140)
3.2.12 Auto-Adjust Tab (Run Configuration)
Click on the Auto-Adjust tab, and the following screen opens.
Figure 3-14. Auto-Adjust tab
Field Description
Settings
Low Flow Cutoff
Main Rotor
Factor (Km)
Sense Rotor
Factor (Ks)
Linearization
Enabled /
Disabled
Max Meter Flow
Expected
Deviation (Abar)
The low flow cutoff is the minimum flow, in units of Actual
Cubic Feet per second that will still be considered valid for
flow measurement. If the flow rate falls below this number,
volume will not be measured.
The main rotor is the upstream rotor and has a greater
blade angle to the flow of gas.
The sense rotor is the downstream rotor and has a
shallower blade angle to the flow of gas.
Enable / disable use of the linearization table.
The maximum meter flow is the maximum flow rate through
the meter, in units of thousands of actual cubic feet per
hour. This number is used to calculate the Minimum and
maximum flow rate through the meter.
Average relative adjustment between main and sense rotors.
3-32 Configuring Stations and Runs (Measurement Tab) Issued: May-2012
Page 79

ControlWave MRMS-IC Configuration Manual (D5140)
Deviation Error
Limit
C Factor
Current
Main Rotor
Count Input
Sense Rotor
Count Input
ACF/s (DeltaVa)
Deviation (Delta
Abar)
Corrected Flow
Rate, Energy
Rate,
Uncorrected
Flow Rate
Min / Max Rates
for this Run
This sets a limit on the difference between the expected Abar
and the calculated Abar.
Current linearization factor.
Pulse count from main rotor.
Pulse count from sense rotor.
The ACF/s (DeltaVa) reading is displayed here.
The Deviation (Delta ABar) reading is displayed here.
The current corrected flow, energy rate, and uncorrected
flow rate are displayed on this screen. The units of flow and
energy rates are set from the Run Configuration page.
The minimum and maximum flow rates for an auto-adjust
meter run are calculated as follows:
Minimum Flow Rate = max frequency * AGA7 Factor * (Min
/100)
Maximum Flow Rate = max frequency * AGA7 Factor *
(Max/100)
Where: Min defaults to 5
Max defaults to 90
Issued: May-2012 Configuring Stations and Runs (Measurement Tab) 3-33
Page 80

ControlWave MRMS-IC Configuration Manual (D5140)
3.2.13 Ultrasonic Tab (Run Configuration)
Click on the Ultrasonic tab, and the following screen opens.
Figure 3-15. Ultrasonic tab
Field Description
Settings
HSC#
Maximum
Input
Low Flow
Cutoff
Correction
Factor (K)
Current
The source for the Counter input comes from a High Speed Counter
Input via the I/O cards. The user may select from the Default HSC
(this would be the “Run X AGA7 Hz” selection from the I/O
configuration page), or from a Shared Hz input.
The maximum input is used to calculate the minimum and maximum
flow rates through the meter run.
The low flow cutoff is the minimum frequency that will still be considered
valid for flow measurement. If the frequency of the inputs from the high
speed counter fall below this number, volume will not be measured.
The correction factor represents either the volume (in Cubic Feet)
per pulse, or the number of pulses per volume (in Cubic Feet). The K
factor value is entered as shown in the box below, while the K factor
units are selected by using the push button. This information is
available from the UFM meter data plate.
Counts
3-34 Configuring Stations and Runs (Measurement Tab) Issued: May-2012
The “Counts” value represents the event (pulse) total during the most
recent execution cycle coming from the High Speed Counter Input.
Page 81

ControlWave MRMS-IC Configuration Manual (D5140)
Pulse
Counter
Input
Override /
Live
Frequency
(Hz)
Correction
Factor /
Pulse/
Second
(K) Used
Corrected
Flow Rate,
Energy
Rate,
Uncorrected
Flow Rate
Min / Max
Rates for this
Run
Ultrasonic
Meter Data
US Meter
Number
Speed of
Sound
The user may override the measurement values in use by selecting
Override instead of Live
When Live is selected, the Value will be driven by the appropriate
high speed counter input value.
Note: the action of changing from Live to Override or Override to
Live is entered in the Audit trail. When in Override, any changes
made to the Value are entered in the Audit Trail.
Note: This override is done at the Run Measurement level, not at the
I/O level. Because of this, care needs to be taken when overriding
runs configured for bidirectional measurement, because the logic
overriding the measurement values occurs after the logic for routing
the measurement inputs to the proper run.
When Override is selected, the user may enter the desired value for
the frequency to be used.
This is the correction factor calculated by the AGA 7 equation.
This correction factor multiplied by the frequency will provide the
corrected flow rate.
The AGA 7 calculation requires the K factor to be input in units of
Cubic Feet/Pulse. The (K) Used value always represents the K factor
in the units of Cubic Feet/Pulse.
The current corrected flow, energy rate, and uncorrected flow rate
are displayed on this screen. The units of flow and energy rates are
set from the Run Configuration page.
The minimum and maximum flow rates for an ultrasonic meter run
are calculated as follows:
Minimum Flow Rate = max frequency * AGA7 Factor * (Min /100)
Maximum Flow Rate = max frequency * AGA7 Factor * (Max/100)
Where: Min defaults to 5
Max defaults to 90
If a MODBUS interface to the ultrasonic meter has been configured
from the I/O Configuration section, the data collected from the
ultrasonic meter is displayed here.
To select the ultrasonic meter that data is being collected from, right
click on the US Meter Number box, and enter the appropriate meter
number.
The Speed of Sound (SOS) readings from each path of the
ultrasonic meter are displayed, and the average is calculated. At the
same time, the Multi-Run Multi-Station controller calculates the
Speed of Sound per the AGA 10 equations. The calculated value is
Issued: May-2012 Configuring Stations and Runs (Measurement Tab) 3-35
Page 82

ControlWave MRMS-IC Configuration Manual (D5140)
compared to the average value from the ultrasonic meter, and if the
deviation is greater than the deviation limit, an alarm will be
generated. This alarm will be entered into the Audit Trail, and will be
available via both the BSAP Slave communications and MODBUS
communications interfaces.
Status
Diagnostics information relating to communications with the
ultrasonic meter, the gain on each path, and the overall status of the
ultrasonic meter is collected and displayed here.
3-36 Configuring Stations and Runs (Measurement Tab) Issued: May-2012
Page 83

ControlWave MRMS-IC Configuration Manual (D5140)
A
3.2.14 PD Tab (Run Configuration)
Click on the PD tab, and the following screen opens.
Figure 3-16. PD tab
Field Description
Settings
Maximum Input
Low Flow Cutoff
Correction Factor
(K)
The maximum input is used to calculate the minimum and
maximum flow rates through the meter run.
A positive displacement meter typically has very low frequency
counts.
be several seconds between pulses. It is not unusual to see 30
seconds or more between pulses from a PD meter, during
normal flowing conditions.
Therefore, the low flow cutoff for a PD meter is the maximum
amount of time allowed between two consecutive pulses before
the flow rate is zeroed. However, all pulses received by the
MRMS-IC controller from a PD meter are included in volume
totalization for the meter run.
The correction factor represents either the volume (in Cubic
Feet) per pulse, or the number of pulses per volume (in Cubic
Feet). The K factor value is entered as shown in the box below,
while the K factor units are selected by using the push button.
This information is available from the PD meter data plate.
valid frequency may be well below 1 Hz, that is, it can
Issued: May-2012 Configuring Stations and Runs (Measurement Tab) 3-37
Page 84

ControlWave MRMS-IC Configuration Manual (D5140)
Current
Counts
Frequency (Hz)
Correction Factor
/ Pulse/ Second
(K) Used
Corrected Flow
Rate, Energy
Rate,
Uncorrected Flow
Rate
Min / Max Rates
for this Run
This shows the number of pulses received at the high speed
counter input.
This is the derived frequency. Because a positive displacement
meter can have very low frequency pulses (< 1 Hz), this
number can be a fraction less than 1.0.
This is the correction factor calculated by the AGA 7 equation.
This correction factor multiplied by the frequency will provide
the corrected flow rate.
The AGA 7 calculation requires the K factor to be input in units
of Cubic Feet/Pulse. The (K) Used value always represents the
K factor in the units of Cubic Feet/Pulse.
The current corrected flow, energy rate, and uncorrected flow
rate are displayed on this screen. The units of flow and energy
rates are set from the Run Configuration page.
The minimum and maximum flow rates for a PD meter run are
calculated as shown below:
Minimum Flow Rate = max freq * (Min /100) * AGA7 Factor
Maximum Flow Rate = max freq* (Max /100) * AGA7 Factor
Where: Min defaults to 5
Max defaults to 90
3-38 Configuring Stations and Runs (Measurement Tab) Issued: May-2012
Page 85

3.3 View Local Archives
Note: To collect the Archives for storage on the PC hard drive, it is
The MRMS-IC controller maintains Hourly Archives (Logs) for each
meter run and each gas chromatograph stream. To view the Archive, select
the Measurement tab, and click on the
The following screen opens:
ControlWave MRMS-IC Configuration Manual (D5140)
recommended that the Collect Local Logs function be used.
button.
Figure 3-17. Selecting a Log to View
3.3.1 Selecting Logs to View
To view the desired archive:
1. Click on the description for the desired archive in the Select an
Archive from the List Below box. This updates the File Number in
the Archive Collection Parameters field.
2. Now click the [Collect Data] button. (See Figure 3-17.)
Figure 3-18. Archive
Issued: May-2012 Configuring Stations and Runs (Measurement Tab) 3-39
Page 86

ControlWave MRMS-IC Configuration Manual (D5140)
3.4 Collect Local Logs
One or more Archives can be selected for collection. From the MRMS-IC
Measurement tab, click the
button to begin.
3.4.1 Selecting Archives for Collection
To select an Archive or for collection click on the desired description in
the log collection control.
Figure 3-19. Selecting Logs for Collection
3.4.2 Collecting a Single Archive
To collect one of the Archives, listed for collection, highlight the desired
item in the list, then click on the [Start Collection] button.
3.4.3 Collecting Multiple Archives
To collect more than one Archive hold down the [Ctrl] key to highlight
multiple items, and then click on the “Start Collection” button.
3.4.4 Log Collection Parameters
There are several different log collection parameters and read-only fields
which govern or report how the log collections operate.
3-40 Configuring Stations and Runs (Measurement Tab) Issued: May-2012
Page 87

ControlWave MRMS-IC Configuration Manual (D5140)
Field
Site Name
Storage Folder
Type
Description
Log #
Description
The Site Name is defined by the user on the Site
Configuration screen, via the Status/Configuration
menu item. The Site Name is used as the base
name for the files created by the collection and
conversion processes.
By default, the storage folder for the Archive
collections is C:\Mrms_ic\Logs.
This may be changed by clicking on the Browse
button, and locating a different folder. However, this
change is not permanent, and the next time the
“Collect Local Logs” screen is opened, the Storage
Folder will revert to C:\Mrms_ic\Logs.
The type of log, either Audit or Archive.
A description of the log.
The log number is populated automatically, when the
Archive or Audit is selected from the “Hourly Logs”
table
Target File
The Target File name will be automatically created.
The file base name will be the Site Name (in this
case “Unamed Site”) and the extension will be one
of the following:
Rnn Where R indicates an Archive for a
measurement run, and nn indicates the run
number.
Gnn Where G indicates an Archive for a gas
chromatograph stream, and nn indicates the
stream number
AUD Represents the Audit Trail collection.
If a file of the same name exists in the Storage
Folder, any new Archive data collected since the last
Archive data was collected will be appended to the
file. The Archive Data will not include duplicate data.
However, whenever the Audit Trail is collected, the
entire audit trail is collected. If there is an existing
Audit Trail file on the PC hard drive, the data from
this collection is appended to the existing file. There
may be duplicate data in the .AUD file.
Issued: May-2012 Configuring Stations and Runs (Measurement Tab) 3-41
Page 88

ControlWave MRMS-IC Configuration Manual (D5140)
A
Start Collection
Stop Collection
View Storage
Convert to CSV
Click here to start the log collection.
While an Archive or the Audit Trail is being collected,
the user may stop the collection by clicking on the
Stop Collection button.
It is possible to view the stored data locally.
Select the item that includes local data, and then
click on “View Storage” button. Note: Only one item
may be selected for the View Storage feature to be
available. A screen similar to this one will appear:
It is possible to convert the stored data to a comma
separated variable (CSV) file.
Collection Status
Messages
Select the item that includes local data, and then
click on “Convert to CSV” button. Note: Only one
item may be selected for the Convert to CSV feature
to be available.
A message will appear in the message window
indicating that the conversion is complete.
file with an extension of CSV will now be located in
the same folder as the stored data. The file name
will be of the format
sitename_originalextension.CSV
Where:
sitename is the Site Name.
originalextension is the original extension (Rnn, Gnn,
or AUD)
While collections are in progress, status messages will be posted in the
message window. When the collection is complete, the message “Log
Collection Complete will appear.
3-42 Configuring Stations and Runs (Measurement Tab) Issued: May-2012
Page 89

3.5 View Audit Log
ControlWave MRMS-IC Configuration Manual (D5140)
Note: To collect the Audit Trail for storage on the PC hard drive, it is
recommended that the Collect Local Logs function be used.
The MRMS-IC controller maintains an Audit Trail. The audit trail
includes entries any time a configuration change is made that could affect
measurement.
To view the Audit Trail:
1. Select the “Measurement” tab, and click the
button.
2. The following screen will appear. Click on the [Collect Data] button.
3. This will collect the first set of records (typically 24 records). To view
additional records, scroll down using the vertical scroll bars
Figure 3-20. Audit Log
The buttons associated with audit collection are.
Field Description
Collect Data
Data Storage
Search Criteria
To view the current entries in the Audit Trail, click
on the Collect Data button.
To store the collected data, click on the Data
Storage button.
Note: It is recommended that the “Collect Local
Logs” function be used to collect and store Audit
Trail data to the PC hard drive, rather than this
function, since more features are available for
collecting, storing, and viewing the data.
Click this button to specify search criteria.
Issued: May-2012 Configuring Stations and Runs (Measurement Tab) 3-43
Page 90

ControlWave MRMS-IC Configuration Manual (D5140)
3.5.1 Data Storage Parameters dialog box
Figure 3-21. Data Storage Parameters dialog box
Field Description
Store Data on
Collection
Storage Parameters
When this box is checked, the data will be stored
automatically on collection. This means as
additional data is collected by scrolling down using
the vertical scroll bar, this data is automatically
written to the PC hard drive.
File
Create File
Append File
Data Delimiter
Convert Data to
Extended Format
Define the storage location and file name for the
collected data.
If Create File is selected, a new file will be created
every time data is collected. If the name of the file
is one previously created, all previous data will be
lost.
If Append File is selected, newly collected data will
be added to previously collected data, in the file of
the same name.
The following data delimiters may be selected –
Space, Comma, or Semicolon. This will be the
delimiter used to separate the data fields
(Date/Time, Signal, Description, Audit Seq#,
Global Seq#).
Not applicable
3-44 Configuring Stations and Runs (Measurement Tab) Issued: May-2012
Page 91

ControlWave MRMS-IC Configuration Manual (D5140)
3.5.2 Search Data Collection Criteria dialog box
The following search criteria may be applied:
Figure 3-22. Select Data Collection Criteria dialog box
Field
Records
Search Method
Direction
Description
The user may elect to collect to view Alarms and
Events, Events Only, or Alarms Only
The user may elect to Collect All Available
Records, or may specify the time period.
Start Date Enter the start date here. All records
that occurred on or after that date will be
collected.
Period The user may specify a period from which
to collect the data. The available
selections are Today, This Week, or This
Month.
The data may be collected and viewed from the
Oldest entry to the Newest entry or from the Newest
entry to the Oldest entry.
Issued: May-2012 Configuring Stations and Runs (Measurement Tab) 3-45
Page 92

ControlWave MRMS-IC Configuration Manual (D5140)
3.6 Maintenance Mode
It is possible to put the Site, Stations, Runs, or individual analog inputs
into maintenance mode.
To enter Maintenance Mode, select the “Measurement” tab, and click on
the button.
The following screen opens:
3.6.1 Site Tab
Figure 3-23 Maintenance Mode - Site tab
The entire site may be placed in Maintenance Mode. When this occurs, all
runs at the site are placed in Maintenance Mode.
The following items are available on the Site Maintenance Mode screen.
Field Description
Site
Maint Off /
Maintenance
Auto Rst Off
This section of the screen controls the maintenance mode for
the site.
To disable the maintenance mode, toggle the button to Maint
Off.
To enable the maintenance mode, toggle the button to
Maintenance.
If Auto Reset is enabled, maintenance mode for the site will
be disabled automatically after the period set under the
Maintenance Mode Auto Reset Timer
If Auto Reset is disabled, maintenance mode for the site will
never be disabled automatically
Note: if Auto Reset is set at the Station level or Run Level, it
3-46 Configuring Stations and Runs (Measurement Tab) Issued: May-2012
Page 93

ControlWave MRMS-IC Configuration Manual (D5140)
takes precedence over the setting at the site level. To disable
Auto Reset, make certain that it is disabled at the site,
station, and run level.
Maintenance
Mode Time
Elapsed Time
The Maintenance Mode Auto Reset Timer is in the format DD
HH:MM:SS.S
Where:
DD number of days
HH number of hours
MM number of minutes
SS.S number of seconds (resolution of 10ths)
The maximum time allowed for the maintenance mode auto
reset timer is
24 20:31:23.9 – (24 Days, 20 hours, 31 minutes, 23.9
seconds)
This is the amount of time the site has been in maintenance
mode.
Remaining Time
Summary
When Auto Reset is enabled, this is the time remaining until
the maintenance mode is automatically reset.
When Auto Reset is disabled, this field remains at 00
00:00:00.0.
In this section of the display, the maintenance mode status
will be indicated.
Any runs not assigned to stations are shown in the
“Unassigned” column.
Runs assigned to stations are displayed in the appropriate
Station n columns.
In this example, the runs are assigned as follows:
Run 1 to Station 1
Run 2 to Station 2
Run 3 to Station 1
Run 4 to Station 2
Run 5 to Station 1
Run 6 to Station 2
Issued: May-2012 Configuring Stations and Runs (Measurement Tab) 3-47
Page 94

ControlWave MRMS-IC Configuration Manual (D5140)
Runs or Stations in Maintenance mode will be indicated with
a magenta outline around the black box.
When not in Maintenance mode, the box will be black, with
no border
3-48 Configuring Stations and Runs (Measurement Tab) Issued: May-2012
Page 95

3.6.2 Station Tab
Individual stations may be put into Maintenance Mode. When this occurs,
all runs assigned to the station are placed in Maintenance Mode.
The following items are available on the Station Maintenance Mode
screen.
ControlWave MRMS-IC Configuration Manual (D5140)
Figure 3-24. Maintenance Mode - Station tab
Field Description
Station n
Maint Off /
Maintenance
Auto Rst Off
This section of the screen controls the maintenance
mode for the selected station.
To disable the maintenance mode, toggle the button to
Maint Off.
To enable the maintenance mode, toggle the button to
Maintenance.
I If Auto Reset is enabled, maintenance mode for the
station will be disabled automatically after the period set
under the Maintenance Mode Auto Reset Timer
If Auto Reset is disabled, maintenance mode for the
station will never be disabled automatically.
Note: If Auto Reset is set at the Station level, it takes
precedence over the setting at the site and run level. To
disable Auto Reset, make certain that it is disabled at the
site, station, and run level.
Issued: May-2012 Configuring Stations and Runs (Measurement Tab) 3-49
Page 96

ControlWave MRMS-IC Configuration Manual (D5140)
Maintenance
Mode Time
Elapsed Time
Remaining Time
Summary
The Maintenance Mode Auto Reset Timer is in the format
DD HH:MM:SS.S
Where:
DD number of days
HH number of hours
MM number of minutes
SS.S number of seconds (resolution of 10ths)
The maximum time allowed for the maintenance mode
auto reset timer is
24 20:31:23.9 – (24 Days, 20 hours, 31 minutes, 23.9
seconds)
This is the amount of time the station has been in
maintenance mode.
When Auto Reset is enabled, this is the time remaining
until the maintenance mode is automatically reset.
When Auto Reset is disabled, this field remains at 00
00:00:00.0.
For each station, the runs assigned to that station are
displayed.
Runs in Maintenance mode will be indicated with a
magenta outline around the black box.
When not in Maintenance mode, the box will be black,
with no border
3-50 Configuring Stations and Runs (Measurement Tab) Issued: May-2012
Page 97

3.6.3 Run Tab
ControlWave MRMS-IC Configuration Manual (D5140)
Individual runs may be put into Maintenance Mode.
The following items are available on the Run Maintenance Mode screen.
Figure 3-25. Maintenance Mode - Run tab
Field
Run n
This section of the screen controls the maintenance mode for
Maint Off /
Maintenance
Auto Rst Off
Description
the selected run.
To disable the maintenance mode, toggle the button to Maint
Off.
To enable the maintenance mode, toggle the button to
Maintenance.
If Auto Reset is enabled, maintenance mode for the run will be
disabled automatically after the period set under the
Maintenance Mode Auto Reset Timer
If Auto Reset is disabled, maintenance mode for the site will
never be disabled automatically.
NOTE – if Auto Reset is set at the Run level, it takes
precedence over the setting at the site or station level. To
disable Auto Reset, make certain that it is disabled at the site,
station, and run level.
Issued: May-2012 Configuring Stations and Runs (Measurement Tab) 3-51
Page 98

ControlWave MRMS-IC Configuration Manual (D5140)
Maintenance
Mode Time
Elapsed Time
Remaining Time
The Maintenance Mode Auto Reset Timer is in the format DD
HH:MM:SS.S
Where:
DD number of days
HH number of hours
MM number of minutes
SS.S number of seconds (resolution of 10ths)
The maximum time allowed for the maintenance mode auto
reset timer is
24 20:31:23.9 – (24 Days, 20 hours, 31 minutes, 23.9
seconds)
This is the amount of time the run has been in maintenance
mode.
When Auto Reset is enabled, this is the time remaining until
the maintenance mode is automatically reset.
When Auto Reset is disabled, this field remains at 00
00:00:00.0.
3-52 Configuring Stations and Runs (Measurement Tab) Issued: May-2012
Page 99

3.6.4 PVs Tab
ControlWave MRMS-IC Configuration Manual (D5140)
From this screen, you can view individual process variables for each run.
Figure 3-26. Maintenance Mode - PVs tab
The Live values always show the live value coming into the MRMS-IC
controller (either through an analog input, or a multi-variable transmitter
(MVT).
The In Use values are the values currently in use for measurement.
Issued: May-2012 Configuring Stations and Runs (Measurement Tab) 3-53
Page 100

ControlWave MRMS-IC Configuration Manual (D5140)
3.6.5 AI Maintenance Tab
It is possible to put any analog input into maintenance mode.
The following items are available on the AI Maintenance Mode screen.
Figure 3-27. Maintenance Mode – AI Maintenance tab
Field
AI Maintenance
Maint Off /
Maintenance
Auto Rst Off
Maintenance
Mode Time
Description
This section of the screen controls the maintenance mode for
the selected AI input.
To disable the maintenance mode, toggle the button to Maint
Off.
To enable the maintenance mode, toggle the button to
Maintenance.
If Auto Reset is enabled, maintenance mode for the AI input
will be disabled automatically after the period set under the
Maintenance Mode Auto Reset Timer
If Auto Reset is disabled, maintenance mode for the AI input
will never be disabled automatically.
The Maintenance Mode Auto Reset Timer is in the format DD
HH:MM:SS.S
3-54 Configuring Stations and Runs (Measurement Tab) Issued: May-2012
 Loading...