

Page 1
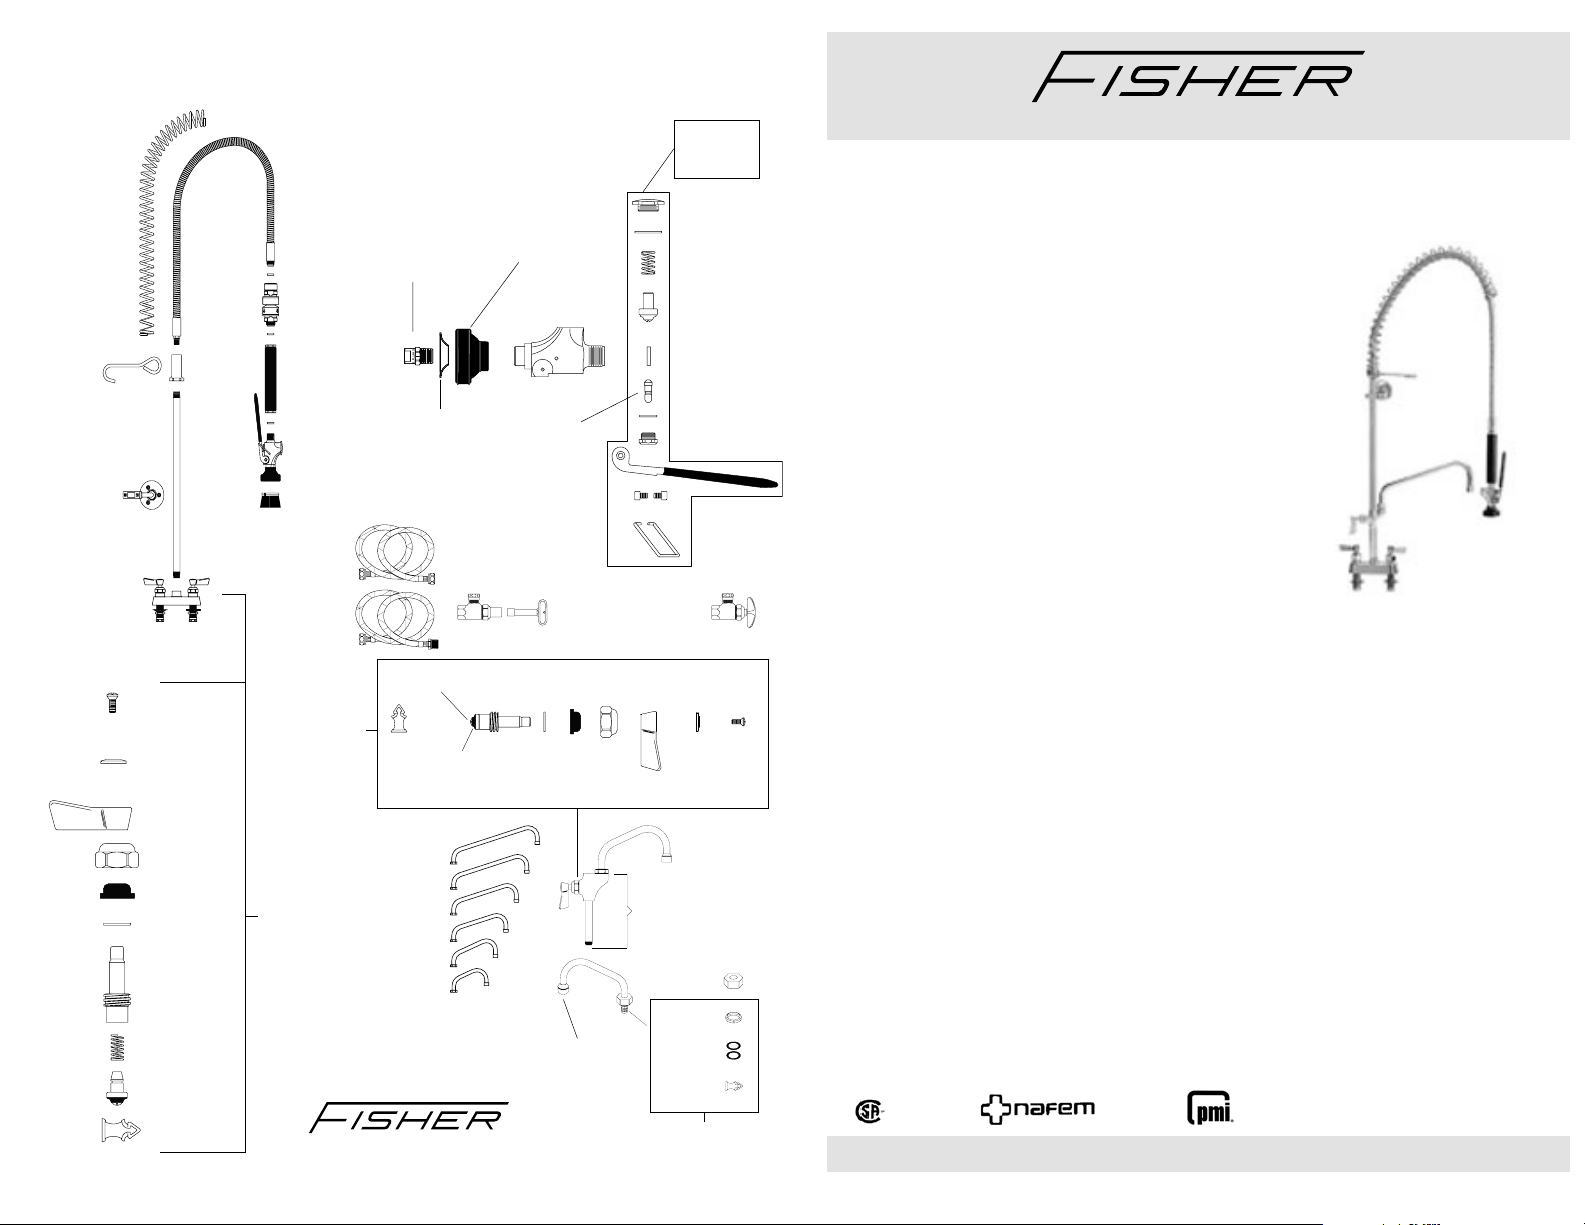
Replacement Parts for Pre-Rinse Units
2924-6000
SPRING
GOOSENECK
2925-6300
HOSE HOOK
2926-3300
PIPE TO HOSE
ADAPTER
2902-12
WALL BRACKET
2500-CV
CONTROL
VALVE
PART NO. 41130
2927-4303
3/8” PIPE
16” RISER
2000-7500
SCREW
2000-8000
RED BUTTON
AND
2000-8001
BLUE BUTTON
2000-2301
LEVER HANDLE
2000-3002
BIBB CAP
10464
DUCK GASKET
2000-5000
WASHER
2000-3406
LH CHECK STEM
OR
2000-3407
RH CHECK STEM
2000-6000
SPRING
2000-0001
RETAINER
ASSEMBLY
10456
LUBE
2914
STAINLESS STEEL
HOSE 36”
2922-5000
WASHER
2932-0002
WATTSN9
BACK-FLOW
PREVENTER
BACKFLOW
PREVENTER
2913
INSULATED
HANDLE
2949 ULTRA SPRAY
VALVE
2949-9001
SCRUB BRUSH
10014 (24”)
10022 (36”)
SUPPLY LINE
1/2” F x 1/2” F
10049 (24”)
10006 (36”)
SUPPLY LINE
1/2” M x 1/2” F
3000-0000
RH SWIVEL
REPAIR KIT
16” SWING SPOUT
2000-0004
RH CHECK STEM
REPAIR KIT
OR
2000-0005
LH CHECK STEM
REPAIR KIT
14” SWING SPOUT
12” SWING SPOUT
10” SWING SPOUT
8” SWING SPOUT
6” SWING SPOUT
MANFACTURING COMPANY
PO BOX 60, TULARE, CA 93275
(800)421-6162, FAX: (800)832-8238
www.fisher-mfg.com
2949-3001
NOZZLE FOR
2949 SPRAY
VALVE
2949-8600
CUP WASHER
1000-7502
SEAT SCREW
10456
LUBE
SEAT WASHER
3967
3964
3963
3962
3961
3960
RH SWIVEL
2000-5003
2949-9002
BLUE BUMPER
3000-0011
STEM
1000-5005
O-RING
2912-2501
2912-7501
2909-6000
ANGLE STOP
10464
DUCK GASKET
2000-5000
WASHER
1792
WITH KEY
2000-3002
BIBB CAP
12564
2.2 GPM
AERATOR
1000-5003 WASHER
1000-7502 SCREW
1790-1
ANGLE STOP
W/ CROSS
HANDLES
2000-2301
LEVER HANDLE
2000-8000
RED BUTTON
2000-8001
BLUE BUTTON
2901-0000
ADD-ON CONTROL
VALVE LESS SPOUT
15621
SPOUT NUT
2002
SNAP RING
1600-5000
SPOUT
O-RINGS
10456
LUBE
SWIVEL SPOUT
RETRO-FIT KIT
11355
SPRAY VALVE
REPAIR KIT
1000-3301
1000-5001
2912-6000
1000-0001
INCLUDES:
2922-5000
1000-0003
2909-5000
2909-3400
2000-7500
SCREW
AND
19119
REV.C
fisher manufacturing company
8” C/C Backsplash Mount Pre-Rinse Unit
Product Installation Guide
Since 1936, Fisher Manufacturing Company has
manufactured heavy-duty, high quality plumbing
products and hardware specialties for the food service
industry. For three generations, the Fisher family has
adhered to a strict dedication of and overall value.
When you install Fisher products… you install the best.
Our hardware is manufactured with the standardization
of internal mechanisms. All chrome plating is triple
plated copper, nickel and chrome for durability.
Every piece of equipment we make is rigorously
tested in both our modern in-house testing center and
in actual fi eld situations under extreme conditions.
Every detail is thoroughly checked. Before we make
our products available to you, they pass each and
every test. You get proven performance. Guaranteed.
Limited One Year Warranty
Fisher Manufacturing Company warrants its products
and parts thereof (except as noted below) against
defects in materials or workmanship for a period of
one year after the date of original purchase. During this
period Fisher Manufacturing Company will replace
a defective product or part without charge to you,
provided that the entire product is delivered to Fisher
Manufacturing Company. All transportation and
insurance charges for shipping the product to and from
Fisher Manufacturing Company must be borne by you.
Charges for transportation and insurance may, at the
option of Fisher Manufacturing Company, be refunded
depending upon our investigation of the warranty claim.
This warranty does not cover external fi nish (except at
date of original purchase) or labor costs not specifi cally
authorized by Fisher Manufacturing Company.
A full and complete copy of our One Year limited
warranty is available upon request.
WARNING:
Proposition 65 requires that we provide you with the
following notice: “This product Contains A Chemical
Known To The State Of California To Cause Birth
Defects Or Other Reproductive Harm.”
KEEP THIS MANUAL FOR FUTURE REFERENCE
fisher manufacturing company - toll free: 800-421-6162 fax: 800-832-8238
#34290 - Pre-Rinse Unit: 4” C/C Deck Mount, Wall Bracket
& Add-On Faucet with 6” Swing Spout
#34304 - Pre-Rinse Unit: 4” C/C Deck Mount, Wall Bracket
& Add-On Faucet with 8” Swing Spout
#34312 - Pre-Rinse Unit: 4” C/C Deck Mount, Wall Bracket
& Add-On Faucet with 10” Swing Spout
#34320 - Pre-Rinse Unit: 4” C/C Deck Mount, Wall Bracket
& Add-On Faucet with 12” Swing Spout
#34339 - Pre-Rinse Unit: 4” C/C Deck Mount, Wall Bracket
& Add-On Faucet with 14” Swing Spout
#34347 - Pre-Rinse Unit: 4” C/C Deck Mount, Wall Bracket
& Add-On Faucet with 16” Swing Spout
ANSI/A112.18.1M, ANSI/NSF 61.9
www.fi sher-mfg.com
Page 2
Installation Instructions for Pre-Rinse Units
BE SURE TO CHECK WITH YOUR LOCAL DEPARTMENT HAVING JURISDICTION REGARDING
Installation Notes:
• Be sure to shut off water supply before beginning.
• Use pipe thread sealant such as PST on all threaded joints.
• Check the packaging for missing items BEFORE beginning installation. If items are missing, contact your supplier.
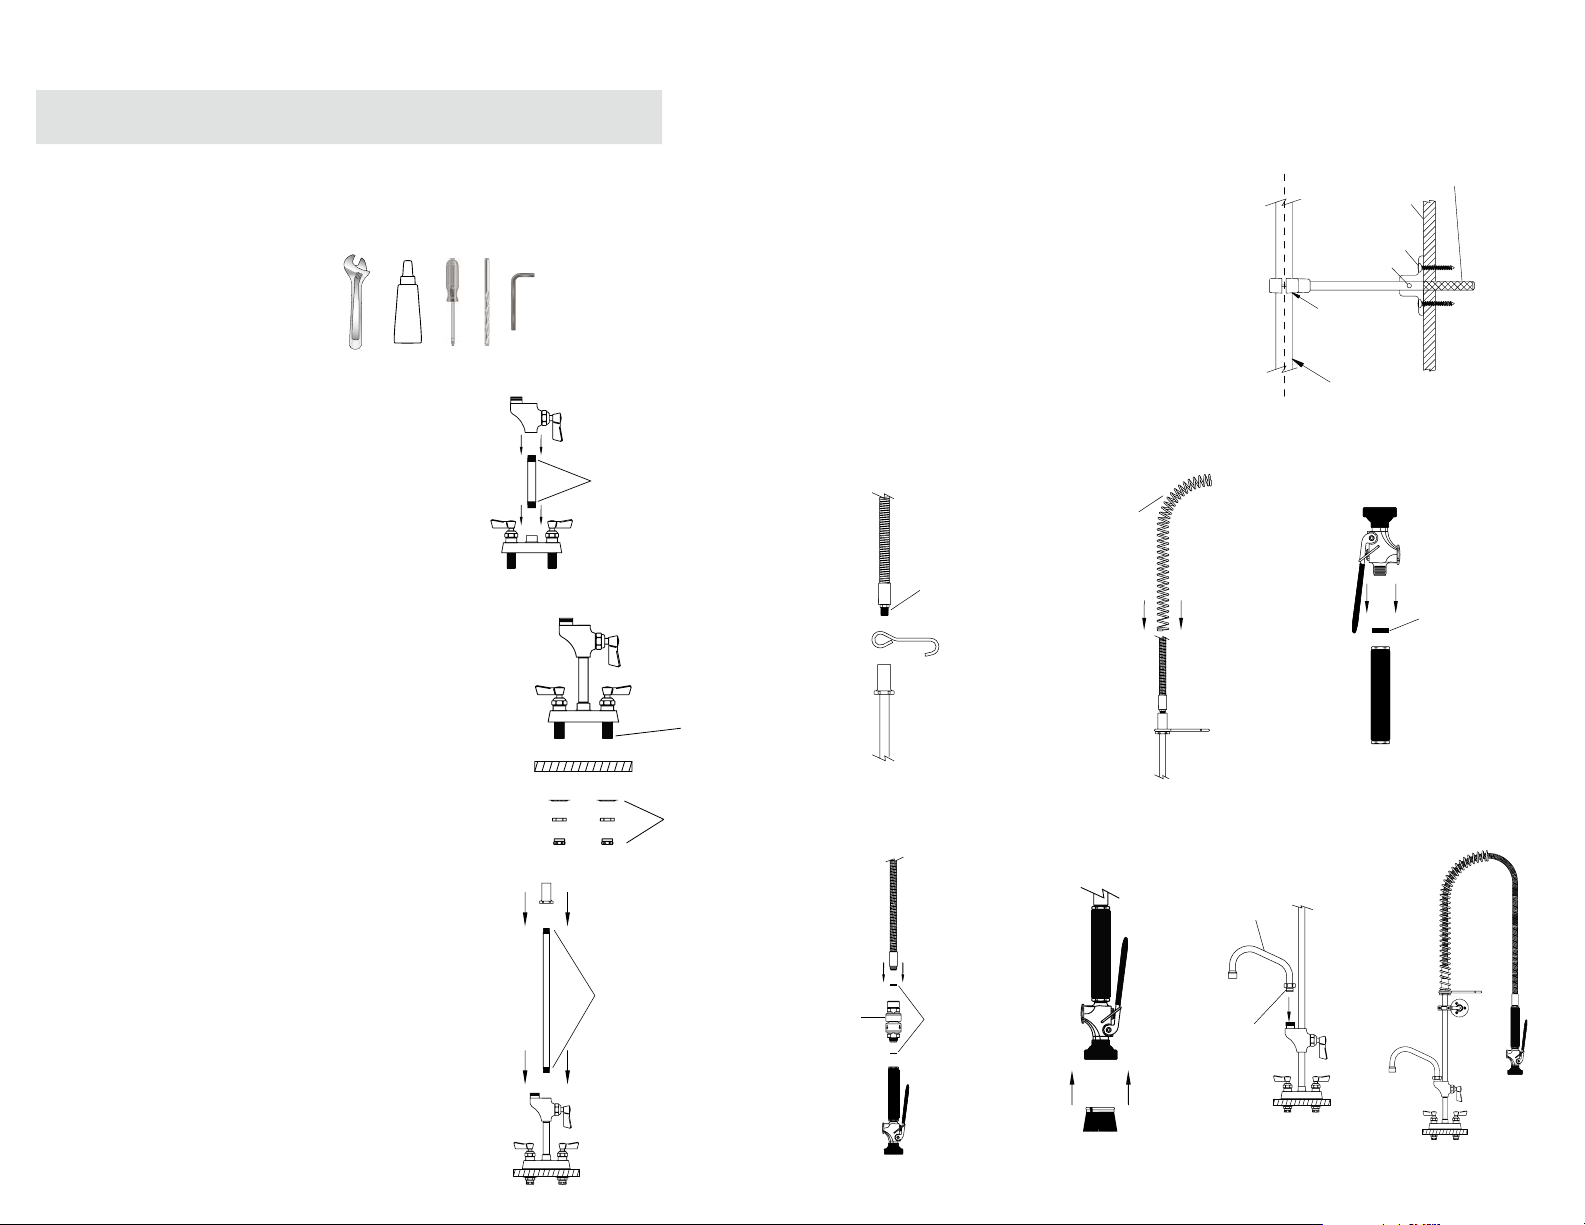
Tools Required for Installation
• Medium Sized Crescent Wrenches
• Pipe Thread Sealant
• Phillips Screwdriver
• 7/16” Drill Bit
• 1/8” Allen Wrench
Installation Instructions
1. Mount the small riser to the control valve body
using thread sealant. Thread the add-on faucet to
the other end of the small riser, again using thread
sealant.
2. Mount control valve on deck by Inserting nipples
through pre-drilled 7/8” holes in deck. Apply thread
sealant to both nipples and attach slip joint kits.
Tighten until control valve is secure.
3. Mount the pipe to hose adapter to the enclosed
riser using thread sealant. Mount the other end of
the riser to the female outlet of the add-on body.
4. If no wall bracket is to be installed, proceed to Step
5, otherwise do the following:
a. Locate and drill a Ø7/16” hole in the wall directly
behind and about 3/4 the way up the riser pipe.
b. Loosely attach the front and back of the pipe
clamp onto the riser pipe.
c. Hold the wall bracket fl ange against the wall,
centered with the hole. Use the wall screws and
a screw driver to mount the fl ange to the wall.
d. Slide part, but not all, of the wall bracket rod non-
threaded end fi rst through the center hole of the
fl ange and into the wall.
e. Align the rod with the pipe clamp and thread the
rod into the pipe clamp. Be sure the rod is level
by adjusting the pipe clamp position.
f. Once level, fi x the rod in place by tightening both
the set screw located in the fl ange and the pipe
clamp screws.
5. Slip the hose hook over the pipe to hose adapter.
Using thread sealant and a crescent wrench, thread
the SS hose into the pipe to hose adapter.
6. Install gooseneck spring by slipping SS hose
through the spring. Spring will fi t over adapter which
holds it in an upright position. Note: Be sure spring
is installed as shown. DO NOT INSTALL SHORT
BEND DOWN.
7. Fit one of the handle gaskets inside the outlet of the
insulated handle and mount the spray valve onto it.
PST
Step 1
Thread Sealant
Goes Here
Step 2
Thread Sealant
Goes Here
Slip Joint Kit
Step 3
Thread Sealant
Goes Here
Installation Instructions Continued
8. Fit the other handle gasket inside the inlet of the
insulated handle and mount the handle onto the
SS hose. If installing backfl ow preventer, attach it
between the SS hose and insulated handle. Be sure
that gaskets are used on both sides of the backfl ow
preventer.
9. If installing a brush, do so by pressing brush into
the bumper of the spray valve until secure.
10. To install swing spout to add-on faucet, apply
o-ring lube to the o-rings on the swing spout.
Make sure the white snap ring is in place before
mounting the swing spout. Mount the swing spout
and tighten the swing spout nut onto the add-on
faucet spout outlet.
11. Turn on water supply and check for leaks.
Step 5 Step 6
Spring Bend
On This Side
Thread Sealant
Goes Here
Step 8 Step 9 Step 10 Step 11
Optional
WATTSN9
BACK-FLOW
PREVENTER
Handle Gasket
Step 4
Excess Rod Length
Trim to Fit (optional)
Wall Screw
Set Screw
Pipe
Clamp
Riser Pipe
Step 7
Swing Spout
Apply O-Ring
Lube Here
Wall
Handle Gasket
 Loading...