

Page 1
User Manual
SRG 717
For Garage Door Openers, Electric Gates,
and Electric Door Strikes
Page 2
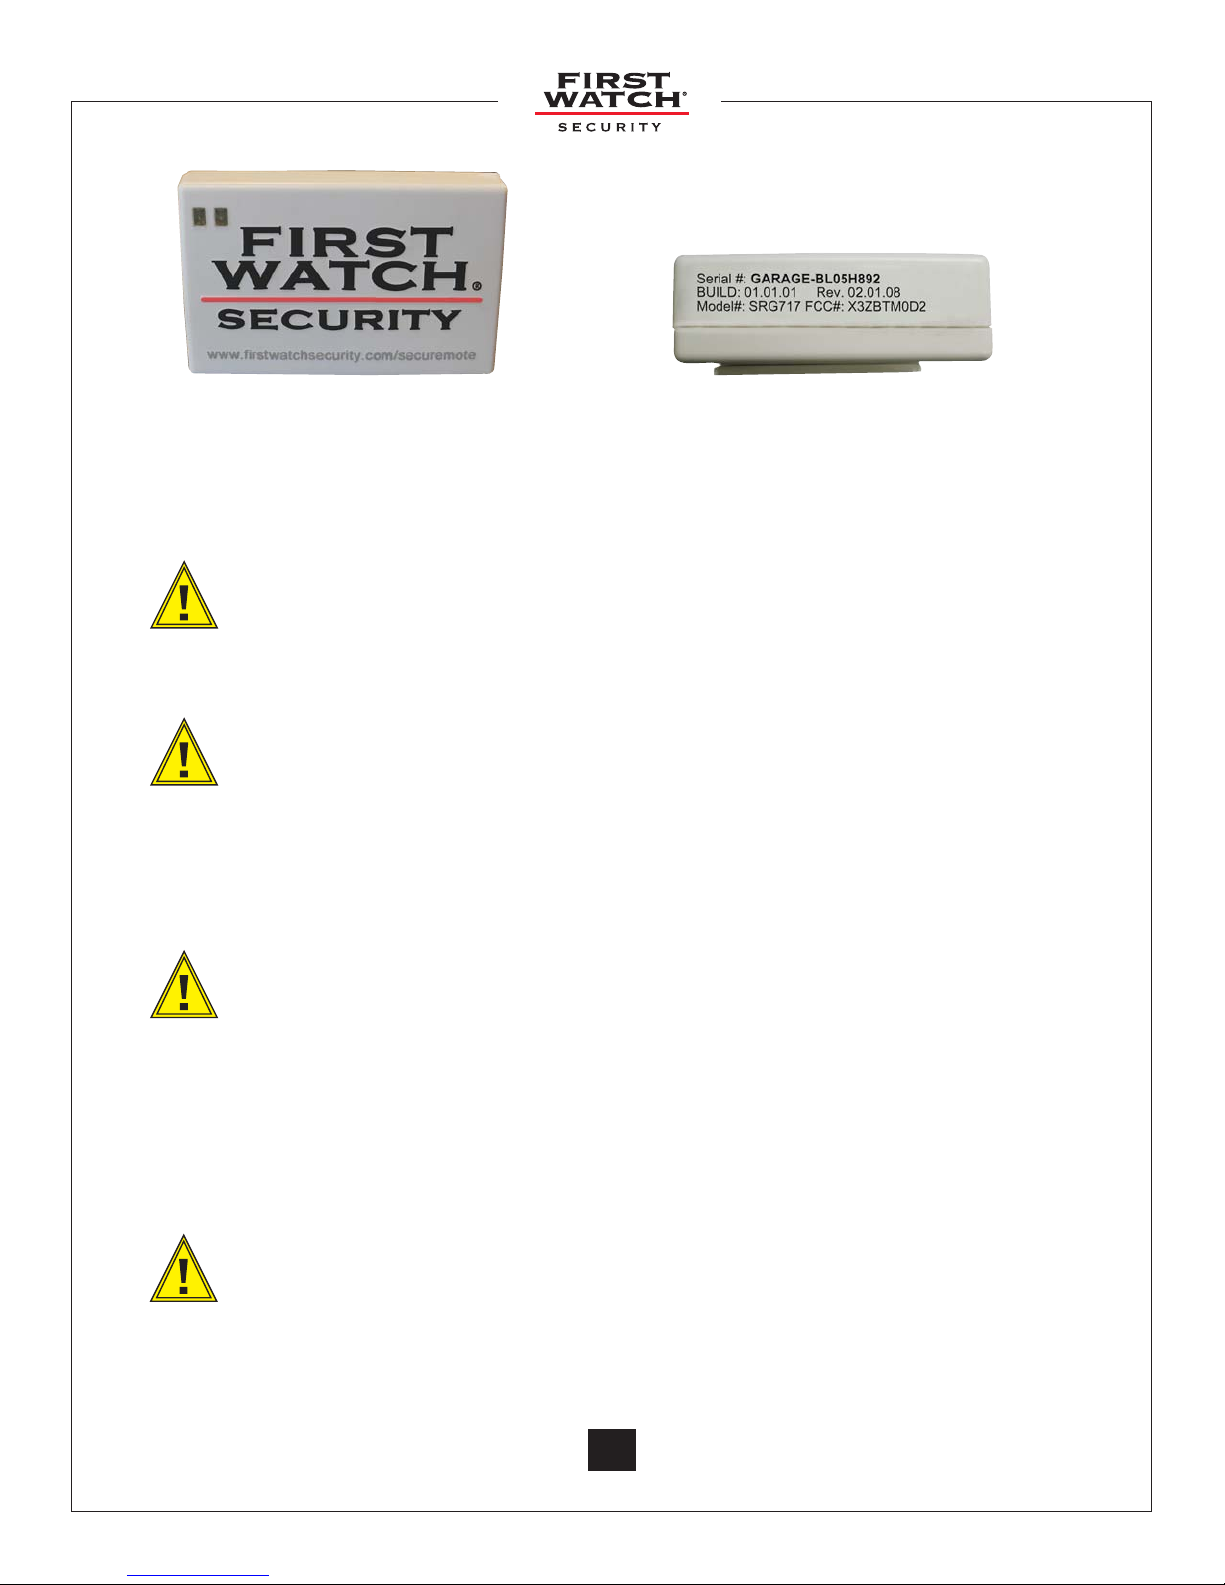
(SRG717) SecuRemote™ device front (SRG717) SecuRemote™ device side
SAFETY INFORMATION
TO AVOID DAMAGE OR MALFUNCTION:
• Do not drop the device or allow objects to fall on the device.
• Do not allow the product to be submerged in water.
• Must plug into a 110 volt outlet to operate safely.
• Avoid mounting the location sensor and location marker within 3/4” of each other.
POWER SUPPLY
• Input: 110 Volt AC (220 with adapter)
• Output: 5 Volt 7.2 watt DC
• UL listed E 144572
• Level 3 (Continuous)
• RoHS lead free compliant (ECO friendly)
• Indoor use only
• No user serviceable parts inside
CPU SRG717
• Mount in a dry, weather protected area.
• Contact Wires: Dry contacts max current 2 amp resistive load. Normally open contacts.
• CAUTION! Do not plug red/white wire cord set into any A/C or D/C power circuit/
outlets
• No usable service parts inside
• Temperature Operating Range: -20°F to 110°F
• Operating Voltage: 5 Volts D/C
• RoHS Lead Free Compliant (ECO friendly)
CAUTION! DO NOT ACTIVATE DEVICE WHILE OPERATING A VEHICLE.
CAUTION! DO NOT OVERRIDE ANY FACTORY (OEM) GARAGE SAFETY SENSORS.
CAUTION! DO NOT USE PHONE WHILE OPERATING A VEHICLE.
© 2011 Belwith® Products, LLC. | All Rights Reserved | www.firstwatchsecurity.com | 72291 Rev B
2
Page 3

GENERAL WARRANTY
First Watch® Security device using SecuRemote™ technology to operate garage doors, gates and door strikes.
Satisfaction Guaranteed
First Watch
®
Security, SecuRemote™ branded products are manufactured to provide quality which you can
count on. We oer a 1 year guarantee against electrical and mechanical defects. BELWITH IS NOT LIABLE FOR
INCIDENTAL OR CONSEQUENTIAL DAMAGES.
Limited Warranty
This warranty is a limited electrical and mechanical warranty which is limited to the original owner (nontransferable).
BELWITH warrants that each First Watch
®
Security, SecuRemote™ product shall be free from electrical defects for
a period of 1 year from time of purchase.
Except as expressly provided in this warranty to the contrary, (1) BELWITH makes no, and disclaims all,
warranties, representations and guarantees (whether expressed, implied or statutory) including, but not limited
to, any implied warranty of electrical for a particular purpose, and (2) BELWITH shall not be obligated or liable
for labor or other costs related to installation, repair or replacement or for loss of, or damage to, any material
which is not sold by BELWITH. BELWITH does not cover consequential damages, any impact that any software
may have on the Smartphone or other mobile devices or software on laptops, personal computers or tablets.
This warranty is the only expressed warranty provided by BELWITH. No employee, representative, agent, nor any
other person has authority to assume or incur on behalf of BELWITH any obligation or liability in place of or in
addition to this warranty.
BELWITH assumes no liability related to the following and no liability of others’ products: Normal wear and tear,
any misuse of product, including but not limited to, Improper Installation, Using Improper voltage (DO NOT use
high voltage), Using the products in a way they were NOT intended, Use with Other Products, including but not
limited to and garage door operators that aren’t installed using proper safety guidelines or building codes or
have improper safety features.
As part of this warranty you agree to hold BELWITH harmless from any and all liabilities, losses, actions, damages,
or claims (including all reasonable expenses, costs, and attorneys fees) arising out of or relating to any use of, or
reliance on the Software or Device.
If a consumer is asked to return product to BELWITH, product must be packaged properly to protect
merchandise from being damaged.
If any of BELWITH’s direct customers (Retailers or Wholesalers) receive any claims or take delivery of any
allegedly defective BELWITH products from the consumers, the direct customer shall communicate and
otherwise cooperate in a reasonable manner with BELWITH concerning the administration, processing and
remedying of such claims, including, but not limited to, delivering repaired or replacement BELWITH products or,
in the appropriate case, purchase price refunds to consumers. Decisions and all warranty claims are at BELWITH’s
sole discretion, not the direct customer decision.
For other legal related matters please refer to the BELWITH website at www.belwith.com or contact Customer
Service at Belwith
®
Products, LLC directly at 1-800-235-9484. For notice of claim please contact:
Corporate Oces
Customer Service Manager
Belwith
®
Products, LLC.
3100 Broadway S.W.
Grandville, Michigan 49418
© 2011 Belwith® Products, LLC. | All Rights Reserved | www.firstwatchsecurity.com | # SRG717© 2011 Belwith
3
3
Page 4

ACKNOWLEDGEMENTS
You should always download the SecuRemote™ directly from your smartphone’s store as this practice ensures
future automatic app improvements/updates. However, there may be situations where this is not feasible. For
instance, if a BlackBerry
“app world” store. In this case consider two other options:
1. Use your smartphone’s web browser to download the SecuRemote™ app from www.rstwatchsecurity.com
2. Use your computer’s web browser to download the app from www.rstwatchsecurity.com to your
computer and then use your desktop manager to install it to your smartphone.
However, neither one of these two options will keep the app automatically updated. Instead, updates will require
manual downloads as described above. The le name of the app shows the latest revision number.
The communication range between SecuRemote™ and a smartphone is approximately 60 to 100 feet assuming no
obstructions between the two devices other than a typical aluminum or wood panel overhead garage door. Doors
or walls made of steel, particularly heavy gauge, will impact this range adversely. In such cases try to position the
SecuRemote™ device behind or as close to a window or a brick wall as possible. Changing the orientation of the
internal antenna by rotating the device 90° may improve the range.
Requirements Prior to Purchase:
• Access to 110 Volt AC Outlet
• One of the following operating systems:
• iPod® touch (4th and 3rd generation)
• iPhone® 4, iPhone 3GS and iPhone 3G
• iPad® 2 and iPad
• Google / Android™ V2.1+ / Android™ tablet (as long as it meets requirements)*
• BlackBerry® / RIM® V4.7+
• The digital data network of the cellular phone carrier and the availability of Bluetooth® wireless
communication readily available in smartphones.
• Access to respective Apple®, BlackBerry®, and Android™ application stores to download the free application.
• Garage door openers, electric gates, Keeler™ Architectural Door Hardware Locks, electric door strikes.
Registars:
FCC PERMIT NUMBER: X3ZBTMOD2
CE: 0307-ARAJ 0079
BQB ID: B016360
IEEE: D4-02-4A
®
smartphone is not on a subscription plan the phone will not allow the installation of the
* Tablet must meet requirements: Bluetooth® with SPP prole support, Internet connectivity, be
able to read phone book contacts, and send SMS messages. BlackBerry® Playbook does not meet
SecuRemote™ requirements
© 2011 Belwith® Products, LLC. | All Rights Reserved | www.firstwatchsecurity.com | 72291 Rev B
4
Page 5
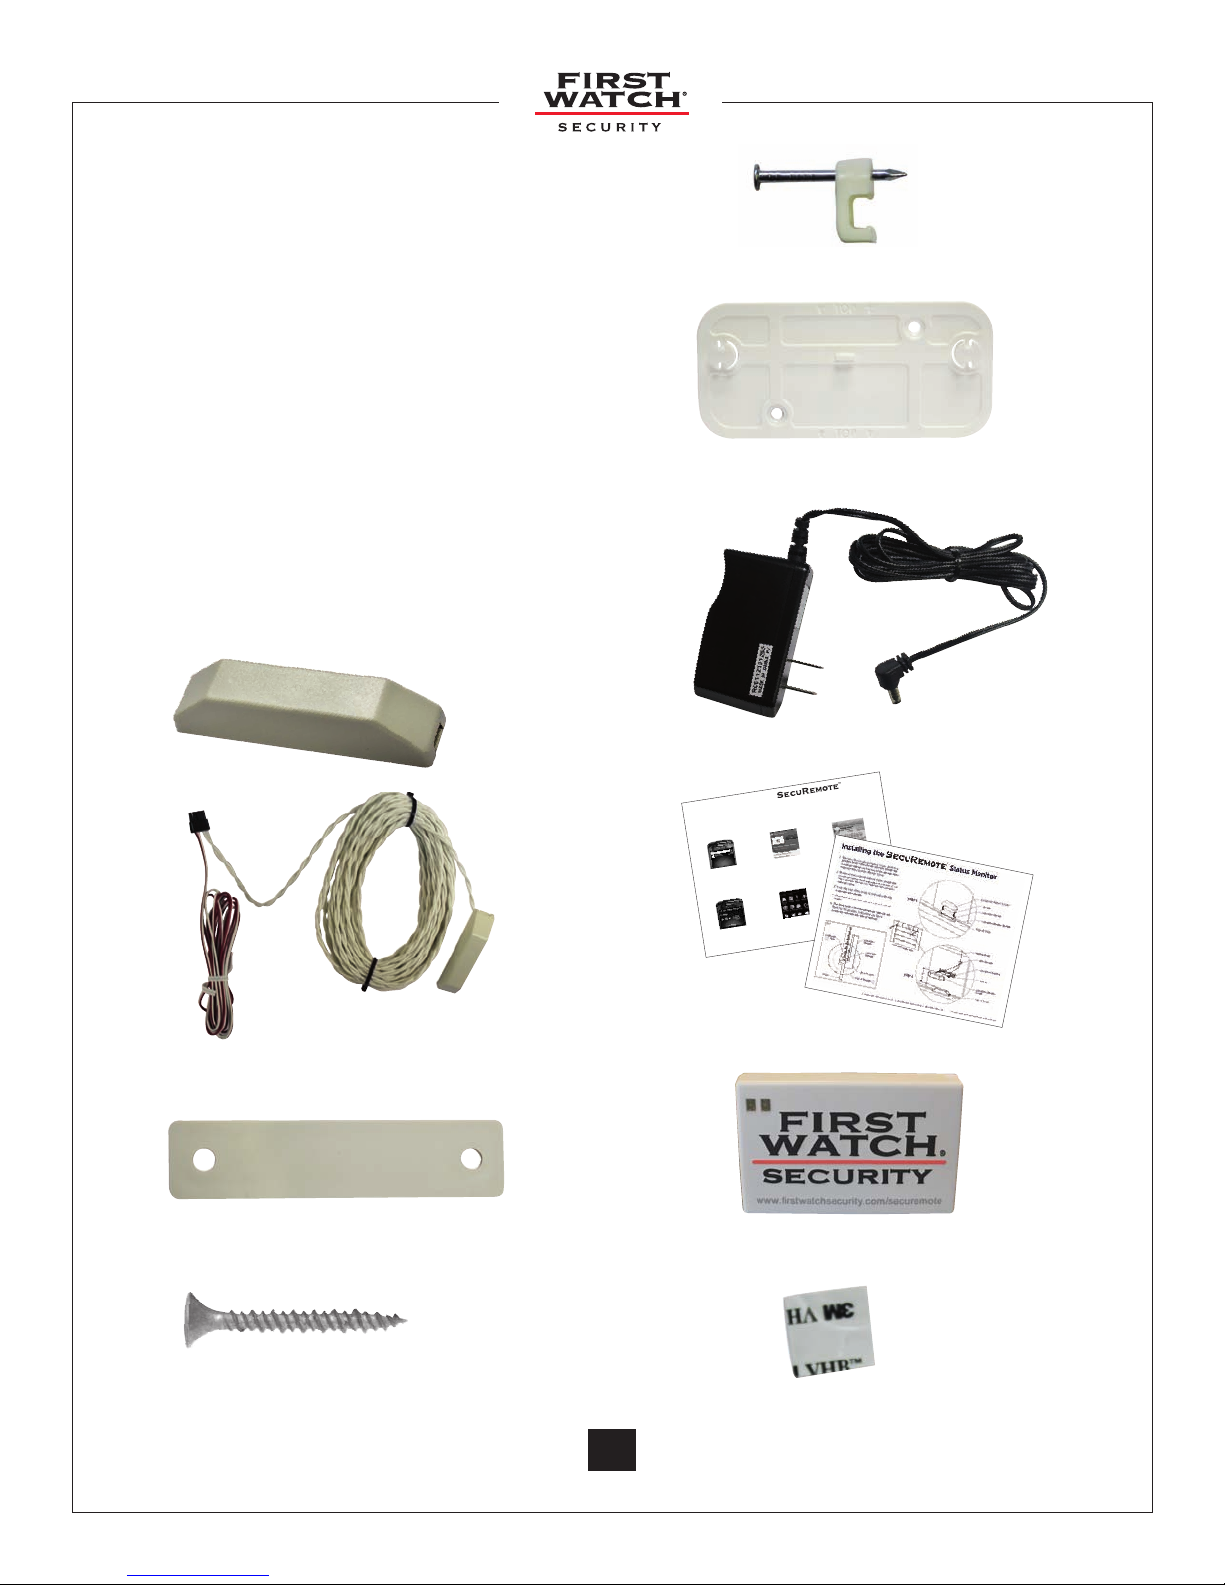
WHAT’S IN THE BOX
© 2011 Belwith
®
Products, LLC | All Rights Reserved Instruction # SRINS0711
# 72172 Rev B
SecuRemote™ for Blackberry
®
Download the SecuRemote™ Application
for Blackberry
®
1. Download the app through the
Blackberry
®
App World™ on your mobile
phone.
2. Type in “SecuRemote”.
3. Once the SecuRemote™ app appears,
select download app.
4. Download the application. By default the
SecuRemote™ application icon is placed
in the download folder.
5. Make sure your Bluetooth
®
is turned on.
To pair, your smartphone must be within
80-100 ft. of the SecuRemote™ device.
SecuRemote™ for Android™
Download the SecuRemote™ Application
for Android™
1. Download the app through the Android™
Market on your mobile phone.
2. Type in “SecuRemote”.
3. Once the SecuRemote™ app appears,
select download app.
4. Download the application. By default the
SecuRemote™ application icon is placed
on your home screen.
5. Make sure your Bluetooth
®
is turned on.
To pair, your smartphone must be within
80-100 ft. of the SecuRemote™ device.
SecuRemote™ for iPhone
®
Download the SecuRemote™ Application
for iPhone
®
1. Download the app through the App
Store
SM
on your mobile phone.
2. Type in “SecuRemote”.
3. Once the SecuRemote™ app appears,
select download app.
4. Download the application. By default the
SecuRemote™ application icon is placed
on your home screen.
5. Make sure your Bluetooth
®
is turned on.
To pair, your smartphone must be within
80-100 ft. of the SecuRemote™ device.
Getting Started with your
Actual size not shown
1. Location Marker
2. Wiring Harness includes Location
Sensor with White Wires (30 feet)
and Bell Wires (6 feet).
3. Location Marker Buer
4. Screws (Qty. 6)
5. Wire Staples (Qty. 10)
6. Mounting Plate
7. 110 Volt AC Power Supply
8. Instructions (Qty. 2)
9. SecuRemote™ Device
5.
6.
10. Adhesive Pads (Qty. 2)
1.
2.
6 feet
3.
7.
8.
30 feet
9.
4.
© 2011 Belwith® Products, LLC. | All Rights Reserved | www.firstwatchsecurity.com | # SRG717© 2011 Belwith
5
10.
5
Page 6

TABLE OF CONTENTS
1. Introduction
1.1 What is SecuRemote™ .................................................................................................................8
1.1.1 Requirements Prior to Purchase .......................................................................................8
1.1.2 How it Works ..........................................................................................................................8
1.2 Local Mode .......................................................................................................................................8
1.3 Online Mode ....................................................................................................................................9
2. Using SecuRemote™
2.1 Install the SecuRemote ................................................................................................................10
2.2 Install the Status Monitor ...........................................................................................................11
3. Download, Pair, and Operate Software for BlackBerry
3.1 Download through the BlackBerry® App World™ ............................................................12
3.2 Move the SecuRemote™ Application ...................................................................................12
3.3 Turn Bluetooth® Connection on ..............................................................................................12
3.4 Plug n Pair™ for your BlackBerry® ..........................................................................................13
3.5 Operate SecuRemote on your BlackBerry®........................................................................14
®
4. Download, Pair, and Operate Software for iOS devices
4.1 Download the SecuRemote™ App through the App StoreSM .......................................15
4.2 Plug n Pair™ for your iOS device ............................................................................................16
4.3 Operate SecuRemote™ on your iOS device .......................................................................17
5. Download, Pair, and Operate Software for Android™
5.1 Download SecuRemote™ application ...................................................................................18
5.2 Plug n Pair™ for your Android™ ...............................................................................................18
5.3 Operate SecuRemote™ on your Android™ ..........................................................................19
© 2011 Belwith® Products, LLC. | All Rights Reserved | www.firstwatchsecurity.com | 72291 Rev B
6
Page 7

6. Application Menu Options
6.1 Plug n Pair™ ....................................................................................................................................20
6.2 Rename device ..............................................................................................................................20
6.3 Status Indicator .............................................................................................................................21
6.4 Users .................................................................................................................................................21
6.4.1 Add Users ..............................................................................................................................22
6.4.2 Add Users: BlackBerry® ....................................................................................................22
6.4.3 Add Users: iOS devices ....................................................................................................23
6.4.4 Add Users: Android™ ........................................................................................................23
6.4.5 Unlink Secure Key...............................................................................................................24
6.5 Help....................................................................................................................................................25
6.6 Settings ............................................................................................................................................25
6.6.1 Password Information ........................................................................................................25
6.6.2 Turn Discovery on/o .......................................................................................................26
6.7 Factory Reset for SecuRemote™ ............................................................................................27
6.8 Factory Reset for SecuRemote™ Application ...................................................................27
6.9 Removing the Application from your Smartphone .........................................................28
6.10 Update the SecuRemote™ Application ..............................................................................28
Introducing Keeler™ Door Lock .............................................................................................................29
7. Frequently Asked Questions ..........................................................................................30
10. Addendum First Watch® Online User Manual .............................................32
© 2011 Belwith® Products, LLC. | All Rights Reserved | www.firstwatchsecurity.com | # SRG717© 2011 Belwith
7
7
Page 8

1. Introduction
1.1 What is SecuRemote™
SecuRemote™ is wireless integrated access management system comprising:
• One physical access control device
• A free, downloadable smartphone application
• A status monitor
• Online User-Access Management (First Watch® Online).
1.1.1 Requirements Prior to Purchase:
• Access to 110 Volt AC Outlet
• One of the following operating systems:
• iPod® touch (4th and 3rd generation)
• iPhone® 4, iPhone 3GS and iPhone 3G
• iPad® 2 and iPad
• Google / Android™ V2.1+ / Android™ tablet*
• BlackBerry® / RIM® V4.7+
• The digital data network of the cellular phone carrier and the availability of Bluetooth®
wireless communication readily available in smartphones.
• Access to respective Apple®, BlackBerry®, and Android™ application stores to download the
free application.
• Garage door openers, electric gates, Keeler™ Architectural Door Hardware Locks, electric
door strikes.
1.1.2 How It Works
SecuRemote™ uses unique technology to transparently deliver powerful communication,
authentication, and functionality. The communication process starts when the primary
user pairs his/her phone with a SecuRemote™ device. The device registers the rst user’s phone
number as that of the “Administrator.”
NOTE: The Administrator must change the default Administrator password after initial pairing. The
SecuRemote™ application cannot be used until this is done. We recommend that you also change
your Bluetooth® password at this time.
The Administrator can then add up to four additional users (for a total of ve users) from his/her
smartphone. (More users can be added through First Watch® Online.) Each user will receive a text
message with a link to download the application. Users must be within 60 to 100 feet of the device
to use SecuRemote™.
1.2 Local Mode
Local mode provides direct access functionality for up to 5 users and unlimited devices directly
from the administrator’s smartphone. Users can have unlimited access or temporary access. Local
mode does not require a subscription fee.
© 2011 Belwith® Products, LLC. | All Rights Reserved | www.firstwatchsecurity.com | 72291 Rev B
* Tablet must meet requirements: Bluetooth® with
SPP prole support, Internet connectivity, be able to
read phone book contacts, and send SMS messages.
8
BlackBerry® Playbook does not meet SecuRemote™
requirements
Page 9
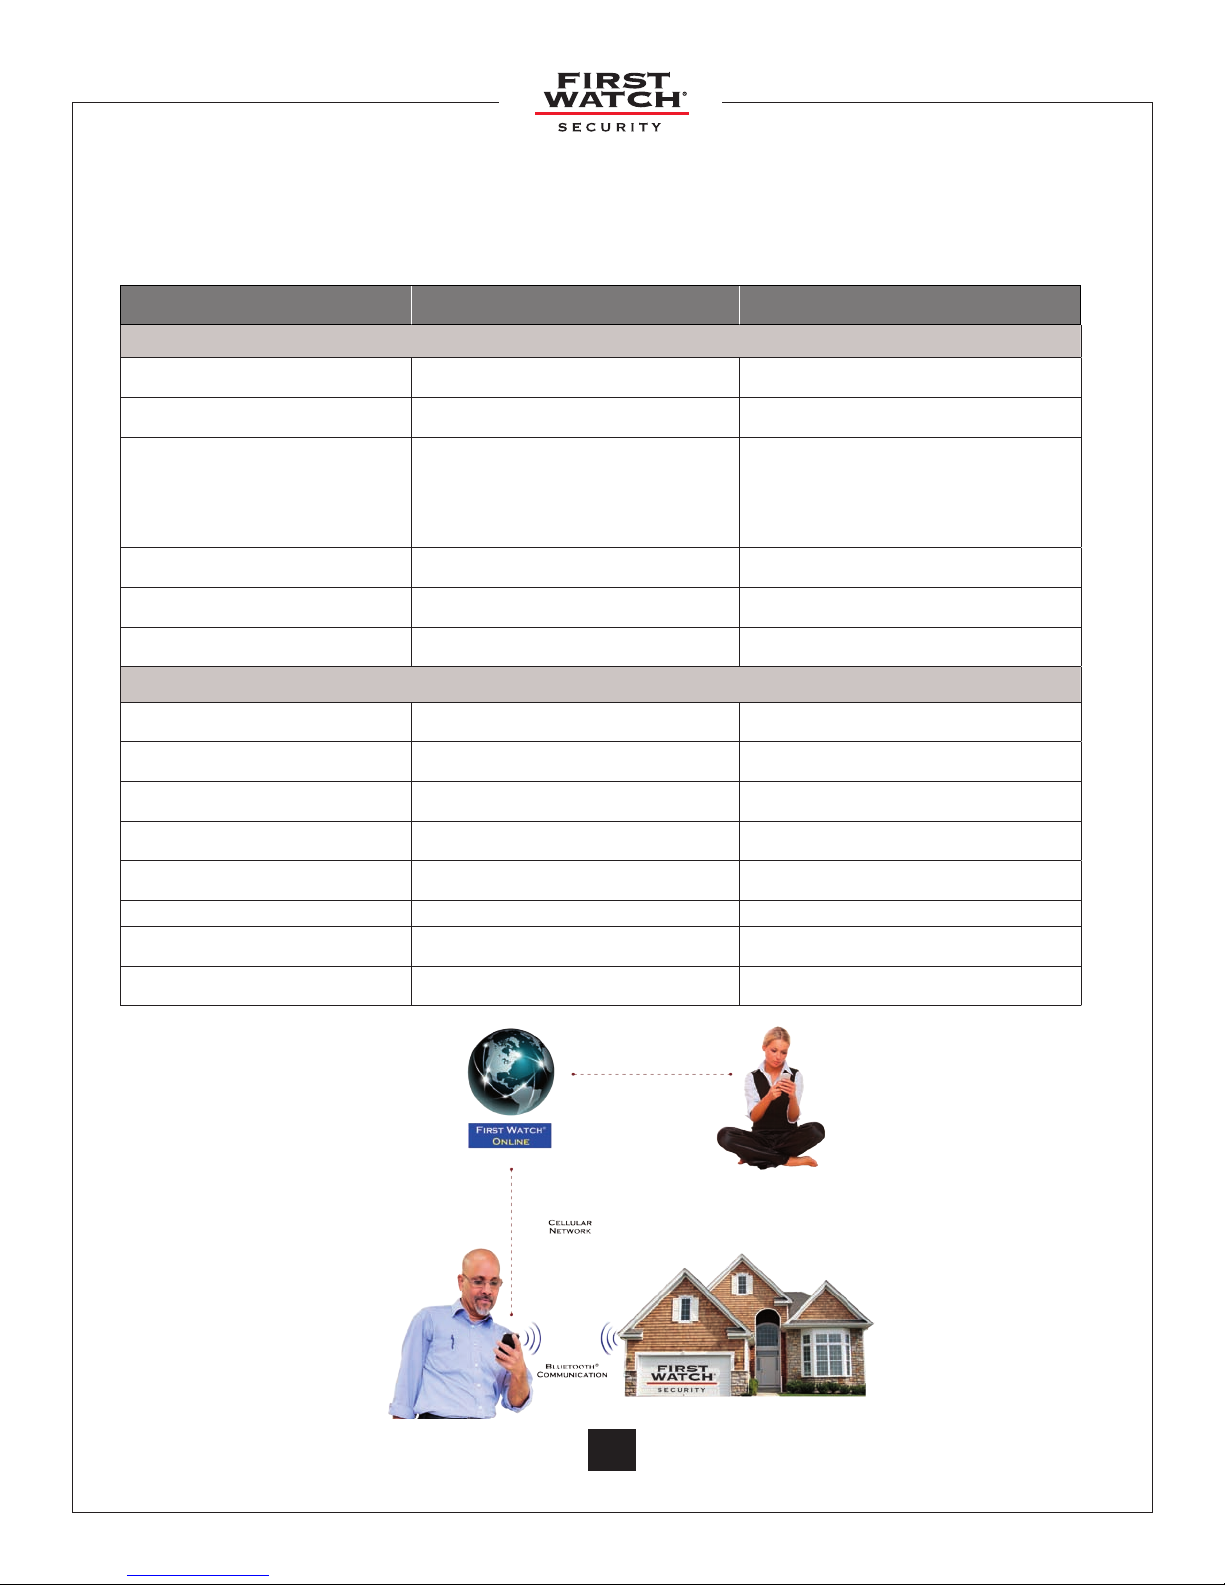
1.3 Online Mode
Online mode provides a scheduling engine that allows the administrator to associate multiple
schedules to multiple users and/or devices. An annual subscription fee is required for an online
account. For more information visit www.rstwatchonline.com.
OPERATING MODE LOCAL FIRST WATCH® ONLINE
CAPABILITIES
SecuRemote™ Activation Range Within Bluetooth® range (60’ - 100’) Within Bluetooth® range (60’ - 100’)
Data Location On the SecuRemote™ device Online
Bluetooth
®
Communication Method
Manage User Access Within Bluetooth
# of Users: Up to 5 users per device Unlimited
# of Devices: Unlimited Unlimited
Bluetooth
Communication between
device and smartphone
®
range (60’ - 100’) Anywhere with web-access
Web connectivity through cellular or
®
communication between
device and smartphone
+
WiFi network
ACCESS MANAGEMENT FEATURES
Add/Edit/Delete Users Yes Yes
Register/Edit/Remove Devices Yes Yes
URL Invite to New User Via SMS Via E-mail
E-mail Notication Alerts Yes Yes
Door Status Check Works with status monitor Works with status monitor
Create/Modify Schedules Limited Yes
Audit Log Availability No Yes
Multiple E-mail Recipients No Ye s
© 2011 Belwith® Products, LLC. | All Rights Reserved | www.firstwatchsecurity.com | # SRG717© 2011 Belwith
9
9
Page 10
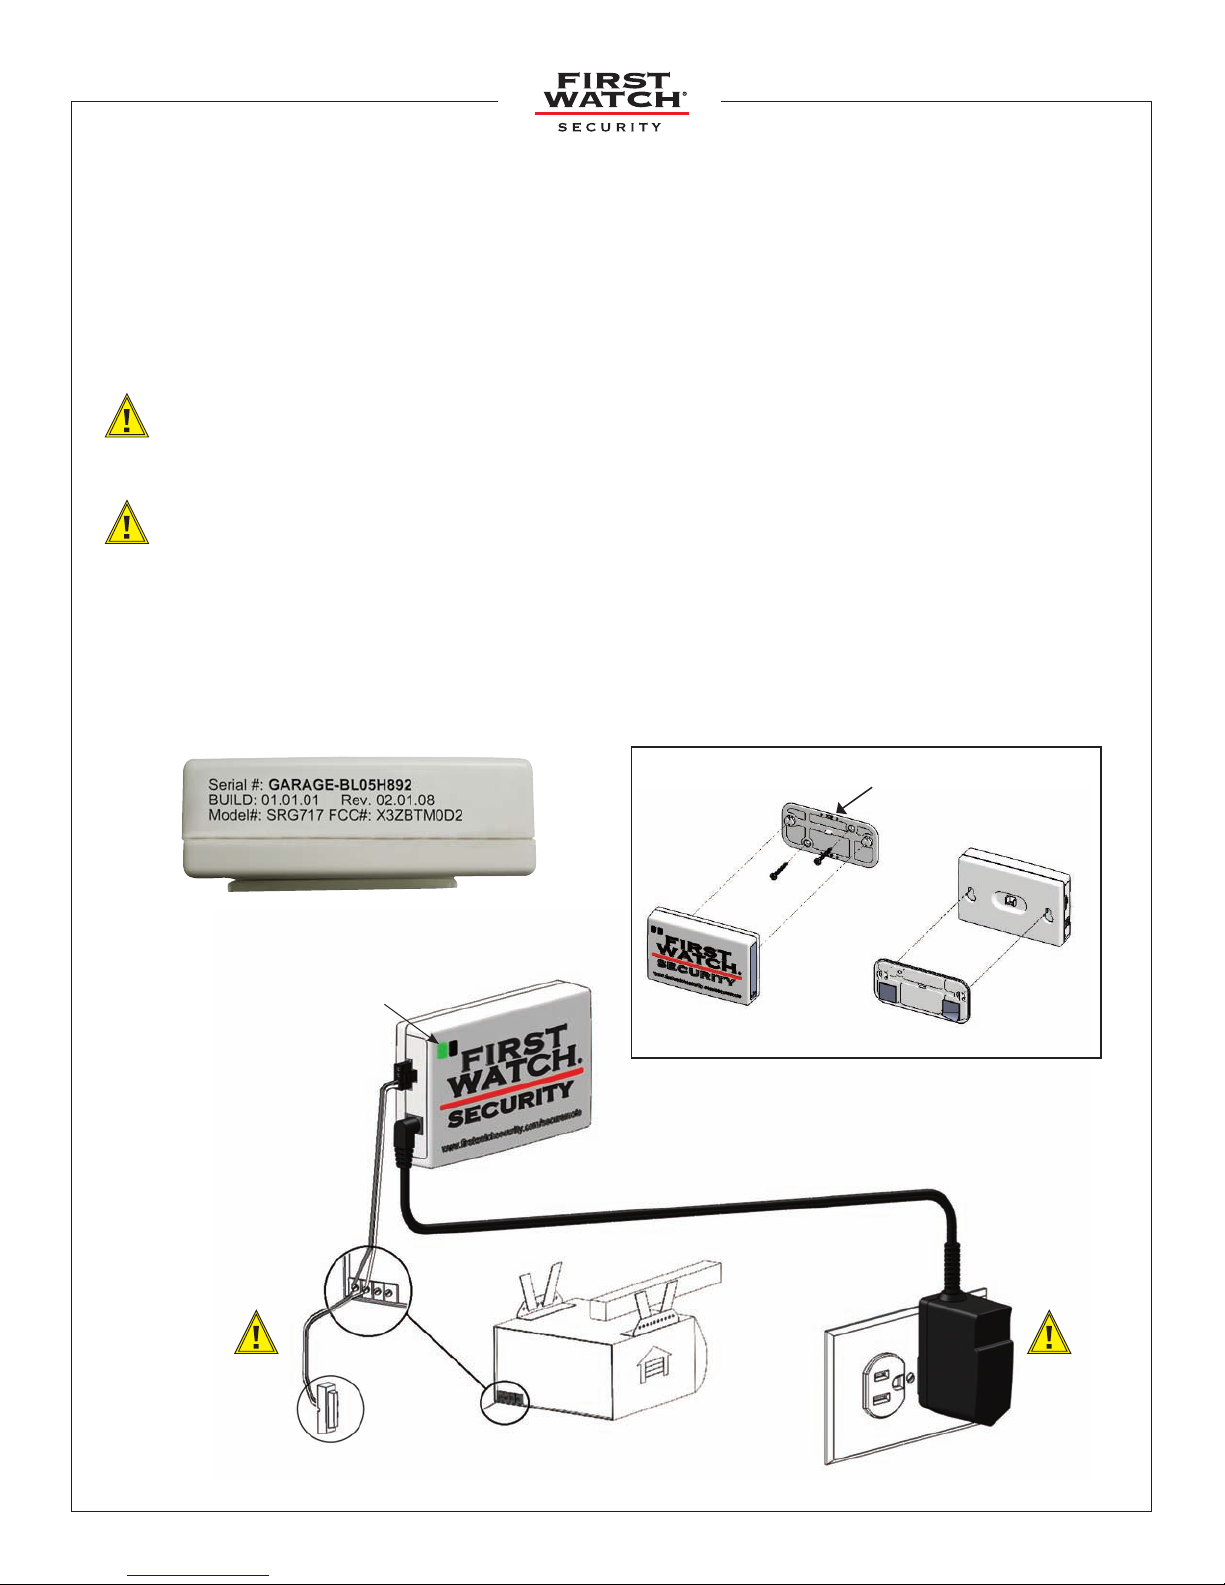
2. Using SecuRemote™
Setting up and using SecuRemote™ is easy.
2.1 Install the SecuRemote™
1. Unwrap the SecuRemote™ device and take note of the serial number on the side of the
device. You will need it when pairing the device with your smartphone.
2. Attach the mounting plate to a wall or ceiling location close to an A/C outlet using the
screws included in the box OR use the double-sided tape provided to place the device near
the garage door opener OR alternately near the wall counsel.
3. Attach the red and white bell wires of the SecuRemote™ device to (a) the wall counsel
button or (b) to the control connectors on the door opener. Match the wire colors
together. Do not disconnect the existing wires to the garage door unit. (To avoid electric
shock, DO NOT insert wires into A/C outlet!)
4. Plug the SecuRemote™ into an A/C outlet. (Caution: Must plug into a 110 Volt A/C outlet)
5. The blue light will ash three times indicating activity with the device. The green power
light remains on and indicates the device has power and is on.
NOTE: For information regarding installation of the SecuRemote™ for electric gates or strikes
please contact our Customer Service department.
1.
5. Ensure the green
power light is on
3. Attach the
red and
white bell
wires
2.
Mounting Plate
4. Plug into
an A/C
outlet
(a) (b)
© 2011 Belwith® Products, LLC. | All Rights Reserved | www.firstwatchsecurity.com | 72291 Rev B
10
Page 11
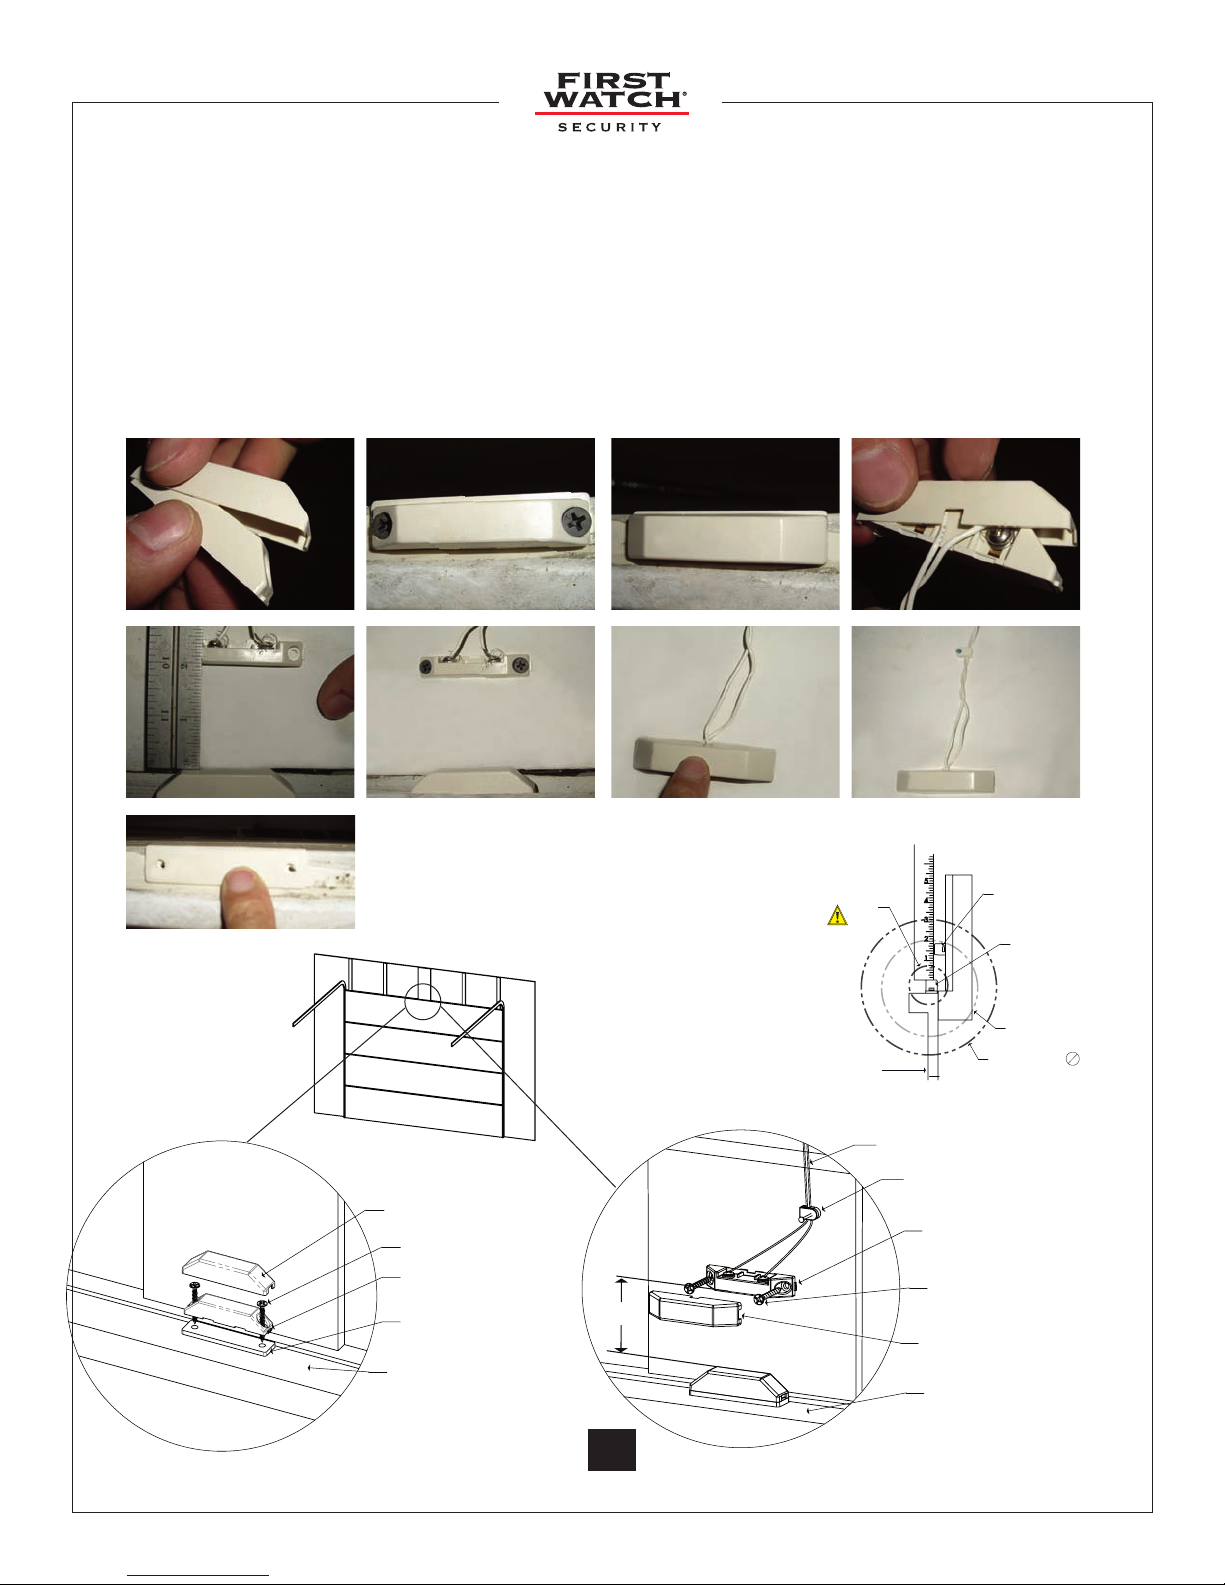
2.2 Install the SecuRemote™ Status Monitor
1. Remove the Location Marker Cover. With the garage door in the closed position, install the
Location Marker on the top of the garage door. Replace the Location Marker Cover.
2. Remove the Location Sensor Cover. Install the Location Sensor on the garage wall within 2” of
the Location Marker (c). Replace the Location Sensor Cover.
3. Tack the two white wires to the wall with the supplied wire staples.
4. Operate the door from close to open to close again.
5. The blue light on the SecuRemote™ device will ash for a few seconds, indicating you have
correctly installed the Status Monitor.
1. 1. 1. 2.
2.
*
2. 2. 3.
* Location Marker Buffer is only
required when mounting on a
steel door.
Step 1 Step 2
Inside of Garage Door
Location Marker Cover
Screw
Location Marker
* Location Marker Buer
Top of Door
2”
(c)
Collision
Risk
Door
White Wires
Wire Staple
Location Sensor
Screw
Location Sensor
Cover
Top of Door
Location
Sensor
Location
Marker
Best Mount
Out of Range
© 2011 Belwith® Products, LLC. | All Rights Reserved | www.firstwatchsecurity.com | # SRG717© 2011 Belwith
11
11
Page 12
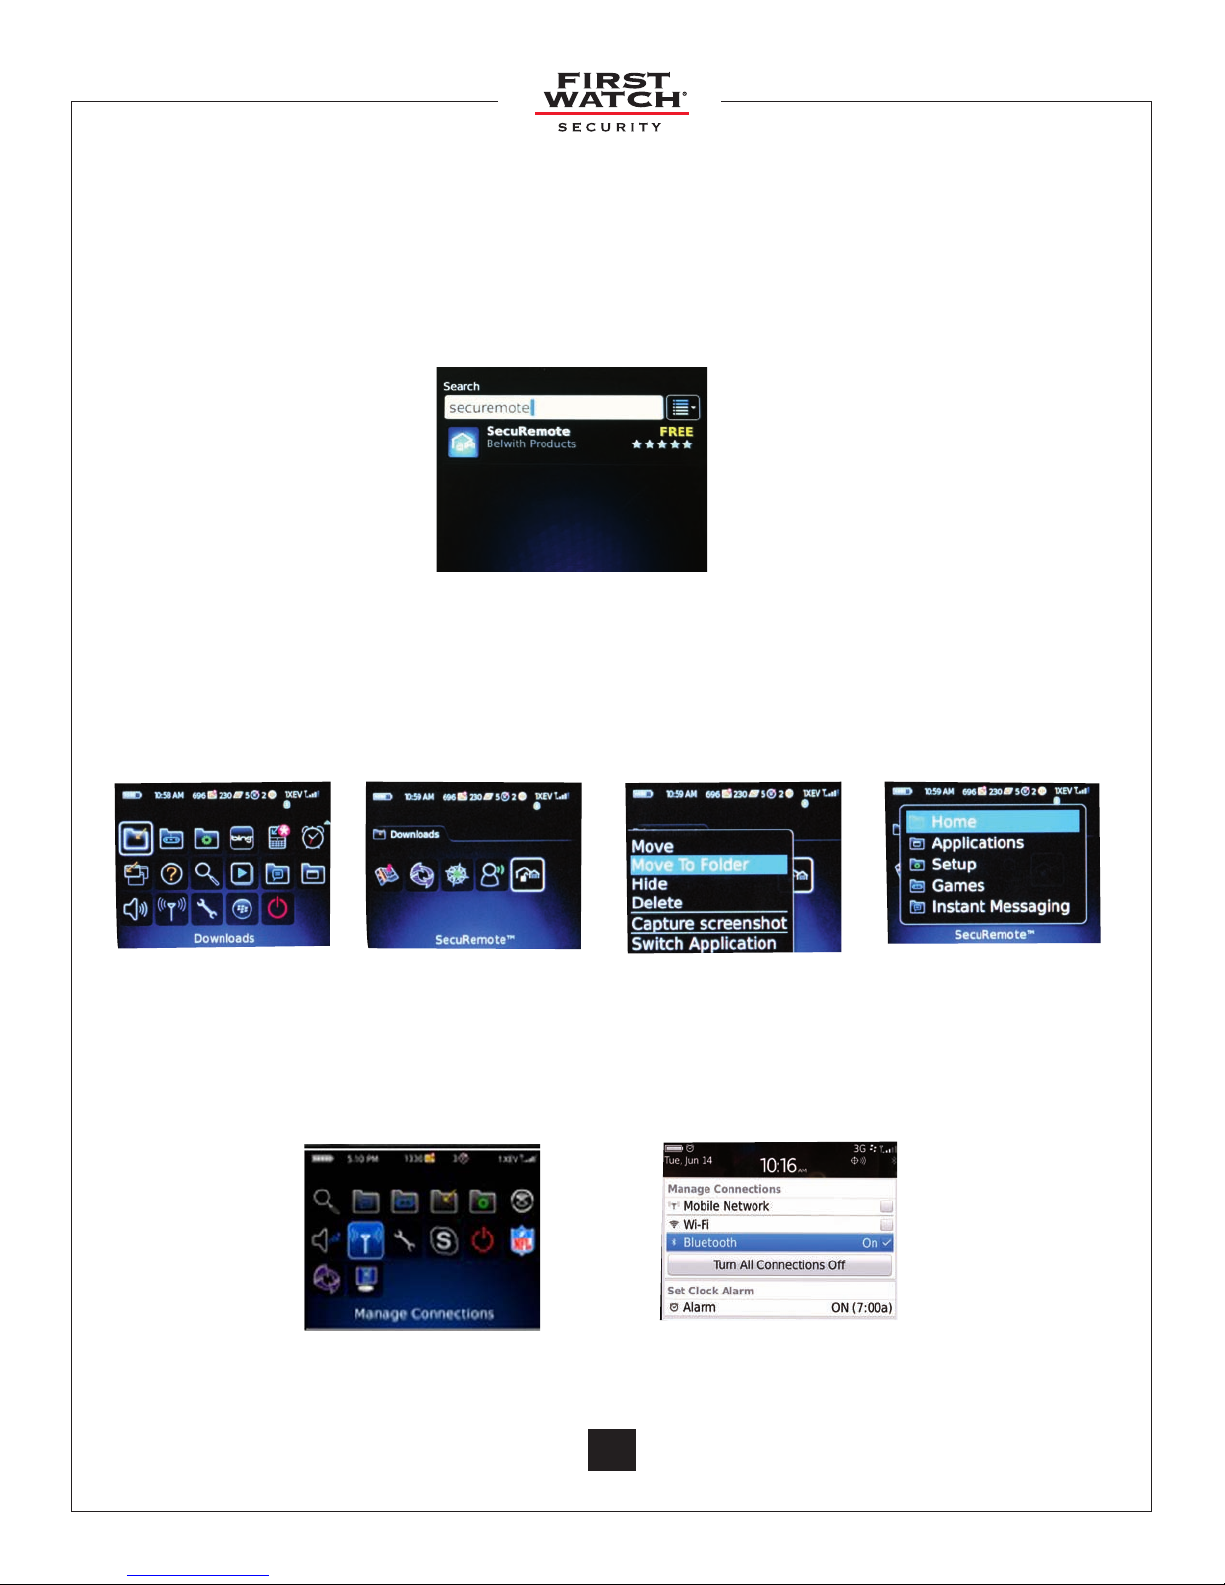
3. Download, Pair, and Operate Software for BlackBerry
®
For BlackBerry® / RIM® V4.7+*
3.1 Download through the BlackBerry® App World™
A. Search for the keyword “SecuRemote”
B. Download the application. By default, the SecuRemote™ application icon is placed in the
download folder. You can move it to the home folder by using the move option. (See 3.2)
A. Search for the app
3.2 Move the SecuRemote™ Application
NOTE: By default, the SecuRemote™ application icon is placed in your download folder.
You can move it to the home folder as follows:
A. Click on the
Downloads icon
B. Select the
SecuRemote™ icon
C. Select the “Move
To Folder” option
from the menu
D. Select “Home”,
to place the
SecuRemote™ icon
on the home screen
3.3 Turn Bluetooth® Connection On
A. Go to the Manage
Connections Folder
© 2011 Belwith® Products, LLC. | All Rights Reserved | www.firstwatchsecurity.com | 72291 Rev B
B. Check Bluetooth® so
it is turned on
12
* BlackBerry® Playbook does not meet SecuRemote™
requirements
Page 13
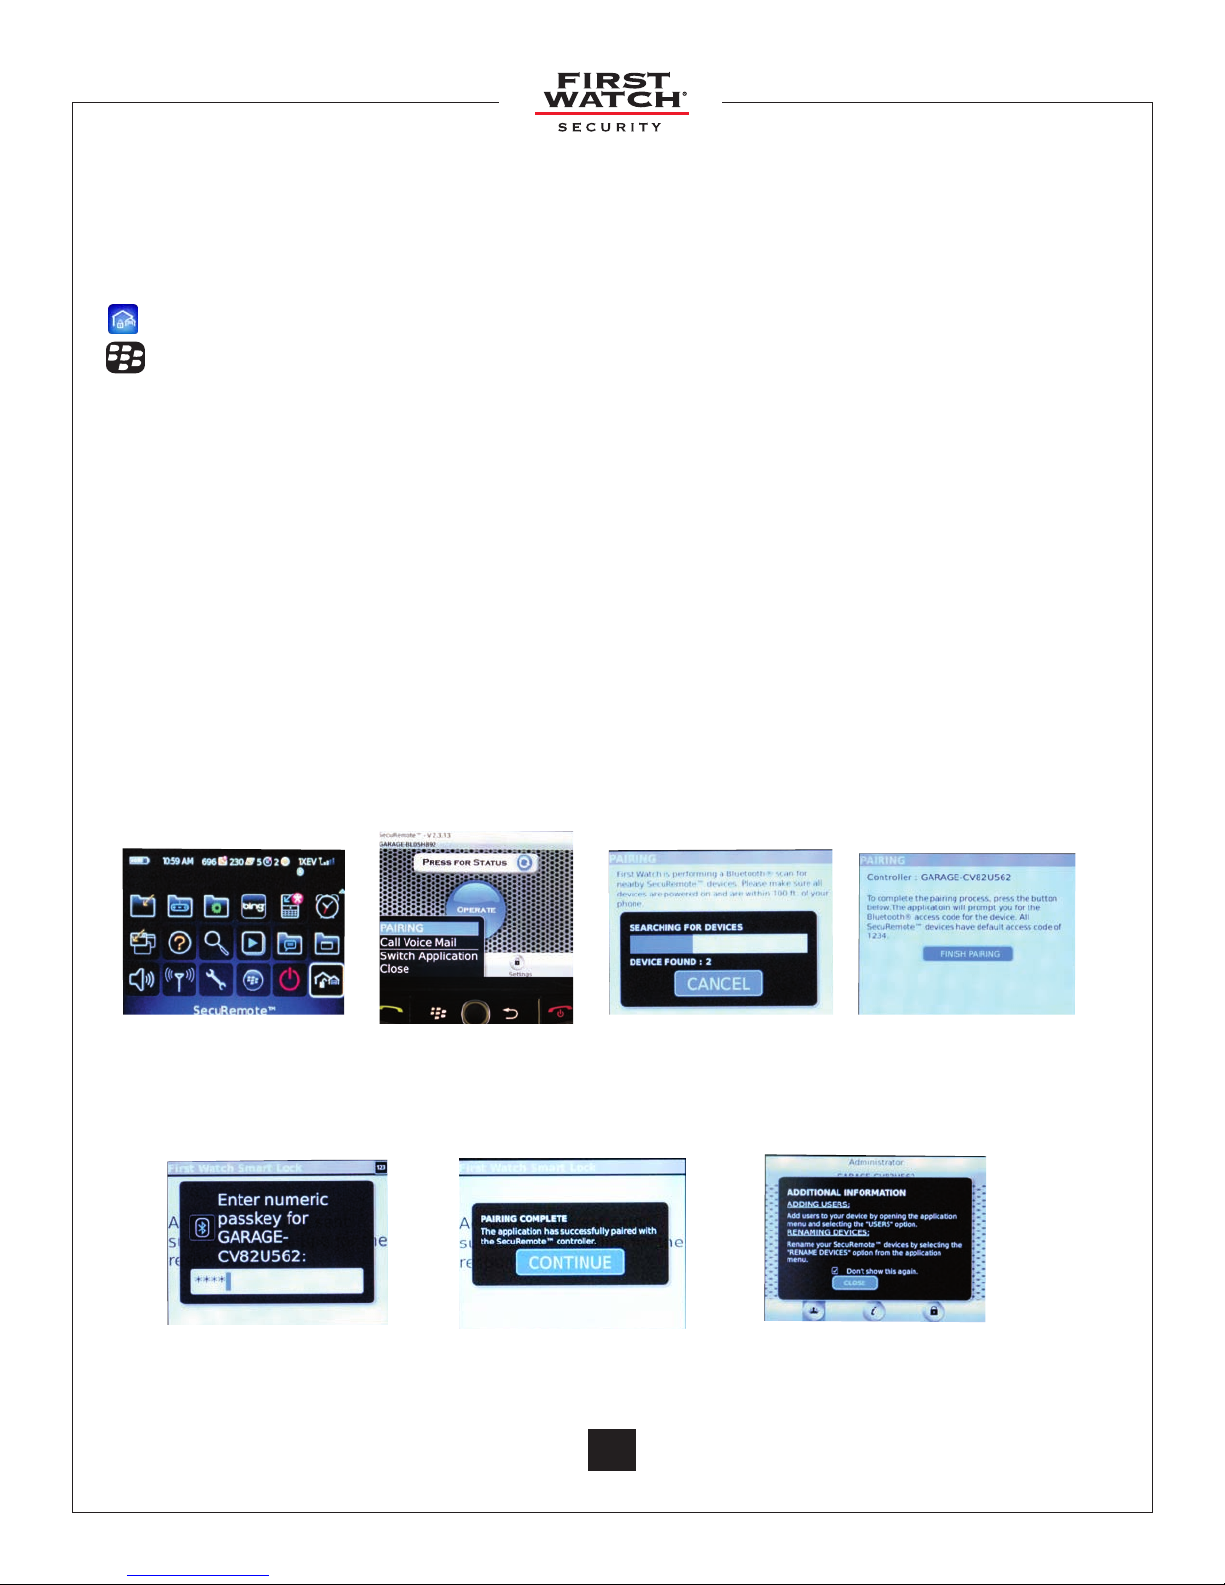
3.4 Plug n Pair™ for your BlackBerry®
NOTE: Perform this step the rst time you activate your SecuRemote™ device, or after
reinstalling. Your smartphone must be within 60 to 100 feet of the SecuRemote™ device.
A. Click on the SecuRemote™ icon to “Run” the application.
B. From the BlackBerry® menu, select “Pairing” from the list of options
C. The application will search for SecuRemote™ devices within Bluetooth® connectivity
range and display the SecuRemote™ devices found.
D. Select the SecuRemote™ device whose name matches the serial number on your
SecuRemote™ device. Click on “Finish Pairing”
E. You will be prompted to enter the Bluetooth® access code (1234).
NOTE: The Bluetooth® access code is always numeric. You do not need to hold down the
Alt key.
F. Upon successful pairing, you will be prompted to “Continue”. Click on “Continue”
G. The “Additional Information” pop-up will appear, instructing you to add users and/or
assign a user-friendly name to your SecuRemote™ device. Click on “Close”. You may
click on the do not show again check box to disable this feature
NOTE: You can rename the device anytime you wish, see 6.2 for more information.
H. You will be directed to the “Home” screen. The Home Screen will display the
SecuRemote™ device with the same name that appears on your box.
A. Run the app B. Begin Pairing C. Search for devices D. Select your device
E. Enter access code F. Successful Pairing G: Additional Info
© 2011 Belwith® Products, LLC. | All Rights Reserved | www.firstwatchsecurity.com | # SRG717© 2011 Belwith
13
13
and nish pairing
Page 14
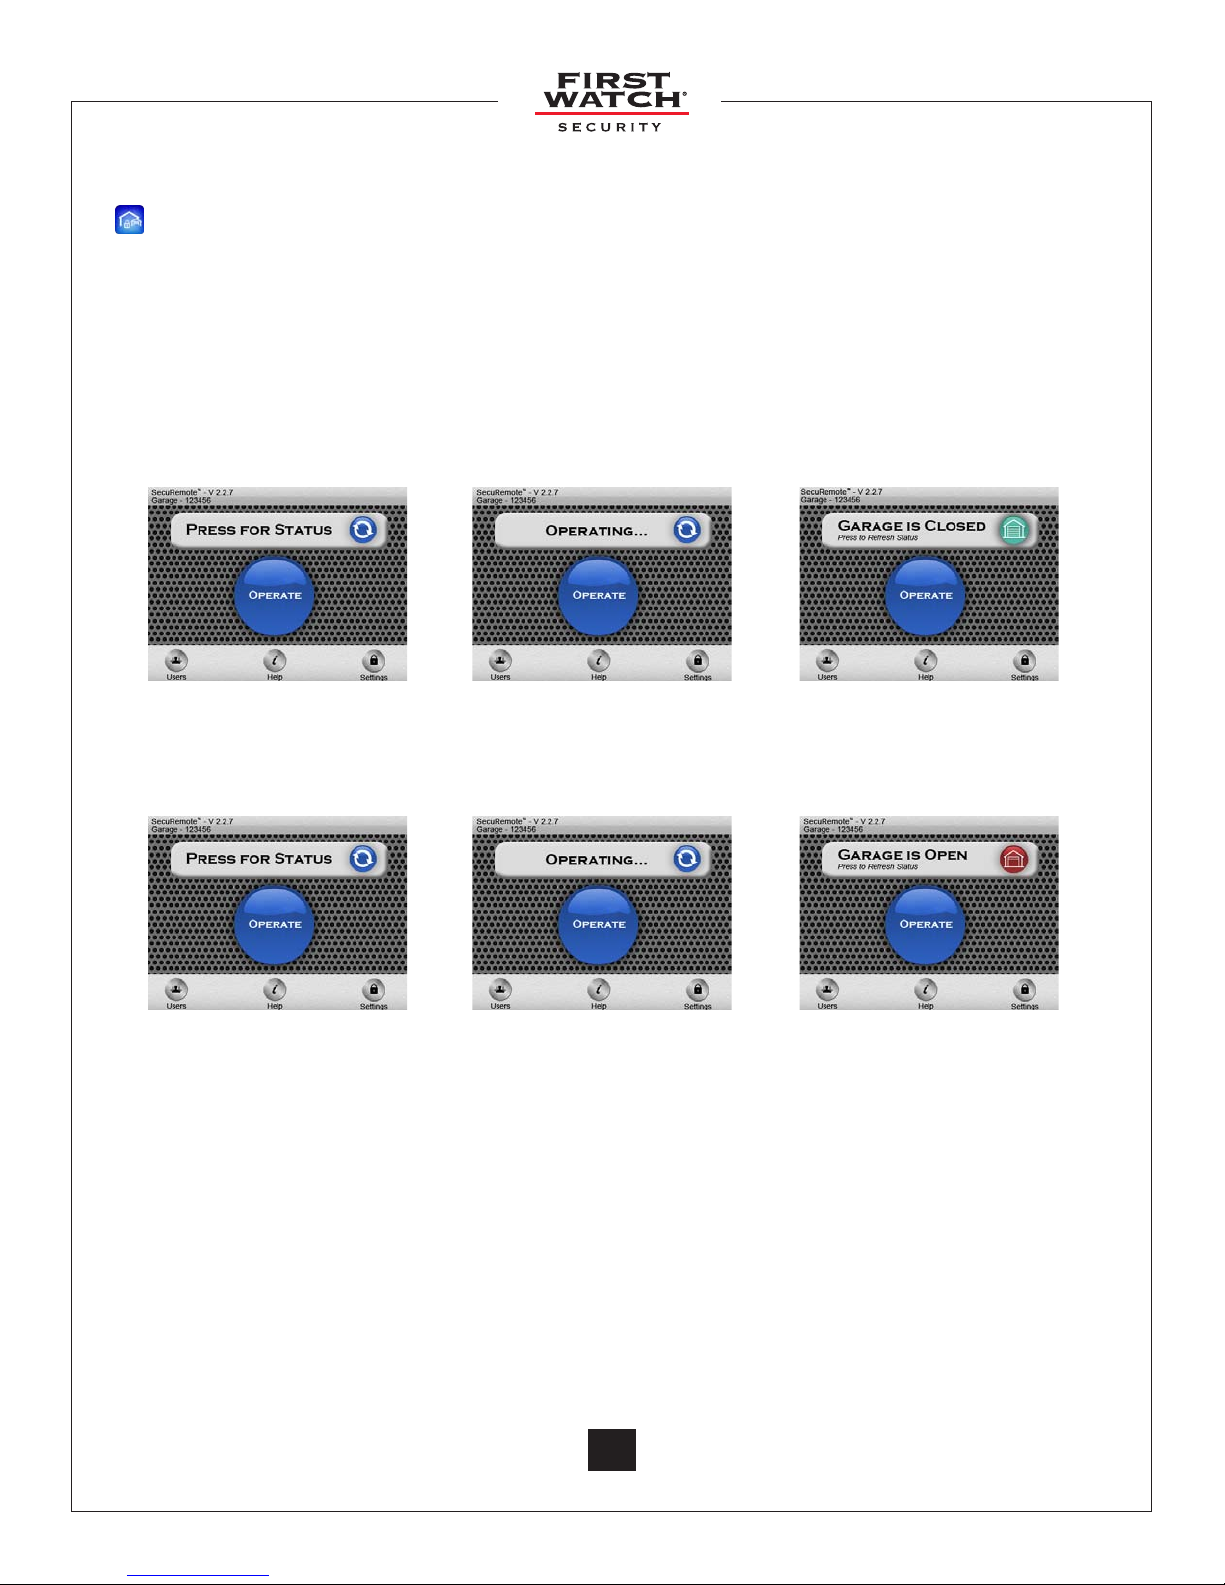
3.5 Operate SecuRemote on your BlackBerry®
A. Click on the SecuRemote™ icon to “Run” the application.
B. Select the “Operate” button.
C. The wheel of the status bar will begin spinning and indicate that the device is
operating with the garage door.
D. When the device is done operating, the status bar will indicate the status of the garage
door: “Garage is Open Press to Refresh Status” or “Garage is Closed Press to Refresh
Status.”
F. After 30 seconds, the app returns to its default state.
B. Select the “Operate”
button
C. The device works to open
the garage door
D. The status bar indicates
the position of the garage
door
B. Select the “Operate”
button
C. The device works to open
the garage door
D. The status bar indicates
the position of the garage
door
You should always download the SecuRemote™ directly from your smartphone’s store as this practice ensures
future automatic app improvements/updates. However, there may be situations where this is not feasible. For
instance, if a BlackBerry® smartphone is not on a subscription plan the phone will not allow the installation of
the “app world” store. In this case consider two other options:
1. Use your smartphone’s web browser to download the SecuRemote™ app from
2. Use your computer’s web browser to download the app from
However, neither one of these two options will keep the app automatically updated. Instead, updates will
require manual downloads as described above. The le name of the app shows the latest revision number.
www.rstwatchsecurity.com
www.rstwatchsecurity.com to your computer and then use your desktop manager to install it to
your smartphone.
© 2011 Belwith® Products, LLC. | All Rights Reserved | www.firstwatchsecurity.com | 72291 Rev B
14
Page 15
4. Download, Pair, and Operate Software for iOS devices
For iOS devices: iOS 4.3.2 and higher operating system.
• iPhone® 3G, 3GS and 4G
• iPod touch® 3G and 4G
• iPad® 1 and 2.
If you are accessing SecuRemote™ through an iPhone®, perform the following steps:
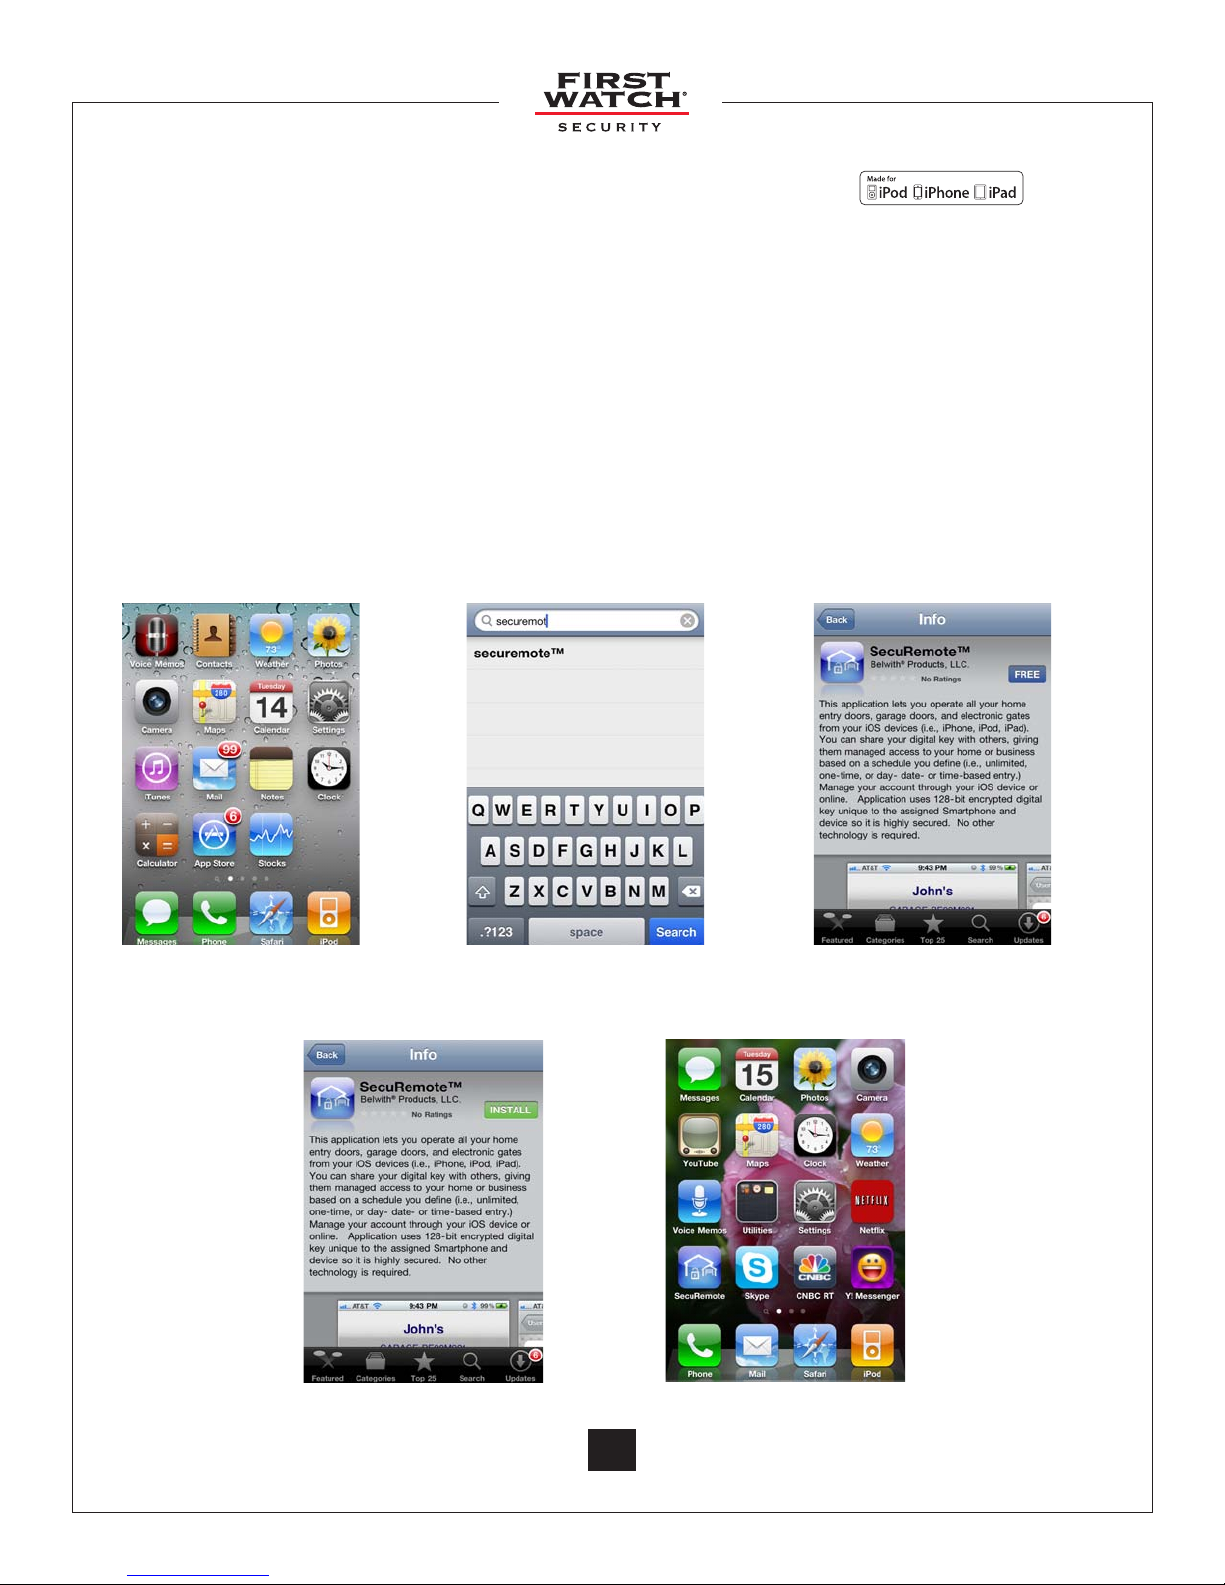
4.1 Download the SecuRemote™ App through the App StoreSM
A. Enter the App Store
B. Search for keyword “SecuRemote™.”
C. Download the application by touching “Free”, then “Install”. You will then need to enter the
password to your Apple® product. By default, the SecuRemote™ application icon is placed in
the rst available spot on your home screen.
SM
A. Enter the app store B. Search for SecuRemote™ C. Download the application
Press the free button
C. Download the application
Press the Install button
15
15
© 2011 Belwith® Products, LLC. | All Rights Reserved | www.firstwatchsecurity.com | # SRG717© 2011 Belwith
The SecuRemote™
application is installed
Page 16
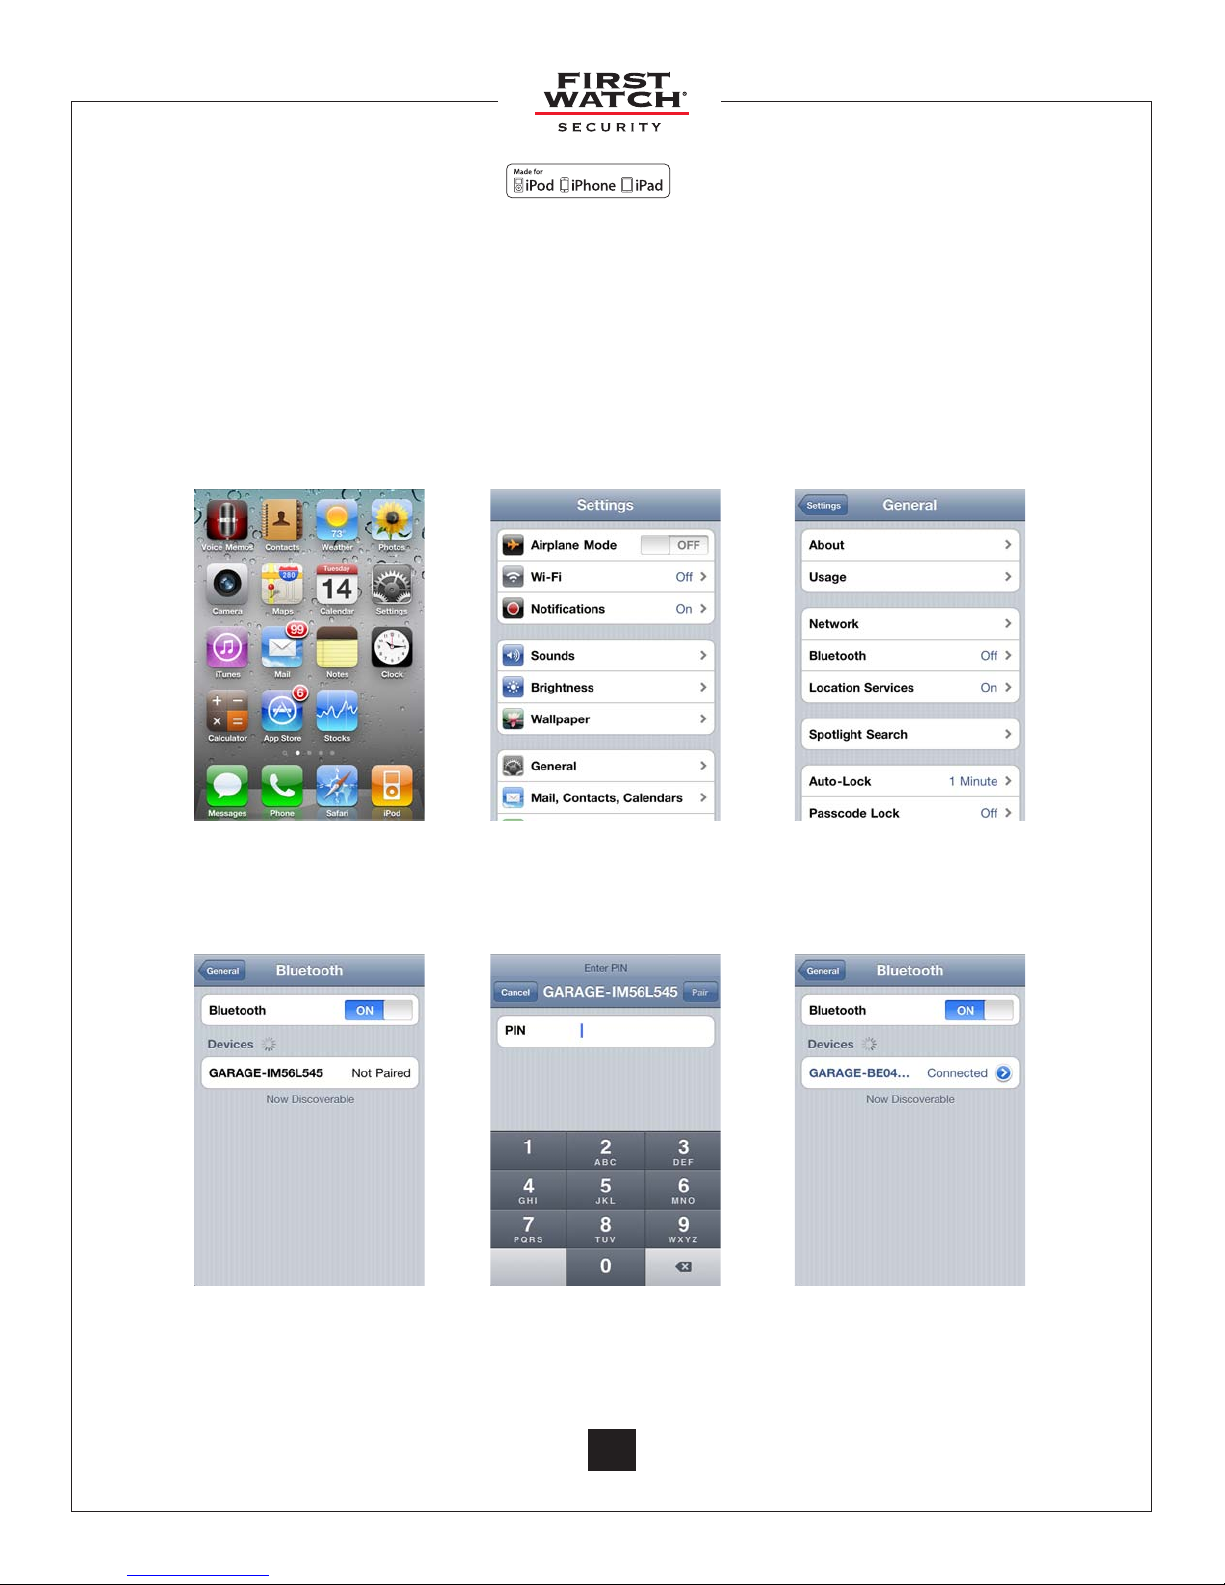
4.2 Plug n Pair™ for your iOS device
NOTE: Perform this step the rst time you activate SecuRemote™, or after reinstalling. Your
smartphone must be within 60 feet to 100 feet of the SecuRemote™ device.
A. Launch the “Settings” app on the home screen.
B. Choose “General” from the list on the rst screen.
C. Choose the “Bluetooth®” Option and ensure Bluetooth® is turned on.
D. Click on your device and enter the pin for your device. (default 1234)
E. Your SecuRemote™ device is connected.
A. Touch Settings
B. Touch General C. Turn Bluetooth® on
D. Click on your device D. Enter your 4-digit pin E. Your SecuRemote™
device is connected
© 2011 Belwith® Products, LLC. | All Rights Reserved | www.firstwatchsecurity.com | 72291 Rev B
16
Page 17
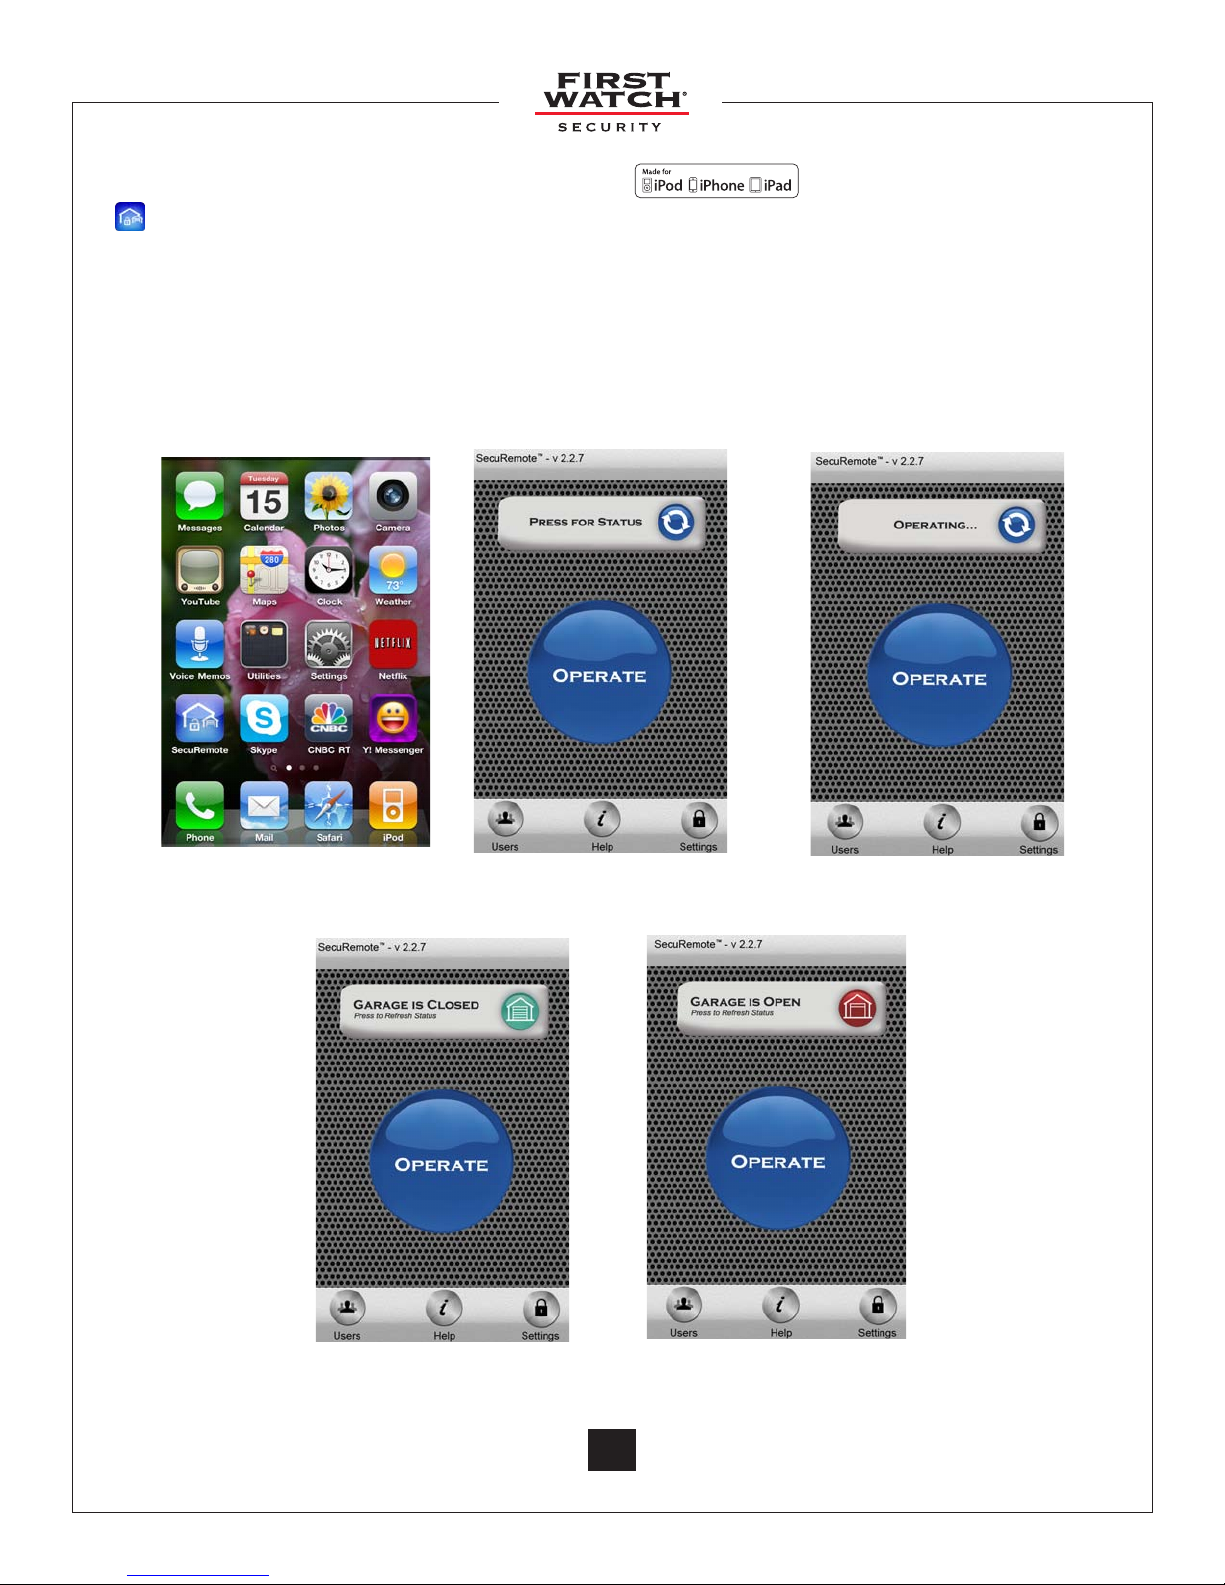
4.3 Operate SecuRemote™ on your iOS device
A. Click on the SecuRemote™ icon to “Run” the application.
B. You will be directed to the SecuRemote™ “Home” screen.
C. If you have more than one SecuRemote™ device, select the device to operate (select
the menu option “Home” and you will be directed back to the home screen).
D. Touch the “Operate” button to open or close your garage door.
E. The Status Bar will indicate that it is operating and the wheel icon will spin.
F. The Status Bar will indicate the status of your garage door.
A. Touch the SecuRemote™
application
F. Your device is done operating, the status of your garage
appears on the status bar.
D. Touch the “Operate”
button
17
17
E. The device is operating
© 2011 Belwith® Products, LLC. | All Rights Reserved | www.firstwatchsecurity.com | # SRG717© 2011 Belwith
Page 18
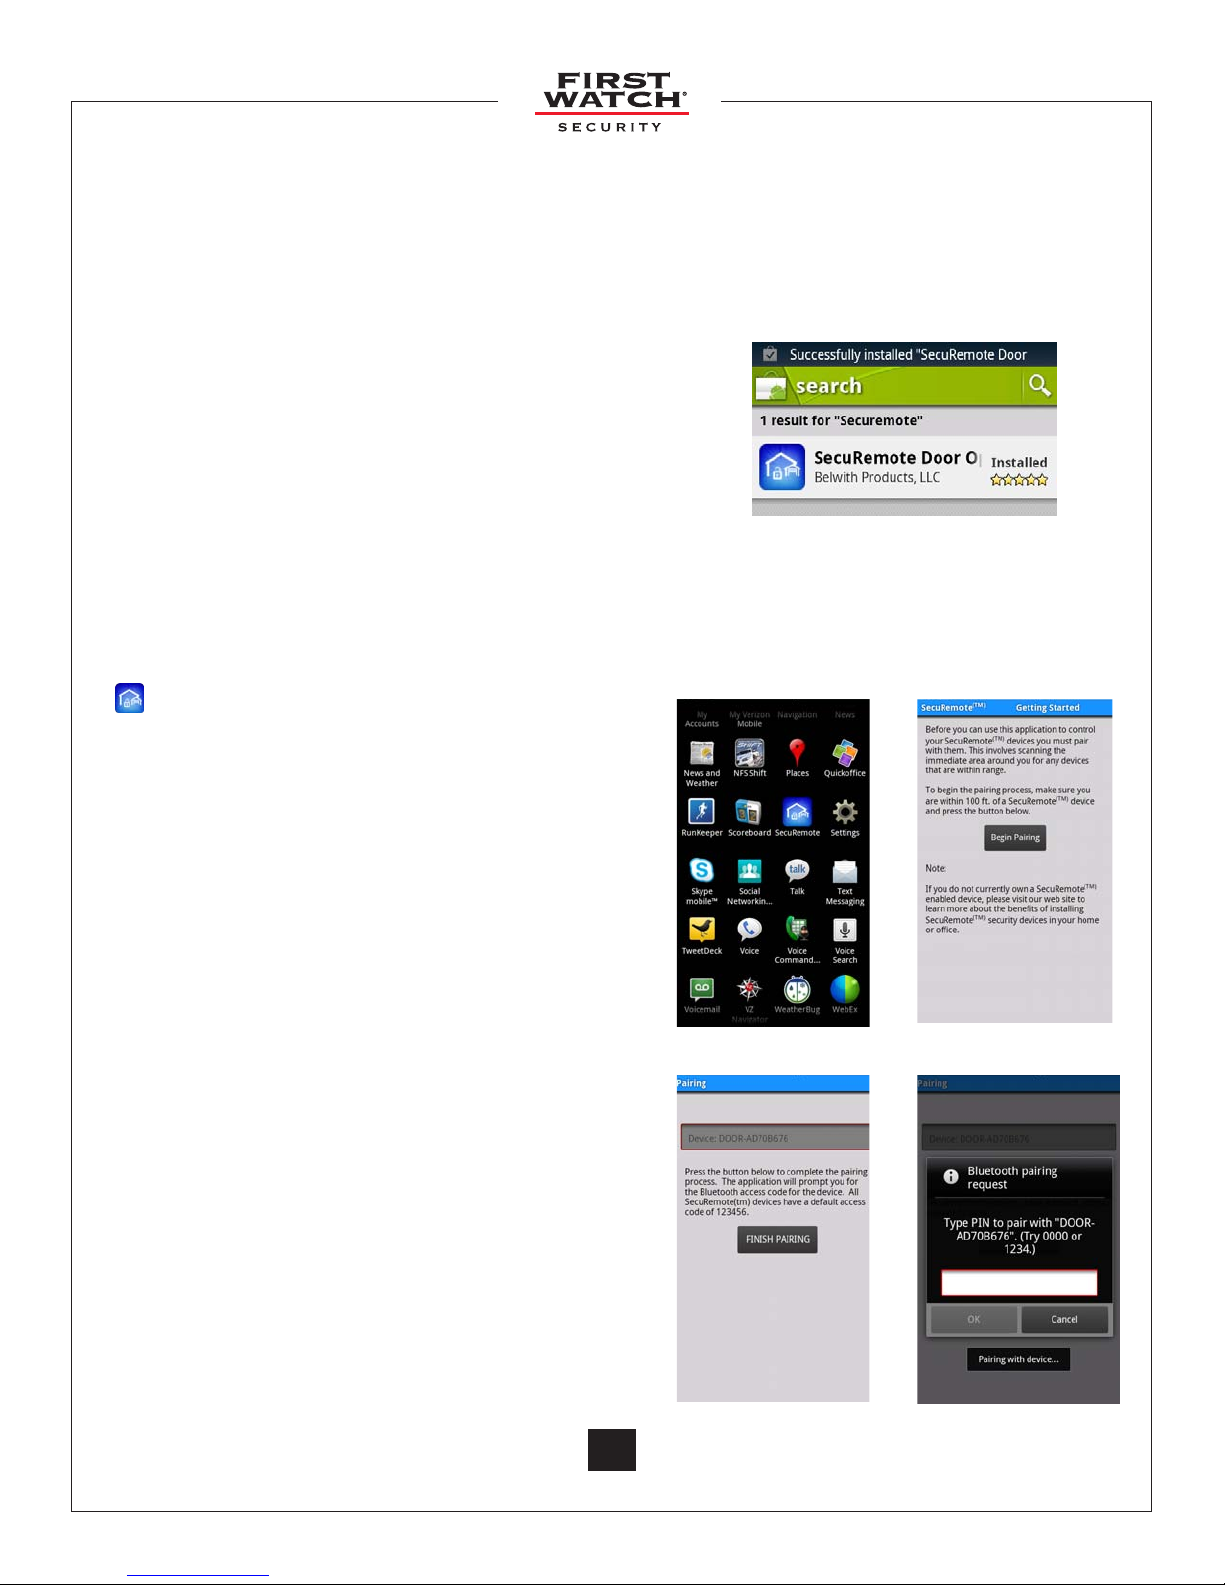
5. Download, Pair and Operate Software for Android™
After installing the SecuRemote™ device, download the appropriate software for your smartphone.
Download for Android™ based Phones
For Android™ OS 2.1 and higher operating system version.
• Motorola®
• HTC
• Samsung
• Google™
• Dell
5.1 Download SecuRemote™ Application
®
®
®
• Android™ Tablet*
A. To Download through the Android™ Market,
search for the keyword “SecuRemote.”
A. Search for the SecuRemote™
application
5.2 Plug n Pair™ for your Android™
NOTE: Perform this step the rst time you activate your SecuRemote™ device, or after
reinstalling. Your smartphone must be within 60 to 100 feet of the SecuRemote™ device.
A. Touch the SecuRemote™ icon to “Run” the
application.
B. A screen will appear prompting you to pair your
smartphone to the SecuRemote™ device. Click
on “Begin Pairing”
C. The application will search for SecuRemote™
devices within Bluetooth® connectivity range
and display the SecuRemote™ devices found.
D. Touch the SecuRemote™ device whose
name matches the serial number on your
SecuRemote™ device. Click on “Finish Pairing”
E. You will be prompted to enter the Bluetooth®
access code (1234).
NOTE: The Bluetooth® access code is always numeric
A. Run the app
.
B. Begin Pairing
F. Upon successful pairing, you will be prompted
to click OK, Click on “OK”
G. The “Additional Information” pop-up will
appear, instructing you to add users and/
or assign a user-friendly name to your
SecuRemote™ device. Click on “Close”
H. You will be directed to the SecuRemote™
“Home” screen. The Home Screen will display
the SecuRemote™ device with the same name
as appears on your box.
* Tablet must meet requirements: Bluetooth® with SPP
prole support, Internet connectivity, be able to read
phone book contacts, and send SMS messages.
© 2011 Belwith® Products, LLC. | All Rights Reserved | www.firstwatchsecurity.com | 72291 Rev B
18
D. Select your device E. Enter access code
Page 19
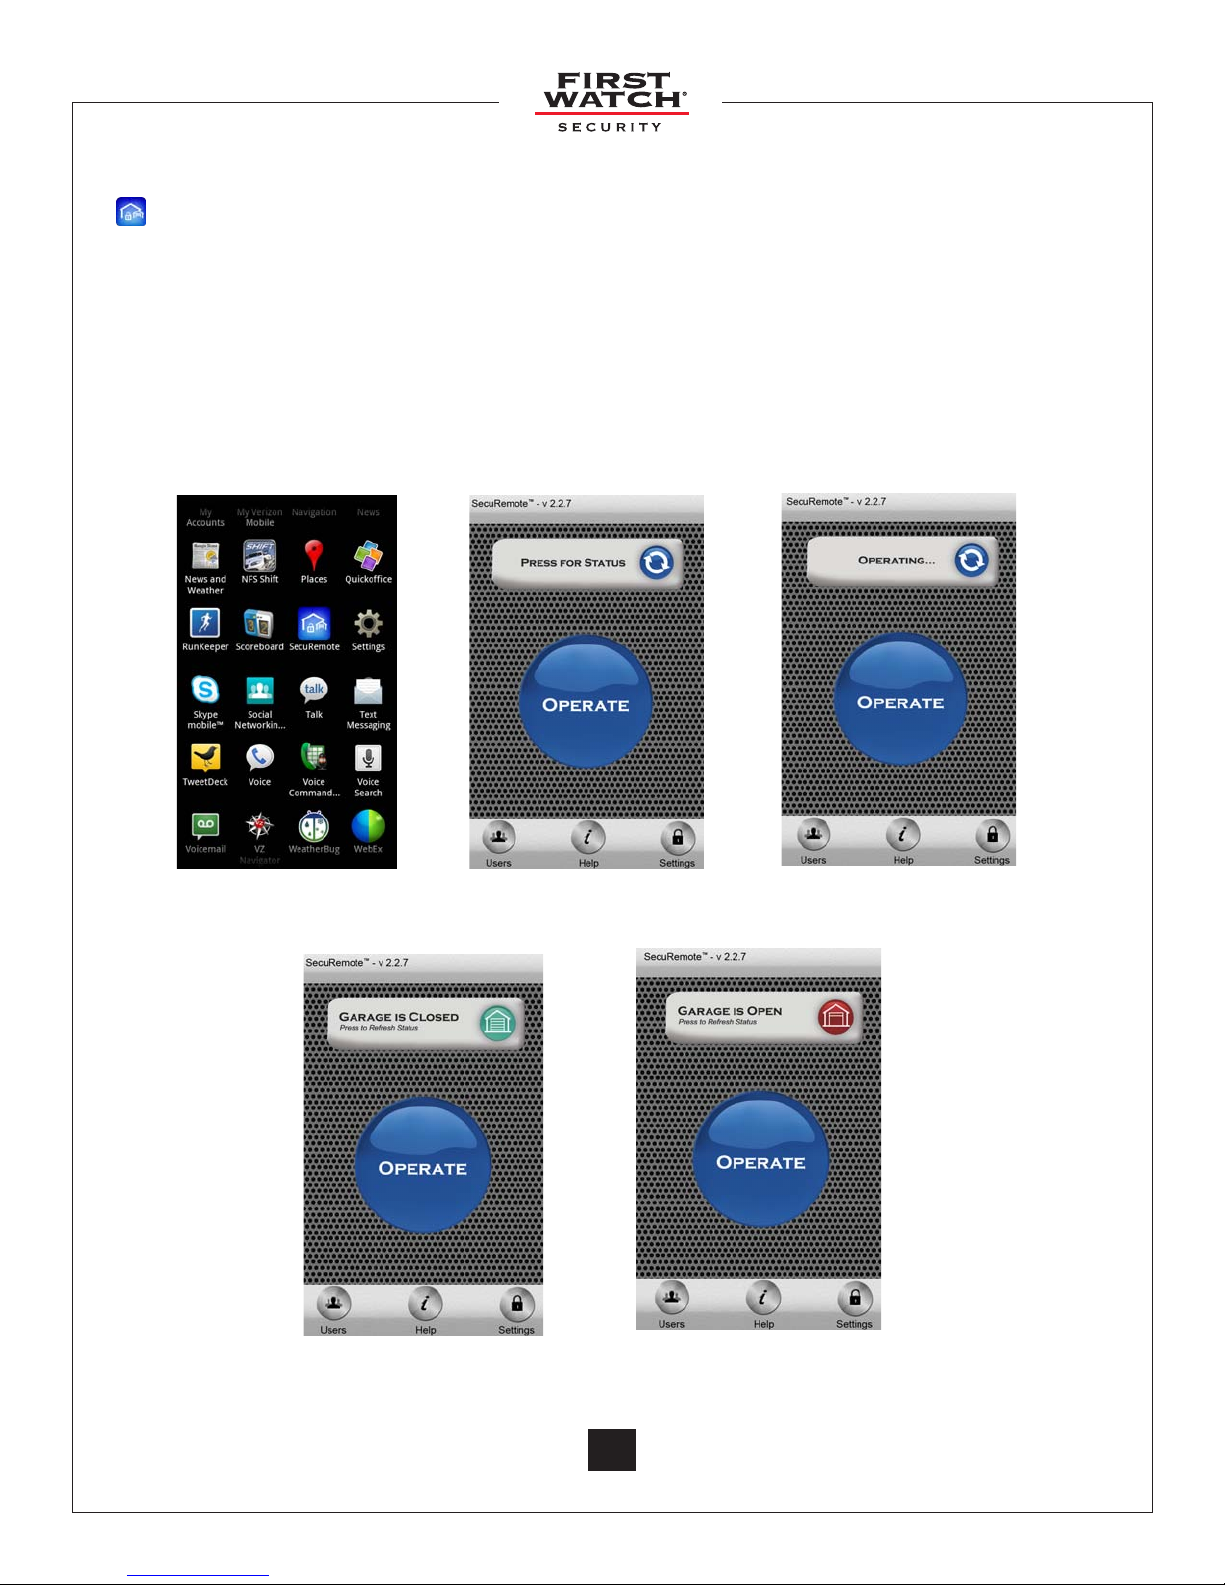
5.3 Operate SecuRemote™ on your Android™
A. Click on the SecuRemote™ icon to “Run” the application.
B. You will be directed to the SecuRemote™ “Home” screen.
C. If you have more than one SecuRemote™ device, select the device to operate (select the
menu option “Home” and you will be directed back to the SecuRemote™ home screen).
D. Touch the “Operate” button to open or close your garage door.
E. The Status Bar will indicate that it is operating and the wheel icon will spin.
F. The Status Bar will indicate the status of your garage door.
A. Run the app E. The device is operating
D. Touch the “Operate”
button
F. Your device is done operating, the status of your garage
appears on the status bar.
19
19
© 2011 Belwith® Products, LLC. | All Rights Reserved | www.firstwatchsecurity.com | # SRG717© 2011 Belwith
Page 20
6. Application Menu Options
The following options are accessible through the Local Mode main menu:
6.1 Plug n Pair™
This function exchanges information between the SecuRemote™ and each applicable smartphone
so that they can work together. Pairing is required the rst time you use SecuRemote™, if
you switch from online mode to local mode, or if your Bluetooth® PIN is changed. To pair, the
smartphone must be within 60 feet to 100 feet of the SecuRemote™ device.
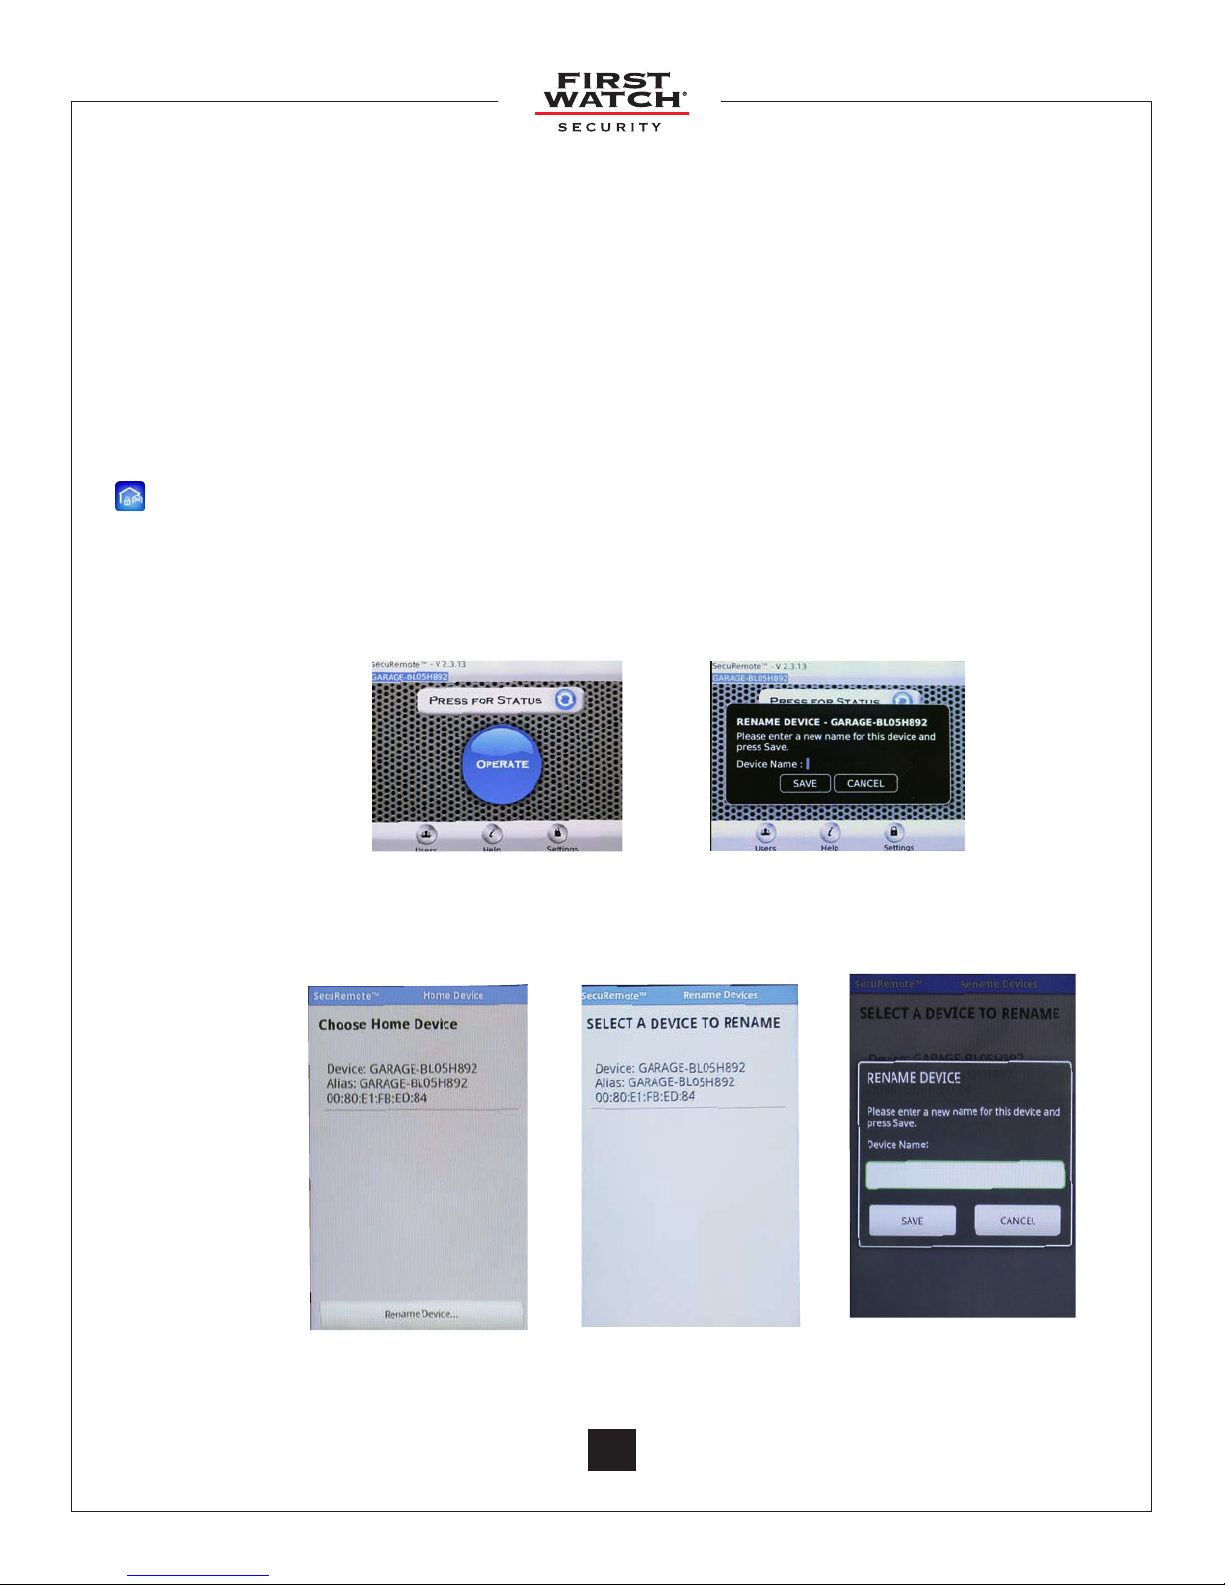
6.2 Rename Device
This option allows you to change the device name to a user-friendly name. For example, you can
change the device name from the device serial number (default) to “Joe’s Garage Door”.
A. Click on the SecuRemote™ icon to “Run” the application.
B. Select the garage from the silver bar at the top of the SecuRemote™ home screen.
C. You will be asked to create a new name for your device, enter a name and select “Save.
D. An alert will tell you the device was successfully renamed, click “OK.”
For BlackBerry
RIM® V4.7+
For
iOS devices
Google
Android™ V2.1+
®
B. Select your garage
C. Enter a new device name
Select “Rename Device” Select a device to
© 2011 Belwith® Products, LLC. | All Rights Reserved | www.firstwatchsecurity.com | 72291 Rev B
rename
20
Enter a new device
name
Page 21
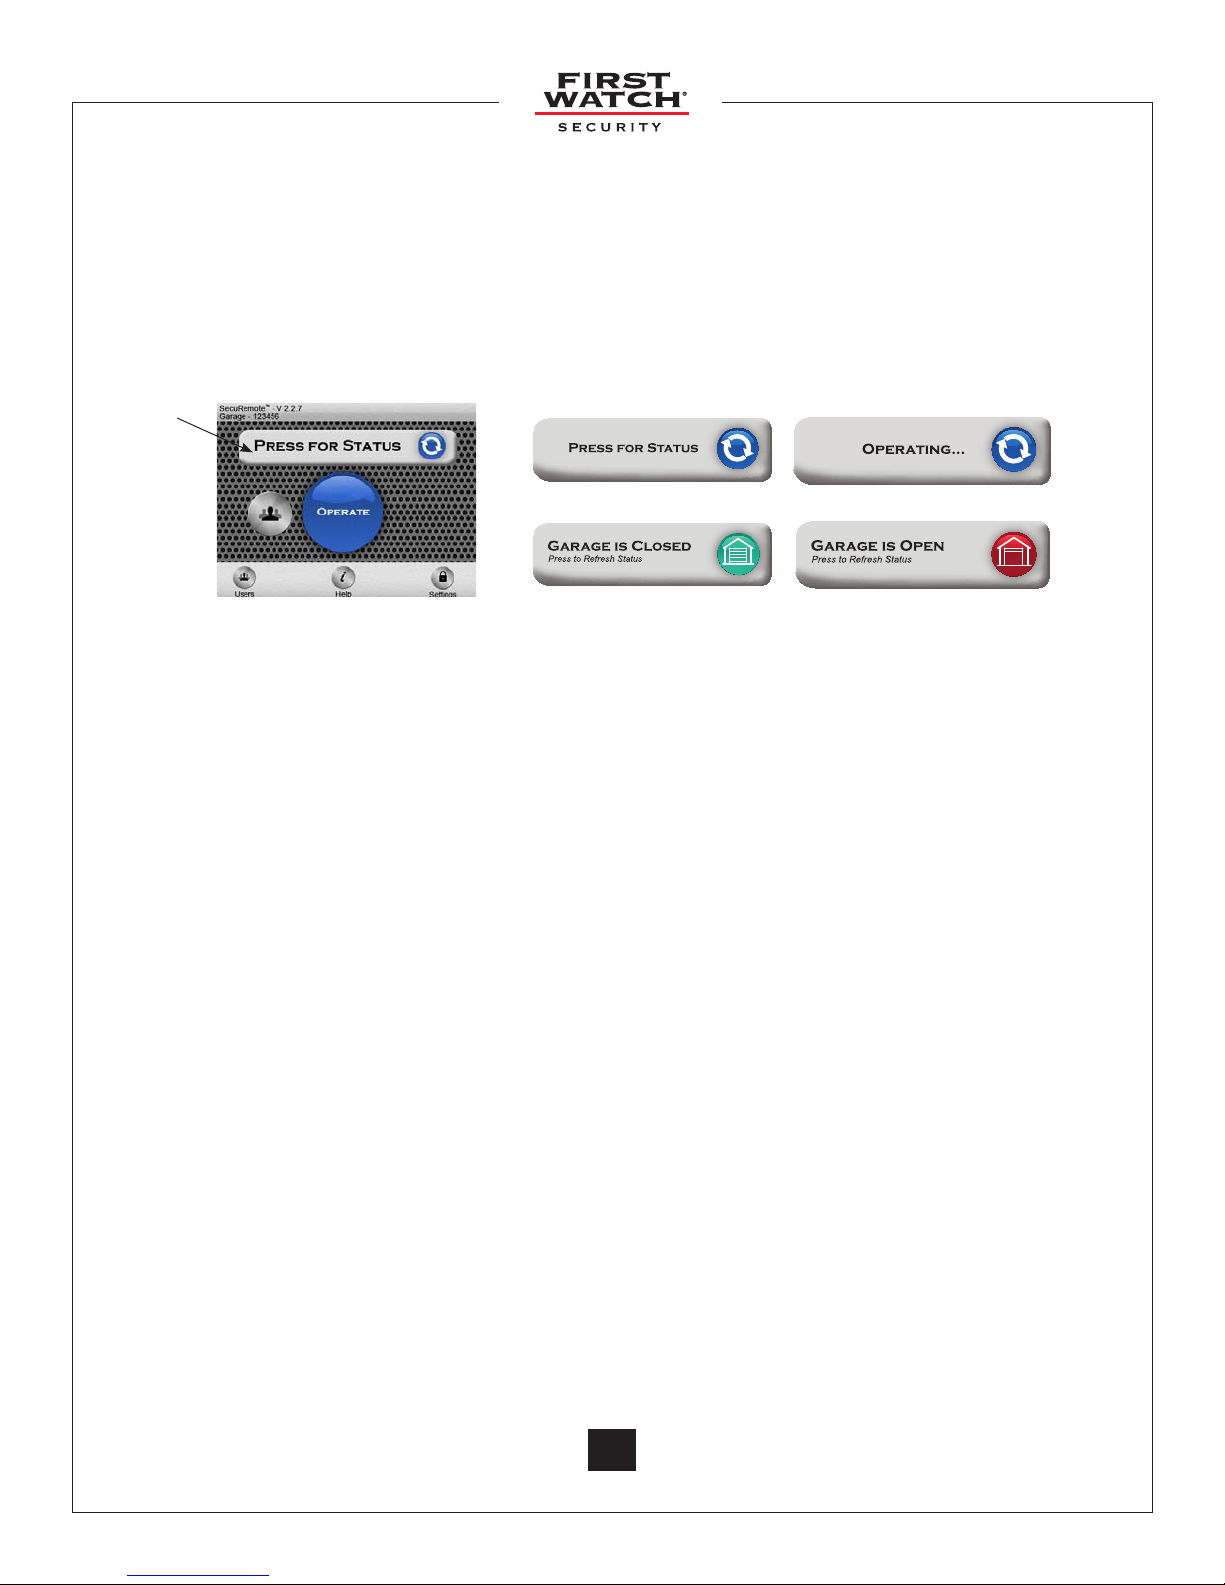
6.3 Status Indicator
This option allows you to query the current status of the door that the SecuRemote™ device is
controlling. Once you press the status bar, the position of Open or Closed will be shown for 30 seconds.
After the 30 seconds, your status bar will return to the “Press for Status” option.
NOTE: This option requires the status indicator accessory to be installed along with the SecuRemote™
device. If the supplied status indicator accessory is not installed, it will always show door status as
“Open”.
Status Bar
6.4 Users
User List provides the following functionality for each selected user:
• Add/Delete/Modify users
• User Access (Unlimited, Temporary, First Watch® Online) or (Unrestricted, Temporary,
First Watch® Online)
• Access Alerts (E-mail)
• Send SMS to a User (iPad® and iPod touch® users can send an e-mail instead of SMS)
Up to four additional users can be added through the local mode operation, and can be granted
unlimited or temporary access. They must be invited to join the SecuRemote™ network by the
Administrator, through his/her “contacts” list. If someone is not in your contacts list, their mobile
phone number must be added to the contact list before you can add them to your SecuRemote™
device.
© 2011 Belwith® Products, LLC. | All Rights Reserved | www.firstwatchsecurity.com | # SRG717© 2011 Belwith
21
21
Page 22
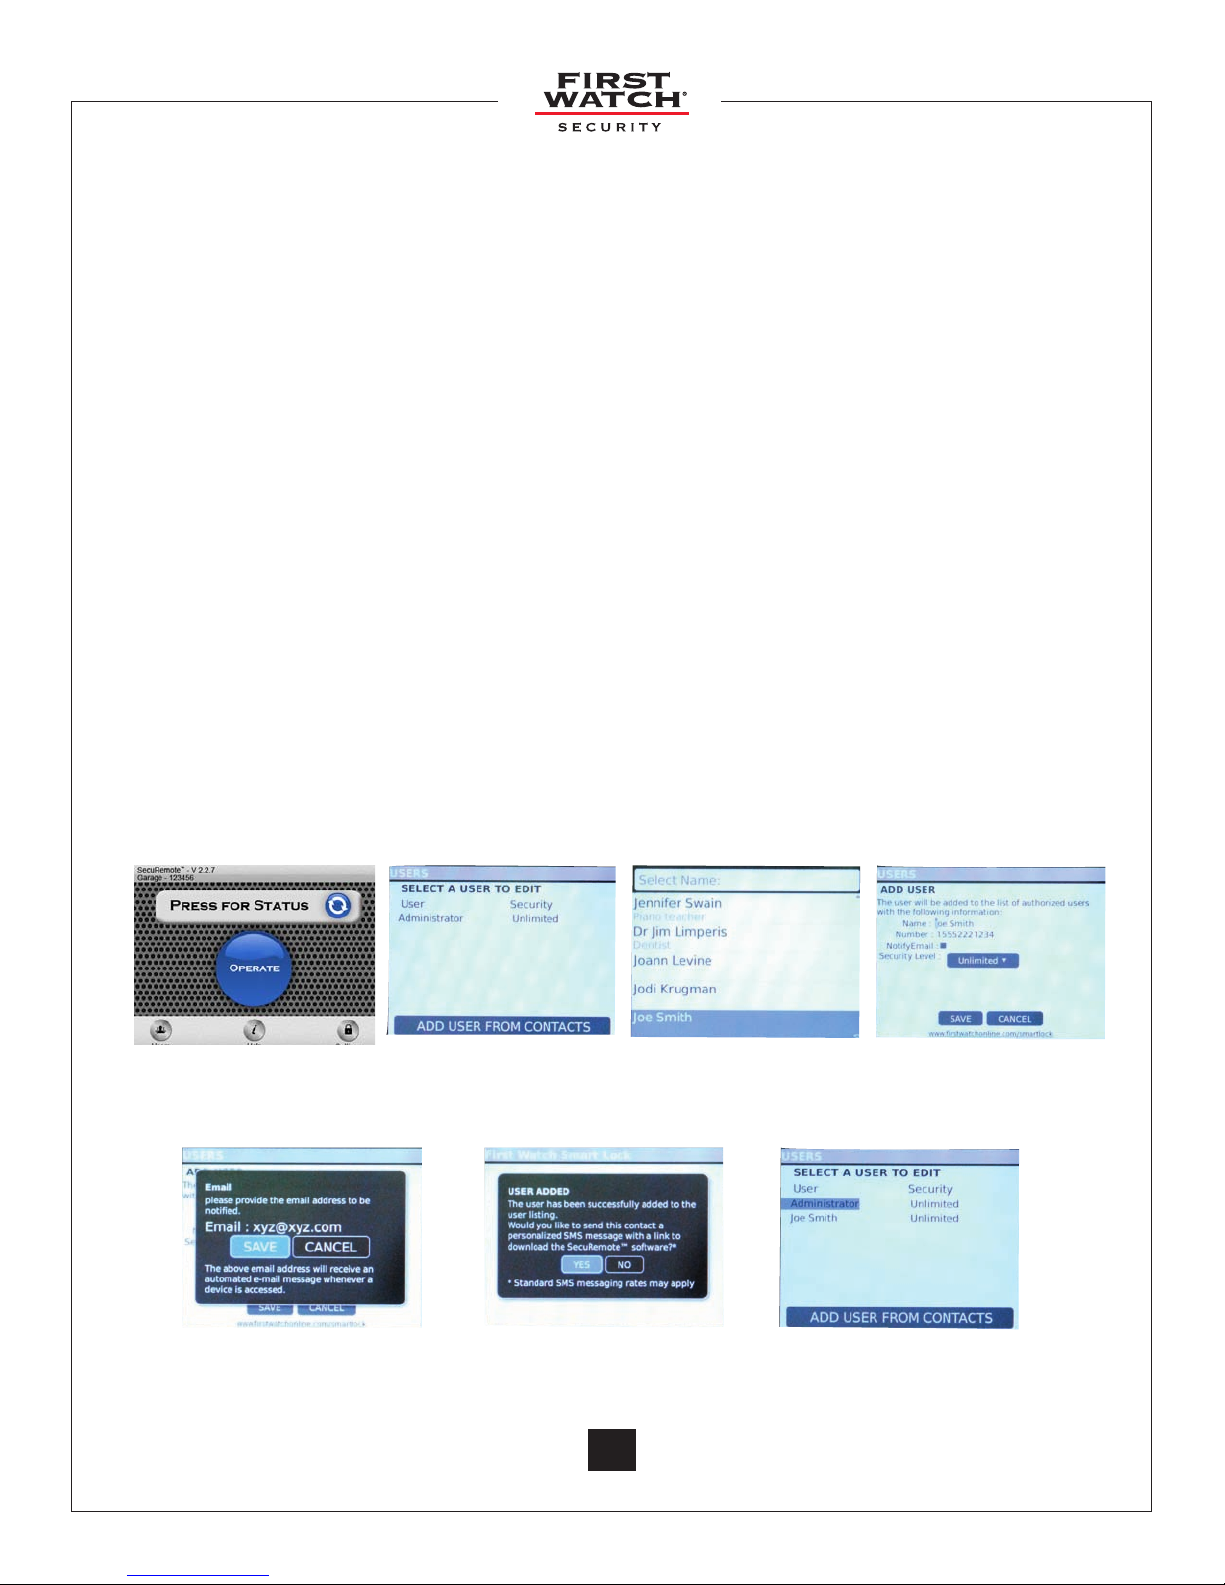
6.4.1 Add Users
A. Click the “Users” option on the SecuRemote™ main menu. The “Users” screen will appear.
B. Click on “Add user from contacts.”
C. Enter your Administrator’s password.
NOTE: Administrator password is alphanumeric. The default password is 12345678. Press the Alt
button when entering the Admin password.
D. Your “Contacts” list will appear. Click on the contact name you want to add.
E. The “Add User” screen appears, listing your contact’s name and smartphone number.
F. Select “Security Level” from drop down menu option. “Unlimited By” is the default.
G. If you would like to receive an e-mail whenever this user activates your device, click on “Notify
E-mail” and add your e-mail address. Click “Save.”
H. You will get a “User Added” dialog box with the option to send a SMS message to added user.
Select “YES” to send SMS message to user. Otherwise select “NO”.
I. You will return to the “Select a User to Edit” screen. You can add another user OR you can
select any user to edit/delete.
J. Click on back button to return to “Home” screen.
6.4.2 Add Users: BlackBerry
A. Select the
B. Click “add user
“Users” option
G. E-mail notications I. Return to “select
®
from contacts”
H. SMS message
D. Select user from
your contacts
user to edit” screen
E. “Add user” screen
F. Select security level
© 2011 Belwith® Products, LLC. | All Rights Reserved | www.firstwatchsecurity.com | 72291 Rev B
22
Page 23
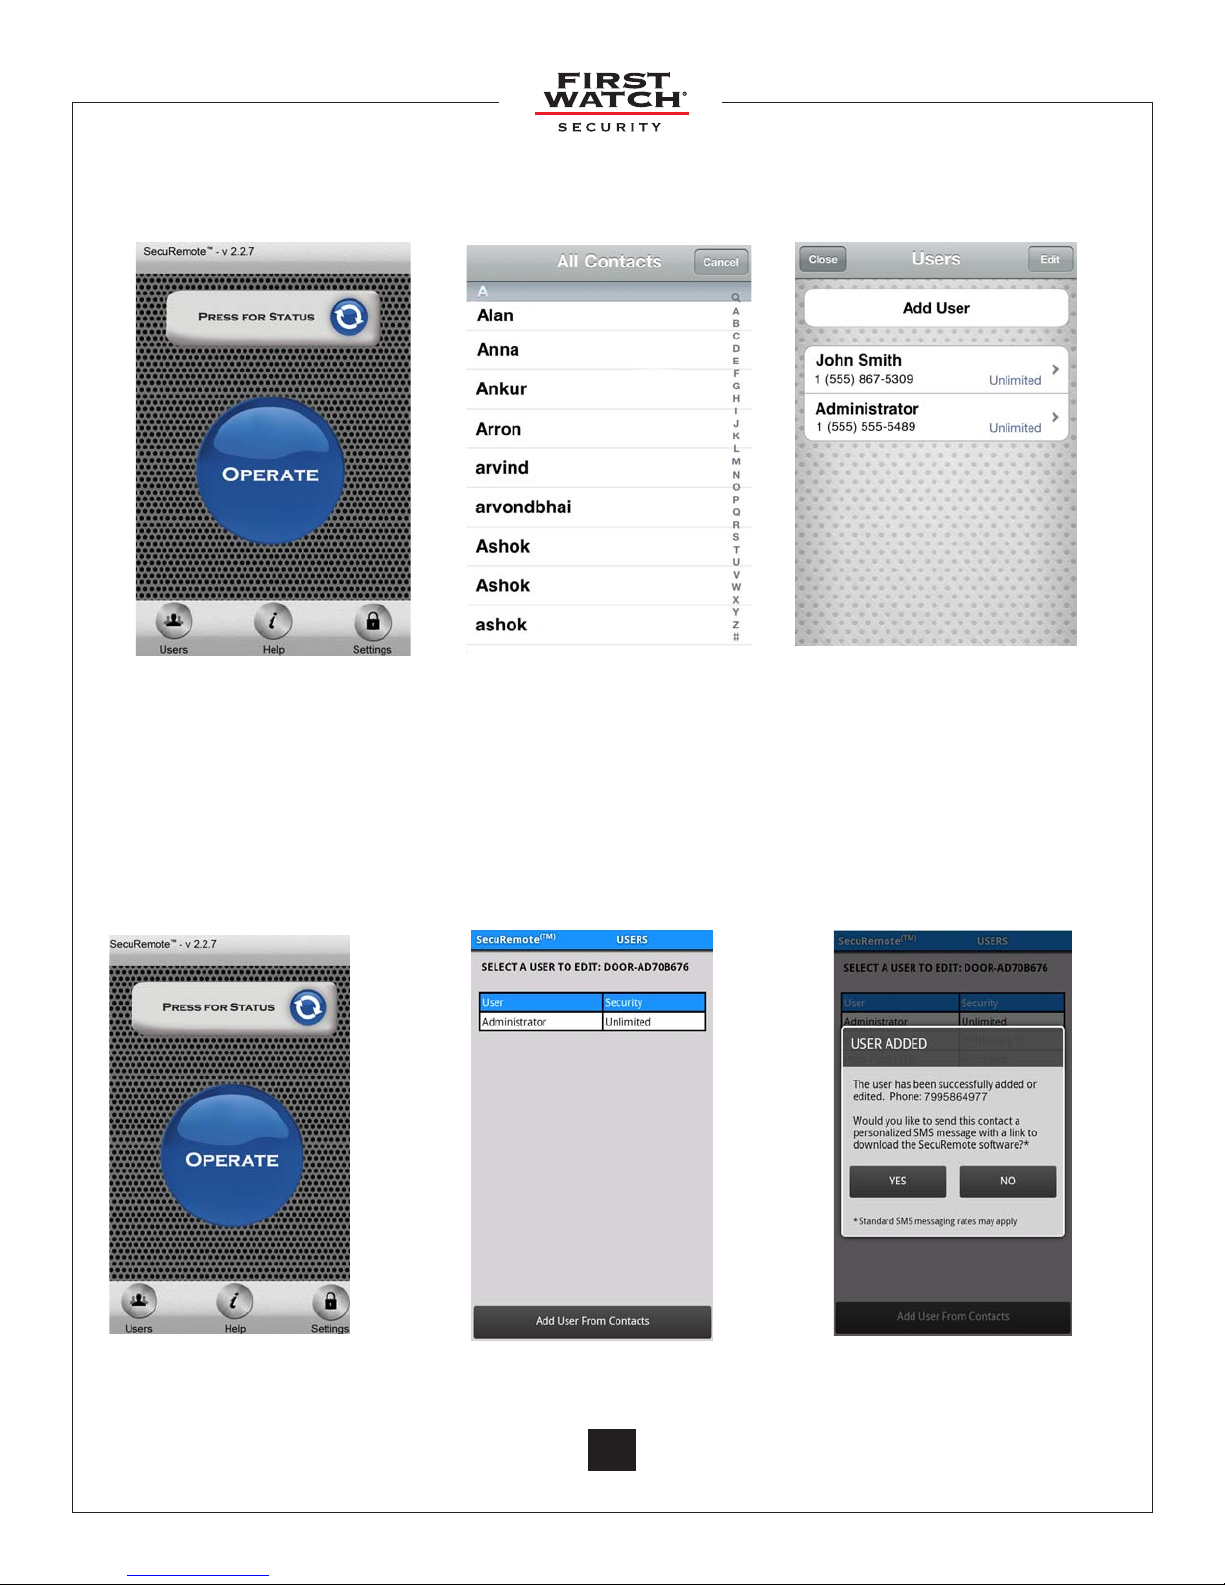
6.4.3 Add Users: iOS device
Touch the “Users” Icon Select a User from
Contacts
6.4.4 Add Users: Android™
Select a user to edit
Touch the “Users” Icon
© 2011 Belwith® Products, LLC. | All Rights Reserved | www.firstwatchsecurity.com | # SRG717© 2011 Belwith
Choose “Add User From
Contacts”
23
23
Touch “YES” to send
the new user an SMS
notication
Page 24
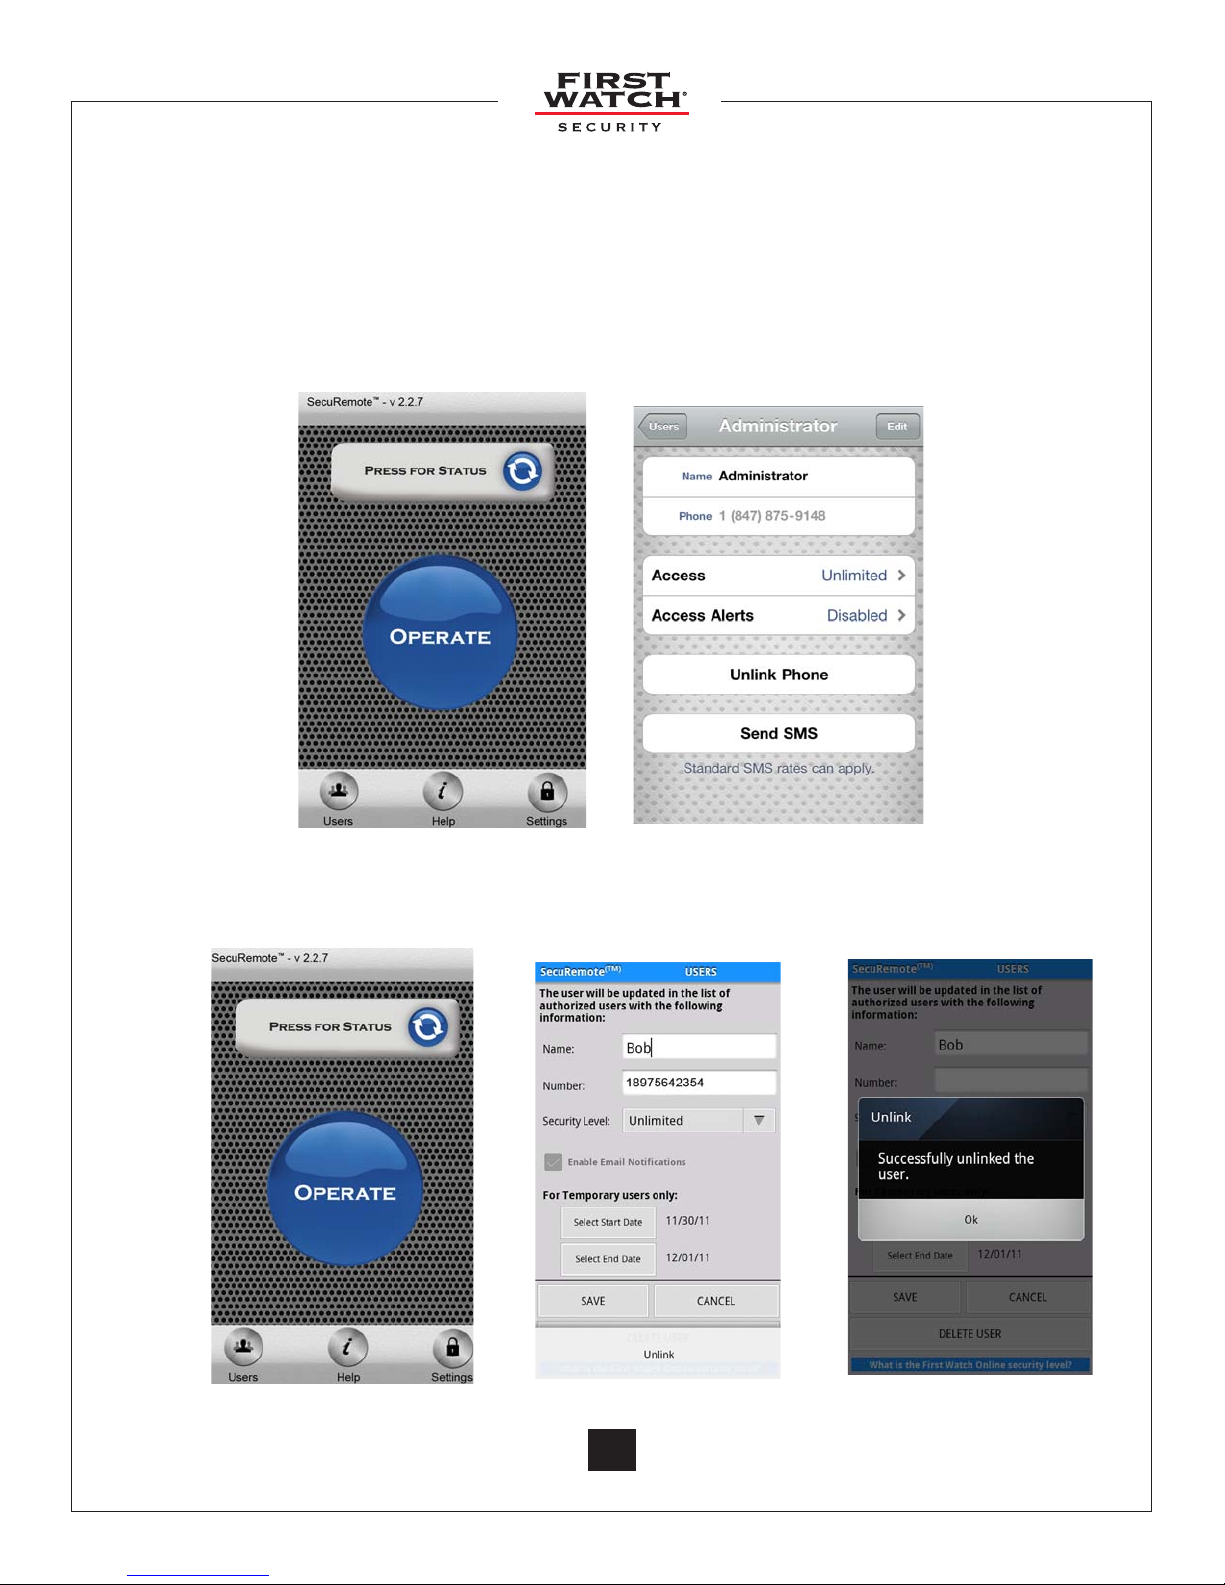
6.4.5 Unlink Secure Key
This feature is added for higher security. If a user replaces any phone, the Administrator
needs to “unlink secure key” for this user so the new (or replacement) phone can operate the
SecuRemote™ device.
iOS device
Touch the “Users” Icon
Android
™
Touch the “Users” Icon
Touch “Unlink Phone”
Touch “Unlink”
© 2011 Belwith® Products, LLC. | All Rights Reserved | www.firstwatchsecurity.com | 72291 Rev B
24
Page 25
6.5 Help
This option is an option within the SecuRemote™ application to help you learn about all the features
on your device. Select the Help icon from the SecuRemote™ home page to view the help topics.
• Installation Instructions
• Password Instructions
• Pairing Instructions
• Operation
• Contact Customer Service
• First Watch® Online Security Help Information
• About
6.6 Settings
6.6.1 Password Information
This option allows you to set, change, or remove password information: Changing the
Administrator or Bluetooth® passwords or disabling a user password requires knowledge of the
Administrator password.
• Change Admin Password
This password allows the user to add, delete or edit any user information. It will also allow
the user to change their Bluetooth® PIN, disable a user PIN, and enable or disable Bluetooth®
Discovery.
• Change Bluetooth® access code - Default is “1234” (Numeric, minimum 6 characters, once
the Bluetooth® PIN is changed the app needs to re-pair with the device through the pairing
menu option using the new Bluetooth® E PIN).
This access code allows users to pair their phone with the SecuRemote™ device. By changing
this access code from the default value, it will provide higher security by not allowing any
user to pair their phone with SecuRemote™ devices.
• User Password – Default is “1234” and can be changed but not disabled by the user. The user
password can be disabled by the Administrator.
This option allows the user to force a user to enter a PIN whenever the user wishes to operate
the device. An unlimited amount of users with the admin password can enable or disable this
PIN option by using the “Change User Pin” option from the settings menu.
• Bluetooth® Discovery.
NOTE: The Administrator must change the default Administrator password after initial pairing.
The SecuRemote™ application cannot be used until this is done. We recommend that you also
change your Bluetooth® password at this time.
© 2011 Belwith® Products, LLC. | All Rights Reserved | www.firstwatchsecurity.com | # SRG717© 2011 Belwith
25
25
Page 26
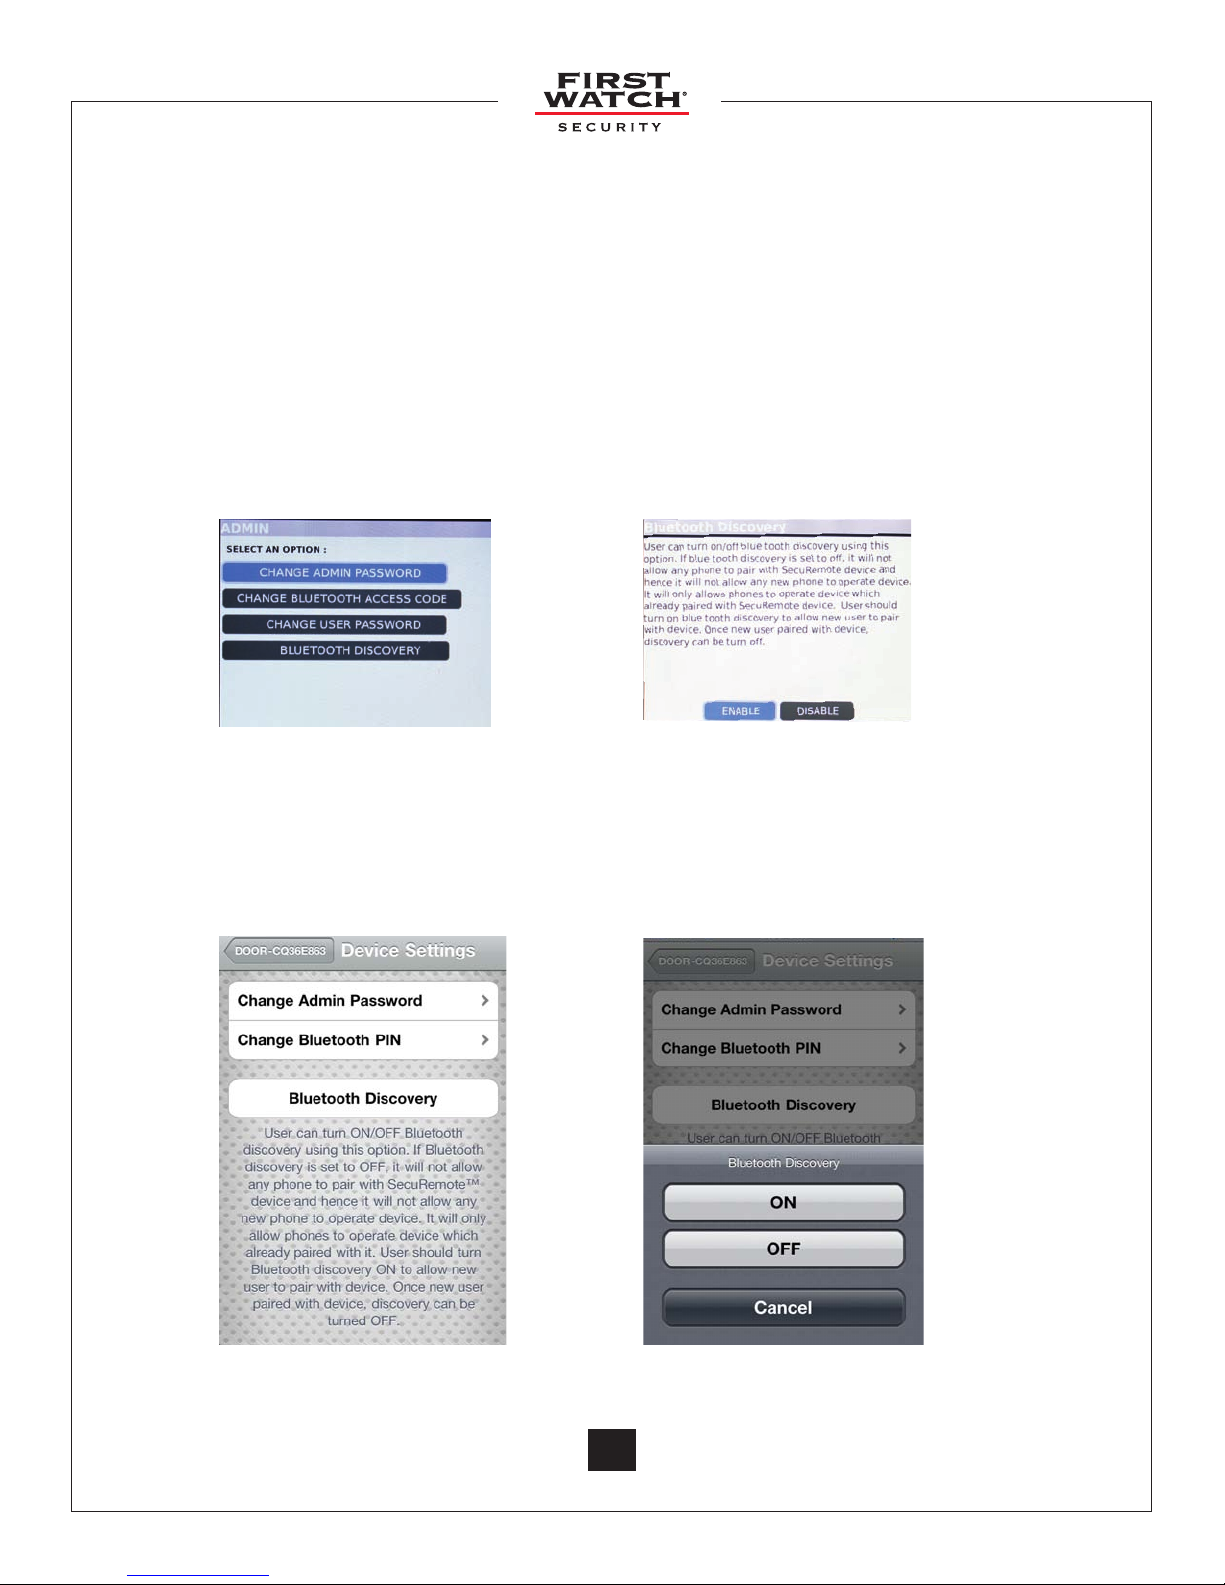
6.6.2 Turn Discovery on/o
This is added for higher security. Using this feature, the user can turn o Bluetooth® discovery on
the SecuRemote™ device so the phone cannot detect this Bluetooth® device during a Bluetooth®
scan and hence cannot Plug n Pair™ to the SecuRemote™ device. Phones that are not paired will not
detect the First Watch® device. If the owner of the SecuRemote™ device would like to add a new
user, SecuRemote™ Bluetooth® discovery is required to be on so the newly added user can detect the
device, pair with it and connect to it to operate it. This feature turns the internal radio OFF making
it virtually impossible to hack the First Watch® devices. Once the new user is paired, the owner can
turn o Bluetooth® discovery. To use this feature, the user needs to be within Bluetooth® range of the
device.
BlackBerry
iOS device
®
Select “Bluetooth®
Discovery”
“Enable” Bluetooth®
discovery
Touch “Bluetooth® Discovery” Touch “ON”
© 2011 Belwith® Products, LLC. | All Rights Reserved | www.firstwatchsecurity.com | 72291 Rev B
26
Page 27
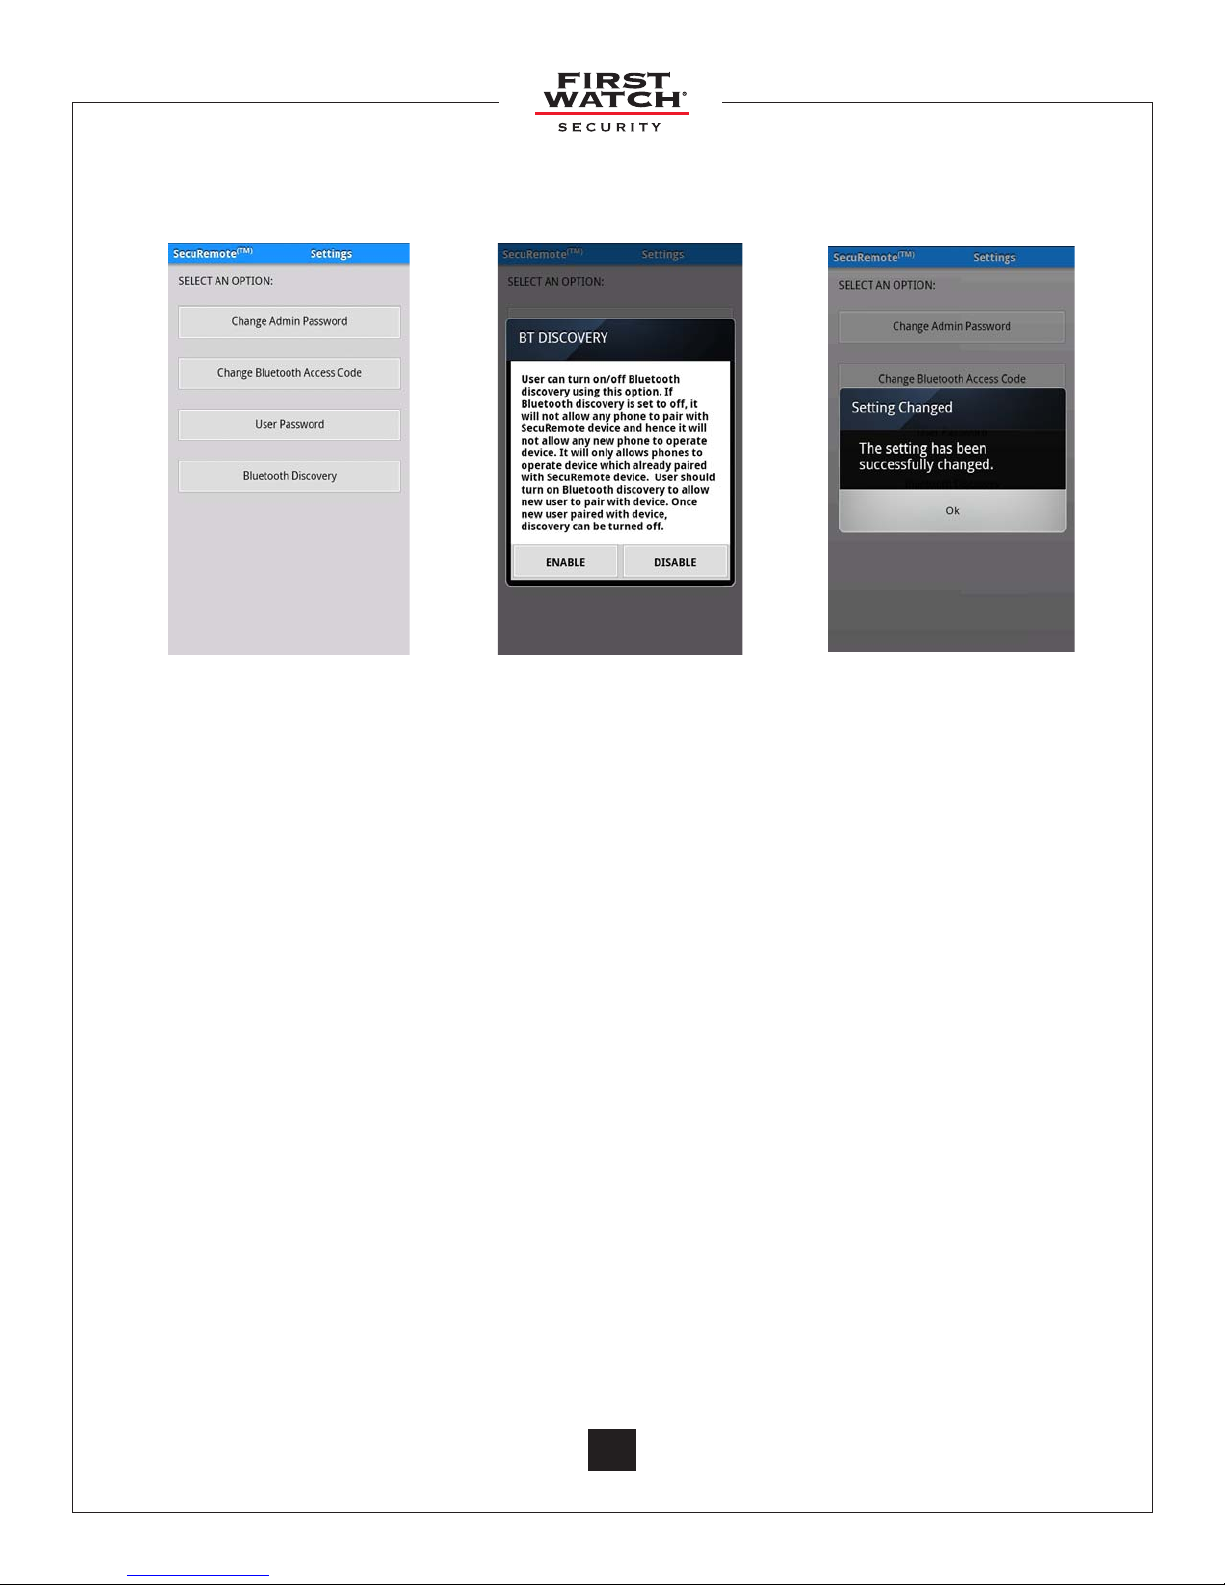
Android™
Touch “Bluetooth
®
Touch to “Enable” Settings changed
Discovery” in the
SecuRemote settings
6.7 Factory Reset for SecuRemote™
This function will reset all passwords and also wipes all the user(s) and pairing information. After
a factory reset, you need to re-pair the smartphone with the SecuRemote™ device, add all users,
and change Administrator and Bluetooth® passwords. To remove users and “wipe the slate clean”
on your SecuRemote™ device, press and hold the reset button with a paper clip until the blue light
ashes, release the button. To prevent damage, please avoid excessive pressure on the button
6.8 Factory Reset for SecuRemote™ Application
• Blackberry®: Manage connection ➞ Set Up Bluetooth® ➞ Cancel ➞ Select this device from
Paired Device list ➞ Delete Device from menu option. Now launch SecuRemote™ application
and select pairing from menu. Refer to the Pairing section for more detail.
• iOS device: Settings ➞ General ➞ Bluetooth® ➞ Select this device from the list (Click on the
arrow button for this device) ➞ Forget this Device. Now select this device to be paired with the
device. Launch the SecuRemote™ application.
• Android™: Menu ➞ Settings ➞ Wireless & Networks ➞ Bluetooth® Settings ➞ Press & hold this
device from the Bluetooth® devices list ➞ Unpair. Now launch the SecuRemote™ application
and select pairing from the menu. Refer to the Pairing section for more detail.
© 2011 Belwith® Products, LLC. | All Rights Reserved | www.firstwatchsecurity.com | # SRG717© 2011 Belwith
27
27
Page 28

6.9 Removing the Application from your Smartphone
This only applies to BlackBerry®
• Run the SecuRemote™ application and do a factory reset from the menu.
• Close the application. From the menu, delete the application.
• Install the new version of the application from the application store from your smartphone.
6.10 Update the SecuRemote™ Application
Update the SecuRemote™ Application for BlackBerry
®
BlackBerry® smartphones will automatically notify you of an update for your SecuRemote®
application.
Update the SecuRemote™ Application for iOS devices
Enter the App StoreSM by touching the App StoreSM icon on your home screen. Touch the
“Updates” option in the bottom right corner. This will display any applications that have updates
available for your phone. To just update the SecuRemote application, select the SecuRemote™
Application and touch the “Update” option in the upper right corner. To update all applications
on your phone, touch “Update All” in the upper right corner of the Updates page.
Update the SecuRemote™ Application for Android™
Update the SecuRemote™ application by setting your Android™ up for automatic updates.
Press the Android™ Market icon from your home screen. Press the “Apps” icon. Using the Menu
Option from your phone, select “My Apps”. Press SecuRemote™ Door Opener and select “allow
automatic updating”.
© 2011 Belwith® Products, LLC. | All Rights Reserved | www.firstwatchsecurity.com | 72291 Rev B
28
Page 29
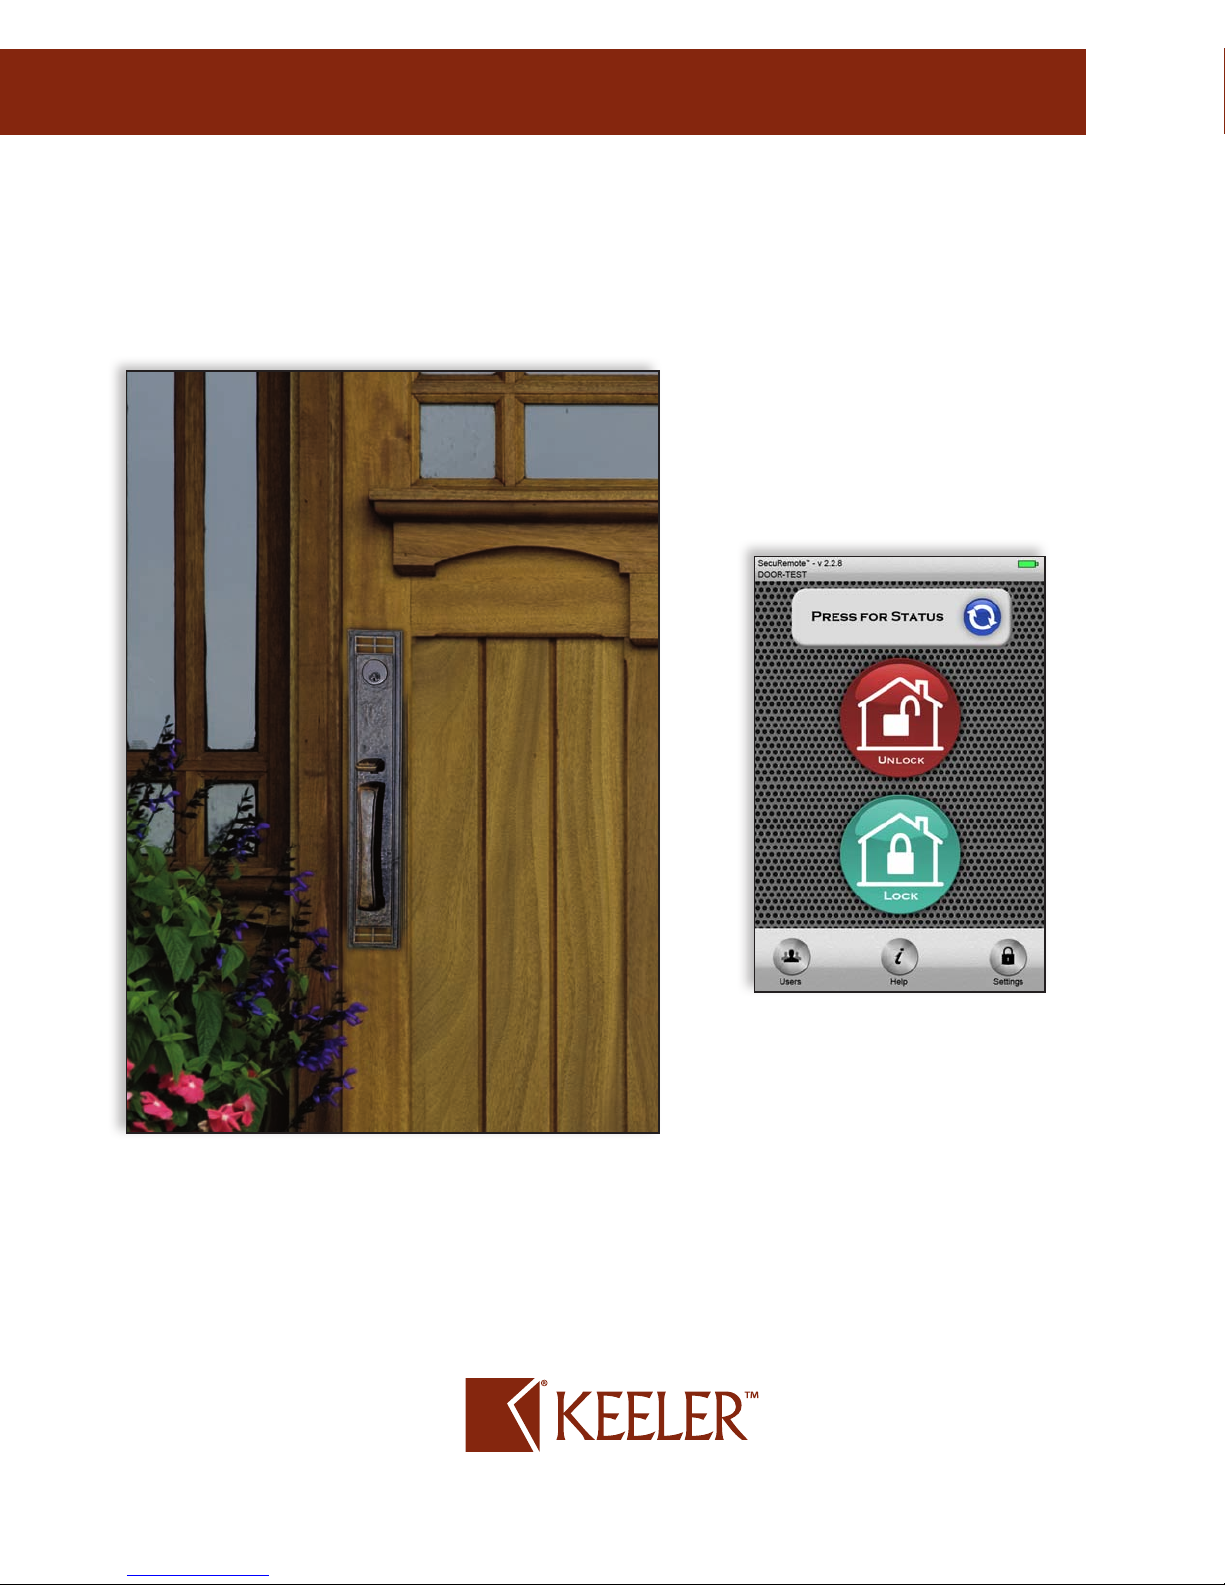
INTRODUCING KEELER™ DOOR LOCK
Belwith
SecuRemote™ technology. It is born from a bold new vision to allow people to operate and
control their entry doors from their smartphone. The SecuRemote™ technology blends
seamlessly with beautiful architectural door hardware to provide unmatched convenience,
control, and security.
®
Products, LLC proudly introduces Keeler™ Architectural Door Hardware using
Electronic SecuRemote™ Technology is fully integrated with
mechanical and decorative hardware components.
For more information regarding Keeler™ hardware products
and user manual visit www.keelerproducts.com
®
Products, LLC. | All Rights Reserved | www.firstwatchsecurity.com | 72291 Rev A
Page 30

7. Frequently Asked Questions
When operating the device, it gives an error message such as: “not authorized user” OR
“unknown error occurs”
• Answer: User is not trusted on the SecuRemote™ device as a Local OR Online User. Please
ask the Administrator to add this user as a Local or Online user. If added as a local user,
make sure the user re-pairs with the SecuRemote™ device using the pairing option from
SecuRemote™ menu.
I am the Administrator and have lost my phone. How do I set my new phone as Administrator to
the SecuRemote™ device?”
• Answer: Do a factory reset of the SecuRemote™ device by pushing and holding the reset
button using a paper clip until blue light starts to ash, then release the button. This will
delete all local users from the SecuRemote™ device and reset the Administrator password
and save the Bluetooth® PIN as “1234”. Download and install the SecuRemote™ application to
the smartphone. Start the application and nish pairing with the SecuRemote™ device. This
will establish the new phone as the administrator again. The User needs to re-enter all local
users to the SecuRemote™ device again. As the SecuRemote™ device is defaulted to factory
re-set, all local and online users need to pair with the SecuRemote™ device using the pairing
option.
How do I set the SecuRemote™ device to vacation mode?
• Answer: The SecuRemote™ device can be set to vacation mode by changing Bluetooth®
access code from setting option.
One of the local users lost his/her phone. How do I delete local user from SecuRemote™ Device
so this phone cannot access the device anymore?
• Answer: Any local user with unlimited privilege can delete this user from the SecuRemote™
device using delete option under user list. This is veried through the Administrator password
so the user needs to know the Administrator password.
How do I delete all local users from the SecuRemote™ device?
• Answer: This can be done using one of the following methods:
1. Factory reset of the SecuRemote™ device. This will also reset the Administrator password
and Bluetooth® access code.
OR
2. Delete the user using the delete option from user list. This needs to be done for all users
except the Administrator. User cannot delete the Administrator.
How do I block access to all local users?
• Answer: A user can block access to all users by changing the Bluetooth® access code.
A user forgot the Admininstrator password and/or Bluetooth access code, how do I reset it?
• Answer: The only way to reset the Administrator password or Bluetooth® access code is
to perform factory reset operation. This will reset the Administrator password and reset
the Bluetooth® access code to “1234”. Please note that it will also delete all users including
Administrator.
© 2011 Belwith® Products, LLC. | All Rights Reserved | www.firstwatchsecurity.com | 72291 Rev B
30
Page 31

I received a “device not found” error when trying to change Administrator and/or Bluetooth® access
code OR trying to get the user list.
• Answer: Administrator password, Bluetooth® access code and local user info are stored in the
SecuRemote™ device. In order to change any of this information, the user needs to be within
Bluetooth® range of SecuRemote™ device. If the device is not in Bluetooth® range, the user will
get “device not found” error.
I received an error for “maximum allowable local users are added” when trying to add new user
• Answer: SecuRemote™ allows a maximum of 5 local users including the Administrator. If the
Administrator wants to add a new user, the Administrator needs to delete any existing local user
or edit any existing local user with the new user information.
How do I check the status of my garage door?
• Answer: Select the status option from the application menu. SecuRemote™ version SRG717
provides status within 60 feet to 100 feet range. SecuRemote™ version SRG717 provides status
from anywhere provided it has web connectivity with the cellular network.
How do I add the application to my smartphone without web connectivity?
• Answer: You can use BlackBerry® desktop manager to install the application to a BlackBerry®
phone. For other platforms, please contact our Customer Service department to access the
application from our server. (Not Recommended)
My iPhone® shows that the Bluetooth® is connected but the SecuRemote™ device shows that the
device is not connected.
• Answer: This is an issue with the Bluetooth® functionality of your iPhone®. Turn the Bluetooth® o
and then on from the Bluetooth® from the Bluetooth® setting screen. Now try to re-connect your
Bluetooth®. Please refer to your smartphone user manual for further information.
My iPhone doesn’t show the Discoverable device list. What do I do?
• Answer: Ensure the SecuRemote™ device is powered on and the phone is within Bluetooth® range
of the SecuRemote™ device. If it is within range, power cycle the SecuRemote™ device. If the
problem still is not resolved, please power cycle the iPhone because this issue is with Bluetooth
functionality of the iPhone®.
What do I do when my iPhone® gives an error that this device is not authorized to operate?
• Answer: Select Settings ➞ SecuRemote™ Device (GARAGE-XXXXX) ➞ Forget this garage door.
Click on the operate button so it will prompt the user to pair with the device, select yes and verify
if the problem is resolved. If not, please follow the factory reset procedure for the SecuRemote™
device.
© 2011 Belwith® Products, LLC. | All Rights Reserved | www.firstwatchsecurity.com | # SRG717© 2011 Belwith
31
31
Page 32

User Manual
Page 33

1.0 First Watch® Online ................................................................................................................................3
1.1 Sign up for First Watch® Online ..................................................................................................... 3
1.2 New Customer Registration ..........................................................................................................3
1.3 Activate Your Account ....................................................................................................................4
1.4 Begin First Watch® Online .............................................................................................................. 4
2.0 Sign-In Page .............................................................................................................................................5
3.0 Secure Home Page ................................................................................................................................5
4.0 All Devices ................................................................................................................................................6
5.0 New Device Registration .....................................................................................................................7
6.0 All Users .....................................................................................................................................................7
7.0 Add New User ..........................................................................................................................................8
8.0 Access Schedules ................................................................................................................................... 8
8.1 Scheduling Disabled .........................................................................................................................8
8.2 Scheduling Enabled ......................................................................................................................... 9
9.0 Create New Schedule/Edit Schedule .............................................................................................9
10.0 Audit Logs ...............................................................................................................................................10
* General Warranty ......................................................... See page 3 of SecuRemote™ User Manual
© 2011 Belwith® Products, LLC. | All Rights Reserved | www.firstwatchsecurity.com | 72211 Rev B
2
Page 34
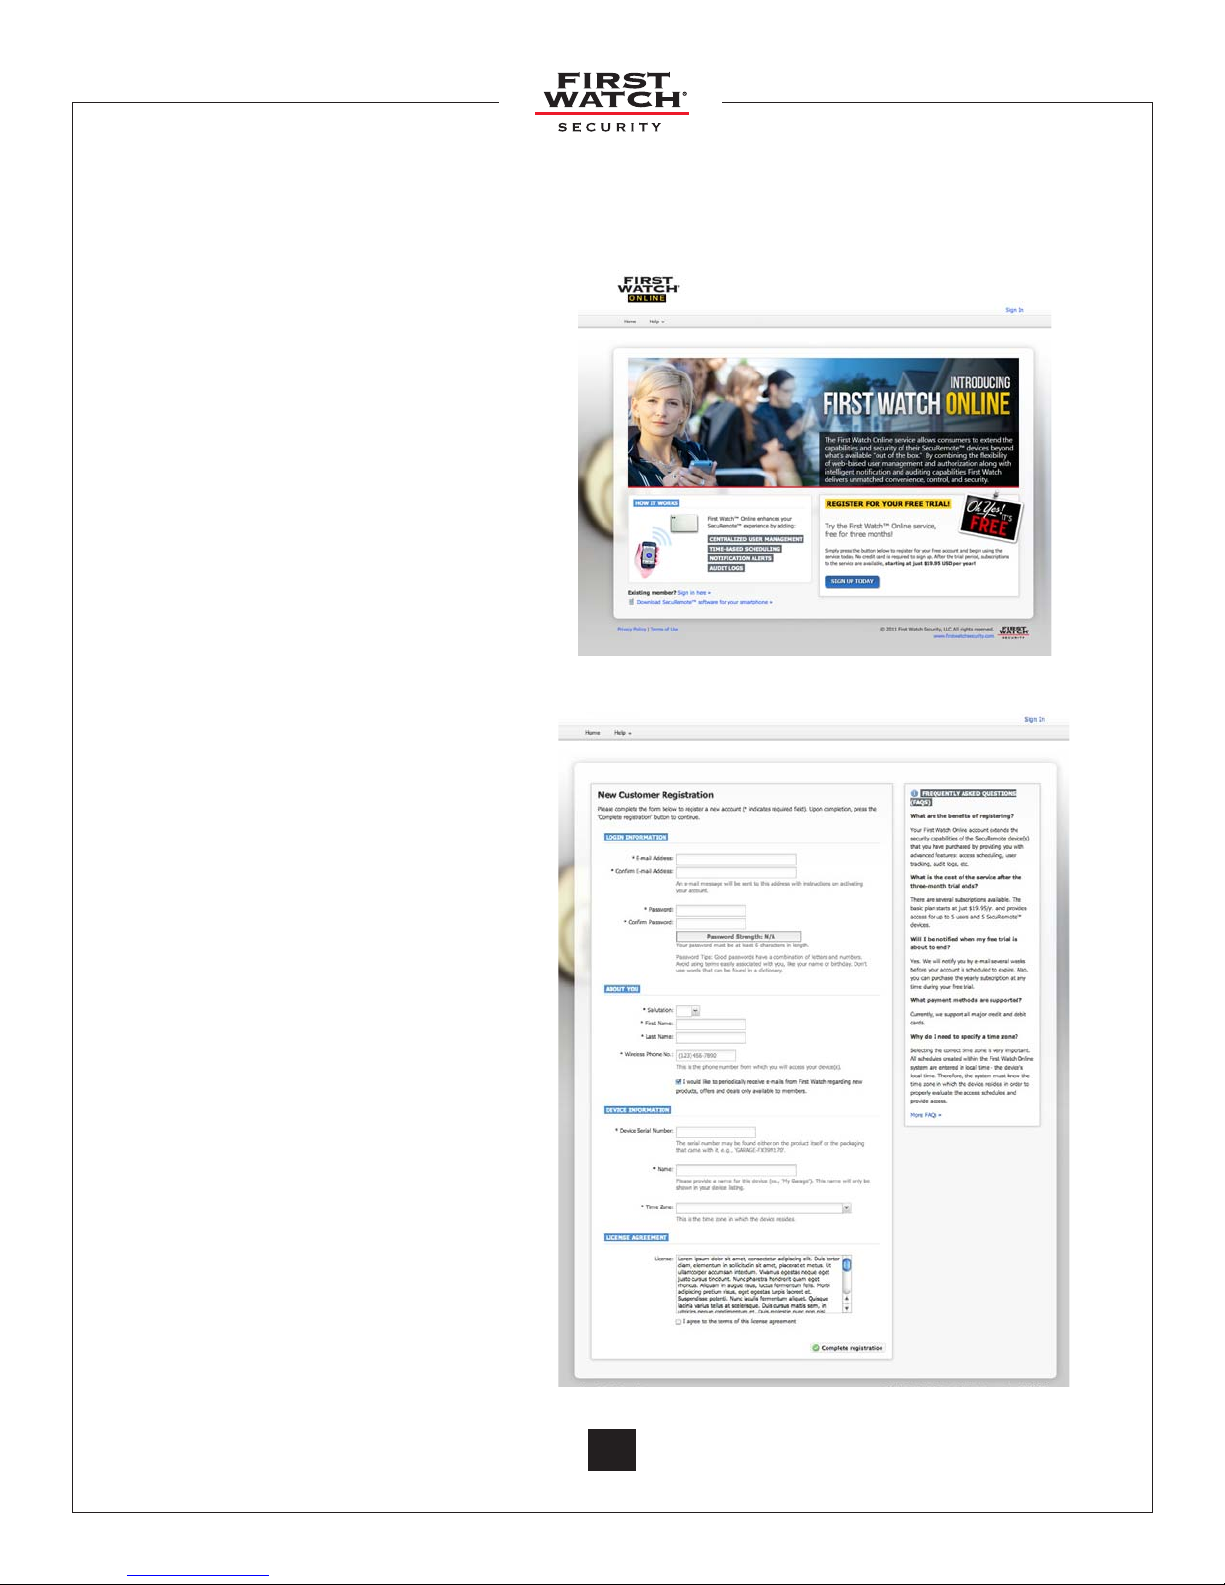
1.0 First Watch® Online
First Watch® Online allows users to expand the capabilities of SecuRemote™. This web-based
user management and authorization system lets the SecuRemote™ Administrator use a computer
to remotely manage users and their access
times/days, and to monitor door use. We
have a selection of flexible plans with finely
personalized access schedules designed to
fit everyone. First Watch® Online brings more
convenience, control and security to families.
1.1 Sign up for First Watch® Online
Go to www.firstwatchonline.com and
click on the “SIGN UP TODAY” button to
begin your free three-month trial of First
Watch® Online.
1.2 New Customer Registration
The “New Customer Registration”
screen appears. This screen collects
basic login information about you and
your SecuRemote™ device as follows.
• TheE-mailaddressyouenteris
the username you will use to log-in
again
• Onlyoneaccountpere-mail
address is allowed.
• Passwordsmustbeatleast
6 characters long. There is
no requirement for password
complexity.
• Registrationrequiresarstname,
last name and wireless phone
number. This information is stored
for the account.
• AvalidSecuRemote™serialnumber
is required to complete registration.
• Sincedevicesmaybeinstalledin
dierent geographical areas, it
is important to know which time
zone each device is in. This way
schedules can be specified in local
time for each device.
© 2011 Belwith® Products, LLC. | All Rights Reserved | www.firstwatchsecurity.com | 72211 Rev B© 2011 Belwith
3
3
Page 35
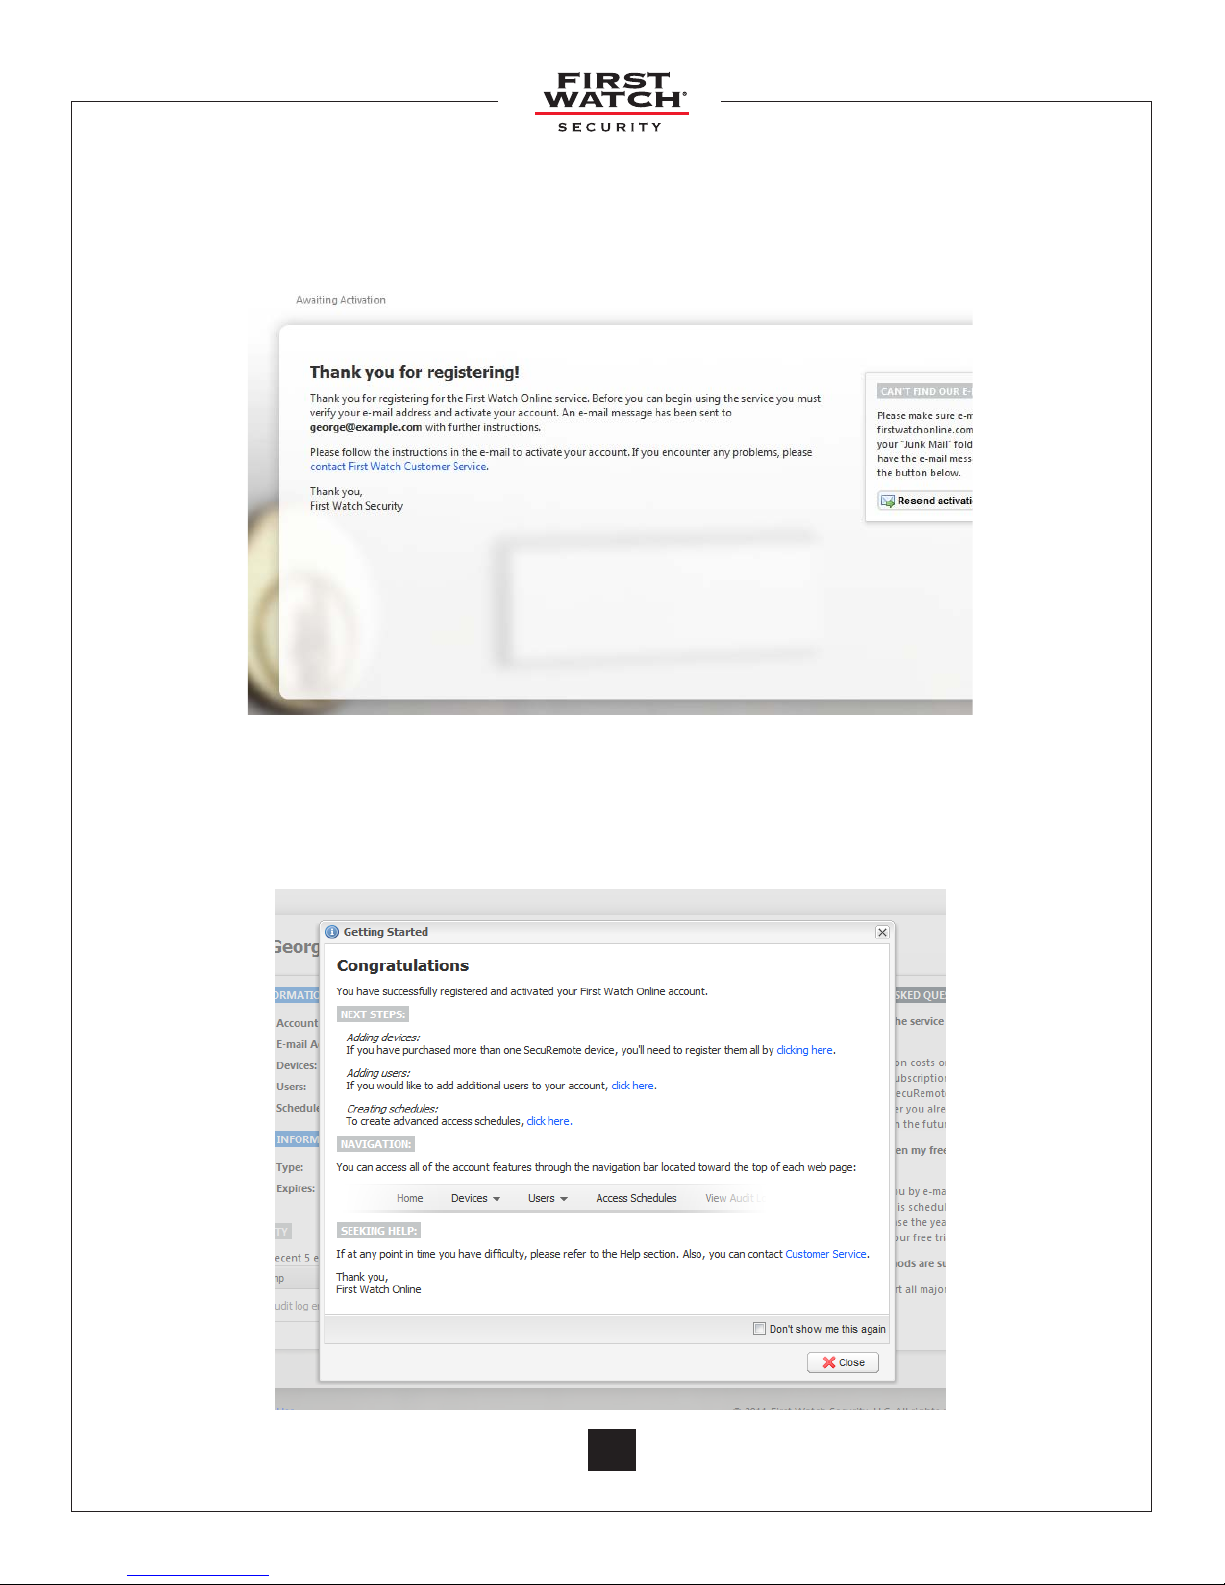
1.3 Activate Your Account
Upon successful registration, the following screen appears and an e-mail entitled
“Action required to activate your First Watch® Online service” is sent to you, with
further instructions. Click (or copy and paste) on the link provided in the e-mail to
verify ownership of the e-mail address.
1.4 Begin First Watch® Online
Once you access the link, you are automatically logged into the site, and your three-
month membership begins. You can now begin building your account, adding
SecuRemote™ devices, authorized users, and user schedules.
© 2011 Belwith® Products, LLC. | All Rights Reserved | www.firstwatchsecurity.com | 72211 Rev B
4
Page 36
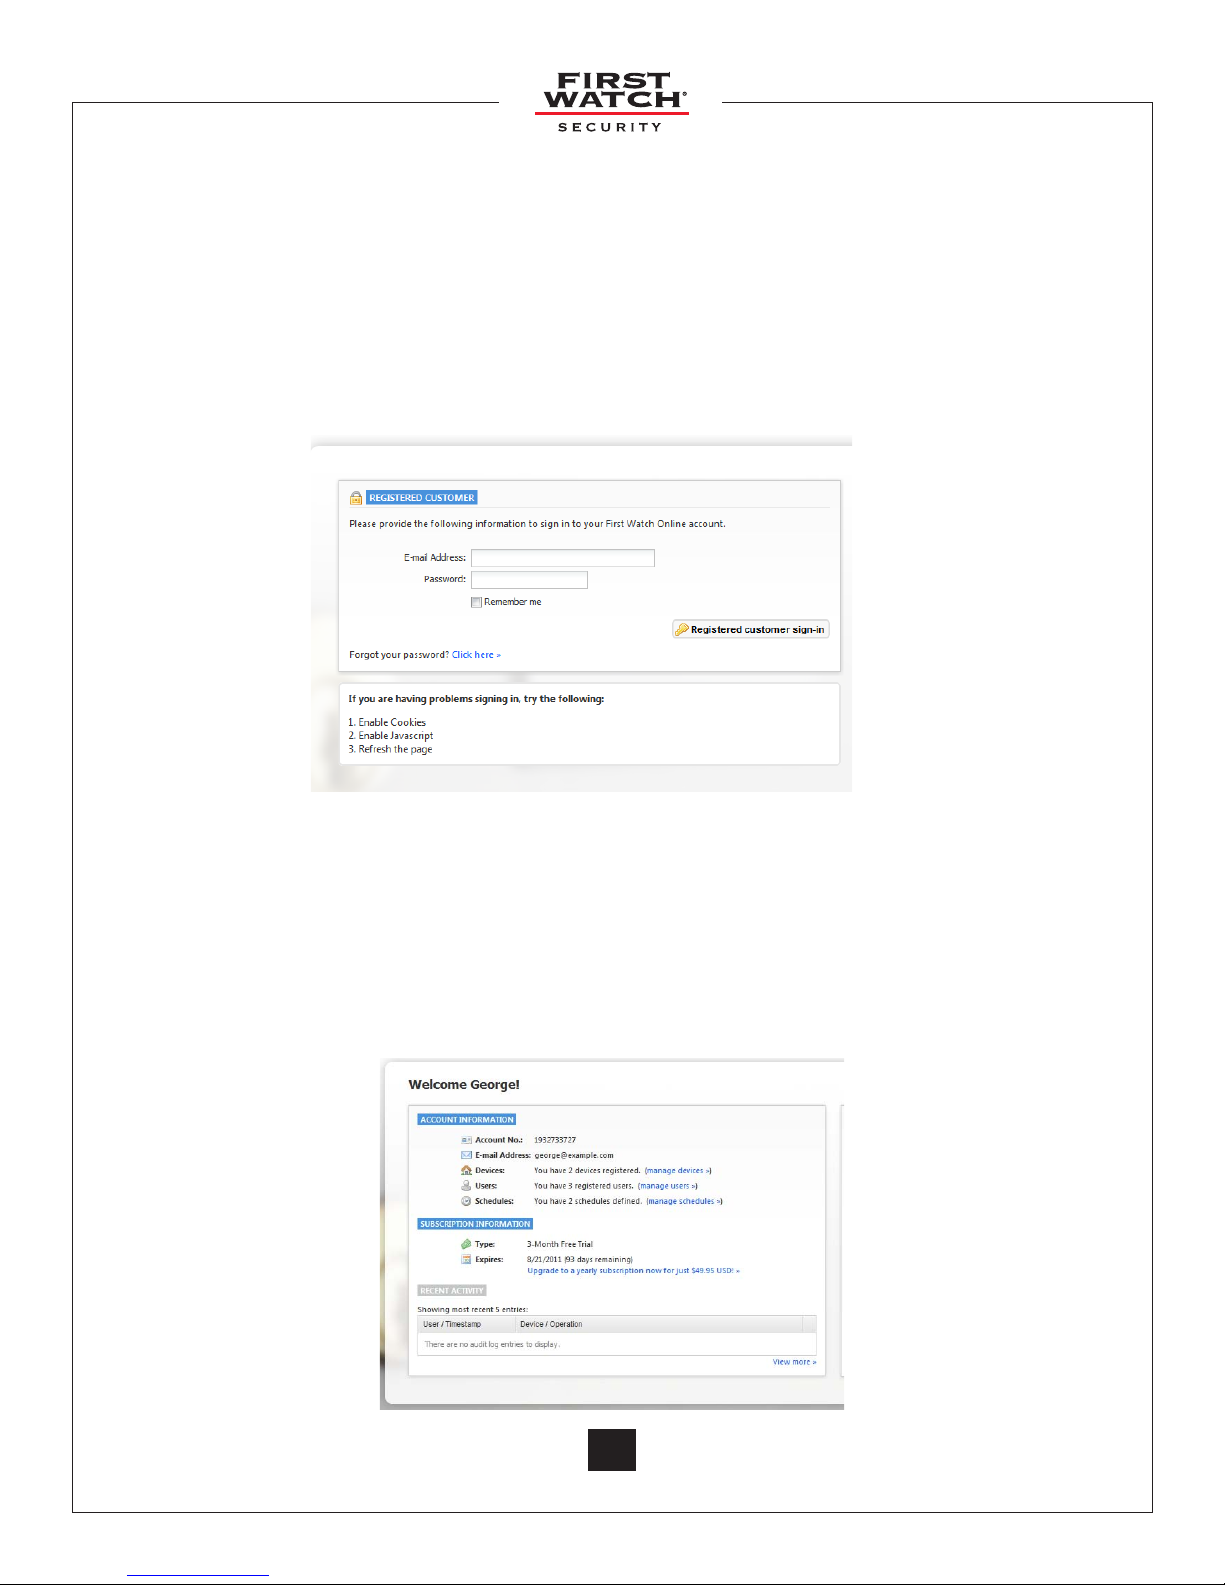
2.0 Sign-In Page
A. The e-mail address and password you used during registration are required to log-
on to First Watch® Online. Your account must have been previously activated via the
confirmation link sent to your e-mail.
B. The “Remember me” check box indicates you wish to be automatically logged in on
future visits.
C. You can choose to have your password reset by following the “Forgot your Password?”
prompt. This requires you to know the e-mail address and last name used to register
the account. An e-mail message is then sent to you with a link that can be used to
complete the password reset.
3.0 Secure Home Page
A. The “Subscription Information” area shows the current subscription you have
purchased and how much time is left on that subscription. If the subscription is a free
trial or is near expiration, there will be link below prompting you to subscribe/extend
your subscription.
B. The “Account Information” area displays the number of users, devices and schedules
that are currently defined on the account.
© 2011 Belwith® Products, LLC. | All Rights Reserved | www.firstwatchsecurity.com | 72211 Rev B© 2011 Belwith
5
5
Page 37
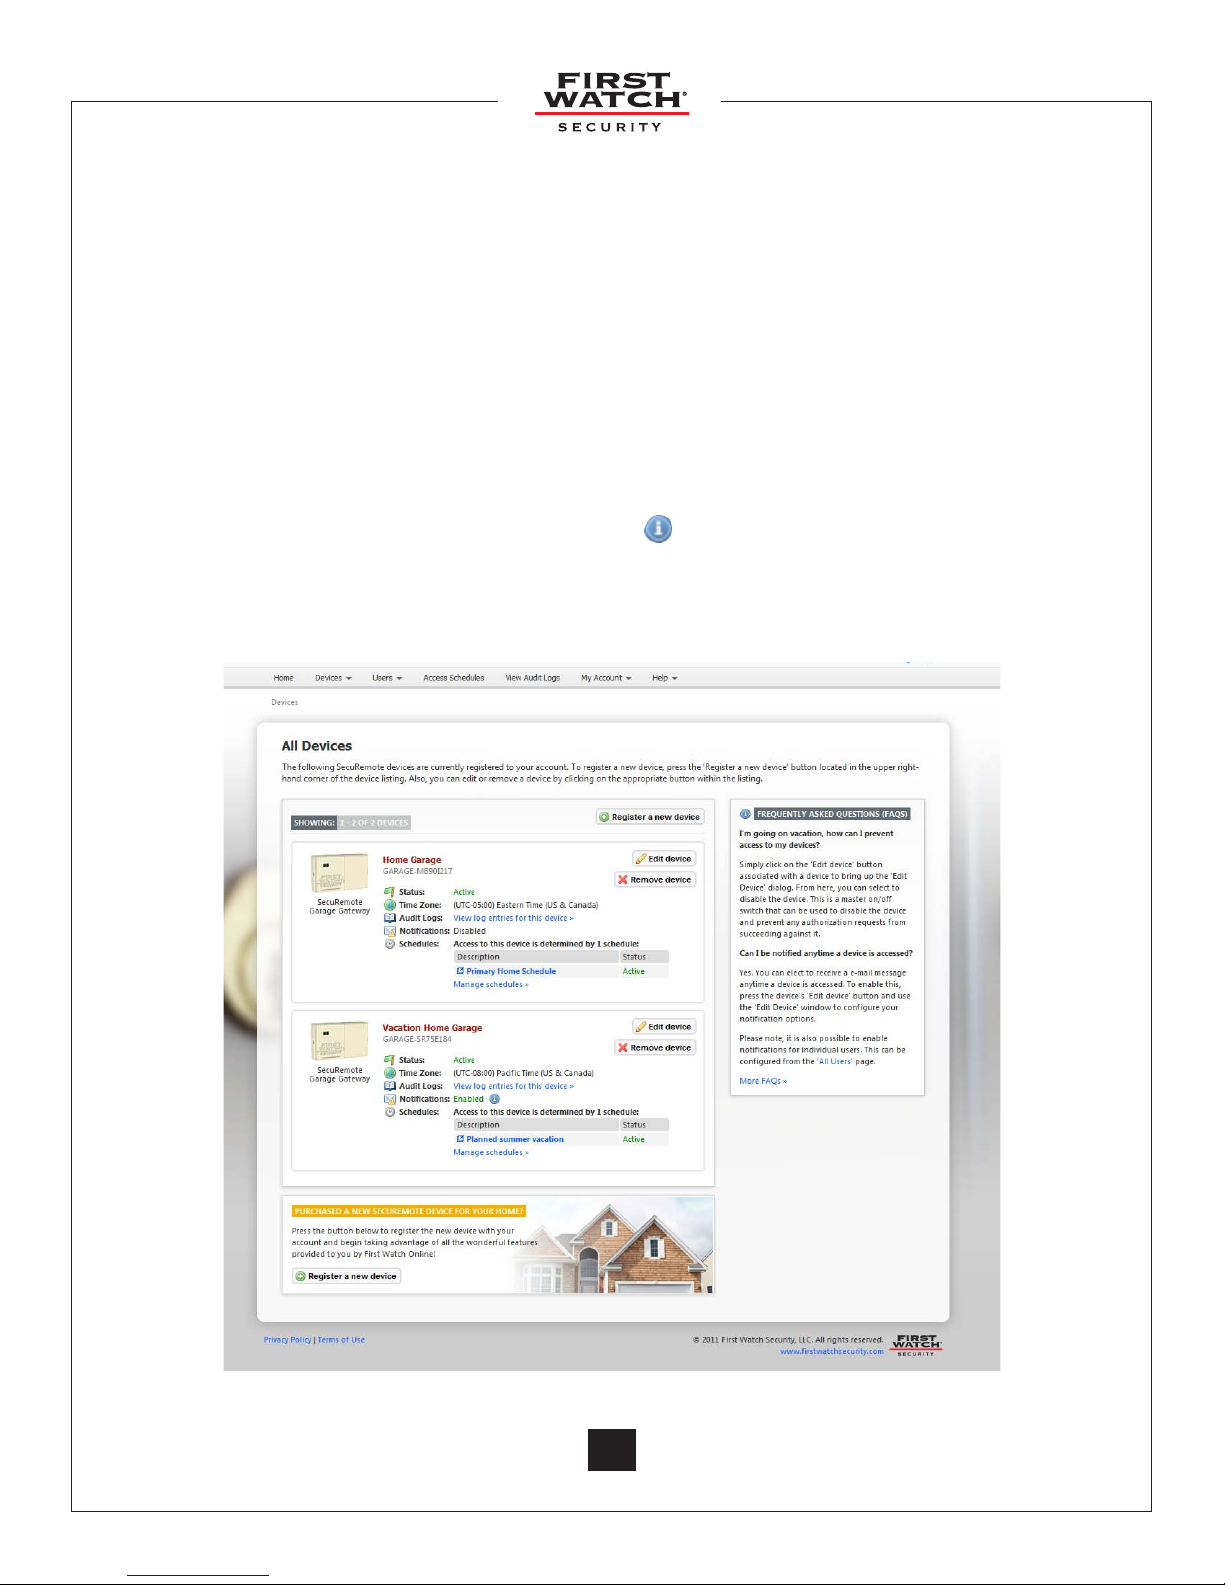
4.0 All Devices
A. All devices belonging to the account are shown using a “card” display.
B. Clicking on a device name will bring up the “Edit Device” dialog for that device. This
dialog allows you to disable a device (when leaving for vacation, for example). The
account administrator can still operate this device.
C. If the device is disabled, its “Status” is changed to “Disabled” and is shown in red. Also,
a message appears below the device name alerting you, since this is considered an
exceptional condition.
D. The “View log entries for this device” link transfers you to the “Audit Logs” page and
automatically filters the log entries based on this device’s serial number.
E. Notifications can be set on a per-device level. This ensures that the administrator
receives notification whenever this device is operated.
F. Hovering your mouse cursor over the blue “i” icon will show you where the notifications
will be sent.
G. If scheduling is enabled for the account, the schedules aecting this device are
displayed. In addition, their status (active, disabled, expired), is also shown.
© 2011 Belwith® Products, LLC. | All Rights Reserved | www.firstwatchsecurity.com | 72211 Rev B
6
Page 38
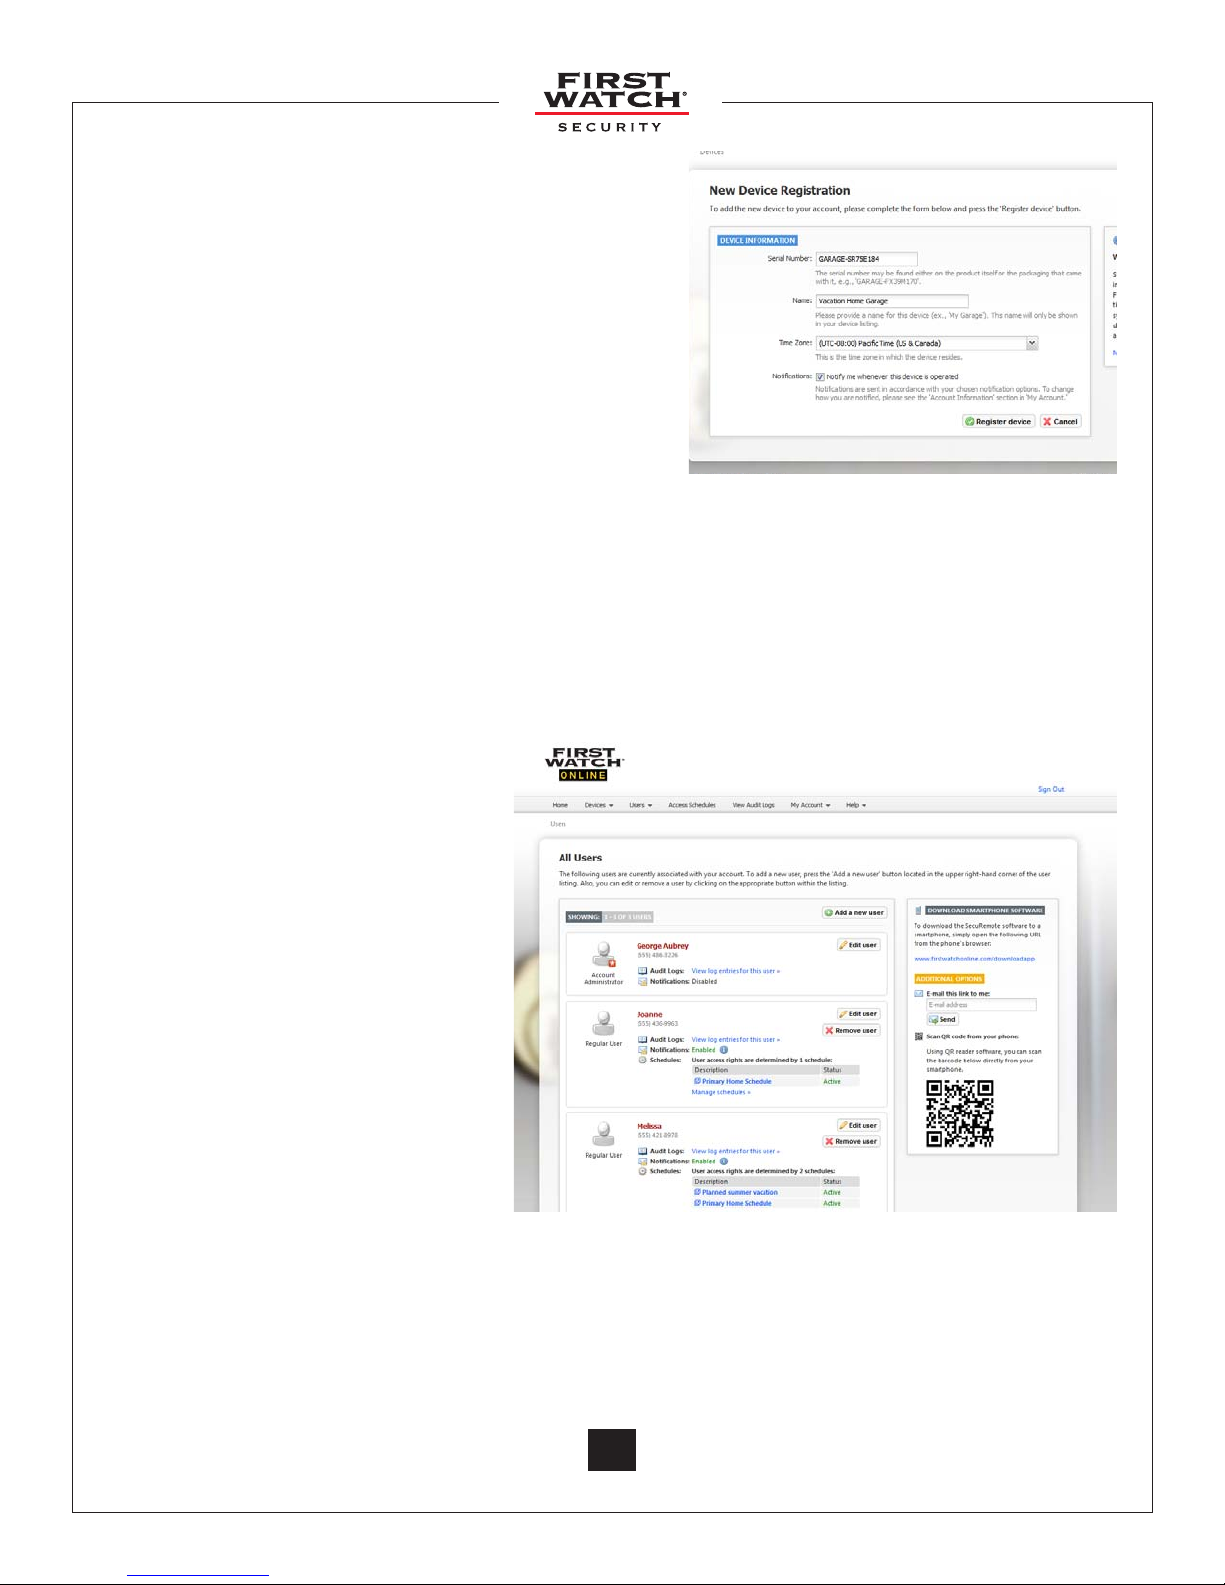
5.0 New Device Registration
A. Requires entry of serial number, name and time
zone just like the account registration form.
B. Allows you to set notification preferences for the
device.
6.0 All Users
A. The account administrator cannot be removed
from the account.
B. Clicking on the user’s name brings up the “Edit
user” dialog.
C. The “View log entries for this user” link transfers you to the “Audit Logs” page and
automatically filters the log entries based on this user’s phone number.
D. Schedules are not shown for the administrator since they are immune to scheduling.
E. Schedules aecting each “Regular User” are shown in their “card” along with their
status (active, disabled, expired).
F. The page oers a link to the app download page. This link can also be transmitted to
the user via e-mail message or by scanning the QR tag with appropriate software.
G. Security Link is an advanced
security feature that allows
the First Watch® Online
service to uniquely identify a
user’s smartphone. When a
SecuRemote™ app is run for the
first time it generates a unique
security token, a large random
number, that it sends to First
Watch® Online everytime an
authorization request is made.
This token must match the
one used on previous requests
in order for the request to be
authorized. This ensures that
no other smartphone can be
used to initiate an authorization
request on behalf of that user.
Occasionally, a user may
need to switch to a new smartphone. In order to allow the new phone to work with
the service it’s necessary to remove the previous security token from First Watch®
Online. This is accomplished by pressing the “Unlink phone” button. Once the unlink is
complete, the user can proceed with their new phone. The first authorization request
will carry the new security token and will link the new phone to their user record.
© 2011 Belwith® Products, LLC. | All Rights Reserved | www.firstwatchsecurity.com | 72211 Rev B© 2011 Belwith
7
7
Page 39
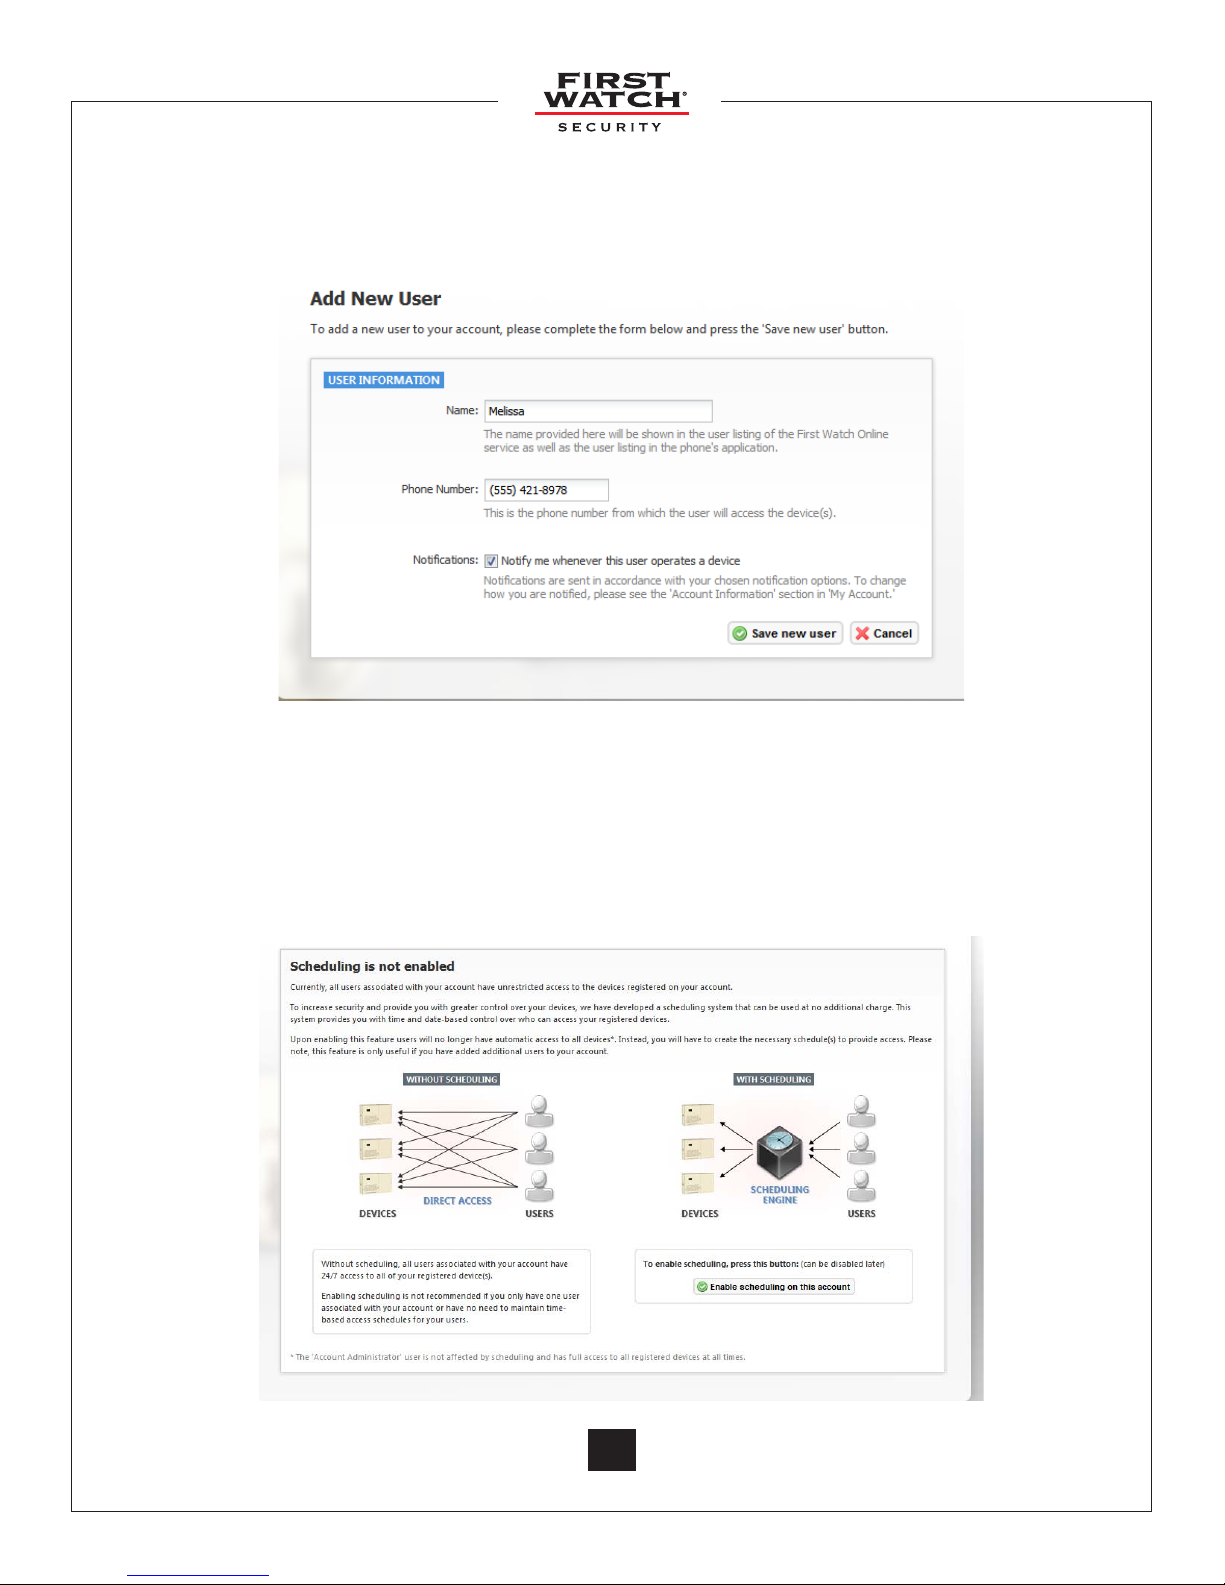
7.0 Add New User
A. You cannot enter a user with a name or phone number that already belongs to another
user on the account.
8.0 Access Schedules
8.1 Scheduling Disabled
If you do not have scheduling enabled, a page detailing the dierences between a
“scheduled” account vs. a “non-scheduled” account is shown. It uses a few graphics to
illustrate that a scheduled account uses a “scheduling engine” to determine access to the
devices.
© 2011 Belwith® Products, LLC. | All Rights Reserved | www.firstwatchsecurity.com | 72211 Rev B
8
Page 40
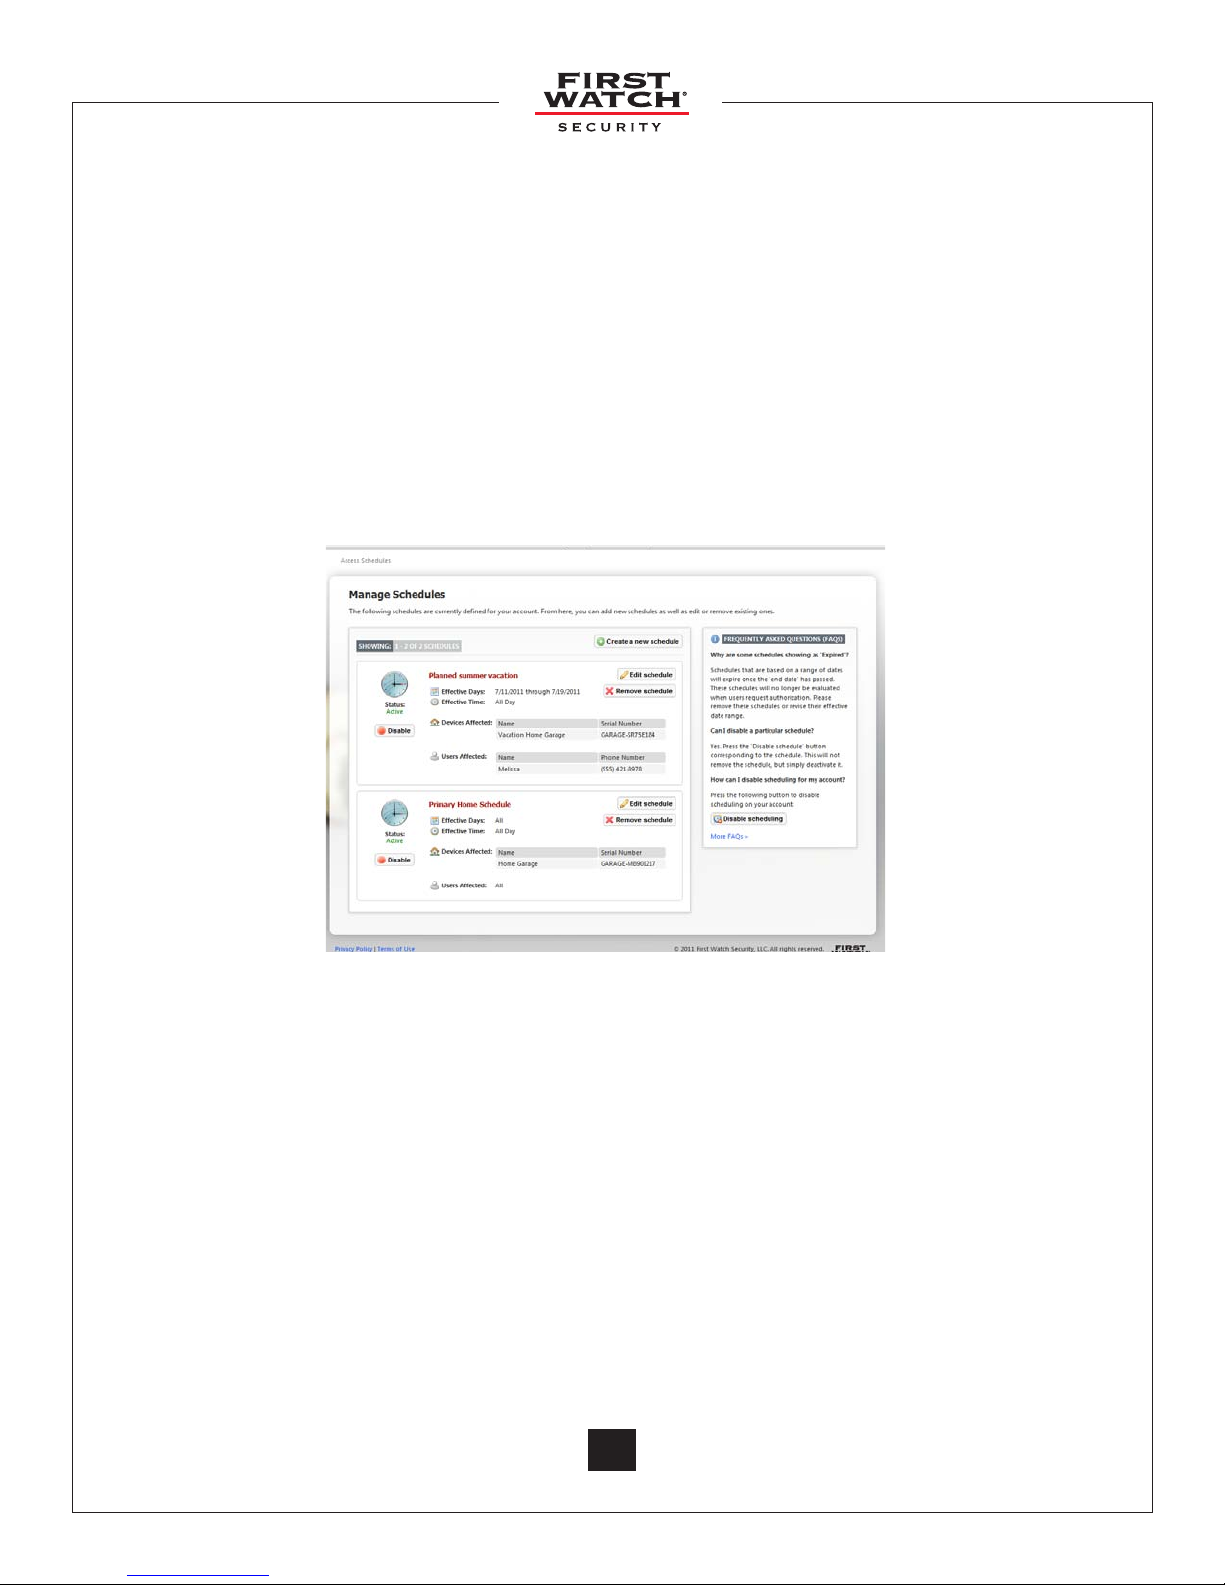
8.2 Scheduling Enabled
•Apageshowingallofyourexistingschedules,ina“card”layout,isshown.
•Clickingontheschedulenametakesyoutothe“EditSchedule”page.
•Eachschedulecardshowswhenthescheduleisvalid,whichusersitaects,andwhich
devices it controls. The phone number and serial number is shown alongside each user and
device respectively.
•Eachcardhasabuttonthatcanbeusedtoenableordisableaschedule.Thisallowssomeone
to disable a schedule without having to delete it.
•Ifaschedulehasexpired,amessageisshownalertingtheuserthatthescheduleisuseless
and should either be corrected or removed.
•Thepagecontainsabuttonthatcanbeusedtodisablescheduling.Thiscausesallexisting
schedules to be deleted and the account to be reverted to a “non-scheduled” account.
9.0 Create New Schedule/Edit Schedule
A. The user must select a schedule type (“By day of week” or “By date range”) in order to save the
schedule.
B. The date and time are specified in “Device Local Time”. For example, a schedule set to allow
access until 9PM will allow access to that device as long as the device’s local time has not passed
9PM. This creates a condition where a device in Chicago (CST) will no longer be operable after 9PM
even though a device in Los Angeles (PST) will continue to work for another two hours and is
using the same schedule.
C. If a “By date range” schedule’s date range passes, the schedule is considered to be expired. This
is determined by checking the schedule’s “To” date and “To” time and comparing it against all
existing devices and their time zones. If the date and time has passed in every device’s local time
zone it is considered expired.
D. When a user requests access to a device on a “scheduled” account, the system will check for any
schedule that provides them with access to the device. If no compatible schedules are found,
access is denied. This allows the account administrator a lot of flexibility in defining schedules
that are layered.
© 2011 Belwith® Products, LLC. | All Rights Reserved | www.firstwatchsecurity.com | 72211 Rev B© 2011 Belwith
9
9
Page 41
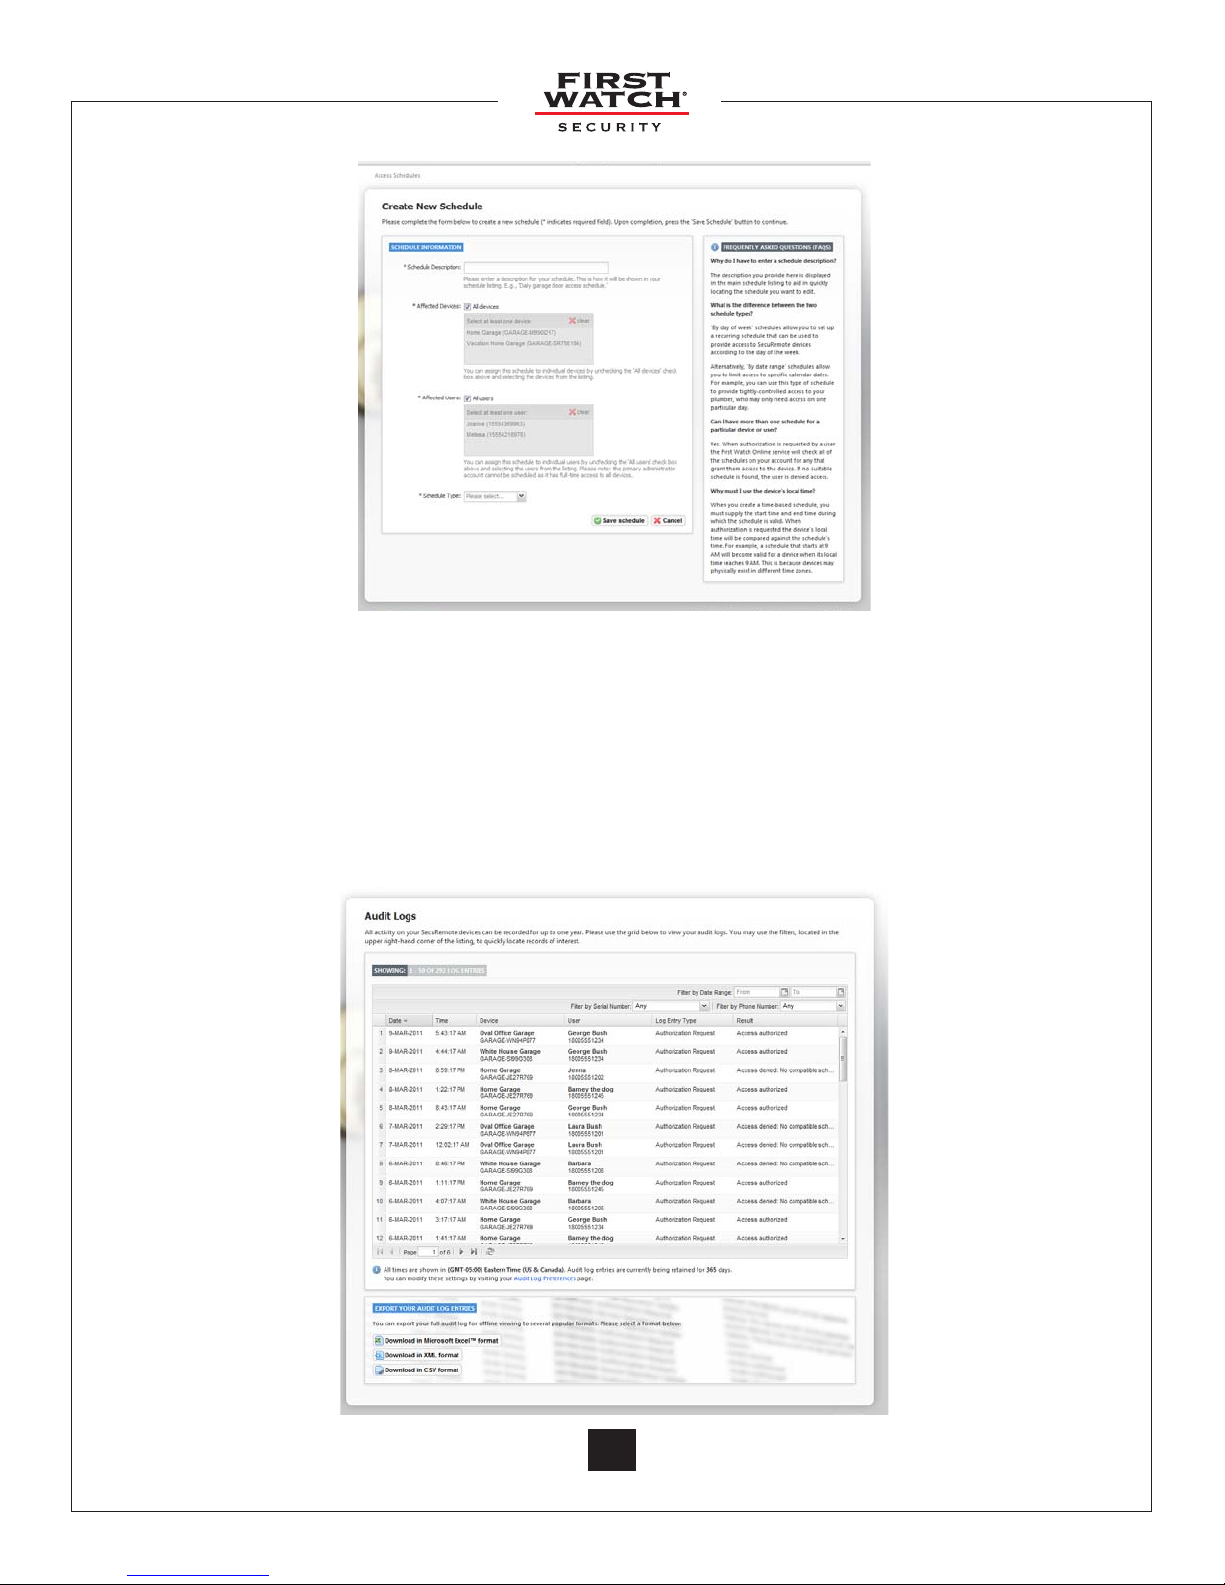
10.0 Audit Logs
A. Audit log entries are shown in UTC by default on all accounts since it’s possible that they
have multiple devices in dierent time zones.
B. Audit logs are maintained for 365 days, the maximum length, by default for each account.
The user can reduce this to as little as 7.
C. Downloading the logs in Excel, CSV or XML format will download the entire audit log history.
It is not aected by the filters used on the table above.
© 2011 Belwith® Products, LLC. | All Rights Reserved | www.firstwatchsecurity.com | 72211 Rev B
10
 Loading...