

Page 1

Title page
Nortel Communication Server 1000
IP Phone 1150E
User Guide
Page 2

Page 3

Revision history
May 2007
Standard 01.03. This document is up-issued to support Nortel
Communication Server 1000 Release 5.0 software. This
document was up-issued to 01.03 to reflect a change in technical
content found in the regulatory section.
October 2006
Standard 01.02. This document is up-issued to support Nortel
Communication Server 1000 Release 4.5 software. This
document was up-issued to 01.02 to reflect a change in technical
content found in the regulatory section.
October 2006
Standard 01.01. This document is up-issued to support Nortel
Communication Server 1000 Release 4.5 software. This
document was up-issued to 01.01 to reflect a change in technical
content found in the regulatory section.
Revision history
3
Page 4

Revision history
4
Page 5

Contents
About the Nortel IP Phone 1150E . . . . . . . . . . . . . . . . . . . . 11
Basic features . . . . . . . . . . . . . . . . . . . . . . . . . . . . . . . . . . . . . 12
Telephone controls . . . . . . . . . . . . . . . . . . . . . . . . . . . . . . . . . 15
Telephone display . . . . . . . . . . . . . . . . . . . . . . . . . . . . . . . . . 22
Call features and Flexible Feature Codes . . . . . . . . . . . . . . . 22
Security features . . . . . . . . . . . . . . . . . . . . . . . . . . . . . . . . . . . 23
Using encrypted calling . . . . . . . . . . . . . . . . . . . . . . . . . . 23
Managing your Station Control Password (SCPW) . . . . . 23
Entering and editing text . . . . . . . . . . . . . . . . . . . . . . . . . . . 26
Entering text using the USB keyboard . . . . . . . . . . . . . . . . . . 26
Entering text using the telephone dialpad . . . . . . . . . . . . . . . 27
Editing text using the context-sensitive soft keys . . . . . . . . . . 27
Contents
Connecting the components . . . . . . . . . . . . . . . . . . . . . . . . 30
Before you begin . . . . . . . . . . . . . . . . . . . . . . . . . . . . . . . . . . 31
Connecting the components of the phone . . . . . . . . . . . . . . . 31
Configuring Telephone Options . . . . . . . . . . . . . . . . . . . . . 36
Using the Telephone Options menu . . . . . . . . . . . . . . . . . . . . 37
Adjusting the volume . . . . . . . . . . . . . . . . . . . . . . . . . . . . 38
Adjusting the display screen contrast . . . . . . . . . . . . . . . . 39
Selecting a language . . . . . . . . . . . . . . . . . . . . . . . . . . . . 40
Selecting date and time format . . . . . . . . . . . . . . . . . . . . 41
Accessing display diagnostics . . . . . . . . . . . . . . . . . . . . . 41
Choosing a local dialpad tone . . . . . . . . . . . . . . . . . . . . . 42
Viewing phone information . . . . . . . . . . . . . . . . . . . . . . . . 43
Diagnostics . . . . . . . . . . . . . . . . . . . . . . . . . . . . . . . . . . . . 43
Selecting a headset type . . . . . . . . . . . . . . . . . . . . . . . . . 44
Configuring call log options . . . . . . . . . . . . . . . . . . . . . . . 45
5
Page 6

Contents
Choosing a ring type . . . . . . . . . . . . . . . . . . . . . . . . . . . . 50
Enabling or disabling Call Timer . . . . . . . . . . . . . . . . . . . 51
Setting the call indicator light . . . . . . . . . . . . . . . . . . . . . . 51
Changing feature key labels . . . . . . . . . . . . . . . . . . . . . . . 52
Configuring the name display format . . . . . . . . . . . . . . . . 54
To configure name display format: . . . . . . . . . . . . . . . . . . 54
Configuring Live Dialpad . . . . . . . . . . . . . . . . . . . . . . . . . 54
Using the Password Admin menu . . . . . . . . . . . . . . . . . . . . . 56
Call Center Agent/Supervisor Features . . . . . . . . . . . . . . . 59
Headset interface . . . . . . . . . . . . . . . . . . . . . . . . . . . . . . . 59
Agent login . . . . . . . . . . . . . . . . . . . . . . . . . . . . . . . . . . . . 59
Login with Agent ID and Multiple Queue
Assignment (MQA) . . . . . . . . . . . . . . . . . . . . . . . . . . . . . . 60
Default login . . . . . . . . . . . . . . . . . . . . . . . . . . . . . . . . . . . 62
Agent logout . . . . . . . . . . . . . . . . . . . . . . . . . . . . . . . . . . . 63
Call Center Agent features . . . . . . . . . . . . . . . . . . . . . . . . . 64
Use Activity Code . . . . . . . . . . . . . . . . . . . . . . . . . . . . . . . 64
Answer Call Center calls . . . . . . . . . . . . . . . . . . . . . . . . . 64
Call Forcing . . . . . . . . . . . . . . . . . . . . . . . . . . . . . . . . . . . 65
The Emergency Key . . . . . . . . . . . . . . . . . . . . . . . . . . . . . 66
Use Not Ready . . . . . . . . . . . . . . . . . . . . . . . . . . . . . . . . . 66
Activate Make Set Busy . . . . . . . . . . . . . . . . . . . . . . . . . . 67
Making non-ACD calls . . . . . . . . . . . . . . . . . . . . . . . . . . . 67
Contact your supervisor . . . . . . . . . . . . . . . . . . . . . . . . . . 68
Use Walkaway and Return from Walkaway . . . . . . . . . . . 69
Call Center Supervisor Features . . . . . . . . . . . . . . . . . . . . . 72
Agent Keys . . . . . . . . . . . . . . . . . . . . . . . . . . . . . . . . . . . . 72
Answer Agent . . . . . . . . . . . . . . . . . . . . . . . . . . . . . . . . . . 73
Answer Emergency . . . . . . . . . . . . . . . . . . . . . . . . . . . . . 73
Call Agent . . . . . . . . . . . . . . . . . . . . . . . . . . . . . . . . . . . . . 74
Use the Supervisor Observe and Supervisor Headset Port
6
. 74
Page 7

Contents
Observe Agent . . . . . . . . . . . . . . . . . . . . . . . . . . . . . . . . . 75
Interflow . . . . . . . . . . . . . . . . . . . . . . . . . . . . . . . . . . . . . . 77
Night Service . . . . . . . . . . . . . . . . . . . . . . . . . . . . . . . . . . 77
IP Phone 1150E non-ACD call features . . . . . . . . . . . . . . . 79
Make a call . . . . . . . . . . . . . . . . . . . . . . . . . . . . . . . . . . . . . . . 79
Using Predial . . . . . . . . . . . . . . . . . . . . . . . . . . . . . . . . . . 80
Using Auto Dial . . . . . . . . . . . . . . . . . . . . . . . . . . . . . . . . 81
Using Ring Again . . . . . . . . . . . . . . . . . . . . . . . . . . . . . . . 82
Using Last Number Redial . . . . . . . . . . . . . . . . . . . . . . . . 83
Using Speed Call . . . . . . . . . . . . . . . . . . . . . . . . . . . . . . . 83
Using System Speed Call . . . . . . . . . . . . . . . . . . . . . . . . 85
Using Hot Line . . . . . . . . . . . . . . . . . . . . . . . . . . . . . . . . . 86
Using Intercom calling . . . . . . . . . . . . . . . . . . . . . . . . . . . . . . 86
Answering a call . . . . . . . . . . . . . . . . . . . . . . . . . . . . . . . . . . . 87
While on an active call . . . . . . . . . . . . . . . . . . . . . . . . . . . . . . 88
Transferring a call . . . . . . . . . . . . . . . . . . . . . . . . . . . . . . . . . . 89
Using Timed Reminder Recall . . . . . . . . . . . . . . . . . . . . . . . . 90
Using Attendant Recall . . . . . . . . . . . . . . . . . . . . . . . . . . . . . . 91
Using Call Park . . . . . . . . . . . . . . . . . . . . . . . . . . . . . . . . . . . . 91
Calling Party Number/Charge Account . . . . . . . . . . . . . . . . . . 93
Displaying incoming calls . . . . . . . . . . . . . . . . . . . . . . . . . . . . 93
Tracing a Malicious call . . . . . . . . . . . . . . . . . . . . . . . . . . . . . 94
Additional Call Features . . . . . . . . . . . . . . . . . . . . . . . . . . . 96
Using the buzz signal . . . . . . . . . . . . . . . . . . . . . . . . . . . . . . . 96
Using Call Page Connect to make an announcement . . . . . . 96
Charging a call or charging a forced call . . . . . . . . . . . . . . . . 97
Using Enhanced Override . . . . . . . . . . . . . . . . . . . . . . . . . . 100
Using Forced Camp-on . . . . . . . . . . . . . . . . . . . . . . . . . . . . 101
7
Page 8

Contents
Override Feature . . . . . . . . . . . . . . . . . . . . . . . . . . . . . . . . . 102
Using Privacy Release . . . . . . . . . . . . . . . . . . . . . . . . . . . . . 103
Using Radio Page . . . . . . . . . . . . . . . . . . . . . . . . . . . . . . . . . 103
Using Voice Call . . . . . . . . . . . . . . . . . . . . . . . . . . . . . . . . . . 105
Using the Voice Messaging control screens . . . . . . . . . . . . . 106
Activate Automatic Answerback . . . . . . . . . . . . . . . . . . . . . . 108
Activate Call Pickup . . . . . . . . . . . . . . . . . . . . . . . . . . . . . . . 108
Use Call Waiting . . . . . . . . . . . . . . . . . . . . . . . . . . . . . . . . . . 109
Forward calls . . . . . . . . . . . . . . . . . . . . . . . . . . . . . . . . . . . . 111
Forward internal calls only . . . . . . . . . . . . . . . . . . . . . . . . . . 112
Use Remote Call Forward . . . . . . . . . . . . . . . . . . . . . . . . . . 113
Secure your phone . . . . . . . . . . . . . . . . . . . . . . . . . . . . . . . . 115
Set up a Conference call . . . . . . . . . . . . . . . . . . . . . . . . . . . 116
Join a call . . . . . . . . . . . . . . . . . . . . . . . . . . . . . . . . . . . . . . . 117
Selectable Conferee Display and Disconnect . . . . . . . . . . . 118
Use Group Call . . . . . . . . . . . . . . . . . . . . . . . . . . . . . . . . . . . 119
Additional phone features . . . . . . . . . . . . . . . . . . . . . . . . . 122
Using the Personal Directory . . . . . . . . . . . . . . . . . . . . . . . . 122
Using the Callers List . . . . . . . . . . . . . . . . . . . . . . . . . . . . . . 125
Using the Redial List . . . . . . . . . . . . . . . . . . . . . . . . . . . . . . . 127
Using Virtual Office . . . . . . . . . . . . . . . . . . . . . . . . . . . . . . . . 129
Logging in to Virtual Office . . . . . . . . . . . . . . . . . . . . . . . 130
Using Virtual Office on your Remote phone . . . . . . . . . . 131
Using Virtual Office on your Office phone . . . . . . . . . . . 133
Logging out of Virtual Office . . . . . . . . . . . . . . . . . . . . . . 135
Troubleshooting Virtual Office . . . . . . . . . . . . . . . . . . . . 136
Using Media Gateway 1000B . . . . . . . . . . . . . . . . . . . . . . . . 138
Using Test Local Mode . . . . . . . . . . . . . . . . . . . . . . . . . 139
Using Resume Normal Mode . . . . . . . . . . . . . . . . . . . . . 139
8
Page 9

Contents
Troubleshooting MG 1000B . . . . . . . . . . . . . . . . . . . . . . 140
Regulatory and safety information . . . . . . . . . . . . . . . . . . 141
DenAn regulatory notice for Japan . . . . . . . . . . . . . . . . . . . . 144
Other . . . . . . . . . . . . . . . . . . . . . . . . . . . . . . . . . . . . . . . . . . . 144
Terms you should know . . . . . . . . . . . . . . . . . . . . . . . . . . 145
Index . . . . . . . . . . . . . . . . . . . . . . . . . . . . . . . . . . . . . . . . . . 149
9
Page 10

Contents
10
Page 11
About the Nortel IP Phone 1150E
About the Nortel IP Phone 1150E
The Nortel IP Phone 1150E provides easy access to a wide range of
business features. Your network administrator assigns features to your
feature keys and provides you with passwords and other codes as
required. The CS 1000 system automatically controls incoming call
routing to answering positions, and can provide music or recorded
announcements to waiting callers.
The IP Phone 1150E can be configured for either an Agent, or
Supervisor. It is shipped in the Agent configuration, but can be modified to
support the Supervisor configuration. Depending on your role, you will
have been provided with one of the two configurations.
Note:
In this document,
Distribution phone (ACD)
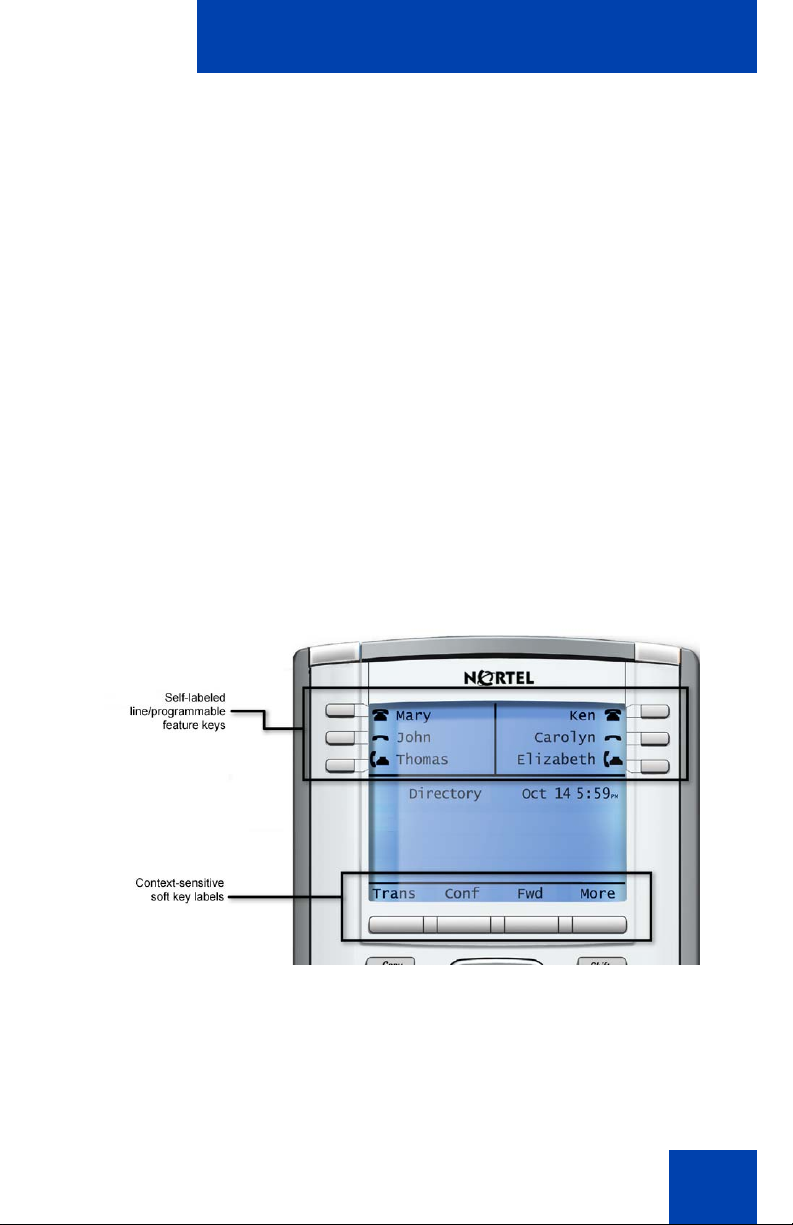
Figure 1: Self-labeled line/programmable feature keys and contextsensitive soft keys
Call Center phone
are interchangeable terms for the 1150E.
and
Automatic Call
11
Page 12

About the Nortel IP Phone 1150E
Basic features
The IP Phone 1150E supports the following features:
• six self-labeled line/programmable with labels and indicators
• four context-sensitive soft keys providing access to a maximum of
nine features
Note:
Some IP Phone 1150E phones are not configured to support
soft key functionality. Contact your system administrator.
For information about context-sensitive soft keys, see
Release Communication Server Release 5.0
• graphical, high-resolution pixel-based display, backlit, with adjustable
contrast
• volume control keys for adjusting ringer, speaker, and headset
volume
• seven specialized feature keys:
—Copy
—Services
—Quit/Stop
— Message/Inbox
— Shift/Outbox
—Directory
— Feature (reserved for future use)
• seven dedicated Automatic Call Distribution (ACD) fixed keys for
default Agent key configuration with an integrated LED (configured by
your system administrator):
— Supervisor Talk/Listen
(NN43001-115).
New in This
— Emergency
— Supervisor
— Make Busy
— Not Ready
12
Page 13

About the Nortel IP Phone 1150E
—In-Calls
— Activity
• eight dedicated ACD fixed keys for Supervisor key configuration with
an integrated LED (configured by your system administrator):
— Supervisor Talk/Listen
— Display Agents
— Interflow
— Answer Emergency
— Answer Agent
—Call Agent
— Observe Agent
—In-Calls
• Call Duration Timer
• Corporate Directory
• Personal Directory
• Redial List
• Callers List
• Password Administration
• Virtual Office
• Branch Office
• integrated Gigabit Ethernet switch for shared PC access
— LAN Ethernet port
— PC Ethernet port
• Agent headset port
• Supervisor headset port
• USB port to support standard USB keyboard, mouse, or powered hub
Note:
Powered downstream 1.1-compliant USB hubs are supported,
including USB 2.0 hubs, if they offer USB 1.1 backwards compliancy.
13
Page 14
About the Nortel IP Phone 1150E
• automatic network configuration
• Hearing Aid Compatibility (HAC) as per FCC Part 68
• wireless device support (Agent port, only) through Bluetooth®
1.2 compliant Audio Gateway Headset Profile)
• language support: English, French, Swedish, Danish, Norwegian,
German, Dutch, Portuguese, Czech, Finnish, Hungarian, Italian,
Polish, Spanish, Russian, Latvian, Turkish, and Katakana
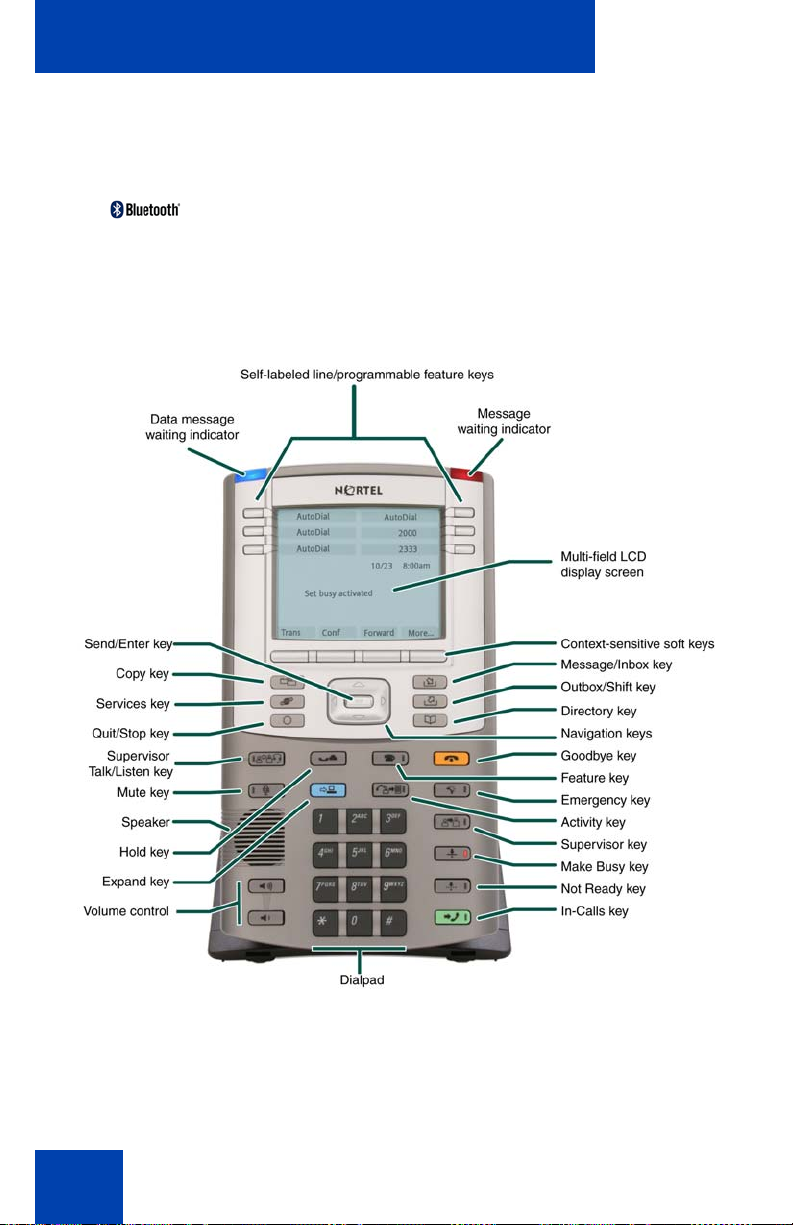
Figure 2: IP Phone 1150E
14
Page 15
About the Nortel IP Phone 1150E
Telephone controls
This section describes the controls on your IP Phone 1150E. In some
geographic regions, the IP Phone 1150E is offered with key caps that
have English text labels. Text in parentheses indicates labels appearing
on the key caps, for example (Services).
Fwd
Fwd
More...
context-sensitive soft keys are located
below the display area. The LCD label above
each key changes based on the active
feature.
When a triangle appears before a soft key
label, the feature is active.
Press the More.. key to access the next
layer of context-sensitive soft keys (selflabeled).
The keys on either side of the LCD display
area are Self-labeled line/programmable
feature keys, with labels on the LCD. These
keys also function as Line (DN) keys.
A steady LCD icon beside a Line (DN) key
indicates that the line is active. A flashing
LCD light indicates the line is on hold or the
feature is being programmed.
A steady LCD icon beside a feature key
indicates that the feature is active. A flashing
LCD light indicates that the feature is being
programmed.
15
Page 16
About the Nortel IP Phone 1150E
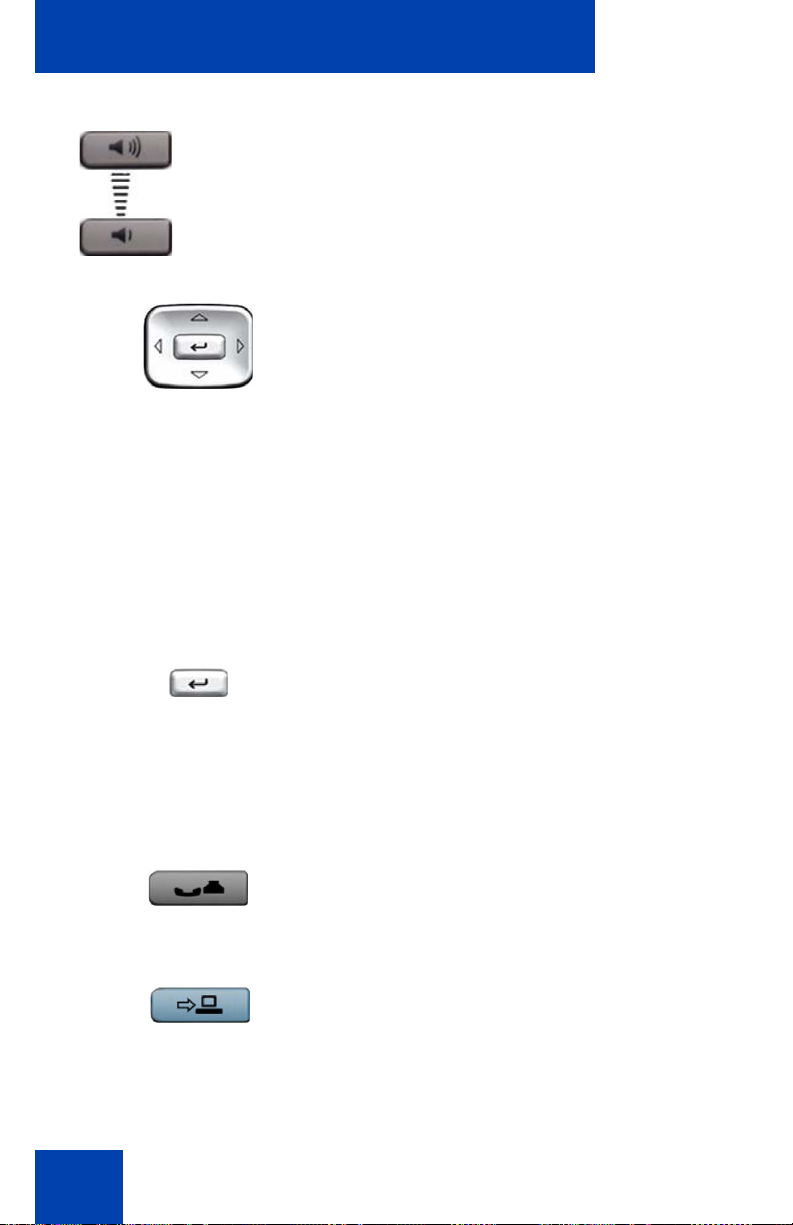
(Volume +)
(Volume -)
Use the Volume control buttons to adjust
the volume of the ringer, headset, and
speaker. Press the top button to increase the
volume, and press the bottom button to
decrease the volume.
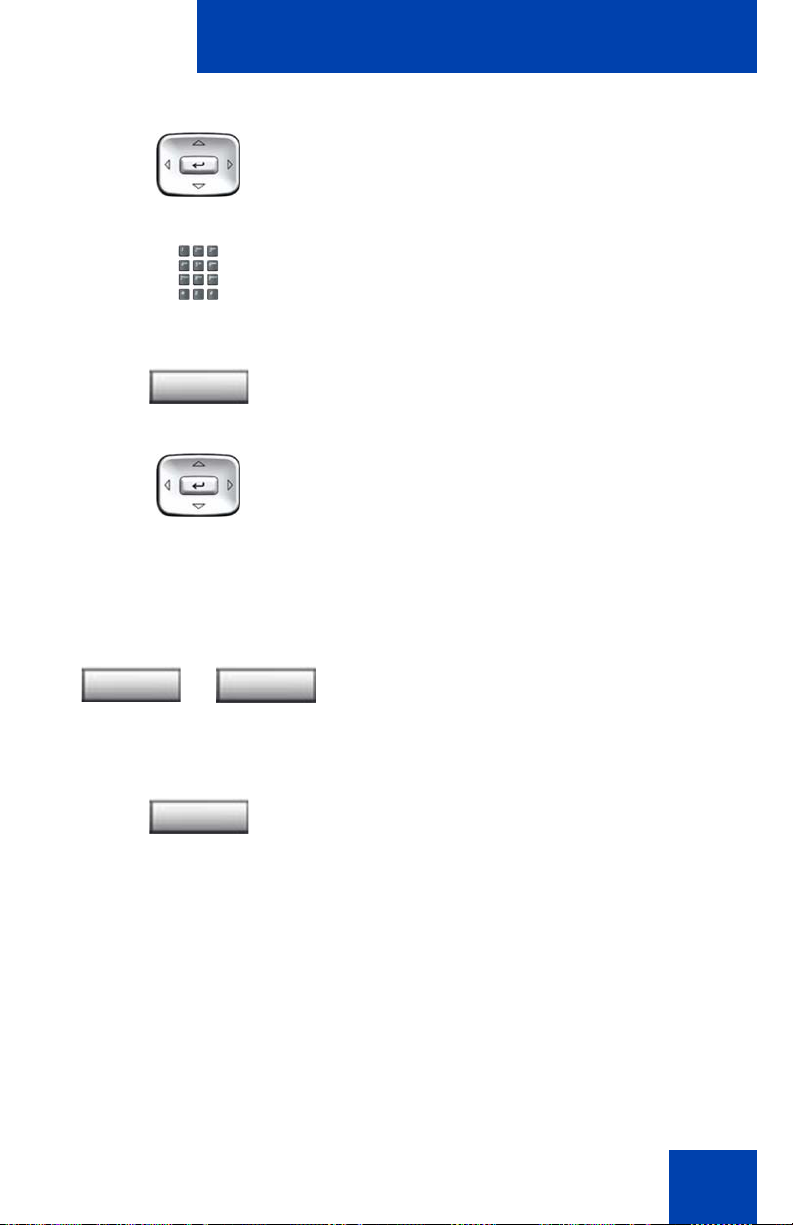
Use the Navigation keys to scroll through
menus and lists appearing on the LCD
display screen. The outer part of this key
cluster rocks for up, down, left, and right
movements.
Use Up and Down keys to scroll up and
down in lists, and the Left and Right keys to
position the cursor. You can also use the Left
and Right keys to select editable fields that
appear on the phone. Press the Right key to
select the field below the current position, or
press the Left key to select the field above
the current position.
Use the Send/Enter key, at the center of the
Navigation key cluster, to confirm menu
selections.
16
Note:
In most menus, you can use the
Send/Enter key instead of the Select
soft key.
Press the Hold key to put an active call on
hold. Tap the flashing line (DN) soft key to
return to the caller on hold.
Use the Expand key to access external
server applications.
Page 17
About the Nortel IP Phone 1150E
Feature key (reserved for future use)
Activity key (reserved for future use)
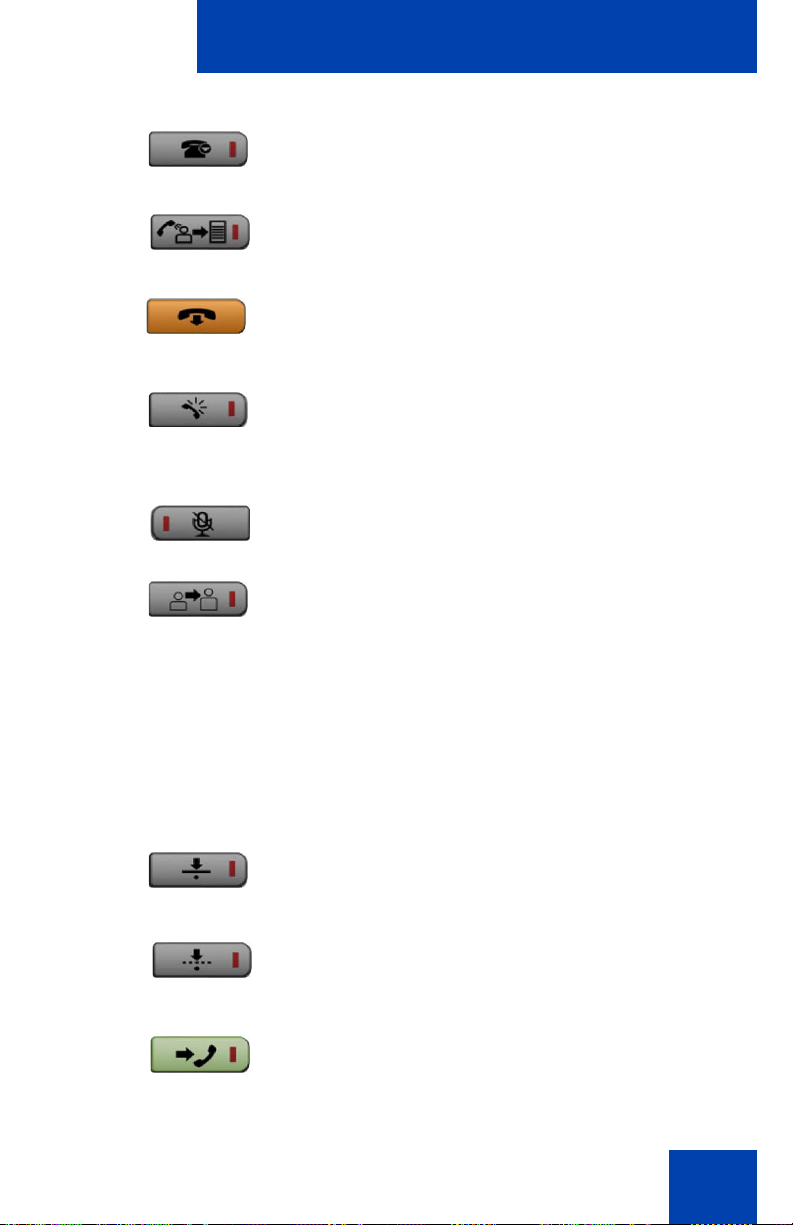
Use the Goodbye key to terminate an active
call.
Press the Emergency key to join the
supervisor into a call that you judge to be an
emergency situation.
Press the Mute key to listen to the receiving
party without transmitting. Press the Mute
key again to return to two-way conversation.
The Mute key applies to headset
microphones.
Note 1:
The Mute LED indicator, located
on the Mute key, flashes to indicate that
the microphone is muted.
Note 2:
The Supervisor key acts as a
mute key for the Supervisor. It is active
when flashing.
Press the Make Busy key to log out of the
ACD queue and agent position.
Press the Not Ready key to exit the ACD
queue without logging out.
Press the In-Calls key to answer incoming
ACD calls.
17
Page 18

About the Nortel IP Phone 1150E
When a message is waiting, the red Visual
Alerter/Message Waiting indicator flashes.
Also, this indicator flashes when the set
ringer is on.
When a data-related message, such as an
instant message, is received, the blue
Feature Status Lamp flashes. Also, this
indicator flashes when a contact has come
online.
Note:
support and, therefore, is not available
on all phones; consult your
administrator.
Press the Copy Key to copy entries to your
Personal Directory from other lists, such as
the Caller List, Redial List, and Corporate
Directory.
This function requires server
18
Page 19

About the Nortel IP Phone 1150E
Press the Services key and use the
navigation keys to access the following
items:
• Telephone Options:
— Volume adjustment
— Contrast adjustment
— Language
—Date/Time
— Display diagnostics
— Local Dialpad Tone
— Set Info
— Diagnostics
— Headset Type
— Call Log Options
— Ring type
—Call Timer
— Call Indicator Light
— Change Feature Key Label
— Name Display Format
— Live Dialpad
Press the (Quit) key to exit an active menu
or dialog. Pressing the Quit key does not
affect the status of active calls.
Press the Shift/Outbox key to toggle
between two feature key pages and to
access an additional six lines/features.
19
Page 20

About the Nortel IP Phone 1150E
• Password Admin:
— Station Control Password
(continued)
Note:
not available on all IP Phone 1150E
phones. Consult your system
administrator.
• Display Network Diagnostics Utilities
Note:
or service provider can use Display
Network Diagnostics Utilities to perform
Internet diagnostics.
• Virtual Office Login and Virtual Office
Logout (if Virtual Office is configured)
• Test Local Mode and Resume Local
Mode (if Media Gateway 1000B is
configured)
Press the Services key to exit from any
menu or menu item.
The Password Admin menu is
Only your system administrator
20
Press the Services key twice to access the
Local Tools menu, and use the navigation
keys to access the following items:
• 1. Preferences
• 2. Local Diagnostics
• 3. Network Configuration
• 4. Lock Menu
Press the Services key to exit from any
menu or menu item.
Note:
Your system administrator can
establish a password for the Local Tools
menu. If you attempt to access the Local
Tools menu and a dialog box appears
prompting you for a password, contact
your system administrator.
Page 21
About the Nortel IP Phone 1150E
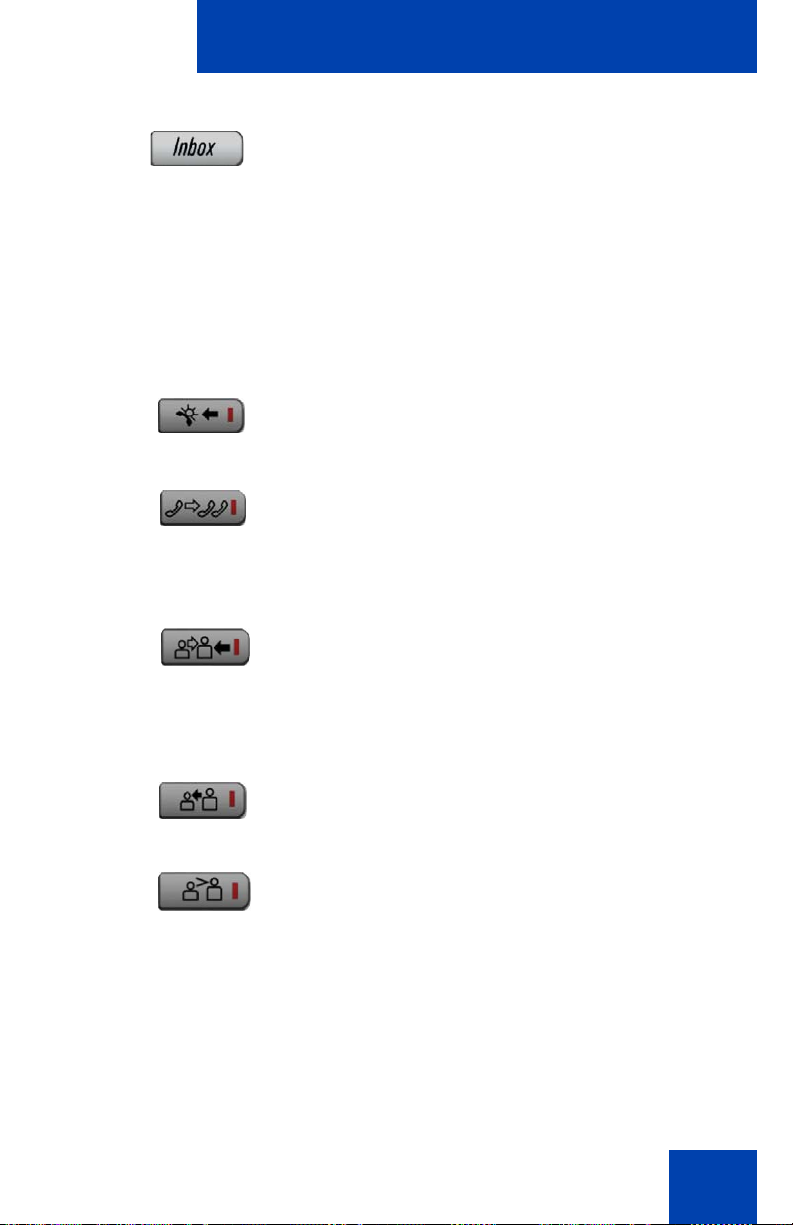
Press the Message/Inbox key to access
your voice mailbox.
Note:
This function is not available on all
phones; consult your system
administrator.
The following telephone controls are IP Phone 1150E Supervisor phones
only.
Press the Ans Emerg key to join the agent
in an emergency situation call.
Press the Interflow key to forward calls to a
predefined target queue when the call
backlog, or the waiting time in the queue
exceeds a set threshold.
Press the Ans Agent key to open the direct
line between the Supervisor and the agent.
The Ans Agent key corresponds to the
agent Supervisor key.
Press the Call Agent key to connect to an
agent position.
Press the Obv Agent key to monitor activity
on the agent phone.
21
Page 22
About the Nortel IP Phone 1150E
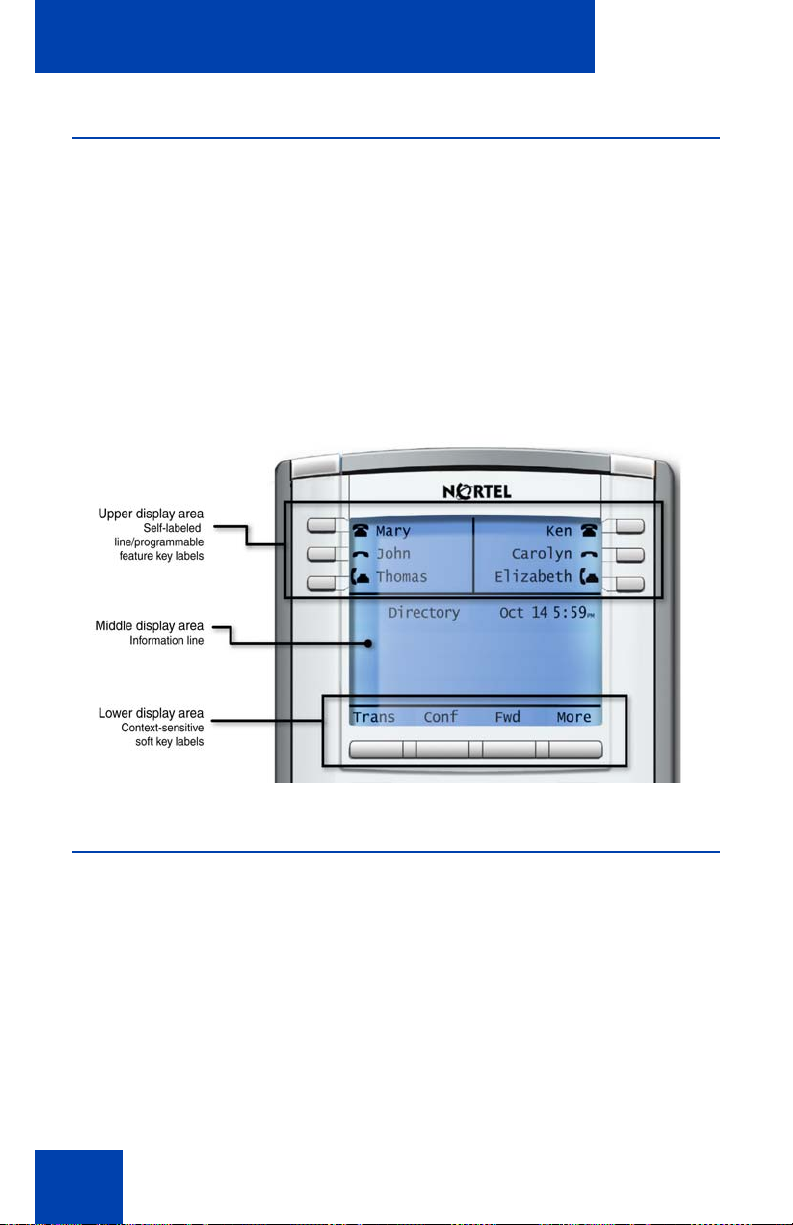
Telephone display
Your IP Phone 1150E has three display areas:
• The upper display area provides line and feature key status.
• The middle display area contains single-line information for items
such as caller number, caller name, Call Timer, feature prompt
strings, user-entered digits, date and time information, and telephone
information.
• The lower display area provides feature soft key label information.
Figure 3: IP Phone 1150E LCD screen
Call features and Flexible Feature Codes
Some features are not available on all telephones. Call features and
Flexible Feature Codes (FFC) must be assigned to your telephone and
supported by system software. Contact your system administrator to
configure these features and codes on your telephone.
22
Page 23

About the Nortel IP Phone 1150E
Security features
The following security features are available on your IP Phone 1150E:
• Using encrypted calling
• Managing your Station Control Password (SCPW)
Using encrypted calling
Your IP Phone 1150E supports secure communication using SRTP
media encryption. If the feature is enabled, a security icon appears on the
screen when your call is secured using SRTP media encryption. Contact
your system administrator to find out if this feature is available for your
use.
Managing your Station Control Password (SCPW)
Your Station Control Password (SCPW) enables the following security
features:
• Electronic Lock to prevent others from making calls from your
telephone
• password-protected telephone features (for example, Personal
Directory, Redial List, and Callers List)
Your system administrator defines your initial SCPW. Contact your
system administrator for detailed information.
To change your SCPW:
1. Press the Services key.
(Services)
2. Press the Up/Down keys to scroll and
highlight Password Admin.
23
Page 24

About the Nortel IP Phone 1150E
3. Press the Send/Enter key.
4. Use the dialpad to enter your password
at the prompt.
5. Press the Up/Down keys to scroll and
highlight New Password.
6. Press the Send/Enter key.
7. Use the dialpad to enter the new
password.
Select
8. Press the Select soft key to accept the
new password.
If you are locked out of your
IP Phone 1150E, or if you forget your
SCPW, contact your system
administrator.
Note:
The default configuration for Password Protection is off.
To turn Password Protection on or off:
1. Press the Directory key.
(Directory)
24
Page 25
About the Nortel IP Phone 1150E
2. Press the Up/Down navigation keys to
scroll and highlight Change Protection
Mode.
3. Use the dialpad to enter your password
(if Password Protection is enabled).
Enter
Yes No
or
Done
4. Press the Enter soft key.
5. Press the Up/Down navigation keys to
scroll and highlight one of the following:
— Enable Password Protection
— Disable Password Protection
6. Choose one of the following contextsensitive soft keys:
— Yes to accept the selection
— No to return to the Directory menu
7. Press the Done soft key.
25
Page 26

Entering and editing text
Entering and editing text
You can enter and edit text on your IP Phone 1150E using the following
methods:
• “Entering text using the telephone dialpad” on page 27
• “Editing text using the context-sensitive soft keys” on page 27
The use of any of these methods for text entry or editing depends on the
application. Table 1 shows the applications and input devices that you
can use for text entry.
Table 1: Application text entry
For: Use:
Call Server-related applications
(for example, changing feature
key labels, adding personal
directory entries, or dialing)
Graphical applications USB keyboard
Local Tools menu USB keyboard
Dialpad
USB keyboard for numeric
entries only
Dialpad for numeric entries
Entering text using the USB keyboard
You can use the USB keyboard, when connected, to enter text in the tools
and graphical applications.
For number entry in telephone applications (for example, when dialing),
you can use the keyboard to enter digits (0–9), as well as * and #. Other
characters are ignored.
26
Page 27

Entering and editing text
When on a call, you can use the function keys (f1, f2, f3, f4, f5, f6, f7, and
f8) to control the telephone. Table 2 shows the function keys and their
associated action during telephone calls.
Table 2: USB keyboard function keys during telephone calls
Function key Action
f1 Go to speaker mode
f2 Go to Headset mode
f3 Place the current call on hold
f4 Mute the current call
f5 Volume up
f6 Volume down
f7 Copy
f8 Quit
Entering text using the telephone dialpad
You can use the dialpad to enter text when you use features such as
Personal Directory, Redial List, and Callers List. Use the dialpad in
conjunction with the context-sensitive soft keys.
For example, if you want to enter the letter A, press the number 2 key
once. If you want to enter the letter C, press the number 2 key three
times. No letters are associated with the number 1 or the 0 keys.
Editing text using the context-sensitive soft keys
You can use context-sensitive soft keys to edit text when you use features
such as Personal Directory, Redial List, and Callers List. Use the contextsensitive soft keys in conjunction with the dialpad.
27
Page 28

Entering and editing text
To edit an entry in your Personal Directory, press the Directory key, and
select the desired entry from your Personal Directory.
To edit text with the context-sensitive soft keys:
1. Press the Edit soft key.
2. Press the Left/Right navigation keys to move through the text.
3. Select the appropriate editing soft key for the operation you want to
perform.
4. If the character you want is not visible, press the More... contextsensitive soft key to access the next layer of context-sensitive soft
keys.
5. To add non-alphanumeric symbols, press the Symbol contextsensitive soft key, and perform the following:
a. Press the Up navigation key to access the symbols.
b. Press the Left/Right navigation keys to move to a specific
symbol.
c. Press the Choose soft key to select a symbol.
6. Press the Next soft key to submit your changes.
When you are editing text using the context-sensitive soft keys, various
commands are available on the soft keys to help you, as described in
Table 3.
Table 3: Editing context-sensitive soft key description
(Part 1 of 2)
Soft key Description
Cancel Cancel an action.
Choose Select a non-alphanumeric symbol (available
only after the Symbol soft key is selected).
Clear Clear the input field.
Case Switch the next character to either uppercase or
lowercase.
Delete Backspace one character.
28
Page 29

Entering and editing text
Table 3: Editing context-sensitive soft key description
(Part 2 of 2)
Soft key Description
Done/Select/Enter Varies, depending on the state of your phone.
More.. Access additional context-sensitive soft keys.
29
Page 30
Connecting the components
Connecting the components
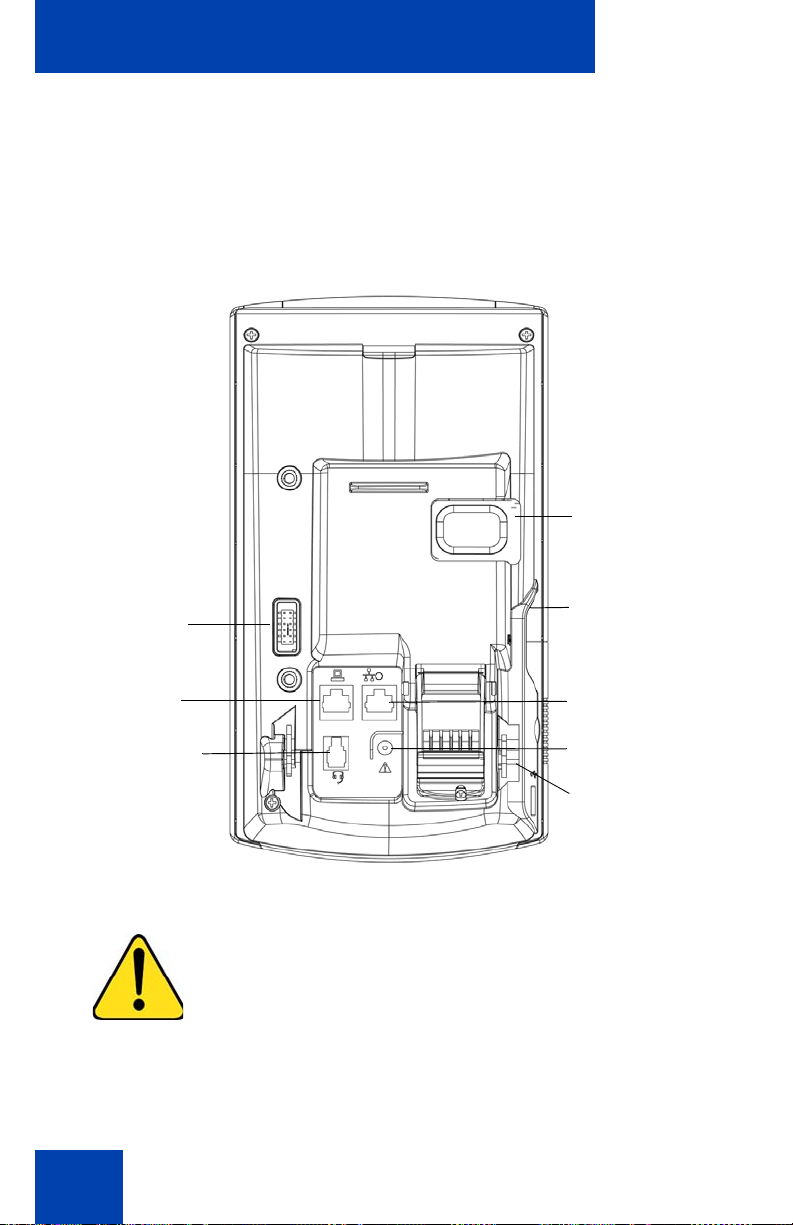
Figure 4 shows connections on the IP Phone 1150E.
Figure 4: IP Phone 1150E connections
Tilt lever button
Accessory
Expansion
module port*
PC Ethernet
port
Agent headset
port
Supervisor
headset port
LAN Ethernet port
AC adapter port
USB port
WARNING *Ensure that the protective rubber cap on
the IP Phone 1150E: Accessory Expansion Module port
is in place when the port is not in use. Connecting
anything other than the proper Accessory Expansion
Module connector to this port can cause damage to the
phone.
30
Page 31

Connecting the components
Before you begin
CAUTION
Damage to Equipment
Do not plug your IP Phone 1150E into a regular
telephone jack. This results in severe damage
to the IP Phone. Consult your system
administrator to ensure that you plug your
telephone into a 10/100BaseT Ethernet jack.
CAUTION
Your IP Phone 1150E is designed for use in an
indoor environment only.
Connecting the components of the phone
WARNING Your IP Phone 1150E is shipped with the
base locked in position. To avoid damaging your phone,
press the wall-mount lever, located under the base, to
release the stand and pull it away from the phone.
31
Page 32

Connecting the components
1. Remove the stand cover. Pull upward on the center catch as
indicated in Figure 5, and remove the stand cover. The cable routing
tracks are now accessible.
Figure 5: Removing the stand
2. Connect the AC power adapter (optional). Connect the adapter to the
AC adapter jack in the bottom of the phone. Form a small bend in the
cable, and then thread the adapter cord through the channels in the
stand.
WARNING
Use your IP Phone 1150E with the approved Nortel AC
Adapter (model #N0089601) for this model of phone
only.
Note 1:
Your IP Phone 1150E supports both AC power and Power
over Ethernet options, including IEEE 802.3af Power Classification 3.
To use local AC power, the optional AC adapter can be ordered
32
Page 33

Connecting the components
separately. To use Power over Ethernet, where power is delivered
over the CAT5 cable, the LAN must support Power over Ethernet, an
AC adapter is not required.
Note 2:
You must use CAT5e (or later) cables if you want to use
gigabit Ethernet.
3. Install the headset. Plug the connector into the RJ-9 headset jack
marked with the symbol ) on the back of the phone, and thread the
headset cord through the channels in the stand, so that the headset
cord exits the channel marked with the symbol ).
4. Install the Ethernet cable. Connect one end of the supplied Ethernet
cable to the back of your phone using the RJ-45 connector marked
with the symbol %, and thread the network cable through the channel
marked with the symbol %.
5. Install the Ethernet cable connecting the PC to the phone (optional). If
you are connecting your PC Ethernet through the phone, connect one
end of the PC Ethernet cable to your phone using the RJ-45
connector marked with the symbol (, and thread it through the
channel marked with the symbol (. Connect the other end to the
LAN connector on the back of your PC.
6. Install additional cables. If applicable, plug in optional USB devices.
Connect the Ethernet cable to the LAN Ethernet connection. If you
are using an AC power adapter, plug the adapter into an ACM outlet.
33
Page 34

Connecting the components
Figure 6: Cable routing tracks
2 Rivet slots
(Method B)
4 Wall-mount holes (Method A)
7. Wall-mount your phone (optional). Your IP Phone 1150E can be
mounted either:
— using the mounting holes on the bottom of the phone stand
(Method A), or
— using a traditional-style wall-mount box with RJ-45 connector and
15-cm (6-inch) RJ-45 cord (not provided) (Method B).
34
Page 35

Connecting the components
Complete steps 1-7, as needed, before you wall-mount your phone:
Method A: Press the wall-mount lever, and pull the phone away from
the stand. Using the stand cover (the part you removed in step 1),
mark the wall-mount holes by pressing the bottom of the stand cover
firmly against the wall in the location where you want to install the
phone. Four small pins on the bottom of the stand cover make marks
on the wall. Use the marks as a guideline for installing the wall-mount
screws (not provided). Install the screws so that they protrude 3 mm
(1/8 inch) from the wall, and then install the phone stand mounting
holes over the screw heads as indicated in Figure 6 (Method A). You
may need to remove the phone from the wall to adjust the lower
screws. When the lower screws are snug, install the phone on the
mounting screws, and then tighten the top screws.
Method B: Attach the 15-cm (6-inch) CAT5e cable, position the stand
over the mounting rivets, and slide the phone down the wall so that
the rivets fit into the slots on the stand, indicated in Figure 6
(Method B).
8. Replace the stand cover. Ensure that all cables are neatly routed and
press the stand cover into place until you hear a click.
9. Put the phone in the wall-mount position (optional). If you wallmounted your phone, put it in the wall-mount position by holding the
Tilt lever and pressing the phone towards the base until the phone is
parallel with the base. Release the Tilt lever and continue to push the
phone towards the base until you hear a click. Ensure the phone is
securely locked in position.
35
Page 36

Configuring Telephone Options
Configuring Telephone Options
The IP Phone 1150E allows you to customize certain characteristics.
Screen prompts take you step-by-step through procedures to keep you
informed on the status of various settings.
The IP Phone 1150E Services menu lists the following submenus:
• The Telephone Options menu enables you or your system
administrator to configure phone preferences. The Telephone
Options menu offers the options shown in Figure 7.
•The Password Admin menu enables you or your system
administrator to change the Station Control Password (SCPW).
•The
Virtual Office Login and Test Local Mode (for branch office)
menus are listed when an IP Phone 1150E Class of Service is
configured for Virtual Office and branch office. For more information,
see “Using Virtual Office” on page 129.
Note:
The Password Admin, Virtual Office Login, and Test Local
Mode menus are not available on all IP Phone 1150E phones.
Consult your system administrator.
Figure 7: Telephone Options menu
Volume adjustment
Contrast adjustment
Language
Date/Time
Display diagnostics
Local Dialpad Tone
Set Info
Diagnostics
Note:
When an option has a sublist, an ellipsis (...) appears after the
option.
36
Headset Type
Call Log Options
Ring Type
Call Timer
Call Indicator Light
Change Feature Key Label
Name Display Format
Live Dialpad
Page 37

Configuring Telephone Options
Using the Telephone Options menu
Use the Telephone Options menu to access the following:
• “Adjusting the volume” on page 38
• “Adjusting the display screen contrast” on page 39
• “Selecting a language” on page 40
• “Selecting date and time format” on page 41
• “Accessing display diagnostics” on page 41
• “Choosing a local dialpad tone” on page 42
• “Viewing phone information” on page 43
• “Diagnostics” on page 43
• “Selecting a headset type” on page 44
• “Configuring call log options” on page 45
• “Choosing a ring type” on page 50
• “Enabling or disabling Call Timer” on page 51
• “Setting the call indicator light” on page 51
• “Changing feature key labels” on page 52
• “Configuring the name display format” on page 54
• “Configuring Live Dialpad” on page 54
To use the Telephone Options menu:
1. Press the Services key.
2. Press the Up/Down navigation keys to
scroll and highlight Telephone Options.
37
Page 38

Configuring Telephone Options
3. Press the Send/Enter key.
4. Press the Up/Down navigation keys
5. Press the Send/Enter key. The display
6. Choose one of the following:
Select Cancel
or
to scroll and highlight an option
(for example, Language…).
provides information required to adjust
your selection.
— Press the Select soft key to save
changes and return to the
Telephone Options menu.
— Press the Cancel soft key to keep
existing configurations.
Adjusting the volume
To adjust the volume, press the Services key and select Telephone
Options, and select Volume adjustment...
To adjust the volume:
1. Press the Up/Down navigation keys to
scroll and highlight one of the following:
— Headset talk
— Ringer
— Headset listen
—Buzzer
38
Page 39

Down Up
or
or
Select Cancel
or
Configuring Telephone Options
2. Press the Send/Enter key.
3. To increase or decrease the volume, do
one of the following:
— Press the Down and Up context-
sensitive soft keys.
— Press the Up/Down navigation keys.
4. Choose one of the following:
— Press the Select soft key to save the
volume level and return to the
Telephone Options menu.
— Press the Cancel soft key to keep
existing configurations.
Adjusting the display screen contrast
To adjust the LCD screen contrast, press the Services key, select
Telephone Options, and select Contrast adjustment.
Note 1:
attached to your phone, adjusting the phone LCD screen contrast
also adjusts the display screen contrast configuration for the
Expansion Module.
Note 2:
Nortel recommends that you use the control in the Telephone
Options menu.
If you have an Expansion Module for the IP Phone 1150E
You can also adjust the contrast using the Local Tools menu;
39
Page 40

Configuring Telephone Options
To adjust the display screen contrast:
1. To increase or decrease the display
Down Up
or
or
contrast level, choose one of the
following:
— Press the Down and Up context-
sensitive soft keys.
— Press the Up/Down navigation keys.
2. Choose one of the following:
Select Cancel
or
— Press the Select soft key to save the
changes and return to the
Telephone Options menu.
— Press the Cancel soft key to keep
existing configurations.
Selecting a language
The display is available in multiple languages. To choose a language,
press the Services key, select Telephone Options, and select
Language…
Note:
This language setting controls the language used by features
on your phone only. To set the language used elsewhere on your
phone, press Services twice, select Preferences, and select
Language.
To select a language:
1. Press the Up/Down navigation keys to
scroll and highlight the desired language
(for example, German [Deutsche]).
40
Page 41

Configuring Telephone Options
2. Choose one of the following:
Select Cancel
or
— Press the Select soft key to save the
desired language and return to the
Telephone Options menu.
— Press the Cancel soft key to keep
existing configurations.
Selecting date and time format
Several date and time formats are available. Formats are based on the
12-hour and 24-hour clocks. To select the date and time format, press the
Services key, select Telephone Options, and select Date/Time…
To select a date and time format:
1. Press the Up/Down navigation keys to
scroll and highlight the desired format.
Sample formats appear on the upperright side of the display area.
2. Choose one of the following:
Select Cancel
or
— Press the Select soft key to save the
format and return to the Telephone
Options menu.
— Press the Cancel soft key to keep
existing configurations.
Accessing display diagnostics
The Display diagnostics option tests the phone display screen and
indicator lights.To access Display diagnostics, press the Services key,
select Telephone Options, and select Display diagnostics.
41
Page 42

Configuring Telephone Options
To use Display diagnostics:
1. Press the Up/Down navigation keys to
scroll through the list to view display
capabilities.
Cancel
2. Press the Cancel soft key to return to
the Telephone Options menu.
Choosing a local dialpad tone
The Local DialPad Tone option produces Dual-Tone Multi-Frequency
(DTMF) sounds, a single tone, or no sound when you press a key on the
dialpad. To choose a local dialpad tone, press the Services key, select
Telephone Options, and select Local DialPad Tone.
To choose a local dialpad tone:
1. Press the Up/Down navigation keys to
scroll and highlight one of the following
dialpad tones:
— None to disable all tones
— Short Click to enable a single tone
for all keys
— DTMF to turn on a separate DTMF
tone for each key
Select Cancel
or
42
2. Choose one of the following:
— Press the Select soft key to save the
tone selection and return to the
Telephone Options menu.
— Press the Cancel soft key to keep
existing configurations.
Page 43

Configuring Telephone Options
Viewing phone information
The Set Info option displays the following phone-specific information:
• IP address
• Hardware ID of the IP Phone
• Current firmware version
To view phone information, press the Services key, select Telephone
Options, and select Set Info.
To view phone information:
1. Press the Up/Down navigation keys to
scroll through the list to view phone
information.
Cancel
2. Press the Cancel soft key to return to
the Telephone Options menu.
Diagnostics
The Diagnostics option displays the following phone-specific information:
• Diag Tools (Ping, do Route Traces)
• EtherStats (Speed, Auto Neg, CRC Errors, Collision)
• IP Stats (Packet Info)
• RUDP Stats (Message receive or transmit)
•QOS Stats
To view diagnostic information, press the Services key, select
Telephone Options, and select Diagnostics.
43
Page 44

Configuring Telephone Options
To view diagnostic information:
1. Press the Up/Down navigation keys to
scroll through the list of diagnostic
information.
Cancel
2. Press the Cancel soft key to return to
the Telephone Options menu.
Selecting a headset type
You can configure your IP Phone 1150E to select a headset type:
• Plantronics
• GN Netcom
• Nortel Networks handset
To select a headset type, press the Services key, select Telephone
Options, and select Headset Type.
To select a headset type:
1. Press the Up/Down navigation keys to
scroll and highlight Headset Type.
2. Press the Send/Enter key.
44
3. Press the Up/Down navigation keys to
scroll and highlight a headset type.
Page 45

Configuring Telephone Options
4. Choose one of the following:
Select Cancel
or
— Press the Select soft key to save the
configuration.
— Press the Cancel soft key to keep
existing configurations.
Configuring call log options
Use the call log option to configure the following preferences:
• “Configuring the Callers List log” on page 45
• “Configuring New Call Indication” on page 46
• “Configuring Preferred Name Match” on page 47
• “Configuring Area Code Setup” on page 48
Configuring the Callers List log
You can configure the Callers List to log all incoming calls or only
unanswered calls. The default configuration is Log all calls. To log only
unanswered calls, press the Services key, select Telephone Options,
and select Call Log Option.
To log only unanswered calls:
1. Press the Up/Down navigation keys to
scroll and highlight the Log Mode
option.
2. Press the Send/Enter key.
3. Press the Up/Down navigation keys to
scroll and highlight Log unanswered
calls.
45
Page 46

Configuring Telephone Options
4. Choose one of the following:
Select Cancel
or
— Press the Select soft key to save the
configuration.
— Press the Cancel soft key to keep
existing configurations.
Configuring New Call Indication
You can configure your IP Phone 1150E to display a message to indicate
that a new incoming call was received. The default configuration is On. To
configure new call indication, press the Services key, select Telephone
Options, and select Call Log Option.
To configure New Call Indication:
1. Press the Up/Down navigation keys to
scroll and highlight the Log Mode
option.
2. Press the Send/Enter key.
3. Press the Up/Down navigation keys to
scroll and highlight New Call Indication.
46
4. Press the Send/Enter key.
5. Press the Up/Down navigation keys to
scroll and highlight one of the following:
— New call indication off
— New call indication on
Page 47

Configuring Telephone Options
6. Choose one of the following:
Select Cancel
or
— Press the Select soft key to save the
configuration.
— Press the Cancel soft key to keep
existing configurations.
Configuring Preferred Name Match
You can configure your IP Phone 1150E to display the name of the caller
as defined in your Personal Directory. The default configuration is Off. To
configure Preferred Name Match, press the Services key, select
Telephone Options, and select Call Log Option.
To configure Preferred Name Match:
1. Press the Up/Down navigation keys to
scroll and highlight Preferred Name
Match.
2. Press the Send/Enter key.
3. Press the Up/Down navigation keys to
scroll and highlight one of the following:
Select Cancel
or
— Preferred name match on
— Preferred name match off
4. Choose one of the following:
— Press the Select soft key to save the
configuration.
— Press the Cancel soft key to keep
existing configurations.
47
Page 48

Configuring Telephone Options
Configuring Area Code Setup
Use the Area Code Setup menu to save up to three area codes. When
an incoming call arrives with an area code that matches one of the three
stored area codes, the incoming call number is reordered to display the
phone number followed by the area code (as opposed to the area code
followed by the phone number).
This reordering is also performed when you scroll through your Callers
List. To configure area codes, press the Services key, select Telephone
Options, and select Call Log Option.
To configure default area codes (maximum of three):
1. Press the Up/Down navigation keys to
scroll and highlight Area Code Setup.
2. Press the Send/Enter key.
48
3. Press the Up/Down navigation keys to
scroll and highlight one of the following:
— Area Code # 1
— Area Code # 2
— Area Code # 3
4. Press the Send/Enter key.
5. Use the dialpad to enter the number at
the prompt.
Page 49

Configuring Telephone Options
6. Choose one of the following:
Select Cancel
or
To edit area code display:
— Press the Select soft key to save the
configuration.
— Press the Cancel soft key to keep
the existing configurations.
1. Press the Up/Down navigation keys to
scroll and highlight Area Code Setup.
2. Press the Send/Enter key.
3. Press the Up/Down navigation keys to
scroll and highlight one of the following:
— Area Code # 1
— Area Code # 2
— Area Code # 3
4. Press the Send/Enter key.
5. Use the dialpad to edit the number.
49
Page 50

Configuring Telephone Options
6. Choose one of the following:
Select Cancel
or
— Press the Select soft key to save the
configuration.
— Press the Cancel soft key to keep
existing configurations.
Choosing a ring type
The Ring type… option configures the phone ring tone. To choose a ring
type, press the Services key, select Telephone Options, and select
Ring type…
To select a ring type:
1. Press the Up/Down navigation keys to
scroll and highlight one of the ring types.
Play
2. Press the Play soft key to sample the
ring tone.
3. Choose one of the following:
50
Select
Stop
Cancel
— Press the Select soft key to save the
ring type and return to the
Telephone Options menu.
— Press the Stop soft key and use the
Up/Down navigation keys to select a
different ring type.
— Press the Cancel soft key to keep
existing configurations.
Page 51

Configuring Telephone Options
Enabling or disabling Call Timer
The call timer measures how long you are on each call. To enable Call
Timer, press the Services key, select Telephone Options, and select
Call Timer. When Call Timer is enabled, it is shown in the Date/Time area
of the display.
To enable or disable Call Timer:
1. Choose one of the following:
On Off
or
Select Cancel
or
— To turn on the call timer, press the
On soft key.
— To turn off the call timer, press the
Off soft key.
2. Choose one of the following:
— Press the Select soft key to save the
configuration and return to the
Telephone Options menu.
— Press the Cancel soft key to keep
existing configurations.
Setting the call indicator light
To select a headset type, press the Services key, select Telephone
Options, and select Call Indicator Light.
To turn the call indicator light on or off:
1. Press the Up/Down navigation keys to
scroll and highlight Headset Type.
2. Press the Send/Enter key.
51
Page 52

Configuring Telephone Options
3. Press the Up/Down navigation keys to
4. Choose one of the following:
scroll and highlight a headset type.
Select Cancel
or
— Press the Select soft key to save the
configuration.
— Press the Cancel soft key to keep
existing configurations.
Changing feature key labels
The Change feature key label option renames the label displayed next to
each feature key or restores the default labels to the keys (collectively or
individually). To rename feature key labels, press the Services key,
select Telephone Options, and select Change feature key labels.
Note:
If a feature key is configured as an auto-dial key, the label does
not change if the auto-dial key configuration changes.
To rename the labels:
1. Press the Send/Enter key.
2493
2. Press the feature key that you are
changing.
52
Note:
If you press a prime DN key, an
error message appears.
3. Enter the new information for the feature
key label. To enter special characters,
press the Up navigation key.
Page 53

Configuring Telephone Options
4. Choose one of the following:
Select Cancel
or
— Press the Select soft key to save the
changes and return to the
Telephone Options menu.
— Press the Cancel soft key to keep
existing configurations.
To restore the default labels:
To restore feature key labels, press the Services key, select Telephone
Options, and select Change feature key labels.
1. Press the Send/Enter key.
2. Use the Up/Down navigation keys to
scroll and highlight one of the following:
a. Restore all key labels
— Press the Yes soft key to change all
feature keys to default values.
b. Restore one key label
— Press the Select soft key.
— Press the feature key.
— Press the Yes soft key to change the
selected feature key label to the
default value.
Note:
When labels are changed to
default values, you cannot undo the
change. The label configurations must
be reentered.
53
Page 54

Configuring Telephone Options
Configuring the name display format
You can configure your IP Phone 1150E to display the name of the
incoming calling party in the following formats:
• first name, last name
• last name, first name
To configure name display format, press the Services key, select
Telephone Options, and select Name Display Format.
To configure name display format:
1. Press the Up/Down navigation keys to
scroll and highlight Name display
format.
2. Press the Send/Enter key.
3. Press the Up/Down navigation keys to
scroll and highlight one of the following:
— first name, last name
— last name, first name
4. Choose one of the following:
Select Cancel
or
— Press the Select soft key to save the
configuration.
— Press the Cancel soft key to keep
existing configurations.
Configuring Live Dialpad
The Live Dialpad option activates the Primary DN key when you make a
call by dialing a directory number on the dialpad without picking up the
handset or pressing the handsfree key.first name, last name
54
Page 55

Configuring Telephone Options
To configure Live Dialpad, press the Services key, select Telephone
Options, and select Live Dialpad.
To configure Live Dialpad:
1. Press the Up/Down navigation keys to
scroll and highlight Live Dialpad.
2. Press the Send/Enter key.
3. Press the Up/Down navigation keys to
scroll and highlight one of the following:
—On
—Off (default)
4. Choose one of the following:
Select Cancel
or
— Press the Select soft key to save the
configuration.
— Press the Cancel soft key to keep
existing configurations.
55
Page 56

Configuring Telephone Options
Using the Password Admin menu
The Password Admin menu allows you to set or change your SCPW and
to enable or disable Password Protection.
To change your SCPW:
1. Press the Services key.
2. Press the Up/Down keys to scroll and
highlight Password Admin.
3. Press the Send/Enter key.
4. Use the dialpad to enter your password
at the prompt.
56
5. Press the Up/Down keys to scroll and
highlight New Password.
6. Press the Send/Enter key.
7. Use the dialpad to enter the new
password.
Page 57

Configuring Telephone Options
Select
8. Press the Select soft key to accept the
new password.
Note:
If you are locked out of your
IP Phone 1150E, or if you forget your
SCPW, contact your system
administrator.
Note:
The default configuration for Password Protection is
To turn Password Protection on or off:
1. Press the Directory key.
2. Press the Up/Down navigation keys to
scroll and highlight Change Protection
Mode.
3. Use the dialpad to enter your password
(if Password Protection is enabled).
off
.
Enter
4. Press the Send/Enter soft key.
5. Press the Up/Down navigation keys to
scroll and highlight one of the following:
— Enable Password Protection
— Disable Password Protection
57
Page 58

Configuring Telephone Options
6. Choose one of the following context-
Yes No
or
sensitive soft keys:
— Yes to accept the selection
— No to return to the Directory menu
Done
7. Press the Done soft key.
58
Page 59

Call Center Agent/Supervisor Features
Call Center Agent/Supervisor
Features
This section describes features and procedures common to both the Call
Center Agent and the Call Center Supervisor.
Headset interface
Note:
Refer to your distributor for recommended headset types for
use with the IP Phone 1150E.
Test your headset before using the phone to receive calls. In a noisy
environment, an amplified headset is an option. Select Headset type in
the Options list and choose Type 1, Type 2, or Amplified. When an
amplified headset is used, there are two methods of volume control: the
Volume Control Bar on the phone and the volume control on the
headset amplifier. Adjust the phone volume before adjusting the headset
volume. To provide the best communication with the least amount of
distortion, the headset volume control should have a higher setting than
the phone volume control.
Agent login
To login as an agent:
1. Press the In-Calls Key.
2. Dial your Agent ID (if required).
3. Press either the In-Calls Key, or the Not
Ready Key to enter the ACD queue.
59
Page 60

Call Center Agent/Supervisor Features
Login with Agent ID and Multiple Queue Assignment (MQA)
The process of logging in using MQA consists of entering your four digit
Agent ID followed by a Supervisor ID (if your queue requires one)
followed by up to five ACD DNs and priority values (if priority values are
being used) terminated by ##.
To choose the default Priority or Supervisor ID, enter # instead of a
Priority entry or a Supervisor ID entry. The Priority or Supervisor
configured for your set will be used.
Note:
A Supervisor who is logging in to accept ACD calls will not be
able to specify a Supervisor ID (even in the case where agents are
required to enter one).
To login with Agent ID and MQA:
1. Press the In-Calls Key.
60
Page 61

Call Center Agent/Supervisor Features
2. Select one of the following four
login options:
Dial your Agent ID #
ACD DN 1 # ACD DN 2 #
ACD DN 3 # ACD DN 4 #
ACD DN 5 ##
Dial your Agent ID,
Supervisor ID
ACD DN 1 # ACD DN 2 #
ACD DN 3 # ACD DN 4 #
ACD DN 5 ##
Dial your Agent ID #
ACD DN 1 # Priority 1 #
ACD DN 2 # Priority 2 #
ACD DN 3 # Priority 3 #
ACD DN 4 # Priority 4 #
ACD DN 5 # Priority 5 # #
Dial your Agent ID #
Supervisor ID #
ACD DN 1 # Priority 1 #
ACD DN 2 # Priority 2 #
ACD DN 3 # Priority 3 #
ACD DN 4 # Priority 4 #
ACD DN 5 # Priority 5 ##
Login without Supervisor ID
and without Priority
To login with Supervisor ID and
without Priority
To login without Supervisor ID
and with Priority
To login with Supervisor ID and
with Priority
3. Press either the In-Calls Key, or
the Not Ready Key to enter the
ACD queue.
61
Page 62

Call Center Agent/Supervisor Features
To correct errors during the login procedure:
1. Dial 0# to correct the previous entry. The
Supervisor ID, ACD DNs, and Priorities
can be re-entered (see the example
below).
Example
To re-enter ACD DN 1 without using
Priority (press # 0 # to correct ACD DN
1):
Dial your Agent ID # Supervisor ID #
ACDDN1# 0 # ACD DN 1 #
ACDDN2# ACD DN 3 # ACD DN 4 #
ACDDN5##.
Default login
If you usually use the same phone, you do not need to repeat the entire
login process at the beginning of each shift. The default login places you
in the same ACD queues and the same supervisor that the set had in the
previous login.
To use the default login feature:
1. Press the In-Calls Key.
2. Dial your Agent ID # # # (if your queue
62
requires a Supervisor ID) or Dial your
Agent ID # # (if a Supervisor ID is not
required).
Note:
If queues are retained from a prior
login by an Agent ID, each queue is
displayed for two seconds. Press In-
Calls, Not Ready, or Make Busy to
cancel display of Multiple Queues.
Page 63

Agent logout
To logout:
Call Center Agent/Supervisor Features
1. Press the Make Busy Key and
disconnect the headset. The LED
indicator lights steadily.
Note 1:
again, the LED indicator will turn off. At
this point your phone can accept nonACD calls, but you are logged out of the
queue.
Note 2:
while on an ACD call, you will be logged
out automatically when the call is
finished.
If you press the Make Busy Key
If you press the Make Busy Key
63
Page 64

Call Center Agent features
Call Center Agent features
This section explains the features that are available to ACD agent
positions.
Use Activity Code
This feature allows you to record the type of activity you are performing.
On the Meridian 1, use the Activity Key and activity codes.The
Meridian 1 tracks items such as the number of specific types of calls and
the holding times for these calls.
To capture activities:
1. Press the Activity key.
2. Dial the Activity Code that corresponds
to the activity being performed.
3. Press the Activity key again.
Repeat these steps if performing multiple tasks.
Answer Call Center calls
The In-Calls Key is the lower right key on your IP Phone 1150E and is the
main ACD extension (Primary DN). It allows you to answer the next
queued call on the primary DN. This key presents only ACD calls. To
disconnect from an ACD call, press the Goodbye Key or press the
In-Calls Key a second time.
To make outgoing calls and accept non-ACD calls, your network
administrator must configure one or more non-ACD DNs (Individual DNs)
to your IP Phone 1150E.
64
Page 65

Call Center Agent features
Note:
If you have the handset option and you pick up the handset,
you must also press a DN key, otherwise the handset is not operable.
You can terminate a call by replacing the handset in the cradle.
The phone rings and the In-Calls indicator flashes:
1. Press the In-Calls Key. The caller is
connected and the indicator lights
continuously.
To end an ACD call:
1. Press the In-Calls Key. The caller is
disconnected and the indicator light
turns off.
or
Press the Goodbye Key.
or
Wait for the caller to terminate the call.
Call Forcing
The Call Forcing option automatically connects incoming ACD calls. You
do not need to press the In-Calls Key.
When Call Forcing is on, you have a time interval between each incoming
call that is defined by your network administrator. After the time interval is
up, you hear a tone and Call Forcing automatically connects you with the
incoming caller. You will hear a short tone and then the call automatically
gets routed to your station. The In-Calls indicator lights continuously
during the call.
Note:
Pressing the In-Calls Key with Call Forcing (Auto Answer) on,
disconnects an active ACD call.
65
Page 66

Call Center Agent features
The Emergency Key
When you have an emergency situation:
1. Press the Emergency Key. The
indicator flashes while your supervisor is
called. When your supervisor picks up
the call, the LED indicator lights
continuously and you have a three-way
conference.
Note:
The display shows information
about the call. Before you press the
Emergency Key, write down this
information for future reference.
Use Not Ready
Use the Not Ready Key, when performing post-call work.
To be taken out of the queue:
1. Press the Not Ready Key. This takes
To be placed back in the queue:
1. Press the Not Ready Key or the
66
you out of the queue.
In-Calls Key.
Note:
If you Press the In-Calls Key
during an ACD call, the call is
disconnected.
Page 67

Call Center Agent features
Activate Make Set Busy
Make Set Busy allows you to make your phone appear busy to all callers.
To activate Make Set Busy:
1. Press the Make Busy Key.
To deactivate Make Set Busy:
1. Press the Make Busy Key a second
time.
Making non-ACD calls
An Individual DN allows you to make outgoing calls and to receive nonACD incoming calls. If you do not have an active call when the LCD
indicator flashes, you can press the corresponding Individual DN Key and
answer the call.
To make a non-ACD call:
2637
1. Press an Individual DN Key.
2. Dial the number you want to call.
67
Page 68

Call Center Agent features
To answer a non-ACD call:
2637
1. Press the DN Key next to the flashing
indicator. You are connected to your
non-ACD caller.
Contact your supervisor
To answer your supervisor when your phone rings and the
Supervisor indicator flashes:
1. Press the Supervisor Key.
If you are on a call and hear a buzz and the Supervisor indicator
flashes:
1. Press the Hold Key.
2. Press the Supervisor Key.
To call your supervisor:
To return to the ACD call:
68
1. Press the Supervisor Key. If you are on
a call, this automatically puts the call in
progress on Hold.
1. Press the In-Calls Key.
Page 69

Call Center Agent features
To Conference your Supervisor during a call in progress:
1. Press the Supervisor Key. The caller is
on hold and you can talk privately with
your supervisor.
2. Press the Supervisor Key a second
time to have a three-way conversation
with the supervisor and the caller.
To Transfer to a supervisor, during a call in progress:
1. Press the Supervisor Key. The caller is
on hold and you can talk privately with
your supervisor.
2. Press the Supervisor Key again when
the supervisor answers.
3. Press the Goodbye Key to disconnect
from the call. The caller remains
connected with your supervisor.
Use Walkaway and Return from Walkaway
Use this feature when you need to leave your desk during an ACD call,
during a non-ACD call, or while in the Not Ready state.
To use the Walkaway feature:
1. Press the Hold Key. The LCD indicator
beside the In-Calls extension flashes.
69
Page 70

Call Center Agent features
2. Disconnect the headset before you
leave.
Note:
Some headsets have a quick
disconnect feature. You can do a quick
disconnect instead of disconnecting the
headset.
To Walkaway while in Not Ready mode (Not Ready LED or LCD
indicator is on, and Not Ready is shown on the display):
1. Press the Not Ready Key.
2. Press the Hold Key.
3. Disconnect the headset.
To return from Walkaway:
70
1. Connect the headset.
Page 71

Call Center Agent features
1. Press the key next to the flashing
indicator.
Note 1:
If a caller disconnects before
you return from Walkaway, the Not
Ready indicator flashes. When you
return from Walkaway, you are in Not
Ready mode.
Note 2:
Even if you are using the
optional handset, you must disconnect
the headset to activate walkaway mode.
There is not a quick disconnect for the
handset.
71
Page 72

Call Center Supervisor Features
Call Center Supervisor Features
In addition to the features described in this section, your network
administrator can assign any feature listed in the “Agent features” section
to a supervisor's phone (except Supervisor).
Agent Keys
Agent Keys allow you to connect, observe, or monitor the status of each
Agent position. Each Agent Key is linked to a particular agent position and
can be used along with the Call Agent or Observe Agent Keys. The
following table shows the meaning of LCD indicator associated with an
Agent Key.
Table 4: LCD status indicators
Indicator Agent Status
Off No agent logged in at this position
On Busy on an ACD call
Slow Flashing Waiting for an ACD call
Fast Flashing Busy on a non-ACD call
72
Page 73

Call Center Supervisor Features
Answer Agent
When your phone rings and the Answer Agent indicator flashes:
1. Press the Answer Agent Key. Your
position goes into Not Ready state and
you are connected to the agent.
To disconnect an agent call:
1. Press the Goodbye Key.
Answer Emergency
When your phone buzzes and the Answer Emergency indicator
flashes:
1. Press the Hold Key if you intend to
return to the call in progress.
2. Press the Answer Emergency Key.
Your position goes into Not Ready state
and the Answer Emergency indicator
lights continuously. You are connected
to the call.
To disconnect from the emergency call:
1. Press the Goodbye Key.
73
Page 74

Call Center Supervisor Features
Call Agent
To call an agent:
1. Press Call Agent Key, your position
goes into the Not Ready state.
2637
To leave Call Agent state:
2. Press the Agent Key assigned to the
agent
or
3. Dial the agent's position ID.
Note:
To talk to another agent repeat
steps one and two or press the Agent
Key for the next agent.
1. Press the Goodbye Key.
Use the Supervisor Observe and Supervisor Headset Port
The Supervisor Talk/Listen Key is located in the upper left corner of the
IP Phone 1150E and has an associated LED.
A supervisor can listen in on an active call at an IP Phone 1150E by
connecting the headset into the port near the Supervisor Talk/Listen Key
on an agent’s phone. The LED remains dark to denote that the supervisor
can hear the conversation while the microphone for the supervisor’s
headset is muted.
74
Page 75

Call Center Supervisor Features
To use the Supervisor Talk/Listen feature:
1. Plug your headset into the agent phone.
To use the Supervisor Observe feature for a two way conversation:
1. Press the Supervisor Key. The LED
lights continuously and the supervisor
can participate in the conversation.
To mute the Supervisor headset:
1. Press the Supervisor Key a second
time to put the supervisor headset on
mute. The LED turns off.
Observe Agent
To observe an agent:
2637
1. Press the Observe Agent Key. Your
position goes into Not Ready state.
2. Press the Agent Key.
or
3. Dial the agent's position ID. You can
listen to the agent and caller's
conversation.
Note:
To observe another agent, repeat
step two.
75
Page 76

Call Center Supervisor Features
Note:
You cannot observe an agent if the agent's call is on hold or if
no calls are in progress.
To talk to an agent you are observing:
1. Press the Observe Agent Key.
You now have a conference with the
agent and the caller.
To leave the Observe state:
1. Press the Goodbye Key.
76
Page 77

Call Center Supervisor Features
Interflow
When the call backlog or the waiting time in the queue exceeds a set
threshold, Interflow forwards calls to a predefined target queue. The
supervisor activates Interflow when the waiting time for the queue
exceeds its threshold.
To activate Interflow:
1. Press the Interflow Key.
The indicator flashes and excess calls
are routed to the destination.
To stop Interflow:
1. Press the Interflow Key again.
Night Service
To enter Night Service:
Night
1. Press the Night Key and dial 6
(6=N for Night).
The indicator lights continuously. All
calls in the queue and new calls receive
Night Service.
77
Page 78

Call Center Supervisor Features
To transition to Night Service:
Night
To exit Night Service:
Night
1. Press the Night Key and dial 8
(8=T for Transition).
The indicator flashes. Calls in the queue
remain in the queue and new calls
receive Night Service.
1. Press the Night Key and dial 3
(3=D for Day).
The indicator flashes. New calls enter
the queue.
78
Page 79

IP Phone 1150E non-ACD call features
IP Phone 1150E non-ACD call
features
This section describes non-ACD features commonly used for call
processing. Your network administrator assigns features to your
programmable feature keys. Whenever this guide describes a procedure
that requires special codes ask your network administrator to provide
these to you.
To access a feature, you press a Feature Key, or enter a Flexible Feature
Code (FFC). Your network administrator supplies you with the Flexible
Feature Codes for your system.
Note:
To use a feature described in this section, your system
software must support the feature and the feature must be assigned
to your phone. Check with your network administrator for more
details.
Make a call
This section describes features that you can use when you make a call.
There are several ways to make a call from your Nortel IP Phone 1150E.
To make a call from your phone, use the features described in this
chapter.
To make a call:
2637
1. Press an Individual Line (DN) Key.
79
Page 80

IP Phone 1150E non-ACD call features
2. Dial the number.
Note:
If you are on a call on your
Individual Line (DN) and your phone is
not in Not Ready or Make Busy state,
your call is automatically placed on hold
when an ACD call rings your phone
enabling you to answer the ACD In-Calls
line. However, if you are on an ACD call
and a call comes in on your Individual
Line (DN), you cannot put your ACD call
on hold to answer the call on your
Individual Line (DN).
Using Predial
The Predial feature allows you to enter and preview a number of up to 31
digits and make corrections before you dial the number.
To use Predial:
80
2637
1. Dial the number.
Note 1:
long distance number, be sure that the
appropriate access codes are included.
Note 2:
1.5 second pause in the dialing string.
2. Press an Individual Line (DN) Key to
receive dial tone. The displayed
predialed number is automatically dialed.
Note:
if the Live dial pad feature is active.
If you are calling an external or
Press the Pause Key to insert a
You cannot use the Predial feature
Page 81

IP Phone 1150E non-ACD call features
Using Auto Dial
Auto Dial lets you dedicate a feature key to a specific phone number.
When the Auto Dial Key is pressed, the number is dialed automatically.
To use Auto Dial:
2637
AutoDial
1. Press an Individual Line (DN) Key.
2. Press the associated Auto Dial Key.
Note:
automatically.
To display the Auto Dial number:
Display
AutoDial
To store an Auto Dial number:
AutoDial
1. Press the Display Key.
2. Press the configured Auto Dial Key. The
number appears on the display.
1. Press the Auto Dial Key.
The number is dialed
2. Dial the number to be stored on the Auto
Dial Key.
81
Page 82

IP Phone 1150E non-ACD call features
AutoDial
3. Press the Auto Dial Key again. The
number is stored on the key. To change
the key label “AutoDial”, select Change
feature key label from the Options
List menu. Please see “Changing
feature key labels” on page 52 for
detailed instructions.
Using Ring Again
Use the Ring Again feature when you dial a number and receive a busy
tone or no answer. The Ring Again feature lets you know when the
person you dialed is available or has used their phone. The feature
notifies you when to redial your party. The Ring Again feature
automatically redials the number.
To use Ring Again:
1. Dial a number and receive a busy tone
or no answer.
RingAgn
2. Press the Ring Again Key. The screen
displays Ring again is active.
To call a Ring Again party when you receive notification:
When the number you want to reach is available, or the person has reused their set, you hear the Ring Again tone.
2637
82
1. Press an Individual Line (DN) Key.
Page 83

IP Phone 1150E non-ACD call features
RngCall
To cancel Ring Again before notification:
CanclRA
2. Press the Ring Call Key.
1. Press the Cancel Ring Again Key. The
screen displays Ring Again is
cancelled.
Using Last Number Redial
Last Number Redial allows you to automatically redial the last number
you dialed. This feature must be enabled by your network administrator.
To use Last Number Redial:
2637
2637
1. Press an Individual Line (DN) Key.
2. Press the Individual Line (DN) Key
again. The last number you dialed is
automatically redialed.
Using Speed Call
The Speed Call feature allows you to automatically dial frequently called
numbers by entering a one, two, or three digit code. Contact your network
administrator to determine the capacity of your Speed Call list.
A phone designated as a Speed Call Controller can program or edit the
Speed Call list. This feature must be enabled by your network
administrator.
83
Page 84

IP Phone 1150E non-ACD call features
To store or change a Speed Call number:
SpcCtrl
1. Press the Speed Call Controller Key.
The screen displays Enter Code, then
number.
2. Dial a one, two, or three digit code. Use
the Delete Key if you make a mistake.
Use the Cancel Key to leave the screen
without storing a speed call number. A
dash is automatically inserted after the
required number of digits have been
entered.
3. Dial the associated phone number. Use
the Delete Key if you make a mistake.
Use the Cancel Key to leave the screen
without storing a speed call number.
Note 1:
Dial the access code (if
required) followed by the internal,
external, or long-distance phone
number.
Note 2:
Press the Pause Key to insert a
1.5 second pause in the dialing string.
Done
To make a Speed Call:
2637
84
4. Press the Done Key to save the code
and number.
1. Press an Individual Line (DN) Key.
Page 85

IP Phone 1150E non-ACD call features
SpcCtrl
or
SpcUsr
2. Press the Speed Call Controller Key or
the Speed Call User Key. The screen
displays Enter code.
3. Dial the Speed Call code assigned to the
phone number. The number is
automatically dialed.
Using System Speed Call
System Speed Call allows you to make a call by dialing Speed Call codes
which may override your phone’s class of service restrictions. The
System Speed Call feature is set up on the system by your network
administrator. It is a speed dial number that is common to many users,
therefore it is set up on the system not on your individual phone.
To make a System Speed Call:
2637
SpcCtrl
or
SpcUsr
1. Press an Individual Line (DN) Key.
2. Press the System Speed Call
Controller key or the System Speed
Call User Key, or enter the System
Speed Call User FFC.
85
Page 86

IP Phone 1150E non-ACD call features
3. Dial the Speed Call code assigned to the
phone number. The number is
automatically dialed.
Using Hot Line
The network administrator can program a Hot Line Key that allows you to
dial a specific number automatically. The network administrator can apply
other features to the Hot Line such as Call Redirection, so that the Hot
Line call is answered by a person and not by a voice mail box.
To use Hot Line:
HotLine
1. Press the Hot Line Key. The Hot Line
Key automatically dials the number.
Note:
If your main DN is a Hot Line, the
Hot Line dials the number automatically.
Using Intercom calling
The Intercom feature connects a group of people together through an
Intercom Key. You can use the Intercom feature to call a member of your
intercom group by pressing a code assigned to each member of the
group. The intercom group must be set up by your network administrator.
To make an Intercom call:
2637
Intercom
1. Press an Individual Line (DN) Key.
2. Press the Intercom Key.
86
Page 87

IP Phone 1150E non-ACD call features
3. Dial the one or two digit code for the
intercom group member you want to call.
To answer an Intercom call while on a line other than your Intercom
group line:
1. Press the Hold Key to put the current
call on hold.
or
Press the Goodbye Key to end the call.
Intercom
2. Press the Intercom Key and begin to
speak.
Answering a call
When you receive an incoming call on an Individual Line (DN), your
phone rings and the LCD indicator flashes.
To answer a call:
2637
1. Press the Individual Line (DN) Key
beside the flashing LCD indicator.
Note:
If you have the handset option and
you pick up the handset, you must also
press the Individual Line (DN) Key,
otherwise the handset is not operable.
However, you may terminate a call by
replacing the handset in the cradle.
87
Page 88

IP Phone 1150E non-ACD call features
While on an active call
This section describes features that you can use while on an active call
on an Individual Line (DN).
To place a call on Hold:
Use the Hold feature when you are talking with one party and a second
call comes in on a second Individual Line (DN). You can answer the
second call and retain the original call by putting it on Hold.
1. Press the Hold Key. The LCD indicator
flashes beside the line on hold.
To retrieve a call on hold:
2493
Note 1:
configured for your Meridian 1, the active
call is automatically put on Hold when
you answer the second call.
Note 2:
hold, if the Music on Hold feature is
configured for your system.
1. Press the Individual Line (DN) Key
beside the flashing LCD indicator.
If the Automatic Hold feature is
The caller hears music while on
88
Page 89

IP Phone 1150E non-ACD call features
Transferring a call
Use the Transfer feature to redirect a call to a third party.
To use the Transfer feature:
Trans
Swap
or
Connect
To go back to the original call if the transfer is incomplete:
1. Press the Transfer Key. The other party
is on hold and you receive a dial tone.
The screen displays Call on hold, dial
number.
2. Dial the number of the phone where the
call is to be transferred.
3. Press the Swap Key to switch between
talking with the original caller and the
new caller. Press the Connect Key to
complete the transfer. The two callers
are connected and your phone is ready
to make or receive new calls.
1. Press the Goodbye key. The caller
remains connected to the attendant.
2493
2. Press the Individual Line (DN) Key with
the flashing icon to return to your original
.
call
89
Page 90

IP Phone 1150E non-ACD call features
Using Timed Reminder Recall
Timed Reminder Recall gives you a reminder tone when a call you
transferred is not answered.
To use Timed Reminder Recall:
Trans
Trans
If the transferred call is not answered, your phone rings:
2493
Trans
1. Press the
on hold.
2. Dial the number where you want to
transfer the call.
3. Press the Transfer Key again.
Note:
recall timer stops.
1. Press the Individual Line (DN) Key
beside the flashing LCD indicator.
2. Press the Transfer Key and repeat the
transfer (to a different DN).
Note:
and they pick up the line while you are
still on the line, press the Goodbye Key
to complete the transfer. Check with your
network administrator to determine the
time interval of your recall timer.
Transfer Key. The call is put
If the transfer is complete, the
If you transfer a call to a person
90
Page 91

IP Phone 1150E non-ACD call features
Using Attendant Recall
The Attendant Recall feature allows you to contact an attendant while on
a call and connect the call to the attendant.
To contact the attendant while on a call:
AttRecall
1. Press the Attendant Recall Key while
on a call. Stay on the line until the
attendant answers.
2. Press the Goodbye key. The caller
remains connected to the attendant.
Using Call Park
The Call Park feature allows a call to be held temporarily and to be
retrieved from any phone. You can park an incoming call and page the
called party. When you use Call Park, you do not tie up a line. Your
network administrator can set up a System Park where most calls are
automatically parked.
If configured network-wide, Call Park can be used across networks.
To park a call on a System Park DN:
Park
1. Press the Park Key. The screen displays
a System Park DN and asks for
confirmation.
OK
2. Press the OK Key. The call parks on the
System Park DN.
91
Page 92

IP Phone 1150E non-ACD call features
To park a call on a DN other than the System Park DN:
Park
OK
To retrieve a parked call:
2493
1. Press the Park Key. The screen displays
Press OK to park call on 2190 (Where
2190 represents the default System Park
DN).
2. Dial the DN where you want to park the
call. When you begin dialing, the screen
displays Enter digits, then park. When
you have completed dialing the call park
DN, the screen displays Press OK to
park call.
3. Press the OK Key. The call parks on the
selected DN.
1. Press an Individual Line (DN) Key.
92
2. Dial the DN where you parked the call.
Note:
If a parked call is not retrieved
within a specified period of time, it rings
back to your phone or to the attendant.
Check with your network administrator to
determine your specified period of time.
Page 93

IP Phone 1150E non-ACD call features
Calling Party Number/Charge Account
The Calling Party Number/Charge Account feature allows you to record a
caller’s number or charge account number for accounting purposes while
on an established call.
To record the calling party number or charge account number:
Charge
Account
or
EnterCallParty
OK
1. Press the Charge Key. The screen
displays Select Charge type.
2. Press the Account Key. The screen
displays Enter account number.
or
Press the Calling Party Number Key.
The screen displays Enter Calling
party number.
3. Dial the charge account number or
calling party number. Use the Clear Key
or Delete Key to edit the number. Press
the Exit Key to leave the screen without
charging the call.
4. Press the OK Key to return to your call.
Displaying incoming calls
The Display Key allows you to be on an active call and display an
incoming caller’s name and/or number, if not automatically displayed,
without interfering with the call in progress.
93
Page 94

IP Phone 1150E non-ACD call features
To view the name of a second caller while on a call in progress:
Display
2493
1. Press the Display Key.
2. Press the flashing Individual Line (DN)
Key. The call waiting information
appears on the display.
Note 1:
interfere with the call in progress.
Note 2:
combination with other feature keys to
display information associated with the
feature.
Use of the Display Key does not
You can use the Display Key in
Tracing a Malicious call
Malicious Call Trace provides a way for you to trace nuisance calls. The
feature is available for both internal and external calls. When the key is
pressed, your Directory Number and the phone number of the caller are
recorded for access by your network administrator.
To use Call Trace while you are on a call:
CallTrace
94
1. Press the Call Trace Key.
Page 95

IP Phone 1150E non-ACD call features
To use Call Trace if you do not have a Call Trace Key:
Trans
or
Conf
2493
1. Press the Transfer Key or the
Conference Key.
2. Dial the Malicious Call Trace FFC.
3. Press the Individual Line (DN) Key
beside the flashing LCD indicator to
return to the call.
95
Page 96

Additional Call Features
Additional Call Features
Using the buzz signal
Buzz allows one person, whose phone is linked to another phone, to
signal the other phone. The person signaled hears a buzz. Use this
feature to notify the other person of a call, a visitor, or a request.
To buzz the phone linked to yours:
Buzz
1. Press the Buzz Key. The phone linked to
yours buzzes as long as you hold down
the key.
Using Call Page Connect to make an announcement
Call Page allows you to make an announcement over the paging system.
To make a page call, dial the paging trunk access code.
Note:
When the Page Key is used on an attendant console it
overrides the phones; the phones are disconnected and must reaccess the paging trunk.
To connect to the paging system:
2637
1. Press an Individual Line (DN) Key.
2. Dial the paging trunk access code. The
connection to the paging system is
complete.
96
Page 97

Additional Call Features
3. Make your announcement.
To disconnect from the paging system:
1. Press the Goodbye key.
Charging a call or charging a forced call
Call Charge allows you to charge a call to a specific account. Forced
Charge Account allows you to charge long-distance calls from a phone
restricted to local calls.
To charge or force charge a local or a long-distance call to an
account before you dial:
2637
Account
OK
1. Press an Individual Line (DN) Key.
2. Press the Account Key. The screen
displays Enter account number.
3. Dial the charge account number. Use
the Clear Key or Delete Key to edit the
number. Press the Exit Key to leave the
screen without charging the call.
4. Press the OK Key.
97
Page 98

Additional Call Features
5. Dial the number.
To charge a call in progress:
Charge
1. Press the Charge Key. The screen
displays Select Charge type.
Account
2. Press the Account Key. The screen
displays Enter account number.
3. Dial the charge account number. Use
the Clear Key or Delete Key to edit the
number. Press the Exit Key to leave the
screen without charging the call.
OK
4. Press the OK Key. You return to your
call.
To charge a call to an account when you transfer a call:
Trans
1. Press the Transfer Key. The call is
placed on hold.
98
Account
2. Press the Account Key.
3. Dial charge account number. You
receive dial tone.
Page 99

Additional Call Features
4. Dial the number of the phone where the
call is to be transferred.
Connect
5. Press the Connect Key when you hear
the phone ring.
Note:
You can use the Swap Key to talk
privately to the person at the transfer
number before you press the Connect
Key.
To charge a call to an account when you add someone to a
conference call:
Conf
1. Press the Conference Key. The call is
placed on hold.
Account
2. Press the Account Key.
3. Dial the charge account number. You
receive dial tone.
Swap
Connect
4. Dial the number of the person you want
to add to the conference.
5. Press the Swap Key to switch between
talking with the original caller and the
new caller. Press the Connect Key to
complete the conference.
99
Page 100

Additional Call Features
Using Enhanced Override
Enhanced Override allows you to override an active call after you have
attempted a Forced Camp-on. Use Enhanced Override when you make
either a simple call or a consultation call (i.e., place a call on hold and call
another party).
To use Enhanced Override:
1. Dial a phone number and receive a busy
signal.
Override
Override
To end the connection:
2. Press the Override Key or enter the
Override FFC to initiate a Forced Campon. If either of the persons on the call
disconnects at this time, you receive an
overflow (fast busy/engaged) signal.
3. Press the Override Key again or enter
the Override FFC again. The other two
persons on the call receive an override
tone and a conference call is established
between the three of you. If anyone
disconnects, the other two persons will
remain connected.
1. Press the Goodbye key.
100
 Loading...