

Page 1

Introduction
please refer to this user manual carefully.
Thank you for your choosing this notebook.
The notebook brings you much convenience for your business (supports Word*, Excel*, send &
receive e-mails*) and entertainment. With Microsoft Windows 10 operating system,
Intel Atom Quad-Core processor, it brings you wonderful user experience. This guide serves to
enable users to get to know and familiar with the product as soon as possible. Here we have made
a brief introduction to the key layout and definitions in figures and words. Before beginning,
*Software not included
Contents
I. Precautions before Use, Cleaning, Used Logos, Intended Use………………………………….
II. Layout and Definitions…………………………………………………………………………….
III. Windows 10 Start Menu, Context Menu, Taskbar, Control Panel and Settings………………
1. Windows 10 start image……………………………………………………………………..
2. Security Management………………………………………………………………………..
3. Wi-Fi, Bluetooth……………………………………………………………………………..
IV. Battery charging…………………………………………………………………………………....
V. Specifications……………………………………………………………………………………….
VI. R&TTE Directive…………………………………………………………………………………..
VII. Information for energy saving –Power Options………………………………………………….
VIII. Package Content…………………………………………………………………………………..
IX. BIOS Settings…………………………………………………………………………………...….
X. Troubleshooting……………………………………………………………………………………
XI. Working Environment Detail……………………………………………………………………..
XII. Warm reminder to end customer………………………………………………………………….
Important Notes:
2,3,4
5,6,7
8
8,9
10,11
12
13
13
13
14
15
15
15
17
17
1. Charge the battery for at least 12 hours before initial start-up.
Page 2

I. Precautions before Use
1.
This product is suitable for use in non-tropic areas below 2,000 meters
2.
Prevent this product from falling to the ground it could be strongly damaged.
3.
Keep the notebook and all accessories out of the reach of small children.
4.
Keep the notebook away from rain, moisture, direct sunlight and heat source.
5.
Avoid using it in the strong magnetic and strong static environment as much as possible.
6.
Once any water or other liquid splashes onto this product, close it immediately and do not use
it until it dries out.
7.
Do not clean this product with any detergent containing chemical element or other liquid to
avoid causing damage due to corrosion and becoming damp. If cleaning is really necessary,
clean it with dry soft cloth tissue paper.
Handle the screen gently. To clear fingerprints or dust on the screen, use soft cloth dedicated
8.
for camera lens instead of gauze.
Please back up your important files at any time to avoid loss.
9.
10. Please do not disassemble this product by yourself; otherwise you will lose the right to
warranty.
11. Do not disconnect the notebook from power suddenly, when formatting or uploading and
downloading, which can lead to program errors.
12. Please use the original AC adapter for charging. Nonconforming chargers may cause harms.
13. Protect the power cord. When connect the power cord, do not step onto it or place any object
on it, which may cause extrusion. Protect the connector of the power cord connected devices
specially.
14. Batteries
The batteries in this product cannot be easily replaced by users themselves.
Replacement with incorrect type batteries may cause explosion.
15. While using the earphone, if the volume is excessively high it may cause
hearing damage.
So please adjust the volume of the player to a moderate level and balance the
time of using.
Note:
Pictures in this manual are for demonstration purpose only and may differ from the real
product.
2
Page 3

Cleaning
brand names)
Avoid the following cleaning products:
Cleaning procedures
Cleaning the sides and cover
Handle the screen gently. To clear the fingerprints or dust on the screen, use soft cloth dedicated
for camera lens instead of gauze.
Cleaning products
Use the following products so safely clean and disinfect your device:
- Dimethyl benzyl ammonium chloride 0.3 percent maximum
concentration (for example: germicidal disposable wipes. These wipes come in a variety of
Alcohol-free glass cleaning fluid
-
Water with mild soap solution
-
Dry microfiber cleaning cloth or a chamois (static-free cloth without oil)
-
Static-free cloth wipes
-
Strong solvents, such as alcohol, acetone, ammonium chloride, methylene chloride, and
hydrocarbons, which can permanently damage the surface of the computer.
Fibrous materials, such as paper towels, which can scratch the device.
Over time, dirt particles and cleaning agents can get trapped in the scratches.
Follow the procedures in this section to safely clean your device.
WARNING!
To prevent electric shock or damage to components do not attempt to clean your
computer while it is turned on:
-
Turn off the device.
-
Disconnect external power.
-
Disconnect all powered external devices.
CAUTION:
Do not spray cleaning agents or liquids directly on any device surface. Liquids dripped
on the surface can permanently damage internal components.
Cleaning the display
Gently wipe the display using a soft, lint-free cloth moistened with an alcohol-free glass cleaner.
Be sure that the display is dry before closing the display.
To clean and disinfect the sides and cover, use a soft microfiber cloth or chamois moistened with
one of the cleaning solutions listed previously or use an acceptable germicidal disposable wipe.
3
Page 4

Caution!
people`s health. Please dispose of the battery commercially or at a municipal recycling plants.
This unit contains battery. If the battery is defective, it should not be disposed of with household
waste. Batteries can possibly contain harmful substances that can harm the environment and
Return is free of charge and is prescribed by law. Please only dispose of empty batteries in the
containers provided and tape the terminals.
Used Logo
All brand marks, trademark and products are registered by their respective company.
Intended Use
This notebook offers many opportunities for the use. For example surf internet, read e-books, look
movies, play games and communication with the whole world.
This product is intended for home and office use and not for industrial application.
4
Page 5
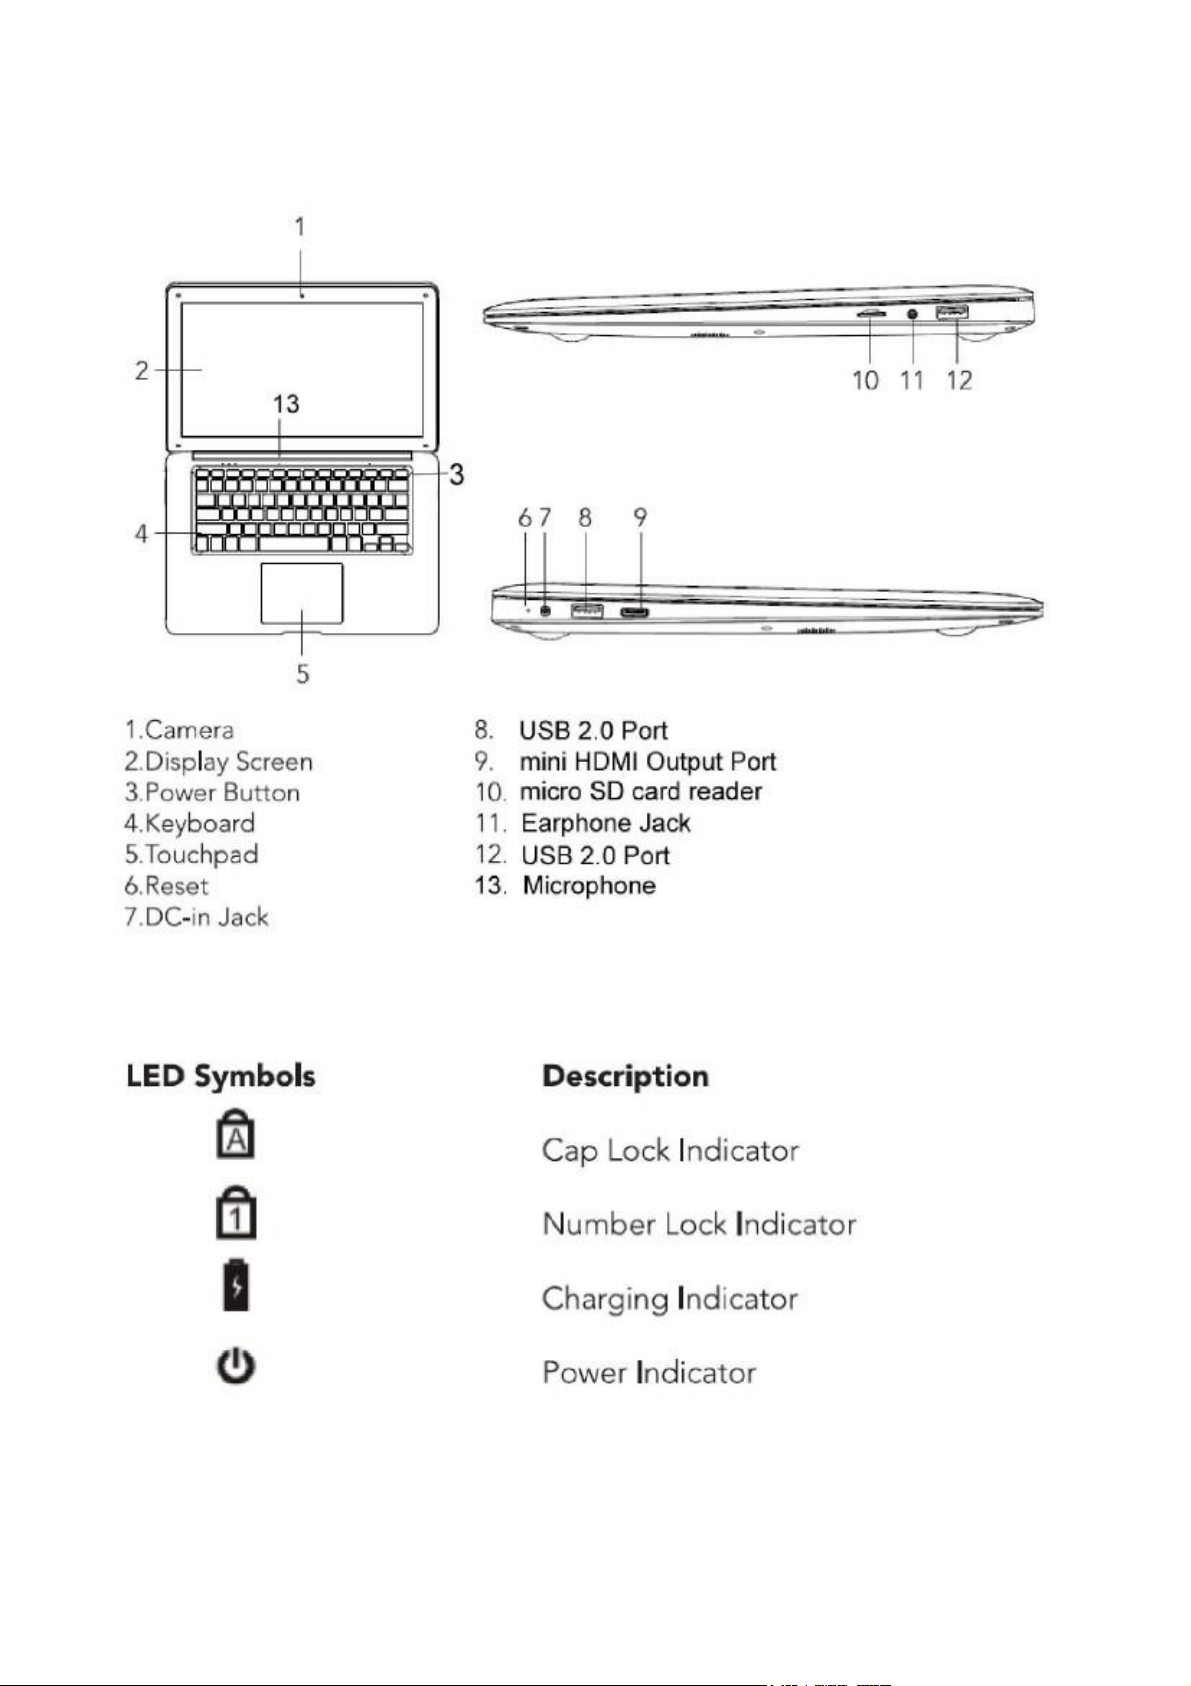
II. Layout and Definitions
5
Page 6
1.
pointing Device
power the notebook and recharge battery
Camera:
2.
Display Screen:
3.
Power Button:
4.
Keyboard:
5.
Touchpad:
6.
Reset:
7.
DC-in Jack:
8.
USB 2.0 port:
9.
Mini HDMI port:
10.
Micro SD Card reader:
11.
Earphone Jack:
12.
USB 2.0 port:
13.
Microphone:
1. Turn on – Turn off the Notebook
Turn the Notebook On
Press Power Button (3) until the screen appears
Frontcamera 2.0 MP
23,5 cm (10.1") 1024x600 TN
turn on the notebook
English QWERTY
reset function (see troubleshooting)
for data transfer
connect this output to HDMI input of TV or TFT
supports micro SD and micro SDHC format
connect earphone or active loudspeaker
for data transfer
for audio recording
Turn the Notebook Off
Switch Off by using Windows Start Menu icon and
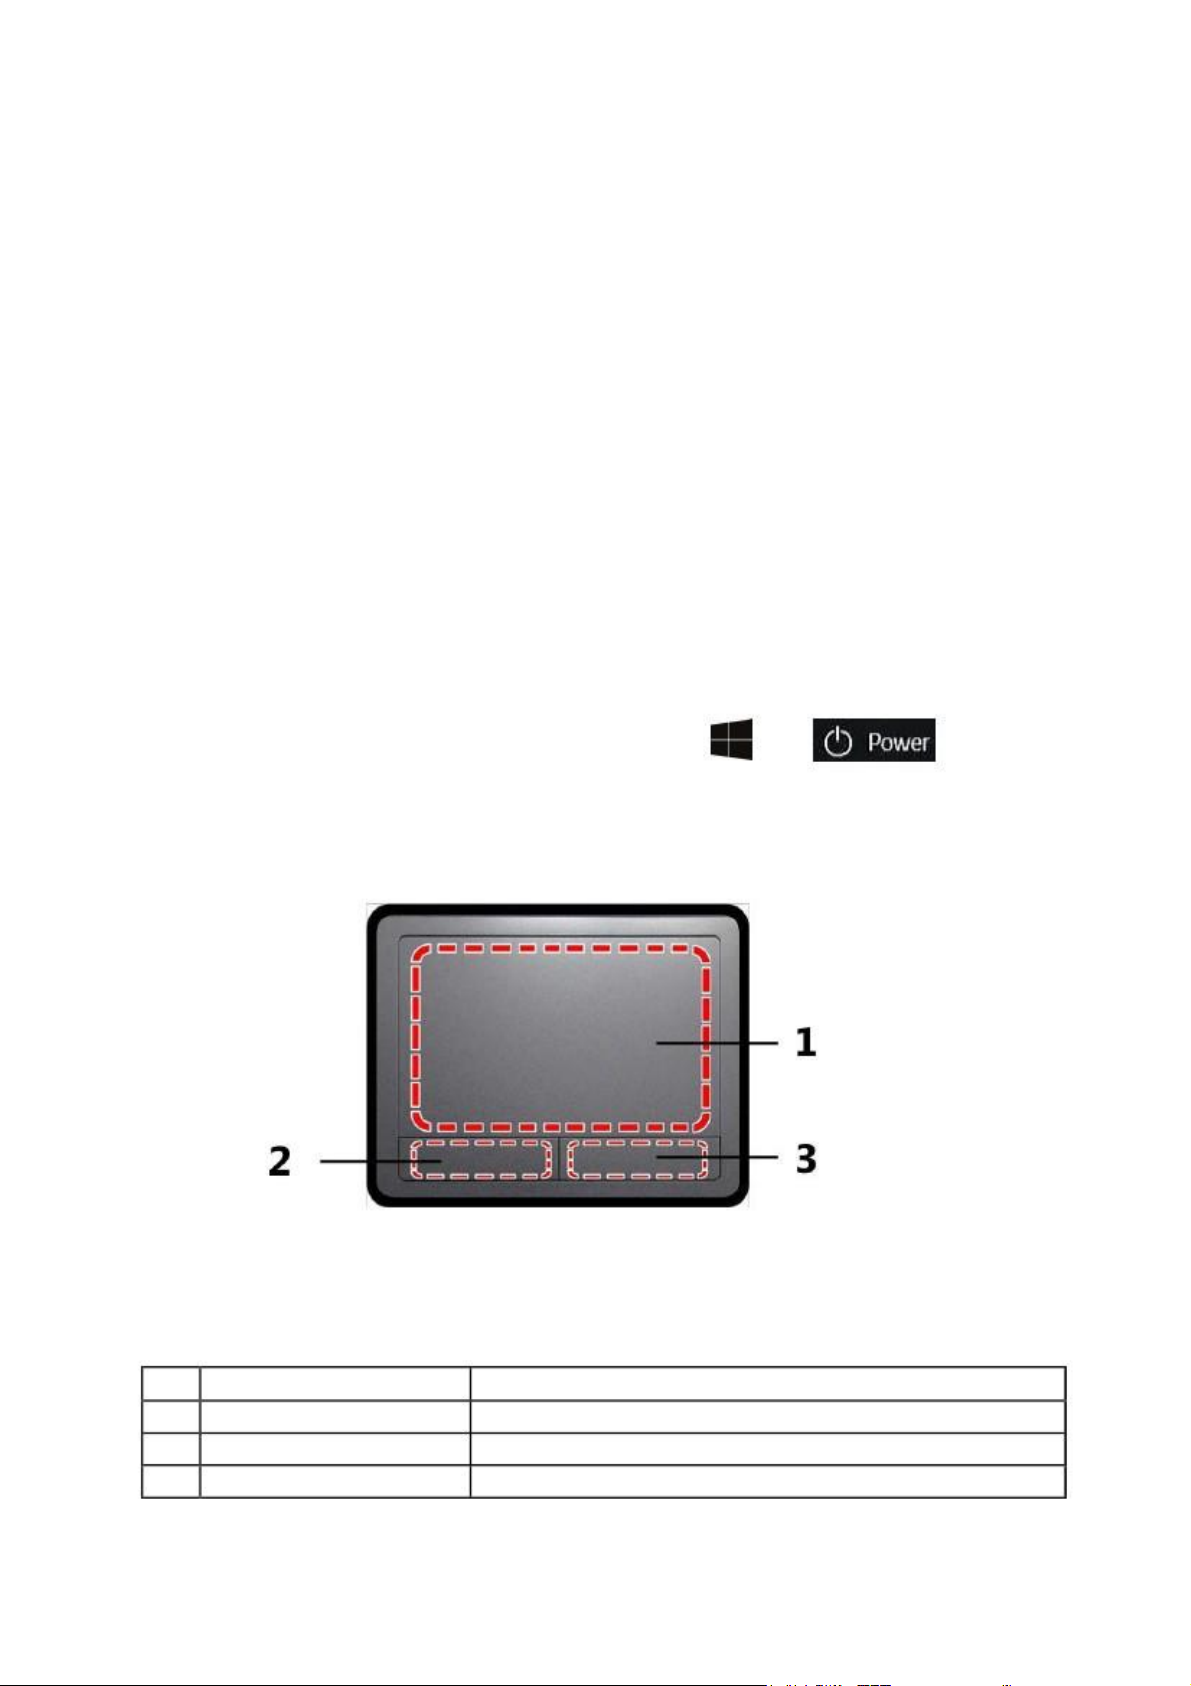
2. Using the Touchpad
The Touchpad with its buttons is a pointing device that functions as an optional mouse,
which can perform navigation, scrolling and selection functions. The components of the
touchpad are described as follows.
Component
No.
Touchpad
1
Left Touchpad Button
2
Right Touchpad Button
3
Function
Moves the pointer, selects or activates items on the screen
Equivalent to the left button of a mouse button
Equivalent to the right button of a mouse button
6
Page 7

Function Left Touchpad Button
Right
Touchpad
Touchpad
Button
--
Select
Execute
Drag
Click once
Click twice quickly
Click once and hold, then
slide your finger across the
touchpad to drag
--
--
Tap once
Tap twice quickly
Tap twice quickly and
hold, then slideyour
fingeracrossthe
touchpad to drag
Displaythe --
Click once
--
contextual menu
The touchpad is a pressure sensitive device that requires proper care to avoid damage
Do not rest heavy objects on the touchpad or its buttons
Do not scratch the touchpad with sharp-pointed objects or your fingernails
3. Using Keyboard
The notebook is equipped with a English QWERTY keyboard with additional functions keys
(blue color). The function key will act as hot key when pressed while the Fn key is held
down. Example: F3 + Fn will decrease the Volume
7
Page 8

III. Windows 10 Start Menu, Context Menu, Taskbar, Control Panel and
panels and applications referred to throughout the course of this manual can be accessed from
Settings
1. Windows 10 start image
Most of the apps, control panels, utilities and programs within Windows 10 can be accessed
from the Start Menu by clicking the icon in the taskbar in the lower left corner of the
screen (or by pressing the Windows Logo Key
Right-click the Start Menu icon
combination) to bring up an advanced Context Menu of useful features such as Control Panel,
Programs and Features, Power Options, Task Manager, Search, File Explorer, Command
Prompt, Device Manager and Network Connections etc.
The notification area of the taskbar is in the bottom right of the screen. Some of the control
here.
8
on the keyboard).
+ X key (or use the Windows Logo Key
Page 9

Throughout this manual you will see an instruction to open the Control Panel. To access the Control
bring up the context menu, and then press
Panel, right-click the Start Menu icon
in the taskbar in the lower left corner of the screen and
select
Control Panel from the menu. Or, press the Windows Logo Key on your keyboard and X to
P to bring up the Control Panel.
9
Page 10

The Settings item in the Start Menu (and also as an App) gives you quick access to
a number of system settings control panels allowing you to adjust settings for
System, Devices, Network & Internet, Personalization, Accounts, Time &
language, Ease of Access, Privacy and Update & security.
2. Security Management
User and password setup – Get in Settings
Accounts
Sign-in options to set up password.
10
Page 11

11
Page 12

3. Wi-Fi , Bluetooth
Wi-Fi
This device has built-in Wi-Fi that you can use to connect to a wireless network.
If you don’t know your wireless network password, use the info below to find it.
Find your password on your hardware
Some wireless router manufacturers set a default security key or password which may be on
the bottom of your router or in the router’s documentation.
Look for the following terms:
Security Key
Wireless Key
WPA Key
WPA2 Key
WEP Key
Find your password on a Windows PC
If you have a computer running Windows that is connected to your wireless network, you can
find the password by doing the following:
Windows 10: Find your password
Step 1: Click the Start Menu icon , click Settings
Step 2: In the Find a setting box, enter “view network connections”, and in the search results
click View network connections.
Step 3: In the Network Connections window, right-click the network name and then click
Status
Step 4: Click the Wireless Properties button
Step 5: Click the Security tab, and click the Show characters check box.
Step 6: The password for the wireless network is displayed in the Network security key field.
Bluetooth
Here`s how to add (also call pair) Bluetooth device with your device:
1. Turn on the Bluetooth device and make it discoverable. To learn how to check the info
that came with your Bluetooth device or the manufacturer’s website.
2. Go to , click Settings > Devices > Bluetooth > On
3. Make sure Bluetooth turned on, then wait while windows searches for Bluetooth devices.
4. Follow the onscreen instructions to finish pairing your device for your accessory requires
a pairing code, you’ll be prompted for it. If you don’t know the code, check the info that
came with your device on the manufacturer’s website
12
Page 13

provided 5V/ 2.0 A power adapter included in the gift box.
IV Battery charging
Notebook 10.1
Notebook, Power Adapter, User Manual
Connect the DC plug of power adapter to the power DC-in jack (7) of the notebook. Plug
the power adapter into a power outlet for charging the battery. It takes around 5 hours
according to the existing battery capacity to charge to full battery. Please only use the
will be , and when charging completes, the iconDuring
will be .
You can still use the device while charging, but this will prolong the charging time.
Use the device at least once every week.
Fully charge the battery regularly.
Don’t keep the battery empty for a long time.
V. Specifications
charging, the icon of battery
Product.
Display:
CPU:
Graphic:
Operating System:
RAM:
Internal Memory:
Connectors:
Sound
Slots:
Camera:
Communication:
Battery:
Package content:
VI. R&TTE Directive
”
23,5 cm (10.1") 1024x600 TN
Intel® Atom Quad-Core Z3735F
Intel® HD Graphics
Microsoft Windows 10 (Supported)
2 GB DDR3L
32GB Flash
2x USB 2.0 , 1x mini HDMI, 1x earphone jack,
1x earphone, DC in
1x microphone, 2x speaker
micro SD card reader
front 2.0MP
WLAN 802.11 b/g/n, Bluetooth
5600 mAh
, Warranty Card
This product complies with the essential requirements of Directive 1999/5/EC.
This product is intended for home and office use in all member states of the EU.
13
Page 14

VII. Information for energy saving – Power Options
profile and possibly connected peripherals are loaded
performance.
1.
Information for energy saving
sequence of steps for achieving a stable power condition
switch on the notebook – the notebook is booting – log on as a user – wait till all
hardware
all power saving settings were set by the manufacturer already. The user can ,
however, change this settings at control panel energy options. The display is switched
off after 10/ 4 min (power-/battery mode) and the sleep mode is executed after 10/ 4
minutes (power-/ battery mode) of user inactivity.
switch of Wi-Fi, Bluetooth if they are not required
2. Power options
To access the Power Options, right-click the Start Menu icon
corner of the screen and select Power Options.
in the taskbar in the lower left
The Power Options control panel icon in Windows allows you to configure power
management features for your computer. You can conserve power by means of power
plans and configure the options for the power button, sleep button (Fn + ESC),
computer lid (when closed), display and sleep mode (the default power saving state)
from the left menu. Note that the Power saver plan may have an affect on computer
Click to select one of the existing plans, or click Create a power plan in the left menu
and select the options to create a new plan. Click Change Plan Settings and click
Change advanced power settings to access further configuration options.
14
Page 15

VIII. Package content
Notebook, Power Adapter, this manual
BIOS Settings
Troubleshooting
, Warranty Card
IX.
X.
Press and hold “DEL” or “ESC” button on keyboard and switch On the
tablet. The BIOS screen will appear
The Device is unable to start up
If the device does not turn on when you press the power button, the following suggestions
may help you determine why the computer does not start up:
If the computer is plugged into an AC outlet, plug another electrical device into the
outlet to be sure that the outlet is providing adequate power.
If the computer is plugged into an external power source other than an AC outlet,
plug the device onto an AC outlet using the AC adapter. Be sure that the power cord
and AC adapter connections are secure.
If the device is turned on but is not responding to software or keyboard commands, try
the following emergency shutdown procedures, in the sequence provided, until
shutdown occurs:
CAUTION: Emergency shutdown procedures result in the loss of unsaved
information.
Hold the power button for at least 5 seconds
The device is unusually warm
It is normal for the device to feel warm to the touch while it is in use.
If you suspect that the computer is overheating, allow the computer to cool to
room temperature
WARNING! To reduce the possibility of heat-related injuries or of overheating the
computer, do not place the device directly on your lap. Use the device only on a
hard, flat surface. Also, do not allow the AC adapter to contact the skin or a soft
surface, such as pillows or rugs or clothing, during operation.
15
Page 16

If the screen is blank but you have not turned off the computer, one or more of these
battery level. To change these and other power settings, right click the battery icon on the
preferences.
but not responding”.
setting may be the cause:
The device may be in the Sleep state. To exit Sleep, briefly press the power button. Sleep
is an energy-saving feature that turns off the display. Sleep can be initiated by the system
while the computer is on but is not in use, or when the computer has reached a low
Windows desktop in the notification area, at the far right of the taskbar, and then click
Software is functioning abnormally
If the software is unresponsive or responds abnormally, restart the computer by clicking
on the start menu icon and then on/off, and then click shut down. If you cannot
restart the computer using this procedure, see the previous section, “The computer is on
Follow these suggestions if an external device does not function as expected:
The wireless network connection is not working
If a wireless network connection is not working as expected, follow these suggestions:
Be sure that all device connections are secure
Be sure that the device is receiving electrical power.
Be sure that the device, especially if it is older, is compatible with the operating
system.
Be sure that the correct drivers are installed and updated
To enable or disable a wireless or wired network device, right-click the network
connection icon on the Windows desktop in the notification area, at the far right of
the taskbar. To enable devices, select the check box from the menu option. To
disable the device, clear the check box.
Be sure that the wireless device is turned on.
Be sure that the computer wireless antennas are free from obstructions.
Be sure that the cable of DSL modem and its power cord are properly connected
and that the lights are on.
Be sure that the wireless router or access point is properly connected to its power
adapter and to the cable or DSL modem, and that the lights are on.
Disconnect and then reconnect all cables, and turn the power off and then back on.
Turn on the device according to the manufacturer’s instructions
16
Page 17

CC Statement
F
This device complies with part 15 of the FCC Rules. Operation is subject to the following
two conditions: (1) This device may not cause harmful interference, and (2) this device
must accept any interference received, including interference that may cause undesired
operation.
This equipment has been tested and found to comply with the limits for a Class B digital
device, pursuant to part 15 of the FCC Rules. These limits are designed to provide
reasonable protection against harmful interference in a residential installation. This
equipment generates, uses and can radiate radio frequency energy and, if not installed
and used in accordance with the instructions, may cause harmful interference to radio
communications. However, there is no guarantee that interference will not occur in a
particular installation. If this equipment does cause harmful interference to radio or
television reception, which can be determined by turning the equipment off and on, the
user is encouraged to try to correct the interference by one or more of the following
measures:
—Reorient or relocate the receiving antenna.
—Increase the separation between the equipment and receiver.
—Connect the equipment into an outlet on a circuit different from that to which the
receiver is connected.
—Consult the dealer or an experienced radio/TV technician for help.
Caution: Any changes or modifications not expressly approved by the party responsible
for compliance could void the user's authority to operate the equipment.
This equipment complies with FCC radiation exposure limits set forth for an uncontrolled
environment.
This transmitter must not be co-located or operating in conjunction with any other antenna or
transmitter.
 Loading...