

Page 1

1. Getting Started -----------------------------------------------------------------------------------------------------------2
Table of Contents
1.1 Power On/Off---------------------------------------------------------------------------------------------------2
1.2 Battery Charging -----------------------------------------------------------------------------------------------2
1.3 Home Screen----------------------------------------------------------------------------------------------------3
1.5 How to Use Mi
2. Pre-installed Application -----------------------------------------------------------------------------------------------8
2.1 Internet Browser------------------------------------------------------------------------------------------------8
2.2 YouTube---------------------------------------------------------------------------------------------------------8
2.3 E-mail------------------------------------------------------------------------------------------------------------8
2.4 File Browser ----------------------------------------------------------------------------------------------------9
2.5 Picture & Video ---------------------------------------------------------------------------------------------- 12
2.6 Music ---------------------------------------------------------------------------------------------------------- 12
3. Adjust Tablet Settings ------------------------------------------------------------------------------------------------ 12
3.1 Sound & Display Settings ---------------------------------------------------------------------------------- 12
3.2 Application Settings ----------------------------------------------------------------------------------------- 13
3.3 Date & Time Settings---------------------------------------------------------------------------------------- 13
3.5 Security Settings --------------------------------------------------------------------------------------------- 13
3.6 Install and Uninstall Applications ------------------------------------------------------------------------- 13
cro SD Card ----------------------------------------------------------------------------------7
1
Page 2

1. Getting Started
The first thing you probably want to do when you get Maylong Mobility™ Tablet is to familiarize
yourself with a few basics.
Unpack tablet box and identify the key items included. You should have:
1. Tablet device: The device includes a touch-sensitive LCD screen, a micro SD memory card slot, USB
port, and a power switch button etc.
2. A/C home adapter: This is used to charge the tablet device which has a built-in chargeable battery.
3. User Manual: You’re holding this in your hands.
Warning: Don’t use the device in the hot environment.
1.1 Power On/Off
Power On:
You may have to charge the tablet by using the A/C home adapter before the tablet can be powered on, if
the tablet battery power is very low.
Power Off:
available for your selection.
1.2 Battery Charging
Maylong Tablet has a built-in chargeable battery. Please charge the battery using the A/C adapter included
when the battery life indicator shows low.
Press and hold the power switch button for a few seconds to turn on the tablet device.
Press and hold the power button to turn off the tablet. A dialog box with options may be
2
Page 3

Warning:
It is important to use the A/C home adapter included in the package for charging your tablet. Please
contact Maylong customer service at 1-888-403-9477 for purchasing extra A/C home adapter. Tablet
device may be damaged if you use an incompatible A/C adapter to charge your tablet.
1.3 Home Screen
The Home Screen is displayed after your tablet Android operating system is started.
3
Page 4
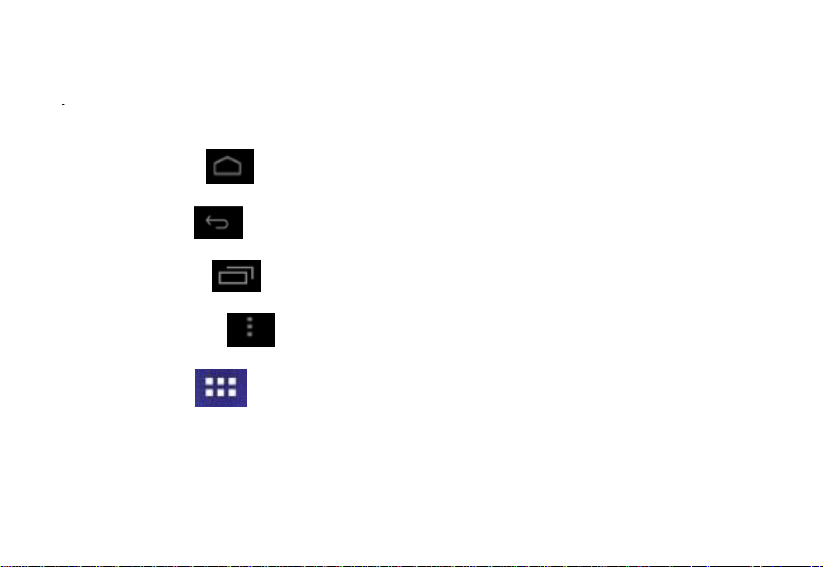
On the Home Screen, you will find command icons shown on lower-left corner and status icons displayed
on lower-right corner. The main icons on the Home Screen are described below.
Home Screen icon
Last Screen icon
Running Apps icon
Command Menu icon
Application icon
: touch this icon to display the Home Screen.
: touch this icon to display last screen.
: touch this icon to list applications running.
: touch this icon to list commands available for current application.
: touch this icon to display Application Screen.
4
Page 5

Battery status icon : this icon indicates tablet battery status.
5
Page 6

1.5 How to Use Micro SD Card
The micro SD card is used for transferring files between tablet and your personal computer, downloading
applications, and playing stored media. There is no micro SD card included in the package. Micro SD card
can be purchased from local electronics stores.
Insert micro SD card:
Insert SD card into the SD card slot until a “click” sound is heard. Once the SD card is inserted properly, a
card icon will be shown on lower-right corner of the display.
Browsing files in SD card:
Touch File Manager icon
from Home Screen and then touch icon from the File Manager
screen. All files & folders under the root directory of the micro SD card will be shown.
Remove SD memory card:
To remove the micro SD card, please close all applications or documents which have been opened from the
SD card. Push the SD card lightly to eject the SD card.
7
Page 7

1.5 How to Use Micro SD Card
The micro SD card is used for transferring files between tablet and your personal computer, downloading
applications, and playing stored media. There is no micro SD card included in the package. Micro SD card
can be purchased from local electronics stores.
Insert micro SD card:
Insert SD card into the SD card slot until a “click” sound is heard. Once the SD card is inserted properly, a
card icon will be shown on lower-right corner of the display.
Browsing files in SD card:
Touch File Manager icon
from Home Screen and then touch icon from the File Manager
screen. All files & folders under the root directory of the micro SD card will be shown.
Remove SD memory card:
To remove the micro SD card, please close all applications or documents which have been opened from the
SD card. Push the SD card lightly to eject the SD card.
7
Page 8

2. Pre-installed Applications
Tablet device comes with some pre-installed applications. Touch from Home Screen, pre-
installed applications will be displayed on the Application screen. A few popular applications are
introduced below.
2.1 Internet Browser
Touch Internet Browser icon
2.2 YouTube
Touch YouTube icon
Note: Some YouTube video format may not be supported by the YouTube application pre-installed.
2.3 Email
To set up email account, touch “Email” icon
and password and then touch Next button. After you have more than one email account set up, you can
select email account for email access. Email account can be removed by selecting an account and scrolling
from Home Screen to access the internet and surf the web.
from Home Screen to start the YouTube application.
from the Home Screen. Enter your email address
8
Page 9

down the list of settings. Touch “Remove account” to delete the selected email account.
Note: Your tablet is enabled with Google Android operating system which may not support some email
services.
2.4 File Browser
File Browser is used for managing files stored on the SD card or in built-in tablet memory.
Touch the File Browser icon
memory or micro SD card. From File Browser screen,
Touch
Touch
Touch
Touch
Transfer files between internal memory and micro SD card:
icon for going back to prior folder accessed.
icon for operation options for the selected files.
icon to access files available in the micro SD card.
icon to access the tablet internal memory.
from Home Screen to explore the files available in internal
9
Page 10

You can transfer files between tablet internal memory and SD card. Procedures of copying a file from
micro SD card to the tablet internal memory are given below.
1. Make sure a micro SD card is inserted into the SD card slot properly.
2. Touch SD card icon
3. Touch & hold the file to be transferred, a file operation command window will be displayed.
4. Touch “Copy File" command.
5. Touch internal memory storage icon
from File Browser screen to display the files in the micro SD card
to switch to tablet internal memory.
10
Page 11

6. Touch & hold a folder in the internal memory screen to display a file operation command window.
7. Touch “Paste into folder” command to copy the file from SD card into the tablet internal memory.
Delete files from internal memory:
Procedures of deleting a file from SD card or internal memory are given below.
1. Touch & hold the file to display a file operation command window.
3. Touch “Delete File” command to delete the selected file.
11
Page 12

2.5 Picture & Video
Touch Photo icon
Press Command Menu icon
2.6 Music
Touch Music icon
3. Adjust Tablet Settings
Touch the Settings icon
fingers to touch & hold the screen and then move up or down on the screen to view all setting options
available.
3.1 Sound & Display Settings
Touch “Sound” from Settings screen to manage the settings related to your tablet sound.
from Application screen to start the Media Player application.
to display the commands available for the media player application.
from Home Screen to start the Music Player.
from Home Screen to display the Settings screen. You can use your
12
Page 13

Touch “Display” from Settings screen to manage the settings related to your tablet display.
On the Display Settings screen, enabling Auto-rotate option will allow switch of display orientation
(vertical or horizontal) when rotating your tablet.
3.2 Application Settings
Touch “Apps” from Settings screen to manage the settings related to your tablet applications. Touch an
application to see operation options for the application.
3.3 Date & Time Settings
Touch “Date & time” from Settings screen to manage your tablet time related settings.
3.4 Language & Input Settings
Touch “Language & input” from Settings screen to manage the settings related to language and keyboard
available for your tablet.
3.5 Security Settings
Touch “Security” from Settings screen to manage the settings related to your tablet security & privacy
protection.
3.6 Install and Uninstall Applications
Install Application:
13
Page 14

Federal Communications Commission (FCC) Statement
Reorient or relocate the receiving antenna.
Increase the separation between the equipment and receiver.
Connect the equipment into an outlet on a circuit different from that to which the receiver is connected.
Consult the dealer or an experienced radio/TV technician for help.
This device complies with part 15 of the FCC Rules. Operation is subject to the following two conditions: (1) This device
may not cause harmful interference, and (2) this device must accept any interference received, including interference that
may cause undesired operation.
Note: This equipment has been tested and found to comply with the limits for a Class B digital device, pursuant to part 15
of the FCC Rules. These limits are designed to provide reasonable protection against harmful interference in a residential
installation. This equipment generates, uses and can radiate radio frequency energy and, if not installed and used in
accordance with the instructions, may cause harmful interference to radio communications. However, there is no
guarantee that interference will not occur in a particular installation. If this equipment does cause harmful interference to
radio or television reception, which can be determined by turning the equipment off and on, the user is encouraged to try
to correct the interference by one or more of the following measures:
Warning: Changes or modifications made to this device not expressly approved by Shenzhen Firstview Electronic Co.
Ltd. may void the FCC authorization to operate this device.
Note: The manufacturer is not responsible for any radio or tv interference caused by unauthorized modifications to this
equipment. Such modifications could void the user’s authority to operate the equipment.
 Loading...