

Page 1

TROUBLESHOOTING
™
is leaking from my new Remote Backplate
My T15
Adapter
Fill up a spray bottle with soapy water and spray
on area that you believe is leaking. The solution
will bubble up where the leak is occurring. Once
you identify the leak, remove the Remote Backplate
Adapter, double check placement of mounting
screw o-ring. Once leak is fixed, wipe off excess
soapy water with a rag damp with paintball gun oil.
My fittings are leaking
Remove all fittings and reapply teflon tape.
My T15 doesn’t cycle fully (it sputter fires) now that
I’m running a remote.
Some remotes restrict the airflow to the T15™.
To combat this, you will need to raise the output
pressure of your tank. For optimum functionality,
use 850-950psi output pressure.
Thank you for purchasing the First Strike T15 Remote
Backplate Adapter. Like all paintball markers, please
remove all air sources prior to servicing.
If you have any questions regarding this product
or other First Strike Paintball products, please
contact us.
FIRST STRIKE
Headquarters:
28101 Ballard Dr. Ste. F
Lake Forest, IL 60045
Manufacturing/Warranty
2717 Ferguson Rd
Fort Wayne, IN 46809
®
1-260-478-2500
service@first-strike.com
FIRST-STRIKE.COM
SUBSCRIBE & FOLLOW US
You must be at least 18 years of age to purchase this
product. This product may be mistaken for a firearm by
law enforcement officers or others. Altering the color of
the product or brandishing the product in public may be
dangerous and may be considered a crime.
!
WARNING!
- Careless use or misuse may result in serious bodily injury or death!
- Eye protection designed for paintball must be worn by the user
and all persons within range.
- Not for sale to persons under 18 years of age.
- Must be 18 years of age or older to operate or handle any paintball
gun and paintball gun accessories without adult or parental
supervision.
- Read and understand all cautions, warnings, and operating manuals
before using any paintball gun or paintball gun accessory.
- Do not aim paintball gun at eyes or head of people or at animals.
- Paintball guns are to be used with paintballs only.
- Use common sense and have fun.
Any tampering with the unit voids your warranty. There are no
consumer serviceable parts inside the unit. The use of non factory
authorized components within this product may cause a critical
failure, fire or shock hazard.
IN NO EVENT SHALL SELLER BE LIABLE FOR ANY DIRECT,
INCIDENTAL OR CONSEQUENTIAL DAMAGES OF ANY NATURE, OR
LOSSES OR EXPENSES RESULTING FROM ANY DEFECTIVE PRODUCT
OR THE USE OF ANY PRODUCT.
WARNING: This product does contain chemicals known to the
State of California to cause cancer and/or birth defects or other
reproductive harm. Wash hands after handling. You must be at
least 18 years of age to purchase this product. This product may be
mistaken for a firearm by law enforcement officers or others. Altering
the color of the product or brandishing the product in public may be
considered a crime.
PAINTBALL GUNS AND PAINTBALL
GUN ACCESSORIES ARE NOT TOYS!
T15™ REMOTE BACKPLATE ADAPTER
First Strike is a brand of United Tactical Systems, LLC.
Page 2
CONTENTS:
- Remote Backplate Adapter
- Q/D Swivel
- Pro Fill Nipple
YOU WILL NEED THE FOLLOWING ITEMS:
- 1/8” hex key
- 3/32” hex key
- 5/32” hex key
(Fig 1)
(Fig 2)
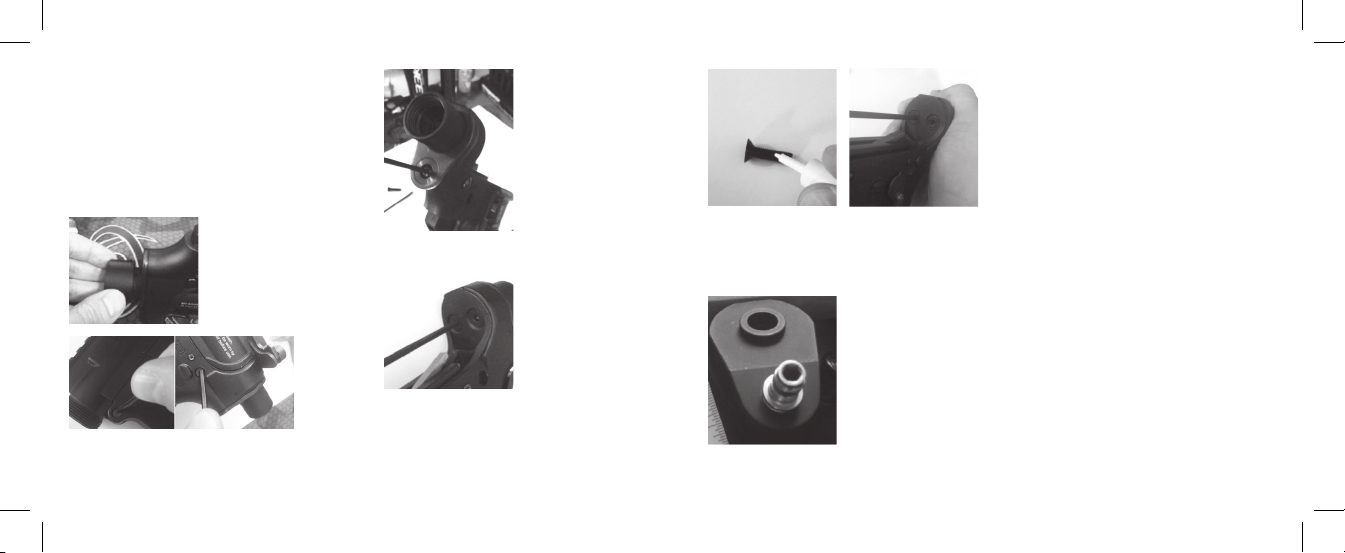
STEP 2. Split T15™ Upper Receiver from the Lower
Receiver by pushing out the front and rear trip pins. (Fig 2)
- Teflon tape
- Blue thread locker
STEP 1. Remove Stock ASA
Ring using 3/32” hex key.
(Fig 1)
(Fig 3)
(Fig 4)
STEP 3. Remove Rear ASA
Port using 3/32” hex key (Fig 3)
STEP 4. Remove stock ASA
using 1/8” hex key. Keep stock
ASA screws and mounting
screw o-ring for installation
of your Remote Backplate
Adapter. (Fig 4)
(Fig 5)
STEP 5. Clean off stock
ASA screws and apply
blue thread locker. (Fig 5)
(Fig 7)
(Fig 6)
STEP 6. Install Remote
Backplate Adapter to
Lower Receiver and
reinstall Stock ASA
screws. (Fig 6)
STEP 7. Apply Teflon Tape to
Pro Fill Nipple Adapter and
place in port. Tighten using
5/32” hex key. (Fig 7)
STEP 8. Install Quick Disconnect Swivel.
STEP 9. Let sit overnight for blue thread locker
to cure.
17/11/7
 Loading...