

Page 1

By Firstech, Inc
INSTALLATION AND USER’S
GUIDE
website: www.compustar.org
© 2001 Firstech, Inc. Page 1
Page 2

TABLE OF CONTENTS
FCC/ID Notice………………………………………………………………….. 2
Remote-Pager ……………………………………………………………………… 3
Remote-Pager Button Functions………………………………………………. 4
Using Your System…………………………………………………………………. 5
Alarm Mode…………………………………………………………………….... 5
Dual Stage Shock Sensor……………………………………………………… 6
Panic Mode………………………………………………………………………. 7
Auto-start Function……………………………………………………………… 8
Query Function………………………………………………………………….. 8
CompuGLO Back-Light Mode ……………………………………………….. 8
Trunk Release ………………………………………………………………….. 8
Reservation Mode (Manual Transmissiononly)
8
Safety Shutdown Features……………………………………………………... 10
Valet Mode……………………………………………………………………….. 10
Timer Start Mode………………………………………………………………...10
Additional Features…………………………………………………………………. 10
Optional Auxiliary 1 & Auxiliary 2…………………………………………….... 10
Installation……………………………… …………………………… 12
© 2001 Firstech, Inc. Page 2
Page 3

FCC/ID Notice
This device complies with Part 15 of the FCC Rules.
Operation is subject to the following two conditions:
(1) This device may not cause harmful interference, and
(2) This device must accept any interference received, including interference that
may cause undesired operation.
CAUTION: Changes or modifications not expressly approved by the party
responsible for compliance could void the user’s authority to operate this device.
This equipment has been tested and found to comply with the limits for a Class B
digital device, pursuant to Part 15 of the FCC Rules. These limits are designed to
provide reasonable protection against harmful interference in a residential
installation. This equipment generates, uses and can radiate radio frequency
energy and, if not installed and used in accordance with the instructions, may
cause harmful interference to radio communications. However, there is no
guarantee that interference will not occur in a particular installation. If this
equipment does cause harmful interference to radio or television reception, which
can be determined by turning the equipment off and on, the user is encouraged to
try to correct the interference by one or more of the following measures:
Reorient or relocate the receiving antenna.
Increase the separation between the equipment and receiver.
Connect the equipment into an outlet on a circuit different from that to
which the receiver is connected.
Consult your Authorized CompuStar dealer.
REMOTE-PAGER
© 2001 Firstech, Inc. Page 3
Page 4
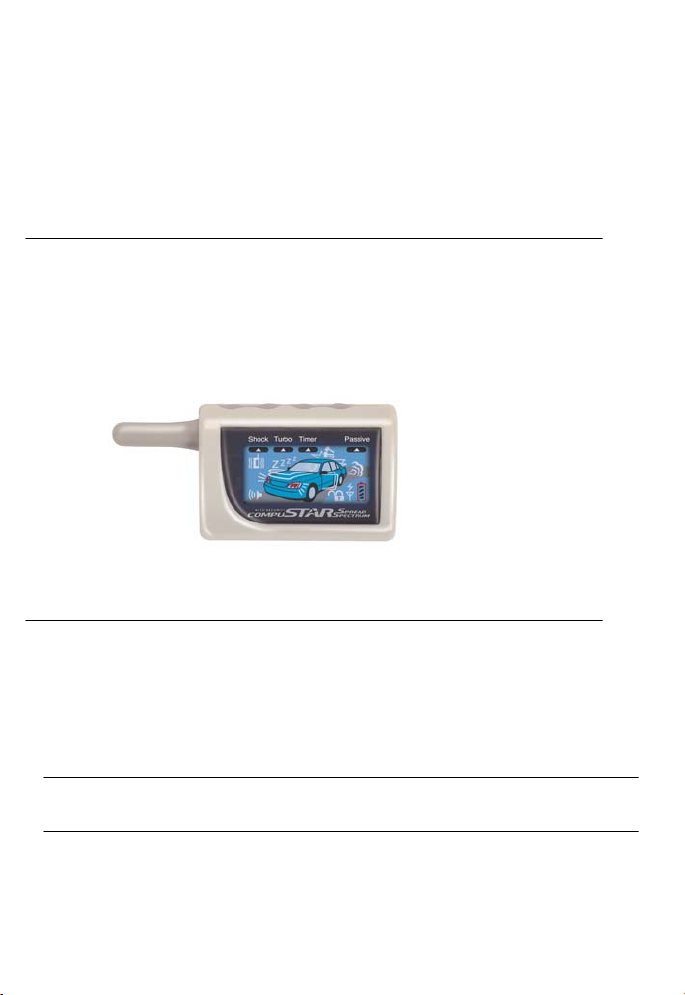
This 5 channel transmitter that allows you to activate multiple functions by pressing
a combination of 4 buttons on the unit in order to transmit signals. Press Buttons
for a ½ second to make your remote-pager mute. A vibration icon will appear
(II+III)
continuously on the upper left-hand corner of your CompuGLO LCD indicating that
you are in
remote-pager mute mode.
Remote-Pager CompuGLO color LCD
The remote-pager comes with CompuGLO which is a unique color LCD display that
visually tells the vehicle owner the security status of your car at all times. There are
differing icons that will appear on your CompuGLO LCD indicating what your vehicle
is currently doing.
Remote-Pager Button Functions
The user can activate differing functions of CompuStar 2WSSR system by pressing
one or two buttons simultaneously [ex.
] located on the antenna side of your
(I+IV)
CompuStar remote-pager.
Channel Button Press for Function Factory
Setting
1.
I
1/2 sec Alarm Mode - on/off
VPS - on/off
2.
II
1/2 sec Auxiliary Option 1
© 2001 Firstech, Inc. Page 4
Page 5

3.
4.
III
IV
1/2 sec Auxiliary Option 2
1/2 sec Query Function
5.
6.
7.
8.
I -
II -
III IV -
2 sec Same as pressing ½ secs.
2 sec Auto-start Function - on/off
2 sec Trunk Release - on/off
2 sec Panic Off
9.
10.
11.
12.
13.
14.
(I+II)
(I+III)
(I+IV)
(II+III)
(II+IV)
(III+IV)
1/2 sec Car Siren (mute) - on/off On
1/2 sec Valet Mode – on/off Off
1/2 sec Ignition Lock - on/off Off
1/2 sec Passive Lock - on/off Off
1/2 sec Timer Start Mode - on/off Off
1/2 sec Turbo Mode - on/off Off
15
16
(I+III) (II+III) -
2 sec Shock Sensor – on/off On
2sec Remote-Pager Beep
(mute)
-
On
on/off
17.
18.
(I+II) (I+III) -
2 sec Programming Menu 1
2 sec Programming Menu 2
Note:
Note:
means simultaneously pressing the buttons
( )
means simultaneously pressing the buttons for 2 seconds.
( ) –
USING YOUR SYSTEM
Your CompuStar 2WSSR system has many different modes and functions that can
be activated by using your remote-pager unit.
Alarm Mode
You can arm or disarm alarm mode by pressing Button I for a ½ second or 2
seconds. A bolted padlock icon will appear on your CompuGLO LCD indicating that
your car is armed and a lock icon will appear showing that your car doors are
locked. Also, your car will chirp when you arm or disarm your car.
© 2001 Firstech, Inc. Page 5
Page 6

Press Buttons
for a ½ second to make your car siren mute when arming or
(I+II)
disarming your vehicle. A car siren icon will disappear on the bottom left-hand
corner of your CompuGLO LCD indicating that you are in
car siren mute mode
.
Keep in mind that your car siren will still activate for all other modes (i.e. panic,
alarm, shock sensor) regardless of whether or not your car siren is in mute mode.
When alarm mode is armed, the remote-pager security alerts will be triggered by the
following:
Unauthorized car door opening will activate the car siren for 30 to 60 seconds
and the parking lights will flash for 60 seconds. The remote-pager will be
notified audibly and the door icon will appear in the CompuGLO LCD. Press
Button I for a ½ second to turn off the car siren and flashing lights. Repeat this
step (press Button I for a ½ second) again to disarm alarm mode.
Unauthorized trunk door opening will activate the car siren for 30 to 60 seconds
and the parking lights will flash for 60 seconds. The remote-pager will beep
and the trunk door icon will appear in the CompuGLO LCD. Press Button I for
a ½ second to turn off the car siren and flashing lights. Repeat this step (press
Button I for a ½ second) again to disarm alarm mode.
In alarm mode, the
starter kill function
starter mechanism on your car, which prevents you from starting your car even with
a manual key when your vehicle’s alarm mode is activated.
Note: (Siren duration is 30 to 60 sec depending on the options set at the time of initial installation.)
Dual Stage Shock Sensor
The dual stage shock sensor on the CompuStar 2WSSR can detect between light
and heavy impact to your vehicle by sensing vibration produced by differing impacts.
Press Buttons
for 2 second to activate or deactivate the dual stage shock
(I+III)
sensor. A red-bordered indicator box labeled Shock will darken in the top left-hand
corner of your CompuGLO LCD showing that your dual stage shock sensor is
activated.
The dual stage shock sensor will activate 30 seconds after the CompuStar alarm
mode is armed.
When the dual shock sensor is engaged, the remote-pager
security alerts will be triggered by the following:
is activated. This feature disengages the
© 2001 Firstech, Inc. Page 6
Page 7

Light impact to your vehicle will activate the first stage shock sensor and
the car siren will chirp 4 times in addition to the parking lights flashing 4
times. The remote pager unit will beep and a vibration icon will appear in
the CompuGLO LCD.
Heavy impact to your vehicle will activate the second stage shock sensor
and the car siren will chirp for 30 to 60 seconds and the parking lights will
flash for 60 seconds. The remote-pager will be notified audibly and a
hammer icon will appear in the CompuGLO LCD. Press Button I for a ½
second to turn off the second stage shock sensor sirens and flashing
lights.
Panic Mode
Panic Mode allows the owner to draw attention to the car in case of an emergency
or in order to easily locate your vehicle in a large parking lot. Press Button
IV
for 2
seconds on the remote-pager to enter Panic Mode. In this mode, the car will arm if
not armed already and the siren will activate and the parking lights will flash. In
order to disengage Panic Mode, press Button IV for 2 seconds. Then, press Button
for a ½ second to unlock/disarm your vehicle.
I
Auto-Start Function
Press Button II for 2 seconds to auto-start an automatic transmission engine. You
will hear one beep from your remote-pager if there is successful communication with
your vehicle. The engine will start and give you a visual confirmation by an exhaust
fume icon coming out from the tailpipe on the remote-pager CompuGLO LCD.
Remember that a manual key in the ignition is required to drive the car. In addition,
the
anti-grind circuit
prevents you from overcranking the starter on a remotestarted vehicle. Press Button II for 2 seconds in order to turn off an auto-started car.
For manual transmission vehicles, please use reservation mode.
© 2001 Firstech, Inc. Page 7
Page 8

The engine will run 15 or 25 minutes (25 or 40 min for diesel) depending on preset
options at the time of installation and then shut off. If your remote-pager has a
problem starting the vehicle, CompuStar will try 2 additional times. If the engine
does not start after the third attempt, please call your authorized CompuStar dealer.
Diagnosing problems with Auto-Start
If there is a problem in auto-starting your car, you will hear three chirps when you
attempt to auto-start the car. Wait for 2 seconds and the cause for the error will be
indicated by the number of times the car chirps and parking lights flash.
Error Number (# of times the car chirps
& parking lights flash)
1 Engine On
2 Key On
3 Door Open
4 Trunk Open
5 Brake On
6 Hood Open
7 Reservation Off (Manual Transmission Only)
Error Reason
Query Function
Query Function allows the owner to visually monitor the status of your car by looking
at the remote-pager CompuGLO LCD icons. Press Button IV for a ½ second to
activate the Query Function.
CompuGLO Back-Light Mode
Press Button IV for 2 seconds to activate light mode. A red-border indicator box
named Light will darken in the upper right-hand corner of your CompuGLO LCD
indicating that light mode is activated. In this mode, when you press the remotepager buttons, the CompuGLO LCD will glow. In order to turn off light mode, press
Button IV for 2 seconds.
Trunk Release
© 2001 Firstech, Inc. Page 8
Page 9

Press Button
for 2 seconds in order to unlock and release your trunk door. Note
III
that the trunk release function will not only release the trunk but will unlock all the
doors as well.
Reservation Mode (manual transmission only)
In order to auto-start your manual transmission car, you must first set the
CompuStar system to Reservation Mode before leaving your vehicle. The purpose
of Reservation Mode is to leave the transmission gear in the neutral position when
you leave your vehicle. Reservation mode is intended for use in MANUAL
TRANSMISSIONS ONLY and NOT FOR AUTOMATIC TRANSMISSIONS.
Reservation Mode must be engaged each and every time you leave your manual
transmission car in order to auto-start the vehicle.
Note: The system is not recommended for vehicles with removable tops.
Important Requirements to activate Reservation Mode
The transmission must be in the NEUTRAL position.
The vehicle windows must be rolled up.
Do not set the reservation mode with people in the vehicle.
Do not auto-start the car with people in the vehicle.
Activating Reservation Mode (MANUAL TRANSMISSION ONLY)
After arriving at your destination, and BEFORE TURNING YOUR
Step 1:
ENGINE OFF, place the transmission in the Neutral position.
Remove your foot from the foot brake.
Step 2:
Activate the parking brake.
Step 3:
Remove the key from the ignition. The engine will remain running.
Step 4:
Exit the vehicle and close the door within two minutes after activating the
Step 5:
parking break. The engine will shut off and reservation mode for the remote
starter is now complete.
Your vehicle is now ready for auto-starting. However, the reservation mode will
be cancelled if the door is opened or the CompuStar system is put in Valet mode
© 2001 Firstech, Inc. Page 9
Page 10

after the reservation has been set. Once cancelled, you will have to start the
vehicle with the manual key and repeat the above 5 steps if you want to restore
reservation mode.
Important!
If you try to auto-start the vehicle when reservation mode has not
been set or turned on, the auto-start feature will not work. When you press the
auto-start button, the car parking lights will flash three times and the door icon in
the CompuGLO LCD will be flashing to inform you that reservation mode has not
been set.
Canceling Reservation Mode
If you do not want to set reservation mode, shut off the engine before you exit the
vehicle. The engine will shut off for the following reasons:
You did not activate the parking brake or press the foot brake when you
turned the manual key to the off position.
You released the parking brake while the engine was running.
You entered Valet Mode after the Reservation Mode has been completed.
Safety Shut Down Features
CompuStar 2WSSR system has several shut down safety features. The following
actions will shut down the engine or prevent the car from auto-starting:
Opening of the car engine hood.
Pressing of the car engine break.
Valet mode is turned on.
Valet switch is turned on.
Valet Mode
Valet Mode is intended to deactivate most of the features of your CompuStar
2WSSR system especially the security alerts/monitoring and remote starting. The
only feature operating in valet mode is the keyless entry function and optional
auxiliary functions. This mode allows a valet to operate your car with your
authorization without him or her triggering all the security features or remote-starting
your vehicle. Also, Valet Mode is very useful when washing your vehicle or having it
serviced.
© 2001 Firstech, Inc. Page 10
Page 11

In order to enter Valet mode, press Buttons
simultaneously for a ½ second or
(I+III)
insert the key into the ignition and turn the ignition on and off five times within 10
seconds. The remote-pager CompuGLO LCD will display a ZZZ icon indicating that
you are in Valet Mode. In order to exit Valet Mode, press Buttons
(I+III)
simultaneously for a ½ second.
Timer Start Mode
In Timer Start Mode, your car automatically starts every 1.5 hours for 15 to 25
minutes depending on preset options during the time of installation for a 24 hour
period. This mode is deleted automatically after 24 hours or once you start your car
with either your manual key or remote-pager. In order to enter Timer Start Mode,
press Buttons
simultaneously for a ½ second.
(II+IV)
A red-bordered indicator box labeled Timer will darken on the top left-hand corner of
your CompuGLO LCD demonstrating that you are in Timer Start Mode. Press
Buttons
simultaneously for a ½ second to exit Timer Start Mode.
(II+IV)
Important!
Timer Start Mode should be used only in open areas. Never start and
run the vehicle in an enclosed space such as a garage or carport.
ADDITIONAL FEATURES
The CompuStar 2WSSR remote-pager has additional features and expansion possibilities.
Optional Auxiliary 1 & Auxiliary 2
The auxiliary system is an optional car feature that can be tailored for your vehicle
by your local authorized CompuStar dealership. The auxiliary feature allows you to
customize the buttons on your remote-pager to add more functionality to your car.
For example, you can customize your car to have remote power control of your
windows, radio, and sunroof in addition to the rooftop on your convertible car. The
remote-pager has two outputs (Aux 1 & Aux 2) that can be custom utilized with
optional features. Please contact your local authorized CompuStar dealer for more
information.
© 2001 Firstech, Inc. Page 11
Page 12

Most likely, you did not push Button II for the required 2 seconds. Pushing Button II for
only a ½ second engages the optional auxiliary function instead of auto-start.
Another reason maybe that you are in Valet Mode. If there is a ZZZ icon on your remotepager unit, you are in this mode and all the functions of the CompuStar 2WSSR are disabled
except for keyless entry. Press Button
Valet Mode.
If there is a problem in auto-starting your car, you will hear three chirps from your remotepager when you attempt to auto-start the vehicle. After waiting two seconds, the diagnosis
for the auto-start error will be indicated depending on the number of times the car chirps and
parking lights flash. For example, 4 car chirps and parking light flashes indicates that the car
did not auto-start because the trunk was open. Please see page 10 of the user’s manual for
the error diagnosis table.
On a small minority of cars, you maybe equipped with a Valet Switch that is located under
the car’s dashboard that disables the auto-start system manually when the switch is turned to
the on position. Turn the Valet Switch to the off position and your car will auto-start.
(I+III)
simultaneously for a ½ second to deactivate
INSTALLATION
Please refer the wiring diagram.
1. Dip Switch and Jumper Settings
Dip
Jumper #1 #2
Switch
Off Cut:
Automatic
Alternator
Sensing
15 min run time
(25 min diesel)
Transmission
On Uncut:
Manual
Tach
Sensing
25 min run time
(45 min diesel)
Transmission
2. Transmitter/Receiver Learn Routine
Your remote-pager has been programmed for your
specific CompuStar brain at the time of installation.
© 2001 Firstech, Inc. Page 12
Page 13

Remove the AA battery from the remote.
Step 1:
Activate Valet/Programming mode by manually turning the ignition on and
Step 2:
off five times with car key within a 10 second period which is the technically similar
to giving the
wire 12V pulse five times. The parking light will flash once with
Green
successful completion of this step.
Step 3: Within a 6 second period after cycling the ignition for the 5
th
time,
Insert the batter back to the remote. The car parking lights will flash once to
confirm that the transmitter has been programmed.
Important!
Note that you can program ONLY ONE remote-pager units
(2WSSR) for a single CompuStar brain. You can program another 1 Way
remote (1WFMR900Meg).
3. Programming Options with the Remote-Pager
The features of your CompuStar 2000AS system can be changed by utilizing the
programming options with your remote-pager. Changing of these programming
options is intended be performed by your local authorized CompuStar dealer.
: For Programming menu 1: Press Buttons
Step 1
For Programming menu 2: Press Buttons
will chirp once indicating that you are in programming mode.
: Within a 2 second period after choosing your programming menu, press
Step 2
Button IV the number of times to go to the option number you want to
change. You will hear a chirp and see the parking lights flash each time
you press Button IV.
: Wait a few seconds. You will hear a number of chirps and see a number
Step 3
of parking light flashes corresponding to the option number you want to
change. If the number of chirps or flashes is not what you want, go back
to Step 1.
: Press Button I for the default factory settings and your car will respond by
Step 4
one chirp and one flash. Press Button II for the optional setting and your
car will respond by two chirps and two parking flashes.
for 2 seconds.
(I+II)
for 2 seconds. The car
(I+III)
© 2001 Firstech, Inc. Page 13
Page 14

If you hear a long chirp, you are going out of programming mode,
please go back to Step 1.
If you want to change more options, go back to Step 1.
Resetting the Programming Options to the factory default settings.
Step 1:
Press Buttons
(I+II)
simultaneously or Buttons
(I+III)
simultaneously
for 2 seconds. Step 1 is confirmed by a car chirp and a one-time flashing of
the parking light.
Step 2:
Press Button
parking light flash each time you press Button
and parking light flash three times by pressing Button
III
three times. This is confirmed by a car chirp and
III
. Hence, your car will chirp
III
three times. Your car
is now set to the original factory default settings.
Remote-Pager Programming Menu Options
Programming Menu #1 (Auto-Start and Door Lock Options)
Feature Factory Default
Setting – Button I
1-1 Unlock Before, Lock After
OFF ON
Optional
Button II
Setting –
Starting
1-2 Door Lock / Unlock Pulse
0.5 sec 2.0 sec
Duration
1-3 Min. Crank Time for the
0.8 sec 1.0 sec
Alternator Sensing
1-4 Driver’s Priority Unlock OFF ON
1-5 Double Pulse Unlock OFF ON
1-6 Dome Light Factory Rearm OFF ON
© 2001 Firstech, Inc. Page 14
Page 15

1-7 Turbo OFF ON
Programming Menu #2 (Security Options)
Feature Factory Default
Setting – Button
I
Optional
Button II
2-1 Cold Start with Temp Sensor OFF ON
2-2 Timer Start or Minimim Interval
3 Hr 1.5 Hr
between Cold Starts
2-3 Passive Arming Passive
Locking, too
No Passive
Locking
2-4 Anti-jacking OFF ON
2-5 Ignition Controlled Door Lock OFF ON
2-6 Aux 1 Output .5 sec Latch
2-7 Aux 2 Output .5 sec Latch
2-8 Siren Duration 30 sec 60 sec
Setting –
© 2001 Firstech, Inc. Page 15
 Loading...