

Page 1
User Guide
8006L2-3CR Integrated PIN Pad
First Data
EFTPOS
Page 2

2 Contents
Get to know your PIN pad
Introduction 05
PIN Pad location and PIN privacy 05
PIN Pad ownership 06
Your PIN Pad layout 06
First Data 8006L2-3CR Integrated PIN Pad 06
Transaction processing options 07
Installing the privacy shield 08
Overview of the Integrated PIN Pad and PC-EFTPOS software installation 09
PC-EFTPOS hardware installation and conguration 09
How to congure the PIN Pad 11
How to log on 12
The PC-EFTPOS control panel 13
Operating your Integrated PIN Pad — samples of transaction ows 14
Purchase transaction 14
Refund transaction 18
How to complete a settlement 20
GlobalChoice DCC 21
ACe Acceptance 27
Admin functions 28
Where to get help 31
What are you
looking for?
Page 3

3
Get to know your PIN Pad
01
Page 4

4
Get to know your PIN Pad
Get to know
your PIN pad
Page 5

5
Get to know your PIN Pad
Introduction
PIN Pad location
and PIN privacy
Your First Data Integrated PIN Pad is designed to interface with selected POINT of Sale (POS) systems
without the need for double keying the same information into both your POS and an EFTPOS terminal.
The First Data integrated PIN Pad enables the completion of EFT transactions through the PIN pad.
The First Data integrated PIN Pad has been specically designed to effortlessly connect to POS solutions
that have been accredited by PC-EFTPOS, one of Australia’s leading supplier s of Integrated EFTPOS
payment solutions in Australia.
When congured to be used in conjunction with a PC-EFTPOS accredited POS system, all the EFTPOS
functionality is initiated through the POS.
If necessary, please consult your POS provider on the operation of EFTPOS transactions through your POS.
The physical location of a PIN Pad is important in
protecting a customer’s PIN privacy.
When your new PIN Pad is installed or relocated
within the premises, you must take care to ensure:
> the PIN Pad is in a position that allows the
customer to enter their PIN so it cannot be
observed by employees or other customers
> the PIN Pad has not been placed at an angle or
height that prevents customers from shielding
their PIN entry
> the placement of mirrors and other reective
materials do not allow the customer’s PIN entry
to be observed through reection
> security cameras can’t make a visual record
of a customer’s PIN entry.
You should communicate these guidelines to any
staff members that process EFTPOS transactions
using the First Data PIN Pad.
It is also important to remind staff members that
customers should never be asked to disclose a PIN.
Page 6
6
Get to know your PIN Pad
PIN Pad ownership
Your PIN Pad layout
All physical equipment provided by First Data remains the property of First Data.
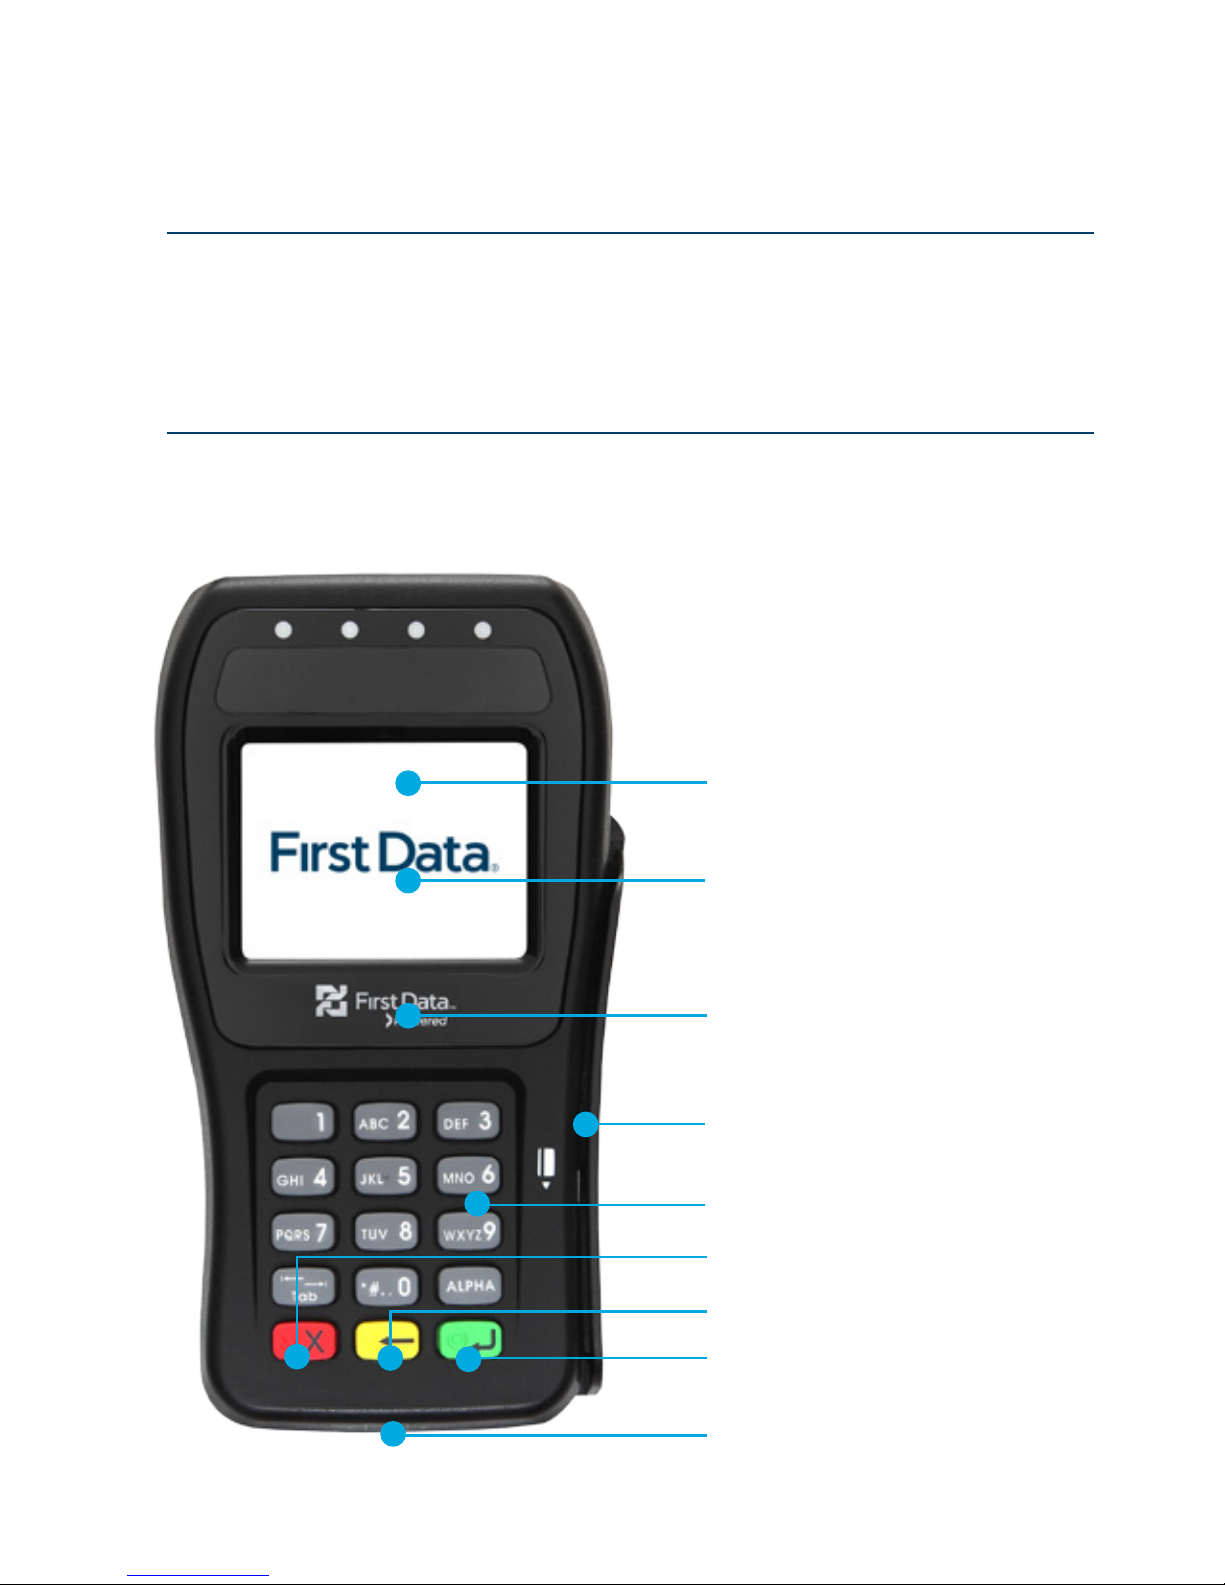
First Data 8006L2-3CR Integrated PIN Pad
Colour touchscreen display
Integrated contactless card
reader lights. (Contactless reader
is embedded behind screen)
Colour touch screen terminal display
Magnetic card reader
Alpha/numeric keys
Power on/off and cancel key
Back key
Enter key
Chip card reader
Page 7
7
Get to know your PIN Pad
Transaction processing options
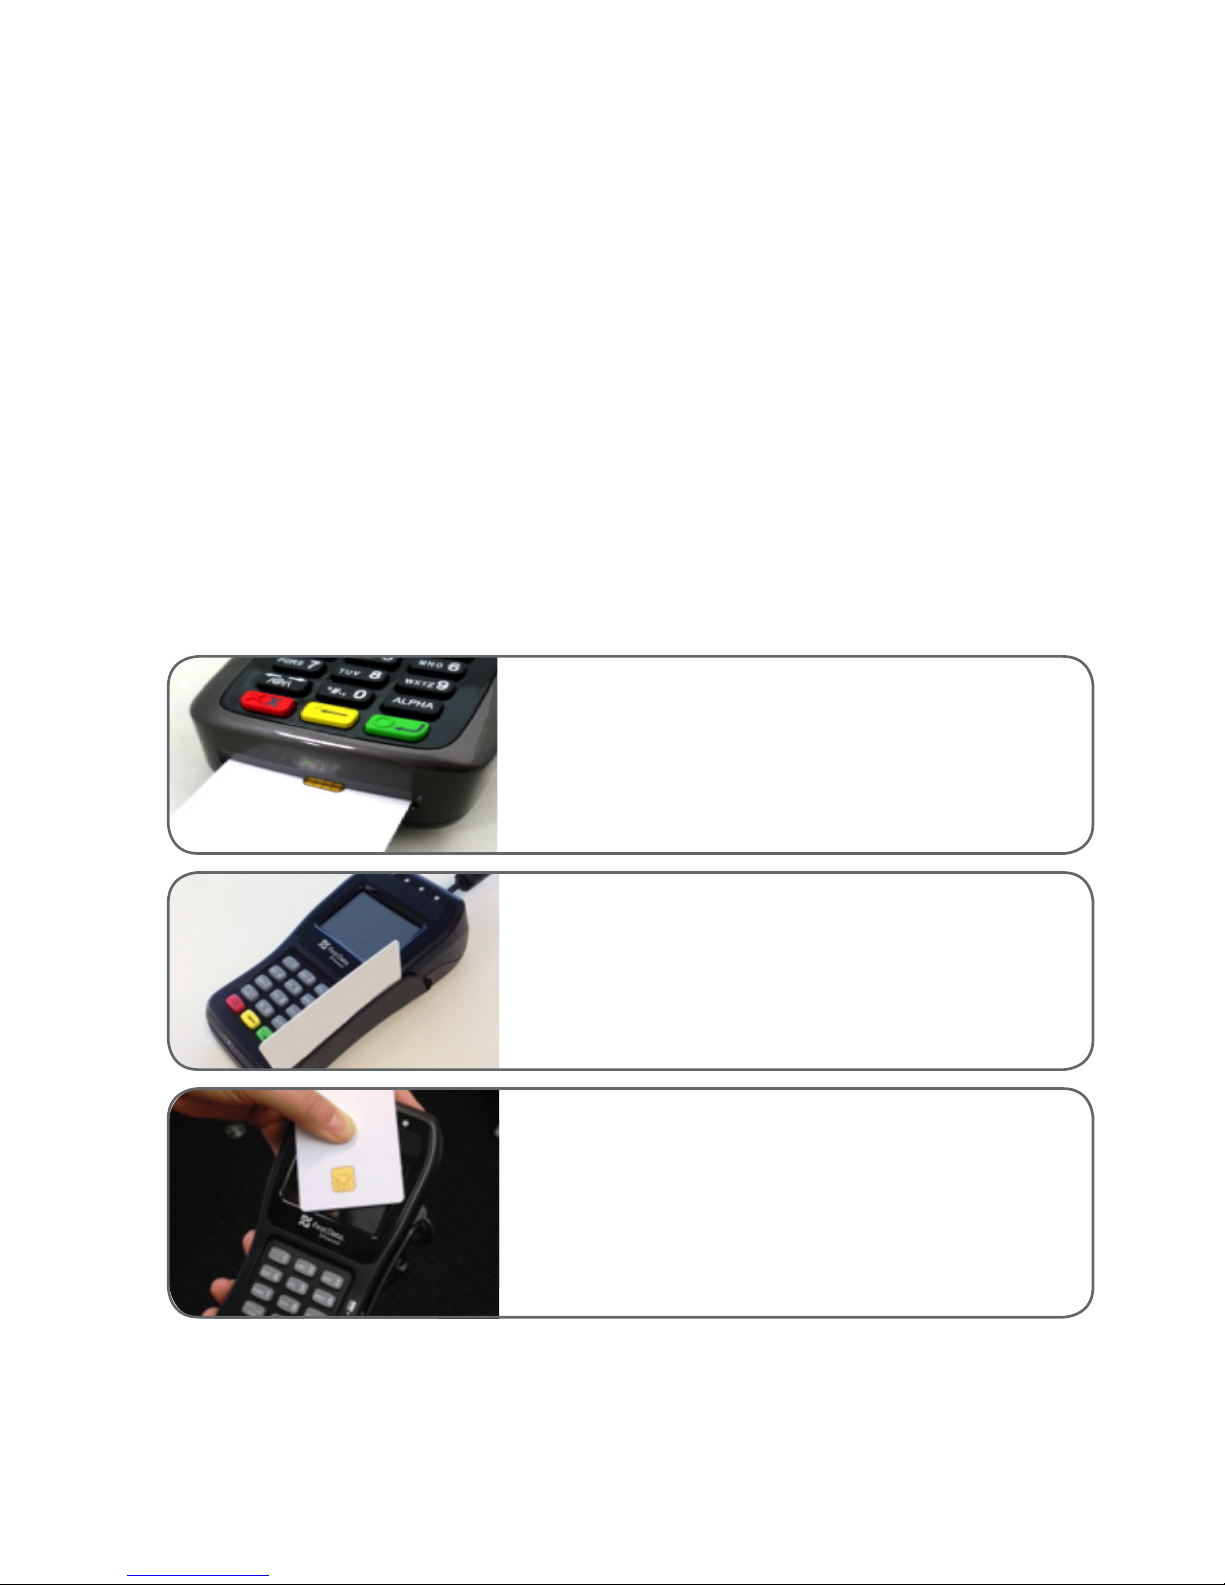
The First Data PIN Pad has a chip card reader, a magnetic stripe reader and an integrated contactless reader
for processing transactions.
All chip cards must be inserted into the chip card reader as shown below.
> Insert the credit card into the card reader with the gold contact pad facing upward, as shown below.
> Leave the chip card in the reader until the transaction is completed and you are prompted to remove it.
> The screen prompts will guide you through the transaction process.
If the card is capable of performing a contactless transaction, place the card over the contactless reader, as
shown below.
If the card does not have a chip or contactless capability, you can process transactions by swiping the
magnetic stripe through the PIN Pad.
Smart card reader — The integrated circuit card (ICC)
reader is located at the bottom end. Please make sure that
the gold ICC contact pad is facing upward when inserting
the card into the slot.
Magnetic card reader — The card reader slot is on the
right side of the PIN Pad. With the magnetic stripe facing
[inwards], slide the card in either direction through the slot
without stopping. If the card swipe fails, check the position
of the magnetic stripe and slide the card again.
Contactless card reader —The contactless card reader
antenna is embedded behind the display and PIN pad. The
reader’s lights will show blue when the PIN Pad is powered
on to indicate the reader is working normally. To process a
contactless payment, place the contactless card near the
card reader antenna during a transaction.
Page 8
8
Get to know your PIN Pad
Installing the privacy shield
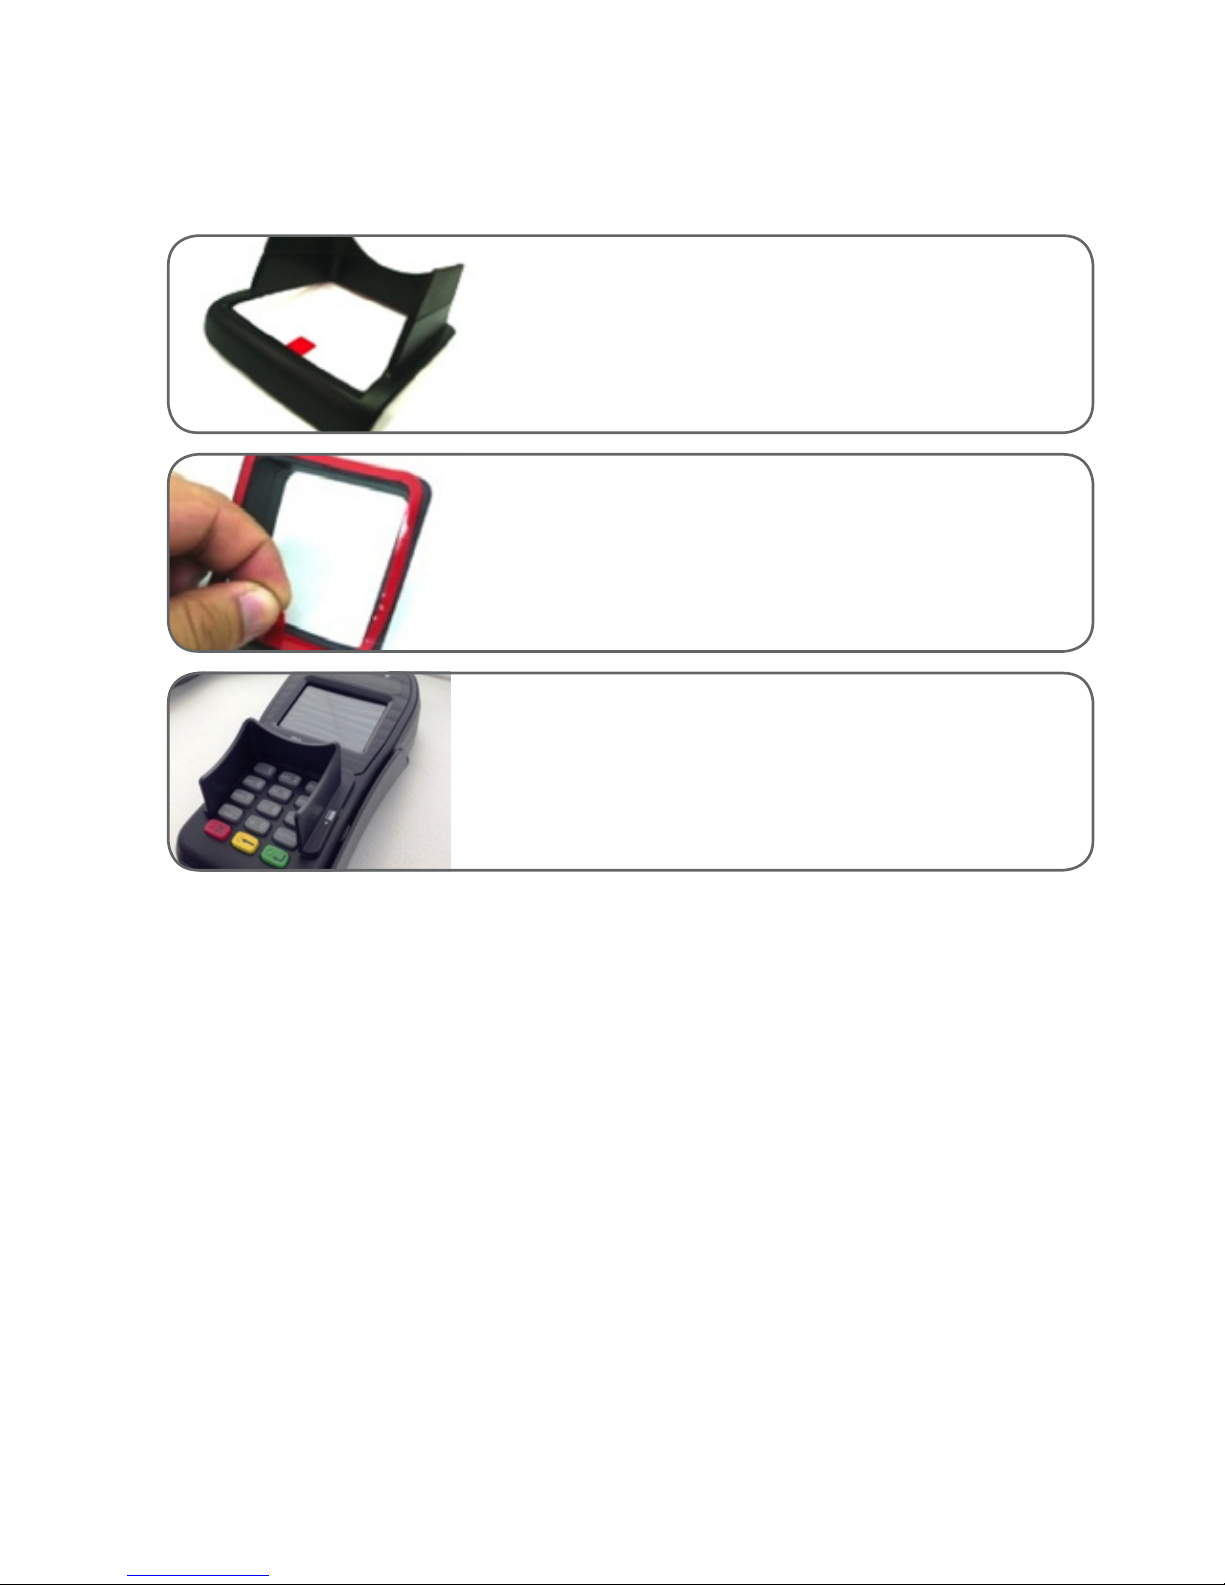
You can choose to add a privacy shield to the terminal to
provide customers with additional security when entering
their PIN.
Remove the adhesive tab around the privacy shield.
Carefully place the privacy shield’s adhesive side around
the keypad.
Page 9

9
Get to know your PIN Pad
Overview of the Integrated
PIN Pad and PC-EFTPOS
Software Installation
The PIN Pad is used to encrypt sensitive data within nancial transactions, and perform all (logical)
communications with First Data. To this end, the First Data 8006L2-3CR PIN Pad is certied compliant with the
PCI and EMV (Level-1 and Level-2) security standards.
The method of connecting the First Data 8006L2-3CR PIN Pad to your POS solution will be either a RS232
serial or USB connection.
The First Data 8006L2-3CR PIN Pad can be installed by an authorised technician but if you chose to perform
installation yourself or arrange for installation to be performed by your POS provider, the following information
is provided to assist.
Determine the POS conguration required at your site. Is a Back Ofce PC to be congured with PC-EFTPOS
Gateway details? If not, which POS is to be congured with the PC-EFTPOS Gateway details?
If you intend to congure to a back ofce PC which hosts the Gateway connection
Run PC-EFTPOS Setup.exe
Select No PIN Pad
Select First Data as the Bank
At Comms to Bank select PC-EFTPOS Gateway on this PC
Enter Gateway User Name and Password
When Setup complete check that the line status in EFT Server reects ‘Connected’
If you intend to congure a POS unit to host the Gateway connection
Run PC-EFTPOS Setup.exe
Select PIN Pad and Server
Select First Data as the Bank
In Client select a Comms Port for PIN Pad
At Comms to Bank select PC-EFTPOS Gateway
Enter Gateway User Name and Password
When Setup complete check line status in EFT Server reects ‘Connected’
Connect a PIN Pad
In Client conrm that the correct Comms Port is assigned
PC-EFTPOS Hardware Installation
and Conguration
Page 10

10
Get to know your PIN Pad
If you intend to congure any other POS (which does not host the Gateway connection)
for connection via one of the above options to access the gateway
Run PC-EFTPOS Setup.exe
Select No PIN Pad and Server
In Client select a Comms Port for PIN Pad
At Comms to Bank select another PC on the Network
At Server Cong enter IP Address of PC-EFTPOS Gateway PC
When Setup complete check line status in EFT Server reects ‘Connected’
When Setup complete check that the line status in EFT Server reects ‘Connected’
Connect a PIN Pad
In Client conrm that the correct COM Port is assigned
Congure the PIN pad by entering the CENTRiQ ID (if unknown please contact the helpdesk on 1800
243 444) by keying in the 5 digit ID and press Enter.
A software download will occur and will be complete when the PIN Pad displays
‘Transaction / Admin’
Open PC-EFTPOS Client / Control Panel / Logon – PIN Pad and Logon will occur
All chip cards must be inserted into the chip card reader as shown below.
> You must contact your POS provider to congure the POS Software for Integrated EFTPOS and to set up
receipt printing.
> If your POS Solution does not have the latest PC-EFTPOS software installed, install the software from the
PC-EFTPOS installation CD or the setup le available for download from the website.
http://www.pceftpos.com/media/PC-EFTPOS%20Setup.exe
Page 11
11
Get to know your PIN Pad
How to congure the PIN Pad
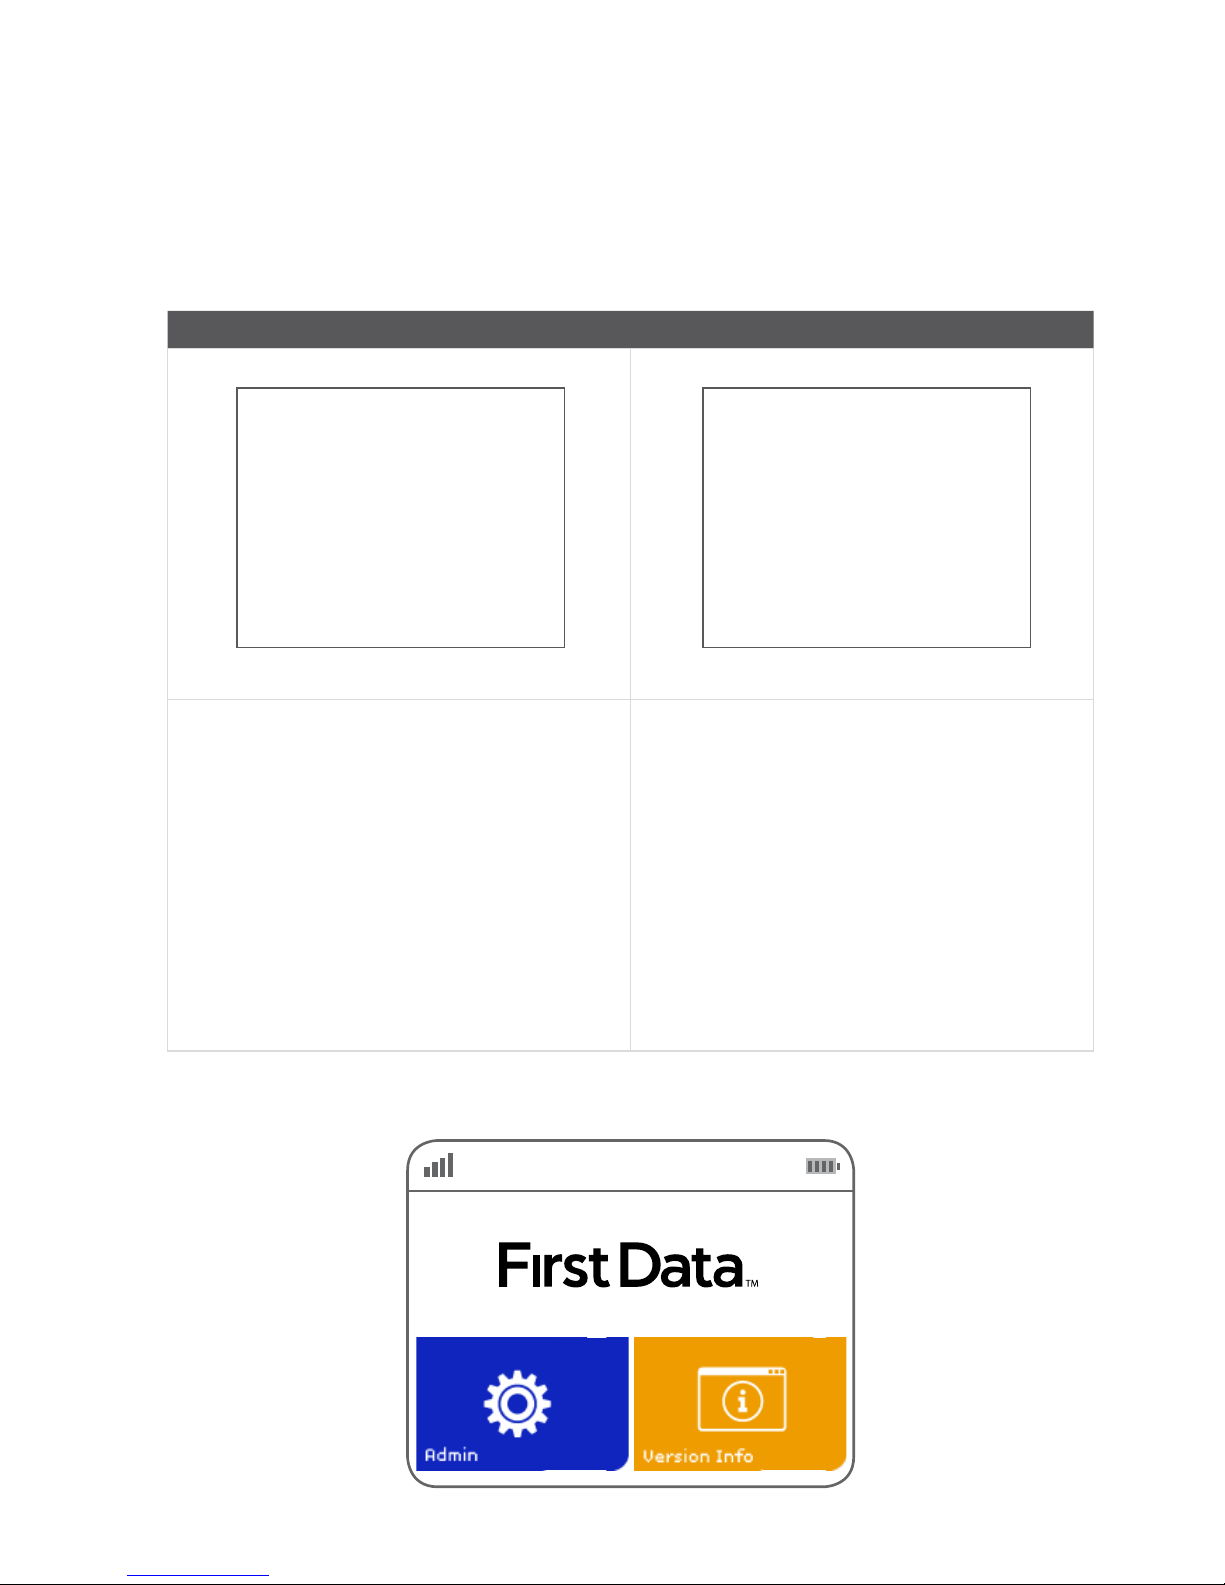
The default comms mode when rst powering on the PIN Pad will be pre-set at the factory according to
the cable already connected to the PIN Pad:
The PIN Pad will perform a software download and go the idle screen when the download is completed.
ENTER
CENTRiQ ID
First PIN Pad screen
Second PIN Pad screen
Press ENTER to continue. CENTRiQ is the First Data supported Terminal
Management System (TMS).
Enter the CENTRiQ ID to connect to the
TMS. The CENTRiQ ID will be provided to
you by First Data.
Enter the CENTRiQ ID using the
PIN pad’s keypad then press the green
enter key.
CONFIGURE
1-WIFI (restart needed)
2-SERIAL (POS integration)
3- PSTN
4- DIAL: PREFIX
5- BLIND DIAL
ENTER-CONTINUE
Page 12
12
Get to know your PIN Pad
How to log on
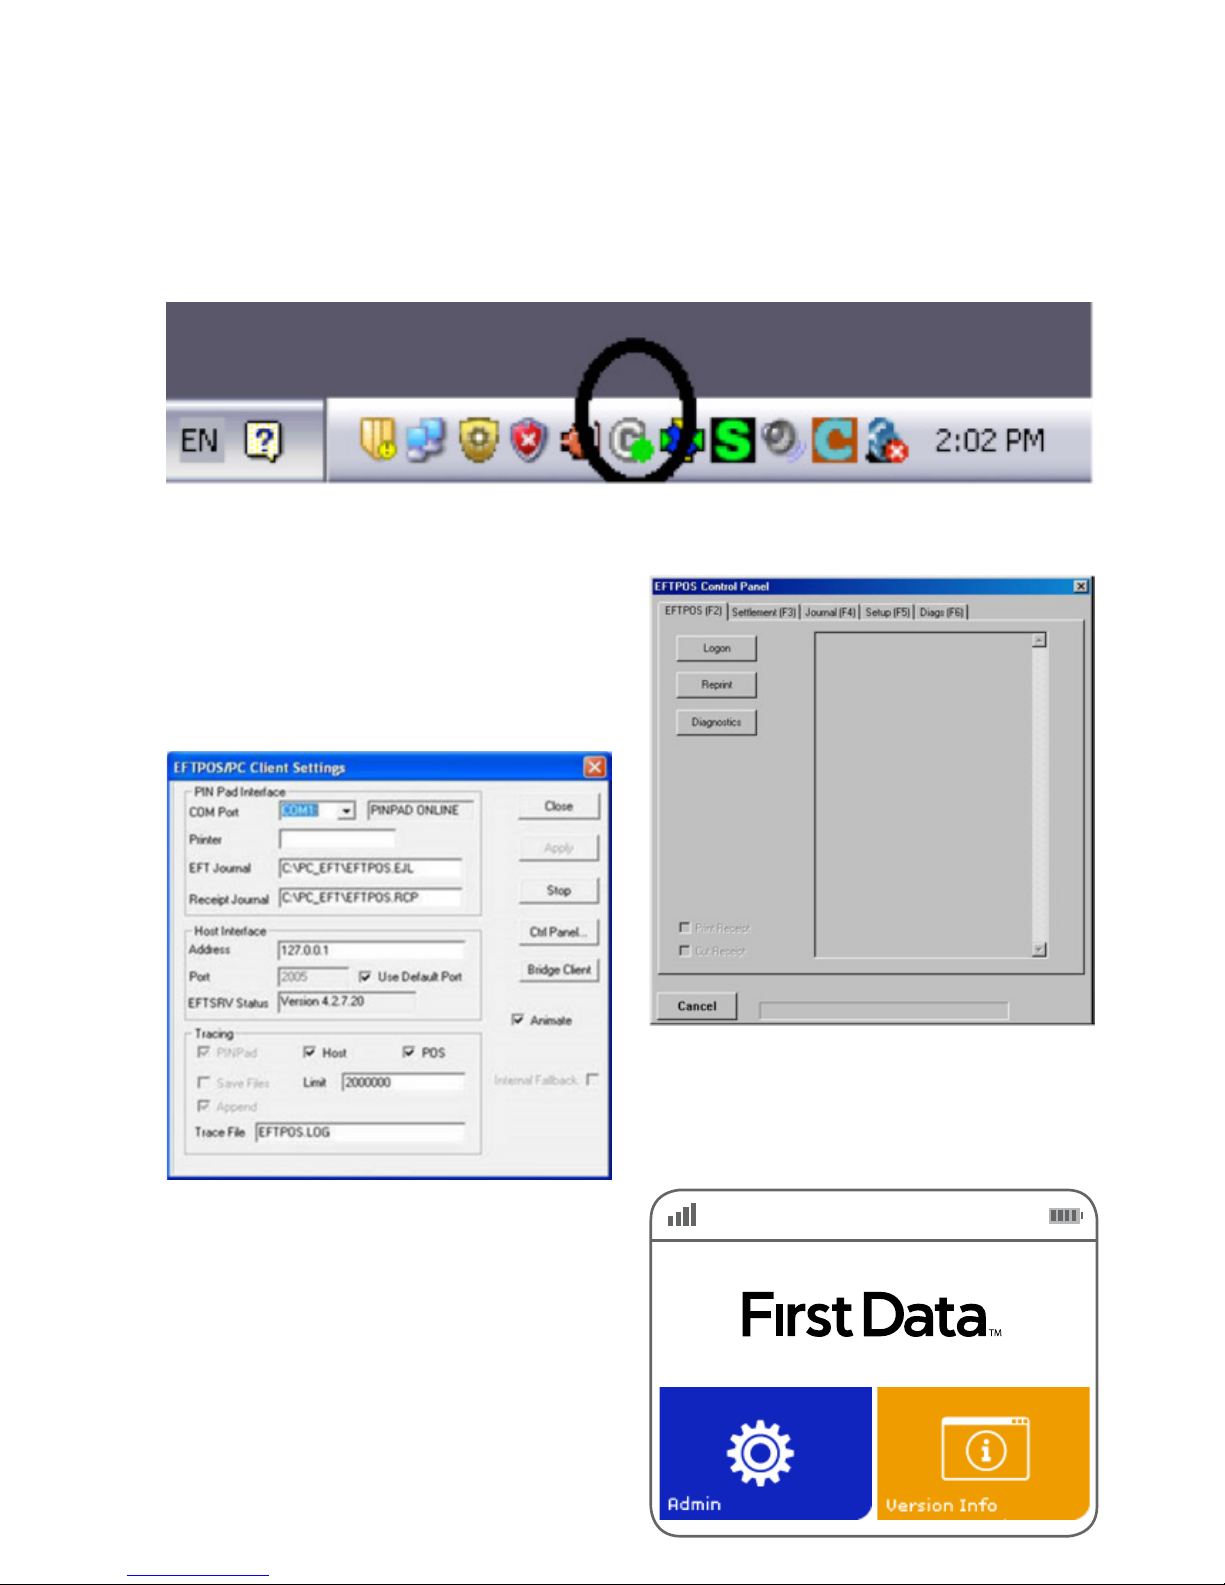
Go to the Windows Task Bar and open the PC-EFTPOS Client by double clicking on the C Icon with the
Green dot.
This will bring up the PC-EFTPOS Client Graphical
User Interface (GUI)
Conrm that the Status of the PIN pad is ONLINE
(PIN PAD ONLINE)
Click on CTRL Panel to open the PC-EFTPOS
Control Panel
Click “Logon” button to initiate a Logon
The First Data PIN Pad is now ready.
Please note: If the previous steps were successful
the PIN Pad will return to the Idle Screen.
Page 13
13
Get to know your PIN Pad
The PC-EFTPOS control panel
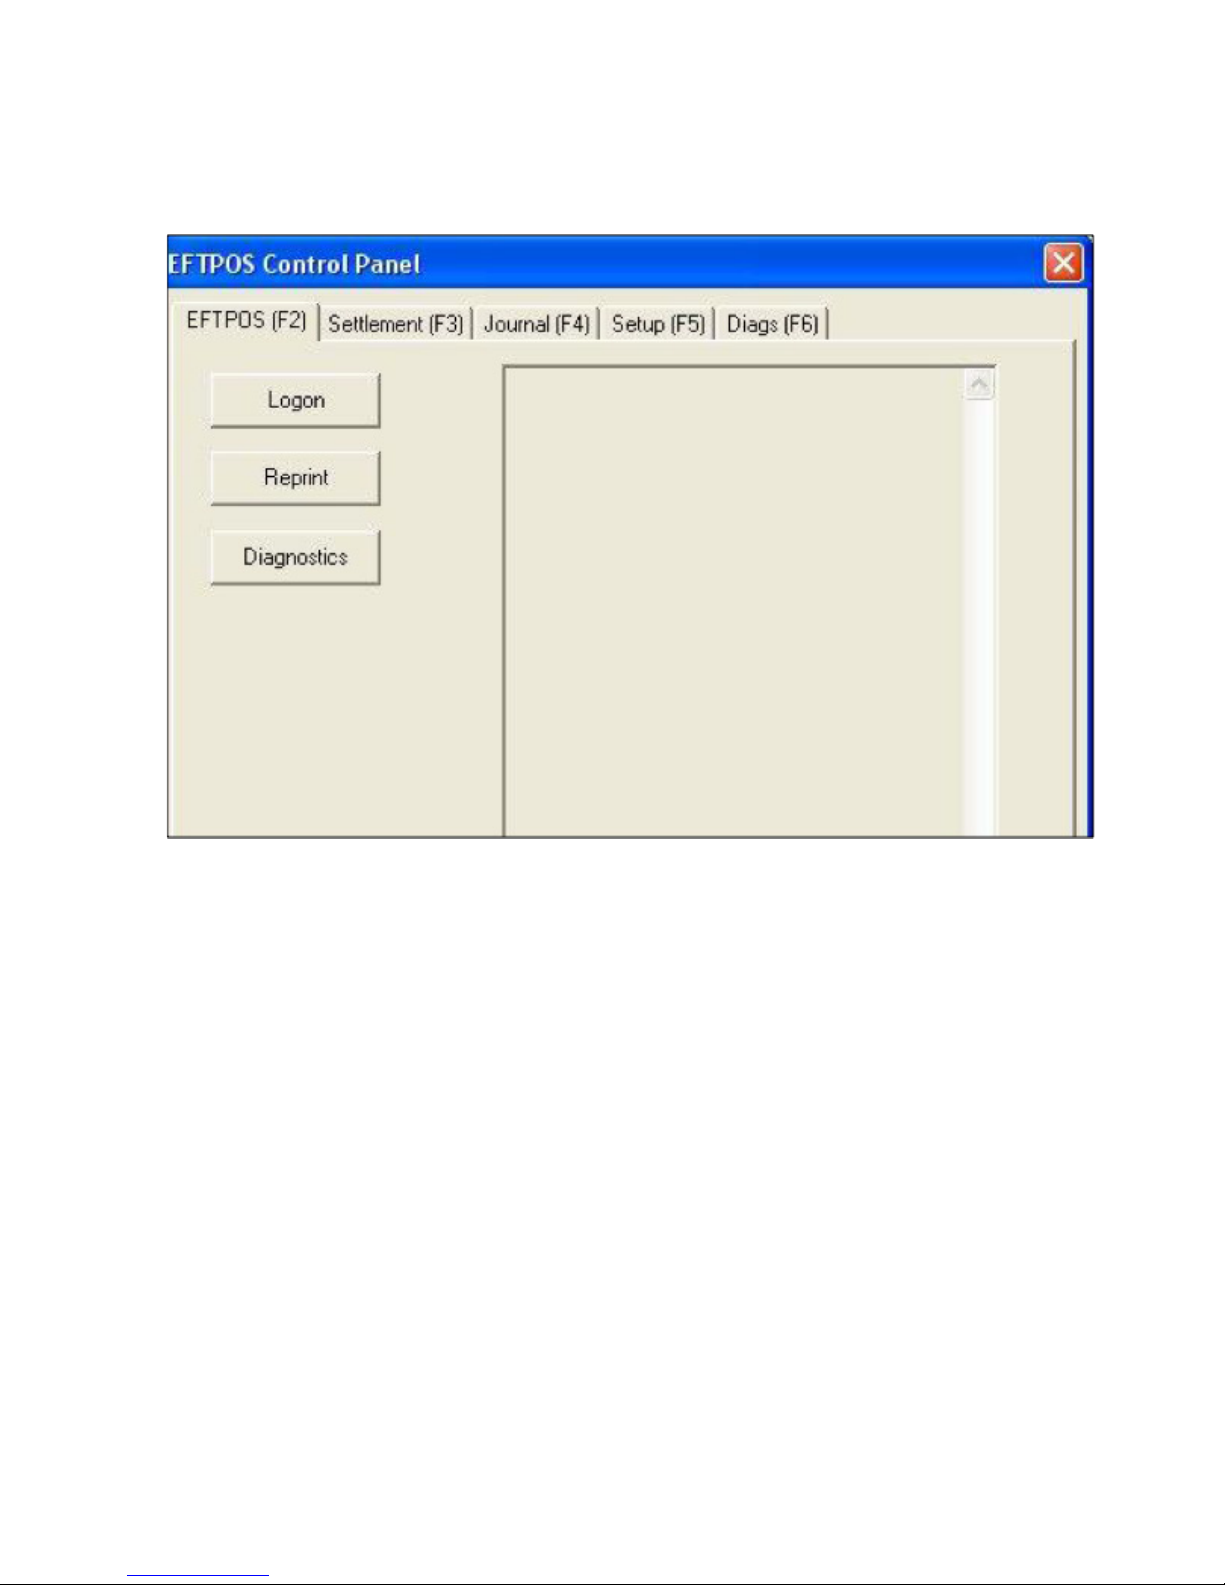
Through the PC-EFTPOS Control Panel, you will be able to perform:
Logon – Performs a Logon to the Host
Reprint- Reprints last receipt
Diagnostics – Provides reports on software conguration and version
Page 14
14
Get to know your PIN Pad
The rinciple of the integrated PIN Pad is that all EFT transactions are instigated from your POS solution to
prevent the need for double keying. The PIN Pad is in essence a “slave” to your POS serving the purpose
of enabling the customer’s PIN to be entered and to build a secure EFT transaction for processing.
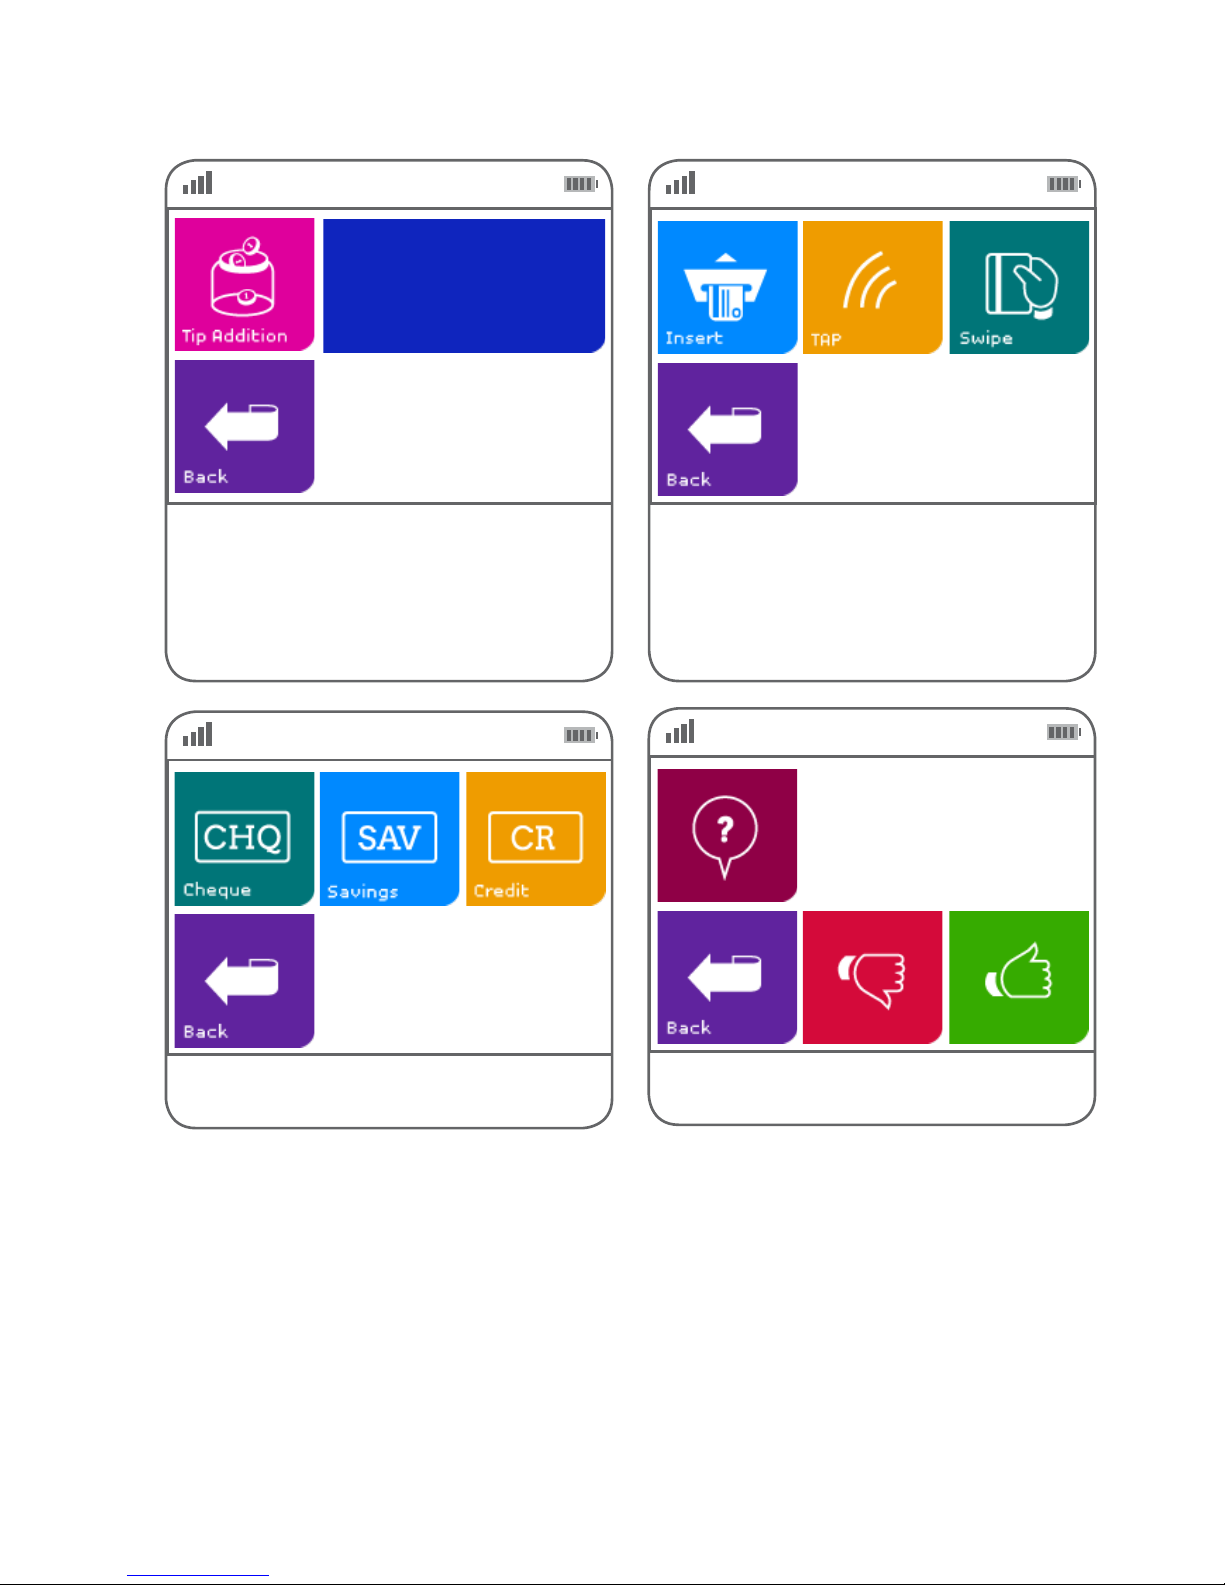
Purchase transaction
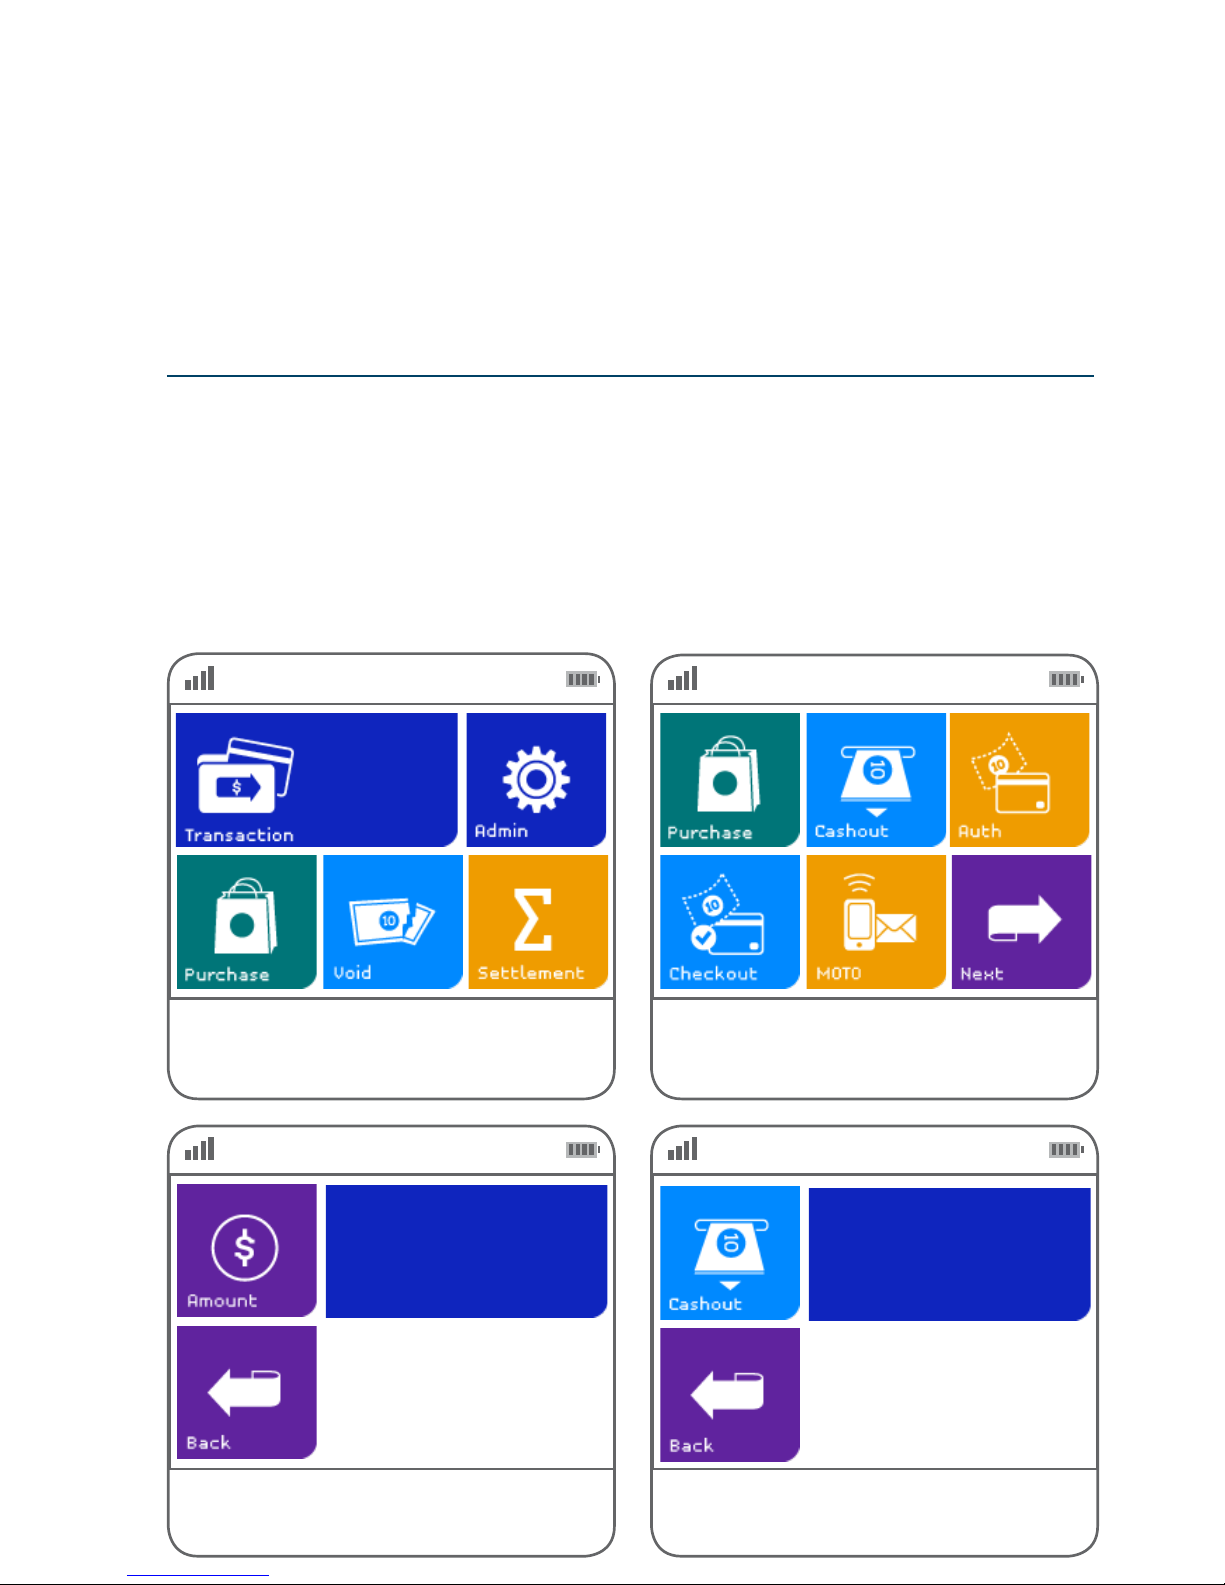
In this sample transaction ow, all transaction data is collected at the ECR/POS, and sent down to the terminal
in the PC-EFTPOS Transaction command.
Step 01
Step 03
Step 02
Step 04
Key in the purchase amount and press the green
ENTER key on the keypad.
Alternatively, if ‘Purchase’ is not a congured hot
key, select ‘Transaction’, then select ‘Purchase’
from the transaction list.
Key in the cash out amount if required.
Select ‘Purchase’ from the main screen. If it is
congured as a hot key. (Refer to page 76 for details.)
$0.00
$0.00
Operating your
Integrated PIN Pad —
samples of transaction ows
Page 15
15
Get to know your PIN Pad
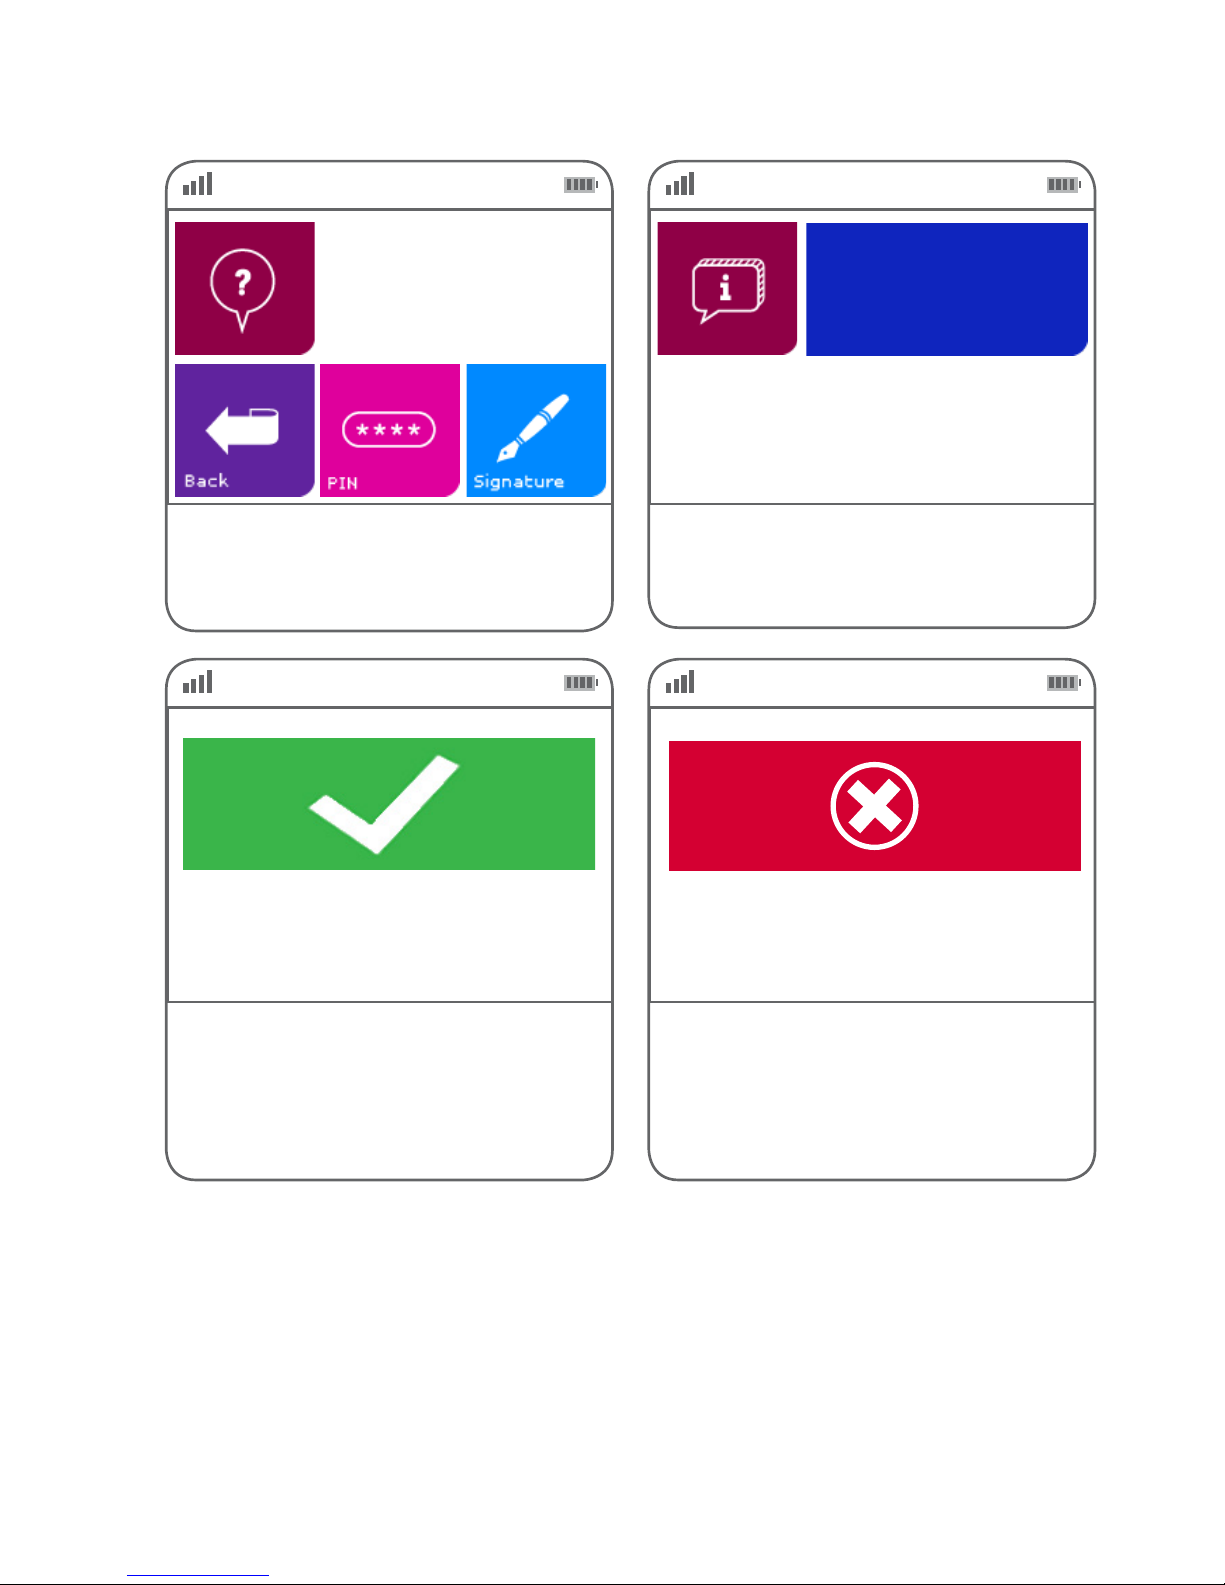
Step 05 Step 06
Step 07
Step 08
Key in the tip amount if required.
Insert, tap or swipe the card.
Note: If the value for a contactless transaction
is $100 or greater, the terminal will prompt the
customer to enter a PIN or insert their card.
Select the account type.
Conrm the transaction amount.
$0.00
Purchase: $$.$$
Total: $$.$$
Page 16
16
Get to know your PIN Pad
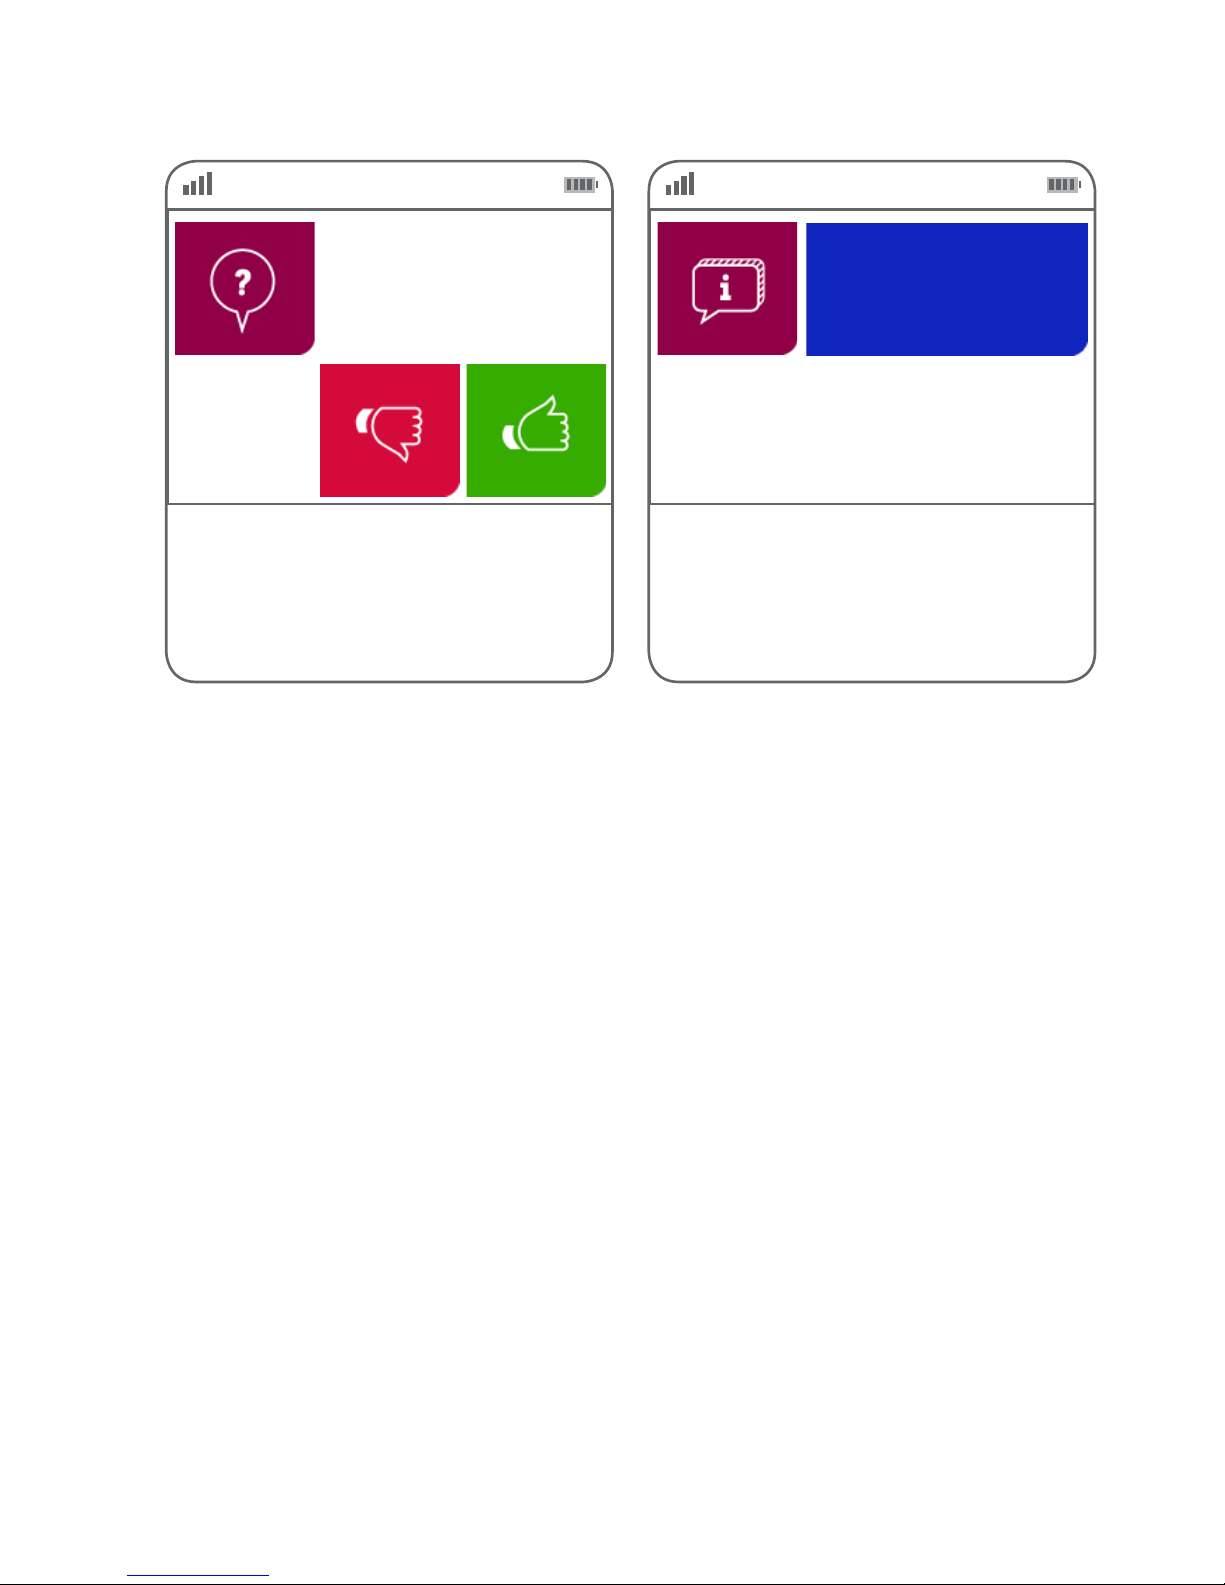
Step 11
If the transaction is ‘APPROVED’ this screen
will appear
Approved
Step 09
Ask the customer if they would prefer to enter
their PIN or sign the receipt. Press ‘PIN’ or
‘Signature’ accordingly.
PIN or Sign?
Step 10
Step 12
This screen indicates the terminal is attempting
to process the transaction. The screen will
update to reect the status, eg ‘APPROVED’.
If the transaction is ‘DECLINED’ this screen will
appear with an audible double beep sound to
draw attention to the screen
<MESSAGE> is optional depending on the
reason for the declined transaction.
EFTPOS in progress.
Please wait
<STATUS>
<MESSAGE>
Page 17
17
Get to know your PIN Pad
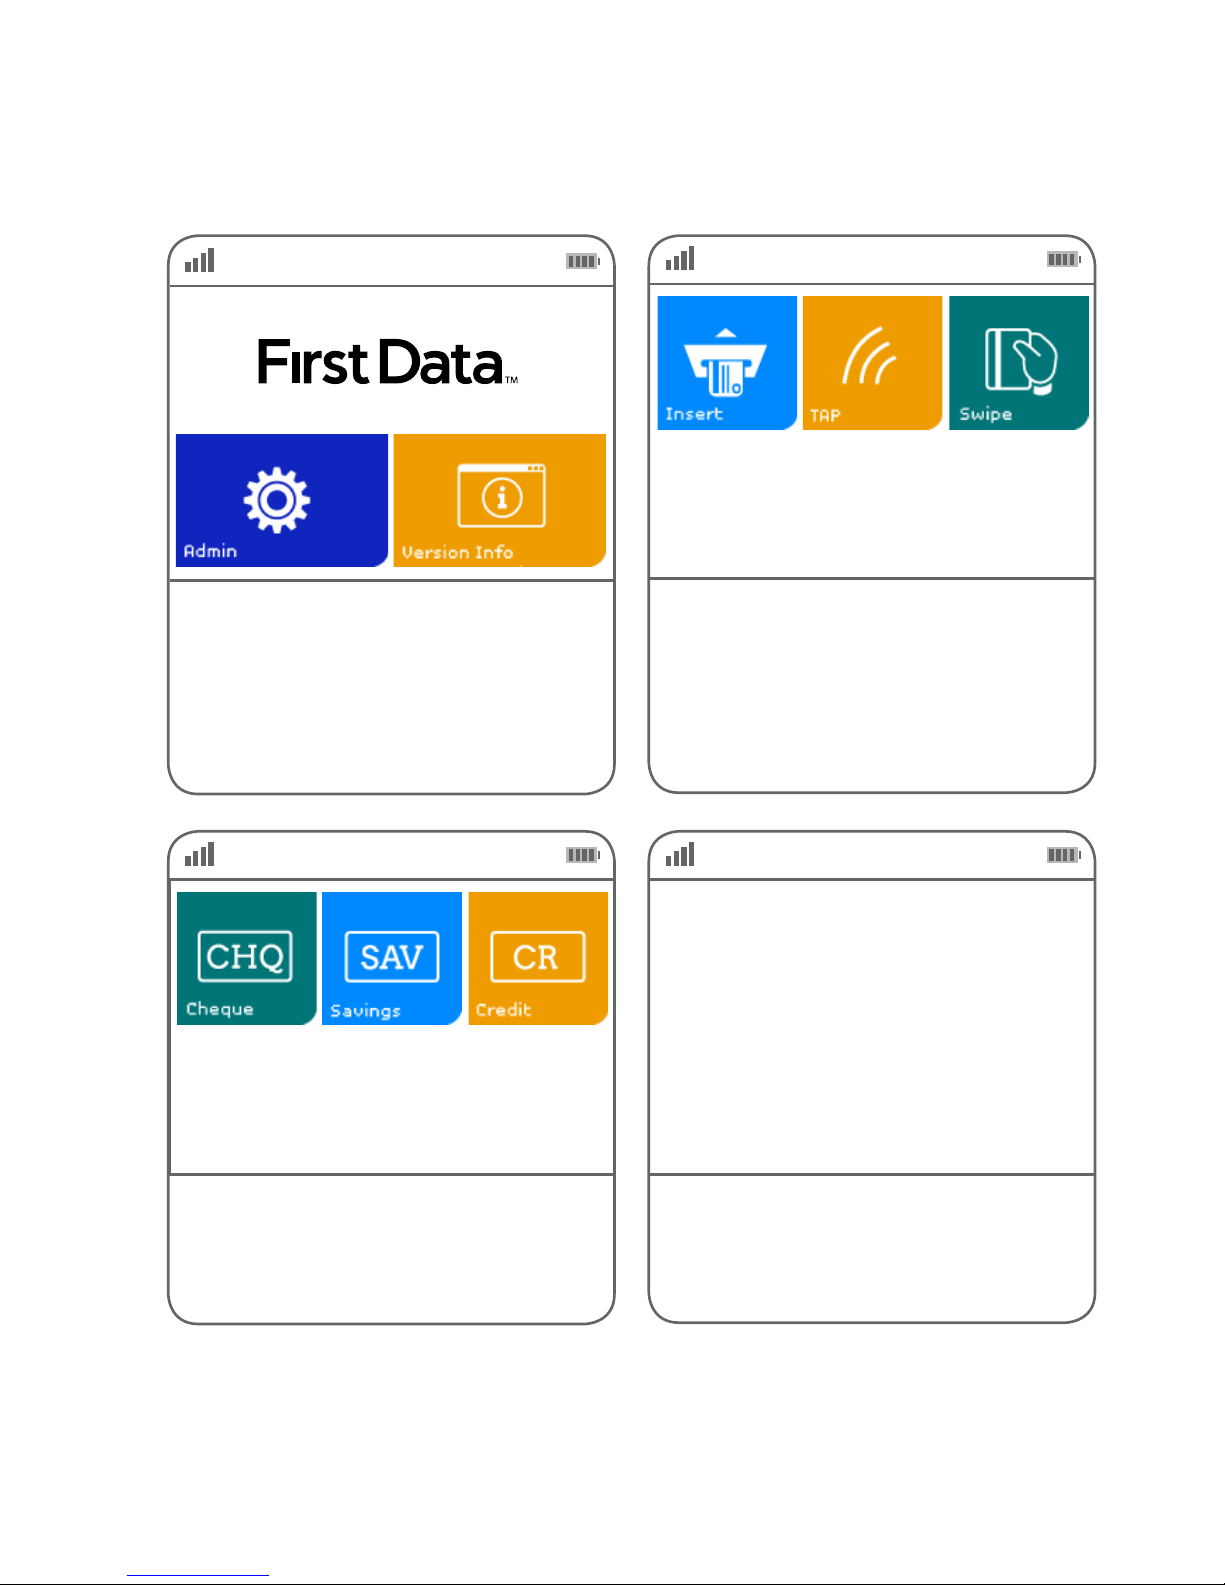
Step 13
If the customer requires a copy of the receipt,
press the green ‘thumbs up’ button.
If the customer does not require a copy of the
receipt, press the red ‘thumbs down’ button.
Customer copy?
Step 14
If the customer used a chip card to process the
transaction, you can now remove the chip card.
Remove card
Page 18
18
Get to know your PIN Pad
Refund transaction
All transaction data (ie: card data, transaction-type,
purchase amount, cash-out amount, account type) is
collected at the POS.
Enter the Refund Amount
At this point the PIN pad will be displaying the
First Data/Admin/Version Info display on the screen.
Select Account on PIN Pad and the PIN Pad will
display Transaction in progress
The PIN pad prompts for the customer PIN to
be entered/ or press
ENTER
.
Customer enters their PIN, and the PIN pad
continues processing the transaction.
Refund: $11.00
Enter PIN
The EFT Transaction is initiated from the POS
Software. The POS will display
‘Please Present Card’
The PIN Pad will ask the cardholder to Insert/
Tap or Swipe
Page 19
19
Get to know your PIN Pad
After the customer enters their PIN, the PIN pad
continues processing the transaction with the
acquirer.
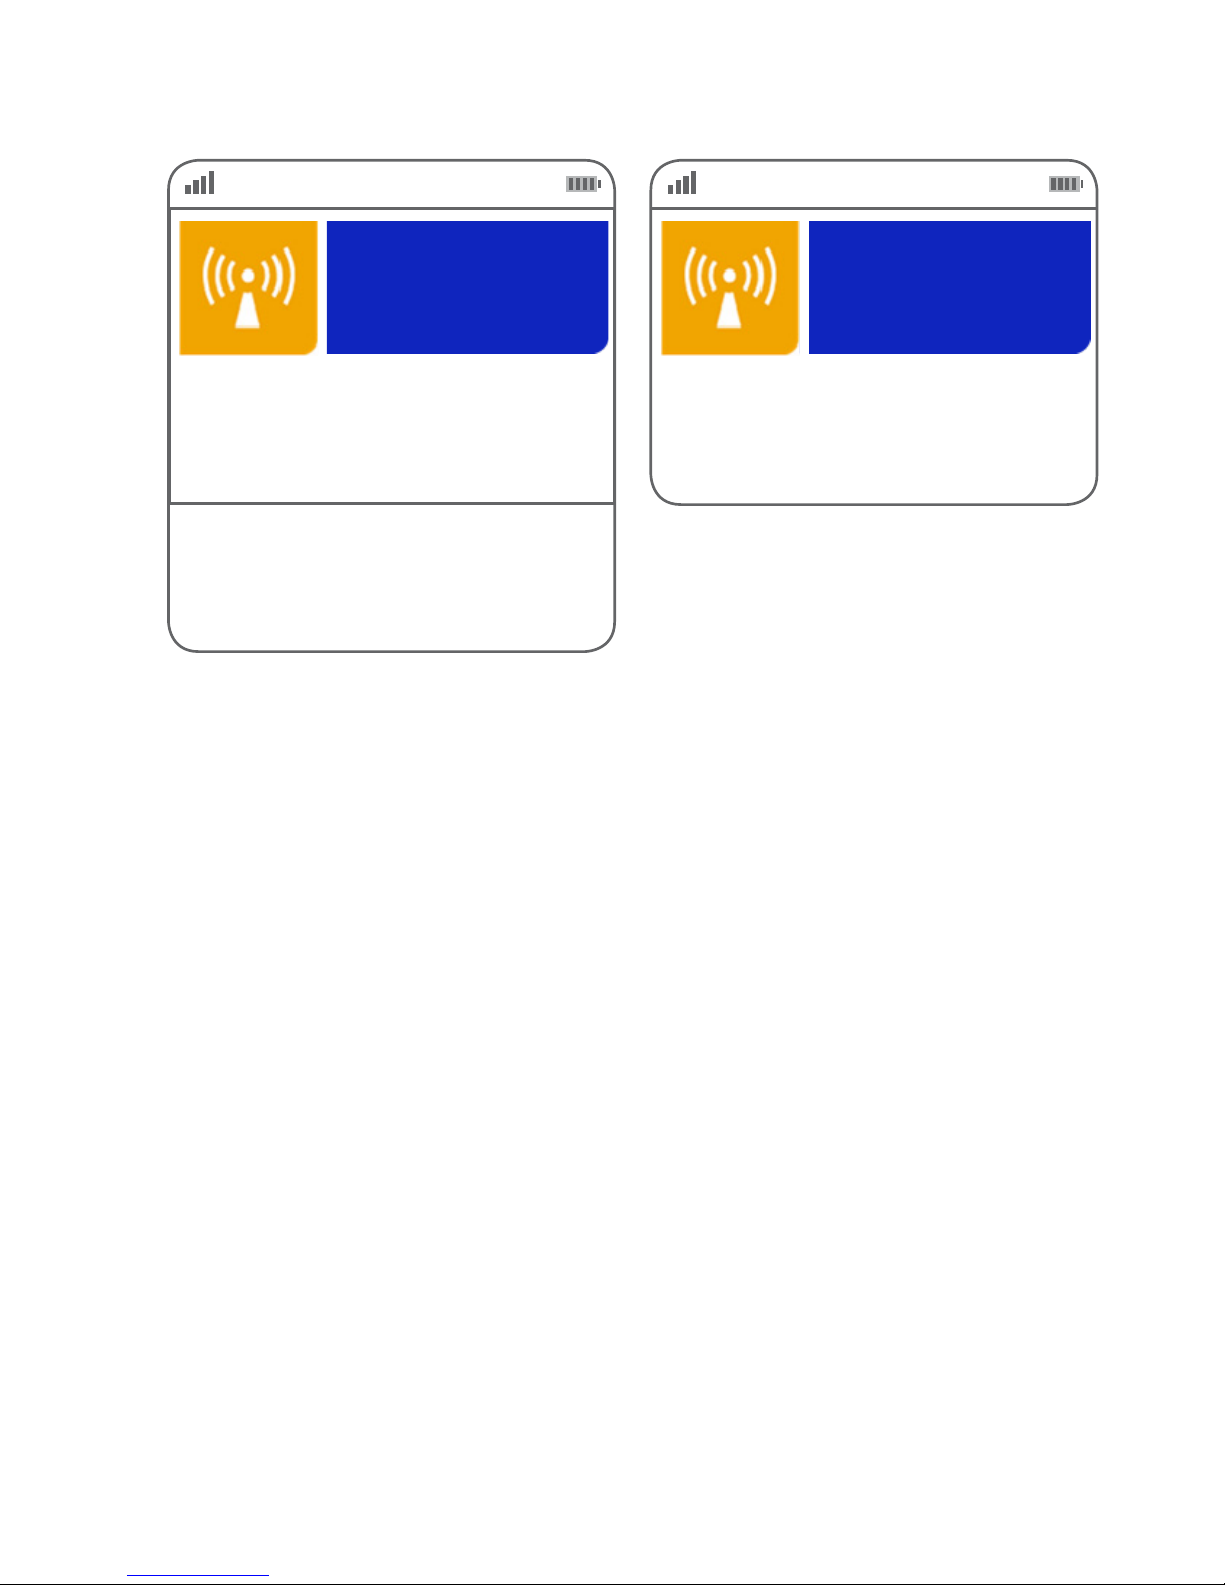
EFTPOS request
processing
Please wait
EFTPOS request
Sending
Please wait
Page 20
20
Get to know your PIN Pad
You can initiate settlement manually any time before 1730 local time. You can also congure your PIN Pad to
automatically settle any time between 0001 and 1800 local time.
If you want to change your settlement terminal cut off time to allow for longer trading hours, please visit the
client support page to download a form and email your request.
If you do not complete settlement using one of these methods, you will be prompted to manually settle when
processing the rst transaction after 1800 local time. You can perform multiple settlements a day at any time,
but the rst settlement of the day (after 0301 and before 1730) will be the only settlement processed that day.
Performing a manual settlement must be initiated from your POS. Please refer to your POS vendor for
instructions.
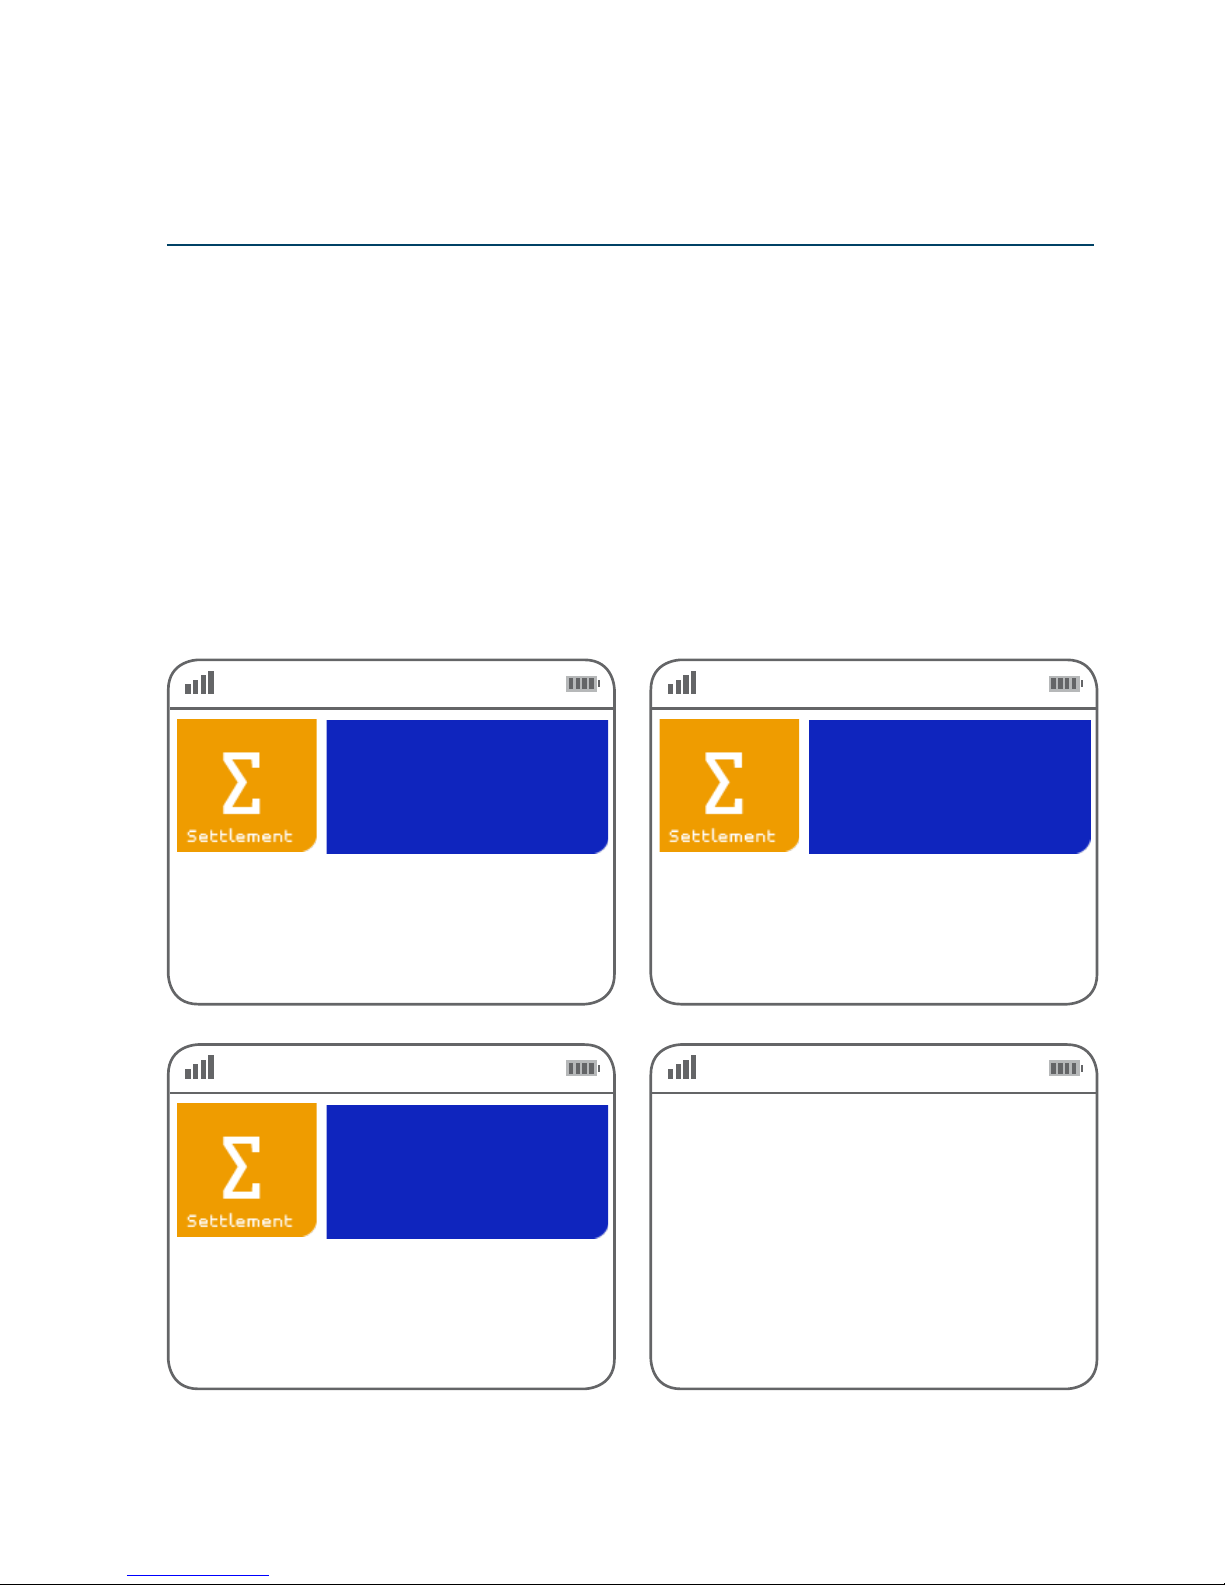
During the settlement process, the PIN Pad screen will display:
FDI sending
FDI settled
FDI processing
Settlement
completed
How to complete a settlement
Page 21
21
Get to know your PIN Pad
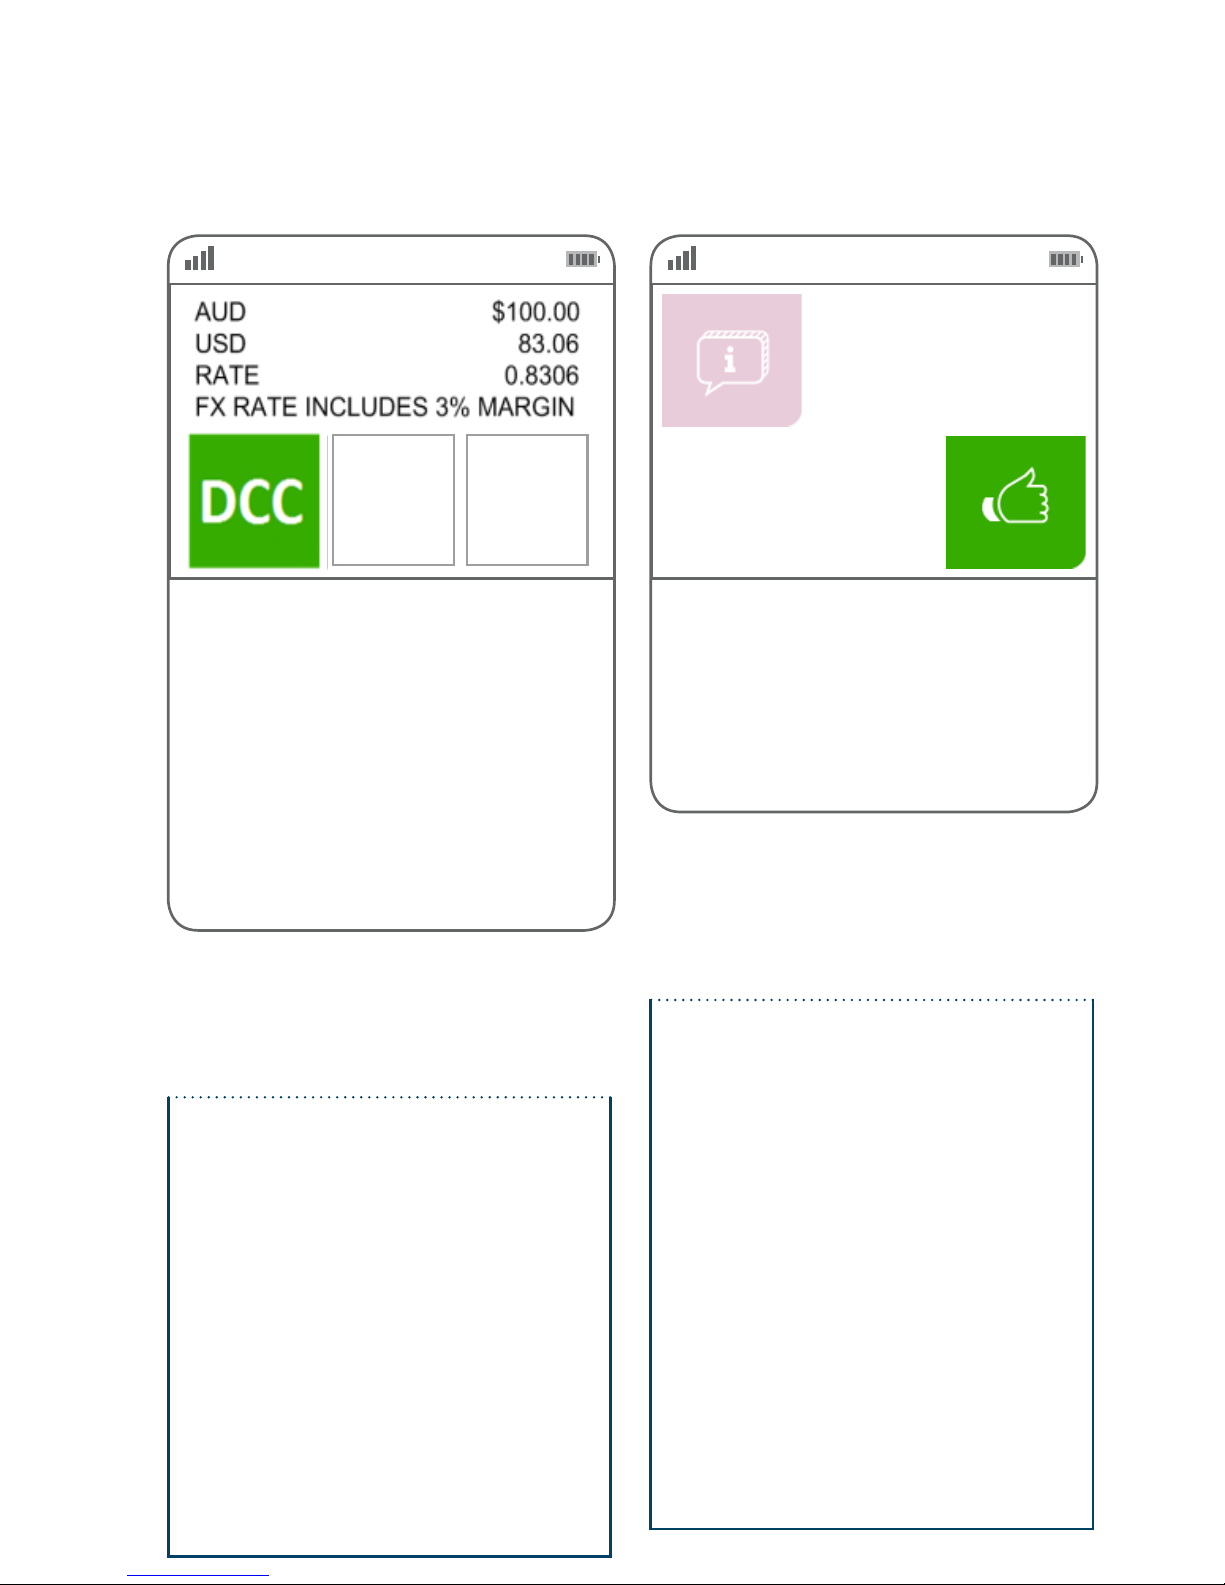
GlobalChoice DCC is offered to your Visa and MasterCard international cardholders when making their
purchase on the First Data EFTPOS terminal. When the card is presented to the terminal, the terminal will
determine whether the card is a candidate to offer DCC and if so, will automatically prompt the merchant
by loading the DCC particulars onto the screen.
A typical DCC transaction ow therefore reects:
> International cardholder presents a Visa or MasterCard for payment
> The EFTPOS terminal determines whether the card presented for payment is an international card.
> If it is, determine whether the card falls into one of the eligible currencies for DCC.
> Obtain an exchange rate.
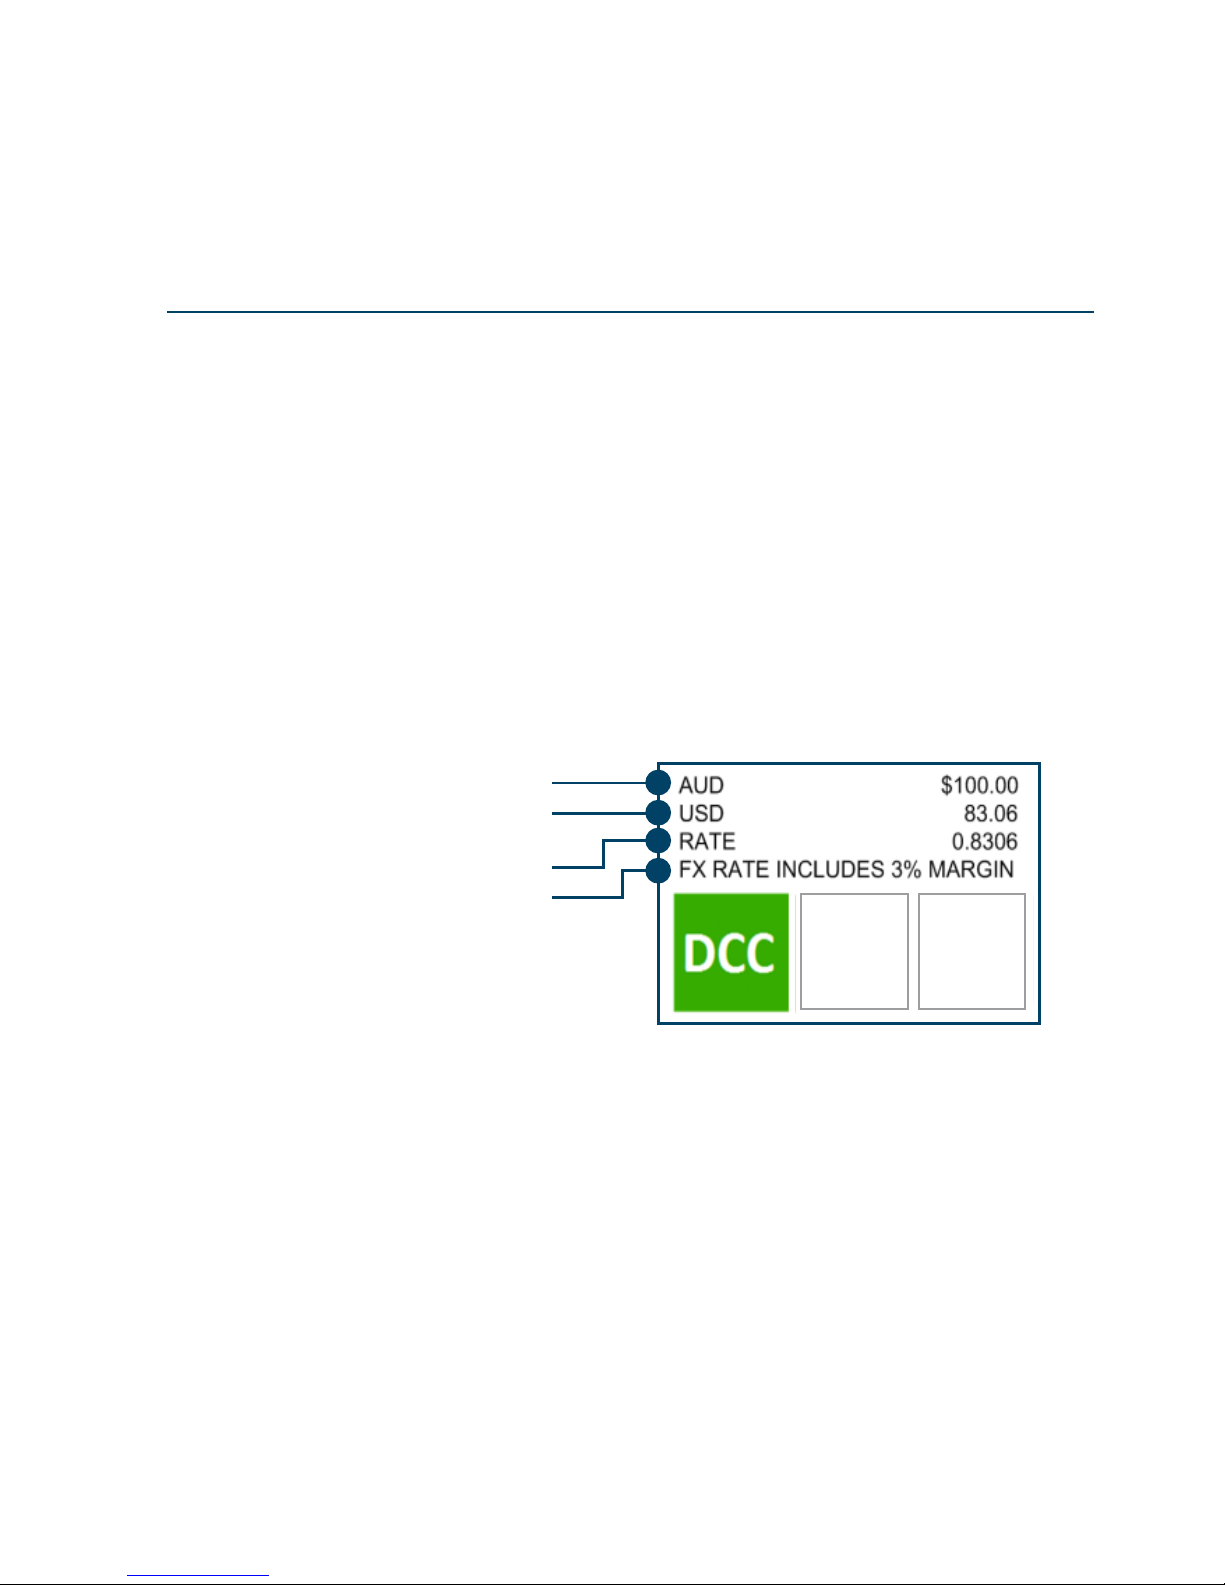
> Display the pertinent details on the EFTPOS screen as per below
Merchant and cardholder receipts will be generated as usual, however, additional information will be
printed on the receipt in accordance with the scheme requirements. It is therefore mandatory to provide
the cardholder their copy of the receipt for a DCC transaction.
GlobalChoice Dynamic
Currency Conversion
YESNO
The AUD amount
The exchange rate
Any fees/margins/commissions
being applied
The equivalent amount in the
cardholder’s home currency
Page 22
22
Get to know your PIN Pad
Mastercard example
YESNO
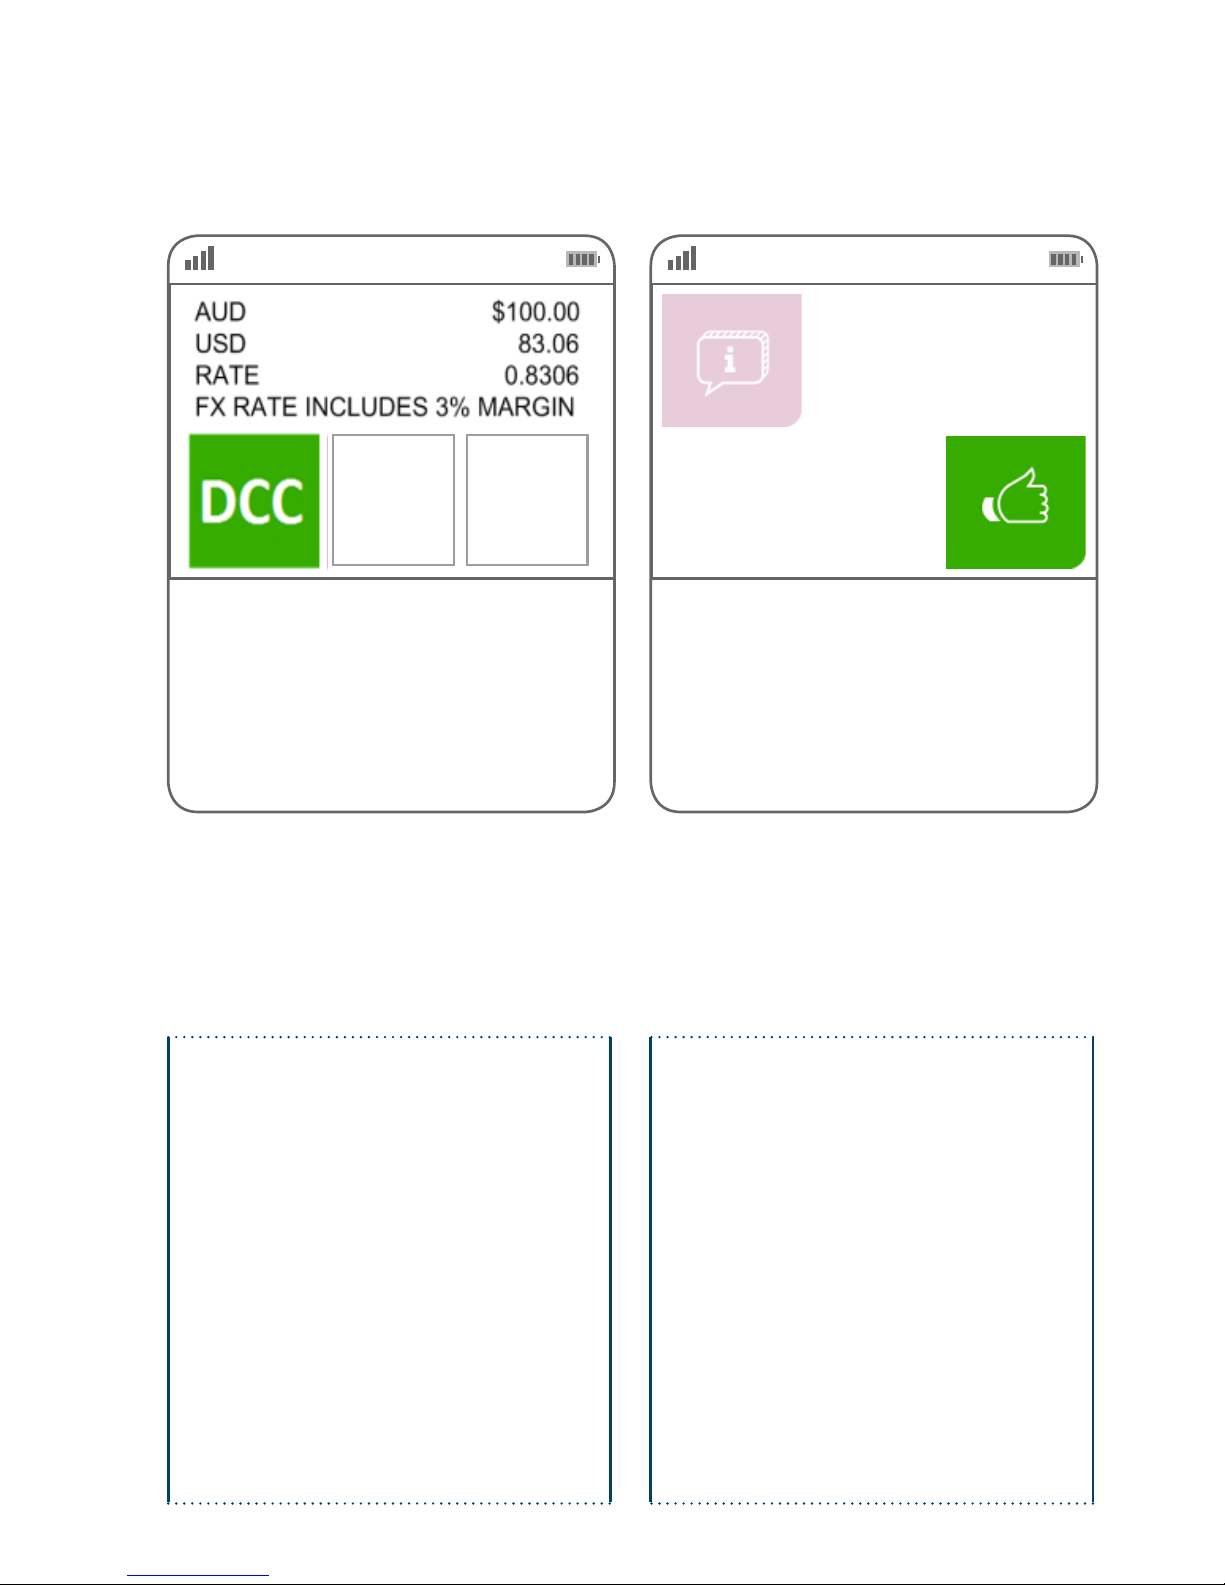
The base amount, the exchange rate and the total
amount which will appear on the card holder’s
statement will be displayed.
At this point, the card holder may accept the rate and
continue with the DCC transaction, or may decline the
rate and process the transaction without DCC.
Merchant Receipt for Mastercard and non VISA
(i.e. default receipt)
DCC rate, DCC currency and DCC Total inserted into
the standard receipt
MASTERCARD
123456...789
**/**
SALE AMOUNT
AUD $100.00
EXCHANGE RATE USD/AUD
0.8306
TRANSACTION CURRENCY
USD
AMOUNT
USD $83.06
AUTH-ID
123456
RRN
654321123456
...
...
...
...
...
...
Customer Receipt for Mastercard and non VISA
(i.e. default receipt)
Note: printing of this receipt is mandatory; the
customer/merchant will not be prompted as to
whether they require a copy.
MASTERCARD
**** **** **** 1234
**/**
SALE AMOUNT
AUD $100.00
EXCHANGE RATE USD/AUD
0.8306
TRANSACTION CURRENCY
USD
AMOUNT
USD $83.06
AUTH-ID
123456
RRN
654321123456
...
...
...
...
...
...
This screen will be displayed whenever a DCC
customer receipt is available.
Customer receipts are mandatory for DCC
transactions so there is no option to cancel printing.
If no action is taken, an operator timeout will be
triggered and the Customer Receipt will be printed.
DCC Transaction
Print Customer
Receipt
Page 23
23
Get to know your PIN Pad
VISA example
YESNO
The base amount, the exchange rate and the total
amount which will appear on the card holder’s
statement will be displayed.
In addition, for VISA only, there is the addition of a
FEES entry. This is the foreign exchange markup
percentage (e.g. 3%) incorporated in the quoted
exchange rate.
At this point, the card holder may accept the rate and
continue with the DCC transaction, or may decline the
rate and process the transaction without DCC.
This screen will be displayed whenever a DCC
customer receipt is available.
Customer receipts are mandatory for DCC
transactions so there is no option to cancel printing.
If no action is taken, an operator timeout will be
triggered and the Customer Receipt will be printed.
DCC Transaction
Print Customer
Receipt
Merchant Receipt for VISA
The DCC exchange rate, the foreign exchange
markup percentage, the transaction currency and
the DCC Total are inserted into the standard receipt.
MASTERCARD
123456...789
**/**
SALE AMOUNT
AUD $100.00
EXCHANGE RATE USD/AUD
0.8306
% MARGIN INCLUDED
3
TRANSACTION CURRENCY
USD
AMOUNT
USD $83.06
AUTH-ID
123456
RRN
654321123456
The service to pay in your own currency is
offered by First Data
This transaction is based on Reuters Wholesale
Interbank exchange rate.
...
...
VISA
**** **** **** 1234
**/**
SALE AMOUNT
AUD $100.00
EXCHANGE RATE USD/AUD
0.8306
% MARGIN INCLUDED
3
TRANSACTION CURRENCY
USD
AMOUNT
USD $83.06
AUTH-ID
123456
RRN
654321123456
I have been offered a choice of currencies
including AUD and agreed to pay in (USD).
The service to pay in your own currency is
offered by First Data
This transaction is based on Reuters Wholesale
Interbank exchange rate.
...
...
Customer Receipt for VISA (i.e. default receipt)
Note: printing of this receipt is mandatory; the
customer/merchant will not be prompted as to
whether they require a copy.
Page 24
24
Get to know your PIN Pad
ACe Acceptance
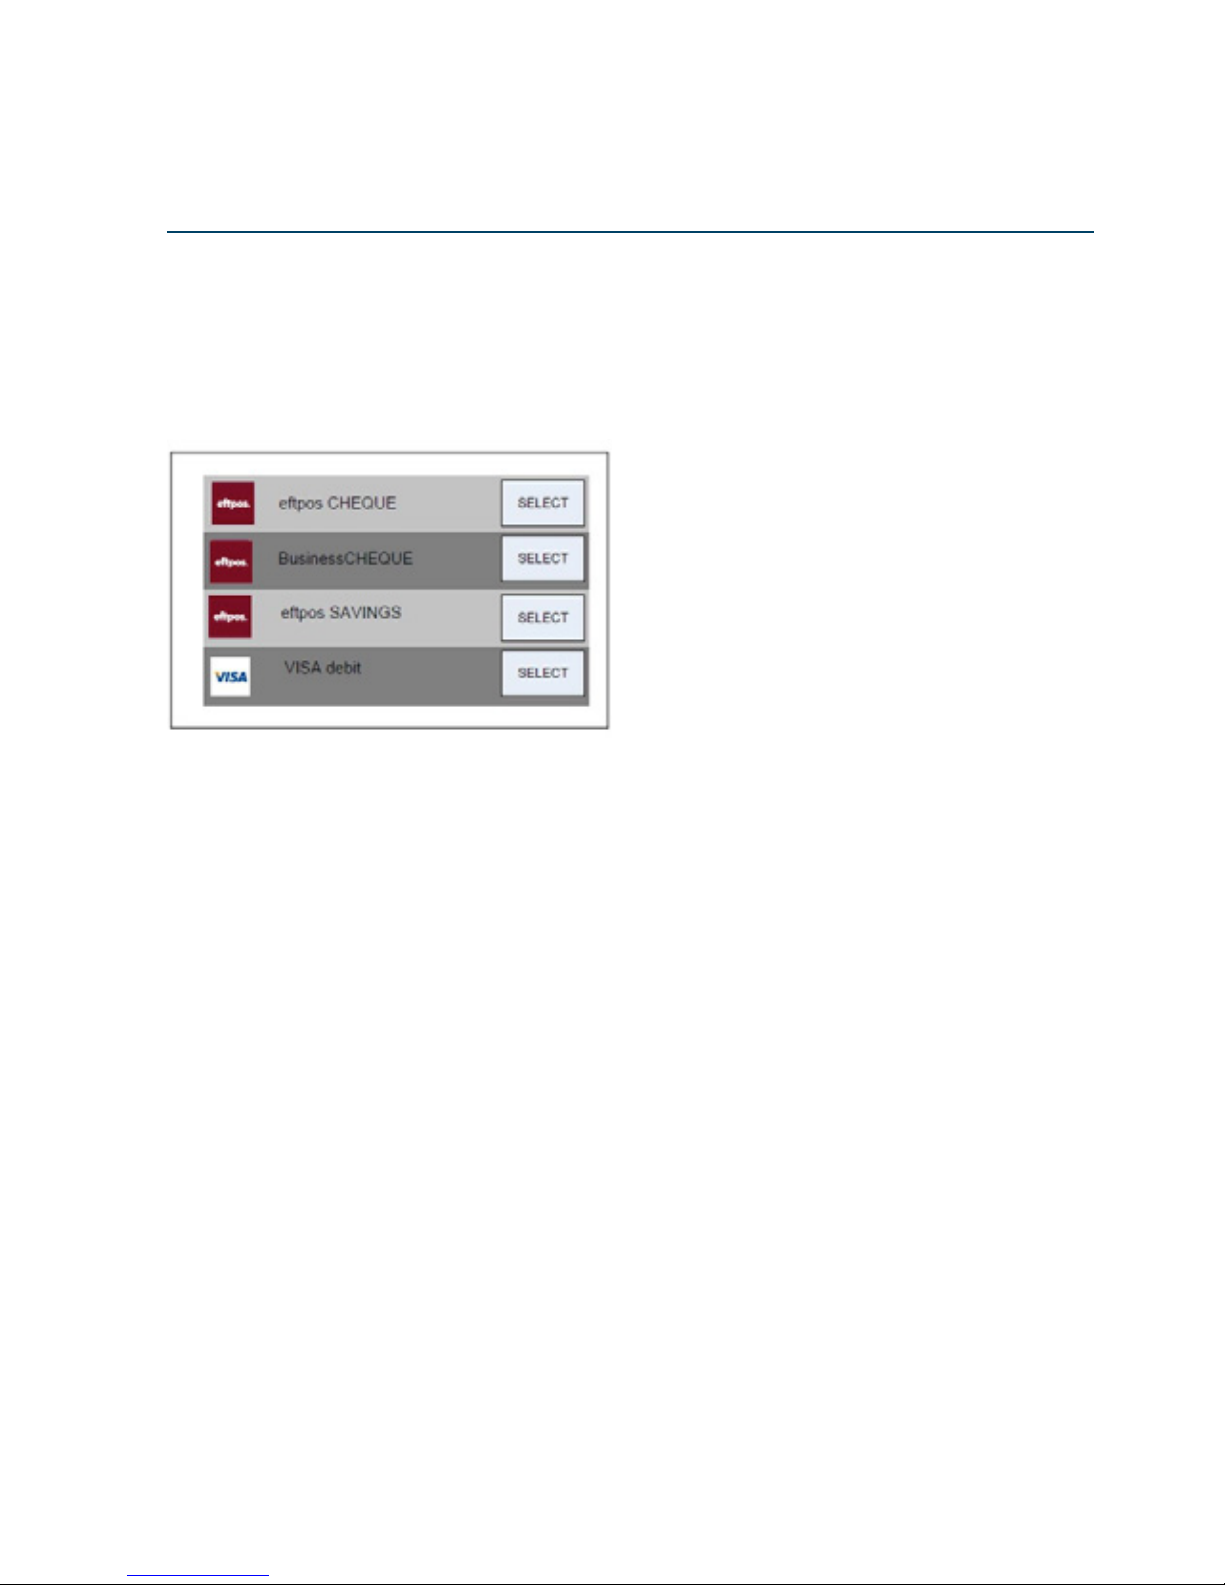
Your terminal supports the eftpos Australia ACe chip for both contact and contactless transactions which
provides consumers with more payment choices and improves security. When an eftpos Australia ACe
chip is presented at the terminal, the available application names for that cardholder’s card will be shown
instead of the cheque, savings and credit options. This allows the cardholder to choose the account
themselves similar to the example screen below.
Note: Application names and order can vary depending on the card.
Page 25
25
Get to know your PIN Pad
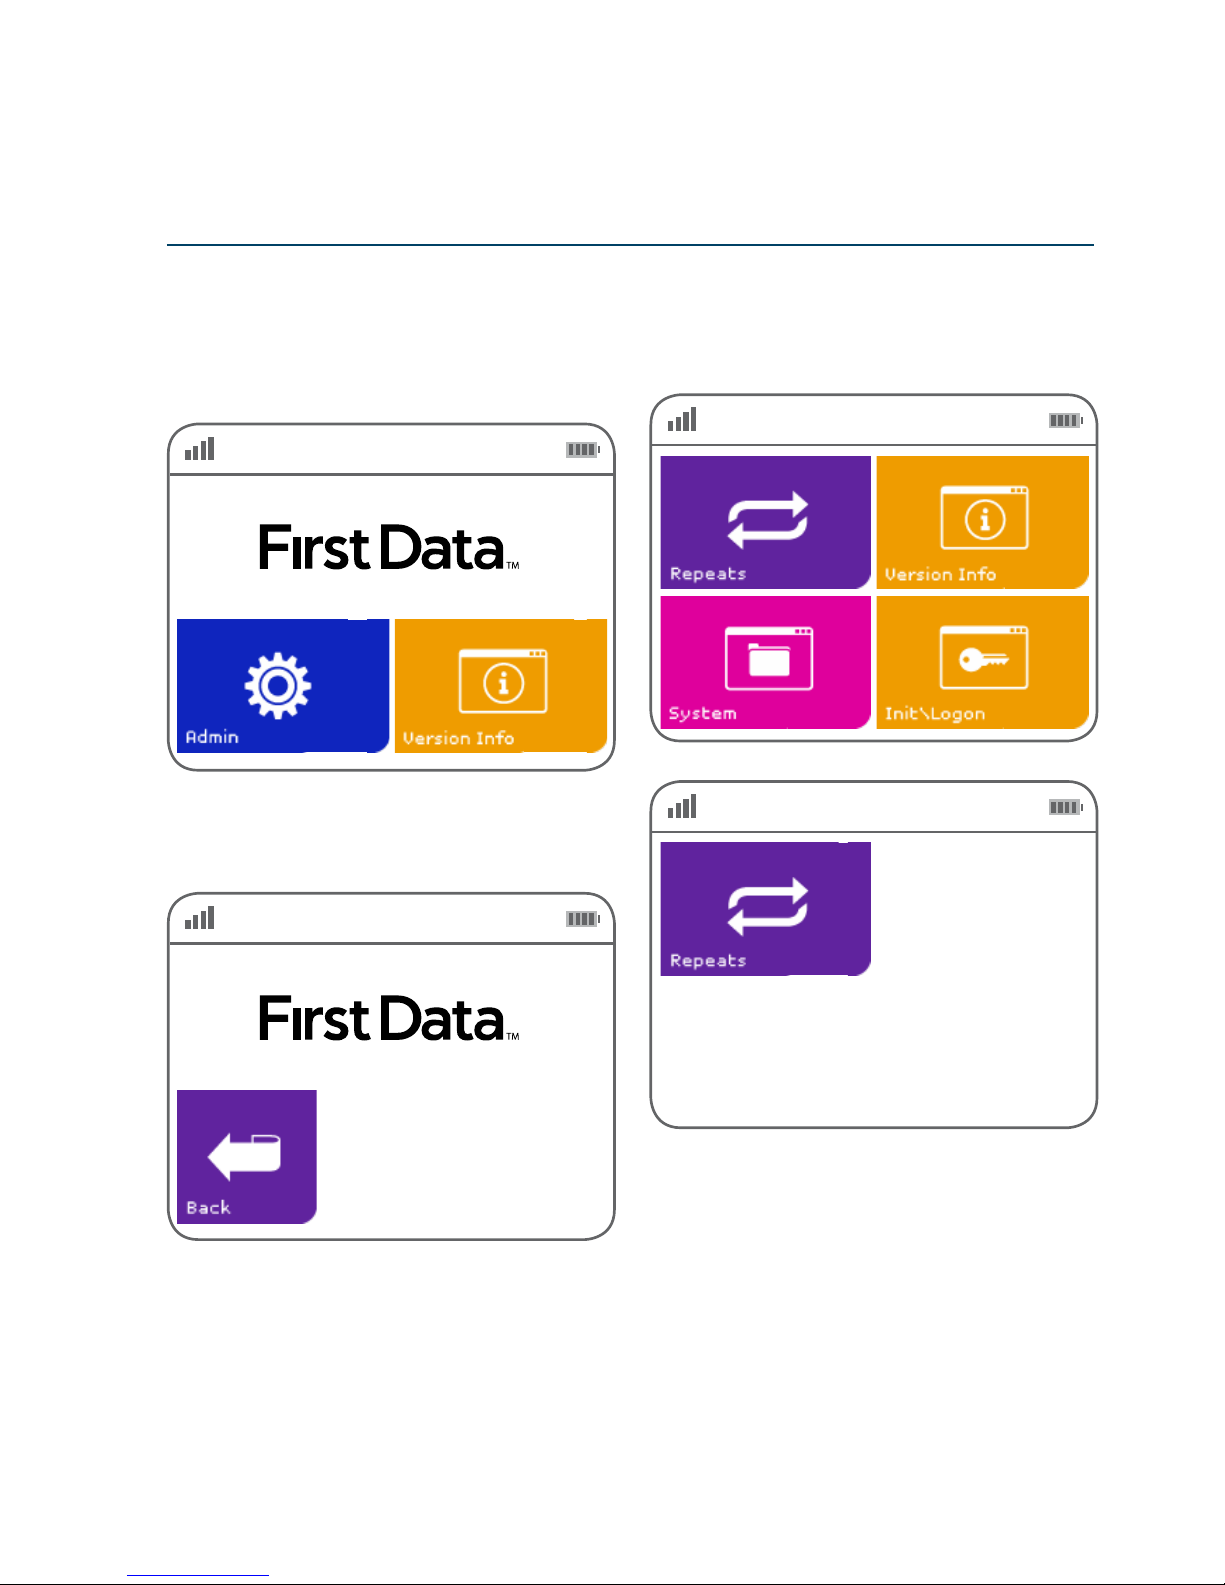
Certain administration functions can be instigated
from the PIN Pad. These administration functions are
performed by selecting the ‘Admin’ button on the
idle screen
Having selected the ‘Admin’ button, you will be
requested to enter password
Having entered the correct password, you will be
offered the following options.
Note: An incorrect password will clear for retry.
Repeats will process outstanding actions such as
check for outstanding reversals.
Note: If there are no repeats to process there is no
prompt or noticeable response from the PIN Pad.
Password
Admin functions
Page 26
26
Get to know your PIN Pad
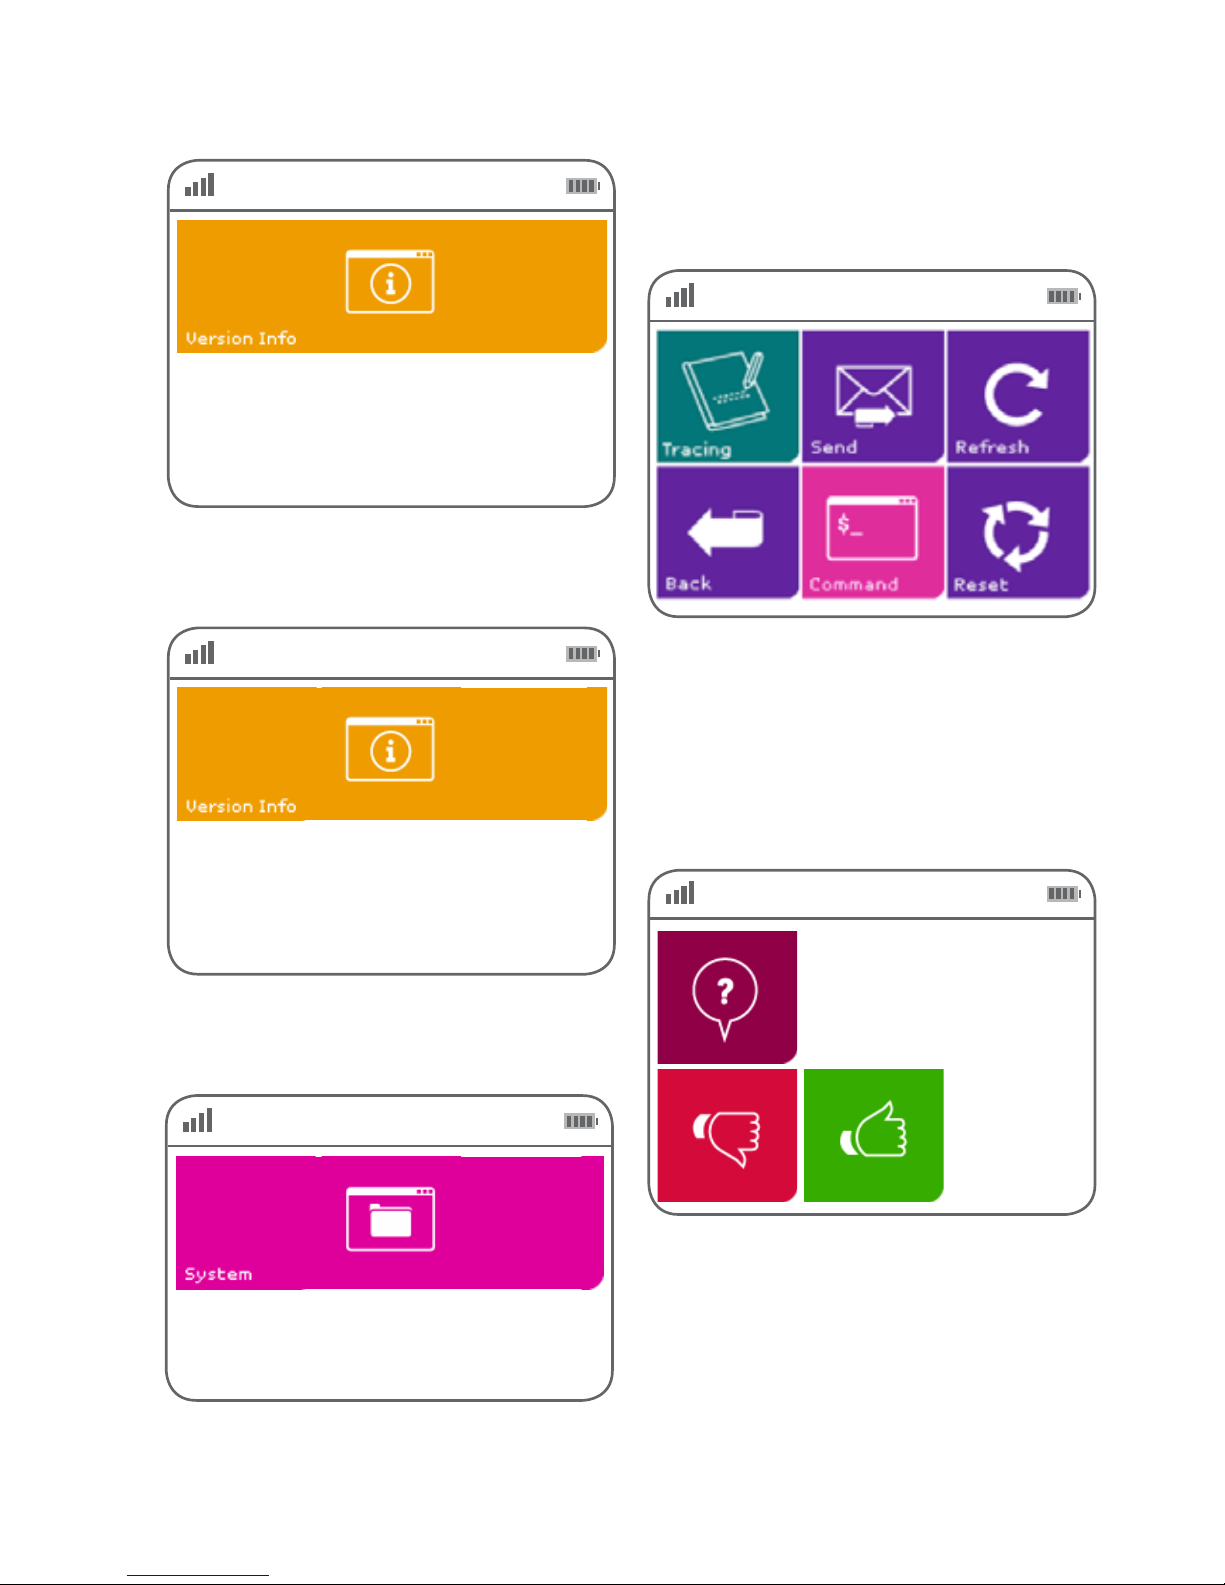
Version Info will display the current Version of PIN
Pad software being run.
This will perform a logon of the PIN Pad connecting
it to First Data.
The System button will allow the user to navigate to
a series of lower level functions. After pressing the
System button, the selection reects.
Tracing is a means to send log les to First Data for
analysis. This function is usually undertaken when
troubleshooting is required.
Tracing should only be turned on when requested to
do so by First Data. When turned on a conrmation
screen will be displayed as follows:
Conrm Operat
TraceOn
Page 27
27
Get to know your PIN Pad
Send is a means to turn tracing off and send the
resulting log les back to First Data for analysis. This
function is usually undertaken when troubleshooting
is required.
Tracing should only be turned on when requested to
do so by First Data. When turned on a conrmation
screen will be displayed as follows:
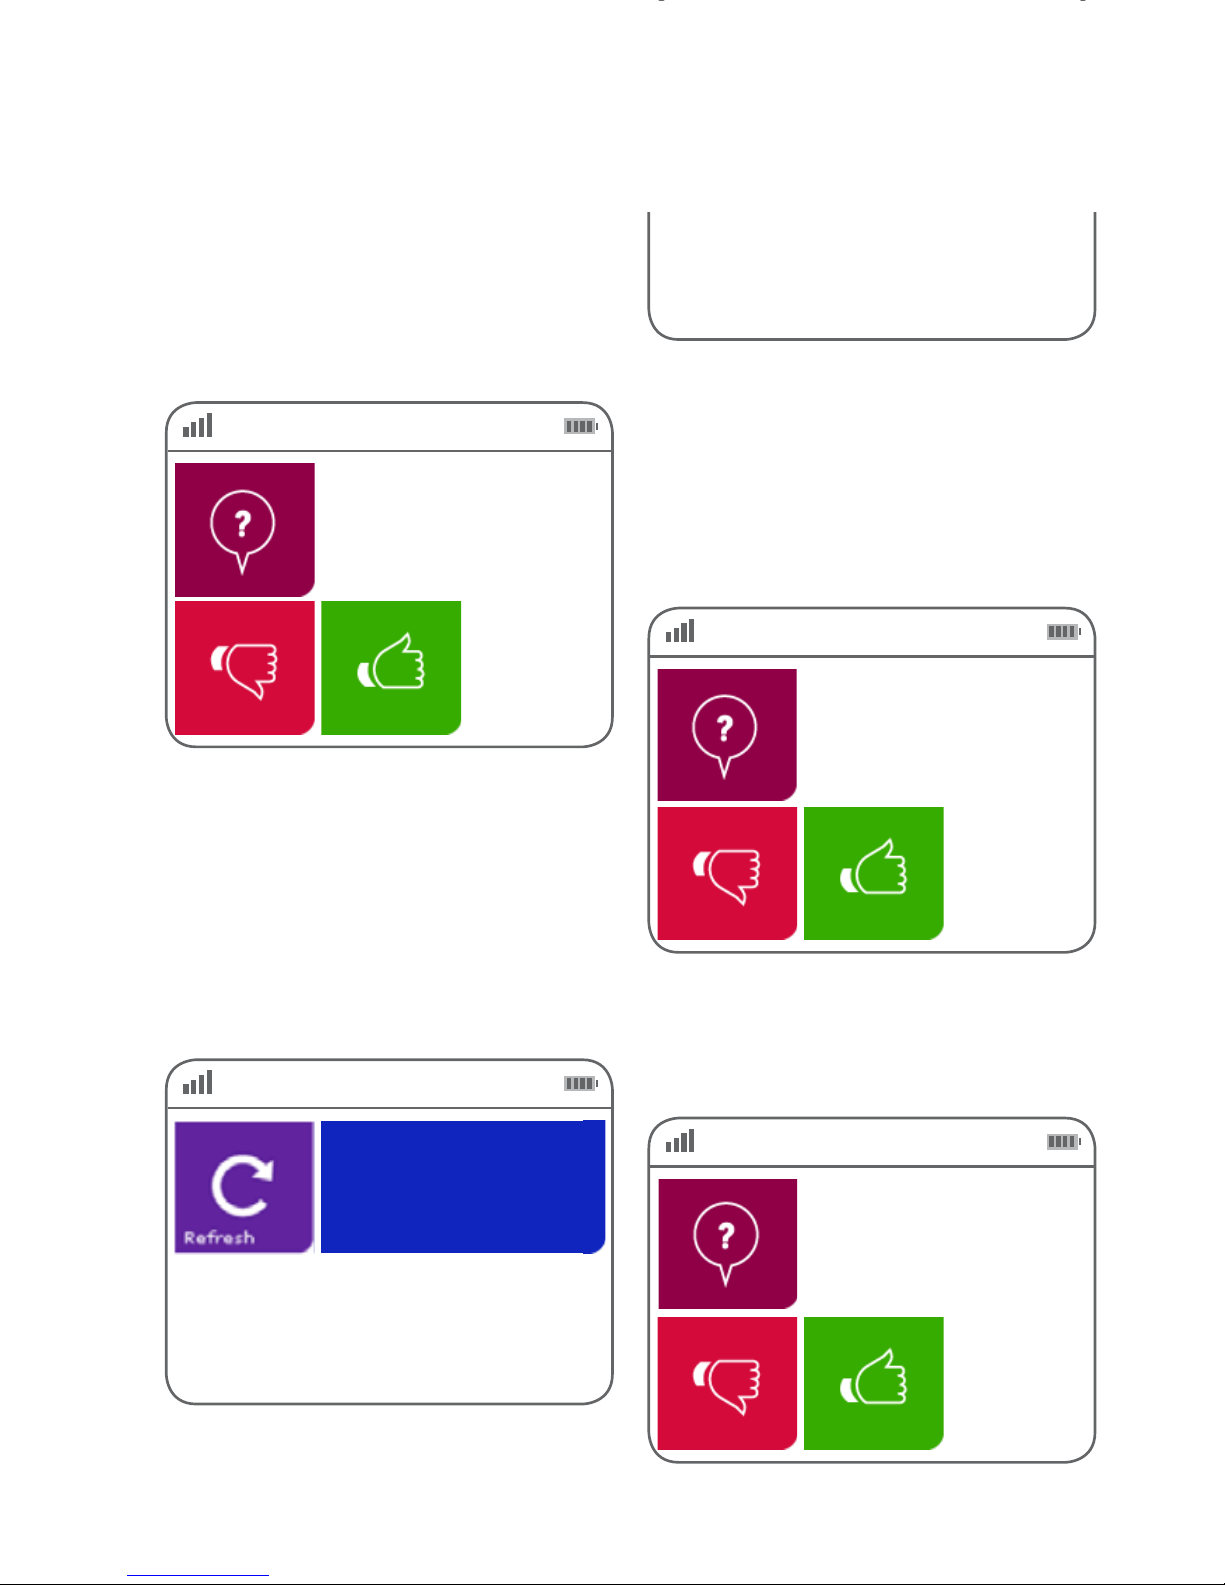
Refresh is a means to download any updates to the
PIN Pad software.
A refresh should only be performed when instructed
to do so by First Data.
Note: during the refresh process the PIN Pad will
reboot, re-connect to the POS and logon.
The PIN Pad will display:
Conrm Operat
TraceOff
Refreshing...
Please wait
Command is a means to download any commands
to the PIN Pad software.
A command should only be performed when
instructed to do so by First Data.
When selected, a conrmation screen will be
displayed as follows:
Reset will complete a full reset of the PIN Pad.
A Reset should only be performed when instructed
to do so by First Data.
Conrm Operat
Requests
Conrm Operat
Reset
Rebooting...
Please wait
Then:
Page 28

28 Operating your EFTPOS terminal
Where to get help
First Data client support
Visit the client support page at rstdata.com.au
The site is equipped to keep you up to date with tips and
articles, forms and guides, security and fraud prevention
information and so much more.
Or call
Service and support 1800 243 444
Fraud and risk support 1800 372 838
Keep your merchant ID number handy when you call,
this can help speed up your enquiry.
Page 29

©2017 First Data Corporation. All Rights Reserved. All trademarks, service marks
and trade names used in this material are the property of their respective owners.
 Loading...