


Installation / Users Guide
Part Number 104061-04
REVISION C

PREFACE
ected by copyright. No pan of this publication may be reproduced, transcribed,
stored in a retrieval system, translated into any language or computer language, or
transmitted in any form whatsoever without prior written consent of FIRST CLASS
PERIPHERALS. For information contact:
FIRST CLASS PERIPHERALS
3579 HIGHWAY 50 EAST
CARSON CITY, NEVADA 89701
702-883-2500
702-883-8200
24 hour bulletin board 702-883-9264
(set modem to 8-n-I t bauds supported 2400,1200,300))
COMPUSERVE APPLE VENDORS FORUM
(When in COMPUSERVE enter ‘GO APP VEND’
and you will find us under sub-topic 6)
The following manual contains instructions for installing the FIRST CLASS
PERIPHERALS SIDER Sider D4 bard drive subsystems on the APPLE lle and
APPLE IIGS. The instructions in the manual assume you have a working knowledge
of the APPLE system.
COPYRIGHT INFORMATION
© Copyright 1988 By FIRST CLASS PERIPHERALS
All rights reserved. This publication contains proprietary information that is pro-

TRADEMARK INFORMATION
Sider, Sider D2, Sider D4, Sider D4A, Sider D4T, Sider C46, SiderFile, Siderware,
SiderPartitioner, FastTape are Copyrights of FIRST CLASS PERIPHERALS, INC.
Apple, Apple lle, Apple IIGS, are all trademarks and Copyrights of Apple Computer
Inc.
ProSel, Copyright 1988 of Glen Bredon. 521 State Road, Princeton, NJ. 08540

Table of Contents
1. HARDWARE INSTALLATION.....................................I
1.1 INVENTORY CHECK LIST......................................2
1.2 INSTALLATION PROCEDURE..................................3
1.3 HARDWARE INSTRUCTIONS SUMMARY.....................9
2. SOFTWARE OVERVIEW..........................................11
2.1 STARTING UP THE SIDER....................................12
2.2 RUNNING THE SIDER FOR THE FIRST TIME...............13
2.3 SOFTWARE INSTALLATION..................................16
2.4 DISKETTE INFORMATION....................................16
2.5 INSTALLATION PROCEDURE.................................17
2.6 SOFTWARE INSTALLATION SUMMARY....................24
2.7 PARKING THE HEADS.........................................25
2.8 GS/OS INSTALLATION........................................25
2.9 ProDOS 16 INSTALLATION...................................26
2.10 ProDOS 1.1.1 INSTALLATION..............................28
3. THE SiderFile UTILITY.............................................31
3.1 COMMANDS AVAILABLE.....................................32
3.2 SIDERFILE FUNCTIONS.......................................34
3.2.1 X - Catalog..................................................34
3.2.2 C . Copy Files..............................................35
3.2.3 T-TypeFiles................................................38
3.2.4 L-LockFlles................................................39
3.2.5 U-Unlock Files............................................40
3.2.6 D - Delete Files.............................................41
I

3.2.7 R - Rename A Fuel Volume...........................42
3.2.8 E
3.2.9 V
3.2.10 S
3.2.11 C
3.2.12
3.2.13 N
- Exhume Files......................................43
- Verify Files ......................................44
- Sort Directory....................................45
- Change File Date................................46
/ - Create Directory..................................47
- Show Volume Names............................48
3.2.14B-ToggleBeIl........................................48
3.2.15 P
3.2.16 M
3.2.17 F
3.2.18 W
3.2.19 C
3.2.20 D
- Toggle Prompting...............................48
- Move Files.......................................49
- Format A Disk....................................50
- Wipe A Volume..................................51
- Compare Directories.............................51
- Disable Unused Devices.........................51
4. AN OVERVIEW OF SiderFile’s ProSel.............................53
4.1 INSTALLING THE SiderFile PACKAGE.......................54
4.2 USING SiderFile’s MENU SYSTEM...........................57
4.3 THE BUILT IN EDITOR.........................................58
4.3.1 Available Functions~.................................58
4.3.2 How To Use Each Function...........................58
4.4 ADDITIONAL CAPABILITIES..................................64
4.4.1 Displaying Files
I Volumes..........................64
4.4.2 Screen Saver Function................................64
4.4.3 Using ProSel On Multiple Volumes.................64
4.5 PROSEL ON THE APPLE IIGS.................................65
II

5. AUXILIARY PROGRAMS.........................................67
5.1 BACKUP...................................................67
5.1.1 Backing Up To A /RAM Drive......................69
5.1.2 Backing Up To Slot 5 or 2.........................70
5.2 BEACH COMBER.........................................71
5.3 BLOCK WARDEN.........................................75
5.3.1 Read I Write Mode...................................76
5.3.2 EdIt Mode.............................................78
5.4 BOOT.S6 I BOOT.S7......................................80
5.5 CACHE / CACHE.XL......................................80
5.6 CLOCK.DRV PROGRAM.................................82
5.7 COPY/ COPY.GS..........................................82
5.8 FTND.FILE.................................................85
5.9 INFO.DESK................................................86
5.10 MAKE.PPSYS............................................88
5.11 MR.FIXIT................................................89
5.12 PARK.HEADS............................................93
5.13 PASSWORD PROTECTION..............................93
5.14 PIN.PATCHER...........................................95
5.15 PRINT.NAMES...........................................95
5.16 PROSEL.CYCLER.......................................95
5.17 PROSEL.ED..............................................97
5.18 SELECT.SYSTEM........................................98
5.19 RAM.DRV................................................99
5.20 RAMDRV.HEADER....................................100
5.21 RESTORE.FAKE........................................101
III

5.22 RECOVER............................................ ....102
5.23 RESTORE..............................................103
5.24 SCAVENGE ............................................105
6. SiderFile’s ProSel APPENDIX 107
6.1 RUNNING FROM A RAM VOLUME...................107
6.2 AUTOMATIC BOOTING OF A RAM VOLUME........110
6.3 AUTOMATIC BACKUP OF A RAM VOLUME.........111
6.4 CHANGING STARTUP NAMES........................112
6.5 HOW TO GET RID OF PROBLEM FILES..............113
7. SPECIFICATIONS.................................................115
7.1 TECHNICAL INFORMATION ......................... 115
7.1.1 Sider Specifications............................115
8. HARDWARE APPENDIX .......................................117
8.1.1 Important Information.........................119
8.1 HOST ADAPTER CONFIGURATION................... 117
9. FCC AND WARRANTY......................................... 121
9.1 FCC COMPLIANCE.................................... 121
9.2 LIMITED WARRANTY POLICY....................... 122
10. GLOSSARY OF TERMS...................................... 125
Iv

1. HARDWARE INSTALLATION
The hardware section of this manual is written to guide you
through a successful first time installation of the Sider D4 subsystem on your Apple IIe or Apple IIGS. Most instructions are
identical for both the IIe or IIGS. Where there are differences,
there will be special sections detailing proper procedures.
To install your new subsystem, you’ll find the following helpful:
A quarter-inch, HEX nut driver.
A pair of needle nose pliers.
Your Apple Corporation, OWNER’S GUIDE manual.
HARDWARE INSTALLATION 1

1.1 INVENTORY CHECK LIST
First Class Peripherals makes every effort to make the installation process as simple as possible. Having the complete package is a big part of that goal. Please inspect the materials in the
Sider’s shipping carton to assure you have received all the required items.
1- Sider D4 subsystem. 1- Power cord.
1- Host adapter interface card. 1-Owner’s manuals
1- FIat ribbon cable. 1- Terminator.
1- Dual 25 pin data cable. 2 Program diskettes.
2- Hex nut screws 1- 3-1/2 inch
1- 5-1/4 inch
2 INVENTORY CHECK LIST
FIG. 1-1 INVENTORY LIST

1.2 INSTALLATION PROCEDURE
Before proceeding, make sure you have turned your computer’s
power off as well as the power to your other peripherals. Follow
each step in order.
1. Locate the SIDER ‘s host adapter and inspect it for proper
configuration as shown below. The host adapter jumpers
Wi and W2 should be in an open position or removed. To
set in an open position, each plastic jumper should connect
with only one of the two pins. WI and W2 should never be
in the closed position or connecting both pins if the Sider
has a warning label on the rear panel. For use with other
models of the Sider host adapter see the HARDWARE APPENDIX.
HARDWARE INSTALLATION 3
FIG. 1-2 HOST ADAPTER SETTINGS
2. With the host adapter properly configured, locate the Sider’s
flat ribbon cable which has a 50 pin connector on one end
and a 25 pin D-SUB connecter on the other. (This cable is
normally rainbow colored).

3. Connect the 50 pin side of the ribbon cable to the front of the host adapter
as shown in FIG. 1-3.
FIG. 1-3 CONNECTING THE RIBBON CABLE
4 INSTALLATION PROCEDURE

4. Pop-out one of the pass-through port covers on the rear of the
Apple. Connect the end of the ribbon cable with the 25 pin
D-SUB female connector to the rear plate of the Apple. We
suggest using a hex nut driver to attach the 25 pin con- nect
with the hex nuts provided as shown in the figure below.
FIG. 1-4 ATTACHING THJE 25 PIN CONNECTOR
5. To install the host adapter, identify slot 7. (The farthest
standard slot from the power supply.) We recommend this
slot because it is not normally used for other expansion cards
such as modems, printers, floppies etc. Using slot 7 will
make the Sider the boot device on the lle. On the 1105, using
slot 7 will make it the boot device if the CONTROL PANEL
is set to SCAN. You should NEVER use slot 3 on either
machine. It is designed for video cards.
FIG. 1-5 INSTALLING THE HOST ADAPTER
HARDWARE INSTALLATION 5
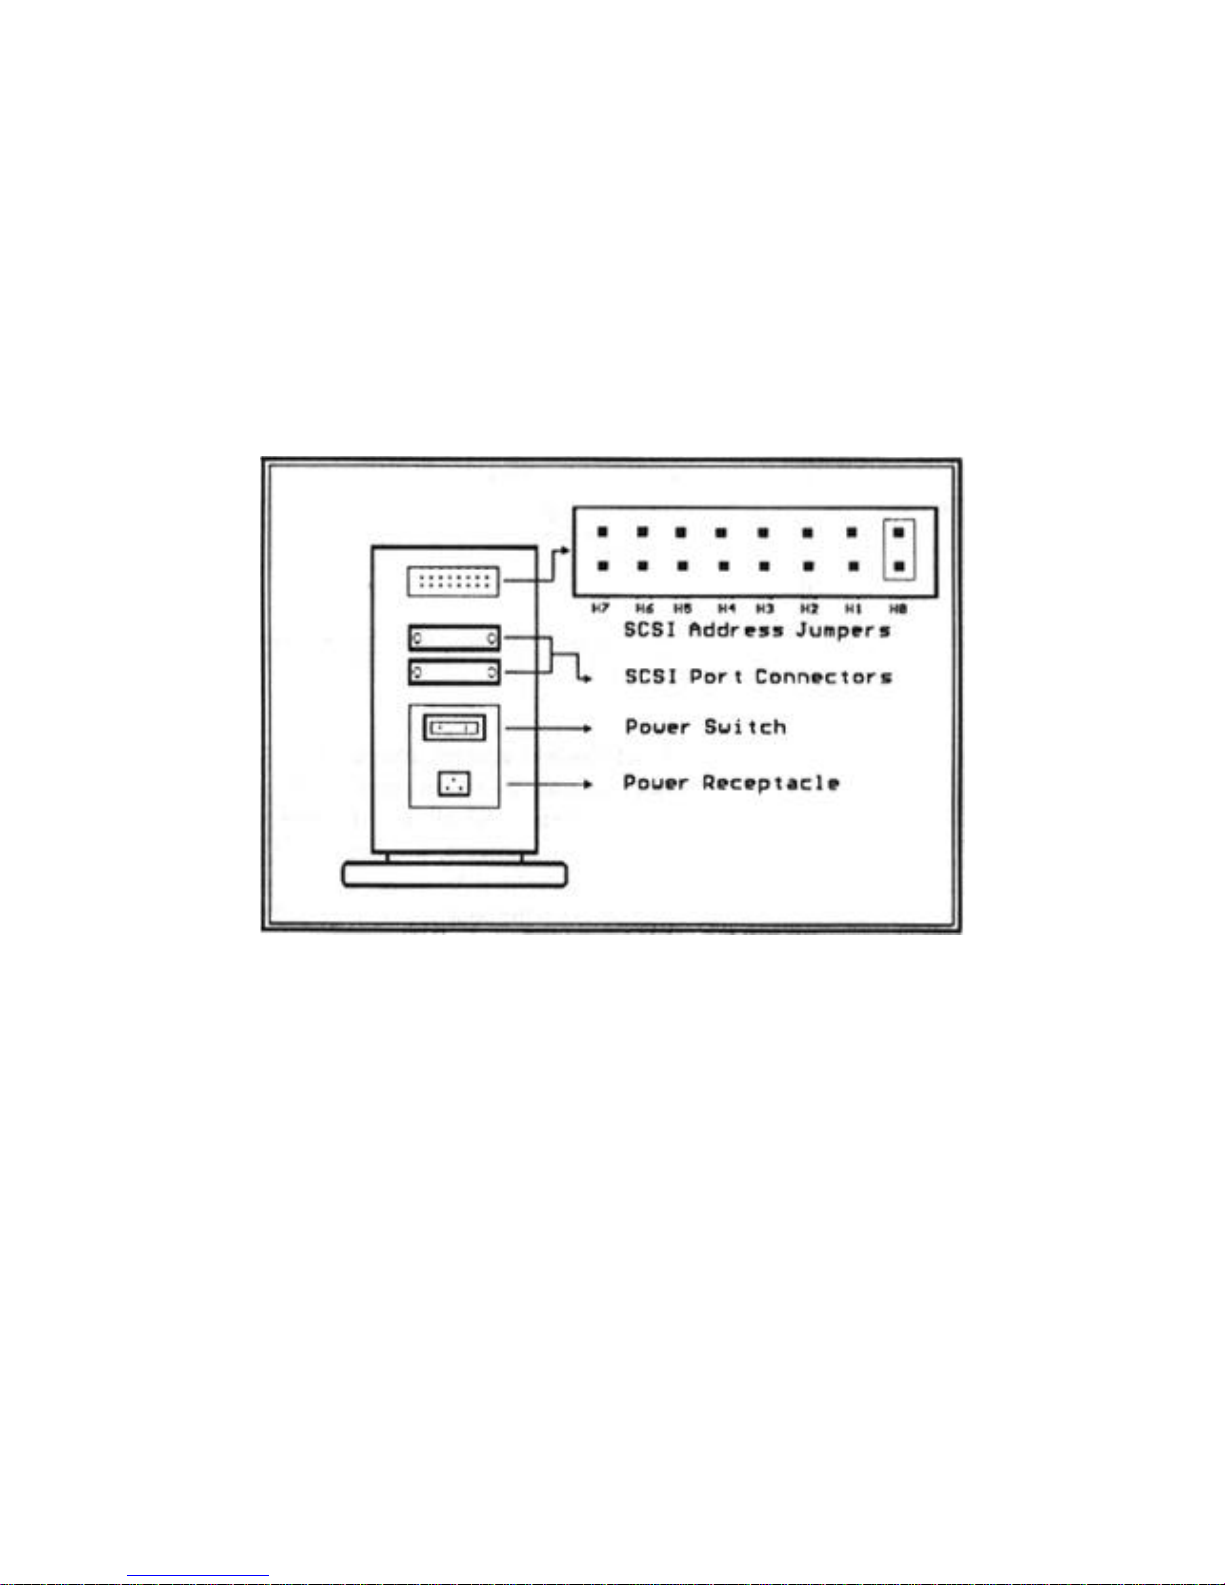
6. Check the device address window on the top rear of the Sider
D4 to assure the jumper is positioned over the HO position
as shown in FIG. 1-6. If it is not, use the needle nose pliers
to move the jumper to the proper position.
FIG. 1-6 REAR PANEL OF SIDER
6 INSTALLATION PROCEDURE

7. With the host adapter installed, next attach the Sider to the
Apple. Place the Sider next to the Apple with at least 3 inches of clearance for top and sides to allow proper ventilation.
FIG. 1.7 PLACING THE SIDER
8. Attach one end of the data I/O cable to the 25 pin connecter
you installed on the rear of the computer. Attach the other
end to either one of the two 25 pin connectors on the rear of
the Sider.
9. Locate the Sider’s terminator plug and attach it to the other
10. The last step in installing the Sider is to attach the power
HARDWARE INSTALLATION 7
FIG. 1-8 CONNECTING THE SIDER
of the two connectors on the rear of the Sider.
cord to the rear of the unit. The Sider’s power switch should
be in the OFF position before applying power.

The Sider can be added to your power strip or surge protector
equipment. We recommend surge protecting all your computer
equipment to lessen the damaging effects of irregularities in your
community’s power source.
NOTES
8 INSTALLATION PROCEDURE

1.3 HARDWARE INSTRUCTIONS SUMMARY
1- Turn off power to the computer and peripherals.
2 - Check the jumpers on the host adapter.
3 - Connect the ribbon cable to host adapter.
4- Connect the ribbon cable to rear of computer.
5 - Insert host adapter in Apple’s mother board.
6 - Check the device address jumpers.
7 - Connect data I/O cable to the rear of computer.
8 - Connect data I/O cable to the rear of Sider.
9. Connect terminator to the rear of Sider.
10- Insert the power cord.
Having completed the above instructions you are ready to use
the Sider. Turn to the Software Overview section for instructions on running your programs from the Sider and an initial
check-out procedure.
HARDWARE INSTALLATION 9

NOTES
10 HARDWARE INSTRUCTIONS SUMMARY

2. SOFTWARE OVERVIEW
Each Sider D4 hard drive subsystem comes with a powerful collection of software tools and utilities to ensure maximum benefit
from your hard drive investment. These software programs are
distributed under the name of ‘SiderFile Disk Utilities’.
SiderFile is designed to work with, and extend the features of the
Apple ProDOS operating system. Your Sider hard drive has both
the SiderFile utilities and the Apple ProDOS operating system
pre-installed on it at the factory.
The Siderfile package contains three types of benefits to you:
1. It is built around an easy to use menu system. This system
is know as the ‘Program Selector’ and allows you to design
your own menu of commonly used application programs.
Items can be selected and run from the menu by simply using
the arrow keys or mouse to highlight a menu item and pressing return. It is also intelligent. When you are done with an
application and exit from it, the Program Selector menu
automatically reloads and allows you to select your next
operation. Information pertaining to the Program Selector
is found in section 4.2
2. It offers a powerful file management program called the
SiderFile Utility. This program appears in the program
selector menu and offers over eighteen time saving utilities.
Its functions include everything from copying and cataloging files to un-erasing and password protecting them. The
program is screen oriented and will prompt you with simple
and understandable requests for information. Information
about the SiderFile Utility is found in section 3
3. First Class Peripheral’s SiderFile package also includes the
ProSel family of data management tools. These utilities
have gained national recognition for their ability to aid
ProDOS users in recovering from or preventing data
catastrophes. SiderFile includes all of the current ProSel
programs ranging from the data de-fragmenting tool, to the
SOFTWARE OVERVIEW 11

advanced block/byte editor. Also included are intelligent backup and restore programs. Discussion of the ProSel utilities is
found in chapter 4 & 5.
The combination of these three pans make up the SiderFile package. The Sider family of hard drives for Apple II computers are
right choice for the wise investor.
2.1 STARTING UP THE SIDER
The Sider D4 supports the APPLE ProDOS operating system. It
was preformatted at the factory with ProDOS-8 and the SiderFile software package and is ready to use. The storage area of
the drive is divided into two (2) ProDOS partitions. Each of these
partitions is 19 megabytes.
To use the Sider, check that all the connectors are securely attached, then power on your Apple and Sider. The computer will
load the SiderFile Program Selector from the hard disk and its
menu will appear. To learn more about SiderFile, refer to the
SiderFile and ProSel sections of this manual.
If your Apple does not boot the operating system from the Sider,
check the following:
Can you hear the drive spinning?
• Is the Sider plugged in, turned on and connected to the
computer?
Is the Host Adapter card in slot 7?
• If you have an Apple IIgs, make sure the CONTROL PANEL
is properly set up for the slot you put the Sider’s host adapter
in (See the Special Instructions for IIGS, see section 2.5).
If these conditions are correct, the drive may simply need re-formatting. To re-format the Sider and prepare it to store your files
and programs, proceed to Section 2.3.
12 STARTING UP THE SIDER

2.2 RUNNING THE SIDER FOR THE FIRST TIME
We recommend a quick checkout of your hard drive before you
load it with your programs and data. As a precaution against
any format or block alterations which may have occurred in shipping, we suggest running ProSel’s MR.FIXIT. This program
will analyze data blocks on the Sider and notify you if any need
reinitializing or de- allocation.
To proceed with this initial check-out, follow these steps:
1. Turn on the Sider and your computer. After a moment the
SiderFile Program Selector menu will appear. Information
about this menu is contained in section 4.2 of this manual.
2. Use the arrow keys or mouse to move the highlighter to
select the ‘Utilities Directory’ and press return.
3. The screen will display the names of the ProSel utilities.
SOFTWARE OVERVIEW 13
FIG. 2-1 SiderFile’s PROGRAM SELECTOR
Move the highlighter and select Mr.Fixit. Mr.Fixit is a
utility used to determine the condition of the data areas of
the bard drive. Detailed information about its operation can
be found in section 5.11 of this manual.

FIG. 2-2 ProSel UTILITIES MENU
4. The Mr.Fixit screen will prompt you for some operational
5. Enter the partition volume number to be analyzed at the
information. Enter the slot number your Sider’s host adapter card is installed in. Normally this would be ‘7’.
DRIVE: prompt. This would be ‘1’.
6. Next, specify the type of test to be performed. For our pur-
14 RUNNING THE SIDER FOR THE FIRST TIME
FIG. 2-3 MR.FIXIT INPUT SCREEN
poses, press ‘B’ for Bad Block Lock Out.

7. Enter ‘F’ for Fix when prompted to do so. This will cause
the program to attempt to correct any format problems
which might have occurred during shipment.
8. The output slot lets you choose whether the test information
will be sent to your screen or printer. Select 3 to display to
the screen.
9. As MR.FIXIT works, you will notice a block counter in the
upper right hand corner of the screen indicating which block
is being tested. The Sider D4 has two volumes of 39,072
blocks each. The counter will increment until it reaches that
figure.
10. When the test completes, you will be prompted whether you
want to run MR.FIXIT again. Enter a 'Y"
11. Run MR.FIXIT a second time to check the second ProDOS
volume on the Sider. All of the inputs will be the same as
before except when prompted for a drive number you should
enter a ‘2’ not a ‘1.’
After the second pass finishes enter a ‘N’ to exit the program
and return to the ProSel program selector menu. The drive
is now ready for use. We recommend you proceed to the
SiderFile section of this manual to learn about some of the
unique features of the Sider’s software.
SOFTWARE OVERVIEW 15

2.3 SOFTWARE INSTALLATION
The SiderFile software package and ProDOS-8 operating system
come installed on the Sider. You should not need to reinstall
them unless the format was disturbed in transit or you are re-formatting for some other reason. The next pages of instructions
guide you through re-installing the operating system and Sider-
File package on your bard drive. If you have successfully com-
pleted the initial check out with the MR.FIXIT program, please
proceed to the SiderFile instructions in chapter 3.
2.4 DISKETTE INFORMATION
The SiderFile software is distributed on two diskettes as well as
installed on the hard drive. One is a 5-1/4 inch 140kb, double
sided ‘flippy’, the other is a 3-1/2 inch floppy. Both diskettes
contain exactly the same programs. We provides each type to
make installation as simple as possible. If you have a 3-1/2 inch
drive, use our 3-1/2 inch Sider diskette. If not, use the 5-1/4 inch
diskette.
The diskettes contain the following utilities
* The Sider installation utilities.
* The SiderFile file management utilities.
* The ProSel disk utilities.
* The ProDOS-8 operating system.
VOLUME Names on floppies
/FLOPPY/ This is the ProDOS volume label for the 3-1/2
inch diskette.
/FLOPPY/ This the ProDOS volume label for the front
side of the 5-1/4 inch diskette.
/EXTRAS/ This is the ProDOS volume label for the
reverse side of the 5-1/4 inch floppy diskette.
16 SOFTWARE INSTALLATION

2.5 INSTALLATION PROCEDURE
Installing the Sider’s software on the APPLE lle and the APPLE
IIGS requires slightly different instructions. We have divided the
following section into two parts; one for APPLE lle owners and
one for APPLE IIGS owners. The first Section will cover the
APPLE IIGS installation.
APPLE IIGS Installation
1. Hold down the ‘OPTION’ key on the Apple IIGS keyboard and
while doing so, turn on the power to the Apple and Sider. The
system menu should appear.
SOFTWARE OVERVIEW 17
FIG. 2-4 APPLE IIGS SYSTEM SCREEN
2a. From the system menu, select option I to enter the CON-
TROL PANEL.

2b. When in the CONTROL PANEL, use the arrow keys to
move the highlighter to the SLOTS menu option. Press the
return key to select it.
FIG. 2-5 APPLE’S CONTROL PANEL
2c. With the SLOTS screen displayed, use the up/down arrow
keys to move the highlighter to the SLOT 7 indicator. Use
the right/left arrow keys to toggle the assignment of SLOT
7 to read “YOUR CARD”.
18 INSTALLATION PROCEDURE
FIG. 2-6 APPLE’S SLOTS SCREEN
2d. Next move the highlighter to the “STARTUP SLOT” in-
dicator. Use the right/left arrow key to toggle the assignment to read “SCAN” then press return.

If you choose to use a slot other than seven, perform the same
the Sider utilities into floppy drive I. Select “QUIT” from
the CONTROL PANEL which will cause the system to boot
from the Sider diskette.
3b. When the Sider software is booted, the screen will display
the Sider welcome message and be waiting for your instructions to continue.
End of Special APPLE IIGS Instructions
At this point, skip past the instructions for the Apple lle and
proceed to the instruction labeled 4.
APPLE //e Installation Instructions
1. Place the 5-1/4 Sider Utility diskette in floppy drive I and
turn on the power to your Apple //e and Sider.
2. The floppy drive should load and the Sider installation
software; if it does proceed to instruction 4. The first time
you startup the Apple lle with the Sider attached, the com-
puter may try and boot off the uninitialized Sider which will
cause the Apple to hang.
SOFTWARE OVERVIEW 19
procedure changing the slot number to the one you selected.
With the slot assignment indicating ‘YOUR CARD” press
the return key to save the information and return to the sys-
tem menu.
If you have questions about using the control panel or the
other options available in it, refer to your Apple Owner’s
Guide for more information or contact your Apple dealer’s
service staff.
3a. With the system menu still displayed, place your COPY of

End of Special APPLE //e Instructions
4. To continue with the setup procedure, type in the word “yes’
where prompted and press return. Typing only the letter y will
cause the software to abort. If this happens, simply rerun the
D4MAT.SYSTEM program or restart the Apple.
5. The next screen will prompt you to enter the slot number in
FIG. 2-7 INSTALLATION SCREEN
20 INSTALLATION PROCEDURE
which your Sider host adapter card is installed. If you followed
our recommendation, type in a ‘7’ at the prompt followed by
return.

6. Next, select names for each ProDOS volume on the Sider.
selecting the default name. There are two equal sized
volumes on the Sider D4 (approx. 19 MB & 19 MB). There
are no options for variable partition sizes.
increment as the drive is verified. The counter will go
through two cycles of 39,072 blocks each. This process
takes about 30 minutes and runs unattended.
SOFTWARE OVERVIEW 21
Type in names for each volume or press return to accept the
defaults. For ease of installing, we strongly recommend
FIG. 2-8 NAME ProDOS VOLUMES
You will be prompted whether to proceed using the choices
you have made. Type ‘YES’ and press return.
7. The program gives you one last chance to exit the format sequence. Pressing return will exit the program with the Sider
untouched. To proceed, type in “GO” and press return.
An initializing message will appear and a block counter will

FIG. 2-9 INSTALLATION MENU
8. When the initialization completes, press any key to con-
tinue. The formatter program will then load the ProSel installer. A series of introductory screens will be displayed,
press a key at each to proceed. After the introductory
screens, an Installation Menu will appear.
9. Select option ‘1’ from the menu to install the SiderFile
utilities to the hard drive. You will be prompted to enter the
volume name where the utilities will be copied to. The
default will be the first partition on the Sider. Enter your
response or simply press return to accept the default and continue.
10. Next you will be asked to enter your screen display size.
Type 80 or 40 as appropriate, and press return. The screen
will then display the SiderFile files as they are copied to the
Sider. If you are using the 5-1/4 floppy diskette, mid-way
through the coping process, you will be prompted to remove
the diskette and turn it over. After doing so, press return to
continue the installation process.
22 INSTALLATION PROCEDURE

When the copying completes, the message ‘INSTALLA-
pages. If you are finished using your Sider, park the
read/write heads. See explanation in the Summary Information section.
SOFTWARE OVERVIEW 23
TION COMPLETE” will display at the bottom of the screen.
Press any key to continue.
This completes the SiderFile software installation process.
The SiderFile program selection menu will appear each time
you start your system. If you would rather use Apple’s
ProDOS directly see the installation instructions on the next

2.6 SOFTWARE INSTALLATION SUMMARY
1. Power on unit.
IIGS - enter the CONTROL PANEL.
or
//e - get a system prompt.
2. IIGS - Set PANEL for "YOUR CARD" in slot 7.
or
//e - Boot floppy drive with PR#6 command.
3. Run the Sider utility program.
4. Enter the slot number in which the Sider’s host card is in
stalled.
5. Name ProDOS volumes on SIDER.
6. Start the SIDER initialization routine.
7. Transfer the SiderFile package to the Sider.
SUMMARY INFORMATION
At this point the Sider is completely installed and ready to be
used for storing your application programs and files. For information about the SiderFile package of utilities, how to use them
and how they can help you, see the ProSel and SiderFile sections
of this manual.
We suggest studying your APPLE ProDOS manual to better understand such ProDOS command and structures as PREFIX,
PATHNAME and SUBDIRECTORIES. A strong working
knowledge of ProDOS will maximize the value of your Sider investment.
The life of the Sider hard drive can be extended through proper
use and care. It is important that you take the time to PARK the
Read/Write heads before you power off. This helps insure data
will not be jeopardized during spin down or power up. You
should also assure proper ventilation and cooling for your Sider
24 SOFTWARE INSTALLATION SUMMARY

and computer. Heat is one of the biggest enemies of computers
floppy drive. (If you have a second 3-1/2 floppy place a
copy of die GS/OS SYSTEM.TOOLS in it also.) From the
SiderFile Program Selector menu choose the UTILITIES
DIRECTORY option. From the second menu select the op-
tion to BOOT.S5.
2. This will cause the GS/OS SYSTEM.DISK to load into
memory. When the desk top displays, eject the GS/OS SYSTEM.DISK and replace it with the GS/OS TOOLS diskette.
(This is not necessary if you are using two floppy drives.)
You will be prompted to swap the SYSTEM.DISK and the
TOOLS disk as the process continues. When the TOOLS
diskettes icon appears, use the mouse to point to and double
click on it to open.
3. With the TOOLS folder open. use the mouse to move the
arrow to and click on the INSTALLER’s folder icon.
25 SOFTWARE OVERVIEW
and computer products.
2.7 PARKING THE HEADS
To park the Sider’s read write heads, return to the Program
Selector’s main menu. Use the arrow keys to select the Park
Heads menu option. When selected the program will automatically run. The activity indicator light on the Sider will blink. A
message will appear on the screen indicating the heads were
parked. You may now power off the computer and Sider drive.
2.8 GS/OS INSTALLATION
These instructions assume you currently have a version of
ProDOS installed on your Sider. Apple’s GS\OS is designed
around a bard drive or a two floppy configuration. If you are
using only one 3-1/2 drive you will be required to interchange
the floppies many times.
1. Place the GS/OS SYSTEM.DISK into your first 3-1/2 inch

4. When opened, the installer will display a list of possible con-
figuration options. If using only one floppy, you will be
again prompted to shuffle the SYSTEM.DISK and the
TOOLS disk. When loaded, a window of options will dis-
play. Use the mouse to move the scroll bar down until the
‘INSTALL EVERYTHING POSSIBLE’ menu item dis-
plays. Click on (highlight) this menu item.
5. Next click on the VOLUME assignment option and change
the volume from /SYSTEM.DISK to /HARD1. When you
have properly setup the configuration information, click on
the INSTALL button to have the necessary
GS/OS files
copied to the Sider /HARD1 volume.
6. When the copy process completes, select QUIT to return to
the OS/OS desk top. Use the CONTROL-OPEN APPLE-
RESET keys to reboot the computer and Sider. The GS/OS
desk top should load and the available device icon should
display.
2.9 ProDOS 16 INSTALLATION
If you would like your computer to boot Apple’s ProDOS 16
rather than the ProSel program selector, follow these instructions
for installing ProDOS 16. It should be noted that ProSel will run
in ProDOS 16 and can be used to aid you in many ProDOS functions even if you choose not to use its menu system.
1. Boot the Apple Has using the ProDOS 16 SYSTEM DIS-
KETTE. Use the mouse to double click on the SYS-
TEM.DISK icon.
2. Double-click on the SYS.UTIL folder to open the folder.
26 ProDOS 16 INSTALLATION

3. Move the mouse and double-click on the SYSUTIL.SYSTEM icon to start the program.
4. Use the arrow keys to select the COPY FILES option and
then press return. Next select the “SLOT AND DRIVE” option, then press return.
5. You will be prompted “WHERE IS YOUR SOURCE
DISK?”. Enter the slot and drive number of the floppy drive
that your SYSTEM disk is in (usually slot 5, drive 1) then
press return.
6. Again, select the “SLOT AND DRIVE” option and press
return. When prompted ‘WHERE IS YOUR DESTINATION DISK?”, enter the slot and drive number of the Sider
drive (usually slot 7, drive 1) and then press return.
7. The screen will prompt you for which files you want to move
from the source disk to the hard drive. You should select
ALL and press return. The copying will continue and the
SYSTEM disk will be copied to the Sider.
8. When finished, the message, ‘COPYING COMPLETE”
will appear. This indicates the procedure was successful.
Press return to display the Main Menu.
9. The Sider should now boot ProDOS 16 each time you start
your computer.
SOFTWARE OVERVIEW 27

2.10 ProDOS 1.1.1 INSTALLATION
ProDOS 1.1.1 is installed on your system at our factory or each
time you re-format the disk with the formatter program. If you
do not wish to use the SiderFile menu system and would rather
continue to use the Apple ProDOS filer system you can uninstall
it by following these instructions.
1. Boot your Apple with the ProDOS USER’S DISK.
2. Select option [F] from the menu to access the FILER menu.
With the FILER menu on the screen select [F] a second time
to access the FILE COMMANDS option. From the FILE
COMMANDS menu select [C] to COPY FILES. You are
now ready to copy the ProDOS files to the Sider.
3. The COPY FILES screen will prompt you to enter pathnames for the files you want to copy to the Sider. For the
source pathname, you should simply enter an equal sign (=).
EXAMPLE:
COPY PATHNAME: = (return]
TO PATHNAME: /HARD1/= [return],[return]
Next you will be prompted to enter the “TO PATHNAME”
which refers to the volume on the Sider you want the files
copied to. Enter ‘/HARD1) /=’ as shown above. If you used
a volume name other than /HARD I when you initialized the
Sider, remember to substitute it for /HARD1 in the above
example.
4.. The files from the floppy drive will be copied to the root
directory of the Sider drive. When the copying is complete
press the [ESC] key twice to return the program to the
FILER menu.
28 ProDOS 1.1.1 INSTALLATION

5. You must make sure the PROSEL.SYSTEM is not the first
ready to have your various application programs copied to
it. Refer to the installation instructions in your applications
user guides for information about installing them on a hard
drive.
SOFTWARE OVERVIEW 29
SYSTEM file on the Sider. Move ProSel to a subdirectory
or delete it from the hard drive. At this point the Sider is

NOTES
30 ProDOS 1.1.1 INSTALLATION

3. THE SiderFile UTILITY
SiderFile is a powerful disk management tool designed to aid you
in managing files on the Sider. Its functions include: copying,
locking, unlocking, and deleting of files. SiderFile is a menu
driven program. There ale two menus listing the tools available.
The ‘TAB’ key will toggle you between the menus. To use
SiderFile’s graphic displays you must have an Apple IIGS or an
Apple lie with the enhanced (mousetext) ROMS.
Below is a list of the items in the SiderFile menus:
FIRST MENU:
Q - Quit
X - Catalog
C - Copy files
T - Type flies
L - Lock files
U - Unlock files
D - Delete flies
E - Exhume files
V - Verify files
R - Rename flies
TAB - Menu Change
S - Sort directories
F - Change file date
/ - Create directory
N - Show volume name
B - Toggle Bell, NOW: ON
P - Toggle prompting NOW: ON
M - Move files
THE SiderFile UTILITY 31
SECOND MENU:
TAB - Main menu
Q - Quit program
F - Format a disk
W - Wipe a volume
C - Compare directories
D - Disable unused devices

The SiderFile utilities perform functions on files or groups of
files. To insure accuracy, the program requires full and proper
pathnames to be specified. The ‘?‘ key can be used instead of a
pathname, as a short-cut method of selecting volumes and directories. Most commands are displayed graphically and the highlighter can be moved within the display to select various options.
3.1 COMMANDS AVAILABLE
Control-D Is used to DELETE the character the cursor is
(D) currently under.
Control-X When prompted for a source pathname, press-
(^X) ing ^X will change the default pathname to the
previously selected pathname. Pressing it
again will change it back to the current pathname.
Open Apple Used to insert characters into inputs on the
screen. Normally, typing will overwrite exist
ing text. To use, moving to the desired loca
tion and hold down the OPEN APPLE key and
type. The new text will be inserted into the exiting text.
Closed Apple Pressing the CLOSED APPLE key on the lle
OPTION or the OPTION key on the IIGS allows you to
change the SLOT and DRIVE number currently being used. With the slot or drive number
displayed, you can type in any other valid drive
or slot number and change the default. This
key can be used when the cursor is under the
first character of the default pathname within
a function.
Mouse Button The QUESTION MARK or mouse button can
(?) be used to display volumes on all drives in the
system. Any time a default pathname is displayed on the screen, pressing the ‘?'key will
cause the system to display all available
volumes. Using the mouse or arrow keys alows you to change the default directory.
32 COMMANDS AVAILABLE

Arrows/Mouse Either the mouse or arrow keys are used to
move the highlighter to various options and to
move the cursor within an input field. If a list
of files is too large to be displayed on a single
screen the arrow keys/mouse can scroll the
screen.
Delete The DELETE key can be used to delete one
character to the left of the cursor.
TAB The tab key is used for two functions. First,
TAB will toggle you back and forth between
the two menus. Second, when in an input field,
TAB will move the cursor to the right most
position.
ESC Used to exit from a utility to the main menu.
Control Reset When in a utility, the control-reset will return
you to the SiderFile menu. Never use this
when any information is being read from or
written to the disk. Interrupting a read or write
may cause unrecoverable damage to files or
directories. If you press ‘control-reset’, there
will be a brief read from the disk.
THE SiderFile UTILITY 33

3.2 SIDERFILE FUNCTIONS
SiderFile helps you use the directory structure of ProDOS. It is
divided into individual tools which are displayed in the Main
Menu. The following section will discuss each utility and bow
to use it
3.2.1 X - Catalog
Catalog is used to list the files in a volume. When selected, a
default pathname will be displayed. At the default, you can do
the following:
• Press return to display the directory of the default pathname
listed.
• Type in a new pathname.
• Use any of the SiderFile function keys (‘?’,‘tab’,‘del’,etc.) to
change the pathname.
If you press ‘?’ all of the on-line ProDOS volumes will be displayed. To change the volume, use the mows/mouse to high-
light the directory you need. If there are no files in a directory
the program will return to the main menu. Pressing return will
return you to the main menu.
34 SIDERFILE FUNCTIONS

3.2.2 C - Copy Flies
This is a file copier which can move single files, groups of files
or volumes. It retains both create dates and modification dates
of files. It is compatible with all types of files including subdirectories. If you select a subdirectory files to be copied, you
will be asked if you want the files INSIDE it to be copied. If not,
only the new directory is created, but no files are copied to it.
When using the copy utility, you will first be prompted for the
source and destination pathnames. Press return to accept the
default pathname or change the pathname by typing in a new one
or use any of the appropriate SiderFile function keys.
After entering the pathname, a listing of the files in the source
directory will display. The following is a summary of methods
used to select files to be copied.
HOW TO SELECT FILES TO BE COPIED.
CONTROL-A Typing a ^A will cause all files to be selected.
(^A) This will include files in any subdirectories
displayed. If you have selected some files
manually, pressing ^A will cause all currently
selected files to be deselected and all previously unselected files to become selected.
CONTROL-C After selecting files to be copied, typing ^C
(^C) will: (1)-copy all files which are on the source
drive but not currently on the destination; (2)if the same file is both on the source and destination drive, then ^C causes the duplicate to
be copied only if its time and date is more
recent than the one on the destination drive.
This option is helpful when updating application software.
THE SiderFIle UTILITY 35

CONTROL-E The ^E command is similar to ^C com-
(AE) mand. The ^E only copies files if(1)- The flies
selected are both on the source and destination
volumes, and (2)-the file on the destination has
an older time and date mark. ^E will not copy a
selected file if it does not exist on the destination volume. If DEL command is used following the ^E command, the files which are copied
to the destination path will also be deleted from
the source path.
ARROWS/ These will move the highlighter to various files
MOUSE in the list. Pressing the space bar/mouse but-
ton will place a check mark next to the file or
subdirectory. An item with a check is
‘selected’ and will be included in the coping
activity. You can select any group of files you
want copied.
To use the copy function, move the highlighter to the files you
want copied and select them with the space bar/mouse. When
ready to copy, press RETURN. If you decide not to copy any
files press ESCAPE to return to the SiderFile menu. You can
easily select/deselect ALL files by pressing (Control-A).
COPYING WITH PROMPTING ‘ON’
When copying a group of selected files, if PROMPTING is set
to ON (see main menu) it will cause the copy process to stop if;
(1)- the file being copied exists on the destination volume; (2)-
if a file is locked on the destination volume; or (3)- prompt you
before copying the files contained within a subdirectory. You
will be prompted whether you want existing files overwritten or
subdirectories copied.
COPYING WITH PROMPTING ‘OFF’
If prompting is OFF, the copy process will run unattended. No
warning before overwriting is given. Files in all selected directories will be copied. When copying subdirectories without
prompting infinite replication can occur.
36 SIDERFILE FUNCTIONS

When the copying is completed, you will be asked if you want to
copy the same group of files to another volume with the same
directory name. If you press DELETE at this point, the delete
routine will re-display your selections. If you press RETURN,
the original files will be deleted from the source volume.
THE SiderFile UTILITY 37

3.2.3 T - Type Files
This option is designed to display text files to the screen, When
selected, you are asked to enter the patbname of the directory
which contains the file you want displayed. You can use the ’?’
to aid you in selecting the pathnanie. After the correct directory
is selected, press RETURN to catalog the directory. Use the
arrow keys/mouse to highiight the file to be typed.
A listing of the contents of the file will display. If the file is not
a data file, the contents will display, but will be unreadable.
CONTROL-P This will cause the listing of the file to be sent
(AP) to the printer instead of the screen.
RETURN This will cause the listing to stop and the utility
to return to the SiderFile main menu.
S This will cause tbe listing to slow down as it
displays. Pressing the SPACE BAR twice will
resume normal listing speed,
SPACE BAR Will cause the listing to freeze. Pressing it a
second time will cause it to continue to display.
ESC Will take the program back to the SiderFile
main menu.
38 SIDERFILE FUNCTIONS

3.2.4 L - Lock Flies
This is used to lock a single file, groups of files or volumes. It
is compatible with all types of files including subdirectories. If
you select a subdirectory file to be locked, all files within the
subdirectory will be locked.
When using the lock utility, you will be prompted for the pathname of the directory containing the file(s) to be locked. Enter
a pathname or use any of the appropriate SiderFile function keys
to aid you in changing the pathname.
After entering the pathname, a listing of files currently not locked will be displayed.
The following is how to select files to he LOCKED.
CONTROL-A Typing ^A will cause all displayed files to be
^A selected. This will include files in any lower
subdirectories displayed. If you have selected
some files manually, pressing AA will cause all
currently selected files to be deselected and all
previously unselected files to become selected.
ARROWS/ These will move the highlighter to various files
MOUSE in the list. Pressing the space bar/mouse but-
ton will place a check mark next to the file or
subdirectory. An item with a check is
‘selected’ and will be included in the locking
activity.
To use the LOCK function, highlight the files you want locked
and select them with the space bar/mouse. When you have
finished selecting files, press RETURN. If you decide not to
LOCK any files press ESCAPE to return to the SiderFile menu.
You can easily select/deselect ALL files by pressing ( ControlA).
THE SiderFile UTILITY 39

3.2.5 U - Unlock Files
This is used to UNLOCK a single file, groups of files or volumes.
It is compatible with all types of files including subdirectories.
If you select a subdirectory file to be unlocked, all files within
the subdirectory will be unlocked.
When using the UNLOCK utility, you will be prompted for the
pathnames of the directory containing the tile(s) to be unlocked.
Enter a pathname or use any of the appropriate SiderFile func-
tion keys to aid you in changing the pathname.
After entering the pathnames, a list of files which are currently
locked will be displayed.
The following is how to select files to be unlocked.
CONTROL-A Typing a ^A will cause all files in the current
^A directory to be selected. This will include files
in any lower subdirectories displayed. If you
have selected some files manually, pressing
^A will cause all currently selected files to be
deselected and all previously unselected files
to become selected.
ARROWS/ These will move the highlighter to various files
MOUSE in the list. Pressing the space bar/mouse but-
ton will place a check mark next to the file or
subdirectory. An item with a check is
‘selected’ and will be included in the unlock-
ing activity.
To use the unlock function, highlight the file(s) you want unlocked and select them with the space bar/mouse. When you have
finished selecting files, press RETURN. If you decide not to unlock any files press ESCAPE to return to the SiderFile menu.
You can easily select/deselect ALL files by pressing (Control
A).
40 SIDERFILE FUNCTIONS

3.2.6 D - Delete Flies
This is used to DELETE single files, groups of files or volumes.
It is compatible with all types of files including subdirectories.
If you select subdirectoty files to be deleted, you will receive an
error message if the subdirectory is not empty. This is a safety
feature to help prevent accidental deletion of whole sudirec-
tones.
When using the DELETE utility, you will be prompted for the
pathnames of the directory containing the file(s) to be deleted.
Enter a pathname or use any of the appropriate SiderFile func-
tion keys to aid you in changing the pathname.
After entering the pathnames, a list of files in the directory will
be displayed.
The following is how to select flies to be DELETED.
CONTROL-A Typing a ^A will cause all files to be selected.
^A This will include files in any subdirectories
displayed. If you have selected some files
manually, pressing ^A will cause all currently
selected files to be deselected and all pre-
viously unselected files to become selected.
ARROWS/ These will move the highlighter to various files
MOUSE in the list. Pressing the space bar/mouse but-
ton will place a check mark next to the file or
subdirectory. An item with a check is
‘selected’ and will be included in the deleting
activity. You can select any group of files you
want deleted.
To use the DELETE function, move the highlighter to the files
you want deleted and select them with the space bar/mouse.
When you have finished selecting files, press RETURN. If you
decide not to DELETE any files press ESCAPE to return to the
SiderFile menu. You can easily select/deselect ALL files by
pressing (Control-A).
THE SiderFile UTILITY 41

3.2.7R- Rename A Fuel Volume
This utility is used to change the name of a file OR the name of a
volume.
To rename a file simply:
• Enter the pathname of the directory containing the file to be
renamed.
• Use the arrows/mouse to move the highlighter to the file to be
renamed.
Use the space bar/mouse to select the file.
• After pressing RETURN, the file name is displayed at the
bottom of the screen and can be changed from the keyboard.
In order to change a VOLUME name, you must select some file
(any file in the volume) as if you wanted to rename it. When the
file’s name displays, use the arrow keys/mouse to move the cursor back and change the volume name. When the change has
been made move the cursor to the right-most position of the file’s
name and press RETURN to save the change. This will change
the volume name and display the file again with the new volume
name. Press ESC to return to the menu.
42 SIDERFILE FUNCTIONS

3.2.8 E - Exhume Flies
(Works only with ProDOS 1.4 and later!)
This function attempts to restore files which have been deleted,
provided the file has not been overwritten.
To use the exhume utility:
Enter the pathname where the deleted file ~a&
• All deleted files which can be detected will be displayed. If
the file you need is not displayed, check that you are in the
right directory. If the file does not display, it can not be
recovered with this function.
• Use arrow keys/mouse to move highlighter to select the file(s)
to un-delete and the space bar/mouse to select them.
• Pressing RETURN will attempt the un-delete.
It might be helpful to describe the principle EXHUME works on.
When a file is deleted from a disk it really isn’t. What is deleted
is part of the file’s name. This deletion tells the operating system it is all right to use the space formally used by the deleted
file to store new files. What all this means is the ability of EXHUME to work depends on whether new information has been
stored to the drive since the old file was erased. If you know you
have accidentally deleted a file(s) DON’T SAVE ANY NEW
DATA until you have tried to recover the file(s) deleted! If other
data gets stored in the middle of the old file, a FILE DAMAGED
error will display when you try to exhume the old file.
THE Sider File UTILITY 43

3.2.9 V - Verify Flies
This will read specified files and test for bad blocks. This utility
does not attempt any repair of damaged blocks; rather it will display block information. ProSel’s Mr.FIXIT program contains
tools that attempt to fix block problems. See chapter 5 for more
information.
The following commands are available:
DEL If a bad block is found in the current file the
verify will pause, and DEL will cause the
verify to leave that tile and begin verifying the
next selected file or exit if no other files are
selected.
RETURN If a bad block is found in the current file the
verify will pause; RETURN will cause the
verify to continue in the current file.
HOW TO USE:
• Enter the pathname where the file(s) you want verified is
stored.
• Move the highlighter and select the file(s) you want verified.
• Press return to begin the verifying process.
During verification, if an error occurs, the block will be shown
at the bottom of the screen and the program will wait for a
keypress. Some block errors are in blocks used to address files.
In these cases, the errors may cause the program to abort. Directories are not themselves verified, but files INSIDE directories
can be. (‘This is automatic if prompting is OFF).
44 SIDERFILE FUNCTIONS

3.2.10 S - Sort Directory
This is a powerful directory sorting utility. It allows you to select
a directory and sort the files within it by the following five
criteria:
A - Sort Alphabetically
C - Sort By Creation Date
M - Sort By Modification Date
T - Sort By File Type
P - Sort By File Type And Alphabetically
Within A Type
You can also use the Open-Apple key in conjunction with arrow
keys to move file names around by hand. The mouse button can
be used in place of the open Apple key to move files around the
screen.
When you are done sorting or arranging the files, press RETURN
to save the information. If you decide not to change the direc-
tory press ESCAPE to abort. When you press RETURN you are
given one more chance to abort before the sorted directory is
written to disk.
THE Sider File UTILITY 45

3.2.11 C - Change File Date
This routine allows you to change the creation and modification
dates on any file.
How to use:
• Specify the full pathname and filename for the file when
prompted. You must type out the entire name. The wildcard
methods do not apply to this function.
• The file’s existing date will display; you will be allowed to
modify it. You do not have to type the dashes or colon shown
in the date, any non-alpha/numeric character (such as a space)
will do. You must type the data in the correct position on the
screen.
• Press the RETURN key to save the new information or ESC
to abort.
This routine allows you to make creation dates for files having
no dates or correct dates of files whose dates are altered by other
programs.
46 SIDERFILE FUNCTIONS

3.2.12 I - Create Directory
This allows you to create new sub-directories while in SiderFile.
It can be used to create multiple sub-directories.
How to use:
• When prompted for the name of the directory to be created,
enter the full pathname. Typing an invalid pathname will
result in an error and will cause the program to terminate and
return to the SiderFile main menu.
• Use the arrow keys to move the cursor within the input field.
• Press return to create the new directory.
THE SiderFile UTILITY 47

3.2.13 N - Show Volume Names
This looks at all mounted ProDOS devices, then displays the following volume information: slot number, drive number, volume
name, number of free blocks, number of used blocks, and total
blocks, creation date.
3.2.14 B - Toggle Bell
If this is OFF, the bell that is heard at some prompts will be
defeated. Current status is shown in the main menu.
3.2.15 P - Toggle Prompting
This refers to the questions the program asks dwing such opentions as copying or verifying files. These prompts are a
safeguard to notify you that files are about to be over written or
whole subdirectories will be included in a particular function.
With prompting ON, you will be required to type in conformation that you intend on letting the program do the over writing,
etc. With prompting OFF, the warning messages are disabled
and the program assumes you always want to over write existing
files when copying and include subdirectory tiles in a functions
operation.
48 SIDERFILE FUNCTIONS

THE FOLLOWING COMMANDS APPEAR ON THE
SIDERFILE’S SECOND MENU:
3.2.16 M - Move Files
This option will move files from within a volume. It can not
move files from one volume to another. MOVE diffurs from a
standard copy in that flies are deleted from the source and copied
to the destination. This is very fast and can move whole directones.
How to use:
• You will be prompted for the pathname of where the files to
be moved are currently located.
• Type in the path or use the SiderFile function keys (ie.?, TAB.
DEL, etc.) to change the default.
• Next enter the destination pathnarne.
• With two valid pathnames entered, a catalog of the source
path will display. Use the arrow mouse to select the files to
be moved. Then press return.
THE SiderFile UTILITY 49

3.2.17 F - Format A Disk
This command is like the FORMAT A VOLUME command
from Apple’s Filer utility. It will re-initialize any ProDOS
volume. Formatting a volume always destroys any files in the
volume and re-initialize the directory areas. Reformatted
volumes can not be unformatted or files recovered with the EXHUME function.
How to use:
• Select FORMAT A DISK from the menu. You will be asked
for the slot and drive number of the disk you want formatted.
• Next you will be prompted to enter a volume name. Pressing
return will accept the default.
• When formatting a floppy, you are prompted to enter the
number of tracks to be included in the format; 35 is standard,
use 40 only if you know your drive is capable of these
non-standard tracks.
50 SIDERFILE FUNCTIONS

3.2.18 W - Wipe A Volume
This will erase all files on a designated volume. This is like formatting a volume but is much faster. It can be used on floppies
(even ones with extra tracks), Unidisks, hard disks and some
/RAM volumes. The /RAM drivers supported are the Checkmate Multiram driver, the AE Ramworks driver, and the /RAM
driver supplied on the ProSel disk. Files removed by the WIPE
utility can not be EXHUMED. It gives you a chance to change
your mind before the action is taken.
3.2.19 C - Compare Directories
This will compare the files’ names of two directories (not the
contents of the files). This function will look at two directories.
It will list in one column the files which are in the first directory
but not in the second, and in the second column the files which
are in the second but not the first. File names which are in both
directories but of different file types are shown with their types,
and those with different modification dates are shown with their
dates. A listing of files can be sent to the printer.
3.2.20 D - Disable Unused Devices
This utility will look at all storage devices on line and temporari-
ly disable access to any device which is either turned off or does
not have a ProDOS volume in it. This can make many of the
SiderFile and ProSel utilities run faster.
THE Sider File UTILITY 51

NOTES
52 SIDERFILE FUNCTIONS

4. AN OVERVIEW OF
SiderFile’s ProSel
The SiderFile package is a set of utilities designed to aid you in
using your computer. They have two main parts. The first is the
Program Selector, which allows you to create a menu system
which displays the various programs on a disk. This menu allows you to use the arrow keys or mouse to select and run your
programs by simple highlighting them and pressing return. The
second part consists of a group of utilities used to manage
programs and data and aid you in customizing your computer to
your individual needs.
ProSel is an enhancement to the Apple ProDOS operating system; as such it only works with that operating system. There is
a great deal ProSel can do, but you do not need to fully understand its capabilities to benefit from its most basic features.
One of SiderFile’s most valuable feature is its ability to simplify
ProDOS commands. Training is a costly and time consuming
process. The SiderFile package simplifies computing to the
point where office personnel can spend their time learning and
using programs and not figuring out bow to get to them.
There are two versions of the SiderFile package on the installation disk. One is for 80 column displays and the other for 40.
The installation programs will ask which you want and then install accordingly. The 40 column version has more space for application specification, but allows fewer of them. Also the 40
column version is a little faster. The 80 column version is more
visually appealing. Choose the one that suits your needs. If your
needs change, you can change the version installed by running
the INSTALL.RE VISION program later.
AN OVERVIEW OF
SiderFile’s ProSel 53

4.1 INSTALLING THE SiderFile PACKAGE
SiderFile’s Program Selector and the ProSel utilities are
automatically installed on the Sider during its original setup. The
Program Selector can also be used on 800k diskettes and memory
card /RAM volumes.
If you have uninstalled SiderFile or are re-installing it, the following is a step by step procedure for loading the needed files.
1. Turn on your Apple computer and Sider hard drive. Boot
the SIDER diskette called/FLOPPY.
2. The Sider formatter program will load and its initial screen
will appear. When asked to proceed with the formatting,
enter ‘NO’ to quit the formatter.
3. The ProSel installer will then load. A series of introductory
screens will display. Press any key to proceed through the
introductory information until the following menu screen
appears.
54 INSTALLING THE SIderFIle PACKAGE
FIG. 4-1 INSTALLATION MENU

EXPLANATION OF OPTIONS
Option 0 This option will exit the installation program
and transfer you to Applesoft Basic.
Option 1 This option is used to transfer SiderFile pack-
age to a volume which does not currently have
it. If the volume you choose to install the
utilities on already has the ProSel system files
on it this option will abort.
To install, select ‘1’. You will be prompted to
specify the volume you want ProSel installed
on. We strongly recommend the default. Next
enter the screen type you have. The screen will
then display the tiles as they are transferred. If
you are using the 5 1/4 inch diskette, you will
be prompted to remove the/FLOPPY diskette,
turn it over and reinsert it, then press return.
After the copying is complete, press return and
the Program Selector menu will display.
This will establish the files PROSEL.SYSTEM, PROSEL, and BASIC.SYSTEM on the
root directory of the sped tied volume. If you
do not want BASIC.SYSTEM there you can
delete it later. It is suggested you leave it there
until you are familiar with the operation of the
SiderFile package. It will also create the subdirectory UTIL and install most of the ProSel
utilities in it.
Option 2 This option is used to update the version of the
SiderFile package you are using. If you have
an older version of ProSel and you purchase a
newer one, use this option to over-write the
older version of ProSel.
Selecting 2 will prompt you to confirm your
intentions by typing ‘OK’. You will be
prompted to specify which volume you want
updated (/HARD1/ is the default). Next you
are asked to specify the frequency the screen
AN OVERVIEW OF
SiderFile’s ProSel 55

will turn itself off during periods of no use.
After copying the updated files, the ProSel
main menu will display.
Option 4 This option is used to copy disks. It will
prompt you for the source and destination slot
and drive number, for the information being
copied.
Option 5 This will return you to the start of the SiderFile
package installation program. The program
will prompt you if you want to run the formatter.
56 INSTALLING THE SiderFile PACKAGE

4.2 USING SiderFile’s MENU SYSTEM
Siderfile’s menu system is designed to simplify interactions with
ProDOS and assist you in organizing your programs. The
Program Selector works by storing commands in a way similar
to a macro or batch file. When you select a menu item, the commands saved within it are executed. These saved instructions included such things as the name of the program, which directory
it is stored in and where supporting files are stored
FIG. 4-2 PROGRAM SELECTOR MENU
When you boot up, the screen will display the Program Selector
menu. Initially it comes with several application specifications
already set up. These items are supplied to demonstrate the system. You will probably want to change them later. Use the arrow
keys/mouse to highlight and select the menu item you want to
run. Typing an alphabetic key while at the menu will move the
highlighter to the next file beginning with that character. If no
file begins with the letter, the highlighter will move to the first
item on the screen.
While using your application programs, the Program Selector becomes inactive. Your application program will function as it
normally would. When you exit the application, once again ProSel will load and the “program selector” menu will appear.
Any time the Program Selector menu is on the screen, you can
press the ESC key to go to the menu editor to modify the list.
AN OVERVIEW OF
SiderFile’s ProSel 57

When you exit the editor, you will return to the modified Program
Selector menu.
4.3 THE BUILT IN EDITOR
The Editor is used to add, correct and delete items from the
Program Selector menu. It also is a tool used to define command
information which the computer uses when a given program is
selected.
4.3.1 AvaIlable Functions:
QUIT This returns you to the Program Selector mode.
EDIT Used to change the information stored in a
menu item.
DELETE This is used to remove items from the program
selectors menu. It does not remove the actual
program files.
ADD This is used to add items to the program selec-
tor menu. This includes defining prefix, pathname and startup information.
SAVE This saves any changes you have made while
in the editor.
ESC This is used to leave the EDITOR and return
to the program selector menu. It can be
pressed at any time. Exiting in this manner
will not save any changes but will leave all
items as they were before entering the editor.
4.3.2 How To Use Each Function
EDIT This displays a list of the programs currently
in the program selector menu. By using the
arrow keys/mouse to move the highlighter to
select any one of the entries to edit. Once
selected, the editor will display the contents in
the following format.
58 THE BUILT IN EDITOR

EXAMPLE:
position you want to change. The syntax for
an application title is 19 or fewer characters.
Spaces and control characters are allowed. If
you don’t need to make changes to a given
field, simply use the arrow key to trace over
the current entry. See the ADD instructions
for explanations of syntax and other options.
DELETE This first displays the list of programs currently
in the program selector menu. Use the arrow
keys/mouse to move the highlighter to select
any one of the entries to delete. Pressing the
return key will remove the entry from the
menu. It will not remove the application
program or files it called up from the drive. Use
ESCAPE if you entered delete mode by mistake. Once deleted an entry must be ADDed
to be returned to the menu.
ADD The ADD command is used to add a new item
to the program selector menu. When ADD is
selected the screen will display the basic input
information shown below.
Screen title:
Prefix:
Pathna me:
Startup:
You can now enter the information pertaining to the application
you would like the Program Selector to preform for you. Input
information for each field will be explained here.
SCREEN TITLE: This is the name which will appear in the
program selector’s menu. It can contain up to 19 characters
(letters, numbers, symbols, spaces). The titles you enter will
be displayed in alphabetical order when displayed by the
AN OVERVIEW OF
SiderFile’s ProSel 59
Screen title: My Own Program
Prefix: /HARD1
/PROGRAMS
Pathname: PROJECT.SYSTEM
Startup: (empty)
Use the arrow keys to move the cursor to the

program selector. If you want to control the order in which
menu items appear, use leading control characters in the
title. Control characters are allowed in the titles (and not
shown except when editing the title) they can be used to force
the sorting to place the items in what appears not to be
alphabetical order. Thus, if there is a group of applications
you want to appear first in the list, just start their titles name
with a control-A, etc. You cannot use control H or U or
others that would be intercepted by the firmware on input.
PREFlX This is needed to describe where the application
program is saved on your disk. In the case of the Sider the
root directory’s prefix is /HARD1 (unless user modified).
Most applications would be in sub-directories, not in the
root. In entering the prefix you would enter both the root
directory and the appropriate sub-directory(s) as follows.
EXAMPLE:
Prefix /HARD1/PROGRAMS (root+1 sub-directory)
Prefix /HARD2/ACCNT/COST (root+2 sub-dIrectorIes)
or
The editor automatically adds the “/” to the end of the
prefixes you supply. The prefix must be a valid full pathname and the application file must be of SYS type. If the
entry is not a SYS type it will cause an error. The editor,
however, will have no knowledge of this. The startup file
may be of any type supported by the interpreter. Presumably, BASIC.SYSTEM 1.1 would support any file for which
the -“ syntax is acceptable.
In prefixes, pathnames and startup names, the character”?”
can be used as a substitute for the volume name (INCLUDING “/” ON BOTH ENDS) containing the active ProSel file.
There are two reasons for this convention. The obvious one
is that it saves a great deal of space in the application list.
The other, mainly applicable to 800K drives, is that it allows
disk swapping.
60 THE BUILT IN EDITOR

PATHNAME~ This is used to tell the Program Selector
where the system file for the application being ran are located.
EXAMPLE:
Pathname: APLWORKS.SYSTEM
If the pathname starts with a “/” it is taken as the “full pathname”. (Eg., that you are specifying a pathname that
begins with a Volume name, such as /HARD2.) Otherwise
the prefix you give will be appended to the default pathname
that you have booted from. This would be /HARD I if you
are working with a Sider.
If the a single “/” character is used as the “pathname”, then
when selected from the menu, the program selector will
search the directory specified in the PREFIX field. All the
SYS files in that directory are then displayed and you can
use the mouse (or mows) to select one of those to be executed, Hitting ESC at this point will reload the main menu.
STARTUP Startup specifies where the system files are. If
the single character ‘3” is entered for STARTUP and the
PATHNAME specified BASIC.SYSTEM, then the directory corresponding to the PREFIX will be displayed.
However, the BAS files and BIN files will be displayed and
can be executed. In this case, the file selected will become
a “startup” program for BASIC.SYSTEM.
AN OVERVIEW OF SiderFile’s ProSel 61

EXAMPLE 2:
changed it, under the title /XXX/PROSEL
where XXX represents the name of the volume
where the program selector is stored.
If you make changes and do not use the Save
command, the changes made will only execute
one time. Unsaved Changes will be erased
upon entering the next application program. If
you find yourself in the editor by accident,
simply select the quit command to return to the
"program select" mode.
62 THE BUILT IN EDITOR
Screen title: MYSTART hello
Prefix: MYVOL/PROGRAMS
Pathname: /HARD1
/BASIC.SYSTEM
Startup: MYSTART
This second example causes BASTC.SYSTEM to run the
MYSTART BASIC program directly instead of executing
the usual STARTUP program. If the Startup line bad been
left blank then STARTUP would be executed as usual.
SAVE This saves the edited information, as you have

The program selector can support up to 54 items in its menu.
(The limit is 48 for the 40-column version).
The SAVE option uses a file to store the program selector menu
in. This file is named PROSEL.80 or PROSEL.40 depending on
your screen sire. There are only 2600 bytes in PROSEL.80 and
2900 bytes in ProSel.40 in this file. If adding or editing an existing entry results in the sum of the data in the file exceeding its
limit, the excess will be deleted. If your needs require a large
number of titles in the program selector, you should use modest
lengths for each. Editing existing titles can also reduce the overall size of the program selector file.
Then using the 40 column version of ProSel, as you exceed 46
“program selector” menu items, the next 2 entrees may not display properly. The only remedy is to use the 80 column version.
REMARKS
Some application programs may not support the ProDOS “quit
protocol”. Apple’s own CONVERT is such a program. If, like
CONVERT, they allow quitting via a direct specification of pathname, to accomplish this specify the pathname
/MYVOL/PROSEL.SYSTEM, which will invoke the program
selector. The reason for this non-support is that these programs
were written while ProDOS was still being developed and did
not yet have a well defined quit procedure.
It is possible to have BASIC.SYSTEM 1.1 on one directory and
have it boot a startup program in a second directory. The following is an example of this:
Screen title: MYPROGRAM
Prefix: /HARD1
Pathname: BASIC.SYSTEM
Startup: /HARD2/MYPROGRAM
In this example, BASIC.SYSTEM would be loaded from the
volume: /HARD1 and would run the program: MY PROGRAM
in the volume: /HARD2. Using this technique, you would not
need to have the BASIC.SYSTEM in both volumes.
AN OVERVIEW OF
SiderFile’s ProSel 63

4.4 ADDITIONAL CAPABILITIES
4.4.1 DIsplaying Flies I Volumes
From the program selector menu, typing “1” or “2” will list the
SYS and DIR files in the root directories of drive I and 2 respectively. Using the arrow keys/mouse you can run a listed
program, or press ESC to return to the program selector menu.
Subdirectories are listed in lower case; selecting one will read
the SYS/DIR ifies in that sub-directory.
Typing a 3,4, 5,6 or 7 key followed by “1” or ‘2” will cause the
device in the slot indicated and the volume 1 or 2 to be selected.
For example, if you press “6” then “1”, the disk in slot 6, drive 1
will be read and its SYS/DIR files displayed. If you have drives
in slots 1 or 2, the keys “8” and “9” are translated to slots 1 & 2.
4.4.2 Screen Saver Function
If the program selector menu has been on the screen for more
than 15 minutes with no activity, ProSel will cause the screen to
blank. Any keypress will bring it back. To change the default
from 15 minutes, see section 4.1 under option 2.
4.4.3 Using ProSel On Multiple Volumes
If you use 800K drives, you should copy the program selector to
each of your 3.5 disks so that as you change disks each new
volume will have the menu system on it. The menu is small
enough to make this possible. When running the menu from a
floppy, each time you change diskettes, simply type “51” to read
in the new volume information. (assuming the disk is in slot 5,
drive 1). When the list of files is displayed highlight and select
the PROSEL.SYSTEM. and press return.
64 ADDITIONAL CAPABILITIES

If you are using a number of diskettes you can have each volume
renew itself automatically without typing “51” if you create a
“program selector” item that has the single character“?” as prefix
and “PROSEL.SYSTEM” as pathname. For this provision to
work correctly you must use the “7” syntax throughout your application list for the volume name.
4.5 ProSel ON THE APPLE IIGS
On the Apple Has, the SiderFile package can also run ProDOS16 application programs (programs of file type $B3, or “S 16”).
In order for this to work, the machine must be booted into
ProDOS-16 from a boot disk with Apple’s START program
replaced by the START program on the EXTRAS disk, and with
the files PROSEL.SYSTEM and PROSEL on the main directory.
To setup the program selector with ProDOS-16 on a 3.5 floppy
drive, copy PROSEL.SYSTEM and PROSEL to the main directory of the boot disk. Next, copy START from the EXTRAS diskette to the SYSTEM sub-directory of the boot disk.
AN OVERVIEW OF
SiderFile’s ProSel 65

NOTES
66 PROSEL ON THE APPLE IIGS

5. AUXILIARY PROGRAMS
The SiderFile package has many useful utility programs in it.
Most of these are installed on the hard drive during the initial installation process and will appear in either the SiderFile Program
Selector menu or in the sub menu ‘Utilities Directory’. The following section list these utilities in alphabetical order and
describes their function and how to use them. These programs
are part of the ProSel family of utilities. They can be very helpful in working with problems that might come up while using
your computer but it is not necessary to understand them all to
use your Sider.
5.1 BACKUP
PURPOSE:
The BACKUP program is used to backup the Sider’s volumes to
your floppies.
SPECIAL REQUIREMENTS:
It will work with 5-1/4 inch floppies, 3-1/2 inch floppies, and/or
any other ProDOS formatted disk media. It requires 128K of
RAM memory to function.
HOW TO USE:
To backup, you will of course need a supply of floppies. The
program can tell you how many disks will be needed. Simply
format one blank diskette with ProDOS. Place it in floppy drive
one, from the program selection menu choose “Utilities Direc-
tory”, select from the utilities directory the ~backup menu’ item.
Run the BACKUP program, it will inform you how many flop-
pies you will need. Exit the program and prepare the required
diskettes.
AUXILIARY PROGRAMS 67

The backup disks MUST BE ProDOS formatted before starting
the BACKUP program. When formatting these floppies use
volume names like BACKUP.01, BACKUP.02, etc. If you use
disks with other volume names, the program will ask if you want
to destroy the existing volume, and rename the volume.
The backup program will use both floppy drives alternately, unless you specify only one is to be used. The BACKUP screen
looks like this:
FIG. 5-1 BACKUP SCREEN
When you run the BACKUP program, you will be prompted to
enter the Original Slot and Drive. This should be the slot and
drive of the device being backed up. The program will read the
volume name from the specified device and display it (example:
/HARD1). Next, specify the destination slot and drive. The
Program can use both floppy drives; simple enter the assignment
of the first. Select whether to use the single drive option or to
have the floppies alternate. (alternate default = Yes).
The backup procedure will start as soon as you answer this question. The first backup disk should be in the specified drive.
While this first diskette is being backed up. insert the second diskette into the alternate drive, and soon. The total number of diskettes required is shown as “Number needed xx”.
If the disk you have inserted is not named properly (i.e. BACKUP.xx) the process will pause and ask if you want to overwrite
the existing volume. The diskette will be renamed and the backup process will then continue. You can choose to abort the back-
68 BACKUP

up process by hitting “N” at this time. If you have inserted the
wrong disk, replace it and hit “Y”
If the program does not recognize a backup diskette as ProDOS
formatted or if is no diskette is in the drive, then the process will
pause and you will be asked to "Reinsert/replace backup disk”.
Possibly the disk was not well centered. Try replacing the disk
and type C for continue. The escape key aborts the backup
process.
If the program is unable to read a block from the hard disk or is
unable to write a block to the backup disk, it will retry four times
and then inform you of the problem. The block that is causing
the problem is shown at the bottom of the screen in inverse. You
can choose to ignore this error and continue the backup process.
(Make a note of the problem block if you do this. That block will
not be transferred correctly.) If the problem is a write error, then
you should abort the process by hitting the ESC key and start the
backup process over after replacing the diskette in error. Don’t
take chances with faulty media.
AUXILIARY PROGRAMS 69
5.1.1 BackIng Up To A /RAM Drive
You can backup a volume to a FILE on a ProDOS disk device.
This is used when saving the contents of a /RAM disk. To instruct BACKUP to store information to a file, type a 0 when
prompted for the destination slot or for the source slot when you
RESTORE. You will then be prompted for the pathname of the
file to be used. If the file exists (of the proper file type - which

is $F6) then it will be overwritten unless it is locked. If it does
Normally, Backup/Restore alternates disk activity between
drives 1 and 2 of the slot indicated. The program also supports
Apple Has configurations which have two 3-1/2 inch drives assigned to slots 5 and 2. To enable this, you must make a simple
patch. This is done by running the MODIFY.BACKUP program
and modifying both BACKUP and RESTORE. Tell the program
the flint backup disk location (eg., slot 5, drive 1) and the second
(eg., slot 2, drive 1. The program also allows selection of other
defaults.
70 BACKUP
not exist, it will be created. To exit the program, press ESCAPE.
The instructions for backing up and restoring from a file to the
\RAM volume can be stored as a menu item in the program selector. It can also be modified to be the “startup” device. In the case
of BACKUP, you also need to place the name of the volume to
be backed up at relative byte $8A in the BACKUP file, with a
leading length byte (see the section on AUTOMATIC BACKUP). This is most easily done by running the MODIFY.BACKUP program. If done correctly, selecting these applications will
automatically backup/restore the /RAM disk to/from the file.
5.1.2 BackIng Up To Slot 5 or 2

5.2 BEACHCOMBER
PURPOSE:
BEACH COMBER is a ProDOS volume de-fragmenter. It will
rearrange the data on a drive such that all directories are at the
beginning of the disk, and all files will have contiguous data
blocks. This makes for much more efficient file access. Normally
this program need only be run once every 3 to 6 months.
There are three version of BEACH COMBER; BEACH COMBER.10, BEACH COMBER.20 and BEACH COMBER.32.
BEACH COMBER.lO is used on ProDOS volumes of ten
megabytes. The program requires 128kb of RAM space. The
program does not need, or use, any storage space on the disk. It
is limited to volumes that have no used blocks above 10MB. It
is also limited to 255 tree files.
BEACH.COMBER.20 is for twenty megabyte drives and requires a /RAM volume with 512 or more contiguous blocks (i.e.
256K free) to work. It will work with the has /RAM5, with the
ProSe! ram driver and the AE Prodrive, but not with the Checkmate driver which has “illegal blocks”.
BEACH.COMBER.32 is for 32 megabyte volumes and ONLY
works on a has with more than 512K free ram (checked by the
program). It does NOT use /RAM5 so it is best to have a small
RAMS set up or none at all.
HOW TO USE:
THERE ARE ONLY TWO RULES TO USING BEACH
COMBER:
1. First, run Mr.FIXIT twice, taking the test and bad
block scan options to make sure the disk Is OK.
2. ALWAYS make a BACKUP before running the Beach
Comber program!!!!
AUXILIARY PROGRAMS 71

The program will ask for a slot and drive number of the volume
to be optimize. It will then read and display the volume name of
the selected device and pause for an input.
FIG. 5-2 BEACHCOMBER INPUT SCREEN
The time needed to complete the operation depends on the
amount of data on the drive. The actual time can range from a
minute to more than an hour. About 5 to 12 minutes per
megabyte is typical for the first run. Later runs may take much
less, depending on what areas of the disk have been changed and
how extensive the changes were. If you absolutely must abort
the program, you can use the escape key. The program will take
a few moments to react to this key because it will only quit at a
time when the disk is “clean”, and must also do some last moment writing to disk at this point If you later want to continue,
72 BEACH COMBER

the program will quickly arrive at the spot where it stopped, for
the simple reason that it has little to do before that spot. NEVER
interrupt the program with RESET; this will probably make
much of the volume unusable, even though the program does its
best to recover.
The program reads through the files in the directory 4 times. The
program counts trees on pass 0 and will exit without harm if the
255 limit exceeded.
First pass reads data from the disk (errors at this phase will not
affect disk contents). The second pass relocates the directory.
The program uses a complex algorithm for this pass, and any
obscure bugs are likely to be reported.
AUXILIARY PROGRAMS 73
FIG. 5-3 PROCESS SCREEN
The third pass relocates all files except tree files. This pass takes
the greatest amount of time. During this pass, the screen will
show the current block being processed. Finally, the last pass

relocates tree files. (This refers to the files themselves, not to
their directory entries, which will not be changed.)
74 BEACH COMBER

5.3 BLOCK WARDEN
PURPOSE:
The BLOCK. WARDEN program can be used to display and edit
blocks of data. It requires either a IIGS or the Apple 80-column
card and a//c or enhanced//e.
HOW TO USE:
When BLOCK WARDEN loads a screen resembling Fig. 5-4
will appear. This screen displays the individual bytes of a data
block. A second block is loaded but not displayed. Pressing “/”
will toggle between the two blocks. Block Warden has two
modes; READ/WRITE (R/W) and EDIT. When first loaded,
Block Warden is in R/W mode.
AUXILIARY PROGRAMS 75
FIG. 5-4 BLOCK WARDEN
At the bottom of the screen you will notice a list of available
commands which can be used while in the READ/WRITE mode.
The following is a brief description of how each works.

5.3.1 Read I Write Mode
and drive parameters. Note this command
does not immediately read from the disk you
change to, so you can transfer a block from one
disk to another. Subsequent reads, however,
will be made to the new disk.
[P]refix The P command allows you to specify the
prefix. This is commonly used with the F and
I commands, but it can be used for changing
devices.
[F]ollow The F command asks for a pathname (full or
partial) to be followed. After issuing this command the file name being followed will show
at the top of the screen. It reads only the data
blocks of a file, sot cannot be used to look at
the file’s index blocks. Hitting the ESCAPE
key will cancel the follow mode. This facility
supports all file types including directory files
and sparse files. ‘While following a file you
may toggle between EDIT and R/W modes.
[E]dit Is used to switch from READ/WRITE mode to
EDIT mode. More information about EDIT is
found in the next section.
76 BLOCK WARDEN
ARROWS Used to read the next or previous block and can
be used to page through the entire disk.
[Q]uit The Q key will ask if you want to quit; if so it
will return to the Program Selector.
[R]ead The R command allows you to specify the next
block to be read. (All block input is in hex.)
[W]rite The W command allows you to change data in
a block. (Press RETURN for no change.) As
safety precaution, it asks if you really want to
write block.
[C]hange The C command allows you to change the slot

[L]ist The L command disassembles the current buff-
er contents. A TXT file lists in ASCII. This
can be forced for any file type by typing a
quotation mark. The ASCII equivalents of
bytes appear after the disassembly. Forty lines
are listed on each page. You are asked for a
starting byte (0-1 FF) for disassembly. If you
press RETURN, the starting byte will be 0. If
you press the right up arrow, the next page of
the disassembly is shown. Press any other key
to cancel this mode. If you are following a file
the right or up arrow keys will cause the next
block of the file to be listed.
While in the List mode you can print the screen
by typing Open-Apple-D (The default printer
is slot 1. If you have used [D]ump and changed
the printer assignment, the new slot will be
used). The disassembly supports the whole
65816 opcode set. The “M and X flags” attempt to follow the program logic, as in the
Merlin-pro assembler. At the start of each
page these flags can be reset by simultaneously pressing the RETURN and OPEN APPLE
keys to set M=0 or RETURN and the CLOSED
APPLE keys to set X=0.
[D]ump The D command dumps the buffer to the
printers assigned to the slot you entered. You
can abort the command by hitting the ESCAPE
key.
[A] The ^ command sends a list to the printer of all
possible “index blocks” starting with block 7.
This is intended as a last ditch attempt to repair
a damaged directory. It would be better if you
have an up to date list made by the
INFO.DESK program. Note: If block 2 is bad
(the volume name is shown as “?“) this command will not work - it will print ALL the
blocks on the disk. Block 2 must be repaired
first to the extent that it has a valid volume
name and the correct number of blocks (bytes
AUXILIARY PROGRAMS 77

$29,2A of block 2). The printing of a list can
be aborted by hitting the ESC key. The list will
include some blocks that are not really index
blocks, mostly partially full blocks at the ends
of files.
[/] Flip is used to toggle between the two data
blocks in memory.
5.3.2 Edit Mode
In edit mode the arrow keys move the cursor (shown in inverse).
Any key other than a control character will be regarded as a
change to the editing buffer. (In hex mode, it is disregarded if
not a valid hex digit.)
ESC The ESC key returns to R/W mode.
Control X The (Control-X) key cancels any changes you
^X may have made on the current block. (This is
done by rereading the block.)
TAB The TAB key toggles between hex and ascii
editing modes. You can tell what the current
mode is by seeing where the cursor is placed.
In ascii editing mode, the high bit of a typed
character will be off unless you press the Open
Apple key at the same time, in which case the
high bit will be on. Control characters can be
inserted into the buffer only in hex editing
mode.
Control F The (Control-F) key is a lead-in to character
^F find mode. If the cursor is in the hex portion
of the screen then the cursor will disappear and
you are expected to type two hex digits. (An
invalid digit causes this mode to be canceled.)
The resulting byte then becomes the “find
character” and the next occurrence of it in the
buffer will be found and the cursor moved
there. (If none exists the cursor returns to the
first byte and the “Find mode” message is
BLOCK WARDEN

erased.) After this first find, subsequent ^F
commands find further instances of the find
character in the buffer. ‘Ibis mode can be cancelled with the RETURN key. If the [ControlF] key is issued when the cursor is in the ascii
portion of the display then an ascii find character will be gathered. (High bit of the find
character will be off unless Open Apple is
pressed when the character is typed.)
Control S The (Control-S) key selects global search
^S mode. When used the first time this brings up
a request to input a search string. If the string
you give begins with “$“ then it will be taken
as a hex string for the search. If FOLLOW
mode is in effect then only the followed file
will be searched for the string, otherwise the
entire disk, from the present position, will be
searched. The ascii search is not sensitive to
the high bit of characters, nor is it case sensitive. (Thus, for example, a search siring of
Junk will find both “JUNK” and “junk”.) You
can cancel a search in progress with the ESC
key while the disk is reading, or during input
of the search string. (On the Ultraterm version,
use (Control-C) for the latter.)
Strings that cross block boundaries can be located with this option. The program will beep
when a string is found. When found, press ^S
in the EDiT mode to continue searching. You
can cancel by pressing RETURN in EDIT
mode. Searching for the same string can be restarted by typing another [Control-S] in EDIT
mode and pressing RETURN when the default
string is shown.
If the volume name at the top of the screen, is “I?" this means the
program encountered an error determining the name. This Indiacats there is something wrong with block 2 (the first block
shown). It could also mean, the disk is not a ProDOS disk.
AUXILIARY PROGRAMS 79

5.4 BOOT.S6/BOOT.S7
This function is used simply to cause the computer to boot from
Slot 6 or Slot 7 respectively
5.5 CACHE/CACHE.XL
PURPOSE:
ProCACHE is used to speed up I/O communication to the Sider.
It uses RAM memory to store a copy of the hard drive’s address
table and command information. With this information stored
in memory, when a read or write command is issued, the system
does not have to search the disk for important I/O information
before the command can complete. The ProCACHE program
will work on both Sider hard drives and 3-1/2 floppies.
HOW TO USE:
ProCACHE will ask which device to cached, the default is the
device the program was run from. It then asks for the slot and
drive assignment of the RAM volume. If the /RAM volume is
suitable, it locks out a range of blocks on the volume for use as
a cache. It then monitors blocks read from the device being
cached (eg., the hard disk) and places frequently used blocks in
the ram cache. This enhances disk operations substantially.
ProCACHE requires the RAM volume to have a sufficient number of CONTIGUOUS blocks ( 262 blocks or more). An error
message: “Not enough room on the ram volume” will display if
there is insufficient room. The name of the RAM volume must
start with “RAM” (i.e. “RAM”,“RAM5”...) this avoids assigning
a non-RAM disk device as a cache. If a non “RAM....” volume
name is selected an error: “Ram volume not found” will display.
80 BOOT. S6 I BOOT.S7

ProCACHE’s operation is transparent to the user. The programs
function can be unintentionally interrupted by programs which
disables RAM volumes or overwrites them with disregard for its
contents.
ProCACHE uses the disk’s volume name to reference its activities, we do not recommend caching floppies. If you do, you
must reboot each time you change the floppy in the cached drive.
You should not have two floppies with the same names and exchange them while running ProCACHE. When using
ProCACHE on the hard drive, the volume label must be HARD1.
If your hard disk is not named HARD 1, you can rename it or use
Block Warden to change the default in ProCACHE. It is after
the pair of $FFs following the startup name and begins with a
length byte. You MUST NOT do this with removable media.
If the RAM volume being used gets disconnected, the SYSTEM
DEATH message: INSERT SYSTEM DISK AND RESTART ERR OF displays. Some versions of Appleworks, disconnect
devices in slot 3 which may disable the RAM drive. You can
patch your Appleworks to fix this as follows: Run Block.Warden, set the prefix to the Appleworks directory, type F to follow
and specify APLWORKS.SYSTEM. Type E for edit mode.
Type AS to search. Type $29 70 C9 30. It should stop with the
cursor on the 29 of such a string. Move the cursor to the 70 and
type F3 to change the 70 to F3. Move the cursor to the 30 and
type B3 to change the 30 to B3. Type ESC to go to R/W mode.
Type W to write, then RETURN to accept the block shown and
Y to accept the write.
When installed and active, the ProCACHE program will slow
down the I/O access to 5-1/4” floppy disks. If you will be using
the floppies a lot, you should turn ProCACHE off by rebooting.
AUXILIARY PROGRAMS 81

The program cannot be used to cache 5-1/4 inch floppy drives
and attempting to do so will yield an error message.
The program CACHE.XL is an alternative version of CACHE
which uses twice as much ram area for caching but disables the
5-1/4” floppy drives (reboot or rerun ProDOS to access them).
Generally the regular CACHE is to be preferred but if you find
too much reloading of files then you might use CACHE.XL instead.
5.6 CLOCK.DRV PROGRAM
This program is only for the AE “//c SYSTEM CLOCK”. Do
not use this if you do not have the Apple llc. The original clock
driver had a conflict with the //c mouse. Consequently, it did not
work correctly with ProSel. Newer versions of it corrected part
of the problem but the year still had to be set by hand. The present
driver knows the year and it will work up to 1992. (It will work
beyond that by a simple modification.) To use this driver just
boot into ProSel and select it as an application. This need only
be done once per computer session.
5.7 COPY/COPY.GS
PURPOSE:
This is a volume copy program for ProDOS disks. Its features
are:
• It is fast, especially on partially full disks.
• It continues even if errors are encountered.
• It can copy one hard disk volume to another (if the two
volumes are the same size). The Sider 40 MB are divided into
equal parts. You could backup /HARD1 to /HARD2.
• It allows single drive or dual drive copies.
• It will use the Multiram or Ramworks card when doing a
single drive copy (unless you tell it not to do so). Even if you
do not have such a card the program will use most of the extra
64K in a//e or//c.
82 CLOCK.DRV PROGRAM

• If only one pass is required then you have the option of
copying to subsequent disks without reading again from the
original.
HOW TO USE:
When running COPY, you will be prompted to enter the slot and
drive numbers of the original and duplicate drives. COPY first
checks if the drives selected are active, if not, the program will
restart. Next COPY checks to see if the source and destination
volumes are the same size. It is impossible to accidentally copy
from a floppy to a Sider. Once selected, the drive assignments
remain active for subsequent copies.
COPY displays the volume names and creation dates of both the
source and destination drives, it will warn you that the destination volume will be destroyed. If you change your mind, it will
exit (via a Quit call). During the copy, the block currently being
read or written is displayed at the bottom of the screen in inverse.
Only blocks listed as used in the bit map are copied.
If a read or write error occurs the program retries four times. If
it is still unable to do the read or write, the program will tell you
the error and ask if you want to continue. If the error is on the
destination disk, we recommend using a different disk. If you
want to continue anyway (and try to fix the bad block by other
means) you should make a note of the block on which the error
occurred and then type C for continue.
When the copy is done you will be asked if you want to do
another copy. The same original and destination drives are used.
If the volume is /HARD1, /HARD2, etc, the copy will be named
/COPY1, /COPY2, etc., and vice-versa. This prevents duplication of volume names when using one Sider to back up another.
Affect on the /RAM volume: If you don’t use the single drive,
use extra memory option then there is no effect. If you only have
the standard /RAM volume, then use of the extra memory option
will cause all data in the [RAM drive to be destroyed, and /RAM
will be reformatted on exit. Other /RAM drives will also lose
their data, and will be reformatted provided they accept a format
request. (The supplied RAM.DRIVE does not accept formatting
- there is no room in the driver - and so it is left disconnected and
RAM.DRIVE will have to be rerun after the exit from COPY.)
AUXILIARY PROGRAMS 83

COPY allows the copying of a small volume to a volume of a
larger size, provided that has been formatted. This allows for
copying of 800k disks using the Apple memory card, by first
copying the disk to the RAM disk and then to another(formatted)
800k disk. For this to work you must have I mb on the Apple
memory card. You are asked (if the program determines that the
situation is one it can handle) whether you want the size increased to the size of the destination disk. You would want this
if you are copying a floppy to a Unidisk, but not if you are copying a floppy to the Apple memory card with a view to copying
that back out to other floppies. If you do not select this option
then the destination volume will have the same size as the
original. You should reformat the /RAM drive (turn the computer off and on) after using it to copy disks in this way. On the
IlGS, you must have at least 800K on the /RAM5 volume to copy
3.5" disks. After copying to /RAM5, you must reverse the slot
and drive specifications and copy the other direction. Alternatively you can use the program COPY.GS which looks for free
memory and uses it provided it is a single drive copy.
84 COPY / COPY.GS

5.8 FIND.FILE
PURPOSE:
Locate files on a particular drive and return information pertaining to
the file including the directory where it can be found.
HOW TO USE:
The following is a list of functions available when using
FIND.FILE:
RETURN Continues searching other directories, if any,
for occurrence of the stated file name.
SPACE Will cause the scrolling of the listing of the to
pause.
ESC Exits the program and returns to the program
selector.
D Displays to the screen the contents of the file
in HEX and ASCII formats. Option for
printer.
T Types the file to the screen. Control characters
may be inverse video and may not print.
Option for printer.
L Works with Basic files. Produces formatted
listing of programs where all statements are
shown on separate lines, loops and conditional are indented.
R If the file found is a SYS file will run the
file.
* or = Are ‘wild cards’. Can be used anywhere in a
file name to represent unspecified characters.
FTND.FILE wilt prompt you for a slot and drive and a file name.
It will search through the entire disk. If found, the directory containing the file and data concerning it will be displayed. Next,
you will be prompted to enter one of the above commands. If the
AUXILIARY PROGRAMS 85

file can not be found or disk is damaged you will be notified and
returned to the program selector menu.
To run BASIC program from FIND.FILE, you must tell it were
the BASIC.SYSTEM file is. This is done by editing the program
selector’s menu item for FIND.FINDER. Specifying the full
pathname of the BASIC.SYSTEM file as the startup of
FIND.FILE. Initial installation places BASIC.SYSTEM in the
main directory. If you move BASIC.SYSTEM to another location, however, you will need to edit the program selection listing
for “File finder”. When a BASIC program is run this way, the
prefix will be set to the directory containing the program. This
directory does not have to contain BASIC.SYSTEM.
FIND.FILE can also find files containing a specified text string.
5.9 INFO.DESK
PURPOSE:
This program will print the entire tree structure of a selected Sider
volume. The output can be sent to the 80 column screen, to a
printer, or to a disk file.
HOW TO USE:
There are four main parts to the program that give you different
types of documentation of the files on your disk. The first part
provides useful directory listings of your files on the Sider. The
other 3 parts provide information of a technical nature.
1. Catalog.
This option is usually the only one you will use. It prints a
tree structured catalog of the entire volume. Sub-directory
contents are indented two spaces. All the usual catalog information is printed except the time of day and the access
(locked) status. Access status is printed if the line length is
set to 90 or more.
86 INFO.DESK

2. Block usage by files.
This mode tells you just what blocks on the disk are used by
each file. The printout gives the number of blocks in each
file (as in mode 1). Then comes the Index field. This contains the number of the index block. This field is empty for
directory files and for seedling files (which have no index
block).
Next come the actual data blocks. If two numbers in this list
are separated by periods then they represent a range of
blocks all belonging to that file.
In case of a tree file (file length = $20000 = 131072) the first
entry in the Index column is the master key block and this
will be indicated by the text ‘ (Master index blockY next
to the block number. Following this, on subsequent lines,
are the index blocks pointed to by the master index block,
and their associated data blocks.,
The information provided by this mode can be invaluable if
you should ever have to attempt a repair by a disk zap
program.
3. File usage by blocks.
This mode is the “reverse’ of mode 2. It shows which files
belong to the blocks on the disk. Most of the disk operations
are done prior to any printing, so be patient. The printout
consists of ranges of blocks in numerical order followed by
the file names (the full pathname less the volume name)
which use these blocks. This routine must build two large
tables and there may not be sufficient room to handle very
large volumes. In that case a partial table will be printed.
You can tell whether this happened by comparing the number of files with that given by one of the other modes.
4. Bit map.
This mode prints the volume bit map. Used blocks are
shown with x’ and free ones with".". (You can change
these.)
Auxiliary PROGRAMS 87

At any time during printout the space bar will stop, then step,
the process, and ESC will abort it. When printing to the
screen is finished, the program waits for a keypress before
clearing the screen and asking if you want to do another.
5.10 MAKE.PPSYS
PURPOSE:
This program will make a file PPSYS that allows you to call
up the Pinpoint accessories directly from ProSel.
HOW TO USE:
Directions (follow very carefully):
1. Install Pinpoint first if not already done.
2. Copy the file MAKE.PPSYS to the directory containing a
Pinpoint modified version of BASIC.SYSTEM and set the
prefix to that directory.
3. Type CREATE PPSYS,TSYS
4. Type BLOAD MAKE.PPSYS
5. Type CALL 8192
6. Type BSAVE PPSYS,TSYS,A$2000,L$3200
7. DO NOT TRY TO EXECUTE PPSYS - THIS MUST BE
DONE FROM ProSel.
8. Make an application specification for this in ProSel. Forexample, if the file PPSYS and your Pinpoint accessories are
in a sub-directory called PINPOINT then use:
Screen title: Pinpoint utilities
Prefix: ?PINPOINT=
Application: PPSyS
Startup: <none>
9. You can then delete the file MAKE.PPSYS at your leisure.
88 MAKE.PPSYS

5.11 MR.FIXIT
PURPOSE:
This program is used to test and attempt to repair data blocks on
your bard drive or floppies. The program allows you to choose
several types of testing to be performed. It also allows you to
print out a copy of the test results. You can and should use this
program even when you are not having problems. Often finding
a data block error early can mean important information can be
repaired instead of lost.
HOW TO USE:
MR.FIXIT has four modes: a Test mode in which nothing is altered on the disk, a Fix mode which attempts to correct defects
found in the directory structure, etc, a Main directory mode
which attempts to reconstruct the main directory and a Bad
blocks mode which scans for bad blocks and, if desired, places
them in a bad block file. The Fix and Main directory modes are
very dangerous and can change a bad situation to a worse one,
so never use them without first using the test mode and never use
them without an adequate backup that you can fall back on.
The program tests and, if fix mode is active, fixes the following
defects on any ProDOS volume:
1. Header pointers of all active files.
2. Parent pointers and parent entry numbers of all sub-directories.
3. Backwards directory links.
4. Used blocks marked free in the bit map.
5. Illegal characters in file names.
6. Entry length (the program assumes this should be $27).
7. Number of entries per block (assumes this should be 13).
8. File count in each directory.
AUXILIARY PROGRAMS 89

9. Incomplete deletes (deleted files with non-zero ‘name
length).
10. Incorrect directory storage types.
11. File and directory block counts.
12. File and directory dates and times.
In file names (point 5) lower case characters are converted to
upper case, high bits are stripped, and other illegal characters are replaced by periods, illegal dates and times are
zeroed.
The following items are checked and reported, but not acted
upon:
13. Blocks used by two or more files.
14. Block number out of range (past volume size).
15. Unknown storage types.
Some errors result in files or directories being skipped over. You
will be told if this occurs. It happens because of information
damaged in such a way that the situation cannot be handled, or
the damage is such that the supposition is that the remaining data
is invalid.
Some block read/write errors cannot be handled and will result in
termination of the program.
Sometimes in the error printout you may see a directory name
printed twice. This indicates the correction refers to the directory “header” rather than the “parent block”.
MR.FIXIT will also look for blocks that are marked used on the
volume bit map but are not used by any file. You will be given
the option, in Fix mode, of releasing these blocks. Sometimes
areas of a volume are marked off without belonging to any file
and in this case you should not ask that these blocks be freed.
Examples are the UNODOS area on a Unidisk or a Pascal area.
As a general rule, if the number of blocks indicated as being
marked, but unused, is large, then you should assume that they
90 MR.FIXIT

are marked for a reason and should not free them. (UNODOS,
for example, marks exactly 400 blocks.)
The most important block on a ProDOS volume is block 2. Since
it is accessed much more often than any other block, it is also the
most likely to be damaged. If it is, you will probably see a message in MR.FIXIT that block 2 is too damaged for the program
to function. There is a special provision for attempting a repair
of the main directory, and it is accessed automatically when you
request Fix mode and block 2 has extensive damage. You can
also force this mode by selecting M at the Test/Fix prompt. You
will be asked if the program should assume that the ‘bit map” is
valid (default = Yes). Ordinarily you should select Y unless
there is some reason to believe the bit map is damaged. (For example, if you are trying to resurrect the sub-directories after a
disk has been “wiped” by SiderFile then the bit map will NOT
be valid and you must select N at this prompt.)
When this mode has been selected by M or automatically because
block 2 has been determined to be substantially damaged
MR.FIXIT will tell you that this attempt is being made, and will
give a few particulars along the way. Although the routine can
resurrect most sub-directory pointers, it cannot do anything for
standard (non-sub-directory) files in the main directory. While
this routine is operating, every block on the volume will be read.
This may take some time, so be patient. When it is finished, you
will get the “Another?” message. Note that this routine does not
do the other repair jobs mentioned above. You can run through
the disk test again to check if those things are all right. You
should realize, however, that this main directory repair routine
expects most of the rest of the volume to be reasonably valid and
normal. (For example, it assumes that the “bit map” starts on
block 6 if the main directory header has been damaged. This is
true for almost all disks, but not for some RAM volumes; this
routine should not be attempted on a RAM volume or any other
volume you suspect is organized in an unusual way.
AUXILIARY PROGRAMS 91
If you select the Bad block mode then you will be asked if you
want only to test or to fix. If you select test then the volume will
simply be scanned for bad blocks and the results reported. If you
select fix then there will be an attempt to place the bad blocks
found in a bad blocks file. This file will be created in the main
volume directory (so be sure there is room for it). If a bad block

is a data block and not a directory or index block then several attempts will be made to read it and relocate it. If it cannot be read
then a fake block is substituted and marked with the message
“DAMAGED BLOCK”.
MISTER FIXIT can be used to resurrect the sub-directories in the
main directory and all other files that are not in the main directory. (It is not possible to retrieve the vital pointers for other files
in the main directory, although those files may still be intact on
the disk somewhere.) This can be used on a disk that has been
inadvertently “wiped” by SiderFile or “deleted” by COPY ][+ or
a large volume that has been “formatted’ by filer (i.e., as long as
the disk was not physically formatted). To do this, first use the
option M of MR.FIXIT to repair the main directory. Then use
the T mode to check the types of remaining errors. (There should
be a LOT of block free errors, and a file count error.) Then use
the F mode to fix the remaining errors if there are no fatal errors.
You must remember that this program makes decisions that
sometimes may be inappropriate and may leave some undetected
problems. MISTER FIXIT can be automated by putting the
desired key sequence after a semicolon in the startup position.
92 MR.FIXIT
 Loading...