

Page 1
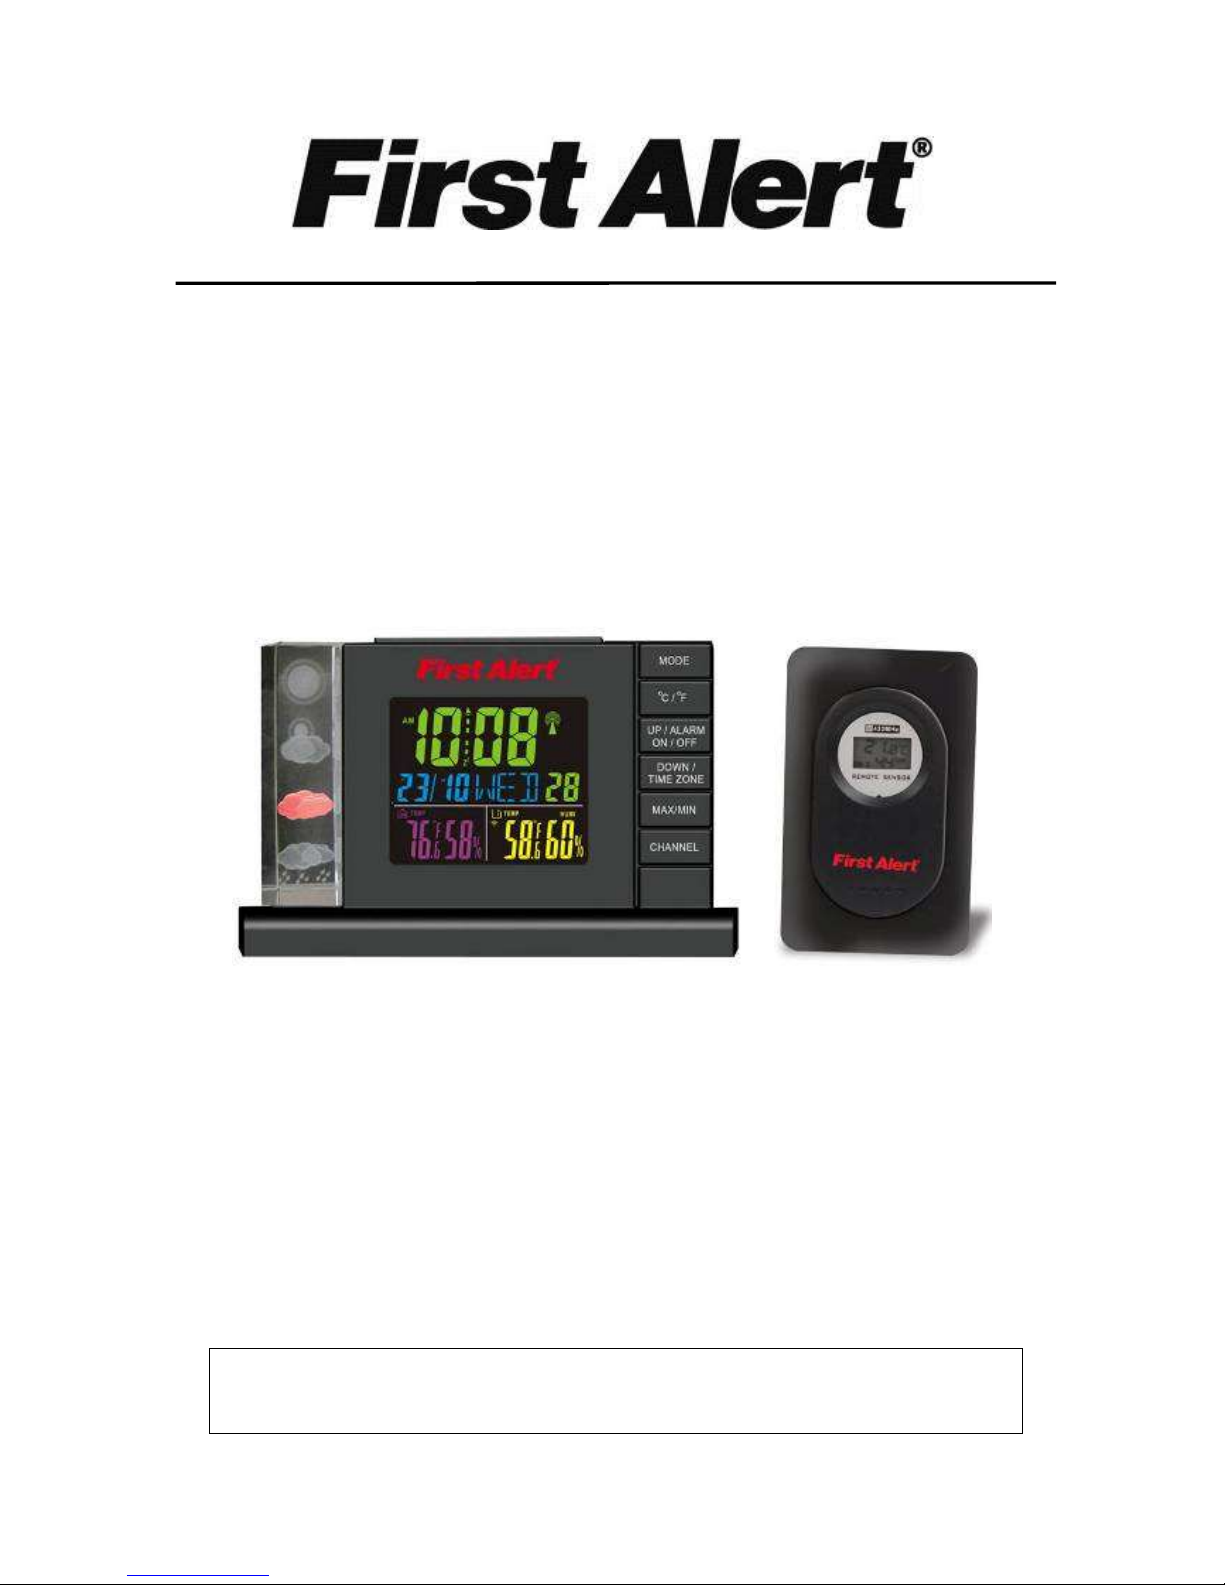
RADIO CONTROLLED WEATHER STATION ALARM CLOCK
USER MANUAL
SFA2650
PLEASE READ THIS USER MANUAL COMPLETELY BEFORE
OPERATING THIS UNIT AND RETAIN IT FOR FUTURE REFERENCE
Page 2

1
IMPORTANT SAFETY INSTRUCTIONS
When used in the directed manner, this unit has been designed and manufactured to
ensure your personal safety. However, improper use can result in potential electrical shock
or fire hazards. Please read all safety and operating instructions carefully before installation
and use, and keep these instructions handy for future reference. Take special note of all
warnings listed in these instructions and on the unit.
1. Read these instructions – All the safety and operating instructions should be read
before the appliance is operated.
2. Keep these instructions – The safety and operating instructions should be kept for future
reference.
3. Heed all warnings – All warnings on the appliance and in the operating instructions
should be adhered to.
4. Follow all instructions – All operation and use instructions should be followed.
5. Do not use this apparatus near water – The appliance should not be used near water;
for example, near a bath tub, washbowl, kitchen sink, laundry tub, in a wet basement, or
near a swimming pool.
6. Clean only with dry cloth – The appliance should be cleaned only as recommended by
the manufacturer.
7. Do not install near any heat sources such as radiators, heat registers, stoves, or other
apparatus (including amplifiers) that produce heat.
8. Only use attachments / accessories specified by the manufacturer.
9. Refer all servicing to qualified service personnel. Servicing is required when the
apparatus has been damaged in any way, such as power-supply cord or plug is
damaged, liquid has been spilled or objects have fallen into the apparatus, the
apparatus has been exposed to rain or moisture, does not operate normally, or has
been dropped.
10. This appliance shall not be exposed to dripping or splashing water and that no object
filled with liquids such as vases shall be placed on the apparatus.
11. Power Sources – The appliance should be connected to a power supply only of the
type described in the operating instructions or as marked on the appliance. Do not
overload wall outlet.
12. Danger of explosion if battery is incorrectly replaced. Replace only with the same or
equivalent type.
13. Do not attempt to dismantle, open or repair this product yourself. If a fault occurs, seek
advice from your local qualified service technician or contact the distributor via the
telephone number at the back of this instruction manual.
14. Caution marking and nameplate are located on back of product.
Page 3

2
COMPLIANCE WITH FCC REGULATIONS
This device complies with Part 15 of the FCC Rules. Operation is subject to the following
two conditions:
(1) this device may not cause harmful interference, and
(2) this device must accept any interference received, including interference that may
cause undesired operation.
NOTE: This equipment has been tested and found to comply with the limits for a Class B
digital device, pursuant to Part 15 of the FCC Rules. These limits are designed to provide
reasonable protection against harmful interference in a residential installation. This
equipment generates, uses and can radiate radio frequency energy and, if not installed and
used in accordance with the instructions, may cause harmful interference to radio
communications. However, there is no guarantee that interference will not occur in a
particular installation. If this equipment does cause harmful interference to radio or
television reception, which can be determined by turning the equipment off and on, the user
is encouraged to try to correct the interference by one or more of the following measures:
- Reorient or relocate the receiving antenna.
- Increase the separation between the equipment and receiver.
- Connect the equipment into an outlet on a circuit different from that to which the receiver
is connected.
- Consult the dealer or an experienced radio/TV technician for help.
CAUTION: Changes or modifications not expressly approved by the party
responsible for compliance could void the user’s authority to operate the
equipment.
SPECIAL NOTE
To prevent any scratching or damage to your furniture, we strongly recommend that you
purchase small self-adhesive felt pads, available at hardware stores and home
improvement centers everywhere, and apply these pads to the bottom of the unit before
you place the product on any fine wooden furniture.
Page 4
3
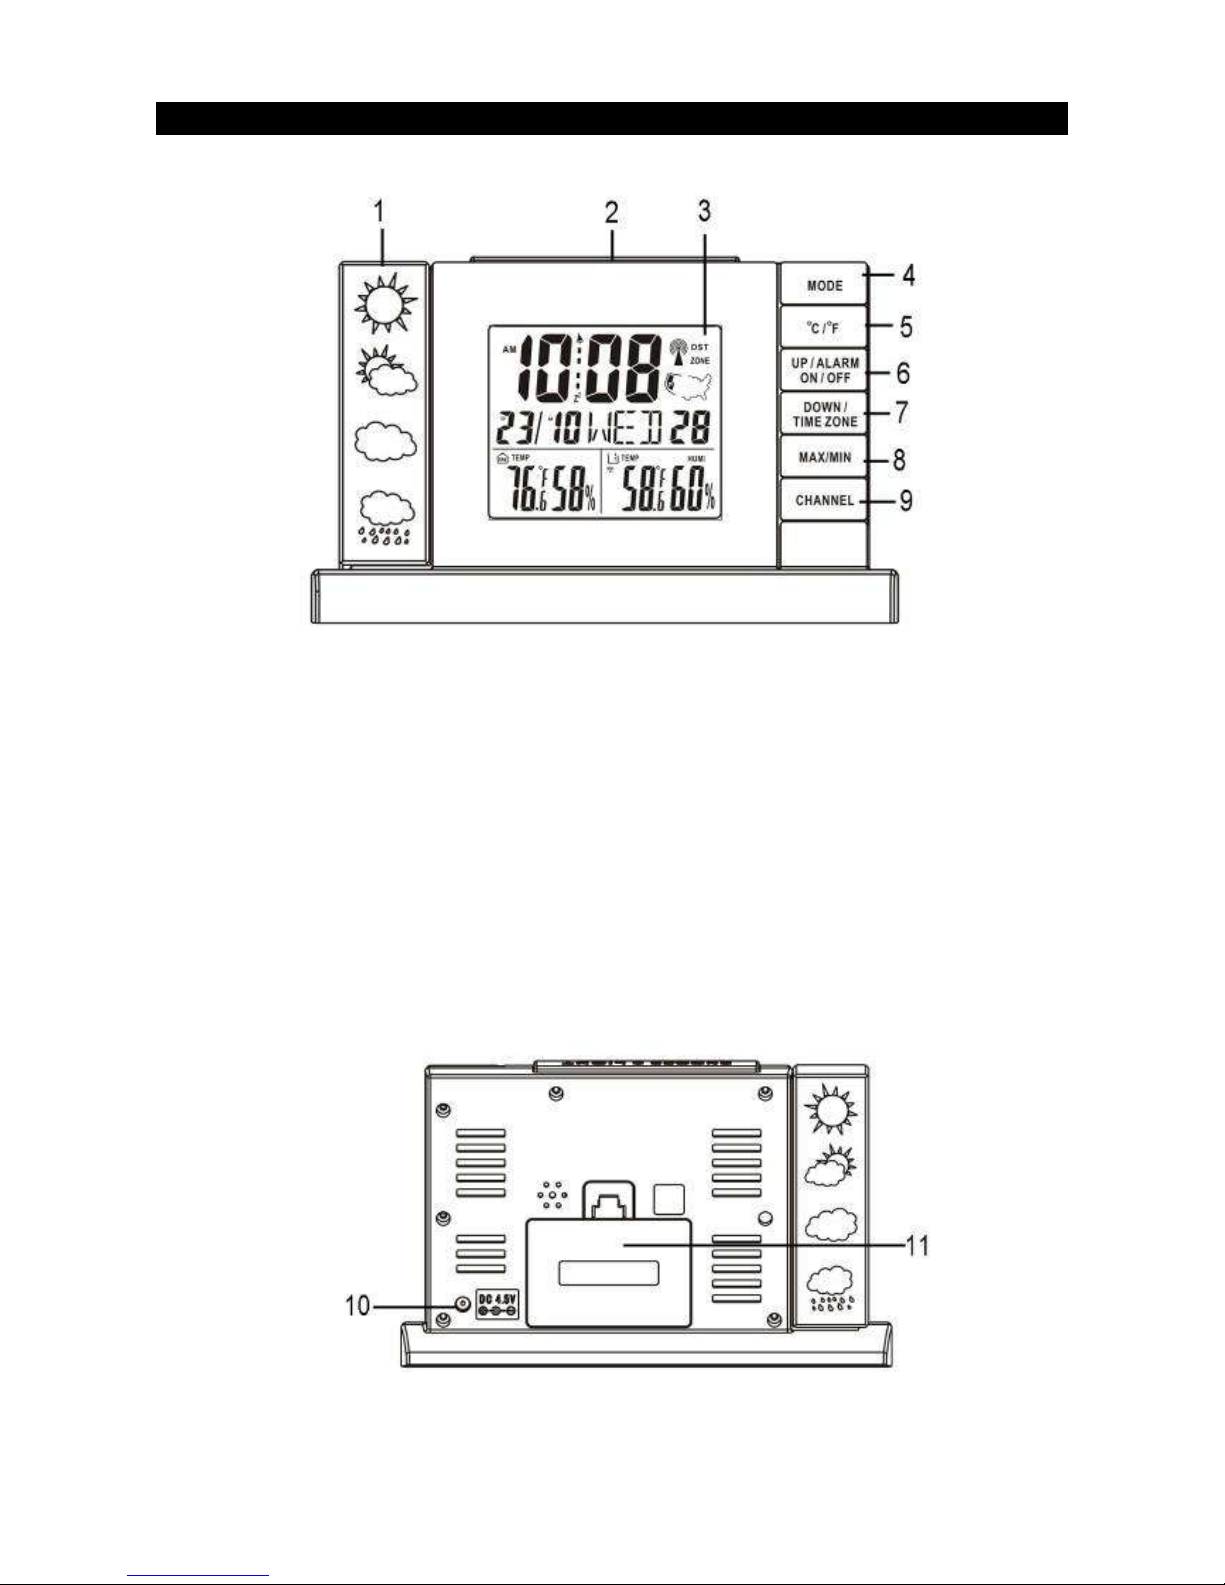
LOCATION OF CONTROLS
MAIN UNIT
1. Weather Forecast Indicator
2. SNOOZE/LIGHT Button
3. Multi Function Display
4. Mode Button
5. Celsius (°C) / Fahrenheit (°F) selection button
6. Adjust UP/Alarm ON/OFF Button
7. Adjust DOWN/Time Zone Button
8. Maximum/Minimum Temperature/Humidity Record Button
9. Channel Selection Button
10. DC IN Jack
11. Main Unit Battery Compartment Door
Page 5
4
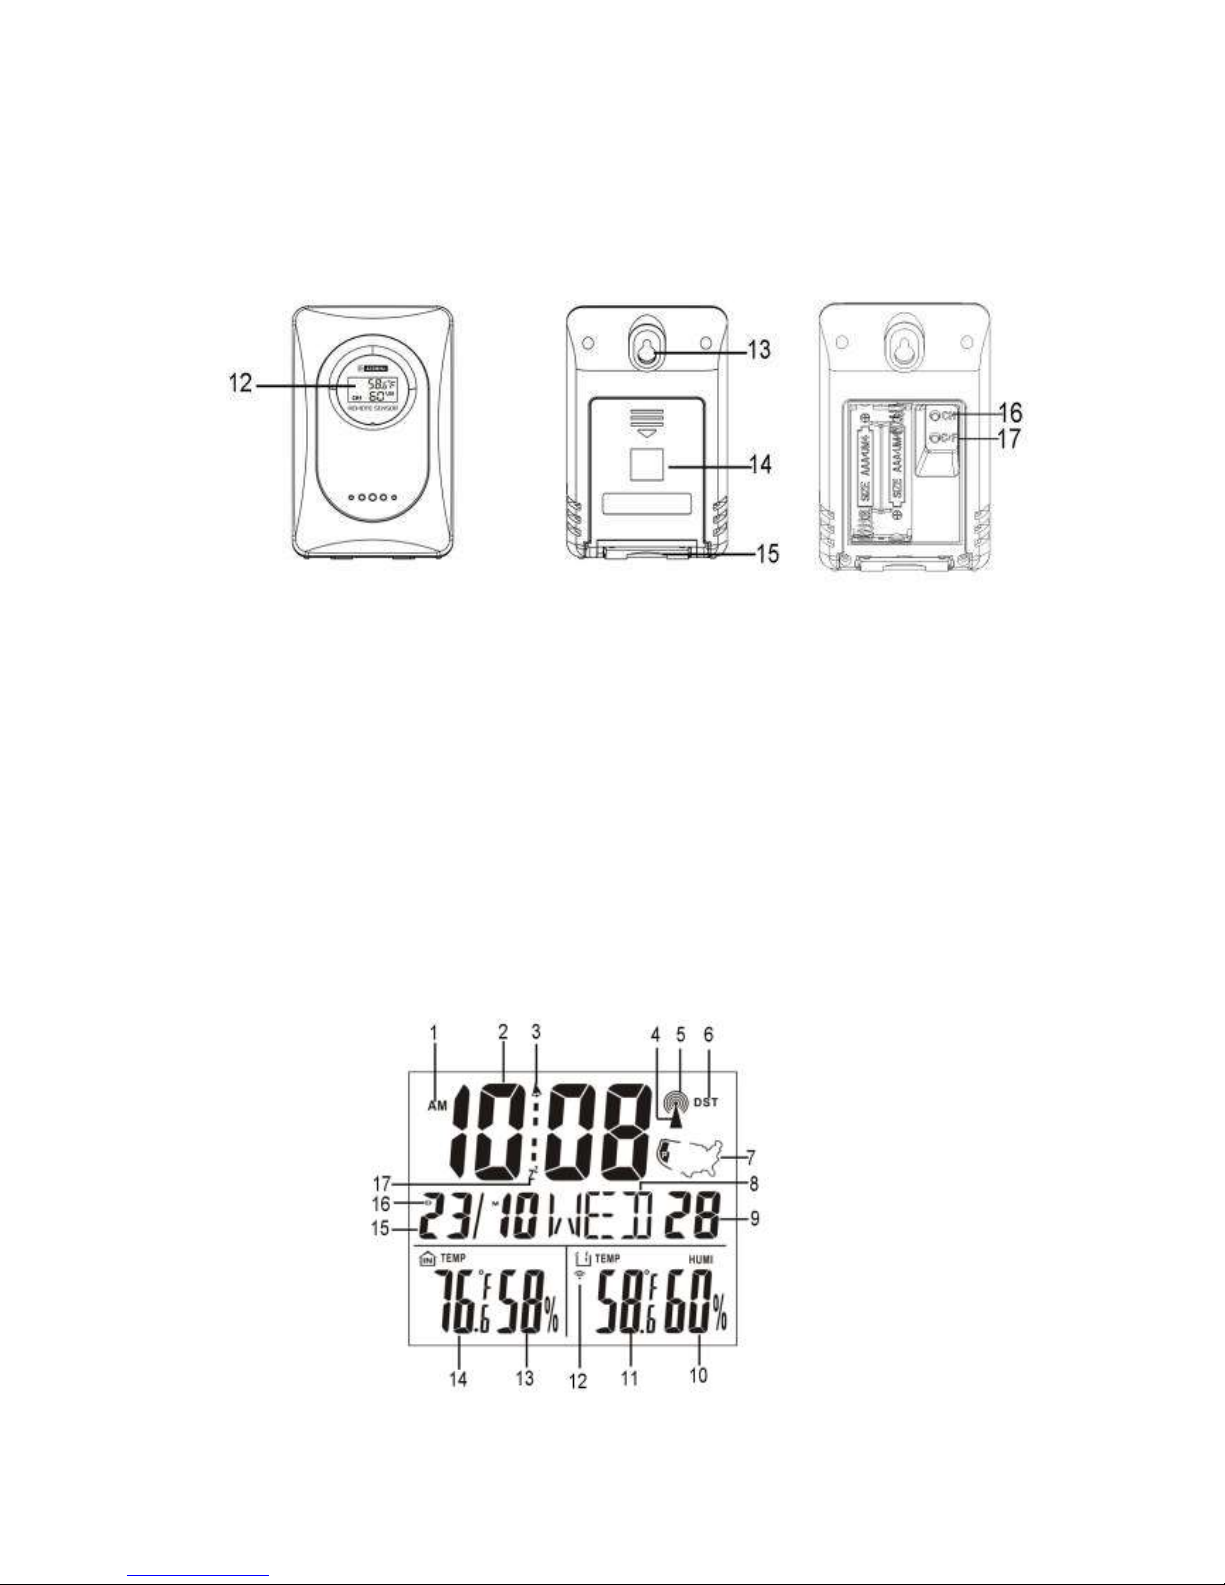
REMOTE SENSOR
12. Remote Sensor Display
13. Remote Sensor Wall Mount Hole
14. Remote Sensor Battery Compartment Cover
15. Folding Stand
16. Channel Selection Button (Inside Battery Compartment)
17. Celsius (°C) / Fahrenheit (°F) selection button (Inside Battery Compartment)
DISPLAY
Page 6

5
1. AM/PM Time Indicator
2. Clock Display
3. Alarm Indicator
4. RCC (Radio Controlled Clock) Indicator
5. RCC Reception Indicator
6. DST (Daylight Saving Time) Indicator
7. Time Zone Indicator
8. Day of the Week Display
9. Second Digits
10. Outdoor Humidity Meter
11. Outdoor Temperature Meter
12. Wireless Sensor receiving indicator
13. Indoor Humidity Meter
14. Indoor Temperature Meter
15. Date/Month
16. Date/Month Format
17. Snooze Indicator
POWER SOURCE
This unit operates using the included AC-DC Adaptor or on 3 X AAA batteries (not included)
AC POWER OPERATION
An AC-DC Adaptor with the output 4.5V DC 200mA (included) is required for operating the
main unit in AC power mode.
1.) To connect the AC-DC Adaptor to the unit, firmly and securely insert the DC plug of the
adaptor into the DC Jack located on the left hand side of the back of the unit.
2.) Plug the AC-DC Adaptor plug into a household AC outlet that supplies 120V AC ~ 60Hz.
Connecting this system to any other power source may cause damage to the system.
NOTE: When the AC-DC adaptor is connected to the DC Jack, the batteries are automatically
disconnected.
BATTERY OPERATION
1. Open the Battery Door on the back of the main unit.
2. Following the polarity (+ and -) diagrams shown inside the battery compartment, insert 3
‘AAA' (UM-4) batteries (not included).
Note: For optimum performance, alkaline-type batteries are recommended.
3. Replace the Battery Door.
IMPORTANT: Be sure that the batteries are installed correctly. Wrong polarity may damage
the unit.
NOTE:
When you first apply power (AC-DC Adaptor or Batteries) to the SFA2650, the clock
display will default to 12 hour mode. The display will show 12:00 AM, and the U.S.
Page 7

6
map will have the West coast highlighted for Pacific Time zone.
If the display is showing something different, or is not in 12 hour mode, please
unplug the power adaptor and remove all the batteries from the main unit. Wait a
minute or two, and reattach the AC-DC Power Adaptor and replace the Batteries.
REMOTE SENSOR
1. Open the Battery Door on the back of the remote sensor.
2. Following the polarity (+ and -) diagrams shown inside the battery compartment, insert 2
‘AAA' (UM-4) batteries (not included).
Note: For optimum performance, lithium type batteries are recommended.
3. Replace the Battery Door.
IMPORTANT: Be sure that the batteries are installed correctly. Wrong polarity may damage
the unit.
BATTERY NOTE AND CARE
- Danger of explosion if the battery is replaced incorrectly. Replace only with the same or
equivalent type.
- Do not mix old and new batteries.
- Do not mix alkaline, standard (carbon-zinc) or rechargeable (nickel-cadmium) batteries.
- If the unit is not to be used for an extended period of time, remove the battery. Any old or
leaking battery can cause damage to the unit and may void the warranty.
- Do not dispose of batteries in fire, batteries may explode or leak.
- Do not try to recharge batteries not intended to be recharged; they can overheat, rupture
and leak(Follow battery manufacturer’s directions).
- Only an adult should replace the batteries
CLOCK AND CALENDAR SETTING
The time on this unit can be set manually or automatically when it’s receiving the WWVB
signal broadcasted by NIST radio station.
AUTOMATIC TIME SETTING
Radio Controlled Clock Receiving
The unit will automatically enter the RCC (Radio Controlled Clock) receiving state after
about 4 minutes once it’s plugged in or reset.
To enter the RCC receiving mode immediately,
1. In clock display mode, press and hold the “DOWN/TIME ZONE” button for 2 seconds, or
until the RCC receiving indicator (#4) appears flashing on the display. The unit will enter
RCC receiving mode automatically every day.
2. Automatic RCC receiving will begin at the following times: 2:00 AM, 3:00 AM, 4:00 AM
and 5:00 AM respectively. The unit begins receiving the RCC signal at 2:00 AM, if it fails
to receive at this time, the unit will try to receive again at 3:00 AM automatically. If the
reception is successful at 2:00 AM, it will not enter the RCC receiving mode any more
until 2:00 AM the next day. If it fails again at 3:00 AM, the unit will try again two more
Page 8

7
times, again at 4:00 AM and at 5:00 AM. If the unit fails to receive the RCC signal at
5:00 AM, it will not automatic enter the RCC receiving mode again until 2:00 AM on the
following day. The RCC receiving period for this unit is around 7 minutes.
NOTE:
Please check the following if you are having problems getting the clock to set
automatically:
If you are using batteries, check them and replace if necessary.
Try rotating the main unit 90 degrees or relocate it to another location opposite
where you have it placed. The antennas are directional and you might be able to
improve the signal strength by turning the antenna.
Place the SFA2650 along a wall or near a window that faces the source of the
broadcast (Fort Collins, Colorado).
Relocate the clock at least 3-6 feet away from any computer monitors, which can
cause interference (some monitors have a scan frequency at or near the WWVB
carrier frequency of 60 kHz).
If nothing else works, take the clock outdoors at night and power it down (remove
the batteries and unplug it), then power it up again to force it to look for the
WWVB signal. If the unit works outdoors but not indoors, you probably have a
local interference problem inside your house or building.
The shielding provided by a metal building might prevent the clock from working.
For example, if you live in a mobile home or a house with steel siding, the clock
might not work because the signals are being blocked.
RCC reception icons
1. When the unit enters RCC receiving status, the RCC indicator (tower-shaped icon) (#4)
will flash on the display.
2. When unit is receiving the signal, the RCC indicator (#4) and the RCC receiving indicator
(#5) will flash.
3. If RCC signal is too weak to be received, the RCC indicator (#4) keeps flashing but the
RCC receiving indicator (#5) will not be displayed.
4. If the unit received the synchronization signal, the RCC indicator (#4) and the RCC
receiving indicator (#5) will both be displayed solid and exit the receiving mode.
5. When the unit fails to receive the signals in a day, it will receive the signal again at 2:00
AM on next day. To exit the RCC receiving mode, press the “DOWN/TIME ZONE” button.
The RCC indicator icon (#4) disappears from display.
6. During the receiving of the RCC signal, if the alarm sounds, it will exit RCC receiving
mode first and change to alarm mode.
7. When received a DST signal, the DST indicator will appear on display.
Page 9

8
8. The RCC indicator (#4) and RCC receiving indicator (#5) will turn off if you reset the time
MANUALLY SETTING THE TIME & CALENDAR
If you are out of the broadcast reach of the RCC radio station or if the reception is not
strong enough, the time can be set manually.
In clock display mode, tap the DOWN button repeatedly to select a Time Zone listed below.
Pacific Time ( P ) Mountain Time ( M ) Central Time ( C ) Eastern Time ( E )
Setting 12/24 Hour Format
1. Press and hold the MODE button for 2 seconds to enter into time setting, “12H” will
appear and flash.
2. Press the UP/DOWN button to change clock setting display in 12 or 24 hour format.
Setting the Clock
3. Press the MODE button to confirm, hour digits will flash to prompt for input.
4. Tap the UP/DOWN button repeatedly to set the hour value. Press and hold the buttons to
speed up the forward or reverse scanning of the digits.
5. Note: Make sure the hour is set so that the AM or PM indicators are displayed correctly.
6. Press the MODE button after the hour is set, Minute digits flashing to prompt for input.
7. Tap the UP/DOWN button repeatedly to set the minute value. Press and hold the buttons
to speed up the forward or reverse scanning of the digits.
Setting the Calendar
8. Press the MODE button after the minute is set, Year digits flashing to prompt for input.
9. Tap the UP/DOWN button repeatedly to set the year.
10. Press the MODE button after the year is set, Month/Date format icons flashing to prompt
for input.
11. Press the UP/DOWN button to change Month – Date or Date – Month display format.
12. Press the MODE button to confirm, month digits is flashing to prompt for input.
13. Tap the UP/DOWN button repeatedly to set the month value.
14. Press the MODE button to confirm, Date digits is flashing to prompt for input.
15. Tap the UP/DOWN button repeatedly to set the date value. Press and hold the buttons to
speed up the forward or reverse scanning of the digits.
16. Press the MODE button to confirm, Language menu for Week date is flashing to prompt
for input. Tap the UP/DOWN button to select the language you want in below sequence.
English (ENG) German (GER) French (FRE) Italian (ITA) Dutch (NET) Spanish (ESP) Danish (DAM)
Turning DST ON/OFF for RCC reception
17. Press the MODE button to confirm, DST ON/OFF of radio controlled is flashing to prompt
for input.
Page 10
9
18. Tap the UP/DOWN button repeatedly to select ON or OFF. Select ON, you will receive
day light saving time automatically. Select OFF, you will no receive day line saving time.
19. Press the MODE button to finish the set up.
NOTE: 1.) As soon as the RCC signal is received again, the clock will automatically
synchronize with received time.
2.) DST ON/FF only available in RCC mode but no manually change the time.
3.) The unit will save your last change and exit automatically if no key is
operated in 30 seconds.
4.) If the unit was reset, you need to set the clock again.
ALARM SETTING
Setting Alarm Time
1. Tap the MODE button twice to enter Alarm setting mode, the alarm indicator appears
on display.
2. Press and hold the MODE button for 3 seconds, Hour digits will flash.
3. Tap the UP/DOWN button repeatedly to set the hour value. Press and hold the buttons to
speed up the forward or reverse scanning of the digits.
4. Note: Make sure the hour is set so that the AM or PM indicators are displayed correctly.
5. Press the MODE button after the hour is set, Minute digits flashing to prompt for input.
6. Tap the UP/DOWN button repeatedly to set the minute value. Press and hold the buttons
to speed up the forward or reverse scanning of the digits.
7. Tap the MODE button to finish the setting or wait for few seconds to exit alarm setting
mode.
8. Alarm will sound for 2 minutes when set time comes. Tap snooze button to enter
SNOOZE mode during alarm sounding. Tap any button on front panel to turn off the
alarm until next day.
Turn the Alarm ON/OFF
In clock display mode, tap the MODE button twice to enter Alarm display mode.
In Alarm off mode, tap the ALARM ON/OFF button to turn on alarm, Alarm icon appears
in display.
In Alarm on mode tap the ALARM ON/OFF button to turn off the alarm, alarm icon
disappears from display.
SNOOZE
- When the alarm sounds, it can be temporarily stopped by pressing the SNOOZE/LIGHT
button. “SNOOZE” indicator appears in display and flash.
- The alarm will be delayed for 5 minutes and then come again.
- This manual snooze operation can be repeated again and again while alarm sounding.
WEATHER STATION OPERATION
Page 11

10
INDOOR WEATHER MEASUREMENT (MAIN UNIT)
NOTE: 1.) The main unit display backlight will remain when using the AC power adaptor.
2.) When using battery power, the backlight will be off to save battery power. Press
the LIGHT/SNOOZE button once, and the backlight will turns on for 10 seconds.
Pressing other buttons on the front panel will not turn on the backlight.
View the Time Zone
In clock display mode, tap the TIME ZONE button repeatedly to view the time of different
time zones.
Change the Temperature Display format
In clock display mode, tap the °C /°F button on main unit to change temperature display
format in degree Celsius (°C) or Fahrenheit (°F) mode.
NOTE: This setting is only applicable to the main unit display, but not the remote sensor.
Indoor Weather Measurement
1. The indoor temperature and humidity is shown in the lower left hand corner of the main
unit display.
2. Tap the MAX/MIN button to check the maximum & minimum temperature and humidity
levels that have been recorded.
3. Press and hold the MAX/MIN button will erase the previously recorded data and start to
record new data.
OUTDOOR WEATHER MEASUREMENT (REMOTE SENSOR)
This unit includes a remote sensor to let you measure outdoor temperature and humidity up
to 100 feet away from the main unit. The remote sensor can be used on table on mounted
to the wall.
NOTE: Always place the remote sensor in a location protected from direct sunlight, rain,
moisture, splashing and dripping liquids.
Using the Stand
To use this unit on an outdoor ledge, unlock the folding stand from the bottom of the remote
sensor and fold it back to form the stand.
Mounting the Remote Sensor On a Wall
1. Use a flat head screw (not included) which is suitable to be hanger for the remote
sensor.
2. Screw the flat head screw directly into a wall that you want to mount the sensor on, and
tighten until the screw head is about 1/4” away from the wall.
3. Hang the remote sensor onto the screw head. Make sure it’s securely attached.
Using the Remote Sensor
1. Remove the rear battery compartment cover of the outdoor remote sensor, press the °C
/ °F button to select Fahrenheit (°F) for the temperature display.
Page 12
11
NOTE: This setting is only applicable to the remote sensor display and will not affect
the main unit.
2. Press the channel selection button to set the same channel number with main unit, the
channel number (1 - 3) shows in the LCD display.
3. Replace the battery compartment door.
4. The outdoor temperature on the main unit will display “- -.-” and humidity will display “- -”
until it picks up the signal from the remote sensor.
5. Press and hold the CHANNEL button on main unit for about 3 seconds, the wireless
remote receiving icon starts flashing. The main unit starts communicating with the
remote sensor.
6. When the main unit detects the remote sensor (after about 1 minute), it will start to
display the temperature and humidity measured by the remote sensor.
NOTE: 1.) After first time set up or reset, if the main unit does not display outdoor
temperature and humidity automatically within 5 minutes, press and hold the
main unit CHANNEL button for more than 2 seconds to reset current channel
information. If it still does not detect the remote sensor, reduce the distance
between them or find another location for the sensor and/or main unit.
2.) Wireless distance may become shorter as the signal may be shielded by thick
walls, steel, concrete, aluminum foil etc., or there maybe strong interference
from other nearby operating electronic devices.
Weather Forecast Indicators
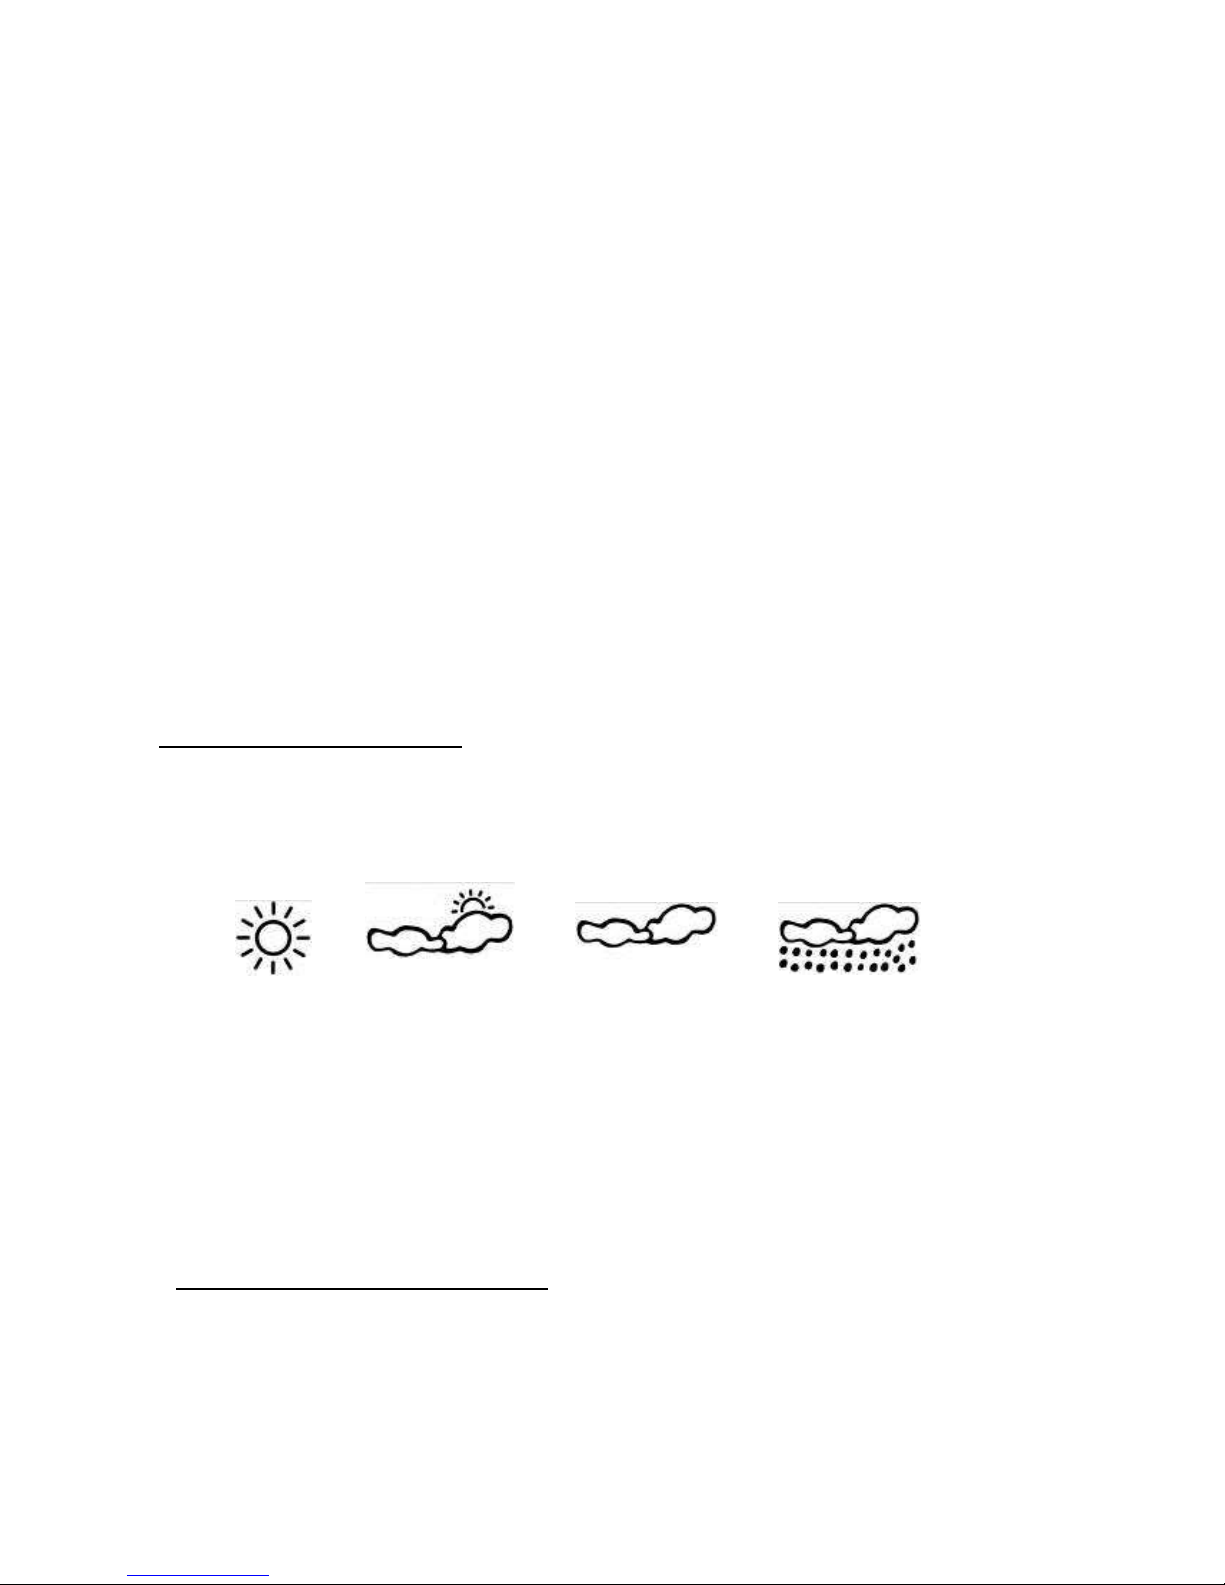
Place the remote sensor in a natural ventilated area to get more accurate results. The four
weather icons Sunny, Partly Cloudy, Cloudy and Rainy represent the estimated weather
forecast over the next 6 hours.
Sunny Partly cloudy Cloudy Rainy
NOTE: The forecast is calculated by changes in temperature and humidity and is
indicative only. There is no guarantee of accuracy when using this unit for forecasting the
actual weather. The calculation can be affected by many varying and local meteorological
conditions. If there is any inconsistency of weather forecast between a local weather
station and this unit, the local weather station's forecast should be followed.
Crystal Weather Forecast Indicator
When you power the unit on for the first time, the crystal weather forecast indicator
will light up from Sunny to Rainy and then stop at the Partly cloudy position.
The related weather forecast indicator lamp will light up upon the weather forecast
after recording the remote sensor data over a 60 minute period.
Press the SNOOZE/LIGHT button any time, the crystal weather indicator lamp lights
Page 13
12
up and will cycle.
The weather indicator lamp lights up from Sunny to Rainy, and will cycle every 5
minutes automatically.
CARE AND MAINTENANCE
1. Do not subject the unit to excessive force, shock, dust or extreme temperature.
2. Do not tamper the internal components of the unit.
3. Clean your unit with a damp (never wet) cloth. Solvent or detergent should never be
used.
4. Avoid leaving your unit in direct sunlight or in hot, humid or dusty places.
5. Keep your unit away from heating appliances and sources of electrical noise such as
fluorescent lamps or motors.
CAUTION: Never allow any water or other liquids to get inside the unit while cleaning.
Resetting the Unit
If the unit experiences a power surge or electric shock, it is possible that the internal
micro-controller may lock up and the unit will not respond to any commands from the panel
controls. In this event, unplug AC adaptor and remove all dry cell batteries, wait for 1
minute, reinstall all batteries and reconnect the AC adaptor. The unit will be reset to 12:00
AM and all of your previous settings will be erased.
TROUBLESHOOTING GUIDE
If you experience difficulties in the use of this music system please check the following or
call 1-800-777-5331 for Customer Service.
Symptom
Possible Cause
Solution
The unit does
not respond (no
power).
No batteries installed or
installed batteries are
exhausted.
Install 3 x “AAA” batteries or replace
the exhausted batteries.
AC power source no
function or DC cable is not
plugged into the DC jack
on the back of the unit.
Plug the AC adaptor into a wall outlet.
Wall outlet is not
functioning.
Plug another device into the same
outlet to confirm the outlet is working.
Wireless Range
short
Remote sensor out of
range
Operation in open area and try to
relocate the position
Remote sensor battery
exhausted
Replace the exhausted batteries.
SPECIFICATION
Power requirement:
Main Unit
Page 14

13
DC Input: 3 X AAA (UM-4) Batteries or
DC 4.5V, 200mA
Remote Sensor 2 X AAA (UM-4) Batteries
Frequency: 433.980 MHz
Temperature Range Indoor 32 – 122 oF (0 - 50 oC)
Outdoor -4 – 140 oF (-20 - 60 oC)
Humidity Range Indoor/Outdoor 20% - 90%
©2014 BRK Brands Inc. All rights reserved. First Alert® is a registered trademark of the
First Alert Trust.
At Spectra, environmental and social responsibility
is a core value of our business. We are dedicated to
continuous implementation of responsible initiatives
with an aim to conserve and maintain the
environment through responsible recycling.
Please visit us at http://www.spectraintl.com/green.htm for more information on
Spectra’s green initiatives or to find a recycler in your area.
1 YEAR LIMITED WARRANTY AND SERVICE
VALID IN THE U.S.A ONLY
This product is manufactured, distributed or sold by SPECTRA MERCHANDISING INTERNATIONAL, INC.,
official licensee for this product. All right, title and interest to use the “First Alert” logo trademarks and the
“First Alert” trade dress are exclusively licensed by BRK Brands, Inc. and are used under license from BRK
Brands, Inc.. Please contact SPECTRA’s Service Department for questions/comments, warranty, support, or
service related to this product.
SPECTRA MERCHANDISING INTERNATIONAL, INC. warrants that this product 1) is free from defects in
materials and workmanship and 2) conforms to its specifications for a period of 1 year from the date of original
customer purchase and provided the product is utilized within the U.S.A. This warranty is not assignable or
transferable. Our obligation under this warranty is the repair or replacement of the defective unit or any part
thereof, except batteries, when it is returned to the SPECTRA Service Department, accompanied by proof of
the date of original consumer purchase, such as a duplicated copy of a sales receipt.
You must pay all shipping charges required to ship the product to SPECTRA for warranty service. If the
product is repaired or replaced under warranty, the return charges will be at SPECTRA’s expense. There are
no other express warranties other than those stated herein.
Page 15

14
This warranty is valid only in accordance with the conditions set forth below:
1. The warranty applies to the SPECTRA product only while:
a. It remains in the possession of the original purchaser and proof of purchase is demonstrated
b. It has not been subjected to accident, misuse, abuse, improper service, usage outside the descriptions and
warnings covered within the owner’s manual or non-SPECTRA approved modifications
c. Claims are made within the warranty period
2. This warranty does not cover damage or equipment failure caused by electrical wiring not
in compliance with electrical codes or SPECTRA owner’s manual specifications, or failure to
provide reasonable care and necessary maintenance as outlined in the owner’s manual.
3. Warranty of all SPECTRA products applies to residential use only and is void when products are used in a
nonresidential environment or installed outside the United States.
This warranty gives you specific legal rights, and you may also have other rights which vary from state to state.
TO OBTAIN SERVICE please remove all batteries (if any) and pack the unit carefully and send it prepaid by
insured parcel post or UPS to SPECTRA at the address shown below. IF THE UNIT IS RETURNED WITHIN
THE WARRANTY PERIOD shown above, please include a proof of purchase (dated cash register receipt) so
that we may establish your eligibility for warranty service and repair of the unit without cost. Also include a
note with a description explaining how the unit is defective. A customer service representative may need to
contact you regarding the status of your repair, so include your name, address, phone number and e-mail
address to speed the process.
IF THE UNIT IS OUTSIDE THE WARRANTY PERIOD, please include a check for $20.00 to cover the cost of
repair, handling and return postage. All out of warranty returns must be sent prepaid.
It is recommended that you contact SPECTRA first at 1-800-777-5331 or by e-mail at
[email protected] for updated information on the unit requiring service. In some cases the model
you have may be discontinued and SPECTRA reserves the right to offer alternative options for repair or
replacement.
SPECTRA MERCHANDISING INTERNATIONAL, INC.
4230 North Normandy Avenue,
Chicago, IL60634, USA.
1-800-777-5331
To register your product, visit the link below on the website to enter your information.
http://www.spectraintl.com/wform.htm
0414 Printed in China
 Loading...