

Page 1
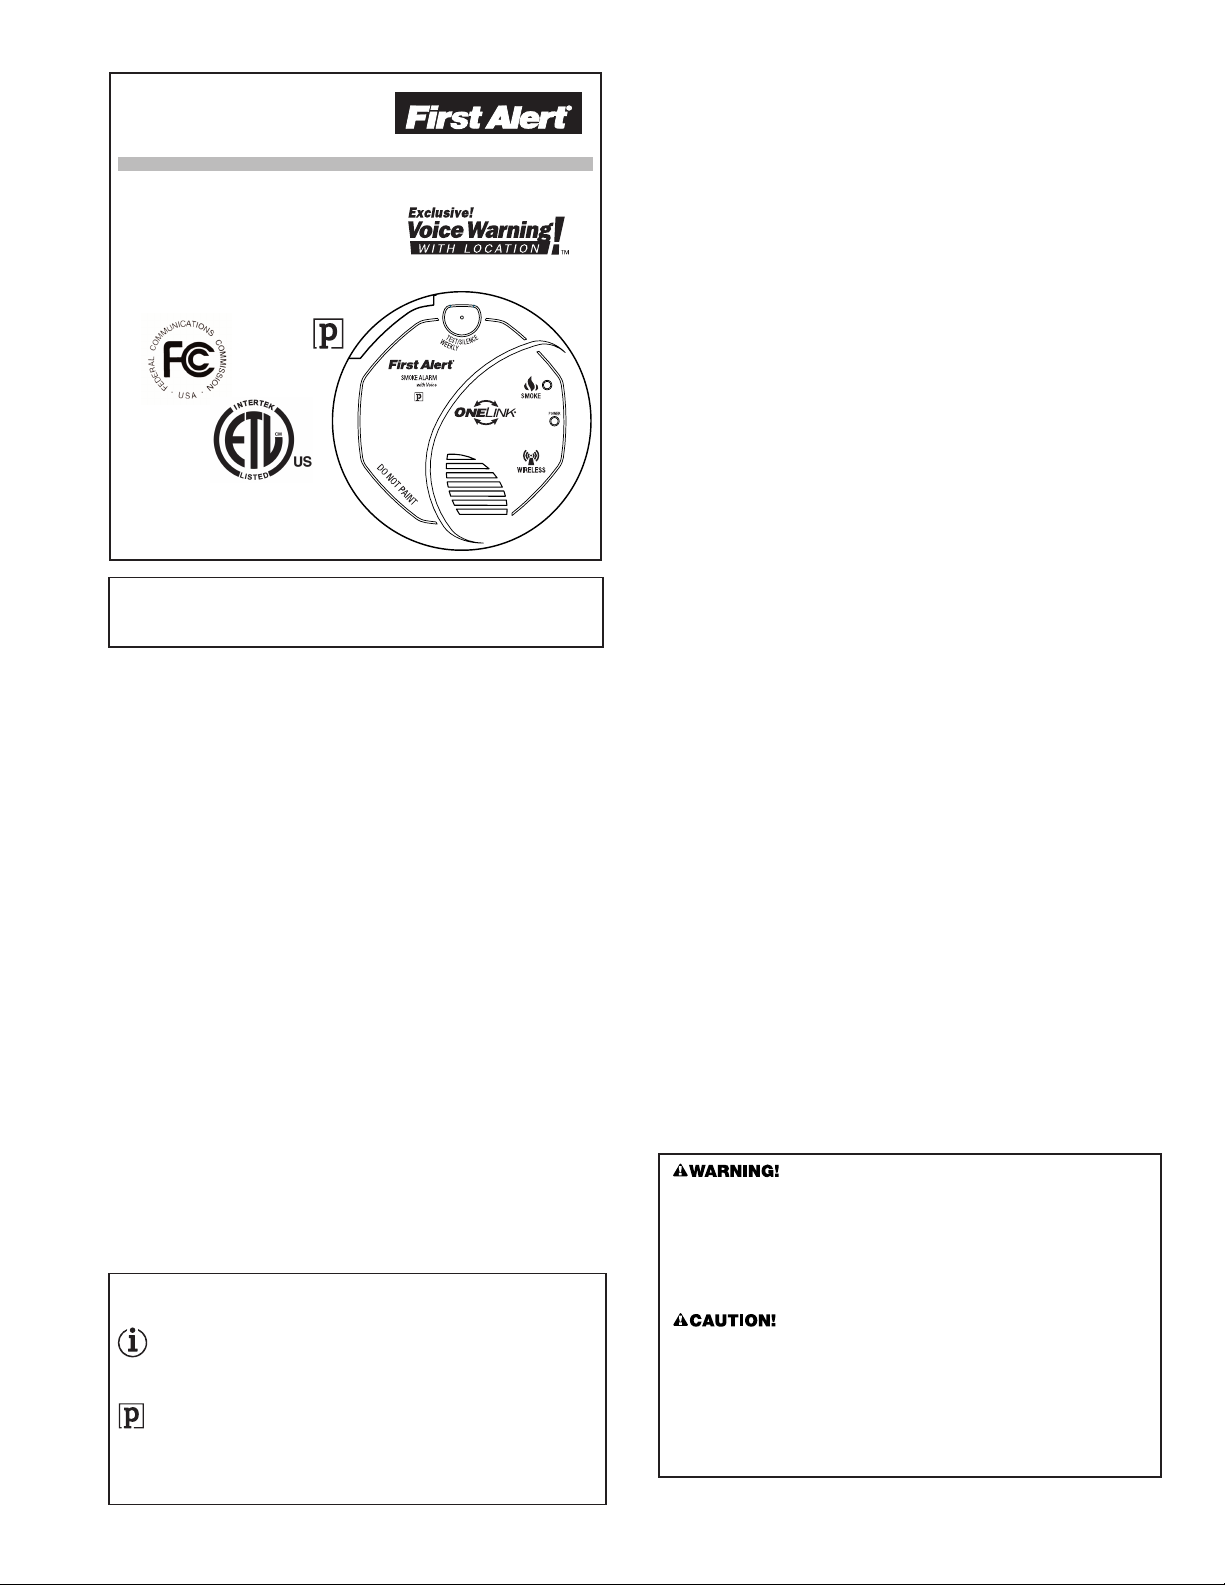
UL STANDARD 217
USER’S MANUAL
ONELINK®BATTERY
OPERATED SMOKE ALARM
Features:
ONELINK®Enabled
Voice with Programmable Location
wo Latching Features
T
Optipath 360 T
wo Silence Features
T
Model SA511
Printed in Mexico
M08-0194-000
This user’s manual contains important information about your Smoke Alarm’s
operation. If you are installing this Smoke Alarm for use by others, you must
leave this manual—or a copy of it—with the end user.
echnology
Q 03/07
TANT! PLEASE READ CAREFULLY AND SAVE.
IMPOR
TM
INTRODUCTION
Thank you for choosing First Alert®for your Smoke Alarm needs. You have
purchased a state-of-the-art Smoke Alarm designed to provide you with early
warning of a fire.
ONELINK®Enabled. Alarm automatically communicates with other ONELINK
enabled alarms when installed.
Exclusive Voice Warning with Location will tell you the preprogrammed
location of the initiating unit and danger detected. Programmable up to 11
locations (ex. "basement"). When alarms sounds, if programmed for basement
it will say "Warning, evacuate, smoke in basement" along with all other
installed ONELINK®Voice alarms.
Spread Spectrum Horn Tone. Lower and varying horn frequency makes it
easier for elderly with normal age related hearing loss to hear horn. Sweeps
through the 2200 – 3400 Hz range.
RF Interconnect. Reliable and secure radio frequency communication
between alarms. 915MHz frequency with 65,000 security codes and 3 channel
frequency hopping.
Optipath 360 TechnologyTMprovides 360 degrees of direct access to the
smoke sensor.
Single Button Test/Silence eliminates confusion. Depending on what mode
the alarm is in, pushing the button provides different functions such as testing
the alarm, silencing the alarm, re-testing the alarm when in silence and clearing
the Latching featur
wo Silence Featur
T
hours befor
minutes.
Two Latching Features. Alarm Latch: Easily identifies initiating alarm even
after alarm condition has subsided. Low Battery Latch: Identifies which unit is
in low battery condition.
Perfect Mount System includes a gasketless base for easy installation and a
mounting bracket that keeps the alarm secure over a wide rotation range to
allow for perfect alignment.
© 2007 BRK Brands, Inc., a Subsidiary of Jarden Corporation
All rights reserved.
BRK Brands, Inc., 3901 Liberty Street Road, Aurora, IL 60504-8122
Consumer Af
*All First Alert®Smoke Alarms conform to regulatory requirements,
including UL217 and are designed to detect particles of combustion.
Smoke particles of varying number and size are produced in all fires.
Ionization technology is generally mor
technology at detecting small particles, which tend to be produced in
greater amounts by flaming fires, which consume combustible materials
rapidly and spr
a wastebasket, or a grease fire in the kitchen.
Photoelectric technology is generally mor
technology at detecting large particles, which tend to be produced in
gr
before bursting into flame. Sources of these fires may include cigarettes
bur
ning in couches or bedding.
For maximum pr
and in every bedroom of your home.
Key features include:
es.
es.
emporarily silence low battery chirp for up to eight
eplacing low battery or silence an unwanted alarm for several
e r
fairs: (800) 323-9005 • www.firstalert.com
eater amounts by smoldering fires, which may smolder for hours
T
e sensitive than photoelectric
ces of these fir
ead quickly
. Sour
otection, use both types of Smoke Alar
es may include paper bur
e sensitive than ionization
ms on each level
ning in
TABLE OF CONTENTS
oduction . . . . . . . . . . . . . . . . . . . . . . . . . . . . . . . . . . . . . . . . . . . . . . . . . .1
Intr
Fire Safety Tips . . . . . . . . . . . . . . . . . . . . . . . . . . . . . . . . . . . . . . . . . . . . . . .1
e You Install This Smoke Alarm . . . . . . . . . . . . . . . . . . . . . . . . . . . . .1
Befor
Step By Step Guide To Programming This Alarm . . . . . . . . . . . . . . . . . . .2
Adding and Linking Additional ONELINK®Alarms
What You Will See and Hear With This Alarm . . . . . . . . . . . . . . . . . . . .2
ireless Operation . . . . . . . . . . . . . . . . . . . . . . . . . . . . . . . . . . . . . . . . . . . .2
W
How To Install This Smoke Alarm . . . . . . . . . . . . . . . . . . . . . . . . . . . . . . . .3
Optional Locking Featur
Weekly Testing . . . . . . . . . . . . . . . . . . . . . . . . . . . . . . . . . . . . . . . . . . . . . . . .4
Regular Maintenance
If This Smoke Alarm Sounds . . . . . . . . . . . . . . . . . . . . . . . . . . . . . . . . . . . .4
If Y
Recommended Locations For Smoke Alarms . . . . . . . . . . . . . . . . . . . . . .5
Locations To Avoid For Smoke Alarms . . . . . . . . . . . . . . . . . . . . . . . . . . . .5
About Smoke Alar
Special Compliance Considerations . . . . . . . . . . . . . . . . . . . . . . . . . . . . . .6
Limitations Of Smoke Alar
Limited Warranty . . . . . . . . . . . . . . . . . . . . . . . . . . . . . . . . . . . . . . . . . . . . . .6
o Do In Case Of Fire . . . . . . . . . . . . . . . . . . . . . . . . . . . . . . . . . .4
What T
Using the Silence Feature . . . . . . . . . . . . . . . . . . . . . . . . . . . . . . . . . . .4
Silencing the Low Battery W
Latching Features . . . . . . . . . . . . . . . . . . . . . . . . . . . . . . . . . . . . . . . . . .4
ou Suspect A Problem . . . . . . . . . . . . . . . . . . . . . . . . . . . . . . . . . . . . . . .5
Agency Placement Recommendations
es . . . . . . . . . . . . . . . . . . . . . . . . . . . . . . . . . . . . . .3
. . . . . . . . . . . . . . . . . . . . . . . . . . . . . . . . . . . . . . . . . .4
arning . . . . . . . . . . . . . . . . . . . . . . . . . . . .4
. . . . . . . . . . . . . . . . . . . . . . . . .5
ms . . . . . . . . . . . . . . . . . . . . . . . . . . . . . . . . . . . . . . . . . .6
ms . . . . . . . . . . . . . . . . . . . . . . . . . . . . . . . . . . . .6
. . . . . . . . . . . . . . . . .2
FIRE SAFETY TIPS
Follow safety rules and prevent hazardous situations:
1) Use smoking materials pr
lighters away from children; 3) Store flammable materials in proper containers;
4) Keep electrical appliances in good condition and don’t overload electrical
cuits; 5) Keep stoves, barbecue grills, fireplaces and chimneys grease-
cir
and debris-fr
7) Keep portable heaters and open flames, like candles, away from flammable
materials; 8) Don’t let rubbish accumulate.
Keep alarms clean, and test them weekly. Replace alarms immediately if they
e not working properly. Smoke Alarms that do not work cannot alert you to a
ar
e. Keep at least one working fire extinguisher on every floor, and an additional
fir
one in the kitchen. Have fire escape ladders or other reliable means of escape
from an upper floor in case stairs are blocked.
®
BEFORE YOU INSTALL THIS SMOKE ALARM
Important! Read “Recommended Locations for Smoke Alarms” and “Locations
to Avoid for Smoke Alarms” before beginning. This unit monitors the air, and
when smoke reaches its sensing chamber, it alarms. It can give you more time
to escape before fire spreads. This unit can ONLY give an early warning of
developing fires if it is installed, maintained and located where smoke can
reach it, and where all residents can hear it, as described in this manual. This
unit will not sense gas, heat, or flame. It cannot prevent or extinguish fires.
Understand The Different Type of Smoke Alarms
Know Where To Install Your Smoke Alarms
Know What Smoke Alarms Can and Can’t Do
Check Y
• This unit will not alert hearing impaired residents. It is recommended
•
•
•
• Do not stand too close to the unit when the alarm is sounding.
• Do not paint over the unit. Paint may clog the openings to the
1
ee; 6) Never leave anything cooking on the stove unattended;
Battery powered or electrical? Different Smoke Alarms provide different
types of protection. See “About Smoke Alarms” for details.
Fire Safety Professionals recommend at least one Smoke Alarm on every
level of your home, in every bedroom, and in every bedr
separate sleeping area. See “Recommended Locations For Smoke Alarms”
and “Locations To Avoid For Smoke Alarms” for details.
A Smoke Alarm can help alert you to fire, giving you precious time to
escape. It can only sound an alarm once smoke reaches the sensor.
See “Limitations of Smoke Alarms” for details.
our Local Building Codes
This Smoke Alarm is designed to be used in a typical single-family home.
It alone will not meet requirements for boarding houses, apartment buildings,
hotels or motels. See “Special Compliance Considerations” for details.
that you install special units which use devices like flashing strobe
lights to aler
Unit will not operate without batter
cannot work until you install the batteries in the correct position
(Match “+” to “+” and “-” to “-”).
This Smoke Alar
batteries are installed.
Do not install this unit over an electrical junction box. Air cur
around junction boxes can prevent smoke from reaching the sensing
chamber and pr
are intended for installation over junction boxes.
It is loud to wake you in an emergency. Exposure to the horn at
close range may harm your hearing.
sensing chamber and pr
operly. Never smoke in bed. 2) Keep matches or
t hearing impaired residents.
. The Smoke Alar
y power
m has a batter
event the unit fr
y drawer which r
om alarming. Only AC powered units
event the unit fr
om operating pr
oom hallway or
m
esists closing unless
ents
r
.
operly
Page 2
STEP BY STEP GUIDE TO PROGRAMMING
THIS ALARM
FOR FIRST TIME AND WHEN CHANGING BATTERIES
Action:
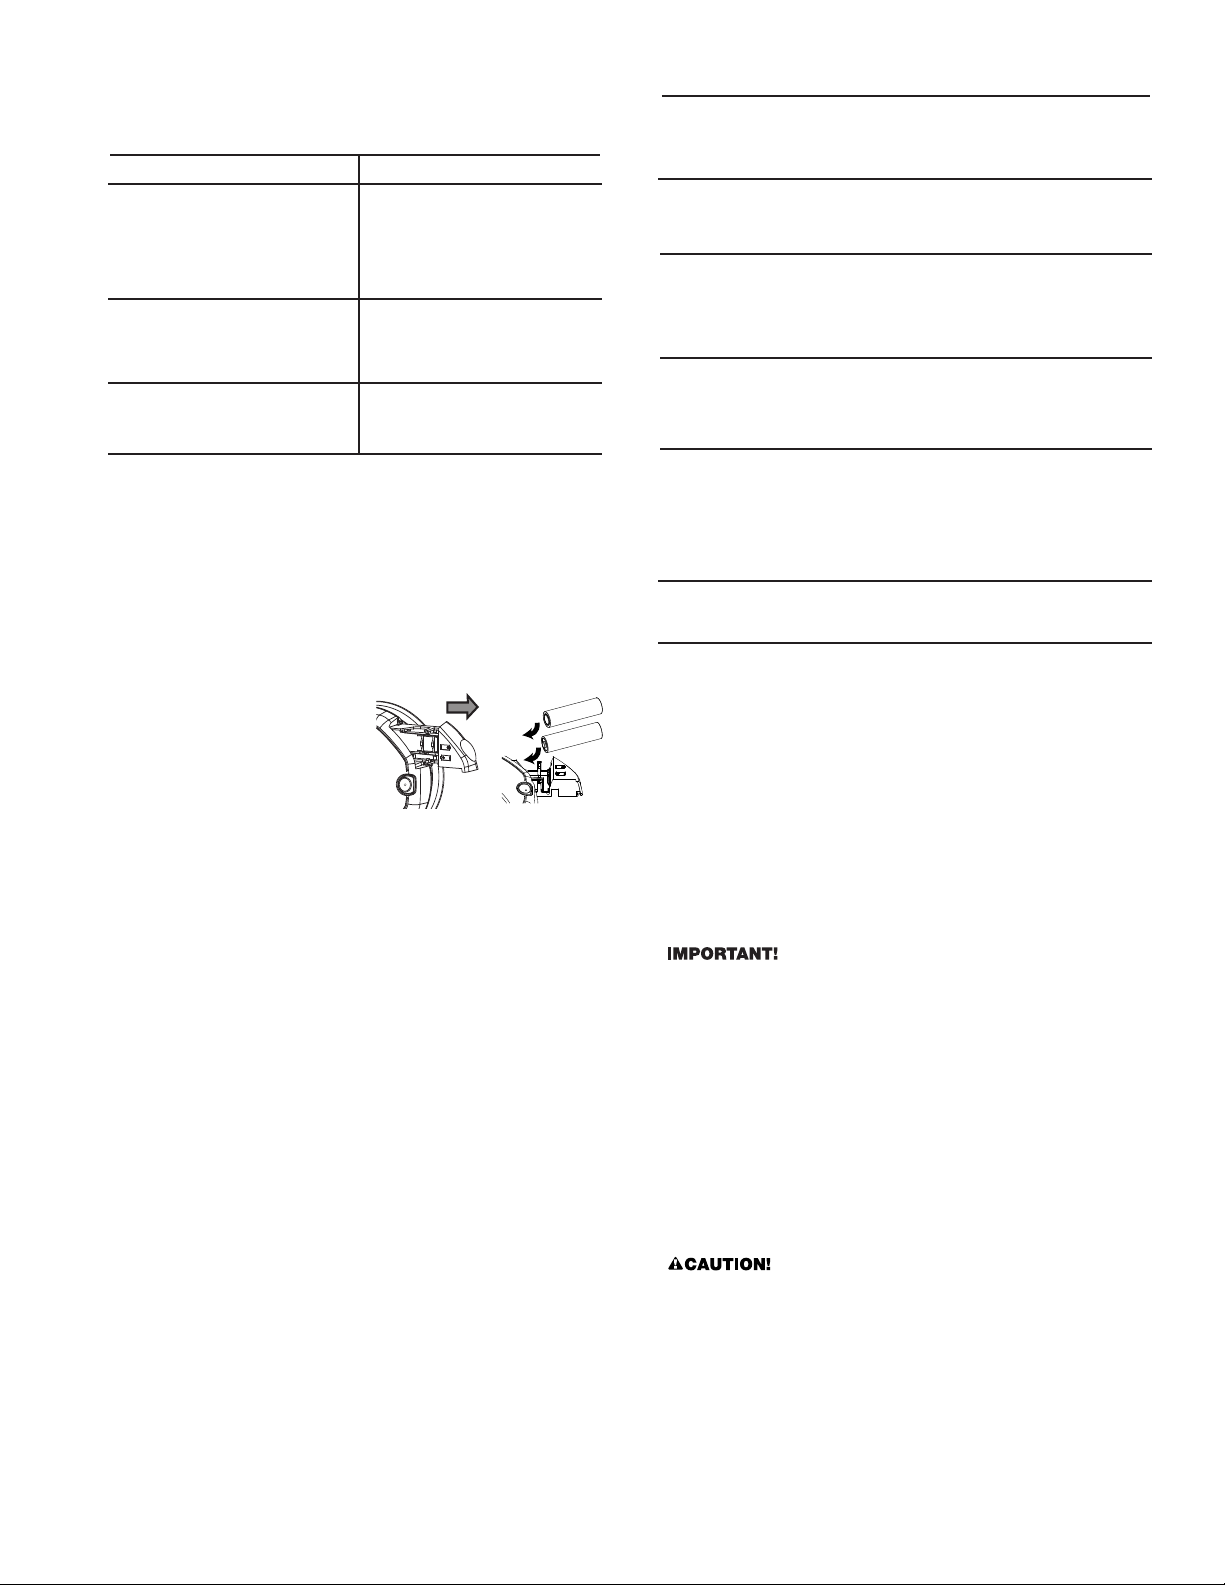
1. Insert batteries (2, AA batteries).
Press & Hold Test Button if
2.
you would like to program the
location or change the location of
the Alarm. Release button after
Alarm responds.
After you hear the location of
3.
e you are placing the Alarm,
wher
Press & Hold the Test Button.
our Alarm has now been programmed for the location of your choice.
Y
vailable locations:
A
Basement
Living Room Dining Room Master Bedroom
Family Room
fice Hallway Utility Room
Of
Kitchen Child’s Bedroom
No Location Guest Bedroom
ADDING AND LINKING ADDITIONAL ONELINK®ALARMS
NOTE: Steps 1 through 3 below need to be completed within two
minutes. If more than two minutes pass, the Green power LED will
stop blinking. Simply open the batter
and repeat steps 1 through 3.
1. Insert the batteries into the battery
drawer of the next Alarm.
DO NOT CLOSE THE DRAWER.
2. Press and hold the test button and
then close the battery drawer.
3. Once you hear the unit chirp, release
the test button. The Green power
LED will start to blink indicating the
®
ONELINK
from one of the other setup ONELINK®Alarms.
4. Press and hold the test button on the first Alarm, until the second Alarm
chirps and its Green power LED stops blinking. Then release the test button.
5. If you purchased a Talking Smoke Alarm, you will now be prompted to set
the Alarm's location. Follow the directions given by the Alarm.
6. If you have purchased the hardwired battery back-up ONELINK
you can now connect the hardwired Alarm by installing the three-wire
connector on the ceiling to the Alarm.
7. Repeat steps 1-6 for additional ONELINK
You have now successfully linked your new ONELINK®Alarms. To add
additional Alarms at a later time, follow steps 1 through 6.
Alarm is waiting for program data
m Will Say:
Alar
“Welcome, First Alert Smoke Alarm.”
“No location pr
time or “[Location, example:
“Basement”] location pr
when changing batteries.
o select location, press and hold
“T
test button now
o save location, press and hold
“T
test button after location is heard.”
Alarm will speak list of locations
(see below).
“[Location, example: “Basement”]
location saved.”
If no location is chosen:
“No location saved.”
ogrammed” if
ogrammed”
.”
first
y drawer of the second Alarm
®
Alarm,
®
Alarms.
WHAT YOU WILL SEE AND HEAR WITH THIS ALARM
Under Nor
When You Test the Alarm
If Battery Becomes Low or is Missing
If Alarm is Not Operating Properly (MALFUNCTION SIGNAL)
Smoke is Detected
Smoke Alar
mal Operations
Voice: Silent
Horn:Silent
Power LED: Flashes Green once/minute
Voice: “Testing.” Horn: 3 beeps, pause, 3 beeps; Voice: “Warning,
evacuate smoke in [Location, example: “Basement”]. Evacuate.”
Smoke LED: Flashes Red in sync with the hor
oice:
“Replace battery in [Location, example “Basement”].”
V
Repeated every 5 hours
n pattern
Horn:chirps once a minute
Power LED: Flashes Green On for 2 seconds/Off for 2 seconds.
Low Battery Latch is now engaged.
oice:
“Detector err
V
manual.” Repeated every 5 hours
Horn:Thr
ee rapid chirps every minute
or in [Location, example “Basement”], please see
Smoke LED: Flashes approximately once a minute
Horn: 3 beeps, pause, repeating 3 times
oice:“Warning, evacuate smoke in [Location, example: “Basement”].
V
Evacuate.”
Smoke LED:
During Alarm: Flashes Red in sync with the hor
After Alarm: Flashes Red On for 2 seconds/Of
Smoke Alarm Latch is now engaged.
n pattern.
f for 2 seconds.
m is Silenced
Horn: Off
Smoke LED: Flashes Red
WIRELESS OPERATION
First Alert®ONELINK®Technology is the easy, cost-effective way to provide
your family with whole-home safety. All ONELINK®Alarms communicate with
each other without wires or connectors. When one Alarm sounds, they all
sound. This provides your family with an earlier warning of potential danger,
and gives you more time to react.
The communication distance (range) between any two ONELINK
typically 50 feet (15 meters) inside of a home. Some features of a home, such
as the number of floors, number/size of rooms, furniture and types of building
materials used may reduce the range of the Alarms.
Examples include: suspended ceilings, ductwork, large metallic appliances
(refrigerators) and metal studs. A feature of ONELINK
operate as a mesh network. All Alarms will repeat any alarm signal that is
received to all other ONELINK®Alarms. Interference from structural conditions
can be overcome by adding additional Alarms to route the wireless signal
around obstructions.
The range and proper operation of any wireless device will vary
•
depending on its surroundings. It is very important that each Alarm is
tested individually before and after installation to make sure that all
Alarms respond properly.
• The ONELINK
between buildings. The Alarms will not communicate properly under
these conditions.
• Metal objects and metallic wallpaper may interfere with signals from
wireless Alarms. Alarms should be tested after changes to your home
such as remodeling, moving furniture, and with metal doors opened
and closed.
Your First Alert®ONELINK®Smoke Alarm will automatically communicate
potential fires with all other First Alert
FCC NOTICE: This device complies with Part 15 of the FCC Rules.
Operation is subject to the following two conditions: (1) This device may not
cause harmful interference, and (2) this device must accept any interference
eceived, including interfer
r
FCC ID: M7U5001L
®
Alarms are not to be used outdoors or to transmit
®
ONELINK®Smoke Alarms.
ence that may cause undesir
®
Alarms is that they
®
ed operation.
Alarms is
Changes or modifications not expr
could void the user’s authority to operate the equipment.
essly approved by BRK Brands, Inc.
2
Page 3
HOW TO INSTALL THIS SMOKE ALARM
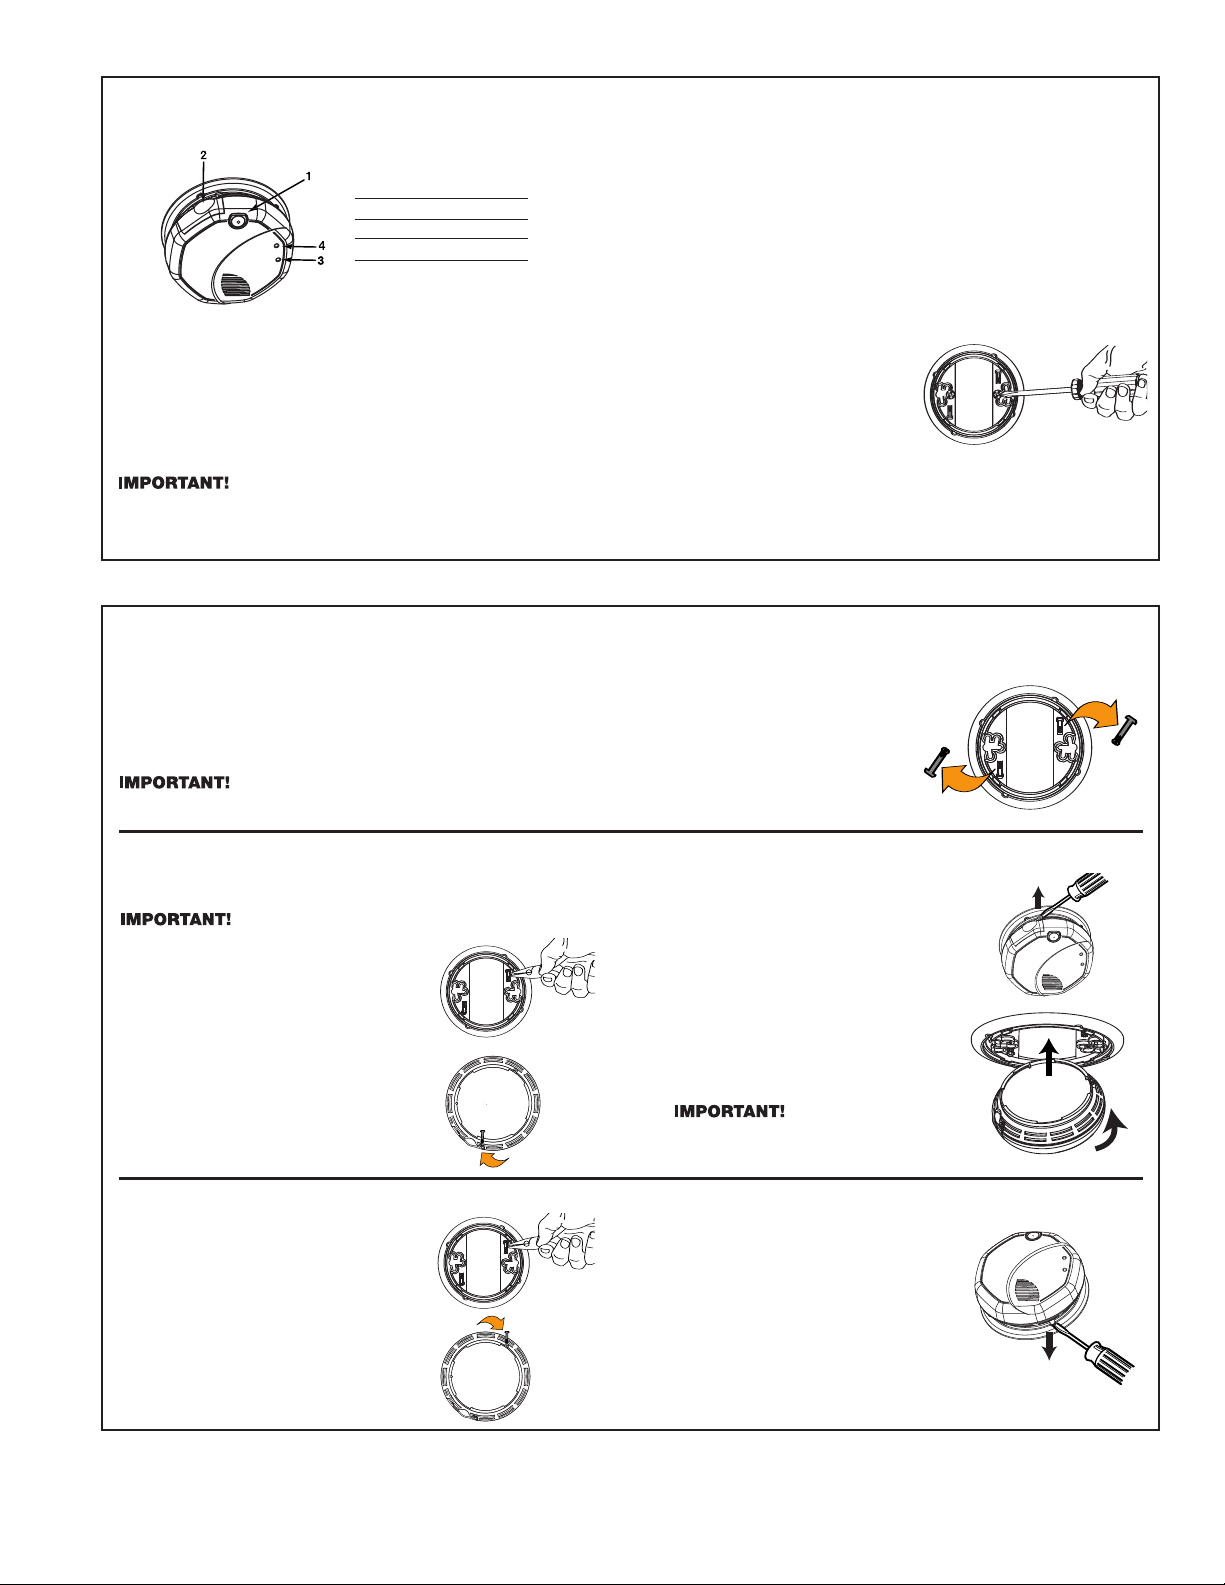
THE PARTS OF THIS SMOKE ALARM
1. Test/Silence button
2. Battery drawer
3. Power indicator LED
4. Smoke Alarm LED
TOOLS YOU WILL NEED:
This unit is designed to be mounted
on the ceiling, or on the wall if necessar
• Pencil
Drill with 3/16” (5 mm) drill bit
•
• Phillips screwdriver
If you want to lock the battery drawer, or lock the Smoke Alarm to the
mounting bracket, please r
e you begin installation.
befor
ead the “Optional Locking Features” section
• Hammer
Pliers to activate optional
•
“tamper
features
y.
-resistant” locking
1. Hold base firmly and twist the mounting bracket counterclockwise to
separate it fr
Hold the mounting bracket against the ceiling (or wall) so the vertical
2.
mounting slot is aligned in the 12 o’clock position and trace ar
inside of the mounting slots (vertical and horizontal mounting).
3. Put the unit where it won’t get covered with dust when you drill the
mounting holes.
4. Using a 3/16” (5 mm) drill bit, drill a hole through the center of the oval
outlines you traced.
5. Insert the plastic screw anchors (in the plastic bag with screws) into the
holes. T
they are flush with the ceiling or wall.
6. Line the mounting bracket up
over the plastic scr
Screw the mounting bracket to
7.
the ceiling or wall through the
mounting slots using the two
scr
8. Attach the Smoke Alarm to the mounting bracket. Line up the guides on
the alarm’
e lined up, turn the base clockwise (right) until it snaps into place.
ar
NOTE: Once the Smoke Alar
bracket, you can r
Test the Smoke Alarm. See “Weekly Testing.”
9.
FOLLOW THESE SIMPLE STEPS!
om the base.
ap the screw anchors gently with a hammer, if necessary, until
ew anchors.
ews provided.
s base with the guides on the mounting bracket. When guides
otate the Smoke Alarm to adjust the alignment.
m is snapped onto the mounting
OPTIONAL LOCKING FEATURES
The optional locking features are designed to prevent unauthorized removal of the battery or alarm. It is not necessary to activate the locks in
single-family households where unauthorized battery or alarm removal is not a concern.
These Smoke Alarms have two separate locking features: one to lock the battery compartment, and the other to lock the
Smoke Alarm to the mounting bracket. You can choose to use either feature independently, or use them both.
Tools you will need: • Needle-nose pliers • Standard flathead screwdriver.
Both locking features use locking pins, which are molded into the mounting bracket. Depending on which locking features you
use, remove one or both pins from the mounting bracket using needle-nose pliers.
ound the
To permanently remove either locking pin, insert a flathead screwdriver between the locking pin and the lock, and pry
the pin out of the lock.
TO LOCK THE BATTERY COMPARTMENT
Do not lock the battery compartment until you install the batteries and
test the Smoke Alarm.
If the unit does not alarm during testing,
DO NOT lock the battery compartment!
Install new batteries and test again. If the
Smoke Alarm still does not alarm, replace it
immediately
1. Using needle-nose pliers, detach one
2. After batteries are inserted, then push
.
locking pin from the mounting bracket.
the locking pin through the hole near the
battery door latch on the back of the
Smoke Alarm.
TO LOCK THE MOUNTING BRACKET
Using needle-nose pliers, detach one
1.
locking pin from the mounting bracket.
2. Insert the locking pin through the hole on
the back of the Smoke Alarm as shown in
the diagram.
When you attach the Smoke Alarm to the
3.
mounting bracket, the locking pin’s head
will fit into a notch on the bracket.
TO UNLOCK THE BATTERY COMPARTMENT
1. Remove the Smoke Alarm from the
mounting bracket. If the unit is locked to
the bracket, see the section “To Unlock
the Mounting Bracket.”
2. Insert a flathead screwdriver under the
head of the locking pin, and gently pry
it out of the battery compartment lock.
(If you plan to relock the battery
compartment, save the locking pin.)
3. To relock the battery compartment,
close the battery door and reinsert
locking pin in lock.
4. Reattach the Smoke Alarm to the
mounting bracket.
When replacing the batteries, always test
the Smoke Alarm before relocking the
battery compartment.
TO UNLOCK THE MOUNTING BRACKET
1. Insert a flathead screwdriver into the
r
ectangular cut-out on the mounting
bracket near
2. Pry the Smoke Alarm away from
the bracket by pushing up on the
screwdriver and turning the Smoke
Alarm counterclockwise (left) at the
same time.
est to the locking pin.
3
Page 4

WEEKLY TESTING
A
B
NEVER use an open flame of any kind to test this unit. You might
•
accidentally damage or set fire to the unit or to your home. The
built-in test switch accurately tests the unit’
by Under
If the Alarm ever fails to test properly, replace it immediately.
•
Pr
replacement. See “Limited Warranty” for details.
DO NOT stand close to the alarm when the horn is sounding.
•
Exposur
testing, step away when horn starts sounding.
writers Laboratories, Inc. (UL).
oducts under warranty may be returned to the manufacturer for
e at close range may be harmful to your hearing. When
s operation as required
REGULAR MAINTENANCE
This unit has been designed to be as maintenance free as possible, but there
e a few simple things you must do to keep it working properly.
ar
Use only the replacement batteries listed below. The unit may not
operate pr
since they may not pr
•
•
•
• Relocate the unit if it sounds frequent unwanted alarms. See “Locations to
•
operly with other batteries. Never use rechargeable batteries
Test it at least once a week.
Clean the Smoke Alarm at least once a month; gently vacuum off any
dust using your household vacuum’
Smoke Alarm after cleaning. Never use water, cleaners or solvents since
they may damage the unit.
If the Smoke Alarm becomes contaminated by excessive dirt, dust and/or
grime, and cannot be cleaned to avoid unwanted alarms, replace the unit
immediately.
Avoid For Smoke Alarms” for details.
When the battery becomes weak, the Smoke Alarm unit will “chirp”
oximately once a minute (the low battery warning). This low battery
appr
warning should last for up to 30 days, but you should replace the battery
immediately to continue your pr
ovide a constant charge.
s soft brush attachment, and test the
otection.
It is important to test this unit every week to make sure it is working
operly.
pr
Alarm. Pr
sounds (the unit may continue to alarm for a few seconds after you release
the button). If it does not alarm, make sur
will flash appr
again. If it still does not alarm, replace it immediately. During testing you will
hear a loud, r
Choosing a replacement battery:
Your Smoke Alarm requires 2 “AA” Energizer E91 batteries. These batteries
are available at many local retail stores.
Actual service life depends on the Smoke Alarm and the environment in which
it is installed. All the batteries specified above are acceptable replacement
batteries for this unit. Regar
you MUST replace the battery immediately once the unit starts “chirping” (the
“low battery warning”).
To replace the batteries (without removing Alarm from the ceiling
or wall):
1.
2. Press tabs A and B as shown in the
3. Insert the new batteries, making sure
4. Close the battery compartment, and
Using the test button is the r
ess and hold the test button on the cover of the unit until the alarm
oximately once a minute indicating it has power); and test it
epeating horn pattern: 3 beeps, pause, 3 beeps, pause.
dless of the manufacturer’s suggested battery life,
Open the battery compartment.
diagram and r
they snap completely into the battery
compartment. Match the terminals
on the ends of the batteries with the
terminals on the unit.
then test the unit by pressing the
Test/Silence button.
emove each battery.
ecommended way to test this Smoke
e the unit is receiving power (LED
IF THIS SMOKE ALARM SOUNDS
RESPONDING TO AN ALARM
During an alarm, you will hear a loud, repeating horn pattern:
3 beeps, pause, 3 beeps, pause. The red LED will flash rapidly.
• If the unit alarms and you are not testing the unit, it is warning you
of a potentially dangerous situation that requires your immediate
attention. NEVER ignore any alarm. Ignoring the alarm may result in
injury or death.
• Never remove the batteries from a battery operated Smoke Alarm to
stop an unwanted alarm (caused by cooking smoke, etc.). Removing
batteries disables the alarm so it cannot sense smoke, and removes
your protection. Instead open a window or fan the smoke away from
the unit. The alarm will reset automatically.
• If the unit alarms get everyone out of the house immediately.
WHAT TO DO IN CASE OF FIRE
• Don’t panic; stay calm. Follow your family escape plan.
• Get out of the house as quickly as possible. Don’t stop to get dressed or
collect anything.
• Feel doors with the back of your hand before opening them. If a door is
cool, open it slowly
closed, unless you must escape through them.
Cover your nose and mouth with a cloth (pr
•
shallow breaths.
• Meet at your planned meeting place outside your home, and do a head
count to make sur
• Call the Fire Department as soon as possible from outside. Give your
address, then your name.
Never go back inside a bur
•
Contact your Fire Department for ideas on making your home safer.
•
ms have various limitations. See "Limitations of Smoke Alar
Alar
details.
t open a hot door. Keep doors and windows
. Don’
eferably damp). T
e everybody got out safely
ning building for any r
.
eason.
ake short,
ms" for
USING THE SILENCE FEATURE
The Silence Feature can temporarily quiet an unwanted alarm for up to
15 minutes. To use this feature, press the “Push to Test/Silence” button on the
cover. If the unit will not silence and no heavy smoke is present, or if it
stays in silence mode continuously, it should be replaced immediately.
The LED will continue to flash rapidly while in silence.
The Silence Feature does not disable the unit—it makes it temporarily
less sensitive to smoke. For your safety, if smoke around the unit is
dense enough to suggest a potentially dangerous situation, the unit will
stay in alarm or may re-alarm quickly. If you do not know the source of
the smoke, do not assume it is an unwanted alarm. Not responding to
an alarm can result in property loss, injury, or death.
SILENCING THE LOW BATTERY WARNING
This silence feature can temporarily quiet the low battery warning “chirp” for
up to 8 hours. You can silence the low battery warning “chirp” by pressing the
Test/Silence button on the alarm cover.
Once the low battery warning “chirp” silence feature is activated, the unit
continues to flash the Green light twice a minute for 8 hours. After 8 hours, the
low battery “chirp” will r
this unit will not operate without battery power!
o deactivate this feature: Press the Test/Silence button again. The unit will
T
go into Test Mode and the low battery warning will resume (LED flashes and
unit sounds “chirp” once a minute).
esume.
Replace the batteries as soon as possible;
LATCHING FEATURES
Alarm Latch is activated after an Alarm is exposed to alarm levels of smoke.
After smoke levels drop below alarm levels, the “Smoke” Red LED will begin to
flash On for 2 seconds/Of
about 15 minutes, to give you time to determine which unit initiated the alarm.
Low Batter
When this occurs, the Power LED flashes Green On for 2 seconds/Off for 2
seconds for about 15 minutes. This feature is designed to help you identify
which Alarm needs to have the battery r
sound the low battery chirp approximately once every minute, sometimes
during the initial stages of "low battery", the Alarm will chirp in greater intervals
than one minute, sometimes up to several hours, until the battery reaches a
steady low battery level. This innovative feature eliminates the frustration of
waiting for and/or identifying which unit is chirping.
y Latch
f for 2 seconds. It will continue to flash or “latch” for
is activated when the Alarm is in the "low battery condition".
eplaced. Although, the Alarm will
4
Page 5
IF YOU SUSPECT A PROBLEM
Smoke Alarms may not operate pr
batteries, a build-up of dirt, dust or grease on the Smoke Alarm cover, or
installation in an impr
“Regular Maintenance,” and install a fresh battery, then test the Smoke Alarm
again. If it fails to test properly when you use the test button, or if the problem
persists, r
•
• If you experience frequent non-emergency alarms (like those caused
•
•
•
If the Smoke Alarm is still not operating pr
please see “How to Obtain Warranty Service” in the Limited Warranty.
eplace the Smoke Alarm immediately.
If you hear a “chirp” about once a minute, replace the battery.
by cooking smoke), tr
If the alarm sounds when no smoke is visible, try cleaning or
relocating the Smoke Alarm. The cover may be dirty.
If the alarm does not sound during testing, try installing a new
battery, and make sure it is snapped in securely.
If the alarm sounds 3 rapid “chirps” every minute; LED flashes
approximately once a minute. MALFUNCTION: the device is not
working pr
Do not tr
oper location. Clean the Smoke Alarm as described in
operly and needs to be replaced.
y fixing the alarm yourself – this will void your warranty!
operly because of dead, missing or weak
y relocating the Smoke Alarm.
operly, and it is still under warranty,
AGENCY PLACEMENT RECOMMENDA
A 72 (National Fire Code) Chapter 11
NFP
“For your information, the National Fir
eads as follows:
r
“11.5.1 One- and T
“11.5.1.1 Smoke Detection.
standards for the specified occupancy, approved single- and multiple-station
Smoke Alarms shall be installed as follows: (1) In all sleeping r
Exception: Smoke Alarms shall not be r
one- and two-family dwelling units. (2) Outside of each separate sleeping area,
in immediate vicinity of the sleeping r
unit, including basements Exception: In existing one- and two family dwelling
units, approved Smoke Alarms powered by batteries are permitted.”
“A.11.8.3 Are More Smoke Alarms Desirable? The required number of
Smoke Alarms might not pr
eas separated by a door from the areas protected by the required Smoke
ar
Alarms. For this reason, it is recommended that the householder consider
the use of additional Smoke Alarms for those ar
The additional ar
room, utility room, and hallways not protected by the required Smoke Alarms.
The installation of Smoke Alarms in kitchens, attics (finished or unfinished),
or garages is not normally recommended, as these locations occasionally
experience conditions that can result in improper operation.”
wo-Family Dwelling Units.”
ovide reliable early warning protection for those
eas include the basement, bedrooms, dining room, furnace
e Protection Association's Standard 72,
e required by applicable laws, codes, or
Wher
equired in sleeping rooms in existing
ooms. (3) On each level of the dwelling
TIONS
ooms
eas for increased protection.
RECOMMENDED LOCATIONS FOR
SMOKE ALARMS
Installing Smoke Alarms in Single-Family Residences
The National Fir
Alarm on every floor, in every sleeping area, and in every bedroom. In new
construction, the Smoke Alarms must be AC powered and interconnected.
See “Agency Placement Recommendations” for details. For additional cover
age, it is recommended that you install a Smoke Alarm in all rooms, halls,
storage areas, finished attics, and basements, where temperatures normally
emain between 40˚ F (4˚ C) and 100˚ F (38˚ C). Make sure no door or other
r
obstruction could keep smoke from reaching the Smoke Alarms.
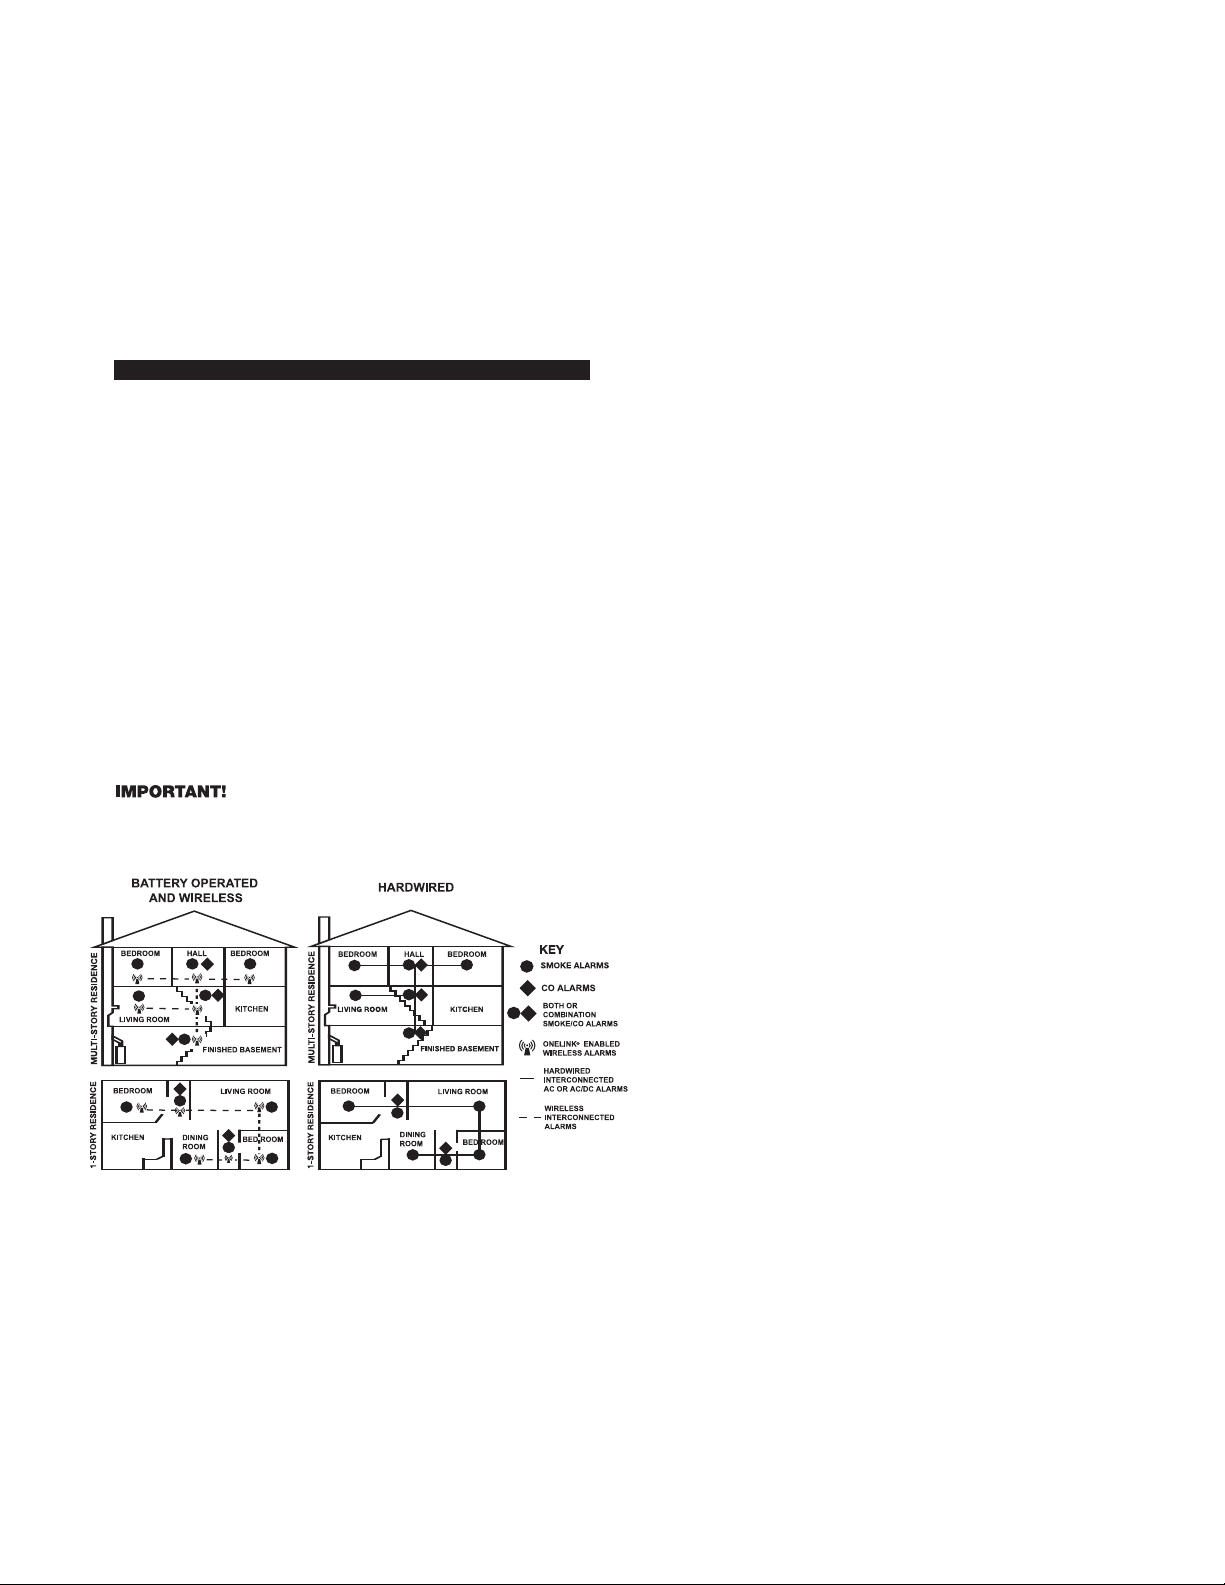
More specifically, install Smoke Alarms:
• On every level of your home, including finished attics and basements.
• Inside every bedroom, especially if people sleep with doors closed.
• In the hall near every sleeping area. If your home has multiple sleeping
areas, install a unit in each. If a hall is over 40 feet (12 meters) long, install
an alarm at each end.
• At the top of the first-to-second floor stairway, and at bottom of basement
stairway.
Specific requirements for Smoke Alarm installation vary from state to state
and from region to region. Check with your local Fire Department for current
requirements in your area.
connected for added protection.
e Protection Association (NFPA), recommends one Smoke
It is recommended AC or AC/DC units be inter-
LOCATIONS TO AVOID FOR SMOKE ALARMS
For best per
Alarms in these areas:
•
-
• In air streams near kitchens. Air currents can draw cooking smoke into
• In very damp, humid or steamy areas, or directly near bathrooms with
• Where the temperatures are regularly below 40˚ F (4˚ C) or above 100˚ F
• In very dusty, dirty, or greasy areas. Do not install a Smoke Alarm directly
• Near fresh air vents, ceiling fans, or in very drafty areas. Drafts can blow
• In insect infested areas. Insects can clog openings to the sensing chamber
• Less than 12 inches (305mm) away from fluorescent lights. Electrical
•
Avoiding Dead Air Spaces
“Dead air” spaces may prevent smoke from reaching the Smoke Alarm.
To avoid dead air spaces, follow the installation recommendations below.
On ceilings, install Smoke Alarms as close to the center of the ceiling as
possible. If this is not possible, install the Smoke Alarm at least 4 inches
(102 mm) from the wall or corner.
For wall mounting (if allowed by building codes), the top edge of Smoke
Alarms should be placed between 4 and 12 inches (102 and 305 mm) from
the wall/ceiling line, below typical “dead air” spaces.
On a peaked, gabled, or cathedral ceiling, install the first Smoke Alarm
within 3 feet (0.9 meters) of the peak of the ceiling, measured horizontally.
Additional Smoke Alarms may be required depending on the length, angle, etc.
of the ceiling's slope. Refer to NFPA 72 for details on requirements for sloped
or peaked ceilings.
formance, it is recommended you AVOID installing Smoke
Where combustion particles are produced. Combustion particles form
when something burns. Areas to avoid include poorly ventilated kitchens,
garages, and fur
the sources of combustion particles (stove, furnace, water heater, space
heater) if possible. In areas where a 20-foot (6-meter) distance is not
possible – in modular, mobile, or smaller homes, for example – it is
ecommended the Smoke Alarm be placed as far from these fuel-burning
r
sources as possible. The placement r
keep these Alarms at a reasonable distance from a fuel-burning source,
and thus reduce “unwanted” alarms. Unwanted alarms can occur if a
Smoke Alarm is placed directly next to a fuel-burning source. Ventilate
these areas as much as possible.
the sensing chamber of a Smoke Alarm near the kitchen.
showers. Keep units at least 10 feet (3 meters) away from showers,
saunas, dishwashers, etc.
(38˚ C), including unheated buildings, outdoor rooms, porches, or
unfinished attics or basements.
over the stove or range. Keep laundry room Smoke Alarms free of dust or
lint.
smoke away from the unit, preventing it from reaching the sensing chamber.
and cause unwanted alarms.
“noise” can interfere with the sensor.
In “dead air” spaces. “Dead air” spaces may prevent smoke from reaching
the Smoke Alarm.
nace rooms. Keep units at least 20 feet (6 meters) from
ecommendations are intended to
5
Page 6

ABOUT SMOKE ALARMS
y (DC) operated Smoke Alarms:Provide protection even when
Batter
electricity fails, pr
are easy to install, and do not require professional installation.
AC powered Smoke Alarms: Can be interconnected so if one unit senses
smoke, all units alarm. They do not operate if electricity fails.
AC with batter
batteries are fresh and correctly installed. AC and AC/DC units must be
installed by a qualified electrician.
ONELINK®Smoke Alarms with battery (DC) back-up: Interconnects with
all ONELINK
nectors, so when one alarm sounds, they all sound. Will operate if electricity
ovided the batteries are fresh and correctly installed. Units are easy to
fails, pr
install, and do not r
Smoke Alar
systems: AC power
pure sine wave inverters. Operating this Smoke Alarm with most battery-
ed UPS (uninterruptible power supply) products or square wave or
power
“quasi sine wave” inverters
your inverter or UPS type, please consult with the manufacturer to verify.
Smoke Alarms for the hearing impaired: Special purpose Smoke Alarms
should be installed for the hearing impair
an audible alarm hor
Disabilities Act. Can be interconnected so if one unit senses smoke, all units
alarm.
Smoke alarms are not to be used with detector guards unless the
combination has been evaluated and found suitable for that purpose.
All these Smoke Alarms ar
installed and car
them. If you are unsure which type of Smoke Alarm to install, refer to Chapter 2
of the National Fir
Alarm Code) and NFP
Association, One Batterymarch Park, Quincy, MA 02269-9101. Local building
codes may also r
of the home.
ovided the batteries are fresh and correctly installed. Units
y (DC) back-up:
®
enabled Smoke and Smoke/CO Alarms without wir
equire professional installation.
ms for Solar or Wind Energy users and battery backup power
ed Smoke Alarms should only be operated with true or
n, and meet the requirements of the Americans With
ed for as described in the user’s manual, and if smoke reaches
e Protection Association (NFPA) Standard 72 (National Fire
A 101 (Life Safety Code). National Fir
equire specific units in new construction or in different areas
will operate if electricity fails, pr
will damage the Alarm. If you are not sure about
ed. They include a visual alarm and
e designed to provide early warning of fires if located,
ovided the
es or con-
e Protection
SPECIAL COMPLIANCE CONSIDERATIONS
This Smoke Alarm alone is not a suitable substitute for complete fire
detection systems in places housing many people—like apartment
buildings, condominiums, hotels, motels, dormitories, hospitals, longterm health care facilities, nursing homes, day care facilities, or group
homes of any kind—even if they were once single-family homes. It is not
a suitable substitute for complete fire detection systems in warehouses,
industrial facilities, commercial buildings, and special-purpose non-residential buildings which require special fire detection and alarm systems.
Depending on the building codes in your area, this Smoke Alarm may be
used to provide additional protection in these facilities.
The following information applies to all four building types below:
In new construction, most building codes require the use of AC or AC/DC
powered Smoke Alarms only. In existing construction, AC, AC/DC, or DC
powered Smoke Alarms can be used as specified by local building codes.
Refer to NFPA 101 (Life Safety Code) or NFPA 72 (National Fire Alarm Code),
local building codes, or consult your Fire Department for detailed fire protection requirements in buildings not defined as “households.”
1. Single-Family Residence:
Single family home, townhouse. It is recommended Smoke Alarms be installed
on every level of the home, in every bedr
2. Multi-Family or Mixed Occupant Residence:
Apartment building, condominium. This Smoke Alarm is suitable for use in
individual apartments or condos, provided a primary fire detection system
eady exists to meet fir
alr
lobbies, hallways, or por
not provide sufficient warning to all residents or meet local fire protection
ordinances/regulations.
3. Institutions:
Hospitals, day care facilities, long-term health care facilities. This Smoke Alarm
is suitable for use in individual patient sleeping/resident rooms, provided a
primary fire detection system already exists to meet fire detection requirements in common ar
Alarm in common areas may not provide sufficient warning to all residents or
meet local fire protection ordinances/regulations.
4. Hotels and Motels:
ding houses and dormitories. This Smoke Alarm is suitable for use
Also boar
inside individual sleeping/r
system already exists to meet fire detection requirements in common areas
like lobbies, hallways, or porches. Using this Smoke Alarm in common areas
may not pr
ordinances/regulations.
ovide suf
e detection r
ches. Using this Smoke Alarm in common areas may
eas like lobbies, hallways, or por
esident r
ficient war
ning to all r
oom, and in each bedr
ements in common areas like
equir
ches. Using this Smoke
ovided a primary fir
ooms, pr
esidents or meet local fir
oom hallway
e detection
e protection
.
LIMITATIONS OF SMOKE ALARMS
Smoke Alarms have played a key role in reducing deaths resulting from home
fires worldwide. However, like any warning device, Smoke Alarms can only
work if they are properly located, installed, and maintained, and if smoke
reaches them. They are not foolproof.
Smoke alarms may not waken all individuals. Practice the escape plan at
least twice a year, making sure that everyone is involved – from kids to grand-
ents. Allow childr
par
holding a fire drill at night when they are sleeping. If children or others do not
readily waken to the sound of the smoke alarm, or if there are infants or family
members with mobility limitations, make sure that someone is assigned to
assist them in fir
en to master fir
e drill and in the event of an emer
e escape planning and practice befor
gency. It is recommended
e
that you hold a fire drill while family members are sleeping in order to determine their r
determine whether they may need assistance in the event of an emer
Smoke Alarms cannot work without power. Battery operated units cannot
work if the batteries ar
batteries ar
work if the AC power is cut off for any reason (open fuse or circuit breaker,
failur
electrical wir
AC power, install both types of units.
Smoke Alar
Smoke fr
doors may not reach the sensing chamber and set off the alarm. That is why
one unit should be installed inside each bedr
if bedr
between them.
Smoke Alar
For example, a stand-alone unit on the second floor may not detect smoke
from a basement fire until the fire spreads. This may not give you enough time
to escape safely
one unit in every sleeping ar
home. Even with a unit on every floor, stand-alone units may not provide as
much pr
remote area. Some safety experts recommend installing interconnected
AC powered units with battery back-up (see “About Smoke Alarms”) or
pr
alarm. Interconnected units may provide earlier warning than stand-alone
units since all units alarm when one detects smoke.
Smoke Alar
exceeds curr
a closed or partially closed door, 2) residents recently consumed alcohol or
drugs, 3) the alarm is dr
or other appliances, 4) r
purpose units, like those with visual and audible alarms, should be installed for
hearing impair
Smoke Alarms may not have time to alarm before the fire itself causes
damage, injury, or death, since smoke from some fires may not reach
the unit immediately. Examples of this include persons smoking in bed,
children playing with matches, or fires caused by violent explosions
resulting from escaping gas.
Smoke Alarms are not foolproof.
are made of components that can wear out or fail at any time. You must test the
unit weekly to ensure your continued protection. Smoke Alarms cannot prevent
or extinguish fires. They are not a substitute for property or life insurance.
Smoke Alarms have a limited life. The unit should be replaced immediately
if it is not operating properly. You should always replace a Smoke Alarm after
10 years from date of purchase. Write the purchase date on the space provided
on back of unit.
esponse to the sound of the smoke alarm while sleeping and to
e used, or if the batteries are not installed correctly. AC units cannot
e along a power line or at a power station, electrical fire that burns the
es, etc.). If you are concerned about the limitations of battery or
ms cannot detect fires if the smoke does not reach them.
om fires in chimneys or walls, on roofs, or on the other side of closed
oom or sleeping area doors are closed at night—and in the hallway
ms may not detect fire on another floor or area of the home.
otection as interconnected units, especially if the fire starts in a
ofessional fire detection systems, so if one unit senses smoke, all units
ms may not be heard.
ent standards, it may not be heard if: 1) the unit is located outside
e missing, disconnected or dead, if the wrong type of
oom or sleeping area—especially
. That is why recommended minimum protection is at least
ed residents.
ea, and every bedroom on every level of your
Though the alarm hor
owned out by noise from stereo, TV, traffic, air conditioner
esidents are hearing impaired or sound sleepers. Special
Like any electronic device, Smoke Alarms
n in this unit meets or
LIMITED WARRANTY
BRK Brands, Inc., ("BRK") the maker of First Alert®brand products warrants
that for a period of ten years from the date of purchase, this product will be
free from defects in material and workmanship. BRK, at its option, will repair
or replace this product or any component of the product found to be defective
during the warranty period. Replacement will be made with a new or remanufactured product or component. If the product is no longer available,
replacement may be made with a similar product of equal or greater value.
This is your exclusive warranty.
This warranty is valid for the original retail purchaser from the date of initial
chase and is not transferable. Keep the original sales receipt. Proof
etail pur
r
chase is required to obtain warranty performance. BRK dealers, service
of pur
centers, or retail stores selling BRK products do not have the right to alter,
modify or any way change the terms and conditions of this warranty.
This warranty does not cover normal wear of parts or damage r
any of the following: negligent use or misuse of the product, use on improper
voltage or current, use contrary to the operating instructions, disassembly,
repair or alteration by anyone other than BRK or an authorized service center.
Further
, the warranty does not cover Acts of God, such as fir
nadoes or any batteries that ar
and tor
BRK shall not be liable for any incidental or consequential damages caused by
the breach of any express or implied warranty. Except to the extent prohibited
by applicable law, any implied warranty of merchantability or fitness for a
particular purpose is limited in duration to the duration of the above warranty
Some states, provinces or jurisdictions do not allow the exclusion or limitation
of incidental or consequential damages or limitations on how long an implied
warranty lasts, so the above limitations or exclusion may not apply to you.
This warranty gives you specific legal rights, and you may also have other
rights that vary from state to state or province to province.
How to Obtain Warranty Service
vice:
Ser
If service is r
In order to obtain warranty service, contact the Consumer Affairs Division at
1-800-323-9005, 7:30 AM - 5:00 PM Central Standard Time, Monday through
Friday. To assist us in serving you, please have the model number and date of
chase available when calling.
pur
For Warranty Service return to:
BRK Brands, Inc., 25 Spur Drive, El Paso, TX 79906
Battery: BRK Brands, Inc. make no warranty, express or implied, written or
oral, including that of merchantability or fitness for any particular purpose with
respect to battery.
First Alert®is a r
ONELINK®is a r
6
egister
egistered trademark of BRK Brands, Inc.
ed, do not r
equir
ed trademark of the First Alert T
e included with this unit.
oduct to your retailer.
n the pr
etur
rust used under license.
Printed in Mexico M08-0194-000 Q 03/07
esulting from
e, flood, hurricanes
gency.
.
 Loading...