

Page 1
INSTRUCTION MaNUal
FaBCSS1 SERIES
Page 2

IMPORTANT SAFEGUARDS
• This device sh ould only be used fo r bark deterrent t raining of dogs.
• Not recommen ded for use in clos e proximity to oth er dogs.
Please note i n some instances a nother dog may trigg er a correctio n.
• This devic e is not a toy; keep out of reac h of children.
• This device is n ot intended to provi de protection a gainst
aggressive dogs.
• Your dog should be in g ood health when usi ng this product .
• This produc t is not to be used on dogs less than 9 lbs . or less than
6 months old.
• Your dog should not b e left unatte nded with this colla r on. Avoid
leaving the c ollar on the dog for mo re than 8 continuous h ours per
day. Prolonge d collar use can caus e pressure sores w hich may lead to
skin irr itation such as con tact dermatit is or decubitus ul cers. If a rash
is discover ed discontinue us e until the skin area h eals completely. If
conditi on persists fo r more than 48 hour s, contact your vet erinarian.
• Do not attac h a leash to the First A lert™ Bark Cont rol Collar. A separate
collar or har ness may be used pro vided it does not int erfere with th e
bark cont rol collar.
• Warning: This device uses two Lithium (CR 2032) coin type batteries.
Keep the batteries out of reach of children. If swallowed, immediately
seek medical help as serious injury may occur.
SAVE THESE INSTRUCTIONS
About this product:
• This produc t should be used wh en training dogs f or deterring
barking behavior.
• Turn unit o whe n not in use to conser ve battery lif e.
• This prod uct can be used in doors and outdo ors.
• Adjusta ble collar ts neck s izes between 6 an d 28 inches.
• 3 levels of cor rection can b e adjusted for your d og
• Low batte ry indicator
• Weatherproof
Page 3
DO NOT USE THIS BAR K CONTROL COLLAR U NTIL YOU
HAVE READ THESE I NSTRUCTIO NS
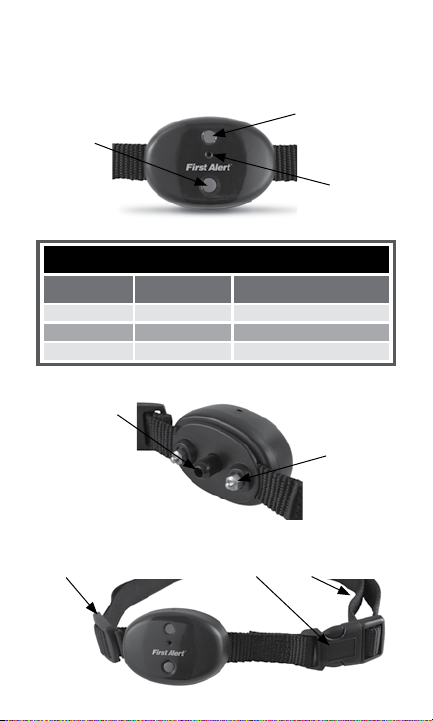
PRODUCT OVERVIEw:
INDICATOR LIGHT:
MAIN CONTROL
BUTTON:
• On/O
• Correct ion
level adjustment
• Number of a shes
indicate s which level
is in use
OUTWA RD
MICROPHONE:
• Used to detec t barking
correction level settings
Level Beeps Green LED Light
1 - low 1 short beep 1 flash (repeated 6 times)
2 - medium 2 short beeps 2 flashes (repeated 6 times)
3 - high 3 short beeps 3 flashes (repeated 6 times)
INWARD MICROPHONE:
Used to detec t
barking
BATTERY DOOR:
Located on b ottom
of unit for bat tery
installa tion and removal
ADJUSTABLE
BUCKLE
QUICK RELEASE
Flashing R ed: Low batter y
STEEL PROBES:
FABRIC
CLASP
COLLAR
STAINLESS
Correction
administering
system
Page 4

The Firs t Alert™ Bark Cont rol Collar has a propr ietary bark d etection
HOw IT wORkS:
system t hat uses a dual micro phone system to de termine barkin g
behavior. Thi s specially design ed system ensure s that a correct ion is
adminis tered only when unwan ted barking behav ior is occurring . The
system a lso has been design ed to prevent continu ous correcti ons if
excessive b arking is detec ted.
AN OVER CORRECTION MODE caus es the system to tu rn o and
automatically reset.
OPERATING INSTRUCTIONS
BATTERY INSTALLATION:
IMPORTANT: This step is to be compl eted when the collar i s NOT on
your dog.
• Remove two sc rews securing t he battery
compar tment using a cros s head or Phillips
head scre wdriver. (
• Lift battery compartment from main body of
bark collar. (
• Insert two CR2032 Lithium coin batteries into
battery compartment. Batteries should be
placed with the positive side facing down.
IMPORTANT: Follow orientation as described on
graphics illustrated on battery compartment.
g. 3)
(
• Replace battery compartment with two CR2032
Lithium coin batteries back into main body.
• Tighten the two screws using the cross head
screwdriver, do not over tighten.
• To test the unit turn on by pressing and holding
the main control button for 4 seconds. The unit
will beep and ash indicating which correction
level is in use. Please refer to the correction level
settings chart under Product Overview on page 3.
• To turn o the unit, press and hold the main
control button for 4 seconds. The unit will
beep up to three times after two seconds.
Continue to press and hold for another two seconds
g. 1)
g. 2)
gure 1
gure 2
gure 3
until you hear a long beep and the unit is o.
Page 5

• When replacing batteries after usage you
must completely discharge the collar by
holding a plastic handle screwdriver across
both stainless steel probes for 5 seconds.
Make sure the
metal portion of the screwdriver is touching
both stainless steel probes and the unit is in
gure 4
the OFF position.
COLLAR FITTING
Proper t of the First Alert™ Bark Control
Collar is essential to establish a good training
foundation and optimal performance.
Note: Batteries should be installed properly
gure 5
and the collar should be in the OFF position
before proceeding with tting the collar to
your dog.
STEP 1:
Ensure dog is in a relaxed position.
STEP 2: With the collar clasp open loosen
the adjustment buckle such that it can reach
completely around your dog’s neck (
g. 4).
gure 6
Place inward microphone directly over the
dog’s
voicebox. When buckled, the collar should rest
directly behind the dog’s ears (the highest
part
of the neck). (
Note: Make sure both stainless steel probes
g. 5)
gure 7
go through the coat completely and make
contact with the skin.
Use the longer stainless steel probes if the coat
does not allow the shorter probes to reach
the skin.
Before changing the stainless steel probes you
gure 8
must completely discharge the collar by holding
a plastic handle screwdriver across both stainless steel probes for 5
seconds. Make sure the metal portion of the screwdriver is touching both
stainless steel probes and the unit is in the OFF position.
(continued)
Page 6

Trimming the hair around the dog’s neck where the stainless steel probes
will touch the skin is optional, DO NOT trim the hair so short that the skin
is completely exposed as this might allow for an irritation or rash to occur.
Use a wrench when assembling or disassembling the stainless steel
probes, do not over tighten. (
STEP 3: Close and lock clasp.
g. 6)
(g. 7)
STEP 4: Adjust for proper t by pulling on strap until you can t two
ngers in between your dog’s neck and the collar. (
g. 8)
Note: Verify that the inward microphone is directly over the dog’s
voicebox. The collar should be rm but not excessively tight.
STEP 5: Let your dog wear the product for sucient time conrming that
they are moving around normally. This step is to ensure that under daily
activity the collar will remain secure and not become loose.
STEP 6: Remove collar from dog and cut the excess collar material,
leaving approximately 1 inch.
STEP 7: Seal the edge of the collar using a ame.
STEP 8: Reattach collar to your dog. Check the t of the collar several
times per day. Wipe the
stainless steel probes weekly with a damp cloth
while collar is in o position.
Reminder: If you choose to use a 2nd collar, leash or harness system
make sure it does not interfere with the operation of the First Alert™
Bark Control Collar.
READY TO USE
Note: The BATTERY INSTALLATION
and COLLAR FITTING steps must be
completed before you are ready to use.
STEP 1: Holding the main body of
the First Alert™ Bark Control Collar
in both hands PRESS and HOLD the
Control Button for 4 seconds.
Note: The unit will beep and ash
indicating which correction level is
in use. Please refer to the correction
level settings chart under Product Overview on page 3.
Page 7

The First Alert™ Bark Control Collar will recall the last setting or the
default setting (level 1 or low).
STEP 2: Set correction level by pressing and holding (approximately
2 seconds) the Control Button.
Once the collar is ON press the Control Button once to toggle to the next
correction level. You will need to test your dog to see which correction
level is appropriate for your dog’s temperament. Always begin training
with the First Alert™ Bark Control Collar on level 1. If your dog does not
respond to the Static Correction on level 1 change the setting to level 2.
If there is no response from your dog at level 2 change the setting to level
3. The table on page 3 describes the correction level settings.
STEP 3: Attach collar to your dog as you did in the COLLAR FITTING stage.
SPECIAL OPERATING NOTES
Turn unit o when not in use to conserve battery life.
The First Alert™ Bark Control Collar retains the LAST correction level
setting and will resume this mode when the unit is turned on.
The LED of the setting chosen will illuminate GREEN when a bark has
been detected and a correction is being administered.
OVER CORRECTION MODE: If excessive barking is detected the bark
control system will enter a mode designed to shut down the system.
The LED of the selected setting will illuminate RED and will automatically
reset. You can manually reset the system by pressing and hold the Main
Control Button.
LOW BATTERY MODE: LED light will ash RED for 5 seconds when the
battery needs to be replaced.
TRAINING GUIDE
Proper training is essential to achieving the best results from the
First Alert™ Bark Control Collar for you and your dog. When rst starting
to use the bark control collar, you should closely monitor your dog’s
reaction when barking behavior is exhibited.
When you begin using the bark control collar, your dog should be inside
a protected area. The protected area should not be a cage, crate, or
Page 8

kennel. If outside, your dog should be in a safe protected area so that
your dog is unable to run away when they receive the correction from the
bark control collar.
Each dog can have a dierent reaction from the bark control collar’s
correction. These reactions can vary from a dip of the head, to shaking
the head, whining, excessive barking, confusion, or running away. In
the event of an extreme reaction, wait until your dog is calm before
approaching your dog.
The reaction your dog will have is dependent on your dog’s personality.
The rst several times you use the bark control collar, you must be
present. It is not recommended that you leave the bark control collar on
your dog when you will not be present for extended periods of time.
The bark control collar should be worn when you want to deter unwanted
barking behavior. Consistently using the bark collar at the correct time
will give the best results. The more disciplined you are when choosing
to use the bark control collar the better your dog will understand that
barking behavior is not wanted when wearing the collar.
The training process needs to be interactive. Once your dog has received
a bark collar correction and stopped barking, you can reward your dog by
praising and/or giving a treat.
For the best results with the First Alert™ Bark Control Collar, you may
consider consulting a qualied obedience trainer.
HINTS AND TIPS
Is this product right for me and my dog?
• The First Alert™ Bark Control Collar is best used in conjunction
with behavior training from a qualied behaviorist or obedience trainer.
• Before using the bark control collar on an aggressive or phobic dog,
consult a qualied behaviorist or obedience trainer.
CARE AND MAINTENANCE
The First Alert™ Bark Control Collar is weatherproof but is
NOT submersible so care must be taken when cleaning.
Page 9

• Always remove the battery before cleaning
• Use a clean damp cloth, water only
• Never use any household or industrial cleaners
• Do not submerse the unit in water or any other liquid
• Keep the dog’s coat and skin clean in the area where the collar makes
contact
• Check the t of the collar several times per day
• Wipe the Stainless Steel Probes weekly with a damp cloth while collar
is in o position
Note: The Lithium coin batteries used in this product contain perchlorate
material. Special handling may apply in California. Go to:
www.dtsc.ca.gov/hazardouswaste/perchlorate for more information.
FCC STATEMENT
Potential for Radio/Television Interference
This product has been tested and found to comply with the limits for a
Class B digital device, pursuant to part 15 of the FCC rules.
These limits are designed to provide reasonable protection against
harmful interference in a residential installation. The product generated,
uses, and can radiate radio frequency energy and, if not installed and
used in accordance with the instructions, may cause harmful interference
to radio communications. However, there is no guarantee that the
interference will not occur in a particular installation. If the product does
cause harmful interference to radio or television reception, which can be
determined by turning the product on or o, the user is encouraged to try
to correct the interference by one or more of the following measures:
• Reorient or relocate the receiving antenna.
• Increase the separation between the product and the receiver.
• Connect the product into an outlet on a circuit dierent from that to
which the receiver is connected.
• Consult the dealer or an experienced radio/TV technician for help.
Changes or modications not expressly approved by the party responsible
for compliance could void the user’s authority to operate the equipment.
Page 10

In the U.S.A. and Canada
1 YEAR wARRANTY
If you have any question regarding this warranty or would like to obtain warranty service,
please call 1-888-474-3172 and a convenient service center address will be provided to you.
Sunbeam® Products, Inc. doing business as Jarden Consumer Solutions, or if in Canada,
Sunbeam® Corporation (Canada) Limited doing business as Jarden Consumer Solutions
(collectively “JCS”) warrants that for a period of one year from the date of purchase, this
product will be free from defects in material and workmanship. JCS, at its option, will repair
or replace this product or any component of the product found to be defective during the
warranty period. Replacement will be made with a new or remanufactured product or
component. If the product is no longer available, replacement may be made with a similar
product of equal or greater value. This is your exclusive warranty.
DO NOT attempt to repair or adjust any electrical or mechanical functions on this product.
Doing so will void this warranty.
This warranty is valid for the original retail purchaser from the date of initial retail purchase
and is not transferable. Keep the original sales receipt. Proof of purchase is required to obtain
warranty performance. JCS dealers, service centers, or retail stores selling JCS products do not
have the right to alter, modify or any way change the terms and conditions of this warranty.
This warranty does not cover normal wear of parts or damage resulting from any of the
following: negligent use or misuse of the product, use on improper voltage or current, use
contrary to the operating instructions, disassembly, repair or alteration by anyone other than
JCS or an authorized Sunbeam® service center. Further, the warranty does not cover: Acts of
God, such as re, ood, hurricanes and tornadoes.
What are the limits on Sunbeam’s Liability?
JCS shall not be liable for any incidental or consequential damages caused by the breach of
any express, implied or statutory warranty or condition. Except to the extent prohibited by
applicable law, any implied warranty or condition of merchantability or tness for a particular
purpose is limited in duration to the duration of the above warranty. JCS disclaims all other
warranties, conditions or representations, express, implied, statutory or otherwise. JCS shall
not be liable for any damages of any kind resulting from the purchase, use or misuse of, or
inability to use the product including incidental, special, consequential or similar damages
or loss of prots, or for any breach of contract, fundamental or otherwise, or for any claim
brought against purchaser by any other party.
Some provinces, states or jurisdictions do not allow the exclusion or limitation
of incidental or consequential damages or limitations on how long an implied warranty lasts,
so the above limitations or exclusion may not apply to you. This warranty gives you specic
legal rights, and you may also have other rights that vary from province to province, state to
state or jurisdiction to jurisdiction.
In the U.S.A., this warranty is oered by Sunbeam® Products, Inc. doing business as Jarden
Consumer Solutions located in Boca Raton, Florida 33431.
In Canada, this warranty is oered by Sunbeam® Corporation (Canada) Limited, doing
business as Jarden Consumer Solutions located at 20 B Hereford Street, Brampton, Ontario
L6Y 0M1.
PLEASE DO NOT RETURN THIS PRODUCT TO ANY OF
THESE ADDRESSES OR TO THE PLACE OF PURCHASE.
© 2013 Sunbeam® P roduct s, Inc. doin g business a s Jarden Cons umer Solut ions.
All right s reser ved. Dist ributed b y Sunbeam® Pro ducts, In c. doing bu siness as
Jarden Co nsumer Solu tions, Bo ca Raton, F lorida 33431.
Printed in China SPR-041513-943P PN 165862
First A lert™ is a tr ademark of t he First Al ert Trust , used unde r license.
 Loading...