

Page 1
8 piece
drum set
FD-480
8 pi ece drum se t wi th f ul l y tu na bl e dr um h ea ds
Ha rd wo od d ru ms ti c k s • D ru m se at
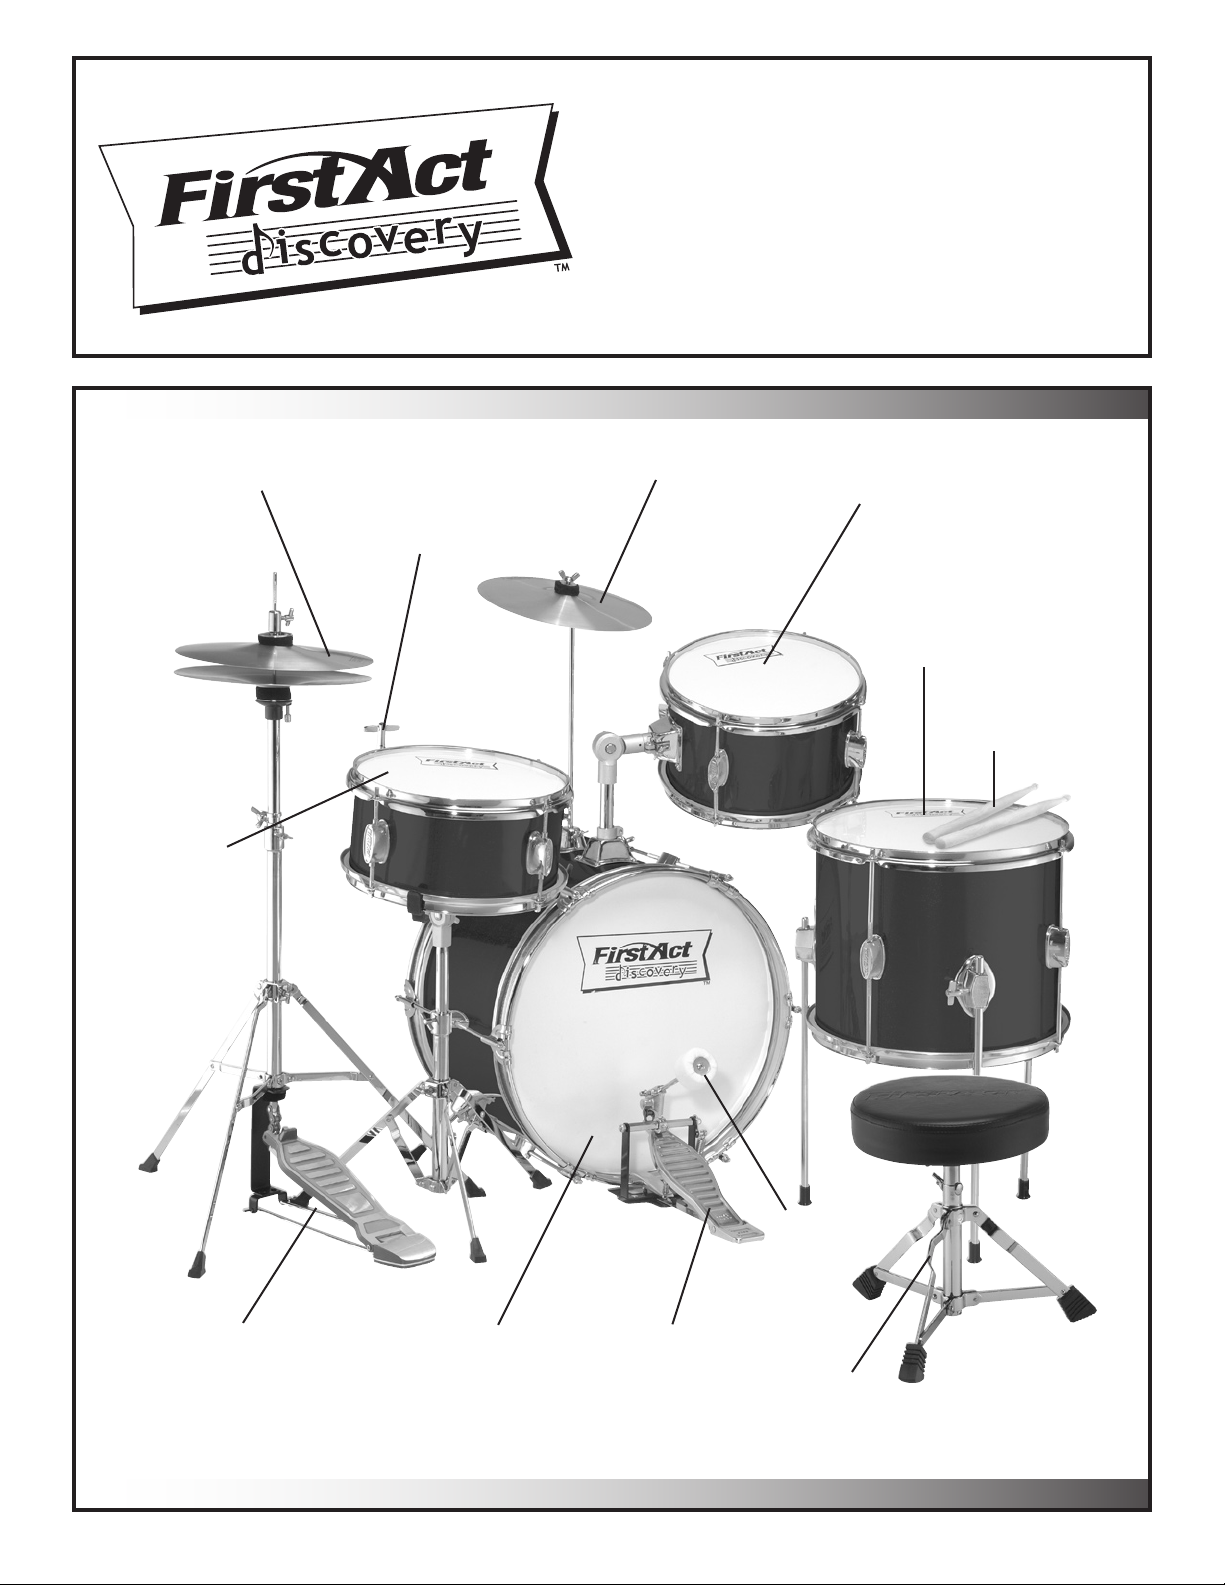
10" Hi-Hat Cymbals
• Adjustable stand
10" Snare Drum
• Adjustable stand
• Fully tunable
drumhead
• Hardwood shell
Tuning Key works
with each drum
10" Brass Cymbal
10" Mounted Tom Drum
• Adjustable mounting arm
• Fully tunable drumhead
• Hardwood shell
13" Floor Tom Drum
• Fully tunable drumhead
• Hardwood shell
Hardwood
Drumsticks
Spring Action
Hi-Hat Stand
16" Bass Drum
• Adjustable angle
• Fully tunable drumheads
• Hardwood shell
Bass Drum
Pedal Beater
Spring Action
Bass Drum Pedal
Drum Seat
• Padded foam cushion
• Sized for young drummers (6-12)
Maximum weight not to exceed 100lbs.
Intended for use as a seat only. Do not stand.
Page 2
Page 3

Thank you for purchasing the First Act DiscoveryTM FD-480 Drum Set! You’ll need no tools other than the
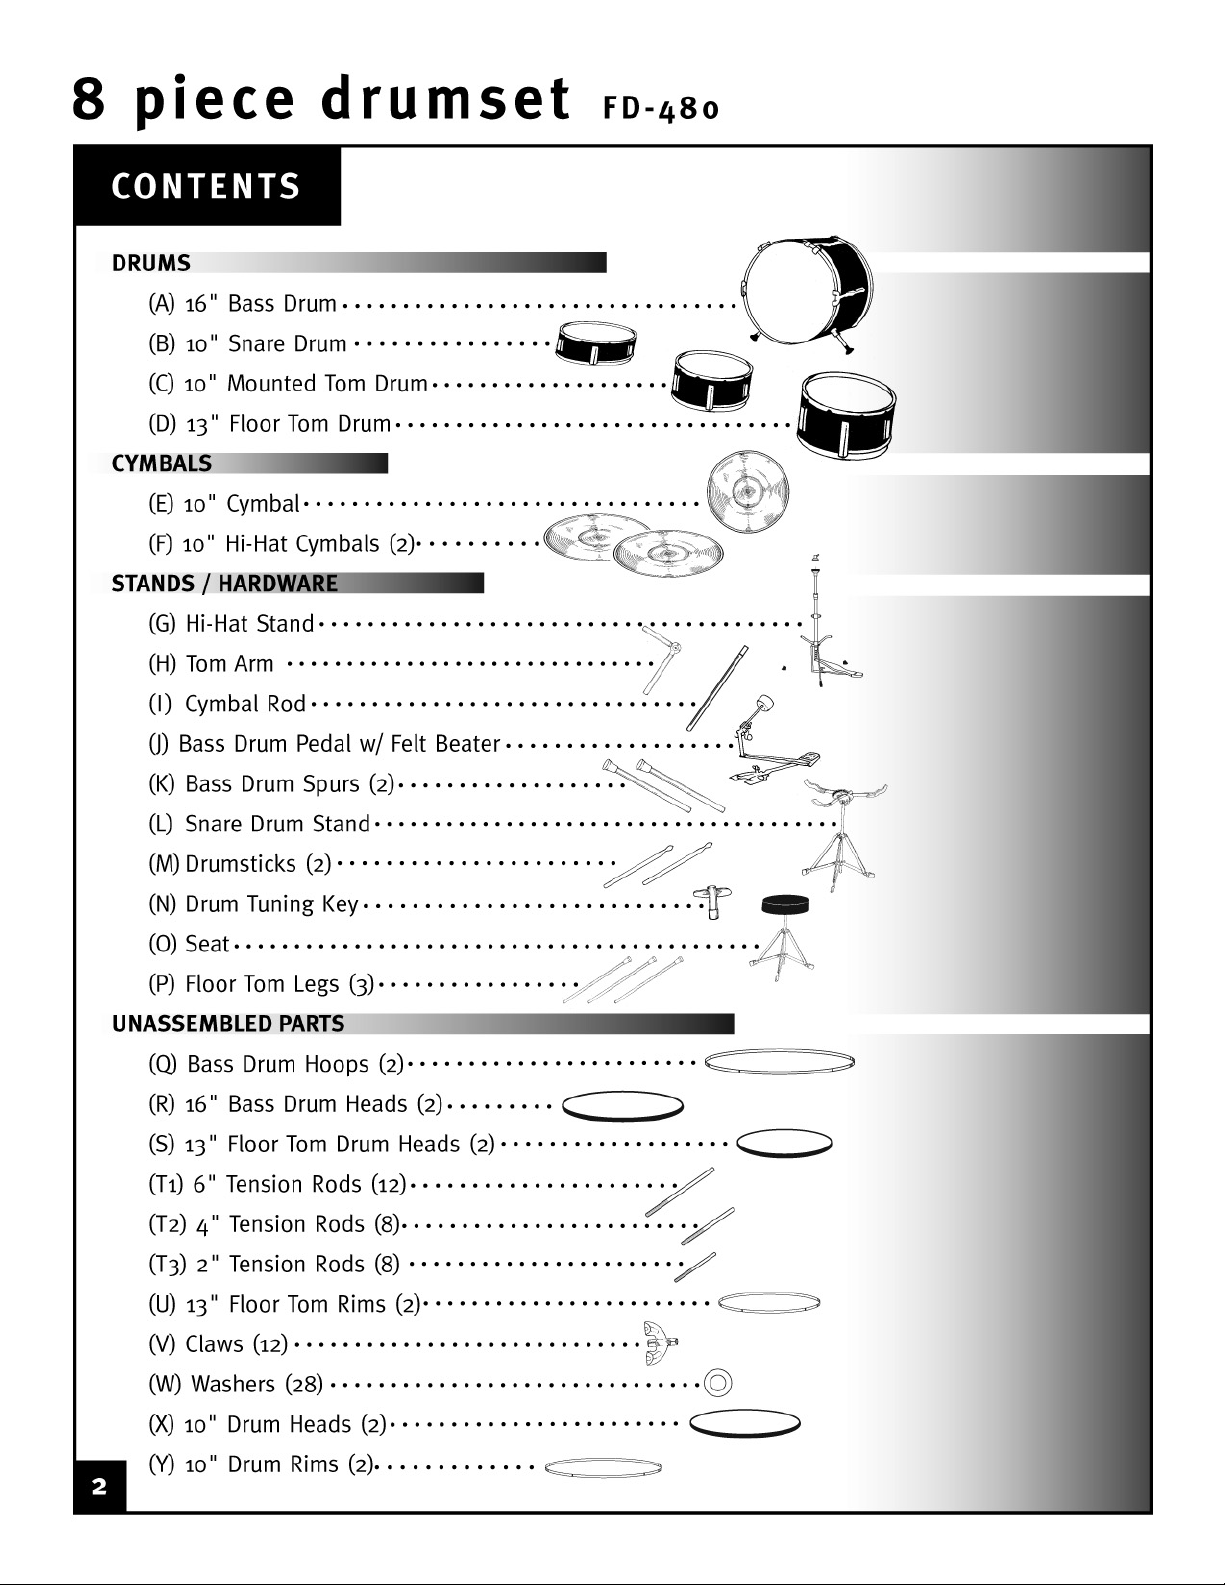
drum key included. Be sure to look over the Drum Contents page so that all of the parts can be easily
identied. Keep the drum-tuning key (N) in a safe place, as you’ll need it to tune or change the heads
periodically. Enjoy!
ASSEMBLY
Bass Drum Assembly
Place the bass drum shell (A) at on the oor and place the drum head (R) on top. Rotate bass drum head
so that the First Act logo is upright. Two spur insets will be on the bottom. Place bass drum hoop (Q) over
the drum head, rounded rim side facing out (the bass drum hoop has a rounded side and a at side, the
at side will be ush with the rim of the bass drum head and the rounded side will be ush with the bass
drum claws). Place the bass drum claws (V) on the bass drum hoop, position them over the lug casings
on the bass drum shell. Place tension rod washer (W) over bass drum tension rod (T1). Insert bass drum
tension rods through bass drum claws and into the corresponding lugs slightly, do not tighten. Repeat for
each tension rod/lug. Once all tension rods have been inserted, tighten in small increments (3-4 turns) with
drum key using opposite lug technique (see illustration on back). Turn bass drum over and repeat procedure.
Insert bass drum spurs (K) into spur mounting brackets. Tighten wing screw when bass drum spur is at
desired length. Bass drum should be level and does not “wobble” held in place by spurs. Attach bass drum
pedal to the bottom of the bass drum hoop on the back of your bass drum. Tighten accordingly. Place white
felt beater into bass drum pedal as shown in (J).
Floor Tom Assembly
Place the 13" drumhead (S) over the 13" oor tom shell (D). Place drum rim (U) over the drumhead and line
up lugs with tension holes. Thread a washer over tension rod (T2), insert tension rod into hole in drum rim
and screw into drum lug. Do not tighten completely. Repeat with additional three tension rods and lugs.
After all rods have been inserted, tighten completely. Tighten drumhead in small increments (3-4 turns) with
drum key using opposite lug technique (see illustration on back). Turn drum over and repeat.
Insert oor tom legs (P) into leg mounting brackets, located on the outside of oor tom shell. Position so
that oor tom is about 6-8 inches off the ground, tighten wing screws.
Tom Assembly
Repeat steps for rims, heads and tuning rods of oor tom with the 10" rims (Y) and 10" heads (X) and 2"
tension rods (T3). Insert adjustable tom arm (H) into tom mounting bracket on top of bass drum and tighten
wing screw at the desired height for tom drum. Place assembled tom drum (C) on tom mounting arm. Adjust
to desired height and tilt, tighten wing screw.
Cymbal Assembly
Place cymbal rod (I) into cymbal arm mounting bracket on top of the bass drum. Remove the wing nut and
top felt of cymbal arm and place the cymbal (E) over threaded rod on top of bottom felt. Replace top felt
and wing nut. Adjust arm to desired height and tighten wing screw on bracket.
Snare Drum Assembly
Locate snare throw-off on snare drum (B). Turn throw-off so that wire snares (visible through the clear
bottom drum head) are touching the bottom head. This gives the snare drum, it’s unique “crack” sound.
Open snare drum stand (L) and adjust to desired height, tighten. Place snare drum on snare drum stand.
Adjust snare drum stand arms and tilt of stand, tighten accordingly.
3
Page 4
ASSEMBLY (cont.)
Hi-hat Assembly:
Stand hi-hat stand [G] straight up, perpendicular to oor. Insert stabilizing rod into slot under hi-hat pedal,
tighten wing screw. Open tripod base of hi-hat stand so that bottom of pedal lies at, tighten wing screw
at top of base. Straighten hi-hat rod, slide top of hi-hat stand over rod and insert into bottom of stand.
Allow knurled portion of hi-hat to be completely exposed, tighten wing screw.
Thread the hi-hat rod through the following in the listed order: 1) curved metal
washer, 2) large cymbal felt, and 3) one hi-hat cymbal.
Remove threaded washer, curved metal washer, and one cymbal felt from hi-hat clutch. Thread hi-hat clutch
through hi-hat cymbal, replace cymbal felt and curved metal washer, secure with threaded washer. Thread
hi-hat rod through hi-hat clutch and position top cymbal 1-2 inches from bottom
cymbal, tighten wing screw. Step on hi-hat pedal to test hi-hat cymbals.
Drum Seat Assembly
For the drum seat (O) open and stabilize tripod base and place seat top onto base. Insert bolt through
collar and tighten wing nut. While sitting behind your drum set, the snare drum and hi-hat should be on
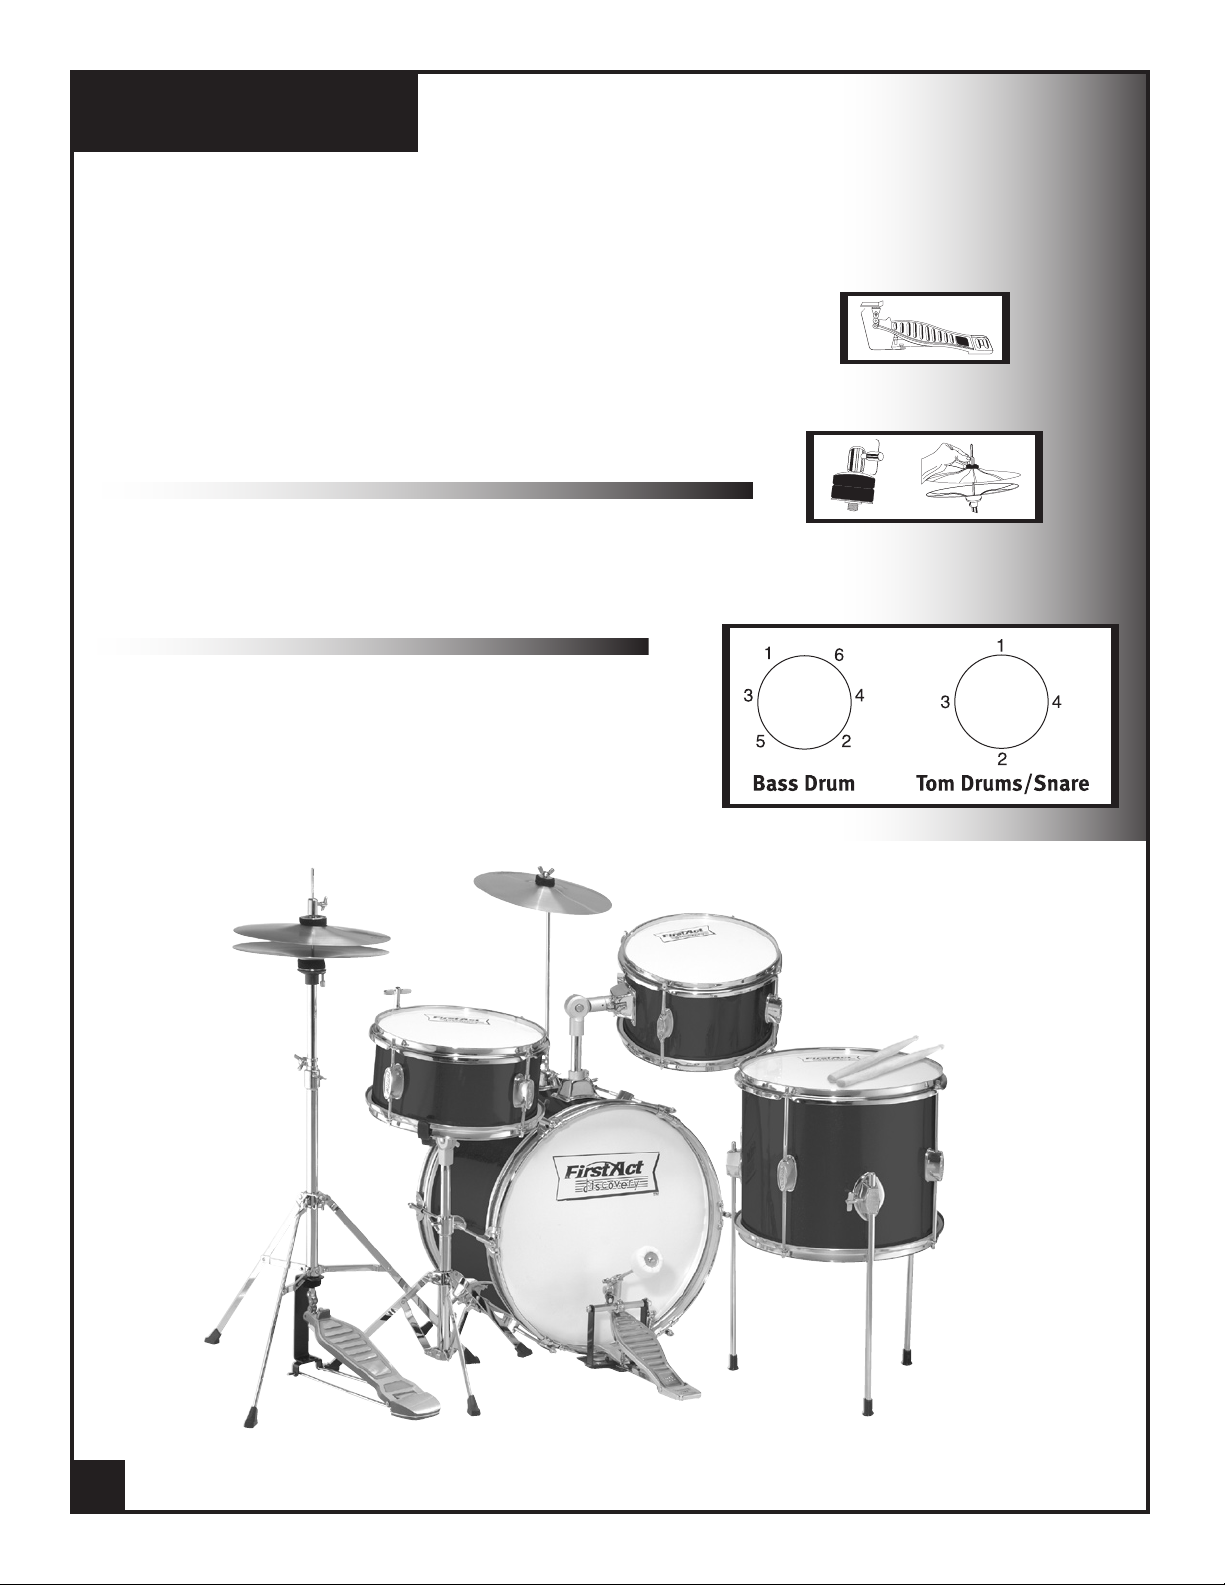
your left and the tom drum and oor tom should be on your right. Look at the photos in this manual
for reference. Make nal adjustments to each drum and play!
Drum Tuning Diagrams
Use your drum key to tighten the lugs in the following order. Apply
equal amounts of tension to each lug, tightening only about 3 to 4
turns per lug, repeating the pattern until satisfactory tuning is
achieved. A drum doesn’t need to be tuned to a specic pitch. The
larger the drum, the lower the pitch.
Good luck and happy drumming!
4
7/13/04
FIRST ACT
P.O. Box 811
Needham, MA 02494 USA
www.rstact.com
Info@rstact.com
CUSTOMER SERVICE 888-551-1115
© ALL RIGHTS RESERVED FIRST ACT INC.
 Loading...