

First Act Discovery FI400, Discovery FI409, Discovery Rockin’ Rhythm FI400, Discovery Rockin’ Rhythm FI409 Instruction Manual
Page 1
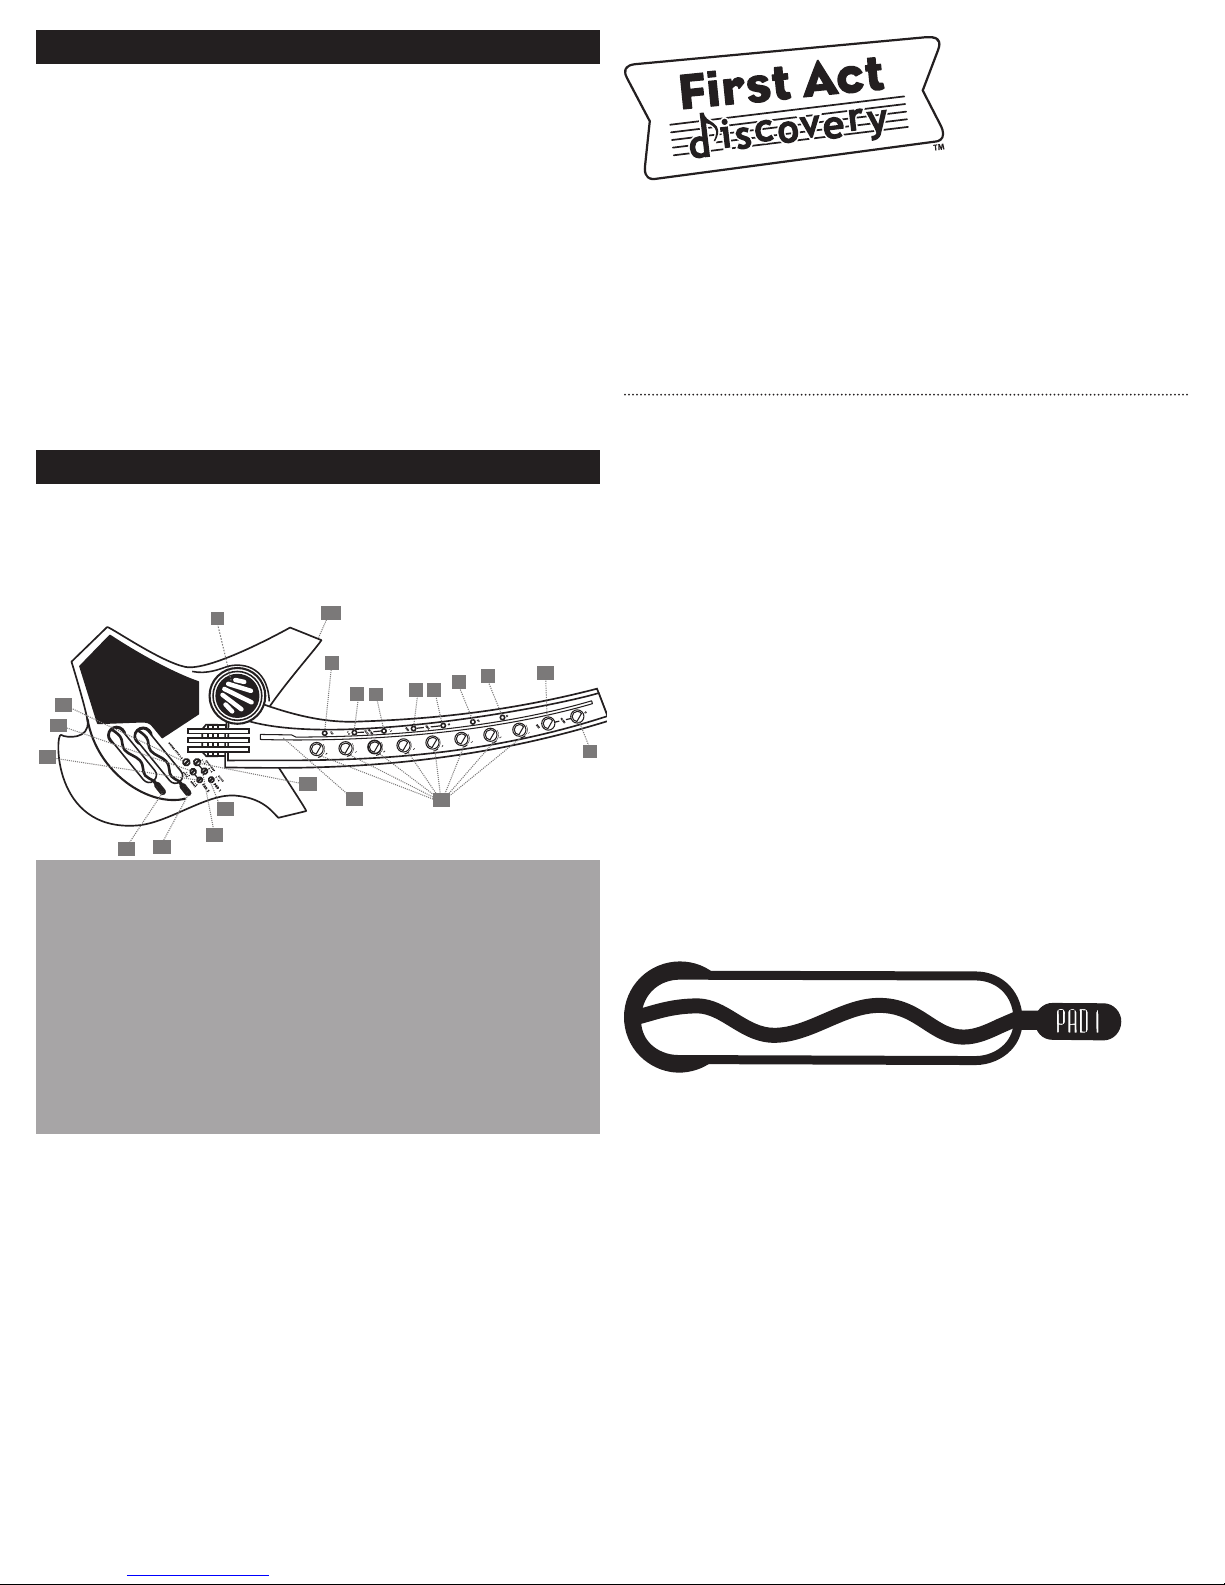
BEFORE YOU PLAY
1
3
2
5
4
7
6
8
21
10
9
11
12
20
13
14
15
16
17
18
19
INSTALL BATTERIES
Always ask an adult to install the batteries for you.
This guitar uses 3 size AA (1.5 V) batteries (included).
Loosen the screw on the battery compartment door with a Phillips
head screwdriver. Open the compartment and refer to the image inside
to install the batteries. Pay close attention to the negative (–) and
positive (+) ends of the battery to be sure they are placed correctly.
Incorrect installation of batteries can damage the guitar or cause an
electrical hazard. Close the battery door and tighten the screw.
Note: If the batteries start to wear out, the guitar’s sound may
deteriorate. If this happens, install a new set of batteries. If you are not
going to play for a long time, remove the batteries from the guitar.
Do not mix old and new batteries. Do not mix alkaline, standard
(carbon-zinc) and rechargeable (nickel-cadmium) batteries.
PLAYING THE ROCKIN’ RHYTHM GUITAR
The Rockin’
FI400/ FI409
ROCKIN’ RHYTHM GUITAR
INSTRUCTION MANUAL
Congratulations on your new guitar!
Please read this guide carefully before you
begin playing.
GUITAR STYLE 1-3
To change the style of the guitar licks, press the GUITAR STYLE 1-3
button on the Pad 2 controls. There are three styles to choose from.
RHYTHM
Press RHYTHM SELECT 1-3 OR 4-6 to choose a rhythm. Each button has
3 rhythms - just press the button again to change the rhythm.
Rhythm Guitar
1. Speaker
2. Power On
3. Power Off
4. Tempo Up
5. Tempo Down
6. Rhythm Select 1-3
7. Rhythm Select 4-6
8. Stop
9. Volume Up
10. Volume Down
11. Fret Keys 1-8
POWER
To play, press the ON button.
To turn power off, press the OFF button.
STOP
Press STOP to exit any mode.
VOLUME
Press the VOLUME UP and DOWN buttons to adjust the volume.
TEMPO
Press the TEMPO UP and DOWN buttons to adjust the tempo.
AUTOMATIC POWER OFF
If no keys are pressed for 60 seconds, the keyboard will power off.
FRET KEYS
Press any of the FRET KEYS (1-8) to play guitar melodies or “licks”.
12. Solo Loop Selection 1-3
13. Solo Loop Selection 4-6
14. Pad 1 Effect Selection Key
15. Guitar Style Selection 1-3
16. Pad 2 Style Selection
Key (1-8)
17. Pad 2 Effect Selection
Key (1-6)
18. Scratch Pad 1
19. Scratch Pad 2
20. LED Indicator
21. MP3 Input (on side)
While a rhythm is playing:
Press the FRET KEYS to play licks over the rhythm.
Press PAD 1 to add rhythm effects.
Press PAD 2 to add sound effects.
Press STOP to exit the rhythm. To re-start the last rhythm, press PAD 1.
SOLO LOOP
Press SOLO LOOP 1-3 OR 4-6 to choose a solo loop, then press any
FRET KEY to begin the loop.
Each button has 3 rhythms - just press the button again to change the
rhythm.
While the loop is playing:
Press the FRET KEYS to play fill-in licks.
Press PAD 2 to add sound effects.
Press STOP to exit the loop.
PAD 1
Add sound effects to the rhythm with PAD 1. Press EFFECT 1-4 on the
Pad 1 controls to choose an effect. You can press the PAD on either side
to get different effects.
There are 4 sound effects, just press EFFECT 1-4 again to change the
sound effect:
Effect 1 – Tempo: Press the pad forward or backward to speed up or
slow down the tempo of the rhythm.
Effect 2 – Volume: Press the pad forward or backward to raise or lower
the volume of the rhythm.
Effect 3 – Reverse: Press the pad forward or backward to play the
rhythm forward or backward.
Effect 4 – Beat-Looping: Press the pad to stay on one beat for as long
as you are touching the pad.
Note: Pad 1 may only be used in Rhythm Mode.
Page 2

Continued
PAD 2
Use PAD 2 to play 8 sound effects in 6 different styles. Press the Pad 2
Effect Selection button to choose an effect, and then press 1-6 EFFECT
on the Pad 2 controls.
Style 1 – Reverse: Press the pad forward or backward to play the effect
forward or backward.
Style 2 – Two Effects: Press the pad in either direction for two randomly
chosen effects.
Style 3 – Echo Effect: Press the pad to play the effect with an echo.
Style 4 – All Effects: Press the pad in different spots to play each of the
8 effects.
Style 5 – Pitch Effect: Press the pad forward or backward to change the
pitch of the effect.
Style 6 – Random: Press the pad to play a random assortment of effects.
Use PAD 2 to add cool sound effects in Rhythm mode or while playing a
solo loop.
MP3 Input
The 1/8-inch input jack lets you plug in your MP3 player and play
along with your favorite tunes.
Important Safety Instructions
Please read this section carefully.
1. Read and follow these instructions.
2. Do not use this device near water.
3. Clean only with a dry cloth.
4. Do not use near any heat sources such as radiators, heaters,
or stoves.
5. Only use the attachments/accessories specified by the
manufacturer.
6. Refer all servicing to qualified service personnel. Servicing is
required when the drum pad has been damaged in any way, liquid
has been spilled onto the drum pad, the drum pad has been
exposed to rain or moisture, does not operate normally, or has
been dropped.
WARNINGS
1. Do not change the parts without professional instructions. Any
change may cause malfunctions.
2. When the guitar is not in use for a long period of time, remove the
batteries to avoid battery corrosion.
3. Keep the wrapping bag out of the reach of children to avoid a
choking hazard.
4. Always move the guitar carefully to avoid damage to outer
covering and inner components.
5. The guitar should not come in contact with acid or alkali. It
should not be operated where there is corrosive or excessively
moist air around to avoid corrosion of the electrical contacts.
NOTE: This equipment has been tested and found to comply with the
limits for a Class B digital device, pursuant to Part 15 of the FCC Rules.
These limits are designed to provide reasonable protection against
harmful interference in a residential installation. This equipment
generates, uses, and can radiate radio frequency energy and, if not
installed and used in accordance with the instructions, may cause
harmful interference to radio communications. However, there is no
guarantee that interference will not occur in a particular installation.
If this equipment does cause harmful interference to radio or television
reception, which can be determined by turning the equipment off and
on, the user is encouraged to try to correct the interference by one or
more of the following measures:
- Reorient or relocate the receiving antenna.
- Increase the separation between the equipment and receiver.
- Connect the equipment into an outlet or a circuit different
from that to which the receiver is connected.
- Consult the dealer or an experienced radio TV technician
for help.
Warning: Changes or modifications to this unit not expressly approved
by the party responsible for compliance could void the user’s authority
to operate the equipment.
Customer Assistance
Phone: 888.551.1115
Email: info@firstact.com
Colors and specifications
depicted on this guide
may vary slightly from
your product.
First Act, First Act Discovery, and the
First Act Discovery logo are trademarks
of First Act Inc.
©2008 First Act Inc.
All rights reserved.
FI400.M.02
 Loading...