

Page 1

DO NOT PRINT THIS PAGE
Page 2

1. Read and follow these instructions.
2. Do not use this device near water.
3. Clean only with a dry cloth.
4. Do not use near any heat sources such
as radiators, heaters, stoves, or
other heat producing machinery.
5. If you use a power cord, protect it
from being walked on or pinched
particularly at plugs and at the point
where it exits from the keyboard.
6. Only use the attachments/accessories
specified by the manufacturer.
7. Unplug the keyboard during lightning
storms or when unused for long
periods of time.
8. Refer all servicing to qualified service
personnel. Servicing is required when
the keyboard has been damaged in
any way, such as power supply cord or
plug is damaged, liquid has been
spilled or objects have fallen into the
keyboard, the keyboard has been
exposed to rain or moisture, does not
operate normally, or has been dropped.
9. To reduce the risk of fire and electric
shock, do not expose this apparatus
to rain or moisture.
Important Safety Instructions
Please read this section carefully.
WARNINGS
1. The pressure and polarity of the
electric adaptors used should conform
to the keyboard specifications to
avoid heat and damage to it. Turn off
the electricity, unplug the adaptors,
and have the product repaired by
professionals if any of the following
occurs: wires or plugs are worn,
torn or damaged; strange smells or
smoke appears; the instrument
suddenly becomes silent when
being played.
2. Do not change the parts without
professional instructions. Any change
may cause malfunctions.
3. When the keyboard is not in use, turn
off the power and unplug the
keyboard to avoid damage to inner
components or fires caused by being
electrified too long.
4. Keep the wrapping bag out of the
reach of children to avoid a choking
hazard.
5. Always move the keyboard carefully to
avoid damage to outer covering and
inner components.
6. The keyboard should not come in
contact with acid or alkali. It should
not be operated where there is
corrosive or excessively moist air
around to avoid corrosion of the
electrical contacts.
BACK COVER
Page 3

Here’s some information to help you get started playing
your new keyboard. Please read carefully.
Happy Playing!
Customer Assistance
Phone: 888.551.1115
Email: [email protected]
Specifications depicted may vary
slightly from product.
First Act, First Act Discovery, and
the First Act Discovery logo are
trademarks of First Act Inc.
©2008 First Act Inc.
All rights reserved.
FD149.M.02
FD149
DIGITAL
KEYBOARD
INSTRUCTION MANUAL
COVER
Page 4
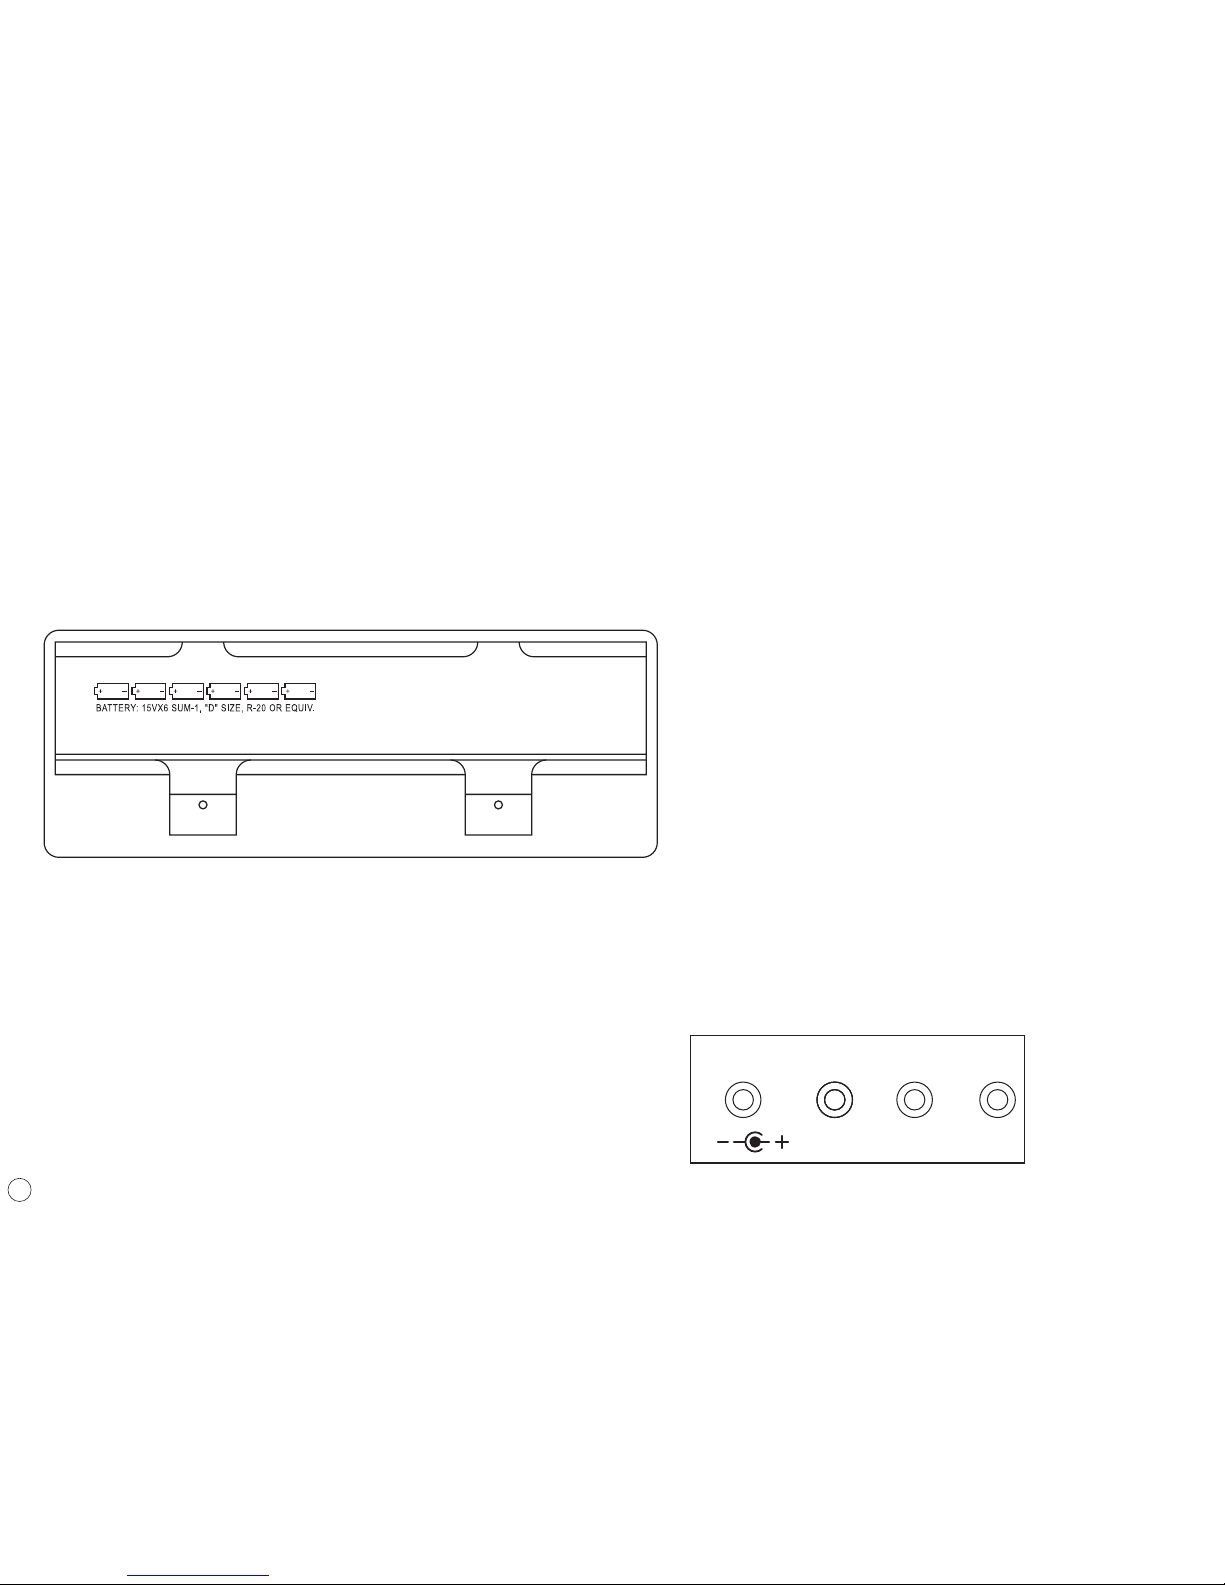
INSTALL BATTERIES
(Always ask an adult to install the batteries for you)
This keyboard uses 6 size D (1.5 V batteries) (not included).
Open the battery compartment on the underside of the keyboard.
Before You Play
Refer to the image on the inside of the compartment door to install
batteries correctly. Pay close attention to
the negative (–) and positive
(+) ends of each battery to be sure they are placed correctly. Incorrect
installation of batteries can damage the keyboard or cause an electrical hazard.
Note: If the batteries start to wear out, the sound of the keyboard may
deteriorate or distort. If this happens, install a new set of batteries. If
you are not going to play for a long time, you should remove the batteries from the keyboard.
DC 9V INPUT
For extended play without batteries, this keyboard can be
connected to a wall outlet using the First Act® FX149 9V
adaptor (sold separately).
The adaptor can be purchased by contacting First Act®
Customer Assistance at 1-800-551-1115.
Caution: Using an adaptor made by a manufacturer other than First Act®
can damage the keyboard or cause an electrical hazard and is therefore not
recommended. Please disconnect the keyboard and adaptor from the wall
outlet when not in use.
MP3 INPUT
The 1/8-inch input jack lets you plug in an MP3 player
and play along with your favorite tunes.
HEADPHONES
To plug in headphones, insert 1/8-inch headphone jack
into “HEADPHONE” input.
(headphones sold separately)
MICROPHONE INPUT
To use a microphone, insert a 1/8-inch microphone plug
into the microphone jack labeled “MIC” and sing along.
(Microphone sold separately)
Battery Compartment
Rear Panel Inserts
INSIDE FRONT COVER
1
DC9V MP3 HEADPHONE MIC
Page 5
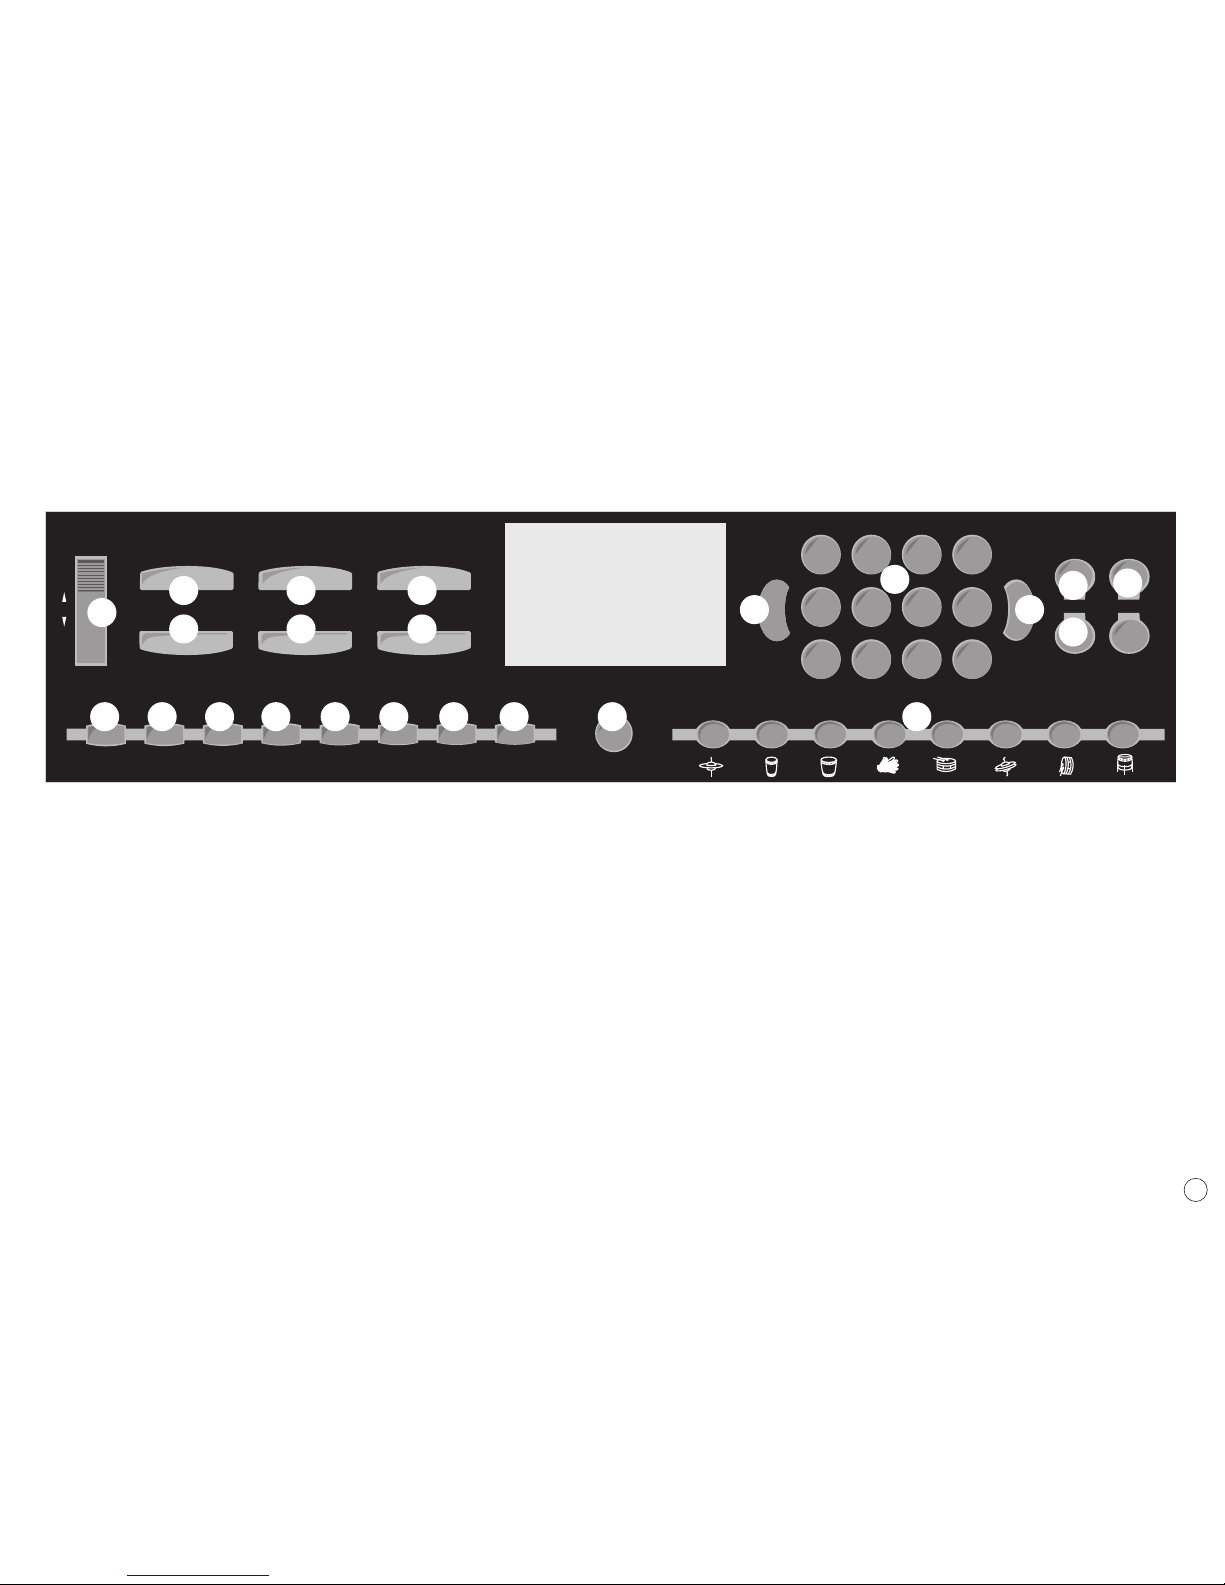
1. Power (On/Off)
2. Master Volume
3. Accompaniment
Volume
4. Sustain/Vibrato
5. Tempo
6. Record/Play
7. Program/Playback
8. Tone
9. Number Buttons
10. Rhythm
11. GUIDE A
12. GUIDE B
13. DEMO START/ STOP
14. Start
15. Stop
16. Synchro
17. Single Finger Chord
18. Fingered Chord
19. Fill-in
20. Bass Chord
21. Chord Off
22. Reset
23. 8 Percussion Sounds
The Keyboard
>L@;<8
=@CC$@E
:?FI ;F==
J%=@E> <I
JK 8I K
98 J J :? F I; JPE:?IF
JKFG
=@E><I< ;
I<J<K
JLJK8@E M@9I8KF
FE
F==
KFE< I?PK?D
DELETE
;<DF
JK 8I K
;<DF
JKFG
>L@;<9
"D8J K<IMF C
$
"8:D G%MFC
$
GC 8P98 :B
GIF>I8 D
GC8PI<:FI;"K<D GF
$
1
2
5
3
6
4
7
8 10
9
11
12
13
14 15 16 17 18 19 20 21 22 23
2
Page 6

DEMO SONGS
Press the DEMO START button to play the
demo songs.
The LED display will show the number of
the song currently playing.
Press the number buttons or (+/-) to
choose other songs.
Press TEMPO +/- to change the speed of
the demo song.
Press the PERCUSSION buttons to add
sounds to the demo songs.
After the current song is played, the keyboard will automatically repeat the song.
Press DEMO STOP to exit the DEMO songs.
RHYTHM
In the normal mode, press RHYTHM.
Press START to begin the rhythm-playing
function.
The current rhythm number will appear
on the display.
Press number buttons or +/- to change to
another rhythm.
Press STOP to exit.
FILL IN
Press the FILL IN button to insert a
variation to the beat pattern.
Playing the Keyboard
POWER
To play, set the power switch to ON.
You will see “0.0” appear on the digital
display.
AUTOMATIC POWER OFF
If no keys are pressed for 3 minutes, the
keyboard will go into sleep mode. Press
any key to “wake up” the keyboard.
MASTER VOLUME and TEMPO
Press MASTER VOLUME +/- to turn the
volume up or down.
Press ACMP. VOL +/- to turn accompaniment volume up or down.
Press TEMPO +/- to speed up or slow
down the tempo of rhythms and demo
songs.
3
Page 7

TONE
In normal mode, press TONE. Play any of
the keys to hear the current tone. The
current tone number will appear on the
display.
Press number buttons or +/- to change
the current TONE.
PERCUSSION SOUNDS
Press the PERCUSSION BUTTONS to get
the corresponding drum sounds.
VIBRATO and SUSTAIN
Press VIBRATO or SUSTAIN to choose an
effect. Play any key to hear the effect:
Vibrato: Makes the note vibrate.
Sustain: Lengthens the end of the note.
CHORDS
SINGLE FINGERED CHORDS
Press the “S. FINGER” button. The 19
keys from the left will serve as the chord
keyboard. Press any key to hear a chord.
Check the enclosed chord chart to learn
chord names.
FINGERED CHORDS
Press the “FINGERED” button. The 19
keys from the left will serve as the chord
keyboard.
Check the enclosed chord chart to learn
chords – with the correct fingering, the
accompaniment chord will be played
automatically; if not, you will only hear
the single note.
BASS CHORDS
Press “BASS CHORD” to start the bass
chord accompaniment function. The 19
keys from the left will serve as chord accompaniment keyboard in which all the
notes played are bass.
Press CHORD OFF to stop chord mode.
RECORD and PLAY
(up to 50 notes)
Press RECORD to begin the recording
function.
The notes you play will be recorded.
Only one note can be recorded at a time,
up to 50 notes.
Press PLAY to play the recorded notes
back.
When recording, press RESET or STOP to
end the recording function.
4
Page 8

GUIDE FUNCTION
Press GUIDE to start the teaching function. Press any key to start the song.
The number on the display will show the
number of the song being played. Press
number buttons or +/- to choose the
song you want to learn to play.
While the song is playing, if you do not
press the keys, the keyboard will stay
on the current chord until you press the
keys again.
After the current song is played, the keyboard will automatically repeat the song.
Press STOP to stop the song being
played.
PROGRAM and PLAYBACK
(up to 16 notes)
To program drum beats, press PROGRAM.
Press the PERCUSSION BUTTONS to edit
drum beats into the keyboard. Only one
drum can be edited at a time, and the
drums edited should not exceed the
maximum number.
Press PLAYBACK to hear your programmed
beats. The keyboard will play the drumbeats in a continuous cycle.
To add melody to your programmed
beats, press SINGLE FINGERED or FINGERED. Use the 19 keys from the left
to add musical accompaniment to the
rhythm.
Press STOP or RESET to end this function.
SINGLE KEY PLAYING FUNCTION
1. Press GUIDE A to start single key
playing function.
2. Whether or not you play the right key,
you will get the right sound.
3. Press GUIDE A again to end the
function.
SYNCHRONAL PLAYING FUNCTION
1. Press GUIDE B to start this function.
2. When you play the right key, you get
a piano sound for that key. When you
play the wrong key, you get a quieter
synthesizer sound of the right note to
play. If you can play the song with all
piano sounds, you played all of the notes
right!
3. Press GUIDE B to end the function.
5
Page 9
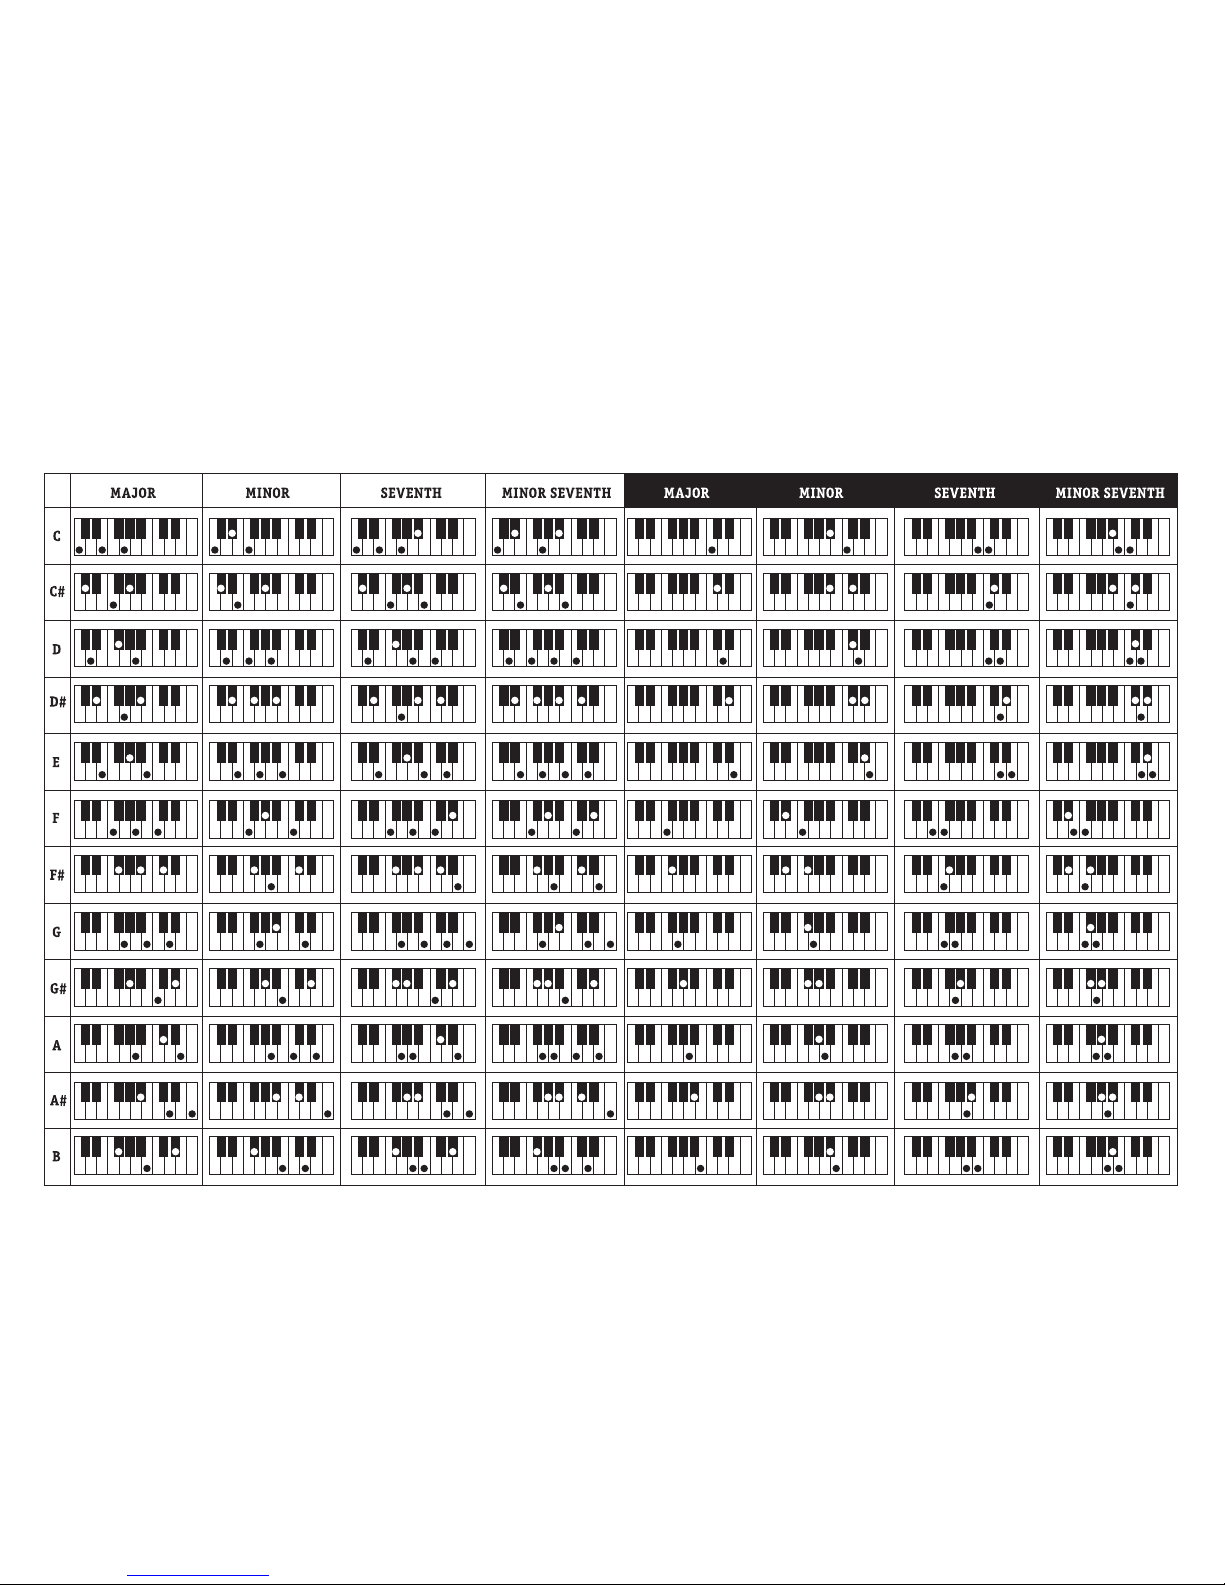
Fingered Chords Single Fingered Chords
INSIDE BACK COVER
 Loading...