

FA-5141-3
N
i
MEAT GRINDER
INSTRUCTION MANUAL
FLEISCHWOLF
BENUTZERHANDBUCH
MAŞINĂ DE TOCAT CARNE
MANUAL DE UTILIZARE
B
MASZYNKA DO MIELENIA MIĘSA
INSTRUKCJA OBSŁUGI
МЕСОМЕЛАЧКА
ИНСТРУКЦИИ ЗА УПОТРЕБА
М‘ЯСОРУБКА
ІНСТРУКЦІЯ З ЕКСПЛУАТАЦІЇ
HACHOIR A VIANDE
MODE D‘EMPLOI
МЯСОРУБКА
ИНСТРУКЦИЯ
MLIN ZA MESO
UPUTSTVO ZA UPOTREBU
MLÝNEK NA MASO
NÁVOD K POUŽITÍ
ΚΡΕΑΤΟΜΗΧΑΝΗ
ΟΔΗΓΙΕΣ ΧΡΗΣΕΩΣ
ENGLISH ............................. PA GE 2
DEUTSCH ........................... SEITE 5
ROMANESTE ................ PAGINA 8
POLSKI ........................ STRONA 11
SCG/CRO/B.i.H. ........... STRANA 14
ČESKY .......................... STRANA 17
ΕΛΛΗΝΙΚΑ .................. ΣΕΛΙΔΑ 20
БЪΛГАРСКИ ...................... СТР. 23
УКРАЇНСЬКА……. ........СТОР. 26
FRANÇAIS ....................... PAGE 29
РУССКИЙ ........................... СТР. 32

MEAT GRINDER
INSTRUCTION MANUAL
Please read carefully and keep the instruction
well
DESCRIPTION (g. A)
1. Body
2. ON/0/R (ON/OFF/Reverse)
3. Tomato Mincer
4. Fasten button
5. Tube inlet
ENGLISH
6. Food pusher
7. Hopper plate
8. Head Tube
9. Snake
10. Cutting blade
11. Cutting plate (ne)
12. Cutting plate (medium)
13. Multi grater
14. Fixing ring
15. Sausage
16. Kibbe
INTRODUCTION
This appliance is equipped with a thermostat
system. This system will automatically cut o
the power supply to the appliance in case of
overheating.
If you appliance suddenly stops running:
1. Pull the mains plug out of the socket.
2. Press the switch button to turn o the
appliance.
3. Let the appliance cool down for 60 minutes.
4. Put the mains plug in the socket.
5. Switch the appliance on again.
Please contact your dealer of an authorized
service center if the thermostat system is
activated too often.
CAUTION: In order to avoid a hazardous
situation, this appliance must never be
connected to a time switch.
IMPORTANT
1. Read these instructions for use carefully and
look at the illustrations before using the
appliance.
2. Keep these instructions for future reference.
3. Check if the voltage indicated on the
appliance corresponds to the local mains
voltage before you connect the appliance.
4. Never use any accessories of parts from
other manufacture.Your guarantee will
become invalid if such accessories or parts
have been used.
5. Do not use the appliance if the mains cord,
the plug or other parts are damaged.
6. If the mains cord of this appliance is
damaged, it muse always be replaced by
manufacture or a service center authorized,
in order to avoid hazardous situations.
7. Thoroughly clean the parts that will come
into contact with food before you use the
appliance for the rst time.
8. Unplug the appliance immediately after use.
9. Never use you nger or an objection to push
ingredients down the feed tube while the
appliance is running. Only the pusher is to
be used for this purpose.
10. Keep the appliance out of the reach of
children.
11. Never let the appliance run unattended.
12. Switch the appliance o before detaching
and install any accessory.
13. Wait until moving parts have stopped
running before you remove the parts of the
appliance.
14. Never immerse the motor unit in the water
or any other liquid, nor rinse it under the tap.
Use only a moist cloth to clean the motor
unit.
15. Do not attempt to grind bones, nuts or other
hard items.
16. Never reach into the cutter housing. Always
use the pusher.
17. Never operation the appliance continuously
for more than 3 minutes at 600W.
18. Accessories shall include instructions for
their safe use.
19. It shall warn of potential injury from misuse.
20. This appliance can be used by children aged
from 8 years and above if they have been
given supervision or instruction concerning
use of the appliance in a safe way and if they
understand the hazards involved. Cleaning
and user maintenance shall not be made
by children unless they are aged from 8
years and above and supervised. Keep
the appliance and its cord out of reach of
children aged less than 8 years.
21. This appliance is intended to be used in
household and similar applications such as:
– sta kitchen areas in shops, oces and
other working environments;
– farm houses;
– by clients in hotels, motels and other
residential type environments;
– bed and breakfast type environments.
22. If the appliance is locked, please press
Reversal button (REV). The meat locked
in cutter housing is untrodden, so the
appliance can renew its usual condition.
INSTRUCTION FOR USE
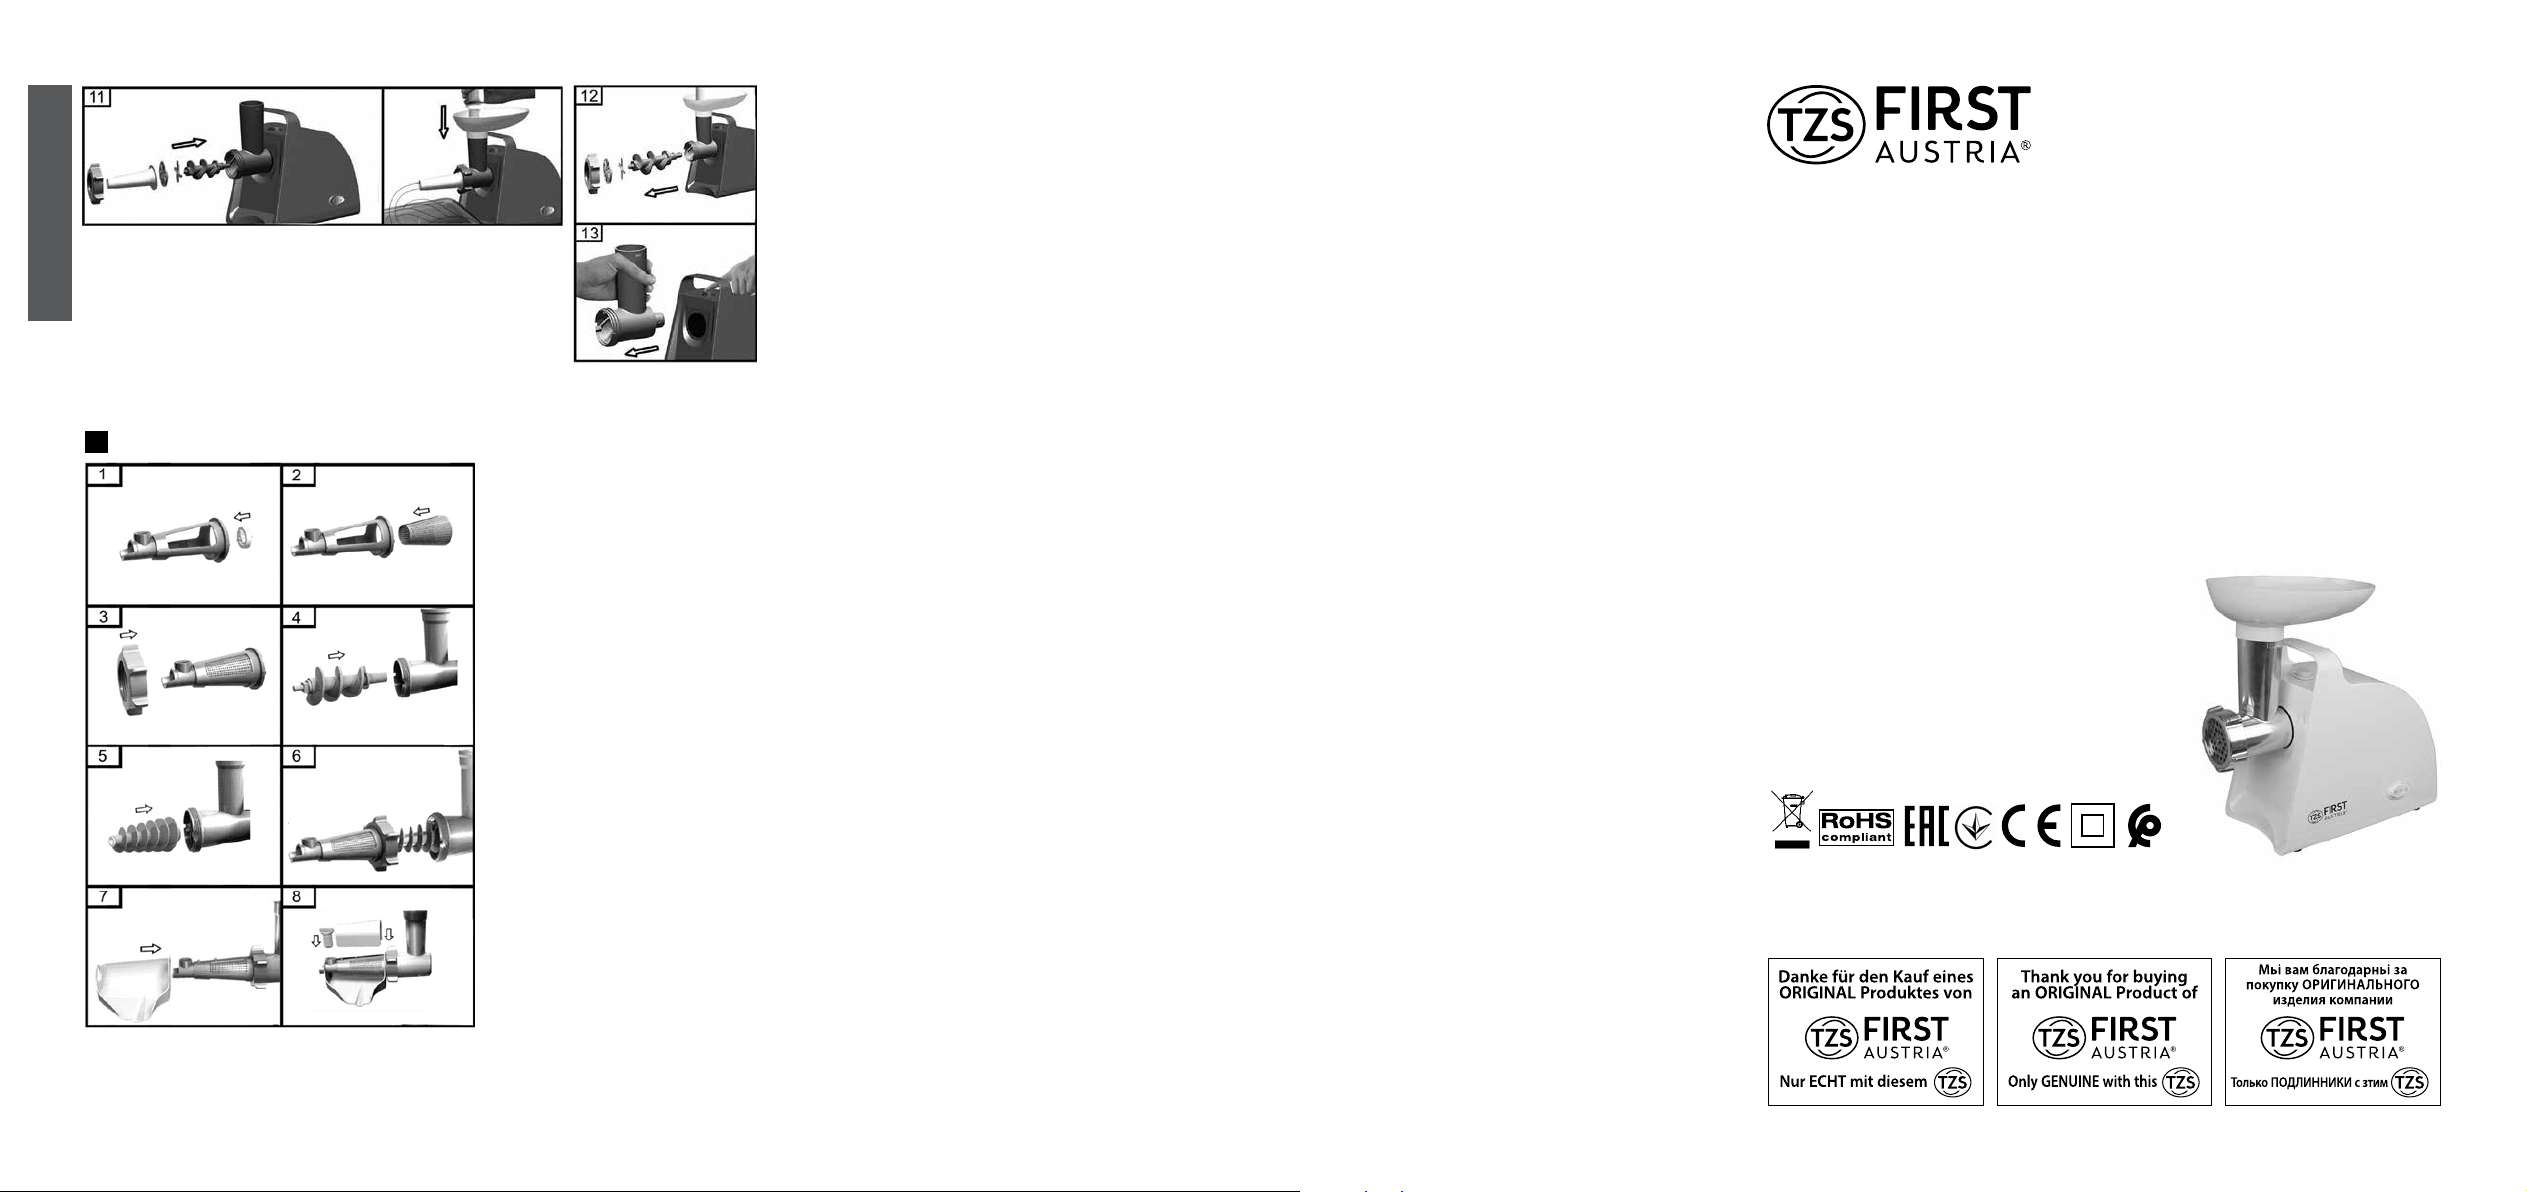
ASSEMBLING
1. Press the fasten button, hold the head and
insert it into the inlet when inserting please
pay attention the head must be slanted as
per arrow indicated on the top, see (g. 1),
then move the head anticlockwise so that
the head being fastened tightly. (g. 2)
2. Place the snake into the head, long end rst,
and turn to feed the screw slightly until it is
set into the motor housing (g. 3).
3. Place the cutting blade onto the snake shaft
with the blade facing the front as illustrated
(g.4). If it is not tted properly, meat will
not be grinded.
4. Place the desired cutting plate next to the
cutting blade, tting protrusions in the slot
(g. 5).
5. Support or press the center of the cutting
plate with one nger then screw the xing
ring tight with another hand (g. 6). Do not
over tighten.
6. Place the hopper plate on the head and x it
into position.
7. Locate the unit on a rm place.
8. The air passage at the bottom and the side
of the motor housing should be kept free
and not blocked.
MINCER
1. Insert the worm shaft into the cutter
housing, the plastic end rst.
Place the cutter unit onto the worm shaft.
(The cutting edges should be at the front)
Place the medium grinding disc or coarse
grinding disc (depending on the consistency
you prefer) onto the worm shaft. (Make
sure the notch of the grinding disc t onto
the projections of the mincer head.) Turn
the screw ring in the direction of the arrow
on the cutter housing until it is properly
fastened.
2. Attach the cutter housing to the motor unit.
3. Place the tray on the upright part of the
cutter housing.
4. Now the appliance is ready for mincing.
Cut the meat into 10cm-long, 2cm-thick strips.
Remove bones, pieces of gristle and sinews as
much as possible. (Never use frozen meat!)
Put the meat in the tray. Use the pusher to
gently push the meat into the cutter hosing. (For
steak tartare, mince the meat with the medium
grinding disc twice.)
MAKING KEBBE
1. Insert the worm shaft into the cutter
housing, the plastic end rst. (g. 8)
Place the cone in the cutter housing.
Place the former on the cutter housing and
screw the ring on the cutter housing. (g. 9)
2. Attach the cutter housing to the motor unit.
3. Place the tray on the upright part of the
cutter housing.
4. Now the appliance is ready for making
kebbe. (g. 10)
Feed the prepared kebbe mixture through
the kebbe maker. Cut the continuous hollow
cylinder into the desired lengths and user as
required.
Kebbe is a traditional Middle Eastern dish made
primarily of lamp and bulgur wheat which are
minced together to form a paste the mixture is
extruded through the kebbe maker and cut into
short lengths. The tubes can then be stued
with a minced meat mixture, the ends pinched
together and then deep fried.
MAKING SAUSAGES
1. Mince the meat
Insert the worm shaft into the cutter
housing, the plastic end rst. (g. 11)
Place the separator in the cutter housing.
Place the sausage horn on the cutter
housing and screw the ring on the cutter
housing.
(Make sure the notches of the separator t
onto the projections of the mincer head.)
2. Attach the cutter housing to the motor unit.
3. Place the tray on the upright part of the
cutter housing.
4. Now the appliance is ready for making
sausages.
Put the ingredients in the tray. Use the pusher
to gently push the meat into the cutter housing.
Put the sausage skin in lukewarm water for
10 minutes. Then slide the wet skin onto the
sausage horn. Push the (seasoned) minced meat
into the cutter housing. If the skin gets stuck
onto the sausage horn, wet it with some water.
ENGLISH
2 3

TOMATO JUICER
ASSEMBLING (g. B)
1. Place the plastic screw locking ring into the
sleeve. (g. B1)
2. Place the gauze into the sleeve next to the
plastic screw locking ring. (g. B2)
3. Put the xing ring through the sleeve and
make it at the end of the sleeve. (g. B3)
4. Place the snake into the head, long end rst,
and turn to feed the snake slightly until it is
set into the motor housing. (g. B4)
ENGLISH
5. Insert the shaft of the snake into the central
axis of the screw. (g. B5)
6. Put the whole sleeve along with the xing
ring through the screw, then move the xing
ring clockwise so that it being fastened
tightly. (g. B6)
7. Put the plastic juice tray through the sleeve
and make it on the suitable position. (g. B7)
8. Insert the plastic screw into the hole of the
sleeve, then move it clockwise until it is
properly fastened. Then place the plastic
cover onto the sleeve. (g. B8)
Now the appliance is ready for juicing.
HOW TO CLEAN YOUR APPLIANCES
Meat left behind in the cutter housing may
be removed from the inside of the appliance
by passing a slice of bread through the cutter
housing.
1. Before you clean the appliance, switch the
appliance o and remove the plug from the
socket. (g. 12)
2. Press the release button and turn the whole
cutter housing in the direction of the arrow.
Remove the pusher and the tray. (g. 13)
3. Unscrew the screw ring and remove all parts
of the cutter housing. Do not clean the parts
in the dishwasher!
4. Wash all parts that have come into contact
with meat in hot soapy water. Clean them
immediately after use.
5. Rinse them with clear hot water and dry
them immediately.
6. We advise you to lubricate the cutter unit
and the grinding discs with some vegetable
oil.
TECHNICAL CHARACTERISTICS
220-240V • 50-60Hz • 300W Nominal/
1000W Maximal
Environment friendly disposal
You can help protect the environment!
Please remember to respect the local
regulations: hand in the non-working electrical
equipments to an appropriate waste disposal
center.
BEDIENUNGSANLEITUNG
Anleitungen bitte aufmerksam lesen und
aufbewahren
AUFBAU (Abb. A)
1. Gerätegehäuse
2. ON/0/R (EIN/AUS/Rücklauf)
3. Tomaten-Püriereinsatz
4. Entriegelung
5. Anschluss
6. Stopfer
7. Fülltablett
8. Einfüllstutzen und Gehäuse für Schneidwerk
9. Schnecke
10. Messer
11. Feiner Locheinsatz
12. Mittlerer Locheinsatz
13. Allzweckreibe
14. Verschlussring
15. Wurstfüllaufsatz
16. Kebbeaufsatz
EINLEITUNG
FLEISCHWOLF
Dieses Gerät ist mit einem Thermoschalter
ausgestattet. Er schaltet das Gerät bei
Überhitzung aus.
Falls das Gerät plötzlich stehen bleibt:
1. Ziehen Sie den Netzstecker.
2. Schalten Sie das Gerät aus.
3. Lassen Sie das Gerät für 60 Minuten
abkühlen.
4. Stecken Sie den Netzstecker wieder in die
Steckdose.
5. Schalten Sie das Gerät wieder ein.
Bitte wenden Sie sich an Ihren Fachhändler
oder den autorisierten Kundendienst, falls
der Überhitzungsschutz mehrfach das Gerät
ausschaltet.
VORSICHT: Schließen Sie das Gerät keinesfalls
über eine Zeitschaltuhr an, um Gefahren zu
vermeiden.
SICHERHEITSHINWEISE
1. Lesen Sie vor Gebrauch alle Anleitungen
aufmerksam durch und sehen Sie sich die
Abbildungen an.
2. Bewahren Sie die Bedienungsanleitung für
späteres Nachschlagen auf.
3. Vergewissern Sie sich, dass Ihre
Netzspannung mit den Angaben auf dem
Typenschild übereinstimmt.
4 5
4. Benutzen Sie keine Zubehörteile von
Drittherstellern. Im Schadenfall erlischt
hierdurch Ihr Garantieanspruch.
5. Benutzen Sie das Gerät nicht mit
beschädigtem Netzkabel oder Stecker.
6. Ein beschädigtes Netzkabel muss von einem
autorisierten Kundendienst ausgetauscht
werden, um Gefahren zu vermeiden.
7. Vor Erstgebrauch reinigen Sie bitte alle
Teile gründlich, die mit Lebensmitteln in
Berührung kommen.
8. Nach Benutzung ziehen Sie bitte den
Netzstecker.
9. Stopfen Sie Zutaten keinesfalls mit den
Fingern oder Küchenutensilien in den
Einfülltrichter. Benutzen Sie ausschließlich
den mitgelieferten Stopfer.
10. Bewahren Sie das Gerät außerhalb des
Zugris von Kindern auf.
11. Lassen Sie das Gerät während des Betriebs
nicht unbeaufsichtigt.
12. Schalten Sie das Gerät aus, bevor Sie
Zubehörteile anbauen oder abnehmen.
13. Warten Sie ab, bis alle beweglichen Teile
zum Stillstand gekommen sind, bevor Sie
Zubehörteile anbauen oder abnehmen.
14. Tauchen Sie die Motoreinheit nicht in Wasser
oder sonstige Flüssigkeiten ein, spülen Sie
das Gerät nicht unter ießendem Wasser ab.
Benutzen Sie zum Reinigen der Motoreinheit
nur ein feuchtes Tuch.
15. Zerkleinern Sie nicht Knochen, Nüsse oder
sonstige harte Artikel.
16. Greifen Sie nicht in das Schneidwerk.
Benutzen Sie immer den Stopfer.
17. Lassen Sie das Gerät mit 600 Watt nicht
länger als 3 Minuten ununterbrochen laufen.
18. Benutzen Sie alle Zubehörteile entsprechend
der Sicherheits- und Bedienungshinweise.
19. Diese Hinweise warnen von Verletzungen
und unsachgemäßer Bedienung.
20. Dieses Gerät ist geeignet für den
Gebrauch durch Kinder ab 8 Jahren,
sofern diese beaufsichtigt oder bzgl. der
sicheren Benutzung des Geräts angeleitet
werden und die damit einhergehenden
Gefahren verstehen. Reinigungs- und
Wartungsarbeiten dürfen nicht von
Kindern durchgeführt werden, es sei
denn, sie sind älter als 8 Jahre alt und sie
werden beaufsichtigt. Halten Sie Gerät und
Netzkabel von Kindern unter 8 Jahren fern.
21. Dieses Gerät wurde für den Einsatz im
Haushalt und für ähnliche Anwendungen
konzipiert, wie:
– Belegschaftsküchen in Geschäften, Büros
oder anderen Arbeitsumgebungen;
DEUTSCH

– Landwirtschaftlichen Betrieben;
– Gäste von Hotels, Motels und anderen
Wohnumfeldern;
– in Frühstückspensionen.
22. Sitzt das Schneidwerk fest, so benutzen
Sie bitte kurz den Rücklaufschalter (R).
Hierdurch löst sich die Verstopfung wieder
auf.
BEDIENUNGSHINWEISE
MONTAGE
DEUTSCH
1. Drücken Sie die Entriegelungstaste und
setzen Sie den Einfüllstutzen am Gerät an.
Neigen Sie den Einfüllstutzen leicht zur Seite,
wie in Abb. 1 dargestellt. Drehen Sie den
Einfüllstutzen nach links an, bis er festsitzt
(Abb. 2).
2. Setzen Sie die Schnecke mit dem langen
Ende voran ein, drehen Sie sie ein wenig, bis
sie im Motorgehäuse einrastet (Abb. 3).
3. Setzen Sie das Messer mit der Schneidkante
nach vorn auf den Schaft der Schnecke, wie
in Abb. 4 dargestellt. Falls Sie das Messer
verkehrt herum einsetzten, wird das Fleisch
nicht zerkleinert.
4. Setzen Sie den gewünschten Locheinsatz
auf. Achten Sie darauf, dass die
Aussparungen und Nasen aufeinander
ausgerichtet sind (Abb. 5).
5. Halten Sie den Locheinsatz in dieser Position
und schrauben Sie mit der anderen Hand
den Verschlussring an (Abb. 6). Überdrehen
Sie das Gewinde nicht.
6. Setzen Sie das Fülltablett auf den
Einfüllstutzen.
7. Stellen Sie das Gerät auf einer stabilen
Arbeitsäche auf.
8. Blockieren Sie nicht die Lüftungsschlitze
unten und an den Seiten der Motoreinheit.
FLEISCHWOLF
1. Setzen Sie die Schnecke mit dem
Kunststoende voran in das Gehäuse ein.
Setzen Sie das Messer auf den Schaft der
Schnecke (Schneidkanten nach vorn). Setzen
Sie den mittleren oder groben Locheinsatz
(geschmacksabhängig) auf den Schaft
der Schnecke (achten Sie darauf, dass die
Aussparungen und Nasen aufeinander
ausgerichtet sind). Schrauben Sie den
Verschlussring in Pfeilrichtung an, bis er
festsitzt.
2. Setzen Sie das Schneidwerk mit dem
Einfüllstutzen an der Motoreinheit an.
3. Setzen Sie das Fülltablett auf den
Einfüllstutzen.
4. Das Gerät ist nun betriebsbereit.
Schneiden Sie das Fleisch in 10cm lange und
2cm dicke Streifen. Entfernen Sie Knochen sowie
Knorpel und Sehnen (kein tiefgefrorenes Fleisch
benutzen).
Legen Sie das Fleisch auf das Fülltablett. Mit
dem Stopfer stopfen Sie das Fleisch vorsichtig in
den Einfüllstutzen (für Tatar zerkleinern Sie das
Fleisch mit dem mittleren Locheinsatz zweimal).
KEBBE ZUBEREITEN
1. Setzen Sie die Schnecke mit dem
Kunststoende voran in das Gehäuse ein
(Abb. 8). Setzen Sie den Kebbeaufsatz ein
und schrauben Sie den Verschlussring in
Pfeilrichtung an, bis er festsitzt (Abb. 9).
2. Setzen Sie das Schneidwerk mit dem
Einfüllstutzen an der Motoreinheit an.
3. Setzen Sie das Fülltablett auf den
Einfüllstutzen.
4. Das Gerät ist nun zur Zubereitung von Kebbe
betriebsbereit (Abb. 10).
Geben Sie die vorbereitete Kebbemischung in
den Einfüllstutzen. Schneiden Sie die Röhre auf
die gewünschte Länge zu.
Kebbe ist ein traditionelles Gericht des
Mittleren Ostens und besteht hauptsächlich
aus Lammeisch und Bulgur-Weizengrütze, die
zusammen zerkleinert werden und eine Paste
bilden, die durch den Kebbeaufsatz gepresst
und dann in kurze Stücke geschnitten wird. Die
Röhren können mit einer Hackeischmischung
gefüllt werden, die Enden werden vor dem
Frittieren zusammengedrückt.
WURST FÜLLEN
1. Zerkleinern Sie das Fleisch.
Setzen Sie die Schnecke mit dem
Kunststoende voran in das Gehäuse ein
(Abb. 11).
Setzen Sie das Messer und den Locheinsatz
auf den Schaft der Schnecke.
Setzen Sie den Wurstfüllaufsatz ein und
schrauben Sie den Verschlussring in
Pfeilrichtung an, bis er festsitzt (achten Sie
darauf, dass die Aussparungen und Nasen
aufeinander ausgerichtet sind).
2. Setzen Sie das Schneidwerk mit dem
Einfüllstutzen an der Motoreinheit an.
3. Setzen Sie das Fülltablett auf den
Einfüllstutzen.
4. Das Gerät ist nun zur Füllung von Würsten
betriebsbereit.
Geben Sie die vorbereitete Wurstmischung auf
das Fülltablett. Mit dem Stopfer stopfen Sie das
Fleisch vorsichtig in den Einfüllstutzen.
Weichen Sie die Wurstpelle für 10 Minuten in
lauwarmem Wasser ein. Schieben Sie dann die
nasse Haut auf den Wurstfüllaufsatz. Geben
Sie das gewürzte und zerkleinerte Fleisch in
den Einfüllstutzen. Falls die Wursthaut am
Wurstfüllaufsatz festklebt, feuchten Sie sie etwas
an.
TOMATEN-PÜRIEREINSATZ
MONTAGE (Abb. B)
1. Setzen Sie den Kunststoring in die
Manschette ein (Abb. B1).
2. Setzen Sie das Siebblech in die Manschette
ein (Abb. B2).
3. Setzen Sie den Verschlussring auf die
Manschette und schieben Sie ihn bis ans
Ende (Abb. B3).
4. Setzen Sie die Schnecke mit dem langen
Ende voran in das Gehäuse ein und drehen
Sie sie ein wenig, bis sie im Motorgehäuse
einrastet (Abb. B4).
5. Setzen Sie den Schaft der Pürierschnecke
auf die Mittelachse der bereits eingesetzten
Schnecke (Abb. B5).
6. Schieben Sie die Manschette mit
Verschlussring auf die Pürierschnecke und
schrauben Sie den Verschlussring fest an
(Abb. B6).
7. Setzen Sie den Kunststoauslauf für den Saft
auf die Manschette (Abb. B7).
8. Setzen Sie die Kunststoschraube oben
in die Manschette ein und schrauben Sie
sie nach rechts fest an. Setzen Sie nun die
Kunststoabdeckung auf die Manschette
(Abb. B8).
Das Gerät ist nun zur Verarbeitung von Tomaten
betriebsbereit.
REINIGUNG UND PFLEGE
Fleisch im Schneidwerk kann einfach
entfernt werden, indem Sie eine Scheibe Brot
durchlaufen lassen.
1. Vor dem Reinigen schalten Sie das Gerät aus
und ziehen Sie den Netzstecker.
2. Nehmen Sie das Fülltablett und den Stopfer
ab. Schrauben Sie den Verschlussring ab
und nehmen Sie alle Zubehörteile aus dem
Schneidwerk (Abb. 12). Waschen Sie diese
Teile nicht im Geschirrspüler ab!
3. Drücken Sie die Entriegelungstaste und
drehen Sie den Einfüllstutzen mit dem
Schneidwerk in Pfeilrichtung (Abb. 13).
4. Waschen Sie alle Teile, die mit Lebensmitteln
in Berührung gekommen sind, in heißem
Spülwasser unmittelbar nach der Benutzung
ab.
5. Spülen Sie die Teile in heißem, klarem Wasser
ab und trocknen Sie sie gut ab.
6. Wir empfehlen die Schmierung von
Schneidwerk, Locheinsatz und Messer mit
etwas Panzenöl.
TECHNISCHE DATEN
220-240V • 50-60Hz • 300W Nennleistung/
1000W Maximal
Entsorgung
Helfen Sie mit beim Umweltschutz!
Entsorgen Sie Elektroaltgeräte nicht mit
dem Hausmüll. Geben Sie dieses Gerät an einer
Sammelstelle für Elektroaltgeräte ab.
DEUTSCH
6 7

MAŞINĂ DE TOCAT CARNE
MANUAL DE UTILIZARE
Vă rugăm să citiţi cu atenţie şi să respectaţi
instrucţiunile
DESCRIERE (g. A)
1. Unitate
2. ON/0/R (PORNIT/OPRIT/ROTAŢIE INVERSĂ)
3. Maşină de tocat roşii
4. Buton de xare
5. Intrare tub
ROMANESTE
6. Împingător alimente
7. Tavă de alimentare
8. Tub principal
9. Ax spiralat
10. Cuţit pentru tăiat
11. Disc tocare (nă)
12. Disc tocare (medie)
13. Răzătoare multifuncţională
14. Inel de xare
15. Cârnaţi
16. Dispozitiv Kibbeh
INTRODUCERE
Acest aparat este echipat cu un sistem
termostatic. Acest sistem va întrerupe în mod
automat alimentarea cu energie electrică a
aparatului în cazul supraîncălzirii.
Dacă aparatul dumneavoastră se opreşte brusc:
1. Scoateţi ştecherul de reţea din priză.
2. Apăsaţi comutatorul pentru a opri aparatul.
3. Lăsaţi aparatul să se răcească timp de 60 de
minute.
4. Introduceţi ştecherul de reţea în priză.
5. Porniţi aparatul din nou.
Vă rugăm să contactaţi reprezentantul unui
centru de service autorizat, în cazul în care
sistemul termostatic se activează prea des.
ATENŢIE: Pentru a evita situaţii periculoase, nu
conectaţi acest aparat niciodată la un comutator
temporizat.
IMPORTANT
1. Citiţi aceste instrucţiuni de utilizare cu
atenţie şi priviţi toate ilustraţiile înainte de
utilizarea aparatului.
2. Păstraţi aceste instrucţiuni pentru o
consultare viitoare.
3. Vericaţi înainte de conectarea aparatului,
dacă tensiunea indicată pe aparat
corespunde tensiunii locale de reţea.
4. Nu utilizaţi niciodată accesorii sau
componente de la alţi producători. Garanţia
dumneavoastră va deveni nulă în cazul în
care au fost utilizate astfel de accesorii.
5. Nu utilizaţi aparatul în cazul în care cablul de
reţea, ştecherul sau alte componente sunt
deteriorate.
6. Dacă s-a deteriorat cablul de reţea al acestui
aparat, acesta trebuie înlocuit întotdeauna
de către producător sau de către un centru
de service autorizat pentru a evita situaţiile
periculoase.
7. Înainte de prima utilizare a aparatului trebuie
să curăţaţi în mod temeinic componentele
care intră în contact cu alimentele.
8. Scoateţi ştecherul din priză imediat după
utilizare.
9. Nu utilizaţi niciodată degetele
dumneavoastră sau alte obiecte pentru a
apăsa alimentele în tubul de alimentare,
atâta timp cât aparatul este pornit. În acest
scop se va utiliza doar împingătorul.
10. Menţineţi aparatul în afara razei de acţiune a
copiilor.
11. Nu lăsaţi aparatul niciodată să funcţioneze
nesupravegheat.
12. Opriţi aparatul înainte să demontaţi şi să
montaţi orice accesorii.
13. Aşteptaţi până când s-au oprit părţile
mobile, înainte de a detaşa componentele
aparatului.
14. Nu introduceţi unitatea motor niciodată
în apă sau în alte lichide, şi nu o spălaţi la
robinetul de apă. Utilizaţi doar o lavetă
umedă pentru a curăţa unitatea motor.
15. Nu încercaţi să tocaţi oase, nuci sau alte
obiecte tari.
16. Nu puneţi niciodată mâna în carcasa
cuţitului. Utilizaţi întotdeauna împingătorul.
17. Nu utilizaţi aparatul niciodată în mod
continuu mai mult de 3 minute la 600W.
18. Accesoriile ar trebui să cuprindă instrucţiuni
pentru utilizarea sigură.
19. Acestea avertizează în privinţa posibilelor
răniri datorate utilizării necorespunzătoare.
20. Acest aparat este recomandat pentru
utilizare de către copiii cu vârste de peste 8
ani dacă sunt supravegheați sau au primit
instrucțiuni cu privire la utilizarea aparatului
într-un mod sigur și dacă înțeleg pericolele
care pot implicate. Curățirea și întreținerea
nu trebuie să e efectuate de copii decât
dacă au vârsta mai mare de 8 ani și sunt
supravegheați. Nu lăsați aparatul și cablul
de alimentare la îndemâna copiilor cu vârste
mai mici de 8 ani.
21. Acest aparat este destinat pentru utilizări
casnice și alte utilizări similare, cum ar :
- de către personalul bucătăriei din
magazine, birouri și alte medii de lucru;
- de către ferme;
- de către clienții din hoteluri, moteluri și alte
medii rezidențiale;
- de către pensiuni.
22. Dacă aparatul este blocat, apăsaţi butonul
de rotaţie inversă (REV). Carnea înţepenită
în carcasa cuţitului se eliberează, astfel încât
aparatul poate reveni la ciclul uzual.
INSTRUCŢIUNI DE UTILIZARE
ASAMBLARE
1. Apăsaţi butonul de xare, ţineţi capul
şi introduceţi-l în partea de îmbinare, la
introducere asiguraţi-vă că aţi înclinat capul
aşa cum indică săgeata de pe partea de sus,
a se vedea (g. 1), rotiţi capul după aceea în
sens contrar acelor de ceasornic, astfel încât
să-l strângeţi ferm. (g. 2)
2. Introduceţi melcul în cap, cu partea alungită
înainte, şi rotiţi în aşa fel încât axul să
avanseze puţin şi să se îmbine în blocul
motor (g. 3).
3. Aşezaţi cuţitul de tocat pe axul melcat cu
lama orientată spre faţă, conform ilustraţiei
(g. 4). În cazul unei montări inadecvate,
carnea nu va tocată.
4. Aşezaţi discul de tocat dorit după cuţit şi
potriviţi proeminenţele în locaşuri (g. 5).
5. Susţineţi sau apăsaţi centrul discului de
tocat cu un deget după care înşurubaţi ferm
inelul de xare cu cealaltă mână (g. 6). Nu
strângeţi în exces.
6. Aşezaţi tava de alimentare pe cap şi xaţi-o
în poziţie.
7. Aşezaţi unitatea pe o suprafaţă stabilă.
8. Fantele de aerisire aate pe partea inferioară
şi lateral pe blocul motor trebuie menţinute
libere şi nu vor blocate.
TOCARE
1. Introduceţi melcul în carcasa cuţitului, cu
partea din plastic înainte.
Aşezaţi unitatea de tocare pe melc. (Lamele
de tocare trebuie să se ae în faţă) Aşezaţi
discul de tocare medie sau discul de tocare
grosieră (în funcţie de consistenţa urmărită)
pe melc. (Asiguraţi-vă că se îmbină canelurile
de pe discul de tocare cu proeminenţele
capului tocător.) Rotiţi inelul letat în direcţia
săgeţii de pe carcasa cuţitului până este xat
ferm.
2. Îmbinaţi carcasa cuţitului cu unitatea motor.
3. Aşezaţi tava de alimentare pe partea
verticală a carcasei cuţitului.
4. Acum aparatul este gata de tocat.
Tăiaţi carnea în fâşii lungi de 10cm şi groase de
2cm. Scoateţi pe cât posibil toate oasele, bucăţi
de zgârci şi tendoane. (Nu utilizaţi niciodată
carne congelată!)
Aşezaţi carnea în tavă. Utilizaţi împingătorul
pentru a împinge uşor carnea în carcasa
cuţitului. (Pentru biftec tartar, tocaţi carnea cu
discul de tocare medie de două ori.)
PREPARAREA DE KIBBEH
1. Introduceţi melcul în carcasa cuţitului, cu
partea din plastic înainte. (g. 8)
Introduceţi conul în carcasa cuţitului.
Aşezaţi piesa pentru formă pe carcasa
cuţitului şi înşurubaţi inelul pe carcasa
cuţitului. (g. 9)
2. Îmbinaţi carcasa cuţitului cu unitatea motor.
3. Aşezaţi tava de alimentare pe partea
verticală a carcasei cuţitului.
4. Acum aparatul este gata de făcut Kibbeh.
(g. 10)
Alimentaţi compoziţia preparată de Kibbeh prin
dispozitivul de format Kibbeh. Tăiaţi cilindrul gol
continuu în lungimile dorite şi utilizaţi conform
preferinţelor.
Kibbeh este o mâncare tradiţională din orientul
mijlociu, preparată în principal din carne de miel
şi grâu bulgur tocate împreună pentru a forma o
pastă. Amestecul este presat prin dispozitivul de
format Kibbeh şi tăiat în bucăţi scurte. Tuburile
pot apoi umplute cu un amestec de carne
tocată, capeţii vor împreunaţi şi apoi prăjiţi
bine.
PREPARAREA CÂRNAŢILOR
1. Tocaţi carnea
Introduceţi melcul în carcasa cuţitului, cu
partea din plastic înainte. (g. 11)
Aşezaţi separatorul în carcasa cuţitului.
Aşezaţi pâlnia de cârnaţi pe carcasa cuţitului
şi înşurubaţi inelul pe carcasa cuţitului.
(Asiguraţi-vă că se îmbină canelurile de pe
separator cu proeminenţele capului tocător.)
2. Îmbinaţi carcasa cuţitului cu unitatea motor.
3. Aşezaţi tava de alimentare pe partea
verticală a carcasei cuţitului.
4. Acum aparatul este gata de făcut cârnaţi.
Aşezaţi ingredientele în tavă. Utilizaţi
împingătorul pentru a împinge uşor carnea în
carcasa cuţitului.
ROMANESTE
8 9

Introduceţi membrana de cârnaţi în apă călduţă
timp de 10 minute. Apoi trageţi membrana
umedă pe pâlnia de cârnaţi. Împingeţi carnea
tocată (condimentată) în carcasa cuţitului. Dacă
membrana se blochează pe pâlnia de cârnaţi,
umeziţi-o cu puţină apă.
STORCĂTOR DE ROŞII
ASAMBLARE (g. B)
1. Aşezaţi inelul letat de xare din plastic în
manşon. (g. B1)
ROMANESTE
2. Introduceţi sita în manşon prin inelul letat
de xare din plastic. (g. B2)
3. Duceţi inelul de xare peste manşon până
ajunge la capătul manşonului. (g. B3)
4. Introduceţi melcul în cap, cu partea alungită
înainte, şi rotiţi în aşa fel încât axul să
avanseze puţin şi să se îmbine în blocul
motor. (g. B4)
5. Aşezaţi trunchiul melcului pe partea centrală
a axului melcat. (g. B5)
6. Puneţi manşonul cu totul, de-a lungul
împreună cu inelul de xare pe melc, apoi
rotiţi inelul de xare în sensul acelor de
ceasornic, astfel încât să e strâns ferm. (g.
B6)
7. Aşezaţi tava de plastic pentru suc pe manşon
şi xaţi-o în poziţia potrivită. (g. B7)
8. Introduceţi şurubul de plastic în oriciul
manşonului şi rotiţi-l în sensul acelor de
ceasornic până când este strâns ferm. Aşezaţi
apoi capacul de plastic pe manşon. (g. B8)
Acum aparatul este pregătit pentru stoarcerea
roşiilor.
CURĂŢAREA APARATULUI
DUMNEAVOASTRĂ
Resturile de carne din carcasa cuţitului pot
scoase din interior prin trecerea unei felii de
pâine prin carcasa cuţitului.
1. Înainte de curăţarea aparatului, opriţi-l şi
scoateţi ştecherul din priză. (g. 12)
2. Apăsaţi butonul de eliberare şi rotiţi întreaga
carcasă a cuţitului în direcţia săgeţii. Scoateţi
împingătorul şi tava. (g. 13)
3. Deşurubaţi inelul letat şi scoateţi toate
piesele din carcasa cuţitului. Nu spălaţi
piesele în maşina de spălat vase!
4. Spălaţi toate piesele care au intrat în contact
cu carne în apă erbinte cu detergent de
vase. Curăţaţi-le imediat după utilizare.
5. Clătiţi-le cu apă erbinte limpede şi ştergeţile imediat.
6. Vă sfătuim să umeziţi cuţitul şi discurile de
tocare cu puţin ulei vegetal.
DATE TEHNICE
220-240V • 50-60Hz • 300W Nominal/
1000W Maxim
Eliminare ecologică
Puteţi ajuta la protejarea mediului!
Respectaţi reglementările locale: predaţi
echipamentele electronice scoase din uz la un
centru specializat de eliminare a deşeurilor.
MASZYNKA DO MIELENIA MIĘSA
INSTRUKCJA OBSŁUGI
Proszą ją uważnie przeczytać i starannie
przechowywać
OPIS (rys. A)
1. Korpus
2. ON/0/R (ZAŁ./WYŁ./Wstecz)
3. Maszynka dla pomidorów
4. Przycisk mocowania
5. Wlot rury
6. Popychacz żywności
7. Płyta zsypu
8. Rura czołowa
9. Ślimacznica
10. Ostrze tnące
11. Płyta tnąca (drobno)
12. Płyta tnąca (średnio)
13. Tarka wielofunkcyjna
14. Pierścień mocujący
15. Parówki
16. Kibbe
WPROWADZENIE
Urządzenie jest wyposażone w system
termostatu. System ten automatycznie wyłączy
zasilanie jeśli urządzenie się przegrzeje.
Jeśli urządzenie nagle się zatrzyma, to:
1. Wyciągnąć wtyczkę z gniazdka.
2. Nacisnąć wyłącznik wyłączający urządzenie.
3. Odczekać 60 minut, aż urządzenie ostygnie.
4. Wetknąć wtyczkę do gniazdka sieciowego.
5. Ponownie włączyć urządzenie.
Jeśli system termostatu włącza się zbyt często,
to proszę skontaktować się ze sprzedawcą lub
autoryzowanym serwisem.
OSTRZEŻENIE: W celu uniknięcia zagrożeń
nie wolno włączać tego urządzenia poprzez
wyłącznik czasowy.
WAŻNE
1. Przed użyciem urządzenia proszę uważnie
przeczytać instrukcje i zapoznać się z
ilustracjami.
2. Instrukcje zachować do przyszłego użytku.
3. Przed podłączeniem sprawdzić czy napięcie
podane na urządzeniu jest zgodne z
lokalnym napięciem zasilającym.
4. Nie używać wyposażenia i części innego
producenta. Takie użycie spowoduje utratę
prawa gwarancji.
5. Nie używać urządzenia jeśli sznur zasilania
lub inne części są uszkodzone.
6. Jeśli uszkodzony jest sznur zasilania,
to dla uniknięcia zagrożenia musi być
on wymieniony przez producenta lub
autoryzowany ośrodek serwisu
7. Przed pierwszym użyciem oczyścić starannie
części, które mają styk z żywnością.
8. Po użyciu wyciągać zawsze wtyczkę z
gniazdka sieci
9. Przy pracującym urządzeniu nigdy nie
używać palca lub innych przedmiotów do
popychania składników w rurze podajnika.
To tego celu służy wyłącznie popychacz.
10. Trzymać urządzenie poza zasięgiem dzieci.
11. Nie pozostawiać pracującego urządzenia bez
nadzoru.
12. Prze dołączaniem lub odłączaniem
wyposażenia wyłączyć urządzenie.
13. Odczekać na zatrzymanie się ruchomych
części przed wyjmowaniem części
urządzenia.
14. Nigdy nie zanurzać jednostki silnika w
wodzie lub innej cieczy, ani też nie płukać jej
pod kranem. Do czyszczenia silnika używać
wyłącznie zwilżonej ściereczki.
15. Nie próbować mielenia kości, orzechów lub
innych twardych przedmiotów.
16. Nigdy nie sięgać do przedziału cięcia. Do
tego służy tylko popychacz.
17. Nie używać urządzenia w sposób ciągły
dłużej niż 3 minuty z mocą 600W.
18. Wyposażenia powinny posiadać instrukcje
ich bezpiecznego użycia.
19. Powinny one wskazywać potencjalne
zagrożenia - urazy, wynikające z
nieprawidłowego użycia.
20. Urządzenie może być użytkowane przez
dzieci powyżej 8 roku życia, jeżeli zostanie
zapewniony nadzór nad dzieckiem lub
dziecko zostało poinstruowane w zakresie
bezpiecznego korzystania z urządzenia
i rozumie wynikające z tego zagrożenia.
Przeprowadzanie konserwacji i czyszczenia
urządzenia przez dzieci poniżej 8 roku życia,
które nie znajdują się pod nadzorem, jest
niedopuszczalne. Urządzenie i jego przewód
zasilający powinny znajdować się poza
zasięgiem dzieci w wieku poniżej 8 lat.
21. Urządzenie jest przeznaczone do użytku w
domach i podobnych miejscach, np.:
– w pracowniczych pomieszczeniach
kuchennych w sklepach, biurach i innych
miejscach pracy;
– w pomieszczeniach socjalnych w
gospodarstwach rolnych;
POLSKI
10 11

– hotele, motele i inne obiekty mieszkalne
– jako wyposażenie przeznaczone dla
klientów;
– w pensjonatach.
22. Jeśli urządzenie jest zablokowane, to
należy nacisnąć przycisk REV (wstecz).
Mięso zablokowane w przedziale cięcia
jest niezmielone, tak więc urządzenie może
wrócić na pozycje wyjściową.
INSTRUKCJA OBSŁUGI
POLSKI
MONTAŻ
1. Nacisnąć przycisk mocowania, przytrzymać
głowicę i włożyć ją do wlotu, przy wsuwaniu
proszę zwrócić uwagę na to by była ona pod
skosem wskazanym przez strzałkę na górze,
(patrz rys. 1), następnie obrócić głowicę w
kierunku przeciwnym do wskazówek zegara,
tak by głowica była pewnie zamocowana.
(rys. 2)
2. Umieścić ślimacznicę w głowicy, wsuwając
dłuższym końcem, obrócić dla nakręcenia
śruby, aż do osadzenia w obudowie silnika
(rys. 3).
3. Umieścić ostrze tnące na osi ślimacznicy,
ostrzem do przodu jak pokazano na (rys. 4).
Jeśli nie jest ono zamocowane prawidłowo,
to mięso nie będzie mielone.
4. Umieścić wymaganą płytę cięcia tuż za
ostrzem, dopasowując wypustki do szczelin
(rys. 5).
5. Dopchnąć środek płyty tnącej jednym
palcem a następnie nakręcić pierścień
mocujący ściśle drugą ręką (rys. 6). Nie
dokręcać za mocno.
6. Umieścić płytę zsypu na głowicy i umocować
7. Urządzenie ustawić na pewnym miejscu.
8. Przelot powietrza u spodu i z boków
obudowy silnika powinien być swobodny i
nie utrudniony.
SIEKACZ
1. Włożyć ślimacznicę do obudowy noża,
końcem plastikowym najpierw.
Umieścić nóż na osi ślimacznicy. (Krawędzie
tnące powinny być do przodu). Umieścić
średnio lub grubo tnący dysk (zależnie od
pożądanej konsystencji) na osi ślimacznicy.
(Upewnić się, że szczeliny dysku tnącego
pasują do wypustek głowicy siekacza.)
Nakręcić pierścień gwintowany w kierunku
strzałki na obudowie noża, aż do właściwego
zamocowania.
2. Przymocować obudowę noża do jednostki
silnika.
3. Umieścić tacę na górnej części obudowy
noża.
4. Urządzenie jest teraz gotowe do siekania.
Pokroić mięso na paski o długości 10cm i
grubości 2cm. Usunąć kości, chrząstki i ścięgna,
na ile to możliwe. (nigdy nie stosować mięsa
zmrożonego!)
Umieścić mięso na tacy. Popychaczem wpychać
mięso delikatnie do wlotu obudowy noża. (Do
przygotowania befsztyka tatarskiego siekać
mięso dwukrotnie z użyciem średniej tarczy
tnącej.)
PRZYGOTOWANIE KEBBE
1. Włożyć ślimacznicę do obudowy noża,
końcem plastikowym najpierw. (rys. 8)
Włożyć rożek do obudowy noża
Umieścić foremkę na obudowie noża i
dokręcić ją pierścieniem. (rys. 9)
2. Przymocować obudowę noża do jednostki
silnika.
3. Umieścić tacę na górnej części obudowy
noża.
4. Urządzenie jest teraz gotowe do
przygotowania kebbe. (rys. 10)
Wprowadzać przygotowaną mieszankę kebbe
przez maszynkę kebbe. Pociąć wychodzącą
pustą rurę na żądane długości.
Kebbe jest tradycyjnym daniem
bliskowschodnim, głównie z jagnięciny i
pszenicy bulgur (kasza pszeniczna), które są
razem zmielone, tworząc ciasto mieszaniny,
wytłaczane się przez maszynkę kebbe i pocięte
na krótkie odcinki. Rury takie są następnie
napełniane mieszaniną siekanego mięsa a
następnie z końcami zlepionymi, smażone w
tłuszczu.
TWORZENIE KIEŁBASEK
1. Mielenie mięsa
Włożyć ślimacznicę do obudowy noża,
końcem plastikowym najpierw. (rys. 11)
Włożyć separator do obudowy noża.
Umieścić rożek kiełbasek na obudowie noża
i dokręcić go pierścieniem. (Upewnić się, że
szczeliny separatora pasują do wypustek
głowicy siekacza.)
2. Przymocować obudowę noża do jednostki
silnika.
3. Umieścić tacę na górnej części obudowy
noża.
4. Urządzenie jest teraz gotowe do
przygotowania kiełbasek.
Umieścić składniki na tacy. Popychaczem
wpychać mięso delikatnie do wlotu obudowy
noża.
Włożyć ak kiełbasek do letniej wody na
10 minut. Następnie nasunąć go na rożek.
Wepchnąć (przyprawione) zmielone mięso do
obudowy noża. Jeśli ak przywrze do rożka
kiełbasek, to zwilżyć go wodą.
WYCISKACZ SOKU POMIDOROWEGO
MONTAŻ (rys. B)
1. Umieścić plastikowy pierścień blokujący w
rurze stożkowej. (rys. B1)
2. Umieścić siatkę w rurze stożkowej, tuż za
plastikowym pierścieniem blokującym (rys.
B2)
3. Nałożyć pierścień mocujący na rurę
stożkową, nasunąć do końca rury. (rys. B3)
4. Umieścić ślimacznicę w głowicy, wsuwając
dłuższym końcem, obrócić dla nakręcenia
śruby aż do osadzenia w obudowie silnika
(rys. B4)
5. Wsunąć oś ślimacznicy do centralnej osi
śruby. (rys. B5)
6. Włożyć całą rurę stożkową wraz z
pierścieniem mocującym na śrubę, następnie
obrócić pierścień w kierunku wskazówek
zegara, aż do ścisłego umocowania.
7. Założyć plastikową tacę soku na rurę
stożkową i ustawić w odpowiedniej pozycji.
(rys. B7)
8. Włożyć plastikową śrubę do otworu rury
stożkowej, następnie obrócić w kierunku
wskazówek zegara aż do zamocowania.
Następnie na rurę stożkową założyć
plastikową pokrywkę. (rys. B8)
Urządzenie jest teraz gotowe do wyciskania
soku.
CZYSZCZENIE URZĄDZENIA
Mięso pozostałe w obudowie noża może być
usunięte z urządzenia przepuszczeniem przez
maszynkę kromki chleba.
1. Przed czyszczeniem urządzenia, wyłączyć je i
wyjąć wtyczkę z gniazdka. (rys. 12)
2. Nacisnąć przycisk uwolnienia i obrócić
obudowę noża w kierunku strzałki. Usunąć
popychacz i tacę. (rys. 13)
3. Odkręcić pierścień mocujący i wyjąć
wszystkie części z obudowy noża. Nie czyścić
części w zmywarce naczyń!
4. Wszystkie części mające styk z mięsem
umyć w gorącej mydlanej wodzie. Czyścić je
bezpośrednio po użyciu.
5. Następnie opłukać w gorącej wodzie i
natychmiast osuszyć.
6. Zalecamy smarowanie jednostki cięcia i
dysków tnących olejem roślinnym.
DANE TECHNICZNE:
220-240V • 50-60Hz • 300W nominalna/
1000W maksymalna
Utylizacja przyjazna środowisku
Możesz wspomóc ochronę środowiska!
Proszę pamiętać o przestrzeganiu
lokalnych przepisów: przekaż uszkodzony
sprzęt elektryczny do odpowiedniego ośrodka
utylizacji.
POLSKI
12 13

MLIN ZA MESO
UPUTSTVO ZA UPOTREBU
Molimo da pažljivo pročitate i sačuvate upustvo
za kasnije
OPIS (slika A)
1. Telo
2. ON/0/R (Uključeno/Isključeno/Unazad
3. Mlin za paradaz
4. Dugme za zatezanje
5. Ulaz za tubu
SCG/CRO/B.i.H.
6. Gurač namirnice
7. Postolje levka
8. Glava tube
9. Vijak
10. Nož za sečenje
11. Oštrica za no sečenje
12. Oštrica za srednje sečenje
13. Višenamenska Rendaljka
14. Prsten za zatezanje
15. Kobasica
16. Kibe
UVOD
Ovaj uređaj je opremljen termostat sistemom
Ovaj sistem će automatski prekinuti dovod struje
do uređaja u slučaju pregrevanja.
Ako vaš uređaj iznenada prestane da radi:
1. Izvucite utikač iz naponske mreže.
2. Pritisnite prekidač da isključite uređaj
3. Ostavite da se uređaj ohladi 60 minuta.
4. Uključite utikač u utičnicu.
5. Ponovo uključite uređaj.
Molimo da kontaktirate vašeg prodavca ili
autorizovani servis, ako se termostat aktivira
previše često.
UPOZORENJE: Da bi ste izbegli rizične situacije,
ovaj uređaj nikada ne sme biti uključen preko
tajmera.
VAŽNO
1. Pažljivo pročitajte ovo uputstvo za upotrebu
i pogledajte ilustracije pre upotrebe uređaja.
2. Čuvajte ovo uputstvo za kasnije potrebe.
3. Pre nego što uključite uređaj proverite da
li naponska mreža označena na uređaju
odgovara naponskoj mreži u vašem domu.
4. Nikada ne koristite dodatke koji su od nekog
drugog prizvođača Vaša garancija će biti
nevažeća ako koristite takve delove ili delove
koji su ranije korišćeni.
5. Ne koristite uređaj ako je naponski kabl ili
utikač ili neki drugi deo oštećen.
6. Ako je naponski kabl uređaja oštećen, mora
ga zameniti proizvođač ili ovlašćeni servis,
da bi se izbegle rizičmne situacije
7. Detaljno očuistite delove uređaja koji su
u kontaku sa hranom pre prve upotrebe
uređaja.
8. Isključite uređaj iz naponske mreže odmah
po završetku upotrebe.
9. Nikada ne korististite prst ili neki drugi
predmet da gurate namirnice kroz tubu, dok
je aparat uključen. U tu svrhu koristite samo
gurač za namirnice.
10. Držte uređaj van domašaja dece.
11. Nikada ne ostavljajte uređaj uključen bez
nadzora.
12. Isključite uređaj pre svakog stavljanja ili
skidanja nekog od dodataka.
13. Sačekajte da se pokretni delovi uređaja
taustave pre nego što skinete ili postavite
neki deo uređaja.
14. Nikada ne potapajte motor uređaja u vodu
ili neku drugu tečnost, niti ga stavljajte pod
tekuću vodu. Za čišćenje motora koristite
isključivo blago navlaženu krpu.
15. Ne pokušavajte da sameljete kosti,
koštunjavo voće ili druge tvrde namirnice.
16. Nikad ne stavljajte prte u kućište sekača.
Uvek koristite gurač.
17. Pri snazi od 600W nikad ne koristite uređaj
duže od 5 minuta.
18. Dodaci imaju svoja posebna uputstva za
bezbednu upotrebu.
19. Ono će vas upozoriti na moguće povrede
usled pogrešne upotrebe
20. Ovaj aparat je namenjen deci uzrasta bar
8 godina pod uslovom da imaju nadzor ili
su dobila uputstva za bezbednu upotrebu
aparata i da razumeju opasnosti koje mogu
da se jave. Deca ne smeju da čiste i održavaju
ovaj aparat ako nemaju bar 8 godina i ako
nemaju nadzor tokom tih aktivnosti. Držite
aparat i njegov strujni kabl van domašaja
dece mlađe od 8 godina.
21. Ovaj aparat namenjen je za upotrebu u
domaćinstvu i sličnim sredinama, na primer:
– u čajnim kuhinjama u okviru prodavnica,
kancelarija i drugih poslovnih prostora;
– na farmama;
– od strane gostiju hotela, motela i u drugim
stambenim jedinicama;
– u ugostiteljskim objektima koji pružaju
noćenje sa doručkom.
22. Ako je uređaj zaključan, molimo da pritisnite
taster za unazad (REV) Mesto unutar kućišta
bi trebalo izvaditi, da bi se uređaj vratio u
svoje osnovno stanje.
UPUTSTVO ZA UPOTREBU
SASTAVLJANJE:
1. Pritisnite taster za pričvršćivanje, zatim
uzmite glavu i ubacite je u otvor. Prilikom
postavljanja glava se mora nagnuti kako
pokazuje gornja strelica (vidi sliku 1) zatim
okrenite glavu u smeru suprotnom od
kretanja kazaljki na satu, dok ne bude
pričvršćena. (slika 2)
2. Postavite vijak u glavu, prvo duži kraj, a zatim
blago okrenite dok ne nalegne čvrsto u
kućište motora. (slika 3).
3. Postavite nož ta sečenje na osovinu vijka,
tako da bude okrenut unapred (slika 4). Ako
nož za sečenje ne bude propisno postavljen
onda meso neće biti mleveno.
4. Postavite željenu oštricu pored noža za
sečenje, tako da ispupčenja naležu na slotove
(slika 5).
5. Pridržite ili blago pritisnite oštricu po sredini
jednim prstom, a zatim zavijte prsten za
zatezanje drugom rukom (slika 6). Ne
prezatežite.
6. Postavite postolje levka na glavu i pričvrstite
ga na mesto.
7. Stavite uređaj na čvrstu podlogu.
8. Prostor na dnu i sa strane kućišta motora ne
sme se ničim blokirati.
SECKANJE
1. Ubacite beskrajni vijak u kućište sekača,
plastični deo prvo.
Stavite jedinicu sekača na beskrajni vijak.
(Oštrice moraju bit ispred). Stavite na
beskrajni vijak disk za srednje mlevenje ili
disk za grubo mlevenje (u zavisnosti od toga
koliko krupno želite da meso bude isečeno).
(Vodite računa da ispupčenje na disku naleže
na odgovarajuća mesta na glavi mlina.)
Okrenite vijak za zatezanje u smeru strelice
na kućištu, dok propisno ne nalegne.
2. Postavite kućište sekača na jedinicu motora.
3. Postavite poslužavnik na prednji deo kućišta
sekača.
4. Sada je uređaj spreman za seckanje.
Isecite meso na 10cm dugačke i 2cm širokte
trake. Što je više moguće uklonite kosti, delove
hrskavice i žile (Nikad ne upotrebljavajte
smrznuto meso.)
Stavite meso na poslužavnik. Upotrebite gurač
da polako gurate meso u tubu sekača (Za tartar
šnicle, dvaput sameljite meso na oštrici za
srednje sečenje.)
PRAVLJENJE KEBE
1. Ubacite beskrajni vijak u kućište sekača,
plastični deo prvo. (slika 8)
Stavte kupu u kućište sekača.
Postavite je na kućište sekača i zategnite
prstenom na kućište sekača. (slika 9)
2. Postavite kućište sekača na jedinicu motora.
3. Postavite poslužavnik na prednji deo kućišta
sekača.
4. Sada je uređaj spreman za pravljenje kebe.
(slika 10)
Stavite pripremljenu smesu za kebe kroz pravilac
kebe. Odsecite neprekidno crevo na dužinu koju
želite
Kebe je tradicionalno bliskoistočno jelo koje
se prvenstveno pravi od jagnjetine i žitarica
zajedno umešanih u pastu i propuštenih kroz
pravilac kebe i isečeni na male komade. Creva
se mogu napuniti mešavinom, a zatim pržiti u
dubokom ulju.
PRAVLJENJE KOBASICA
1. Iseckajte meso.
Ubacite beskrajni vijak u kućište sekača,
plastični deo prvo. (slika 11)
Stavte separator u kućište sekača.
Postavite crevo za kobasice na kućište sekača
i zategnite prstenom na kućište sekača.
(Vodite računa da ispupčenje na separatoru
naleže na odgovarajuća mesta na glavi
mlina.)
2. Postavite kućište sekača na jedinicu motora.
3. Postavite poslužavnik na prednji deo kućišta
sekača.
4. Sada je uređaj spreman za pravljenje
kobasica.
Stavite sastojke na poslužavnik. Upotrebite
gurač da polako gurate meso u tubu sekača.
Stavite omot kobasice u mlaku vodu na 10
minuta. Zatim navucite vlažan omot na crevo
kobasice. Stavite (začinjeno) iseckano meso u
kućište sekača. Ako se omot zaglavi na crevo
kobasice, nakvasite ga s malo vode.
SOKOVNIK ZA PARADAJZ
SASTAVLJANJE (slika B)
1. Stavite plastični prsten za zavijanje na nosač
(slika B1)
2. Stavite mrežu u nosač odmah pored
plastičnog prstena za zavijanje (slika B2)
SCG/CRO/B.i.H.
14 15

3. Stavite prsten za zatezanje kroz nosač i
namestite ga na kraju nosač. (slika B3)
4. Postavite vijak na glavu, prvo duži kraj, a
zatim blago okrenite dok ne nalegne čvrsto
u kućište motora. (slika B4).
5. Stavite osovinu na centalnu os zavrtnja (slika
B5).
6. Stavite čitav nosač sa prstenom za zatvaranje
kroz zavrtanj, zatim okrenite zavrtanj u
pravcu kretanja kazaljki na satu, dok se ne
pričvrsti (slika B6).
7. Stavite plastičnu posudu kroz nosač i
SCG/CRO/B.i.H.
postavite je u odgovarajući položaj (slika B7).
8. Stavite plastični zavrtanj na rupu nosača,
zatim ga okrenite u pravcu kretanja kazaljki
na satu sve dok ne bude propisno pričvršćen.
Zatim stavite plastično pokoopac na nosač
(slika B8)
Sada je uređaj spreman za pravljenje soka.
KAKO DA ČISTITE VAŠ UREĐAJ
Meso koje je zaostalo u sekaču se može ukloniti
provlačenjem parčeta hleba kroz kućište sekača.
1. Pre nego što započnete sa čišćenjem
uređaja, isključite ga i izvucite naponski kabl
iz strujne mreže. (slika 12)
2. Pritisnite taster za otpuštanje i okrenite
čitavo kućište u smeru koji pokazuje strelica.
Ukonite gurač i poslužavnik. (slika 13)
3. Odvijte zatezni prsten i uklonite sve delove
sa kućišta sekača. Nemojte čistiti delove u
mašini za pranje sudova!
4. Sve delove koji su došli u kontakt sa mesom
operite u toploj vodi sa deteržentom sa
pranje. Očistite odmah posle upotrebe.
5. Isperite čistom toplom vodom i odmah
osušite.
6. Preporučujemo vam da podmažete sekač i
diskove sa malo jestivog ulja.
TEHNIČKI PODACI:
220-240V • 50-60Hz • 300W nominalne
snage/1000W maksimalne snage
Ekološko odlaganje otpada
Možete pomoći zaštiti okoline! Molimo ne
zaboravite da poštujete lokalnu regulativu.
Odnesite pokvarenu električnu opremu u
odgovarajući centar za odlaganje otpada.
MLÝNEK NA MASO
NÁVOD K POUŽITÍ
Přečtěte si návod pečlivě a dobře jej uschovejte.
POPIS (obr. A)
1. Těleso
2. ZAPNOUT/0/ZPĚT (ZAPNOUT / VYPNOUT /
zpětný chod)
3. Nástavec pro výrobu rajčatového protlaku
4. Upevňovací tlačítko
5. Vstup trubice
6. Pěchovadlo potravin
7. Násypka
8. Trubice hlavice
9. Šnek
10. Řezací čepel
11. Řezací deska (jemná)
12. Řezací deska (střední)
13. Multi struhadlo
14. Upevňovací kroužek
15. Nástavec pro výrobu klobás
16. Nástavec pro výrobu kibbe
ÚVOD
Tento spotřebič je vybaven termostatem. V
případě přehřátí termostat automaticky odpojí
napájení spotřebiče.
Pokud se spotřebič náhle zastaví:
1. Odpojte zástrčku od síťového napájení.
2. Stisknutím vypínače spotřebič vypněte.
3. Nechte spotřebič po dobu 60 minut
vychladnout.
4. Připojte zástrčku k síťovému napájení.
5. Spotřebič znovu zapněte.
Pokud se termostat aktivuje příliš často, obraťte
se na svého prodejce.
VÝSTRAHA: Tento spotřebič nesmí být nikdy
připojen k časovému spínači, aby se zabránilo
nebezpečné situaci.
DŮLEŽITÉ
1. Před použitím spotřebiče si pečlivě přečtěte
tyto pokyny k používání a podívejte se na
uvedené obrázky.
2. Uschovejte tyto pokyny pro pozdější použití.
3. Před připojením spotřebiče zkontrolujte,
zda napětí uvedené na spotřebiči odpovídá
napětí vaší místní sítě.
4. Nikdy nepoužívejte příslušenství jiného
výrobce. V opačném případě může dojít ke
zrušení platnosti záruky.
16 17
5. Spotřebič nepoužívejte, pokud jsou napájecí
kabel, zástrčka nebo jakákoli jiná část
poškozeny.
6. Pokud je poškozen napájecí kabel
spotřebiče, musí jej vždy vyměnit výrobce
nebo autorizované servisní středisko, aby se
zabránilo nebezpečným situacím.
7. Před prvním použitím spotřebiče důkladně
omyjte všechny součásti, které přijdou do
kontaktu s potravinami.
8. Po použití spotřebič ihned odpojte.
9. Je-li spotřebič v chodu, nikdy neposunujte
suroviny v plnicí trubici prsty ani žádným
jiným předmětem. K tomuto účelu se smí
používat pouze pěchovadlo.
10. Uchovávejte spotřebič mimo dosah dětí.
11. Nikdy neponechávejte spotřebič v chodu
bez dozoru.
12. Před sejmutím nebo montáží jakéhokoli
příslušenství spotřebič vypněte.
13. Než součásti ze spotřebiče sejmete, počkejte,
než se pohybující se součásti zastaví.
14. Motorovou jednotku nikdy neponořujte
do vody ani žádné jiné kapaliny a ani ji
neoplachujte pod tekoucí vodou. K čištění
motorové jednotky používejte pouze
navlhčený hadřík.
15. Nepokoušejte se mlet kosti, ořechy ani žádné
jiné tvrdé suroviny.
16. Nikdy nevkládejte ruce do krytu řezací části.
Vždy používejte pěchovadlo.
17. Spotřebič nikdy neudržujte v chodu s
příkonem 600 W po dobu delší než 3 minuty.
18. K příslušenství by měly být přiloženy pokyny
k jejich bezpečnému používání.
19. Při nesprávném používání hrozí nebezpečí
zranění.
20. Tento spotřebič smí používat děti ve věku 8
let a starší, pokud jsou pod dozorem nebo
pokud byly poučeny o bezpečném používání
spotřebiče a porozuměly nebezpečím s ním
spojeným. Čištění a údržbu smí provádět
děti pouze starší 8 let a pod dohledem
dospělé osoby. Uchovávejte spotřebič i jeho
napájecí kabel mimo dosah dětí mladších 8
let.
21. Tento spotřebič je určen k použití v
domácnostech a k podobnému použití,
např.:
– v kuchyňkách pro zaměstnance v
obchodech, kancelářích a na jiných
pracovištích,
– na statcích a farmách,
– pro klienty v hotelech, motelech nebo
jiných typech ubytování,
– v ubytování poskytujícím nocleh se
snídaní.
ČESKY

22. Dojde-li k zablokování spotřebiče, stiskněte
tlačítko pro zpětný chod. Maso není v krytu
řezací části zpracováno a spotřebič může
poté obnovit běžný stav.
POKYNY K POUŽÍVÁNÍ
SESTAVENÍ
1. Stiskněte upevňovací tlačítko, podržte hlavici
a vložte ji do otvoru. Při vkládání musí být
hlavice nakloněna dle šipky uvedené nahoře,
viz obrázek (obr. 1). Poté otočte hlavicí proti
ČESKY
směru hodinových ručiček tak, abyste hlavici
pevně zajistili. (Viz obr. 2.)
2. Vložte do hlavice šnek delším koncem. Poté
mírně utahujte šroub, dokud nebude v krytu
motoru zajištěn (obr. 3).
3. Umístěte na hřídel šneku řezací čepel tak,
aby čepel směřovala směrem dopředu, jak
je zobrazeno (obr. 4). Pokud nebude řádně
nasazena, maso se neumele.
4. Vedle řezací čepele umístěte požadovanou
řezací desku, výčnělek musí zapadnout do
otvoru (obr. 5).
5. Řezací desku jedním prstem podepřete
nebo stiskněte a poté druhou rukou pevně
zašroubujte upevňovací kroužek (obr. 6).
Neutáhněte jej příliš.
6. Umístěte násypku na hlavici a zajistěte ji.
7. Umístěte jednotku na pevné místo.
8. Ventilační otvory ve spodní části krytu
motoru a po jeho straně musí být volné a
nesmí je blokovat žádné překážky.
MLETÍ MASA
1. Plastovým koncem vložte do krytu řezací
části šnekovou hřídel.
Umístěte na šnekovou hřídel řezací jednotku.
(Řezací strana musí být směrem dopředu.)
Nasaďte na šnekovou hřídel střední
nebo hrubou řezací desku (v závislosti na
požadované konzistenci). (Zajistěte, aby
výřez řezací desky zapadl do výčnělku
hlavice mlýnku na maso.) Utahujte na krytu
řezací části ve směru šipky šroubovací
kroužek, dokud nebude řádně zajištěn.
2. Připevněte kryt řezací části na motorovou
jednotku.
3. Umístěte na kryt řezací části násypku.
4. Spotřebič je nyní připraven k použití.
Nakrájejte maso na proužky o délce 10
cm a výšce 2 cm. Odstraňte do maximální
možné míry kosti, chrupavky a šlachy. (Nikdy
nezpracovávejte zmražené maso!)
Vložte maso do násypky. Pomocí pěchovadla
maso jemně stlačujte do krytu řezací části.
(Chcete-li připravit tatarský biftek, umelte maso
pomocí střední řezací desky dvakrát.)
PŘÍPRAVA KIBBE
1. Plastovým koncem vložte do krytu řezací
části šnekovou hřídel. (Viz obr. 8.)
Umístěte na kryt řezací části matici.
Výše uvedené vložte do krytu řezací části a
zašroubujte kroužek na krytu řezací části.
(Viz obr. 9.)
2. Připevněte kryt řezací části na motorovou
jednotku.
3. Umístěte na kryt řezací části násypku.
4. Spotřebič je nyní připraven k přípravě kibbe.
(Viz obr. 10.)
Připravenou směs na kibbe vkládejte
prostřednictvím nástavce pro výrobu kibbe.
Uřízněte souvislý dutý válec na požadovanou
délku a použijte jej dle své potřeby.
Kibbe je tradiční pokrm na Blízkém východě,
kde se připravuje především z jehněčího masa a
bulguru. Obě suroviny se společně rozemelou a
vytvoří pastu. Směs se protlačí skrz nástavec pro
výrobu kibbe a uřízne na krátkou délku. Trubici
lze poté naplnit směsí mletého masa, konce
stlačit a poté zprudka osmažit.
VÝROBA KLOBÁS
1. Umelte maso.
Plastovým koncem vložte do krytu řezací
části šnekovou hřídel. (Viz obr. 11.)
Vložte do krytu řezací části separátor.
Vložte do krytu řezací části nástavec pro
výrobu klobás a zašroubujte kroužek na
krytu řezací části. (Zajistěte, aby výřez
separátoru zapadl do výčnělku hlavice
mlýnku na maso.)
2. Připevněte kryt řezací části na motorovou
jednotku.
3. Umístěte na kryt řezací části násypku.
4. Spotřebič je nyní připraven k výrobě klobás.
Vložte suroviny do násypky. Pomocí pěchovadla
maso jemně stlačujte do krytu řezací části.
Vložte střívko na klobásy na dobu 10 minut do
vlažné vody. Poté navlhčené střívko nasuňte na
nástavec pro výrobu klobás. Vtlačte (okořeněné)
mleté maso do krytu řezací části. Pokud se v
nástavci pro výrobu klobás střívko zasekne,
navlhčete jej vodou.
ODŠŤAVŇOVÁNÍ RAJČAT
SESTAVENÍ (obr. B)
1. Nasaďte na pouzdro plastový šroubovací
zajišťovací kroužek. (Viz obr. B1.)
2. Za plastový šroubovací zajišťovací kroužek
umístěte do pouzdra gázu. (Viz obr. B2.)
3. Vložte do pouzdra upevňovací kroužek a na
konci pouzdra jej zajistěte. (Viz obr. B3.)
4. Vložte do hlavice šnek delším koncem. Poté
mírně utahujte šnek, dokud nebude v krytu
motoru zajištěn. (Viz obr. B4.)
5. Nasaďte hřídel šneku na středovou osu
šroubu. (Viz obr. B5.)
6. Nasaďte celé pouzdro spolu s upevňovacím
kroužkem na šroub, poté upevňovací
kroužek ve směru hodinových ručiček
utáhněte, aby byl pevně zajištěn. (Viz obr.
B6.)
7. Nasaďte na pouzdro plastový tác na šťávu a
zajistěte jej ve vhodné poloze. (Viz obr. B7.)
8. Vložte do otvoru pouzdra plastový šroub,
poté jej utáhněte ve směru hodinových
ručiček, dokud nebude řádně zajištěn. Poté
na pouzdro umístěte plastový kryt.
(Viz obr. B8.)
Spotřebič je nyní připraven k použití.
ČIŠTĚNÍ SPOTŘEBIČE
Zůstane-li v krytu řezací části nějaké maso, lze jej
z vnitřní části spotřebiče odstranit zpracováním
plátku chleba v krytu řezací části.
1. Než budete spotřebič čistit, vypněte jej a
odpojte zástrčku ze zásuvky. (Viz obr. 12.)
2. Stiskněte tlačítko uvolnění a otočte celým
krytem řezací části ve směru šipky.
Vyjměte pěchovadlo a násypku. (Viz obr. 13.)
3. Odšroubujte šroubovací kroužek a sejměte z
krytu řezací části všechny součásti. Nemyjte
součásti v myčce na nádobí!
4. Všechny součásti, které přišly do kontaktu
s masem, umyjte v horké mýdlové vodě.
Vyčistěte je ihned po použití.
5. Opláchněte je čistou horkou vodou a
okamžitě je vysušte.
6. Řezací jednotku a řezací desky se doporučuje
promazávat rostlinným olejem.
TECHNICKÉ ÚDAJE
220–240 V • 50-60 Hz • jmenovitý příkon 300 W /
maximální příkon 1000 W
Likvidace šetrná k životnímu prostředí
Vždy chraňte životní prostředí před
znečištěním. Při likvidaci nefunkčních
elektrických zařízení dodržujte místní předpisy a
zaneste je do příslušného sběrného střediska pro
likvidaci odpadu.
ČESKY
18 19

ΚΡΕΑΤΟΜΗΧΑΝΗ
ΟΔΗΓΙΕΣ ΧΡΗΣΕΩΣ
Διαβάστε προσεκτικά αυτό το εγχειρίδιο και
φυλάξτε το για μελλοντική αναφορά.
ΠΕΡΙΓΡΑΦΗ (Εικ.A)
1. Σώμα συσκευής
2. ON/0/R (Ενεργοποίηση/Απενεργοποίηση/
Αντίστροφη φορά)
3. Κόφτης τομάτας
4. Κουμπί συναρμολόγησης
ΕΛΛΗΝΙΚΑ
5. Είσοδος σωλήνα
6. Πιεστήρας τροφών
7. Χοάνη
8. Σωλήνας κεφαλής
9. Κοχλίας
10. Λεπίδα κοπής
11. Δίσκος κοπής (για ψιλοκομμένο κιμά)
12. Δίσκος κοπής (για μεσαίου μεγέθους κιμά)
13. Πολλαπλασιαστής)
14. Δακτύλιος στήριξης
15. Εξάρτημα παρασκευής λουκάνικων
16. Εξάρτημα παρασκευής κεμπάπ
ΕΙΣΑΓΩΓΗ
Αυτή η συσκευή διαθέτει σύστημα θερμοστάτη.
Αυτό το σύστημα θα διακόψει αυτόματα την
τροφοδοσία της συσκευής σε περίπτωση
υπερθέρμανσης.
Εάν η συσκευή σας σταματήσει ξαφνικά να
λειτουργεί:
1. Αποσυνδέστε τη συσκευή από την πρίζα.
2. Πατήστε το κουμπί λειτουργίας για να
απενεργοποιήσετε τη συσκευή.
3. Αφήστε τη συσκευή να ψυχθεί για 60 λεπτά.
4. Συνδέστε το καλώδιο τροφοδοσίας στην
πρίζα.
5. Θέστε ξανά τη συσκευή σε λειτουργία.
Εάν το σύστημα θερμοστάτη ενεργοποιείται
πολύ συχνά, επικοινωνήστε με τον πωλητή σας.
ΠΡΟΣΟΧΗ: Για να αποφύγετε τυχόν επικίνδυνες
καταστάσεις, η συσκευή αυτή δεν πρέπει να
συνδέεται ποτέ με χρονοδιακόπτη.
ΣΗΜΑΝΤΙΚΟ
1. Πριν χρησιμοποιήσετε τη συσκευή, διαβάστε
προσεκτικά αυτές τις οδηγίες χρήσης και
δείτε τις εικόνες που περιέχονται σε αυτές.
2. Κρατήστε αυτές τις οδηγίες για μελλοντική
αναφορά.
3. Ελέγξτε αν η τάση που αναγράφεται στη
συσκευή αντιστοιχεί στην τοπική τάση
δικτύου πριν συνδέσετε τη συσκευή.
4. Ποτέ μην χρησιμοποιείτε εξαρτήματα άλλου
κατασκευαστή. Σε αντίθετη περίπτωση, η
εγγύηση μπορεί να ακυρωθεί.
5. Μην χρησιμοποιείτε τη συσκευή εάν
το καλώδιο τροφοδοσίας, το βύσμα ή
οποιοδήποτε άλλο τμήμα της έχει υποστεί
ζημιά.
6. Εάν το καλώδιο τροφοδοσίας υποστεί
ζημιά, πρέπει να αντικατασταθεί από τον
κατασκευαστή ή από εξουσιοδοτημένο
τεχνικό σέρβις, προκειμένου να αποφευχθεί
ο κίνδυνος.
7. Καθαρίστε σχολαστικά τα μέρη που θα
έρθουν σε επαφή με τα τρόφιμα προτού
χρησιμοποιήσετε τη συσκευή για πρώτη
φορά.
8. Αποσυνδέστε τη συσκευή από την πρίζα
αμέσως μετά τη χρήση.
9. Ποτέ μην σπρώχνετε τα τρόφιμα στον
σωλήνα τροφοδοσίας με το δάχτυλό σας ή
άλλο αντικείμενο ενώ λειτουργεί η συσκευή.
Μόνο ο πιεστήρας τροφών μπορεί να
χρησιμοποιηθεί για τον σκοπό αυτό.
10. Κρατήστε τη συσκευή μακριά από παιδιά.
11. Μην αφήνετε ποτέ τη συσκευή να λειτουργεί
χωρίς επίβλεψη.
12. Απενεργοποιείτε τη συσκευή πριν
αποσυνδέσετε και εγκαταστήσετε κάποιο
εξάρτημα.
13. Περιμένετε έως ότου σταματήσουν να
κινούνται τα εξαρτήματα πριν αφαιρέσετε
εξαρτήματα από τη συσκευή.
14. Ποτέ μην βυθίζετε το μοτέρ σε νερό ή
οποιοδήποτε άλλο υγρό και μην το ξεπλένετε
κάτω από τη βρύση. Χρησιμοποιήστε ένα
υγρό πανί για να καθαρίσετε το μοτέρ.
15. Μην επιχειρείτε να αλέσετε οστά, ξηρούς
καρπούς ή άλλα σκληρά αντικείμενα.
16. Ποτέ μην βάζετε τα χέρια σας μέσα στο
περίβλημα κοπής. Χρησιμοποιείτε πάντα τον
πιεστήρα τροφών.
17. Μη χρησιμοποιείτε ποτέ τη συσκευή
συνεχώς για περισσότερο από 3 λεπτά στα
600W.
18. Τα εξαρτήματα περιλαμβάνουν οδηγίες για
την ασφαλή χρήση τους.
19. Προειδοποιούν για πιθανό τραυματισμό από
κακή χρήση.
20. Αυτή η συσκευή μπορεί να χρησιμοποιηθεί
από παιδιά ηλικίας από 8 ετών και άνω
εφόσον έχουν επιτήρηση ή οδηγίες σχετικά
με τη χρήση της συσκευής με ασφαλή τρόπο
και εφόσον κατανοούν τους σχετικούς
κινδύνους. Ο καθαρισμός και συντήρηση δεν
πρέπει να γίνεται από παιδιά, εκτός εάν είναι
ηλικίας άνω των 8 ετών και εποπτεύονται.
Διατηρείτε τη συσκευή και το καλώδιό της
μακριά από παιδιά ηλικίας κάτω των 8 ετών.
21. Αυτή η συσκευή προορίζεται για χρήση
σε οικιακό περιβάλλον και παρόμοιες
εφαρμογές όπως:
- κουζίνες προσωπικού σε καταστήματα,
γραφεία και άλλα εργασιακά περιβάλλοντα,
- σε εξοχικές κατοικίες,
- από πελάτες σε ξενοδοχεία, μοτέλ και άλλα
περιβάλλοντα οικιακού τύπου,
- σε χώρους φιλοξενίας που προσφέρουν
πρωινό.
22. Αν η συσκευή είναι κλειδωμένη, πατήστε
το κουμπί αντίστροφης φοράς (REV). Το
κρέας στο περίβλημα κοπής δεν υφίσταται
επεξεργασία, έτσι ώστε η συσκευή να μπορεί
να συνεχίσει τη συνήθη λειτουργία της.
ΟΔΗΓΙΕΣ ΧΡΗΣΗΣ
ΣΥΝΑΡΜΟΛΟΓΗΣΗ
1. Πιέστε το κουμπί συναρμολόγησης,
κρατήστε την κεφαλή και τοποθετήστε
την στην είσοδο. Κατά την εισαγωγή,
παρακαλούμε να σημειώσετε ότι η κεφαλή
πρέπει να είναι κεκλιμένη σύμφωνα με το
βέλος που υποδεικνύεται στο επάνω μέρος,
όπως φαίνεται στην (Εικ. 1) και, στη συνέχεια,
να στρέψετε την κεφαλή αριστερόστροφα
έτσι ώστε η κεφαλή να εγκατασταθεί
σταθερά. (Εικ. 2)
2. Τοποθετήστε τον κοχλία στην κεφαλή, το
μακρύτερο άκρο πρώτα, και, στη συνέχεια,
στρέψτε τον ελαφρά προς τα μέσα μέχρι να
προσαρμοστεί στο περίβλημα του μοτέρ
(Εικ. 3).
3. Τοποθετήστε τη λεπίδα κοπής στον άξονα
του κοχλία με την λεπίδα να είναι στραμμένη
προς την μπροστινή πλευρά, όπως
απεικονίζεται (Εικ. 4). Εάν δεν τοποθετηθεί
σωστά, το κρέας δεν θα αλεστεί.
4. Τοποθετήστε τον επιθυμητό δίσκο κοπής
δίπλα στη λεπίδα κοπής, με την προεξοχή
τοποθετημένη στην εγκοπή (Εικ. 5).
5. Στηρίξτε ή πιέστε το κέντρο του δίσκου
κοπής με ένα δάκτυλο και, στη συνέχεια,
σφίξτε καλά τον δακτύλιο σταθεροποίησης
με το άλλο χέρι (Εικ. 6). Μην σφίγγετε
υπερβολικά.
6. Τοποθετήστε τη χοάνη στην κεφαλή και
στερεώστε τη στη θέση της.
7. Τοποθετήστε τη συσκευή σε σταθερή θέση.
8. Η οπή εξαερισμού στο κάτω μέρος και στο
πλάι του περιβλήματος του μοτέρ πρέπει να
διατηρείται ελεύθερη και να μην φράσσεται.
ΚΡΕΑΤΟΜΗΧΑΝΗ
1. Τοποθετήστε τον κοχλία μέσα στο
περίβλημα κοπής, με το πλαστικό άκρο
πρώτα.
Τοποθετήστε τη μονάδα κοπής επάνω στον
κοχλία. (Το άκρο κοπής πρέπει να βρίσκεται
μπροστά) Τοποθετήστε τον δίσκο μεσαίας ή
χονδρής κοπής (ανάλογα με τις προτιμήσεις
σας) στον κοχλία. (Βεβαιωθείτε ότι η εγκοπή
του δίσκου κοπής είναι τοποθετημένη πάνω
στην προεξοχή στην κεφαλή της συσκευής.)
Στρέψτε τον δακτύλιο στήριξης προς την
κατεύθυνση του βέλους στο περίβλημα
κοπής μέχρι να ασφαλίσει σωστά.
2. Προσαρτήστε το περίβλημα κοπής στο
μοτέρ.
3. Τοποθετήστε τη χοάνη στο κάθετο τμήμα
του περιβλήματος κοπής.
4. Τώρα η συσκευή είναι έτοιμη για λειτουργία.
Κόψτε το κρέας σε λωρίδες μήκους 10εκ και
πάχους 2εκ. Αφαιρέστε τα οστά, το λίπος και τα
νεύρα όσο το δυνατόν περισσότερο. (Ποτέ μην
χρησιμοποιείτε κατεψυγμένο κρέας!)
Τοποθετήστε το κρέας στον δίσκο.
Χρησιμοποιήστε τον πιεστήρα τροφών για να
ωθήσετε απαλά το κρέας μέσα στο περίβλημα
κοπής. (Για μπιφτέκι ταρτάρ, αλέστε το κρέας με
τον δίσκο μεσαίας κοπής δύο φορές.)
ΠΑΡΑΣΚΕΥΗ ΚΕΜΠΑΠ
1. Τοποθετήστε τον κοχλία μέσα στο
περίβλημα κοπής, με το πλαστικό άκρο
πρώτα. (Εικ.8)
Τοποθετήστε τη χοάνη στο περίβλημα
κοπής.
Τοποθετήστε το εξάρτημα κεμπάπ στην
υποδοχή κοπής και βιδώστε τον δακτύλιο
στο περίβλημα κοπής. (Εικ.9)
2. Προσαρτήστε το περίβλημα κοπής στο
μοτέρ.
3. Τοποθετήστε τον δίσκο στο κάθετο τμήμα
του περιβλήματος κοπής.
4. Τώρα η συσκευή είναι έτοιμη για την
παρασκευή κεμπάπ. (Εικ.10)
Τροφοδοτήστε το μείγμα κιμά στον δίσκο και
ωθήστε με τον πιεστήρα τροφών. Κόψτε στο
επιθυμητό μήκος σύμφωνα με τις προτιμήσεις
σας.
Το κεμπάπ είναι ένα παραδοσιακό πιάτο της
Μέσης Ανατολής που παρασκευάζεται κυρίως
από αρνίσιο κιμά και πλιγούρι, τα οποία
ΕΛΛΗΝΙΚΑ
20 21

αλέθονται μαζί για να σχηματίσουν μια πάστα.
Το μείγμα εξάγεται μέσω του εξαρτήματος
κεμπάπ και κόβεται σε μικρό μήκος. Οι σωλήνες
που δημιουργούνται μπορούν να γεμιστούν με
ένα μείγμα από κιμά, οι άκρες ενώνονται και
μετά τηγανίζονται.
ΠΑΡΑΣΚΕΥΗ ΛΟΥΚΑΝΙΚΩΝ
1. Αλέστε το κρέας
Τοποθετήστε τον κοχλία μέσα στο
περίβλημα κοπής, με το πλαστικό άκρο
πρώτα. (Εικ.11)
ΕΛΛΗΝΙΚΑ
Τοποθετήστε τον διαχωριστή στο περίβλημα
κοπής.
Τοποθετήστε το χωνί παρασκευής
λουκάνικων στην υποδοχή κοπής και
βιδώστε τον δακτύλιο στο περίβλημα κοπής.
(Βεβαιωθείτε ότι η εγκοπή του διαχωριστή
είναι τοποθετημένη πάνω στην προεξοχή
στην κεφαλή της συσκευής.)
2. Προσαρτήστε το περίβλημα κοπής στο
μοτέρ.
3. Τοποθετήστε τον δίσκο στο κάθετο τμήμα
του περιβλήματος κοπής.
4. Τώρα η συσκευή είναι έτοιμη για την
παρασκευή λουκάνικων.
Τοποθετείστε τα υλικά στον δίσκο.
Χρησιμοποιήστε τον πιεστήρα τροφών για να
ωθήσετε απαλά το κρέας μέσα στο περίβλημα
κοπής.
Τοποθετήστε το έντερο σε χλιαρό νερό για 10
λεπτά. Περάστε το έντερο στο χωνί. Πιέστε τον
(αρωματισμένο) κιμά στο περίβλημα κοπής. Εάν
το έντερο κολλήσει στο χωνί, νοτίστε το με λίγο
νερό.
ΠΑΡΑΣΚΕΥΗ ΧΥΜΟΥ ΤΟΜΑΤΑΣ
ΣΥΝΑΡΜΟΛΟΓΗΣΗ (Εικ.B)
1. Τοποθετήστε τον πλαστικό βιδωτό δακτύλιο
ασφάλισης μέσα στο περίβλημα (Εικ.B1)
2. Τοποθετήστε το εξάρτημα μέσα στο
περίβλημα δίπλα στον πλαστικό βιδωτό
δακτύλιο ασφάλισης. (Εικ.B2)
3. Τοποθετήστε τον δακτύλιο σταθεροποίησης
διαμέσου του περιβλήματος μέχρι να φτάσει
στο τέλος του περιβλήματος. (Εικ.B3)
4. Τοποθετήστε τον κοχλία στην κεφαλή, το
μακρύ άκρο πρώτα, και στρέψτε τον ελαφρά
μέχρι να ασφαλίσει μέσα στο περίβλημα του
μοτέρ. (Εικ.B4)
5. Τοποθετήστε τον άξονα του κοχλία μέσα
στον κεντρικό άξονα. (Εικ.B5)
6. Τοποθετήστε ολόκληρο το περίβλημα μαζί
με τον δακτύλιο στήριξης μέσω του κοχλία.
Στη συνέχεια στρέψτε τον δακτύλιο στήριξης
προς τα αριστερά έτσι ώστε να ασφαλίσει.
(Εικ.B6)
7. Τοποθετήστε τον πλαστικό αποσπώμενο
δίσκο χυμού δια μέσου του περιβλήματος
και ασφαλίστε τον στην κατάλληλη θέση.
(Εικ.B7)
8. Τοποθετήστε τον πλαστικό κοχλία στην οπή
του περιβλήματος και μετακινήστε τον προς
τα δεξιά μέχρι να ασφαλίσει σωστά. Στη
συνέχεια τοποθετήστε το πλαστικό κάλυμμα
επάνω στο περίβλημα. (Εικ.B8)
Τώρα η συσκευή είναι έτοιμη για λειτουργία.
ΚΑΘΑΡΙΣΜΟΣ ΣΥΣΚΕΥΗΣ
Τα υπολείμματα κρέατος που παραμένουν στο
περίβλημα κοπής μπορούν να αφαιρεθούν από
το εσωτερικό της συσκευής περνώντας λίγο
ψωμί από το στόμιο του περιβλήματος κοπής.
1. Πριν καθαρίσετε τη συσκευή,
απενεργοποιήστε την και βγάλτε το καλώδιο
από την πρίζα. (Εικ.12)
2. Πατήστε το κουμπί αποδέσμευσης και
περιστρέψτε ελαφρώς ολόκληρο το
περίβλημα κοπής προς τα δεξιά.
Αφαιρέστε τον πιεστήρα και τον δίσκο.
(Εικ.13)
3. Ξεβιδώστε τον δακτύλιο και απομακρύνετε
όλα τα εξαρτήματα του περιβλήματος κοπής.
Μην πλένετε τα εξαρτήματα σε πλυντήριο
πιάτων!
4. Πλύνετε όλα τα εξαρτήματα που ήρθαν
σε επαφή με το κρέας σε ζεστό νερό και
απορρυπαντικό πιάτων. Καθαρίστε τα
εξαρτήματα αμέσως μετά τη χρήση.
5. Ξεπλύνετε με καυτό νερό και στεγνώστε τα
αμέσως.
6. Σας συμβουλεύουμε να αλείφετε τη μονάδα
του κόφτη και τους δίσκους κοπής με λίγο
φυτικό λάδι.
ΤΕΧΝΙΚΕΣ ΠΡΟΔΙΑΓΡΑΦΕΣ
220-240V • 50-60Hz • 300W Ονομαστική/1000W
Μέγιστη
Φιλική προς το περιβάλλον διάθεση
Πάντα να προστατεύετε το περιβάλλον
από την μόλυνση! Μην ξεχνάτε να τηρείτε
τους τοπικούς κανονισμούς και παραδώστε τον
μη λειτουργικό ηλεκτρικό εξοπλισμό σε ένα
κατάλληλο κέντρο διάθεσης.
МЕСОМЕЛАЧКА
ИНСТРУКЦИИ ЗА УПОТРЕБА
Прочетете внимателно и спазвайте
инструкциите
ОПИСАНИЕ (фиг. A)
1. Корпус
2. ON/0/R (ВКЛ./ИЗКЛ./Обратен ход)
3. Уред за смилане на домати
4. Бутон за затягане
5. Вход на тръбата
6. Притисквач
7. Пластина на бункера
8. Тръба на главата
9. Винт
10. Нож
11. Нож (фино рязане)
12. Нож (средно рязане)
13. Мулти ренде
14. Фиксиращ пръстен
15. Приставка за наденици
16. Дробилка
ВЪВЕДЕНИЕ
Този уред е оборудван със система
термостати. Системата прекъсва захранването
автоматично в случай на прегряване.
Ако уредът внезапно спре да работи.
1. Поставете щепсела на захранването в
контакта.
2. Натиснете бутона, за да включите уреда.
3. Оставете уреда да се охлади за около 60
минути.
4. Поставете щепсела на захранването в
контакта.
5. Включете отново уреда отново.
Свържете се с доставчика или упълномощен
сервизен център, ако системата термостати се
активира твърде често.
ВНИМАНИЕ: За да избегнете опасни
ситуации, уредът никога не трябва да се
свързва към таймер.
ВАЖНО
1. Прочетете внимателно инструкциите за
употреба и разгледайте илюстрациите,
преди да използвате уреда.
2. Запазете инструкциите за бъдещи
справки.
3. Проверете дали посоченото върху уреда
напрежение съответства на напрежението
на мрежата, преди да свържете уреда.
4. Никога не използвайте аксесоари
или части от друг производител. При
използване на такива части се отменя
гаранцията.
5. Не използвайте уреда, ако има повреди
в захранващия кабел, щепсел или други
части.
6. Ако захранващият кабел на уреда е
повреден, е необходимо да бъде сменен
от производителя или упълномощен
сервизен център, за да избегнете
рисковете.
7. Почиствайте добре влизащите в контакт с
храната части, преди да използвате уреда
за първи път.
8. Изключвайте уреда незабавно след
употреба.
9. Никога не използвайте пръстите си или
други обекти за притискане на храната
в отвора, ако уредът работи. За тази цел
използвайте само притисквача.
10. Пазете уреда извън досега на деца..
11. Никога не оставяйте уреда да работи без
наблюдение.
12. Изключвайте уреда преди да демонтирате
или монтирате аксесоар.
13. Изчакайте движещите се части да спрат
преди да ги отстраните от уреда.
14. Никога не потапяйте двигателя във вода
или други течности, нито измивайте под
течаща вода. За почистване на двигателя
използвайте само влажна кърпа.
15. Не правете опити за раздробяване на
кости, ядки или други твърди храни.
16. Никога не поставяйте пръстите си в
корпуса на ножовете. Винаги използвайте
притисквача.
17. Никога не работете с уреда непрекъснато
за повече от 3 минути при 600W.
18. Аксесоарите трябва да включват
инструкции за безопасна употреба.
19. В нея е дадена информация относно
възможните наранявания при неправилна
употреба
20. Този уред може да се използва от деца
на възраст над 8 години, ако са под
наблюдение или са били инструктирани
как да го използват на безопасно, както
и ако разбират опасностите, свързани
с употребата му. Почистването и
поддръжката не трябва да се извършват
от деца, освен ако не са на възраст над
8 години и са под наблюдение. Дръжте
уреда и кабела за захранване далеч от
деца под 8 години.
БЪΛГАРСКИ
22 23

21. Този уред е предназначен за домашна
употреба и други подобни приложения,
като например:
– в кухни за персонал в магазини, офиси и
други типове работна среда;
– във ферми;
– от клиенти в хотели, мотели и други
типове жилищна среда;
– в заведения, предлагащи настаняване и
закуска.
22. Ако уредът блокира, натиснете бутона
за обратно движение (REV).: Металната
БЪΛГАРСКИ
блокировка в корпуса на ножа се
освобождава, така че уредът възстановява
стандартното си състояние.
ИНСТРУКЦИИ ЗА УПОТРЕБА
СГЛОБЯВАНЕ
1. Натиснете затягащия бутон, хванете
главата и я поставете в отвора. При това
обърнете внимание, че главата трябва
да бъде под посочения от стрелката от
горната й страна наклон. Вижте (фиг. 1).
След това придвижете главата в обратна
на часовниковата стрелка посока, така че
да се затегне добре (фиг. 2)
2. Поставете винта върху режещата глава,
първо дългият край, и започнете да
затягате леко подаващия винт докато
пасне на място в корпуса на двигателя
(фиг. 3).
3. Поставете ножа върху вала на винта, като
предната му страна е насочена както е
показано на илюстрацията (фиг. 4). Ако не
пасва добре, месото няма да се смели.
4. Поставете желания нож до режещата
пластина, като го захванете в отворите
(фиг. 5).
5. Подпрете или натиснете центъра на
режещата пластина с един пръст и
завинтете фиксиращия пръстен с другата
ръка (фиг. 6). Не затягайте прекалено
много.
6. Поставете пластината на бункера върху
главата и фиксирайте на място.
7. Разположете уреда на стабилно място.
8. Въздушният пасаж отдолу и отстрани на
корпуса на двигателя трябва да остава
свободен и да не се блокира.
МЕЛАЧКА
1. Поставете въртящия се вал върху корпуса
на ножа напред с пластмасовия край.
Поставете ножа върху винта. (Режещите
ръбове трябва да бъдат отпред).
Поставете диск за средно или грубо
рязане (в зависимост от предпочитаната
консистенция) върху винта. (Уверете се,
че нарезите върху дисковете попадат
върху продълженията на млевната
глава.) Завъртете пръстена по посоката
на стрелката върху корпуса на ножа до
достигане на добро затягане.
2. Поставете корпуса на ножа върху
двигателния блок.
3. Поставете тавата от горната страна на
корпуса на ножа.
4. При това уредът е готов за работа.
Нарежете месото на ленти с дължина 10cm
и дебелина 2cm. Отстранявайте максимално
костите, хрущялите и жилите. (Никога не
използвайте замразено месо!)
Поставете месото на подложката.
Използвайки притисквача, внимателно
притиснете месото към корпуса на ножа. (За
татарски кюфтета смелете месото двукратно
при използване на диск за средна степен на
мелене.)
ПРАВЕНЕ НА ЛУКАНКИ
1. Поставете винта върху корпуса на ножа
напред с пластмасовия край (фиг. 8).
Поставете конуса в корпуса на ножа.
Поставете последния корпус върху
корпуса на ножа и завийте пръстена върху
корпуса. (фиг. 9)
2. Поставете корпуса на ножа върху
двигателния блок.
3. Поставете тавата от горната страна на
корпуса на ножа.
4. При това уредът е готов за работа. (фиг. 10)
Заредете подготвената смес за луканки
през приставката. Нарежете непрекъснатия
кух цилиндър на желаните дължини и
използвайте по предназначение.
Луканката представлява традиционно ястие
от Средния изток и се приготвя предимно от
агнешко и булгур, които се смилат заедно.
Така получената паста се екструдира през
приставката за луканки и се нарязва на малки
парчета. Получената смес може да се напълни
в черва, чиито краища да се завържат. Така
получените луканки се сушат.
НАДЕНИЦИ
1. Смелете месото
Поставете въртящия се вал върху корпуса
на ножа напред с пластмасовия край.
(фиг. 11)
Поставете разделителя върху корпуса на
ножа.
Поставете накрайника за наденици
върху корпуса на ножа и стегнете
пръстена върху корпуса. (Уверете се, че
нарезите върху дисковете попадат върху
продълженията на млевната глава.)
2. Поставете корпуса на ножа върху
двигателния блок.
3. Поставете тавата от горната страна на
корпуса на ножа.
4. При това уредът е готов за работа.
Поставете съставките на подложката.
Използвайки притисквача, внимателно,
притиснете месото към корпуса на ножа.
Поставете червата за наденици в хладка вода
за 10 минути. След това плъзнете влажното
черво върху накрайника за наденици.
Притиснете месото към корпуса на ножа.
Ако червото върху приставката се препълни,
навлажнете с малко вода.
УРЕД ЗА ДОМАТЕН СОК
СГЛОБЯВАНЕ (фиг. B)
1. Поставете пластмасовия пръстен за
блокиране върху ръкава (фиг. B1)
2. Поставете мрежата върху ръкава до
блокиращия пластмасов пръстен (фиг. B2)
3. Нанижете фиксиращия пръстен върху
ръкава и го захванете към краищата му
(фиг. B3)
4. Поставете винта върху режещата глава,
първо дългият край, и започнете да я
затягате леко докато пасне на място в
корпуса на двигателя (фиг. B4).
5. Поставете вала на серпантината върху
централната ос на винта (фиг. B5).
6. Поставете целия ръкав, заедно с
фиксиращия пръстен през винта и
завъртете фиксиращия пръстен по посока
на часовниковата стрелка до пълно
затягане (фиг. B6)
7. Поставете пластмасовия контейнер за
сок през ръкава и се уверете, че е на
подходящо място (фиг. B7)
8. Поставете пластмасовия винт в отвора
на ръкава и завъртете по часовниковата
стрелка до пълно затягане. След това
поставете пластмасовия капак върху
ръкава (фиг. B8)
При това уредът е готов за работа.
НАЧИН ЗА ПОЧИСТВАНЕ НА УРЕДА
Останалото в корпуса на ножа месо може
да се отстрани от вътрешната страна на
уреда чрез прокарване на парче хляб през
ножовете.
1. Преди да почистите уреда, изключете и
отстранете щепсела от контакта. (фиг. 12)
2. Натиснете бутона за освобождаване
и завъртете целия корпус на ножа по
посоката на стрелката. Отстранете
притисквача и поставката (фиг. 13)
3. Развийте винтовия пръстен и отстранете
всички части от корпуса на ножа. Не
почиствайте частите в съдомиална
машина
4. Измийте всички части, които са били в
контакт с месото, с топла вода и сапун.
Почистете незабавно след употреба.
5. Измийте с чиста гореща вода и подсушете.
6. Препоръчваме да смазвате блока на ножа
и млевните дискове с растително масло.
ТЕХНИЧЕСКИ ДАННИ:
220-240V • 50-60Hz • 300W номинална/
1000W максимална
Съобразено с околната среда
изхвърляне
Можете да помогнете да защитим
околната среда! Помнете, че трябва да
спазвате местните разпоредби: Предавайте
неработещото електрическо оборудване
в специално предназначените за целта
центрове.
БЪΛГАРСКИ
24 25

М‘ЯСОРУБКА
ІНСТРУКЦІЯ З ЕКСПЛУАТАЦІЇ
Прочитайте уважно і ретельно дотримуйтеся
інструкції
ОПИС (рис. A)
1. Корпус
2. Кнопка вмикача ON/0/R (УВІМК./ВИМК./
Реверс)
3. Насадка для витискання соку з томатів
4. Кнопка кріплення
УКРАЇНСЬКА
5. Вхідний отвір трубки
6. Подавач
7. Тарілка
8. Напрямна трубка
9. Шнек
10. Ніж
11. Сито (дрібне)
12. Сито (середнє)
13. Мультиварка
14. Фіксатор
15. Насадка для ковбаси
16. Насадка для кеббе
ВСТУП
Цей прилад оснащено термостатом. Він
автоматично відключає електроживлення при
перегріванні приладу.
Якщо прилад раптово припиняє працювати:
1. Вийміть штепсельну вилку шнура
живлення з розетки.
2. Натисніть кнопку вмикача і вимкніть
прилад.
3. Залиште прилад на 60 хвилин, щоб охолов.
4. Вставте штепсельну вилку шнура
живлення в розетку.
5. Знову увімкніть прилад.
Якщо термостат спрацьовує надто часто,
звернітся до дилера або у спеціалізовану
майстерню.
УВАГА: Щоб уникнути небезпеки, не
підключайте прилад до реле часу.
ВАЖЛИВО
1. Перед використанням приладу уважно
прочитайте інструкцію і перегляньте
ілюстрації.
2. Зберігайте інструкцію для подальшого
вжитку.
3. Перед підключенням приладу перевірте,
чи напруга, вказана на ньому, відповідає
напрузі в мережі.
4. Не використовуйте приналежності
чи деталі інших виробників. При
використанні таких деталей гарантія буде
нечинною.
5. Не використовуйте прилад при
пошкодженні шнура живлення,
штепсельної вилки чи інших деталей.
6. Якщо шнур живлення пошкоджено,
його замінну повинен проводити лише
кваліфікований майстер спеціалізованого
центру обслуговування.
7. Перед першим використанням
приладу ретельно очистіть деталі, які
торкатимуться до продуктів.
8. Після користування приладом негайно
вийміть штепсельну вилку з розетки.
9. Коли прилад працює, не намагайтеся
проштовхнути продукти в трубку пальцем
чи іншим предметом. Використовуйте для
цього лише подавач.
10. Не дозволяйте дітям гратися з приладом.
11. Не залишайте працюючий прилад без
нагляду.
12. Перед тим, як встановити чи демонтувати
приналежності, вимикайте прилад.
13. Перед зніманням деталей приладу
дочекайтеся, поки рухомі частини
припинять обертатися.
14. Не занурюйте мотор у воду чи іншу
рідину і не промивайте під краном. Для
чистки відділення двигуна скористайтеся
вологою ганчіркою.
15. Не пробуйте молоти кістки, горіхи та інші
тверді продукти.
16. Не встромляйте пальці в різальний відсік.
Користуйтеся подавачем.
17. Не допускайте безперервної роботи
приладу понад 3 хвилини при 600Вт.
18. До приналежностей повинні додаватись
інструкції з їх безпечного використання.
19. Вони повинні попереджати про можливі
травми внаслідок неправильного
використання.
20. Цей прилад може використовуватися
дітьми віком від 8 років та старше
за умови забезпечення нагляду за
ними або надання інструкцій щодо
безпечного використання цього приладу
та ознайомлення їх з небезпеками,
пов‘язаними з цим приладом. До
операцій з очищення та обслуговування
приладу дітей можна допускати лише за
умови, що вони досягли 8-річного віку
й перебувають під наглядом дорослих.
Зберігайте сам пристрій і кабель до нього
в місці, недоступному для дітей віком до 8
років.
21. Цей прилад призначений для
використання в домашніх господарствах
та інших подібних умовах, наприклад:
– у зонах для приготування їжі в
магазинах, офісах та інших робочих
приміщеннях;
– на фермах;
– клієнтами у готелях, мотелях та інших
середовищах житлового типу;
– у готелях, які пропонують сніданки своїм
гостям.
22. Якщо прилад забито м‘ясом, натисніть
кнопку реверсу (REV). Затор із
незмеленого м‘яса, що залишилося в
різальному відсіку, буде усенено, тож
прилад повернеться у робочий стан.
ІНСТРУКЦІЯ З ВИКОРИСТАННЯ
СКЛАДАННЯ
1. Натисніть кнопку кріплення; візьміть
напрямну трубку і вставте в отвір, при
чому трубка має бути нахилена в напрямку
стрілки, див. (рис. 1), тоді поверніть трубку
проти годинникової стрілки, щоб надійно
закріпити її. (рис. 2)
2. Вставте шнек у напрямну трубку, довгим
кігцем спереду, і поверніть злегка гвинт
так, щоб він розмістився у відділенні
двигуна (рис. 3).
3. Надягніть ніж на вал шнека лезом
допереду, як на (рис. 4). Якщо ніж вставити
неправильно, м‘ясо молотися не буде.
4. Вставте потрібне сито біля ножа,
вставивши виступ у паз (рис. 5).
5. Притримуючи одним пальцем по центру
сита, другою рукою туго закрутіть фіксатор
(рис. 6). Не затягуйте надто сильно.
6. Вставте тарілку на напрямну трубку і
зафіксуйте її.
7. Поставте прилад на тверду основу.
8. Не закривайте вентиляційні отвори на дні
та боках моторного відділення.
М‘ЯСОРУБКА
1. Вставте вал шнека у різальний відсік
пластиковим кінцем допереду.
Надягніть ніж на вал шнека. (Ріжучі
поверхні повинні бути спереду). Надягніть
на вал середнє або велике сито (залежно
від спообу обробки). (Паз диска має
суміщатися з виступами на трубці.)
Поверніть фіксатор за стрілкою
на різальному відсіку, поки не затягнеться
туго.
2. Приєднайте різальний відсік до відділення
двигуна.
3. Розмістіть тарілку на верхній стороні
різального відсіку.
4. Тепер прилад готовий для мелення м‘яса.
Наріжте м‘ясо смужками довжиною 10см та
товщиною 2см. Якнайкраще видаліть кістки,
хрящі і сухожилля. (Не меліть морожене
м‘ясо!)
Покладіть м‘ясо на тарілку. Легенько
натискаючи подавачем, введіть м‘ясо
у різальний відсік. (Для приготування
татарського біфштекса пропустіть мясо через
середнє сито двічі.)
ПРИГОТУВАННЯ КЕББЕ
1. Вставте вал шнека у різальний відсік
пластиковим кінцем допереду (рис. 8).
Вставте конус у різальний відсік.
Вставте фасонну насадку на різальний
відсік і затягніть фіксатор на різальному
відсіку. (рис. 9)
2. Приєднайте різальний відсік до відділення
двигуна.
3. Розмістіть тарілку на верхній стороні
різального відсіку.
4. Тепер прилад готовий для виготовлення
кеббе. (рис. 10)
Пропустіть приготовану суміш для кеббе
через насадку для формування кеббе на
м‘ясорубці. Поріжте отримані трубочки
на потрібну довжину і використовуйте за
потребою.
Кеббе - це традиційна близькосхідна страва
в основному з баранини і пшеничної крупи.
Вони перемелюються і утворюють пасту,
яку пропускають через виготовлювач кеббе
і трубочки нарізають. Трубочки можна
заповнити м‘ясним фаршем, кінці стиснути
докупи і прожарити.
ВИГОТОВЛЕННЯ КОВБАСИ
1. Перемеліть м‘ясо
Вставте вал шнека у різальний відсік
пластиковим кінцем спереду. (рис. 11)
Вставте сепаратор у різальний відсік.
Вставте ковбасний ріжок у різальний відсік
і затягніть фіксатор. (Пази сепараторів
повинні суміщатися з виступами на
трубці.)
2. Приєднайте різальний відсік до відділення
двигуна.
УКРАЇНСЬКА
26 27

3. Розмістіть тарілку на верхній стороні
різального відсіку.
4. Тепер прилад готовий для виготовлення
ковбас.
Покладіть складові частини на тарілку.
Легенько натискаючи подавачем введіть м‘ясо
у різальний відсік.
Покладіть кишки в ледь теплу воду на 10
хвилин. Натягніть кишку на ковбасний ріжок.
Подайте фарш з приправами у різальний
відсік. Якщо кишка прилипне до ріжка, змочіть
її водою.
УКРАЇНСЬКА
СОКОВИТИСКАЧ ДЛЯ ТОМАТІВ
Збирання (рис. B)
1. Вставте пластикове кільце у рукав. (рис.
B1)
2. Помістіть конусну сітку у рукав після
пластикового кільця. (рис. B2)
3. Надягніть фіксатор на рукав до упора.
(рис. B3)
4. Помістіть шнек в трубку довгим кінцем
вперед та злегка повертайте його, доки він
не зайде у відділення двигура. (рис. B4)
5. Вставте гвинт по центру на на шнек. (рис.
B5)
6. Надягніть увесь рукав із фіксатором
на гвинт, а тоді затягніть туго фіксатор,
повертаючи його за годинниковою
стрілкою. (рис. B6)
7. Помістіть пластиковий лоток для соку на
рукав у належне положення. (рис. B7)
8. Вставте пластиковий гвинтик в отвір
рукава та належно затягніть його,
повертаючи за годинниковою стрілкою.
Після цього помістіть пластикову кришку
на рукав. (рис. B8)
Тепер соковитискач для томатів готовий для
використання.
ЧИЩЕННЯ ПРИЛАДУ
М‘ясо, що залишилося у різальному відсіку,
можна видалити, перемоловши скибку хліба.
1. Перед чищенням приладу вимкніть його і
вийміть штепсельну вилку з розетки.
(рис. 12)
2. Натисніть кнопку кріплення і поверніть
різальний відсік у напрямку стрілки.
Вийміть подавач і тарілку. (рис. 13)
3. Відкрутіть кільце фіксатора і вийміть всі
деталі з різального відсіку. Не мийте деталі
у посудомийній машині!
4. Промийте всі деталі, що стикалися
з м‘ясом, гарячою мильною водою.
Почистіть їх одразу ж після використання.
5. Сполосніть чистою гарячою водою і
одразу ж витріть.
6. Рекомендується змащувати ніж і диски
рослинною олією.
ТЕХНІЧНІ ХАРАКТЕРИСТИКИ
220-240В • 50-60Гц • Номінальна потужність
300Вт/Максимальна потужність 1000Вт
ТЕРМІН ПРИДАТНОСТІ: НЕ ОБМЕЖЕНИЙ.
Безпечна утилізація
Ви можете допомогти захистити
довкілля! Дотримуйтесь місцевих
правил утилізації: віднесіть непрацююче
електричне обладнання у відповідний центр
із його утилізації.
HACHOIR A VIANDE
MODE D‘EMPLOI
Lisez attentivement le mode d‘emploi et bien le
conservez
DESCRIPTION (g. A)
1. Bloc-moteur
2. ON/0/R (Marche/Arrêt/Marche arrière)
3. Hachoir à tomates
4. Bouton de xation
5. Tube de remplissage
6. Poussoir d‘aliments
7. Plateau de remplissage
8. Tête du tube
9. Vis sans n
10. Couteaux
11. Disque à trous ns
12. Disque à trous moyens
13. Râpe multi
14. Bague de fermeture
15. Embout à saucisses
16. Accessoires pour Kebbé
INTRODUCTION
Cet appareil est équipé d‘un système de
thermostat. Ce système va automatiquement
couper de l‘appareil en cas de surchaue.
Si votre appareil s‘arrête soudainement :
1. Débranchez la prise du secteur.
2. Appuyez sur l’interrupteur l‘alimentation
pour éteindre l‘appareil.
3. Laisser l‘appareil refroidir pendant 60
minutes.
4. Branchez la prise au secteur.
5. Remettez l‘appareil en marche.
Contactez votre revendeur ou un centre de
service agréé si le système de thermostat est
activé trop souvent.
MISE EN GARDE : Pour éviter des situations
dangereuses, il ne faut jamais contrôler cet
appareil par un minuteur.
IMPORTANT
1. Veuillez lire ces instructions attentivement
et regardez les illustrations avant d‘utiliser
l‘appareil.
2. Conservez ces instructions pour toute
référence ultérieure.
3. Avant de brancher l‘appareil, vériez si le
voltage indiqué sur l‘appareil correspond au
voltage du secteur.
4. N‘utilisez jamais d‘accessoires ou pièces
d‘autres fabricants. Votre garantie ne sera
plus valide si de tels accessoires ou pièces
viennent à être utilisées.
5. N‘utilisez pas l‘appareil si le cordon
d‘alimentation ou une autre pièce de
l‘appareil est endommagée.
6. Pour éviter tout danger, faire remplacer le
cordon d‘alimentation endommagé par le
fabricant, un centre de service agréé ou une
personne qualiée.
7. Nettoyez soigneusement les parties qui
entrent en contact avec les aliments avant
d‘utiliser l‘appareil pour la première fois.
8. Toujours débrancher l‘appareil aussitôt après
utilisation.
9. N‘utilisez jamais le doigt ou un autre objet
pour pousser les ingrédients dans le tube
d‘alimentation lorsque l‘appareil est en
marche. Utilisez toujours le poussoir.
10. Gardez l‘appareil hors de la portée des
enfants.
11. Ne jamais laisser l‘appareil fonctionner sans
surveillance.
12. Eteignez l‘appareil avant de retirer ou
d‘installer tout accessoire.
13. Attendez que les pièces mobiles soient
arrêtées avant de retirer des pièces de
l‘appareil.
14. Ne plongez jamais le bloc moteur dans
l‘eau ou tout autre liquide et ne le rincez
pas sous le robinet. Nettoyez le bloc moteur
uniquement avec un chion humide.
15. N‘essayez pas de broyer des os, des noix ou
d‘autres objets durs.
16. Ne mettez jamais les doigts dans le
logement du couteau. Utilisez toujours le
poussoir.
17. Ne faites jamais fonctionner l‘appareil de
façon continue pendant plus de 3 minutes à
600W.
18. Les accessoires doivent comprendre des
instructions pour leur utilisation en toute
sécurité.
19. Ils avertissent sur les blessures potentielles
suite à une mauvaise utilisation.
20. Cet appareil peut être manipulé par des
enfants de 8 ans ou plus s’ils bénécient
d’une surveillance ou ont reçu des
instructions quant à l’utilisation de l’appareil
en toute sécurité, et s’ils en comprennent
bien les dangers potentiels. Seuls des
enfants âgés d’au moins 8 ans et bénéciant
de l’assistance d’un adulte peuvent assurer
le nettoyage et l’entretien de l’appareil.
Conservez l’appareil et son cordon
FRANÇAIS
28 29

d’alimentation hors de portée des enfants
âgés de moins de 8 ans.
21. Cet appareil est destiné à l’usage
domestique et à des applications similaires,
par exemple :
– les espaces cuisine pour le personnel dans
les boutiques, les bureaux et tous autres
environnements de travail ;
– les maisons de fermes ;
– les clients d’hôtels, de motels et d’autres
environnements de type résidentiel ;
– les chambres d’hôtes et les pensions
FRANÇAIS
familiales.
22. Si l‘appareil se coince, appuyez sur le
bouton d‘inversion (REV). La viande
coincée dans le logement du couteau sera
reculée, ainsi l‘appareil peut reprendre son
fonctionnement normal.
MODE D’EMPLOI
ASSEMBLAGE
1. Appuyez sur le bouton de xation, insérez la
tête dans l‘entrée tout en faisant attention
à cette dernière qui doit être inclinée selon
la èche indiquée en haut, voir (g. 1), puis
faites tourner la tête dans le sens antihoraire
de manière qu‘elle soit bien xée. (g. 2)
2. Placez la vis sans n dans la tête, l‘extrémité
longue en premier, et tournez-la légèrement
jusqu‘à ce quelle soit xée dans le bloc
moteur.
3. Placez le couteau dans l‘arbre de la vis sans
n, les lames face à l‘avant comme illustré
(g. 4). Si le couteau n‘est pas bien mis en
place, la viande ne sera pas hachée.
4. Posez le disque souhaité sur le couteau,
les tenons d‘arrêt doivent être introduits
exactement dans les encoches prévues (g.
5).
5. Appuyez sur le centre de la plaque de coupe
avec un doigt puis vissez la bague de xation
fermement avec une autre main (g. 6). Ne
serrez pas trop.
6. Placez le plateau de remplissage sur le
boîtier du hachoir.
7. Placer l‘appareil sur une surface solide.
8. Les fentes d‘aération situées en bas et sur
les côtés du bloc moteur ne doivent pas être
obstruées.
HACHOIR
1. Insérez la vis sans n dans le logement du
couteau, l‘extrémité en plastique d‘abord.
Placez l‘unité de coupe sur l‘arbre à vis
sans n. (Les arêtes de coupe doit être vers
l‘avant).
Fixez le disque à trous moyens ou le
disque broyage de façon grossière (selon
la consistance que vous préférez) à la vis
sans n. (Assurez-vous que les encoches
du disque de broyage sont alignées aux
rainures de la tête du hachoir.) Tournez la
bague de serrage dans le sens de la èche
du logement du couteau jusqu‘à ce qu‘elle
soit correctement xée.
2. Fixez le logement du couteau au bloc
moteur.
3. Placez le plateau sur la partie supérieure du
logement de couteau.
4. Maintenant l‘appareil est prêt pour hacher.
Couper la viande en bandes de 10cm de long et
2cm d‘épaisseur. Enlever autant que possible les
os, de morceaux de cartilage et les tendons. (Ne
jamais utiliser de la viande congelée !)
Mettez la viande dans le plateau. Utilisez le
poussoir pour pousser doucement la viande
dans le logement du couteau. (Pour le steak
tartare, hachez deux fois la viande avec le disque
à trous moyens.)
PRÉPARATION DE KEBBÉ
1. Insérez la vis sans n dans le logement du
couteau, l‘extrémité en plastique d‘abord.
(g. 8)
Placez le cône dans le logement du couteau.
Placez ce dernier dans le logement du
couteau et vissez la bague sur logement du
couteau. (g. 9)
2. Fixez le logement du couteau au bloc
moteur.
3. Placez le plateau sur la partie supérieure du
logement de couteau.
4. Maintenant l‘appareil est prêt à faire du
kebbé. (g. 10)
Faites passer le mélange de kebbé préparé à
travers la machine à kebbé. Coupez le cylindre
creux continu à des longueurs de votre choix et
utilisez comme vous le souhaitez.
Le Kebbé est un plat traditionnel du MoyenOrient fait principalement de viande d’agneau
et de boulgour qui sont hachées ensemble
pour former une pâte, le mélange est extrudé
à travers la machine à kebbé et coupé en
tronçons. Les tubes peuvent être farcis avec un
mélange de viandes hachées, les extrémités
serrées ensemble, puis frits.
PRÉPARATION DE SAUCISSES
1. Hachez la viande.
Insérez la vis sans n dans le logement du
couteau, l‘extrémité en plastique d‘abord.
(g. 11)
Placez le séparateur dans le logement du
couteau.
Placez l‘entonnoir à saucisses dans le
logement du couteau et vissez la bague sur
logement du couteau. (Assurez-vous que les
encoches du séparateur sont alignées aux
rainures de la tête du hachoir.)
2. Fixez le logement du couteau au bloc
moteur.
3. Placez le plateau sur la partie supérieure du
logement de couteau.
4. Maintenant l‘appareil est prêt à faire des
saucisses.
Mettez les ingrédients dans le plateau. Utilisez
le poussoir pour pousser doucement la viande
dans le logement du couteau.
Mettez la peau pour saucisses dans l‘eau tiède
pendant 10 minutes. Faites ensuite glisser la
peau humide dans l‘entonnoir à saucisses.
Poussez la viande hachée (assaisonnée) dans le
logement du couteau. Si la peau reste collée sur
l‘entonnoir à saucisses, mouillez-la avec de l‘eau.
PRESSE-TOMATES
ASSEMBLAGE (g. B)
1. Placez la vis de la bague de xation en
plastique dans le manchon. (g. B1)
2. Placez le tamis métallique dans la manche
à côté de la vis de la bague de xation en
plastique. (g. B2)
3. Insérez jusqu‘au fond la bague de xation à
travers le manchon. (g. B3)
4. Placez la vis sans n dans la tête, l‘extrémité
longue en premier, et la tourner légèrement
jusqu‘à ce quelle soit xée dans le bloc
moteur. (g. B4)
5. Insérez l‘arbre de la vis sans n dans l‘axe
central de la vis. (g. B5)
6. Mettez toute la manche avec la bague de
xation dans la vis, puis tournez la bague de
xation dans le sens horaire de sorte qu‘elle
soit solidement attachée. (g. B6)
7. Placez le plateau de jus en plastique dans
le manchon et le régler sur une position
appropriée. (g. B7)
8. Insérer la vis en plastique dans le trou du
manchon, puis tournez-la dans le sens
horaire jusqu‘à ce qu‘elle soit correctement
xée. Placez ensuite le couvercle en
plastique au dessus du manchon. (g. B8)
Maintenant l‘appareil est prêt pour extraire le
jus.
NETTOYAGE DE L‘APPAREIL
La viande qui reste dans le logement du couteau
peut être enlevée de l‘intérieur de l‘appareil en
passant d‘une tranche de pain dans le logement
du couteau.
1. Avant de nettoyer l‘appareil, mettez-le hors
tension et retirez la prise secteur. (g. 12)
2. Appuyez sur le bouton de xation et tournez
complètement le logement du couteau dans
le sens de la èche. Retirez le poussoir et le
plateau. (g. 13)
3. Dévissez la bague de serrage et retirez
toutes les pièces du logement du couteau.
Ne lavez pas les pièces dans le lave-vaisselle !
4. Lavez toutes les pièces qui sont entrés en
contact avec la viande dans l‘eau chaude
savonneuse. Nettoyez-les immédiatement
après usage.
5. Rincez à l‘eau chaude et les sécher
immédiatement.
6. Nous vous conseillons de lubrier l‘unité de
coupe et les disques de hachage avec un
peu d‘huile végétale.
DONNÉES TECHNIQUES :
220-240V • 50-60Hz • 300W Nominal/
1000W Maximal
Mise au rebut dans le respect de
l‘environnement
Vous pouvez contribuer à protéger
l‘environnement ! Il faut respecter les
règlementations locales. La mise en rebut de
votre appareil électrique usagé doit se faire dans
un centre approprié de traitement des déchets.
FRANÇAIS
30 31

МЯСОРУБКА
ПРЕДНАЗНАЧЕНИЕ
Для измельчения продуктов.
Не для коммерческого и промышленного
использования.
ИНСТРУКЦИЯ
Прочитайте внимательно и сохраните на
будущее
ОПИСАНИЕ (рис. A)
РУССКИЙ
1. Корпус
2. Включатель и выключатель и реверс
3. Томатный измельчитель
4. Защелка
5. Нажим
6. Толкатель
7. Наклонный лист
8. Подающий патрубок
9. Шнек
10. Ножи
11. Сетка (тонкая)
12. Сетка (средняя)
13. Мульти терка
14. Фиксирующая гайка
15. Колбаска
16. Кеббе
ВВЕДЕНИЕ
Это устройство оборудовано
термостатирующей системой. Эта система
автоматически отключается при перегреве
системы питания.
Если ваше устройство вдруг перестает
работать:
1. Выключите вилку из розетки.
2. Кнопкой на приборе выключите его.
3. Дайте возможность устройству остыть в
течение 60 минут.
4. Вставьте вилку в розетку.
5. Включите снова прибор.
Если термостатирующая система
активируется слишком часто, обратитесь
к вашему дилеру или авторизованному
сервисному центру.
ОСТОРОЖНО: С целью избежать опасные
ситуации, это устройство никогда не должно
быть подключено к таймеру.
ВНИМАНИЕ
1. Внимательно прочитайте инструкцию и
просмотрите иллюстрации перед началом
использования устройства.
2. Сохраните инструкцию для будущего
использования.
3. Перед включением прибора
удостоверьтесь, что напряжение,
указанное на приборе соответствует
вашему местному напряжению.
4. Никогда не пользуйтесь деталями другого
изготовителя. При использовании таких
деталей вы лишаетесь гарантии.
5. Не пользуйтесь устройством, если
шнур питания, вилка или другие части
повреждены.
6. Если шнур питания поврежден, он должен
быть всегда заменен изготовителем, или в
авторизованном сервисном центре, чтобы
избежать несчастных случаев.
7. Перед первым использованием тщательно
очистите части, которые могут войти в
прикосновение с пищевыми продуктами.
8. После использования отключите вилку от
розетки.
9. Для подачи ингредиентов в устройство
не пользуйтесь пальцем или иным
предметом, кроме толкателя.
10. Не позволяйте детям пользоваться
устройством.
11. Не оставляйте устройство работать без
присмотра.
12. Перед снятием или установкой
принадлежности устройство нужно
выключить.
13. После выключения дождитесь остановки
движущихся частей перед тем, как
снимать части.
14. Никогда не погружайте двигатель в
воду или другую жидкость, никогда не
споласкивайте его с постукиваниями.
Для чистки мотора используйте только
влажную тряпочку.
15. Не пытайтесь притереть болты, гайки или
другие металлические детали.
16. Не открывайте кожух устройства. Всегда
пользуйтесь толкателем.
17. Никогда не используйте устройство более
чем на 3 минуты при мощности 600Вт.
18. Принадлежности должны иметь указания
по их безопасному использованию.
19. Эти указания должны предупредить о
возможных последствиях неправильного
использования.
20. Данное устройство может использоваться
детьми от 8 лет и старше, если за ними
осуществляется наблюдение или они
проинструктированы на предмет
безопасного использования устройства
и уяснили связанные с его эксплуатацией
риски. Очистка и обслуживание не
могут выполняться детьми младше 8 лет
и без соответствующего наблюдения.
Держите устройство и его шнур питания
в недосягаемом для детей младше 8 лет
месте.
21. Данное устройство предназначено для
использования в бытовых и схожих
условиях:
– на кухне персонала магазинов, офисов и
других рабочих сред;
– фермах;
– отелях, мотелях и других жилых
помещениях;
– помещениях, предоставляющих ночлег и
завтрак.
22. Если устройство заблокируется, нажмите
кнопку (REV). Оставшееся мясо будет
размолото, и устройство обновляет свое
состояние.
ИНСТРУКЦИЯ ПО ИСПОЛЬЗОВАНИЮ
СБОРКА
1. Нажмите защелку, держа за головку,
вставьте подающий патрубок во входное
отверстие, обращая внимание, на
поворот по стрелке наверху (рис. 1),
затем поверните головку против часовой
стрелки до полной затяжки. (рис. 2)
2. Установите шнек и повращайте его для
правильной установки до совпадения
(рис. 3).
3. Установите ножи на вал шнека лицом
вперед как показано на (рис. 4). Если ножи
будут установлены неправильно – мясо не
будет молоться.
4. Установите желаемую сетку пазом в
выступ (рис. 5).
5. Поддерживая одной рукой и пальцем
центр, навинтите другой рукой
фиксирующую гайку (рис. 6). Не слишком
затягивайте.
6. Установите наклонный лист и
зафиксируйте его положение.
7. Закрепите устройство на твердой
поверхности.
8. Вентиляционные отверстия внизу и по
бокам корпуса мотора должны быть
свободны.
КУТТЕР
1. Плотно вставьте шнек.
(Режущие кромки должны быть обращены
вперед) Установите среднюю или крупную
сетку (в зависимости от консистенции,
которую вы предпочитаете) на вал шнека.
(Обеспечьте совпадение выемки сетки с
выступом головки мясорубки) Заверните
гайку до отказа.
2. Присоедините собранную машинку к
мотору.
3. Установите лоток сверху корпуса
мясорубки.
4. Теперь устройство готово для работы.
Мясо режется кусочками 10см длиной и 2см
толщиной. Удалите, насколько возможно,
кости, хрящи и сухожилия. (Никогда не
пользуйтесь замороженным мясом!)
Положите мясо на лоток. Толкателем
легонько вталкивайте мясо в устройство.
(Для татарского стейка прогоните мясо через
среднюю сетку дважды.)
ДЕЛАЯ КЕББЕ
1. Вставьте шнек плотно. (рис. 8)
Установите конус.
Установите форматор и завинтите гайку.
(рис. 9)
2. Присоедините куттер к моторному отсеку.
3. Установите сверху лоток.
4. Устройство готово для изготовления
кеббе. (рис. 10)
Подавайте подготовленную смесь кеббе
через свою насадку. Макароны отрезайте по
желанию клиента.
Кеббе является традиционным блюдом
Среднего Востока, приготавливается из
мяса и пшена нескольких сортов, которые
смешиваются, чтобы изготовить тесто и
прокрутить его через kebbe устройство
короткими кусочками. Затем трубочки
набиваются фаршем, концы сводятся и
защемляются и продукт жарится во фритюре.
ДЕЛАЯ КОЛБАСКИ
1. Перемолоть мясо
Вставить плотно шнек. (рис. 11)
Вставить сетку.
Вставить колбасную насадку и завинтить
гайку. (Удостоверьтесь, что выемка сетки
совпала с выступом горла мясорубки.)
2. Присоедините мясорубку к моторному
блоку.
3. Установите сверху лоток.
4. Устройство готово к работе.
РУССКИЙ
32 33

Уложите ингредиенты на лоток. При помощи
толкателя осторожно подавайте мясо в
подаватель.
Колбасную шкурку подержите в теплой воде
10 минут. Затем мокрую шкурку натяните на
насадку. Затем заправляйте (приправленное)
молотое мясо в куттер. Если шкурка липнет к
насадке – слегка смочите ее водой.
ТОМАТНЫЙ СОКОВЫЖИМАТЕЛЬ
СБОРКА (рис. B)
РУССКИЙ
1. Установите пластиковое винтовое
фиксирующее кольцо в рукав. (рис. B1)
2. Сразу затем установите ситечко. (рис. B2)
3. Дожмите пластиковое кольцо до конца.
(рис. B3)
4. Вставьте до упора шнек, и поверните его
до впадения в пазы выжималки. (рис. B4)
5. Вставьте шнек в центральную ось (рис. B5)
6. Собранный рукав с фиксирующим
кольцом вставьте, а потом поверните
фиксирующее кольцо по часовой стрелке
до конца. (рис. B6)
7. Наденьте пластиковый мешок на рукав.
(рис. B7)
8. Ввинтите пластиковые винты в отверстия
рукава, затем поверните его по часовой
стрелке до предела. Затем покройте рукав
пластмассовой крышкой. (рис. B8)
Сейчас устройство готово работать.
КАК ОЧИСТИТЬ ВАШЕ УСТРОЙСТВО
остатки мяса в куттере можно очистить, подав
в него кусок хлеба.
1. Перед очисткой выключите устройство и
отключите его от сети. (рис. 12)
2. Нажмите защелку и поверните корпус
куттера по стрелке. Снимите толкатель и
лоток (рис. 13)
3. Открутите гайку и выньте все части. Не
мойте части в посудомойке!
4. Все части, бывшие в контакте с мясом
промыть в горячей мыльной воде.
Почистить немедленно после этого.
5. Сполоснуть горячей водой и немедленно
обсушить.
6. Рекомендуем смазать куттер и сетку
растительным маслом.
ХАРАКТЕРИСТИКИ:
220-240 В • 50-60 Гц • 300 Вт
номинальная/1000 Вт максимальная
Хранение.
Рекомендуется хранить в закрытом сухом
помещении при температуре окружающего
воздуха не выше плюс 40ºС с относительной
влажностью не выше 70% и отсутствии в
окружающей среде пыли, кислотных и других
паров.
Транспортировка.
К данному прибору специальные правила
перевозки не применяются. При перевозке
прибора используйте оригинальную
заводскую упаковку. При перевозке
следует избегать падений, ударов и иных
механических воздействий на прибор, а также
прямого воздействия атмосферных осадков и
агрессивных сред.
Производитель сохраняет за собой
право изменять дизайн и технические
характеристики устройства без
предварительного уведомления.
Срок службы прибора – 3 года
Данное изделие соответствует всем
требуемым европейским и российским
стандартам безопасности и гигиены.
Изготовитель:
Компания Тиметрон Австрия (Timetron
GesmbH)
Адрес:
Раймундгассе 1/8, 1020, Вена, Австрия
(Raimundgasse 1/8, 1020 Vienna, Austria)
Сделано в Китае
Дата производства указана на упаковке
Импортер:
ООО «Грантэл»
143912, Московская область, г. Балашиха,
Западная коммунальная зона, ул. Шоссе
Энтузиастов, вл.1а, тел. +7 (495) 297 50 20
В случае неисправности изделия необходимо
обратиться в ближайший авторизованный
сервисный центр.
За информацией о ближайшем сервисном
центре обращайтесь к продавцу.
Экологическая утилизация
Вы можете помочь защитить
окружающую среду! Помните о
соблюдении местных правил: Отправьте
неработающее электрооборудование в
соответствующие центры утилизации.
A
13
3
N
34
35
РУССКИЙ
i
 Loading...