


PP-9645
Aer PPC
UUsseerr MMaannuuaall
ver. 0.1

PP-9645 Aer PPC
1
Copyright Notice
This document is copyrighted,
to make improvements of the product described in this manual at any time without notice.
No part of this manual may be reproduced, copied, translated, or transmitted in any form or by any
means without the prior written permission from Firich Enterprise Co., Ltd. Information provided in this
manual is intended to be accurate and reliable. However, Firich Enterprise Co., Ltd assumes no
responsibility for its use, nor for any infringements upon the rights of third parties, which may result from
its use.
The material in this document is for product information only and is subject to change without notice.
While reasonable efforts have been made in the preparation of this document to assure its accuracy,
Firich Enterprise Co., Ltd, assumes no liabilities resulting from errors or omissions in this document, or
from the use of the information contained herein.
© 2014. All rights are reserved. Firich Enterprises Co., Ltd reserves the right
Revision Record
Date Version Description Note
2015/08/15 0.1 Draft Ben Hu

PP-9645 Aer PPC
2
Safety Precaution
Please observe the following precautions to ensure safe use of equipment.
1. Disconnect the equipment from AC outlet before cleaning.
Use only moist cloth (with water). Do not use detergent.
2. Power outlet must be easily accessible and near the equipment.
3. Keep the equipment away from humid and dusty environment.
4. Place the equipment on a stable surface during installation and operation.
5. Do not place any load on the power cord.
6. All cautions and warnings on the equipment should be noted.
7. When the equipment is not in use, disconnect it from the power source to avoid damage by
transient over-voltage.
8. Liquid into the equipment may cause fire or electrical shock.
9. Only qualified service personnel should be allowed to open the equipment.
10. If any of the following situations arises, ask service personnel to check the equipment:
A. Power cord / plug is damaged
B. Liquid penetrates into the equipment
C. The equipment does not function properly and/or cannot work according to the User Manual
D. The equipment has been dropped
E. The equipment shows signs of damage
11. Temperature below -20° C (-4°F) or above 60° C (140° F) may damage the equipment

PP-9645 Aer PPC
3
TTaabbllee ooff CCoonntteenntt
CChhaapptteerr 11
Introduction 5
PP-9645 (Aer PPC) ................................................................................................................................. 5
Overview ............................................................................................................................................... 6
Dimension ............................................................................................................................................. 9
Mounting ............................................................................................................................................... 9
I/O Connectivity .................................................................................................................................. 10
Packing List .......................................................................................................................................... 11
CChhaapptteerr 22
Hardware Installation and Upgrade 12
2.5” SATA Storage (HDD / SSD) ........................................................................................................... 12
MSR / iButton / RFID / FingerPrint (ID Device) ................................................................................... 14
Power Setting (COM / Cash Drawer Port) ........................................................................................... 15
Cable Cover and Cabling ..................................................................................................................... 17
LED Backlight Brightness ..................................................................................................................... 18
2nd Monitor (15” Pole Type) ................................................................................................................ 20
Cash Drawer ........................................................................................................................................ 21
112
5
5
2
eerr 5
5
CChhaapptteerr 33
Software Installation and Setup 22
EETI TouchKit for Windows system .................................................................................................... 32
EETI TouchKit Control Panel ................................................................................................................ 35
ELO TouchKit Tools Installation .......................................................................................................... 36
ELO TouchKit Installation for Windows system .................................................................................. 36
ELO TouchKit Control Panel update .................................................................................................... 41
ELO TouchKit Control Panel version T15 Test ..................................................................................... 44
Wireless LAN Driver for Windows system. ......................................................................................... 45
CChhaapptteerr 44
Specifications 46
CChhaappt
t
Troubleshooting 47
Touch Panel does not work ................................................................................................................. 47
OSD Buttons do not work.................................................................................................................... 47
222
446
447
2
6
7

PP-9645 Aer PPC
4
HDD / SSD is not detected ................................................................................................................... 47
MSR does not function properly ......................................................................................................... 47
LAN does not function properly .......................................................................................................... 47
COM does not function properly ........................................................................................................ 48
Cash Drawer Port does not function properly .................................................................................... 48

5
PP-9645 (bezel)
PP-9645 (bezel free)
CChhaapptteerr 11
PP-9645 Aer PPC
IInnttrroodduuccttiioonn
PP-9645 (Aer PPC)
PP-9645 is the latest member of Aer PPC series that features a slim all-in-one design with great versatility.
It can be easily configured to meet the demand of different store environments as a desktop, wall-mount
or pole-mount POS system.
PP-9645 is a performance system in die-cast aluminum chassis that withstands harsh environments. It is
equipped with the Intel 4
those are both powerful and energy efficient.
Key Features
• Performance and Powerful
• Slim & Sleek
• Desktop, Wall-Mount or Pole-Mount
• Resistive (bezel & bezel free) and Projected Capacitive Touch (IP65 compliant panel)
• Rich in I/O Connectivity
th
Generation Core Processor i3-4330TE, i5-4570TE and Intel Celeron G1820TE

6
15” Touch Display
HDD Indicator (Orange color)
Integrated Customer
SATA Storage
Speaker
MSR / ID Device
Overview
PP-9645 Aer PPC
Power Switch (OFF / Red ;
ON / Blue)
Display

PP-9645 Aer PPC
7
Lock Button
CPU BOX
Monitor
How to disassembly PP9645 for maintenance
1. Locate the button that is at the bottom of the machine.
2. Push lock button and Slide down the CPU Box

PP-9645 Aer PPC
8
3. Separate the CPU BOX from main system, return CPU BOX to your local service center for
maintenance

PP-9645 Aer PPC
9
D: 250mm
W: 190mm
H: 360mm
W: 366mm
Commento [i1]:
?
Dimension
Mounting
When mounted on a desktop pedestal, PP-9645 can be tilted up and down as indicated below.
嗎
組裝方式需要說明

10
I/O Connectivity
I/O- Default
I/O – Type C
I/O – Type G
I/O – Type K
PP-9645 Aer PPC

PP-9645 Aer PPC
11
5v : Green / 12v : Orange
Option G
Option K
Standard
Optional
I/O Port Connector Type Description
12v DC- in DC-in (4 pin) 12V Power Adapter
12V DC-out DC-out 12V DC Jack 2.5 mm
24v PUSB 2.0 24v USB 24v USB device
Cash Drawer RJ11 12v / 24v Cash Drawer
VGA D-Sub 15 2nd LCD
HDMI HDM Type A Type A HDMI
Ethernet RJ-45 Gigabit LAN
USB USB Type A USB 3.0
USB USB Type A USB 2.0
COM1 RJ45
RI / 5v / 12v (select in BIOS)
Option Type C
12v PUSB 2.0 12v USB 12v USB device
COM 3 RJ45 RI / 5V / 12V (select in BIOS)
COM 2 RJ45 RI / 5V / 12V (select in BIOS)
12v USB 2.0 12v USB 12v USB device
12v USB 2.0 12v USB 12v USB device
12v USB 2.0 12v USB 12v USB device
12v USB 2.0 12v USB 12v USB device
12v USB 2.0 12v USB 12v USB device
COM 2 D-Sub 9 RI / 5V / 12V (select in BIOS)
Packing List
1
PP-9645
2
Power Adapter (150w)
3
AC Power Cord
4
RJ45-DB9 Cable
1
2nd I/O
2
MSR / iButton / RFID / FingerPrint
3
9mm 20x2 VFD / 20x2 LCM / 240x64 LCM
4
5mm 20x2 LCM / 192x32 LCM
5
2nd Monitor

12
SWITCH OFF POWER AND UNPLUG POWER CORD BEFORE
2.5”
CChhaapptteerr 22
PP-9645 Aer PPC
HHaarrddwwaarree IInnssttaallllaattiioonn aanndd UUppggrraaddee
SATA STORAGE IS REMOVED
2.5” SATA Storage (HDD / SSD)
1. Power off and unplug power cord from PP-9645
2. remove SATA storage cover
with a COIN from your pocket
3. fix SATA storage to metal bracket via
4 screws
4. install SATA storage with bracket
5. fix the bracket via 1 x M3 screw
HDD

13
6. Replace SATA storage cover with
hands.
7. Plug in power cord and power on
PP-9645 Aer PPC

PP-9645 Aer PPC
14
MSR / iButton / RFID / FingerPrint (ID Device)
1. remove plastic cover
2. plug in ID device (USB) and
fix it via 1 x M3 screw

PP-9645 Aer PPC
15
Power Setting (COM / Cash Drawer Port)
You may select the power (5v / 12v) of COM and Cash Drawer Port in BIOS
<COM1/2>

16
<COM3/4/5>
PP-9645 Aer PPC
*Make sure the device voltage matches the power setting before connection
17
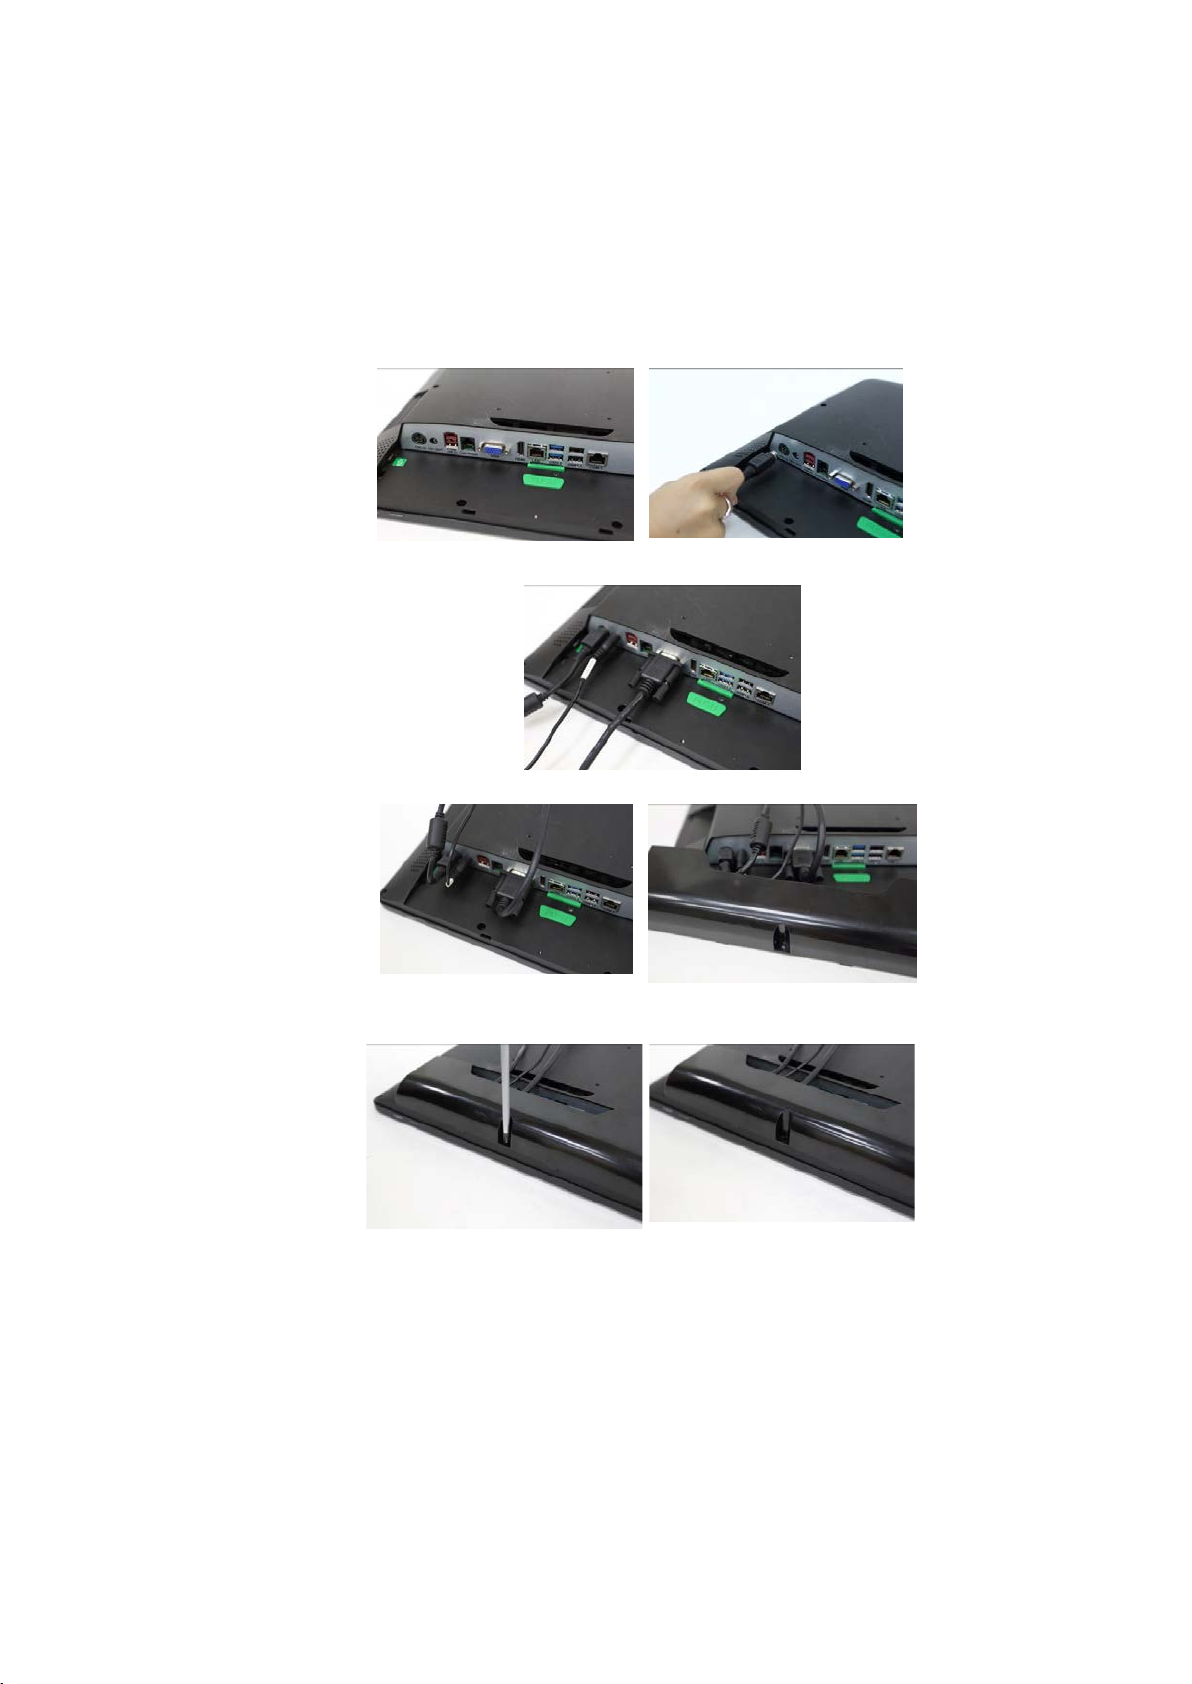
Cable Cover and Cabling
1. Connect the adapter to
12v DC-in
2. Connect all devices
3. Install cable cover
PP-9645 Aer PPC
4. Tighten 1 x M3 screw

PP-9645 Aer PPC
18
LED Backlight Brightness
5 levels of backlight brightness (5, 25, 50, 75, 100%) can be selected in the BIOS

19
exceed the tilt angle as this
Integrated VFD / LCM
1. Remove the back cover
2. Connect customer display
via serial cable and tighten
3 x M3 screw
PP-9645 Aer PPC
AP-2025 AP-2029
3. Customer display (integrated type) is connected to COM4
5mm LCM Module (AP-2025) is 5v
9mm VFD (AP-2029), 9mm LCM 20x2 (AP-2024), LCM 240x64 (AP-240G) are 12v
* Make sure the power setting of COM4 is correct before customer display is connected
4. Do not
may damage internal cable

20
2nd Monitor (15” Pole Type)
PP-9645 Aer PPC
1. Fasten PP-9645 and 2
together with 2 x M5 screw
nd
monitor
2. Connect VGA and 12v DC cables

PP-9645 Aer PPC
21
Cash Drawer
Please make sure the voltage and cable pin assignment of your cash drawer matches the cash drawer port on PP-
9645.
You may find the jumper setting and pin definition in M/B H81 user manual.
Please refer to trouble shooting
To open drawer 1 (the default):
port[openaddr] <= open1
wait(sleep(ms))
port[openaddr] <= close
To open drawer 2:
port[openaddr] <= open2
wait(sleep(ms))
port[openaddr] <= close
To get status:
StatusValue <= port[status] and statusmask
if the cash drawer cannot be detected by PP-9645
The parameters, which are in the cashdrawer.ini
openaddr=A05
status=A05
sleep=200
open1=40
open1=80
close=1
statusmask=10

22
、
CChhaapptteerr 33
PP-9645 Aer PPC
SSooffttwwaarree IInnssttaallllaattiioonn aanndd SSeettuupp
Please download drivers and utilities from www.fecpos.com/en-global/ams/Download
OS Installation Sequence
Install Windows system ( Windows7 , Windows system, Windows 8 , Windows 8.1 , Window10 )
32bit/64bit ,
Please press Del into BIOS when you login the system.
1、 Manu: Advance → SATA configuration→ IDE/AHCI Mode select AHCI Mode
2
Manu: Boot
→Boot Mode →CSM/UEFI Boot select CSM Boot
→Boot Option Priorities
→Option #1 DVD device (Model name, type), Windows system in DVDROM

PP-9645 Aer PPC
23
→Option #2 Hard Driver device (Model name, type)
3、 Press F10 to install OS
Please notice , While the PC is in UEFI mode, the Windows PE version must match the PC architecture. A PC in 64-bit
UEFI firmware mode can only boot 64-bit versions of Windows PE. A PC in 32-bit UEFI firmware mode can only boot
32-bit versions of Windows PE. On PCs that support both UEFI mode and legacy BIOS mode, you may be able to run
32-bit Windows PE on a 64-bit PC by changing BIOS menu settings from “UEFI mode” to “BIOS mode”, assuming the
manufacturer supports legacy BIOS mode.
If you need more information about the UFEI Mode , you can check following website :
https://msdn.microsoft.com/en-au/library/hh824898.aspx

PP-9645 Aer PPC
24
Device Installation Sequence
1. Chipset Driver
2. ME Driver
3. VGA Driver
4. Audio Driver
5. LAN Driver
6. USB 3.0 Driver
7. Touch Tools (Touch Utility)
Intel H81 Chipset Utilities for Windows system
1. Download drivers from www.fecpos.com/en-global/ams/Download
2. Run Setup.exe
3. restart PP-9645 to complete installation

PP-9645 Aer PPC
25
Intel VGA Driver for Windows system
1. Download drivers from www.fecpos.com/en-global/ams/Download
Win32(32bit) Win64(64bit)
2. Run Steup.exe
3. Restart PP-9645 to complete installation

PP-9645 Aer PPC
26
ME Update (Hotfix) for Windows system
1. Download drivers from www.fecpos.com/en-global/ams/Download
32 bit 64bit
2. Run kmdf1.11-win-6.1-x86/64.msu
3. Restart PP-9645 to complete installation
PP-9645 Aer PPC
27
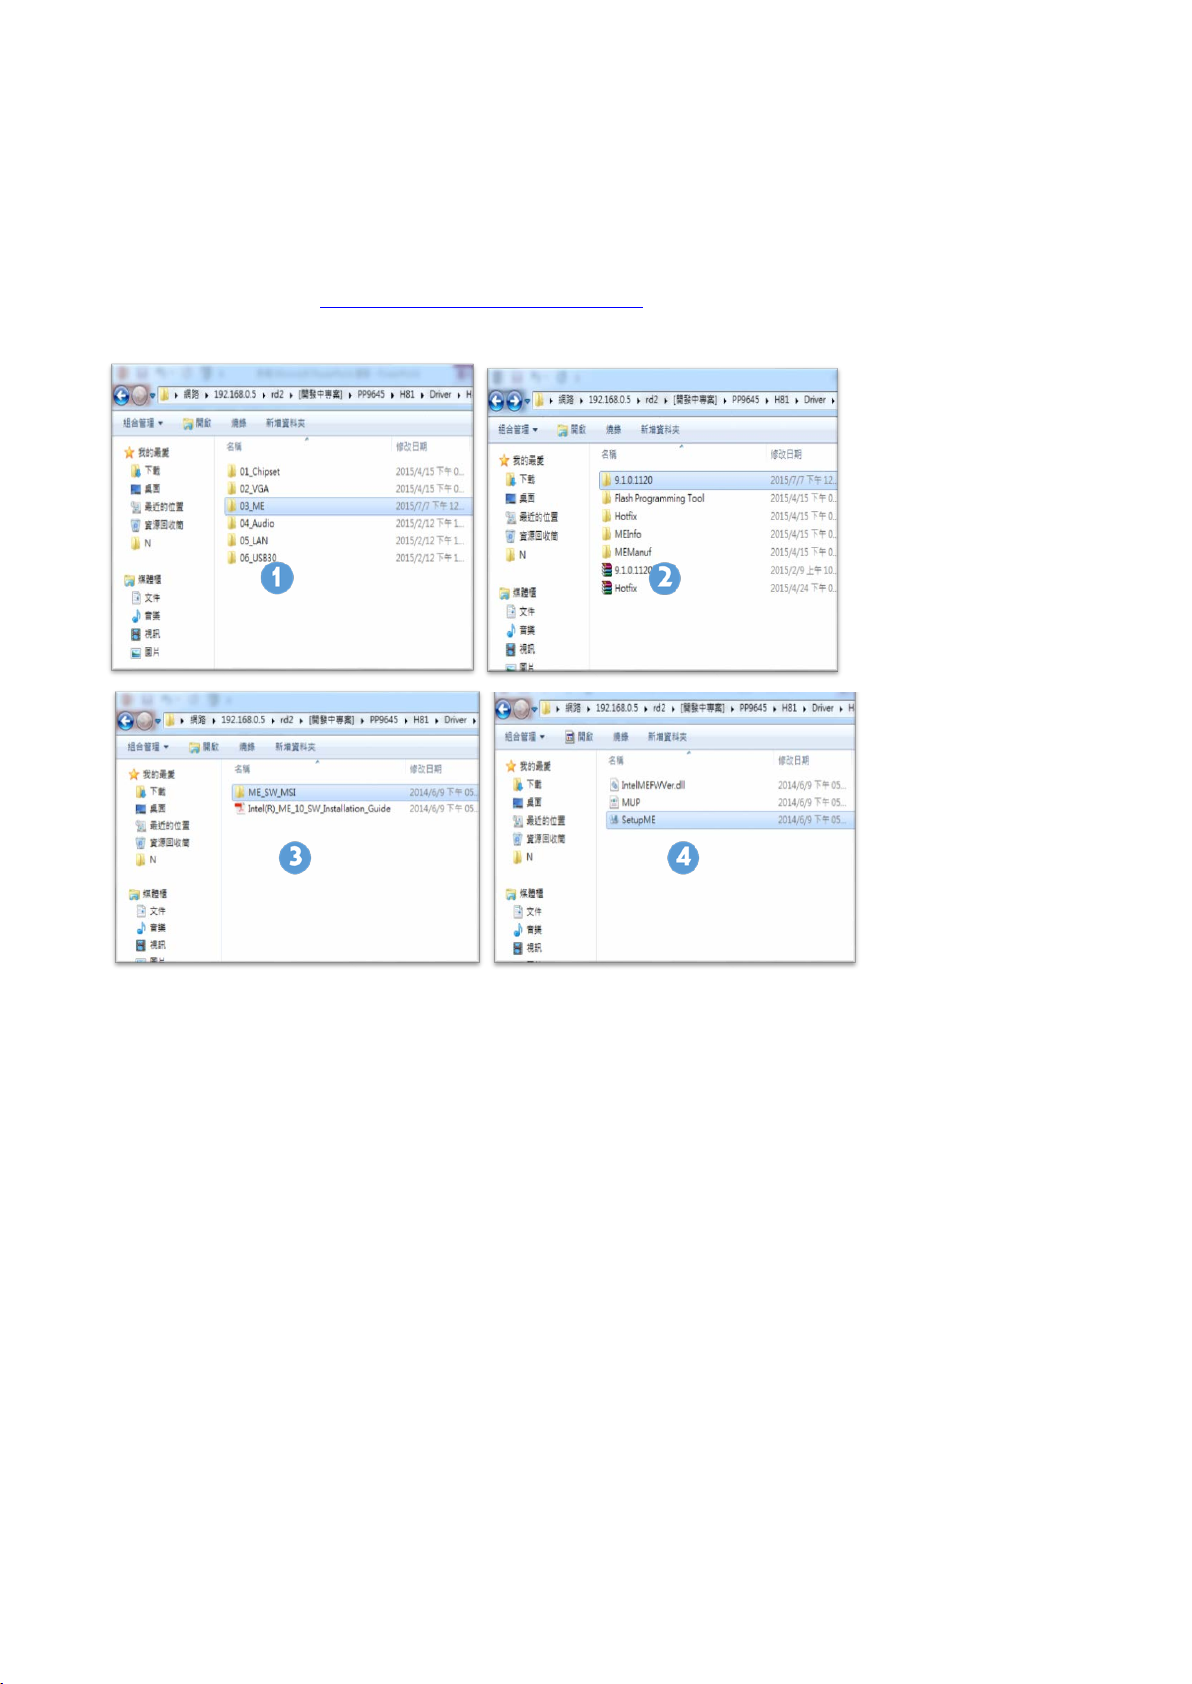
ME Driver for Windows system
1. Download drivers from www.fecpos.com/en-global/ams/Download
2. Run SetupME.exe
3. Restart PP-9645 to complete installation
*When the system is POSReady7 or Windows 7, you needs to install Hotfix derive extra, but you don’t need to
install this derive that the system is Window 8 or Windows 8.1.

PP-9645 Aer PPC
28
ME Driver for Windows system.
1. Download drivers from www.fecpos.com/en-global/ams/Download
2. Run SetupME.exe
Restart PP-9645 to complete installation
3.

29
Audio Driver for Windows system
1. Download drivers from
2. Run Steup.exe
PP-9645 Aer PPC
3. Restart PP-9645 to complete installation

PP-9645 Aer PPC
30
LAN Driver for Windows system
1. Download drivers from www.fecpos.com/en-global/ams/Download
2. Run Steup.exe

PP-9645 Aer PPC
31
USB 3.0 Driver for Windows system
1. Download drivers from www.fecpos.com/en-global/ams/Download
2. Run Steup.exe
3. Restart PP-9645 to complete installation

PP-9645 Aer PPC
32
Model
Touch Sensor
Touch Control Board
PP-9645A
ELO
EETI
PP-9645B
ELO
ELO
PP-9645C
AUO
EETI
TouchKit
Please following those information to setup the program , and please be carefully , if the
machine type is PP-9645 C which don’t need to setup the ELO touchkit system .
EETI TouchKit for Windows system
1. Download drivers from www.fecpos.com/en-global/ams/Download
2. Run Steup.exe
3. Do NOT check Install PS/2 interface driver and continue

PP-9645 Aer PPC
33
4. Do NOT check Install RS232 interface driver and continue
5. Confirm USB touch device is in use
6. Check Support Multi-Monitor System” and continue

PP-9645 Aer PPC
34
7. Restart PP-9645 to complete installation

PP-9645 Aer PPC
35
EETI TouchKit Control Panel
Tools allows the user to calibrate the touch panel via 4 Points Calibration

PP-9645 Aer PPC
36
ELO TouchKit Tools Installation
Please notice the machine type you used .If is the machine type is PP-9645 A or PP-
9645 B, both of them Don’t need to update the TouchKit Tools . But if the machine is
PP-9645 C, please following the steps to update the TouchKit Tools version form
T13 to T15.
ELO TouchKit Installation for Windows system
1. ELO Touch (SW602211_ELOMouseTouch_5.5.3.exe)
2. Run as administrator

PP-9645 Aer PPC
37
3. Unzip file and start to Install USB Touch Screen Driver
4. Start installation and choose “Calibrate ELO ToucScreen” as finished

PP-9645 Aer PPC
38
5. Four Corners Calibration
6. ELO Touchscreen Control Panel General Page can choose calibration mode for “Normal
Mode” or “Enhance Mode”
7. Mode Page:
1. Mouse Button emulation mode Click on Mouse emulation and Double Click Area
2. Options Click on show tool tray utility Adjust Drag delay Adjust Untouch Timeout

PP-9645 Aer PPC
39
8. Sound Page:
1. Beep options without Beep, Beep on touch, Beep on Untouch
2. Beep from External Speaker, Motherboard Beeper
3. Motherboard Beep settings Tone and Duration
9. Properties 1:
1. Screen Information

PP-9645 Aer PPC
40
2. Align touch calibration
3. Identify Monitor identification of 1
st
screen touch or 2nd screen touch
Advanced:

PP-9645 Aer PPC
ELO TouchKit Control Panel update
Please notice that only the machine type is PP-9645C need to update t he
version , please foll owing the steps to updat e the TouchKit Tools version
form T13 to T15.
1. Decompress the ELO Touch update file (eGalaxWorks5960~20150903-1185_B100_00_T15_AUO-
Device(Firich)
2. Run “ eGalaxUpdate”
3. Click “ Load image” (The original version is t13)

PP-9645 Aer PPC
42
4. Click image “PCAP7910_LD1185_B100_V00_T15_auo_15p_Dthqa.791p” and then click
“Open”
5. Click “Go!”

43
6. Finish and click “OK”
PP-9645 Aer PPC
7. F/W update to T15

PP-9645 Aer PPC
44
ELO TouchKit Control Panel version T15 Test
Please following these steps to cali br ate t he To uch system.
1. Run “ eGalaxSensorTester”
2. Click Start Test
3. Finish

PP-9645 Aer PPC
45
Wireless LAN Driver for Windows system.
1. Download drivers from www.fecpos.com/en-global/ams/Download
2. Run Steup.exe

46
Intel® Celeron™ G1820TE 2.20 GHz,
Intel® Core™ i5-4570TE 3.30 GHz
20 x 2 (9mm / 12v / character mode)
CChhaapptteerr 44
PP-9645 Aer PPC
SSppeecciiffiiccaattiioonnss
Aer PPC PP-9645A PP-9645B PP-9645C
System
Display
Processor
Memory Dual SODIMM DDR3 L Standard 2G ; Max 16
Power Supply 150W
Thermal Smart Fan
Storage Device
Speakers 2w x 2
Display 15” (4 : 3)
Touch
Backlight LED
Brightness 350 nits
Resistive
(bezel)
Intel® Core™ i3-4330TE 2.40 GHz,
1 x 2.5” SATA Drive
1 x M.2 SSD socket (coming soon )
Resistive
(bezel free)
Projected Capacitive
Peripherals
Backlight MTBF 50,000 hours
MSR Track 1/2/3 (USB)
Finger Print Optical (USB)
RFID 13.56 MHz (USB)
iButton USB / Virtual COM
WireLess LAN 802.11b/g/n (USB) _ (coming soon)
VFD 20 x 2 (9mm / 12v / character mode)
LCM
2nd Display 15” pole type
240 x 64 (9mm / 12v / graphic mode)
20 x 2 (5mm / 5v / character mode)
192 x 32 (5mm / 5v / graphic mode)

47
CChhaapptteerr 55
PP-9645 Aer PPC
TTrroouubblleesshhoooottiinngg
This guide is for people with strong knowledge in computing hardware
Touch Panel does not work
A) Check the connection between touch panel and touch controller
B) HID USB touch device is detected by O/S
C) (Resistive) EETI driver (or TouchKit driver) is properly installed or try reinstallation
D) (P-Cap) P-Cap touch is detected by O/S or try reinstallation
F) (P-Cap touch calibration) reboot the system and P-Cap touch will calibrate automatically
OSD Buttons do not work
A) Press each OSD button for more than two seconds to trigger its function
B) Make sure one button is touched at a time
HDD / SSD is not detected
A) Make sure S ATA storage device is properly installed
B) HDD power cable is properly connected to the mainboard
C) Check CMOS setup and set SATA HDD to Auto Detect
D) Check onboard SATA port
MSR does not function properly
A) Make sure MSR (USB Hid keyboard) is properly connected
B) MSR LED is blue (color)
LAN does not function properly
A) LAN driver is installed properly
B) RJ45 cable is connected properly
C) check IRQ conflict

PP-9645 Aer PPC
48
COM does not function properly
A) Check the I/O ports in CMOS
B) Check IRQ conflict
C) Check mainboard and I/O cable
Cash Drawer Port does not function properly
A) Pin assignment of cash drawer matches that of RJ11 cash drawer port
B) Check I/O port address
 Loading...