

Page 1
fw.028
USER
MANUAL
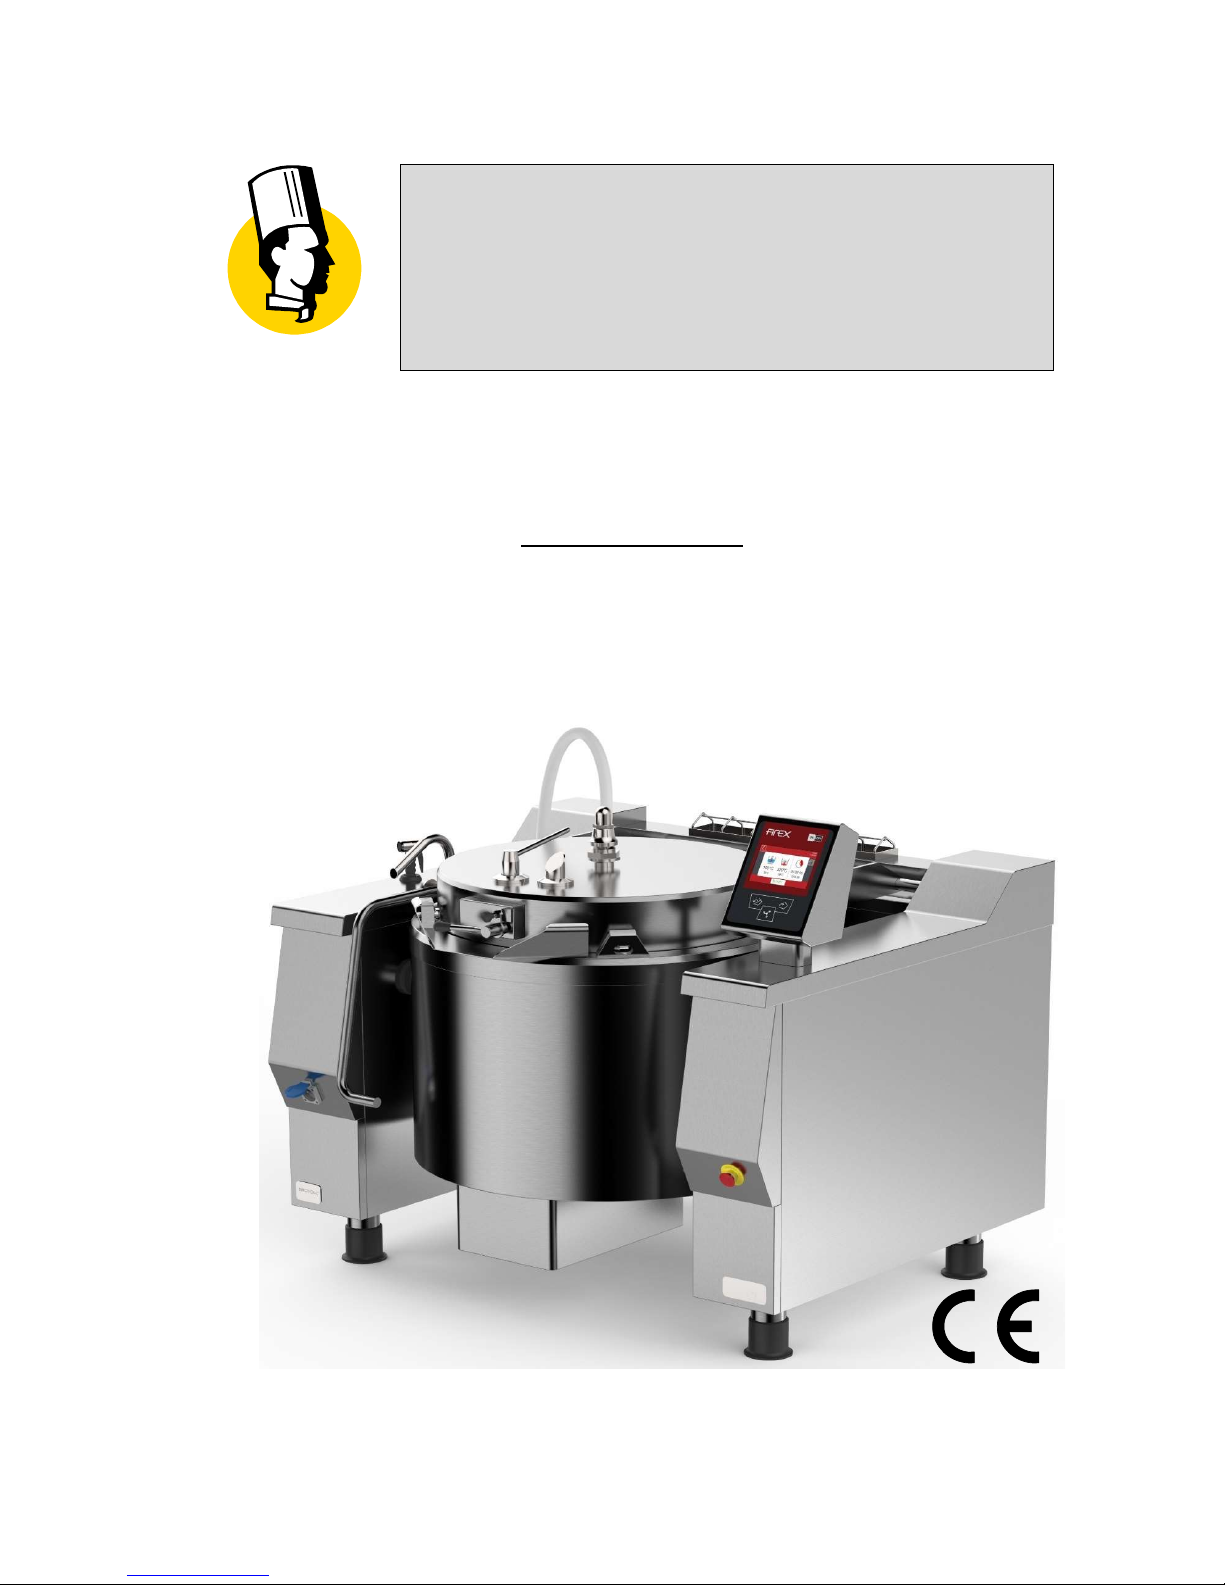
ROUND PRESSURE BRATT PAN
WITH MIXER
TOUCH SCREEN
"CUCIMAX"
MOD. CBTG ..A - CBTE ..A - CBTE..AC - CBTV ..A
Page 2

02-CBT.A
-
TOUCH
-01-EN
INTRODUCTION
2
Table of contents
1 INTRODUCTION ....................................................................................................................................5
1.1 OVERVIEW ............................................................................................................................................... 5
1.2 SYMBOLS AND PICTORIALS .................................................................................................................. 5
2 SAFETY .................................................................................................................................................6
2.1 OVERVIEW ............................................................................................................................................... 6
2.2 WARNINGS .............................................................................................................................................. 7
2.3 TABLE OF PAN PRODUCT LEVELS ....................................................................................................... 9
2.4 PRESSURE COOKING (SAFETY WARNINGS) .................................................................................... 10
2.4.1 CLOSING THE PRESSURE COOKER LID ........................................................................................................11
2.4.2 OPENING THE PRESSURE COOKER LID ........................................................................................................12
3 DESCRIPTION OF THE MACHINE ..................................................................................................... 13
3.1 DESCRIPTION ........................................................................................................................................ 13
3.2 MATERIALS ............................................................................................................................................ 13
3.3 OPERATING PARTS .............................................................................................................................. 14
3.4 TECHNICAL DATA CBTG E/V..A ........................................................................................................... 15
3.5 OPTIONAL .............................................................................................................................................. 16
3.5.1 SHOWER FOR WASHING..................................................................................................................................16
3.5.2 PLUG SOCKET ...................................................................................................................................................16
3.5.3 CASTORS ...........................................................................................................................................................16
4 USING THE MACHINE ........................................................................................................................ 17
5 TOUCH SCREEN ................................................................................................................................. 17
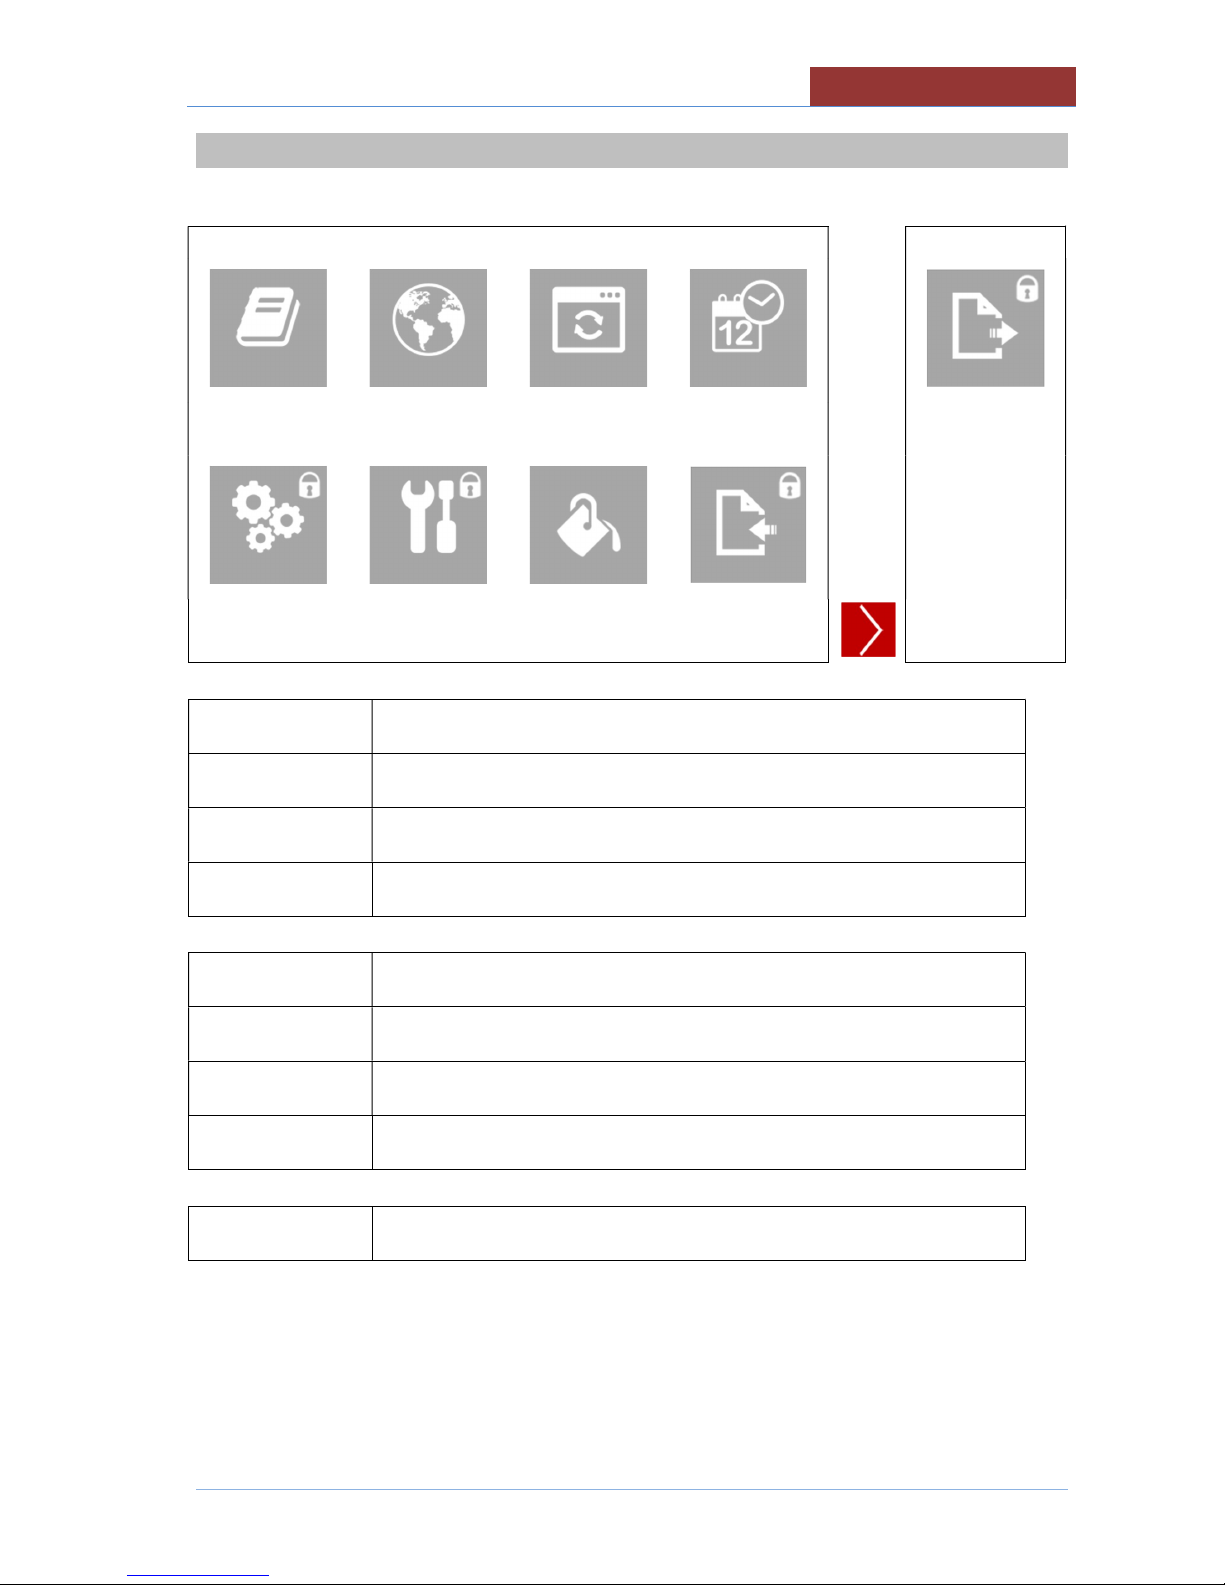
6 MAIN MENU......................................................................................................................................... 18
7 SETTINGS MENU ................................................................................................................................ 19
8 PROGRAMS MENU ............................................................................................................................. 20
9 COOKING LAYOUT ............................................................................................................................ 21
9.1 STATUS BAR .......................................................................................................................................... 22
9.2 COOKING AREA .................................................................................................................................... 23
9.2.1 COOKING ICONS (MEANING) ...........................................................................................................................24
9.3 MESSAGE COLUMN (L)......................................................................................................................... 25
9.4 FUNCTION COLUMN (R) ....................................................................................................................... 26
9.5 FUNCTION BAR ..................................................................................................................................... 27
9.5.1 START-STOP KEY FOR RUNNING PROGRAMS .............................................................................................27
9.5.2 EXTRA KEY ........................................................................................................................................................29
9.5.3 COOKING WITH DELAY TIMER KEY ................................................................................................................29
10 COOKING METHODS IN DETAIL ....................................................................................................... 30
10.1 COOKING CBT.. ..................................................................................................................................... 30
Page 3

INTRODUCTION
02-
CBT.A
-
TOUCH
-01-EN
3
11 SETTING SETPOINT PARAMETERS ................................................................................................. 31
11.1 SETTING SETPOINT VALUES WITH THE KEYPAD ............................................................................. 31
12 COOKING PARAMETERS SETTING .................................................................................................. 33
12.1 SETTING COOKING METHOD AND TEMPERATURE .......................................................................... 33
12.2 SETTING COOKING TIME ..................................................................................................................... 34
13 CREATING PROGRAMS (MULTI-PHASE) ......................................................................................... 36
13.1 CREATING/DELETING PHASES ........................................................................................................... 36
13.2 MESSAGE SETTINGS ........................................................................................................................... 38
13.3 SAVING A PROGRAM ............................................................................................................................ 42
13.4 EDIT/ COPY/ RENAME PROGRAM ....................................................................................................... 43
13.5 DELETING A PROGRAM ....................................................................................................................... 44
14 RUNNING A PROGRAM/MANUAL COOKING ................................................................................... 44
14.1 RUNNING A PROGRAM/MANUAL COOKING ....................................................................................... 44
14.2 END OF COOKING ................................................................................................................................. 45
15 RUNNING PROGRAMS (MULTI-PHASE) ........................................................................................... 46
15.1 RUNNING PROGRAMS (MULTI-PHASE) .............................................................................................. 46
15.2 END OF PROGRAM ............................................................................................................................... 48
16 COOKING WITH DELAY TIMER ......................................................................................................... 49
17 FILLING PAN WITH H2O .................................................................................................................... 50
17.1 FILLING THE PAN WITH H2O USING A LITRE-COUNTER DEVICE.................................................... 50
17.2 MANUALLY FILLING THE PAN WITH H2O ........................................................................................... 52
18 USING THE MIXER ............................................................................................................................. 53
18.1 MIXER SETTINGS .................................................................................................................................. 53
18.2 STARTING THE MIXER (MANUAL COOKING PROGRAM) .................................................................. 54
18.3 STARTING THE MIXER (MULTI-PHASE PROGRAM) ........................................................................... 55
19 WALL HEATING (CBTE ..AC) ............................................................................................................. 56
19.1 WALL HEATING SETTINGS................................................................................................................... 56
19.2 STARTING WALL HEATING (MANUAL COOKING PROGRAM) ........................................................... 57
19.3 STARTING WALL HEATING (MULTI-PHASE PROGRAM) ................................................................... 57
20 MOVING THE PAN .............................................................................................................................. 58
21 CLEANING AND CARE ....................................................................................................................... 60
21.1 GENERAL INFORMATION ..................................................................................................................... 60
21.2 DAILY CLEANING .................................................................................................................................. 60
21.3 MIXER CLEANING ................................................................................................................................. 61
21.4 CLEANING THE PRESSURE COOKER SYSTEM ................................................................................. 62
21.5 CLEANING AND CHECKING THE SAFETY VALVE .............................................................................. 62
21.6 PRECAUTIONS IN CASE OF PROLONGED INACTIVITY .................................................................... 63
21.7 PRECAUTIONS IN CASE OF MALFUNCTION ...................................................................................... 63
Page 4

02-CBT.A
-
TOUCH
-01-EN
INTRODUCTION
4
22 MAINTENANCE ................................................................................................................................... 64
22.1 MAINTENANCE OF THE APPLIANCE ................................................................................................... 64
22.2 PERIODIC MAINTENANCE .................................................................................................................... 64
23 DISPLAY MESSAGES ........................................................................................................................ 66
24 DISPOSAL OF THE APPLIANCE ....................................................................................................... 67
Page 5

INTRODUCTION
02-
CBT.A
-
TOUCH
-01-EN
5
1 INTRODUCTION
1.1 OVERVIEW
The heads of departments, where this machine will be installed, must ensure, in
accordance with current legislation, that they have read the contents of this
document carefully and ensure that operators and maintenance personnel have read
the relevant parts.
This manual contains all the necessary information for correct and safe use of our
appliances.
Ensure this manual is conserved correctly so that it is always available to all users
of the machine!
The manufacturer assumes no responsibility or warranty commitment for injuries
and damage due to non-compliance with the instructions or any installation or
maintenance that does not comply with safety standards.
The same applies in case of improper use of the appliance by the operator.
1.2 SYMBOLS AND PICTORIALS
NOTE!
This indicates a recommendation or information deemed to be particularly important.
ATTENTION!
This indicates a dangerous operation or situation.
ATTENTION!
This indicates a regulation or an obligation.
ATTENTION!
This indicates the prohibition to carry out an operation.
EQUIPOTENTIAL TERMINAL SYMBOL
The appliance is to be connected within an equipotential system.
The connection terminal is located in the immediate vicinity of the power cable inlet.
Page 6

02-CBT.A
-
TOUCH
-01-EN
SAFETY
6
2 SAFETY
2.1 OVERVIEW
Read the warnings contained in this manual carefully as they provide important information
regarding safe installation, maintenance and use.
These appliances should only be used by personnel
trained to use them.
The appliance must be operated under close supervision.
The appliance must only be used for the purpose for which it was explicitly designed, any other
use is improper and as a result considered dangerous.
This appliance is intended for professional use and therefore must be used by appropriately
trained personnel
Take particular care during operation as the outside of the appliance can also become very hot!
It is essential to contact a specialist support centre for any repairs or maintenance.
All the important information about the appliance for technical support can be found on the
technical data plate (see figure "Appliance general layout").
When requesting technical support, you should describe the problem in detail in order to allow the
technician to immediately understand the cause and type of fault.
Certain operational faults may be due to operator error, therefore it is important for staff to receive
comprehensive training.
Page 7
SAFETY
02-
CBT.A
-
TOUCH
-01-EN
7
2.2 WARNINGS
All installation and maintenance work must only be carried out by a company
belonging to the relevant industry register.
Fire protection regulations must be strictly adhered to.
The machine should be serviced at least once a year to ensure it is in prime
condition. Therefore, it is recommended to sign a maintenance contract with a reliable
technical support centre.
The appliance can only be used for cooking food in industrial kitchens. Any other use is
considered improper use and, therefore, dangerous
The appliances should only be used by personnel trained to use them.
The appliance must be operated under close supervision.
Any damage caused by water/steam infiltration or insects, due to the machine
panels not being closed (after installation or maintenance) shall void any warranty
claims.
The manufacturer assumes no responsibility for injuries or damage due to noncompliance with safety regulations or improper use of the appliance by the operator.
The appliance is not intended to be used by persons (including children) with
reduced physical, sensory or mental abilities, or lack of experience or knowledge,
unless they are supervised, by someone responsible for their safety, or given
instructions regarding the use of the appliance.
Children should be supervised at all times so that they do not play with the
appliance.
Wear rubber gloves, goggles or a face shield and protective clothing when using
the appliance.
Risk of scalding!
The machine controls can only be hand operated. Damage caused by the use of
pointed, sharp and similar objects shall void any warranty claims.
It is essential to wash the inside of the cooking pan thoroughly before setting up
the appliance for first use.
The cooking pan must be filled respecting the minimum and maximum values
(including the food to be cooked) indicated in the table depending on the cooking
method.
It is absolutely forbidden to place your hands or other objects in the pan when the
mixer is running.
When emptying the pan, the operator must position him/herself on the right-hand
side of the machine (control side) being careful of any hot content spilling from
the pan and avoiding any splashes.
Page 8
02-CBT.A
-
TOUCH
-01-EN
SAFETY
8
The operator must also ensure that any persons present in the room maintain a
safe distance of at least 2 metres from the perimeter of the machine, both while
emptying and replacing the pan.
The pressure cooking phases must be carried out with particular care as indicated
in this manual.
When opening the lid pay particular attention to the steam escaping from the vent
on the lid and from the front of the lid.
Do not use the "PRESSURE" cooking functions for frying operations.
Take particular care during operation as the surfaces become hot.
When filling the pan with water, using a tap or shower (optional), make sure that
there is no hot oil in the pan.
The appliance must be disconnected from the power supply during cleaning,
maintenance and replacement of the internal parts.
When cleaning the appliance, never spray water directly in order not to cause
infiltration and damage to the parts.
Most cleaning products are harmful to the skin, eyes, mucous membranes, and
clothes. Precautions must be taken. Wear rubber gloves, safety glasses/goggles
or a face shield, and protective clothing. Read the warnings carefully and follow
the directions on the label of the detergent.
The floor may be slippery in the area around the appliance.
If the power cord is damaged, it must be replaced by the manufacturer or by a
servicing company or a similarly qualified person in order to avoid hazards.
Switch off the appliance in case of breakdown, malfunction or water leakage.
Disconnect all water, electricity and gas supplies and contact a support centre.
In the event of a fire, cover the cooking pan by closing the lid and disconnect all
water, electricity and gas supplies.
NEVER USE WATER to extinguish a fire.
Do not store or use flammable gases or liquids near the machine.
Page 9
SAFETY
02-
CBT.A
-
TOUCH
-01-EN
9
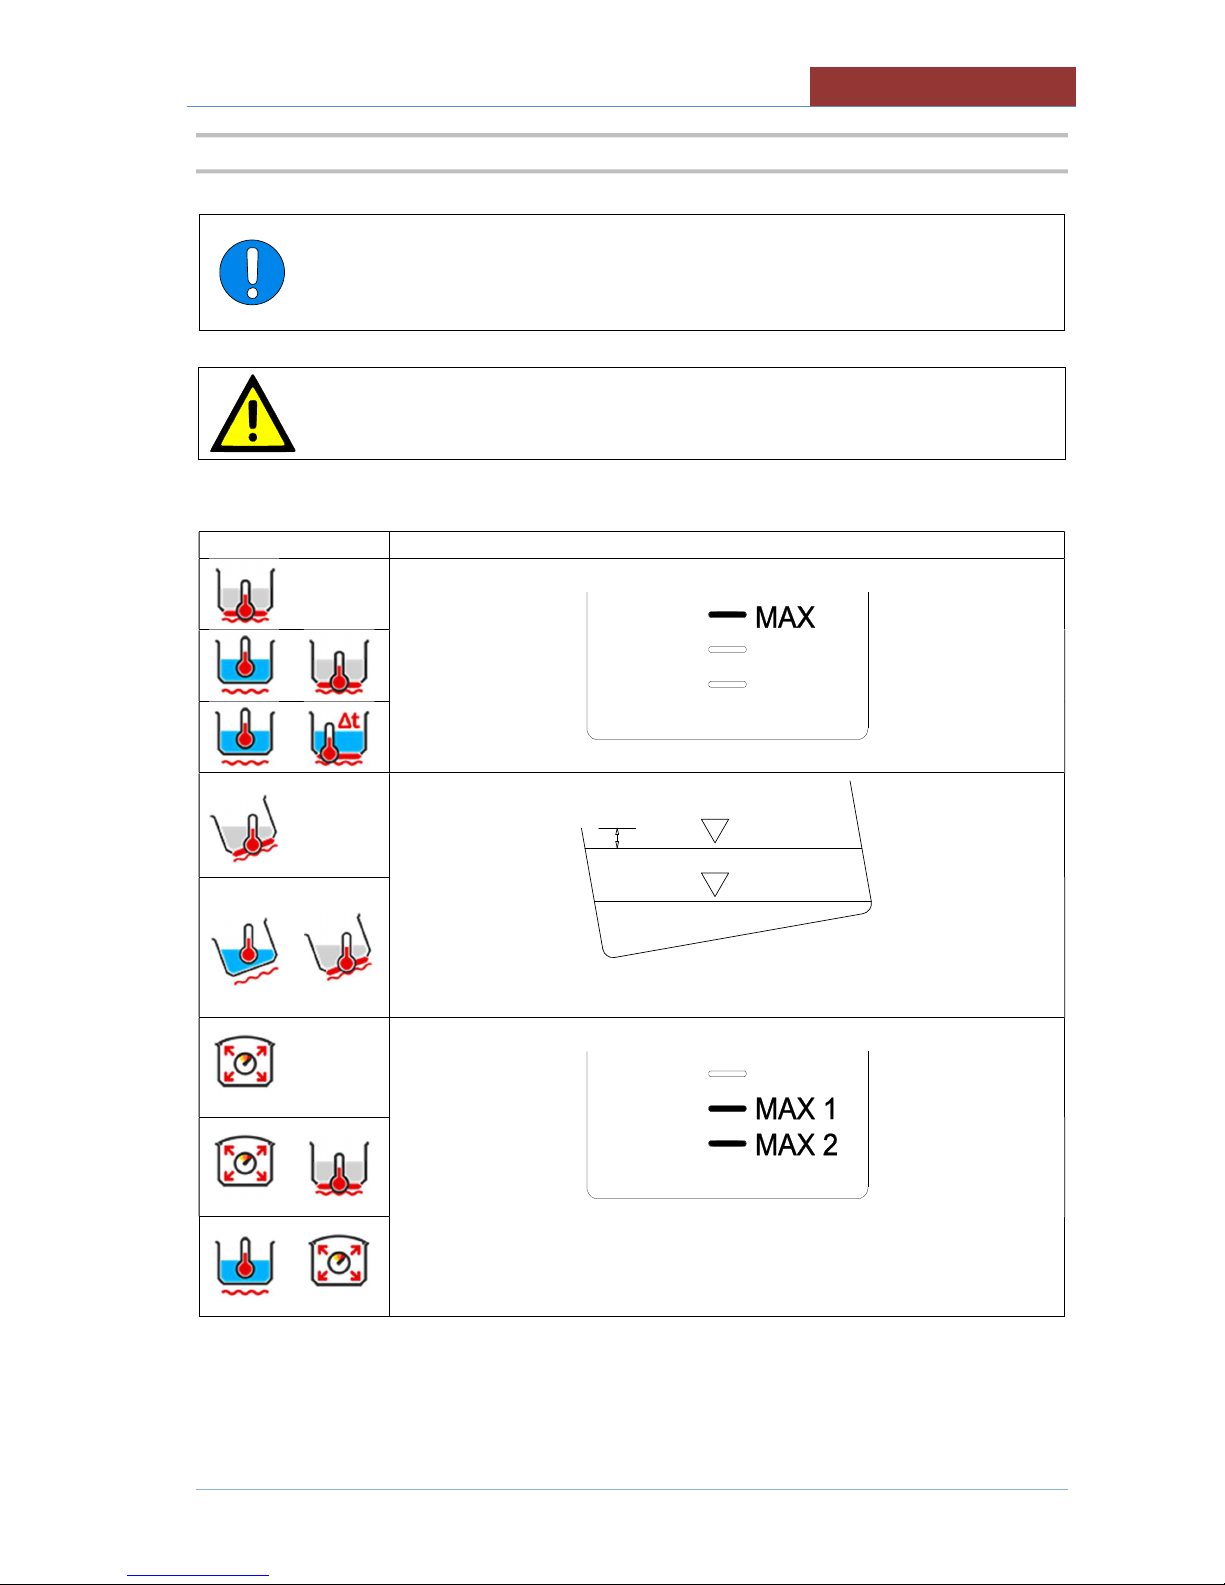
2.3 TABLE OF PAN PRODUCT LEVELS
ATTENTION:
The cooking pan must be filled respecting the minimum and maximum values
(including the food to be cooked) indicated in the table depending on the cooking
method.
ATTENTION:
Failure to comply with this requirement may cause serious injury to persons and
compromise the operation of the appliance
Cooking method
PAN LEVELS TO BE RESPECTED
min. The minimum level MUST cover the entire pan bottom!!
MAX.1. Standard maximum level
MAX.2. Maximum level when cooking foods that increase in volume or produce
foam during cooking.
Page 10
02-CBT.A
-
TOUCH
-01-EN
SAFETY
10
2.4 PRESSURE COOKING (SAFETY WARNINGS)
Carefully observe the following indications when pressure cooking:
1. Respect the product loading levels in the pan!
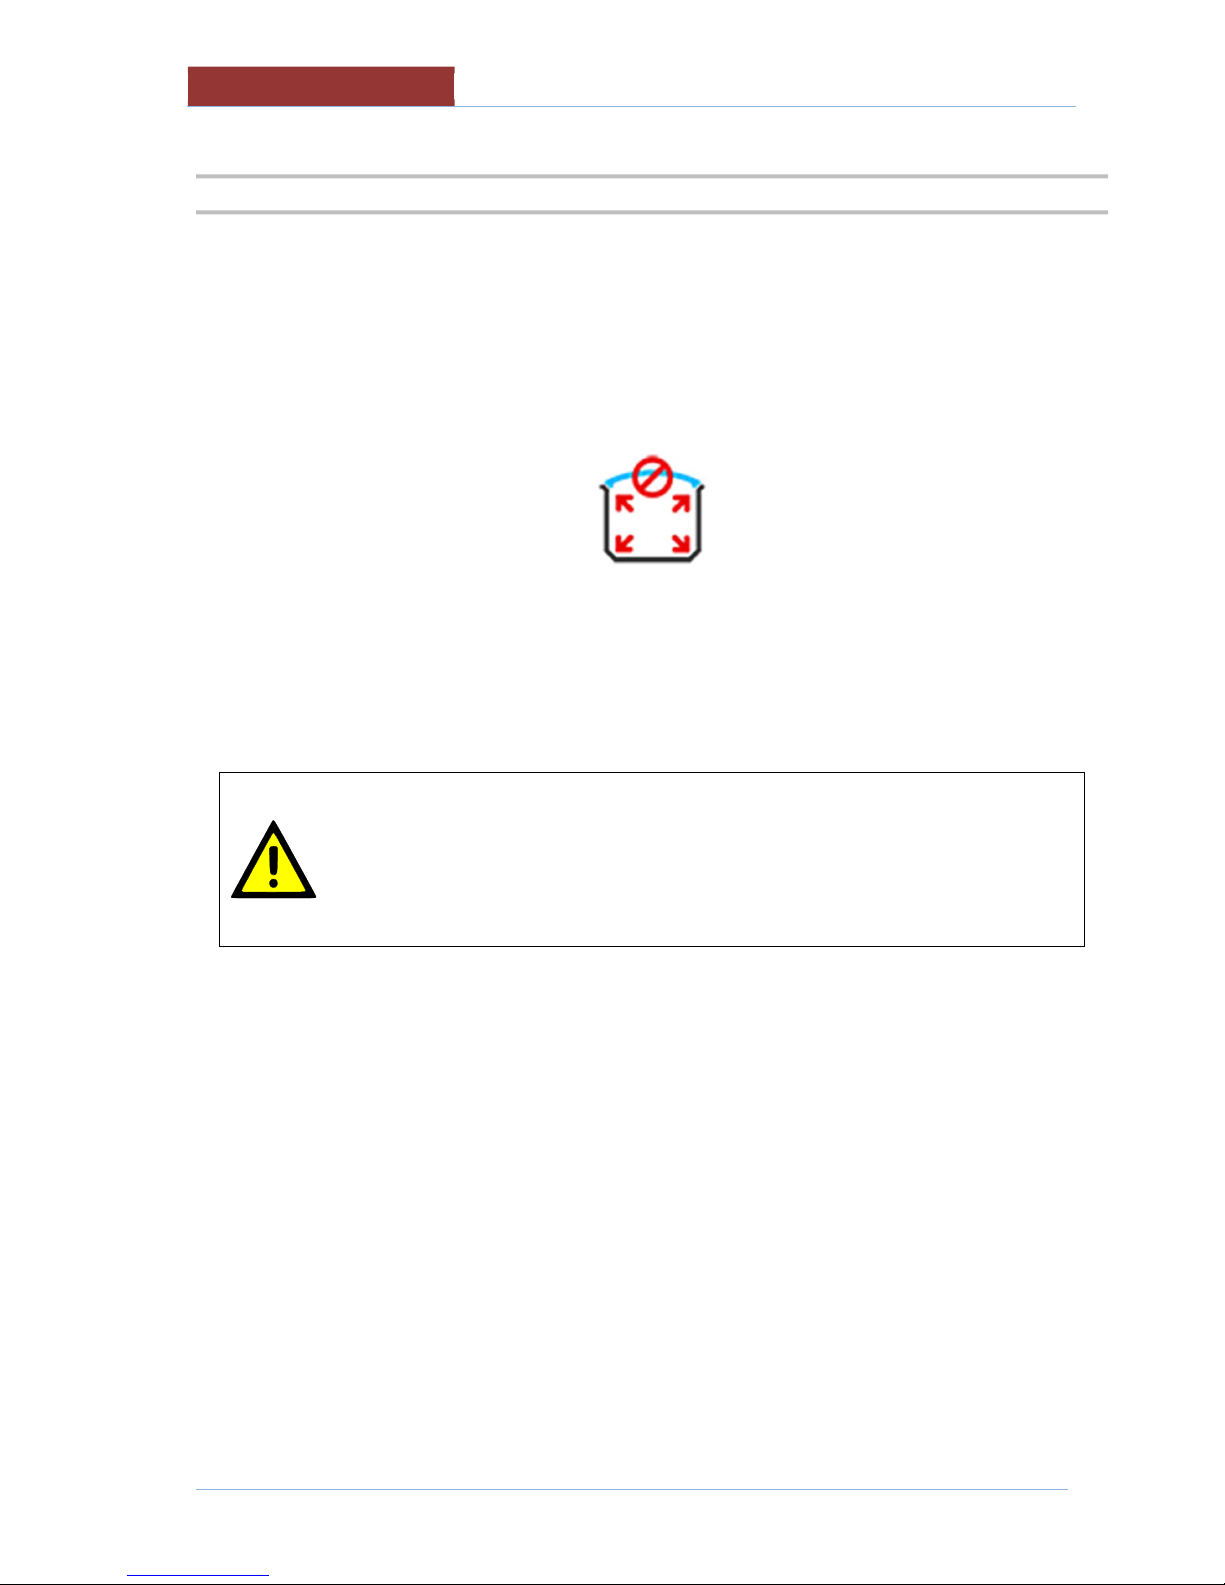
2. When the icon appears
DO NOT ATTEMPT TO OPEN THE LID!!!
A dangerous pressure has been reached inside the pan!!!
ATTENTION:
If there is a power cut when pressure cooking, the pressure in the pan is brought
to atmospheric pressure by the automatic opening of the solenoid valve. In this
case the steam will NOT be condensed.
It is normal for the uncondensed steam to come out from under the side of the
machine for a few minutes!
Page 11
SAFETY
02-
CBT.A
-
TOUCH
-01-EN
11
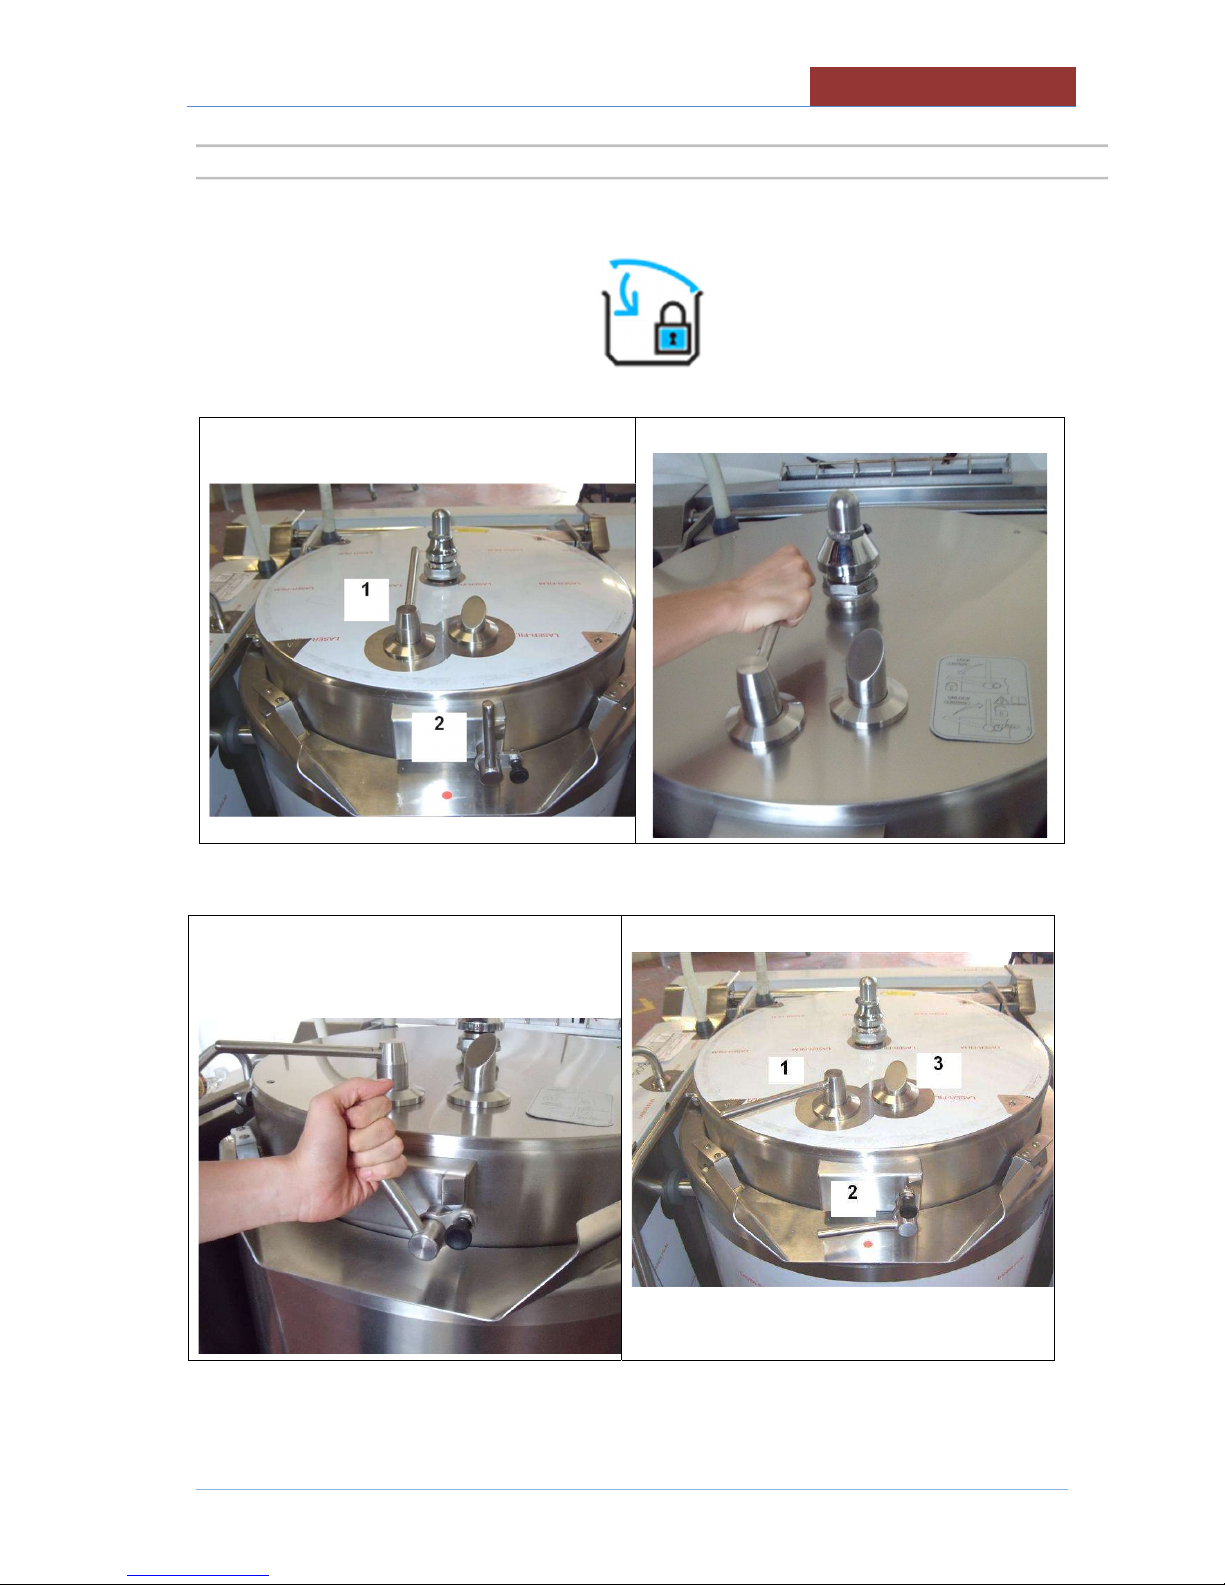
2.4.1 CLOSING THE PRESSURE COOKER LID
When the icon appears
Closing the lid in pressure cooker mode
Lid position unlocked (NO pressure
cooking)
a. Turn handle 1 anticlockwise
b. Turn handle 2 anticlockwise until it is
locked.
Lid position locked (pressure cooking)
Page 12
02-CBT.A
-
TOUCH
-01-EN
SAFETY
12
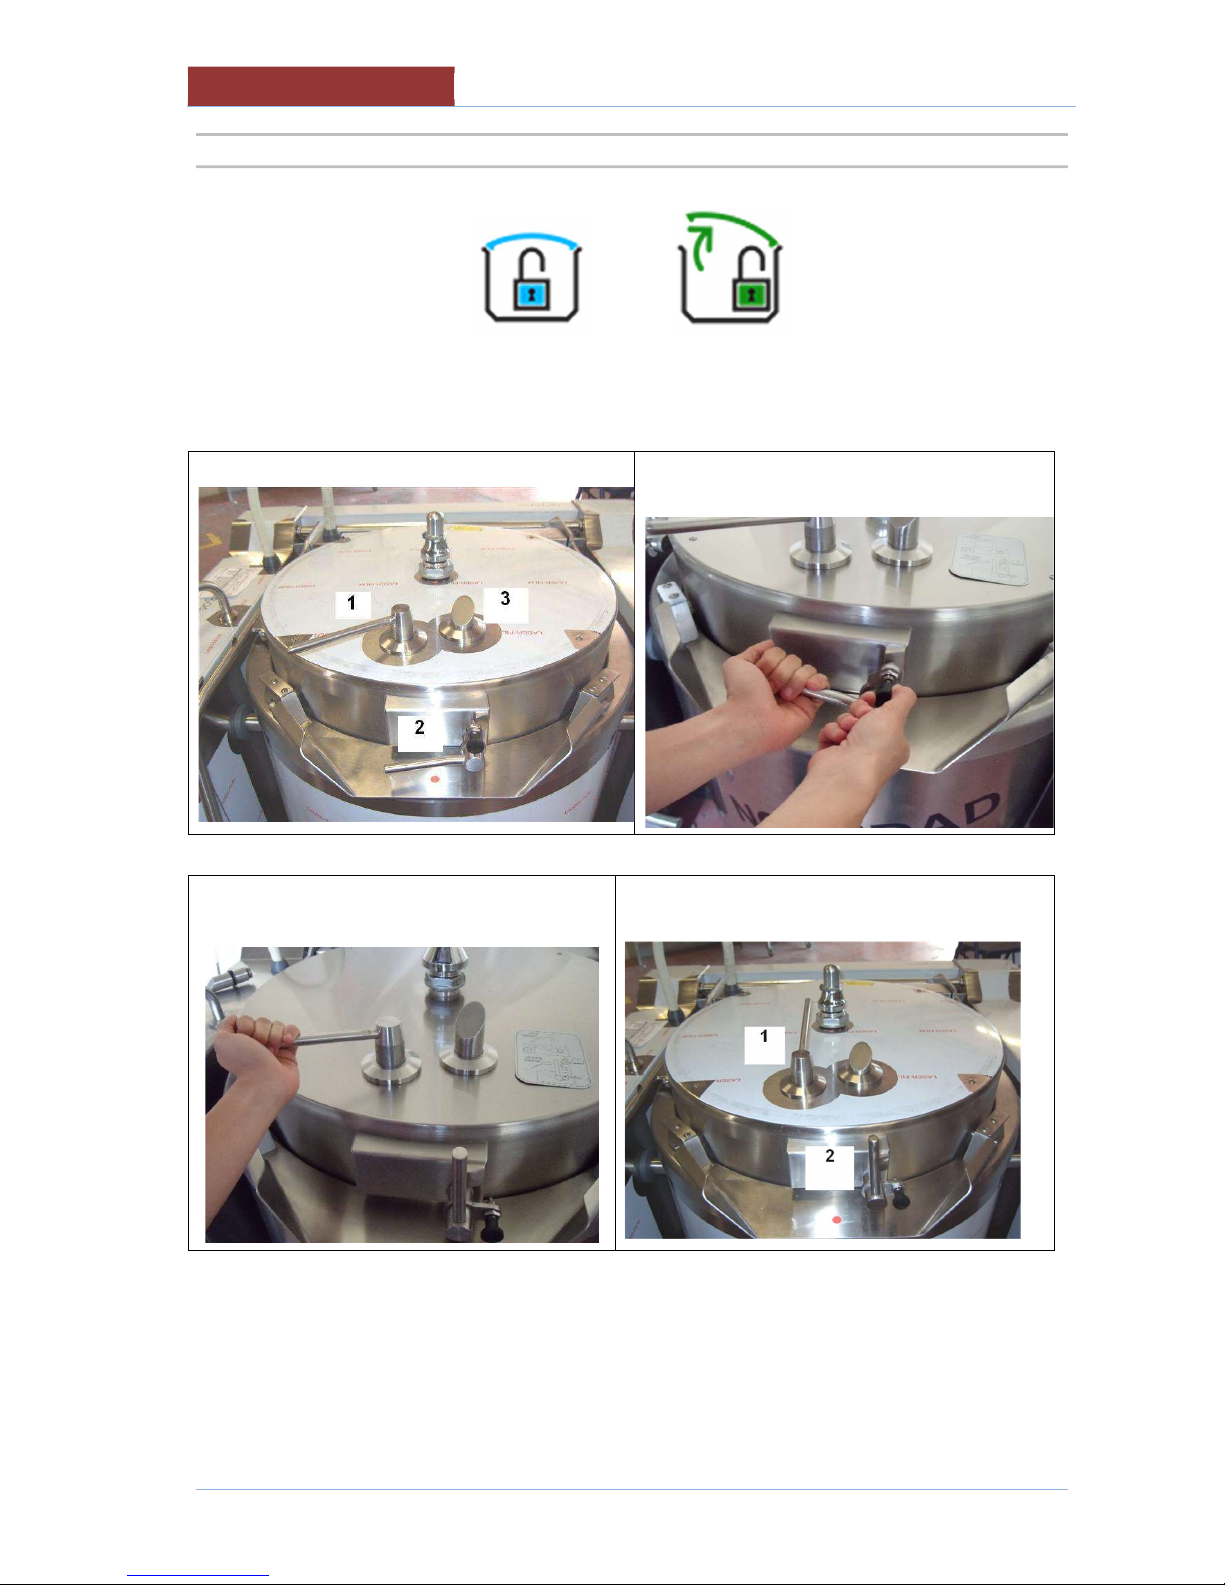
2.4.2 OPENING THE PRESSURE COOKER LID
When the icons appear
or
Opening the lid as described below.
Lid position locked (pressure cooking) a. Release the lock and gently turn
handle 2 clockwise.
b. Wait for the residual steam to escape from vent 3.
c. Turn handle 1 clockwise
Lid position unlocked (NO pressure
cooking)
d. Lift the lid slightly (about 5°) and wait for the steam to come out safely without hitting
the operator.
e. Open the lid completely.
Page 13
DESCRIPTION OF THE MACHINE
02-
CBT.A
-
TOUCH
-01-EN
13
3 DESCRIPTION OF THE MACHINE
3.1 DESCRIPTION
Round Bratt pans with built-in mixer, ideal for cooking meat, sauces, risotto, fillings and for all those
dishes that require the ingredients to be worked gently.
Uniform cooking and a high-quality end product are the result of cutting edge and simple to use
technology.
CBTE..AC version with confectionery pack (wall heating, vertical blade for wall scraping and PEEK
scrapers).
Gas and electric versions with usable capacity from 130 to 310 litres.
The appliance can only be used for cooking food in industrial kitchens. Any other use is
considered improper use and, therefore, dangerous
3.2 MATERIALS
Cooking pan in AISI 304 grade stainless steel
Double-walled lid in AISI 304 grade stainless steel
Seal in food-grade silicone with a single junction point
Outer cover in fine satin AISI 304 grade stainless steel.
Self-supporting frame in AISI 304 grade stainless steel.
Adjustable feet for levelling in AISI 304 grade stainless steel, equipped with removable cover for cleaning
operations.
Page 14
02-CBT.A
-
TOUCH
-01-EN
DESCRIPTION OF THE MACHINE
14
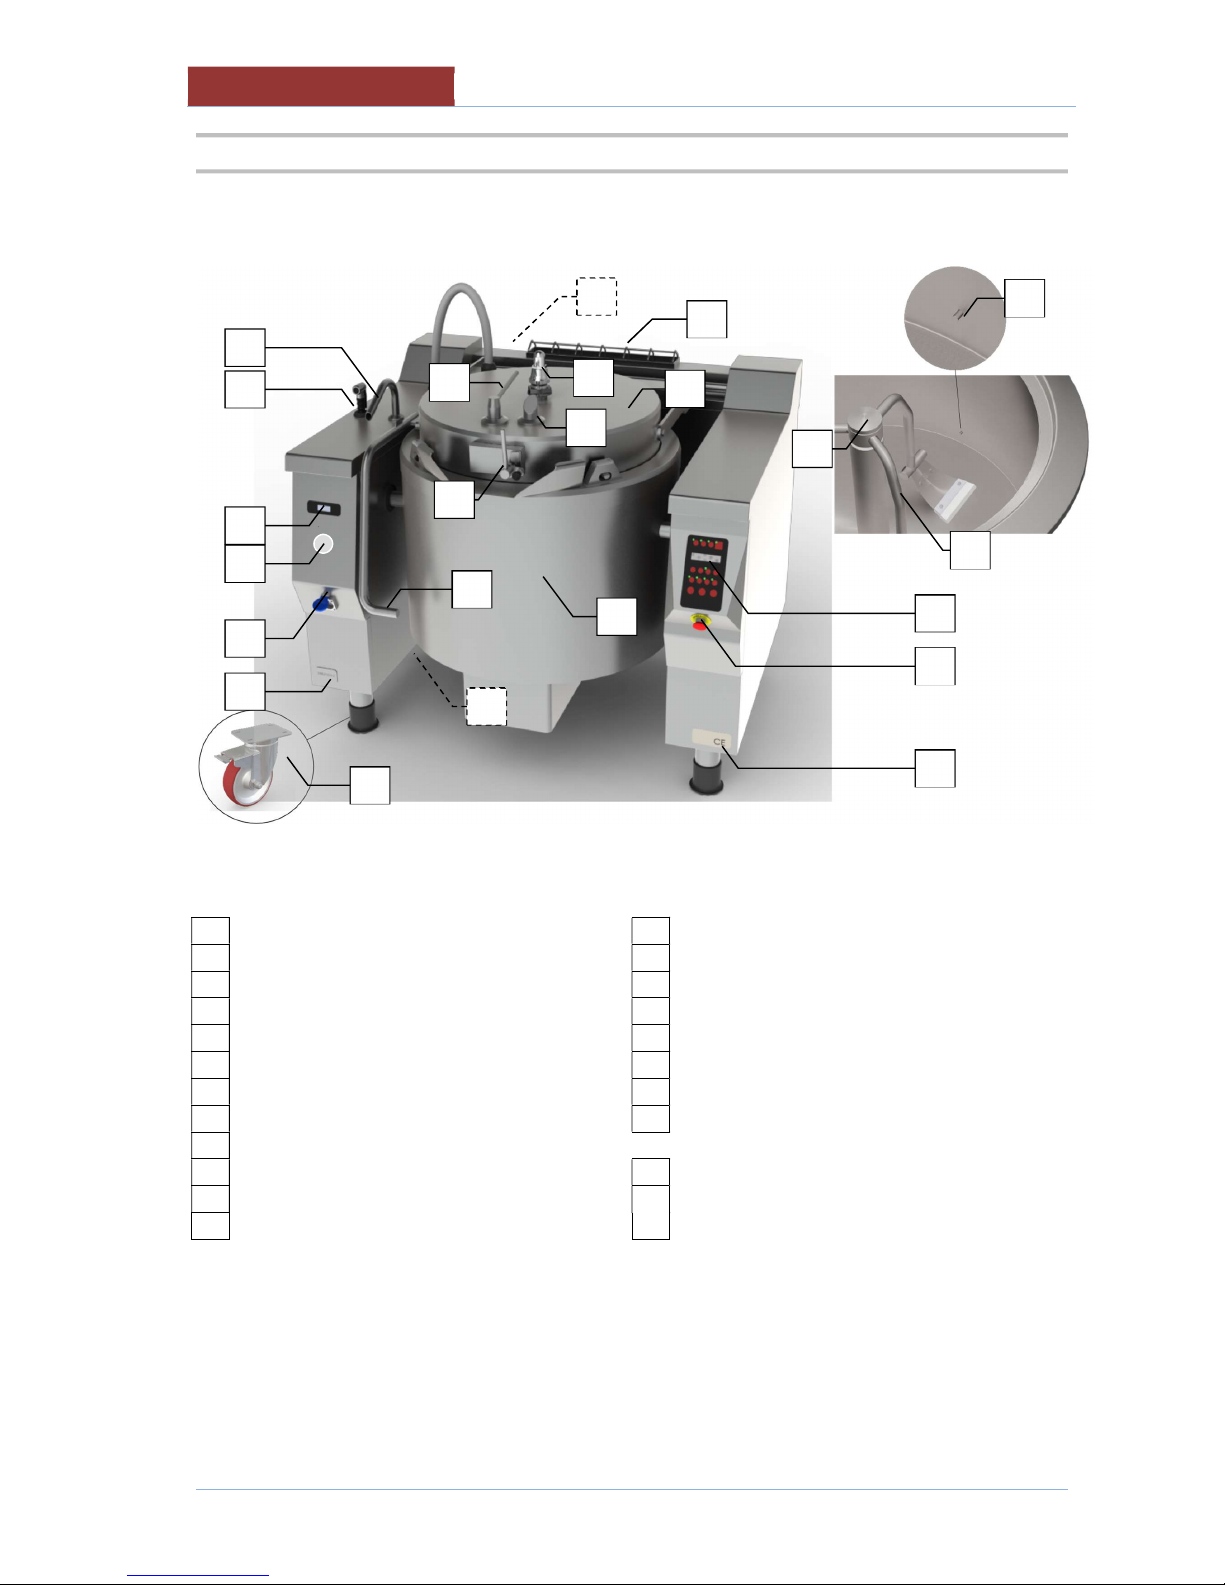
3.3 OPERATING PARTS
01 Technical Data Plate
13
Safety valve
02 Plate serial no.
14
Condensate drain
03 Emergency button
15
Sensor
in the pan
04
Control panel
16
Mixer
05 Cooking pan
17
Mixer locking ring
06 Fill tap
18
Steam vent (mod.CBTG)
07 Lid 19 Steam pressure gauge (mod.CBTV)
08
Lid handle
20
Steam safety valve (mod.CBTV)
09 Lid closing lever
OPTIONAL
10 Lid lock lever
21
Plug socket
11
Pressure switch
22
Shower
12 Steam outlet vent
23
Castors
17
16
22
06
11
05
07
08
23
02
21
15
01
04
03
09
10 13 12
14
18
19
20
Page 15
DESCRIPTION OF THE MACHINE
02-
CBT.A
-
TOUCH
-01-EN
15
3.4 TECHNICAL DATA CBTG E/V..A
CBTG/E/V 130A 180A 310A
TECHNICAL DATA: DIMENSIONS
Dim.appl.A
mm
1455 1655 1755 Dim.appl.B
mm
1270 1500 1560
Dim.applia.H1
mm
1030 1062 1062 Height of work surface H
mm
950 950 950 Height with lid open H2
mm
2100 2360 2380 TECHNICAL DATA: OPERATING
Container diameter
mm
700
900
1000
Dim. container H
mm
420
370
470
Bottom surface
area dm² 38
63
78
Total volume
lt
162
235
369
Usable volume
lt
135
190
320
Mixer speed
rpm 6÷18
6÷14
4÷10
Mixer torque
Nm
191
236
353
Mixer power
kW
0.37
Pressure cooking
bar 0.4
0.2
0.2
Temperature range (mod.G/E)
°C
20 ÷ 220
Temperature range (mod.V)
°C
20 ÷ 175
Wall temperature range (mod ..AC)
°C
20 ÷ 130
Sound pressure
dbA <70 POWER MOD.GAS (CBTG ..)
Gas power kW
22
33
49
POWER MOD.ELEC.
Electric power (mod.CBTE ..A) kW
13.5
21
29
Electric power (mod.CBTE ..AC) kW
18.3 26.4 36.8
POWER MOD. STEAM (CBTV..)
Steam pressure bar
8
Steam flow kg/h
70 100 120
Steam consumption (20-100° C) kg
20 28 47
Page 16
02-CBT.A
-
TOUCH
-01-EN
DESCRIPTION OF THE MACHINE
16
3.5 OPTIONAL
3.5.1 Shower for washing
The shower has a twist-out type system. Pull out gently until the desired or maximum length is reached.
To return, it is necessary to tug gently outwards and then twist it back into position.
Press the black lever to operate the water jet. The flow of water immediately stops when released. If you
want to have a continuous jet of water, turn the black lever as far as you can.
Handle this accessory with care and store it in its housing at the end of each use to avoid
damaging it.
Make sure there is no hot oil in the pan before using the jet.
3.5.2 Plug socket
The plug socket can be used to connect the appliance externally to a 230V connection
(MAX 2500W).
Lift the protective cover and connect the plug.
If the protective cover is damaged, replace it straight away.
3.5.3 Castors
The appliances can be installed on castors. The front two have brakes: to engage them, press gently on
the lever above the castor, to release them, press more firmly.
Always engage the castor brakes if you do not have to move the appliance.
Make sure the machine is completely disconnected before moving it .
Page 17
USING THE MACHINE
02-
CBT.A
-
TOUCH
-01-EN
17
4 USING THE MACHINE
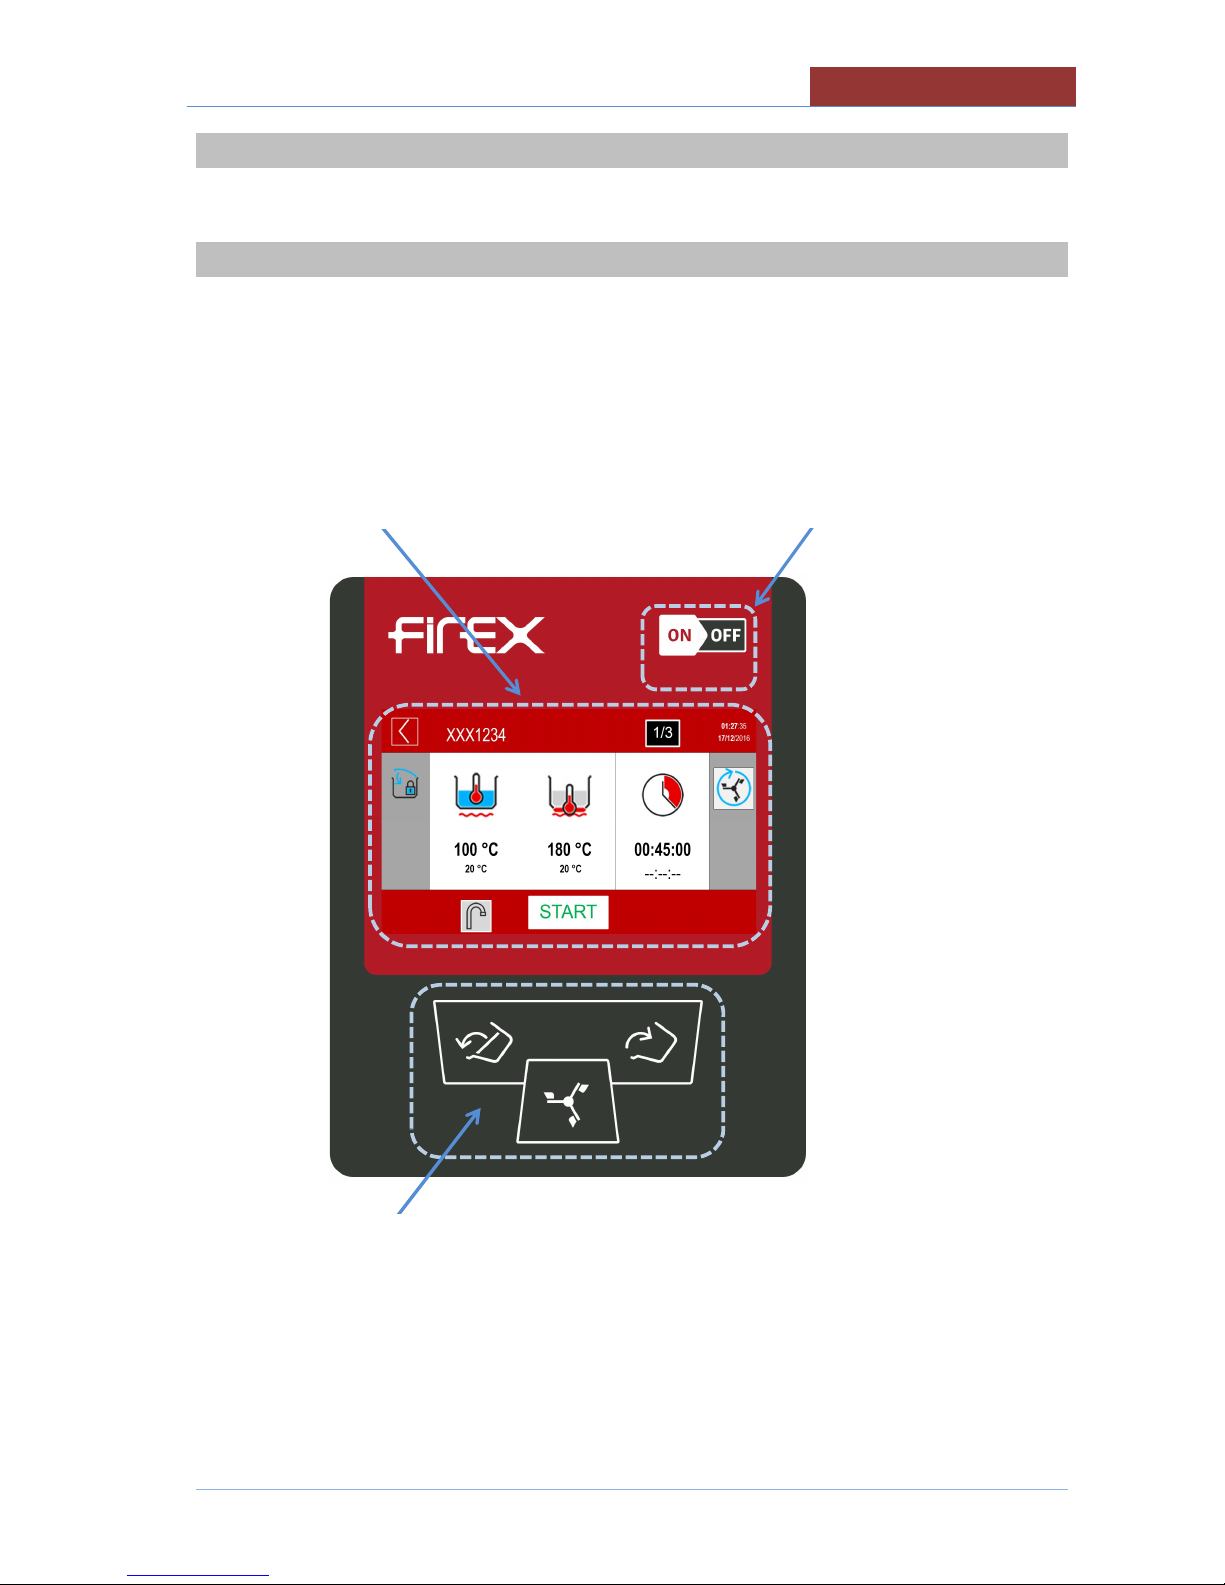
5 TOUCH SCREEN
1-On-off switch
2- 7" TFT resistive display
3- Keypad for movements (mixer, pan)
2- 7" TFT resistive display
1-On-off switch
3- Keypad for movements (mixer, pan)
Page 18
02-CBT.A
-
TOUCH
-01-EN
MAIN MENU
18
6 MAIN MENU
PROGRAMS
SETTINGS
PROGRAMS
Setting manual cooking parameters
Carrying out manual cooking
Running cooking programs
SETTINGS
Appliance setting-user;
creating-editing cooking programs
language
date-time
firmware update
colors
EXPORT (HACCP data)
Appliance setting - installer/technical assistant;
TEST I/O
Parameter setting (unit of measurement)
Import database
Page 19
SETTINGS MENU
02-
CBT.A
-
TOUCH
-01-EN
19
7 SETTINGS MENU
PROGRAMS
LANGUAGES
FIRMWARE
DATE
-
HOUR
EXPORT
TEST I/0
PARAMETERS
COLORS
IMPORT
PROGRAMS
Creating-editing cooking programs
LANGUAGES
Language setting
FIRMWARE
Firmware update (from USB)
DATE-HOUR
Current Date and Time setting
TEST I/0
Test I/O board (only with password)
PARAMETERS
Parameter setting (only with password)
COLORS
Screen colour setting
IMPORT
Import database (parameters, cooking, languages, programs) only with
password.
EXPORT
Export (HACCP data).Read the instruction manual dedicated to HACCP.
Page 20

02-CBT.A
-
TOUCH
-01-EN
PROGRAMS MENU
20
8 PROGRAMS MENU
MANUAL
ALL SAUCES
MEAT
FAVORITES
CHEF
POULTRY
FISH
MANUAL
Setting manual cooking parameters
Carrying out manual cooking
ALL
FAVORITES
MEAT
ETC
Running cooking programs
Page 21
COOKING LAYOUT
02-
CBT.A
-
TOUCH
-01-EN
21
9 COOKING LAYOUT
XXX1234
01:27: 35
17/12/ 2016
100°C
20°C
180°C
20°C
00:45:00
--:--:--
STATUS BAR
XXX1234
01:27: 35
17/12/ 2016
↓ COOKING AREA
_________________________________________________________
100°C
20°C
180°C
20°C
00:45:00
--:--:--
_________
__________
↑ MESSAGE COLUMN FUNCTION COLUMN ↑
FUNCTION BAR
1/3
START
1/3
START
Page 22

02-CBT.A
-
TOUCH
-01-EN
COOKING LAYOUT
22
9.1 STATUS BAR
1 2
3 4
5
XXX1234
01:27: 35
17/12/ 2016
1
STAND-BY/RETURN KEY; 3 sec → HOME
↓
COOKING/PROGRAM IN PROGRESS.
↓
COOKING/PROGRAM IN PROGRESS (PAUSED) AWAITING ACTION.
2
XXX1234
Name of cooking program selected
3
PROGRAM IN THE LIST OF FAVOURITES (not present in manual cooking)
4
PROGRAM PHASE IN PROGRESS (not present in manual cooking)
5
01:27: 35
17/12/ 2016
CURRENT TIME AND DATE
I I
Page 23

COOKING LAYOUT
02-
CBT.A
-
TOUCH
-01-EN
23
9.2 COOKING AREA
COOKING METHOD>
SETPOINT >
VALUE MEASURED>
100°C
20°C
180°C
20°C
00:45:00
--:--:--
< TIME TYPE
< SETPOINT
< COUNTDOWN
HEATING IN OPERATION
MINIMUM HEATING
HEATING OFF AS SETPOINT REACHED OR FOR WAITING (L
COLUMN ICONS)
Page 24

02-CBT.A
-
TOUCH
-01-EN
COOKING LAYOUT
24
9.2.1 COOKING ICONS (MEANING)
Left or central icon: main control (when the SETPOINT is reached, heating stops and the countdown of
the cooking time starts)
↓
↑
Right icon: secondary control (when the SETPOINT is reached,
the heating stops)
Name Icon Description
Temperature at bottom
Temperature in the pan
Δ Temperature between bottom and main temperature
Temperature at bottom (tilted pan)
Temperature in the pan (tilted pan)
H2O temperature in the pan
Pressure cooking (SETPOINT not settable)
Page 25

COOKING LAYOUT
02-
CBT.A
-
TOUCH
-01-EN
25
9.3 MESSAGE COLUMN (L)
INFORMATION AND REQUESTS INDICATOR L COLUMN
buzzer
Light
Indicator
Icon Description Behaviour
no no
Pan out of position (for
cooking)
Icon present when pan out of position
no no
Pan movement not
allowed
Icon present only when you want to
perform a pan movement in an
unauthorised phase.
B
Request to completely
open the lid (for pan
movement)
Icon present only when you want to move
the pan and the lid is not completely open.
B
Request to turn the tap
(for pan movement)
Attn. alternate icon
Icon present only when you want to move
the pan and the tap is not completely
turned (towards the outside of the pan).
B
Request to turn the tap
(to fill pan with H2O)
Attn. alternate icon
Icon present only when you want to fill pan
with H2O and the tap is not completely
turned (towards the pan).
no no
Not allowed to fill pan
with H2O
Icon present only when you want to fill pan
with H2O during an unauthorised phase.
B
Request to unlock the lid
(cooking not allowed)
Icon only present when the lid is closed
(locked in pressure mode) during NONpressure cooking.
B
Request to close and
block the lid (pressure
cooking)
Attn. animated icon
Icon only present when the lid is NOT
closed (locked in pressure mode) during
pressure cooking.
no no
Do not open the lid
(pressurised pan!!)
Attn. alternate icon
Icon present when the machine is
pressurised.
no no
Steam condensation Reduction in cooking
pressure
Icon present at the end of a pressure
cooking. Indicates that steam is being
condensed to reduce the pressure in the
cooking pan and allow the lid to be
opened.
no
End of pressure cooking.
It is possible to unlock
and open the lid
Icon present at the end of a pressure
cooking.
Page 26

02-CBT.A
-
TOUCH
-01-EN
COOKING LAYOUT
26
buzzer Light
Indicato
r
Icon Description Behaviour
A
Safety thermostat has
been triggered
Icon present when the safety thermostat
has been triggered. To reset the alarm,
restore the safety thermostat.
A
Insufficient gas pressure Icon present when gas pressure switch
has been triggered.
A
Gas central unit reset
Icon present due to interruption in the gas
central unit
9.4 FUNCTION COLUMN (R)
Icon Description
Mixer ON-OFF key (also external) + mixer setting (2 sec.)
ROTATION TYPE; SPEED: TIME.
ON-OFF key for heating walls + setting (2 sec.)
No. LEVELS; TEMPERATURE.
Page 27

COOKING LAYOUT
02-
CBT.A
-
TOUCH
-01-EN
27
9.5 FUNCTION BAR
EXTRA KEY (functions) START/STOP KEY DELAYED COOKING KEY
↓ ↓ ↓
9.5.1 START-STOP KEY FOR RUNNING PROGRAMS
Attention: the START/STOP key indicates the action that will be performed by pressing the key!
The machine status is indicated by the icon on the top left
With key presence Machine status
icon on the top left
Machine in stand-by.
Pressing the START key starts the program and the START key becomes the STOP.
With key presence Machine status
icon on the top left
Program running.
or
I I
Page 28

02-CBT.A
-
TOUCH
-01-EN
COOKING LAYOUT
28
To avoid accidentally stopping the cooking program in progress, press the STOP key and the following
screen appears:
If the STOP key has been pressed incorrectly, wait approximately 5 seconds and you return to the
program in progress.
If instead you want to stop the program, slide the coloured square from the triangle to the square and
release the key.
The STOP key becomes START.
Page 29

COOKING LAYOUT
02-
CBT.A
-
TOUCH
-01-EN
29
<
9.5.2 EXTRA KEY
Press the key to access pan H2O filling and pan tilting functions.
FILL PAN WITH H2O PAN MOVEMENT
↓ ↓
0 Lt
0 Lt
FILLING PAN WITH H2O
LITRE-COUNTER DEVICE ACCURACY +/- 2% AND MAX H2O TEMPERATURE
90°C
MAX LITRES = PAN CAPACITY
9.5.3 COOKING WITH DELAY TIMER KEY
Press the key to access the settings for cooking with delay timer.
START
Page 30

02-CBT.A
-
TOUCH
-01-EN
COOKING METHODS IN DETAIL
30
10 COOKING METHODS IN DETAIL
10.1 COOKING CBT..
Icon Description
For braising that requires a temperature up to 220°C; the temperature
regulation is controlled by the sensor (PT1000) located on the bottom of the
pan
For gentle cooking; the temperature regulation is controlled by the sensor
(PT1000) located inside the pan, in contact with the product, and by the
sensor located on the bottom of the pan.
For gentle and slow cooking that require accurate regulation and monitoring
of the temperature at the core of the product, the temperature regulation is
controlled by the sensor located inside the pan by the temperature
difference set between the bottom and the product.
For different cooking methods that require faster processes; the
temperature regulation is controlled by the pressure switches, the maximum
attainable pressure is 0.45 bar (mod.130) 0.30 bar (mod.180 310).
For different types of cooking that require faster processing and control of
the temperature of the bottom (particularly dry products); the temperature
regulation is controlled by the pressure switches and by the sensor located
on the bottom of the pan. The maximum pressure that can be reached is
0.45 bar (mod. 130) 0.30 bar (mod.180 310).
For cooking that requires accurate regulation and monitoring of the
temperature at the core of the product during pressure cooking; the
temperature regulation is controlled by the sensor (PT1000) located inside
the pan, in contact with the product, and by intervention of the pressure
switches, the maximum pressure that can be reached is 0.45 bar (mod.130)
0.30 bar (mod.180 310)..
For braising with tilted pan that requires a temperature up to 220°C; the
temperature regulation is controlled by the sensor (PT1000) located on the
bottom of the pan (only CBTE).
For gentle cooking with tilted pan; the temperature regulation is controlled
by the sensor (PT1000) located inside the pan, in contact with the product,
and by the sensor located on the bottom of the pan (only CBTE).
Page 31

SETTING SETPOINT PARAMETERS
02-
CBT.A
-
TOUCH
-01-EN
31
11 SETTING SETPOINT PARAMETERS
11.1 SETTING SETPOINT VALUES WITH THE KEYPAD
The following screen appears when setting any setpoint value:
left column: parameter of which you are changing the setpoint value.
right column: keypad + cursor for changing the setpoint.
100°C
20°C 120°C
min max
-------------------
1 2 3 4
5 6 7 8
- 9 0
Fields in the left column have the following meanings:
100°C
RED VALUE: VALUE OF WHICH YOUR ARE CHANGING THE SET
20°C
min
MINIMUM VALUE SETTABLE
120°C
max
MAXIMUM VALUE SETTABLE
Page 32

02-CBT.A
-
TOUCH
-01-EN
SETTING SETPOINT PARAMETERS
32
The values in the right column will be changed as follows:
SETTING WITH KEYPAD
TYPE THE DESIRED VALUE.
ATTENTION : THE VALUE MUST BE BETWEEN min AND max!
SETTING WITH CURSOR
QUICK SETTING
PRECISE SETTING
------------------
← →
------------------
EXIT FROM SETTINGS
Exit without confirming settings key
Exit confirming settings key
Page 33

COOKING PARAMETERS SETTING
02-
CBT.A
-
TOUCH
-01-EN
33
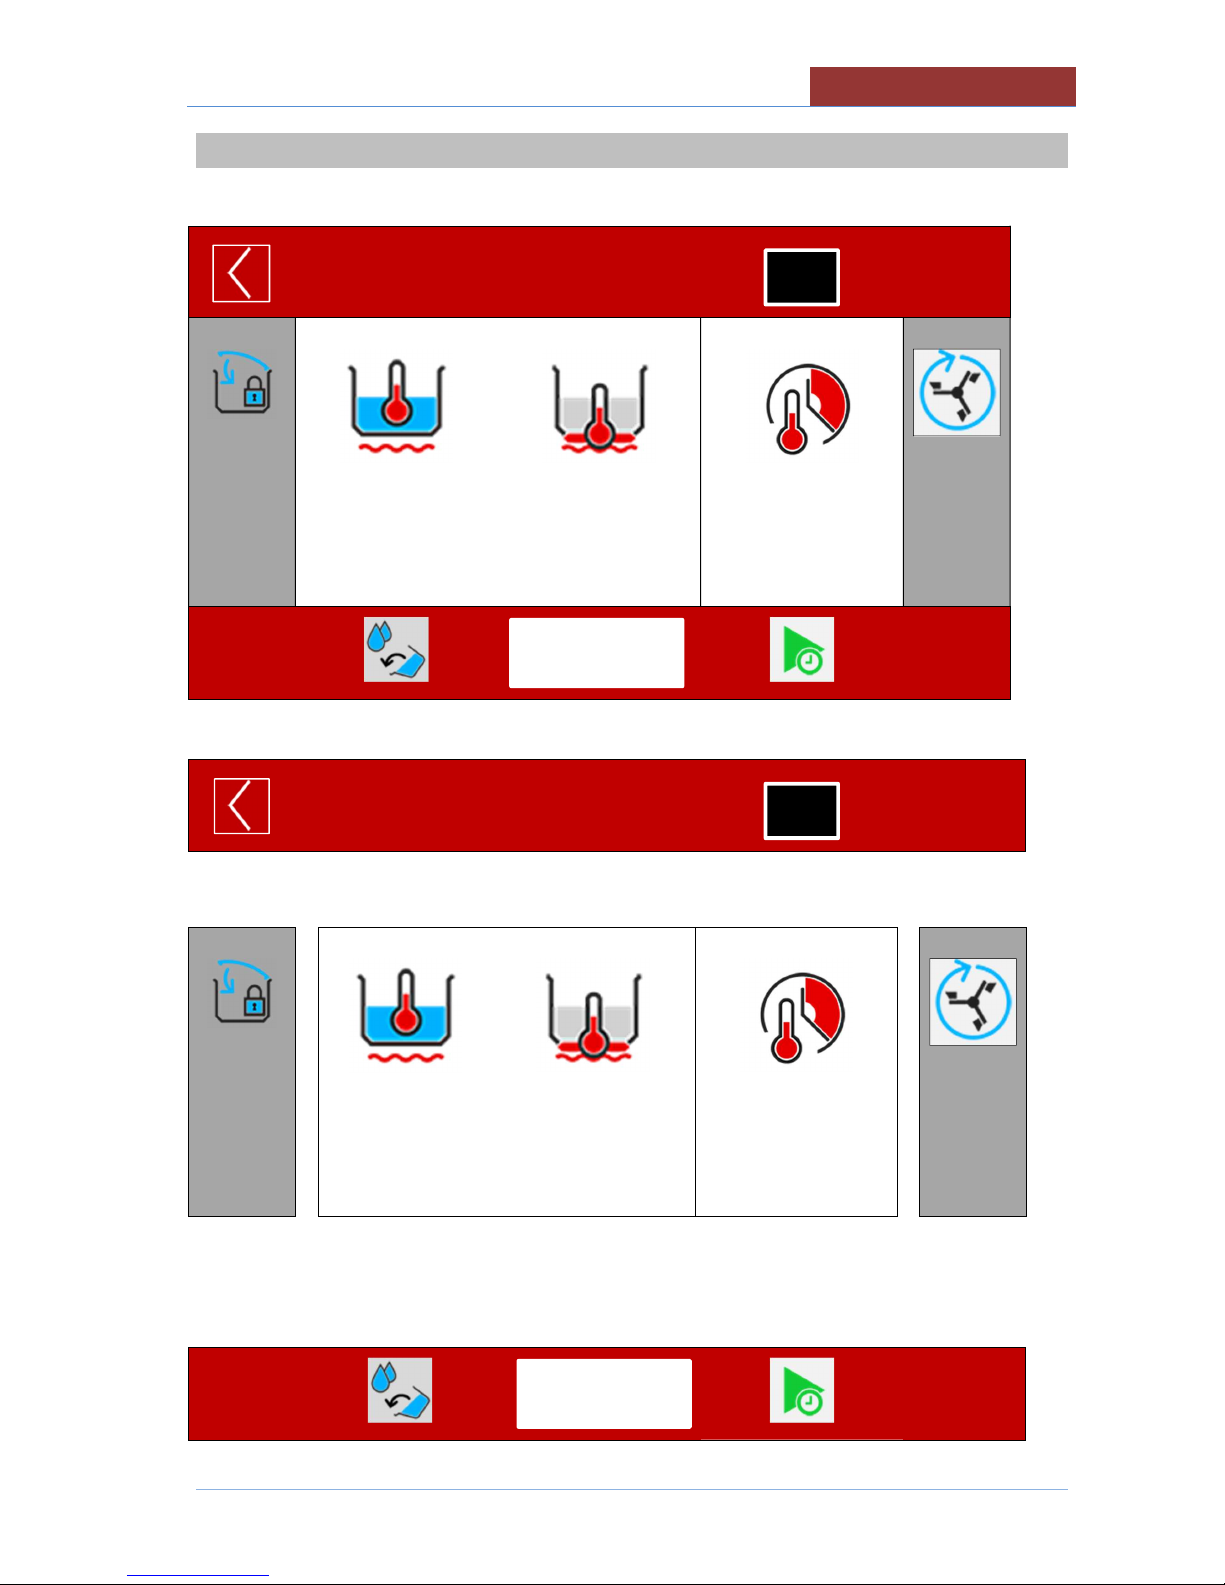
12 COOKING PARAMETERS SETTING
The setting of the following parameters can only be made from the menu:
1. PROGRAMS + MANUAL
2. SETTINGS + PROGRAMS
12.1 SETTING COOKING METHOD AND TEMPERATURE
100°C
20°C
180°C
20°C
00:45:00
--:--:--
AREA HIGHLIGHTED = SELECTION/SETTINGS
SETTING COOKING METHOD
SELECTING COOKING METHOD (see Cooking
methods in detail)
SETTING TEMPERATURE SETPOINT
20 °C
20 °C
< COOKING SETPOINT (see SETPOINT)
< TEMPERATURE DISPLAY
SET THE SETPOINT AS DESCRIBED IN THE CHAPTER
18
0 °C
10
0 °C
Page 34

02-CBT.A
-
TOUCH
-01-EN
COOKING PARAMETERS SETTING
34
12.2 SETTING COOKING TIME
--:--:--
SELECTING COOKING TIME
< COOKING TIME SETPOINT (see SETPOINT)
< COOKING TIME COUNTDOWN
SELECTING COOKING TIME
Cooking time Cooking time Infinite time
(at setpoint °C) (immediate)
→ → →
ATTENTION: WHEN SELECTING THE INFINITE TIME, PRESS THE KEY INDICATED BELOW TO
TERMINATE THE PROGRAM IN PROGRESS.
NOTE:
The time elapsed since the beginning of the phase is indicated on the bottom row.
--:--:--
00:04:31
00:45:00
Page 35

COOKING PARAMETERS SETTING
02-
CBT.A
-
TOUCH
-01-EN
35
SETTING COOKING TIME SETPOINT
Only with
↓
00:45:00
---------------
1 2 3 4
5 6 7 8
- 9 0
HH:MM:SS
HH: 99 max; MM: 59 max; SS: 59 max
00:45:00
Page 36

02-CBT.A
-
TOUCH
-01-EN
CREATING PROGRAMS (MULTI
-
PHASE)
36
13 CREATING PROGRAMS (MULTI-PHASE)
FROM SETTINGS> PROGRAMS> NEW
NEW PROGRAM
01:27: 35
17/12/ 2016
100°C
20°C
180°C
20°C
00:45:00
--:--:--
A PROGRAM CAN CONSIST OF 20 PHASES.
THE PARAMETERS ARE CONSTANT WITHIN EACH PHASE. IF A SINGLE VALUE CHANGES, YOU
NEED TO CREATE A NEW PHASE!
THE CREATION OF THE PHASE CONSISTS OF ENTERING THE COOKING METHOD, COOKING
TIMES, MIXER FUNCTIONS AND WALL HEATING.
IT IS ALSO POSSIBLE TO ENTER (IN EVERY PHASE) 3 MESSAGES PRESENT IN THE LEFT
COLUMN. (SEE MESSAGE SETTINGS)
13.1 CREATING/DELETING PHASES
ONCE THE PARAMETERS OF PHASE 1 ARE SET, YOU CAN THEN ADD PHASE 2:
>
>
AFTER HAVING ADDED AND SET THE PARAMETERS OF PHASE 2, PRESSING ON THE
PHASE/PHASE FIELD DISPLAYS THE FOLLOWING SCREEN:
Page 37

CREATING PROGRAMS (MULTI
-
PHASE)
02-
CBT.A
-
TOUCH
-01-EN
37
>
SHOWS THE CURRENT PHASE
RETURNS TO PHASE 1 SETTINGS
ENTERS A NEW PHASE AFTER THE HIGHLIGHTED PHASE
(e.g. if the program consists of 2 phases and I want to insert a phase between 1 and 2, I have to select
phase 1 and press the + key, phase 2 becomes 3 and you need to set the parameters for phase 2).
>
>
DELETES THE HIGHLIGHTED PHASE AND RENUMBERS THE FOLLOWING
PHASES
(e.g. if the program consists of 3 phases and phase 2 is deleted, phase 3 becomes 2)
>
>
ATTENTION: NO CONFIRMATION IS REQUIRED WHEN DELETING PHASES! PRESSING THE KEY
IMMEDIATELY DELETES THE CURRENT PHASE!
PHASE 1 CAN NOT BE DELETED!
Page 38

02-CBT.A
-
TOUCH
-01-EN
CREATING PROGRAMS (MULTI
-
PHASE)
38
13.2 MESSAGE SETTINGS
The following screen appears when selecting the message icon:
NEW PROGRAM
01:27:35
17/12/2016
______
↑
_______
↑
MESSAGE SELECTION KEYS
↑
MESSAGE SETTINGS KEYS
MESSAGE WRITING AREA
MESSAGE SELECTION KEYS
Icon Description
MESSAGE AT THE BEGINNING OF THE PHASE
MESSAGE ON REACHING SETPOINT
MESSAGE AT THE END OF THE PHASE
1/1
Page 39

CREATING PROGRAMS (MULTI
-
PHASE)
02-
CBT.A
-
TOUCH
-01-EN
39
MESSAGE SETTINGS KEYS
THE KEY ON THE TOP RIGHT TAKES ON THE FOLLOWING FUNCTIONS SPECIFIED IN RELATION
TO THE SELECTED MESSAGE (START; SET °C: END)
START MESSAGE
Key Behaviour when program running
No message appears
The message appears
The heating starts at "ON"
If the time is set
, the countdown begins
The message appears
The heating stays "OFF" until you reply to the message
If the time is set , the countdown begins when you reply to the
message.
MESSAGE ON REACHING SETPOINT
Key Behaviour when program running
No message appears
The message appears
Heating keeps the SETPOINT
If the time is set , the countdown begins
The message appears
Heating keeps the SETPOINT
If the time is set , the countdown begins when you reply to the
message.
END OF PHASE MESSAGE
Key Behaviour when program running
No message appears
The message appears
Heating keeps the SETPOINT
When the countdown has ended, it is possible to increase the cooking time or
move on to the next phase.
Page 40

02-CBT.A
-
TOUCH
-01-EN
CREATING PROGRAMS (MULTI
-
PHASE)
40
ATTENTION : IF THE MESSAGE IS SET TO OFF, ALL THE SETTINGS DESCRIBED BELOW
(FLASHING, BUZZER, AND TEXT) WILL NOT APPEAR WHEN THE PROGRAM IS RUNNING!
THE FOLLOWING KEYS HAVE THE SAME FUNCTIONS FOR ALL MESSAGES (START; SET °C;
END)
Flashing (optional)
Right key
Behaviour when program running
Flashing not enabled
When the message appears, the flashing light also switches on.
(message frame flashing or external flashing optional)
Buzzer
Right key
Behaviour when program running
Buzzer not enabled
When the message appears, the buzzer sounds
Page 41

CREATING PROGRAMS (MULTI
-
PHASE)
02-
CBT.A
-
TOUCH
-01-EN
41
ENTERING MESSAGE TEXT
NEW PROGRAM
01:27: 35
17/12/ 2016
USE THE KEYPAD TO ENTER A DESCRIPTIVE TEXT (MAX 200 CHARACTERS) AND CONFIRM
WITH THE KEY .
AFTER HAVING SET ALL THE VARIABLES WITHIN THE MESSAGE, THE RELATED MESSAGE
ICON WILL SHOW WITHIN ALL THE SYMBOLS THAT SUMMARISE THE SETTINGS OF THE
MESSAGE ITSELF.
TEXT PRESENT>
BUZZER ENABLED>
< ACTION TYPE
< FLASHING ENABLED
ATTENTION: IF THE MESSAGE IS IN "OFF", IT APPEARS ON A GREY BACKGROUND.
ANY SETTINGS (TEXT, BUZZER, FLASHING) WILL NOT BE CANCELLED FROM MESSAGE
SETTING!
Page 42

02-CBT.A
-
TOUCH
-01-EN
CREATING PROGRAMS (MULTI
-
PHASE)
42
13.3 SAVING A PROGRAM
IF YOU WANT TO ADD THE PROGRAM TO THE LIST OF FAVOURITES, PRESS THE "STAR"
SYMBOL.
NEW PROGRAM
01:27: 35
17/12/ 2016
Program NOT added to favourites
Program added to favourites
PRESS THE "SAVE" BUTTON
THE KEYPAD APPEARS TO ENTER THE PROGRAM NAME.
PROGRAM NAME
01:27: 35
17/12/ 2016
Page 43

CREATING PROGRAMS (MULTI
-
PHASE)
02-
CBT.A
-
TOUCH
-01-EN
43
ENTER THE PROGRAM NAME AND CONFIRM WITH THE KEY .
ATTENTION : THE PROGRAM DOES NOT PERFORM A CHECK TO SEE IF A PROGRAM WITH THE
SAME NAME ALREADY EXISTS. 2 PROGRAMS WILL BE SAVED WITH THE SAME NAME, WITH HE
POSSIBILITY OF RENAMING THEM. (SEE EDITING PROGRAMS)
THE SCREEN APPEARS FOR LINKING THE PROGRAM TO A CATEGORY
13.4 EDIT/ COPY/ RENAME PROGRAM
FROM SETTINGS> PROGRAMS
SELECT THE CATEGORY OF THE PROGRAM OR ALL
SELECT THE PROGRAM THAT YOU WANT TO EDIT.
REFER TO "CREATING MULTIPHASE PROGRAMS" FOR EDITING
ONCE CHANGES HAVE BEEN MADE, PRESS THE SAVE KEY AND THE FOLLOWING SCREEN
APPEARS:
SAVE: SAVES THE PROGRAM (NO FURTHER REQUEST)
COPY: A NEW PROGRAM IS CREATED (GIVE THE NAME TO THE PROGRAM AND THE
CATEGORY)
RENAME: GIVES A NEW NAME TO THE PROGRAM (SAVING THE CHANGES MADE)
MOVE: MOVES THE PROGRAM TO ANOTHER GROUP (PRESS THE SAVE KEY TO CONFIRM)
Page 44

02-CBT.A
-
TOUCH
-01-EN
RUNNING A PROGRAM/MANUAL COOKING
44
13.5 DELETING A PROGRAM
FROM SETTINGS> PROGRAMS
SELECT THE CATEGORY OF THE PROGRAM OR ALL
SELECT THE PROGRAM YOU WANT TO DELETE BY PRESSING ON THE NAME OF THE
PROGRAM FOR ABOUT 2 SEC.
A POP-UP WILL BE APPEAR TO CONFIRM PROGRAM DELETION
CONFIRM DELETION
CANCEL DELETION
14 RUNNING A PROGRAM/MANUAL COOKING
14.1 RUNNING A PROGRAM/MANUAL COOKING
FROM PROGRAMS> MANUAL
SET ALL THE COOKING PARAMETERS
PRESS THE START KEY
MANUAL
01:27: 35
17/12/ 2016
Page 45

RUNNING A PROGRAM/MANUAL COOKING
02-
CBT.A
-
TOUCH
-01-EN
45
THE SCREEN BECOMES
MANUAL
01:27: 35
17/12/ 2016
100°C
180°C
00:45:00
20°C
20°C
--:--:--
A SYMBOL APPEARS ON THE SIDE OF THE VALUE READ WITH THE FOLLOWING MEANINGS:
HEATING IN OPERATION
MINIMUM HEATING
HEATING OFF AS SETPOINT REACHED OR FOR WAITING (L COLUMN
ICONS)
WHEN RUNNING THE PROGRAM YOU CAN CHANGE THE TEMPERATURE AND TIME SETPOINT
BY PRESSING IN THE FIELD CORRESPONDING TO THE SET VALUES FOR ABOUT 2 sec. .
IT IS NOT POSSIBLE TO CHANGE THE COOKING METHOD AND TIME!!
14.2 END OF COOKING
EITHER WAIT UNTIL END OF COOKING TIME (IF TIME SET) OR PRESS THE STOP KEY.
IF THE SET TIME IS (INFINITE), COOKING/HEATING CAN ONLY BE ENDED BY PRESSING
THE STOP KEY!
Page 46

02-CBT.A
-
TOUCH
-01-EN
RUNNING PROGRAMS (MULTI
-
PHASE)
46
15 RUNNING PROGRAMS (MULTI-PHASE)
15.1 RUNNING PROGRAMS (MULTI-PHASE)
FROM PROGRAMS> SELECT THE PROGRAM THAT YOU WANT TO RUN FROM THE FOLDER: ALL;
CATEGORY (MEAT, SAUCES, ETC) OR FAVOURITES
PRESS THE START KEY
NOTE 1)
WHEN RUNNING THE PROGRAM YOU CAN CHANGE THE TEMPERATURE AND TIME SETPOINT
(ONLY IN THE PHASE IN WHICH THE PROGRAM IS CURRENTLY RUNNING) BY PRESSING IN THE
FIELD CORRESPONDING TO THE SET VALUES FOR ABOUT 2 sec. .
IT IS NOT POSSIBLE TO CHANGE THE COOKING METHOD AND TIME!!
NOTE 2)
YOU CAN MOVE ON TO THE NEXT PHASE (WITHOUT WAITING FOR THE PHASE IN PROGRESS
TO FINISH) BY PRESSING THE "PROGRAM PHASE" FIELD.
XXX1234
01:27: 35
17/12/ 2016
APPEARS:
x1
IT RETURNS TO THE PHASE IN PROGRESS
x2
IT PASSES TO THE NEXT PHASE.
ATTENTION: IF IT IS THE LAST PHASE, THE PROGRAM
FINISHES!
NOTE 3)
IF A PROGRAM HAS A PHASE SET WITH AN INFINITE TIME, THE MOVE TO THE NEXT STAGE IS
ACHIEVED BY PRESSING THE KEY TO THE SIDE OF THE TIME SYMBOL
Press the key to move on to the next phase
--:--:--
--:--:--
The time elapsed since the
beginning of the phase
is shown on the bottom row.
--:--:--
00:04:31
1/3
I
Page 47

RUNNING PROGRAMS (MULTI
-
PHASE)
02-
CBT.A
-
TOUCH
-01-EN
47
NOTE 4)
IF YOU ARE RUNNING A PROGRAM WITH ACTIVE MESSAGES, WHEN THE MESSAGE APPEARS,
THE OPERATOR:
CAN PRESS THE BUZZER OR TURN OFF THE FLASHING (IF PRESENT IN THE MESSAGE)
MUST CONFIRM THE OPERATION REQUESTED TO CONTINUE WITH THE PHASE OR TO MOVE
ON TO THE NEXT PHASE.
NOTE 5)
IF THE PROGRAM HAS THE ACTIVE MESSAGE "END" AT THE END OF THE COOKING TIME, THE
FOLLOWING MESSAGE APPEARS: END THE PHASE?
IF YOU PRESS "YES" , IT MOVES ON TO THE NEXT PHASE;
IF YOU PRESS "NO", THE FOLLOWING KEYS APPEAR:
key to move on to the next phase
00:45:00
00:00:11
key to increase the time (+ 1 minute each time the key is pressed)
The bottom row indicates the time passed since the cooking time elapsed.
AT THIS POINT IT IS NO LONGER POSSIBLE TO CHANGE THE TIME SETPOINT!
IN ORDER TO EXTEND THE COOKING:
EITHER YOU CHECK THE TIME PASSED ON THE LOWER ROW AND GO TO THE NEXT
STEP BY PRESSING THE KEY ABOVE;
OR PRESS THE +1 KEY (THE NUMBER OF TIMES CORRESPONDING TO THE DESIRED
NUMBER OF MINUTES). THE COUNTDOWN WILL BE DISPLAYED ON THE BOTTOM ROW
AND THE KEY ABOVE WILL DISAPPEAR. IT IS NOT POSSIBLE TO DECREASE THE
MINUTES SET. IF YOU MAKE A MISTAKE AND SET TOO MANY MINUTES, YOU HAVE TO
MOVE ON TO THE NEXT PHASE AS DESCRIBED IN NOTE 2.
+1
Page 48

02-CBT.A
-
TOUCH
-01-EN
RUNNING PROGRAMS (MULTI
-
PHASE)
48
ONCE THE TIME HAS RUN OUT, THE FOLLOWING MESSAGE WILL REAPPEAR: END THE PHASE?
--:--:--
--:--:--
15.2 END OF PROGRAM
EITHER WAIT FOR THE END OF PROGRAM OR PRESS THE STOP KEY (+ CONFIRM).
IF THE SET TIME IS (INFINITE) , COOKING/HEATING CAN ONLY BE ENDED BY PRESSING
THE STOP KEY!
+1
Page 49

COOKING WITH DELAY TIMER
02-
CBT.A
-
TOUCH
-01-EN
49
16 COOKING WITH DELAY TIMER
After having chosen the program to run,
press the button to access the settings for cooking with delay timer.
It is possible to set the delayed start in two ways:
Top row:
setting the start date and time: set the hour and minutes, and, if necessary, the day (with a maximum of 7
days in advance).
Bottom row:
setting delayed start: starting from the current time and date, set the hour and minutes, and if applicable
the day(s) delayed (with a maximum of 7 days in advance).
In automatic, when setting in one mode or the other, the other row will also be updated. (if the start time
and date are set, the delayed time will be updated, and vice versa).
To exit without saving, press the key .
Press the START key to confirm.
The display shows the time and date when it will start, and the bottom row shows the time remaining until
it starts.
To cancel the delayed start, press the STOP button.
Attention: check that there are no lights in the left column (e.g. pan out of position), otherwise
the cooking with delay timer will NOT be carried out.
Page 50

02-CBT.A
-
TOUCH
-01-EN
FILLING PAN WITH H2O
50
17 FILLING PAN WITH H2O
17.1 FILLING THE PAN WITH H2O USING A LITRE-COUNTER DEVICE
0 Lt
0 Lt
Select hot or cold water. Press on the Lt. Field
0 Lt
Set the number of litres you want to add and confirm with
120 Lt
min max
0 310
-----------------
1 2 3 4
5 6 7 8
- 9 0
START
START
Page 51

FILLING PAN WITH H2O
02-
CBT.A
-
TOUCH
-01-EN
51
Press the "START" key
120 Lt
0 Lt
120 Lt litres set
10 Lt litres added
If you want to stop filling with water before the number of litres set is reached, press the "START"
key
START
START
Page 52

02-CBT.A
-
TOUCH
-01-EN
FILLING PAN WITH H
2O
52
17.2 MANUALLY FILLING THE PAN WITH H2O
0 Lt
0 Lt
select hot or cold water
Keep the "START" key pressed down for the desired number of litres
0 Lt
10 Lt litres added
START
START
Page 53

USING THE MIXER
02-
CBT.A
-
TOUCH
-01-EN
53
18 USING THE MIXER
18.1 MIXER SETTINGS
Speed
15
Hz
2 sec.
Select the type of mixing
Select the field to edit.
Set the desired values with the keypad.
Speed on off
15 5 5
5 5
Hz sec. sec.
min max
15 50
Page 54

02-CBT.A
-
TOUCH
-01-EN
USING THE MIXER
54
Attention: When creating multi-phase programs, if you do NOT want to use the mixer in a certain
phase, you need to press key select mixing type (in dark grey), so that all the keys have a light
grey background (the area for setting values also disappears: speed; on; etc).
18.2 STARTING THE MIXER (MANUAL COOKING PROGRAM)
The mixer can be started or switched off by pressing the internal key or the external key.
To change the mixing type and speed refer to the "MIXER SETTINGS" paragraph.
Attention:
When opening the lid (PRI..M) the mixer automatically operates at minimum speed and only
rotates clockwise. When the lid is closed, the mixer returns to the set values.
When the pan is tilted, the mixer stops automatically. To facilitate product unloading, the mixer
can be operated (only at minimum speed and in a clockwise rotation) by keeping the key pressed
When the pan returns to the horizontal position, the mixer MUST be restarted!
Page 55

USING THE MIXER
02-
CBT.A
-
TOUCH
-01-EN
55
18.3 STARTING THE MIXER (MULTI-PHASE PROGRAM)
If the selected program involves the operation of the mixer, after pressing the START key, a message will
appear with a countdown for mixer start up.
If you do NOT want to start the mixer, press the "STOP MIXER" key. If you do want to use it, simple wait
for the time to run out.
Attention:
This message will appear in the program every time there is a phase with NO active mixer,
followed by a phase with active mixer.
To change the mixing type and speed refer to the "MIXER SETTINGS" paragraph.
The changes made will NOT be saved in the program, and will only be valid for the phase currently
running!
Whenever the mixer is turned off voluntarily, the key flashes to indicate that the mixer is required for that
phase.
Attention: if during the current phase (where the program involves the mixer) you manually decide
not to choose any type of mixing (all 3 buttons light grey), the key does NOT flash!
Attention:
When opening the lid (PRI..M) the mixer automatically operates at minimum speed and only
rotates clockwise. When the lid is closed, the mixer returns to the set values.
When the pan is tilted, the mixer stops automatically. To facilitate product unloading, the mixer
can be operated (only at minimum speed and in a clockwise rotation) by keeping the key pressed
When the pan returns to the horizontal position, the mixer MUST be restarted!
Page 56

02-CBT.A
-
TOUCH
-01-EN
WALL HEATING (CBTE ..AC)
56
19 WALL HEATING (CBTE ..AC)
19.1 WALL HEATING SETTINGS
100°C
20°C
2 sec.
Select the heating levels
Depending on the quantity of product present in the pan, it is possible to select the level to be heated.
1/3 2/3 3/3
Attention: to prevent the surface of the product from burning, select the correct number of levels
depending on the product present in the pan.
Selecting heating temperature
100°C
20°C 130°C
min max
Select the field to edit.
Set the desired values with the keypad.
Once the values have been confirmed, the selected heating levels are shown in the key in the right
column.
Page 57

WALL HEATING (CBTE ..AC)
02-
CBT.A
-
TOUCH
-01-EN
57
19.2 STARTING WALL HEATING (MANUAL COOKING PROGRAM)
After setting the parameters, to start heating, press the key in the right column. To turn it off, press the
key again.
Heating NOT active, dark grey key - heating active, light grey key.
OFF ON OFF
19.3 STARTING WALL HEATING (MULTI-PHASE PROGRAM)
If the program phases involve wall heating, the heating in the specific phase will be activated
automatically. You can always turn it off or change setting values.
Page 58

02-CBT.A
-
TOUCH
-01-EN
MOVING THE PAN
58
20 MOVING THE PAN
To move the cooking vessel, keep pressed the corresponding key on the display or external keypad.
The keys on the display are disabled when the pan tilting limits are reached.
With a completely horizontal pan = enabled only
With a tilted pan = enabled only
DISPLAY KEYPAD
Pan tilting key
Pan return key
Pan tilting key Pan return key
As tilting prevents the heating and mixing functions, whenever the pan is not in a horizontal position, the
icon appears.
ATTENTION: when cooking with tilted pan (CBTE ..) the icon only appears when tilted above 20°. If you
want to cook, as soon as this icon appears, press the return key up to the desired tilt angle (from
horizontal position until the icon appears).
Page 59

MOVING THE PAN
02-
CBT.A
-
TOUCH
-01-EN
59
Any messages that prevent pan movement appear in the left column.
Icon Description
Pan movement not allowed
Request to completely open the lid (for pan movement)
Request to turn the tap (for pan movement)
ATTENTION: In machines with mixer, to make it easier to empty the product, the mixer can be operated
(only at minimum speed and in a clockwise direction) by keeping the key pressed.
To return the pan to the horizontal position, press and hold the corresponding key, until the icon
disappears.
ATTENTION: The presence of the icon prevents the cooking functions of the machine.
Page 60

02-CBT.A
-
TOUCH
-01-EN
CLEANING AND CARE
60
21 CLEANING AND CARE
21.1 GENERAL INFORMATION
Do not use aggressive substances or abrasive detergents when cleaning stainless steel
parts.
Avoid using iron scourers on steel parts as rust formation may occur. For the same reason
avoid contact with ferrous materials.
No sandpaper or abrasive paper should be used during cleaning. In special cases, pumice
stone may be used in powder form.
In the event of particularly resistant dirt, we recommend the use of abrasive sponges (e.g.
Scotch-Brite).
21.2 DAILY CLEANING
Always wear protective clothing required by current regulations.
For safety reasons, clean the machine when it is cold and off (with the emergency button
pressed) (or on stand-by if cooking with delay timer).
When cleaning the appliance never spray water directly in order not to cause
infiltration and damage to the parts.
Never use water jets in the flue in gas versions.
Clean the pan with water and detergent, rinse well and dry thoroughly with a soft cloth
Clean the outside with a sponge soaked in hot water and a suitable detergent readily available on the
market.
Always rinse well and dry with a soft cloth.
Be careful not to damage the lid seal.
Clean the seal with NON-abrasive liquid detergent.
Page 61

CLEANING AND CARE
02-
CBT.A
-
TOUCH
-01-EN
61
21.3 MIXER CLEANING
To facilitate cleaning operations, the mixer can be removed from the pan by following the instructions
below:
-Tilt the cooking vessel up to 30-40°.
- Unscrew the "mixer locking ring"(01)
- Extract the "mixer" (02) taking care not to lose the Teflon sealing ring (03).
Gently place the mixer on the ground. The forged steel blades could get damaged!! It
is better to place the mixer on its side, rather than with the blades directly on the
ground.
- Clean the mixer and the Teflon ring.
- Refit the Teflon ring, the mixer and the locking ring nut.
- Return the pan to a horizontal position.
Page 62

02-CBT.A
-
TOUCH
-01-EN
CLEANING AND CARE
62
21.4 CLEANING THE PRESSURE COOKER SYSTEM
Clean the pressure system as described below:
1) Pour in water equal to about 10% of the pan's capacity (e.g. mod.180 = 18 litres), or about 2/3
cm of water in the bottom of the pan.
2) Start a 5-minute pressure cooking cycle
The cleaning cycle must be performed weekly.
Depending on how often pressure cooking is used and/or the product used, the
cleaning cycle may also be performed more frequently.
21.5 CLEANING AND CHECKING THE SAFETY VALVE
Thoroughly clean the safety valve housing from inside the lid as described below
1) Remove the spring loaded lid.
2) Remove the residue that may stick the poppet to the valve housing
3) At the end of cleaning, check that the valve poppet is free.
4) Refit the spring loaded lid
The check described in point 3 must be carried out at least once a month
Page 63

CLEANING AND CARE
02-
CBT.A
-
TOUCH
-01-EN
63
21.6 PRECAUTIONS IN CASE OF PROLONGED INACTIVITY
If the appliance has been inactive for a prolonged period of time (holidays, seasonal work...), clean well,
remove any residue and ensure it is dry.
Leave the lid open so that air can circulate inside the pan.
The room must be sufficiently ventilated.
Disconnect all water, electricity and gas supplies.
21.7 PRECAUTIONS IN CASE OF MALFUNCTION
Should malfunctions occur during use, switch off the appliance immediately and disconnect or stop all
supplies (gas and water).
Request assistance from technical support or a qualified technician.
The manufacturer assumes no responsibility or warranty commitment for injuries
and damage due to non-compliance with the instructions or any installation or
maintenance that does not comply with safety standards.
The same applies in case of improper use of the appliance by the operator.
Page 64

02-CBT.A
-
TOUCH
-01-EN
MAINTENANCE
64
22 MAINTENANCE
22.1 MAINTENANCE OF THE APPLIANCE
All maintenance work must only be performed by a specialist technical service
centre!
In order to keep the appliance working efficiently, it is advisable to perform annual
maintenance, which includes checking the status of components subject to wear and
tear (pipes, etc.).
It is advisable to replace any worn components during maintenance, in order to avoid
further call outs and unexpected issues and faults with the appliance.
Therefore, it is recommended to sign a maintenance contract with a reliable technical
support centre.
22.2 PERIODIC MAINTENANCE
Periodic inspections will minimise machine downtime and increase operating efficiency.
The following points must be checked:
Periodic inspections will minimise machine downtime and increase operating efficiency.
The following points must be checked:
FOR THE OPERATOR
DAILY CHECKS
1. Thoroughly clean the machine daily
WEEKLY CHECKS
2. Perform THE PRESSURE COOKER SYSTEM CLEANING CYCLE
3. Perform THE SAFETY VALVE CLEANING CYCLE
4. Make sure that all the blade screws (04) are not loose (all the blade fixing screws have a
self-locking nut).
5. Check the wear of the Teflon scraper (05). If it needs replacing, contact technical support.
Page 65

MAINTENANCE
02-
CBT.A
-
TOUCH
-01-EN
65
MONTHLY CHECKS
6. Perform the SAFETY VALVE check (step 3)
QUARTERLY CHECKS
7. Clean the mixer motor fan with compressed air or a suction device.
8. Check the following are undamaged and intact:
Screen controls, switches, warning lights.
Emergency button:
Contact technical support if they are damaged.
Page 66

02-CBT.A
-
TOUCH
-01-EN
DISPLAY MESSAGES
66
23 DISPLAY MESSAGES
Message Meaning Solution
Safety thermostat has been triggered
The safety thermostat can be disarmed
during transport without any issues.
Reset the thermostat
from the lower panel on
the right hand side, by
pressing firmly on the red
thermostat key.
If the thermostat is
triggered again, contact
the support centre.
Insufficient gas pressure.
It is not possible to start cooking.
Verify that gas is
supplied and that the
pressure is sufficient.
Contact the support
centre.
!! BLOCK GAS
DEVICE !!
PRESS
**RESET**
If a cooking phase has started and
insufficient gas pressure has been
detected on 4 consecutive occasions or
there is a fault on the flame detection
system, the central unit will be interrupted.
Press “RESET”.
After 3 RESET attempts,
the message below
appears.
!! GAS SYSTEM
ANOMALY!!
CONTACT TECHNICAL
ASSISTANCE
Problem with the gas system: gas central
unit fuses, gas solenoid valve, spark plugs
and pilot light plug.
Contact technical support.
PROBES ERROR
One or more of the appliance's
sensors/probes are faulty (or not
connected). Cooking methods that use
these sensors/probes will be disabled (light
grey) until they are repaired.
Contact technical support.
INTERNAL ERROR
Connection error between the relay board
and keypad board
System board error.
Switch the appliance off,
and switch back on after
two minutes, if the
problem persists, call a
technician
Page 67

DISPOSAL OF THE APPLIANCE
02-
CBT.A
-
TOUCH
-01-EN
67
BLACK OUT ERROR
t.b.d
INVERTER ERROR
Connection error between relay board and
inverter
Contact technical support.
EXTERNAL MEMORY
ERROR
SD memory card not available.
Contact technical support.
OUTPUT
CONFIGURATION
ERROR
PROGRAMMING ERROR. Dual output
assignment!!
Contact technical support.
24 DISPOSAL OF THE APPLIANCE
Directives 2002/95/EC, 2002/96/EC and 2003/108EC
The symbol shown on the technical data plate indicates that the product must be disposed of
separately from other waste at the end of its useful life.
Contact the supplier of the appliance for separate collection of this appliance at the end of its useful life.
 Loading...