

Fire Stone Cook Number Grill, Legacy 20 i, Legacy 20 i/e Electric Owner's Operating And Safety Instructions
Page 1
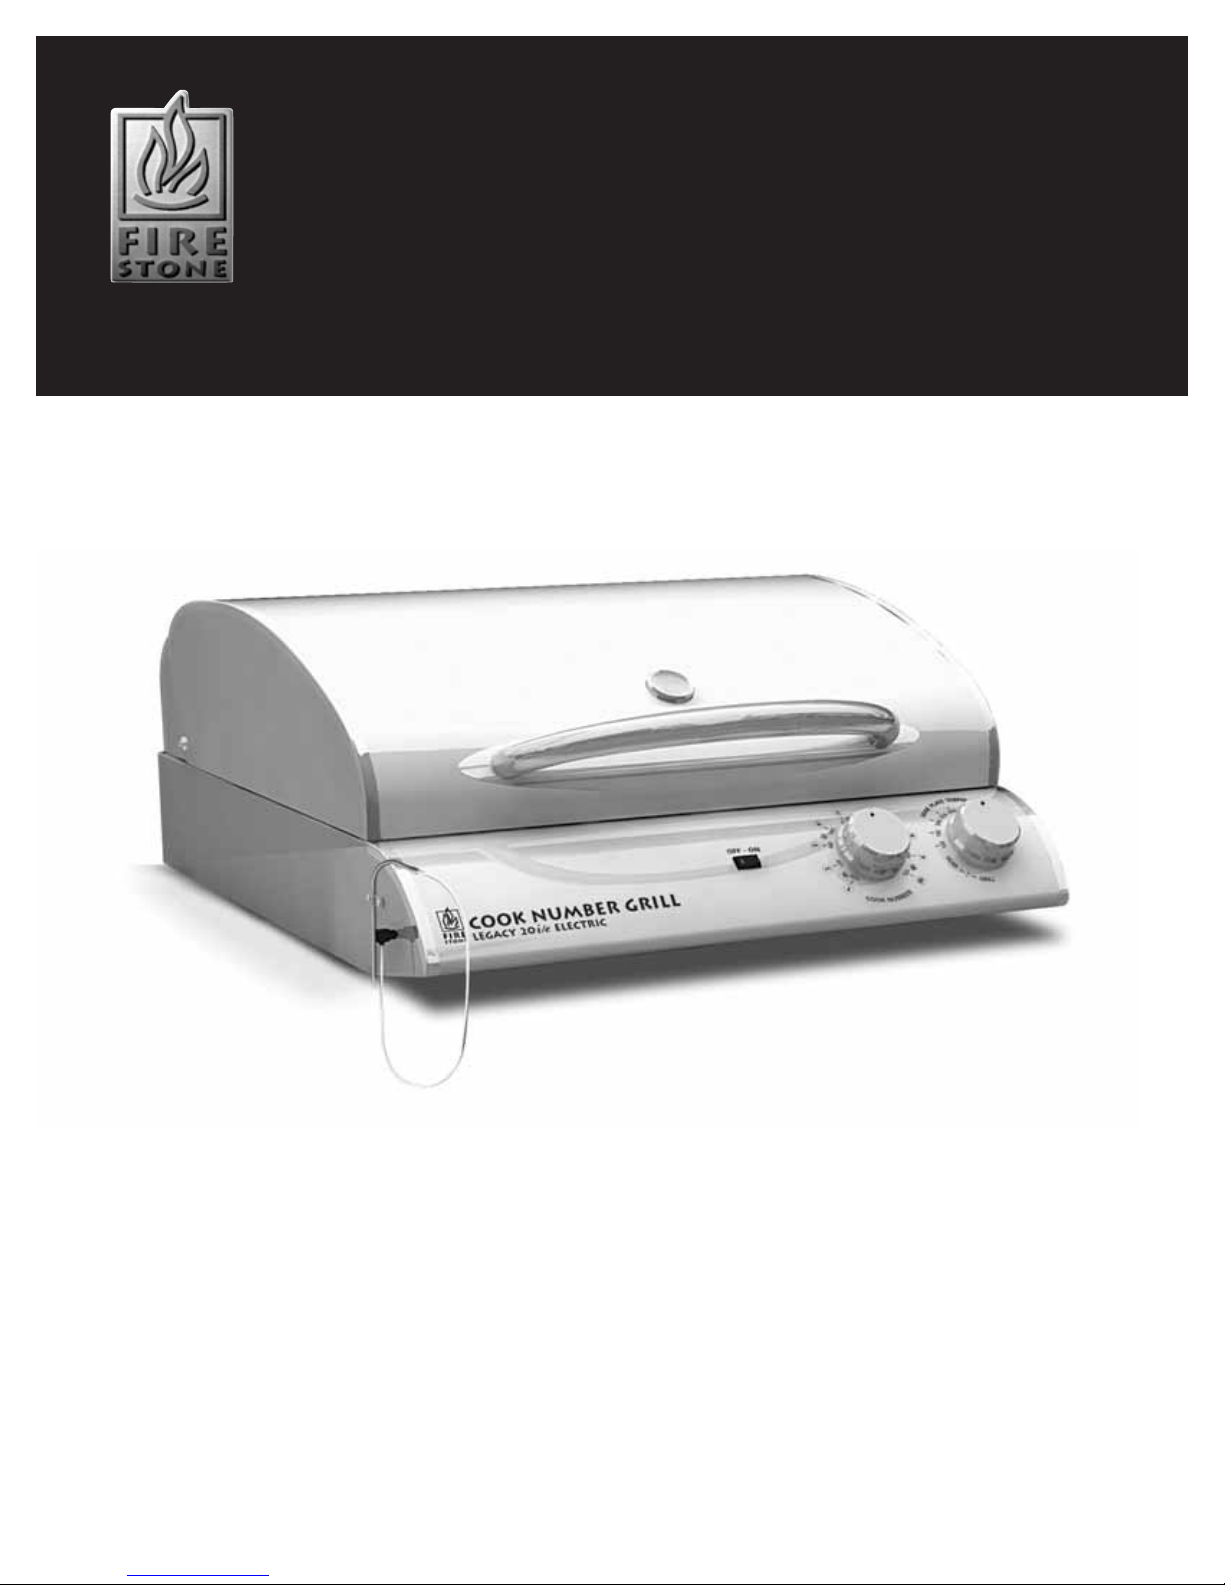
Cook Number Grill
™
Designed for Professional Results in Four Grill Cooking Formats:
Grill
■
Roast ■Sear ■Convection Baking
Owner’s Operating and Safety Instructions
®
Legacy 20 i/e Electric
Page 2
CAUTION
DO NOT DISCARD THIS MANUAL
■ Important operating and maintenance
instructions included.
■ Read, understand and follow these instructions
for safe installation and operation.
■ Leave this manual with party responsible for
use and operation.
WARNING:
If the information in these instructions is not
followed, a fire or explosion may result causing
property damage, personal injury or death.
FOR YOUR SAFETY
Do not store or use gasoline or other flammable
vapors and liquids in the vicinity of this or any
other appliance.
Read the following instructions carefully and be
sure your grill is properly installed, assembled
and maintained.
Failure to follow these instructions may result in
serious bodily injury and/or property damage. If
you have questions concerning assembly or
operation, consult your dealer.
Thank You for selecting the
Fire Stone Legacy 20 i/e Electric COOK NUMBER
GRILL™.
We trust you’ll be delighted with the high
quality engineering and performance you’ll
experience with this highly versatile grill and
convection range. It has been carefully designed
to deliver professional quality “controlled
cooking” – all encompassed in a lightweight and
efficient format with features unlike any other
grill in its category.
Please follow the instructions carefully for safe
enjoyable use. We wish you years of superior
performance, entertainment & culinary
enjoyment.
Safety Instructions 3
Getting Started 4-5
Unpacking 4
Seasoning your Grill 4
Starting & Grilling 4-5
Outdoor Use 5
Indoor Use 5
How to Cook 6-7
Cleaning and Maintenance 8
Warranty 9
Recipes 10-11
Fire Stone Home Products
7900 International Plaza
Suite 200
Bloomington, MN 55425
Toll free: 1-866-303-4028
Fax: 952-876-4029
Customer Service: 952-876-4028
www.firestonehp.com
Patent pending.
© Copyright 2005, Fire Stone Home Products
FCNL20ie – V:II 2M/0206
2
Table of Contents
®
Cook Number Grill™
Page 3
Safety instructions
9. Do not place on or near a hot gas or electric
burner or in a heated oven.
10. Extreme caution must be used when moving
an appliance containing hot oil or other hot
liquids.
11. To disconnect, turn any control to OFF, then
remove plug from wall outlet.
PLEASE NOTE:
The OFF/ON switch found on the front panel
of the Fire Stone 20 i/e operates as a
MANUAL switch and DOES NOT SHUT OFF
AUTOMATICALLY. This is a design feature
which enables extended grilling times for
slow roasting.
12. Do not use appliance for other than intended
use.
13. Fuel, such as charcoal briquettes, is not to be
used with appliance.
14. Use only on properly grounded outlet.
SAVE THESE INSTRUCTIONS
3
WARNING!
Never allow children to operate the grill.
Do not allow children to play near the grill.
WARNING!
IMPORTANT SAFEGUARDS
When using electrical appliances, basic safety
precautions should always be followed including
the following:
1. Read all instructions.
2. Do not touch hot surfaces. Use handles or
knobs.
3. To protect against electrical shock, do not
immerse cord, plugs, probe or grill in water or
other liquid.
4. Close supervision is necessary when any
appliance is used near children.
5. Unplug from outlet when not in use and
before cleaning. Allow to cool before putting
on or taking off parts.
6. Do not operate any appliance with a damaged
cord or plug or after the appliance
malfunctions or has been damaged in any
manner. Return appliance to the nearest
authorized service facility for examination,
repair or adjustment.
7. The use of accessory attachments not
recommended by the appliance manufacturer
may cause injuries.
8. Do not let cord hang over edge of table or
counter, or touch hot surfaces.
®
Cook Number Grill™
Page 4
Getting Started
Unpacking & Initial
Prep cleaning
Carefully unpack your COOK NUMBER GRILL
™
and remove all corrugated shipping elements
used to protect your grill in transit. Before you
begin, we first recommend removing the Grilling
Grate on the left side and the Searing Plate on
the right side and washing them both with
warm soapy water.
Seasoning your Fire
Stone legacy 20 i/e Grill
Getting Started
1. Please familiarize yourself with the safety
guidelines at the front of this manual.
2. Be sure the grill is plugged in and stationed
on a clean and dry surface.
3. Open the grill lid.
4. For first time START-UP procedure, we
recommend following the steps below to
prepare your grill for optimum performance
by staging a proper initial “seasoning / burn
off” process.
Step 1.
BEFORE IGNITION, take a soft clean cloth and
apply a thin coating of cooking oil or olive oil to
the cloth and lightly wipe on both the grate and
the searing plate of the grill.
Step 2.
You’ll be seasoning both surfaces of the grill one
side at a time following the ignition instructions
below. Be sure to allow time for each side to
fully heat up and release any initial smoke
during this break-in / seasoning stage.
Step 3.
Fire Stone COOK
NUMBER GRILL™STARTING
INSTRUCTIONS:
The Fire Stone COOK NUMBER GRILL™is
designed to operate either on the left side / grill
mode - or the right side / sear mode BUT NEVER
BOTH SIDES AT THE SAME TIME.
To start the LEFT Grilling & Roasting side:
1. First, turn on the grill by depressing the black
OFF / ON rocker switch on the front panel to
the right – for the ON position.
2. Turn the – far right dial COUNTER-CLOCKWISE
to start the GRILL SIDE heating element.
The Fire Stone COOK NUMBER GRILL
™
is
designed to automatically operate at HIGH
TEMPERATURE in this mode.
3. Allow 5 to 7 minutes for the GRILL SIDE
surface to reach its full temperature to
complete the initial seasoning process or to
begin grilling.
To start the RIGHT Searing Plate side:
1. Turn on the grill by depressing the black OFF /
ON rocker switch on the front panel to the
right – for the ON position.
2. Turn the – far right dial CLOCKWISE to start
the SEARING PLATE heating element and turn
the temperature to the highest setting @ 550°
for the initial seasoning / burn-off process.
Allow 5 to 7 minutes for the SEARING PLATE
surface to reach its full temperature to
complete the break-in / seasoning process or
to begin searing.
Now that your Fire Stone COOK NUMBER GRILL
™
is seasoned, you will use the searing feature by
selecting the desired temperature of your choice
using this far right knob. Searing times may vary
based on what you’re grilling, but we
recommend using a QUICK-SEAR method to lock
in the juices at higher temps.
Then, after the quick searing is done, you
continue by turning the left GRILL SIDE on by
rotating the same far right knob COUNTERCLOCKWISE and finish the grilling process using
your convection grill feature to achieve the
desired professional cooking results.
4
®
Cook Number Grill™
Page 5

Starting & Grilling
Notes About
OUTDOOR USE
Be sure you have proper ventilation, and protect
all other surfaces near the grill.
NEVER grill in the open rain or in standing water
as this grill is an electric appliance. There is
always a hazard of electric shock while operating
this unit.
Notes About
INDOOR USE
Use the Fire Stone COOK NUMBER GRILL™ONLY
with:
■ The proper surfaces and surroundings
to avoid fire or shock hazard.
■ The proper ventilation - preferably directly
underneath an indoor cooking ventilation
hood or near a well-stabilized stone surface
such as a fireplace hearth.
■ Never operate in the presence of flammable
surfaces or in standing or running water.
■ While grilling, flare-ups from fats and juice
drippings can occur, so be sure to monitor
food closely so it does not burn.
5
WARNING
HOT! DO NOT TOUCH. SEVERE
BURNS MAY RESULT. CLOTHING
IGNITION MAY RESULT.
■ Keep children away.
■ CAREFULLY SUPERVISE children in same area
as grill.
■ Alert children and adults to hazards of
high temperatures.
■ Never lean over the cooking area while
grill is on.
■ Surfaces are hot during operation and
cool down.
®
Cook Number Grill™
Page 6

HOW TO use your Cook number Grill™
Overview
1. Follow the steps for Getting Started outlined on
page 4.
2. To begin SEARING or GRILLING - push the Fire
Stone Legacy OFF / ON rocker switch to the
right for the ON position.
3. Next, rotate the far right searing & grilling
control dial clockwise for searing...or
counterclockwise for grilling, roasting or
convection baking.
How to use the FIRE STONE
Cook Control System™:
1. First, follow the start-up instructions under the
Getting Started section shown at the top of
page 4. Pre-heat the grill for 5 to 7 minutes in
the mode of your choice – either the LEFT
Grilling & Roasting side, or the RIGHT Searing
Plate side. After the grill mode you’ve selected
is up to temperature, place the food on the preheated surface and insert the Cook Control
System™ Monitor Probe into the food for
worry-free controlled cooking.
For best results, be sure to
insert the probe into the
deepest part of your fillet or
roast.
2. Set the audible temperature
“controlled cooking” monitor
feature by dialing in your Cook
Number™ to correlate with the
food you are grilling or roasting.
3. When the probe detects the food has reached
its proper temperature, the alarm will sound
and the red lights will illuminate.
Remember – thick cuts of meat such as steaks or
roasts will continue to cook after they have been
removed from the grilling surface.
4. Be sure to turn the far right control dial OFF by
pushing the black OFF / ON rocker switch to the
left OFF position, and unplug your grill after
each use.
Searing
TIP: You may want to lightly coat
the searing plate with oil or
non-stick cooking spray prior
to use.
1. Follow the steps for Getting
Started outlined on page 4.
2. For a professional seared finish, place meat or
fillet on pre-heated SEARING PLATE located on
the right side of the grill.
3. Sear meat or fillet approximately 30-45 seconds
on each side for rare, 45-60 seconds on each
side for medium, 60-90 seconds on each side for
well-done, and slightly longer for cuts thicker
than one inch or in cold weather.
4. Once meat or fillet is seared on both sides,
rotate far right dial counterclockwise to
ignite grilling surface and continue
convection grilling.
Cook Control System™
Monitor Probe
Hood Temperature Gauge
OFF/ON Rocker Switch
Searing Plate/Grill
Temperature Dial
Cook Control System™
Temperature Setting/Alert Dial
Probe Heat Shield
Cast Iron Searing Plate and
Stainless Steel Grate (inside)
Grill Searing
Plate
6
®
Page 7

Grilling and Roasting
1. Follow steps for Getting Started outlined on
page 4.
2. For professional grilling and convection
roasting, place meat or fillet on pre-heated
stainless steel grate. You may want to lightly
coat the steel grate with oil or non-stick
cooking spray prior to use.
3. For turkey, whole chicken, or roast, follow
recipe instructions for preparation, basting,
etc. as you normally would for indoor range
cooking. A V-shaped roasting rack is
recommended. Make sure to use a shallow
roasting pan to catch drippings.
4. Remove the COOK CONTROL
SYSTEM™ Monitor Probe from
holder and insert probe into
thick part of meat but NOT
touching the bone (see photo).
For steaks, fillets and roasts,
insert probe tip as near the
center of the meat as possible.
CAUTION: Probe gets hot during use. ALWAYS
use the probe heat shield, or high-temperature
gloves, when inserting and removing probe from
meat or fillet. NEVER let heat shield remain
inside hood when cooking.
5. Turn COOK CONTROL SYSTEM™ dial to
desired setting.
6. Close the hood and let
convection cooking do
the rest. Keeping the
hood closed is
important to the
convection process.
7. When the probe detects the food has reached
its proper temperature, the alarm will sound
and the red lights will illuminate.
8. When finished, wipe COOK CONTROL SYSTEM™
Probe clean and return it to holder.
9. Turn the far right control dial OFF by pushing
the black OFF / ON rocker switch to the left OFF
position, and unplug your grill after each use.
Baking
TIP: Use of seasoned baking stones, particularly
for breads and grill roasted pizza, can enhance the
quality of your baking. Experiment and discover
what works best for you.
1. Follow the steps for Getting Started outlined on
page 4.
2. For professional baking, place pan, sheet or dish
on grill.
3. Close hood, turn far right dial counterclockwise
to ignite grill, and wait for grill hood
temperature gauge to reach 300-350˚F.
4. Set a timer according to recipe instructions and
keep the hood closed as you normally would for
indoor range baking. This is important to the
convection process.
5. When finished, turn the far right control dial
OFF by pushing the black OFF / ON rocker switch
to the left OFF position, and unplug your grill
after each use.
At Fire Stone, we’re constantly developing new
techniques to make cooking on your Legacy 20 i/e
Electric COOK NUMBER GRILL™ a great experience
that delivers the best results possible.
To learn more, visit www.firestonehp.com
7
HOW TO use your Cook number Grill
™
®
continued
Page 8

Cleaning and Maintenance
ALWAYS BE SURE THE GRILL IS UNPLUGGED
BEFORE CLEANING
Periodically, remove the grilling grates and
searing plate and wash in soap and warm water.
Use a wash cloth or vegetable brush to clean the
cooking grids.
CAUTION: Never try to clean the cooking grids
until they are cool to the touch.
Cleaning the Grease Tray and Receptacle
To reduce the chance of fire, the grease draining
tray and grease receptacle should be inspected
before each grill use. Remove any grease and
wash aluminum tray and receptacle with soap
and warm water– or discard and replace with a
new aluminum tray.
As with all appliances, proper care and
maintenance will keep this grill in top operating
condition. By following these cleaning
procedures on a regular basis, your Fire Stone
Legacy Grill will stay clean and work properly
with minimum effort.
WARNING Fire & Shock Risk
1. Remove the grilling grate on left for cleaning
– and also to clean the vaporizer plate below
the heating element. Also – remove the
searing plate on the right for cleaning and reseasoning as needed.
2. Using a putty knife, carefully scrape the area
below the heating element on the left side for
optimal performance.
Be careful NOT to scrape the heating element
directly.
WARNING Fire & Shock Risk
Do not line the bottom of the grill housing with
aluminum foil, sand or any substance that will
restrict the flow of grease into the grease
draining tray and receptacle.
■ Failure to comply with these instructions could
result in a fire or explosion which could
cause property damage, serious bodily
injury or death.
CAUTION: Be sure the grill is OFF and cool before
cleaning.
Annual Cleaning of the Grill Interior
Burning-off the grill after every cookout will
keep it ready for instant use. However, once a
year you should give the entire grill a thorough
cleaning to keep it in top operating condition.
Follow these steps:
1. Unplug the grill.
2. Brush the inside and bottom of the grill with a
stiff wire brush, and wash with soap and
warm water. Rinse thoroughly and let dry.
Cleaning Exterior Surfaces
Before initial use, and periodically thereafter,
wash the grill using soap and warm water. Use a
wash cloth or sponge for this process. Do not use
a stiff wire or brass brush that might scratch the
stainless steel surface.
Cleaning Exterior Stainless Steel Surfaces
Weathering and extreme heat can cause exterior
stainless steel surfaces to turn tan in color.
Follow these steps for the best cleaning results:
1. Remove dirt or grease using hot water & soap
and a soft cloth. Then, polish and treat the
stainless surfaces using only an approved
stainless steel care product. Never use abrasive
cleaners or scrubbers as they will damage the
stainless steel surface as well as destroy the
printed graphic surfaces used for operating
instructions.
2. Finish by wiping your grill clean with a soft
cloth and allow to air dry before starting the
grill.
Cleaning the Grease Tray
Pull the tray out from the BACK SIDE of the grill.
This is also a replaceable tray feature and can be
ordered from our Fire Stone Customer Care Parts
Center found on our web site at
www.firestonehp.com
8
®
Cook Number Grill™
CAUTION: The OFF/ON rocker switch found
on the front panel of the Fire Stone
Legacy 20 i/e Electric COOK NUMBER
GRILL™ operates as a MANUAL switch and
DOES NOT shut off automatically. This is a
design feature which enables extended
grilling times for slow roasting.
Page 9

Fire Stone Legacy 20 i/e Electric COOK NUMBER GRILL™
Limited Warranty
Fire Stone extends the following warranty for Legacy 20 i/e Electric Grills used in the United States of
America or Canada. Dealers and employees of Fire Stone have no authority to make any warranty or
authorize any remedies in addition to or inconsistent with the terms of this warranty. This warranty
gives you specific legal rights. You may also have other rights that vary from state to state.
Fire Stone warrants that this Legacy 20 i/e Electric Grill (the “Product”) will be free from defects in
material and workmanship as follows:
■ Stainless steel parts - for the life of the Product.
■ All other parts - for a period of one year from the Product’s date of purchase.
This warranty is subject to the conditions, exclusions and limitations described below:
This warranty applies only to the original owner of the Product and is nontransferable. Fire Stone’s
obligation under this warranty does not extend to damages resulting from (1) assembly, operation or
maintenance of the Product not in accordance with the Installation/Assembly Instructions, Operating
Instructions and the Listing Agency Identification Label furnished with the Product; (2) installation or
use which does not comply with local building codes and ordinances; (3) shipping, improper handling,
improper operation, abuse, misuse, accident or unworkmanlike repairs; (4) use of fuels other than
those specified in the Operating Instructions; (5) installation or use of components not supplied with
the Product or any other components not expressly authorized and approved in writing by Fire Stone;
and/or (6) modification of the Product not expressly authorized and approved in writing by Fire Stone.
Any of the circumstances described in the previous sentence voids this warranty. This warranty is void
if the Product or any component has been removed, repaired or replaced before Fire Stone has been
afforded a reasonable opportunity to inspect the Product.
This warranty is limited to the replacement of defective components and Fire Stone may fully discharge
its obligations under this warranty by replacing, at its discretion, the defective components. Fire Stone
will provide replacement parts at no charge and will pay reasonable and necessary freight costs related
to replacing defective components under this warranty. The maximum amount recoverable under this
warranty is limited to the purchase price of the Product and, if Fire Stone is unable to provide
replacement components in an expedient and cost-effective manner, Fire Stone may discharge all
obligations under this warranty by refunding the purchase price of the Product.
EXCEPT TO THE EXTENT PROVIDED BY LAW, FIRE STONE MAKES NO EXPRESS WARRANTIES OTHER
THAN THE WARRANTY EXPRESSED HEREIN. THE DURATION OF ANY IMPLIED WARRANTY IS LIMITED
TO THE DURATION OF THE WARRANTY SPECIFIED ABOVE. IN NO EVENT SHALL FIRE STONE BE LIABLE
FOR ANY INCIDENTAL OR CONSEQUENTIAL DAMAGES CAUSED BY DEFECTS IN THE PRODUCT. Some
states do not allow limitations on how long an implied warranty lasts, or do not allow exclusion or
limitation of incidental or consequential damages, so these limitations may not apply to you.
To obtain service under this warranty, you must:
1. Obtain service and/or parts by visiting our web site at www.firestonehp.com, or visit any authorized
dealer, or send written notice of the claimed condition to Fire Stone, Technical Services Department,
7900 International Plaza, Suite 200, Bloomington, MN 55425, or fax 952-876-4029.
2. Provide documentary proof that you are the original owner of the Product.
3. Provide Fire Stone reasonable opportunity to investigate the claim, including reasonable opportunity to
inspect the Product prior to any repair or replacement work and before the Product or any component of
the Product has been removed.
Warranty
9
®
Cook Number Grill™
Page 10

®
Cook Number Grill™
10
recipes
Chermoula (Mediterranean style
marinade)
Best Served with Fish, Chicken or Pork
1/2 cup extra virgin olive oil
1/2 cup corn oil
1/2 cup lemon juice
1/2 cup Italian parsley, chopped
1/2 cup cilantro, chopped
1/2 ounce garlic, chopped fine
1 tablespoon paprika
1 teaspoon cumin, toasted and ground
1/2 teaspoon cayenne
1/2 teaspoon kosher salt
1/4 teaspoon white pepper
Whisk all ingredients together in a bowl.
■ Marinade meat for 10-15 minutes
(for best flavor, place meat portions and
chermoula in a large freezer bag, shake
and refrigerate)
■ Sear meat on the searing plate for 45 seconds
-1 minute on each side.
■ Switch grill to the grilling mode and move
meat onto the grilling grate.
■ Cook on one side for 3-5 minutes, flip meat
to the other side and insert temperature
probe and cook to desired doneness.
Cider Brine For Pork (Marinade)
1 each cinnamon sticks
1/2 teaspoon cumin seed
1/2 tablespoon allspice berries
2 each star anise
1/2 teaspoon coriander seed
3 each garlic cloves
1 cup brown sugar
1/4 teaspoon black pepper corns
4 cups apple cider
Combine all ingredients in a saucepan and bring
to a boil. Remove from heat and let cool. Pour
the entire mixture over portions of pork and let
marinate for 10-15 minutes (for best flavor, place
meat portions and Cider Brine in a large freezer
bag, shake and refrigerate).
■ Sear meat on the searing plate for 45 seconds
-1 minute on each side.
■ Switch grill to the grilling mode and move
meat onto the grilling grate.
■ Cook on one side for 3-5 minutes, flip meat
to the other side and insert temperature
probe and cook to desired doneness.
Page 11

11
®
Cook Number Grill™
recipes
Salsa Roja (Sauce/Salsa)
Best served with fish, rice, flank steak (fajita
style), or chips and salsa.
2 1/2 pounds Roma tomatoes
3/4 pound yellow onion
1 1/4 cloves garlic
1/8 cup lime juice
1/4 bunch cilantro
3/4 each jalapeno
1/4 tablespoon kosher salt
1/2 teaspoon black pepper
3/4 each chipotle peppers
On a hot grill char tomatoes, halved onions and
jalapenos until skin are black. In meat grinder
process all ingredients leaving salsa fairly coarse.
Can be used as a marinade, or served over meat.
■ Marinade meat for 10-15 minutes (for best
flavor, place meat portions and Salsa roja in a
large freezer bag, shake and refrigerate)
■ Sear meat on the searing plate for 45 seconds
-1 minute on each side.
■ Switch grill to the grilling mode and move
meat onto the grilling grate.
■ Cook on one side for 3-5 minutes, flip meat
to the other side and insert temperature
probe and cook to desired doneness.
Tangerine-Ginger Glaze (Marinade)
Best served with poultry or seafood
4 cups tangerine juice
2 cups orange juice
1 cup mirin
1/2 cup soy sauce
1/2 cup brown sugar
2 tablespoons sugar
2/3 tablespoon garlic, chopped fine
1 each tangerine, zest
1/4 cup ginger
1 tablespoon cornstarch
1 tablespoon water
Combine first 8 ingredients in a sauce pan and
reduce by 1/2 - Mix cornstarch and water
together and add to reduction. Bring reduction
back to a boil.
■ Marinade meat for 10-15 minutes (for best
flavor, place meat portions and Tangerine-
Ginger Glaze in a large freezer bag, shake
and refrigerate)
■ Sear meat on the searing plate for 45 seconds
-1 minute on each side.
■ Switch grill to the grilling mode and move
meat onto the grilling grate.
■ Cook on one side for 3-5 minutes, flip meat
to the other side and insert temperature
probe and cook to desired doneness.
Page 12

Cook Number System
™
Grill by the numbers and suddenly, you’re an expert.
Filets
Stuffed
Cooked
Medium
Well
Breast Thigh
Dark
Rare
R/MedR
MedR
Med M/MedW MedW
Well WWell
Burgers
Brats
Med MedW
Well
Med MedW
Well
Fire Stone Legacy Convection Grill
The Cook Number Grill
Page 13

®
Cook Number Grill™
 Loading...