

Fire Sense Weyland Round Aluminum, Dynasty Square Aluminum User Manual
Weyland Round Aluminum LPG Fire Pit
Conforms to ANSI STD Z21.97-2014,
Certified to CSA STD 2.41-2014 Outdoor decorative gas appliances
Item#: 62752
WARNING
FOR YOUR SAFETY
1. Improper installation, adjustment,
alteration, service or maintenance can
cause injury or property damage.
2. Read the installation, operation, and
maintenance instructions thoroughly
before installing or servicing this
equipment.
3. Failure to follow these instructions
could result in fire or explosion, which
could cause property damage, personal
injury, or death.
WARNING
For Outdoor Use Only
WARNING
This product can expose you to chemicals
including Carbon Monoxide, Lead, Chromium
(hexavalent compounds), Di(2ethylhexyl)phthalate (DEHP) and Diisononyl
phthalate (DINP), which are known to the State of
California to cause cancer and birth defects or
other reproductive harm. For more information, go
to www.P65Warnings.ca.gov.
ATTACH YOUR
RECEIPT HERE
Keep a copy of your proof of
purchase or order confirmation
which will be needed if you
need to contact us about
warranty coverage.
Purchase Date:
Questions, problems, missing parts?
Before returning to your retailer, our exceptional customer service is available.
Call us toll-free at (866) 985-7877, email us at cservice@welltraveled.net, or go online and
live chat at www.wtliving.com. Our hours are: 9 a.m. – 6 p.m., EST, Monday – Friday.
Manual updated Jan 2019 | Code ZDMF
www.wtliving.com
TABLE OF CONTENTS
Table of Contents Page 2
Before You Begin
Page 2
Package Contents Page 3
Safety Information Page 4
Assembly
Pages
5-8
Operating Instructions Pages 9-12
Conversion to Natural Gas Pages 13-15
Care and Maintenance Page 16
Troubleshooting Page 17
Warranty Information Page 18
BEFORE YOU BEGIN
Please read and understand this entire manual before attempting to assemble, operate or install this
appliance. If you have any questions regarding the product, please call us toll-free at (866) 985-7877,
email us at cservice@welltraveled.net, or go online and live chat at www.wtliving.com.
Our hours are: 9 a.m. – 6 p.m., EST, Monday – Friday.
This manual contains important information about the assembly, operation and maintenance of this LPG
fire pit. General safety information is presented in the first few pages and is also located throughout this
manual. Keep this manual for future reference and to educate new users of this appliance.
Contact us for assistance: (866) 985-7877 | www.wtliving.com 2
G
A
B
C
G
E
A
B
C
D
E
F
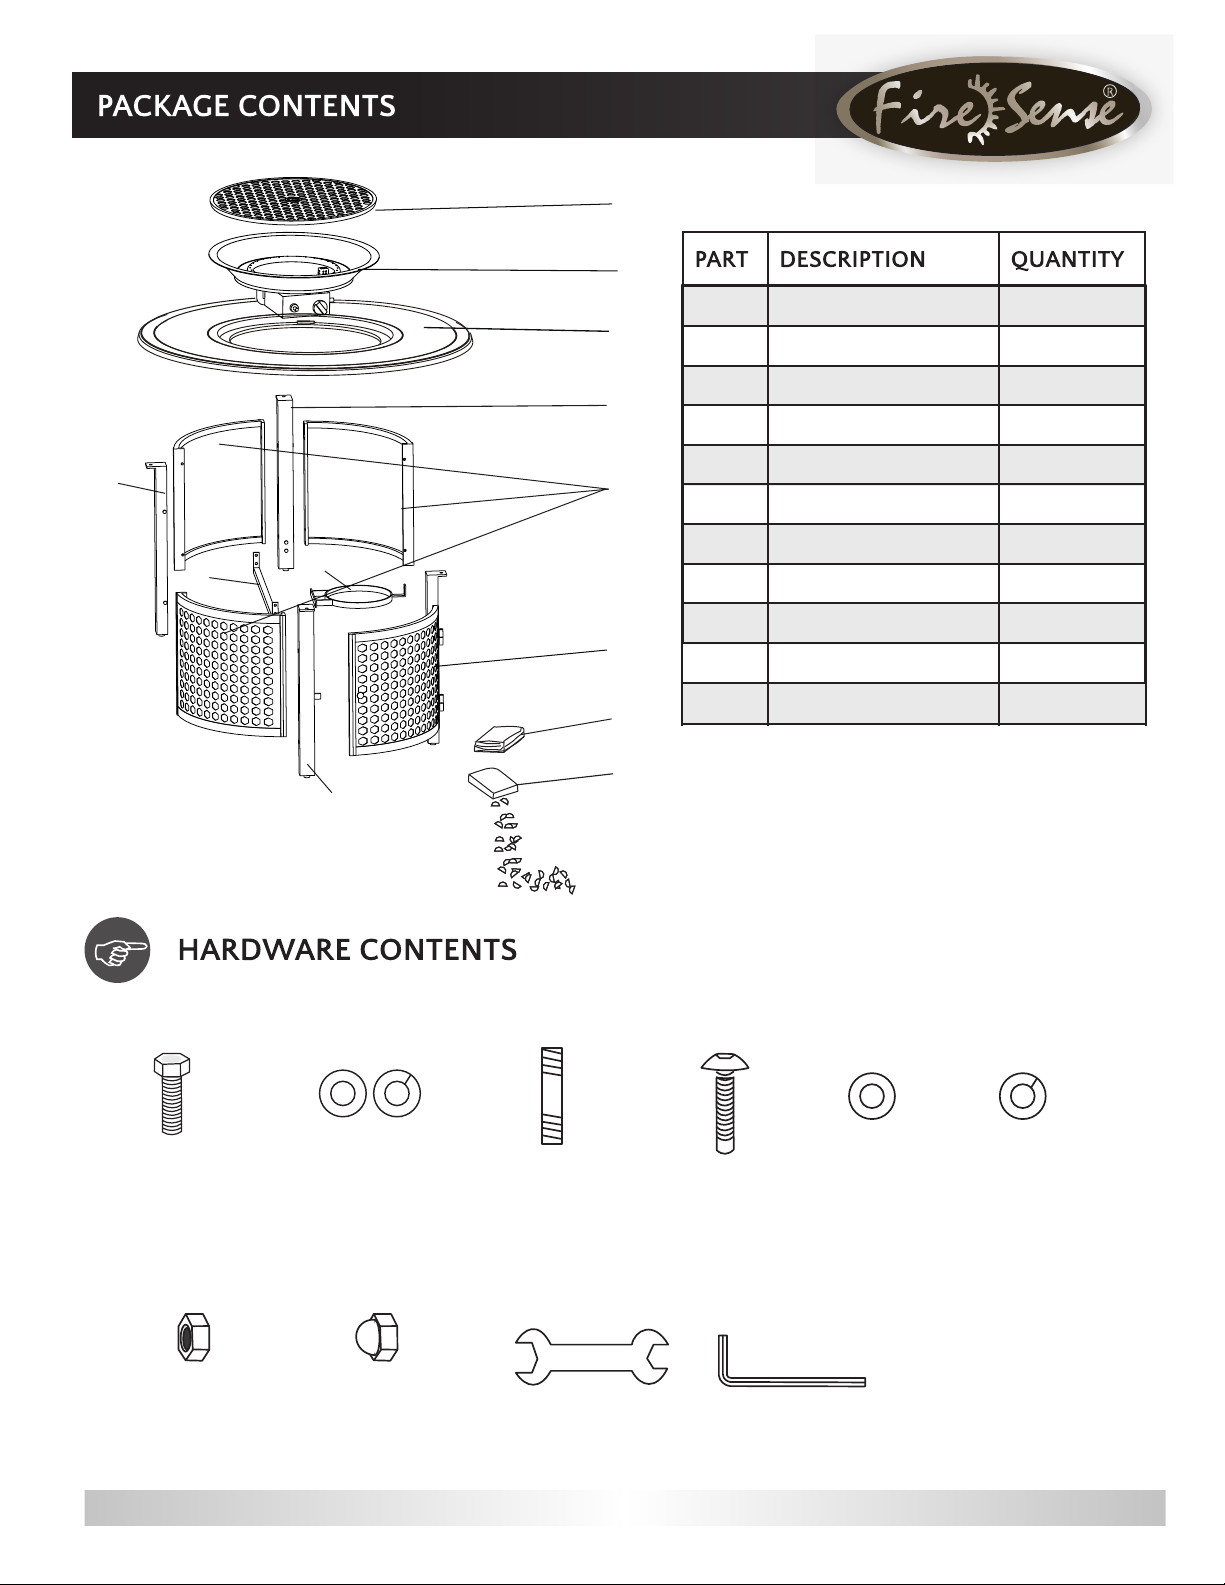
Removable Burner Cover
Burner
Table Top
Door Panel
Panels
Door Frame Leg
1
1
1
1
3
1
I
J
D
K
G
I
J
K
L
Support Legs
Tank Support Bar
Tank Support Ring
Protective Cover
Fire Glass
2
1
1
1
1
L
F
M N O P Q R
Bolt (8x20mm)
Qty: 5
(4 for assembly +1 extra)
Washer/Spring Washer (M8)
Qty: 5
(4 for assembly +1 extra)
Stud (6x40mm)
Qty: 13
(12 for assy. +1 extra)
Bolt (6x20mm)
Qty: 8
(7 for assy. +1 extra)
Washer (M6)
Qty: 20
(19 for assy. +1 extra)
Spring Washer (M6)
Qty: 13
12
(
for assy. +1 extra)
S T U V
Nut (6mm)
Qty: 13
(12 for assy. +1 extra)
Contact us for assistance: (866) 985-7877 | www.wtliving.com 3
Plastic Cap (8mm)
Qty: 4
Hex KeyWrench

SAFETY INFORMATION
SAFETY INFORMATION
This appliance has been tested to and
complies with the ANSI Z21.97-2014, Outdoor
Decorative Gas Appliances CGA CR 97-003
Outdoor Gas Fireplaces. The installation must
conform to local codes or in the absence of
local codes to the National Fuel Gas Code.
ANSI Z223.1. This manual contains important
information about the assembly, operation
and maintenance of this fire pit. General
safety information is presented in these first
few pages and is also located throughout the
manual. Keep this manual for future reference
and to educate new users of this product.
This manual should be read in conjunction
with the labeling on the product. Safety
precautions are essential when any
mechanical or propane fueled equipment is
involved. These precautions are necessary
when using, storing, and servicing. Using the
equipment with the respect and caution
demanded will reduce the possibilities of
personal injury or property damage. The
following symbols (shown below) are used
extensively throughout this manual. Always
heed these precautions, as they are essential
when using any mechanical or propane
fueled equipment.
WARNING
Failure to comply with the precautions and
instructions provided with this fire pit can
result in death, serious bodily injury
property loss or damage from hazards of
fire, explosion, burn, asphyxiation, and/
or carbon monoxide poisoning. Only
persons who can understand and follow the
instructions should use or service this fire pit.
and
WARNING / DANGER
WARNING/DANGER indicates an imminently
hazardous situation which, if not avoided,
will result in death or serious injury.
WARNING
Do not store or use gasoline or other
flammable vapors and liquids in the vicinity
of this or any other appliance. An LP-cylinder
not connected for use shall not be stored in
the vicinity of this or any other appliance.
WARNING
Solid fuels shall not be burned in this
appliance.
DANGER
EXPLOSION—FIRE HAZARD
•
Keep solid combustibles, such as building
materials, paper, or cardboard a safe distance
away from the fire pit as recommended by the
instructions.
•
Provide adequate clearances around air
openings into the combustion chamber. Never
use the fire pit in spaces which do or may
contain volatile or airborne combustibles, or
products such as gasoline, solvents, paint
thinner, dust particles, or unknown chemicals.
•
During operation, this appliance can be a source
of ignition. Keep fire pit area clear and free from
combustible materials, gasoline, paint thinner,
cleaning solvents and other flammable vapors
and liquids. Do not use fire pit in areas with high
dust content. Minimum fire pit clearances from
combustible materials: 2 feet (24 inches) from
the sides & 2 feet (24 inches) from the rear, 6
feet (72 inches) from ceiling.
•
Never store propane near high heat, open
flames, pilot lights, direct sunlight, other ignition
sources or where temperatures exceed 120
degrees F (49 degrees C).
•
Propane vapors are heavier than air and can
accumulate in low places. If you smell gas, leave
the area immediately.
•
Never install or remove a propane cylinder
while the fire pit is lighted, or near flame, pilot
lights, or other ignition sources or while fire pit is
hot to the touch.
•
This fire pit is red hot during use and can ignite
flammables too close to the burner. Keep
flammables at least 6 feet (72 inches) from top
and 2 feet (24 inches) from sides. Keep gasoline
and other flammable liquids and vapors well
away from fire pit.
•
Store the propane cylinder outdoors in a well
ventilated space out of the reach of children.
Never store the propane cylinder in an enclosed
area (house, garage, etc.). If fire pit is to be
stored indoors, disconnect the propane cylinder
for outdoor storage.
WARNING
•
This fire pit is fueled by propane gas. Propane gas
is invisible, odorless, and flammable. An odorant
is normally added to help detect leaks and can be
described as having a "rotten egg" smell. The
odorant can fade over time so leaking gas is not
always detectable by smell alone.
•
Propane gas is heavier than air and leaking
propane will sink to the lowest level possible. It
can ignite by ignition sources including matches,
lighters, sparks, or open flames of any kind many
feet away from the original leak. Use only
propane gas set up for vapor withdrawal.
•
Store or use propane gas in compliance with
local ordinances and codes or with ANSI/NFPA
58. Turn off propane when not in use.
DANGER
FOR YOUR SAFETY
If you smell gas:
1. Shut off gas to the appliance.
2. Extinguish any open flame
3. If odor continues, keep away from
the appliance and immediately call your
gas supplier or fire department.
WARNING
We cannot foresee every use which may be
made of our .fire pit. Check with your local fire
safety authority if you have questions about
fire pit use. Other standards govern the use of
fuel gases and heat producing products for
specific uses. Your
you about these. If no local codes exist, follow
National Fuel Gas Code, ANSI Z223.1. In
Canada, installation must conform to local
codes. If no local codes exist, follow the
current National standards of CANADA CAN/
CGA-B 149.2.
local authorities can advise
WARNING:
FOR OUTDOOR USE ONL
CARBON MONOXID
•
This fire pit is a combustion appliance. All
combustion appliances produce carbon
monoxide (CO) during the combustion process.
This product is designed to produce extremely
minute, non-hazardous amounts of CO if used
and maintained in accordance with all warnings
and instructions. Do not block air flow into or
out of the fire pit.
•
Carbon Monoxide (CO) poisoning produces
flu-like symptoms, watery eyes, headaches,
dizziness, fatigue and possibly death. You can’t
see it and you can’t smell it. It’s an invisible
killer. If these symptoms are present during
operation of this product get fresh air
immediately!
•
For outdoor use only. Using
this fire pit in an enclosed
space can kill you. Never use this
fire pit in an enclosed space such as a camper,
tent, home, or other unventilated or enclosed
area.
•
This fire pit consumes air (oxygen). Do not use
in unventilated or enclosed areas to avoid
endangering your life.
Y
E HAZARD
WARNING
Improper installation, adjustment, alteration,
service or maintenance can cause property
damage, injury or death. Read the installation,
operation and maintenance instructions
thoroughly before installing or servicing this
equipment.
Contact us for assistance: (866) 985-7877 | www.wtliving.com 4
ASSEMBLY
PREPARATION
Before beginning assembly, empty contents of carton and make sure all parts are present. Place all parts on a soft, level
surface for assembly. NOTE: It is best to use TWO PEOPLE to assemble this gas fire pit.
Estimated Assembly Time: 60 Minutes | DO NOT over tighten hardware!
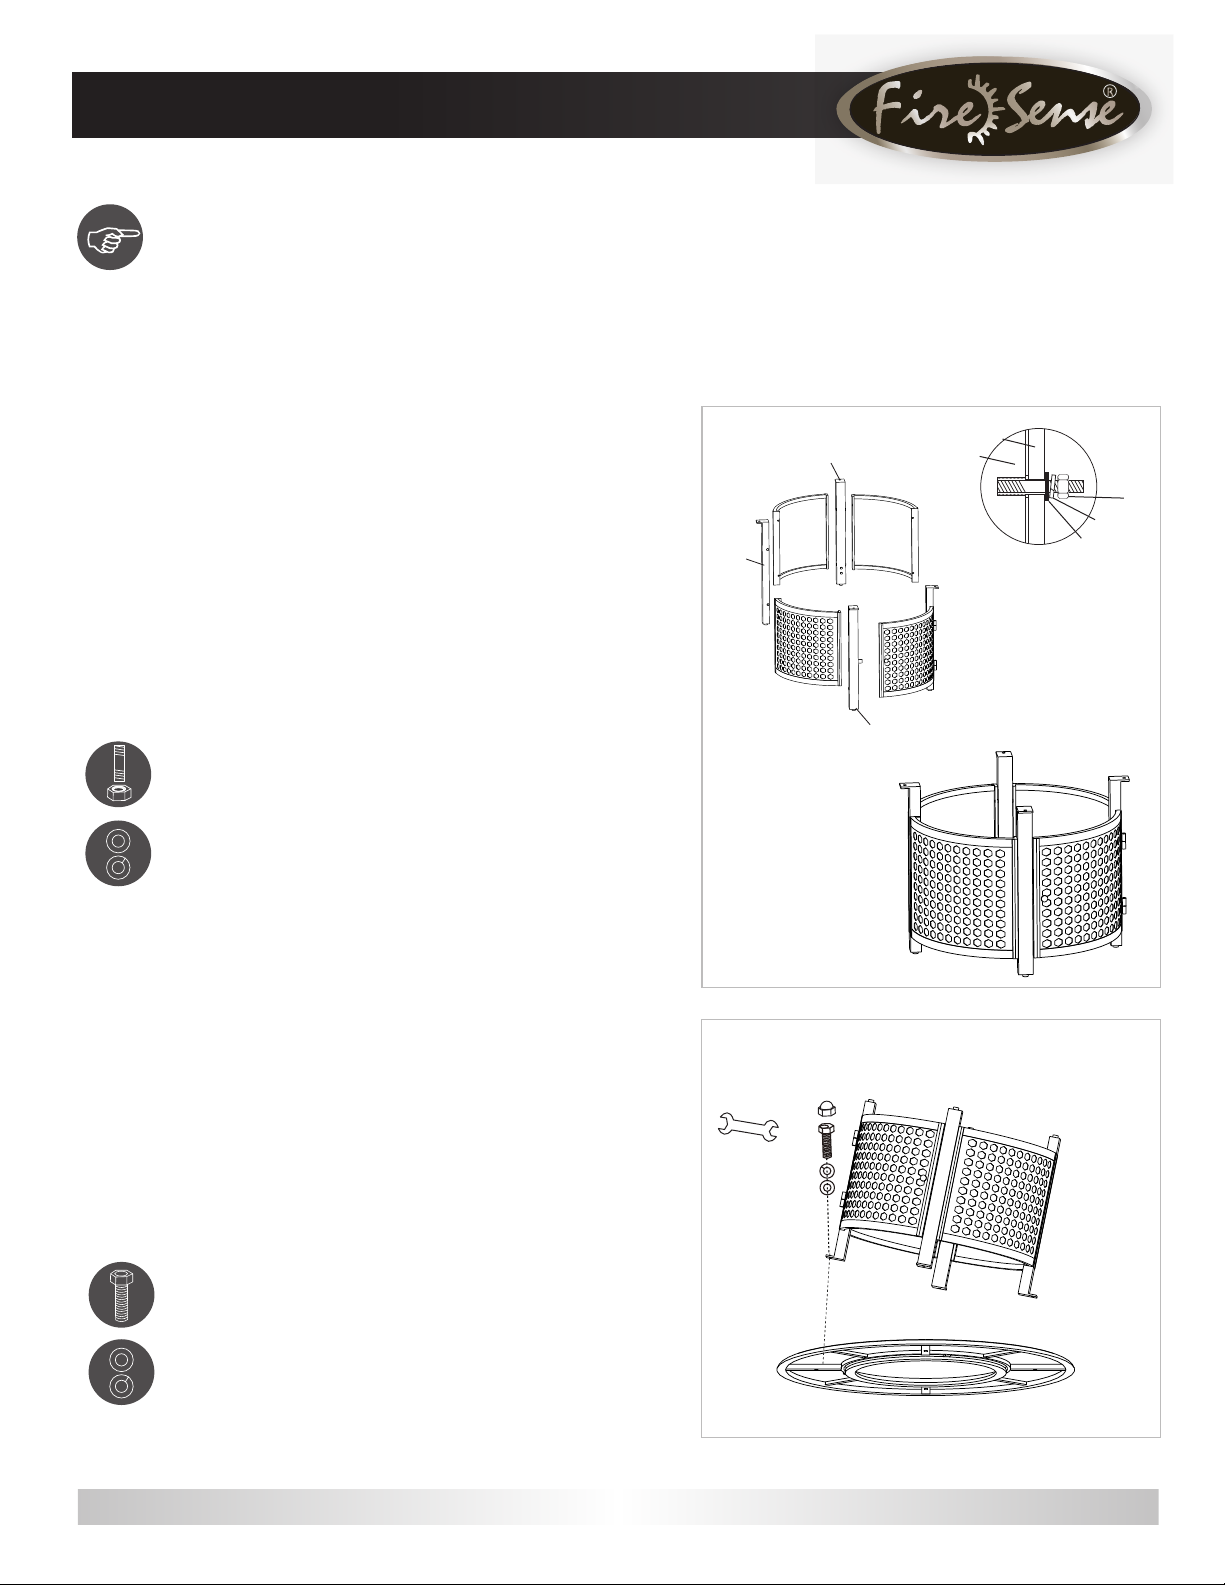
Assemble the fire pit base: Locate Door Panel D, 3 Side Panels E,
Door Frame Leg F, and 2 Support Legs G.
1
Screw Studs O into the holes in the sides of all 4 legs, including
the leg pre-assembled to the door. Beginning with Door Frame
Leg, join the legs and panels together by fitting the holes on the
sides of the Side Panels onto the Studs installed earlier.
To secure the Legs to the Panels, place a Washer Q then a Spring
Washer R onto each Stud, then thread a Nut S onto each Stud.
Do not tighten the hardware until the entire base is assembled.
Then, firmly tighten all Nuts with the Wrench U, but DO NOT
OVERTIGHTEN.
Hardware Used:
O Stud (6x40mm) x 12
Q Washer (M6) x 12
R Spring Washer (M6) x 12
S Nut (M6) x 12
1
Side Panel
G
E
G
E
F
Leg
E
D
Washer
Nut
Spring
Washer
Place Table Top C upside-down on a nonabrasive surface.
Carefully turn the assembled fire pit base upside-down and align
2
the holes in
Place a Spring Washer N, then a Washer N on each of 4 Bolts M.
Insert Bolts through the aligned holes into the Table Top, then
tighten with Wrench U.
Cover bolt heads with Plastic Caps T.
the top of the Legs with the holes on Table Top.
Hardware Used:
M Bolt (8x20mm) x 4
N Washer/Spring Washer (8mm) x 4
T Plastic Cap x 4
T
M
N
2
Contact us for assistance: (866) 985-7877 | www.wtliving.com 5
ASSEMBLY
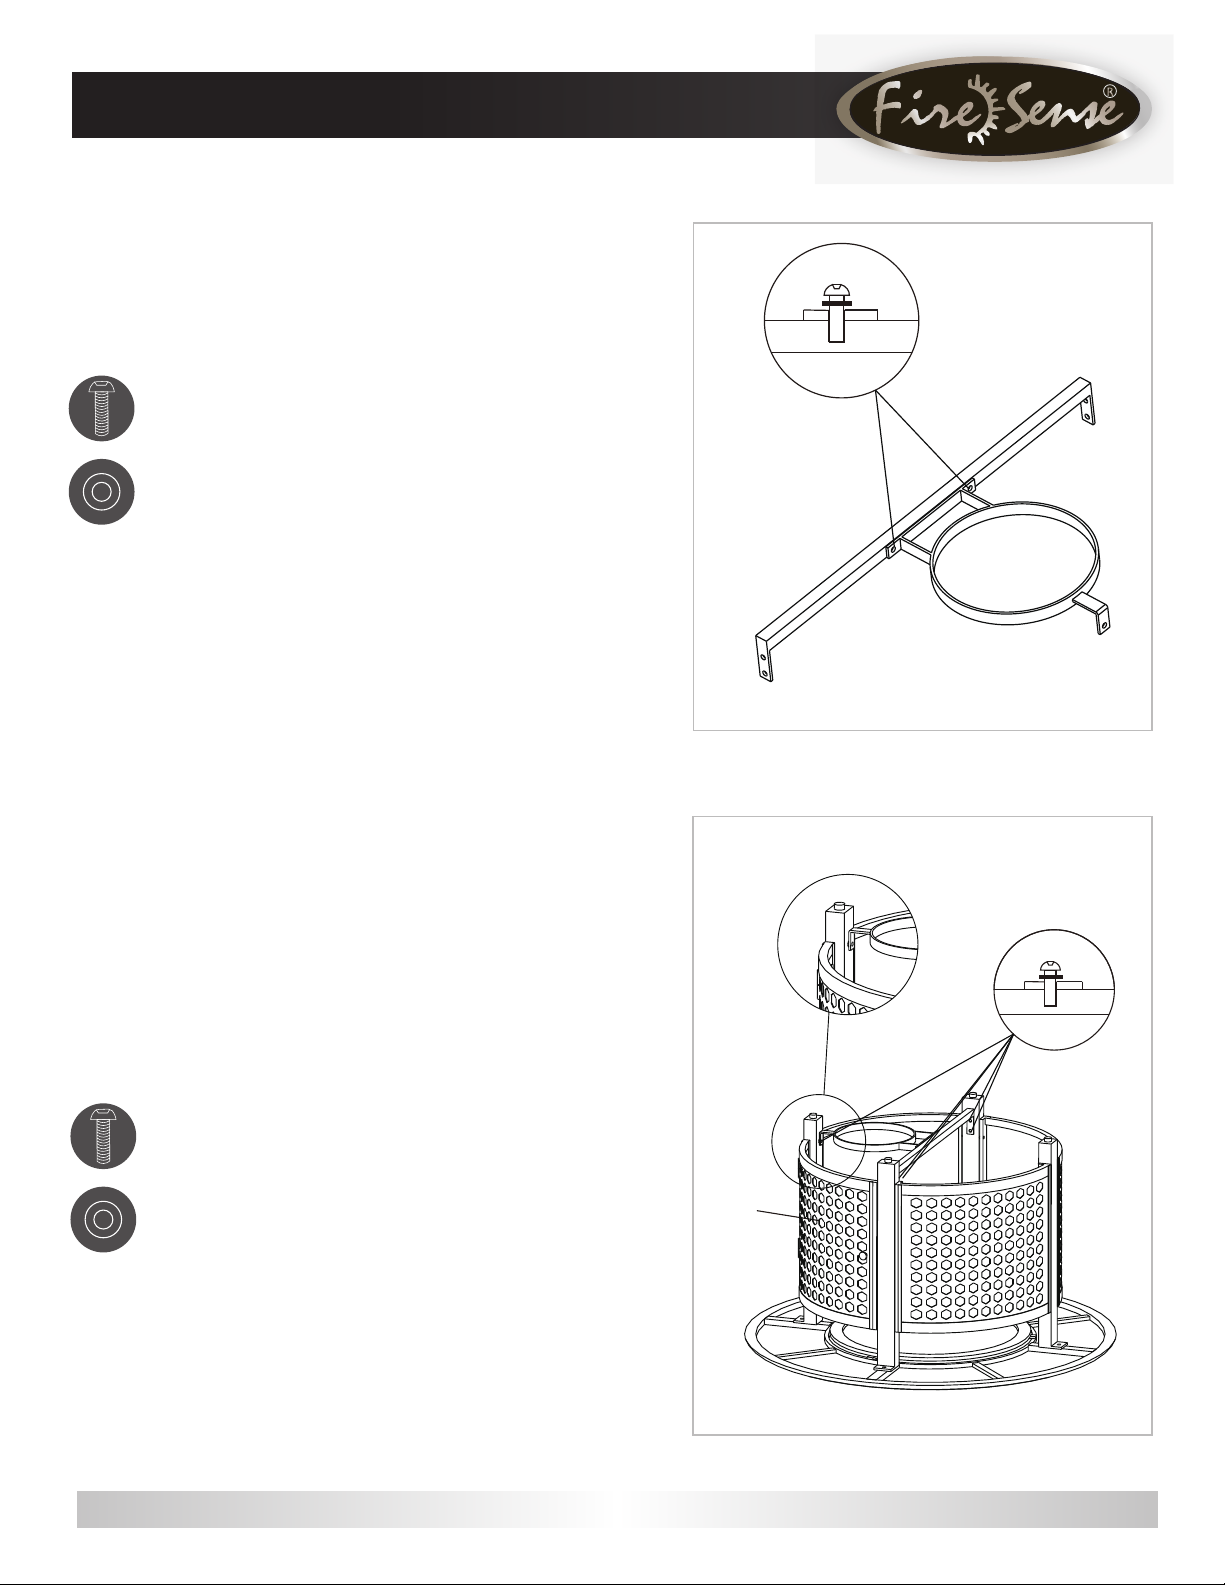
3
Attach Tank Support Ring J to Tank Support Bar I by aligning
holes in the center of Tank Support Bar with holes in the end of
Tank Support Ring. Place a Washer Q on each of 2 Bolts P and
insert into holes. Tighten with Hex Key V.
Hardware Used: P Bolt (6x20mm) x 2
Q Washer (M6) x 2
P
Q
3
Attach Tank Support Bar I to Door Frame Leg F and Support
Leg G by aligning holes at each end of Tank Support Bar with
4
holes at the bottom of Door Frame Leg and Support Leg. Place
a Washer Q on each of 4 Bolts P and insert into holes. Tighten
with Hex Key V.
Attach Tank Support Ring J to the leg of Door Panel D by
aligning holes in front of Tank Support Ring with holes in leg.
Place a Washer on a Bolt and insert through hole in Tank
Support Ring into leg. Tighten with Hex Key.
Hardware Used: P Bolt (6x20mm) x 5
Q Washer (M6) x 5
P
Q
D
4
Contact us for assistance: (866) 985-7877 | www.wtliving.com 6
 Loading...