

Page 1
**Save these instructions for future reference.**
***IMPORTANT NOTICE***
-Do NOT return to place of purchase
For customer service and warranty issues
contact our Toll Free Hotline at:
(866)-985-7877 OR
Email: cservice@welltraveled.net
Hotline hours : Mon. – Fri. 9:00 am – 6:00 pm (EST)
WARNING
FOR YOUR SAFETY
For Outdoor Use Only
(outside any enclosure)
WARNING
FOR YOUR SAFETY:
ϭ/ŵƉƌŽƉĞƌŝŶƐƚĂůůĂƟŽŶĂĚũƵƐƚŵĞŶƚĂůƚĞƌĂƟŽŶ
ƐĞƌǀŝĐĞŽƌŵĂŝŶƚĞŶĂŶĐĞĐĂŶĐĂƵƐĞŝŶũƵƌLJŽƌ
property damage.
ϮZĞĂĚƚŚĞŝŶƐƚĂůůĂƟŽŶŽƉĞƌĂƟŽŶĂŶĚ
ŵĂŝŶƚĞŶĂŶĐĞŝŶƐƚƌƵĐƟŽŶƐƚŚŽƌŽƵŐŚůLJďĞĨŽƌĞ
installing or servicing this equipment.
ϯ&ĂŝůƵƌĞƚŽĨŽůůŽǁƚŚĞƐĞŝŶƐƚƌƵĐƟŽŶƐĐŽƵůĚƌĞƐƵůƚ
ŝŶĮƌĞŽƌĞdžƉůŽƐŝŽŶǁŚŝĐŚĐŽƵůĚĐĂƵƐĞƉƌŽƉĞƌƚLJ
ĚĂŵĂŐĞƉĞƌƐŽŶĂůŝŶũƵƌLJŽƌĚĞĂƚŚ
34'' Tuscan Style Firepit
Item # 60243
1
Page 2
Before You Begin
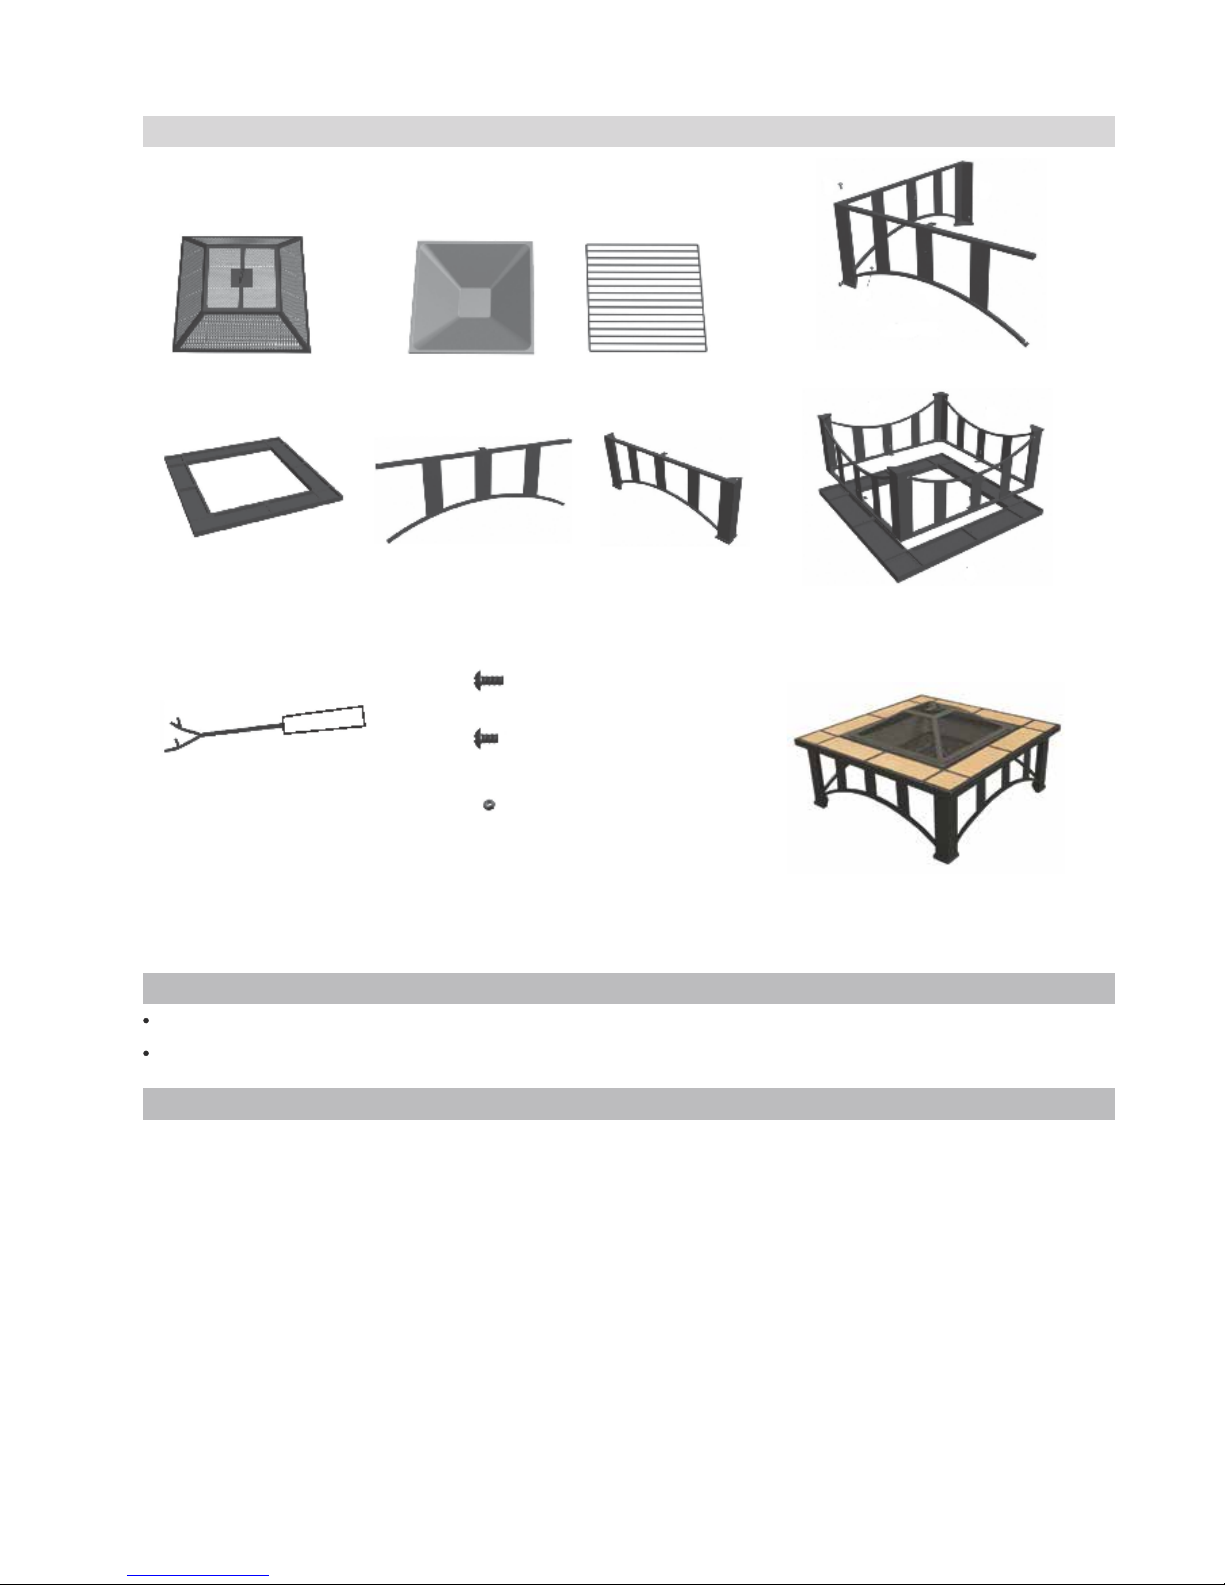
Parts List
Check to make sure you have the following:
Remove all parts from packing and check to make sure you have all parts described in “Before You Begin” section above.
Spread out parts on a soft, level surface to avoid scratching parts.
Step 1: Unpack parts carefully and set aside on a flat, non-abrasive surface.
Step
2: Choose a level location for set up.
Step
3: Connect Iron Stand Part I (E) to Iron Stand Part II (F) using screws (H) and nuts (J). See Fig.1.
Step
4: Put Decorative square top (D) on something soft and flat (cardboard etc.) with tile side down. Connect
stand (E&F) to Decorative square top (D) using M6x10 screws (I). See Fig. 2.
Step5: Turn over the entire assembled fire pit and make sure it is level with the floor. Place Fire bowl (B) into the
assembled stand (E&F&D).
Step6: Place Wood grate (C) into the Fire bowl (B).
Step7: Place
Mesh screen (A) on the top of the Fire bowl (B).
CAUTION: NEVER use your hands to open or close the screen when hot. Use the Fire screen lift tool (G) provided.
Your fire pit is now ready for use.
Preparation
Assembly Instructions
A. Mesh fire screen with handle
1 pc
B. 23"x 23’’ Fire bowl
1 pc
C. Wood grate
1 pc
D. Decorative square top
(with 12 pcs of yellow tile)
1 pc
E. Iron Stand Part I
2 pcs
F. Iron Stand Part II
2 pcs
H. M6x20 screw
8 pcs
I. M6x10 screw
4 pcs
J. M6 nut
8 pcs
G.
Fire screen lift tool
1 pc
Assembled Fire Pit
Fig. 2
D
E
F
Fig. 1
J
F
E
H
2
Page 3

1. This appliance is for outdoor use only, and shall NOT be used in a building, garage or any other enclosed area.
2. Do NOT use this fire pit for indoor heating. TOXIC carbon monoxide fumes can accumulate and cause asphyxiation.
3. This fire pit is NOT for commercial use.
4. This fire pit is NOT to be operated by children.
5. This fire pit is NOT to be used in or on boats or recreational vehicles.
6. Always use in accordance with all applicable local, state and national codes. Contact your local fire department for
details on outdoor burning.
7. When using this fire pit, exercise the same precautions you would with any open fire.
8. The use of alcohol, prescription or non-prescription drugs may impair the consumer’s ability to properly assemble or
safely operate this fire pit.
9. Do NOT use this fire pit without reading the entire “Owner’s Manual”.
10. This fire pit is for use with dry, seasonal hardwood. It will burn hotter, more completely and create less smoke.
11. Do NOT burn charcoal briquets, lump charcoal, manufactured logs, driftwood, trash, leaves, paper, cardboard, plywood,
painted or stained or pressure treated wood. Avoid using softwoods such as pine or cedar that can throw sparks.
12. Do NOT alter this fire pit in any manner.
13. Do NOT use this fire pit until it is COMPLETELY assembled and all parts are securely fastened and tightened.
14. Do NOT store or use gasoline or other flammable vapors or liquids in the vicinity of this or any other appliance.
15. Do NOT store or use an LP gas cylinder within 10 feet (3.05m) of this fire pit while it is in operation.
16. Do NOT use this fire pit near automobiles, trucks, vans or recreational vehicles.
17. Do NOT use in an explosive atmosphere. Keep outdoor area clean and free from combustible materials, gasoline and
other flammable liquids.
18. Do NOT use this fire pit under any overhead or near any unprotected combustible constructions. Avoid using near or
under overhanging trees and shrubs.
19. Always use this fire pit on a hard, level non-combustible surface such as concrete, rock or stone. An asphalt or blacktop
surface may not be acceptable for this purpose. Do NOT use on wooden decks.
20. Always empty this fire pit before each use.
21. Do NOT wear flammable or loose clothing when operating this fire pit.
22. Do NOT use in windy conditions.
23. Do NOT use this fire pit unless fire screen is securely in place.
24. Do NOT use gasoline, kerosene, diesel fuel, lighter fluid or alcohol to light or relight fires.
25. Keep all electrical cords away from a hot fire pit.
26. All surfaces of this fire pit are hot when in operation. To avoid burns, do NOT touch fire pit until it has completely cooled
unless you are wearing protective gear (Potholders, gloves, BBQ mittens, hot pads & etc.). Never touch ashes or coals
to see if they are hot.
27. Do NOT leave a lit fire pit unattended, especially around children and pets.
28. Do NOT attempt to move or store this fire pit until all ashes and coals are completely extinguished.
29. Do NOT remove ashes or coals until they are completely and fully extinguished.
30. Use heat-resistant gloves or hot pads when contacting handles.
31. Use long, sturdy firepit tools when adding or moving logs.
32. Do NOT place wood directly into bottom of the fire pit. Place wood only on the wood grid.
33. Do NOT overload the fire pit. Do not add additional firewood until the fire burns down. NOTICE: If any portion of the bowl
lid or spark guards of this fire pit are glowing red it is overloaded.
34. Do NOT lean over this fire pit when lighting or when in use.
35. Do NOT place a hot fire screen or hot fire pit tools onto combustible surfaces such as grass, wooden deck or furniture.
36. Avoid breathing smoke from the fire and avoid getting it into your eyes.
37. This fire pit should be thoroughly inspected and cleaned on a regular basis.
38. After a period of storage and/or non-use, check for sighs of damage and creosote build-up. Do NOT operate until
necessary repairs and/or cleanup are executed.
39. Deaths, serious injury or damage to property may occur if the above is not followed exactly.
3
Warning
CAUTION: It is not recommended to use this fire pit (fire place) on a wooden or other combustible
surface or any surface that is not entirely resistant to high heat. However, if you intend to use this
item on a wooden deck other combustible surface or any surface that is not entirely resistant to high
heat, you must use a non-flammable and heat resistant material such as concrete pavers, brick or
stone between the fire pit (fire place) and the surface.
3
Page 4

Cleaning and Care
4
Inspecting:
This outdoor fire pit should be inspected on a regular basis to ensure product safety and longer
product life.
Do NOT attempt to inspect this outdoor fire pit until the fire is COMPLETELY out and fire pit is
COOLED COMPLETELY.
1. Check handle on Spark Guard/Firescreen to make sure it is secure.
2. Check all parts for signs of damage or rust.
3. If you find any damaged parts, do NOT operate until repairs and/or replacement has been done.
Cleaning
This outdoor fire pit should be cleaned on a regular basis to promote a safer experience and longer
product life.
NOTE: After repeated use, a slight discoloration of the finish may occur.
Do NOT attempt to clean this outdoor fire pit until the fire is COMPLETELY out and the fire pit has
cooled completely.
Do NOT use oven cleaner or abrasive cleaners as they will damage this product.
Do NOT clean any part of this outdoor fire pit in a self cleaning oven as it may damage the finish.
1. Wipe exterior surfaces with a mild dishwashing detergent or baking soda.
2. For stubborn surfaces, use a citrus based degreaser and a nylon scrubbing brush.
3. Rinse with clean water.
4. Remove built-up creosote from components with a chimney cleaning product.
Storage
Do NOT move or store this outdoor fire pit until the fire is COMPLETELY out and the fire pit has cooled
COMPLETELY.
1. Once the fire is out, coals are cold and outdoor fire pit is cool to the touch, remove ashes and dispose
of properly.
It is best to cover the outdoor fire pit with a protective vinyl cover.
2.
3. Store assembled in a location away from children and pets.
NOTE: If you do not use a protective cover for your fire pit, then store this outdoor fire pit in a dry location
to maximize product life.
FireSense® products are made to resist premature rusting. However, eventually, all metals will rust.
Some environments promote premature rusting of metals. For best results, at the first sign of rust or
other corrosion, use an emery cloth, metal-grade sand paper or a rotary tool to buff away the blemish
and touch up the spot with rust-resistant spray paint available at local hardware stores.
Page 5

1 YEAR LIMITED WARRANTY – Customers in the Continental US
All components are warranted for a period of 1 year after date of purchase by the original owner against defects in
materials and workmanship under normal use. This warranty does NOT cover normal wear and weathering, assembly
and/or maintenance OR use in a commercial application. At Well Traveled Living’s sole discretion, products under
warranty will be repaired and/or replaced at no charge to the customer. Any returns sent back to Well Traveled Living
must be sent via prepaid freight and in the original retail packaging.
For warranty service contact Well Traveled Living at the address, phone numbers or internet site and email listed in this
owner’s manual. Be sure to have
your sales receipt, date of purchase and catalogue/model numbers available when
calling. All warranty service will be coordinated by the Well Traveled Living’s, Amelia Island, Florida service center.
This warranty is extended only to the original purchaser. Proof of purchase will be required before warranty service is
rendered. The sales receipt is the only valid proof of purchase. This warranty only covers failures due to defects in
materials or workmanship which occur during normal use. Failures and/or damage which result from accident, negligence,
misuse, abuse, neglect, mishandling, alteration or modification, failure to maintain, improper assembly or maintenance,
service by unauthorized agency or use of unauthorized components or damage that is attributable to acts of God are N
OT
covered.
***THERE ARE NO EXPRESS WARRANTIES EXCEPT AS LISTED ABOVE***
***PURCHASER ASSUMES ALL RISKS IN THE ASSEMBLY AND OPERATION OF THIS UNIT***
***FAILURE TO FOLLOW WARNINGS AND OPERATIONAL INSTRUCTIONS CONTAINED IN THIS MANUAL CAN
RESULT IN SEVERE PROPERTY DAMAGE AND/OR PERSONAL INJURY***
IN NO EVENT WILL WELL TRAVELED LIVING, OR ITS DIRECTORS, OFFICERS OR AGENTS BE LIABLE TO THE
PURCHASER OR ANY THIRD PARTY, WHETHER IN CONTRACT, IN TORT, OR ON ANY OTHER BASIS, FOR ANY
INDIRECT, SPECIAL, PUNITIVE, EXEMPLARY, CONSEQUENTIAL, OR INCIDENTAL LOSS, COST, OR DAMAGE
ARISING OUT OF OR IN CONNECTION WITH THE SALE, MAINTENANCE, USE, OR INABILITY TO USE THE
PRODUCT, EVEN IF WELL TRAVELED LIVING OR ITS DIRECTORS, OFFICERS OR AGENTS HAVE BEEN
ADVISED OF THE POSSIBILITY OF SUCH LOSSES, COSTS OR DAMAGES, OR IF SUCH LOSSES, COSTS, OR
DAMAGES ARE FORESEEABLE. IN NO EVENT WILL WELL TRAVELED LIVING, OR ITS OFFICERS, DIRECTORS,
OR AGENTS BE LIABLE FOR ANY DIRECT LOSSES, COSTS OR DAMAGES THAT EXCEED THE PURCHASE
PRICE OF THE PRODUCT.
SOME JURISDICTIONS DO NOT ALLOW THE EXCLUSION OR LIMITATION OF INCIDENTAL OR CONSEQUENTIAL
DAMAGES, SO THE ABOVE LIMITATION OR EXCLUSION MAY NOT APPLY TO THE PURCHASER.
This limited warranty gives you specific legal rights and you may also have other rights which vary from jurisdiction to
jurisdiction. The provisions of the United Nations Convention on Contracts for the Sales of Goods shall not apply to this
limited warranty or the sale of products covered by this limited warranty.
DistriďƵƚĞĚ By:
Well Traveled Living
716 S 8
th
Street
Amelia Island, FL 32034
Toll Free: 866-WTL-SUPP
Web: www.wtliving.com
Email: cservice@welltraveled.net
***IMPORTANT NOTICE***
-Do NOT return to place of purchase-
For customer service and warranty issues
contact our Customer Service Center at:
(866)-985-7877 OR
Email: cservice@welltraveled.net
Customer Service Hours: Mon. – Fri. 9:00 a.m. – 6:00 p.m. (EST)
Fire Sense®, Mojave Sun ™, and Well Traveled Living® are registered trademarks of Well Traveled Imports, Inc®. All assembly instrucƟon presentaƟons are the
property of Well Traveled Imports, Inc.® and are protected by U.S. copyrights and trademarks. All rights reserved.
5
 Loading...