

Page 1
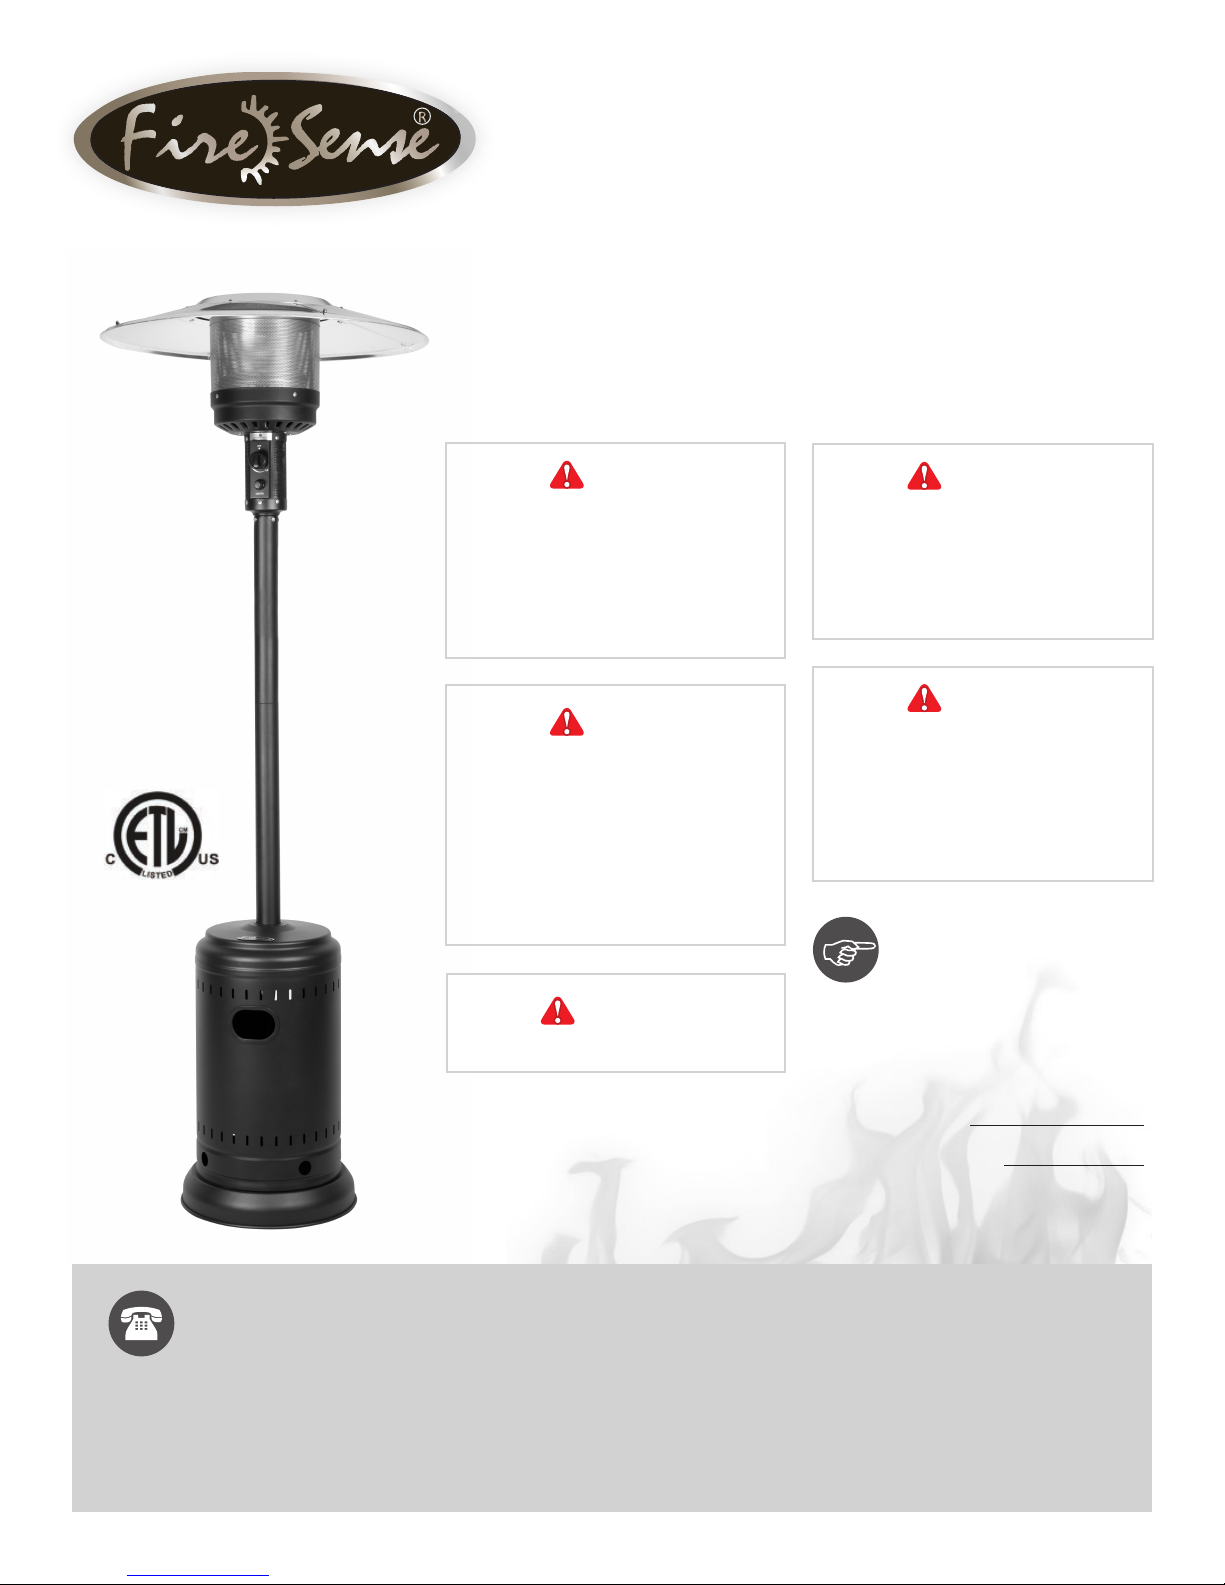
Patio Heater
ITM. / ART. 1031510
ASSEMBLY / CARE & USE INSTRUCTIONS
IMPORTANT, RETAIN FOR FUTURE
REFERENCE: READ CAREFULLY
DANGER
FOR YOUR SAFETY:
If you smell gas:
1. Shut off gas to the appliance.
2. Extinguish any open ame.
3. If odor continues, keep away from the
appliance and immediately call your gas
supplier or re department.
DANGER
Failure to comply with the precautions
and instructions provided with this heater
can result in death, serious bodily injury
and property loss or damage from hazards
of re, explosion, burn, asphyxiation,
and/or carbon monoxide poisoning. Only
persons who can understand and follow
the instructions should use or service
this heater.
WARNING
FOR OUTDOOR USE ONLY!
WARNING
Do not store or use gasoline or other
ammable vapors and liquids in the
vicinity of this or any other appliance.
An LP-cylinder not connected for use
shall not be stored in the vicinity of this
or any other appliance.
WARNING
Improper installation, adjustment,
alteration, service or maintenance can
cause property damage, injury or death.
Read the installation, operation and
maintenance instructions thoroughly
before installing or servicing this
equipment.
ATTACH YOUR
RECEIPT HERE
Keep a copy of your proof of
purchase or order conrmation
which will be needed if you
need to contact us about
warranty coverage.
Questions, problems, missing parts?
Before returning to your retailer, our customer service is available. English & Spanish speaking.
Call us toll-free at (866) 985-7877, email us at cservice@welltraveled.net, or go online
and live chat at www.wtliving.com. Our hours are: 9 a.m. – 6 p.m., EST, Monday – Friday
Serial No.
Purchase Date
Page 2

www.wtliving.com
English Page 3
Français Page 18
Español Page 34
Contact us for assistance: (866) 985-7877 | www.wtliving.com 2
Page 3
BEFORE YOU BEGIN
TABLE OF CONTENTS
Before You Begin Page 2
Safety Information Page 3
Package Contents Page 4
Hardware Contents Page 4
Assembly Page 5-8
Operating Instructions Page 9-12
Care and Maintenance Page 13
Troubleshooting Page 14
Replacement Parts List Page 15
Warranty Information Page 16
BEFORE YOU BEGIN
Please read and understand this entire manual before attempting to assemble, operate or install this
appliance. If you have any questions regarding the product, please call us toll-free at (866) 985-7877,
email us at cservice@welltraveled.net, or go online and live chat at www.wtliving.com. Our hours are:
9 a.m. – 6 p.m., EST, Monday – Friday. English & Spanish speaking.
This manual contains important information about the assembly, operation and maintenance of this patio heater.
General safety information is presented in the rst few pages and is also located throughout this manual. Keep this
manual for future reference and to educate new users of this appliance. This manual should be read in conjunction
with the labelling on the appliance. Safety precautions are essential when any mechanical or propane fuelled
equipment is involved. These precautions are necessary when using, storing, and servicing. Using this appliance
with the respect and caution demanded will reduce the possibilities of personal injury or property damage. The
following symbols shown on page 3 are used extensively throughout this manual. Always heed these precautions,
as they are essential when using any mechanical or propane fueled equipment.
Contact us for assistance: (866) 985-7877 | www.wtliving.com 3
Page 4
SAFETY INFORMATION
DANGER
EXPLOSION—FIRE HAZARD
•
Keep solid combustibles, such as
building materials, paper, or cardboard
a safe distance away from the heater as
recommended by the instructions.
•
Provide adequate clearances around air
openings into the combustion chamber.
•
Never use the heater in spaces which
do or may contain volatile or airborne
combustibles, or products such as
gasoline, solvents, paint thinner, dust
particles, or unknown chemicals.
•
During operation, this appliance can be a
source of ignition. Keep heater area clear
and free from combustible materials,
gasoline, paint thinner, cleaning solvents
and other ammable vapours and liquids.
Do not use heater in areas with high dust
content. Minimum heater clearances from
combustible materials: 91.44 cm or three
(3) feet or 36 inches from top and 91.44 cm
or three(3) feet or 36 inches from sides.
•
Never store propane near high heat, open
ames, pilot lights, direct sunlight, other
ignition sources or where temperatures
exceed 120 degrees F (49 degrees C).
•
Propane vapours are heavier than air and
can accumulate in low places. If you smell
gas, leave the area immediately.
•
Never install or remove a propane cylinder
while the heater is lighted, near ame, pilot
lights, or other ignition sources or while
heater is hot to the touch.
•
This heater is red hot during use and can
ignite ammables too close to the burner.
Keep ammables at least 3 feet (36 inches)
from top and 3 feet (36 inches) from sides.
Keep gasoline and other ammable liquids
and vapours well away from heater.
•
Store the propane cylinder outdoors in a
well ventilated space out of the reach of
children. Never store the propane cylinder
in an enclosed area (house, garage, etc.). If
heater is to be stored indoors, disconnect
the propane cylinder for outdoor storage.
WARNING
Certain materials or items, when stored
under the heater, will be subject to radiant
heat and could be seriously damaged.
DANGER
CARBON MONOXIDE HAZARD
•
This heater is a combustion appliance.
All combustion appliances produce carbon
monoxide (CO) during the combustion
process. This product is designed to
produce extremely minute, non-hazardous
amounts of CO if used and maintained
in accordance with all warnings and
instructions. Do not block the air ow into
or out of the heater.
•
Carbon Monoxide (CO) poisoning produces
u-like symptoms, water eyes, headaches,
dizziness, fatigue, and possibly death.
You can’t see and you can’t smell it. It is
an invisible killer. If these symptoms are
present during operation of this product,
get fresh air immediately!
•
For outdoor use only.
•
Never use inside house or other unventilated
or enclosed areas.
•
This heater consumes air (oxygen). Do not
use in unventilated or enclosed areas to
avoid endangering your life.
WARNING
•
By-products of the combustion fuel used
by this product contain chemicals known to
the State of California to cause cancer, birth
defects or other reproductive harm
WARNING
BURN HAZARD
•
Never leave heater unattended when hot
or in use.
•
Keep out of reach of children.
WARNING
WARNING indicates an imminently
hazardous situation which, if not avoided,
will result in death or serious injury.
CAUTION
SERVICE SAFETY
•
Keep all connections and ttings clean. Make
sure propane cylinder valve outlet is clean.
•
During set up, check all connections and
ttings for leaks using soapy water, never
use a ame to check for leaks.
•
Use as a heating appliance only. Never alter
in any way to use with any device.
WARNING
•
This product is fueled by propane gas.
Propane gas is invisible, odorless, and
ammable. An odorant is normally added
to help detect leaks and can be described
as having a “rotten egg” smell. The odorant
can fade over time so leaking gas is not
always detectable by smell alone.
•
Store propane gas in compliance with local
ordinances and codes or with ANSI/NFPA
58. Turn off propane when not in use.
•
Alert children and adults to the hazards
of high surface temperatures. Stay away
from these surfaces to avoid burning
skin or igniting clothing.
•
Carefully supervise young children when
in the vicinity of the heater.
•
Do not hang clothing or any other
ammable materials from the heater,
or place near the heater.
•
Replace any guard or protective device
removed for servicing the appliance prior
to placing back in service.
•
Installation and repair should be done by a
qualied service person. The heater should
be inspected before use and annually by
a qualied service person. More frequent
cleaning may be required as necessary. It is
imperative that the control compartment,
burners, and circulating air passageway of
the appliance be kept clean.
Contact us for assistance: (866) 985-7877 | www.wtliving.com 4
Page 5
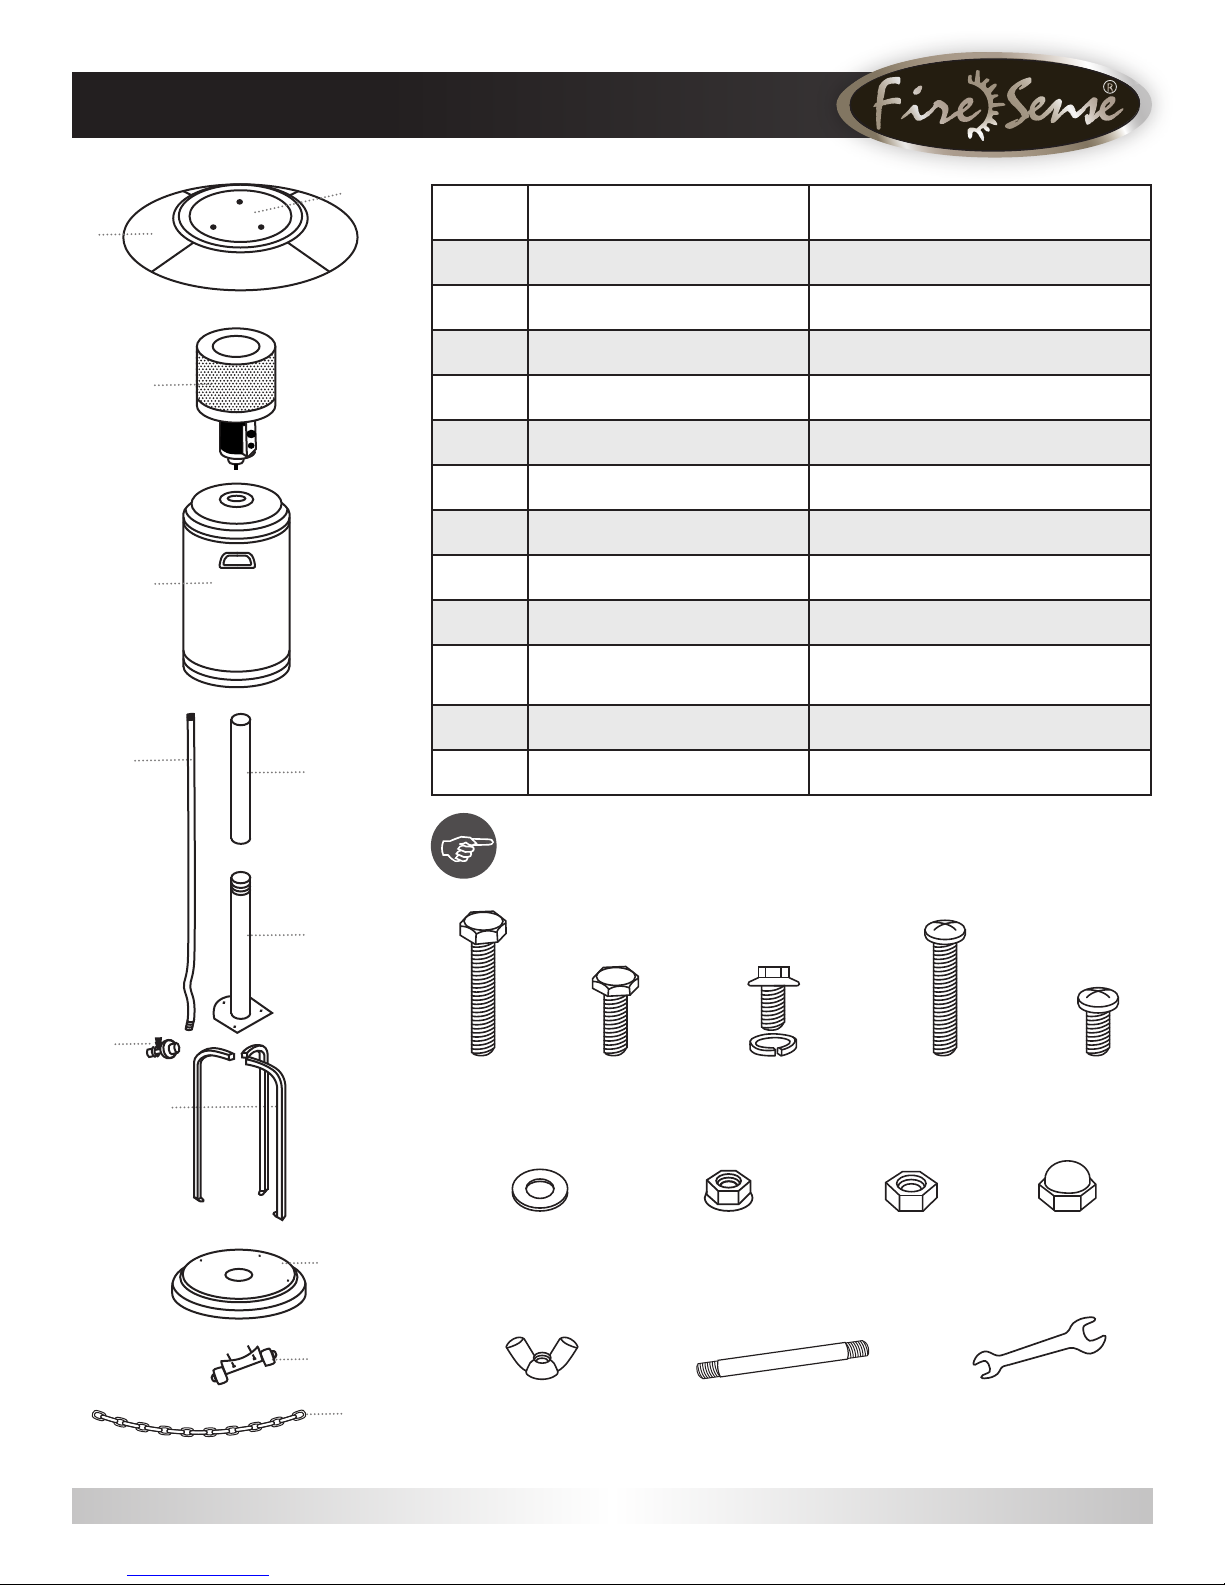
PACKAGE CONTENTS
A
E
C
D
F
B
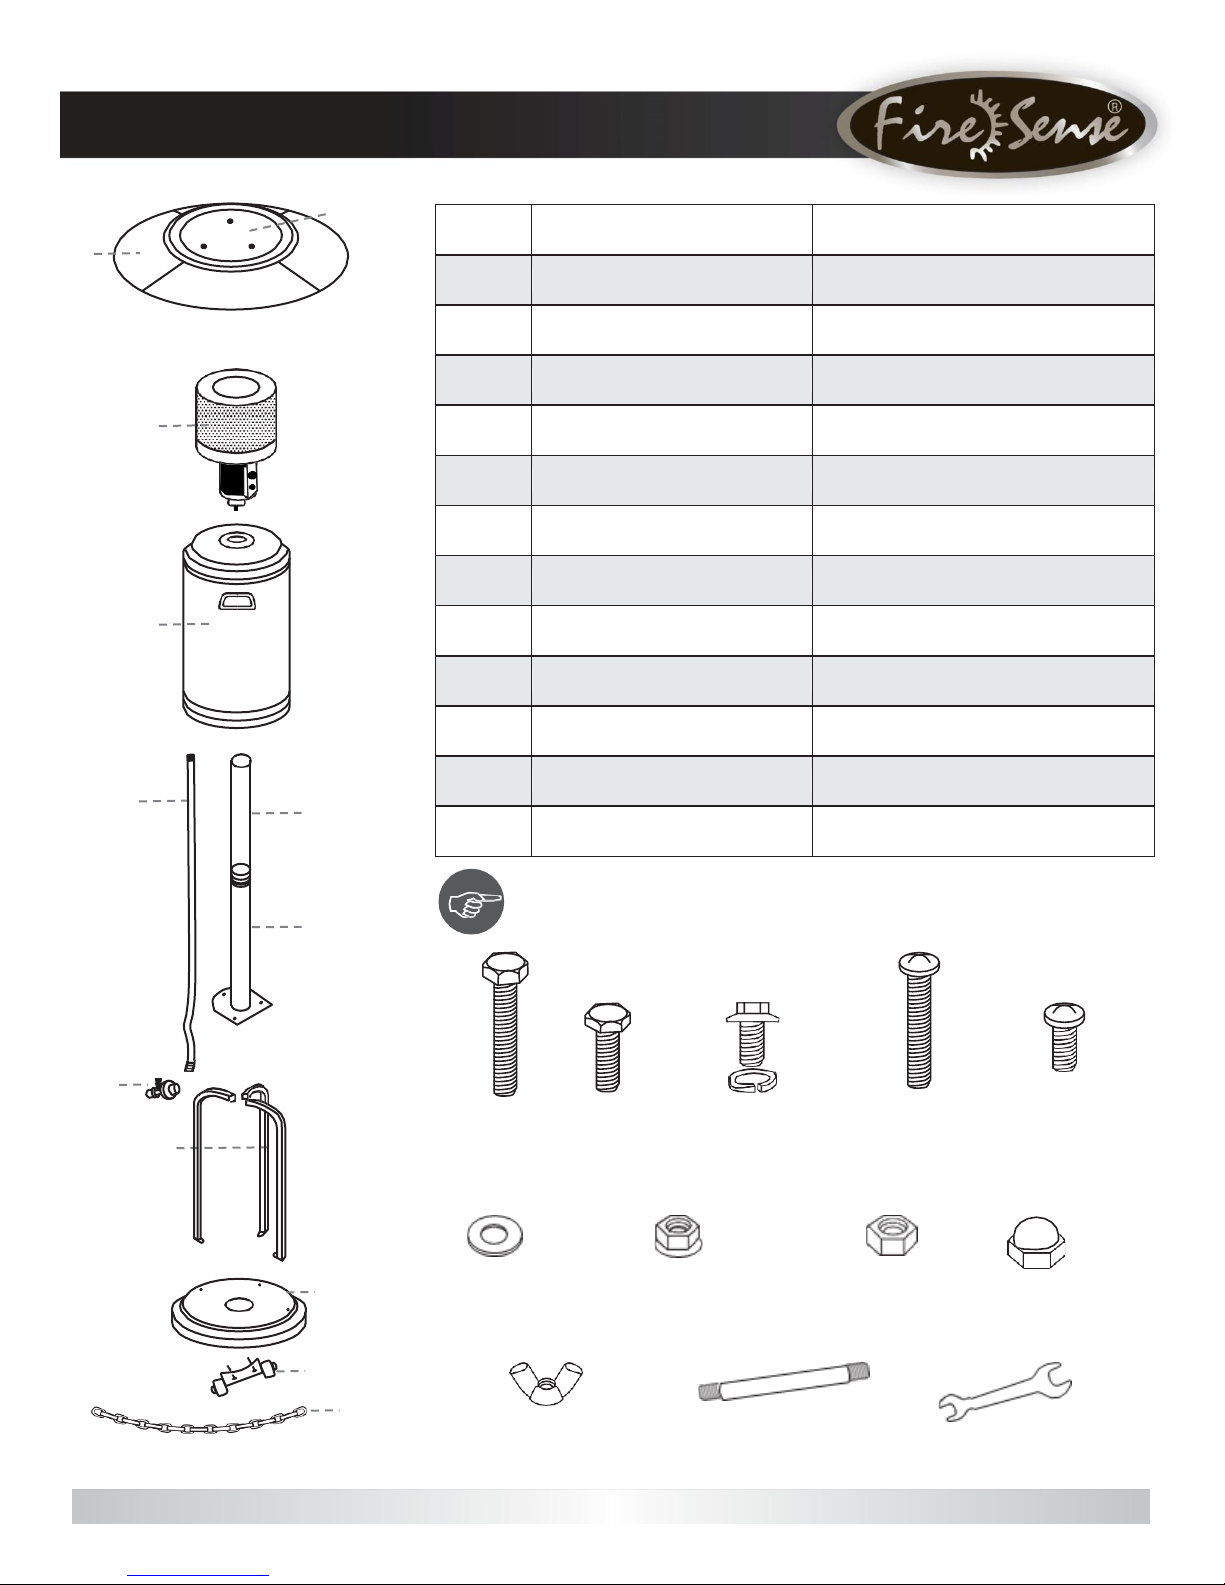
PART DESCRIPTION QUANTITY
A
B
C
D
E
F
G
H
I
J
K
L
Reector Panel 4 packed in 2 inner cartons
Reector Center Cap 1
Head Assembly 1 packed in 1 inner carton
Tank Housing 1
Gas Hose 1 attached to Head Assembly
Upper Post 1
Lower Post 1
Regulator 1 packed with Head Assembly
Post Supports 3 packed in 1 inner carton
Base with Pre-assembled
Waterbox
Wheel Assembly 1 packed with Head Assembly
Chain (Secures LPG Cylinder) 1 packed with Post Supports
1
H
I
G
K
J
L
HARDWARE CONTENTS
M
Large Bolt
Qty: 6
(Step 3)
R
Large Flat Washer
Qty: 9
(Step 6 & 9)
V
Wing Nut
Qty: 3
(Step 9)
N O P Q
Small Bolt
Qty: 5
(Step 1 & 2)
Small Bolt
w/ Lock Washer
Qty: 4
Large Screw
Qty: 4
(Pre-assembled in
base/waterbox)
Small Screw
S T U
Small Flange Nut
Qty: 6
(Step 3)
Large Nut
Qty: 4
(Pre-assembled in
base/waterbox)
Cap Nut
Qty: 12
(Step 8)
W X
Qty: 3
(Step 6)
Wrench
Qty: 1
Qty: 12
(Step 8)
Contact us for assistance: (866) 985-7877 | www.wtliving.com 5
Page 6
ASSEMBLY
PREPARATION
Before beginning assembly of this appliance, make sure all parts are present. Compare all parts with package contents list
and hardware contents as listed on page 4 of this manual. If any part is missing or damaged, do not attempt to assemble
this product. Contact customer service for replacement parts.
ESTIMATED ASSEMBLY TIME: 60 minutes
Tools Required for Assembly (NOT included):
• 7/16” open-end wrench • Phillips screwdriver w/medium blade
• Adjustable wrench • Leak test solution (see page 10)
Note: This heater has an Electronic Ignition and will require installation of 1 – AAA battery. The battery should be installed
by unscrewing the RED IGNITER BUTTON – battery not included.
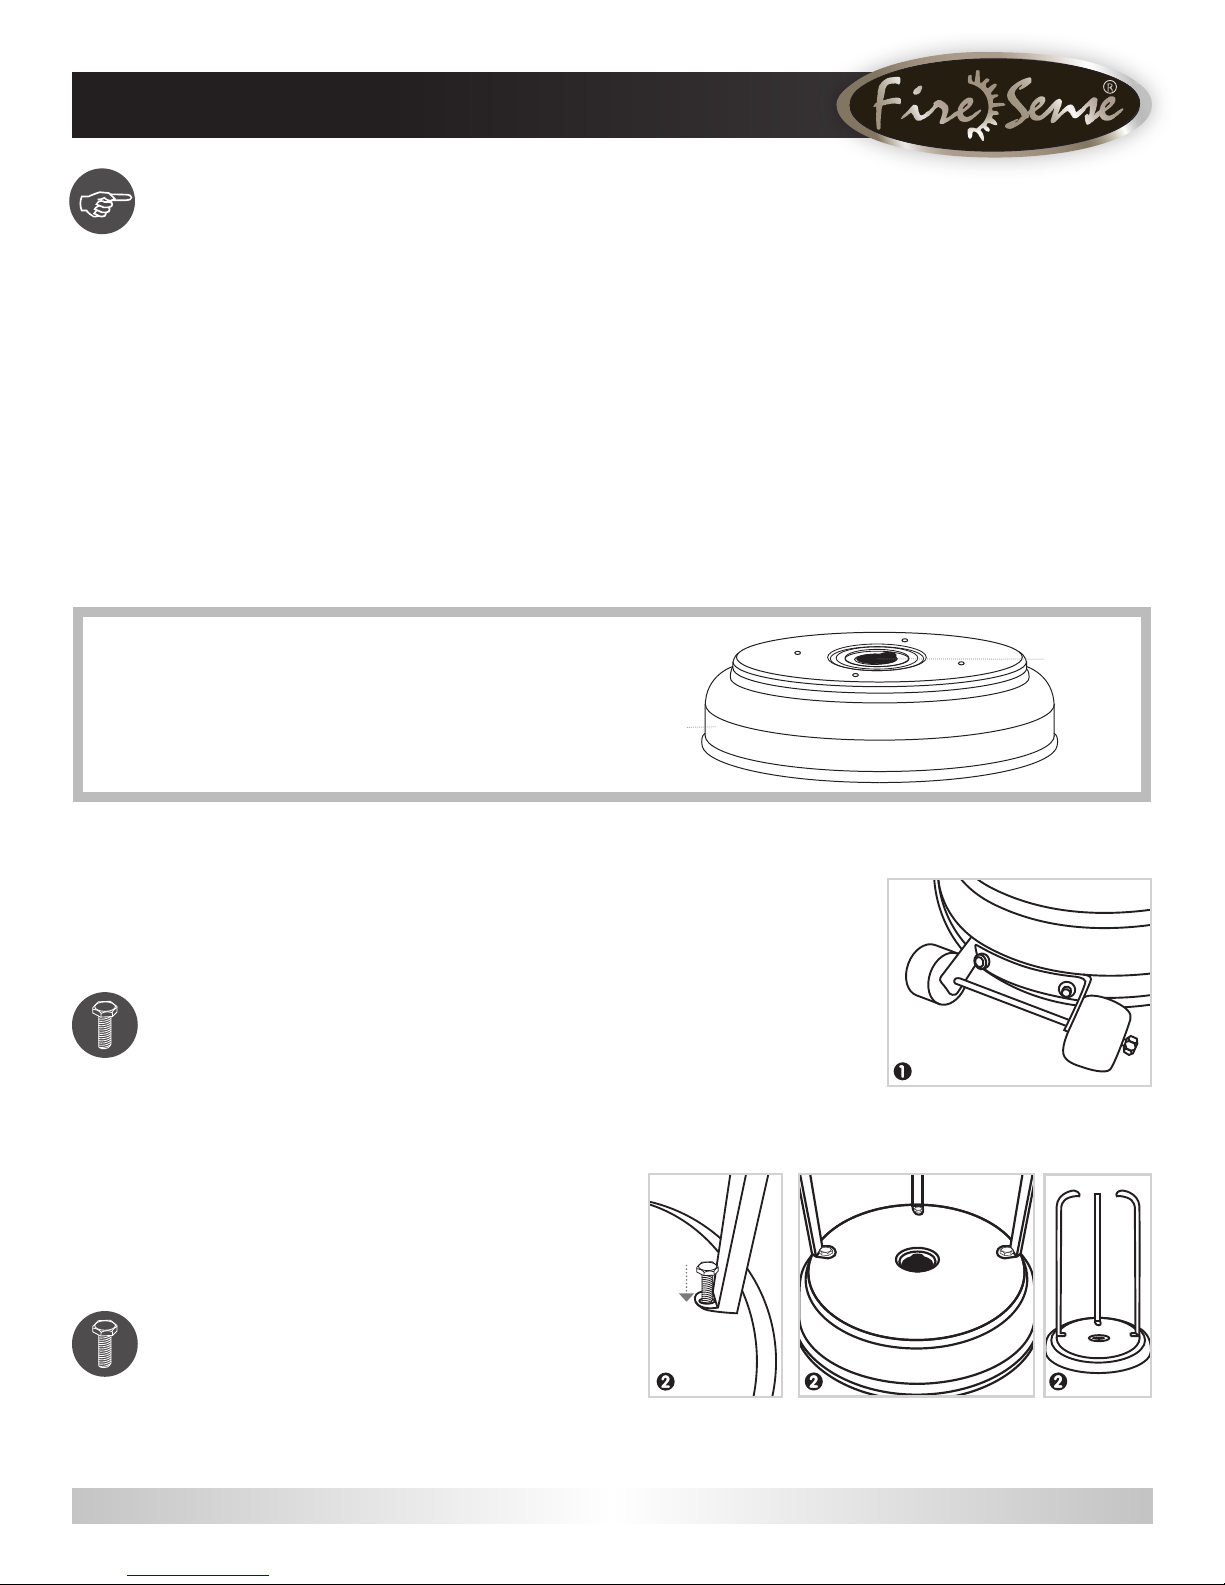
The Waterbox will be pre-assembled to the base. To ll, pull
open the plastic cap on top of the waterbox and ll with water
or sand. Place the plastic cap back on top. You may nd it
easier to ll the waterbox prior to attaching wheels.
Attach Wheel Assembly K to Base J. Align holes to the
1
Base, and insert 2 Small Bolts N through the holes and
nger tighten. Be sure that the Wheel Assembly is parallel to
the Base J and tighten with the Wrench X.
Hardware Used: 2x Small Bolts
Attach the Post Supports I to the Base J. Align the holes
2
in the bottom of each Post Support with the hole on the
Base. Insert 1 Small Bolt N through the hole in the support and
into the Base and hand tighten. Repeat with the other 2 Post
Supports and then tighten all bolts with the Wrench X.
N
Waterbox Cap
Base
Hardware Used: 3x Small Bolts
Contact us for assistance: (866) 985-7877 | www.wtliving.com 6
N
Page 7
ASSEMBLY
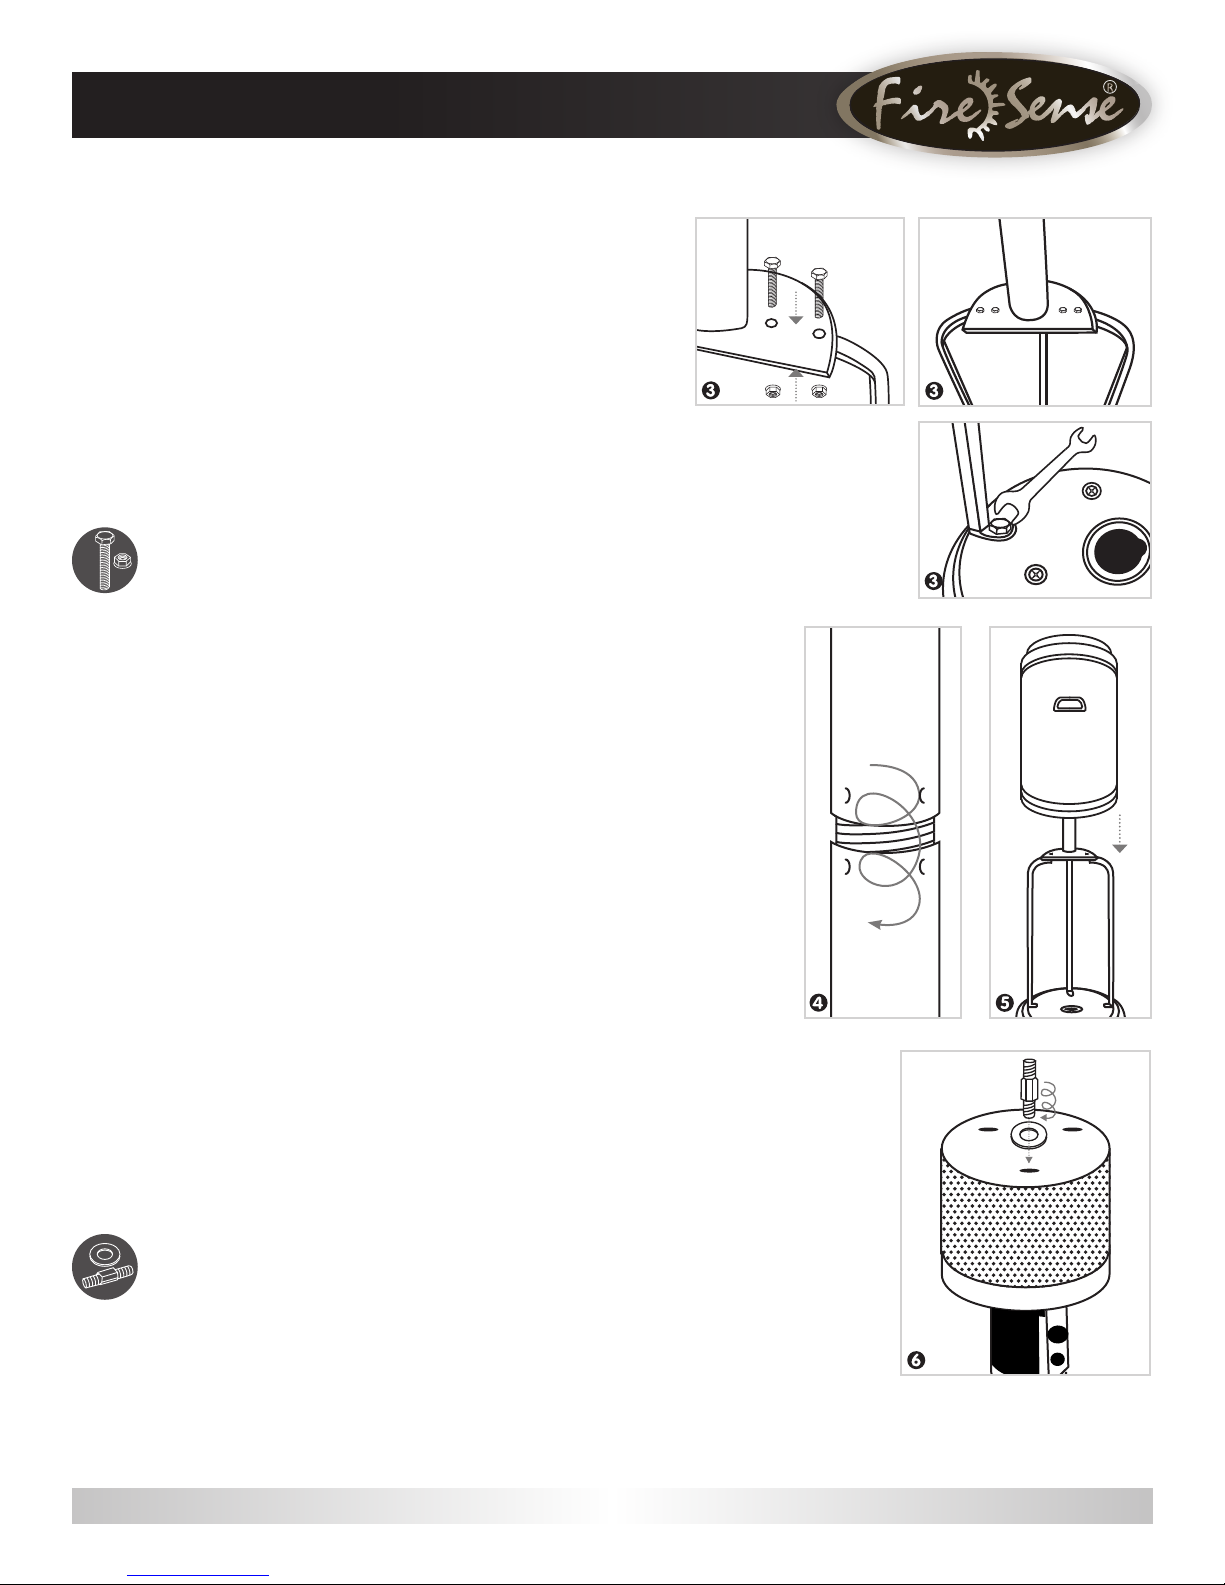
Attach the Lower Post G to the Post Supports I. Once
3
you have tightened the bolts holding the Post Supports I
to the Base J, align the holes in the Lower Post G with the
holes on the tops of the Post Supports and insert a Large
Bolt M through the hole in the Post Support. Secure with
a Small Flange Nut S. Repeat this in the 5 remaining holes
(6 holes total—2 for each Post Support piece). Hand tighten
initially then tighten with the Wrench X when all bolts have
been inserted.
Hardware Used: 6x Large Bolt M
6x Small Flange Nut
S
Attach Upper Post F to Lower Post G by screwing the
4
two pieces of the post together.
Note: Bolts not needed to hold the posts in place.
Slide Tank Housing D over the assembled Upper/Lower
5
Posts F/G and down over the Post Supports I. Rest the
Tank Housing on the Base J.
Attach to the top of the Head
6
Assembly C. Insert 1 through 1 Large Flat
Washer and into the hole on the top of the Head Assembly C.
Tighten stud securely. Repeat with the other 2 .
Hardware Used: 3x Reector Stud
3x Large Flat Washer
W
R
Contact us for assistance: (866) 985-7877 | www.wtliving.com 7
Page 8
ASSEMBLY
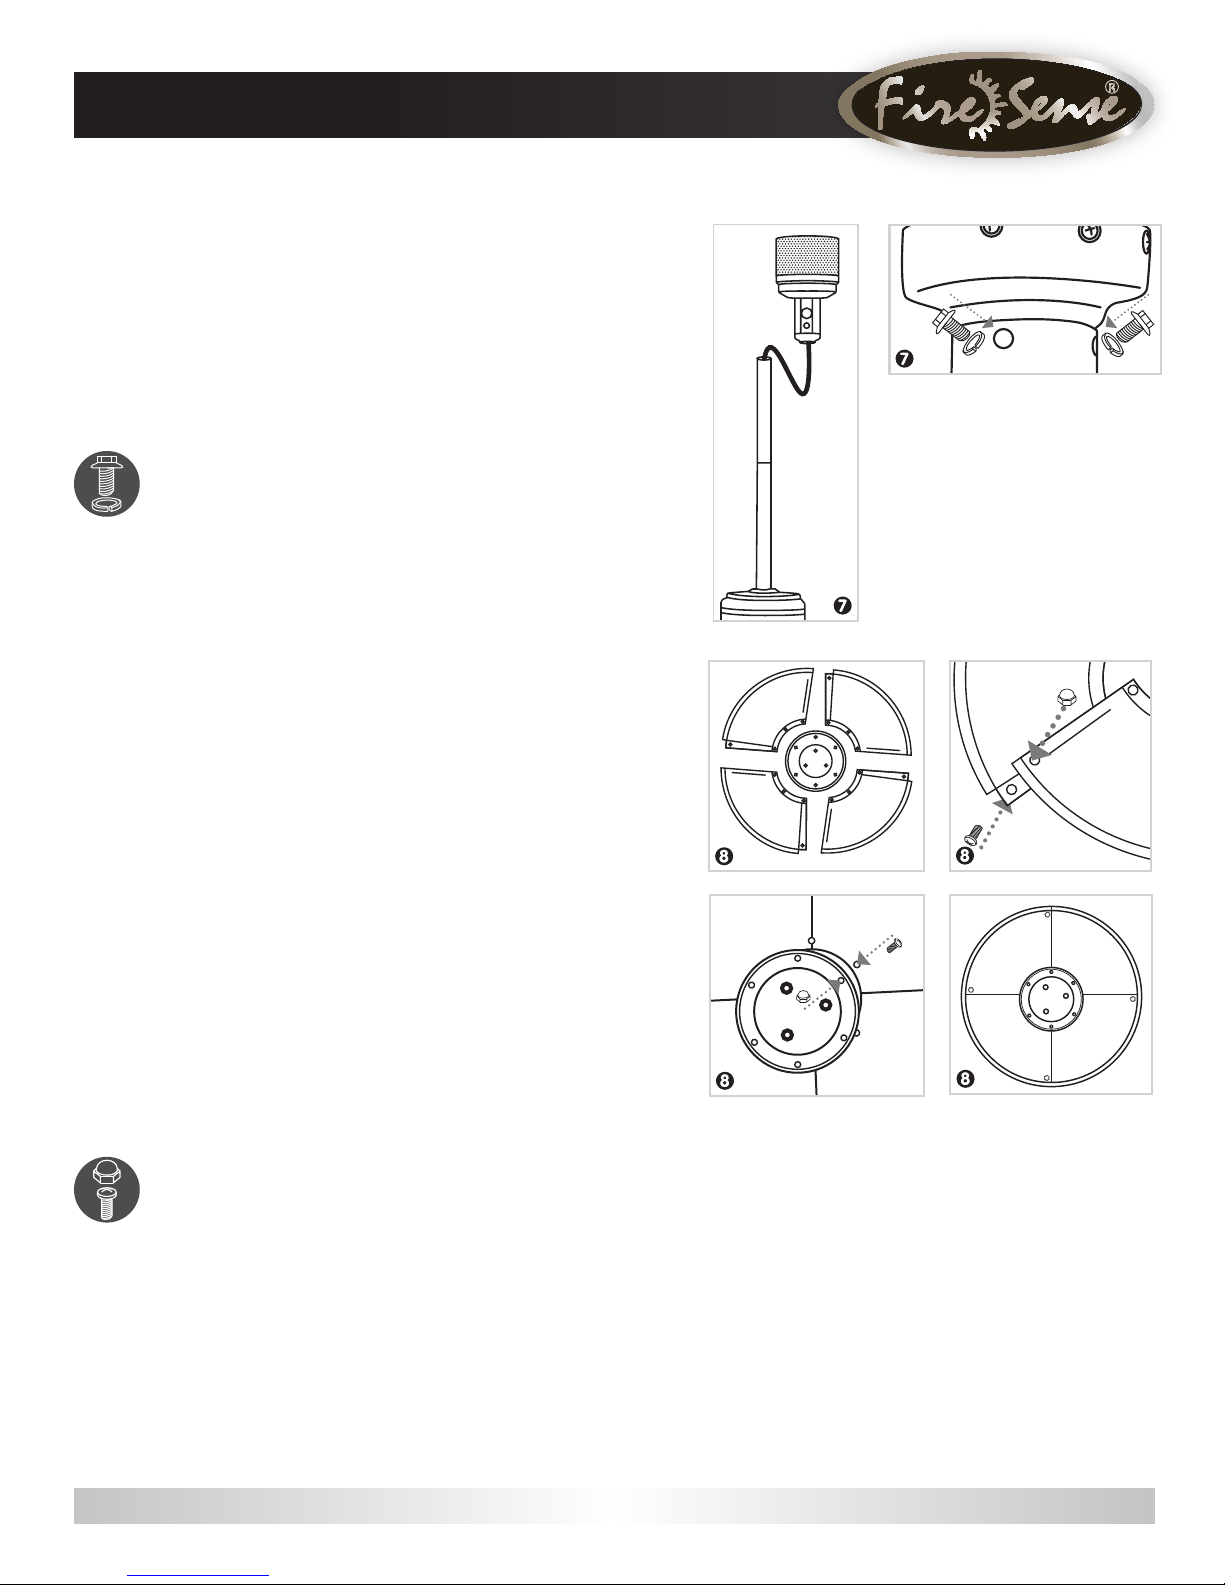
Attach Head Assembly C to Upper Post F. Route
7ñ
Gas Hose E down into Upper/Lower Posts F/G and
align 4 small holes on the Head Assembly C with 4 Small
holes in the Upper Post F. [HINT: Control knob should be
above decal on post.] Insert the 4 Small Bolts with Lock
Washers O through the aligned 4 holes and tighten securely
with the Wrench W.
Hardware Used: 4 x Small Bolt w/Lock Washer
¸Á>¿,gÛgUÁµ¦¿NOTE: MAKE SURE TO REMOVE THE
8ñ
BLUE REFLECTOR TAPE ON REFLECTOR PIECES PRIOR TO
ASSEMBLY!
¸¸gLÓ¿/¡[¿t¿gUg¸¸>µÓ¿tµ¿¡µ¡gµ¿>ygÁ¿t¿µgÛgUÁµ¿
¸gUÁ¸\¿¸g¿g>U¿¸UµgÑ¿¡µµ¿Á¿tɵÁgµ¿>¸¸gLÓ¿>_¿
retighten after sections are aligned.
Slide two ,g×gU¿³½*>g¶ A together. Insert one Small Screw.
Screw on Cap Nut loosely.
Repeat with the other ,g×gU¿³½*>g¶ A.
Slide ,g×gU¿³½g¿g³½>½B onto assembled ,g×gU¿³½
Panels A. Insert one Small Screw Q and screw on Cap Nut
loosely. Repeat with two more Small Screws and Cap Nuts
Á¿U¡gÁg¿µgÛgUÁµ¿>¸¸gLÓ¦¿ÉÓ¿ÁyÁg¿>¿¸UµgѸ¿>_¿
cap nuts.
O
U
Hardware Used: 12x Small Screw Q | 12x Cap Nut
Contact us for assistance: (866) 985-7877 | www.wtliving.com l
U
Page 9
ASSEMBLY
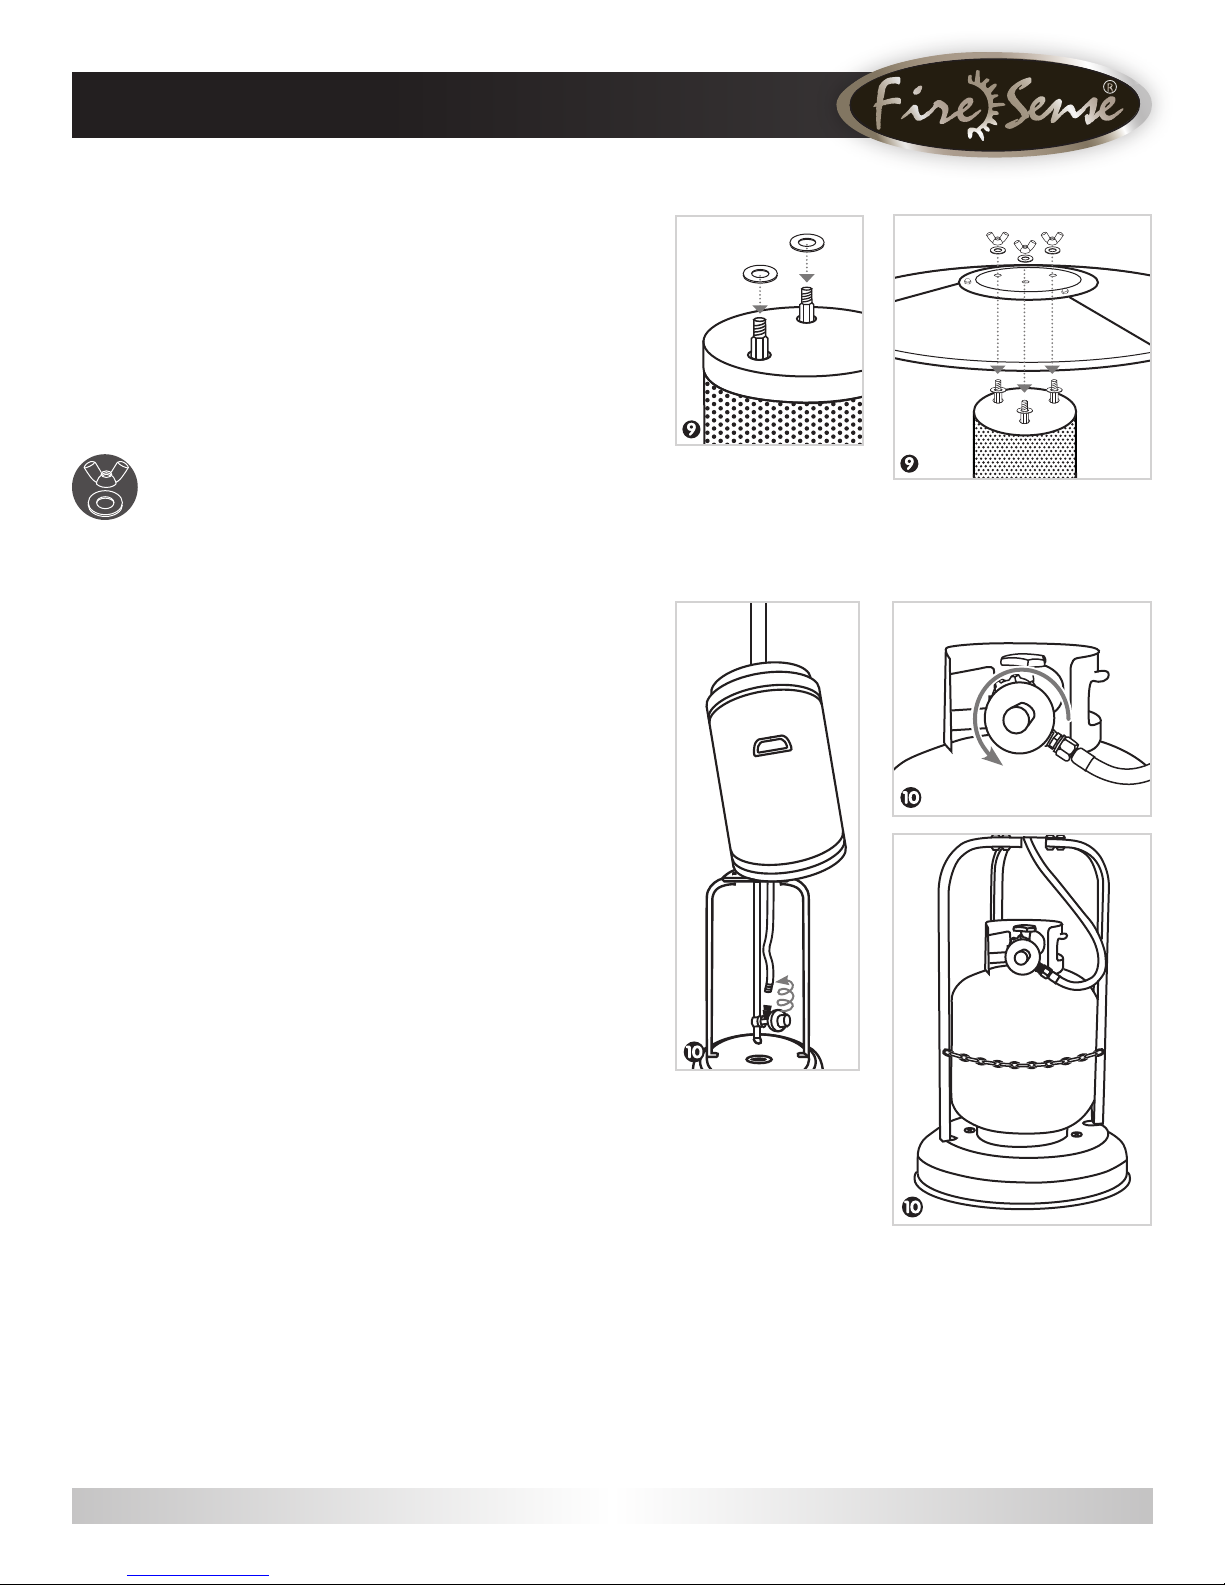
While supporting heater, tilt the Head Assembly C
9
and slide 3 Large Flat Washers R over the
Studs W. Place the reector assembly onto the
and slide 3 Large Flat Washers over the and
onto the . Secure with 3 Wing Nuts.
Once you have tightened the Wing Nuts, return the heater
to an upright position.
Hardware Used: 6x Large Flat Washer B
3x Wing Nut
Connect the hose and regulator to the LP cylinder.
10
9.07 kg / 20 lb propane cylinder only. Lift the Tank Housing D
up and rest it on the top of the assembled Post Supports I.
Screw Regulator H onto Gas Hose E. Do not cross thread.
Hand tighten securely then tighten with the Wrench. Attach
the Regulator to the valve on the LP cylinder and hand tighten
securely. Place LP tank onto base of heater. Secure the
LPG tank by attaching the Chain L onto the post supports.
Lower the Tank Housing.
The LP cylinder is sold separately. Use a standard
V
NOTE: Use this heater only with a propane vapor withdrawal
supply system. See chapter 5 of the standard for storage and
handling of liqueed petroleum gas, ANSI/NFPA 58. Your local
library or re department should have this book.
Contact us for assistance: (866) 985-7877 | www.wtliving.com 9
Page 10

OPERATING INSTRUCTIONS
A minimum supply pressure of .5 psi is required for the purpose of input
adjustment of propane gas. Storage of this patio heater indoors is permissible
only if the cylinder is disconnected and removed from the appliance. A cylinder
must be stored outdoors in a well-ventilated area out of the reach of children.
A disconnected cylinder must have dust caps tightly installed and must not
be stored in a building, garage, or any other enclosed area. The minimum
permissible gas supply pressure of 11 W.C. is required for purpose of hose
adjustment. The minimum hourly of 17,500 BTU is required input rating for
a heater for automatic operation rating less than full input rating.
The pressure regulator and hose assembly supplied with the appliance must
be used.
The installation must conform with local codes, or in the absence of local codes,
with national fuel gas code, ANSI Z223.1/NFPA54, natural gas and propane
Installation Code, CSA B149.1, or propane storage and handling code, B149.2
• Do not store a spare LP-gas
cylinder under or near this
appliance.
• Never ll the cylinder beyond
80 percent full.
• Place the dust cap on the
cylinder valve outlet whenever
the cylinder is not in use. Only
install the type of dust cap
on the cylinder valve that is
provided with the cylinder
valve. Other types of caps or
plugs may result in leakage of
propane.
A dented rusted or damaged propane cylinder may be hazardous and should
be checked by your local cylinder supplier. Never use a propane cylinder with
a damaged valve connection. The propane cylinder must be constructed and
marked in accordance with the specications for LP gas cylinders of the U.S.
Department of Transportation (DOT) or the standard for cylinders, spheres and
tubes for transportation of dangerous goods and commission, CAN/CSA-B339.
• The cylinder must have a listed overlling prevention device.
• The cylinder must have a connection device compatible with the connection
for the appliance.
• The cylinder used must include a collar to protect the cylinder valve.
• Never connect an unregulated propane cylinder to the heater.
Contact us for assistance: (866) 985-7877 | www.wtliving.com 10
Page 11
OPERATING INSTRUCTIONS
LEAK TEST
1. Make 2-3 oz. of leak test solution
(one part liquid dish washing
detergent and three parts water).
2. Apply several drops of solution
where hose attaches to regulator.
•
Perform all leak tests outdoors.
•
Extinguish all open ames.
•
NEVER leak test when smoking
•
Do not use heater until all connections
have been leak tested and show no signs
of leakage.
WARNING
3. Apply several drops of solution
where regulator connects to cylinder.
4. Make sure all patio heater valves are OFF.
5. Turn cylinder valve ON.
IF BUBBLES APPEAR AT ANY CONNECTION, THERE IS A LEAK.
1. Turn cylinder valve OFF.
2. If leak is detected at hose/regulator connection, tighten connection and
perform another leak test. If bubbles continue to appear, call our customer
service hotline at (866) 985-7877, 9 a.m. – 6 p.m., EST, Monday – Friday.
3. If leak is detected at regulator/cylinder valve connection, disconnect,
reconnect, and perform another leak test. If you continue to see bubbles
after several attempts, cylinder valve is defective. Call our customer service
hotline at (866) 985-7877, 9 a.m. – 6 p.m., EST, Monday – Friday.
English & Spanish speaking.
IF NO BUBBLES APPEAR AT ANY CONNECTION, THE CONNECTIONS
ARE SECURE.
Note: Whenever gas connections are loosened or removed, you must perform
a complete leak test.
Caution: Do not attempt to operate this appliance until you have read and
understand all Safety Information in this manual and all assembly is complete
and leak tests have been performed.
BEFORE TURNING GAS SUPPLY ON:
1. Your heater was designed and
approved for OUTDOOR use
only. Do NOT use it inside a
building, garage, or any other
enclosed area.
2. Make sure surrounding areas are
free of combustible materials,
gasoline, and other ammable
vapors or liquids.
3. Ensure that there is no
obstruction to air ventilation. Be
sure all gas connections are tight
and there are no leaks.
4. Be sure the cylinder cover is
clear of debris. Be sure any
component removed during
assembly or servicing is
replaced and fastened prior
to starting.
BEFORE LIGHTING:
1. Heater should be thoroughly
inspected before each use, and
by a qualied service person
at least annually. If re-lighting a
hot heater, always wait at least
5 minutes.
2. Inspect the hose assembly for
evidence of excessive abrasion,
cuts, or wear. Suspected areas
should be leak tested. If the
hose leaks, it must be replaced
prior to operation. Only use the
replacement hose assembly
specied by the manufacturer.
Contact us for assistance: (866) 985-7877 | www.wtliving.com 11
Page 12
OPERATING INSTRUCTIONS
LIGHTING
NOTE: For initial start or after any cylinder
change, hold the control knob in for 2
minutes to purge air from all gas lines
before proceeding.
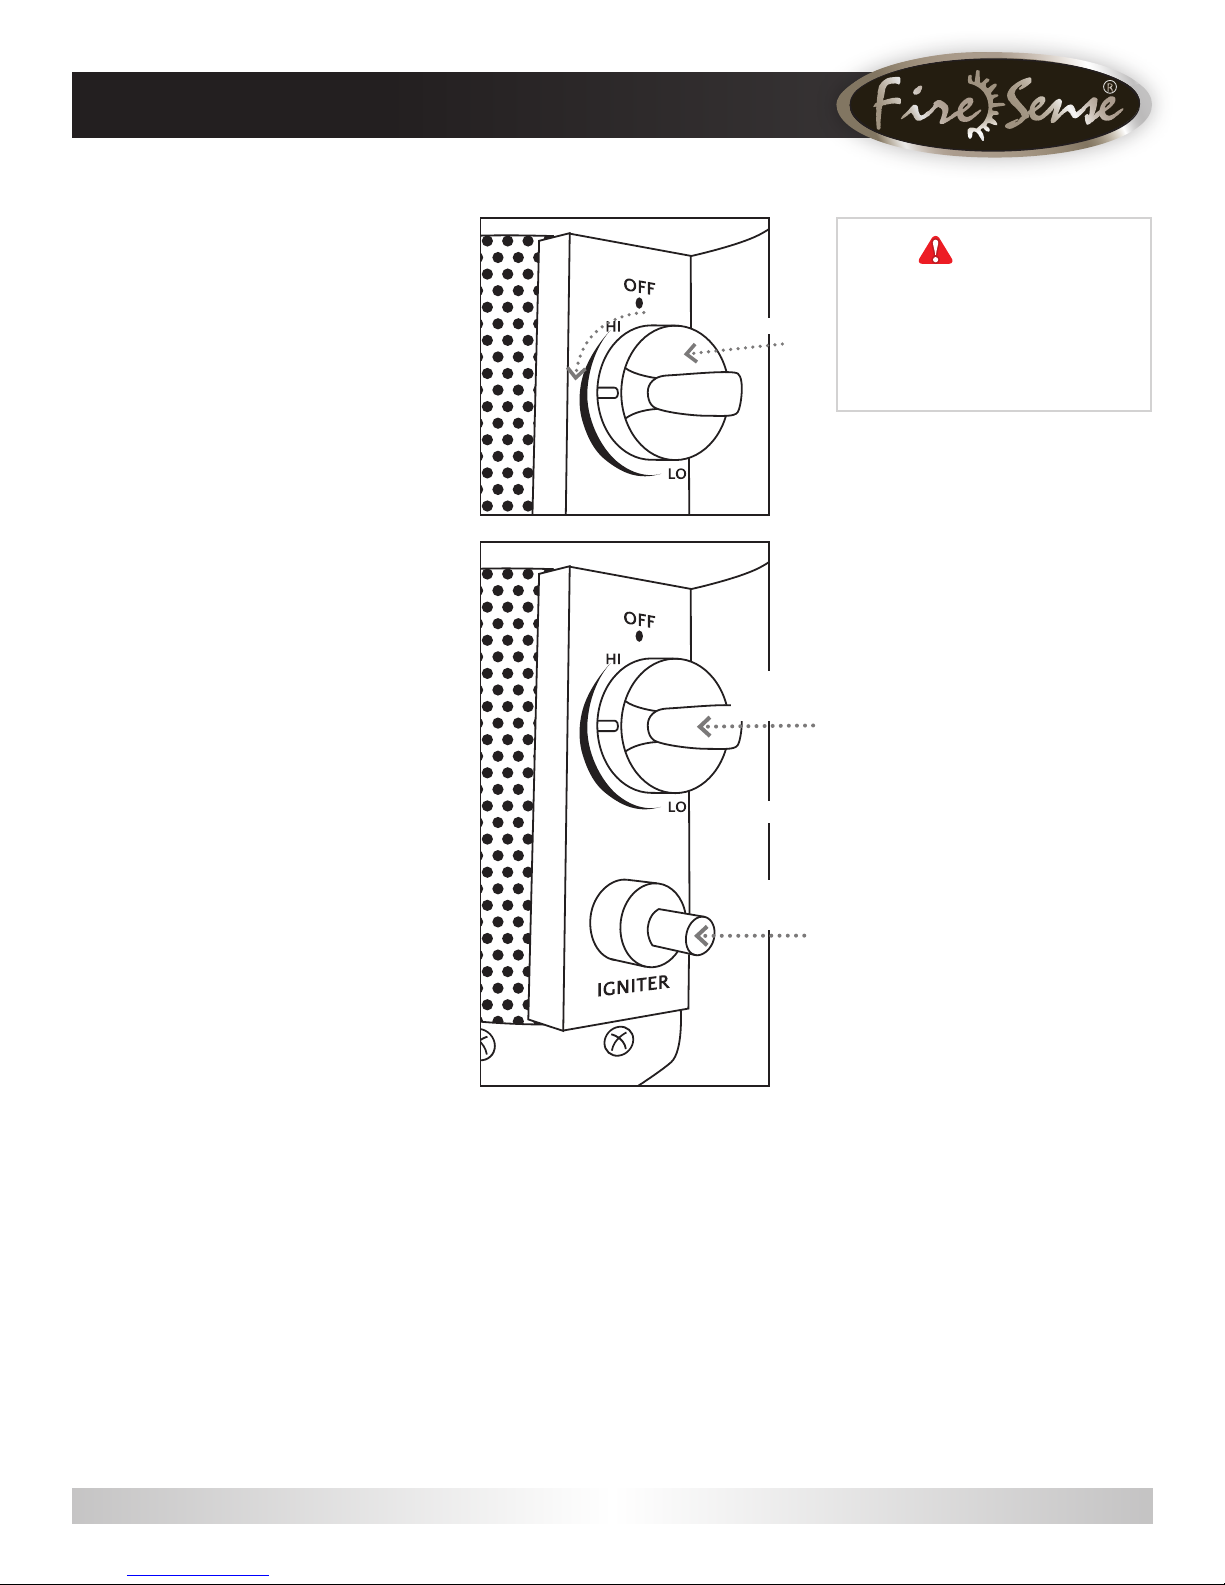
1. Turn the control knob to the “OFF”
position.
2. Fully open the LP cylinder valve.
3. Push in and turn the control knob
to HI.
4. While holding control knob in, push
the RED igniter button to ignite the
main burner.
5. To decrease the ame, turn the control
knob counter clockwise towards LO.
To increase the ame, turn the control
knob clockwise to HI.
6. To turn the appliance OFF, push in the
control knob and turn clockwise to the
OFF position.
7. Wait at least 5 minutes before
attempting to re-light the heater.
8. Turn the gas cylinder valve to OFF
or closed.
If you experience any ignition
problems, please consult
“Troubleshooting” on page 14.
Caution: Avoid inhaling fumes
emitted from the heater’s rst use.
Smoke and odor from the burning
of oils used in the manufacturing
will appear. Both smoke and odor
will dissipate after approximately
30 minutes. The heater should
NOT produce thick black smoke.
TURN
PUSH IN
PUSH &
HOLD
WHILE
PUSHING
IN BUTTON
WARNING
FOR YOUR SAFETY
Be careful when attempting to manually
ignite this heater. Holding in the control
knob for more than 10 seconds before
igniting the gas will cause a ball of ame
upon ignition.
WHEN HEATER IS ON:
Emitter screen will become bright
red due to intense heat. The color
is more visible at night. Burner will
display tongues of blue and yellow
ames. These ames should not
be yellow or produce thick black
smoke, indicating an obstruction
of airow through the burners. The
ame should be blue with straight
yellow tops. If excessive yellow
ame is detected, turn off heater
and consult “Troubleshooting” on
page 14.
RE-LIGHTING:
Note: For your safety, the control
knob cannot be turned OFF
without rst depressing the
control knob and then rotating
to OFF.
1. Turn control knob to OFF.
2. Wait at least 5 minutes to
allow gas to dissipate before
re-lighting.
3. Repeat the “Lighting” steps
listed above.
Contact us for assistance: (866) 985-7877 | www.wtliving.com
12
Page 13

OPERATING INSTRUCTIONS
OPERATION CHECKLIST:
For a safe and pleasurable heating experience, perform this check
before each use:
BEFORE OPERATING:
I am familiar with entire owner’s manual and understand all
precautions noted.
All components are properly assembled, intact and operable.
No alterations have been made.
All gas connections are secure and do not leak.
Wind velocity is below 10 mph.
Heater is for use outdoors (outside any enclosure).
There is adequate fresh air ventilation.
Heater is away from gasoline or other ammable liquids or vapors.
Heater is away from windows, air intake openings, sprinklers and
other water sources.
Heater is at least 91.44 cm / 36 in on top and at least 91.44 cm / 36 in
on sides from combustible materials.
Heater is on a hard and level surface.
There are no signs of spider or insect nests in heater orices.
All burner passages are clear.
All air circulation passages are clear.
Clothing or other protective material should not be hung from the
heater, or placed on or near the heater.
Any guard or other protective device removed for servicing the heater
must be replaced prior to operating the heater.
Installation and repair should be done by a qualied service person.
The heater should be inspected before each use and at least annually
by a qualied service person.
WARNING
FOR YOUR SAFETY
Heater will be hot after use. Handle with
extreme care. Reector is hot to the touch.
SHUT DOWN:
1. Turn control knob
clockwise to OFF while
depressing the knob.
(Normally, burner will
make a slight popping
noise when extinguished).
2. Turn cylinder valve
clockwise to OFF and
disconnect regulator
when heater is not in use.
NOTE: After use, some
discoloration of the
emitter screen is normal.
AFTER OPERATION:
1. Gas control knob is in
OFF position.
2. Gas tank valve is OFF.
3. Disconnect gas line.
4. Heater is stored upright
in a secure location.
OPERATION INFORMATION AND SAFETY:
• Unit will operate at reduced efciency below 4.44° C / 40° F.
• Children and adults should be alerted to the hazards of high surface
temperatures and should stay away to avoid burns or clothing ignition.
• Young children should be carefully supervised when they are in the
area of the heater.
• More frequent cleaning may be required as necessary. It is imperative
that control compartment burner and circulating air passageways of the
heater be kept clean and free of debris and/or spider or insect nests.
Contact us for assistance: (866) 985-7877 | www.wtliving.com
13
Page 14
CARE AND MAINTENANCE
To enjoy years of outstanding performance from your heater, make sure you
perform the following maintenance activities on a regular basis:
KEEP EXTERIOR SURFACES CLEAN.
1. Use soapy water for cleaning. Never use ammable or corrosive
cleaning agents.
2. While cleaning your unit, be sure to keep the area around the burner and
control compartment dry at all times. Do not submerge the control valve
assembly. If the gas control is submerged in water, do NOT use it. It must
be replaced.
3. Air ow must be unobstructed. Keep controls, burner, and circulating
air passageways clean. Signs of possible blockage include:
• Gas odor with extreme yellow tipping of ame.
• Heater does NOT reach the desired temperature.
• Heater glow is excessively uneven.
• Heater makes popping noise.
• Spiders and insects can nest in burner or orices. This dangerous
condition can damage heater and render it unsafe for use. Clean
burner holes by using a heavy-duty pipe cleaner. Compressed air
may help clear away smaller particles.
• Carbon deposits may create a re hazard. Clean dome and burner
screen with warm soapy water if any carbon deposits develop.
Note: In a salt-air environment (such as near an ocean), corrosion
occurs more quickly than normal. Frequently check for corroded areas
and repair them promptly.
WARNING
FOR YOUR SAFETY
•
Do NOT touch or move heater for at least
45 minutes after use.
•
Reector is hot to the touch.
•
Allow reector to cool before touching.
STORAGE:
Between uses:
• Turn control knob OFF.
• Disconnect LP source.
• Store heater upright in an area
sheltered from direct contact
with inclement weather (such
as rain, sleet, hail, snow, dust
and debris).
• If desired, cover heater to
protect exterior surfaces and
to help prevent build-up in
air passages. Never leave LP
cylinder exposed to direct
sunlight or excessive heat.
(Cover not included.)
Note: Wait until heater is
cool before covering.
Contact us for assistance: (866) 985-7877 | www.wtliving.com
SERVICE:
Only a qualied service person
should repair gas passages and
associated components.
Caution: Always allow heater to
cool before attempting service.
14
Page 15
TROUBLESHOOTING
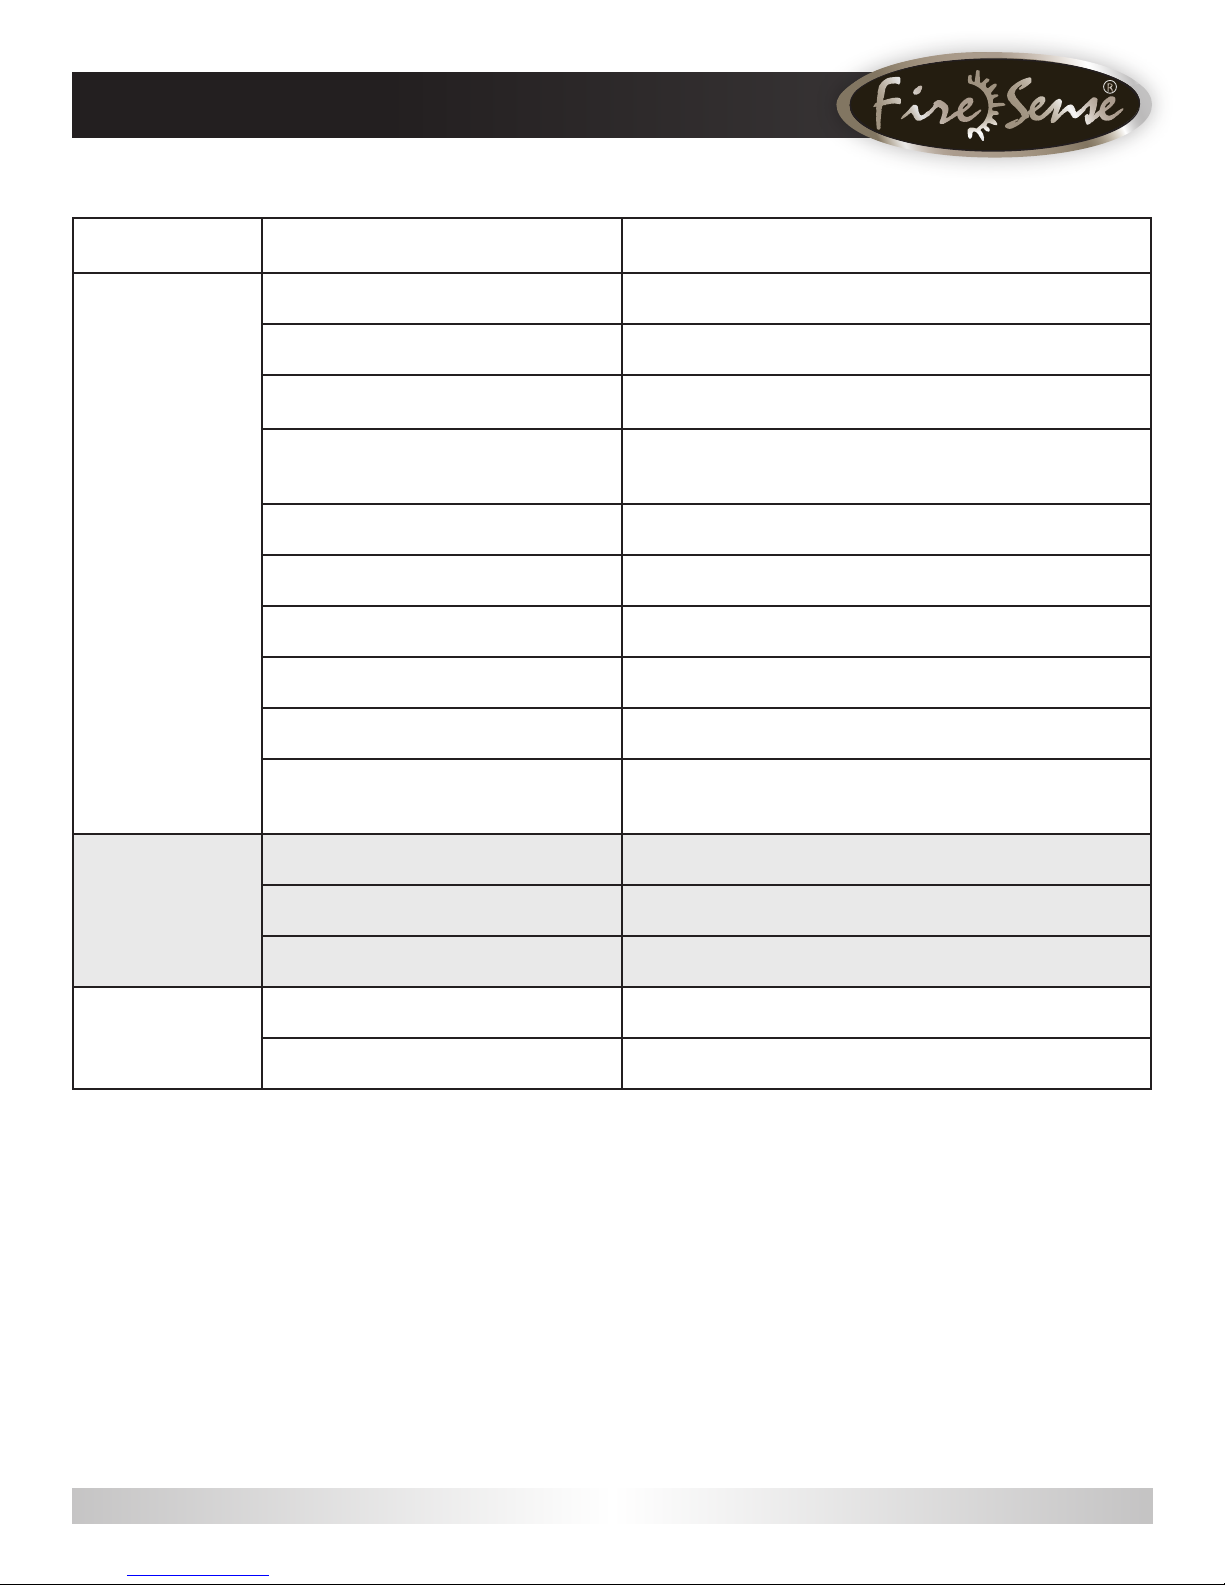
PROBLEM POSSIBLE CAUSE CORRECTIVE ACTION
Gas valve may be off Turn gas valve ON
Fuel tank may be empty Rell LPG tank
Orice blocked Clean or replace orice
Main burner will
not light
Low burner ame
Burner unit
Air in supply system
Loose connection Check all ttings
Igniter fails Use stick lighter to manually light
Gas pressure low with valve open full Replace cylinder or regulator
New cylinder or 1st ignition Purge air from lines
Cylinder valve on, no gas ow Replace hose/regulator assembly
AAA Battery behind igniter button
is dead
Pressure is low Replace LPG tank
Tank is low on fuel Fill LPG tank
Gas hose is kinked Check and straighten or replace
Carbon on reector and emitter screen Clean components as needed
Thick black smoke Blockage in burner assembly—thoroughly clean burner
Purge air from lines. Open gas lines and depress control
knob for 2-3 minutes.
Replace with a new AAA Battery
Contact us for assistance: (866) 985-7877 | www.wtliving.com
15
Page 16

REPLACEMENT PARTS LIST
A
E
C
D
F
B
PART DESCRIPTION QUANTITY
A
B
C
D
E
F
G
H
I
J
K
L
Reector Panel 4 packed in 2 inner cartons
Reector Center Cap 1
Head Assembly 1 packed in 1 inner carton
Tank Housing 1
Gas Hose 1 attached to Head Assembly
Upper Post 1
Lower Post 1
Regulator 1 packed with Head Assembly
Post Supports 3 packed in 1 inner carton
Base with Pre-assembled
Waterbox
Wheel Assembly 1 packed with Head Assembly
Chain (Secures LPG Cylinder) 1 packed with Post Supports
1
H
I
G
K
Questions, problems, missing or
replacement parts?
Before returning to your retailer, our customer service
is available. English & Spanish speaking.
Call us toll-free at (866) 985-7877, email us at
cservice@welltraveled.net, or go online and live
chat at www.wtliving.com. Our hours are:
9 a.m. – 6 p.m., EST, Monday – Friday
J
L
Contact us for assistance: (866) 985-7877 | www.wtliving.com
16
Page 17
1 YEAR LIMITED WARRANTY
Customers in the Continental US
All components are warranted for a period of 1 year after date of purchase by the original
owner against defects in materials and workmanship under normal use. This warranty
does NOT cover normal wear and weathering, assembly and/or maintenance OR use in a
commercial application if model is not designated as a commercial model. At Well Traveled
Living’s sole discretion, products under warranty will be repaired and/or replaced at no
charge to the customer. Any returns sent back to Well Traveled Living must be sent via
prepaid freight and in the original retail packaging.
For warranty service contact Well Traveled Living at the address, phone numbers or internet
site and email listed in this owner’s manual. Be sure to have your sales receipt, date of
purchase and catalogue/model numbers available when calling. All warranty service will be
coordinated by the Well Traveled Living’s, Amelia Island, Florida service center.
This warranty is extended only to the original purchaser. Proof of purchase will be required
before warranty service is rendered. The sales receipt is the only valid proof of purchase.
This warranty only covers failures due to defects in materials or workmanship which
occur during normal use. Failures and/or damage which result from accident, negligence,
misuse, abuse, neglect, mishandling, alteration or modication, failure to maintain,
improper assembly or maintenance, service by unauthorized agency or use of unauthorized
components or damage that is attributable to acts of God are NOT covered.
This limited warranty gives you specic legal rights and you may also have other rights
which vary from jurisdiction to jurisdiction. The provisions of the United Nations Convention
on Contracts for the Sales of Goods shall not apply to this limited warranty or the sale of
products covered by this limited warranty.
AUSTRALIA: Our goods come with guarantees that cannot be excluded under the Australian
Consumer Law. You are entitled to a replacement or refund for a major failure and for
compensation for any other reasonably foreseeable loss or damage. You are also entitled
to have the goods repaired or replaced if the goods fail to be of acceptable quality and the
failure does not amount to a major failure.
EXCEPT AS LISTED ABOVE
ASSEMBLY AND OPERATION OF THIS UNIT
OPERATIONAL INSTRUCTIONS CONTAINED
IN THIS MANUAL CAN RESULT IN SEVERE
PROPERTY DAMAGE AND/OR PERSONAL
INJURY
LIVING, OR ITS DIRECTORS, OFFICERS OR
AGENTS BE LIABLE TO THE PURCHASER
OR ANY THIRD PARTY, WHETHER IN
CONTRACT, IN TORT, OR ON ANY OTHER
BASIS, FOR ANY INDIRECT, SPECIAL,
PUNITIVE, EXEMPLARY, CONSEQUENTIAL,
OR INCIDENTAL LOSS, COST, OR DAMAGE
ARISING OUT OF OR IN CONNECTION
WITH THE SALE, MAINTENANCE, USE,
OR INABILITY TO USE THE PRODUCT,
EVEN IF WELL TRAVELED LIVING OR ITS
DIRECTORS, OFFICERS OR AGENTS HAVE
BEEN ADVISED OF THE POSSIBILITY OF
SUCH LOSSES, COSTS OR DAMAGES, OR
IF SUCH LOSSES, COSTS, OR DAMAGES
ARE FORESEEABLE. IN NO EVENT WILL
WELL TRAVELED LIVING, OR ITS OFFICERS,
DIRECTORS, OR AGENTS BE LIABLE FOR
ANY DIRECT LOSSES, COSTS OR DAMAGES
THAT EXCEED THE PURCHASE PRICE OF
THE PRODUCT.
THE EXCLUSION OR LIMITATION OF
INCIDENTAL OR CONSEQUENTIAL
DAMAGES, SO THE ABOVE LIMITATION
OR EXCLUSION MAY NOT APPLY TO THE
PURCHASER.
Important Notice For customer service and warranty issues contact our Customer Service Center
at: (866) 985-7877, email us at cservice@welltraveled.net, or go online and live chat at www.wtliving.com.
Our hours are: 9 a.m. – 6 p.m., EST, Monday – Friday. English & Spanish speaking.
Distributed by:
Costco Wholesale Corporation
P.O. Box 34535
Seattle, WA 98124-1535
USA
1-800-774-2678
www.costco.com
Fire Sense®, Mojave Sun®, and Well Traveled Living® are registered trademarks of Well Traveled Imports, Inc®. All assembly instruction presentations
Imported by / Importé par :
Costco Wholesale Canada Ltd.*
415 W. Hunt Club Road
Ottawa, Ontario
K2E 1C5, Canada
1-800- 463-3783
www.costco.ca
* faisant affaire au Québec sous le
nom Les Entrepôts Costco
are the property of Well Traveled Imports, Inc.
Importado por:
Importadora Primex S.A. de C.V.
Blvd. Magnocentro No.4
San Fernando La Herradura
Huixquilucan, Estado de México
C.P.52765
RFC: IPR-930907-S70
(55)-5246-5500
www.costco.com.mx
®
and are protected by U.S. copyrights and trademarks. All rights reserved.
Imported by:
Costco Wholesale UK Ltd /
Costco Online UK Ltd
Hartspring Lane
Watford, Herts
WD25 8JS
United Kingdom
01923 213113
www.costco.co.uk
Imported by / Manufactured for:
Costco President Taiwan, Inc.
No. 656 Chung-Hwa 5th Road
Kaohsiung, Taiwan
Company Tax ID: 96972798
0800-885-889
www.costco.com.tw
MADE IN CHINA
FABRIQUÉ EN CHINE
HECHO EN CHINA
17
Page 18

DANGER
Le non-respect des consignes de sécurité et
des instructions fournies avec ce chauffage
peut causer la mort, des blessures graves ou
des pertes et dommages matériels dus au
risque d’incendie, d’explosion, de brûlure,
d’asphyxie et d’empoisonnement au
monoxyde de carbone. Seules les personnes
aptes à comprendre et à suivre les instructions
doivent utiliser ou faire l’entretien de ce
chauffage.
Chauffage de terrasse
AVERTISSEMENT
Une installation, un réglage, une modification,
une utilisation ou un entretien inadéquat peut
causer des dommages matériels, des
blessures ou la mort. Lisez attentivement le
mode d’emploi et les instructions sur
le fonctionnement et l’entretien avant
de procéder à l’installation ou à l’entretien de
cet équipement.
DANGER
POUR VOTRE SÉCURITÉ :
Si vous détectez une odeur de gaz :
1. Coupez l’alimentation en gaz de l’appareil.
2. Éteignez toute flamme nue.
3. Si l’odeur persiste, tenez-vous à distance de
l’appareil et appelez immédiatement le
fournisseur de gaz ou le service d’incendie.
AVERTISSEMENT
POUR UN USAGE À L’EXTÉRIEUR
SEULEMENT!
Des questions, des problèmes, des pièces manquantes?
Avant de retourner l’article au détaillant, notre service d’assistance à la clientèle est à votre disposition.
Interlocuteurs anglophones et hispanophones.
Appelez au numéro sans frais (866) 985-7877, envoyez-nous un courriel à l’adresse
cservice@welltraveled.net, ou accédez à notre site Web et chattez en direct à l'adresse
www.wtliving.com. Heures d'ouverture : entre 9 h et 18 h (HNE), du lundi au vendredi
AVERTISSEMENT
N’entreposez pas et n’utilisez pas d’essence ni
aucun autre liquide ou vapeur inflammable à
proximité de cet appareil ou de tout autre
appareil. Aucune bouteille de gaz de pétrole
liquéfié non utilisée ne doit être rangée
à proximité de cet appareil ou de tout autre
appareil.
ÉLÉM. / ART. 1031510
INSTRUCTIONS D'ASSEMBLAGE,
D'ENTRETIEN ET D'UTILISATION
IMPORTANTES, À CONSERVER POUR
POUVOIR VOUS Y RÉFÉRER
ULTÉRIEUREMENT : À LIRE ATTENTIVEMENT
JOIGNEZ VOTRE
REÇU ICI
Conservez une copie de votre
justificatif d'achat ou une
confirmation de commande
dont vous aurez besoin si
vous devez communiquer
avec nous au sujet de la
garantie.
Numéro de série
Date d'achat
18
Page 19

AVANT DE COMMENCER
TABLE DES MATIÈRES
Avant de commencer
Page 19
Renseignements sur la sécurité
Contenu de l'emballage
Quincaillerie incluse
Assemblage
Mode d'emploi
Entretien et maintenance
Dépannage
Liste des pièces de rechange
Renseignements sur la garantie
Page 20
Page 21
Page 21
Pages 22 à 25
Pages 26 à 29
Page 30
Page 31
Page 32
Page 33
AVANT DE COMMENCER
Assurez-vous de lire et de comprendre l’intégralité de ce guide avant de tenter d’assembler, d’installer ou
d’utiliser cet appareil. Si vous avez des questions, appelez au numéro sans frais (866) 985-7877,
envoyez-nous un courriel à l’adresse cservice@welltraveled.net, ou accédez à notre site Web et chattez
en direct à l'adresse www.wtliving.com. Heures d'ouverture : entre 9 h et 18 h (HNE), du lundi au
vendredi. Interlocuteurs anglophones et hispanophones.
Ce guide contient des renseignements importants au sujet de l’assemblage, de l’utilisation et de l’entretien
du chauffage de terrasse. Ce guide contient des consignes de sécurité générales, dans ses premières
pages entre autres. Veuillez conserver ce guide pour vous y référer ultérieurement. Il sera également utile
pour les nouveaux utilisateurs de cet appareil. Consultez ce guide ainsi que les étiquettes apposées sur
l’appareil. Vous devez prendre des mesures de sécurité lors de l’utilisation de tout appareil mécanique
ou alimenté au propane. Ces mesures de sécurité sont nécessaires à l’utilisation, à l’entreposage et à
l’entretien. Vous réduirez les risques de blessure ou de dommage matériel en respectant les instructions
et en faisant preuve de prudence lorsque vous utilisez cet appareil. Les symboles suivants, illustrés à la
page 3, sont abondamment utilisés dans ce guide. Vous devez suivre ces mesures, car elles sont
essentielles pour utiliser correctement tout appareil mécanique ou alimenté au propane.
Contactez-nous pour obtenir de l'aide : (866) 985-7877 | www.wtliving.com
19
Page 20

RENSEIGNEMENTS SUR LA SÉCURITÉ
AVERTISSEMENT
•
Les produits de combustion émis lors de
l’utilisation de ce produit contiennent des
produits chimiques connus dans l’État de
Californie comme étant la cause de cancers,
de malformations congénitales et d’autres
effets nocifs pour la reproduction.
AVERTISSEMENT
RISQUE DE BRÛLURE
•
Ne laissez jamais le chauffage sans
surveillance lorsqu’il est chaud ou en marche.
•
Tenir hors de la portée des enfants.
AVERTISSEMENT
AVERTISSEMENT indique un risque imminent
qui entraînera la mort ou des blessures graves
s’il n’est pas prévenu.
DANGER
RISQUES D’EXPLOSION OU D’INCENDIE
•
Gardez le chauffage à une distance
sécuritaire des combustibles solides tels que
les matériaux de construction, le papier ou le
carton, tel qu’il est indiqué dans les
instructions.
•
Assurez-vous qu’il y a suffisamment d’espace
autour des orifices d’aération de la chambre
de combustion.
•
N’utilisez jamais ce chauffage dans des
endroits qui contiennent ou qui pourraient
contenir des combustibles volatils ou en
suspension, ou encore des produits
comme de l’essence, des solvants, du
diluant à peinture, de la poussière ou des
produits chimiques inconnus.
•
Pendant son utilisation, cet appareil peut être
une source d’inflammation. Assurez-vous que
l’espace autour du chauffage est propre et ne
contient ni matériaux combustibles ni essence
ni diluant à peinture ni solvants de nettoyage
ni d’autres vapeurs ou liquides inflammables.
N’utilisez pas le chauffage dans des endroits
où il y a beaucoup de poussière. Distances
minimales du chauffage par rapport à des
matériaux combustibles : 91,44 cm du haut et
•
N’entreposez jamais le propane près d’une
source de chaleur élevée, d’une flamme nue,
d’une veilleuse, de toute autre source
d’inflammation, ou aux rayons du soleil ainsi
que dans un endroit où les températures
dépassent 49 °C.
•
Le gaz propane est plus lourd que l’air. Il peut donc
s’accumuler près du sol. Si vous détectez une
odeur de gaz, éloignez-vous immédiatement de
l’endroit où vous vous trouvez.
•
Vous ne devriez ni installer ni retirer une bouteille
de propane lorsque le chauffage fonctionne ou
qu’il est chaud, ou si vous vous trouvez près
d’une flamme, d’une veilleuse ou d'autres
sources d’inflammation.
•
Ce chauffage devient brûlant lorsqu’il est en
marche et les produits inflammables risquent de
prendre feu s’ils sont trop près du brûleur. Tenez
les produits inflammables éloignés d’au moins 1 m
chauffage. Tenez l’essence et les autres liquides
ou vapeurs inflammables loin du chauffage.
•
La bouteille de propane doit être entreposée
à l’extérieur, dans un endroit bien aéré et hors
de la portée des enfants. N’entreposez jamais
la bouteille de propane dans un espace clos
(maison, garage, etc.). Si vous rangez le
chauffage à l’intérieur, retirez d’abord la bouteille
de propane que vous entreposerez à l’extérieur.
ATTENTION
CONSIGNES DE SÉCURITÉ RELATIVES
À L’ENTRETIEN
•
Assurez-vous que tous les branchements et tous
les raccords sont propres. Assurez-vous que le
tuyau de sortie de la valve de la bouteille de
propane est propre.
•
En vous servant d’eau savonneuse, vérifiez
au cours de l’assemblage qu’aucun
branchement ni raccord ne présente des
fuites. N’utilisez pas de flamme pour vérifier
la présence de fuites de gaz.
•
Utilisez cet appareil seulement comme appareil
de chauffage. Ne le modifiez d’aucune façon
pour l’utiliser avec un appareil.
AVERTISSEMENT
•
Ce produit est alimenté au gaz propane.
Le gaz propane est invisible, inodore
et inflammable. Une substance odorante est
habituellement ajoutée au gaz afin de
permettre de détecter les fuites. Elle a une
odeur « d’œuf pourri ». Cependant, la
substance odorante perd son effet avec
le temps. Ainsi, les fuites de gaz ne peuvent
pas toujours être détectées à l’odeur.
•
L’entreposage du gaz propane doit être
conforme aux codes et règlements locaux ou
au code ANSI/NFPA 58. Coupez
l’alimentation en propane lorsque vous ne
vous servez pas du gaz.
•
Prévenez enfants et adultes des risques que
représentent les surfaces pouvant atteindre
des températures élevées. Tenez-vous loin
de ces surfaces pour éviter de vous brûler
ou que vos vêtements prennent feu.
•
Surveillez attentivement les jeunes enfants
lorsqu’ils se trouvent à proximité du
chauffage.
•
N’accrochez pas et ne placez pas de
vêtements ni de matières inflammables sur le
chauffage ou près de celui-ci.
•
Avant d’utiliser l’appareil après avoir procédé
à son entretien, réinstallez tout protecteur
que vous auriez pu enlever.
•
L’installation et les réparations doivent être
effectuées par une personne qualifiée. Le
chauffage devrait être inspecté avant chaque
utilisation et au moins une fois par année par
une personne qualifiée. Un nettoyage plus
fréquent peut être nécessaire. Il est essentiel
de garder toujours propres le compartiment
de contrôle, les brûleurs et le conduit
d’aération.
AVERTISSEMENT
Certains matériaux ou objets placés sous le chauffage
pendant son utilisation sont exposés à une chaleur
radiante et peuvent être considérablement
endommagés.
DANGER
RISQUE LIÉ AU MONOXYDE DE CARBONE
•
Ce chauffage est un appareil à combustion.
Tous les appareils à combustion produisent du
monoxyde de carbone (CO) lors de la
combustion. Ce produit est conçu pour produire
de minuscules quantités de CO qui ne
représentent aucun danger. Cependant, il doit
être utilisé et entretenu conformément à tous
les avertissements et à toutes les instructions.
N’obstruez pas les entrées et les sorties d’air du
chauffage.
•
Le monoxyde de carbone (CO) entraine des
symptômes semblables à ceux de la grippe :
yeux larmoyants, maux de tête,
étourdissements et fatigue. Il peut également
causer la mort. Il est invisible et inodore, mais il
demeure mortel. Si vous présentez ces
symptômes au cours de l’utilisation de
l’appareil, recherchez immédiatement de l’air
frais!
•
Pour un usage à l’extérieur seulement.
•
N’utilisez jamais ce produit dans la maison ou
dans tout autre espace clos ou non aéré.
•
Ce chauffage consomme de l’air (oxygène). Afin
d’éviter de mettre votre vie en danger, n’utilisez
pas ce produit dans des endroits clos ou non
ventilés.
91,44 cm de chaque côté.
du haut, et d’au moins 91,44 cm de chaque côté du
Contactez-nous pour obtenir de l'aide : (866) 985-7877 | www.wtliving.com
20
Page 21
Llámenos si necesita ayuda : (866) 985-7877 | www.wtliving.com
PIÈCE
DESCRIPTION
QUANTITÉ
A
Panneau réflecteur
4 emballés dans 2 cartons inclus
B
Capuchon central
du réflecteur
1 C Ensemble de l’embout
1 emballé dans 1 carton inclus
D
Boîtier du réservoir
1
E
Tuyau de gaz
1 fixé à l'ensemble de l'embout
F
Borne supérieure
1 G Borne inférieure
1 H Régulateur
1 emballé avec l'ensemble
de l'embout
I
Supports de borne
3 emballé dans 1 carton inclus
J
Base avec chambre
à eau préassemblée
1 K Ensemble de la roue
1 emballé avec l'ensemble
de l'embout
L
Chaîne (fixe la bouteille
de GPL)
1 emballée avec les supports
de borne
QUINCAILLERIE INCLUSE
M
Grand
boulon
Qté : 6
(Étape 3)
N
Petit boulon
Qté : 5
(Étapes 1 et 2)
O
Petit boulon
avec rondelle
de sécurité
Qté : 4
P
Grande vis
Qté : 4
(Préassemblées
dans la base/
chambre à eau)
Q
Petite vis
Qté : 12
(Étape 8)
R
Grande rondelle
plate
Qté : 9
(Étapes 6 et 9)
S
Petit écrou à
bride Qté : 6
(Étape 3)
T
Grand écrou
Qté : 4
(Préassemblés dans
la base/chambre
à eau)
U
Écrou borgne
Qté : 12
(Étape 8)
Écrou à oreilles
Qté : 3
(Étape 9)
W
Goujon de réflecteur
Qté : 3
(Étape 6)
X
Clé Qté : 1
CONTENU DE L'EMBALLAGE
B
A
C
D
E F
G
H
I
J
K
L
21
Page 22

Llámenos si necesita ayuda : (866) 985-7877 | www.wtliving.com
ASSEMBLAGE
ASSEMBLAGE
ASSEMBLAGE
PRÉPARATION
1
2
La chambre à eau est préassemblée sur la base. Pour la
remplir, ouvrez le capuchon en plastique situé au-dessus de
la chambre à eau et remplissez-la d'eau ou de sable. Remettez
en place le capuchon en plastique. Il peut vous sembler plus
simple de remplir la chambre à eau avant de fixer les roues.
Capuchon de la
chambre à eau
Base
Avant de commencer l’assemblage de cet appareil, assurez-vous d’avoir toutes les pièces. Comparez toutes
les pièces avec la liste du contenu de l’emballage et celle de la quincaillerie indiquées à la page 4 de ce guide.
S’il y a des pièces manquantes ou endommagées, ne tentez pas d’assembler cet article. Communiquez avec
le service à la clientèle pour obtenir des pièces de rechange.
TEMPS D'ASSEMBLAGE APPROXIMATIF : 60 minutes
Outils nécessaires pour l’assemblage (NON inclus) :
•
Clé plate de 7/16” • Tournevis cruciforme de taille moyenne
•
Clé réglable • Solution de détection des fuites (voir page 10)
Remarque : ce chauffage inclut un allumeur électronique qui nécessite l'installation d'une (1) pile AAA. La batterie doit
être installée en dévissant le BOUTON D'ALLUMAGE ROUGE ; la pile n'est pas incluse.
Fixez l'ensemble de la roue (K) à la base (J). Alignez
les trous avec la base, insérez 2 petits boulons (N)
dans les trous et serrez-les à la main. Vérifiez que
l'ensemble de la roue est parallèle à la base (J) et serrez
avec la clé (X).
Quincaillerie utilisée : 2 petits boulons (N)
Fixez les supports (I) de borne (K) à la base (J).
Alignez les trous en bas de chaque support de borne
avec le trou de (N) à travers le trou du support et
de la base. Insérez 1 petit boulon dans la base et serrez-le
à la main. Répétez avec les 2 autres supports de borne et
serrez tous les boulons avec la clé (X).
Quincaillerie utilisée : 3 petits boulons (N)
22
Page 23

Llámenos si necesita ayuda : (866) 985-7877 | www.wtliving.com
ASSEMBLAGE
ASSEMBLAGE
ASSEMBLAGE
Fixez la borne inférieure Lorsque vous avez serré les
3
4
6
5
boulons tout en maintenant les supports de borne (I)
à la base (J), alignez les trous sur la borne inférieure (G)
avec les trous en haut des supports de borne et insérez un
grand boulon (M) dans le trou sur le support de borne. Fixez
à l'aide d'un petit écrou à bride (S). Répétez pour les 5 autres
trous (6 trous au total, 2 pour chaque support de borne).
Serrez tout d'abord à la main, puis serrez à l'aide de la
clé (X) lorsque tous les boulons ont été installés.
Quincaillerie utilisée : 6 grands boulons (M)
6 petits écrous à bride (S)
Fixez la borne supérieure (F) à la borne inférieure (G) en vissant les
deux éléments de la borne ensemble.
Remarque : l'utilisation de boulons n'est pas nécessaire pour maintenir les
bornes en place.
Faites glisser le boîtier du réservoir (D) sur l'ensemble de bornes
supérieure/inférieure (F)/(G) et abaissez-le sur les supports de borne
(I). Faites reposer le boîtier du réservoir sur la base J.
Fixez les goujons de réflecteur en haut de l'ensemble de l'embout
(C). Insérez 1 goujon de réflecteur dans 1 grande rondelle plate et
dans le trou en haut de l'ensemble de l'embout (C). Serrez fermement
le goujon. Répétez avec les 2 autres goujons du réflecteur.
Quincaillerie utilisée : 3 goujons de réflecteur (W)
3 grandes rondelles plates (R)
23
Page 24

Llámenos si necesita ayuda : (866) 985-7877 | www.wtliving.com
ASSEMBLAGE
ASSEMBLAGE
ASSEMBLAGE
8
Fixez l'ensemble de l'embout (C) à la borne supérieure (F).
7
Faites passer le tuyau de gaz (E) dans les bornes
supérieure/inférieure (F)/(G) vers le bas et alignez 4 petits
trous sur l'ensemble de l'embout C avec 4 petits trous dans la borne
supérieure (F). [ASTUCE : le bouton de commande doit se trouver
au-dessus de l'étiquette apposée sur la borne.] Insérez les 4 petits
boulons avec rondelles de sécurité (O) dans les 4 trous alignés et
serrez fermement à l'aide de la clé(W).
Quincaillerie utilisée : 4 petits boulons avec rondelle
de sécurité (
Installez le réflecteur. REMARQUE : VEILLEZ À NE
PAS ENLEVER LA BANDE DE RÉFLECTEUR BLEUE
SUR LES RÉFLECTEURS AVANT L' ASSEMBLAGE!
Conseil d'assemblage : si cela est nécessaire pour aligner
correctement les sections du réflecteur, desserrez chaque
vis avant de continuer l'assemblage et resserrez lorsque
les sections sont alignées.
O)
Faites glisser deux panneaux de réflecteur (
Insérez une petite vis. Vissez légèrement l'écrou borgne.
Répétez avec les autres panneaux de réflecteur (
Faites glisser le capuchon central du réflecteur (B) sur
les panneaux de réflecteur (A) assemblés. Insérez une
petite vis (Q) et vissez légèrement l'écrou borgne (U).
Répétez avec deux autres petites vis et écrous borgnes
pour terminer l'assemblage du réflecteur. Serrez fermement
toutes les vis et tous les
écrous borgnes.
Quincaillerie utilisée :
12 petites vis
(Q) | 12 écrous borgnes (U)
A) ensemble.
A).
Page 25

Llámenos si necesita ayuda : (866) 985-7877 | www.wtliving.com
ASSEMBLAGE
ASSEMBLAGE
ASSEMBLAGE
10
Tout en maintenant le chauffage, inclinez l'ensemble de
9
l'embout (C) et faites glisser 3 grandes rondelles plates
(R) sur les goujons de réflecteur (W). Placez l'ensemble
du réflecteur sur les goujons de réflecteur et faites glisser
3 grandes rondelles plates sur les goujons de réflecteur et sur
l'ensemble du réflecteur. Fixez-le avec 3 écrous à oreilles.
Lorsque vous avez serré les écrous à oreilles, remettez le
chauffage à la verticale.
Quincaillerie utilisée : 6 grandes rondelles plates (B)
3 écrous à oreilles (V)
Raccordez le tuyau et le régulateur à la bouteille
de propane. La bouteille de propane est vendue
séparément. Utilisez une bouteille de propane
standard de 9,7 kg seulement. Soulevez le boîtier du réservoir
(D) et posez-le en haut des supports de borne (I) assemblés.
Vissez le régulateur (H) sur le tuyau de gaz (E). Ne faussez
pas les filetages. Serrez fermement à la main, puis serrez
à l'aide de la clé. Fixez le régulateur à la valve de la bouteille
de propane et serrez fermement à la main. Placez le réservoir
de propane sur la base du chauffage. Fixez le réservoir
de propane en fixant la chaîne (L) sur les supports de borne.
Abaissez le boîtier du réservoir.
REMARQUE : utilisez ce chauffage uniquement avec un système
d’alimentation de gaz propane à l’état gazeux. Consultez le
chapitre 5 de la norme d’entreposage et de manutention de gaz
de pétrole liquéfié, ANSI/NFPA 58. Vous devriez pouvoir vous la
procurer chez un libraire ou auprès du service local de prévention
des incendies.
25
Page 26

MODE D'EMPLOI
Llámenos si necesita ayuda : (866) 985-7877 | www.wtliving.com
Une pression d’alimentation en gaz minimale de 0,5 psi est nécessaire
•
Ne rangez pas de bouteille
de gaz de pétrole liquéfié
de rechange sous
l’appareil ni à proximité
de celui-ci.
•
Ne remplissez jamais la
bouteille à plus de
80 pour cent de sa capacité.
•
Placez le capuchon
antipoussière sur le tuyau
de sortie de la valve de la
bouteille lorsque vous
n’utilisez pas cette dernière.
Utilisez uniquement des
capuchons protecteurs
du même type que celui
fourni avec la valve de la
bouteille. D’autres types
de capuchon ou de bouchon
peuvent laisser fuir le
propane.
pour le réglage d'entrée du gaz propane. L'entreposage de ce chauffage
de terrasse à l'intérieur est autorisé uniquement si la bouteille est retirée
de l'appareil. Une bouteille doit être entreposée à l’extérieur, dans un endroit
bien aéré et hors de la portée des enfants. Les capuchons antipoussières
doivent être bien fixés à une bouteille débranchée. Cette dernière ne doit
pas être entreposée dans un bâtiment, un garage ou tout autre espace clos.
La pression d’alimentation en gaz minimale permise de 11 W.C. est
nécessaire pour le réglage du tuyau. Le débit calorifique minimal de
17 500 BTU est nécessaire pour le fonctionnement d’un chauffage à un
débit inférieur au débit maximal.
Il est nécessaire d’utiliser l'ensemble du régulateur et du tuyau de pression
de gaz inclus avec l’appareil.
L’installation doit être conforme aux codes locaux. En l’absence de tels
codes, elle doit être conforme au National Fuel Gas Code des États-Unis
(ANSI Z223.1/NFPA54), au Code d’installation du gaz naturel et du gaz
propane (CSA B149.1) ou au Code sur le stockage et la manipulation
du propane (B149.2).
Une bouteille de propane bosselée, rouillée ou abîmée peut présenter des
dangers. Vous devez la faire vérifier par votre fournisseur de propane
liquide. N’utilisez jamais une bouteille de propane dont le raccord de valve
est endommagé. La bouteille de propane doit être fabriquée et identifiée
conformément aux normes pour les bouteilles de propane du
U.S. Department of Transportation (DOT) ou à la norme sur les bouteilles
et les tubes utilisés pour le transport des marchandises dangereuses
(CAN/CSA-B339).
•
La bouteille doit être munie d’un dispositif reconnu de prévention des
trop-pleins.
•
La bouteille doit être munie d’un dispositif de raccord de bouteille
pouvant être raccordé
avec l’appareil.
•
La valve de la bouteille doit être munie d’un collet pour protéger
la bouteille.
•
Ne raccordez jamais une bouteille de propane non réglementée
au chauffage.
26
Page 27

MODE D'EMPLOI
Contactez-nous pour obtenir de l'aide : (866) 985-7877 |
TEST DE FUITES
AVERTISSEMENT
•
Effectuez toujours la détection des fuites
à l’extérieur.
•
Éteignez toute flamme nue.
•
Ne vérifiez JAMAIS la présence de fuites
à proximité d’une cigarette allumée.
•
N’utilisez le chauffage qu’une fois que
tous les raccords ont été vérifiés et ne
présentent aucun signe de fuite.
1. Préparez de 60 à 90 ml de solution
pour détection des fuites (une part
de savon à vaisselle liquide et trois
parts d’eau).
2. Appliquez plusieurs gouttes de la
solution à la jonction entre le tuyau
et le régulateur.
3. Appliquez plusieurs gouttes de la
solution à la jonction entre le
régulateur et la bouteille.
4. Assurez-vous que toutes les valves
du chauffage de terrasse sont
fermées.
5. Ouvrez la valve de la bouteille.
SI DES BULLES SE FORMENT SUR UN RACCORD, C'EST QU'IL
Y A UNE FUITE.
1. Fermez la valve de la bouteille.
2. Si une fuite est détectée au niveau du raccord tuyau/régulateur, serrez
le raccord et effectuez une autre vérification. Si des bulles s’y forment
toujours, appelez notre service d’assistance téléphonique à la clientèle
au (866) 985-7877 entre 9 h et 18 h (HNE), du lundi au vendredi.
3. Si une fuite est détectée au niveau du raccord de régulateur/valve de la
bouteille, débranchez le régulateur, rebranchez-le et effectuez une autre
vérification. Si des bulles se forment toujours après plusieurs essais,
la valve de la bouteille est défectueuse. Appelez notre service
d’assistance téléphonique à la clientèle au (866) 985-7877 entre 9 h
et 18 h (HNE), du lundi au vendredi.
Interlocuteurs anglophones et hispanophones.
SI AUCUNE BULLE NE SE FORME SUR UN RACCORD, CEUX-CI SONT
SÉCURITAIRES.
Remarque : si les raccords viennent à être desserrés ou défaits, effectuez
une vérification complète.
Attention : ne tentez pas d’utiliser cet appareil avant d’avoir lu et compris
toutes les consignes de sécurité contenues dans ce guide et d’avoir terminé
l’assemblage et la détection d’éventuelles des fuites.
AVANT D’OUVRIR L’ALIMENTATION
EN GAZ :
1. Le chauffage est conçu et
certifié pour un usage à
l’EXTÉRIEUR seulement. Ne
l’utilisez PAS dans un bâtiment,
un garage ou tout autre espace
clos.
2. Assurez-vous que l’espace autour
de l’appareil est exempt de
matières combustibles, d’essence
et d’autres vapeurs ou liquides
inflammables.
3. Veillez à ce que rien n’entrave la
circulation de l’air. Assurez-vous
que tous les raccords de gaz sont
bien serrés et qu’il n’y a aucune
fuite.
4. Veillez à ce que le couvercle
de la bouteille soit exempt de
tout débris. Assurez-vous que
les composants retirés au
cours de l’assemblage ou de
l’entretien sont replacés et
fixés avant d’allumer le
chauffage.
AVANT L’ALLUMAGE :
1. Le chauffage devrait être
rigoureusement inspecté avant
chaque utilisation, et par une
personne qualifiée, au moins une
fois par année. Si vous rallumez
un chauffage chaud, attendez au
moins 5 minutes.
2. Examinez l’ensemble de tuyau
pour vérifier s’il a été coupé ou s’il
présente des traces d’abrasion ou
d’usure excessive. Effectuez une
vérification des fuites pour
chaque zone suspecte. Si le
tuyau fuit, vous devez le
remplacer avant d’utiliser
l’appareil. Utilisez uniquement
les ensembles de tuyaux de
remplacement précisés par le
fabricant.
27
Page 28

MODE D'EMPLOI
Contactez-nous pour obtenir de l'aide : (866) 985-7877 | www.wtliving.com
ALLUMAGE
AVERTISSEMENT
POUR VOTRE SÉCURITÉ
Soyez prudent lorsque vous tentez d’allumer
manuellement le chauffage. Si vous
maintenez le bouton de commande enfoncé
pendant plus de 10 secondes, une boule de
feu se formera à l’allumage.
MAINTENIR
ENFONCÉ
TOUT EN
APPUYANT SUR
LE BOUTON
APPUYER SUR
REMARQUE : avant d’allumer l’appareil pour
la toute première fois ou après un changement
de bouteille, maintenez le bouton de
commande enfoncé pendant 2 minutes afin
de purger l’air contenu dans toutes les
conduites de gaz.
1. Tournez le bouton de commande
jusqu’à la position « OFF ».
2. Ouvrez complètement la valve de la
bouteille de propane.
3. Appuyez sur le bouton de commande,
puis tournez-le jusqu’à la position « HI ».
4. Tout en maintenant le bouton de
commande enfoncé, appuyez sur le
bouton d’allumage ROUGE pour allumer
le brûleur principal.
5. Pour réduire l’intensité des flammes,
tournez le bouton de commande dans le
sens contraire des aiguilles d’une montre
jusqu’à la position « LO » (faible). Pour
augmenter l’intensité des flammes,
tournez le bouton de commande dans le
sens des aiguilles d’une montre jusqu’à
la position « HI » (élevé).
6.
Pour éteindre l'appareil, appuyez sur le
bouton de commande et tournez-le dans
le sens des aiguilles d’une montre
jusqu’à la position « OFF » (arrêt).
7.
Attendez au moins 5 minutes avant
d’essayer de rallumer le chauffage.
8.
Placez la valve de la bouteille de gaz sur
« OFF » ou fermez la valve.
Si vous rencontrez des problèmes
d'allumage, consultez la section
« Dépannage » à la page 14.
Attention : Évitez d'inhaler les
fumées produites lors de la
première utilisation du chauffage.
De la fumée et une odeur sont
produites par la combustion des
huiles utilisées pendant la
fabrication de l'appareil. La fumée
et l'odeur se dissipent au bout de
30 minutes environ. Le chauffage
ne doit PAS produire de la fumée
épaisse noire.
LORSQUE LE CHAUFFAGE
EST ALLUMÉ :
L'écran de l'émetteur devient
rouge en raison d'une chaleur
intense. La couleur est plus
visible la nuit. Le brûleur laisse
échapper des flammes bleues
et jaunes. Celles-ci ne doivent
pas être jaunes ni produire de la
fumée épaisse noire, indiquant
que la circulation de l’air à
travers les brûleurs est obstruée.
Les flammes devraient être
bleues avec des extrémités
légèrement jaunes. Si les
flammes sont principalement
jaunes, éteignez le chauffage et
consultez la section
« Dépannage » à la page 14.
RALLUMAGE :
Remarque : pour votre
sécurité, le bouton de
commande ne peut pas être
mis à la position « OFF »
(arrêt). Vous devez tout
d'abord appuyer sur le bouton
de commande, puis le tourner
à la position « OFF » (arrêt).
1. Tournez le bouton de
commande à la position
« OFF » (arrêt).
2. Attendez au moins 5 minutes
que le gaz se dissipe avant de
rallumer l'appareil.
3. Répétez les étapes ci-dessus
de la section « Allumage ».
28
Page 29

MODE D'EMPLOI
Contactez-nous pour obtenir de l'aide : (866) 985-7877 | www.wtliving.com
LISTE DE VÉRIFICATION :
AVERTISSEMENT
POUR VOTRE SÉCURITÉ
Le chauffage sera chaud après chaque
utilisation. Faites preuve de beaucoup de
prudence lorsque vous le manipulez. Le
réflecteur est chaud.
Afin de profiter d’un chauffage sûr et agréable, effectuez les
vérifications suivantes avant chaque utilisation :
AVANT DE METTRE LE CHAUFFAGE EN MARCHE :
Assurez-vous de vous être familiarisé avec l’intégralité du guide
d’utilisation et de comprendre toutes les précautions indiquées.
Vérifiez que toutes les composantes sont assemblées correctement,
intactes et en état de fonctionnement.
Assurez-vous qu’aucune modification n’a été apportée au produit.
Vérifiez que tous les raccords de gaz sont solides et qu’aucun ne fuit.
Assurez-vous que la vitesse du vent est inférieure à 16 km/h.
Assurez-vous de placer le chauffage pour un usage à l’extérieur
(en dehors de tout endroit clos).
Assurez-vous que l’aération est adéquate.
Assurez-vous que le chauffage n'est pas à proximité d’essence ou d'autres
liquides ou vapeurs inflammables.
Assurez-vous que le chauffage n’est pas à proximité d’une fenêtre, d’un
orifice d’entrée d’air, d’un arroseur ou de toute autre source d’eau.
Assurez-vous que le chauffage se trouve à au moins 91,44 cm en haut et à
au moins 91,444 cm de chaque côté de matériaux combustibles.
Assurez-vous que le chauffage est placé sur une surface dure et plane.
Vérifiez qu’aucun signe ne montre la présence d’araignées ou d’insectes
à proximité des orifices du chauffage.
Vérifiez que toutes les conduites du brûleur sont dégagées.
Vérifiez que toutes les conduites d’aération sont dégagées.
Des vêtements ou d'autres matériaux protecteurs ne doivent pas être
accrochés sur le chauffage ou placés près de celui-ci.
Tout protecteur retiré pour l'entretien du chauffage doit être réinstallé avant
d’utiliser le chauffage.
L’installation et les réparations doivent être effectuées par une personne
qualifiée. Le chauffage devrait être inspecté avant chaque utilisation
et au moins une fois par année par une personne qualifiée.
RENSEIGNEMENTS SUR L'UTILISATION ET LA SÉCURITÉ :
•
L’unité fonctionne à un niveau d’efficacité réduit en dessous de 4,44 °C.
•
Prévenez enfants et adultes des risques que représentent les surfaces
pouvant atteindre des températures élevées et demeurez à une distance
sécuritaire de l’appareil pour prévenir les brûlures et l’inflammation des
vêtements.
•
Les jeunes enfants doivent être surveillés attentivement lorsqu’ils se
trouvent dans la zone du chauffage.
•
Un nettoyage plus fréquent peut être nécessaire. Il est essentiel de garder
toujours propres le compartiment de contrôle, le brûleur et les conduits
d’aération du chauffage et qu'ils soient dépourvus de débris et/ou
d'araignées ou d'insectes.
ARRÊT :
1. Tournez le bouton de
commande dans le sens
des aiguilles d’une montre
jusqu’à la position « OFF »
(arrêt) tout en appuyant
dessus. (Le brûleur émet
normalement un léger bruit
de claquement lorsqu'il
s'éteint).
2. Tournez la valve de la
bouteille dans le sens des
aiguilles d’une montre
jusqu’à la position « OFF »
(arrêt) et débranchez le
régulateur lorsque vous
n’utilisez pas le chauffage.
REMARQUE : après
l'utilisation, une certaine
décoloration de l'écran
de l'émetteur est normale.
APRÈS L'UTILISATION :
1. Vérifiez que le bouton
de commande de gaz
est à la position
« OFF » (arrêt).
2. Vérifiez que la valve de la
bouteille de gaz est fermée.
3. Débranchez la conduite
de gaz.
4. Le chauffage est
entreposé à la verticale
dans un endroit sûr.
29
Page 30

Contactez-nous pour obtenir de l'aide : (866) 985-7877 | www.wtliving.com
ENTRETIEN ET MAINTENANCE
Afin d’obtenir le meilleur rendement possible de votre chauffage pendant
AVERTISSEMENT
POUR VOTRE SÉCURITÉ
•
Ne touchez PAS le chauffage ou ne le déplacez
pas pendant au moins 45 minutes après l’avoir
utilisé.
•
Le réflecteur est chaud.
des années, assurez-vous d’effectuer régulièrement les tâches
d’entretien suivantes :
GARDEZ LES SURFACES EXTÉRIEURES PROPRES.
1.Utilisez une eau savonneuse pour le nettoyage. N’utilisez jamais de
produits nettoyants inflammables ou corrosifs.
2.Pendant le nettoyage de l’appareil, assurez-vous de ne pas mouiller la
zone entourant le brûleur et le compartiment de contrôle. N’immergez pas
l’ensemble de valve de commande. Si la commande de gaz a été
immergée dans l’eau, ne l’utilisez PAS. Elle doit être remplacée.
3.
Assurez-vous que rien n’empêche une bonne circulation de l’air.
Maintenez les commandes, le brûleur et les conduites d’aération
propres. Voici les signes indiquant qu’il y a possiblement un
blocage de l’air :
•
Une odeur de gaz se dégage et la pointe des flammes est
extrêmement jaune.
•
Le chauffage n’atteint PAS la température souhaitée.
•
Le rayonnement lumineux du chauffage est beaucoup trop inégal.
•
Le chauffage émet un bruit de claquement.
•
Des araignées ou autres insectes peuvent faire leur nid dans
le brûleur ou les orifices. Cela peut endommager le chauffage
et compromettre son utilisation sécuritaire. Nettoyez les trous
du brûleur à l’aide d’un nettoyant puissant pour tuyaux. De l’air
comprimé peut également aider à éliminer les petites particules.
•
Les dépôts de carbone entraînent des risques d’incendie.
Au besoin, nettoyez le dôme et l'écran du brûleur avec de l’eau
savonneuse chaude.
Remarque : un environnement salin (près de la mer, par exemple)
accélère la corrosion de l’appareil. Examinez souvent l’appareil afin
d’y détecter les zones rongées par la corrosion et de les réparer
dans les plus brefs délais.
ENTREPOSAGE:
Entre les usages :
• Tournez le bouton de
commande à la position
« OFF » (arrêt).
• Débranchez l’alimentation
en gaz de pétrole liquéfié.
• Rangez le chauffage à la
verticale à l’abri des
intempéries (comme la pluie,
le grésil, la grêle et la neige),
de la poussière et des débris.
• Vous pouvez recouvrir le
chauffage afin de protéger les
surfaces extérieures et d’éviter
que les conduites d’aération
s’obstruent. Veillez à ce que
la bouteille de gaz de pétrole
liquéfié ne soit pas exposée
directement aux rayons du
soleil et qu’elle ne soit pas
exposée à une chaleur
excessive.
Remarque : laissez le
chauffage refroidir avant
de le couvrir.
ENTRETIEN :
Les réparations des conduites
de gaz et des composantes qui
y sont liées doivent être
effectuées par un technicien
qualifié seulement.
Attention : laissez le foyer
refroidir avant de procéder
à son entretien.
30
Page 31

Contactez-nous pour obtenir de l'aide : (866) 985-7877 | www.wtliving.com
DÉPANNAGE
PROBLÈME
CAUSE POSSIBLE
MESURE CORRECTIVE
Le brûleur
principal ne
s’allume pas.
La valve de la bouteille de gaz est
peut-être fermée.
Ouvrez la valve de la bouteille de gaz.
Le réservoir de carburant est peutêtre vide.
Remplissez le réservoir de GPL.
Un orifice est obstrué.
Nettoyez ou remplacez l'orifice.
De l'air est présent dans le système
d'alimentation.
Purgez l’air contenu dans les conduites. Ouvrez les
conduites de gaz et appuyez sur le bouton de
commande pendant 2 à 3 minutes.
Raccordement lâche.
Vérifiez tous les raccords.
L'allumeur ne fonctionne pas.
Utilisez un briquet pour allumer l'appareil manuellement.
La pression de gaz est faible lorsque
la valve de la bouteille est
complètement ouverte.
Remplacez la bouteille ou le régulateur.
Bouteille neuve ou premier allumage.
Purgez l’air contenu dans les conduites.
La valve de la bouteille est ouverte
mais aucun gaz ne circule.
Remplacez l'ensemble tuyau/régulateur.
La pile AAA située derrière le bouton
d'allumage est déchargée.
Remplacez-la par une pile AAA neuve.
Flamme
du brûleur faible.
La pression est faible.
Remplacez le réservoir de GPL.
Le niveau de carburant du réservoir
est bas.
Remplissez le réservoir de GPL.
Le tuyau de gaz est plié.
Vérifiez et renforcez ou remplacez.
Unité du brûleur.
Carbone sur le réflecteur et l'écran
de l'émetteur.
Nettoyez les composants si nécessaire.
Épaisse fumée noire.
L'ensemble du brûleur est obstrué. Nettoyez le brûleur
à fond.
31
Page 32
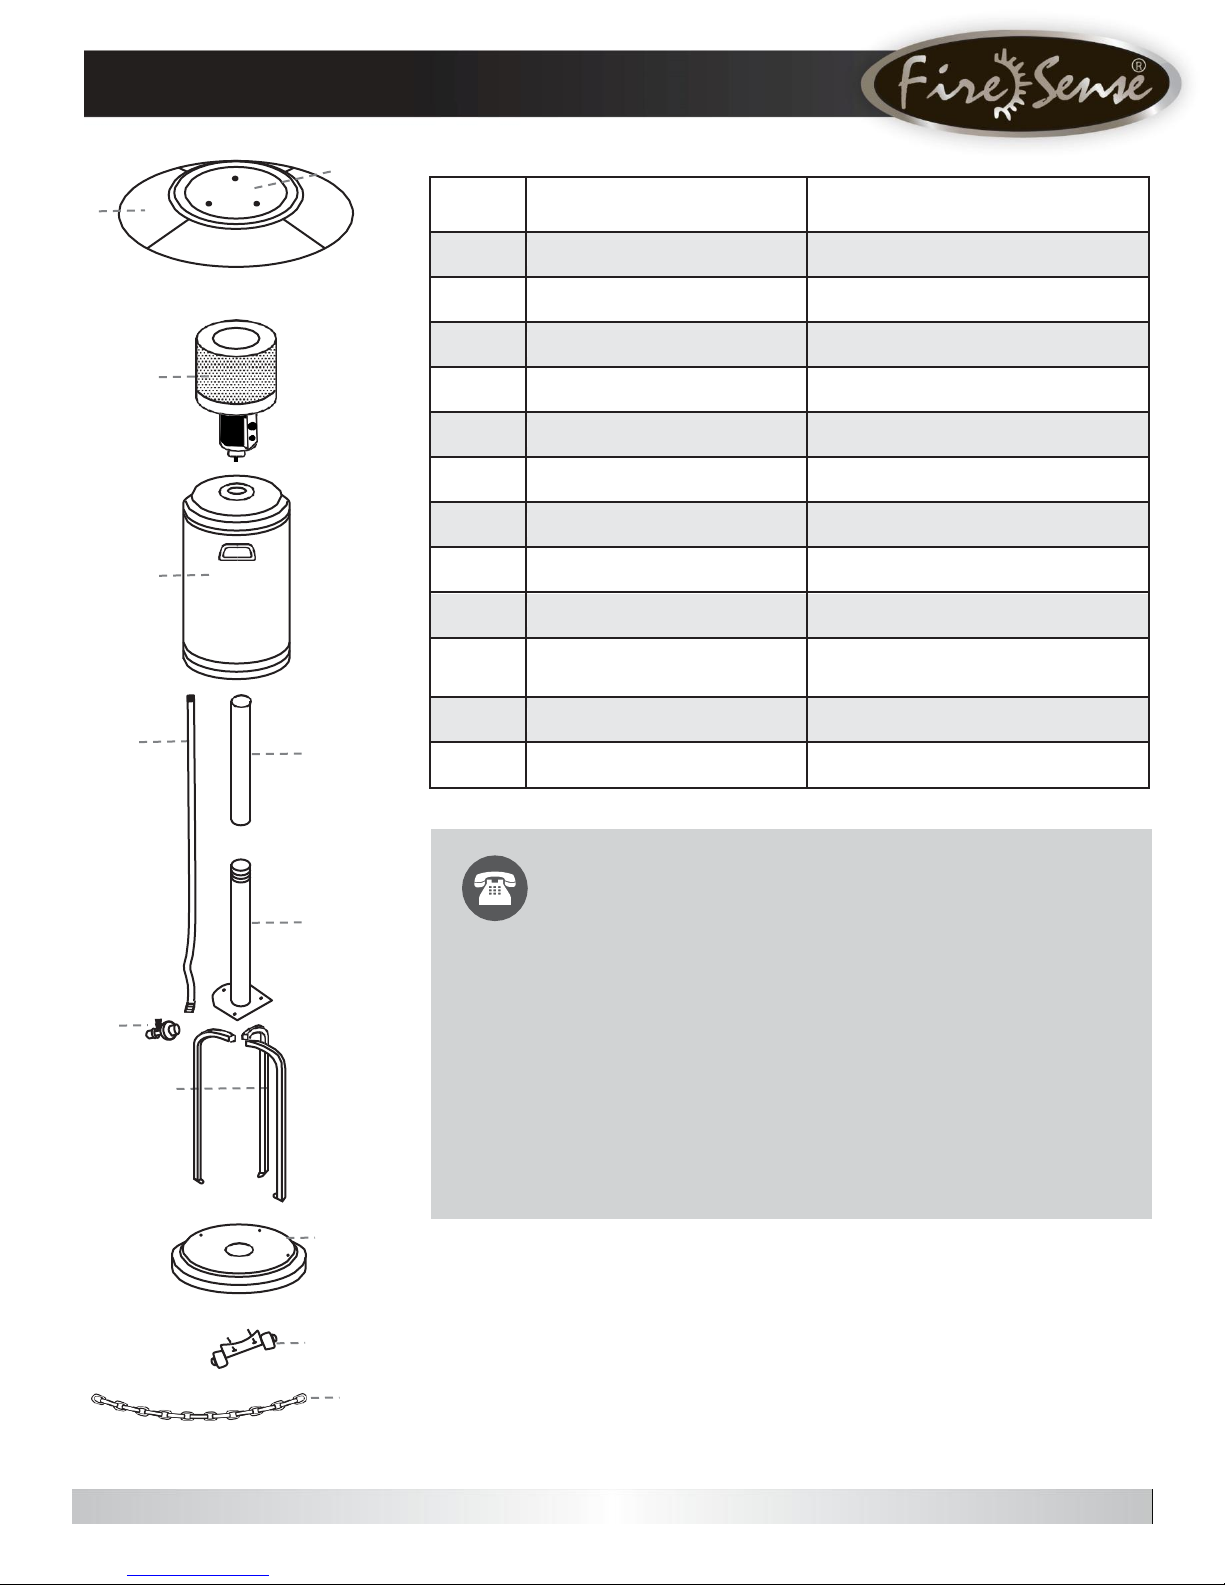
Contactez-nous pour obtenir de l'aide : (866) 985-7877 | www.wtliving.com
C
Des questions, des problèmes, des pièces
manquantes ou besoin de pièces de rechange?
Avant de retourner l’article au détaillant, notre service d’assistance
à la clientèle est à votre disposition. Interlocuteurs anglophones
et hispanophones.
Appelez au numéro sans frais (866) 985-7877, envoyez-nous un
courriel à l’adresse cservice@welltraveled.net, ou accédez à notre
site Web et chattez en direct à l'adresse www.wtliving.com. Heures
d'ouverture : 9 h et 18 h (HNE), du lundi au vendredi
PIÈCE
DESCRIPTION
QUANTITÉ
A
Panneau réflecteur
4 emballés dans 2 cartons inclus
B
Capuchon central du réflecteur
1 C Ensemble de l’embout
1 emballé dans 1 carton inclus
D
Boîtier du réservoir
1
E
Tuyau de gaz
1 fixé à l'ensemble de l'embout
F
Borne supérieure
1 G Borne inférieure
1 H Régulateur
1 emballé avec l'ensemble de l'embout
I
Supports de borne
3 emballé dans 1 carton inclus
J
Base avec chambre à eau
préassemblée
1
K
Ensemble de la roue
1 emballé avec l'ensemble de l'embout
L
Chaîne (fixe la bouteille de GPL)
1 emballée avec les supports de borne
B
A
LISTE DES PIÈCES DE RECHANGE
D
E F
G
H
I
J
K
L
32
Page 33

GARANTIE LIMITÉE DE 1 AN
Avis important Si vous avez des questions à propos du service à la clientèle et de la garantie, appelez notre
centre de service à la clientèle au numéro : (866) 985-7877, envoyez-nous un courriel à l’adresse
cservice@welltraveled.net, ou accédez à notre site Web et chattez en direct à l'adresse www.wtliving.com. Heures
d'ouverture : entre 9 h et 18 h (HNE), du lundi au vendredi. Interlocuteurs anglophones et hispanophones.
AUSTRALIE: Nos articles sont offerts avec des garanties qui ne peuvent connaître d'exclusions
au regard de la loi australienne sur la protection des consommateurs. Vous avez droit au
remplacement ou au remboursement en cas de défaillance majeure de votre article ainsi qu'à une
compensation en cas de perte ou de dommage prévisible. Vous avez aussi droit à la réparation ou
au remplacement de l'article s'il n'est pas d'une qualité acceptable et que la défaillance n'est pas
majeure.
Clients aux États-Unis (zone continentale)
Toutes les pièces sont garanties contre les défauts de matériaux et de fabrication, dans
des conditions normales d’utilisation, pour une période de un (1) an à compter de la date
d’achat par l’acheteur initial. Cette garantie ne couvre PAS le vieillissement découlant
de l’usure normale, l’assemblage et l’entretien ou l’utilisation à des fins commerciales
lorsque le modèle n’est pas conçu pour un usage commercial. Well Traveled Living
réparera ou remplacera gratuitement, à sa seule discrétion, les produits sous garantie.
Tous les retours doivent être expédiés port payé à Well Traveled Living, dans
l’emballage original.
Pour effectuer une réclamation, communiquez avec Well Traveled Living, dont les
coordonnées figurent dans le guide d’utilisation, ou par l’intermédiaire de son site
Internet. Lorsque vous appellerez, assurez-vous d’avoir en main votre reçu, la date
d’achat et le numéro de modèle ou de catalogue. Le centre de service de Well Traveled
Living, à Amelia Island en Floride, traitera toutes les réclamations.
Cette garantie ne s’applique qu’à l’acheteur initial. Vous devez présenter une preuve
d’achat avant l’exécution de la garantie. Le reçu est la seule preuve d’achat valide.
La présente garantie ne couvre que les défaillances qui surviennent au cours d’un
usage normal et qui sont causées par des défauts de matériaux et de fabrication. Les
défaillances et les dommages causés par un accident, de la négligence, un usage
inapproprié, un usage abusif, une manipulation inadéquate, une modification, un
entretien déficient, un assemblage ou un entretien inadéquat, un entretien effectué par
une entreprise non autorisée, une utilisation de pièces non autorisées ou des dommages
causés par une catastrophe naturelle ne sont PAS couverts.
La présente garantie limitée vous accorde des droits précis. Vous pourriez aussi
bénéficier d’autres droits, qui varient d’un territoire à l’autre. Les dispositions de la
Convention des Nations Unies sur la vente de biens ne s’appliquent pas à la présente
garantie limitée ni à la vente des produits couverts par cette garantie limitée.
AUCUNE GARANTIE EXPRESSE NE SERA
ACCORDÉE AUTRE QUE CELLE QUI EST
INDIQUÉE CI-DESSUS
•
L’ACHETEUR ASSUME TOUS LES RISQUES
ASSOCIÉS À L’ASSEMBLAGE ET AU
FONCTIONNEMENT DE CET APPAREIL
•
SI VOUS NE RESPECTEZ PAS LES
AVERTISSEMENTS ET LE MODE D’EMPLOI
CONTENUS DANS LE PRÉSENT GUIDE, VOUS
POURRIEZ CAUSER D’IMPORTANTS
DOMMAGES MATÉRIELS ET DES BLESSURES
GRAVES
•
WELL TRAVELED LIVING OU SES
DIRECTEURS, RESPONSABLES OU AGENTS
DÉCLINENT TOUTE RESPONSABILITÉ
ENVERS L’ACHETEUR OU TOUTE TIERCE
PARTIE, MÊME SI CETTE RESPONSABILITÉ
REPOSE SUR UN CONTRAT, DES DÉLITS OU
TOUTE AUTRE BASE, QUANT AUX PERTES,
COÛTS OU DOMMAGES INDIRECTS,
PARTICULIERS, PUNITIFS, EXEMPLAIRES,
CONSÉCUTIFS OU ACCESSOIRES
OCCASIONNÉS PAR LA VENTE,
L’ENTRETIEN, L’UTILISATION OU
L’INCAPACITÉ À UTILISER LE PRODUIT, OU
LES DOMMAGES S’Y RAPPORTANT, MÊME
SI WELL TRAVELED LIVING OU SES
DIRECTEURS, RESPONSABLES OU AGENTS
ONT ÉTÉ INFORMÉS DE LA POSSIBILITÉ
DE TELS PERTES, COÛTS OU DOMMAGES,
ET MÊME SI DE TELS PERTES, COÛTS OU
DOMMAGES SONT PRÉVISIBLES. EN AUCUN
CAS
WELL TRAVELED LIVING OU SES
RESPONSABLES, DIRECTEURS OU AGENTS
NE POURRONT ÊTRE TENUS RESPONSABLES
POUR TOUT COÛT, PERTE OU DOMMAGE
DIRECT QUI DÉPASSE LE PRIX D’ACHAT
DU PRODUIT.
•
CERTAINS ÉTATS N’AUTORISENT PASLES
EXCLUSIONS OU LES LIMITATIONS DES
DOMMAGES ACCESSOIRES OU
CONSÉCUTIFS. PAR CONSÉQUENT,
LES LIMITATIONS OU EXCLUSIONS
PRÉCÉDENTES PEUVENT NE PAS
S'APPLIQUER À L'ACHETEUR.
Distribué par :
Costco Wholesale Corporation
P.O. Box 34535 Seattle, WA
98124-1535
États-Unis
1-800-774-2678
www.costco.com
Fire Sense®, Mojave Sun® et Well Traveled Living® sont des marques de commerce déposées de Well Traveled Imports, Inc®. Toutes les instructions d’assemblage présentées
appartiennent à Well Traveled Imports, Inc.® et sont protégées par la Loi sur les droits d’auteur et la Loi sur les marques déposées des États-Unis. Tous droits réservés.
Imported by / Importé par :
Costco Wholesale Canada Ltd.*
415 W. Hunt Club Road
Ottawa, Ontario
K2E 1C5, Canada
1-800- 463-3783
www.costco.ca
* faisant affaire au Québec sous le
nom Les Entrepôts Costco
Importado por :
Importadora Primex S.A. de C.V.
Blvd. Magnocentro No.4 San
Fernando La Herradura
Huixquilucan, Estado de México
C.P.52765
RFC : IPR-930907-S70
(55)-5246-5500
www.costco.com.mx
Importé par :
Costco Wholesale UK Ltd /
Costco Online UK Ltd
Hartspring Lane Watford,
Herts WD25 8JS
Royaume-Uni
01923 213113
www.costco.co.uk
Importé par / Fabriqué pour :
Costco President Taiwan, Inc.
No. 656 Chung-Hwa 5th Road
Kaohsiung, Taïwan
Identifiant fiscal de l’entreprise :
96972798 0800-885-889
www.costco.com.tw
MADE IN CHINA
FABRIQUÉ EN CHINE
HECHO EN CHINA
33
Page 34

CALENTADOR
ADVERTENCIA
Una instalación, ajuste, alteración,
funcionamiento o mantenimiento incorrectos
pueden causar daños, heridas o la muerte. Lea
detenidamente las instrucciones de instalación,
funcionamiento y mantenimiento antes de
instalar o poner en servicio este equipo.
PELIGRO
POR SU SEGURIDAD:
Si hauele a gas:
1. Cierre el paso de gas del aparato.
2. Apague cualquier llama.
3. Si el olor no se va, aléjese del aparato
y llame inmediatamente a su proveedor
de gas o al cuerpo de bomberos.
ITM. / ART. 1031510
PARA PATIO
ENSAMBLE / INSTRUCCIONES DE CUIDADO
Y DE USO, CONSERVAR PARA FUTURAS
CONSULTAS: LEER DETENIDAMENTE
ADVERTENCIA
No guarde o use gasolina ni ningún vapor
o líquido inflamable cerca de este o de
cualquier otro aparato. No guarde ningún
cilindro de gas que no esté conectado cerca de
este o de cualquier otro aparato.
PELIGRO
Si no se siguen las precauciones y las
instrucciones proporcionadas con este
calentador, se puede provocar la muerte,
heridas corporales graves y pérdida de la
propiedad o daños causados por el fuego,
explosiones, quemaduras, asfixia y/o
intoxicación por monóxido de carbono. Solo
podrán inspeccionar y poner en funcionamiento
este calentador las personas que entiendan
y puedan seguir estas instrucciones.
ADVERTENCIA
¡SOLO PARA USO AL AIRE LIBRE!
PONGA AQUÍ
SU RECIBO
Guarde una copia de su
comprobante de compra o de su
confirmación de pedido, ya que
lo necesitará si debe ponerse
en contacto con nosotros sobre
la cobertura de la garantía.
¿Preguntas, problemas, le faltan piezas?
Antes de consultar con su vendedor puede ponerse en contacto con nuestro servicio al cliente.
Se habla inglés y español.
Llámenos gratis al (866) 985-7877, escriba un correo electrónico a cservice@welltraveled.net,
o conéctese a nuestro chat en www.wtliving.com. Nuestro horario es: 9 a.m. – 6 p.m., EST,
lunes a viernes
Nº de serie
Fecha de compra
34
Page 35

ANTES DE COMENZAR
Llámenos si necesita ayuda: (866) 985-7877 | www.wtliving.com
Antes de comenzar
ÍNDICE
Página 35
Información de seguridad
Contenidos del embalaje
Herramientas incluidas
Ensamble
Instrucciones de funcionamiento
Cuidados y mantenimiento
Resolución de problemas
Lista de piezas de repuesto
Información sobre la garantía
Página 36
Página 37
Página 37
Páginas 38-41
Páginas 42-45
Página 46
Página 47
Página 48
Página 49
ANTES DE COMENZAR
Lea y entienda este manual antes de intentar montar, operar o instalar este aparato. Si tiene alguna
pregunta sobre el producto llámenos gratis al (866) 985-7877, escriba un correo electrónico
a cservice@welltraveled.net, o conéctese a nuestro chat en www.wtliving.com. Nuestro horario es:
9 a.m. – 6 p.m., EST, lunes a viernes. Se habla inglés y español.
Este manual contiene información importante sobre el montaje, el funcionamiento y el mantenimiento de este
calentador para patio. La información general de seguridad figura en las primeras páginas, y también hay más
a lo largo de este manual. Guarde este manual para consultas futuras y para educar a nuevos usuarios sobre
este aparato. Este manual debe leerse junto a la etiqueta del aparato. Las precauciones de seguridad son
esenciales cuando hay algún equipo mecánico o alimentado con propano. Estas precauciones son necesarias
para usarlo, almacenarlo y ponerlo en funcionamiento. Al usar este aparato con el respeto y la precaución
adecuadas reducirá las posibilidades de heridas personales o daños a la propiedad. Los símbolos que
aparecen en la página 3 se utilizan bastante en todo el manual. Tenga siempre a mano estas precauciones,
ya que son imprescindibles para usar un equipo mecánico o alimentado por propano.
35
Page 36

Llámenos si necesita ayuda: (866) 985-7877 | www.wtliving.com
INFORMACIÓN DE SEGURIDAD
PELIGRO
PELIGRO DE EXPLOSIÓN O DE FUEGO
•
Mantenga a una distancia segura del
calentador los combustibles sólidos tales
como materiales de construcción, papel
o cartón, tal y como recomiendan las
instrucciones.
•
Mantenga la separación adecuada alrededor
de los orificios de ventilación de la cámara
de combustión.
•
No use nunca el calentador en espacios
que puedan o contentan combustibles
volátiles o aéreos, o productos como
la gasolina, disolventes, diluyentes
de pintura, partículas de polvo
o químicos desconocidos.
•
Este aparato puede ser una fuente de ignición
durante su funcionamiento. Mantenga la zona
del calentador limpia y libre de materiales
combustibles, gasolina, diluyente de pintura,
disolventes y otros vapores y líquidos
inflamables. No use el calentador en zonas
con alto contenido en polvo. Distancias
mínimas entre el calentador y los materiales
combustibles: 91,44 cm o tres (3) pies
o 36 pulgadas desde la parte superior,
desde los lados.
•
Nunca guarde propano cerca de fuegos,
llamas, indicadores luminosos, luz directa
del sol u otras fuentes de ignición, o donde
las temperaturas superen los 120°F (49°C).
•
Los vapores del propano pesan más que el
aire, y pueden acumularse en lugares bajos.
Si huele a gas, abandone la zona
inmediatamente.
•
Nunca instale o retire el cilindro de propano
mientras está encendido, o se encuentra
cerca de llamas, indicadores luminosos
u otras fuentes de ignición, o si el calentador
está demasiado caliente como para tocarlo.
•
Este calentador se pone al rojo vivo durante
su uso, y puede prender los materiales
inflamables que estén demasiado cerca del
quemador. Mantenga los materiales
inflamables al menos a 91,44 cm (3 pies
los lados. Mantenga la gasolina y otros
líquidos y vapores inflamables completamente
alejados del calentador.
•
Guarde el cilindro de propano en el exterior,
en un espacio bien ventilado y lejos del
alcance de los niños. Nunca guarde el
cilindro de propano en un área cerrada (casa,
garaje, etc). Si el calentador tienen que
guardarse en un área cerrada, desconecte
el cilindro de propano y guárdelo fuera.
ADVERTENCIA
ADVERTENCIA
PRECAUCIÓN
SEGURIDAD DURANTE EL MANTENIMIENTO
PELIGRO
RIESGO POR MONÓXIDO DE CARBONO
•
Este calentador es un aparato de
combustión.
Todos los aparatos de combustión
producen monóxido de carbono (CO)
durante el proceso de combustión.
Este producto está diseñado para producir
cantidades extremadamente pequeñas
y ni peligrosas de CO si se usa y mantiene
siguiendo todas las advertencias
e instrucciones. No bloquee el paso del
aire que sale o entra del calentador.
•
La intoxicación por monóxido de carbono
(CO) provoca síntomas parecidos a la
gripe, ojos llorosos, dolores de cabeza,
mareos, cansancio y posiblemente la
muerte. No se puede ver ni oler. Se trata
de un asesino invisible. ¡Si durante el
funcionamiento de este producto presenta
estos síntomas, respire aire fresco
inmediatamente!
•
Solo para uso al aire libre.
•
Nunca lo use dentro de casa o de otras
zonas cerradas o sin ventilación.
•
Este calentador consume aire (oxígeno).
No lo use en zonas cerradas o sin ventilación
y evite poner su vida en peligro.
ADVERTENCIA
ADVERTENCIA indica una situación
inminentemente peligrosa que, si no se evita,
puede provocar la muerte o heridas graves.
y 91,44 cm o tres (3) pies o 36 pulgadas
o 36 pulgadas) de la parte superior,
y a 91,44 cm (3 pies o 36 pulgadas) desde
ADVERTENCIA
Algunos materiales o elementos, al ser
almacenados bajo el calentador, pueden
dañarse gravemente al recibir calor radiante.
•
Los productos derivados de la combustión
carburantes al usar este producto contienen
químicos que según el Estado de California
pueden provocar cáncer, defectos de
nacimiento y otros daños reproductivos
PELIGRO DE QUEMADURAS
•
Nunca deje el calentador desatendido cuando
este está caliente o en uso.
•
Manténgalo alejado del alcance de los niños.
de
•
Mantenga limpias todas las conexiones.
Asegúrese de que la válvula de salida del
cilindro de propano está limpia.
•
Durante la instalación, compruebe todas
conexiones en busca de fugas usando agua
jabonosa. Nunca use materiales ignífugos para
comprobar las fugas.
•
Usar solamente como aparato de
Nunca lo altere nunca para usarlo en conjunto
con otro aparato.
las
calefacción.
ADVERTENCIA
•
Este producto se alimenta de gas propano.
El gas propano es invisible, inodoro
e inflamable. Se suele añadir un olor para
ayudar a detectar fugas, y se dice que es como
de “huevos podridos”. El olor puede irse con el
tiempo, así que las fugas de gas no siempre se
podrán detectar solamente con el olor.
•
Guarde el gas propano de acuerdo a las
ordenanzas y códigos locales o según
el código ANSI/NFPA 58. Cierre el propano
cuando no esté en uso.
•
Advierta a niños y adultos sobre los peligros
las temperaturas elevadas de la superficie.
Aléjese de estas superficies para evitar
quemaduras de piel o de ropa.
•
Vigile de cerca a los niños pequeños cuando
se encuentren cerca del calentador.
•
No cuelgue ropa o ningún otro material
inflamable en el calentador, ni los coloque cerca
del calentador.
•
Vuelva a colocar cualquier aparato de
protección que haya retirado durante su revisión
antes de volver a ponerlo en funcionamiento.
•
La instalación y la reparación debe realizarla
técnico de servicio cualificado. El calentador
debe ser inspeccionado anualmente por un
técnico de servicio cualificado. Puede que
necesite ser limpiado con más frecuencia.
Es fundamental que el compartimento de
control, los quemadores y conducto de
circulación del aire del aparato estén siempre
limpios.
de
un
36
Page 37

Llámenos si necesita ayuda: (866) 985-7877 | www.wtliving.com
PIEZA
DESCRIPCIÓN
CANTIDAD
A
Panel reflector
4 empacados en 2 cajas interiores
B
Tapa central del reflector
1 C Conjunto de la cabeza
1 empacado en 1 caja interior
D
Cubierta del tanque
1 E Manguera del gas
1 junto al conjunto de la cabeza
F
Poste superior
1 G Poste inferior
1 H Regulador
1 empacado junto al conjunto de la cabeza
I
Soportes del poste
3 empacados en 1 caja interior
J
Base con caja de agua preensamblada
1
K
Conjunto de ruedas
1 empacado junto al conjunto de la cabeza
L
Cadena (asegura el cilindro de
gas propano)
1 empacada con los soportes del poste
B
A
COCONNTENIDTENIDOS DEL EMBALAJE
C
D
E F
H
G
J
K
L
HERRAMIENTAS INCLUIDAS
M
Tornillo
grande
Cant: 6
(Paso 3)
R
Arandela plana
grande
Cant: 9
(Pasos 6 y 9)
N
Tornillo
pequeño
Cant: 5
(Pasos 1 y 2)
S
Tuerca pequeña
con arandela
O
Tornillo pequeño
con arandela
de seguridad
Cant: 4
Cant: 6
(Paso 3)
P
Tornillo grande
Cant: 4
(Pre-
ensamblado
en la base/caja
de agua)
T
Tuerca grande
Cant: 4
(Pre-ensamblado
en la base/caja
de agua)
Q
Tornillo
pequeño Cant:
12
(Paso 8)
U
Tuerca de
sombrerete
Cant: 12
(Paso 8)
Tuerca de mariposa
Cant: 3
(Paso 9)
W
Pasador del reflector
Cant: 3
(Paso 6)
X
Llave Cant: 1
37
Page 38

Llámenos si necesita ayuda: (866) 985-7877 | www.wtliving.com
ENSAMBLE
PREPARACIÓN
Tapa de la
caja de agua
Base
The La caja de agua está pre-ensamblada en la base. Para
llenarla, abra la tapa de plástico que hay sobre la caja de agua
y rellénela de agua o arena. Vuelva a colocar la tapa de plástico
encima. Puede que le sea más fácil llenar la caja de agua antes
de unir las ruedas.
1
2
Antes de empezar a ensamblar el aparato, asegúrese de que están todas las piezas. Compare todas las piezas
con la lista de contenidos del embalaje y los contenidos de las herramientas que aparecen en la página 4 de este
manual. Si falta alguna pieza o hay alguna pieza dañada, no trate de ensamblar el producto. Póngase en contacto
con el servicio al cliente para reemplazar las piezas.
TIEMPO ESTIMADO DE ENSAMBLE: 60 minutos
Herramientas necesarias para el ensamble (NO incluidas):
•
Llave fija de 7/16” • Destornillador Philips de punta media
•
Llave inglesa • Solución para la prueba de fugas (ver página 10)
Nota: este calentador se enciende eléctricamente, y requiere 1 pila AAA. La pila debe colocarse desatornillando
el BOTÓN INICIADOR ROJO - batería no incluida.
Una el conjunto de ruedas (K) a la base (J). Alinee los agujeros
a labase, e inserte 2 tornillos pequeños (N) por los agujeros,
y luego apriételos con los dedos. Asegúrese de que el conjunto
de ruedas está paralelo a la base (J) y apriete con la llave (X).
Herramientas usadas: 2 tornillos pequeños ( N)
Una los soportes del poste (K) a la base (J). Alinee
los agujeros inferiores de cada soporte del poste con
el agujero que hay en (N) a través del agujero del
soporte y la base. Inserte 1 tornillo pequeño en la base
y apriételo manualmente. Repita la operación con los otros
2 soportes del poste y luego apriete todos los tornillos
con la llave (X).
Herramientas usadas: 3 tornillos pequeños (N)
38
Page 39
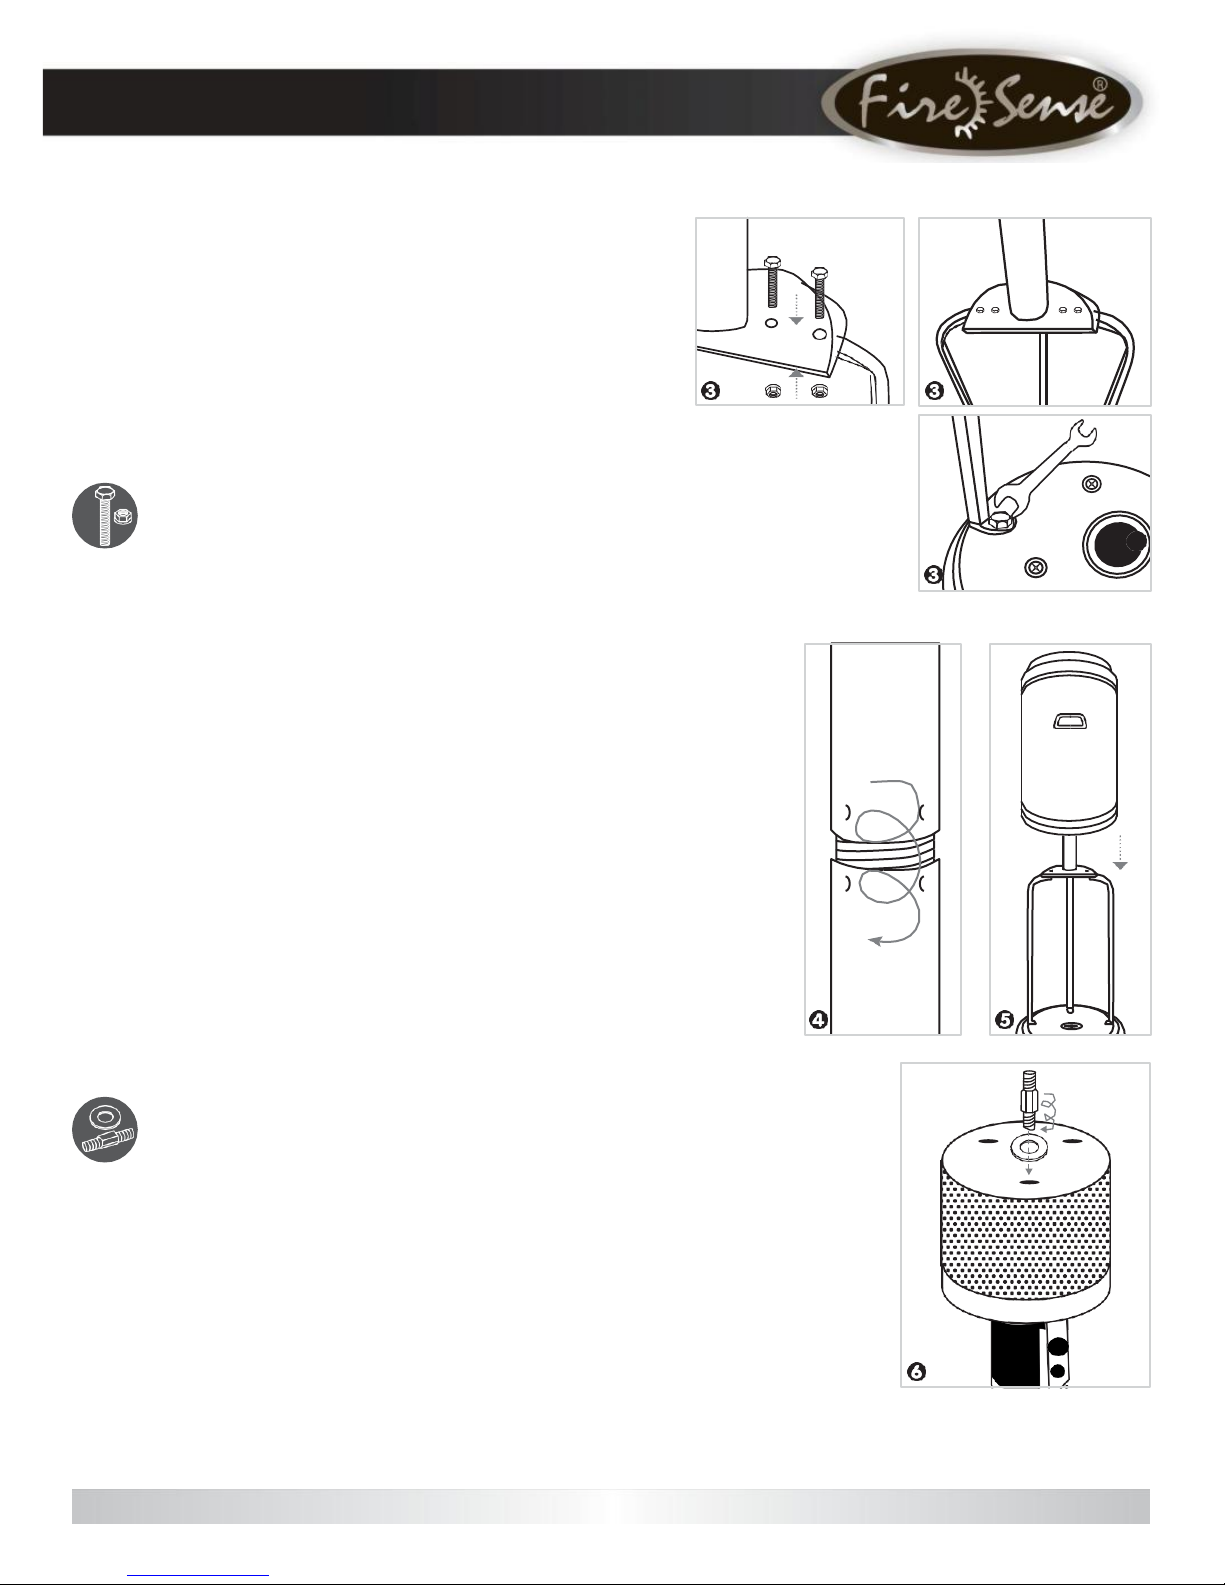
Llámenos si necesita ayuda: (866) 985-7877 | www.wtliving.com
ENSAMBLE
Una el poste inferior Cuando haya apretado los tornillos
346
5
que sujetan los soportes del poste (I) a la base (J), alinee
los agujeros del poste inferior (G) con los agujeros
superiores de los soportes del poste e inserte un tornillo grande
(M) por el agujero del soporte del poste. Asegúrelo con una
tuerca pequeña con arandela (S). Repita la operación con los
5 agujeros restantes (6 agujeros en total — 2 por cada pieza
de soporte del poste). Primero apriételos manualmente,
y luego con la llave (X) una vez que todos los tornillos hayan
sido colocados.
Herramientas usadas: 6 tornillos grandes (M)
6 tuercas pequeñas con arandela (S)
Una el poste superior (F) al poste inferior (G) atornillando
las dos piezas del poste juntas.
Nota: no se necesitan tornillos para sujetar los postes.
Deslice la cubierta del tanque D sobre los postes superior/inferior
ensamblados (F)/(G) hasta los soportes del poste(I). Deje la
cubierta del tanque en la base J.
Una los pasadores del reflector a la parte superior de la cabeza
Ensamble (C). Inserte 1 pasador del reflector a través de 1
arandela plana grande y métalo por el agujero que hay en la parte
superior del conjunto de la cabeza (C). Asegure el pasador
apretándolo. Repita con los otros 2 pasadores del reflector.
Herramientas usadas: 3 pasadores del reflector (W)
3 arandelas planas grandes (R)
39
Page 40

Llámenos si necesita ayuda: (866) 985-7877 | www.wtliving.com
ENSAMBLE
8
Una el conjunto de la cabeza (C) al poste superior (F).
7
Pase la manguera del gas (
superior/inferior (
del conjunto de la cabeza
superior (
encima de la etiqueta del poste.] Inserte los 4 tornillos pequeños
con arandelas de seguridad (
y apriételos con la llave(
F). [TRUCO: la perilla de control debería quedar por
F)/(G) y alinee los 4 agujeros pequeños
C con los 4 agujeros pequeños del poste
W).
E) por los postes
O) por los 4 agujeros alineados
Herramientas usadas: 4 tornillos con arandela (
Instalar el reflector. NOTA: ¡ASEGÚRESE DE
RETIRAR LA CINTA AZUL DE LAS PIEZAS
DEL REFLECTOR ANTES DE ENSAMBLARLO!
Consejo de ensamble: si fuese necesario alinear mejor
las secciones del reflector, afloje cada tornillo antes de
seguir ensamblando, y vuelva a apretarlos cuando las
secciones estén alineadas.
Deslice dos paneles reflectores (
tornillo pequeño. Enrosque una tuerca de sombrerete
sin apretar demasiado.
Repita con los demás paneles del reflector (
A) juntos. Inserte un
A).
O)
Deslice la tapa central del reflector (
ensamblados del reflector (
pequeño (
sin apretar demasiado. Repita con dos tornillos pequeños
y tuercas de sombrerete más
ensamblado del reflector. Apriete del todo los tornillos
y las tuercas de sombrerete.
Q) y enrosque una tuerca de sombrerete (U)
Herramientas usadas: 12 tornillos pequeños Q |
12 tuercas de sombrerete (
A). Inserte un tornillo
B) sobre los paneles
para completar el
U)
Page 41

Llámenos si necesita ayuda: (866) 985-7877 | www.wtliving.com
ENSAMBLE
10
Mientras sujeta el calentador, incline el conjunto de la
9
cabeza (C) y deslice 3 arandelas planas grandes (R)
sobre los pasadores del reflector (W). Coloque el
conjunto reflector sobre los pasadores del reflector y deslice
3 arandelas planas grandes por los pasadores del reflector
y el conjunto reflector. Asegure con 3 tuercas de mariposa.
Cuando haya apretado las tuercas de mariposa,
vuelva a colocar derecho el calentador.
Herramientas usadas: 6 arandelas planas grandes (B)
3 tuercas de mariposa (V)
Conecte la manguera y el regulador al cilindro de gas.
El cilindro de gas se vende por separado. Use un
cilindro de propano estándar 9,7 de 9 kg / 20 lb solamente.
Levante la cubierta del tanque (D) y déjela sobre los soportes
de los postes (I). Enrosque el regulador (H) a la manguera
del gas (E). No lo enrosque descentrado. Apriételo manualmente
primero y luego con la llave. Una el regulador a la válvula que
hay en el cilindro de gas y asegúrelo. Coloque el tanque de gas
en la base del calentador. Asegure el tanque de gas colocado
la cadena (L) en los soportes de los postes. Baje la cubierta
del tanque.
NOTA: use este calentador solamente con un sistema de
suministro de propano con eliminación de vapor. Consulte
información sobre almacenamiento y manejo del gas licuado
del petróleo en el capítulo 5 de ANSI/NFPA 58. Su
biblioteca local o departamento de bomberos debería tener
este libro.
41
Page 42

Llámenos si necesita ayuda: (866) 985-7877 | www.wtliving.com
INSTRUCCIONES DE FUNCIONAMIENTO
Se necesita un mínimo de presión de suministro de 5 psi para poder ajustar la
•
No almacene un cilindro
de gas de repuesto bajo
el aparato o cerca de él.
•
Nunca llene el cilindro más
de un 80 por ciento.
•
Coloque el tapón en la válvula
de salida del cilindro cada vez
que este no esté en uso. Para
la válvula del cilindro, use
solamente el tipo de tapón
que viene suministrado junto
a la misma. Si usa otros tipos
de tapones podría provocar
fugas de propano.
entrada de gas propano. Solo se podrá guardar este calentador de patio en
espacios interiores si el cilindro ha sido desconectado y separado del aparato.
El cilindro debe guardarse en el exterior, en un espacio bien ventilado y lejos del
alcance de los niños. El cilindro desconectado debe llevar colocados los tapones
de seguridad, y no debe guardarse en un edificio, garaje ni zona cerrada. Es
necesaria una presión mínima de suministro admisible de 11 c.a. para ajustar la
manguera. Se necesita un mínimo de 17 500 BTU (4416 Kcal) por hora para que el
calentador funcione de forma automática con una potencia menor que el máximo
de entrada.
Deben usarse el regulador de presión y el conjunto de la manguera
suministrados con el aparato.
La instalación debe cumplir con los códigos locales o, en ausencia de estos,
con los códigos de gas combustible ANSI Z223.1/NFPA54, el código
de instalación de gas natural y propano CSA B149.1 o el código
de almacenamiento y manejo del propano B149.2.
Usar un cilindro de propano abollado o dañado puede ser peligroso, así que
debería ser comprobado por su proveedor local de cilindros. Nunca use un cilindro
de propano con una válvula conectora dañada. El cilindro de
propano debe estar hecho y marcado de acuerdo a los requisitos de los
cilindros de gas del Departamento de Transportes de Estados Unidos
(DOT) o las normas para cilindros, esferas y tubos que transportan
mercancías peligrosas y comisiones, CAN/CSA-B339.
•
El cilindro debe tener un dispositivo de prevención de rebose.
•
El cilindro debe tener un dispositivo de conexión compatible con la conexión
del aparato.
•
El cilindro utilizado debe incluir un collar para proteger la válvula del cilindro.
•
Nunca conecte al calentador un cilindro de propano no reglamentado.
42
Page 43

INSTRUCCIONES DE FUNCIONAMIENTO
Llámenos si necesita ayuda: (866) 985-7877 | www.wtliving.com
PRUEBA DE FUGAS
ADVERTENCIA
•
Realice todas las pruebas de fuga en el
exterior.
•
Apague todas las llamas abiertas.
•
NUNCA realice pruebas de fuga fumando
•
No use el calentador hasta que se
hayan probado todas las conexiones
y no haya señales de fuga.
1. Mezcle una solución de
60-90 ml (2-3 oz) para la
prueba de fugas (una parte de
detergente líquido para platos
y tres partes de agua).
2. Aplique algunas gotas de dicha
solución donde la manguera se
une al regulador.
3. Aplique algunas gotas de dicha
solución el regulador conecta
con el cilindro.
4. Asegúrese de que todas las válvulas del calentador están CERRADAS.
5. ABRA la válvula del cilindro.
SI APARECEN BURBUJAS EN ALGUNA CONEXIÓN, HAY UNA FUGA.
1. CIERRE la válvula del cilindro.
2. Si se detecta una fuga en la conexión de la manguera/regulador,
apriete la conexión y lleve a cabo otra prueba de fugas. Si siguen
apareciendo burbujas, llame a nuestra línea de servicio de atención
a cliente al (866) 985-7877, de las 9 a.m. a las 6 p.m., EST, de lunes
a viernes.
3. Si se detecta una fuga en la conexión del regulador/cilindro, desconecte,
vuelva a conectar y lleve a cabo otra prueba de fugas. Si continua
viendo burbujas luego de algunos intentos, es que la válvula del cilindro
está defectuosa. Llame a nuestra línea de servicio de atención a cliente
al (866) 985-7877, de las 9 a.m. a las 6 p.m., EST, de lunes a viernes.
Se habla inglés y español.
SI NO APARECEN BURBUJAS EN NINGUNA CONEXIÓN,
LAS CONEXIONES SON SEGURAS.
Nota: Cuando afloje o retire las conexiones de gas, deberá llevar a cabo
una prueba completa de fugas.
Precaución: No intente poner en funcionamiento este aparato hasta haber
leído y comprendido toda la información de seguridad contenida en este
manual y luego de haber llevado a cabo el ensamble y las pruebas
de fugas.
ANTES DE PONER EL GAS:
1.Su calentador ha sido diseñado
y aprobado solo para su uso
AL AIRE LIBRE. NO lo use
dentro de un edificio, un garaje
o de cualquier otra zona
cerrada.
2. Mantenga las zonas
circundantes limpias y libres
de materiales combustibles,
gasolina y otros vapores
y líquidos inflamables.
3. Asegúrese de que la entrada
de aire no está obstruida.
Asegúrese de que todas las
conexiones de gas están
apretadas y de que no hay
fugas.
4. Asegúrese de que la cubierta
del cilindro no tiene residuos.
Asegúrese de que todo
componente retirado durante
el ensamble o el mantenimiento
es reemplazado y ajustado
antes de comenzar de nuevo
su funcionamiento.
ANTES DE PRENDERLO:
1.El calentador debe ser
inspeccionado minuciosamente
antes de cada uso, y al menos
una vez al año por una persona
del servicio de mantenimiento
cualificada. Si vuelve a prender
un calentador ya caliente,
espere siempre al menos
5 minutos.
2. Examine el conjunto de la
manguera en busca de
desgaste, cortes o deterioro
excesivo. Las áreas
sospechosas deberían
someterse a la prueba de fugas.
Si la manguera tiene fugas,
debe ser reemplazada antes
de poner en funcionamiento
el aparato. Use solo el conjunto
de manguera de repuesto
especificado por el fabricante.
43
Page 44

ENCENDIDO
Llámenos si necesita ayuda: (866) 985-7877 | www.wtliving.com
ADVERTENCIA
INSTRUCCIONES DE FUNCIONAMIENTO
EMPUJE
INSTRUCCIONES DE FUNCIONAMIENTO
PRESIONAR
Y MANTENER
MIENTRAS
BOTÓN DE
EMPUJE
NOTA: En el encendido inicial, o luego de un
cambio de cilindro, sujete la perilla de control
durante 2 minutos para purgar el aire de todas
las líneas de gas antes de proceder.
1. Gire la perilla de control hasta la posición
“OFF”.
2. Abra por completo la válvula del cilindro
de gas.
3. Presione y gire la perilla de control hasta
la posición “HI” (ALTO).
4. Manteniendo la perilla de control, empuje
el botón iniciador ROJO para encender
el quemador principal.
5. Para bajar la llama, gire la perilla de control
en dirección contraria a las agujas del reloj
hasta LO (BAJO). Para aumentar la llama,
gire la perilla de control en dirección de las
agujas del reloj hacia HI (ALTO).
6. Para apagar el aparato, empuje la perilla
de control y gírela en dirección de las agujas
del reloj hasta la posición OFF (APAGADO).
7. Espere siempre al menos 5 minutos antes
de volver a encender el calentador.
8. Gire la válvula del cilindro de gas hasta
OFF (APAGADO) o ciérrela.
Si tiene algún problema de encendido,
consulte la sección “Resolución de
problemas” de la página 14.
Precaución: Evite inhalar los humos
emitidos durante el primer uso del
calentador. Al quemar aceite durante
el funcionamiento se generarán humor
y olores. Tanto el humo como el olor
se disiparán luego de unos 30 minutos.
El calentador NO debería producir
humo negro denso.
POR SU SEGURIDAD
Tenga cuidado al intentar encender este
calentador de forma manual. Si sujeta
la perilla de control durante más de
10 segundos antes de encender el gas,
esto generará una bola de fuego.
Petmir que el reflector se enfríe antes
de tocar.
CUANDO EL CALENTADOR
ESTÁ ENCENDIDO:
La pantalla emisora se pondrá al un rojo
vivo debido al intenso calor. El color
se ve mejor por la noche. El quemador
mostrará lenguas de llamas azules
y amarillas. Estas llamas no deberían
ser amarillas ni producir humo negro
denso, lo cual indicaría una obstrucción
del paso del aire por los quemadores.
La llama debe ser azul con unos picos
amarillos rectos. Si se detecta un exceso
de llamas amarillas, apague el calentador
y consulte la sección “Resolución
de problemas” en la página 14.
REENCENDIDO:
Nota: Por su seguridad, la perilla
de control no puede apagarse
sin antes apretar la perilla y rotarla
hasta la posición OFF (APAGADO).
1. Gire la perilla de control hasta
OFF (APAGADO).
2. Espere siempre al menos 5 minutos
para que los gases se disipen antes
de volver a encender el aparato.
3. Repita los pasos de “Encendido”
anteriormente mencionados.
44
Page 45

INSTRUCCIONES DE FUNCIONAMIENTO
Llámenos si necesita ayuda: (866) 985-7877 | www.wtliving.com
COMPROBACIONES ANTES DEL FUNCIONAMIENTO:
ADVERTENCIA
POR SU SEGURIDAD
Luego de su uso, el calentador estará
caliente. Manipúlelo con extremo
cuidado.
Para un uso seguro y satisfactorio, realice estas
comprobaciones antes de cada uso:
ANTES DEL FUNCIONAMIENTO:
o Estoy familiarizado con el manual del usuario y comprendo
todas las precauciones mencionadas.
o Todos los componentes están bien ensamblados, íntegros y sin
fallos de funcionamiento.
o No se han realizado alteraciones.
o Todas las conexiones de gas están aseguradas y no hay fugas.
o La velocidad del viento es menor a 16 km/h (10 mph).
o El calentador solo es para uso al aire libre (fuera de cualquier
lugar cerrado).
o Hay una ventilación de aire fresco adecuada.
o El calentador se encuentra lejos de gasolina y otros líquidos
y vapores inflamables.
o El calentador se encuentra lejos de ventanas, aperturas
de entrada de aire, aspersores y otras fuentes de agua.
o El calentador está separado al menos 91 cm (36 in) por la parte
superior y 91 cm (36 in) por los lados de materiales
combustibles.
o El calentador se encuentra en una superficie dura y nivelada.
o No hay signos de nidos de arañas o insectos en los orificios
del calentador.
o Todos los conductos del quemador están limpios y sin
obstrucciones.
o Todos los conductos de circulación del aire limpios y sin
obstrucciones.
o No hay ropa ni ningún otro material inflamable colgando
del calentador, ni están colocados cerca del calentador.
o Todos los dispositivos de protección que fueron retirados
durante su revisión deben volver a ser colocados antes
de volver a poner en funcionamiento el calentador.
o La instalación y la reparación debe realizarla un técnico de
servicio cualificado. El calentador debe ser inspeccionado
minuciosamente antes de cada uso, y al menos una vez
al año por una persona del servicio de mantenimiento cualificada.
INFORMACIÓN DE SEGURIDAD Y DE FUNCIONAMIENTO:
•
La unidad funcionará con menor eficacia por debajo de 4,4º C (40º F).
•
Los niños y los adultos deben ser informados sobre los peligros de
las altas temperaturas, y deberían mantenerse alejados para evitar
quemaduras de piel o ropa.
•
Vigile de cerca a los niños pequeños cuando se encuentren en la
zona del calentador.
•
Puede que necesite ser limpiado con más frecuencia. Es fundamental
que el compartimento de control, el quemador y los conductos de
circulación del aire del calentador estén siempre limpios de residuos
y/o de nidos de arañas o insectos.
APAGADO:
1. Gire la perilla de control
en dirección de las
agujas del reloj hasta
OFF (APAGADO)
mientras empuja la
perilla. (Normalmente,
el quemador producirá
un ligero chasquido
al apagarse.)
2. Gire la válvula del cilindro
en dirección de las
agujas del reloj hasta
OFF (APAGADO)
y desconecte el regulador
cuando el calentador
no esté en uso.
NOTA: Luego de cierto
uso, es normal que
la pantalla sufra cierta
decoloración.
COMPROBACIONES
LUEGO DEL
FUNCIONAMIENTO:
1. La perilla de control
está en la posición
OFF (APAGADO).
2. La válvula del tanque
está apagada, en OFF.
3. Desconecte la línea
de gas.
4. El calentador está
guardado en un lugar
seguro.
45
Page 46

Llámenos si necesita ayuda: (866) 985-7877 | www.wtliving.com
CUIDADOS Y MANTENIMIENTO
Para disfrutar de muchos años de excelente funcionamiento con
ADVERTENCIA
POR SU SEGURIDAD
•
NO toque ni mueva el calentador al
menos durante 45 minutos tras su uso.
•
El reflector está caliente al tacto.
•
Deje que el reflector se enfríe antes
de tocarlo.
su calentador, asegúrese de que realiza las siguientes actividades
de mantenimiento periódicamente:
MANTENGA LIMPIAS LAS SUPERFICIES EXTERIORES.
1. Para limpiar use agua jabonosa. Nunca use agentes de limpieza
inflamables o corrosivos.
2. Mientras limpia su unidad, asegúrese de que la zona que rodea
al quemador y al compartimento de control están siempre secas.
No sumerja la el conjunto de la válvula de control. Si el control del
gas ha sido sumergido en agua, NO lo use. Debe ser reemplazado.
3. El flujo de aire no debe estar obstruido. Mantenga todos los
controles, el quemador y los conductos de aire limpios. Algunos
signos de posible obstrucción:
• Olor de gas con muchas llamas con el extremo amarillo.
• El calentador NO alcanza la temperatura deseada.
• El brillo del calentador es muy desigual.
• El calentador produce chasquidos.
• Puede haber nidos de arañas e insectos en el quemador o en
los orificios. Esta peligrosa situación puede dañar el quemador
y hacer que su uso no sea seguro. Limpie los agujeros del
quemador con un limpiador de tuberías resistente. El aire
comprimido puede ayudar a dispersar las partículas más
pequeñas.
• Los depósitos de carbonilla pueden provocar fuego. Limpie
la pantalla y la cúpula del quemador con agua jabonosa tibia
si se producen depósitos de carbonilla.
Nota: En ambientes con aire salado (como cerca del océano), hay
más riesgo de corrosión que lo normal. Compruebe periódicamente
las zonas corroídas y repárelas sin demora.
ALMACENAMIENTO:
Entre usos:
•
Gire la perilla de control hasta
OFF (APAGADO).
•
Desconecte la fuente de gas.
•
Guarde el calentador de forma
vertical en una zona protegida
del contacto directo con las
inclemencias del tiempo
(como la lluvia, aguanieve,
nieve, polvo
y suciedad).
•
Si lo desea, cubra el
calentador para proteger
las superficies exteriores
y para prevenir la
acumulación de residuos
en los conductos de aire.
Nunca deje un cilindro de gas
directamente expuesto a la luz
solar o al calor excesivo (tapa
no incluida).
Nota: Antes de cubrir el
calentador, espere hasta
que se haya enfriado.
MANTENIMIENTO:
Las reparaciones de los
conductos de gas y de los
componentes asociados
debe realizarlas un técnico
de servicio cualificado.
Precaución: Deje que el
calentador se enfríe antes
de intentar repararlo.
46
Page 47

Llámenos si necesita ayuda: (866) 985-7877 | www.wtliving.com
RESOLUCIÓN DE PROBLEMAS
PROBLEMA
POSIBLE CAUSA
ACCIÓN CORRECTIVA
El quemador
principal
no se enciende
Puede que la válvula del gas esté
apagada
Abra la válvula del gas en ON (ENCENDIDO)
El tanque de gas puede estar vacío
Rellene el tanque de gas propano
Orificio bloqueado
Limpie o reemplace el orificio
Aire en el sistema de suministro
Purgue el aire de los conductos. Abra los conductos
de gas y pulse la perilla de control durante 2-3 minutos.
Conexión suelta
Compruebe todas las conexiones
El iniciador falla
Use un encendedor para prender de forma manual
La presión del gas es baja y la válvula
está completamente abierta
Reemplace el cilindro o el regulador
Nuevo cilindro o primer prendimiento
Purgue el aire de los conductos
Válvula del cilindro abierta, no hay gas
Reemplace el conjunto de manguera/regulador
La pila AAA del botón iniciador
se ha agotado
Reemplácela con otra pila AAA
Llama baja
en el quemador
Baja presión
Reemplace el tanque de gas
El tanque tiene poco gas
Llene el tanque de gas propano
La manguera del gas está torcida
Compruebe y estírela o reemplácela
Unidad de
quemado
Carbonilla en el reflector y la pantalla
Limpie los componentes necesarios
Humo negro y denso
Bloqueo en el conjunto del quemador—limpie
profusamente el quemador
47
Page 48

Llámenos si necesita ayuda: (866) 985-7877 | www.wtliving.com
C
B
A
PIEZA
DESCRIPCIÓN
CANTIDAD
A
Panel reflector
4 empacados en 2 cajas interiores
B
Tapa central del reflector
1 C Conjunto de la cabeza
1 empacado en 1 caja interior
D
Cubierta del tanque
1 E Manguera del gas
1 junto al conjunto de la cabeza
F
Poste superior
1 G Poste inferior
1
H
Regulador
1 empacado junto al conjunto
de la cabeza
I
Soportes del poste
3 empacados en 1 caja interior
J
Base con caja de agua
pre-ensamblada
1
K
Conjunto de ruedas
1 empacado junto al conjunto
de la cabeza
L
Cadena (asegura el cilindro
de gas propano)
1 empacada con los soportes
del poste
LISTA DE PIEZAS DE REPUESTO
D
E F
G
¿Preguntas, problemas, piezas
faltantes o de repuesto?
H
I
J
K
L
Antes de consultar con su vendedor puede
ponerse en contacto con nuestro servicio al
cliente. Se habla inglés y español.
Llámenos gratis al (866) 985-7877,
escriba un correo electrónico
a cservice@welltraveled.net, o conéctese
a nuestro chat en www.wtliving.com.
Nuestro horario es:
9 a.m. – 6 p.m., EST, lunes a viernes
48
Page 49

GARANTÍA LIMITADA DE 1 AÑO
Aviso importante Para obtener información sobre el servicio de atención al cliente y de la
garantía, póngase en contacto con nuestro centro de servicios del cliente en: (866) 985-7877, escríbanos
un correo electrónico a cservice@welltraveled.net, o conéctese a nuestro chat en www.wtliving.com.
Nuestro horario es: 9 a.m. – 6 p.m., EST, lunes a viernes. Se habla inglés y español.
Clientes en Estados Unidos continental
Todos los componentes tienen una garantía de 1 año tras la fecha de compra del
propietario original ante los defectos de material y de fabricación durante su uso normal.
Esta garantía NO cubre el desgaste y los efectos de la intemperie, ni el ensamble y/o
mantenimiento O uso en aplicaciones comerciales, si el modelo no fue diseñado como
un modelo comercial. Los productos bajo garantía de Well Traveled Living serán
reparados y/o sustituidos según su criterio y sin cobrar costos al cliente. Cualquier
devolución enviada a Well Traveled Living deberá ser enviada con el flete prepagado
y el embalaje original del producto.
Para el servicio de garantía, póngase en contacto con Well Traveled Living en la dirección,
número de teléfonos o web y correo electrónico que aparecen en este manual del usuario.
Asegúrese de que tiene un recibo de compra, la fecha de compra y los número del
catálogo/modelo cuando llame. El servicio de garantía será coordinado por el centro
de servicio de Well Traveled Living de la Isla de Amelia, en Florida.
Esta garantía solamente se extiende al comprador original. Se necesitará una prueba
de compra antes de ofrecer el servicio de garantía. El recibo de compra es la única
forma válida de prueba de compra. Esta garantía solo cubre los fatos debidos a defectos
de materiales o de fabricación ocurridos durante el uso normal. Los fallos y/o daños
derivados de accidentes, negligencia, uso inadecuado, descuido, manipulación
defectuosa, alteración o modificación, falta de mantenimiento, ensamble o mantenimiento
inadecuado, reparación por agencias no autorizadas o uso de componentes no
autorizados o daños atribuidos a fuerzas mayores NO están cubiertos.
Esta garantía limitada le proporciona unos derechos legales específicos, y puede que
también tenga otros derechos que varían según la jurisdicción. La provisiones de la
Convención de las Naciones Unidas sobre los contratos de compraventa de bienes
no son aplicables a esta garantía limitada ni a la venta de productos cubierta por esta
garantía limitada.
•
NO HAY GARANTÍAS EXPRESAS EXCEPTO
LAS ARRIBA MENCIONADAS
•
EL CONSUMIDOR ASUME TODOS LOS
RIESGOS AL ENSAMBLE Y FUNCIONAMIENTO
DE ESTA UNIDAD
•
NO SEGUIR LAS ADVERTENCIAS NI LAS
INSTRUCCIONES DE FUNCIONAMIENTO
CONTENIDAS EN ESTE MANUAL PUEDE
PROVOCAR GRAVES DAÑOS EN LA
PROPIEDAD Y/O HERIDAS PERSONALES
•
EN NINGÚN MOMENTO WELL TRAVELED
LIVING O SUS DIRECTORES, FUNCIONARIOS O
AGENTES RESPONDERÁN ANTE EL
COMPRADOR NI NINGUNA TERCERA PARTE,
YA SEA POR CONTRATO, POR DEMANDA NI
POR NINGUNA OTRA RAZÓN, POR NINGUNA
PÉRDIDA, COSTO O DAÑO INDIRECTO,
ESPECIAL, PUNITIVO, EJEMPLAR,
RESULTANTE O INCIDENTAL DERIVADO DE O
EN RELACIONADO CON LA VENTA,
EL MANTENIMIENTO, EL USO O LA
INCAPACIDAD DE USAR EL PRODUCTO,
INCLUSO SI WELL TRAVELED LIVING O SUS
DIRECTORES, FUNCIONARIOS O AGENTES
HAN SIDO AVISADOS DE LA POSIBILIDAD
DE DICHAS PÉRDIDAS, COSTOS O DAÑOS,
O DE SI TALES PÉRDIDAS, COSTOS O DAÑOS
ERAN PREVISIBLES. EN NINGÚN MOMENTO
WELL TRAVELED LIVING O SUS DIRECTORES,
FUNCIONARIOS O AGENTES RESPONDERÁN
POR NINGUNA PÉRDIDA DIRECTA, COSTOS
O DAÑOS QUE EXCEDAN EL PRECIO
DE COMPRA DEL PRODUCTO.
•
ALGUNAS JURISDICCIONES NO PERMITEN
LA EXCLUSIÓN O IMITACIÓN DE DAÑOS
ACCIDENTALES O INDIRECTOS, ASÍ QUE
LA IMITACIÓN O EXCLUSIÓN
ANTERIORMENTE MENCIONADA NO SE
APLICA AL COMPRADOR.
Distribuido por:
Costco Wholesale Corporation
P.O. Box 34535
Seattle, WA 98124-1535 Estados
Unidos
1-800-774-2678
www.costco.com
Imported by / Importé par :
Costco Wholesale Canada Ltd.*
415 W. Hunt Club Road
Ottawa, Ontario
K2E 1C5, Canada
1-800- 463-3783
www.costco.ca
* faisant affaire au Québec sous le
nom Les Entrepôts Costco
Fire Sense®, Mojave Sun®, y Well Traveled Living
de ensamble son propiedad de Well Traveled Imports, Inc.® y están protegidas por la ley de propiedad intelectual y de marcas registradas de Estados Unidos.
Importado por:
Importadora Primex S.A. de C.V.
Blvd. Magnocentro No.4
San Fernando La Herradura
Huixquilucan, Estado de México
C.P.52765
RFC: IPR-930907-S70
(55)-5246-5500
www.costco.com.mx
®
son marcas registradas de Well Traveled Imports, Inc
Todos los derechos reservados.
Imported by:
Costco Wholesale UK Ltd /
Costco Online UK Ltd
Hartspring Lane Watford,
Herts
WD25 8JS
United Kingdom
01923 213113
www.costco.co.uk
Imported by / Manufactured for:
Costco President Taiwan, Inc. No.
656 Chung-Hwa 5th Road
Kaohsiung, Taiwan
Company Tax ID: 96972798
0800-885-889
www.costco.com.tw
®
. Todas las presentaciones de las instrucciones
MADE IN CHINA
FABRIQUE EN CHINE
HECHO EN CHINA
49
 Loading...