

Page 1

G AMING POWER SUPPLY
I NSTRUCTION MANUAL
Page 2

01
CONTENTS - INDEX
Technical Specifications
Connectors
Power Supply Installation
Troubleshooting/ Warranty and RMA
GERMAN
Einbau des Netzteils
Fehlerbehebung/Garantie und Rücksendungsgewähr
SPANISH
Instalación de fuente de alimentación
Solución de problemas/Garantía y Autorización de devolución de mercancía (RMA)
FRENCH
Installation de l'alimentation
Dépannage / Garantie et procédure de retour du matériel
ITALIAN
Installazione dell’alimentatore
Risoluzione dei problemi/Garanzia e RMA
RUSSIAN
Установка блока питания
Устранение неисправностей/Гарантия и гарантийный возврат
JAPANESE
電源据付
トラブルシューティング/保証とRMA
CHINESE
电源安装
故障诊断/产品保修和退货授权
2
3
4
5
6
7
8
9
10
11
12
13
14
15
16
17
18
19
Page 3
02
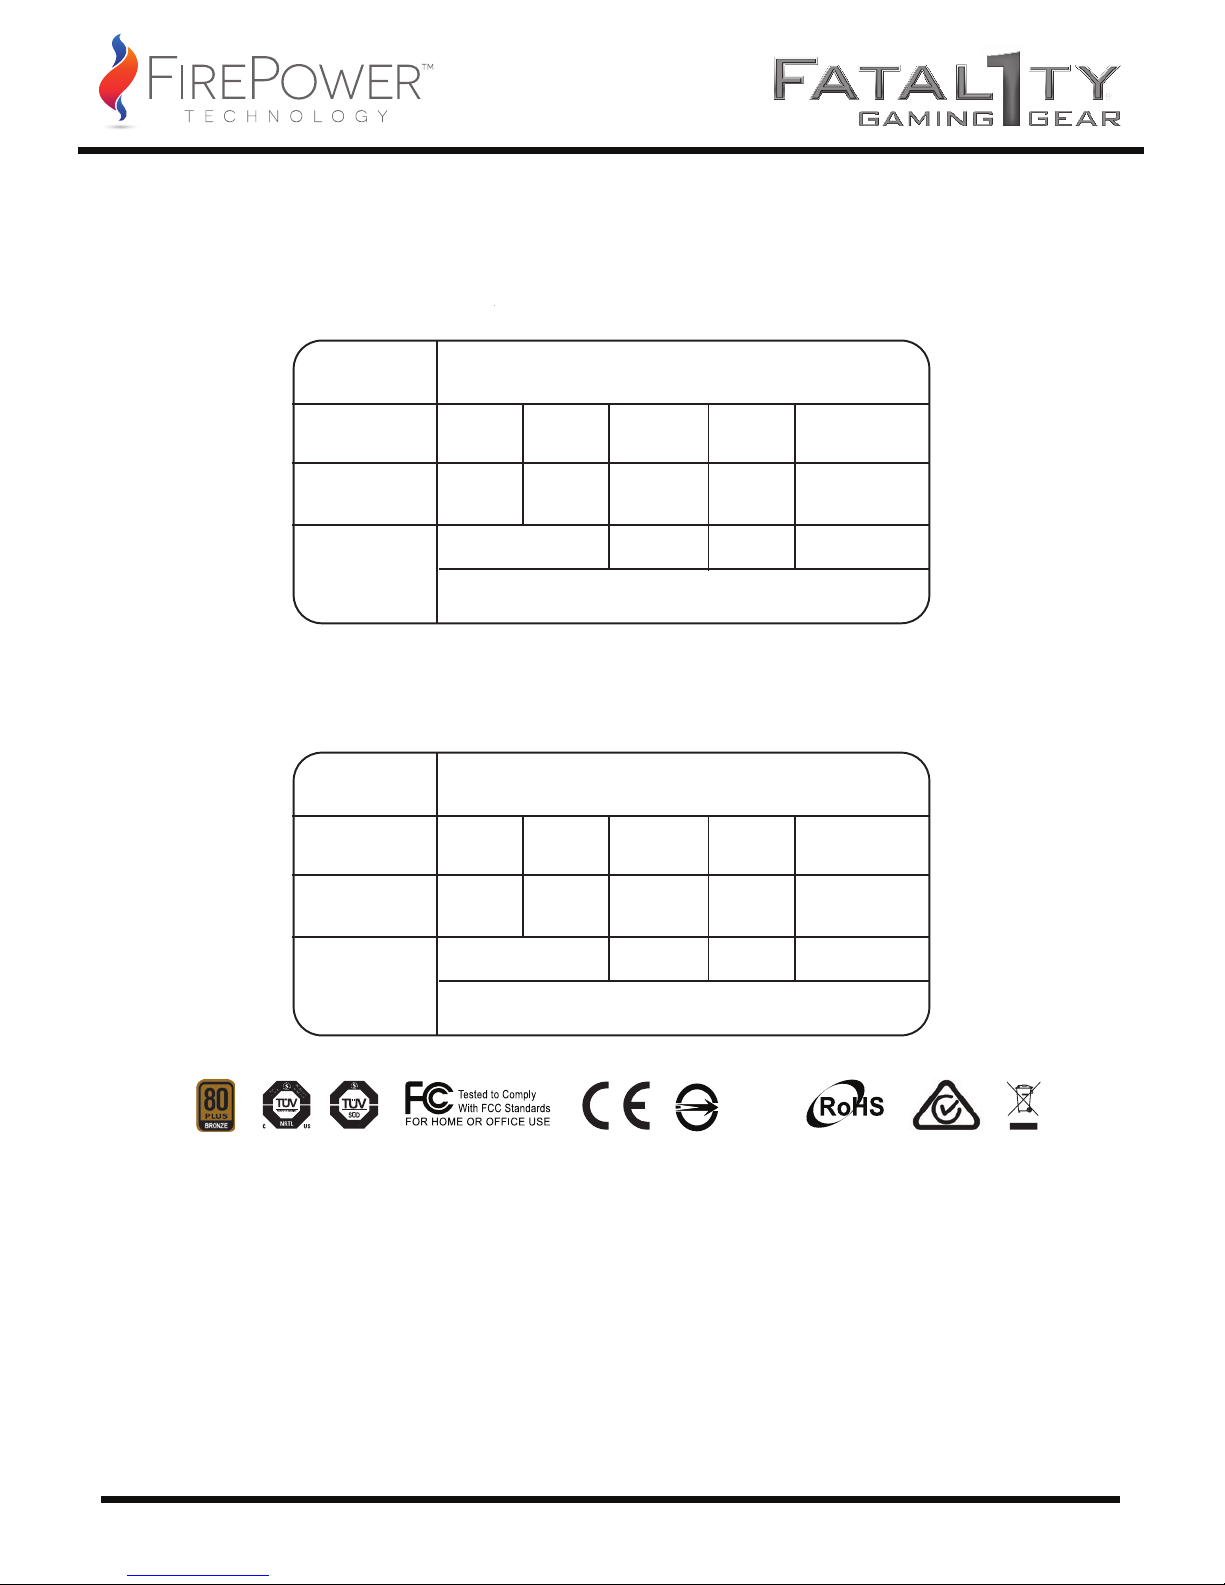
TECHNICAL SPECIFICA TIONS
AC INPUT
DC OUTPUT
MAX LOAD
MAXIMUM
COMBINED
WATTAGE
150W
100-240Vac, 10A, 50-60Hz
+3.3V +5V +12V -12V +5VSB
25A 25A 62.5A 0.3A 3.0A
750W 3.6W 15W
MODEL:
OCZ-FTY750W
AC INPUT
DC OUTPUT
MAX LOAD
MAXIMUM
COMBINED
WATTAGE
120W
TOTAL POWER: 550W CONTINUOUS
TOTAL POWER: 750W CONTINUOUS
115-230Vac, 8A, 50-60Hz
+3.3V +5V +12V -12V +5VSB
22A 22A 41.25A 0.3A 2.5A
495W 3.6W 12.5W
MODEL:
OCZ-FTY550W
R35522
Page 4
03
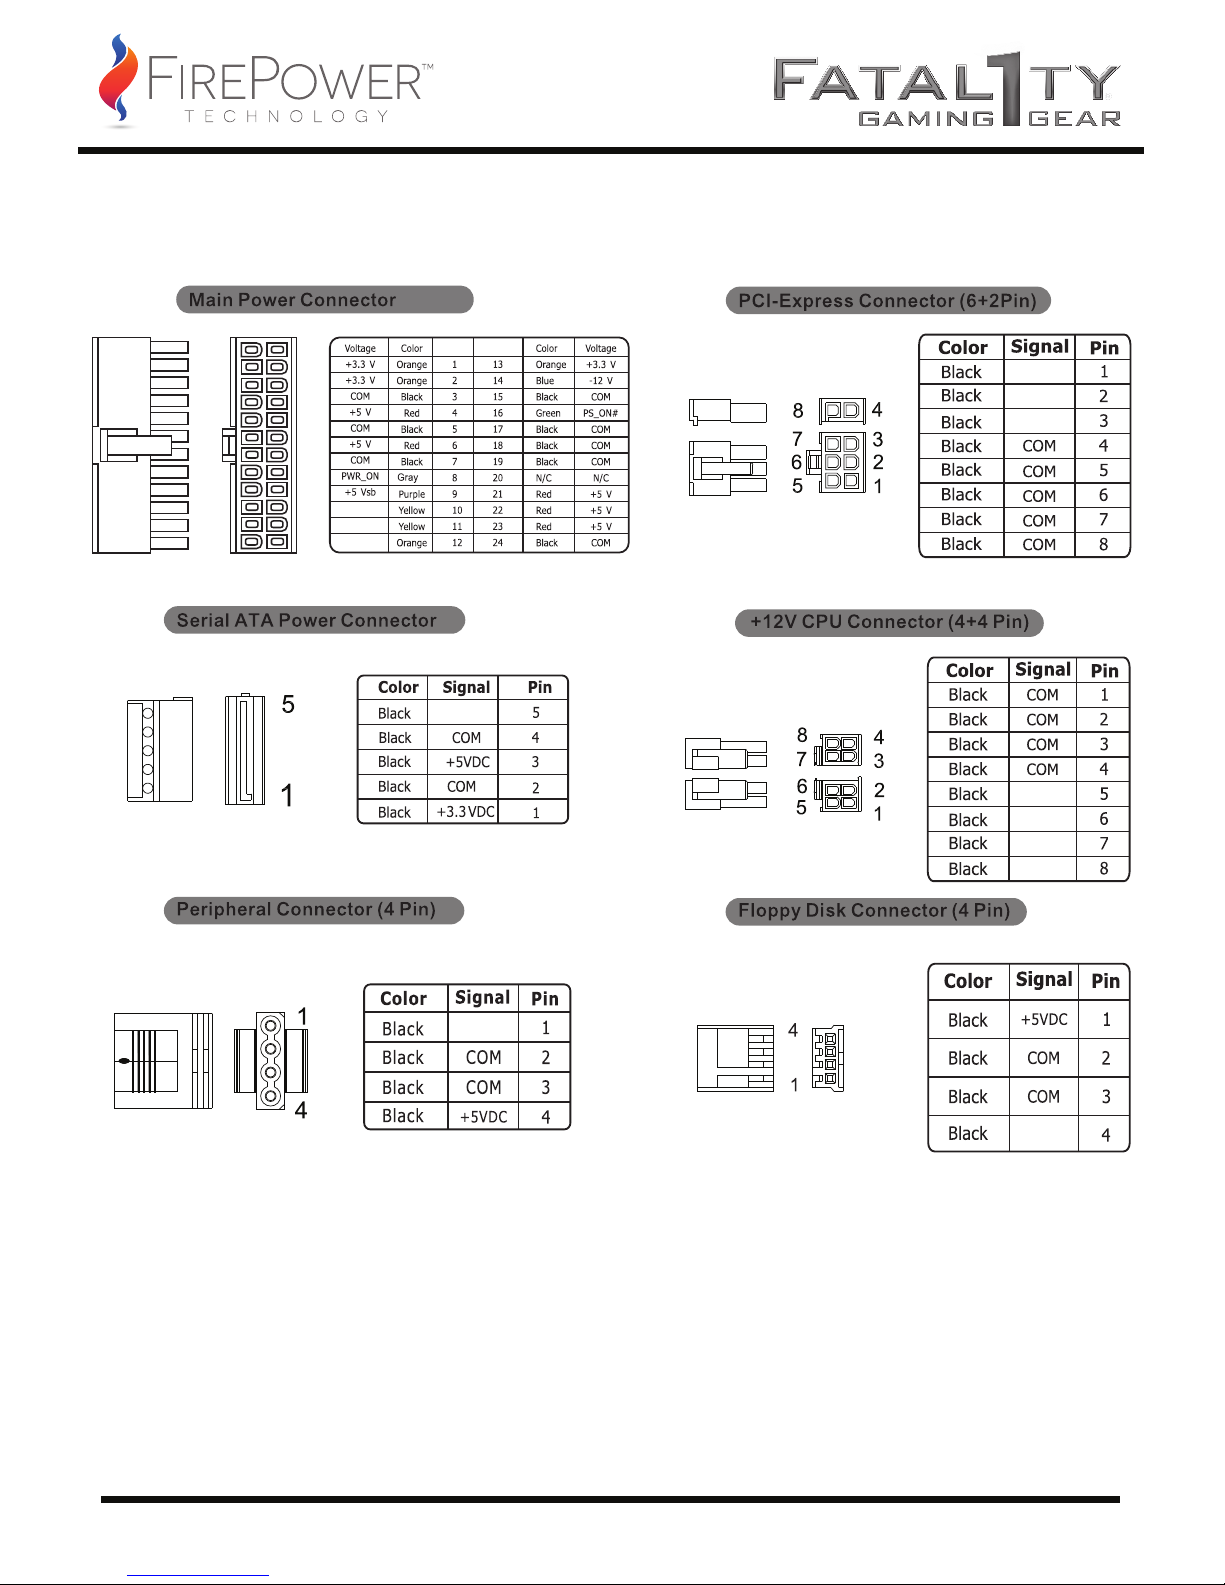
CONNECTORS DESCRIPTION AND ILLUSTRATION
+12VDC
+12VDC
+12VDC
+12VDC
+12VDC
+12VDC
+12VDC
+12VDC
+12VDC
+12VDC
(24Pin)
+12V
+12V
+3.3 V
1
13
1224
Page 5

04
POWER SUPPLY INSTALLATION
REMOVING THE OLD POWER SUPPLY:
NOTE: You will need a Philips head screwdriver to install your new power supply.
INSTALLING THE NEW POWER SUPPLY:
1. Turn off the power switch on your old power supply then unplug the AC power cord.
2. Disconnect all other cables from the PC. Remove the screws holding the PC’s cover in
place and then remove the cover from the case; specifics will vary by computer case
design.
3. Disconnect the power supply from all the components in the PC making sure all
connectors are unplugged.
4. Remove the screws securing the old power supply to your case; normally there are
four screws at the back of the chassis. After removing all the screws, slowly take the power supply
out of the PC case. Be careful you do not damage any other components during this action.
NOTE: The single most reason a PSU is reported as DOA, is improper or not fully seated
connections.
1. Place your new power supply in the appropriate space in the PC case and secure it by screwing the
four screws into the rear of the power supply.
2. Guide the 24-pin ATX connector through the case and connect it to your motherboard.
3. Connect the 8-pin (4+4-pin) CPU power cables to the motherboard as needed. If your
motherboard only has a 4-pin CPU jack, connect only the right side of the connector to your
motherboard.
4. Connect the 6-pin graphics card connector to your video card’s power jack. If your video card
supports more than one jack connect a second 6-pin connector. If your video card has an 8-pin jack
mounted just use the additional two pins beside the regular 6-pin connector to form an 8-pin
connector.
5. Proceed with connecting all peripheral and SATA connectors to your hard drives and optical
drives.
6. Connect any other internal components that require power to the appropriate connector- i.e. fans
and or case lighting.
7. Replace the cover on the PC case and secure with the screws.
8. Connect your display, keyboard, mouse, speakers, printer, and any other peripherals to your
computer.
9. Plug in the main AC power cord into the back of the power supply, turn the switch on the power
supply to the “l” position and then start your computer with the switch on the front of your PC case.
Page 6

05
TROUBLESHOOTING/WARRANTY AND RMA
If you experience any problems with your new power supply, please check these simple
trouble-shooting steps or consult the retailer where the product was purchased.
Caution: Working on electrical devices can be life-threatening. If you are not familiar with the steps
taken please consult a professional. If your power supply has developed traces of smoke, broken
cables, or was exposed to liquids it should not under any circumstances be brought back into
operation.
If you installed a new power supply and the system will no longer start, please check the following
steps:
1. Make sure the AC input is plugged in correctly and the wall outlet distributes power. [Try another
device in the electrical outlet to verify it is working properly.]
2. Make sure the power switch on the power supply is in the “l” position.
3. Check that all connectors from the power supply are correctly plugged into the motherboard and
that all of the connectors are fully seated and latched.
4. Is the cable from the power switch on the computer case properly connected to the motherboard?
5. If the system still will not turn on; unplug all cards from the motherboard leaving only processor
and RAM. Unplug the power supply from everything except the motherboard and a hard drive. Try
turning on the computer and see if the power supply fan starts.
6. If it starts, turn off the computer and plug in another card or peripheral and subsequently restart
until either all of them work, or you detect the one item that is causing the problem.
If you need further assistance please visit:
http://www.firepower-technology.com/support-resources/
OCZ-FTY550W 3- Year Warranty
Your FirePower Fatal1ty 550W PSU is covered by an industry-leading 3-Year Warranty. This
product is warranted to be free from defects in material and workmanship for a period of three [3]
years from the date of purchase. If any defects should occur during this period, contact FirePower
Technology for further assistance and to take advantage of your warranty.
OCZ-FTY750W 5- Year Warranty
Your FirePower Fatal1ty 750W PSU is covered by an industry-leading 5-Year Warranty. This
product is warranted to be free from defects in material and workmanship for a period of five [5]
years from the date of purchase. If any defects should occur during this period, contact FirePower
Technology for further assistance and to take advantage of your warranty.
To place a Returned Merchandise Authorization [RMA] request, you may simply submit
a ticket through our website at: http://www.firepower-technology.com/support-resources/
FirePower-Technology, 5995 Avenida Encinas, Carlsbad, CA 92008 / FirePower-Technology.com
Page 7

06
EINBAU DES NETZTEILS
ENTFERNEN DES ALTEN NETZTEILS:
HINWEIS: Für den Einbau Ihres neuen Netzteils benötigen Sie einen Philips-Schraubendreher.
EINSETZEN DES NEUEN NETZTEILS:
1. Schalten Sie den Netzschalter an Ihrem alten Netzteil aus und ziehen Sie das Netzkabel ab.
2. Trennen Sie alle anderen Kabel vom PC. Entfernen Sie die Schrauben der PC-Abdeckung und nehmen
Sie die Abdeckung anschließend vom Gehäuse ab; je nach Gehäusetyp Ihres PCs variieren Einzelheiten.
3. Trennen Sie das Netzteil von allen Bauteilen des PCs und vergewissern Sie sich, dass alle Anschlüsse
abgezogen sind.
4. Lösen Sie die Schrauben, die das alte Netzteil am Gehäuse befestigen; normalerweise befinden sich
vier Schrauben an der Hinterseite des Gehäuses. Heben Sie das Netzteil vorsichtig aus dem PC-Gehäuse,
sobald alle Schrauben entfernt sind. Achten Sie darauf, dass Sie bei diesem Schritt keine anderen Bauteile
beschädigen.
HINWEIS: Der häufigste Grund, weshalb Netzteile als fehlerhaft gemeldet werden, sind fehlerhafte oder
nicht vollständig eingesteckte Verbindungen.
1. Setzen Sie Ihr neues Netzteil an der geeigneten Stelle in das PC-Gehäuse ein und sichern Sie es durch
Anziehen der vier Schrauben an der Rückseite des Netzteils.
2. Führen Sie den 24-Pin-ATX-Anschluss durch das Gehäuse und verbinden Sie ihn mit dem
Motherboard.
3. Verbinden Sie die CPU-Stromkabel mit 8 (4+4) Pins nach Bedarf am Motherboard. Wenn Ihr
Motherboard nur eine CPU-Buchse mit 4 Pins hat, so verbinden Sie lediglich die rechte Seite des
Steckers mit Ihrem Motherboard.
4. Verbinden Sie den 6-Pin-Grafikkartenstecker mit dem Stromanschluss Ihrer Grafikkarte. Verbinden Sie
einen zweiten 6-Pin-Stecker, wenn Ihre Videokarte mehr als eine Buchse unterstützt. Wenn Ihre
Videokarte über eine 8-Bin-Buchse verfügt, verwenden Sie einfach die beiden zusätzlichen Pins neben
dem herkömmlichen 6-Pin-Stecker, um einen 8-Pin-Stecker zu erhalten.
5. Fahren Sie fort, indem Sie alle periphären und SATA-Stecker mit Ihren Festplatten und optischen
Laufwerken verbinden.
6. Schließen Sie alle anderen internen Bauteile, die eine Netzverbindung benötigen, an die entsprechenden Stecker an – d.h. Gebläse und/oder Gehäusebeleuchtung.
7. Setzen Sie die Abdeckung wieder auf das PC-Gehäuse und ziehen Sie die Schrauben fest.
8. Verbinden Sie Bildschirm, Tastatur, Maus, Lautsprecher, Drucker und andere Peripheriegeräte mit
Ihrem Computer.
9. Stecken Sie das Netzstromkabel in die Rückseite des Netzteils, stellen Sie den Schalter am Netzteil auf
die Position „I“ und starten Sie Ihren Computer mit dem Schalter auf der Vorderseite des PC-Gehäuses.
Page 8

07
FEHLERBEHEBUNG/GARANTIE UND RÜCKSENDUNGSGEWÄHR
Lesen Sie bitte diese einfachen Fehlerbehebungsschritte oder kontaktieren Sie den Händler, bei dem Sie
dieses Produkt erstanden haben, falls Sie Probleme mit Ihrem neuen Netzteil haben.
Vorsicht: Die Arbeit an elektrischen Geräten kann lebensgefährlich sein. Wenn Sie die beschriebenen
Schritte nicht gut kennen, bitten Sie einen Experten um Hilfe. Ihr Netzteil darf unter keinen Umständen
in Betrieb genommen werden, wenn es Rauch entwickelt hat, seine Kabel beschädigt worden sind oder
es mit Flüssigkeiten in Kontakt geraten ist.
Überprüfen Sie bitte die folgenden Schritte, wenn Sie ein neues Netzteil eingebaut haben und das System
nicht mehr hochfährt:
1. Prüfen Sie, ob das Netzkabel richtig eingesteckt ist und die Steckdose Strom abgibt. [Stecken Sie ein
anderes Gerät in die Steckdose ein, um ihre Funktionsfähigkeit zu bestätigen.]
2. Vergewissern Sich sich, dass der Hauptschalter am Netzteil in Position „I“ steht.
3. Prüfen Sie, ob alle Stecker des Netzteils richtig an das Motherboard angeschlossen sind und dass alle
Verbindungen vollständig eingesetzt und verriegelt sind.
4. Ist das Kabel des Netzschalters im Computergehäuse richtig mit dem Motherboard verbunden?
5. Wenn sich das System immer noch nicht einschalten lässt, ziehen Sie alle Karten aus dem
Motherboard, so dass nur Prozessor und RAM verbleiben. Ziehen Sie das Netzteil von allem ab, außer
von Motherboard und Festplatte. Versuchen Sie, den Computer einzuschalten und zu prüfen, ob der
Ventilator des Netzteils startet.
6. Wenn er startet, schalten Sie den Computer aus und stecken Sie nach und nach andere Karten oder
Peripheriegeräte ein; starten Sie den Computer jedes Mal neu, bis entweder alle funktionieren oder Sie
dasjenige Element ermittelt haben, das das Problem verursacht.
OCZ-FTY550W 3 Jahre Gewährleistung
Ihr Netzteil von FirePower Fatal1ty 550W ist mit einer branchenführenden 3-jährigen Gewährleistung
versehen. Wir gewährleisten, dass dieses Produkt für einen Zeitraum von drei [3] Jahren ab dem
Kaufdatum frei von Material- und Herstellungsfehlern bleibt. Sollten Sie während dieses Zeitraums
Fehler bemerken, so kontaktieren Sie bitte FirePower für weitere Unterstützung und um Ihre
Gewährleistung in Anspruch zu nehmen.
OCZ-FTY750W 5 Jahre Gewährleistung
Ihr Netzteil von FirePower Fatal1ty 750W ist mit einer branchenführenden 5-jährigen Gewährleistung
versehen. Wir gewährleisten, dass dieses Produkt für einen Zeitraum von fünf [5] Jahren ab dem
Kaufdatum frei von Material- und Herstellungsfehlern bleibt. Sollten Sie während dieses Zeitraums
Fehler bemerken, so kontaktieren Sie bitte FirePower für weitere Unterstützung und um Ihre
Gewährleistung in Anspruch zu nehmen.
Um die Rücksendungsgewähr geltend zu machen, können Sie einfach eine Supportanfrage über unsere
Website abschicken: http://www.firepower-technology.com/support-resources/
FirePower-Technology, 5995 Avenida Encinas, Carlsbad, CA 92008 / FirePower-Technology.com
Page 9

08
INSTALACIÓN DE LA FUENTE DE ALIMENTACIÓN
ELIMINACIÓN DE LA ANTIGUA FUENTE DE ALIMENTACIÓN:
INSTALACIÓN DE LA NUEVA FUENTE DE ALIMENTACIÓN:
NOTA: necesitará un destornillador de estrella para instalar la nueva fuente de alimentación.
1. Apague el interruptor de encendido de la vieja fuente de alimentación y después desconecte el cable
de alimentación de CA.
2. Desconecte todos los demás cables del ordenador. Quite los tornillos que mantienen la tapa del
ordenador en su sitio y después quítela de la caja. Los detalles específicos variarán según el diseño de la
caja del ordenador.
3. Desconecte la fuente de alimentación de todos los componentes del ordenador; asegúrese de que todos
los conectores están desconectados.
4. Ahora podrá quitar los tornillos que fijan la fuente de alimentación vieja al ordenador. Normalmente,
suele haber cuatro tornillos en la parte posterior de la caja. Tras quitar todos los tornillos, saque la fuente
de alimentación de la caja del ordenador con cuidado. Tenga cuidado de no dañar ningún componente
durante la extracción de la fuente de alimentación.
NOTA: una de las razones por las que una fuente de alimentación puede considerarse averiada a su
llegada es por las malas conexiones o porque no se han asentado.
1. Coloque la nueva fuente de alimentación en el lugar adecuado dentro de la caja del ordenador y fíjela
con los cuatro tornillos a la parte posterior de la caja del ordenador.
2. Pase el conector ATX de 24 pines por la caja y conéctelo a la placa madre.
3. Conecte los cables de alimentación de 8 pines (4+4 pines) de la CPU a la placa madre según sea
necesario. Si la placa madre sólo admite clavijas de 4 pines para la CPU, conecte sólo la parte derecha
del conector a la placa madre.
4. Conecte el conector de la tarjeta gráfica de 6 pines a la toma de alimentación de su tarjeta de vídeo. Si
la tarjeta admite más de una toma, conecte el segundo conector de 6 pines. Si la tarjeta tiene una clavija
de 8 pines montada, utilice los 2 pines adicionales además del conector de 6 pines para formar un
conector de 8 pines.
5. Conecte todos los conectores de los periféricos y SATA a los discos duros y a las unidades ópticas.
6. Conecte cualquier otro componente interno que requiera energía al conector adecuado; por ejemplo,
los ventiladores o la iluminación de la caja.
7. Vuelva a poner la tapa de la caja del ordenador y apriete los tornillos.
8. Conecte la pantalla, el teclado, el ratón, los altavoces, la impresora y todos los demás periféricos al
ordenador.
9. Enchufe el cable principal de alimentación de CA en la parte posterior de la fuente de alimentación,
ponga el interruptor en la posición "I" e inicie el ordenador con el interruptor de la parte delantera de la
caja de la CPU.
Page 10

09
SOLUCIÓN DE PROBLEMAS/GARANTÍA Y AUTORIZACIÓN DE DEVOLUCIÓN DE MERCANCÍA (RMA)
Si tiene algún problema con la nueva fuente de alimentación, compruebe estos pasos de solución de
problemas o consulte al representante que le vendió el producto.
Precaución: El trabajo con dispositivos eléctricos puede suponer un peligro para la vida. Si no está
familiarizado con los pasos descritos, consulte a un profesional. Si la fuente de alimentación vieja ha
echado humo alguna vez, tiene algún cable roto o se ha visto expuesta a líquidos, no deberá ponerla en
funcionamiento bajo ningún concepto.
Si ha instalado una nueva fuente de alimentación y el ordenador no se enciende, compruebe los
siguientes pasos:
1. Asegúrese de que la entrada de CA está bien enchufada y que la toma de la pared funciona
correctamente. [Pruebe otro dispositivo en la toma eléctrica para ver si funciona correctamente.]
2. Asegúrese de que el interruptor de alimentación de la fuente de alimentación está en la posición "I".
3. Compruebe que todos los conectores de la fuente de alimentación están correctamente enchufados a la
placa madre y que todos están totalmente asentados y conectados.
4. ¿Está el cable del interruptor de encendido de la caja del ordenador conectado correctamente a la placa
madre?
5. Si el sistema aún no se enciende, desconecte todas las tarjetas de la placa madre y deje sólo el
procesador y la memoria RAM. Desconecte la fuente de alimentación de todos los sitios excepto de la
placa madre y de un disco duro. Vuelva a intentar encender el ordenador y compruebe si se pone en
funcionamiento el ventilador de la fuente de alimentación.
6. Si se pone en funcionamiento, apague el ordenador y conecte otra tarjeta o un periférico y reinicie el
ordenador. Siga haciendo esto hasta que funcione todo o detecte el elemento que le causa problemas.
OCZ-FTY550W Garantía de 3 años
Su fuente de alimentación y refrigeración (FirePower Fatal1ty 550W) está cubierta por una garantía
de 3 años líder en el sector. Se garantiza que este producto está libre de defectos de material y
fabricación durante un período de tres [3] años desde la fecha de compra. Si se produce algún
defecto durante este período, póngase en contacto con FirePower para recibir asistencia y
aprovecharse de la garantía.
OCZ-FTY750W Garantía de 5 años
Su fuente de alimentación y refrigeración (FirePower Fatal1ty 750W) está cubierta por una garantía
de 5 años líder en el sector. Se garantiza que este producto está libre de defectos de material y
fabricación durante un período de cinco [5] años desde la fecha de compra. Si se produce algún
defecto durante este período, póngase en contacto con FirePower para recibir asistencia y
aprovecharse de la garantía.
Para hacer una solicitud de Autorización de devolución de mercancía (RMA), sólo tiene que presentar
un formulario de incidencias en nuestro sitio web:
http://www.firepower-technology.com/support-resources/
FirePower-Technology, 5995 Avenida Encinas, Carlsbad, CA 92008 / FirePower-Technology.com
Page 11

10
INSTALLATION DE L'ALIMENTATION
RETRAIT DE L'ANCIENNE ALIMENTATION :
INSTALLATION DE LA NOUVELLE ALIMENTATION :
REMARQUE : l'installation de la nouvelle alimentation requiert l'emploi d'un tournevis cruciforme.
1. Mettez l'ancienne alimentation hors tension, puis débranchez le cordon d'alimentation secteur.
2. Débranchez tous les autres câbles du PC. Retirez les vis fixant le couvercle du PC, puis retirez le
couvercle du boîtier. L'apparence peut changer selon le boîtier de l'ordinateur.
3. Débranchez l'alimentation de tous les composants du PC et vérifiez que tous les connecteurs sont
débranchés.
4. Retirez les vis de fixation de l'ancienne alimentation du boîtier. Il devrait y avoir quatre vis à l'arrière
du châssis. Après avoir retiré toutes les vis, sortez précautionneusement l'alimentation du boîtier du PC.
Prenez garde à ne pas endommager les autres composants pendant cette opération.
REMARQUE : la raison principale de PAD (Panne au démarrage) de l'alimentation est une connexion
incorrecte ou mal branchée.
1. Positionnez votre nouvelle alimentation à la place qui lui est réservée dans le boîtier du PC et fixez-la
à l'aide des quatre vis prévues dans la partie arrière de l'alimentation.
2. Introduisez le connecteur ATX 24 broches dans le boîtier et branchez-le sur la carte mère.
3. Branchez les câbles d'alimentation du processeur à 8 broches (4+4 broches) à la carte-mère selon le
besoin. Si la carte mère est seulement munie d'une fiche de processus à 4 broches, branchez uniquement
la partie droite du connecteur à la carte-mère.
4. Branchez le connecteur de carte graphique à 6 broches à la fiche d'alimentation de votre carte vidéo. Si
la carte vidéo est équipée de plusieurs fiches, branchez un deuxième connecteur à 6 broches. Si elle est
équipée d'une fiche à 8 broches, servez-vous simplement des deux broches contiguës au connecteur
standard à 6 broches pour réaliser un connecteur à 8 broches.
5. Effectuez toutes les connections périphériques et SATA de votre disque dur et des lecteurs optiques.
6. Branchez tous les autres composants internes qui ont besoin de courant aux connecteurs appropriés,
tels que ventilateurs et/ou éclairage du boîtier.
7. Replacez le couvercle sur le boîtier du PC et fixez-le à l'aide des vis.
8. Branchez l’écran, le clavier, la souris, les haut-parleurs, l'imprimante et tous les autres périphériques
de votre ordinateur.
9. Branchez le cordon d'alimentation secteur principal à l'arrière de l'alimentation, mettez l'interrupteur
de l'alimentation en position « l », puis démarrez votre ordinateur à l'aide de l'interrupteur situé sur le
devant du boîtier du PC.
Page 12

11
DÉPANNAGE / GARANTIE ET PROCÉDURE DE RETOUR DU MATÉRIEL
Si vous rencontrez des problèmes avec votre nouvelle alimentation, veuillez suivre ces simples conseils
de dépannage ou consulter le fournisseur qui vous l'a vendue.
Avertissement: la manipulation d'appareils électriques peut mettre votre vie en danger. Si vous ne
connaissez pas la marche à suivre, veuillez consulter un professionnel. Vous ne devez en aucun cas
réutiliser votre alimentation électrique lorsque celle-ci présente des traces de fumée, des câbles
sectionnés ou qu’elle a reçu des projections de liquides.
Après l’installation d’une nouvelle alimentation, si le système ne redémarre pas, veuillez vérifier les
points suivants :
1. Assurez-vous que le câble d’alimentation secteur est correctement branché et que la prise électrique
murale est bien alimentée. [Effectuez un essai avec un autre appareil pour vérifier que la prise électrique
fonctionne bien.]
2. Vérifiez que l'interrupteur d'alimentation est en position « I ».
3. Vérifiez que tous les connecteurs de l'alimentation sont correctement branchés à la carte-mère et que
tous les connecteurs sont bien fixés et attachés.
4. Le câble de l'interrupteur d'alimentation du boîtier de l'ordinateur est-il correctement connecté à la
carte mère ?
5. Si le système ne s'allume toujours pas, débranchez toutes les cartes de la carte-mère et ne laissez que le
processeur et la mémoire RAM. Débranchez l'alimentation de partout, sauf de la carte-mère et du disque
dur. Essayez d'allumer l'ordinateur et regardez si le ventilateur de l'alimentation démarre.
6. S'il démarre, mettez l'ordinateur hors tension et branchez une autre carte ou un autre périphérique, puis
redémarrez jusqu'à ce qu'ils fonctionnent tous ou jusqu'à ce que vous découvriez celui qui pose problème.
OCZ-FTY550W 3 ans de garantie
Votre alimentation FirePower Fatal1ty 550W est couverte par la garantie de 3 ans des leaders du secteur.
Ce produit est garanti exempt de vices de matériaux et de fabrication pendant une période de trois [3]
ans à compter de sa date d’achat. En cas de défectuosité constatée pendant cette période, veuillez
contacter FirePower pour prendre conseil et bénéficier de votre garantie.
OCZ-FTY750W 5 ans de garantie
Votre alimentation FirePower Fatal1ty 550W est couverte par la garantie de 5 ans des leaders du secteur.
Ce produit est garanti exempt de vices de matériaux et de fabrication pendant une période de
cinq [5] ans à compter de sa date d’achat. En cas de défectuosité constatée pendant cette période, veuillez
contacter FirePower pour prendre conseil et bénéficier de votre garantie.
Pour solliciter la procédure de retour du matériel, il suffit d’en faire la demande sur notre site Internet
à l'adresse: http://www.firepower-technology.com/support-resources/
FirePower-Technology, 5995 Avenida Encinas, Carlsbad, CA 92008 / FirePower-Technology.com
Page 13

12
INSTALLAZIONE DELL’ALIMENTATORE
RIMOZIONE DELL'ALIMENTATORE PRECEDENTE:
INSTALLAZIONE DEL NUOVO ALIMENTATORE:
NOTA: Per montare il nuovo alimentatore è necessario un cacciavite a croce.
1. Spegnere l’alimentatore precedente e scollegare il cavo CA.
2. Scollegare tutti gli altri cavi dal PC. Rimuovere le viti che fissano la copertura del PC e quindi
rimuovere la copertura del case; le specifiche variano a seconda del design del case.
3. Scollegare l’alimentatore da tutti i componenti nel PC assicurandosi che tutti i connettori siano
scollegati.
4. Rimuovere le viti che fissano l’alimentatore da sostituire al case; normalmente ci sono quattro viti
sulla parte posteriore del case. Dopo aver rimosso tutte le viti, estrarre lentamente l’alimentatore dal case
del PC. Fare attenzione a non danneggiare altri componenti durante questa operazione.
NOTA: Il motivo principale di segnalazione DOA per alimentatore è un collegamento errato o non
completamente inserito.
1. Posizionare il nuovo alimentatore nell’apposito spazio nel case del PC e fissarlo serrando le quattro
viti nella parte posteriore dell’alimentatore.
2. Guidare il connettore ATX 24-pin attraverso il case e collegarlo alla scheda madre.
3. Collegare i cavi CPU 8-pin (4+4-pin) alla scheda madre secondo necessità. Se la scheda madre ha solo
un connettore CPU 4-pin, collegare solo il lato destro del connettore alla scheda madre.
4. Collegare il connettore scheda grafica 6-pin al connettore di alimentazione della scheda video. Se la
scheda video supporta più di un connettore, collegare un secondo connettore 6-pin. Se la scheda video è
dotata di un connettore 8-pin, utilizzare i due pin aggiuntivi a fianco al connettore 6-pin per formare un
connettore 8-pin.
5. Procedere collegando tutte le periferiche e i connettori SATA ai dischi rigidi e ai dischi ottici.
6. Collegare eventuali altri componenti interni che richiedano alimentazione al connettore appropriato,
es. ventole o illuminazione del case.
7. Riposizionare la copertura sul case del PC e fissarla con le viti. 8. Collegare lo schermo, la tastiera, il
mouse, gli altoparlanti, la stampante ed eventuali altre periferiche. 9. Collegare il cavo di alimentazione
CA principale nella parte posteriore dell’alimentatore, mettere l’interruttore dell’alimentatore in
posizione “I” e avviare il computer con il pulsante di accensione sulla parte anteriore del case del PC.
Page 14

13
RISOLUZIONE DEI PROBLEMI / GARANZIA E RMA
In caso di problemi con il nuovo alimentatore, verificare questi semplici passi di risoluzione dei problemi
o rivolgersi al rivenditore presso il quale è stato acquistato il prodotto.
Attenzione: La manipolazione di dispositivi elettrici può essere letale. Se non si è sicuri dei passi
effettuati, rivolgersi a un professionista. Se l’alimentatore ha sviluppato tracce di fumo, cavi rotti, o è
stato esposto a liquidi, non deve in alcun caso essere rimesso in funzione.
Se è stato installato un nuovo alimentatore e il sistema non si avvia più, verificare i seguenti passi:
1. Assicurarsi che l’ingresso CA sia inserito correttamente e che la presa della parete sia alimentata.
[Collegare un dispositivo diverso alla presa elettrica per verificare che funzioni correttamente.]
2. Assicurarsi che l’interruttore sull’alimentatore sia in posizione “I”.
3. Verificare che tutti i connettori dall’alimentatore siano correttamente collegati alla scheda madre e che
tutti i connettori siano inseriti completamente e bloccati.
4. Il cavo dell’alimentatore nel case del computer è collegato correttamente alla scheda madre?
5. Se il sistema ancora non si accende, scollegare tutte le schede dalla scheda madre, lasciando solo il
processore e la RAM. Scollegare l’alimentatore da tutto eccetto la scheda madre e il disco rigido. Provare
ad accendere il computer e vedere se la ventola dell’alimentatore si avvia.
6. Se si avvia, spegnere il computer e collegare un’altra scheda o periferica e riavviare fino a quando
tutte siano in funzione o si rileva l’elemento che causa il problema.
OCZ-FTY550W 3 anni di garanzia
Questa unità di alimentazione e raffreddamento è coperta da una garanzia di 3 anni all’avanguardia
nel settore. Questo prodotto è garantito per l’assenza di difetti di material e lavorazione per un
periodo di tre [3] anni dalla data d’acquisto. Se dovessero verificarsi dei difetti durante questo
periodo, contattare “FirePower” per ulteriore assistenza e per usufruire della garanzia.
OCZ-FTY750W 5 anni di garanzia
Questa unità di alimentazione e raffreddamento è coperta da una garanzia di 5 anni all’avanguardia
nel settore. Questo prodotto è garantito per l’assenza di difetti di material e lavorazione per un
periodo di cinque [5] anni dalla data d’acquisto. Se dovessero verificarsi dei difetti durante questo
periodo, contattare “FirePower” per ulteriore assistenza e per usufruire della garanzia.
Per posizionare una RMA [RMA] richiesta, si può semplicemente inviare un biglietto attraverso il nostro
sito web all'indirizzo: http://www.firepower-technology.com/support-resources/
FirePower-Technology, 5995 Avenida Encinas, Carlsbad, CA 92008 / FirePower-Technology.com
Page 15

14
УСТАНОВКА БЛОКА ПИТАНИЯ
ДЕМОНТАЖ СТАРОГО БЛОКА ПИТАНИЯ:
УСТАНОВКА НОВОГО БЛОКА ПИТАНИЯ:
ПРИМЕЧАНИЕ: Для установки нового блока питания вам понадобится крестообразная отвертка.
1. Отключите старый блок питания, затем отсоедините кабель питания АС.
2. Отсоедините все остальные кабели от ПК. Открутите винты, на которые крепится крышка системного
блока, и затем снимите ее с системного блока; особенности конструкции системного блока будут
различаться.
3. Отсоедините блок питания от всех компонентов ПК, убедитесь, что все разъемы отключены.
4. Открутите винты, на которые старый блок питания крепится к системному блоку; обычно это четыре
винта на задней части корпуса. После откручивания всех винтов медленно вытащите блок питания из
системного блока ПК. Будьте внимательны, чтобы не нанести повреждения другим компонентам во время
этой операции.
ПРИМЕЧАНИЕ: Одна из самых частых причин обращений в связи с неработоспособностью блока
питания при поступлении заключается в неудовлетворительной фиксации или недостаточной фиксации
разъемов.
1. Поместите новый блок питания в соответствующий отсек корпуса ПК и закрепите его четырьмя
винтами в тыльной части блока питания.
2. Протяните разъем 24-pin ATX через корпус ПК и подключите к материнской плате.
3. Подключите 8-контактные (4+4-конт.) силовые кабели к материнской плате по необходимости. Если на
материнской плате имеется только 4-контактная колодка ЦП, подключите к материнской плате только
правую сторону разъема.
4. Подключите 6-контактный разъем графической карты к гнезду для подключения питания на видеокарте.
Если видеокарта поддерживает более одного гнезда, подключите второй 6-контактный разъем. Если
видеокарта оснащена 8-контактным гнездом, используйте две дополнительных контакта помимо
стандартного 6-контактного разъема для получения 8-контактного разъема.
5. Продолжите подключение всех периферийных устройств и разъемов SATA к жестким дискам и
оптическим дисководам.
6. Подключите любые другие внутренние компоненты, для которых требуется питание, напр. вентиляторы
или подсветку корпуса, через соответствующие разъемы.
7. Установите на место крышку системного блока ПК и закрепите ее винтами.
8. Подключите дисплей, клавиатуру, мышь, колонки, принтер и любые другие периферийные устройства к
компьютеру.
9. Вставьте главные силовой кабель АС в тыльную часть блока питания, переключите выключатель в
положение I и далее запустите компьютер с помощью кнопки на передней части системного блока.
Page 16

УСТРАНЕНИЕ НЕИСПРАВНОСТЕЙ/ГАРАНТИЯ И ГАРАНТИЙНЫЙ ВОЗВРАТ
Если у вас возникли сложности с новым блоком питания, пожалуйста, выполните простые действия по
устранению неисправностей или проконсультируйтесь с продавцом, у которого вы приобрели изделие.
Внимание: Манипуляции с электрическими приборами могут представлять угрозу жизни. Если вам
незнакомы приведенные действия, пожалуйста, проконсультируйтесь у профессионала. Если из блока
питания идет дым, если у него поврежден кабель или на него была пролита жидкость, блок питания
запрещается включать при любых обстоятельствах.
Если после установки нового блока питания система перестала запускаться, пожалуйста, выполните
следующее:
1. Убедитесь, что силовой кабель правильно включен и в настенной розетке есть напряжение. (Попробуйте
подключить к розетке другое устройство, чтобы проверить ее работоспособность).
2. Убедитесь, что силовой выключатель на блоке питания находится в позиции I.
3. Проверьте, чтобы все разъемы от блока питания были правильно включены в материнскую плату и
чтобы все разъемы были полностью вставлены и зафиксированы.
4. Правильно ли подключен кабель от выключателя питания на корпусе компьютера к материнской плате?
5. Если система все так же не включается, отсоедините все карты от материнской платы, оставив только
процессор и оперативную память. Отключите питание от всего за исключением материнской платы и
жесткого диска. Попробуйте включить компьютер и посмотреть, запустится ли вентилятор блока питания.
6. Если запустился, выключите компьютер и вставьте одну из карт или периферию и далее снова запустите
компьютер, выполняя данное действие, пока все устройства не заработают или пока вы не обнаружите,
какое из них является источником проблемы.
OCZ-FTY550W 3-летняя гарантия
На блок питания производства
FirePower Fatal1ty 550W распространяется 3-летняя гарантия ведущего
производителя. Гарантируется, что данное изделие не будет иметь дефектов материала и
производственных дефектов в течение 3 (три) лет со дня приобретения. Если в течение данного периода
обнаружатся какие-либо дефекты, свяжитесь с
FirePower для получения дальнейшей поддержки и
воспользуйтесь вашей гарантией
.
OCZ-FTY750W
5-летняя гарантия
На блок питания производства
FirePower Fatal1ty 750W распространяется 5-летняя гарантия ведущего
производителя. Гарантируется, что данное изделие не будет иметь дефектов материала и
производственных дефектов в течение 5 (пять) лет со дня приобретения. Если в течение данного периода
обнаружатся какие-либо дефекты, свяжитесь с
FirePower для получения дальнейшей поддержки и
воспользуйтесь вашей гарантией
.
Для того чтобы подать заявку на гарантийный возврат, вы можете просто подать запрос через наш
веб-сайт на:
http://www.firepower-technology.com/support-resources/
FirePower-Technology, 5995 Avenida Encinas, Carlsbad, CA 92008 / FirePower-Technology.com
15
Page 17

電源据付
旧電源の取り外し:
注:新しい電源を取り付ける際、プラスネジ用ドライバが必要です。
新しい電源の取り付け:
1.今までの電源のスイッチをオフにして、AC電源コードを抜きます。
2.その他のケーブルは、すべてPCから外します。PCカバーを固定しているネジを外し、次にケースからカ
バーを外します。PCケースのデザインによって仕様が異なります。
3.PCの全コンポーネントから電源を外し、コネクタすべてを抜いてください。
4.今までの電源をケースに固定している、シャーシ裏の4本ネジを外します。ネジをすべて外した後、PCケ
ースからゆっくりと電源を取り出します。上記作業中、他のコンポーネントを傷つけないように注意してく
ださい。
注:PSUがDOAとして報告される唯一の理由は、接続が不適切か不十分なためです。
1.PCケースの適切な場所に新しい電源をセットし、電源裏側を4本ネジで固定してください。
2. 24ピンAT Xコネクタをケースに通し、マザーボードに接続してください。
3.必要に 応じて、8ピ ン( 4+4ピン)CPU電源ケーブルをマザーボードに取り付けます。マザーボードが4ピン
ジャックのみの場合、マザーボードにはコネクタ右側のみ接続してください。
4.6ピングラフィックスカードコネクタを、ビデオカードの電源ジャックに接続します。複数のジャックに対
応しているビデオカードの場合、二番目の6ピンコネクタに接続してください。ビデオカードに8ピンジャッ
クを搭載している場合、一般の6ピンコネクタ以外に2ピン追 加して、8ピンコネクタにしてください。
5.すべての周辺機器とSATAコネクタを、ハードドライブとオプティカルドライブに接 続する作業を進めて
ください。
6.
ファンやケース照明など、電源を必要とする他の内部コンポーネントを適切なコネクタに接続してくださ
い。
7.PCケースのカバーを交換し、ネジで留めてください。
8.ディスプレイ、キーボード、マウス、スピーカー、プリンタ、その他の周辺機器をPCに接 続します。
9.AC電源コードを電源背部に差し込み、電源のスイッチを“l”位置 にして、PCケース正面のスイッチを入
れてコンピュータを立ち上げます。
16
Page 18

トラブ ル シュー ティング /保証とRMA
新しい電源で問題が発生した場合、簡単トラブルシューティングステップでチェックするか、製品を購入した
販売店にお問い合わせください。
注意:電気デバイスの作業をしていると、命にかかわる事故につながる恐れがあります。ステップに慣れてい
ない場合、専門家にお問い合わせください。電源から煙の発生、ケーブルの切断、液体に濡らした場合など
は、決して再起動しないでください。
新しい電源を取り付けたのにPCが立ち上がらない場合、以下のステップでチェックしてください。
1.AC
コードを正しくコンセントに差し込んでいるか確認してください。[別のデバイスをコンセントに接続し、
正常に機能するか確認してください]
2.電源のスイッチが“l”位置に なっているか、確 認します。
3.電源のコネクタすべてが、マザーボードに正しく差し込まれていて、コネクタすべてを完全にセットし、ラッ
チしているか チェックします。
4.PCケースの電源スイッチのケーブルが、マザーボードに正しく接続されていますか?
5.それでもシステムが立ち上がらない場合、プロセッサとRAM以外のカードすべてを、マザーボードから取
り外してみます。マ ザー ボードとハ ードドライブ を 除き、電 源 を完全 に取り外します。PCを立ち上げ、電源ファ
ンが回転するか確認します。
6.回転した場合、PC
をシャットダウンして、別のカードか周辺機器にプラグを差し込み、すべてが機能するか
、あるいはトラブルの 原因となっているものを探り当てるまで、再 起 動を繰り返します。
I
OCZ-FTY550W 3 年保証
FirePower Fatal1ty 550WPSUは、業界随一を誇る3年保証です。本製品は、購入日から3年間にわたり
、材 料と製 品の不具合に対して保証します。不具合が発生した場合、補償を有効活用して、FirePower
にアド バイスを求めてください。
OCZ-FTY750W 5 年保証
FirePower Fatal1ty 550WPSUは、業界随一を誇る5年保証です。本製品は、購入日から5年間にわたり
、材 料と製 品の不具合に対して保証します。不具合が発生した場合、補償を有効活用して、FirePower
にアド バイスを求めてください。
RMA[返品保証]を請求する場合、弊社ウェブサイトからチケットを提出するだけでOKです。
http://www.firepower-technology.com/support-resources/
FirePower-Technology, 5995 Avenida Encinas, Carlsbad, CA 92008 / FirePower-Technology.com
17
Page 19

电源安装
移除旧电源:
备注:您需用十字的螺丝刀安装新电源。
安装新电源:
1. 关闭您的旧电源上的电源开关,然后拔下交流电电源线。
2. 从 PC 上断开所有其它电缆。取下电脑罩壳的固定螺丝,然后从电脑机箱上取下罩壳;具体
情况因电脑机箱设计而异。
3. 断开电源与电脑中的所有组件的连接,确保已拔下所有连接器。
4. 取下机箱上固定旧电源的螺丝,一般机箱背后有四颗螺丝。取下所有螺丝后,慢慢地把电源
从个人电脑机箱中取出。小心在此过程中不要损坏任何其它组件。
备注:将 PSU 报告为 DOA 的一个最常见原因是连接不正确或未充分接牢。
1. 把新电源放进个人电脑机箱中的合适位置,并把四颗螺丝旋进电源背部,固定住电源。
2. 把 24 针 ATX 连接器穿过机箱,与主板连接。
3. 根据需要将 8 针(4+4 针)CPU 电源电缆连接到主板。如果您的主板只有 4 针 CPU 插孔,
则仅将连接器的适当面连接到您的主板。
4. 将 6 针显卡连接器连接到您视频卡的电源插孔。如果视频卡支持一个以上插孔,则连接第二
个 6 针连接器。如果视频卡装有 8 针插孔,则使用常规 6 针连接器旁边的另外两针,构成 8 针
连接器。
5. 继续把所有外部和 SATA 连接器连接到硬盘和光驱动上。
6. 把需要用电的任何其它内部组件连接到相应的连接器上,如风扇和/或机箱指示灯。
7. 把罩壳装回到电脑机箱上并用螺丝固定。
8. 把显示器、键盘、鼠标、扬声器、打印机和任何其它外设连接到电脑上。
9. 将主交流电电源线插入到电源的背面,将电源上的开关转动到“l”位置,然后使用您的电脑机
箱前面的开关启动您的计算机。
18
Page 20

故障诊断/产品保修和退货授权
如果新电源发生任何问题,请核对这些简单的故障诊断步骤,或咨询出售产品的经销商。
注意事项:操作电器设备可能有生命危险。如果您不熟悉这些步骤,请咨询专业人员。如果电源
有冒烟现象,电缆折断,或电源接触过液体,那么在任何情况下都不能再度使用。
如果您安装新电源后,系统不再启动,那么请检查以下步骤:
1. 确保正确插入交流电输入端,且墙壁插座有电。[把另一个器件插入电源插座,看它是否正常
工作。]
2. 确保电源上的电源开关处于“l”位置。
3. 检查电源上的所有连接器是否都正确插入主板,以及所有连接器是否都充分接牢且锁上。
4. 计算机机箱电源开关上的电缆是否正确插入主板?
5. 如果系统仍无法打开,请从主板上拔下所有卡,只剩下处理器和 RAM。断开所有组件(主板
和硬盘驱动器除外)的电源连接。尝试打开计算机,查看电源风扇是否启动。
6. 如果启动,则关闭计算机并插入另一个卡或外设,随后重新启动,直到所有组件均正常运行,
或检测到一个导致发生问题的项目为止。
OCZ-FTY550W 3 年保修
FirePower Fatal1ty 550W PSU 有业内领先的三年保修服务。自购买产品之日起三[3] 年,产品保证
没有材 质和工艺上的缺陷。如果在此期间发生任何缺陷,请联络 FirePower Technology获得进一
步协助,并运用您的保修权。
OCZ-FTY750W 5 年保修
FirePower Fatal1ty 750W PSU 有业内领先的五年保修服务。自购买产品之日起五[5] 年,产品保证
没有材 质和工艺上的缺陷。如果在此期间发生任何缺陷,请联络 FirePower Technology获得进一
步协助,并运用您的保修权。
如需提出退货授权 [RMA] 申请,您只需通过我们的网站提交一份申请单,网址是:
http://www.firepower-technology.com/support-resources/
FirePower-Technology, 5995 Avenida Encinas, Carlsbad, CA 92008 / FirePower-Technology.com
19
 Loading...