


the heart of your home
INSTALLATION AND OPERATOR’S HANDBOOK
FOR THE FIRENZO INSERT FIRES
Please read this booklet, for the safe installation and operation of your
DECO RURAL SD
OR
PLAZA RURAL SD
The Appliance and Flue System must be installed in accordance with AS/NZS2918. Consult
with the Building Authority having jurisdiction to obtain a permit prior to commencing the
installation. Failure to follow these instructions may also void your fire insurance and
warranty.
This unit has been tested to Appendix E & B of the joint Australia/New Zealand
Standard 2918:2001.

Please leave this manual with the owner after installation
Your warranty card is enclosed and may be completed and returned to us.
INDEX
PAGE: ITEM:
3 1 Warnings
4 Fascia & Floor Protector Dimensions
5 2 Floor Protector Requirements
6-12 3 Builtin Fire Canopy
13-14 Raised Builtin Fire Canopy
15 Builtin Fire – Cavity Chimney Termination
16 4 Pre-Installation
17 5 Assembly Instructions
18 6 Insert Flue System for Masonry Installation
19 Minimum Height of Flue System Outlet
20 Typical Insert Installation Diagram
21 7 Fascia Assembly & Installation
DIAGRAMS:
Page 4 Fascia & Floor Protector Dimensions
Page 6 Builtin Fire Canopy Dimensions
Page 7 Builtin Fire Canopy Assembly
Page 8-12 Builtin Fire Canopy Framing Guide
Page 13-14 Raised Builtin Fire Canopy Framing Guide
Page15 Cavity Chimney Termination
Page 18-19 Insert Flue System
Page 20 Typical Insert Installation Diagram
Edited 13/5/2011
Deco RU SD & Plaza RU SD Installation
2

1. WARNINGS
THIS APPLIANCE SHOULD BE MAINTAINED AND OPERATED AT ALL TIMES IN
ACCORDANCE WITH THESE INSTRUCTIONS.
The DECO RU SD and the PLAZA RU SD has been tested to N.Z. Standards AS/NZS
2918:2001.
If this heater is incorrectly installed a house fire may result. For your safety follow the
installation instructions carefully.
Do NOT connect the heater to a chimney serving another appliance.
Although the exterior of the heater may appear cool, contact with the unit may cause
burns; warn children and others of the possibility of injury should they touch the heater.
Do NOT dry clothing or unseasoned wood directly in contact with the heater.
Keep all household combustible materials at least 600mm away from front of the heater.
This includes clothing, furniture, wood, newspaper, plastic, matches, etc.
DO NOT USE FLAMMABLE LIQUIDS OR AEROSOLS IN THE VICINITY OF
THIS APPLIANCE WHEN IT IS OPERATING.
Use caution when reloading with fuel. Do NOT attempt to load fuel into the heater
when the fire inside the stove is at or near its peak.
Do NOT burn large quantities of paper or combustible material that would create an
extremely hot/quick fire.
Do NOT burn highly coloured paper or brochures (junk mail).
USE ONLY DRY WOOD. AVOID BURNING WET OR GREEN WOOD.
THE USE OF SOME TYPES OF PRESERVATIVE TREATED WOOD AS A FUEL
CAN BE HAZARDOUS.
TIMBER TREATED WITH COPPER CHROMIUM AND ARSENIC TYPE
PRESERVATIVES WILL LEAVE TOXIC RESIDUES IN THE ASH, FIREBOX OR
WITHIN THE FLUE; TIMBER OFFCUTS FROM BUILDING CONSTRUCTION WILL
OFTEN CONTAIN BORIC SALTS. THE COMBUSTION OF THIS MATERIAL OVER
PROLONGED PERIODS CAN PRODUCE ADVERSE EFFECTS ON REFACTORY
LINING IN SOLID FUEL APPLIANCES. EMISSION OF POISONOUS GASES CAN
ALSO BE EXPERIENCED WITH THE BURNING OF TREATED WOOD.
Driftwood with salt content will also cause rapid deterioration of the heater and should not be
used.
Deco RU SD & Plaza RU SD Installation
3

FLOOR PROTECTOR & FASCIA
DIMENSONS
Dimensions based on
a 40mm floor protector
height.
Mantel Shelf: In a Masonry
shelf 600mm. Using a Firenzo Double Shield Deflector this can be reduced to 290mm.
Installing in an Inbuilt Fire Canopy
clearance from the fascia to a non-combustible mantel is 500mm.
Fireplace minimum height above fascia to a combustible mantel
it can NOT have a combustible mantel. The minimum
PLAZA
RU SD
DECO
RU SD
Deco RU SD & Plaza RU SD Installation
4
All measurements in mm
.

2. FLOOR PROTECTOR REQUIREMENTS
If the heater is to be placed on or within 500mm of a heat sensitive floor, an insulated floor
protector will be required.
The insulated floor protector needs to extend under the heater and in front of the door. See
dimensions for floor protector. Similarly a 200mm extension is required on each side of the
door opening unless the insulated floor protector forms an abutment with a wall or heat shield
at a lesser distance.
The heater and floor protector must be fixed to the floor for seismic restraint. Anchor
points are provided in the feet of the unit.
40mm
consisting of
INSULATED FLOOR PROTECTOR CONSTRUCTION
An
Insulated
20mm of an approved insulation material material i.e. 2 sheets of 10mm micorboard or
superlux, 10mm tile backing board and 10mm tiles or similar on the top surface. All joints
on the upper surface should be sealed to prevent spilt ash from contacting any heat-sensitive
material.
HEIGHT FROM FIRE BREAST
Level 520
20 460
40 330 (minimum)
Floor Protector shall consist of a minimum thickness of
FLOOR PROTECTOR DIMENSIONS
WHEN BEING INSTALLED IN A
FLOOR PROTECTOR DEPTH
INBUILT FLOOR PROTECTOR DIMENSIONS
WHEN INSTALLING IN A
MASONRY
BUILT IN FIRE CANOPY
FIRE PLACE
(ZERO CLEARANCE BOX)
HEIGHT FROM FIRE BREAST
40mm 500
A Built In Fire Canopy is required if the fire is not being installed into a
For Built In Fire Canopy installations see details on pages 6 to 14.
Deco RU SD & Plaza RU SD Installation
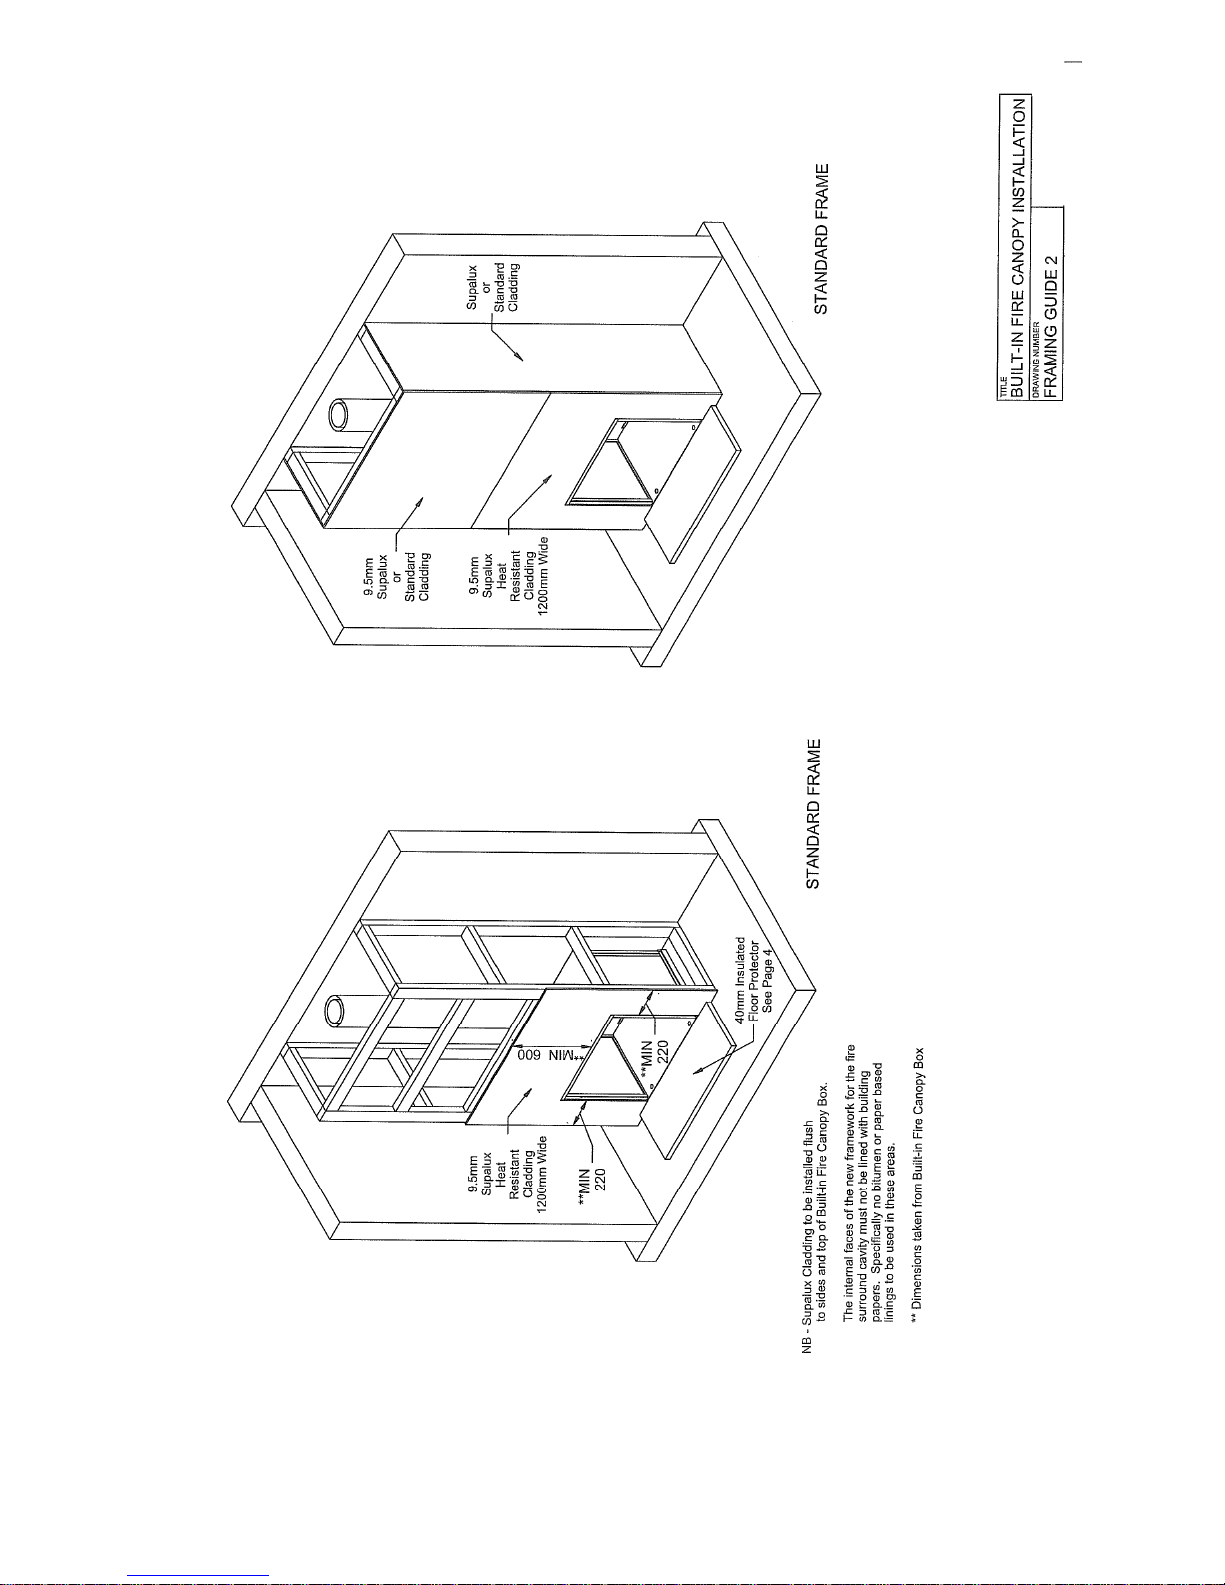
3. BUILT IN FIRE CANOPY
masonry fire place.
5

3. BUILT IN FIRE CANOPY
A Built In Fire Canopy is required if the fire is not being installed into a
masonry fire place.
For Built In Fire Canopy installations see the following pages 6,7,8,9,10,11,12,13,14.
Deco RU SD & Plaza RU SD Installation
6

Deco RU SD & Plaza RU SD Installation
7

BUILT IN FIRE CANOPY INSTRUCTONS
NON-MASONARY INSTALLATION
FOR
Deco RU SD & Plaza RU SD Installation
8
Deco RU SD & Plaza RU SD Installation
9

Deco RU SD & Plaza RU SD Installation
10

Deco RU SD & Plaza RU SD Installation
11

Deco RU SD & Plaza RU SD Installation
12

Deco RU SD & Plaza RU SD Installation
13

Deco RU SD & Plaza RU SD Installation
14

Built In Fire Canopy Instructions
Deco RU SD & Plaza RU SD Installation
15

4. PRE - INSTALLATION
(Refer diagram page 4)
IN A MASONRY FIREPLACE:
Before installing your Firenzo Insert it is important to check the condition of your masonry
chimney. Ensure any cracks are sealed, loose masonry repaired and the chimney swept.
Check the dimensions of your fireplace opening. Firebricks may need to be removed and the
floor of the opening should be level using mortar if necessary.
Ensure any gaps between the chimney face and fireplace surround are sealed with heat
resistant material.
MANTEL – Masonry Fireplace
If the mantel shelf is of a combustible material there should be a minimum distance above the
top of the fascia of 600mm. This may be reduced to 290mm provided a Firenzo
skinned heat shield is fitted under the mantel. Firenzo heat shields are available from your
Firenzo dealer.
MANTEL – using BUILT-IN FIRE CANOPY
Can NOT
have a combustible mantel, however if the mantel is made of a non heat sensitive
material then the minimum distance above the top of the fascia must be 500mm
SIDE SURROUNDS – MASONRY & BUILT IN FIRE CANOPY
Clearance between the fascia and any wooden surround must be 50mm providing the timber
protrudes no more than 100mm.
double
.
Deco RU SD & Plaza RU SD Installation
16

5. ASSEMBLY INSTRUCTIONS
1 Carefully remove all packaging.
2a If installation is into a MASONRY ENCLOSURE: Remove firebricks as necessary to fit
the firebox into the opening. The firebox front when installed must be flush with the
finished fireplace surround and on a level base of the same height as the finished floor
protector. This may be achieved by using a concrete mix to level the base.
2b If installation is into a BUILT-IN CANOPY: Construct the canopy box as per page 7
and install into framework following guides on pages 8-14 as applicable.
3 Slide the firebox into the opening so that the outer casing return folds are flush
with the finished fire surround.
4 DUE TO NEW ZEALAND BEING AN EARTHQUAKE PRONE COUNTRY, IT IS
IMPORTANT TO ANCHOR THE INSERT DOWN IN CASE OF EARTH
MOVEMENT. See diagram page 20 showing Typical Insert Installation.
5 Install Flue as per instructions on page 18 and 19 if installing in a masonry fireplace or
page 8,9,10,11,12, 15 if using a Built-in fire canopy (zero clearance box).
6 Now that the firebox and flue are in position,
(supplied) on top of casing.
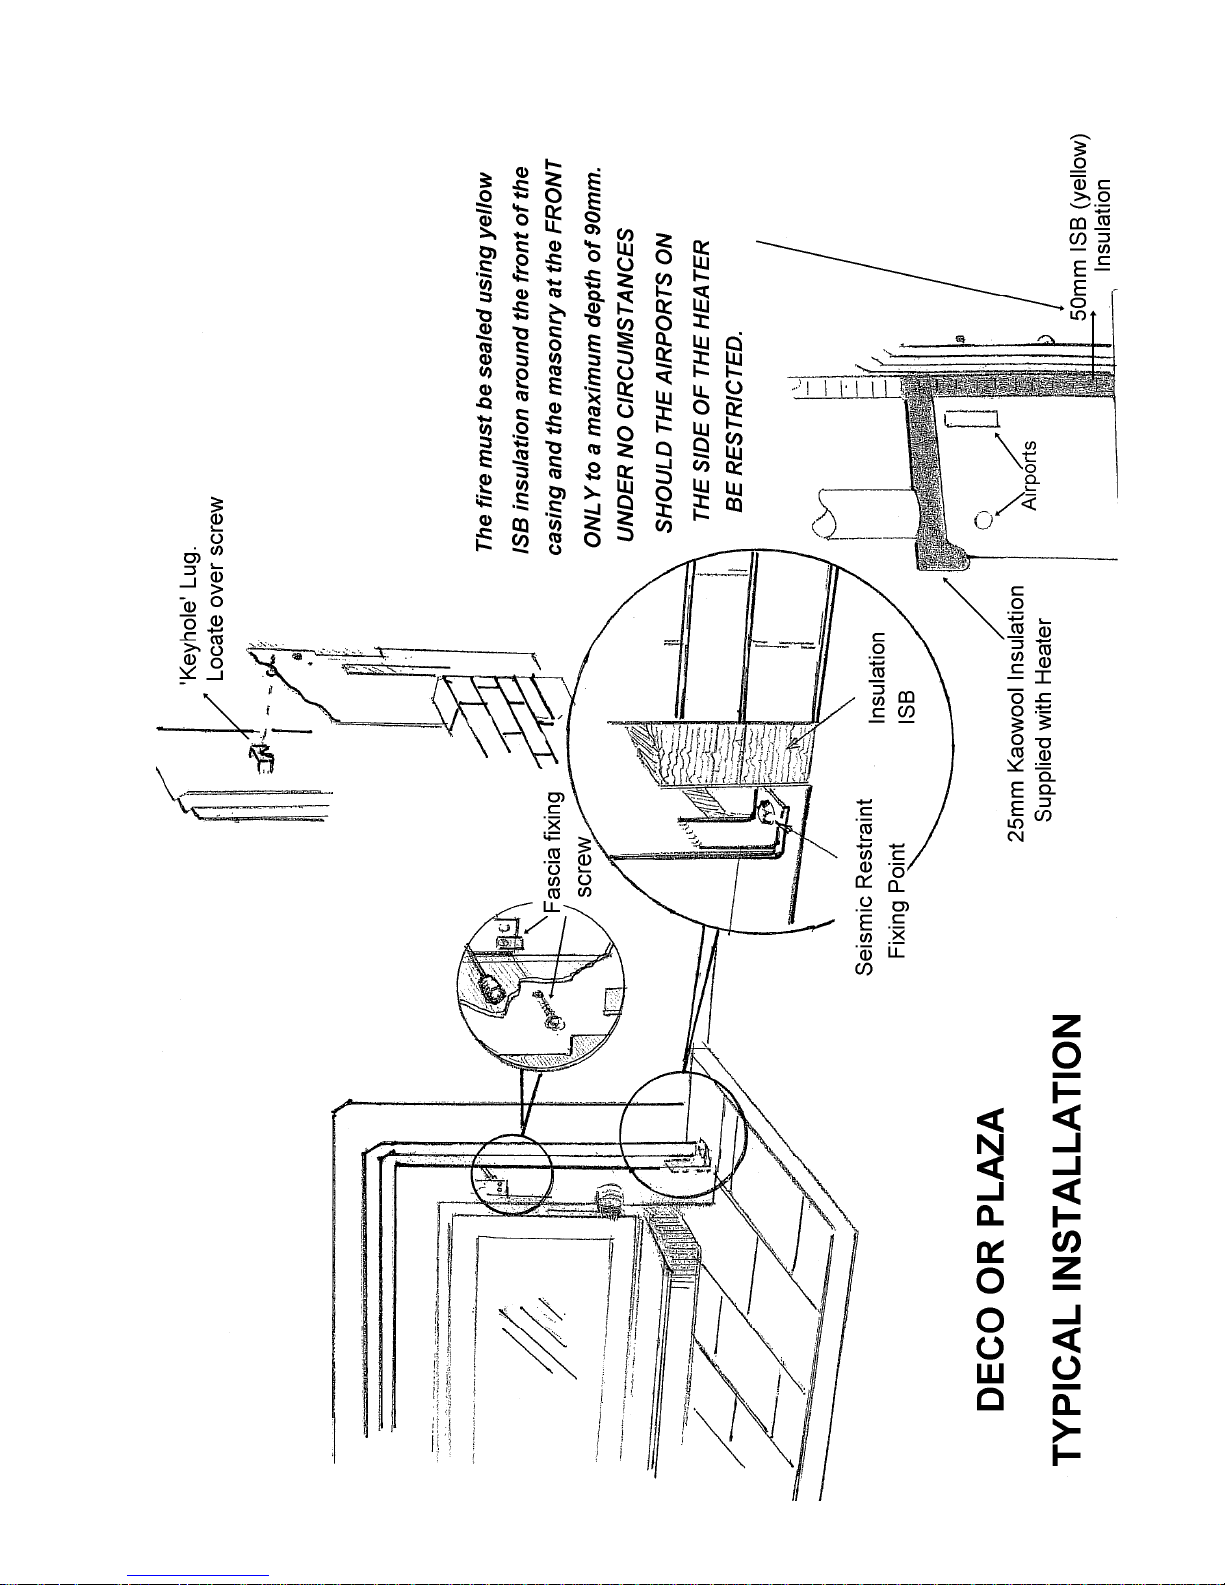
7 As this fire sources its combustion air from the chimney cavity/enclosure, the fire MUST
be sealed around the front between the casing and the masonry or inbuilt canopy. This is
achieved by packing the yellow ISB insulation supplied between the casing and the
masonry or inbuilt canopy at the FRONT ONLY to maximum depth of 90mm.
UNDER NO CIRCUMSTANCES SHOULD THE AIRPORTS ON THE SIDE
OF THE HEATER BE RESTRICTED. Refer diagram page 20.
The fire sources its combustion air from the chimney cavity, not from the room
where the fire is installed. This ventilation air should be drawn down the
chimney cavity from the air gap set up when the top spacer bracket holds the
weather collar off from the outer flue casing enabling air to be drawn into the
chimney cavity. Failure to ensure this air supply will starve the fire of air and
lead to poor performance.
8 Assemble and fit the fascia as per instructions on page 21.
NOTE
: In the case of some insert fires into existing masonry fireplaces it may be necessary to
install additional adventitious ventilation into the chimney cavity as per AS/NZ 2918
3.4.1.2 to assist air flow into the fire.. This ventilation should not be taken/drawn from
the room that the fire is installed in.
Deco RU SD & Plaza RU SD Installation
place 25mm white kaowool blanket
17

6. INSERT FLUE SYSTEM
For Installation in a Masonry Fireplace
WARNING; The appliance and flue system
must be installed in accordance with AS/NZS
2918:2001 and the appropriate requirements of
the relevant building code or codes.
1. Position heater in fireplace. Extend plumb
line from top of chimney, ensuring heater spigot
is in line with top of chimney. If not, flue pipe
offsets will be required.
2. Assemble flue pipes ensuring all seams are in
line and assembly is straight and tight with
crimped ends pointing downwards.
Secure flue pipes with at least 3 stainless steel
or monel rivets and seal.
3. Fasten chimney plate supplied onto the
chimney top. The chimney plate must be
weather sealed with silicone or mortar.
4. Install chimney liner on top of the chimney
plate.
5. Ensure flue pipe is extended over the
chimney liner by 180mm. Secure top spacer
bracket to the flue pipe and ensure slots fit
snugly inside the chimney liner.
6. Slide flashing cone over top of flue, until it
rests firmly over top spacer. Ensure ventilation
gap is not closed off. Secure with pop rivets or
self tapping screws.
7. Fit anti-down draught cowl. Do not secure
as it must be removed for cleaning.
CAUTION: Mixing of flue system components from different sources or modifying the
dimensional specifications of components may result in hazardous conditions. Where such action
is considered the flue manufacturer should be consulted in the first instance.
Refer also to notes on page 19 regarding height of flue system outlet.
Deco RU SD & Plaza RU SD Installation
18

Deco RU SD & Plaza RU SD Installation
19
Deco RU SD & Plaza RU SD Installation
20

7. FASCIA ASSEMBLY & INSTALLATION
DECO RU SD OR PLAZA RU SD
1 Remove screws fixed to lugs on firebox side.
2 Place single back plate against firebox and replace screws.
3 Fit lower grill over screws and tighten.
4 Place the keyhole brackets on the 3 plate fascia over the protruding screws on the
backplate to fit.
5 Locate the air control extrusion onto the control rod behind the fascia.
(Plaza requires only the knob to be fitted
6 Fit the ash lip lugs over the two 6mm screws on body and tighten.
(STEEL DOOR)
).
Deco RU SD & Plaza RU SD Installation
21

FIRENZO
FIRENZO
FIRENZOFIRENZO
WOODFIRES
by
HEWITSONS LIMITED
Manufacturers of:
Lady Kitchener
Contessa
Coaster
Bronte
Viking
Royale
Zealandia
Athena
Forte
Aqualux
68 Austin Street
Onekawa
PO Box 3231
Napier 4142
Phone: 06 8438260
Fax: 06 8430505
Deco RU SD & Plaza RU SD Installation
Website: www.firenzo.co.nz
Email:
hothouse@firenzo.co.nz
22
 Loading...