

Fire Magic 53816, 53825-T Fire Magic Trash Container- For Use With Clean And Cut Combo -53825-T Installation Manual

CUT & CLEAN COMBO
(CUTTING BOARD & TRASH CHUTE)
MODEL # 53816
INSTALLER: Leave these instructions with consumer.
CONSUMER: Retain for future reference.
Item Description Qty.
1. Cutting board 1
2. Trash chute top assembly 1
3. Stainless steel assembly 1
Trash chute bottom assembly
4.
w/ cover plate
1
1
2
3
REV 1 - 1809191315
4
Fig. 1-1
Robert H. Peterson Co. • 14724 East Proctor Avenue • City of Industry, CA 91746
1
L-C2-372

SPECIFICATIONS
Specification Value
A
Stainless steel assembly width 16
B
Stainless steel assembly depth 15
C
Trash chute top assembly height 10"
D
Trash chute bottom assembly height 5"
Specification Value
E
Cut-out width 9
F
Cut-out depth 4
1
/2"
1
/2"
ORIENTATION
1
/4"
1
/4"
Install if
applicable
C
A
E
B
Countertop cut-out
for trash chute
F
(countertop)
D
REV 1 - 1809191315
(knock-out)
2
(shown installed over a
Fire Magic built-in trash
container, not included)
L-C2-372
INSTALLATION
The Cut & Clean Combo was designed to be installed over
a trash can. A built-in trash container is available from your
Fire Magic dealer.
Ensure a trash can / container is properly installed into your
island, then proceed as instructed below.
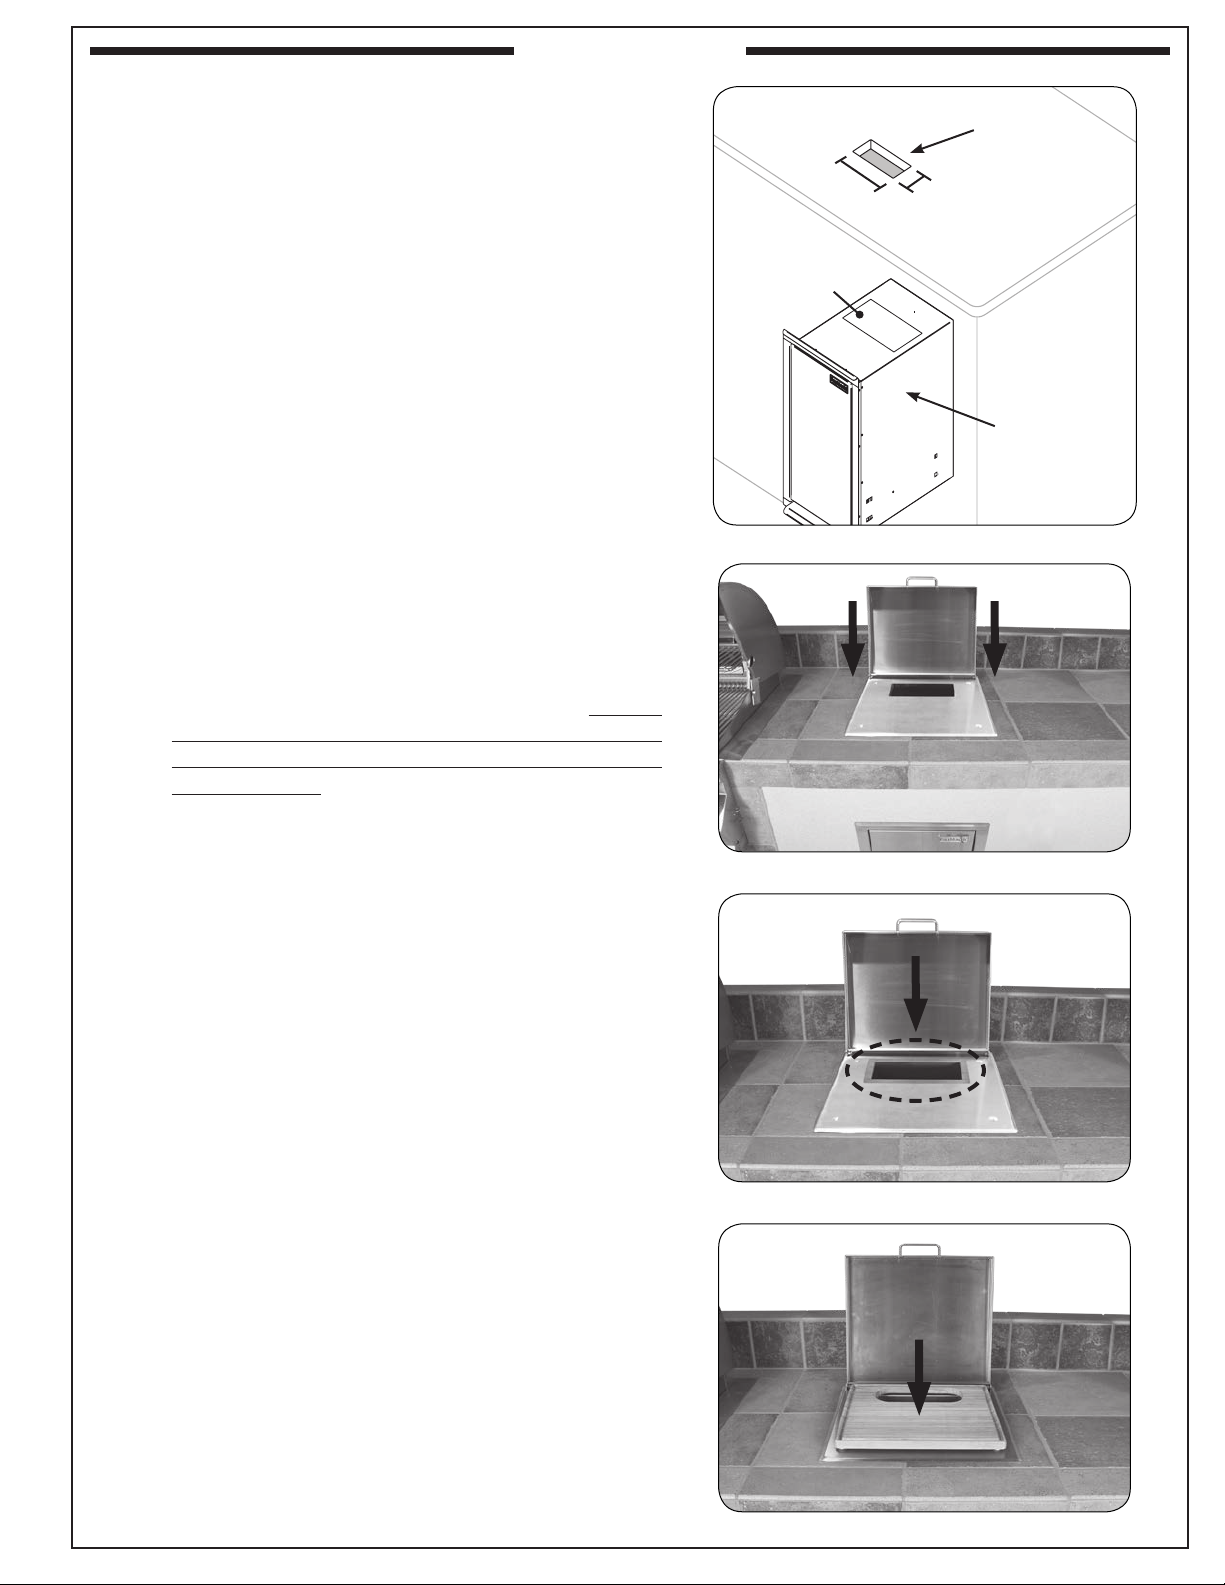
1. Determine the location on the countertop that the cutout (for the unit's trash chute) must be, based upon the
location of the trash can below (see Fig. 3-1).
Note: If your unit is to be installed over a Fire Magic built-in
trash container; the cut-out must be directly above
the opening found on the top of the trash container.
The opening on the trash container must first be
knocked-out. Fig. 3-1 illustrates this setup.
2. Once the countertop cut-out is created, drop the stainless
steel assembly into place (see Fig. 3-2). Use silicone to
secure the unit to the countertop.
3. Drop the trash chute top into place (see Fig. 3-3).
Note: If your unit is to be installed over a Fire Magic built-
in trash container; the trash chute top should drop
down toward the opening (knock-out) of the trash
container. The opening is larger than the trash chute
to allow for tolerance during installation. A trash
chute bottom assembly with cover plate is supplied
to close up any resulting gaps, and to link with the
trash chute top.
1
9
/2"
(knock-out)
Fig. 3-1 Countertop cut-out
41/2"
(countertop)
Countertop
cut-out for
trash chute
(shown
installed over
a Fire Magic
built-in trash
container, not
included)
Align the cover plate over the trash container opening
(knock-out) and carefully lower the top chute into the
bottom chute. Secure the cover plate by using silicone
or appropriate screws. Reference the orientation
drawing on the previous page.
4. Position the cutting board in place (see Fig. 3-4).
Fig. 3-2 Drop assembly into place
Fig. 3-3 Drop trash chute top into place
REV 1 - 1809191315
Fig. 3-4 Position cutting board in place
3
L-C2-372

CARE & CLEANING
The Cut & Clean Combo is exposed to raw foods and should
be cleaned after each use.
The cutting board and trash chute top are removable and
should be washed thoroughly. They are dish-washer safe.
The interior surfaces of the unit should also be cleaned
/ disinfected with soapy water or an appropriate kitchen
cleaner safe for stainless steel. Use caution not to treat the
interior of the unit with chemicals that may come in contact
with future food preparations. Always wipe with the grain.
The trash can below should be emptied regularly to prevent
the trash chute from backing up.
The exterior of the unit should be cleaned by first using
grill cleaner to remove grease and dirt. Always wipe with
the grain (see Fig. 4-1). Next, apply stainless steel polish
and wipe down using polish wipes to restore the stainless
steel color. Use caution not to treat the exterior of the unit
with chemicals that may come in contact with future food
preparations.
Wipe with
grain
Fig. 4-1 Clean exterior, wipe with grain
REV 1 - 1809191315
4
L-C2-372
 Loading...