

Page 1
GETTING STARTED
REFRIGERATOR
COMPACT
3598 Series
INSTALLATION AND
OWNER’S MANUAL
INSTALLER: Leave these instructions with consumer.
CONSUMER: Retain for future reference.
Important: READ THESE INSTRUCTIONS CAREFULLY BEFORE STARTING INSTALLATION OR USE.
KEEP THIS MANUAL IN A SAFE PLACE AFTER READING IT.
3598-DR model
shown
SAFETY PRECAUTIONS AND WARNINGS
Read all of the instructions before using this appliance.
When using this appliance, always exercise basic safety
precautions, including the following:
Note: If the refrigerator has been placed in a horizontal
or tilted position for any period of time, wait 24
hours before plugging the unit in.
1. Use this appliance only for its intended purpose as
described in this owner's manual.
2. This refrigerator must be properly installed in
accordance with the installation instructions before it is
used. See grounding instructions in the ELECTRICAL
SAFETY INFORMATION section.
3. Never unplug the refrigerator by pulling on the power
cord. Always grasp the plug fi rmly and pull straight
out from the outlet.
4. Any electric service cords that may have become
frayed or damaged MUST be repaired or placed
immediately. Do not use a cord that shows any cracks
or abrasion damage along its length, the plug, or the
connector end.
5. Unplug the refrigerator before cleaning or making
any repairs.
Note: If this product requires any service, it must be
performed by a qualifi ed professional service
technician.
CAUTION - Risk of Fire or Explosion
Dispose of property in accordance with Federal or Local
Regulations. Flammable refrigerant used.
6. DANGER: Risk of Fire or Explosion. Flammable
refrigerant used. Do not use mechanical devices to
defrost refrigerator. Do not puncture refrigerant tubing.
7. If your refrigerator is not being used, it is recommended
to remove the door and leave the shelves in place.
This will reduce the possibility of danger to children.
8. Do not operate this refrigerator in the presence of
explosive fumes.
9. This refrigerator is designed for freestanding or
recessed installation.
10. Do not use where the supply voltage is different from
the unit's requirements.
11. WARNING: If the instructions are not observed,
serious injury or death may result.
12. Before installing the product, read the installation
manual in full. The manual contains detailed
instructions to be observed during installation. If you
have any questions about installation, contact your
dealer.
13. Save these instructions.
IMPORTANT
Do Not Return This Product To
The Store
If you have a problem with this
product, please contact the
nearest Fire Magic Dealer.
For the name of nearest dealer
call 626-369-5085
Refrigerator
LISTED
115V~ 60Hz
Made in China
REV 0 - 1710200745
Robert H. Peterson Co. • 14724 East Proctor Avenue • City of Industry, CA 91746
1
L-C2-520
Page 2
COMPACT
RÉFRIGÉRATEUR
Série 3598
INSTALLATION ET
LE MANUEL DU PROPRIÉTAIRE
INSTALLATEUR: Laissez ces instructions avec le
consommateur.
CONSOMMATEUR: Conservez pour référence ultérieure.
Important: LISEZ CES INSTRUCTIONS ATTENTIVEMENT AVANT DE COMMENCER L'INSTALLATION
OU L'UTILISATION. GARDEZ CE MANUEL DANS UN LIEU SÉCURISÉ APRÈS LE LECTURE.
PRÉCAUTIONS DE SÉCURITÉ ET AVERTISSEMENTS
Modèle 3598-DR
montré
Lisez toutes les instructions avant d'utiliser cet appareil.
Lorsque vous utilisez cet appareil, faites toujours des
précautions de sécurité de base, y compris les suivantes:
Remarque: Si le réfrigérateur a été placé dans
une position horizontale ou inclinée
pendant une période quelconque,
attendez 24 heures avant de brancher
l'appareil.
1. Utilisez cet appareil uniquement pour l'usage prévu,
tel que décrit dans le présent manuel d'utilisation.
2. Ce réfrigérateur doit être correctement installé
conformément aux instructions d'installation avant
d'être utilisé. Voir les instructions de mise à la terre dans
la section ELECTRICAL SAFETY INFORMATION.
3. Ne jamais débrancher le réfrigérateur en tirant sur
le cordon d'alimentation. Toujours saisir fermement
la fi che et tirer tout droit de la sortie.
4. Tout cordon de service électrique qui pourrait être
effi loché ou endommagé DOIT être réparé ou placé
immédiatement. N'utilisez pas un cordon qui présente
des fi ssures ou des dégâts d'abrasion sur toute sa
longueur, la fi che ou l'extrémité du connecteur.
5. Débranchez le réfrigérateur avant de nettoyer ou de
faire des réparations.
Remarque: Si ce produit nécessite un service, il doit
être exécuté par un technicien de service
professionnel qualifi é.
ATTENTION - Risque d'incendie ou d'explosion
Éliminer les biens conformément aux règlements fédéraux
ou locaux. Liquide frigorigène infl ammable utilisé.
6. DANGER: Risque d'incendie ou d'explosion. Liquide
frigorigène infl ammable utilisé. N'utilisez pas de
dispositifs mécaniques pour dégivrer le réfrigérateur.
Ne pas percer les tubes de réfrigérant.
7. Si votre réfrigérateur n'est pas utilisé, il est
recommandé d'enlever la porte et de laisser les
étagères en place. Cela réduira la possibilité de
danger pour les enfants.
8. N'utilisez pas ce réfrigérateur en présence de vapeurs
explosives.
9. Ce réfrigérateur est conçu pour une installation
autonome ou encastrée.
10. Ne pas utiliser lorsque la tension d'alimentation est
différente des exigences de l'unité.
11. ATTENTION: Si les instructions ne sont pas
observées, des blessures graves ou mortelles peuvent
en résulter.
12. Avant d'installer le produit, lisez le manuel d'installation
en entier. Le manuel contient des instructions
détaillées à respecter lors de l'installation. Si vous
avez des questions concernant l'installation, contactez
votre revendeur.
13. Enregistrez ces instructions.
IMPORTANT
Ne retournez pas ce produit à
la boutique
Si vous avez un problème avec
ce produit, contactez le revendeur
Fire Magic le plus proche.
Pour le nom du concessionnaire
le plus proche appelez le
626-369-5085
Réfrigérateur
LISTÉ
115V~ 60Hz
Fabriqué en Chine
REV 0 - 1710200745
2
L-C2-520
Page 3

CONTENTS
GETTING STARTED
SAFETY PRECAUTIONS AND WARNINGS ........................................................................................ 1
IMPORTANT INFORMATION .................................................................................................................. 4
ELECTRICAL SAFETY INFORMATION ............................................................................................... 4
SPECIFICA TIONS AND DIMENSIONS ................................................................................................. 5
INSTALLATION REQUIREMENTS ........................................................................................................ 6
LOCATION ............................................................................................................................................... 6
USE OF EXTENSION CORDS ................................................................................................................ 6
PARTS LIST ................................................................................................................................................... 7
INSTALLATION
INSTALLATION ........................................................................................................................................... 8
UNPACK REFRIGERATOR ..................................................................................................................... 8
LOCATE REFRIGERATOR ..................................................................................................................... 8
LEVEL REFRIGERATOR ........................................................................................................................ 8
CONNECT POWER SUPPLY CORD ...................................................................................................... 8
ALIGN DOOR (if needed) ........................................................................................................................ 8
REVERSE DOOR HINGE (if needed) ...................................................................................................... 9
USE, CARE, & SERVICE
FEATURES AND USE ............................................................................................................................... 11
ADJUSTABLE TEMPERATURE DIAL .................................................................................................. 11
REFRIGERATOR INTERIOR SHELVES .............................................................................................. 11
WIRE CAN HOLDER COMPARTMENT ............................................................................................... 11
CRISPER ................................................................................................................................................ 11
LOCK AND KEY .................................................................................................................................... 11
NORMAL OPERATING SOUNDS .........................................................................................................11
CLEANING AND MAINTENANCE ......................................................................................................12
GENERAL CLEANING ..........................................................................................................................12
DOOR GASKETS ................................................................................................................................... 12
STAINLESS STEEL SURFACES (if applicable) ..................................................................................... 12
PORCELAINIZED SURFACES (if applicable) ...................................................................................... 12
MAINTENANCE .................................................................................................................................... 13
LIGHT ...................................................................................................................................................13
POWER INTERRUPTIONS ................................................................................................................... 13
VACATION AND MOVING CARE .........................................................................................................13
ENERGY SAVING TIPS .........................................................................................................................13
NOTES PAGE .............................................................................................................................................. 14
TROUBLESHOOTING .............................................................................................................................. 15
WARRANTY ............................................................................................................................................... 16
REV 0 - 1710200745
3
L-C2-520
Page 4
IMPORTANT INFORMATION
After removing the packing materials, check the appearance of the refrigerator for possible defects or irregularities.
If the product shows any irregularity in its appearance, contact the dealer to inquire about it.
All the packing materials should not be left within reach of children and should be disposed of responsibly.
For safety, the product should be installed and used with caution in accordance with this manual. Incorrect
installation or careless use of the product may cause damage or injury to the environment, humans, animals,
and/or materials and property. The manufacturer does not bear any responsibility for any damage or injury.
DANGER: Risk of child entrapment. Before you throw away your old refrigerator or freezer, take off the
doors. Leave the shelves in place so that children may not easily climb inside. If applicable,
keep the door(s) closed with lock secured.
The refrigerator should be leveled.
When moving the product using a hand truck or dolly, place the dolly at the side of the product and shut or fi x
the door tightly to avoid possible opening during movement.
CAUTION: The fi nished bottom should be protected with a suitable material to avoid possible damage when
moving the product.
The appearance, design, color, and parts of the product are subject to change without notice.
ELECTRICAL SAFETY INFORMATION
• To protect against electric shock, do not immerse cord or plugs in water or other liquid.
• Unplug from the outlet when not in use and before cleaning.
• CAUTION: Risk of Electric Shock - Dial in "0" position does not de-energize the unit.
• Do not operate appliance with a damaged cord, plug, or after the appliance malfunctions or has been
damaged in any manner. Contact the manufacturer for repair.
• Do not let the cord touch hot surfaces.
• Do not use appliance for purposes other than intended.
• Use only a properly wired and inspected 115VAC (15 AMP minimum) Ground Fault Circuit Interrupter
(GFCI) GROUNDED 3-wire receptacle with this appliance.
• The GFCI receptacle must be a WEATHER-PROOF IN-USE COVERED RECEPTACLE.
• Never remove the grounding plug or use with an adapter of 2 prongs.
• Do not use three prong adapters or cut off the third grounding prong in order to accommodate a two prong
outlet. This is a dangerous practice since it provides no effective grounding for the refrigerator and may
result in shock hazard.
• Use only extension cords with a 3 prong grounding plug, rated for the power of the equipment, and approved
for outdoor use with a W-A marking.
• The provisions of the National Electric Code as well as any local codes must be observed when
installing the product.
REV 0 - 1710200745
4
L-C2-520
Page 5
SPECIFICATIONS AND DIMENSIONS
Description Specifi cation
Input electrical requirements
Power consumption
Temperature setting range
Cooling type
115VAC / 15 Amp minimum / 60Hz / GFCI outlet
65-70W
32° F - 50° F
Compressor
Table 1 - Technical Data
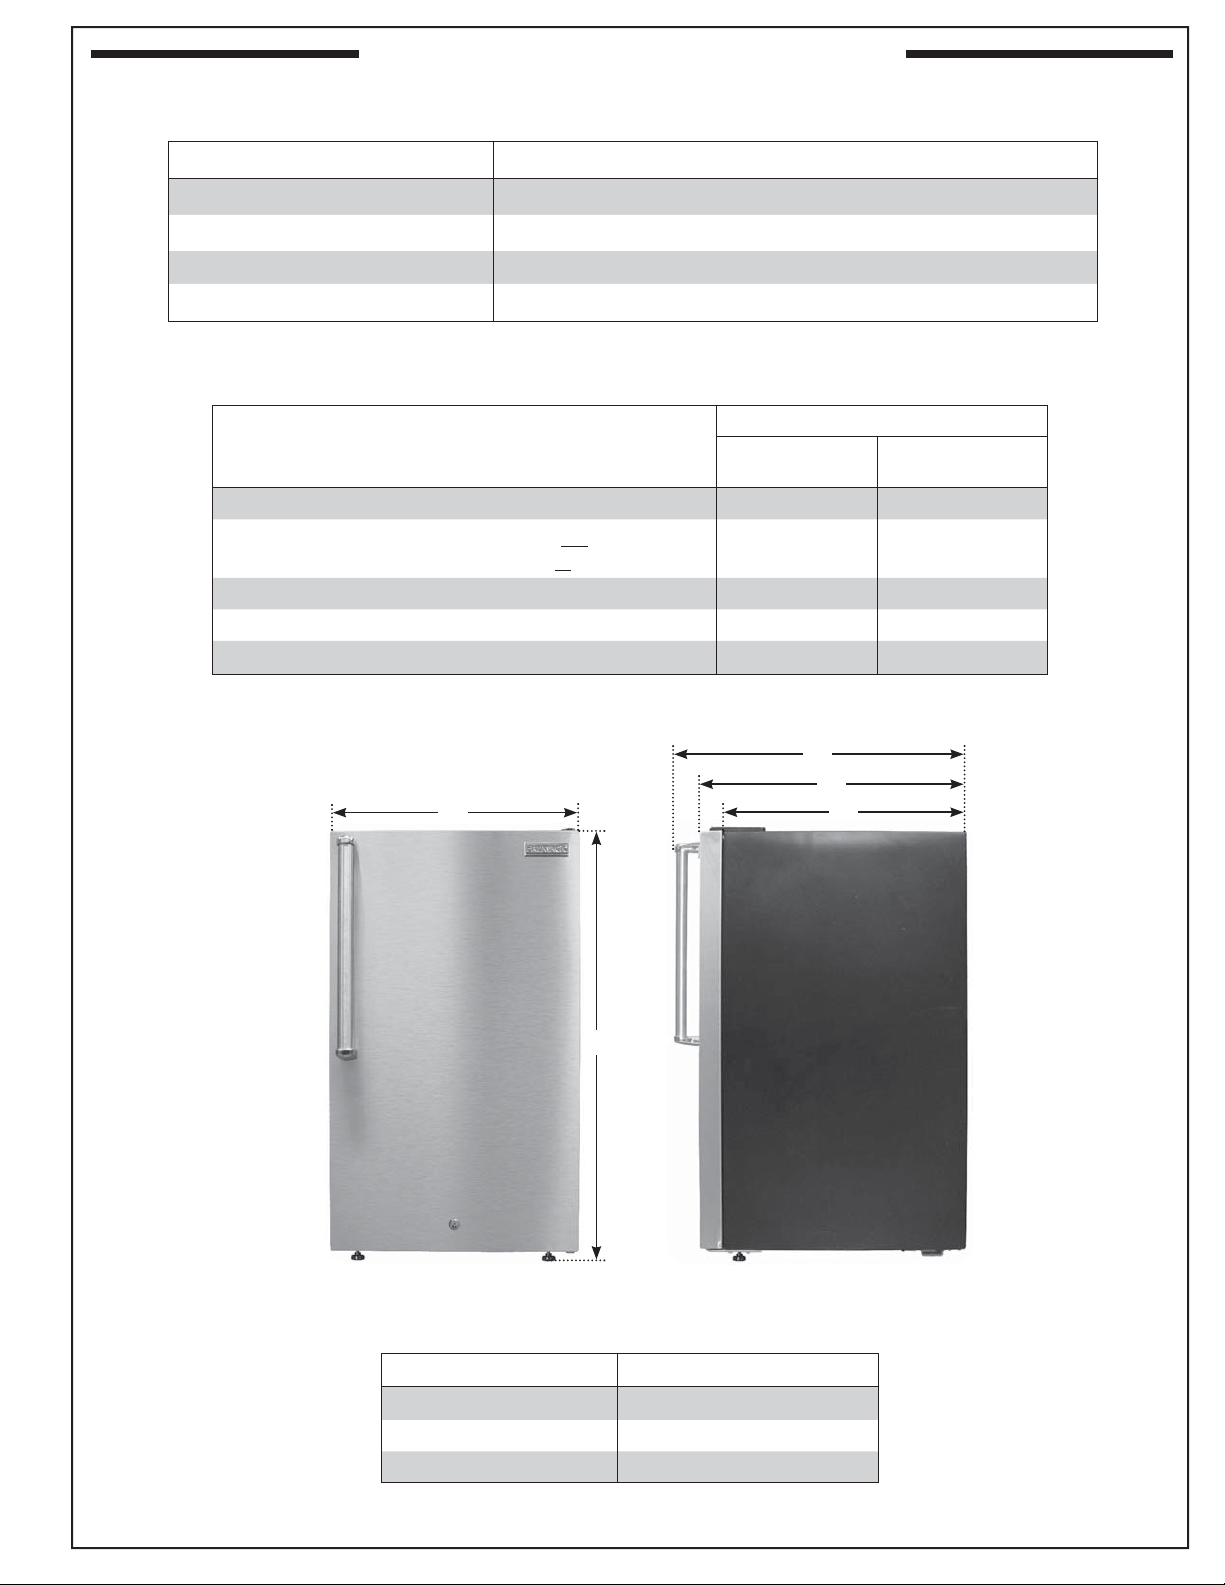
Refrigerator Models
3598
A Width (door closed) 18.9" 19"
B Height (maximum, leveler legs fully out)
Height (minimum, leveler legs fully in)
C Depth (body only) 19" 19"
D Depth (door closed) 21.25" 21.25"
E Depth (door closed) w/ bar handle *
If equipped
*
Table 2 - Product Dimensions
A
34"
33.25"
N/A
E*
D
C
3598-D(L,R)
3598H-D(L,R)
34"
33.25"
23.75"
3598-DR model
REV 0 - 1710200745
shown
B
Fig. 5-1 Product dimensions
Description Specifi cation
Sides
Top 2" (50mm)
Back 2" (50mm)
3
/4" (19mm)
Table 3 - Recommended Clearances
5
L-C2-520
Page 6

INSTALLATION REQUIREMENTS
LOCATION
Do not install this refrigerator in any location not properly insulated or heated, e.g. garage, etc. This refrigerator
was not designed to operate in temperature settings below 55° Fahrenheit.
Select a suitable location for the refrigerator on a hard even surface away from direct sunlight or any heat source,
e.g. radiators, baseboard heaters, cooking appliances, etc. Any fl oor unevenness should be corrected with the
leveling legs located on the front bottom corners of the refrigerator.
USE OF EXTENSION CORDS
Avoid the use of an extension cord because of potential safety hazards under certain conditions. If it is necessary
to use an extension cord, use only a 3-wire extension cord that has a 3-blade grounding plug and a 3-slot outlet
that will accept the plug. The marked rating of the extension cord must be equal to or greater than the electrical
rating of the appliance.
REV 0 - 1710200745
6
L-C2-520
Page 7

7
6
PARTS LIST
9
11
10
8
13
7
6
15
2
1
3
4
7
5
6
Item Description Part No. Qty.
Adjustable temperature control with light - 1
1.
Thermostat knob 3598-20 1
2.
Can holder compartment - 1
3.
Fixed door shelf (to accommodate 2-liter bottles) - 1
4.
Lock bracket - 1
5.
Keys (pair) 3598-21 1
6.
Adjustable front leveling legs (pair) 3598-22 1
7.
Crisper bin 3598-23 1
8.
Crisper bin glass cover 3598-24 1
9.
Slide-out glass shelf 3598-25 2
10.
Slide-out fl ip shelf (to accommodate tall bottles) 3598-26 1
11.
Upper door hinge assembly * 3598-27 1
12.
Upper door hinge cover 3598-28 1
13.
Lower door hinge assembly * 3598-29 1
14.
Door assembly w/ built-in top handle (reversible)
15.
Stainless steel door assembly w/ bar handle (left hinge)*
or
Stainless steel door assembly w/ bar handle (right hinge)*
or
Black Diamond Series door assembly w/ bar handle (left hinge)*
or
Black Diamond Series door assembly w/ bar handle (right hinge)*
or
* Not shown
3598-10
3598DL-10
3598DR-10
3598H-DL-10
3598H-DR-10
1
1
1
1
1
REV 0 - 1710200745
7
L-C2-520
Page 8

INSTALLATION
INSTALLATION
CAUTION: Risk of Fire or Explosion due to puncturing of refrigerant tubing. Flammable refrigerant used.
Handle with care when moving refrigerator to avoid either damaging the refrigerant tubing or
increasing the risk of a leak.
UNPACK REFRIGERATOR
Remove all packaging material. This includes the foam base and all adhesive tape holding the refrigerator
accessories inside and outside.
Inspect and remove any remains of packing, tape or printed materials before powering on the refrigerator.
LOCATE REFRIGERATOR
To ensure the refrigerator works at the maximum effi ciency it was designed for, install it in a location where
there is proper air circulation and electrical connections.
Important: When locating the refrigerator, be sure to follow all requirements and safety information in this
manual (see the SPECIFICATIONS AND DIMENSIONS and INSTALLATION REQUIREMENTS
sections).
LEVEL REFRIGERATOR
This refrigerator has two leveling legs which are located in the front bottom corners of the refrigerator. After
properly placing the refrigerator in its fi nal position, level the refrigerator.
Leveling legs can be adjusted by turning them counterclockwise to raise the refrigerator or by turning them
clockwise to lower the refrigerator. The refrigerator door will close easier when the leveling legs are extended.
CONNECT POWER SUPPLY CORD
Connect the cord coming from the appliance's power supply to a 115VAC (15 AMP minimum) GFCI GROUNDED
3-wire receptacle. The GFCI receptacle must be a WEATHER-PROOF IN-USE COVERED RECEPTACLE.
ALIGN DOOR (if needed)
1. Remove the top hinge cover.
2. Loosen the top hinge screws using a Phillips head screwdriver.
3. Adjust the door or put a spacer in between and then tighten the screws.
4. Replace the top hinge cover.
REV 0 - 1710200745
8
L-C2-520
Page 9

INSTALLATION (cont.)
REVERSE DOOR HINGE (if needed)
Note: Refrigerator doors on 3598(H)-D(R,L) models are not reversible.
1. Remove the top hinge cover.
2. Using a Phillips Head Screwdriver, loosen and remove the screws holding the top hinge in place.
3. Remove the top hinge and carefully lift off the door.
4. Remove the screw hole plugs from the opposite side and insert the plugs in the screw hole openings of
the just removed screws.
5. Remove any loose items in the refrigerator and carefully turn refrigerator on its back and place in a secure
area.
6. Loosen the screws holding the lower hinge bracket to the refrigerator and remove the screws and bracket.
7. Remove (2) screws from the other side and insert in the previously removed screw holes.
8. Remove door pin by turning counter-clockwise and reinsert to the underside of the bracket and tighten.
9. Align the bracket and insert (2) remaining screws into the holes provided.
10. Align the hole in the door with the door pin and washer and gently push down until fi rm.
11. Align the upper hinge bracket with the screw holes, then insert screws and partially secure. Check that the
door and cabinet are properly aligned, then secure tightly.
12. Replace the hinge cap.
Note: The door gets pressed in during shipping and may cause the door gasket from fully expanding to a
proper seal. After reversing the door, the gasket may need to be reset. This is done to prevent the cool
refrigerated air from escaping. If there is a gap between the door gasket and the cabinet, set the gasket
by gently pulling it out to seal the gap.
Note: Wait 24 hours before plugging the unit in.
REV 0 - 1710200745
Tur n
Fig. 9-1 Reverse door hinge
9
L-C2-520
Page 10

CARACTÉRISTIQUES ET UTILISATION
DIAL DE TEMPERATURE RÉGLABLE
Le réfrigérateur maintiendra automatiquement le niveau de
température que vous choisissez. Le sélecteur de température
a 7 réglages plus "0". "7" est le plus froid, "1" est le plus chaud,
et "0" est zéro refroidissement. Au début, régler la molette sur
"4" et laisser passer 24 heures avant de régler la température
à la température désirée.
ATTENTION: Le cadran réglé sur "0" ne désactive pas
l'unité.
ÉTAGÈRES INTÉRIEURES DE RÉFRIGÉRATEUR
Pour retirer ou remplacer une étagère à glissière:
• Inclinez doucement l'étagère et faites-la glisser vers
l'extérieur jusqu'à ce que l'étagère soit complètement
enlevée.
• Pour remplacer l'étagère, faites glisser doucement
l'étagère.
Pour utiliser la tablette pivotante:
Il suffi t de basculer l'étagère comme indiqué sur la Fig. 10-2.
Ceci est conçu pour donner un stockage supplémentaire pour
les grandes bouteilles.
COMPOSITION DE PORTE-PORTE
Le réfrigérateur est équipé d'un compartiment de porte-fi l
pratique. Le compartiment contient jusqu'à cinq boîtes. Il suffi t
de charger des canettes en haut. Pour distribuer une boîte,
tirez une en bas du bas.
Cadran de température
Fig. 10-1 Cadran de température réglable
Étagère à
glissière
Étagère
en verre
coulissante
Fig. 10-2 Étagères intérieures
Compartiment
porte-fi l
TIROIR
Le réfrigérateur est équipé d'un tiroir plus fi n. Pour ouvrir le
tiroir, agripper fermement la poignée et tirer vers l'extérieur.
Faites glisser de nouveau pour fermer le tiroir-bac.
VERROUILLAGE ET CLÉ
Pour l'utiliser, insérez la clé et tournez dans le sens des aiguilles
d'une montre pour verrouiller, et tournez dans le sens inverse
des aiguilles d'une montre pour déverrouiller.
SONS DE FONCTIONNEMENT NORMAL
Les sons suivants sont une partie normale de l'opération:
• L'eau bouillante, les sons gargouillis ou les légères
vibrations qui résultent du fait que le fl uide frigorigène
circule dans les serpentins de refroidissement.
• Le contrôle du thermostat cliquera quand il sera activé
ou désactivé.
Fig. 10-3 Compartiment porte-fi l
Fig. 10-4 Tiroir
REV 0 - 1710200745
10
Fig. 10-5 Verrouillage et clé
L-C2-520
Page 11

USE, CARE, & SERVICE
FEATURES AND USE
ADJUSTABLE TEMPERATURE DIAL
The refrigerator will automatically maintain the temperature
level you select. The temperature dial has 7 settings plus "0".
"7" is the coldest, "1" is the warmest, and "0" is zero cooling.
At fi rst, set the dial to "4" and allow 24 hours to pass before
adjusting the temperature to your desired temperature.
CAUTION: The dial set to "0" does not de-energize the
unit.
REFRIGERATOR INTERIOR SHELVES
To remove or replace a slide-out shelf:
• Gently tilt the shelf up and slide outward until the shelf has
been completely removed.
• To replace the shelf, gently slide the shelf back.
To use the slide-out fl ip shelf:
Simply fl ip the shelf as shown in Fig.11-2. This is designed to
give extra storage for tall bottles.
Temperature dial
Fig. 11-1 Adjustable temperature dial
Slide-out
fl ip shelf
Slide-out
glass shelf
WIRE CAN HOLDER COMPARTMENT
The refrigerator is equipped with a convenient wire can holder
compartment. The compartment holds up to fi ve cans. Simply
load cans from the top. To dispense a can, draw one out from
the bottom.
CRISPER
The refrigerator is equipped with a crisper bin. To open the
crisper bin, grab the handle fi rmly and pull outward. Slide back
in to close the crisper bin.
LOCK AND KEY
To use, insert the key and turn clockwise to lock, and turn
counter-clockwise to unlock.
NORMAL OPERATING SOUNDS
The following sounds are a normal part of operation:
• Boiling water, gurgling sounds or slight vibrations that are
the result of the refrigerant circulating through the cooling
coils.
Fig. 11-2 Interior shelves
Wire can holder
compartment
Fig. 11-3 Wire can holder compartment
• The thermostat control will click when it cycles on and off.
REV 0 - 1710200745
11
Fig. 11-4 Crisper bin
Fig. 11-5 Lock and key
L-C2-520
Page 12

CLEANING AND MAINTENANCE
All the exterior parts and interior parts of the product should be kept clean.
The refrigerator should be cleaned periodically. If the refrigerator is kept clean, its lifespan will be extended.
Regular cleaning should be performed at least once a year; twice a year is recommended.
CAUTION: Before service or cleaning is performed, ensure the dial is set to "0", the power supply is
disconnected, and all components of the unit are completely cool.
WARNING: To avoid electric shock, always unplug your refrigerator before cleaning. Ignoring this warning may
result in death or injury.
CAUTION: Before using cleaning products, always read and follow manufacturer's instructions and warnings
to avoid personal injury or product damage.
GENERAL CLEANING
Prepare a cleaning solution of 3-4 tablespoons of baking soda mixed with warm water. Use sponge or soft cloth,
dampened with the cleaning solution, to wipe down your refrigerator.
Rinse with clean warm water and dry with a soft cloth.
Do not use harsh chemicals, abrasives, ammonia, chlorine bleach, concentrated detergents, solvents or metal
scouring pads. Some of these chemicals may dissolve, damage and/ or discolor your refrigerator.
DOOR GASKETS
Clean door gaskets every three months using cleaning solution and non-abrasive cloths or pads. Gaskets must
be kept clean and pliable to ensure a proper seal.
Petroleum jelly applied lightly on the hinge side of gaskets will keep the gasket pliable and ensure a good seal.
STAINLESS STEEL SURFACES (if applicable)
The exterior of the appliance should be cleaned by fi rst using stainless steel
cleaner to remove grease and dirt. Always wipe with the grain (see Fig. 12-1).
Next, apply stainless steel polish and wipe down using polish wipes to restore
the stainless steel color.
PORCELAINIZED SURFACES (if applicable)
Refrigerator doors that are porcelainized provide many years of trouble-free service.
These surfaces may be cleaned with non-corrosive oven/grill cleaner, following
manufacturer's instructions.
Fig. 12-1 Wipe with grain
Wipe with grain
REV 0 - 1710200745
12
L-C2-520
Page 13

CLEANING AND MAINTENANCE (cont.)
MAINTENANCE
DANGER: Risk of Fire or Explosion due to puncturing of refrigerant tubing. Flammable refrigerant
used. Do not use metal instruments to defrost refrigerator. Do not puncture refrigerant
tubing.
• All safety precautions must be followed.
• To be repaired only by a qualifi ed professional service technician.
LIGHT
To replace the bulb, carefully pull the plastic light cover to the left and
remove. Locate and unscrew the bulb and replace it with a new bulb
(use bulbs of 15 watts or less). Replace plastic light cover.
POWER INTERRUPTIONS
Occasionally there may be power interruptions due to
thunderstorms or other causes. Remove the power cord from
GFCI outlet when a power outage occurs. When power has been
restored, reconnect power cord to GFCI outlet. If outage is for a
prolonged period, inspect and discard spoiled or thawed food in
refrigerator. Clean refrigerator before reusing.
VACATION AND MOVING CARE
For long vacations or absences, empty food from refrigerator and
freezer, move the temperature dial to the "0" position and clean the
refrigerator and door gaskets (see previous page). Prop doors open,
so air can circulate inside. When moving, always move the refrigerator
vertically. Do not move with the unit lying down. Possible damage to
the sealed system could occur.
115 V / 10W
Light cover
Fig. 13-1 Replace light bulb
Light bulb
ENERGY SAVING TIPS
• The refrigerator should be located in the coolest area of the room, away from heat-producing appliances
or heating ducts, and out of direct sunlight.
• Let hot foods cool to room temperature before placing in the refrigerator. Overloading the refrigerator forces
the compressor to run longer and thus increases energy consumption. Foods that refrigerate too slowly
may lose quality or spoil.
• Be sure to wrap foods properly, and wipe containers dry before placing in the refrigerator.
• The wire shelves should not be lined with aluminum foil, wax paper, or paper towels. Liners interfere with
cold air circulation, making the refrigerator less effi cient.
• Organize food to reduce door openings and extended searches. Remove as many items as needed at one
time, and close the door as soon as possible.
REV 0 - 1710200745
13
L-C2-520
Page 14

NOTES PAGE
REV 0 - 1710200745
Please use this page to record any information that you may want to have at hand.
14
L-C2-520
Page 15

TROUBLESHOOTING
PROBLEM POSSIBLE CAUSE CORRECTION
Refrigerator does
not operate
Food
temperature
appears too
warm
Food temperature
is too cold
Refrigerator runs
too frequently
1. Dial turned to "0"
2. Refrigerator is unplugged
3. Breaker tripped
1. Frequent door openings
2. Food not allowed enough time to cool
3. Door gaskets not properly sealed
4. Temperature setting is too low
1. Temperature setting is too high 1. Adjust temperature dial to warmer setting.
1. Hot and humid conditions
2. Prolonged or frequent door openings
3. Door gaskets not properly sealed
4. Door not completely closed
1. Turn dial past "0".
2. Plug the refrigerator in.
3. Reset GFCI outlet and/or the main breaker. If it
happens again, call an authorized service center.
1. Keep door openings to a minimum to prevent cool
air from escaping.
2. Allow time for recently added warm food to reach
fresh food temperature.
3. Check gaskets for proper seal. See the CLEANING
AND MAINTENANCE, DOOR GASKETS section.
4. Adjust temperature dial to colder setting.
1. This may be normal to maintain constant temperature
during high temperatures and humid days.
2. Keep door openings to a minimum and keep open
for short amounts of time.
3. Check gaskets for proper seal. See the CLEANING
AND MAINTENANCE, DOOR GASKETS section.
4. Check to see if door is completely closed.
Moisture build
up on interior or
exterior of the
refrigerator
Refrigerator
has an odor
Refrigerator door
does not shut
properly
Popping or
cracking sound
when the
compressor comes
on
1. Humid conditions
2. Prolonged or frequent door openings
3. Door gaskets not properly sealed
1. Interior needs cleaning
2. Foods improperly wrapped or sealed are
giving off odors
1. Unit not level
2. Door out of alignment
3. Foods not properly stored
1. Unit not level
2. The fl oor is uneven or weak
3. The refrigerator rocks on the fl oor when it
is moved slightly.
4. The refrigerator is touching the wall.
1. This is normal during high humidity periods.
2. Keep door openings to a minimum and keep open
for short amounts of time.
3. Check gaskets for proper seal. See the CLEANING
AND MAINTENANCE, DOOR GASKETS section.
1. Clean the interior. See the CLEANING AND
MAINTENANCE section.
2. Properly wrap and seal foods.
1. Level the refrigerator. See INSTALLATION, LEVEL
REFRIGERATOR section.
2. Align the refrigerator door. See INSTALLATION,
ALIGN DOOR section.
3. Check for blockages, e.g. food containers, crisper
cover, shelves, bins, etc.
1. Level the refrigerator. See INSTALLATION, LEVEL
REFRIGERATOR section.
2. Ensure the fl oor is even and can adequately support
the refrigerator.
3. Ensure the fl oor is even.
4. Move the refrigerator from the wall.
REV 0 - 1710200745
15
L-C2-520
Page 16

WARRANTY
®
ONE-YEAR WARRANTY - Fire Magic
from the date of purchase.
A COPY OF YOUR SALES SLIP FOR PROOF OF PURCHASE IS REQUIRED
This warranty applies to the original purchaser for products which are installed in the United States or Canada and which are operated and maintained
as intended for single family residential usage. This warranty is valid only with proof of purchase, shall commence on the date of purchase, and shall
terminate (both as to original and any replacement products) on the anniversary date of the original purchase of the product stated on the above schedules.
This warranty covers defects in material and workmanship. This warranty does not cover parts which become defective as a result of negligence,
misuse, use not in compliance with the Owner’s Manual/Installation Instructions, accidental damage, improper handling, improper storage, improper
installation, lack of required routine maintenance (as specifi ed in the Owner’s Manual/Installation Instructions), or electrical damage. Product must
be installed as specifi ed in the Owner’s Manual/Installation Instructions by a qualifi ed professional installer. Modifi cations to products which are not
specifi cally authorized will void this warranty. Accessories, parts, valves, remotes, etc. when used must be Peterson products or this warranty is void.
Warrantied items will be repaired or replaced at Peterson’s sole discretion. This warranty does not apply to rust, corrosion, oxidation, or discoloration
unless the affected part becomes inoperable.
This warranty does not cover labor or labor related charges, except as provided by separate specifi c written programs from the Peterson Co. All repair
work must be performed by a qualifi ed professional service person and requires prior approval of Peterson.
Peterson may require the defective product or part to be returned to the factory to determine the cause of failure. Peterson will pay freight charges if
the product or part is determined to be defective. This warranty does not cover breakage in shipment from our (Independent) distributor to its customer
if the damage is determined to have occurred during that shipment.
This warranty specifi cally excludes liability for indirect, incidental, or consequential damages. Some states and provinces do not allow the exclusion
or limitation of incidental or consequential damages, so the above exclusion may not apply to you. This warranty gives you specifi ed legal rights, and
you may have other rights that vary from state to state or province.
For additional information regarding this warranty, or to place a warranty claim, contact the R. H. Peterson dealer where the product was purchased.
When contacting your Peterson dealer or the R. H. Peterson Co., please provide the following information:
- Your name, address, telephone number, e-mail
- Sales receipt showing where purchased and date purchased
- Model number, serial number of product, date code
- Relevant information: installer, additions, repairs, when defect was fi rst noted
electric accessories are warranted for one year
TO REGISTER YOUR PRODUCT ONLINE GO TO: WWW.RHPETERSON.COM,
AND CLICK ON PRODUCT REGISTRATION. THANK YOU FOR YOUR PURCHASE.
Robert H. Peterson Co. • 14724 East Proctor Avenue • City of Industry, CA 91746
16
 Loading...