

Page 1
ISLAND ENCLOSURE
ASSEMBLY INSTRUCTIONS
INSTALLER: Leave these instructions with
consumer.
CONSUMER: Retain for future reference.
IMPORTANT:
READ THESE INSTRUCTIONS CAREFULLY BEFORE STARTING ASSEMBLY.
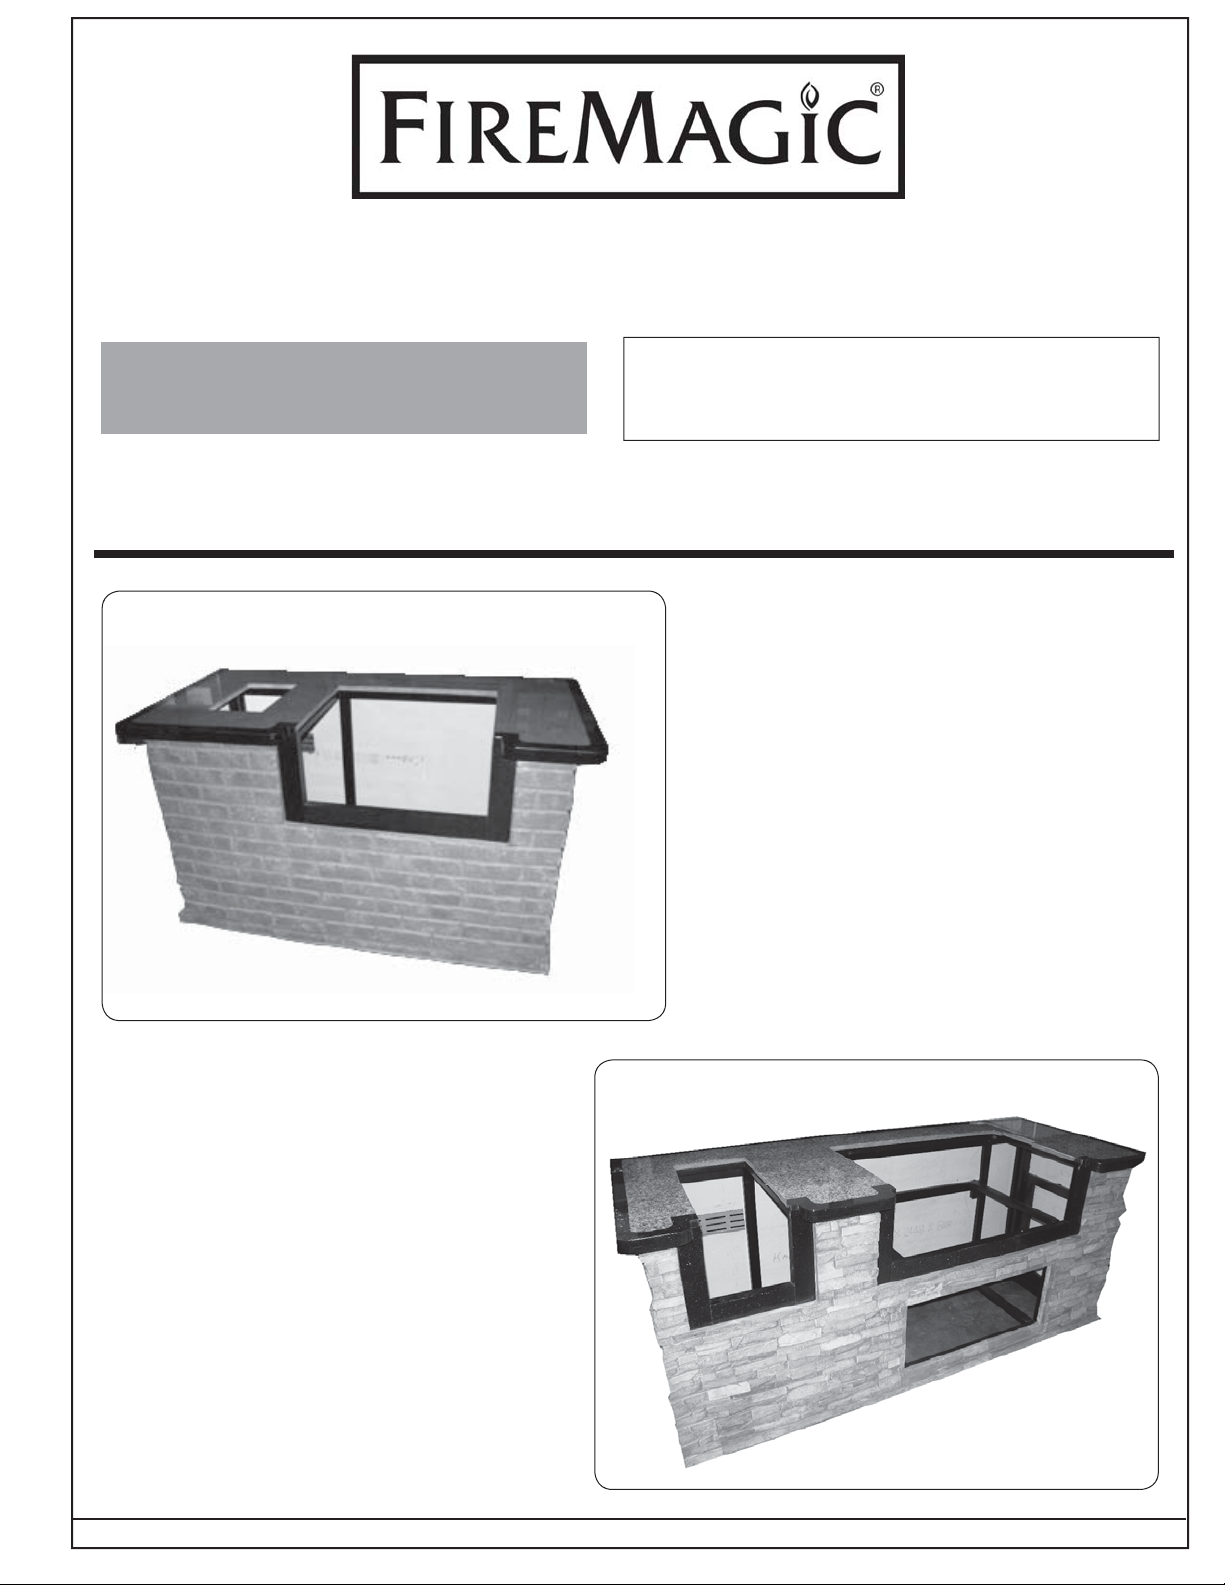
5 foot island
• Available in brick and stack stone
models
• Compatible with the following Fire
Magic products:
- A430i grill series
1
/2" x 14" storage doors
Brick
model
shown
- All 20
- Drop-in blender
- Drop-in sideburner
7 foot island
• Available in brick and stack stone
models
• Compatible with the following Fire
Magic products:
- A790i/E790i grill series
- All 20
- All 301/2" x 121/2" storage drawers
- Slide-in double sideburner
REV 2 - 0808071400
1
/2" x 14" storage doors
Robert H. Peterson Co. • 14724 East Proctor Avenue • City of Industry, CA 91746
Stack stone
model
shown
1
L-C2-30608
Page 2
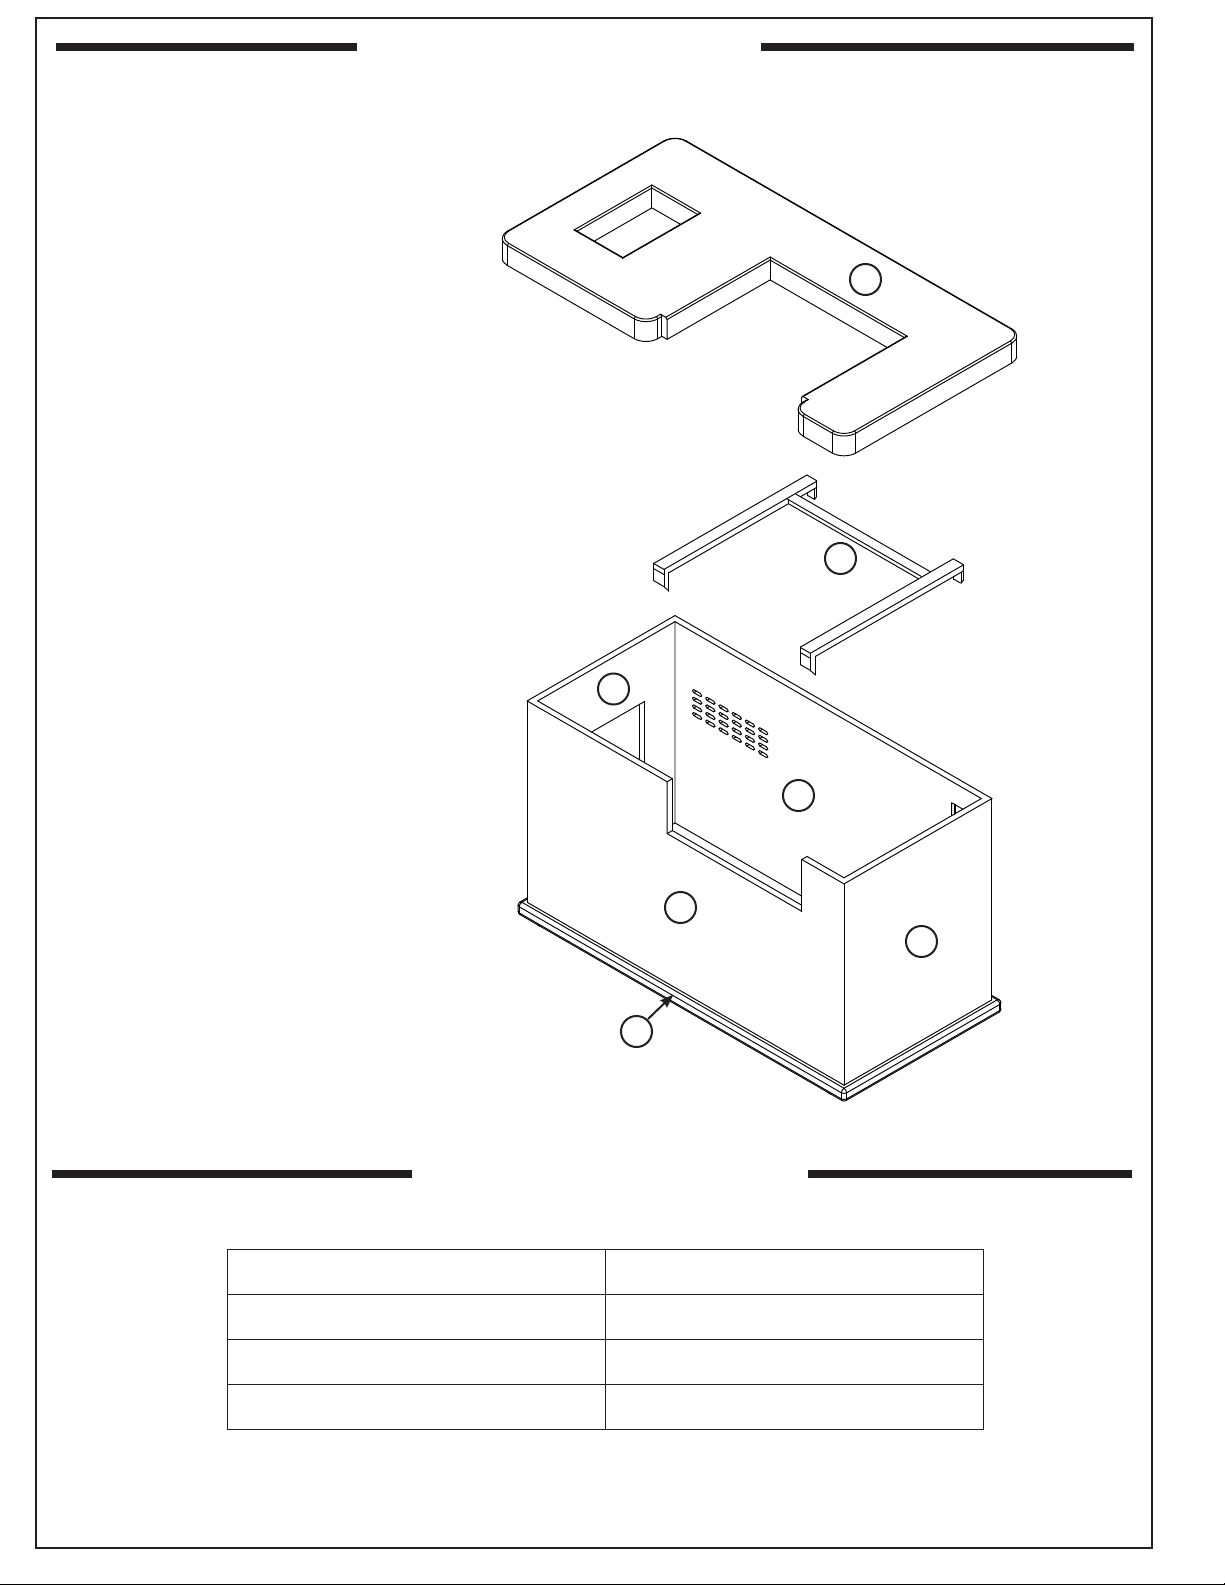
Item Description
1. Hardware (not shown)
(4-levelers, 4-self drilling screws)
2. Island base
3. Front wall
4. Rear wall
5. Right side wall
6. Left side wall w/ door cutout
7. Grill support
8. Countertop
PARTS LIST (5 foot model)
8
7
6
3
2
PRODUCT DATA TABLE
4
5
REV 2 - 0808071400
Specifi cation Value
Height 381/2"
Width 66"
Depth 34"
Table 1 - Product Data Table
2
L-C2-30608
Page 3
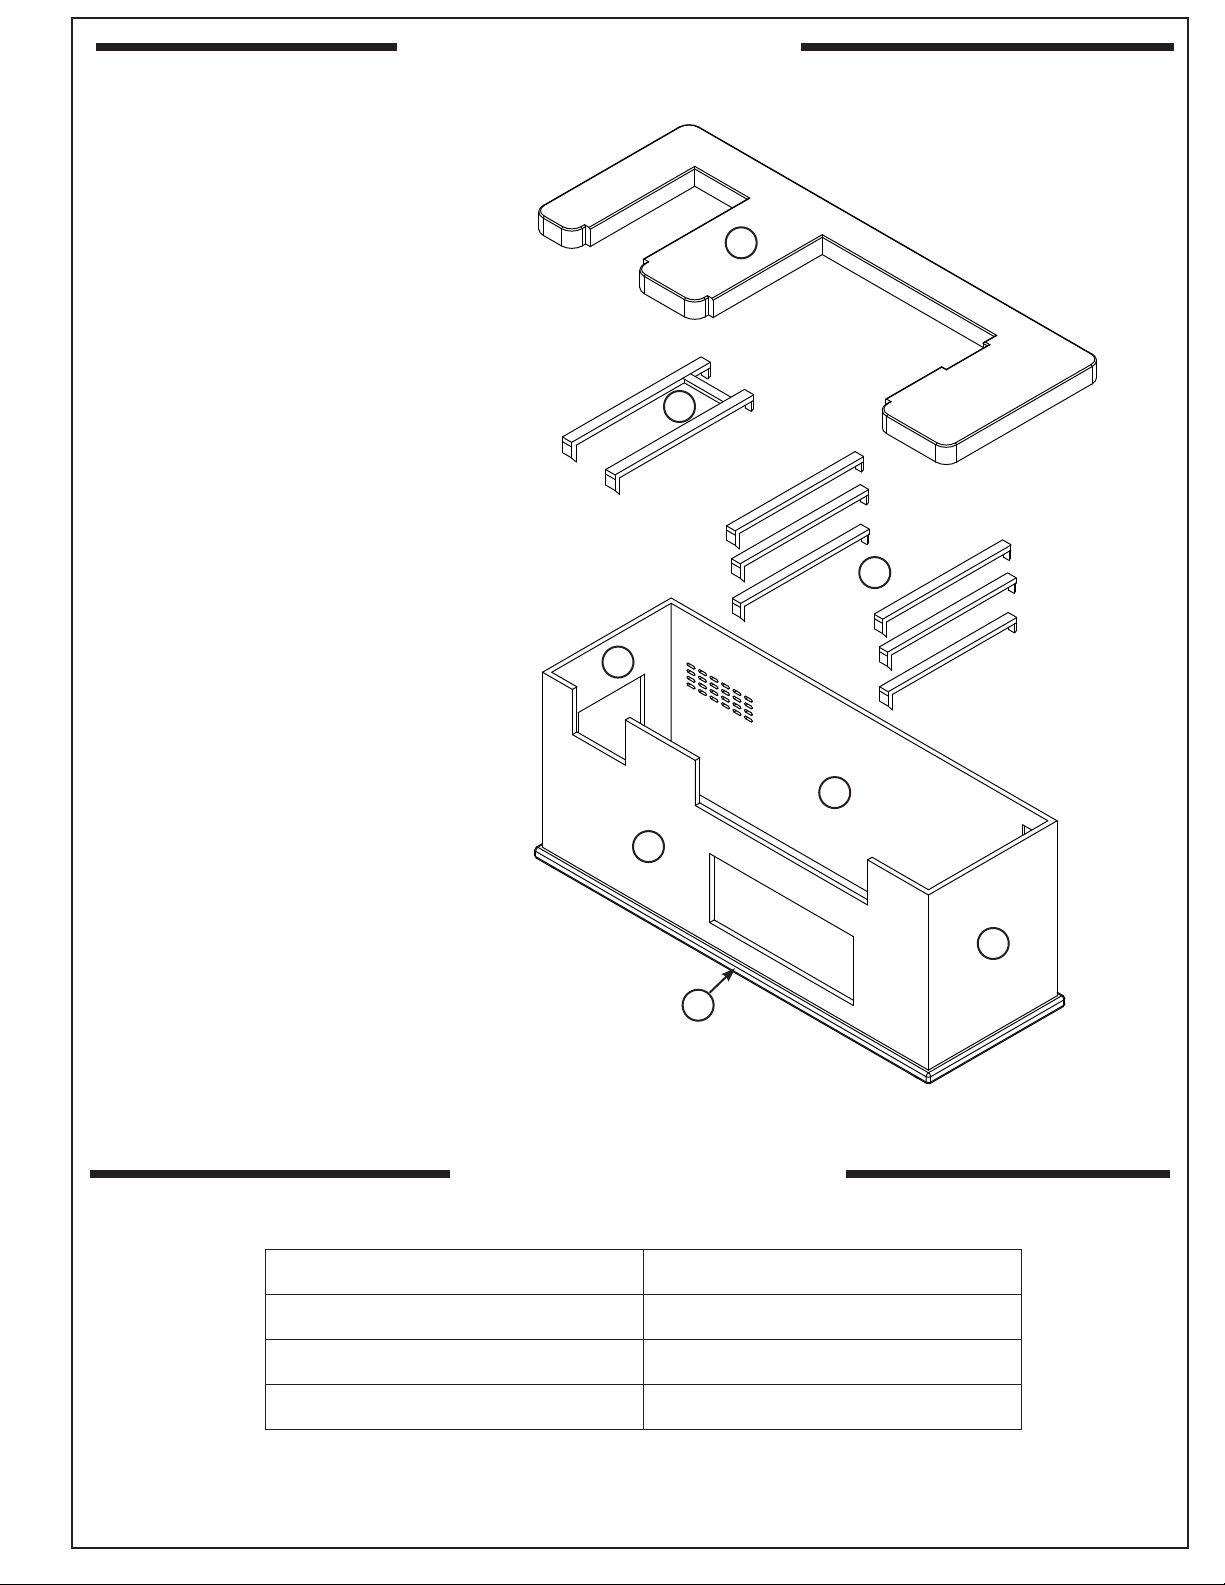
Item Description
1. Hardware (not shown)
(4-levelers, 8-self drilling screws)
2. Island base
3. Front wall
4. Rear wall
5. Right side wall
6. Left side wall w/ door cutout
7. Double sideburner support
8. Individual support (6)
9. Countertop
PARTS LIST (7 foot model)
9
7
8
6
3
2
PRODUCT DATA TABLE
4
5
REV 2 - 0808071400
Specifi cation Value
Height 381/2"
Width 901/4"
Depth 351/2"
Table 2 - Product Data Table
3
L-C2-30608
Page 4

Tools required:
• power drill
• 1/4" hex drive
ASSEMBLY (5 foot model)
Rear wall
Attach levelers
Island base
1. Place the island base upside down and attach
the 4 levelers.
Rear wall
Front wall
2. Flip the island base so that it rests on the 4
levelers. Place the rear wall down onto the
base by inserting the guide posts into the base
receiving-post-pockets.
Rear
Right Side
wall
wall
3. Place the front wall down onto the base
by inserting the guide posts into the base
receiving-post-pockets.
REV 2 - 0808071400
4. Place the right side wall down onto the base
by inserting the guide posts into the base
receiving-post-pockets.
4
L-C2-30608
Page 5

ASSEMBLY (5 foot model)
1" vent
strip at
back
Left Side
wall
Rear
wall
5. Place the left side wall down onto the base
by inserting the guide posts into the base
receiving-post-pockets.
Rear
wall
6. Place the grill support down onto the island
by inserting the guide posts into the receivingpost-pockets (on the front and rear walls).
7. Complete installation by placing the countertop
onto the island as shown. Be sure to align the
grill cutout in the countertop with the sides of
the grill support and the opening in the front
wall.
REV 2 - 0808071400
8. Refer to the instructions provided with
your selected grill, accessory, and door for
installation.
Note: Self drilling screws are included with this
unit for door installation. Using a power
drill with a 1/4" hex drive attached; install
2 screws into the top, and 2 screws into
the bottom of the frame (through the pilot
holes) as shown in the above illustration.
5
L-C2-30608
Page 6

Tools required:
• power drill
• 1/4" hex drive
Attach levelers
ASSEMBLY (7 foot model)
Front wall
Island base
1. Place the island base upside down and attach
the 4 levelers.
Front wall
Rear wall
2. Flip the island base so that it rests on the 4
levelers. Place the front wall down onto the
base by inserting the guide posts into the base
receiving-post-pockets.
1" vent strip
at back
Front
wall
Right Side
wall
3. Place the rear wall down onto the base
by inserting the guide posts into the base
receiving-post-pockets.
REV 2 - 0808071400
4. Place the right side wall down onto the base
by inserting the guide posts into the base
receiving-post-pockets.
6
L-C2-30608
Page 7

Left Side
wall
ASSEMBLY (7 foot model)
Front
wall
5. Place the left side wall down onto the base
by inserting the guide posts into the base
receiving-post-pockets.
6. Place the double sideburner support down
onto the island by inserting the guide posts
into the receiving-post-pockets (on the front
and rear walls).
7. Place four of the individual supports down
into the bottom and middle of the island by
inserting the guide posts into the receivingpost-pockets (on the front and rear walls).
REV 2 - 0808071400
8. Place the remaining individual supports onto
the top of the island by inserting the guide
posts into the receiving-post-pockets (on the
front and rear walls).
7
L-C2-30608
Page 8

ASSEMBLY (7 foot model)
9. Complete installation by placing the countertop
onto the island as shown. Be sure to align the
grill and double sideburner cutouts in the
countertop with the sides of the supports and
the openings in the front wall.
10. Refer to the instructions provided with your
selected grill, accessory, drawer, and door for
installation.
Note: Self drilling screws are included with this
unit for door/drawer installation. Using a
1
power drill with a
/4" hex drive attached;
install 2 screws into the top, and 2 screws
into the bottom of the frame (through
the pilot holes) as shown in the above
illustration.
REV 2 - 0808071400
8
L-C2-30608
 Loading...