

Page 1
Outdoor Fire Pits - 2009
Owner’s Manual
Installation and Operation
Installation and service of this appliance should be performed
by qualified personnel. It is suggested to use a NFI
certied or factory-trained professionals, or
technicians supervised by an NFI certied
professional.
If the information in these instructions is not followed exactly, a fire
or explosion may result causing
property damage, personal injury,
or death.
• Do not store or use gasoline or other flammable vapors and liquids in the vicinity of
this or any other appliance.
• What to do if you smell gas:
- Do not try to light any appliance.
- Do not touch any electrical switch. Do not
use any phone in your building.
- Immediately call your gas supplier from
a neighbor’s phone. Follow the gas
supplier’s instructions.
- If you cannot reach your gas supplier, call
the fire department.
• Installation and service must be performed
by a qualified installer, service agency, or
the gas supplier.
• For Outdoor Use Only.
WARNING
HOT! DO NOT TOUCH.
SEVERE BURNS MAY RESULT.
CLOTHING IGNITION MAY RESULT.
WARNING
• Keep children away.
• CAREFULLY SUPERVISE children in same room as
appliance.
• Alert childre n and adults to hazards of high
temperatures.
• Keep clothing, fu r n i t u r e , draperies an d other
combustibles away.
Metal and other surfaces are hot during
operation and cool down.
DO NOT DISCARD THIS MANUAL
CAUTION
• Important operating and
maintenance instructions
included.
•
Leave this manual with
party responsible for
use and operation.
•
Read, understand and follow
these instructions for safe
installation and operation.
DO
N
O
T
D
IS
CARD
Models:Prairie Glow, Charlotte Blaze, Impression, Reflection, Phoenix.
Outdoor Fire Pits
Decorative Gas Log Set
• Improp e r ins t a l l ation, adjustment,
al tera tion , ser vice or main tena nce
can cause injury or property damage.
Read the installation, operating and
maintenance instructions thoroughly
befor e instal l i n g or servici n g this
equipment.
WARNING
Page 2

2 Outdoor Fire Pits - 2009
Read this manual before installing or operating this appliance.
Please retain this owner’s manual for future reference.
Congratulations on selecting an Outdoor Fire Pit decorative
gas log set. The Outdoor Fire Pit you have selected is designed
to provide the utmost in safety, reliability, and efficiency.
As the owner of an Outdoor Fire Pit, you’ll want to read and
carefully follow all of the instructions contained in this owner’s
manual. Pay special attention to all cautions and warnings.
This owner’s manual should be retained for future reference.
We suggest you keep it with your other important documents
and product manuals.
The information contained in this owner’s manual, unless
noted otherwise, applies to all models and gas control
systems.
Your new Outdoor Fire Pit will give you years of durable use
and trouble-free enjoyment.
Homeowner Reference Information
Model Name: Date purchased/installed:
Serial Number: Location on appliance:
Dealership purchased from: Dealer phone:
Notes:
We recommend that you record the following pertinent
information about your appliance:
Congratulations
Page 3

Outdoor Fire Pits - 2009
Table of Contents
1 Listing and Code Approvals
A. Appliance Certification . . . . . . . . . . . . . . . . . . . . . . . . . 4
B. BTU Specifications . . . . . . . . . . . . . . . . . . . . . . . . . . . 4
2 Getting Started
A. Design and Installation Considerations . . . . . . . . . . . . 5
B. Tools and Supplies Needed . . . . . . . . . . . . . . . . . . . . 5
C. Inspect the Appliance and Components . . . . . . . . . . . 5
3 Framing and Clearances
A. Select Appliance Location . . . . . . . . . . . . . . . . . . . . . . 6
B. Clearances . . . . . . . . . . . . . . . . . . . . . . . . . . . . . . . . . 6
C. Fra
ming Enclosure for LP Gas Supply System
. . . . . . . 7
4 Gas Information
A. Fuel . . . . . . . . . . . . . . . . . . . . . . . . . . . . . . . . . . . . . . . 8
B. Gas Pressure. . . . . . . . . . . . . . . . . . . . . . . . . . . . . . . . 8
C. Gas Connection . . . . . . . . . . . . . . . . . . . . . . . . . . . . . . 8
D. High Altitude Installations . . . . . . . . . . . . . . . . . . . . . . 9
E. LP Gas Supply. . . . . . . . . . . . . . . . . . . . . . . . . . . . . . . 9
5 Finishing . . . . . . . . . . . . . . . . . . . . . . . . . . . . . . . . . 10
6 Appliance Setup
A. Burner Assembly . . . . . . . . . . . . . . . . . . . . . . . . . . . 11
7 Operating Instructions
A. Before Lighting Appliance . . . . . . . . . . . . . . . . . . . . . 12
B. Lighting the Appliance . . . . . . . . . . . . . . . . . . . . . . . . 13
C. After the Appliance is Lit . . . . . . . . . . . . . . . . . . . . . . 14
D. Frequently Asked Questions . . . . . . . . . . . . . . . . . . . 14
8 Troubleshooting . . . . . . . . . . . . . . . . . . . . . . . . . . . .15
9 Maintaining and Servicing the Appliance . . . . . . . 16
10 Reference Materials
A. Service Parts List. . . . . . . . . . . . . . . . . . . . . . . . . 17-19
C. Limited Lifetime Warranty . . . . . . . . . . . . . . . . . . . . . 20
D. Contact Information . . . . . . . . . . . . . . . . . . . . . . . . . . 20
Page 4

4 Outdoor Fire Pits - 2009
1
Listing and Code Approvals
A. Appliance Certification
The Outdoor Fire Pit has been tested in accordance with
CSA International Requirement 4.96 for Outdoor Gas
Fireplaces, 2004 for the U.S. and Canada and has been
listed for installation and operation as described in these installation and operating instructions.
The installation must conform with local codes or, in the
absence of local codes, with the National Fuel Gas Code
ANSI Z223.1 or CSA B149.1, National Gas and Propane
Installation Code.
B. BTU Specifications
Gas
Max Input
BTUH Orifice Size
Natural 70,000 #22
LP 70,000 #42
Page 5
Outdoor Fire Pits - 2009
Do NOT use this appliance if any part has been under
water. Immediately call a qualified service technician
to inspect the appliance and to replace any part of the
control system and any gas control which has been
under water.
WARNING
Check building codes prior to installation.
• Installation MUST comply with local, regional,
state and national codes and regulations.
• Consult insurance carrier, local building, fire
officials or authorities having jurisdiction about
restrictions, installation inspection, and permits.
CAUTION
A. Design and Installation Considerations
When planning an appliance installation, it’s necessary to
determine the following information before installing:
• Where the appliance is to be installed. See Sections 3
and 4.
• Gas supply piping. See Section 4.
• Framing and finishing details. See Section 3.
2
Getting Started
This appliance is a Decorative Outdoor Fire Pit Gas Log
Set for OUTDOOR USE ONLY and MUST NOT be used for
cooking.
Place the Outdoor Fire Pit on a flat and stable surface in an
outdoor location such as a patio or deck. This location must
be adjacent to the gas supply line or LP gas supply cylinder.
DO NOT locate the appliance where it can get excessively wet or submerged in water.
Do Not burn sold fuels in this appliance.
Asphyxiation Risk
• This gas log set is for outdoor use in a wellventilated space.
• Log set must not be installed inside an
enclosed structure or unvented appliance.
WARNING
We disclaim any responsibility for, and the
warranty will be voided by, the following
actions:
• Installation and use of any damaged components.
• Modification of the burner or log assemblies.
• I n s t a l l a t i o n ot he r th a n as i n s t r u c t e d b y
manufacturer.
• Improper positioning of the gas logs.
• Installation and/or use of any component part not
approved by manufacturer.
Any such action may cause a fire hazard.
WARNING
B. Tools and Supplies Needed
Before beginning the installation be sure that the following
tools and building supplies are available.
Gloves
Safety glasses
Non-corrosive leak check solution
Wrenches
Sharp Edges
• Wear protecti v e gloves
and safety glasses during
installation.
CAUTION
C. Inspect the Appliance and Components
Inspect appliance and components for
damage. Damaged parts may impair safe
operation.
• Do NOT install damaged components.
• Do NOT install incomplete components.
• Do NOT install substitute components.
Report damaged parts to dealer.
WARNING
• Carefully remove the appliance and components from the
packaging
• The gas logs are packaged separately and must be field
installed.
• Report to your dealer any parts damaged in shipment.
• Read all of the instructions before starting the
installation. Follow these instructions carefully
during the installation to ensure maximum safety and
benefit.
Page 6
6 Outdoor Fire Pits - 2009
Note:
• Illustrations reflect typical installations and are FOR
DESIGN PURPOSES ONLY.
• Illustrations/diagrams are not drawn to scale.
• Actual installation may vary due to individual design
preference.
Fire Risk
Provide adequate clearance:
• Around air openings.
• For service access.
Locate appliance away from traffic areas.
WARNING
A. Select Appliance Location
When selecting a location for your appliance it is important to
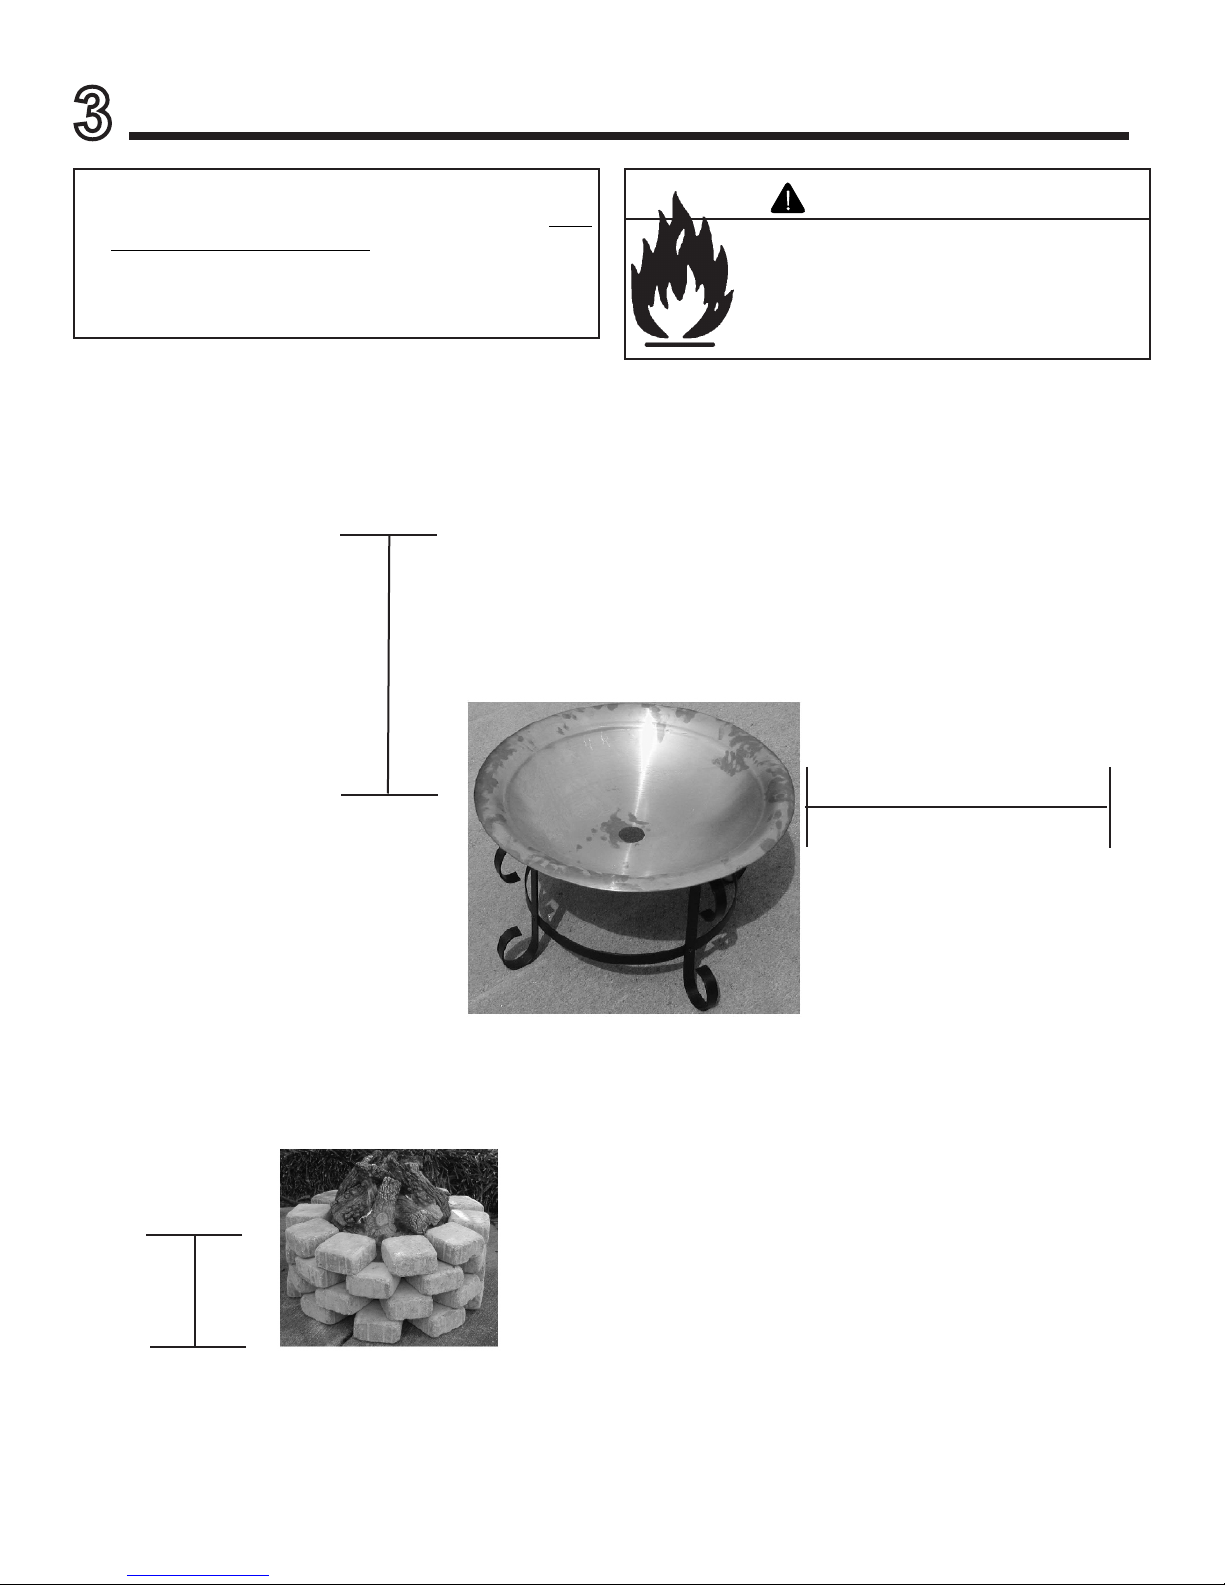
consider the required clearances to walls (See Figure 3.1).
3
Framing and Clearances
B. Clearances
Figure 3.1 Clearances to Combustibles
8 ft (2.4 m) to anything overhead
24 in. (610 mm) all around the
Outdoor Set to walls & combustible
materials
Note: Clearance requirements for Outdoor Expressions :
Using your desired surround landscape stone, ensure that
the stainless burner plate is securely placed at a minimum
height of 12 inches off the surface to ensure safety clearances.
Also ensure that there are slight gaps between the material
to allow ventilation.
12 inches
Page 7

Outdoor Fire Pits - 2009
C. Fra
ming Enclosure for LP Gas Supply System
If you build an enclosure for an LP gas cylinder, follow these
recommended specifications and local codes:
Ventilation
Enclosures must be ventilated by openings at the level of
the cylinder valve and at floor level. Effectiveness must be
determined with the cylinder(s) in place.
• One side of the enclosure must be completely open.
• For an enclosure having four sides, a top and a bottom:
- At least two ventilation openings at cylinder valve level
shall be provided in the side wall, equally sized, spaced
at 180 degrees (3.14 rad), and unobstructed. Each
opening must have a total free area of not less than
1/2 square inch per pound (3.2 sq. cm/kg) of stored
fuel capacity and not less than a total free area of 10
square inches (64.5 sq. cm).
- Ventilation opening(s) must be provided at floor level
and shall have a total free area of not less than 1/2
square inch per pound (3.2 sq. cm/kg) of stored fuel
capacity and not less than a total free area of 10
square inches (64.5 sq. cm). If ventilation openings
at floor level are in a side wall, there must be a least
two openings. The bottom of the openings must be
at floor level and the upper edge can’t be more than
5 in. (127 mm) above the floor. The openings must
be equally sized, spaced at 180 deg (3.14 rad) and
unobstructed.
- Every opening must have minimum dimensions to
permit the entrance of a 1/8 inch (3.2 mm) diameter
rod.
Accessibility
• Cylinder valves must be readily accessible for hand
operation. A door on the enclosure to gain access to the
cylinder valves is acceptable, provided it is non-locking
and can be opened without the use of tools.
• The design of the enclosure must be such that:
- The LP gas supply cylinder(s) can be connected,
disconnected and the connections inspected and
tested outside the cylinder enclosure.
- Those connections which could be disturbed when
installing the cylinder(s) in the enclosure can be leak
tested inside the enclosure.
- Be certain to mount or set the LP gas cylinder on a flat
stable surface and retain it to prevent it from tipping.
Minimum Clearances
• There must be a minimum clearance of 2 in. (50.8 mm)
between the lower surface of the floor of the LP gas supply
cylinder enclosure and the ground.
Page 8
8 Outdoor Fire Pits - 2009
A. Fuel
Before making gas connections ensure appliance being installed is compatible with the available gas type.
B. Gas Pressure
Proper input pressures are required for optimum appliance
performance. Gas line sizing requirements need to be made
following NFPA51.
C. Gas Connection
Note: Have the gas supply line installed in accordance
with local building codes, if any. If not, follow ANSI
223.1. Installation should be done by a qualified installer
approved and/or licensed as required by the locality. (In
the Commonwealth of Massachusetts installation must be
performed by a licensed plumber or gas fitter.)
Note: A listed (and Commonwealth of Massachusetts
approved) 1/2 in. (13 mm) T-handle manual shut-off valve
and flexible gas connector are connected to the 1/2 in.
(13 mm) control valve inlet.
• If substituting for these components, please consult
local codes for compliance.
4
Gas Information
WARNING
Fire Risk
Explosion Risk
• Gas build-up during line purge may
ignite.
• Purge should be performed by qualified
technician.
• Ensure adequate ventilation.
• Ensure there are no ignition sources such
as sparks or open flames.
• Incoming gas line should be piped to the 1/2 in.
connection on the manual shutoff valve.
Fire Risk
Explosion Risk
Verify inlet pressures.
• Hi g h p r es s ur e m a y c a us e o v er f i re
condition.
• Low pressure may cause explosion.
• Verify minimum pressures when other
household gas appliances are operating.
Install regulator upstream of valve if line
pressure is greater than 1/2 psig.
WARNING
Pressure requirements for appliance are shown in table below. Minimum pressures must be met when other household
gas appliances are operating.
Pressure Natural Gas Propane
Minimum Inlet Pressure 5.0 in. w.c. 11.0 in. w.c.
Maximum Inlet Pressure 7.0 in. w.c. 14.0 in. w.c.
• A small amount of air will be in the gas supply lines.
When first lighting appliance it will take a short time
for air to purge from lines. Subsequent lighting of the
log set will not require such purging. Never allow
the ON/OFF valve to remain in the open position
without placing a burning match on top of the
burner FIRST.
WARNING
CHECK FOR GAS LEAKS
Fire Risk
Explosion Risk
Asphyxiation Risk
• Check all fittings and connections.
• Do not use open flame.
• After the gas line installation is complete,
all connections must be tightened and
checked for leaks with a commercially
available, non-corrosive leak check
solution. Be sure to rinse off all leak check
solution following testing.
Fittings and connections may have loosened
during shipping and handling.
• The appliance must be isolated from the gas supply
piping system by closing its individual manual shutoff
valve during any pressure testing of the gas supply
piping system at test pressures equal to or less than
1/2 psi (3.5 kPa).
• Un its are assemb led and configured from the
factory fo r LP ga s with a natural ga s orfice
su pp li ed fo r f i e l d c o n v e r s i o n i f r e q u i r e d .
Page 9

Outdoor Fire Pits - 2009
D. High Altitude Installations
Appliances are tested and approved without requiring changes for elevations from 0 to 2000 ft in the USA and Canada.
When installing this appliance at an elevation above 2000 ft,
it may be necessary to decrease the input rating by changing the existing burner orifice to a smaller size. Input rate
should be reduced by 4% for each 1000 ft above a 2000 ft
elevation in the U.S.A., or 10% for elevations between 2000
and 4500 ft in Canada. If the heating value of the gas has
been reduced, these rules do not apply. To identify the proper orifice size, check with the local gas utility.
If installing this appliance at an elevation above 4500 ft (in
Canada), check with local authorities.
E. LP Gas Supply
• The pressure regulator and hose assembly supplied
with LP models must be used. Replacement pressure
regulators and hose assemblies must be those specified
in this manual.
• The LP gas supply cylinder used with LP models must
be constructed and marked in accordance with the
specifications for LP gas cylinders of the U.S. Department
of Transportation (DOT). A minimum 20 lb. cylinder is
recommended.
• Cylinders must be stored outdoors in a well ventilated
area out of the reach of children. Disconnected cylinders
must have threaded valve plugs tightly installed and must
not be stored in a building, garage or any other enclosed
area.
• Storage of this appliance indoors is permissible only if it
has been disconnected from its fuel supply (natural gas
line or LP gas cylinder).
• The LP gas cylinder supply system must be arranged for
vapor withdrawal.
• The LP gas cylinder used must include a collar to protect
the cylinder valve.
• When an LP model is not in use, the LP gas must be turned
off at the supply cylinder.
Page 10
10 Outdoor Fire Pits - 2009
5
Finishing
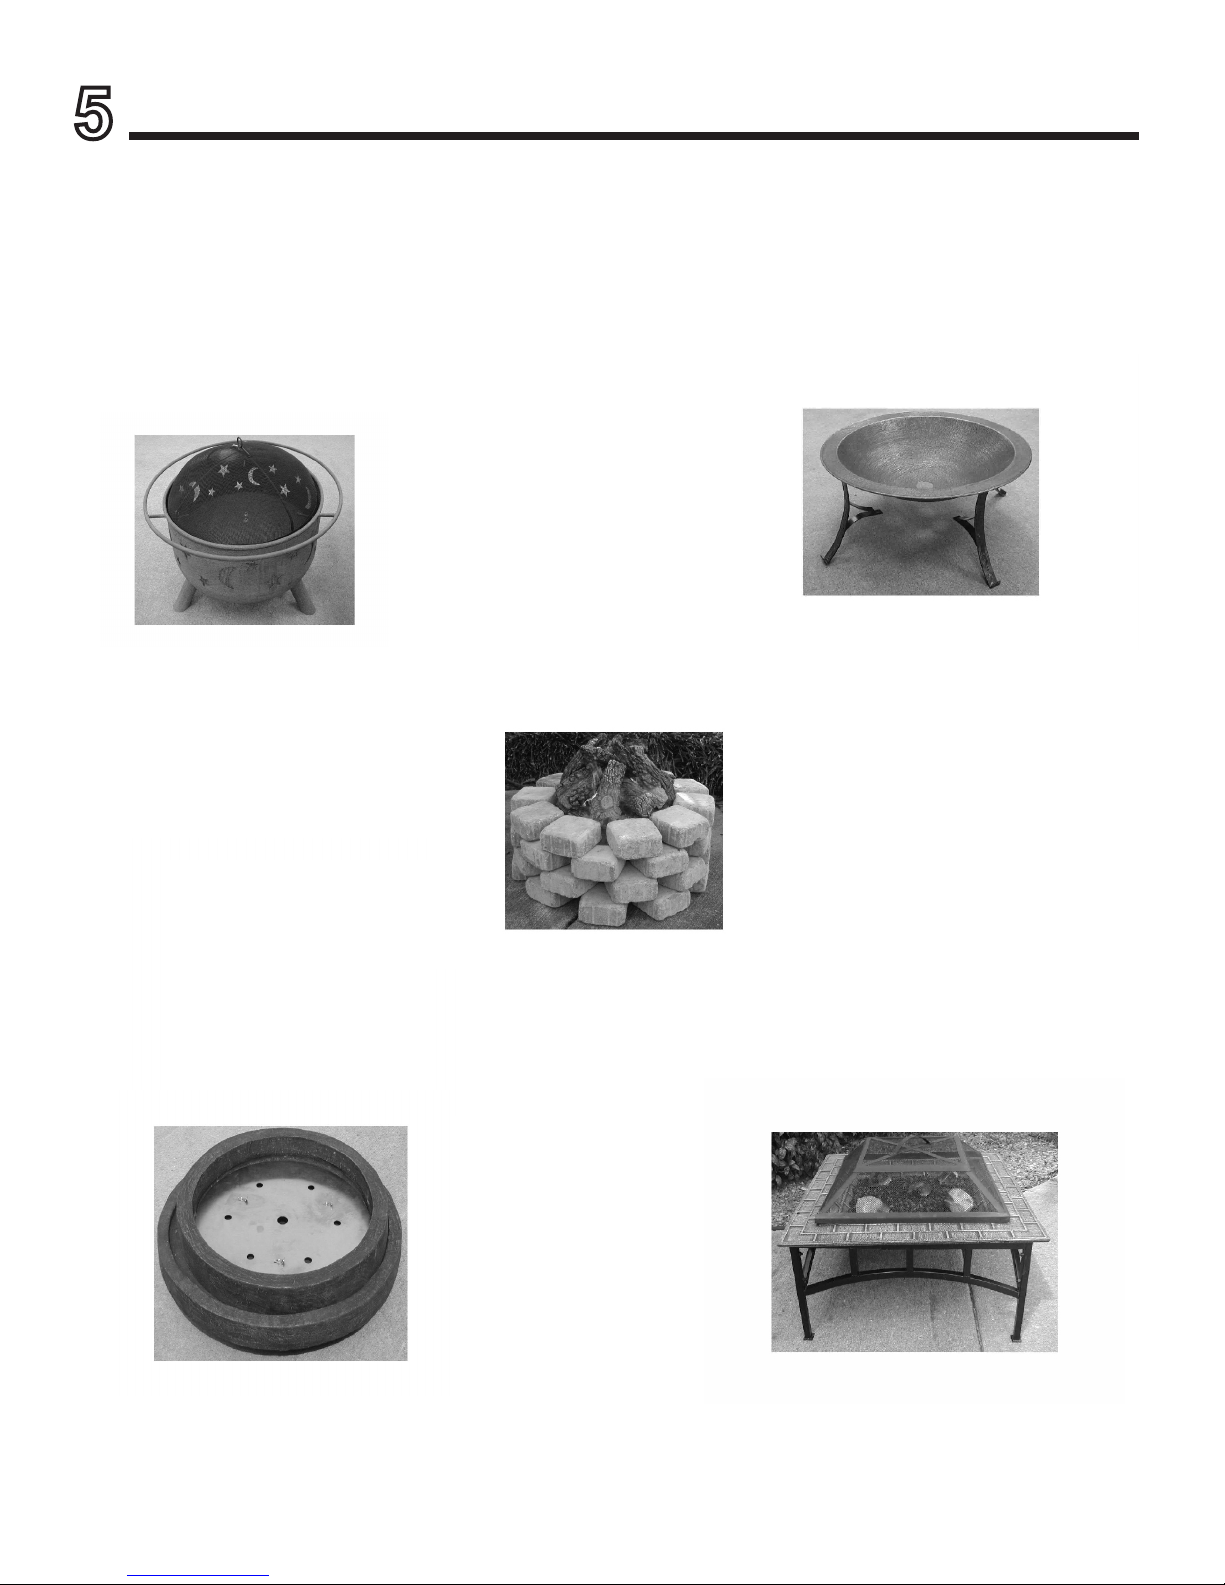
A decorative surround can be made from noncombustible
material (such as bricks, landscape blocks, rocks, etc.) for
the Outdoor Expressions only or several models of fabricated surrounds are available
Amber Elegance
SKU# - AGLAE
Phoenix
Reflection
(surround sold separately)
Grand Chariot
SKU # - AGLGC
Prairie Glow
Sedona Blaze
SKU# - AGLSB
Charlotte Blaze
Impression
Page 11
Outdoor Fire Pits - 2009
6
Appliance Setup
A. Burner Assembly
All Models
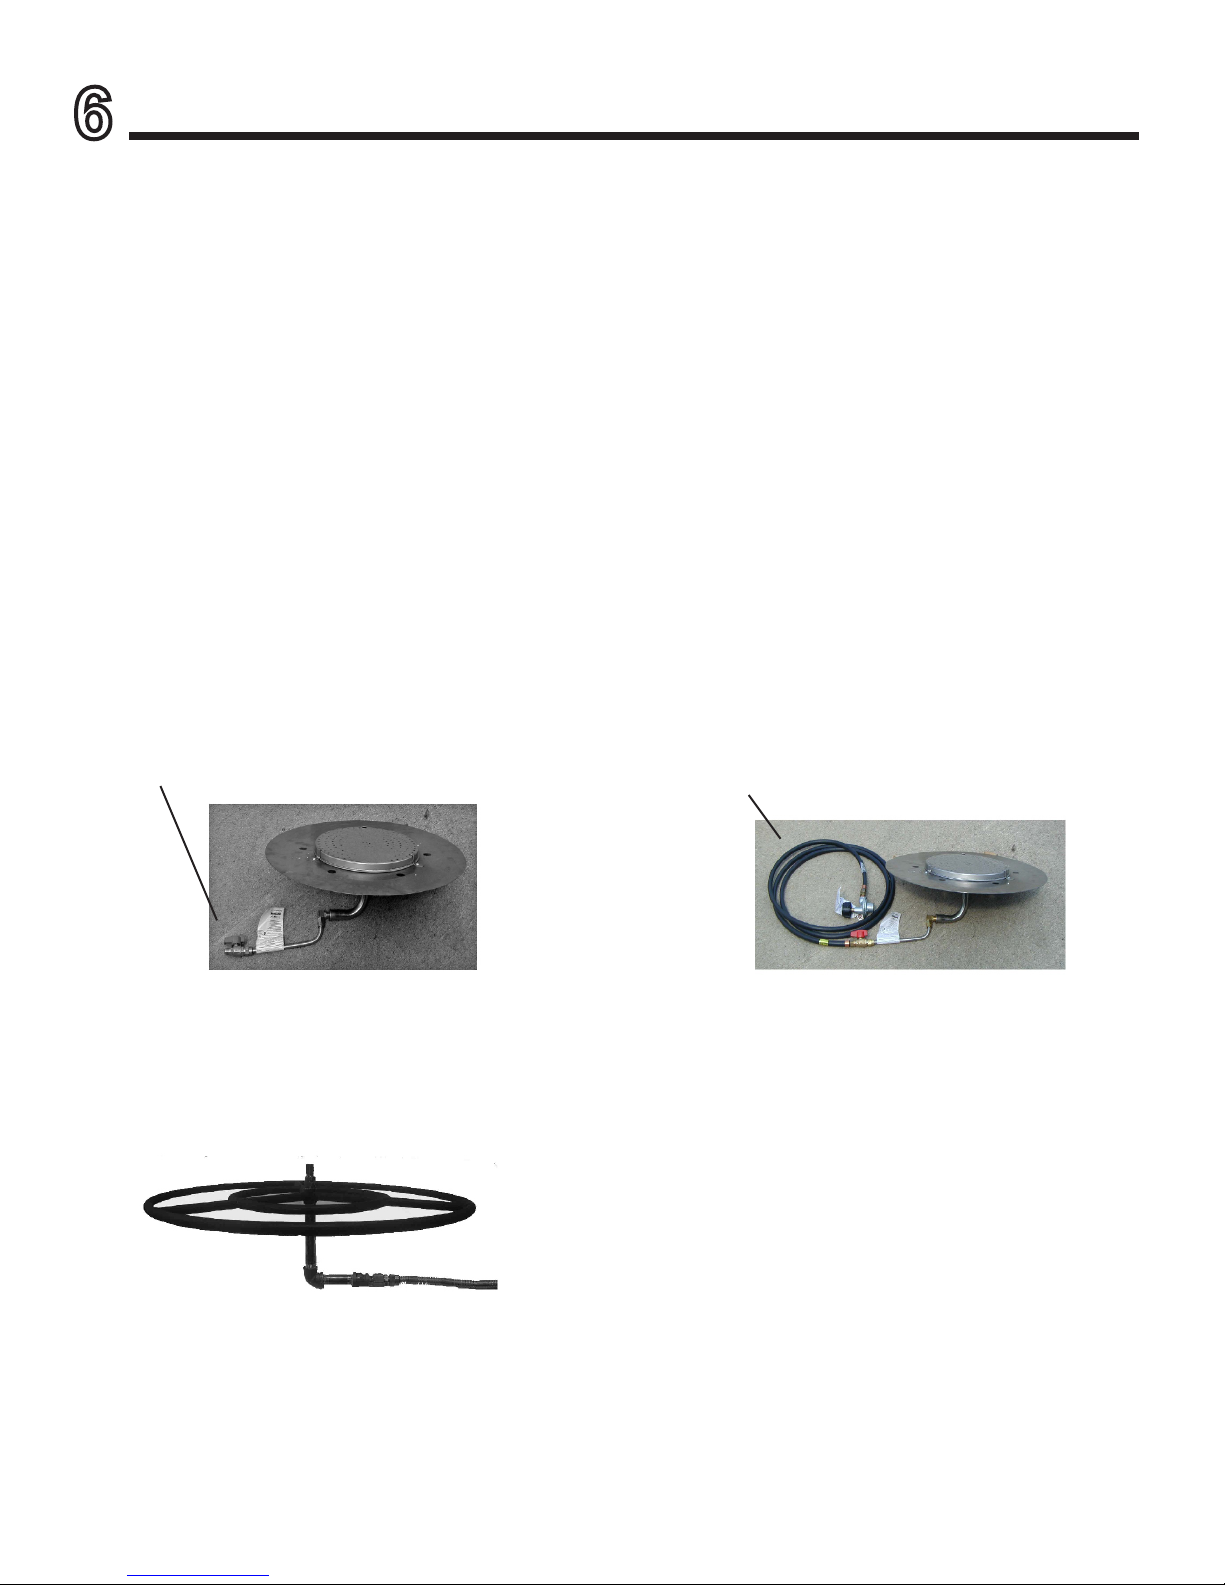
• Remove the burner assembly and check for damage. Do
not use damaged components.
• Position the burner assembly in the desired location.
This location must be adjacent to the gas supply line.
You must have easy access to the gas valve control
knob after it is installed and connected to the gas supply
because the ON/OFF gas valve is used to turn the burner
on and off.
Natural Gas Models
• Connect the ON/OFF gas valve of the appliance to the
incoming gas supply line. See Figure 6.1. Make certain
all gas connections are tight.
• Turn the ON/OFF valve at the appliance slowly to the “ON”
position. All connections must be tightened and checked
for leaks with a commercially available, non-corrosive leak
check solution. Be sure to rinse off the solution when done
leak testing.
LP Gas Models
• Make sure the tank valve is turned completely off
(clockwise).
• Ensure the tank valve has the proper external mating
threads (tank valve marked “USE WITH TYPE 1”).
• Inspect the hose shipped with the appliance for any
damage. Do not use if there is evidence of damage.
• Connect the end of the hose onto the ON/OFF gas valve
of the appliance. Make sure it is secured tightly.
• Connect the regulator assembly to the tank valve. Hand
tighten only (clockwise). Do not use a wrench to tighten!
Use of a wrench may damage the quick closing nut and
result in a hazardous condition. See Figure 6.2.
• Position the hose out of pathways where people might
trip over it or in areas where the hose might be subject to
accidental damage.
• Open the tank valve fully (counterclockwise). Turn the ON/
OFF valve slowly to the “ON” position. All connections must
be tightened and checked for leaks with a commercially
available, non-corrosive leak check solution. Be sure to
rinse off the solution when done leak testing. If a leak is
found, turn the tank valve off and do not use the appliance
until repairs can be made.
Figure 6.1 Natural Gas Burner Assembly
Figure 6.2 Propane Gas Burner Assembly
“ON/OFF” Valve
Check fittings for leaks
Check fittings for leaks
Propane Regulator Hose
Flex Line
Flex line to be installed to on/off valve
(provided/installed by installer)
Page 12
12 Outdoor Fire Pits - 2009
A. Before Lighting Appliance
LP (Propane)
• Before lighting this appliance, ensure both the LP tank
valve and the manual shutoff valve are closed. Open the
LP tank valve first, THEN the manual shutoff valve. This is
required due to built-in safety features of your LP tank.
Natural Gas
• Before lighting this appliance, ensure the manual shutoff
valve is open.
Fire Risk
Burn Risk
HOT! DO NOT TOUCH.
SEVERE BURNS MAY RESULT.
CLOTHING IGNITION MAY RESULT
Glass and other surfaces are hot during
operation and cool down.
WARNING
• Keep children away.
• CAREFULLY SUPERVISE children in same room as
appliance.
• Ale r t childre n and adults to hazards of high
temperatures.
• Ke ep cloth ing, furni ture, drap eries and other
combustibles away.
Improper installation, adjustment, alteration, service or
maintenance can cause injury or property damage. Refer
to the owner’s information manual provided with this
appliance. For assistance or additional information consult
a qualified installer, service agency or the gas supplier.
WARNING
Do NOT use this appliance if any part has been under
water. Immediately call a qualified service technician
to inspect the appliance and to replace any part of the
control system and any gas control which has been
under water.
WARNING
7
Operating Instructions
Before operating this appliance, have a qualified
technician:
• Inspect the burner before each use of the gas log set. If
there is any evidence that the burner is damaged, it must
be replaced before operating.
• Review proper placement of logs.
• Check the air shutter adjustment.
• Ensure that there are no gas leaks.
• Ensure that the flow of combustion and ventilation air is
not obstructed.
B. Before Each Use of The Appliance:
• Before each use of the appliance, check the gas supply
hose for any evidence of excessive abrasion, wear or
damage. If damage is evident, a replacement hose
assembly must be installed before use. A replacement
hose assembly may be ordered from the manufacturer.
• Before each lighting, check to insure that the logs are in
their proper locations and that the burner is not obstructed
with any foreign materials. Additionally, check that the
burner and all air passage ways are kept clean.
Page 13

Outdoor Fire Pits - 2009
C. Lighting the Appliance
FOR YOUR SAFETY, READ BEFORE LIGHTING
WARNING!
If you do not follow these instructions exactly, a fire or explosion may result causing property damage,
personal injury and/or loss of life.
A. This appliance must be lit by hand. When lighting,
follow these instructions exactly.
B. Before lighting, smell all around the appliance area
for gas. Be sure to smell next to the base of the
appliance because some gas is heavier that air and
will settle on the floor.
WHAT TO DO IF YOU SMELL GAS:
• Do not try to light any appliance.
• Do not touch any electric switch; do not use any
phone in your building.
• Immediately call your gas supplier from a neighbor’s
phone. Follow the gas supplier’s instructions.
• If you cannot reach your gas supplier, call the fire
department.
C. Use only your hand to turn the gas control knob or
valve. Never use tools. If the valve will not turn by
hand, don’t try to repair it, call a qualified service
technician. Force or attempted repair may result in
a fire or explosion.
D. Do not use the appliance if any part has been under
water. Immediately call a qualified service technician
to inspect the appliance, and to replace any part
which has been under water.
Turn the ON/OFF valve to the “OFF” position at the appliance for a natural gas appliance.
For an LP appliance, turn the ON/OFF valve to the “OFF” position at the appliance and then turn the valve on the
LP tank clockwise to the “OFF” position.
TO TURN OFF GAS TO APPLIANCE
1. Stop! Read the safety information above.
2. Remove the cover.
3. Find the manual gas control valve.
4. Place a burning match on top of the burner in the
middle where ports are present. DO NOT HOLD
THE MATCH IN YOUR HAND! For a natural gas
appliance turn on the ON/OFF valve slowly at the
appliance. For an LP appliance turn the valve on the
LP tank counterclockwise all the way and then turn
on the ON/OFF valve slowly at the appliance.
5. If the burner does not light before the match goes
out, immediately turn the gas valve to “OFF”.
6. Wait at least five minutes to clear out any gas. Then
smell for gas, including the base of the appliance.
If you smell gas, STOP! Follow “B” in the safety
information above. If you do not smell gas, repeat
Step 4.
LIGHTING INSTRUCTIONS
CAUTION: The Gas pressure regulator provided with this appliance must be used. This regulator is set for
an outlet pressure of 10 inches water column.
Page 14
14 Outdoor Fire Pits - 2009
Note: This appliance should be run one to two hours on the
initial start-up. Turn it off and let it cool completely. This will
help cure the products used in the paint and logs.
Fire Risk
Keep combustible materials, gasoline and
other flammable vapors and liquids clear of
appliance.
• Do NOT store flammable materials in the
vicinity of the appliance.
• Do NOT use gasoline, lantern fuel,
kerosene, charcoal lighter fluid or similar
liquids in this appliance.
Combustible materials may ignite.
WARNING
Fire Risk
High Temperatures
Keep combustible household items away
from appliance.
• Do NOT obstruct co m b u s tion an d
ventilation air.
• Do NOT place combustible items on top
of or near appliance.
• Keep furniture, draperies away from
appliance.
WARNING
E. Frequently Asked Questions
D. After the Appliance is Lit
Initial Break-in Procedure
When you light the appliance, you may notice that it produces heat which may have an odor or smell. If you feel this
odor is excessive it may require the initial one to two hour
continuous burn on high to fully drive off any odor from paint
and lubricants used in the manufacturing process.
Issue Solutions
Blue flames This is a result of normal operation and the flames will begin to yellow as the log set is
allowed to burn for 20 to 40 minutes.
Odor from log set When first operated, this log set may release an odor for the first several hours.
This is caused by the curing of the paint and burning off of any oils remaining from
manufacturing.
Metallic noise Noise is caused by metal expanding and contracting as it heats up and cools down,
similar to the sound produced by a furnace or heating duct. This noise does not affect
the operation or longevity of the Outdoor Firepit.
Each time you use your Outdoor Fire
Pit, check that the flames are igniting at
all parts of the burner. If any part of the
burner is not igniting properly, turn the
appliance off. Let it cool, and check for
any obstructions.
WARNING
Page 15
Outdoor Fire Pits - 2009
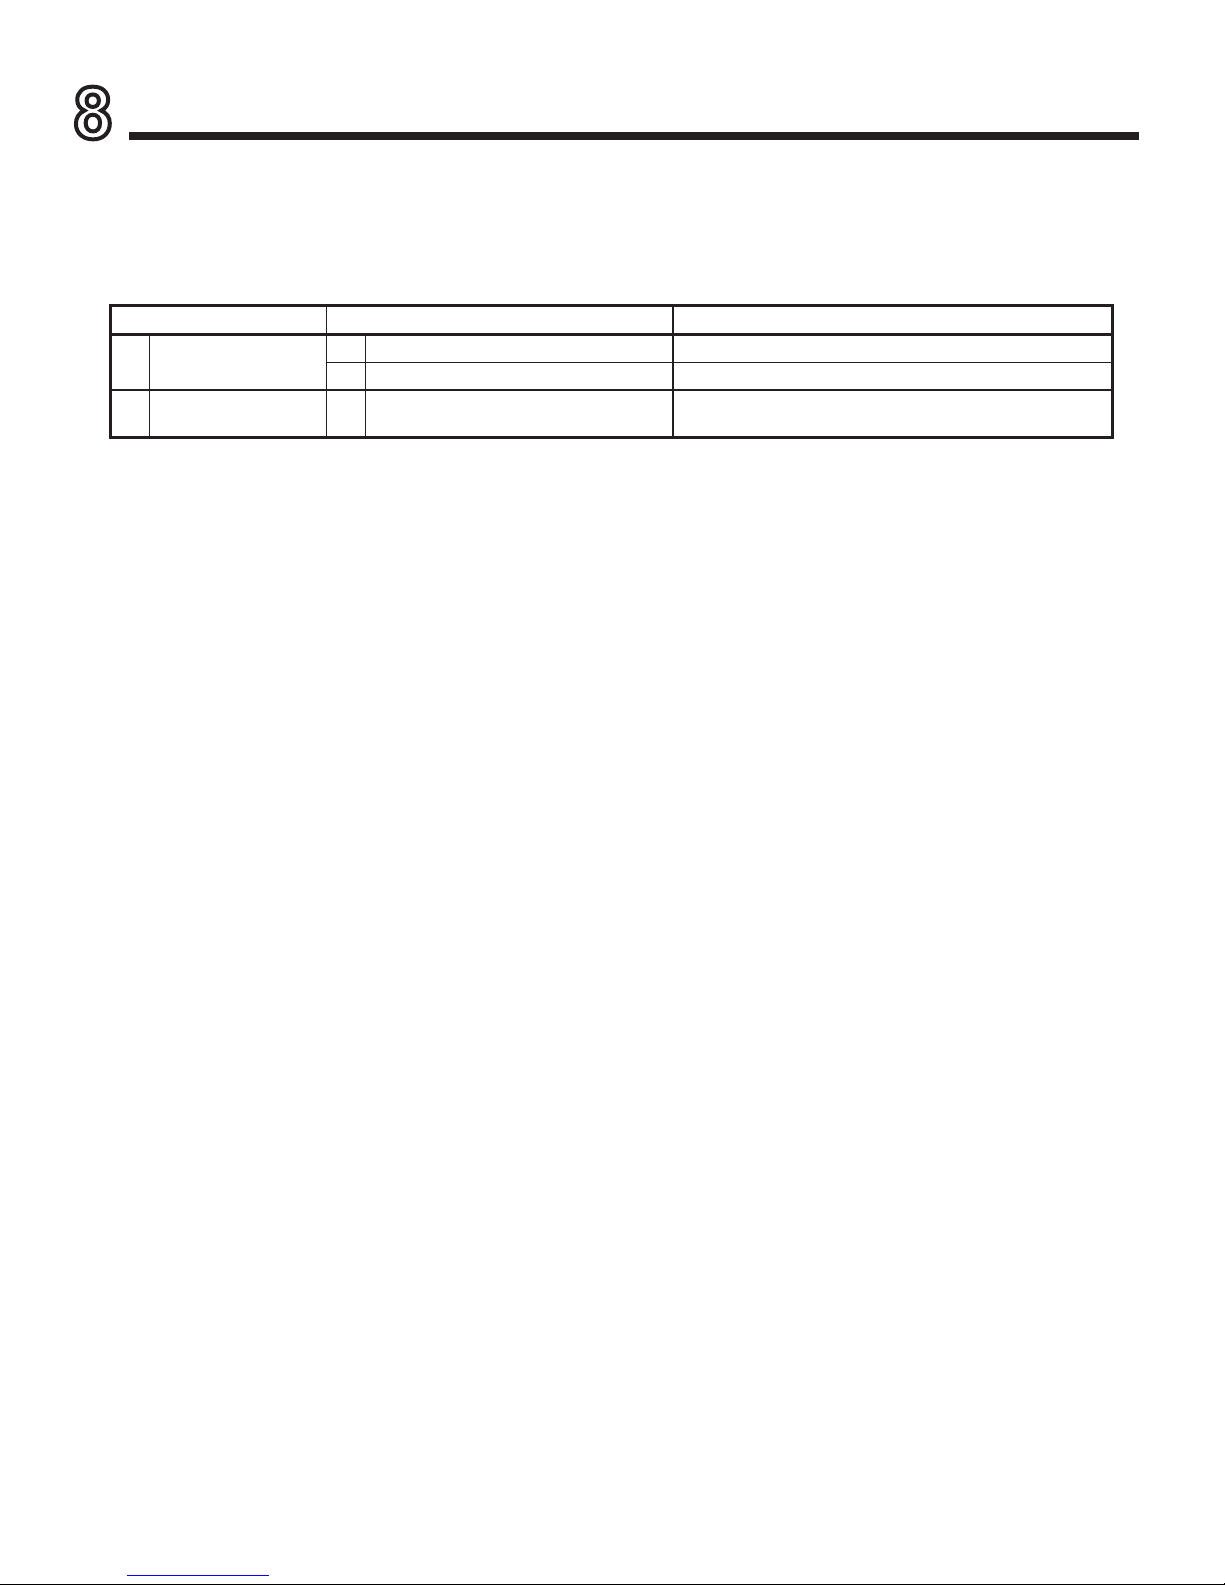
With proper installation, operation and maintenance your Outdoor Fire Pit will provide years of trouble-free service. If you
do experience a problem, this troubleshooting guide will assist a qualified service person in the diagnosis of a problem and
the corrective action to be taken. This troubleshooting guide can only be used by a qualified service technician.
8
Troubleshooting
Symptom Possible Causes Corrective Actions.
1 Decorative gas log
set won’t light.
A. No LP in tank. Check the LP (propane) tank. You may be out of gas.
B. Plugged burner orifice Check the burner orifice for stoppage. Remove stoppage.
2 Low flames or won’t
stay lit.
A. Manual shutoff valve open or not
installed between LP tank and log set.
Close LP tank and manual shutoff valves. Open LP tank valve
first, THEN the manual shutoff valve.
Page 16
16 Outdoor Fire Pits - 2009
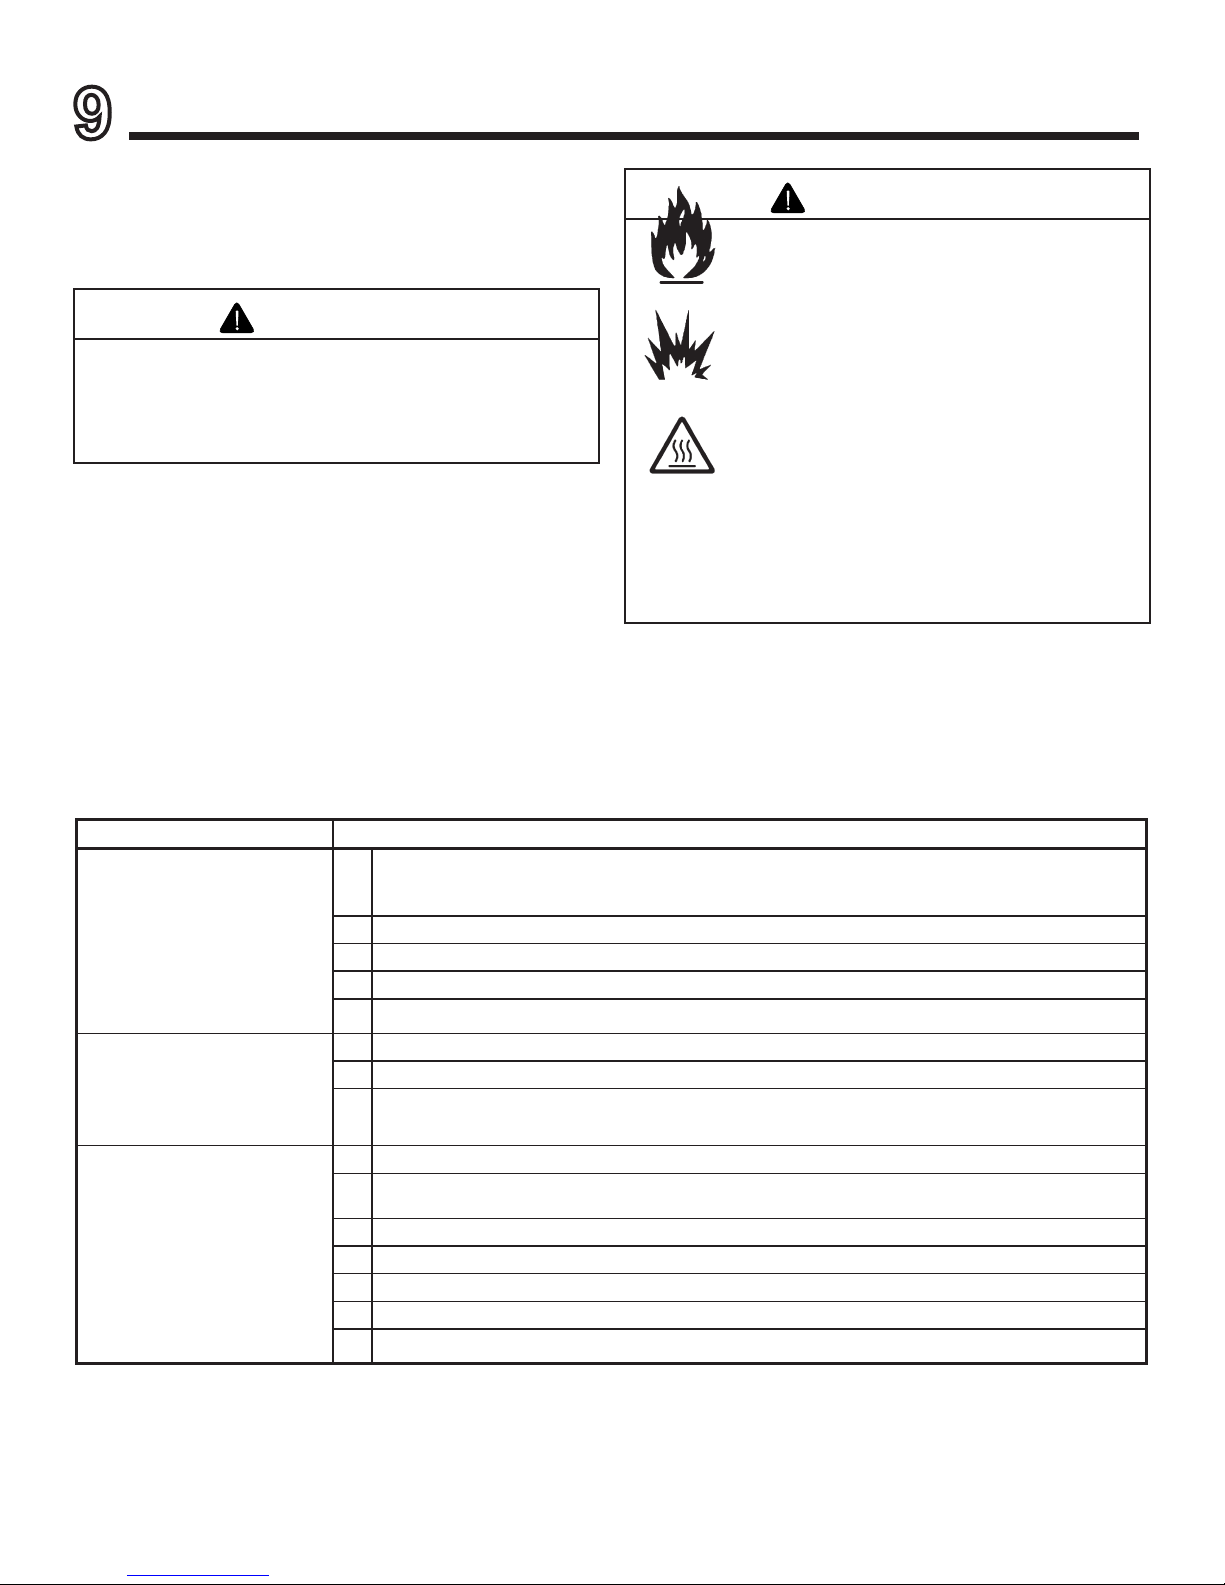
Although the frequency of appliance servicing and maintenance will depend on use and the type of installation, a
qualified service technician should perform an appliance
check-up annually.
Annual inspection by qualified technician
recommended.
Check:
• Obstructions of combustion and ventilation
air.
• Condition of logs.
• Condition of burner assembly.
• Burner ignition and operation.
• Burner air shutter adjustment.
• Gas connections and fittings.
Risk of:
• Fire
• Delayed ignition or explosion
• Exposure to combustion fumes
• Odors
WARNING
9
Maintaining and Servicing the Appliance
Risk of injury or property damage
Before servicing:
• Turn off utilities to appliance.
• Ensure appliance is completely cooled.
WARNING
Maintenance and Service Tasks:
Inspect Maintenance Tasks
Burner Assembly 1 Remove logs and examine burner. Vacuum and wipe out dust, cobwebs, debris or pet hair. Use caution
when cleaning these areas. Screw tips that have penetrated the sheet metal are sharp and should be
avoided.
2 Remove any foreign objects
3 Inspect for paint condition, warpage, corrosion. Sand and repaint as necessary.
4 Check the hose connecting the LP gas cylinder to ensure it is not damaged. Replace as necessary.
5 Verify unobstructed air circulation.
Logs 1 Inspect for broken, damaged or missing logs. Replace as necessary.
2 Verify correct log placement and no flame impingement causing sooting. Correct as necessary.
3 Verify logs are clean and carbon (soot) free. Logs may be cleaned with a dry bristle brush or dry cloth.
Handle logs with care as they are fragile and easily damaged.
Burner ignition and operation 1 Verify all gas connections are tight and leak-free.
2 Clean off burner top, inspect for plugged ports, corrosion or deterioration. Replace burner if necessary.
3 Check for smooth lighting and ignition carryover to all ports. Verify there is no ignition delay.
4 Inspect for lifting or other flame problems.
5 Verify air shutter is clear of dust and debris.
6 Inspect orifice for soot, dirt or corrosion.
7 Verify manifold and inlet pressures. Adjust regulator as required.
Page 17
Outdoor Fire Pits - 2009
10
Reference Materials
A. Service Parts List
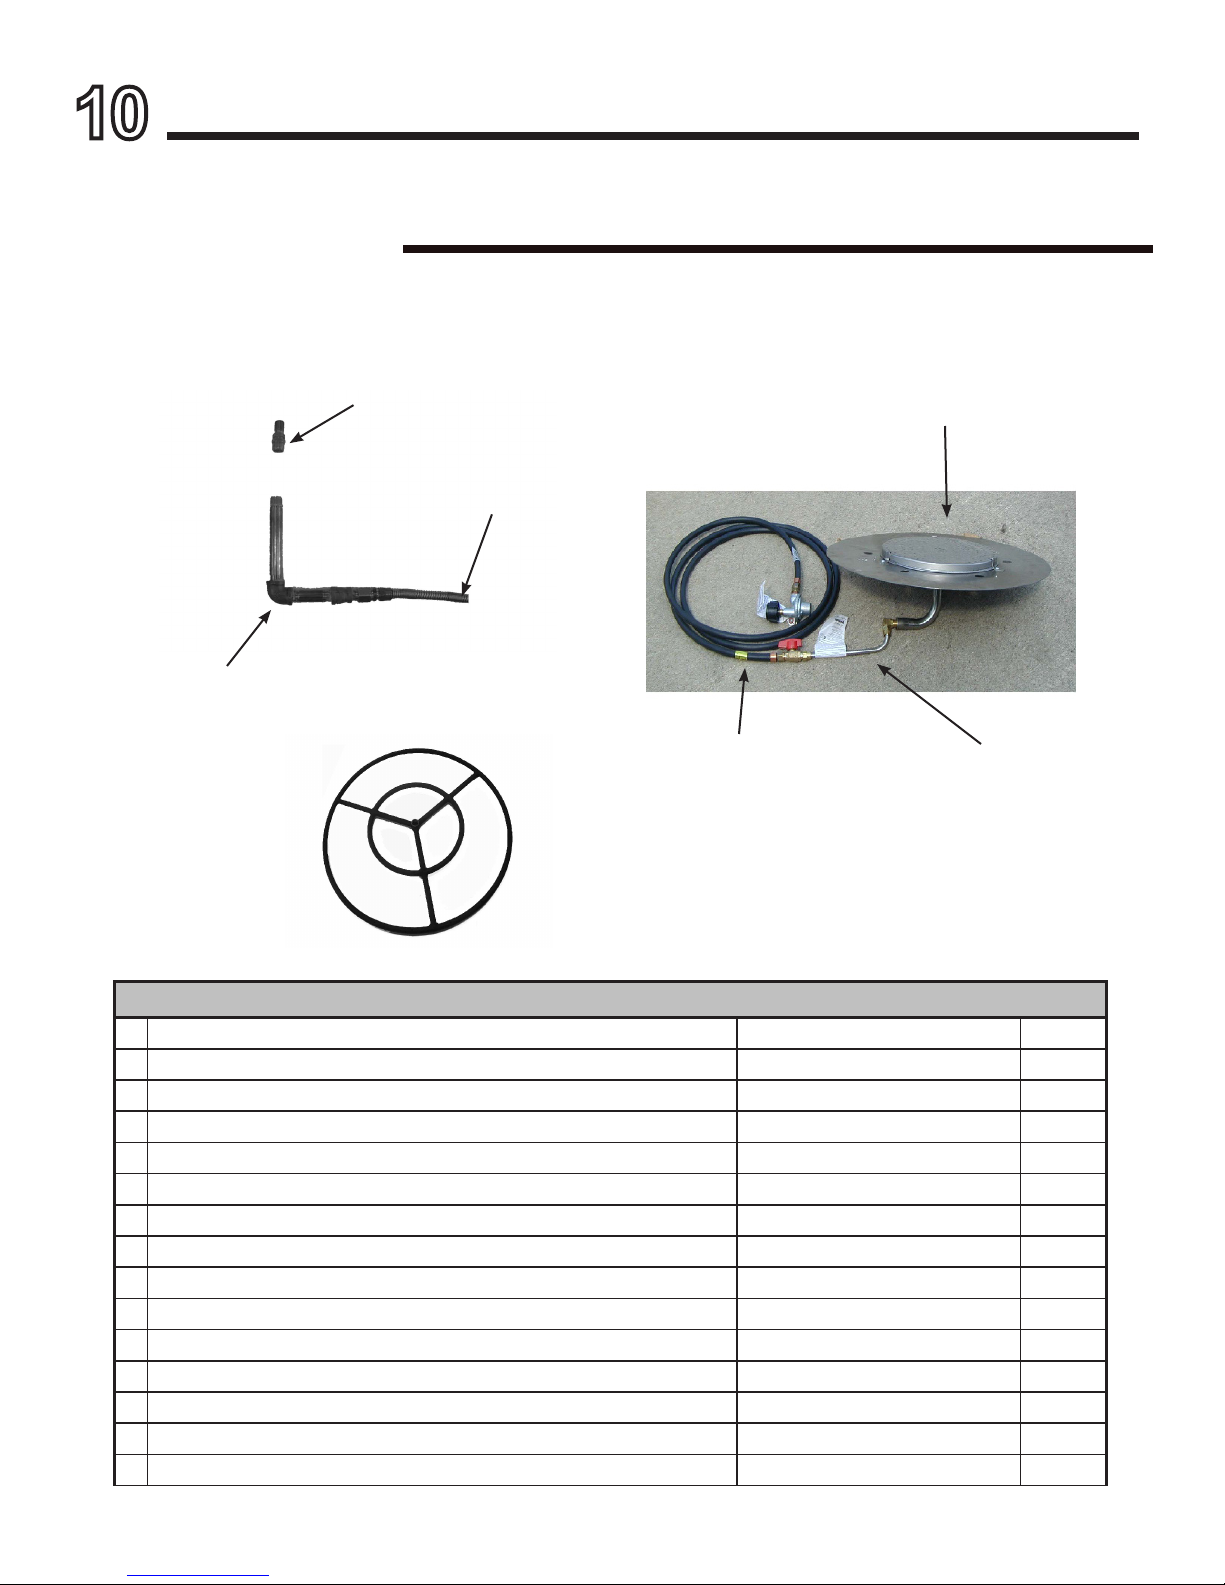
Service Parts
OUTDOOR FIRE PIT
A
# Description of Part Qty.
1 Air Shutter 1
2 Flex tube - large 1
3 Connection Piping 1
4 Burner Ring - 24” or 30” 1
5 Burner Assembly (plate & burner) 1
6 Hose Connection (regulator, shut-off valve & hose) 1
7 Flex tube - small 1
B u r n e r A s s e m b l y
(plate & burner)
Flex tube small
H o s e c o n n e c t i o n
(reg u l ator , sh u t-off
valve & hose)
Connection Piping
Flex tube large
Air Shutter
B u r n e r R i n g
(24” or 30”)
Page 18

18 Outdoor Fire Pits - 2009
Fire Gear LLC
Outdoor Fire Pits Limited One-Year Warranty
FIRE GEAR LLC extends the following warranty for the logs and stainless steel burner assembly for the Outdoor Fire Pits
used only in the United States of America or Canada. Dealers and employees of FIRE GEAR LLC have no authority to make
any warranty or authorize any remedies in addition to or inconsistent with the terms of this warranty. This warranty gives you
specific legal rights. You may also have other rights that vary from state to state.
FIRE GEAR LLC warrants that this Outdoor Product (the “Product”) will be free from defects in material and workmanship for
a period of one year from its date of purchase. This warranty is subject to the conditions, exclusions and limitations described
below.
This warranty applies only to the original owner of the Product and is non-transferable. FIRE Gear’s obligation under this
warranty does not extend to damages resulting from (1) assembly, operation or maintenance of the Product not in accordance
with the Installation/Assembly Instructions, Operating Instructions and the Listing Agency Identification Label furnished with
the Product; (2) installation or use which does not comply with local building codes and ordinances; (3) shipping, improper
handling, improper operation, abuse, misuse, accident or unworkmanlike repairs; (4) use of fuels other than those specified
in the Operating Instructions; (5) Installation or use of components not supplied with the Product or any other components
not expressly authorized and approved in writing by FIRE GEAR LLC; and/or (6) modification of the Product not expressly
authorized and approved in writing by FIRE GEAR LLC. Any of the circumstances described in the previous sentence voids
this warranty. This warranty is void if the Product or any component has been removed, repaired, or replaced before FIRE
GEAR LLC has been afforded a reasonable opportunity to inspect the Product.
This warranty is limited to the replacement or repair of defective components or workmanship and FIRE GEAR LLC may
fully discharge its obligations under this warranty by repairing or replacing, at its discretion, the defective components. FIRE
GEAR LLC will provide replacement parts at no charge and will pay reasonable and necessary labor and freight costs related
to replacing or repairing defective components under this warranty. The maximum amount recoverable under this warranty is
limited to the purchase price of the Product and, if FIRE GEAR LLC is unable to provide replacement or repair in an expedient
and cost-effective manner, FIRE GEAR LLC may discharge all obligations under this warranty by refunding the purchase
price of the Product.
EXCEPT TO THE EXTENT PROVIDED BY LAW, FIRE GEAR LLC MAKES NO EXPRESS WARRANTIES OTHER THAN
THE WARRANTY EXPRESSED HEREIN. THE DURATION OF ANY IMPLIED WARRANTY IS LIMITED TO THE DURATION
OF THE WARRANTY SPECIFIED ABOVE. IN NO EVENT SHALL FIRE GEAR LLC BE LIABLE FOR ANY INCIDENTAL OR
CONSEQUENTIAL DAMAGES CAUSED BY DEFECTS IN THE PRODUCT.
Some states do not allow limitations on how long an implied warranty lasts, or do not allow exclusion or limitation of incidental
or consequential damages, so these limitations may not apply to you.
To obtain service under this warranty, you must:
1. Send written notice of the claimed condition to FIRE GEAR LLC, P.O. BOX 871250, Canton, MI 48187 (888-220-4333)
2. Affirm that you are the original owner of the Product. Provide proof of purchase.
3. Provide FIRE GEAR LLC reasonable opportunity to investigate the claim, including reasonable opportunity to inspect
the Product prior to any repair or replacement work and before the Product or any component of the Product has been
removed.
4. Obtain FIRE GEAR LLC’ consent to any warranty work before the work is done.
firegear LLC
PO BOX 871250
Canton, MI 48187-6250
Office: 888-220-4333
Fax: 888-431-0585
email: www.firegearusa.com
 Loading...