

glowPhone
Refer to the label below during the activation of
your glowPhone.
™
Quickstart Guide

Copyright @2007 Firey Mobile, Inc.
glowPhone™ is the exclusive trademark of Firey Mobile, Inc.
For more information visit www.reymobile.com
Screen images are simulated. Actual screen images may vary among service
providers.
Printed in USA
84-0001-037

Table of Contents
MEET glowPhone ...........................................................1
GETTING STARTED ........................................................2
Battery and SIM Card .............................................2
Power On/Off .........................................................3
DISPLAY AREA / KEYPAD ................................................5
Display Area ..........................................................5
Keypad .................................................................5
MENUS ........................................................................6
SETTING UP glowPhone ..................................................8
Type Names and Numbers .......................................8
Setup the Call Keys ................................................8
Setup the Contact List .............................................9
USING THE PHONE ........................................................9
Make a Call Using the Call Keys ................................9
Make a Call Using the Contact List ............................9
Make an Emergency Call .......................................10
Answer a Call .......................................................10
Missed Calls .........................................................10
VOICE MAIL ................................................................ 11
TEXT MESSAGES ......................................................... 11
GAMES....................................................................... 12
RINGTONES ................................................................ 12
WALLPAPER ................................................................13
FLASHLIGHT ...............................................................13
TERMS & CONDITIONS .................................................14
FIREFLY ONE-YEAR LIMITED WARRANTY .........................14
SPECIFIC ABSORPTION RATE DATA ................................ 17
RF ENERGY INTERFERENCE / COMPATIBILITY ..................18
Quick Start Guide
i

Battery Safety/Disposal
glowPhone uses a rechargeable lithium-ion (Li-ion) battery. An AC charger is
provided.
Follow these battery safety guidelines:
•
Do not expose the battery to temperatures above 140 degrees F
(60 degrees C).
Do not take the battery apart.
•
Do not allow metal objects to touch the terminals.
•
Dispose of properly. Do not dispose of in re. Do not throw in the trash.
•
Customer Service
Do not return this product to the store. Contact Firey Customer Service or visit
our web site at reymobile.com for any of the following:
Troubleshooting
•
Activation questions
•
Coverage issues
•
About this Quick Start Guide
This Quick Start Guide provides basic information about using glowPhone. For
additional and more detailed information about the features and functions of
your glowPhone, go to reymobile.com to download the User’s Guide.
Password Protection
The password-protected Parental Controls can be used to block certain phone
functions. See the User’s Guide for information on programming the call
keys, setting up the Contact List, setting Parental Controls, and changing the
password.
ii
Quick Start Guide
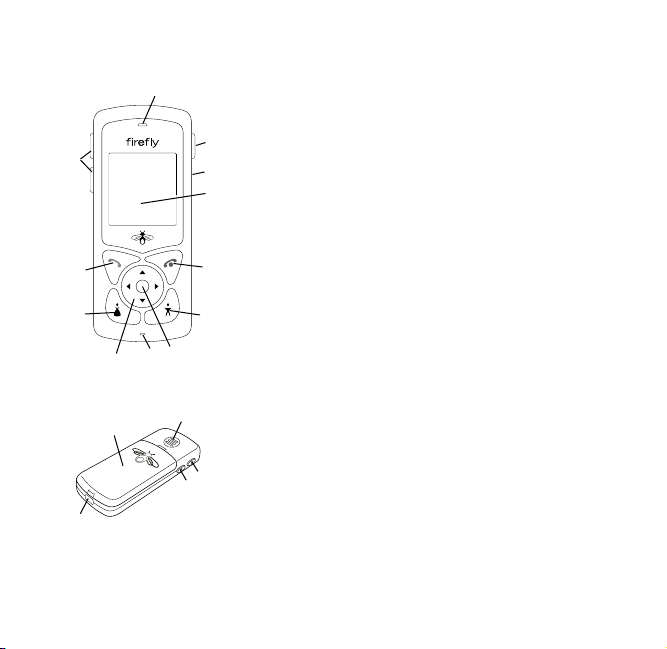
MEET glowPhone
1
5
6
8
11
10
13
12
Quick Start Guide
1 Earpiece Hold to ear when using the
phone.
2 Emergency Call button
2
3 Headset port For accessory headset.
3
4 Display area View glowPhone activities.
4
5 Volume buttons Press to raise/lower the
sound.
6 Send key Press to answer or make a call.
7
7 End key Press to end a call. Press and hold
to turn glowPhone on/off.
9
8 Mom Call key Press to call a pre-
programmed number.
10
9 Dad Call key Press to call a pre-
programmed number.
14
10 Navigation key Navigation arrows and
Select button.
11 Mouthpiece
12 Connect port Connect to battery charger.
2
3
13 Battery compartment Install battery and
SIM card.
14 Loud speaker
1
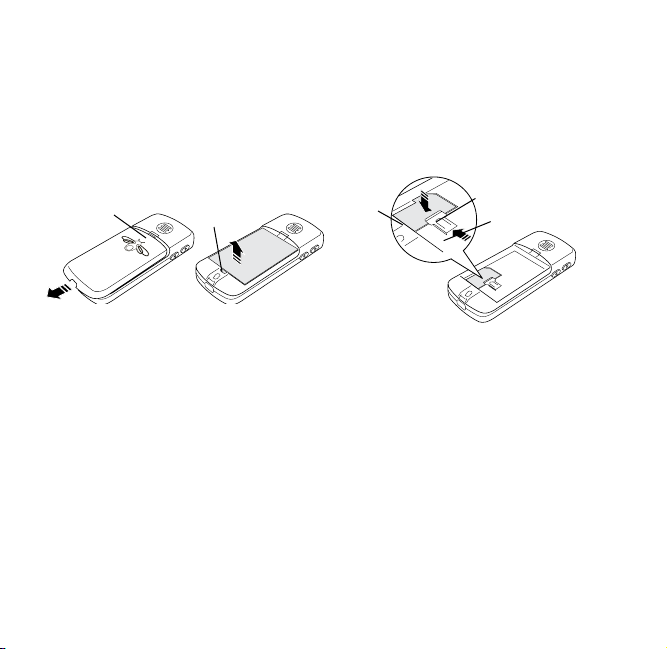
GETTING STARTED
Battery and SIM Card
Remove the Battery
1. Press lightly at the top of the
battery compartment (1) with
your thumb and slide the cover
until it stops. Lift up the cover.
1
2. Place the tip of your thumb in
the indent (2), push in the tab,
and lift the battery out of
the compartment.
Install a SIM Card
glowPhone requires a SIM card and
a charged battery for operation.
You must install a SIM card
(provided with your phone or
obtained through your network
service provider). The SIM card
2
contains the phone number for your
glowPhone and provides access to
network services.
Note: Do not touch the metal part
of the SIM card.
1. Remove the battery cover.
2. Remove the battery (if installed).
3
2
1
3. Push back the metal tab (1)
if needed.
4. Slide a SIM card (2) into the
SIM card holder and under the
plastic lip (3). Make sure the
SIM card lies at in the holder
and that the side with the metal
side is face down.
5. Slide the metal tab over the SIM
card to hold it in place.
6. Install the battery and replace
the cover.
2
Quick Start Guide

Install the Battery
1. Hold the battery so that the
words are facing down and the
tab (1) is at the bottom of
the compartment.
2. Lower the battery into place and
press gently on the tab end until
it clicks into place.
1
2
3. Place the cover (2) over the
battery and slide it gently
forward until it closes.
Charge the Battery
It will take about 3 hours for the
battery to charge the rst time.
Recharge the battery when the
battery icon is at 1 bar or less.
Important! Always use the charger
supplied with glowPhone or one
approved by the manufacturer.
Other chargers may damage
glowPhone and void the warranty.
1. Plug the charger cable into a
standard AC wall outlet.
1
2
2. Plug the charger cable (1) into
the glowPhone battery port (2).
A battery icon will display
on the screen.
Power On/Off
1
To turn on: press and hold
•
the End key (1) until the
display activates.
To turn off: press and hold
•
the End key (1) until the
lights go off.
Quick Start Guide
3
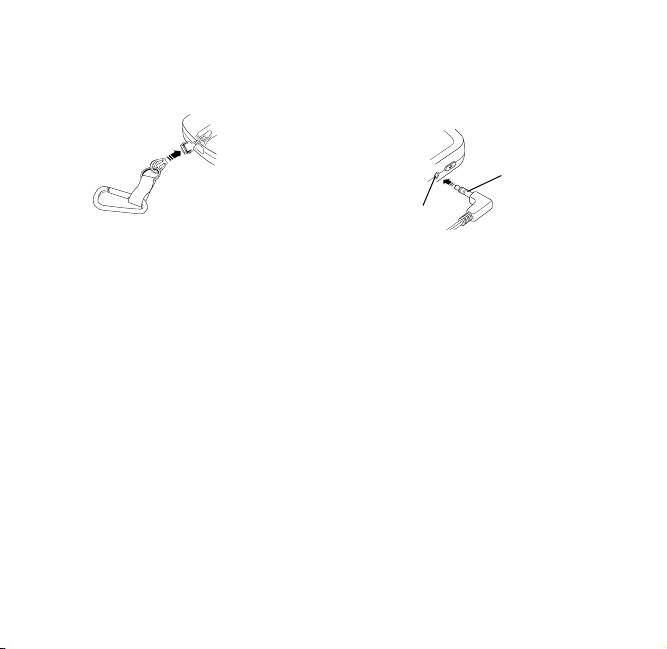
Backpack Clip
The string loop on the backpack clip
attaches to your glowPhone.
Headphones
Plug your headphone cable (1) into
the headphone port (2) on the right
side of your glowPhone.
1
To install the backpack clip:
1. Remove the battery
compartment cover.
2. Slip the string loop through the
hole next to the charger port
and hook the string loop over
the notch.
3. Pull gently on the string to make
sure it is on the notch. Replace
the cover.
4
Parental Controls
2
See the Setting Up glowPhone
section of this guide for information
on how to program the special keys
and create a Contact List.
See the User’s Guide for information
on how to set permissions and use
the other options in the Parental
Controls menu.
Quick Start Guide

DISPLAY AREA / KEYPAD
Display Area
The Display Area provides
information about glowPhone.
Top Line
Middle Area
Bottom Line
Top line Icons for network
connection, voice mail, messages,
battery strength, etc. Check the top
line when you turn on glowPhone:
Middle area Viewing/activity area
for date/time, phone numbers,
names, wallpaper, menu lists,
games, etc.
Bottom line Menu options.
Note: When glowPhone is on, the
keypad and display area will
go dark when it isn’t being
used. Press any key to wake
up glowPhone.
Keypad
1
3
1 Send Press to place a call.
2 End Press to quit a call.
2
4
65
Press and hold to turn
glowPhone on and off.
3 Navigation arrows
Press the Navigation
arrows to scroll to and
highlight items.
4 Select button
Press to select or open
an option.
5 Mom Call key
Press call a
pre-programmed number.
6 Dad Call key
Press to call a
pre-programmed number.
Quick Start Guide
5

MENUS
There are 8 menus. Each menu has an icon that displays in the center of
the bottom line of the display area. When you highlight an icon, the menu
name appears above it in the display area.
Use the Navigation arrows to scroll to and highlight a menu.
•
Press the Select button to open a menu.
•
Press the Navigation arrows to highlight a menu option on a list.
•
Press the Select button to open the option.
•
Note: The default menu is Contacts. See the User’s Guide if you want to
change this default option.
6
Quick Start Guide

Parental
Controls
Check and change glowPhone settings.
Read Text
Messages
Voice
Mailbox
Contacts
Games
Ringtones
Wallpaper
Flashlight
Quick Start Guide
Check your messages.
Access your voice messages.
View your phonebook containing a list of
names and numbers.
Play games.
Change ringtones.
Change wallpaper.
Turn on all of the glowPhone lights.
7
SETTING UP glowPhone
1 2 3
4 5 6
7 8 9
A B C D E F G H
I J K L M N O P
Q R S T U V W X
Y Z 1 2
3 4 5 6 7 8 9 0
There are many other setup
options. See the User’s Guide for
more information.
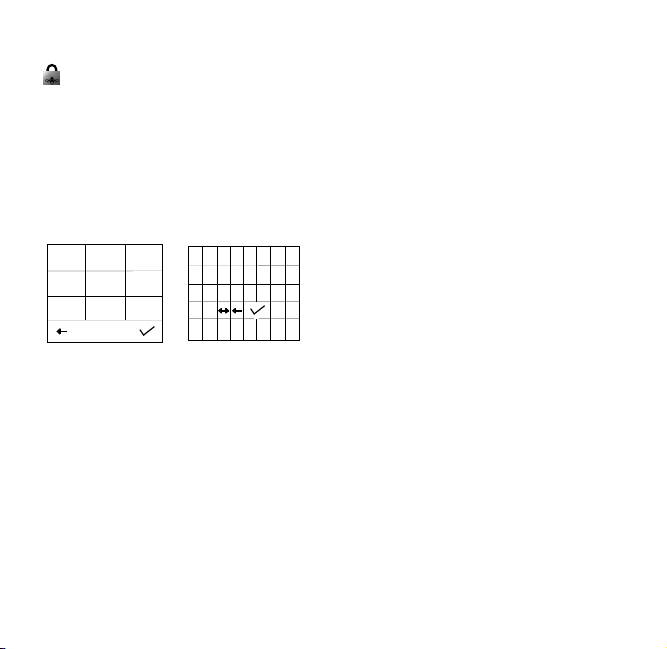
Type Names and Numbers
Use the display area keypads to
type names and numbers. These
keypads are only available in the
Parental controls menu.
1. Press the Navigation arrows to
scroll to a number or letter.
2. Press the Select button to enter
the number/letter in the top line
of the display area.
4. Scroll to the back arrow in the
bottom line of the display and
press the Select button to erase
a number/letter.
5. Scroll to the check mark and
press the Select button to save
the entry.
8
Setup the Call Keys
There are two pre-programmed
call keys. Each key calls a single
number. These keys are sometimes
called Mom and Dad keys.
To program the call keys:
1. Scroll to Parental Controls and
press the Select button.
2. Scroll to each number in your
password [default is 0000]
(if you have forgotten your
password, enter 5678) and
press the Select button. Scroll
to the check mark and press
the Select button to open the
Parental Controls menu.
3. Scroll to Setup Mom or Setup
Dad and press the Select button.
4. Type the phone number for this
key. Scroll to the check mark
and press the Select button to
save the number.
5. Type the name you want to see
when the Call key is pressed.
Scroll to the check mark and
press the Select button to save
the name.
6. Repeat to setup the other call key.
Quick Start Guide

Setup the Contact List
The Contact List contains
pre-programmed names and
phone numbers.
1. Scroll to Parental Controls and
press the Select button.
2. Scroll to each number in your
password [default is 0000] and
press the Select button. Scroll
to the check mark and press
the Select button to open the
Parental Controls menu.
3. Scroll to Contact List and press
the Select button.
4. Scroll to Add New Contact and
press the Select button.
5. Type the phone number for this
contact (see page 8). Scroll to
the check mark and press the
Select button to save
the number.
6. Type the name you want to see
in the Contact List. Scroll to
the check mark and press the
Select button to save the name.
7. Repeat for each contact you
want to add to the list. You can
enter up to 48 names in the
Contact List.
USING THE PHONE
The Call Keys and the Contact List
must be setup before you can use
them to make a call.
Make a Call Using the Call Keys
1. Press and hold the End key to
turn on the phone.
2. Check the network and battery
strength icons at the top of the
display area.
3. Press the Mom or Dad key. The
number and name will appear in
the display area.
4. Press the Send key.
5. Press the End key when you are
done talking.
Make a Call Using the Contact List
1. Press and hold the End key to
turn on the phone.
2. Check the network and battery
strength icons at the top of the
display area.
3. Scroll to Contacts and press the
Select button.
Quick Start Guide
9

4. Scroll to the name or number
you want to call and press
the Select button. The name
and number will appear in the
display area.
5. Press the Send key.
Make an Emergency Call
1. Press and hold the End key to
turn on the phone.
2. Check the network and battery
strength icons at the top of the
display area.
3. Press the Emergency Call
button on the side of the phone.
The emergency number will
appear in the display area.
4. Press the Send button.
5. Press the End key when you are
done talking.
Answer a Call
Note: See the User’s Guide
for information on how to set
permissions for incoming calls.
1. Press the Send key button to
answer the call.
2. Press End key when you are
done talking.
Missed Calls
If a call arrives when glowPhone
is off, a Missed Calls prompt will
display when you turn it on. To view
the missed call, press the Select
button. To skip the missed call,
scroll to Ignore and press the
Select button.
Note: Check the Voice Mail menu to
listen to a voice mail message
if the caller left one.
10
Quick Start Guide

VOICE MAIL
If glowPhone is off when a
call arrives, the caller can leave
a voice message. When you turn
on glowPhone, the New Voice Mail
Messages prompt will display.
If glowPhone is on and a call is not
answered, the caller can also leave
a voice message. The Voice Mail
icon will appear at the top of the
display area.
TEXT MESSAGES
If a message arrives when
glowPhone is on, the message
will display, and you can read the
message or save it to read later.
Then, when another message
arrives, a New Text Message
prompt displays. Use the Read
Text Messages menu to read this
message and all of the other
messages saved on your phone.
To listen to a voice mail message:
1. Press and hold the End key to
turn on the phone.
2. Check the network and battery
strength icons at the top of the
display area.
3. Scroll to the Voice Mail menu
and press the Select button.
Note: Scroll to the Speaker
icon and press the
Select button to turn the
speaker on or off when
you listen to the voice
mail message.
Quick Start Guide
To read a message:
1. Press and hold the End key to
turn on the phone.
2. Check the network and battery
strength icons at the top of the
display area.
3. Scroll to the Read Text
Message menu and press the
Select button.
4. Scroll to the message you want
to read and press the Select
button.
11

5. Read the message.
a. If you want to call the
sender of the message,
press the Send key.
b. If you want to delete the
message, scroll to the
Trashcan icon and press
the Select button. You will
be prompted to conrm
the deletion.
GAMES
glowPhone has several games
ready for you to play.
To play a game:
1. Scroll to the Games menu and
press the Select button.
2. Scroll to the game you want
to play and press the
Select button.
To delete a message:
It is a good idea to go through your
messages and delete the ones you
no longer want to keep.
1. Press and hold the End key to
turn on the phone.
2. Scroll to the Read Text
Message menu and press the
Select button.
3. Scroll to the message you want
to delete and press the
Select button.
4. Scroll to the Trashcan icon and
press the Select button. You will
be prompted to make sure you
want to delete the message.
12
RINGTONES
You can change the ringtones
for alerts, phone calls, and text
messages.
1. Scroll to the Ringtones menu
and press the Select button.
2. Scroll to Ring Type and press
the Select button.
3. Scroll to Ringer or Silent and
press the Select button. A
Saved prompt will display.
Note: Silent means that the
phone will not ring when
a phone call or messages
arrives.
Quick Start Guide

4. Scroll to Ringtone and press
the Select button.
5. Scroll to the ringtone you
want to hear and press the
Select button.
6. Scroll to Message Alert and
press the Select button.
7. Scroll to the ringtone you want
to hear when a message arrives
and press the Select button. A
Saved prompt will display.
WALLPAPER
The wallpaper you select will
appear in the display area on the
idle screen.
1. Scroll to the Wallpaper menu
and press the Select button.
2. Scroll to the wallpaper you want
to see in the display area and
press the Select button.
FLASHLIGHT
When you turn on the
Flashlight, all of the glowPhone
lights will go on and you can use
your phone as a ashlight.
1. Scroll to the Flashlight menu
and press the Select button.
2. To turn off the Flashlight press
the End button.
Note: The ashlight will also go
off when you use the Mom
or Dad keys or the
Send key.
Quick Start Guide
13

TERMS & CONDITIONS
To use a Firey handset as a cellular phone, you must obtain service from a
wireless service provider. Your service provider may provide additional terms and
conditions and instructions for using network services. Some networks may have
limitations that affect how you can use wireless services.
If Firey Mobile is your wireless service provider, your service is bound by the Firey
Mobile Service Terms & Conditions, which are subject to change. A complete, up to
date listing of Firey Mobile Service Terms & Conditions can always be found at
www.reymobile.com/rey minutes/terms & conditions. Below is a summary of
some key terms and conditions for using Firey services.
Domestic and international calls and text messages are charged at a per unit rate, and
airtime usage is billed in full minute increments, rounded up to the next full minute.
Firey Mobile does not guarantee coverage or network availability.
Note: Value deposited into your Firey account(s) will expire, depending on the
selected rate plan. Upon account expiration, you will have a 30 day grace period
to rell your account before your Firey phone number is cancelled. A service
activation fee and new phone number may be required to reactivate service. More
information on rate plans, expiration dates, and reactivation can be found at
www.reymobile.com.
FIREFLY ONE-YEAR LIMITED WARRANTY
Firey Mobile, Inc. (“Firey”) warrants that this cellular phone and battery (“Product”)
will be free from defects in material and workmanship that result in Product failure
during normal usage for ONE (1) YEAR from the date of purchase, according to the
following terms and conditions:
1. The limited warranty extends only to the original purchaser (“You” or
“Consumer”) of the Product and may not be assigned or transferred to any
subsequent purchaser or user. The limited warranty extends only to the Consumer
who purchases the Product in the country for its intended sale.
2. Upon request from Firey, You must prove the date of the original purchase of the
Product by a dated bill of sale or dated itemized receipt.
14
Quick Start Guide

3. During the limited warranty period, Firey will repair or replace the Product, as
Firey determines, if its limited warranty applies. Firey will be responsible for
parts and labor to repair or replace the Product or defective parts of the Product.
4. The limited warranty does NOT cover defects in appearance, cosmetic, decorative
or structural items, including framing, and any parts that do not affect the
Product functions.
5. Firey’s limited warranty does NOT apply if any of the following circumstances
occurs:
a. The Product has been subjected to abnormal use or conditions, improper
storage, exposure to moisture or dampness, unauthorized modications,
unauthorized connections, unauthorized repairs, misuse, neglect, abuse,
accident, alteration, improper installation, or other acts that are not the fault
of Firey. This includes damage caused by shipping.
b. The Product has been damaged by external causes such as liquid, water,
collision with an object, or from re, ooding, sand, dirt, windstorm,
lightning, or exposure to weather conditions; battery leakage; theft; blown
fuse, electrical surge, or improper use of any electrical source; computer or
Internet viruses, bugs, worms, Trojan Horses; or connection to products not
recommended for interconnection by Firey.
c. Defects or damages are caused by physical damage to the surface of the
Product, including scratches or cracks in or to the outside housing or the LCD
display.
d. The Product serial number has been removed, defaced, or altered.
e. The defect or damage was caused by the defective function of the cellular
system or by inadequate signal reception.
6. If damage or a defect develops during the limited warranty period, You must take
the following step-by-step procedure:
a. Contact Firey customer service for repair or replacement.
b. Remove any additional memory. You must copy to another device and delete
from the Product any sensitive data that You have stored in the Product prior
to sending the Product for repair or replacement. Firey is not responsible for
additional memory, SIM cards, or accessories returned with the Product.
Quick Start Guide
15

c. You may have to bear the cost of shipping the product to Firey or to Firey’s
authorized return center.
d. Purchased content is the responsibility of the user and will not be replaced by
Firey.
e. If the Product is covered by Firey’s limited warranty, Firey will return the
repaired or replaced Product to You at Firey’s expense. You are responsible
for any expenses related to reinstallation of the Product.
f. Firey will repair or authorize the repair of the Product under the limited
warranty within 30 days of receipt of the Product. If Firey cannot perform
repairs covered under this warranty within 30 days, Firey will provide a
replacement Product or refund the purchase price.
7. A repaired Product may consist of used components, some of which have
been reprocessed. All used components comply with Product performance and
reliability specications.
8. Returning a Product for warranty repair or replacement will not extend the
original warranty period.
9. Firey’s limit of liability under the warranty shall be the actual cash value of the
Product at the time the Consumer returns the Product for repair. The cash value
shall be determined by the price paid by the Consumer for the Product less a
reasonable amount for usage. Firey shall not be liable for any other losses or
damages.
10. The remedies set forth in this limited warranty are Your exclusive remedies for
breach of warranty.
11. THE FOREGOING LIMITED WARRANTY IS THE CONSUMER’S SOLE AND
EXCLUSIVE REMEDY AND IS IN LIEU OF ALL OTHER WARRANTIES, EXPRESS OR
IMPLIED, INCLUDING ANY WARRANTY OF MERCHANTABILITY OR FITNESS FOR
A PARTICULAR PURPOSE OR USE. IN NO EVENT SHALL FIREFLY BE LIABLE FOR
SPECIAL, INCIDENTAL, CONSEQUENTIAL OR PUNITIVE DAMAGES, INCLUDING
LOSS OF ANTICIPATED BENEFITS OR PROFITS, LOSS OF SAVINGS OR REVENUE,
LOSS OF USE OF THE PRODUCT OR ANY ASSOCIATED EQUIPMENT, LOSS OF
DATA, COST OF CAPITAL, COST OF ANY SUBSTITUTE EQUIPMENT OR FACILITIES,
DOWNTIME, THE CLAIMS OF ANY THIRD PARTIES, INCLUDING CUSTOMERS, AND
16
Quick Start Guide

INJURY TO PROPERTY, RESULTING FROM THE PURCHASE OR USE OF THE
PRODUCT OR ARISING FROM BREACH OF THE WARRANTY, BREACH OF
CONTRACT, NEGLIGENCE, STRICT LIABILITY, OR ANY OTHER LEGAL OR
EQUITABLE THEORY, EVEN IF FIREFLY KNEW OF THE LIKELIHOOD OF SUCH
DAMAGES. FIREFLY SHALL NOT BE LIABLE FOR DELAY IN RENDERING SERVICE
UNDER THE LIMITED WARRANTY, OR LOSS OF USE DURING THE PERIOD THAT
THE PRODUCT IS BEING REPAIRED OR FOR LOSS OF DATA STORED IN THE
PRODUCT.
12. Disclaimers of implied warranties are not enforceable in some jurisdictions, and
some jurisdictions do not allow limitation of how long an implied warranty lasts,
so the one year warranty limitation may not apply to You. This limited warranty
gives You specic legal rights and You may also have other rights that vary from
jurisdiction to jurisdiction.
13. This limited warranty is the entire warranty between Firey and the Consumer,
and supersedes all prior and contemporaneous agreements or understandings,
oral or written, and all communications relating to the Product. No representative
of Firey or any third party seller of Firey PRODUCTS may modify these terms,
either orally or in writing.
SPECIFIC ABSORPTION RATE DATA
This model wireless phone meets the U.S. Government’s requirements for exposure to
radio waves.
Your wireless phone is a radio transmitter and receiver. It is designed and
manufactured not to exceed limits for exposure to radio frequency (RF) energy set by
the U.S. Federal Communications Commission (FCC) and by the European Committee
for Electrotechnical Standardization (CENELEC). These limits are part of comprehensive
guidelines and establish permitted levels of RF energy for the general population.
The guidelines are based on standards that were developed by independent scientic
organizations through periodic and thorough evaluation of scientic studies. The
standards include a substantial safety margin designed to assure the safety of all
persons, regardless of age or health.
The exposure standard for wireless mobile phones employs a unit of measurement
Quick Start Guide
17

known as Specic Absorption Rate, or SAR. The SAR limit set by the FCC and CENELEC
regulatory authorities is 1.6 W/kg. Tests for SAR are conducted using standard
operating positions with the phone transmitting at its highest certied power level in
all tested frequency bands. Although the SAR is determined at the highest certied
power level, the actual SAR level of the phone while operating can be well below the
maximum value. This is because the phone is designed to operate at multiple power
levels so as to use only the power required to reach the network. In general, the closer
you are to a wireless base station, the lower the power output.
Before a wireless phone is available for sale to the public, it must be tested and
certied to the FCC and CENELEC that it does not exceed the limit established for safe
exposure. The highest SAR value for this model phone when tested for use at the ear is
1.46 W/kg. This SAR compliance is limited to the specic accessories shipped with
this phone. For body worn operation this device was tested with 1.5cm separation to
the body. Third party belt-clips, holsters, and similar accessories containing metallic
components should not be used.
While there may be differences between the SAR levels of various phones and at
various positions, they all met the governmental requirements for safe exposure.
Please note that improvements to this product model could cause differences in the
SAR value for later products; in all cases, products are designed to be within the
guidelines.
Additional information on Specic Absorption Rates (SAR) can be found on the Cellular
Telecommunications & Internet Association (CTIA) Web site:
http://www.phonefacts.net
or the CENELEC Web site:
http://www.cenelec.org
18
Quick Start Guide

RF ENERGY INTERFERENCE / COMPATIBILITY
Nearly every electronic device is subject to RF energy interference from external
sources if inadequately shielded, designed, or otherwise congured for RF energy
compatibility. In some circumstances your mobile phones may cause interference with
other devices. This device complies with part 15 of the FCC Rules. Operation is subject
to the following two conditions: (1) This device may not cause harmful interference,
and (2) this device must accept any interference received, including interference that
may cause undesired operation.
Any changes or modications not expressly approved by Firey Mobile, Inc. will void
the user’s ability to operate the equipment. Use only Firey approved chargers.
Note: This equipment has been tested and found to comply with the limits for a Class B
digital device, pursuant to Part 15 of the FCC Rules. These limits are designed to
provide reasonable protection against harmful interference in a residential installation.
This equipment generates, uses, and can radiate radio frequency energy and if not
installed and used in accordance with the instructions, may cause harmful interference
to radio communications. However, there is no guarantee that the interference will not
occur in a particular installation. If the equipment does cause harmful interference to
radio or television reception, which can be determined by turning the equipment off
and on, the user is encouraged to try to correct the interference by one or more of the
following measures:
Reorient or relocate the receiving antenna.
•
Increase the separation between the equipment and the receiver.
•
Connect he equipment to an outlet on a circuit different from that to which the
•
receiver is connected.
Consult the dealer or an experienced radio/television technician for help.
•
Follow Instructions to avoid Interference problems. Turn off your mobile device in any
location where posted notices Instruct you to do so. These locations include hospitals
or health care facilities that may be using equipment that is sensitive to external RF
energy.
In an aircraft, turn off your mobile device whenever instructed to do so by airline staff.
If your mobile device offers an airplane mode or similar feature, consult airline staff
about using it in ight.
Quick Start Guide
19

Firefly Minutes™ Coverage Map
For more information, visit fireflymobile.com
This map is an approximate depiction of our nationwide GSM coverage outdoors and portions of the
coverage map depict networks that are operated by our partners and affiliates. We are not responsible
for the performance of those networks. Map may include locations with limited or no coverage. Actual
coverage area may differ from map graphics. Firefly Mobile does not guarantee coverage. The Services
we provide you depend on over-the-air radio transmissions and many factors can affect your ability to
make and receive calls on your wireless phone and the quality of those calls. These factors include
your location, the conditions of the atmosphere, the terrain, nearby buildings and other structures.
 Loading...