

Page 1

TABLE OF CONTENTS
SAFETY INFORMATION . . . . . . . . . . . . . . . . . . . . . . . . . . . . . . . . . . . . . . . . . . .1
Network Services . . . . . . . . . . . . . . . . . . . . . . . . . . . . . . . . . . . . . . . . . . . . .1
Charger and Enhancements . . . . . . . . . . . . . . . . . . . . . . . . . . . . . . . . . . . . .1
MEET FIREFLY . . . . . . . . . . . . . . . . . . . . . . . . . . . . . . . . . . . . . . . . . . . . . . . . . .2
PREPARE FIREFLY FOR USE . . . . . . . . . . . . . . . . . . . . . . . . . . . . . . . . . . . . . . .3
Install a SIM Card . . . . . . . . . . . . . . . . . . . . . . . . . . . . . . . . . . . . . . . . . . . .3
Charge the Battery . . . . . . . . . . . . . . . . . . . . . . . . . . . . . . . . . . . . . . . . . . . .4
GETTING STARTED . . . . . . . . . . . . . . . . . . . . . . . . . . . . . . . . . . . . . . . . . . . . . .5
Power On and Off . . . . . . . . . . . . . . . . . . . . . . . . . . . . . . . . . . . . . . . . . . . .5
Display . . . . . . . . . . . . . . . . . . . . . . . . . . . . . . . . . . . . . . . . . . . . . . . . . . . . .5
FIREFLY MENUS . . . . . . . . . . . . . . . . . . . . . . . . . . . . . . . . . . . . . . . . . . . . . . . .6
Menu Choices . . . . . . . . . . . . . . . . . . . . . . . . . . . . . . . . . . . . . . . . . . . . . . .8
Using the Menus . . . . . . . . . . . . . . . . . . . . . . . . . . . . . . . . . . . . . . . . . . . . .9
SET UP FIREFLY . . . . . . . . . . . . . . . . . . . . . . . . . . . . . . . . . . . . . . . . . . . . . . .10
Set the Time and Date . . . . . . . . . . . . . . . . . . . . . . . . . . . . . . . . . . . . . . . .10
Set Up the Call Keys . . . . . . . . . . . . . . . . . . . . . . . . . . . . . . . . . . . . . . . . .11
Load Call Key Numbers from the SIM . . . . . . . . . . . . . . . . . . . . . . . . . . . .14
Call Screening . . . . . . . . . . . . . . . . . . . . . . . . . . . . . . . . . . . . . . . . . . . . . .14
CUSTOMIZE FIREFLY . . . . . . . . . . . . . . . . . . . . . . . . . . . . . . . . . . . . . . . . . . . .15
Set the Ring Tones . . . . . . . . . . . . . . . . . . . . . . . . . . . . . . . . . . . . . . . . . . .15
Select Display Colors . . . . . . . . . . . . . . . . . . . . . . . . . . . . . . . . . . . . . . . . .15
Select an Animation . . . . . . . . . . . . . . . . . . . . . . . . . . . . . . . . . . . . . . . . . .16
Change the Charger Lights . . . . . . . . . . . . . . . . . . . . . . . . . . . . . . . . . . . . .16
USING FIREFLY . . . . . . . . . . . . . . . . . . . . . . . . . . . . . . . . . . . . . . . . . . . . . . . .17
Make a Call . . . . . . . . . . . . . . . . . . . . . . . . . . . . . . . . . . . . . . . . . . . . . . . .17
Make an Emergency Call . . . . . . . . . . . . . . . . . . . . . . . . . . . . . . . . . . . . . .17
Answer a Call . . . . . . . . . . . . . . . . . . . . . . . . . . . . . . . . . . . . . . . . . . . . . . .18
Answer a Call with a Waiting Call . . . . . . . . . . . . . . . . . . . . . . . . . . . . . . . .18
Send Numbers During a Call . . . . . . . . . . . . . . . . . . . . . . . . . . . . . . . . . . .18
Adjust the Volume . . . . . . . . . . . . . . . . . . . . . . . . . . . . . . . . . . . . . . . . . . .19
View the Missed Calls List . . . . . . . . . . . . . . . . . . . . . . . . . . . . . . . . . . . . .19
View the Total Call Time . . . . . . . . . . . . . . . . . . . . . . . . . . . . . . . . . . . . . . .19
Firefly Lights and Firefly Fireworks™ . . . . . . . . . . . . . . . . . . . . . . . . . . . . .20
Attach the Backpack Clip . . . . . . . . . . . . . . . . . . . . . . . . . . . . . . . . . . . . . .20
Page 2

HELP YOUR CHILD USE FIREFLY . . . . . . . . . . . . . . . . . . . . . . . . . . . . . . . . . .21
MAINTENANCE AND TROUBLESHOOTING . . . . . . . . . . . . . . . . . . . . . . . . . . .21
Clean Firefly . . . . . . . . . . . . . . . . . . . . . . . . . . . . . . . . . . . . . . . . . . . . . . . .21
Use the Manual Reset Option . . . . . . . . . . . . . . . . . . . . . . . . . . . . . . . . . .21
FIREFLY ONE-YEAR LIMITED WARRANTY . . . . . . . . . . . . . . . . . . . . . . . . . . . .22
FCC NOTICE AND SAR STATEMENT . . . . . . . . . . . . . . . . . . . . . . . . . . . . . . . .25
Copyright ©2005 Firefly Mobile, Inc.
Firefly and Firefly Fireworks are the exclusive trademarks of Firefly Mobile, Inc.
For more information visit www.fireflymobile.com.
Screen images are simulated. Actual screen images may
vary between service providers.
Printed in USA
84-0001-012
Page 3
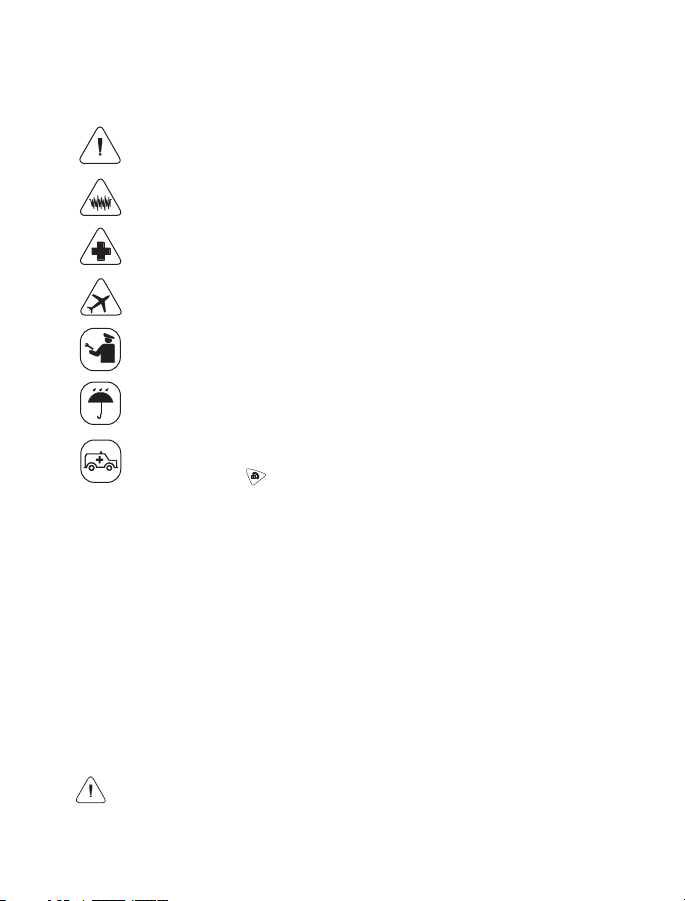
SAFETY INFORMATION
Read and follow these guidelines. Not following these guidelines may be dangerous
or illegal. Read the complete guide for more information.
Power up (turn on) safely. Use this phone only where wireless phones
are permitted.
Interference. All wireless phones may be susceptible to interference,
which could affect performance.
Turn off in hospitals. Follow any restrictions. Wireless devices can cause
interference with medical equipment.
Turn off in aircraft. Wireless devices can cause interference in aircraft.
Qualified service. Only qualified technicians may repair this product.
Water resistance. This phone is not waterproof. Keep it dry.
Emergency calls. Make sure the phone is turned on and in service. Press
and hold the emergency call button until Emergency Call appears in the
display. Press to complete the call.
When using the features in this device, obey all laws and respect privacy and
legitimate rights of others.
Network Services
To use the Firefly handset, you must obtain service from a wireless service provider.
Your service provider may provide additional instructions for using network services
on this phone. Some networks may have limitations that affect how you can use
wireless services.
Charger and Enhancements
This handset uses an internal, rechargeable lithium-ion battery. When you
disconnect a power cord, grasp and pull the plug, not the cord. For availability of
approved chargers and enhancements, please check with your dealer.
Warning! Use only chargers and accessories approved by the manufacturer
for use with Firefly. Use of any other types will invalidate the warranty and
may be dangerous.
1
Page 4
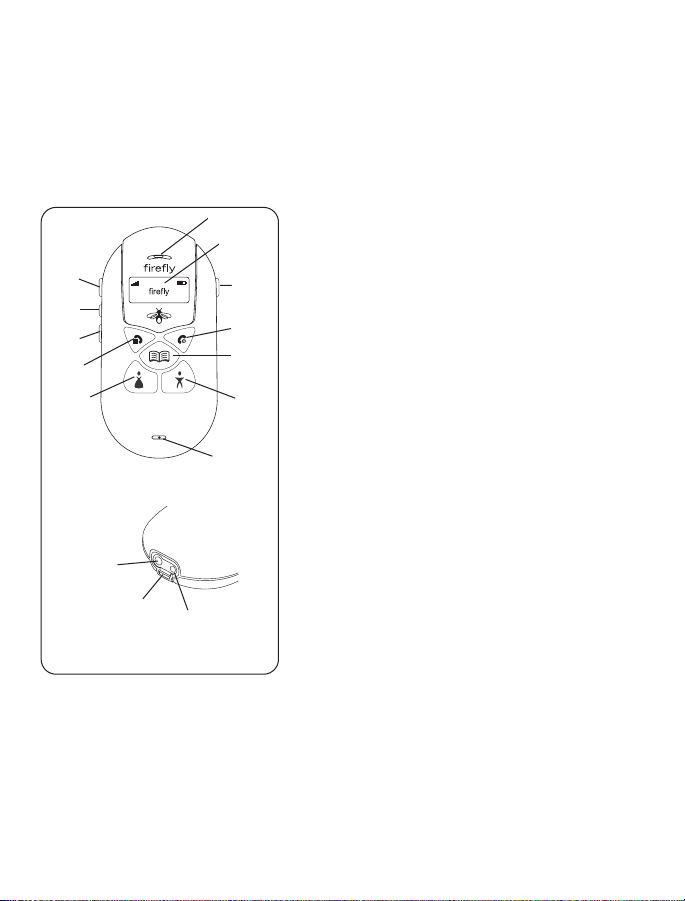
MEET FIREFLY
Your new Firefly wireless phone is designed for kids. It is easy to use. Just press a
couple of buttons to place a call. There is no need to remember numbers or dial.
Firefly's special Phone Book makes this possible. It can hold up to 20 preprogrammed numbers. Use the parental control options to limit incoming and
outgoing calls to the numbers in the Phone Book.
1. Earpiece. Hold to ear when using Firefly.
2. Display. View status and menu
information.
3. Emergency call button. Press and hold to
activate the emergency call function.
Emergency Call appears on the display.
4. End key. Press to end a call. Press and
hold to turn Firefly on or off.
5. Phone Book call key. Press to view and
call up to 20 pre-programmed numbers.
6. Dad call key. Press to call a pre-
programmed number.
7. Mouthpiece. Hold near mouth when using
Firefly.
8. Mom call key. Press to call a pre-
programmed number.
9. Send key. Press to answer or make a call.
Press and hold to see the menus.
10. Volume down button. Press to decrease
earpiece or ring volume.
11. Firefly Fireworks™ button. Press to start
the Firefly Fireworks™.
12. Volume up button. Press to increase
earpiece or ring volume.
13. Charger port. For charger cable.
14. Earpiece port. For accessory earpiece
cable.
15. Accessory Hook. Use to attach Firefly
accessories.
8:00 SAT SEP 17
12
11
10
8
7
6
5
4
3
2
1
9
13
15
14
2
Page 5

PREPARE FIREFLY FOR USE
Firefly requires a SIM card and a charged battery for operation.
Install a SIM Card
Your Firefly may already have a SIM card installed. If not, you must install a SIM
card before setting up your Firefly. The SIM card (provided by your network service
provider) contains the phone number for your Firefly and provides access to
network service options.
Note: Contact your network service provider if you have problems with the SIM
card or questions about your service.
1. Push up on the release button
at the top of the rear cover.
Start at the top and gently pull
off the rear cover.
2. Remove the front cover
by pressing on the and
keys while holding the front
cover.
3. Slide the SIM card under the
metal clip. Make sure the cut
corner is lower left and the
gold contacts of the SIM card
face down.
4. Replace the front cover. Move
the keypad into place, if
needed.
5. Replace the rear cover and
gently press the front and rear
covers together.
3
1
2
3
4 5
Page 6
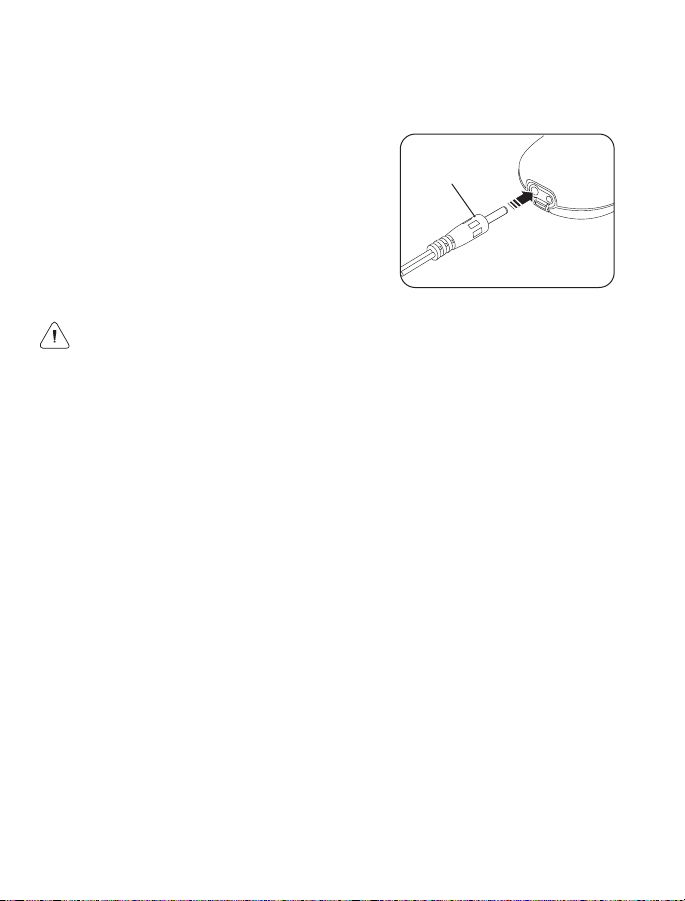
Charge the Battery
It will take about 2 hours to charge the internal battery for the first time. While
charging, the tail lights flash and Charging appears on the display. The battery icon
will indicate that Firefly is charging.
To charge the battery:
1. Connect the charger to a standard AC
wall outlet.
2. Plug the charger cable into the Firefly
battery port.
Note: After the initial charge, recharge the
battery when the battery icon in the display
reads low.
Warning! Always use the charger supplied with Firefly or one approved by the
manufacturer. Other chargers may damage Firefly and will void the warranty.
4
Charger
cable
Page 7
GETTING STARTED
After the SIM card is installed and the battery is charged, you are ready to begin
the setup process.
Power On and Off
To turn on Firefly, press and hold for several
seconds. The lights go on and the display
activates. Firefly will attempt to locate the
wireless service.
Note: If Firefly is not in a service area, No
Network appears on the display.
To turn off Firefly, press and hold for several
seconds. The display goes blank and the lights
go off.
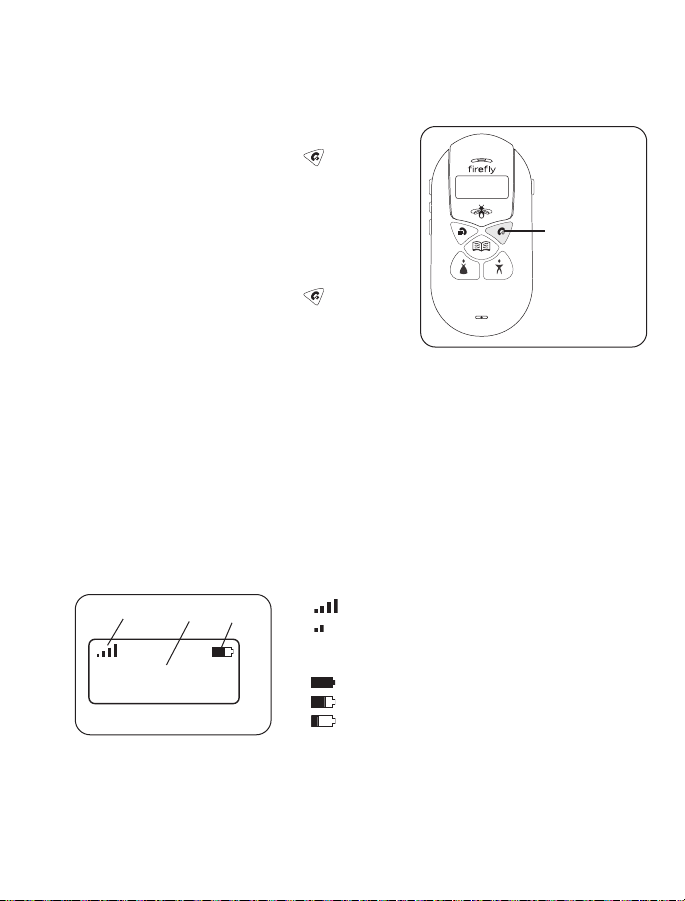
Display
The display area is activated when Firefly is on and provides information about:
• Your wireless service.
• Signal strength.
• Battery status.
• Name and number of incoming/outgoing calls.
• Menu options and selections.
1. Indicates signal strength.
Strong signal
Weak signal
2. Indicates battery strength.
Full charge
Partial charge
Low charge, recharge battery
3. Text area.
5
firefly
8:00 SAT SEP 17
1
3
2
Press and
hold to turn
Firefly on or
off.
Page 8
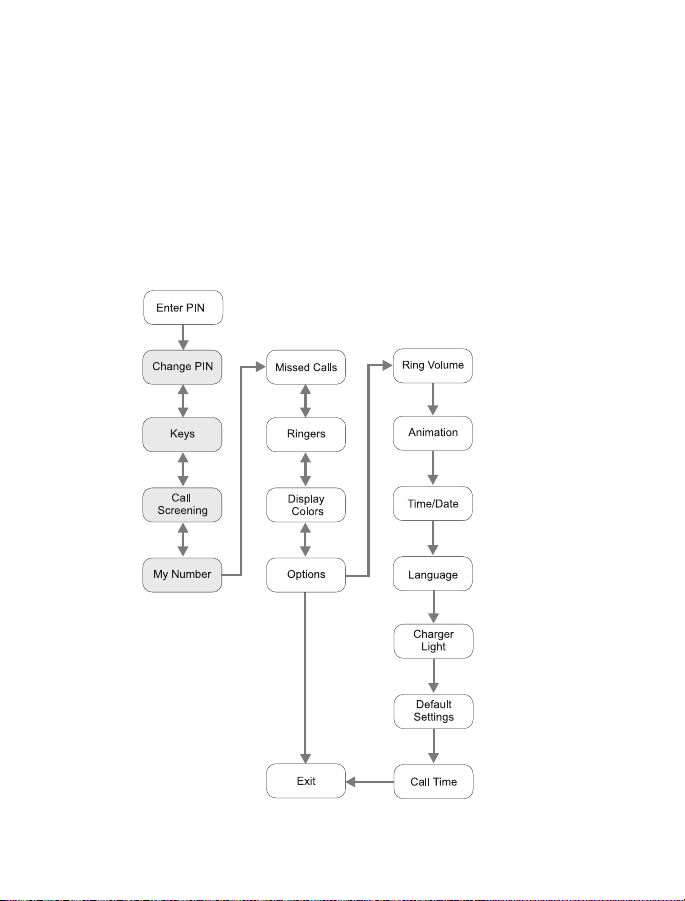
FIREFLY MENUS
Firefly uses menus to customize the Firefly and make it more fun for your child to
use. For example, using the menus you or your child can:
• Change the Firefly Fireworks™ animation.
• Select display colors and animations.
• Select a language for the display text.
In addition, several PIN-protected, parental control menus allow you to manage
incoming and outgoing calls for your child.
To prepare Firefly for use, complete the set-up tasks described in this section.
Gray = PIN-protected menu
6
Page 9

Each menu controls a special operation or feature.
MENU OPERATION/FEATURE
Enter PIN Enter your PIN to access the PIN-protected menus.
*Change PIN Set up a unique PIN.
*Keys Assign names and telephone numbers to the Call Keys.
*Call Screening Turn Call Screening on or off.
*My Number See the phone number of your Firefly.
Missed Calls See a list of unanswered calls.
Ringers Select and assign special ring tones for each Call Key.
Display Colors Change the background color of the display.
Options Set/select the following options:
Ring Volume Set the default ring volume.
Animation Select the animation option for the display.
Time/Date Set the time and date.
Language Select the language used for display
messages.
Charger Light Turn the tail lights on or off when charging
the battery.
Default Settings Restore Firefly to its original factory settings.
Call Time View the total cumulative call time of Firefly.
Exit Return to normal operation.
*
Indicates a PIN-protected menu.
7
Page 10

Menu Choices
In the menus, the , , and keys are used to select the menu choices on
the bottom line of the display. Press the menu key below the menu choice to
perform the task.
MENU CHOICE PRESS THE MENU KEY TO:
<– Scroll to previous item.
–> Scroll to next item.
BACK Return to previous menu.
CANCEL Cancel the current selection.
COLOR View the next display color.
EDIT Change/modify time, date, name, or number.
EXIT Close the menus and return to normal operation.
KEY Select the next Call Key.
LOAD Load a name and number from the SIM card.
MORE View additional options.
NEXT View next screen or menu.
NO Reject current setting/selection.
OK Accept current or selected setting/selection.
OPTION View the next Option menu.
RING Play the next ring tone choice.
SAVE Apply current setting/selection.
SWITCH Switch between options.
YES Accept current setting/selection.
Note: Not all menu choices are available in each menu.
8
Time/Date
BACK OK OPTION
Menu Name or Menu Option
Menu Choices
Page 11

Using the Menus
When you access the Firefly menus, you will be prompted
to enter a 4-digit PIN. If you skip the PIN, you will see
only the menus that are not PIN-protected. If you enter a
PIN, you will see all the menus.
To access the menus:
1. Press and hold until you see Enter PIN.
2. Press SKIP to access the menus that are not PINprotected.
3. Use BACK and NEXT to move through the menus. Use
OK to select options.
4. To exit the menus, continue to press NEXT until you see
the Exit screen, then press EXIT.
To access the PIN-protected menus:
1. Press and hold until you see Enter PIN.
2. Press ENTER.
3. Enter your PIN. {default PIN = 1 2 3 4}
a. Press –> to scroll to the first number and press
OK. An asterisk (*) appears on the top line.
b. Scroll to the next number and press OK. Repeat
until you have entered the PIN.
c. Scroll to Done and press OK. If the PIN is
accepted, you will see Change PIN.
4. Press YES to change the PIN number. (Press NO to
go to the next menu without changing the PIN.)
a. Scroll to the number and press OK. An asterisk (*)
appears on the top line.
b. Scroll to the next number and press OK. Repeat
until you have entered the PIN. Make sure there
are 4 asterisks (****) on the top line.
c. Scroll to Done and press OK. Saved indicates the
new PIN was accepted.
Note: If you change the default PIN, remember to
save a copy of the new PIN in a secure place.
5. Press YES to change the PIN again or press NO to move to the next menu.
6. Use BACK and NEXT to move through the menus. Use OK to select options.
9
Done Del 0 1 2
<– OK –>
Enter PIN
ENTER SKIP
****
Done Del 0 1 2
<– OK –>
Page 12

SET UP FIREFLY
Before using Firefly, you should:
• Set the time and date.
• Set up the Call Keys and Phone Book.
• Turn Call Screening ON (optional) .
Note: When Call Screening is ON, Firefly only accepts calls from numbers in the
Phone Book. When Call Screening is OFF, Firefly accepts all incoming calls.
Set the Time and Date
1. Scroll through the menus until you see Options.
Press OK.
2. Press OPTION until you see Time/Date. Press OK.
3. Press EDIT to see the time options:
a. Scroll to the current hour. Press OK.
b. Scroll to the current minute. Press OK.
c. Scroll to am or pm and press OK. Scroll to Done
and press OK.
d. Check the time. Press EDIT if you need to change
the time.
e. Press OK to save the time.
4. Press EDIT to see the date options:
a. Press <– and –> to scroll to the current year, then
press OK.
b. Scroll to the current month. Press OK.
c. Scroll to today's date. Press OK.
d. Scroll to Done. Press OK.
e. Check the date. Press EDIT if you need to change
the date.
f. Press OK to save the date.
10
Date:
2005/12/04
BACK OK EDIT
Options
BACK OK NEXT
Time/Date
BACK OK OPTION
Page 13

Set Up the Call Keys
There are 3 Call Keys:
• Two speed dial keys, and . Each calls a single
number. By default, these keys are called Mom and Dad.
• The key is used to access up to 20 names and
numbers. During set-up, the names and numbers are
entered individually or downloaded from a preprogrammed SIM card.
Use the PIN-protected Keys menu to change the names and numbers assigned to
the three Call Keys.
To set up the and Call Keys:
1. Press and hold to access the menus. Enter your PIN.
2. Scroll through the menus to Keys. Press OK. A Call
Key name appears on the display.
3. Press OK to set up this Call Key or press KEY until
you see the name of the Call Key you want.
Note: If your SIM card contains programmed
numbers, you may load names/numbers directly from
the SIM. If the SIM does not contain numbers, press
EDIT. See
Load Call Key Numbers from the SIM
for more information.
a. Press <– and –> to scroll to the first digit of the number, then press OK.
The digit appears on the top line.
b. Scroll to the next digit and press OK. Repeat until the entire number is on
the top line.
Tip: Scroll to Del and press OK to delete a digit.
c. Scroll to Done and press OK to save the number and display the name
(if any) assigned to this key.
4. Now the name assigned to the Call Key is displayed. If needed, press EDIT
to change the name.
a. Press <– and –> to scroll to the first letter, then press OK. The name
appears on the top line.
Tip: Scroll to Del and press OK to remove a letter.
b. Scroll to the next letter and press OK. Repeat until the entire name is on
the top line.
c. Scroll to Done and press OK to save the name and return to the
Keys menu.
5. Repeat steps 3 and 4 to set-up the key.
11
Keys
BACK OK NEXT
Page 14

To set up the Phone Book key:
The Firefly Phone Book can hold a maximum of 20 names and numbers. Setting
up the names and numbers in the Phone Book is similar to setting up the Mom
and Dad keys.
Use the PIN-protected Keys menu to add, change, and delete names and numbers
in the Phone Book.
• Add. Enter names/numbers.
• Edit. Modify names/numbers already in the Phone Book.
• Delete. Remove names and numbers from the Phone Book.
To add a name/number to the Phone Book:
1. Press and hold to access the menus. Enter your PIN.
2. Scroll to Keys and press OK. Press KEY until you see
Phone Book. Press OK.
3. Press OPTION until you see Add, then press OK.
a. Press EDIT.
b. Use <– and –> to scroll to a letter and press OK
to put it on the top line.
Tip: Scroll to Del and press OK to delete the
last letter.
c. Scroll to the next letter and press OK. Repeat until the entire name is on
the top line of the display.
d. Scroll to Done and press OK. The number will appear on the display.
Press EDIT to change the number.
e. Scroll to the desired digit and press OK to put the digit on the top line.
f. Scroll to the next digit and press OK. Repeat until the entire number is on
the top line.
g. Scroll to Done and press OK.
4. Press OK to enter another name/number and repeat step 3.
5. Press BACK to return to the Keys menu.
12
Phone Book
BACK OK KEY
Page 15

To edit the Phone Book:
1. Press and hold to access the menus. Enter your PIN.
2. Scroll to Keys and press OK. Press KEY until you see Phone Book and
press OK.
3. Press OPTION until you see Edit, then press OK.
a. Press EDIT to change the name.
b. Use <– and –> to scroll to a letter and press OK
to put it on the top line.
Tip: Scroll to Del and press OK to delete the
last letter.
c. Scroll to the next letter and press OK. Repeat until
the entire name is on the top line of the display.
d. Scroll to Done and press OK. The number will appear on the display.
Press EDIT to change the number.
e. Scroll to the desired digit and press OK to put the digit on the top line.
f. Scroll to the next digit and press OK. Repeat until the entire number is
on the top line.
g. Scroll to Done and press OK.
4. Press OK to enter another name/number and repeat step 3.
5. Press BACK to return to the Keys menu.
To delete a name/number from the Phone Book:
1. Press and hold to access the menus. Enter your PIN.
2. Scroll to Keys and press OK. Press KEY until you see
Phone Book and press OK.
3. Press OPTION until you see Delete. Press OK.
4. Use –> to scroll to the name/number you want to
delete.
5. Press DEL to delete the Phone Book entry. Press
YES to confirm that you want to delete this Phone
Book entry.
6. Press BACK to return to the Keys menu.
13
Name
Number
BACK EDIT –>
Name
Number
BACK DEL –>
Page 16

Load Call Key Numbers from the SIM
Note: Your SIM card can be pre-programmed with names and numbers from
any GSM cellular handset. These names and numbers can then be loaded onto
your Firefly.
1. Press and hold to access the menus. Enter your PIN.
2. Scroll through the menus to Keys. Press OK.
3. Press KEY to scroll to the desired Call Key and press OK.
4. Press LOAD.
a. Press –> to scroll through the names and numbers on the SIM.
b. Press OK when you see the desired name and number.
c. Press OK to save the name/number.
Tip: Press EDIT if you need to change the number.
d. Press OK again to confirm the name/number and finally to return to Keys.
5. Repeat steps 3 and 4 to load another name and number.
Call Screening
When Call Screening is OFF, Firefly will accept all incoming calls. When Call
Screening is ON, Firefly will accept calls only from the names/numbers assigned to
the Call Keys and in the Phone Book. The default setting for Call Screening is OFF.
After you activate the Call Screening option, test it to make sure it is working
properly before giving Firefly to your child.
To turn Call Screening on or off:
1. Press and hold to access the menus. Enter your PIN.
2. Scroll through the menus to Call Screening. Press OK.
3. Press SWITCH to toggle between Call Screen ON and Call Screen OFF.
4. Press OK to accept the setting.
To test Call Screening, call Firefly from two different phones:
• Call from a phone that is listed in the Firefly Phone Book. Firefly should ring.
• Call from a phone that is not in the Phone Book. Firefly should not ring.
If Call Screening is not working:
• Check the Phone Book to make sure the number of the "approved phone" is
in the Phone Book.
• Check the Call Screening menu to make sure the Call Screening is ON.
14
Page 17

CUSTOMIZE FIREFLY
You have finished the basic setup and Firefly is ready to use. However, you may
also want to set/select other features, including:
• Set ring tones for each Call Key.
• Set display colors for each Call Key.
• Select an animation that will run during the Firefly Fireworks™.
Set the Ring Tones
To assign a special ring tone to a Call Key:
1. Scroll through the menus until you see Ringers.
Press OK.
2. Press KEY until you see the Call Key you want.
Press OK.
3. Listen to the first ring tone. Press RING to hear
another ring tone. Press OK to assign the ring tone to
the Call Key. Saved appears on the display and you
will return to the Ringers menu.
4. Repeat steps 2 and 3 to assign a ring tone to each
Call Key.
Select Display Colors
To assign a background display color to a Call Key:
1. Scroll through the menus until you see Display Colors.
Press OK.
2. Press KEY until you see the Call Key you want.
Press OK.
3. Look at the display color. Press COLOR to see more
choices. Press OK to assign the color to the Call key.
Saved appears on the Display and you will return to
the Display Colors menu.
4. Repeat to assign a display color to another key.
15
Ringers
BACK OK NEXT
Genie
BACK OK RING
Display Colors
BACK OK NEXT
Turf
BACK OK COLOR
Page 18

Select an Animation
The animation you select will play during the Firefly Fireworks™.
To select an animation:
1. Scroll through the menus until you see Options.
Press OK.
2. Press OPTION until you see Animation. Press OK.
3. Press MORE until you see the animation name you
want, then press OK. Saved will appear on the
display and you will return to the Animation menu.
Change the Charger Lights
To turn the tail lights on or off while the battery is charging:
1. Scroll through the menus until you see Options. Press OK.
2. Press OPTION until you see Charger Light. Press OK.
3. Press SWITCH to turn the lights on or off, then press OK to save the setting.
16
Soccer
BACK OK MORE
Page 19

USING FIREFLY
Now that you have set-up and customized Firefly, it's time to use it for the first time.
Make a Call
To make a call using or :
1. Press or .
2. Check the name on the display.
Note: If it is not correct, you need to reprogram
this key.
3. Press to place the call.
4. Press to end the call.
To make a call using the
Phone Book:
1. Press .
2. Use <– and –> to scroll to the name/number
you want to call. Press OK. The name will
appear on the display.
3. Press to place the call.
4. Press to end the call.
Make an Emergency Call
1. Press and hold the emergency button for
3 seconds. Release the button when you see
Emergency Call on the display.
Note: Do NOT complete the call unless this is an
actual emergency.
2. Press to complete the call.
3. Press to end the call.
17
1
3
2
1
4
3
2
3
1
2
4
Page 20

Answer a Call
1. Check the name and/or number on the display.
2. Press to answer the call.
3. Press to end the call.
Answer a Call Waiting Call
If Firefly is in use and another call comes in, use this procedure to put the first call
on hold, answer the second call, and switch between callers.
1. Press to answer the new call. Firefly will put the first caller on hold.
2. Check the display and press SWAP to switch between calls.
3. Press to end the call. The call on hold will become active. Press
again to end the active call.
Send Numbers During a Call
If Firefly is in a call and you need to send numbers (DTMF tones) to the network or
to an answering machine, use this procedure.
1. Press TONE to access the number entry display.
2. Use <– and –> to scroll to the desired number, then press OK to send the
number.
3. Repeat to send as many as needed.
4. Scroll to Done and press OK after all numbers have been sent.
18
1
3
2
Incoming
GRANDMA
HI BYE
GRANDMA
SWAP 00:24 BYE
Page 21

Adjust the Volume
To adjust the volume during a call:
• Press the Volume up button to increase
the volume.
• Press the Volume down button to decrease
the volume.
To adjust the volume of the ring:
The ring can only be adjusted when Firefly is not in
call mode.
• Press the Volume up button to increase the
volume of the ring tone.
• Press the Volume down button to decrease the
volume of the ring tone.
View the Missed Calls List
Only calls that are missed while Firefly is powered on will appear on the
Missed Calls list.
To see a list of unanswered calls:
1. Scroll through the menus to Missed Calls. Press OK.
2. Press –> to scroll through the list. Press BACK to return to the menus.
View the Total Call Time
To see the total call time for your Firefly:
1. Scroll through the menus until you see Options. Press OK.
2. Press OPTION until you see Call Time. Press OK. The call time format
is hh:mm:ss.
3. Press OK.
19
Volume up
Volume down
Page 22

Firefly Lights and Firefly Fireworks
™
Firefly lights up when it is turned on and when the Firefly Fireworks™ button is
pressed. The lights go off after 15 seconds or when Firefly is turned off.
• Display background color changes during
the Firefly Fireworks™. It is red when the
Emergency button is pressed.
• Call Keys lights glow when pressed and
when receiving calls.
• Tail lights flash when the battery is charging
and periodically when Firefly is on.
Press the Firefly Fireworks™ button to see a
30-second Firefly Fireworks™ show. All the
lights flash, the animation runs, and the display
changes colors. The Firefly Fireworks™ also
play periodically whenever Firefly
is powered on.
Your child can change the light color for each call
key, select an animation for the display, and
activate/deactivate the Firefly Fireworks™ option.
Note: See
Customize Firefly
for more information.
Attach the Backpack Clip
The backpack clip is a convenient accessory that your child can use to clip Firefly
to a backpack or other item.
1. Detach the 2-piece plastic clip.
2. Thread the string loop through the
accessory hook (located under the
battery charger port).
3. Insert the plastic clip through the loop
and pull it tight to secure.
4. Reattach the 2-piece plastic clip.
5. Use the backpack clip to secure Firefly
to a backpack, belt loop, or similar item.
20
Press to start
the Firefly
Fireworks™.
plastic clip
backpack
clip
String
loop
Page 23

HELP YOUR CHILD USE FIREFLY
Now it's time to show your child how to use and take care of Firefly.
Depending on the age of your child, you may want to read the Firefly User Guide
with your child. We recommend you show your child how to use Firefly properly
and allow him/her to demonstrate how to answer a call and place a call.
Explain how to take care of Firefly and make arrangements for charging the battery
on a regular basis. Depending on the age of the child, you may want to make sure
an adult is responsible for charging the battery.
MAINTENANCE AND TROUBLESHOOTING
Clean Firefly
To clean Firefly, use a soft cloth lightly moistened with water.
• Firefly is NOT waterproof. Keep Firefly away from water and rain.
• Do not use strong cleaning solutions or abrasive products as they may
damage the plastic.
Use the Manual Reset Option
If the Firefly display "freezes" or the keys won't work:
• Make sure a key isn't stuck in the keypad. If it is, gently move the key to
free it.
• You may need to reset the system using the manual override option.
1. Remove the rear and front covers. See
Install a
SIM Card
for instructions.
2. Use your fingernail to press the small reset key
located on the left side of the circuit board
under the keypad. This should cause Firefly to
turn off immediately.
3. Replace the covers.
4. Press and hold to turn on Firefly.
21
Reset button
Page 24

FIREFLY ONE-YEAR LIMITED WARRANTY
Firefly Mobile, Inc. ("Firefly") warrants that this cellular phone ("Product") will be
free from defects in material and workmanship that result in Product failure during
normal usage for ONE (1) YEAR from the date of purchase, according to the
following terms and conditions:
1. The limited warranty extends only to the original purchaser ("You" or
"Consumer") of the Product and may not be assigned or transferred to any
subsequent purchaser or user. The limited warranty extends only to the
Consumer who purchases the Product in the country for its intended sale.
2. Upon request from Firefly, You must prove the date of the original purchase
of the Product by a dated bill of sale or dated itemized receipt.
3. During the limited warranty period, Firefly will repair or replace the Product,
as Firefly determines, if its limited warranty applies. Firefly will be
responsible for parts and labor to repair or replace the Product or defective
parts of the Product.
4. The limited warranty does NOT cover defects in appearance, cosmetic,
decorative or structural items, including framing, and any parts that do not
affect the Product functions.
5. You shall bear the cost of shipping the Product to Firefly or to Firefly's
authorized return center. Firefly shall bear the cost of shipping the Product
back to You after completion of service, provided that repairs were required
to be performed under this limited warranty.
6. Firefly's limited warranty does NOT apply if any of the following
circumstances occurs:
a. The Product has been subjected to abnormal use or conditions,
improper storage, exposure to moisture or dampness, unauthorized
modifications, unauthorized connections, unauthorized repairs, misuse,
neglect, abuse, accident, alteration, improper installation, or other acts
that are not the fault of Firefly. This includes damage caused by
shipping.
b. The Product has been damaged by external causes such as liquid,
water, collision with an object, or from fire, flooding, sand, dirt,
windstorm, lightning, or exposure to weather conditions; battery leakage;
theft; blown fuse or improper use of any electrical source; computer or
Internet viruses, bugs, worms, Trojan Horses, cancelbots; or connection
to products not recommended for interconnection by Firefly.
22
Page 25

c. Defects or damages are caused by physical damage to the surface of
the Product, including scratches or cracks in or to the outside housing
or the LCD display.
d. You did not advise Firefly in writing of the alleged defects or malfunction
of the Product within fourteen (14) days after the expiration of the
warranty period.
e. The Product serial number plate or the accessory data code has been
removed, defaced, or altered.
f. The defect or damage was caused by the defective function of the
cellular system or by inadequate signal reception.
7. If damage or a defect develops during the limited warranty period, You must
take the following step-by-step procedure:
a. Return the Product to the place of purchase for repair or replacement.
You must copy to another device and delete from the Product any
sensitive data that You have stored in the Product prior to sending the
Product for repair or replacement.
b. If return to the place of purchase is not convenient due to distance
(more than 80 km), You may contact the Customer Service Department
of your cellular operator.
c. Ship the Product prepaid and insured at Your expense. Shipping
expenses and expenses related to removing the Product from an
installation are not covered under Firefly's limited warranty.
d. If the Product is covered by Firefly's limited warranty, Firefly will return
the repaired or replaced Product to You at Firefly's expense. You are
responsible for any expenses related to reinstallation of the Product.
e. Firefly will repair or authorize the repair of the Product under the limited
warranty within 30 days of receipt of the Product. If Firefly cannot
perform repairs covered under this warranty within 30 days, Firefly will
provide a replacement Product or refund the purchase price.
f. If the Product is returned more than fourteen (14) days after the
expiration of the limited warranty period, or if the Product is returned
during the limited warranty period, but the problem with the Product is
not covered under the terms and conditions of Firefly's limited warranty,
Firefly will so notify You and provide an estimate (using Firefly's
standard rates) of the charges You must pay to repair the Product,
including return shipping charges. If You refuse the estimate Firefly will
return the Product freight collect.
23
Page 26

8. A repaired Product may consist of used components, some of which have
been reprocessed. All used components comply with Product performance
and reliability specifications.
9. Returning a Product for warranty repair or replacement will not extend the
original warranty period.
10. Firefly's limit of liability under the warranty shall be the actual cash value of
the Product at the time the Consumer returns the Product for repair. The
cash value shall be determined by the price paid by the Consumer for the
Product less a reasonable amount for usage. Firefly shall not be liable for
any other losses or damages.
11. The remedies set forth in this limited warranty are Your exclusive remedies
for breach of warranty.
12. THE FOREGOING LIMITED WARRANTY IS THE CONSUMER'S SOLE AND
EXCLUSIVE REMEDY AND IS IN LIEU OF ALL OTHER WARRANTIES, EXPRESS OR
IMPLIED, INCLUDING ANY WARRANTY OF MERCHANTABILITY OR FITNESS FOR
A PARTICULAR PURPOSE OR USE.
IN NO EVENT SHALL FIREFLY BE LIABLE FOR SPECIAL, INCIDENTAL,
CONSEQUENTIAL OR PUNITIVE DAMAGES, INCLUDING LOSS OF ANTICIPATED
BENEFITS OR PROFITS, LOSS OF SAVINGS OR REVENUE, LOSS OF USE OF THE
PRODUCT OR ANY ASSOCIATED EQUIPMENT, LOSS OF DATA, COST OF CAPITAL,
COST OF ANY SUBSTITUTE EQUIPMENT OR FACILITIES, DOWNTIME, THE
CLAIMS OF ANY THIRD PARTIES, INCLUDING CUSTOMERS, AND INJURY TO
PROPERTY, RESULTING FROM THE PURCHASE OR USE OF THE PRODUCT OR
ARISING FROM BREACH OF THE WARRANTY, BREACH OF CONTRACT,
NEGLIGENCE, STRICT LIABILITY, OR ANY OTHER LEGAL OR EQUITABLE THEORY,
EVEN IF FIREFLY KNEW OF THE LIKELIHOOD OF SUCH DAMAGES. FIREFLY
SHALL NOT BE LIABLE FOR DELAY IN RENDERING SERVICE UNDER THE LIMITED
WARRANTY, OR LOSS OF USE DURING THE PERIOD THAT THE PRODUCT IS
BEING REPAIRED OR FOR LOSS OF DATA STORED IN THE PRODUCT.
13. Disclaimers of implied warranties are not enforceable in some jurisdictions,
and some jurisdictions do not allow limitation of how long an implied
warranty lasts, so the one year warranty limitation may not apply to You.
This limited warranty gives You specific legal rights and You may also have
other rights that vary from jurisdiction to jurisdiction.
14. This limited warranty is the entire warranty between Firefly and the
Consumer, and supersedes all prior and contemporaneous agreements or
understandings, oral or written, and all communications relating to the
Product. No representative of Firefly or any third party seller of Firefly
PRODUCTS may modify these terms, either orally or in writing.
24
Page 27

FCC NOTICE AND SAR STATEMENT
This device complies with part 15 of the FCC Rules. Operation is subject to the
following two conditions: (1) This device may not cause harmful interference, and
(2) this device must accept any interference received, including interference that
may cause undesired operation.
Any changes or modifications not expressly approved by Firefly Mobile, Inc. will
void the user's authority to operate the equipment. Use only Firefly approved
chargers.
Note: This equipment has been tested and found to comply with the limits for a
Class B digital device, pursuant to part 15 of the FCC Rules. These limits are
designed to provide reasonable protection against harmful interference in a
residential installation. This equipment generates, uses and can radiate radio
frequency energy and if not installed and used in accordance with the instructions,
may cause harmful interference to radio communications. However, there is no
guarantee that interference will not occur in a particular installation. If this
equipment does cause harmful interference to radio or television reception, which
can be determined by turning the equipment off and on, the user is encouraged to
try to correct the interference by one or more of the following measures:
• Reorient or relocate the receiving antenna.
• Increase the separation between the equipment and receiver.
• Connect the equipment into an outlet on a circuit different from that to which
the receiver is connected.
• Consult the dealer or an experienced radio/TV technician for help.
THIS PHONE MODEL HAS BEEN CERTIFIED TO BE IN COMPLIANCE WITH
THE U.S. GOVERNMENT’S REQUIREMENTS FOR EXPOSURE TO RADIO WAVES.
THIS PHONE IS ALSO IN FULL COMPLIANCE WITH THE RSS-102 RF EXPOSURE
REQUIREMENTS FOR INDUSTRY CANADA COMPLIANCE.
Before a phone model is available to sale to the public, it must be tested and
certified that it does not exceed government limits for exposure to radio frequency
(RF) energy. Specific Absorption Rate (SAR) is a value that corresponds to the
relative amount of RF energy absorbed by the user of a wireless phone. The
Federal Communications Commission of the United States government and Health
Canada set SAR limits. The limits include a safety margin designed to assure the
safety of all persons, regardless of age and health. The maximum allowed SAR
value set by the FCC is 1.6 W/kg. Tests for SAR values are conducted using FCC
approved operating positions at the highest possible power levels. Although the SAR
is determined at the highest certified power level, the actual SAR level of the phone
while operating is likely well below the maximum value.
25
Page 28

The highest SAR values as reported to the FCC for this model phone are in full
compliance with FCC limits. This SAR compliance is limited to the specific
accessories shipped with this phone. For body worn operation this device was
tested with 0cm separation to the body. Third party belt-clips, holsters, and similar
accessories containing metallic components should not be used.
For more information about RF exposure, visit the FCC website at www.fcc.gov.
Additional information on Specific Absorption Rates (SAR) can be found on the
Cellular Telecommunications & Internet Association (CTIA) website:
http://www.ctia.org/wireless_consumers/health_and_safety/index.cfm
or the Canadian Wireless Telecommunications Association (CWTA) website:
http://www.cwta.ca
26
 Loading...