

Page 1

Instruction Manual
Electric Patio Heater
OL2804
Please read these instructions carefully before using your
new Electric Patio Heater
Unpack the Electric Patio Heater making sure that all the items
are present and that there are no components left in the box and
that the heater head is free from any packing material.
Using the detailed drawing follow the three steps to assemble
your halogen heater.
Do not connect the Electric Patio Heater to the electrical supply
until all the assembly is complete.
Do not connect the halogen heater to the electrical supply if any
of the components or the power cord is damaged in any way.
If in doubt contact your supplier.
If in doubt contact your supplier.
If in doubt contact:
Primrose London
info@primrose.co.uk
Tel:0118 9035210(UK)
Tel:0044 118 9035210(outside of UK)
Page 2
Assembly Instruction
Step one: Unpack the Electric Patio Heater making sure that all the
items are present
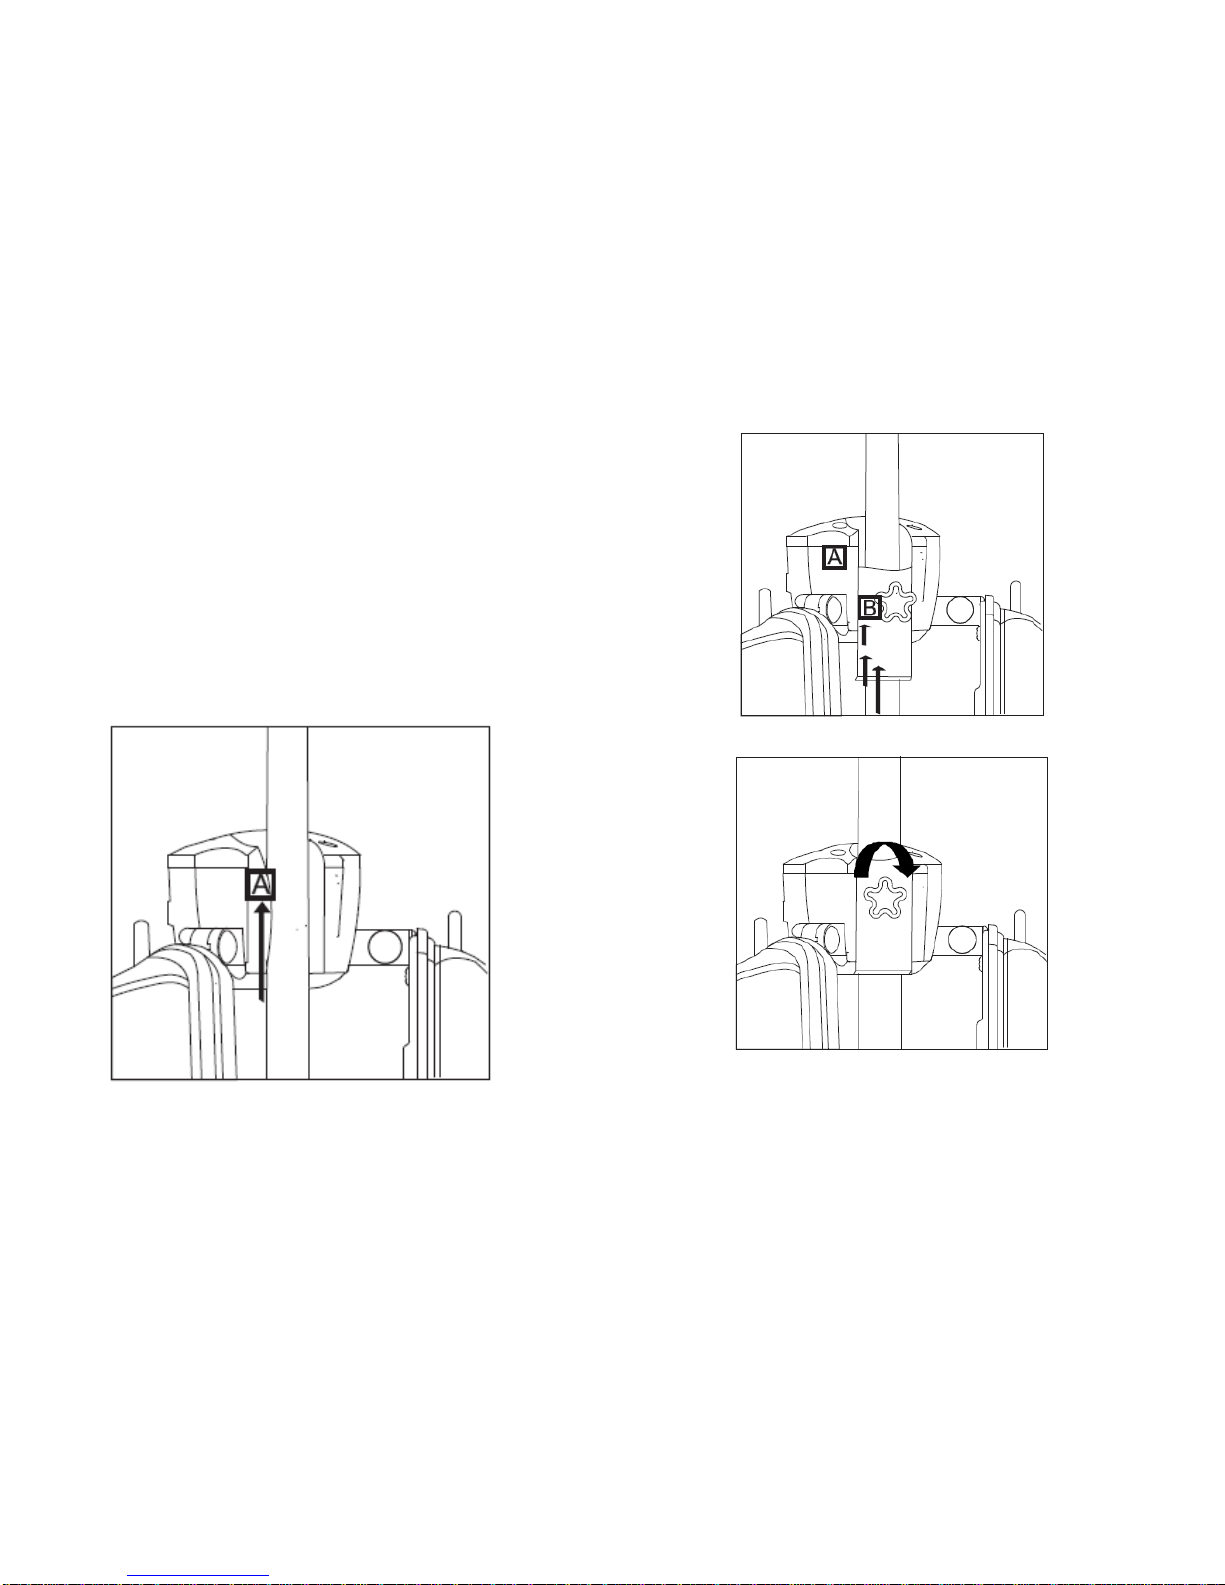
Step two: Place the Heater Mounting Part A on a Pole which diameter
is between 25mm – 60mm.
Step Three: Slip the Mounting Part B and fit it to the Mounting Part A
from the bottom up.
Step Four: Turn the Fixation Screw until the Mounting Part A is fixed on
the pole
Step 1: Mounting Part A
Pole
Pole size between 25mm – 60mm
Step 2: Mounting Part B
Step 3: Fixation Screw
Page 3

Step 4: When start using the heater, just holding the little handle by the
end of the heater and push up.
Step 5: When finish using the heater, please
a) Right hand push up the heater
b) Left hand press the little silver knob to the end
c) Right hand push down the heater.
Page 4

Operation
Connect the power cable to a 13 ampere supply that is located in a
safe, dry area.
1. The switch on the heater head is used to control the three heats
setting. (Ⅰ) for 650W--- (Ⅱ) for650W--- (Ⅰ&Ⅱ) for 2000W.
The 0 position is off.
2. Although the electric patio heater is shower proof, do not use
when raining or in wet conditions.
3. Always disconnect the power cable from the electrical supply,
when the patio heater is not in use.
Care and Maintenance
1. When disconnected from the electrical supply, clean the
outside of the patio heater with a damp cloth . Never use
corrosive or solvent cleaners or immerse in water.
2. Any maintenance or repairs including replacing the halogen
heating tube should only be carried out by a qualified
electrician or by a recommended service center.
Technical Specification
1. Power supply 220-240V ~50Hz
2. Wattage max 2000W
3. Net weight 3.60kg; Gross weight:4.50kg
4. Insulation class I
Caution
Only use the Electric Patio Heater on a firm vertical pole where all the
feet on the pole base are in contact with the floor. Should the heater
be tilted or fall over the auto cut off switch will activate.
1. This appliance is not intended for use by person (including
children) with reduced physical, sensory or mental
capabilities, or lack of experience and knowledge, unless
they have been given supervision or instruction concerning
use of the appliance by a person responsible for their safety.
2. Do not use the electric patio heater near bath tubs, wash
areas or swimming pools.
3. Do not use in unventilated areas
4. Do not use where gas, petrol, paint or other inflammable
goods are stored.
5. Do not push any items through, obstruct or cover the grill of
the heater head.
6. The heater must not be located immediately below a
socket-outlet.
7. Do not move when connected to an electrical supply and
always wait for the patio heater to cool down before storing
away.
8. Do not touch the heater head when in use.
9. Do not leave turned on and unattended especially when
children and or animals are in the vicinity.
10. The unit must be placed with the clearance of 180 cm to the
floor and 30cm to the roof / parasol cloth.
11. The unit must be correctly installed according to the
instructions. Make sure the heater is fixed at a height of at
least 1.8m above the floor.
12. The unit must be securely placed on a pole which is
vertically to the flat surface.
13. The unit is at high temperature during operation. It keeps hot
for a period after shut down. Potential danger would occur
when touching it during this period.
Page 5

14. Don’t place the unit closed to curtains, or other combustible
materials. Otherwise there will be a danger of catching fire.
15. Don’t cover the unit with anything during operation or a short
time after it’s shut down.
16. Don’t wrap the power supply cord on the unit.
17. The unit must be handled with care, and avoid of vibration or
hitting.
18. The unit must be securely grounded during operation.
19. When damaged, the unit must be repaired by professional
repairing team.
20. When the power supply cord is damaged, it must be
replaced by authorized agent or other professional people
so as to avoid danger.
21. When assembling, keep clear from any board or flammable
material.
22. The unit must be attended by adults if it’s used by a child.
23. It is not allowed to install the unit by swimming, pool, in bath
room or shower area.
24. The head of the unit is at high temperature during operation.
Unplug the unit and wait till it’s cool before cleaning.
25. Don’t use this unit in place where causticity or volatile air
exists, i.e. dust, steam, gas, etc.
26. Don’t use this unit as a cloth drier or towel drier.
27. Don’t use this unit as a sauna heater.
28. Don’t use this unit as a room heater of heating storing.
29. Don’t use this unit in place of animal propagating and
raising.
30. Don’t use this unit in heating system of hot air centre.
31. Don’t immerse this unit into water for cleaning.
32. The unit should be plugged in a socket, which is easily
visible and reachable.
33. One or two dark points may exist on the surface of the
heating elements during the first few minutes after it is
turned on. This is normal, and may not affect the
performance of the unit.
34. A tilt switch is fitted inside the unit for safety purpose
35. Children should be supervised to ensure that they do not
play with the appliance
EC declaration of conformity
This is to certify that
The ZHQ2028 Electric Patio Heater conforms to the standards:-
IEC/EN55014-1; IEC/EN 55014-2; IEC/EN61000-3-2;
IEC/EN61000-3-3; IEC/ EN60335-1; IEC/EN60335-2-3
 Loading...