

Page 1

Instruction Manual
Electric Patio Heater
OL0220
Please read these instructions carefully before using your
new heater
Page 2
Unpack the heater to make sure that all the items are present and
that there are no components left in the box and that the heater
head is free from any packing material.
Using the detailed drawing, follow the steps to assemble your
heater.
Do not connect the heater to the electrical supply until all the
assembly is complete.
Do not connect the heater to the electrical supply if any of the
components or the power cord is damaged in any way.
If in doubt contact your supplier.
This appliance can be used by children aged from 8 years and
above and persons with reduced physical, sensory or mental
capabilities or lack of experience and knowledge if they have been
given supervision or instruction concerning use of the appliance in
a safe way and understand the hazards involved. Children shall
not play with the appliance. Cleaning and user maintenance shall
not be made by children without supervision.
WARNING: This heater is not equipped with a device to control the room
temperature. Do not use this heater in small rooms when they are occupied by
persons not capable of leaving the room on their own, unless constant supervision
is provided.
Children of less than 3 years should be kept away unless continuously supervised.
Children aged from 3 years and less than 8 years shall only switch on/off the
appliance provided that it has been placed or installed in its intended normal
operating position and they have been given supervision or instruction concerning
use of the appliance in a safe way and understand the hazards involved. Children
aged from 3 years and less than 8 years shall not plug in, regulate and clean the
appliance or perform user maintenance.
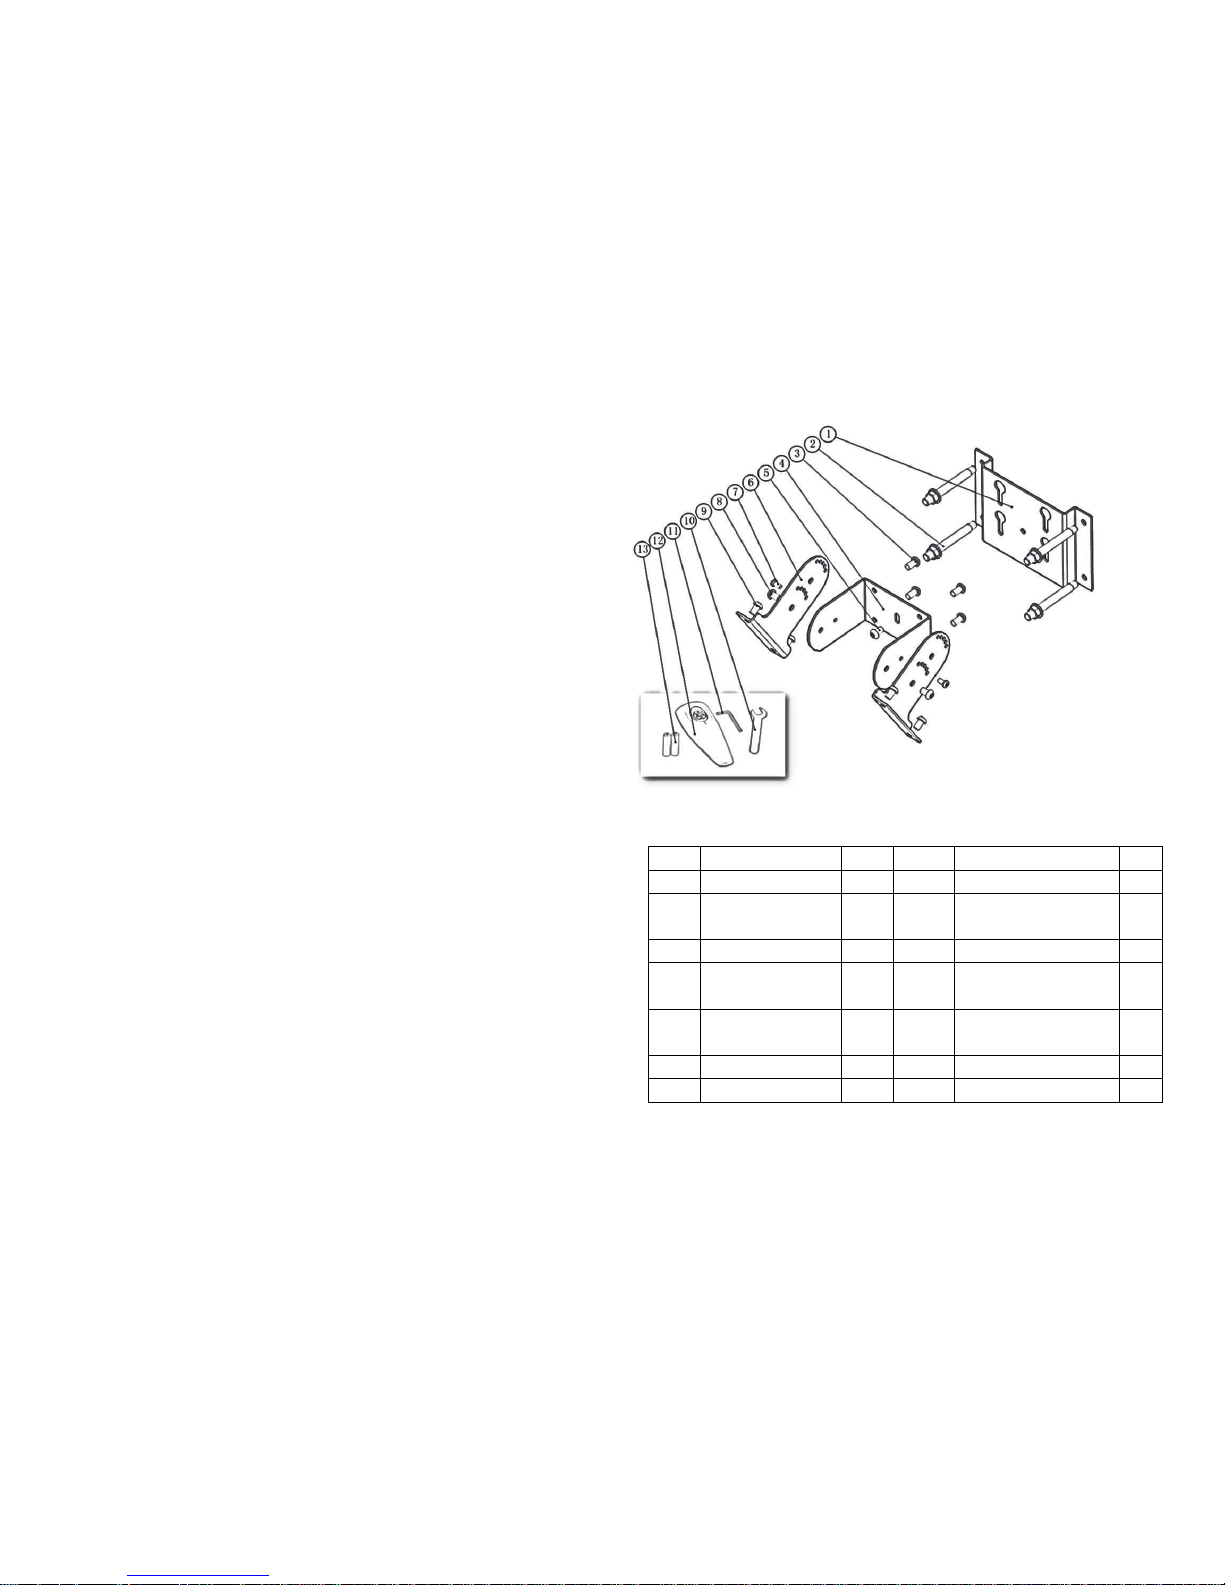
Accessories
REF.
Name
Qty
REF.
Name
Qty
1
Part 1 1 8
screws M6*10
2
2
Explosive bolt
M6*50
4 9 screws M6*10
4
3
screws M6*10
4
10
M6 spanner
1
4
Part 2 1 11
‘L' hexagonal
wrench
1
5
Security screw
M6*10
1
12
Remote control
1
6
part 3 2 13
Battery
2 7 screws M4*8
2
Page 3
Connection to 220-240 Volts Power Supply
It is important to ensure that the electricity supply is of adequate
capacity for the electrical load required by the appliance being installed.
These appliances must be earthed.
Installation
The Heater is built with the best quality components in accordance to the
prevailing legal regulations and certified for safety in use. For best results
from the appliance please ensure that the installation is done by a qualified
electrician in accordance with the following instructions and taking full
account of current regulations. When using the heater, please carefully
follow the instructions and recommendations below.
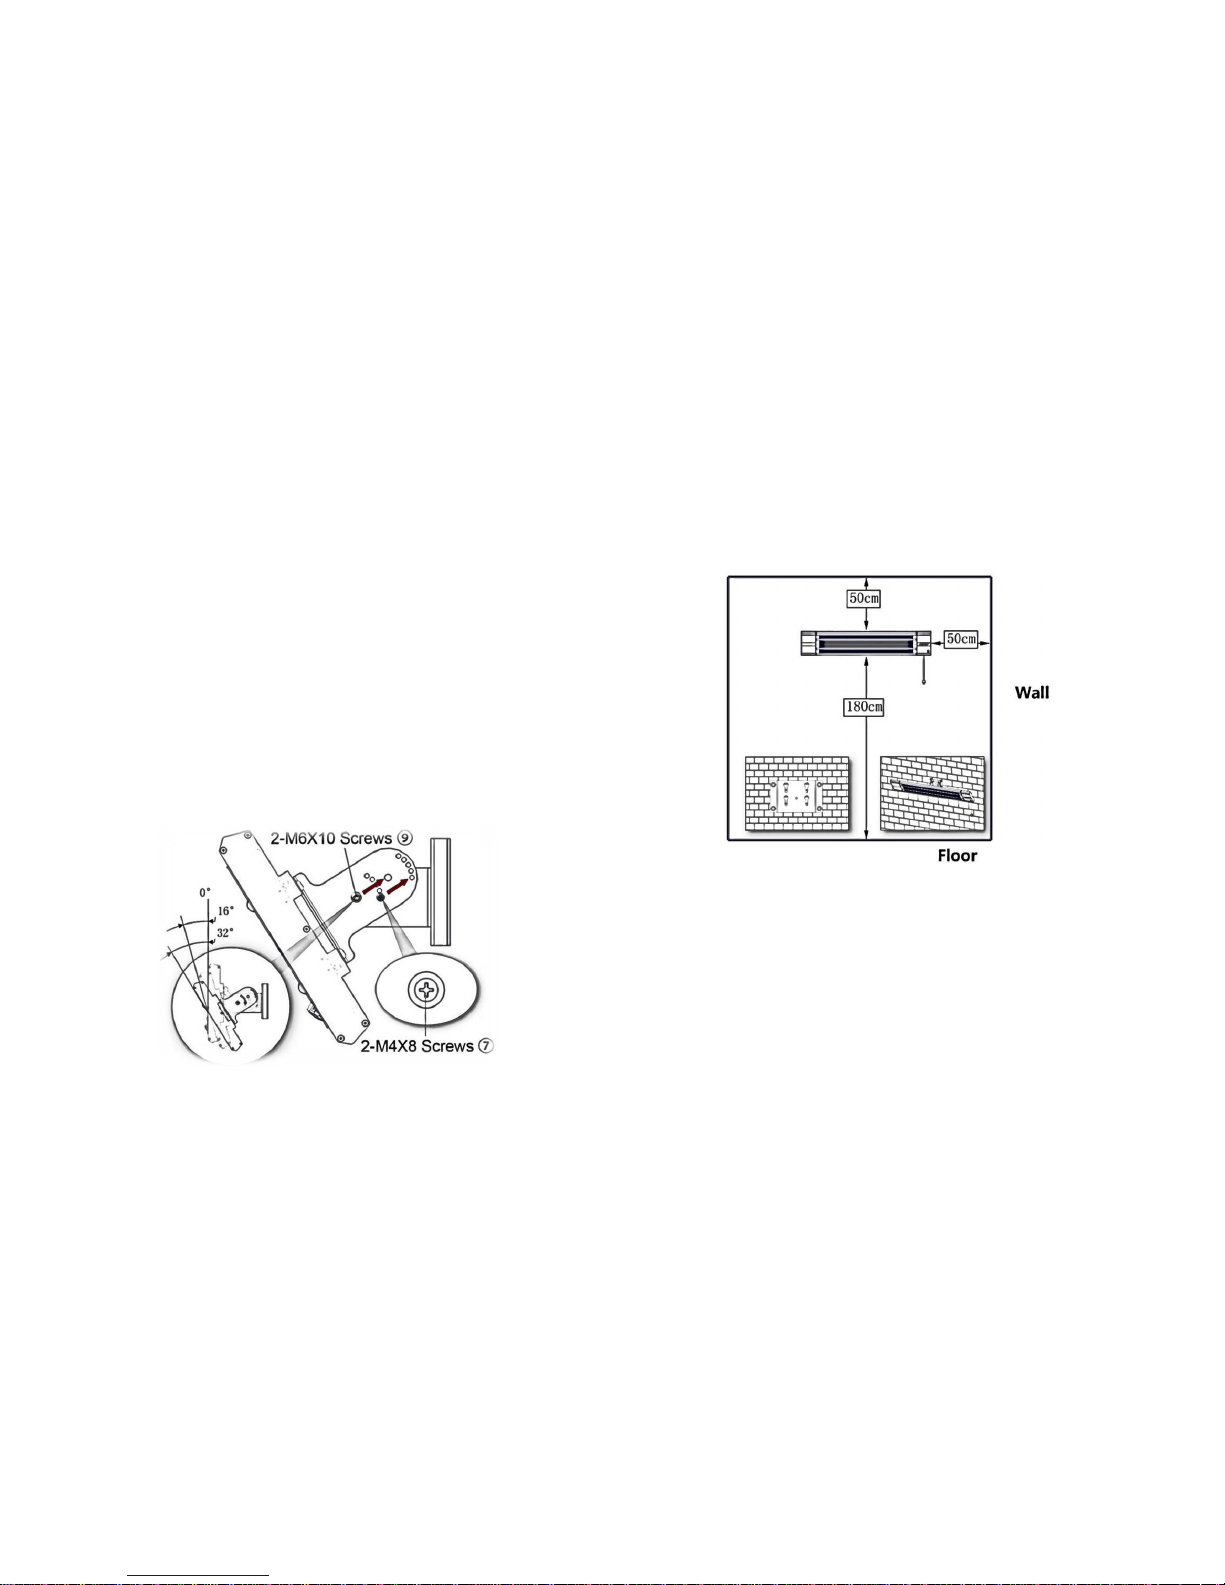
You could change the position of the M4*8 screws○7 and the M6*10
screws○9 for the best Angle of heating. We have 6 positions for your
choice. (near:0°,16°,32°;far: 0°,16°,32°)
Installation to Wall
When fixing the heater to a wall, ensure hinges are in the underside so
that the lid hands down in the open position.
Minimum required distances:
a) 500mm from the side wall
b) 500 mm from the ceiling
c) Installation height above 1.8M
The heater must be fixed to a wall with the bracket supplied to allow
adequate ventilation.
Never fix or place heater near flammable or combustible materials.
Generally heaters must be placed at a safe distance (clear space) of at
least 2.0m from combustible materials and glass walls. If installed in
workshops or garages where inflammable or combustible paints are
used, the heaters must be installed at a distance of at least 4.0m from
the source of danger.
If the heaters are placed in areas where spray painting of any
description is taking place, they should not be used during the painting
operations.
Never use the heater in particularly dusty and explosive areas.
Page 4

Assembling Process
Step1: Assemble the bracket. (○3 ,○6 .○7 ,○8 )
Do not tighten the four M6*10screws ○3, reserve 2-3mm of gap for step 4.
Step 2:Install the bracket on the back of the heater.
Adjust the four sliders which inside the track to the middle of the heater .Fix
the bracket which you have assemble in the step 1 with four M6*18
screws○9 , tighten them with ‘L ‘hexagonal wrench○12。
Step 3: Fix the part 1○1 on the wall, tighten the four nuts (a part of
explosive bolt M6*50)○2 with M6 spanner○11 .
Step 4: Put the heater on the wall, slide it into the part 1○1 .
Step 5: Please tighten the M6*10securityscrew○5 toavoid accidents
Page 5

Complete!
Caution
Some parts of this product can become very hot and cause burns.
Particular attention has to be given where children and vulnerable people
are present.
1. Mount the heater outside or in a large open area and well away from
any obstructions such as branches or where the heater is near any
objects that can be affected by heat, such as furniture, curtains or
other inflammable objects (minimum distance 1 meter).
2. Do not position immediately above or below an electrical socket.
3. The unit must be placed with the clearance of 180cm to the floor
and 30cm to the ceiling.
4. When the power supply cord is damaged, it must be replaced by
authorized agent or other professional people to avoid danger.
5. This appliance is not intended for use by persons (including children)
with reduced physical. Sensory or mental capabilities, or lack of
experience and knowledge, unless they have been given
supervision or instruction concerning use of the appliance by a
person responsible for their safety.
6. Children should be supervised to ensure that they do not play with
the appliance.
7. Place the heater outside or in a large open area and well away from
any obstructions such as branches or where the heater is close to
any objects that can be affected by heat, such as furniture, curtains
or other inflammable objects (minimum distance 1 meter).
8. Do not use it near bath tubs, wash areas or swimming pools.
9. Do not use it in unventilated areas
10. Do not use where gas, petrol, paint or other inflammable goods are
stored.
11. Do not move when connected to an electrical supply and always
wait until the patio heater cool down before storing away.
12. Do not touch the heater head when in use.
13. Do not leave after turn it on and unattended especially when
children or animals are in the vicinity.
Page 6

14. The indication of different positions of switches should be visible
from a distance of 1M at least.
15. The Marking concerning covering shall be visible after the heater
has been installed. It shall not be placed on the back of heaters.
16. The heater must be correctly installed according to the instructions.
17. The heater must be securely placed on a horizontal and flat Wall
surface.
18. The heater will be at high temperature when in use. It keeps hot for
a period after shut down. Potential danger would occur when you
touch it during this period.
19. Don’t place the heater closed to curtain or other flammable objects.
Otherwise there will be a danger of catching fire.
20. Don’t cover the heater with anything when in use or a short time
after it is shut down.
21. Don’t wrap the power supply cord on the heater.
22. The heater must be handled with care, and avoid vibration or hitting.
23. The heater must be securely grounded when in use.
24. If the heater gets damaged, it must be repaired by professional
electricians.
25. When the power supply cord is damaged, it must be replaced by
authorized agent or other professional people to avoid danger.
26. When assembling, keep away from any board or flammable
material.
27. The heater must be supervised by adults when it is used by a child.
28. It is not safe to install the heater near a swimming pool, in a
bathroom or shower area.
29. The heater is for household use only. It is not safe to use on a
building site, greenhouse, barn or stable where there’s flammable
dust.
30. The heater is at high temperature when in use. Unplug the heater
and wait until it cools down before cleaning.
31. Don’t use this heater in place where causticity or volatile air exists,
such as dust, steam, gas, etc.
32. Don’t use this heater as a cloth drier or towel drier.
33. Don’t use this heater as a sauna heater.
34. Don’t use this heater in place of animal propagating and raising.
35. Don’t immerse this heater into water for cleaning.
36. The heater should be plugged in a socket, which is easily visible
and reachable.
37. Do not use this heater in the immediate surroundings of a bath, a
shower or a swimming pool.
38. WARNING! In order to avoid overheating, do not cover the heater
39. Do not use this heater with a programmer, timer, separate
remote-control system or any other device that switches the heater
on automatically, since a fire risk exist if the heater is covered or
positioned incorrectly.
40. The appliance is not to be used by children or persons with reduced
physical, sensory or mental capabilities, or lack of experience and
knowledge, unless they have been supervision or instruction.
41. If the supply cord is damaged, it must be replaced by the
manufacturer, its service agent or similarly qualified persons in
order to avoid a hazard.
42. DO NOT COVER! Don’t cover the heater with anything when in use
or a short time after it is shut down.
43. After startup and shutdown in a few minutes, the machine will beep,
due to thermal expansion, which is a normal situation,
please rest assured.
Page 7

Operation
Connect the power cable to a 13 amp supply which is located in a safe, dry
area.
The switch on the heater is used to control the Heater. The【I】position
means on, the first indicator light will be turn red, the heater in ready
mode. The【O】 position means off.
The panel control:
The remote control:
Although the patio heater is waterproof, do not use when raining or in
wet conditions.
Never connect the power cable from the electrical supply, when the
patio heater is not in use.
Care and maintenance
• When disconnected from the electrical supply, clean the surface of
the patio heater with a damp cloth. Never use corrosive or solvent
cleaners or immerse in water.
• Any maintenance or repairs including replacing the halogen tube
should only be carried out by a qualified electrician or by a
recommended service center.
Technical specification
• Power supply 230V~50Hz
• Wattage max1800w
• Net weight 7.5 kg
• Insulation class I
• Width23 cm; Lengh:109cm
If in doubt contact your supplier.
Primrose London
info@primrose.co.uk
Tel: 0118 9035210 (UK)
Tel: 0044 118 9035210 (outside of UK)
 Loading...