

Page 1
©2013 Sellmark Corporation
Features:
Enhanced low-light digital imaging
See up to 195ft
3x optical with 9x digital zoom
Adjustable gain control
Use day and night
Full color display
Compact/Ergonomic Design
Video output capability
Powerful built-in InfraRed illuminator
Includes:
Monocular
Lanyard
Carrying Case
Instruction Manual
Specifications:
Magnification, x
3
Digital zoom, x
9
Camera resolution
640x480
Display resolution
96x64
Video output resolution
640x480
Objective dia., mm
14
FOV, o, horizontal
7
Eye relief, mm
10
Exit pupil, mm
5
IR wavelength, nm
850
IR power, mW
1,000
Range of detection, ft
195
Dimensions, mm
145x90x50
Weight (w/batteries),oz
11.6
Battery type
4x AA
Battery life (w/o IR, w/IR)
12, 3 (HI) 6 (LO)
Operating temp, oF
14 to 104
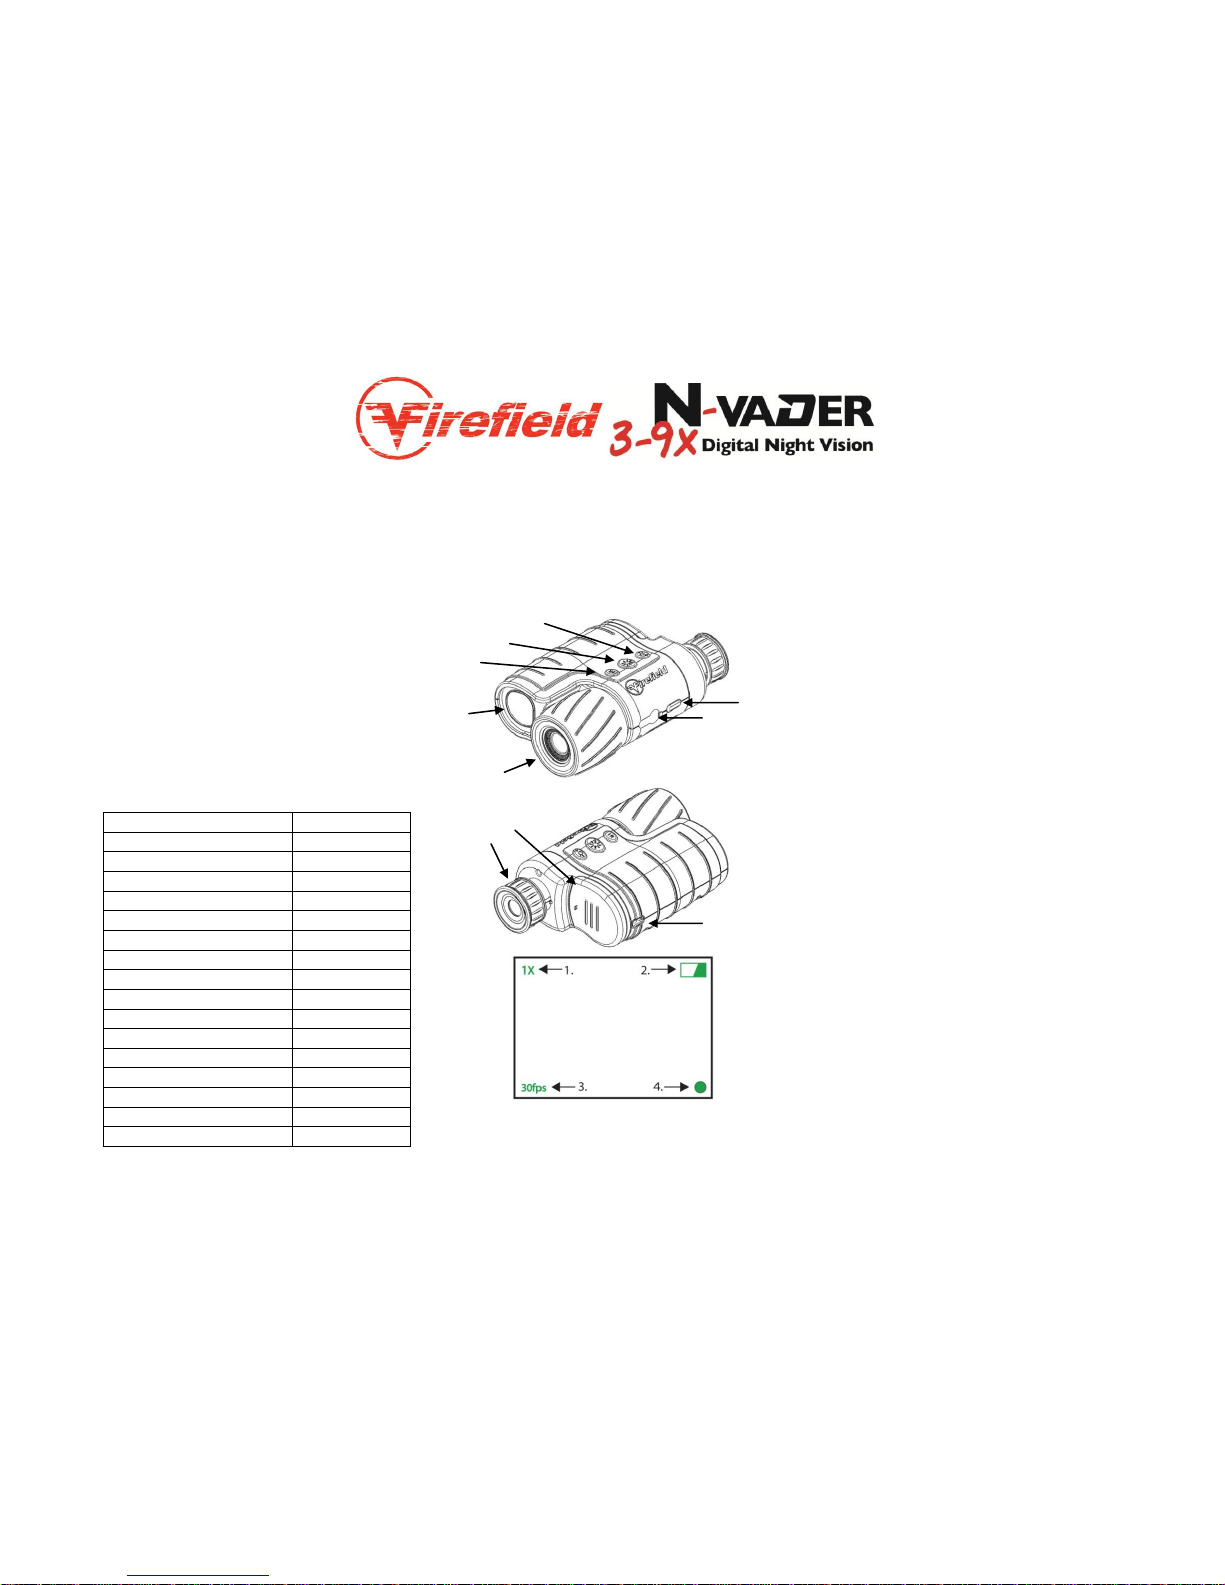
Diagram
1. On/Off Button 6. Gain control
2. Video Output 7. Digital zoom
3. Objective Lens 8. Eyepiece
4. InfraRed lluminator 9.Battery cover
5. IR control 10. Lanyard eyelet
On-Screen Indicators
1. Digital Zoom 2. Battery Power 3. Frame Rate 4. IR Mode
Battery Installation
To install, locate the battery cover (9). Slide
the cover out. The cap will release and flip
open. Insert four AA batteries into the
compartment so that polarity of the battery
matches the markings inside the
compartment. Replace the battery cover.
Battery charge level is identified in the upper
right corner of the display. Note: Rechargeable
batteries can be used with this device.
On/off Operation
To activate the device, press the on/off button
(1). While looking through the device, the
“Firefield” splash screen will appear three
seconds after pressing the on button. After
another three seconds, the device will begin
operating in the night vision mode. To turn the
unit off, press the on/off button once more.
Note: After 5 minutes of no button operation
the unit will notify the user the unit will turn
off. To continue operation, press any button.
Focusing
To focus the device, locate an object 10 to 20
yards away. Rotate the eyepiece (8) until you
clearly see the display screen. Next, rotate the
objective lens (3) until the image of the object
is sharp and crisp. When the viewing distance
changes, the objective lens only needs to be
rotated.
1.
2.
6.
7.
10.
3.
4.
5.
8.
9.
Page 2

©2013 Sellmark Corporation
Day/Night Vision Mode and IR Power
Day/Night Vision mode and the InfraRed
illuminator power are controlled by the IR
control (5). Night Vision mode is equipped with
two IR power settings: high (1 watt) and low
(500mw). The current IR power setting is
identified in the lower right corner of the
display. A full circle represents high power. A
checkered circle represents low power. Press
the IR control (5) once to switch from high to
low power. To switch from night vision mode
to day vision mode, press the IR control once
more. The display will change from black and
white to color, the IR illuminator will
automatically turn off, and the frame per
second (fps) will increase to 30 fps. Note: A
small click will be heard when activating and
deactivating the day vision mode. This is
normal and is not a defect. This click is an
internal mechanism designed to enhance color
imaging for daytime viewing.
Gain Control
To increase the brightness of the image and
the nighttime viewing distance, the gain
control button (6) should be used.
Consecutively pressing the gain control will
decrease the frames per second from 25 fps,
to 15 fps, to 8 fps. The current fps setting is
identified in the lower left corner of the
display. To achieve maximum viewing distance,
8 fps should be used.
Digital Zoom
To digitally increase the magnification of the
device, press the digital zoom button (7).
Consecutively pressing the digital zoom will
digitally increase the magnification from 3x, to
6x, to 9x magnification. The current
magnification is identified in the upper left
corner of the display.
Video Output
To attach the device to an external viewing
monitor, plug in a composite video cable into
the video output plug (2) on the side of the
device. Once plugged in, the device will
automatically send the video feed to the
external device.
Maintenance
The Firefield NVader should be stored in a
cool, dry place. Remove the batteries if the
device is not to be used for 3 or more months.
Debris and dust can be removed from lens
surfaces with a lens cleaning cloth or soft
brush. Oils can be removed with a small
amount of denatured alcohol applied to a
cotton swab.
Troubleshooting
If the image is not focused:
Check the eyepiece is focused for the user
Check the objective lens is focused to the
correct distance
Check no oils are on the objective lens
If the device does not turn on or no image:
Check the batteries are installed correctly
Check there is no obstruction blocking the
objective lens or infrared illuminator
For further technical support, please visit:
www.fire-field.com/content/contact-us
Warranty
Your Firefield NVader is covered for a period of
3 years. This includes mechanical parts and
digital imaging sensors. In the event of a
defect under this warranty, we will, at our
option, repair or replace the product. This
warranty does not cover damages caused by
misuse or improper handling. Also, this
warrant is null and void if modification or
maintenance is provided by someone other
than Firefield. This warranty is nontransferable and is only valid if the product is
registered within 30 days after the product has
been purchased.
For product registration please visit:
www.fire-field.com/content/productregistration-form
For further warranty information please visit:
www.fire-field.com/content/firefield-warranty
 Loading...