

Page 1
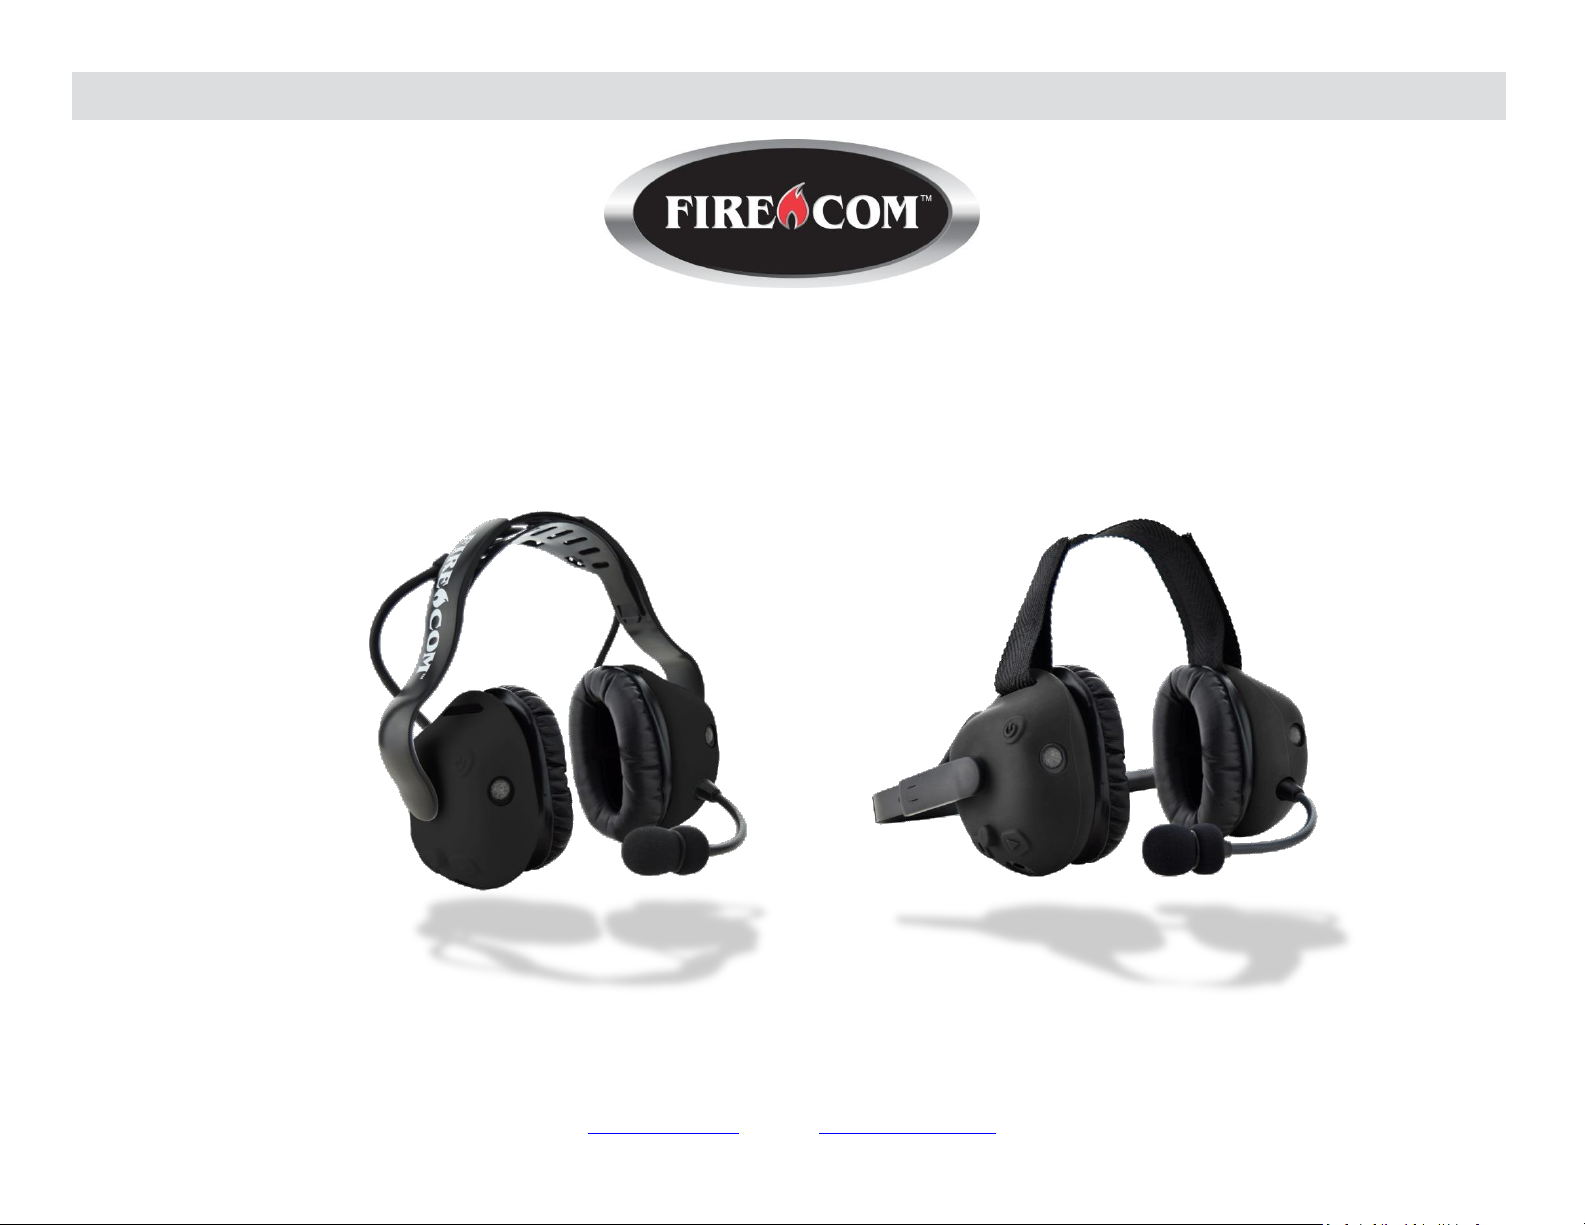
FHW50X and UHW50X headsets
DECT7, Bluetooth, and Electronic Headsets
Manual
7340 SW Durham Road, Portland, OR 97224 USA
Phone: 800-527-0555, 503-684-6647, Fax 503-620-2943
Page 2

Page 3

Table of Contents
Overview 1
Model Matrix 1
Replacement Parts 1
Contents in Box 1
Accessories (not included) 1
Features 2
Common Features, All Models 2
Common Features, Communication Headsets 3
Wireless Bluetooth® Technology 3
Wireless DECT7 Communications 3
Configuring the Headset 4
Headband Removal 4
Headband Installation 4
Headstrap Installation 5
Replacing the Ruggedizer 5
Connecting a Two-way Radio 5
Fitting 6
Overhead Fitment 6
Behind Head Fitment 6
Fitment Warnings 7
Charging 8
Battery Replacement 9
LED Indications 9
Settings & Operation 10
Buttons 10
Advanced Menu 11
Wireless Bluetooth® 12
Wireless DECT7 12
DECT Signal Strength 12
Quick Launch 13
PC Programming 13
Locating the USB Port 13
Installation of Sonetics Configurator Software for Windows 13
Care and Maintenance 14
Mic Muff Replacement 14
Ear Seal Replacement 14
Troubleshooting 15
Service Contact: 15
General Connection Issues 15
Wired Auxiliary 15
Wireless Bluetooth 15
Wireless DECT 15
Glossary 16
Specifications 17
Headset 17
Regulatory 17
Bluetooth® Specifications 18
DECT Specifications 18
Important Safety Information 19
General Warning for Sensitive Electronic Devices 19
General Communication Privacy Notice 19
Industry Canada (I.C.) Notice (UHW503/5/7, FHW507, DW501B) 19
FCC Part 15 Information (UHW503/505/507, FHW507, DW501B) 20
FCC/IC RF Exposure Warning 20
Rechargeable Battery Information 20
Important NRR Information 21
Firecom Standard Limited Warranty 22
Page 4
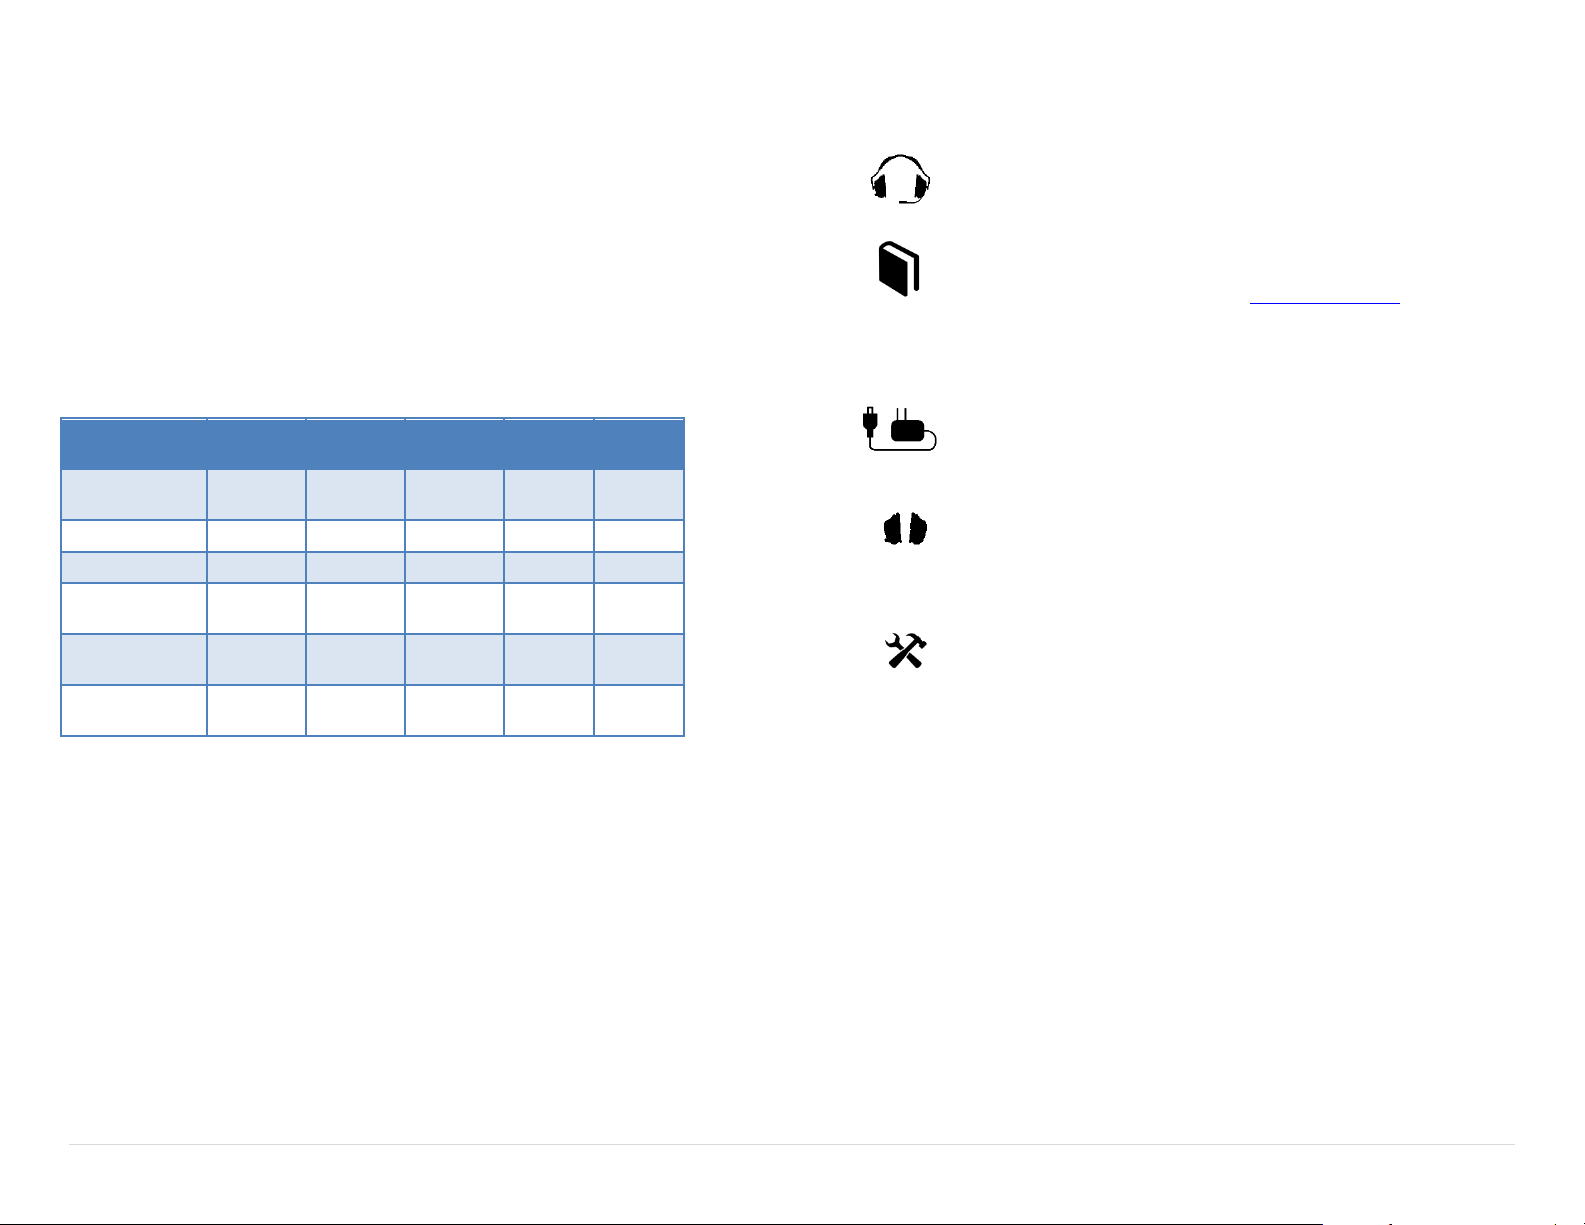
FHW507
UHW507
UHW505
FHW505
UHW503
DW501
BT
DW501
Boom
Microphone
Listen Through
Wired AUX
Radio
Transmit
Wireless
Bluetooth
Wireless
DECT7
Overview
The Firecom FHW and UHW series Electronic Headsets protect you from dangerous
noise while keeping other audio at a comfortable listening level. It protects your
hearing without sacrificing your safety or situational awareness. You can hear
alarms, music, or even have a face-to-face conversation while still being protected.
Simultaneous integration with two-way radios, cell phones, and MP3 players is
available via wired and optional Bluetooth inputs. DECT7 models extend conference
call like team communication up to 1,600 feet (line of sight). The rugged and
comfortable design ensures this headset is ready for tough work environments.
Model Matrix
Contents in Box
Headset
1 ea x Firecom Headset
Manual and Reference
1 ea x Quick Reference Guide
1 ea x Manual (online at: www.firecom.com)
1 ea x FCC / IC / NRR compliance sheet
1 ea x Warranty Card
1 ea x Accessory Sheet
Charging
1 ea x AC Wall Adaptor
1 ea x Heavy Duty DC Charging Adaptor
Accessories
1 ea x USB Cable
1 pair x Black Ruggedizers (installed)
1 pair x ComLeather Earseals
Tools
1 ea x Headband/Battery Removal Tool
(Sonetics Screw Driver)
= Included
= Not Available
Replacement Parts
Silicone Ruggedizers
Earseals
Mic Muffs
Head Bands and Head Straps
Batteries
Speaker Covers
Accessories (not included)
Hard Hat Adaptors (FHW & DW only)
PR Radio Interface - Connect to any portable two-way-radio and many
other devices
Silicone Ruggedizers in a variety of colors to meet your team’s needs
Earseals to enhance comfort
Worldwide Power Adaptor
DC Cigarette Adaptor
DC Fuse Assembly
1 | P a g e
Page 5

Features
Common Features, All Models
Adjustable Volume Control
The Headset has a user adjustable volume control. The Headset will remember the
last setting at each power up for convenience.
Automatic Loud Noise Suppression
The Headset will limit high impulse sounds, such as gun shots, from being
transmitted to the user when using the Stereo Listen Through.
Convertible Headband (FHW, DW models only)
The Headset is user configurable for overhead, behind-head, or hard hat (with hard
hat accessory). This gives the user the ability to change the way they use the
Headset over time without needing to invest in a new one.
Multi-Color Ruggedizers
The ruggedizers offer additional abrasion and impact protection. They are available
in many colors (sold separately) to give the user the ability to define teams, roles, or
enhance safety.
Extreme Environmental Design
The Headset has an IP-66 dust and water egress rating. Even when worn in heavy
rain, the Headset will still be useable. Operation has been verified to -22F / -30C for
extreme cold weather environments.
Light Weight
Through the use of the latest weight saving technologies, Firecom is able to deliver
a wireless headset that is lighter than many wired headsets.
Listen Through Situational Awareness
The Headset has two listen through microphones to give the user stereo situational
awareness. The microphones are placed on the forward edge of the headset to give
the user the perception of sounds in the front versus from the rear. The listen
through has a programmable volume level and limits all sounds the user hears to
82dB.
Long Battery Life
With over 24 hours of battery life on DECT7 Headsets, and 44 hours of battery life
on those without, the Headset works whenever the user needs it.
Multimode Auto Shutdown
To extend the life of the batteries, the Headset will automatically shut down.
Bluetooth and DECT7 Wireless Shutdown: If a DECT wireless connection has been
established, the Headset will power down after 5 minutes if the connection is lost.
Non-Activity Shutdown: Headsets shut down after 1 hour if not used.
The headset will announce when it is about to shut down. Shutdown may be
cancelled by pressing any button.
Two Stage Low Battery Alert
The Electronic Headset has a two stage low battery alert system to notify the user
of a depleted battery before communications are lost.
Flexible Charging
An AC adaptor and DC automotive charging cable are included to allow charging in
most environments.
Hearing Protection
The Headset conforms to many hearing protection standards, keeping the user safe
from harmful noise.
In Headset Charging
The Headset has charging circuitry built in allowing it to be charged from multiple
sources. These include the supplied AC wall adaptor and multiple DC charging
options from a variety of sources including most cars, trucks, and aircraft. Refer to
specification for charging voltages and power requirements.
USB Programmable
Using its USB port, a Headset can be configured using a Windows PC. Many of the
features may be customized and saved. Refer to the Sonetics Headset Software for
details.
User Replaceable Battery
The Electronic Headset uses a replaceable battery. This allows the user to replace
the battery at end-of-life and have spares in the field for extended operation times.
Only Sonetics batteries should be used.
Voice Prompts
Voice prompts allows the user to make all adjustments without removing the
headset. There is no need to look for lights, text, or knob positions. The voice
prompts automatically adjust volume to ensure intelligibility in changing
environments.
2 | P a g e
Page 6

Wired Line-in
The wired line-in is used to interface with cell phones and hand held radios. This
gives the user more flexibility in their communication needs. The wired connection
features a mono input and mono PTT output. See your Sonetics dealer for
accessories to match your equipment.
Common Features, Communication Headsets
Auto-Leveling Microphone
The Headset automatically detects the voice of the user against noise in the
background. This gives the headset an automatic VOX (noise gate or squelch) that
needs no adjustment when transitioning from areas of differing noise levels.
Noise Cancelling Microphone
Noise cancelling microphones remove background noise right at the mic element.
This lets listeners hear the person talking and not the background noise.
Radio PTT
The Headset interfaces with any two-way portable radio using the wired AUX input
or wireless DECT connection. When there is a wireless DECT connection, the PTT
signal is passed to the wireless DECT7 Wireless Base Station and onto the Digital
Intercom. Otherwise, the PTT signal is passed to the wired AUX input.
Wireless Bluetooth® Technology
Available on the FHW507, UHW507, & DW501BT headsets.
standalone Sonetics Wireless Base Stations or Sonetics IP-DECT7 wireless systems. A
DECT7 network gives up to 1600ft of range (line of sight) from its wireless base,
with interference free, digitally encrypted communications.
Backwards Compatibility
Firecom Wireless Headsets are backwards compatible with Firecom first generation
wireless DECT, and DECT6 Wireless Base Stations with minimal loss in functionality.
Broadcast Mode
The Headset may be paired into a listen only mode of operation, reducing power
consumption considerably. This also allows many more headsets to be connected to
a Wireless Base Station simultaneously. Pressing the Radio PTT button allows the
headset to momentarily talk on any available slot. A tone will let the user know
when they can talk. After talking, there will be a slight delay when other users
cannot be heard. Refer to the Wireless Base Station manual for details.
Dual Dome Antenna Design
Each dome has a separate DECT7 antenna using diversity switching to lock onto the
best signal. The user never needs to worry about head position relative to the
wireless base. The best possible connection is delivered at all times.
Radio PTT or Intercom Only Selection
The Headset may be configured to send a transmit signal to radios connected via a
DECT7 Wireless Base Station or Intercom. The user can transmit over multiple
radios depending on the configuration.
Bluetooth enabled Wireless Headsets can connect with other wireless Bluetooth
enabled devices. This lets you connect an additional audio or communications
device. Cell phones, mp3 players, mobile radios, computers, etc. expand your
communications potential.
A2DP Audio Streaming
The Headset features integrated A2DP streaming audio functionality, so you can
listen to music or podcasts, and hear turn-by-turn direction information from a GPS
application on your phone. You can also use this feature to stream audio from a
Bluetooth-enabled computer to the headset.
Wireless DECT7 Communications
Available on the FHW507, UHW507, UHW505, & UHW503 headsets
The Sonetics Wireless DECT7 Headsets enable full duplex, conference call like
communications to others on the same channel. The Headsets will connect to
Out of Range Warning
The user is notified when DECT7 signal is weak, or when it goes out of range.
Proximity Pairing
To enhance security, the Wireless Base Station will only pair to wireless DECT7 units
in close proximity. This adds another layer of protection for users.
Signal Strength Reporting
The Headset may be placed into a field diagnostic mode to detect signal strength at
The Headset. This can be used to optimize placement of Comhubs or Base Stations.
Wide Band Audio
Wireless DECT7 communications are transmitted in a high definition wide band
audio format. This gives better sound quality, greater intelligibility, and improves
with voice activated control systems. The Headset can also be used in narrow band
if necessary.
3 | P a g e
Page 7
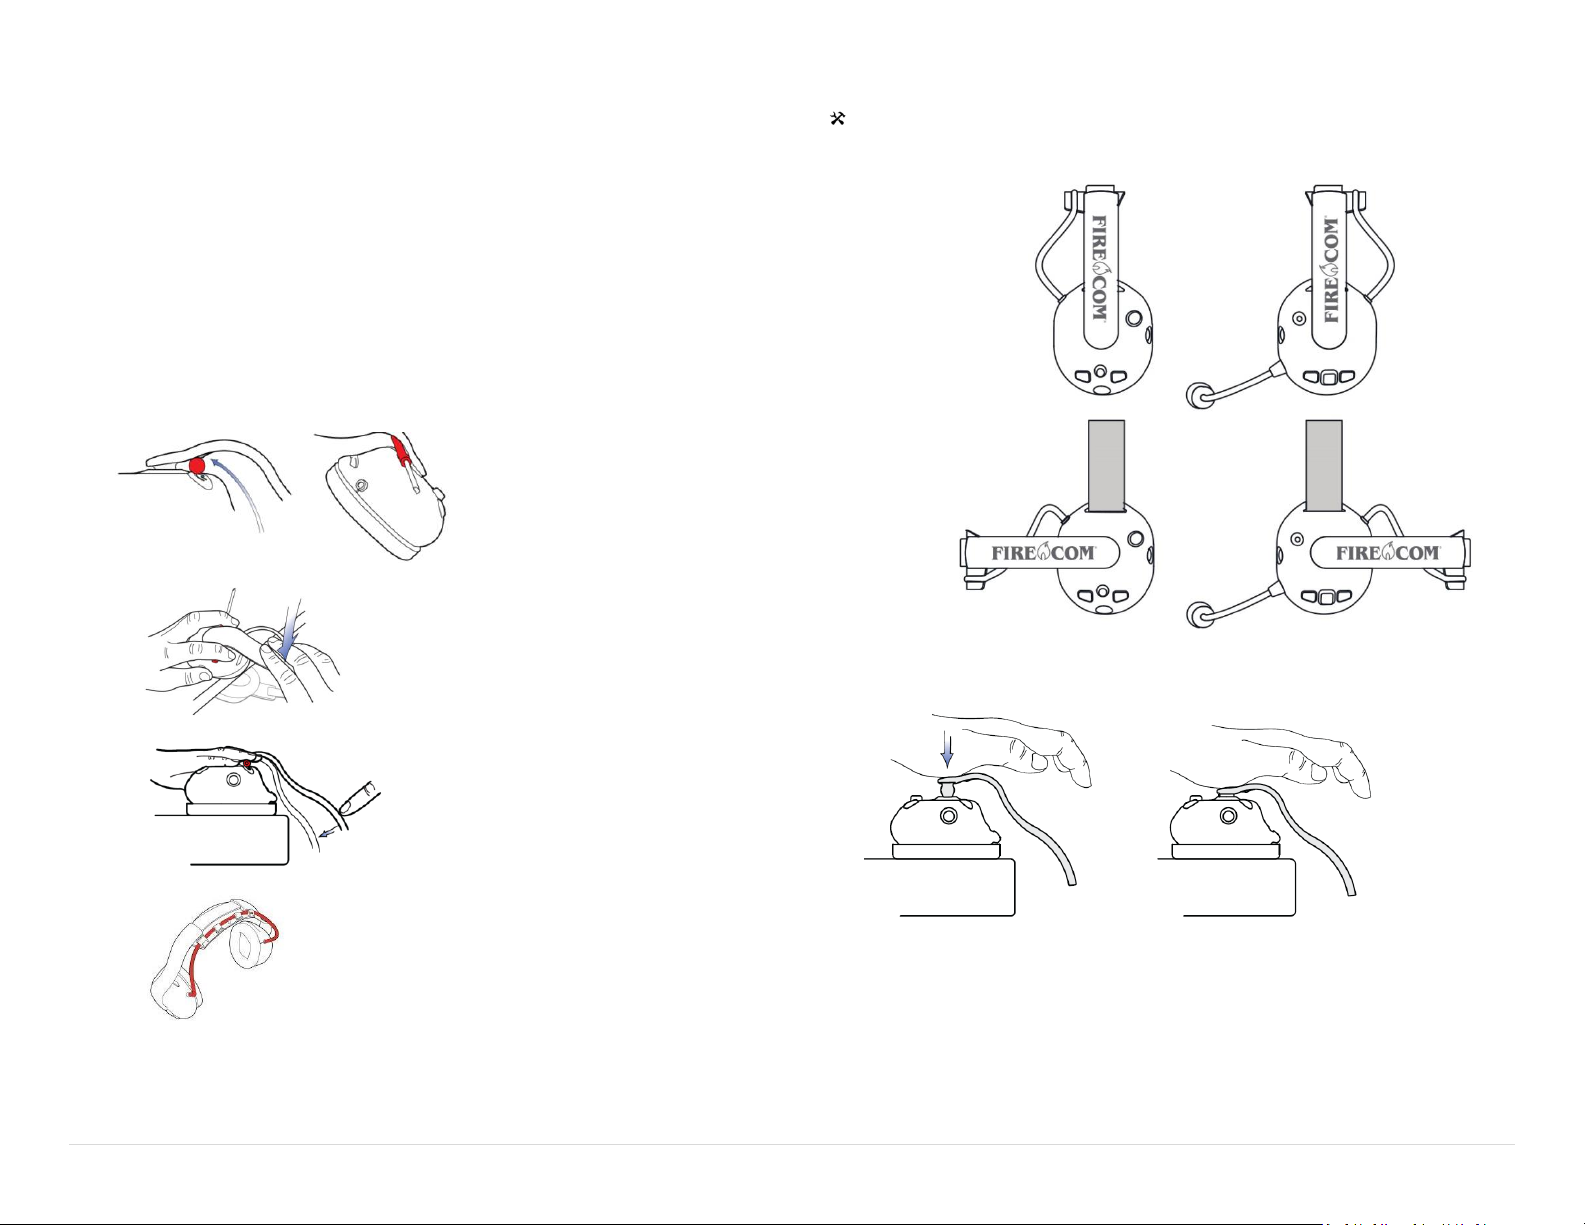
Over
Head
Behind
Head
Configuring the Headset
The Firecom 500 Series Electronic Headset may be set up for use in overhead,
under-helmet, or hard hat (sold separately) configurations. Different headbands are
attached through a secure snap joint on the side of the ear domes. It keeps the ear
dome correctly oriented while providing full freedom of movement, allowing the
dome to seat comfortably against the users head.
Headband Removal
Tools Required: Sonetics Screwdriver
1. Place the handle of your Sonetics Screwdriver between the headband and the
dome. Make sure the handle is behind the notch on the inside of the
headband.
2. Use one hand to hold the dome on a flat surface
3. Gently push with the headband with the other hand.
Headband Installation
Tools Required: None
1. Align the headband with the domes as shown.
2. Place the Dome onto a flat surface.
3. Press Down on the headband until the ball joint snaps into place.
4. Route the headband cable through the headband as shown.
4 | P a g e
Page 8
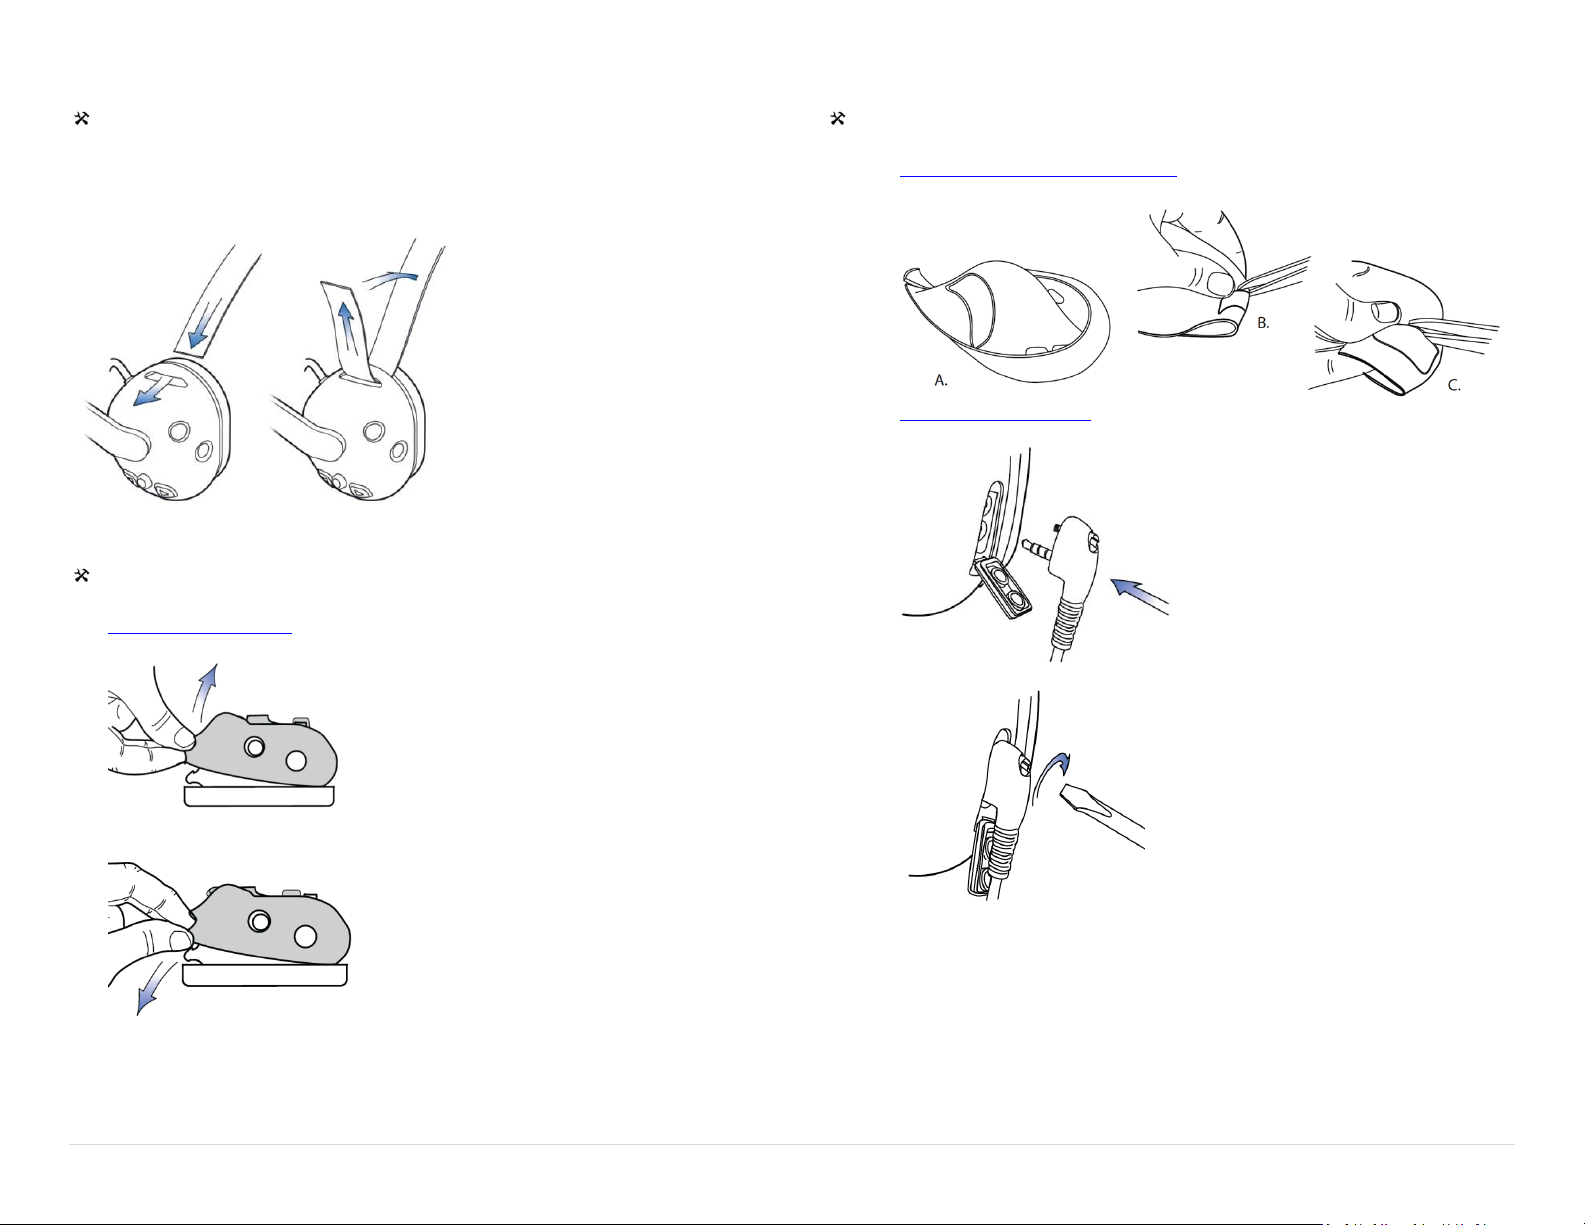
Headstrap Installation
Tools Required: None
1. Insert the strap at dome opening.
2. Affix the strap using the hook and loop.
Replacing the Ruggedizer
Tools Required: None
1. Remove the headband
2. Peel back the ruggedizer
Connecting a Two-way Radio
Tools Required: Scissors, Firecom screwdriver
1. Remove the left dome ruggedizer. (with the microphone boom attached)
2. Cut the along the groove on the underside of the ruggedizer.
3. Replace the ruggedizer.
4. Open the Radio Cover and plug in the Firecom PR Radio Adaptor.
5. Screw the adaptor into place.
Replace the ruggedizer. Note the left and right.
6. Connect the Sonetics PR Radio Adaptor to the Radio.
5 | P a g e
Page 9
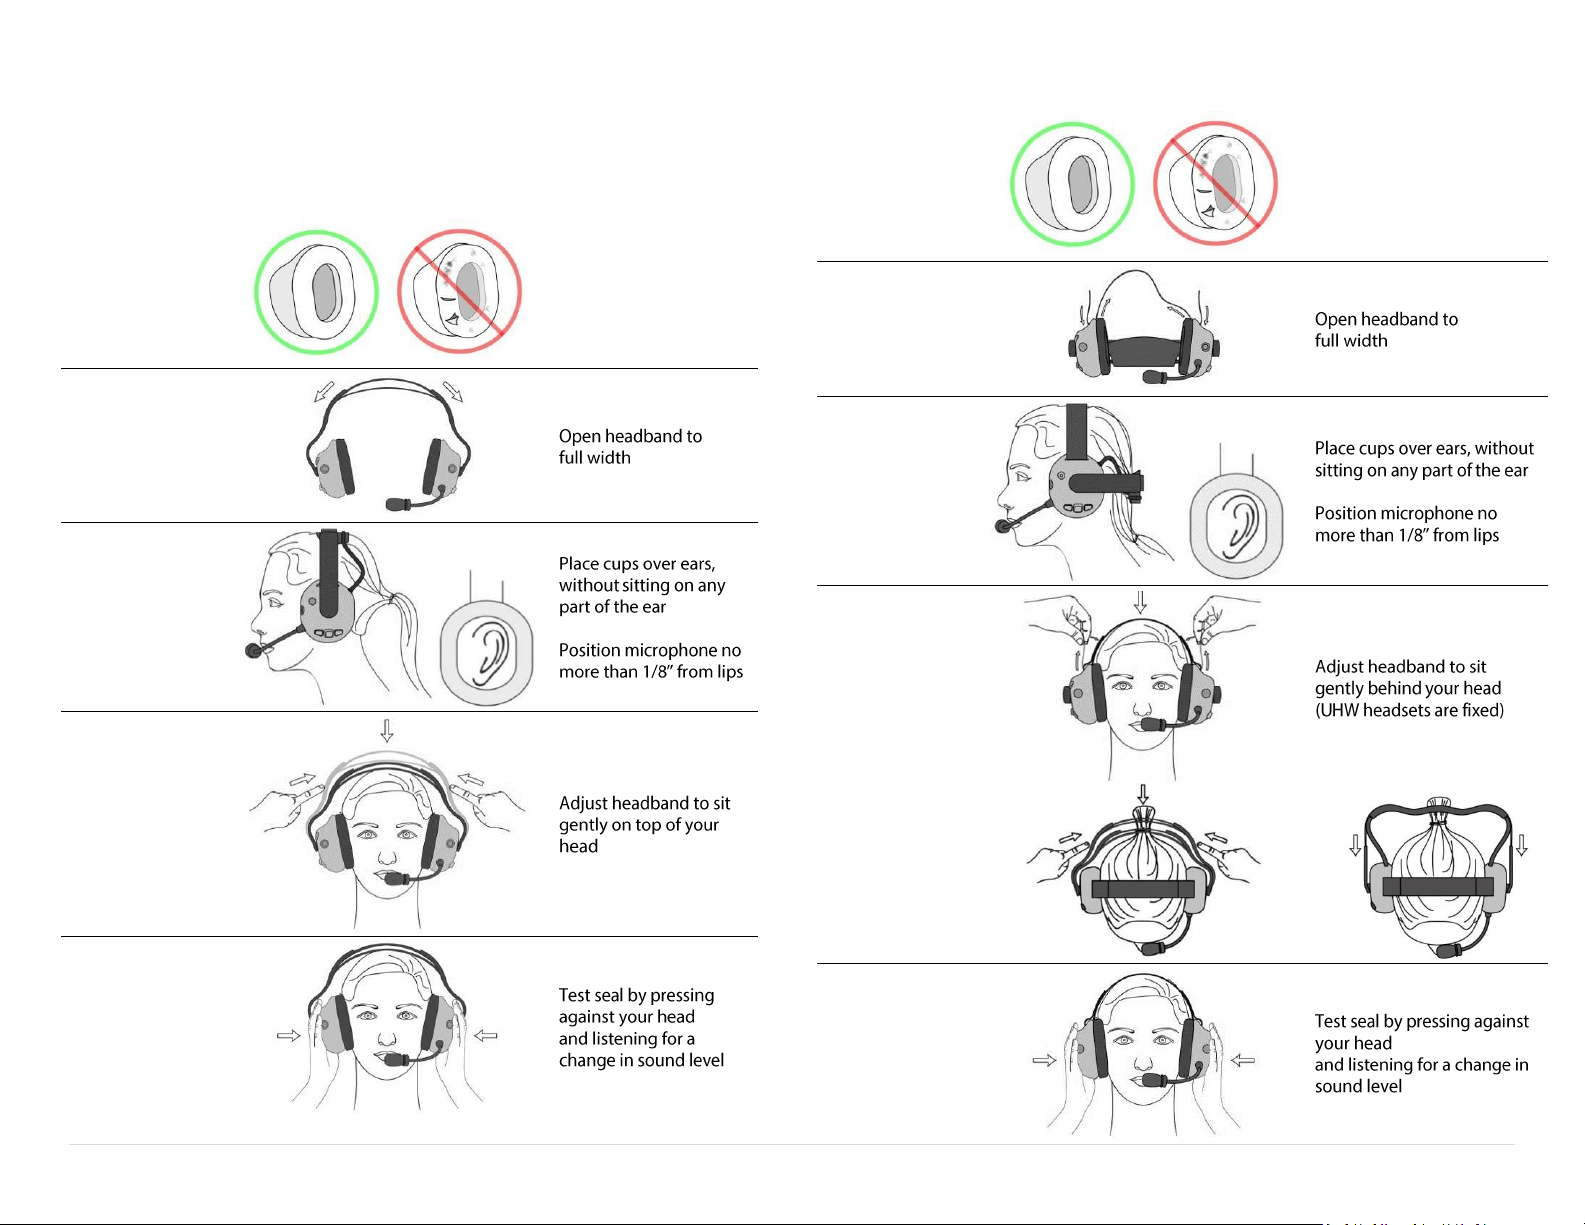
1. Inspect
Ensure no damage to
the earseals or the
Headset
2. Expand
3. Place
4. Adjust
5. Seal
1. Inspect
Ensure no damage to the
earseals or the Headset
2. Expand
3. Place
4. Adjust
5. Seal
Fitting
Proper fitment is required to achieve the rated hearing protection levels.
Overhead Fitment
Behind Head Fitment
6 | P a g e
Page 10
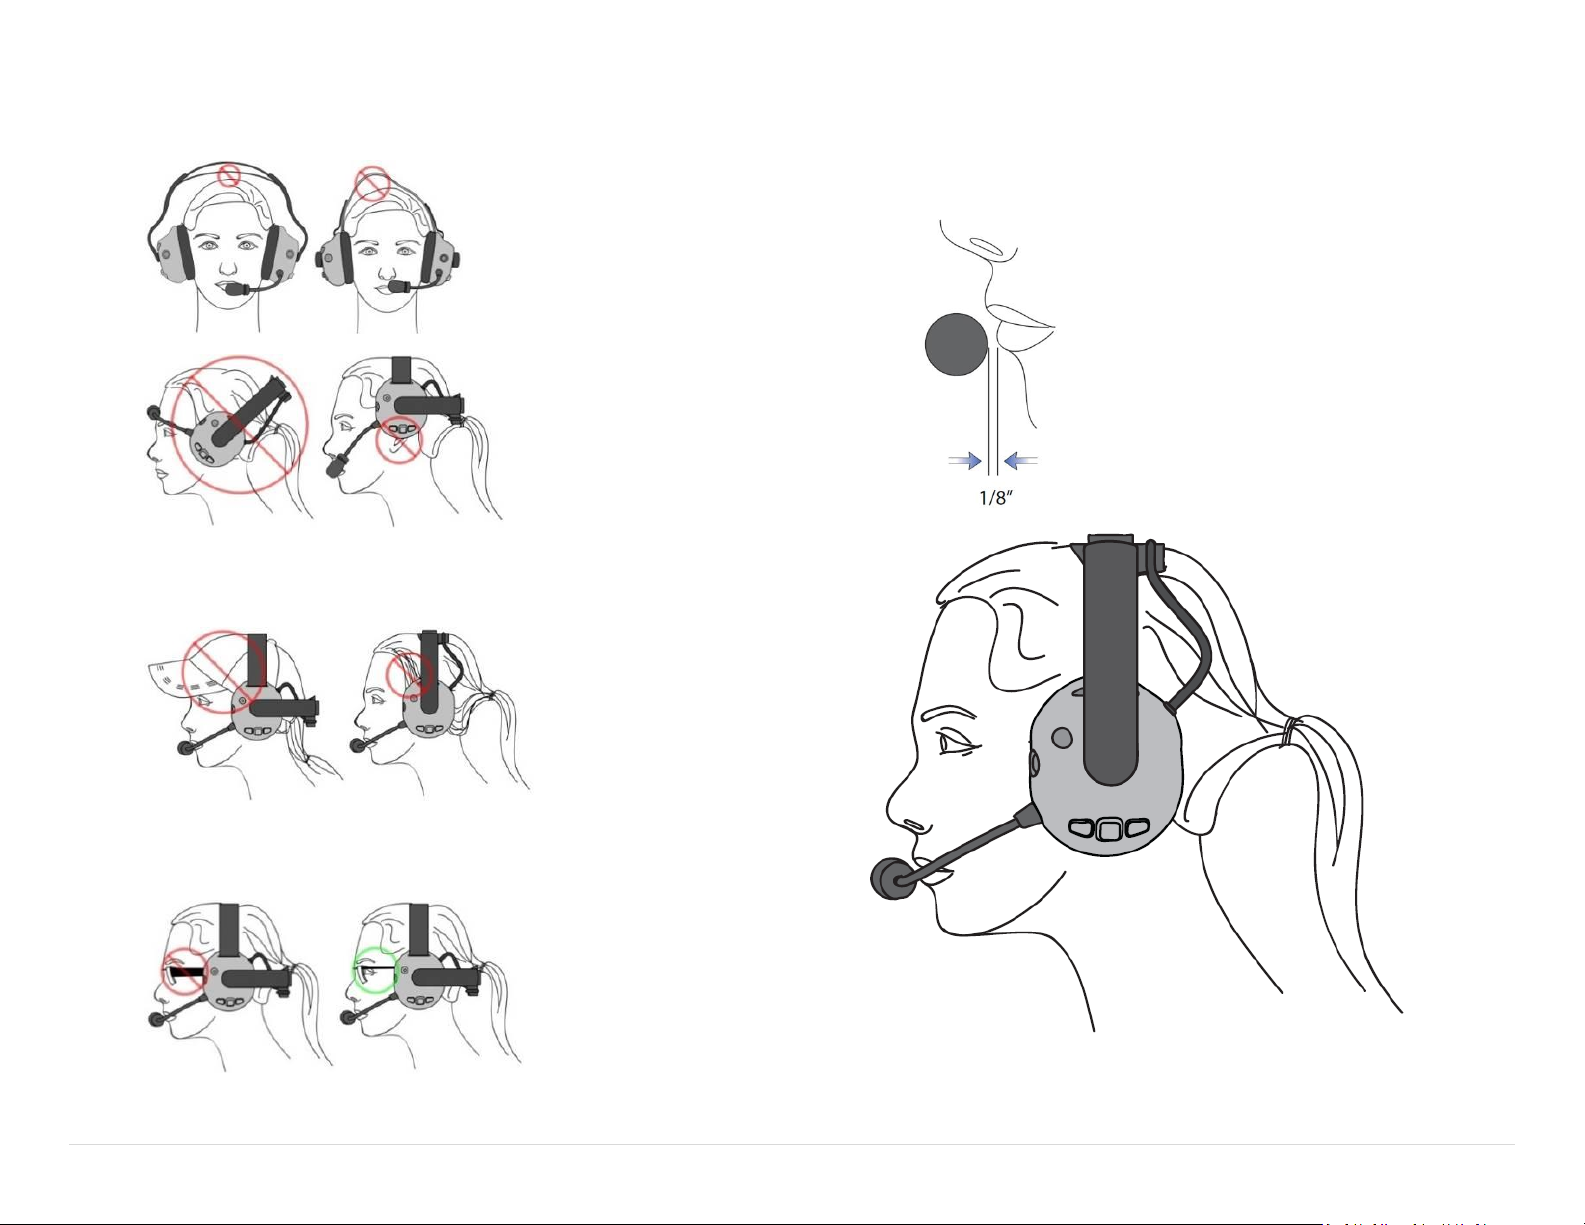
Fitment Warnings
Improper Placement and Adjustment
Obstructions
Ensure headwear and hair does not cause gap in the earseal.
Microphone Placement
To optimize speech, a noise cancelling microphone is used. This type of microphone
is designed to enhance sounds from very close, while reducing sounds from afar.
Ensure proper placement for best results.
Glasses
Ensure Glasses do not cause a gap in the earseal.
7 | P a g e
Page 11
Charging
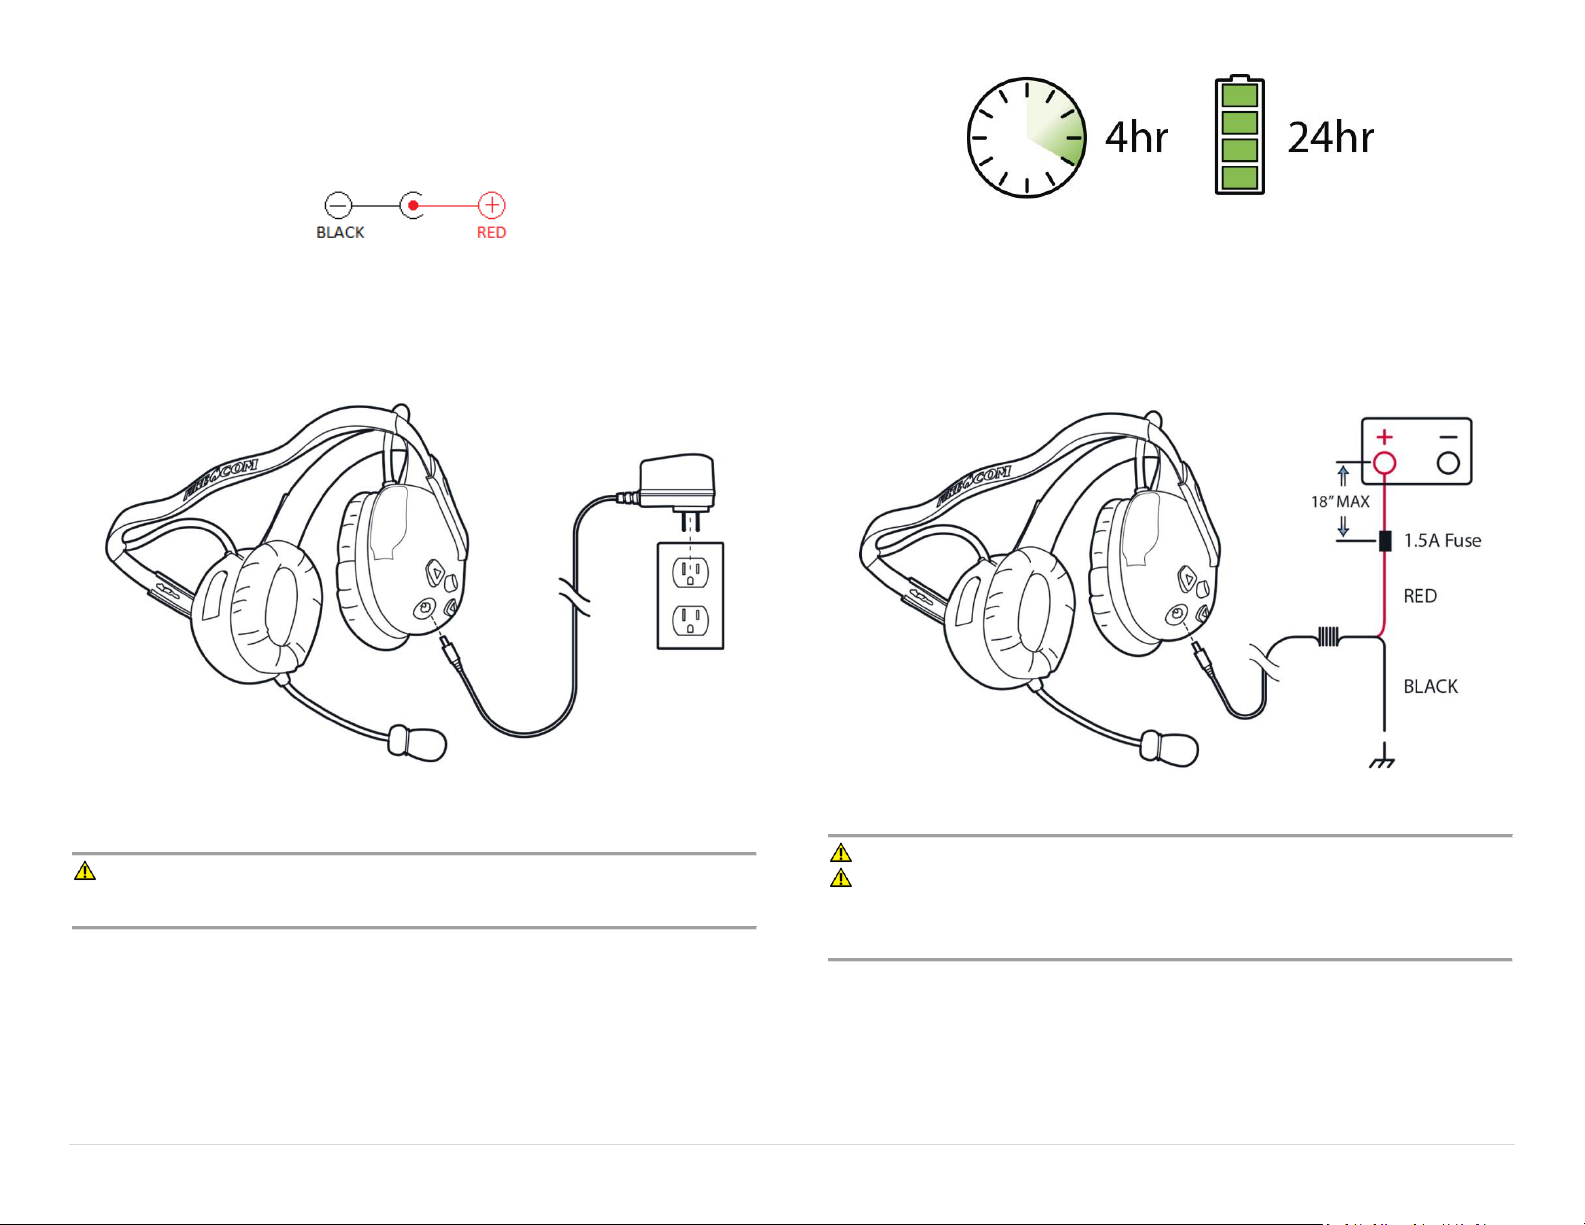
The Firecom Electronic Headsets use a barrel charging jack with the connections
shown below.
Wall Adapter Charging
Only charge the Headset using the supplied 12VDC regulated wall adapter.
Vehicle Charging
Connect the RED wire to +12VDC and the BLACK wire to battery chassis ground.
Install the fuse no further than 18" from the battery.
WARNING: Using unregulated wall adapters will damage the Headset and
void the warranty.
8 | P a g e
WARNING: Only replace fuse with the same type, 1.5A AGU.
WARNING: Voltages exceeding the Headset charging specification will
damage the Headset. Verify the Headset voltage specification to the vehicle
battery and charging system specifications.
Page 12
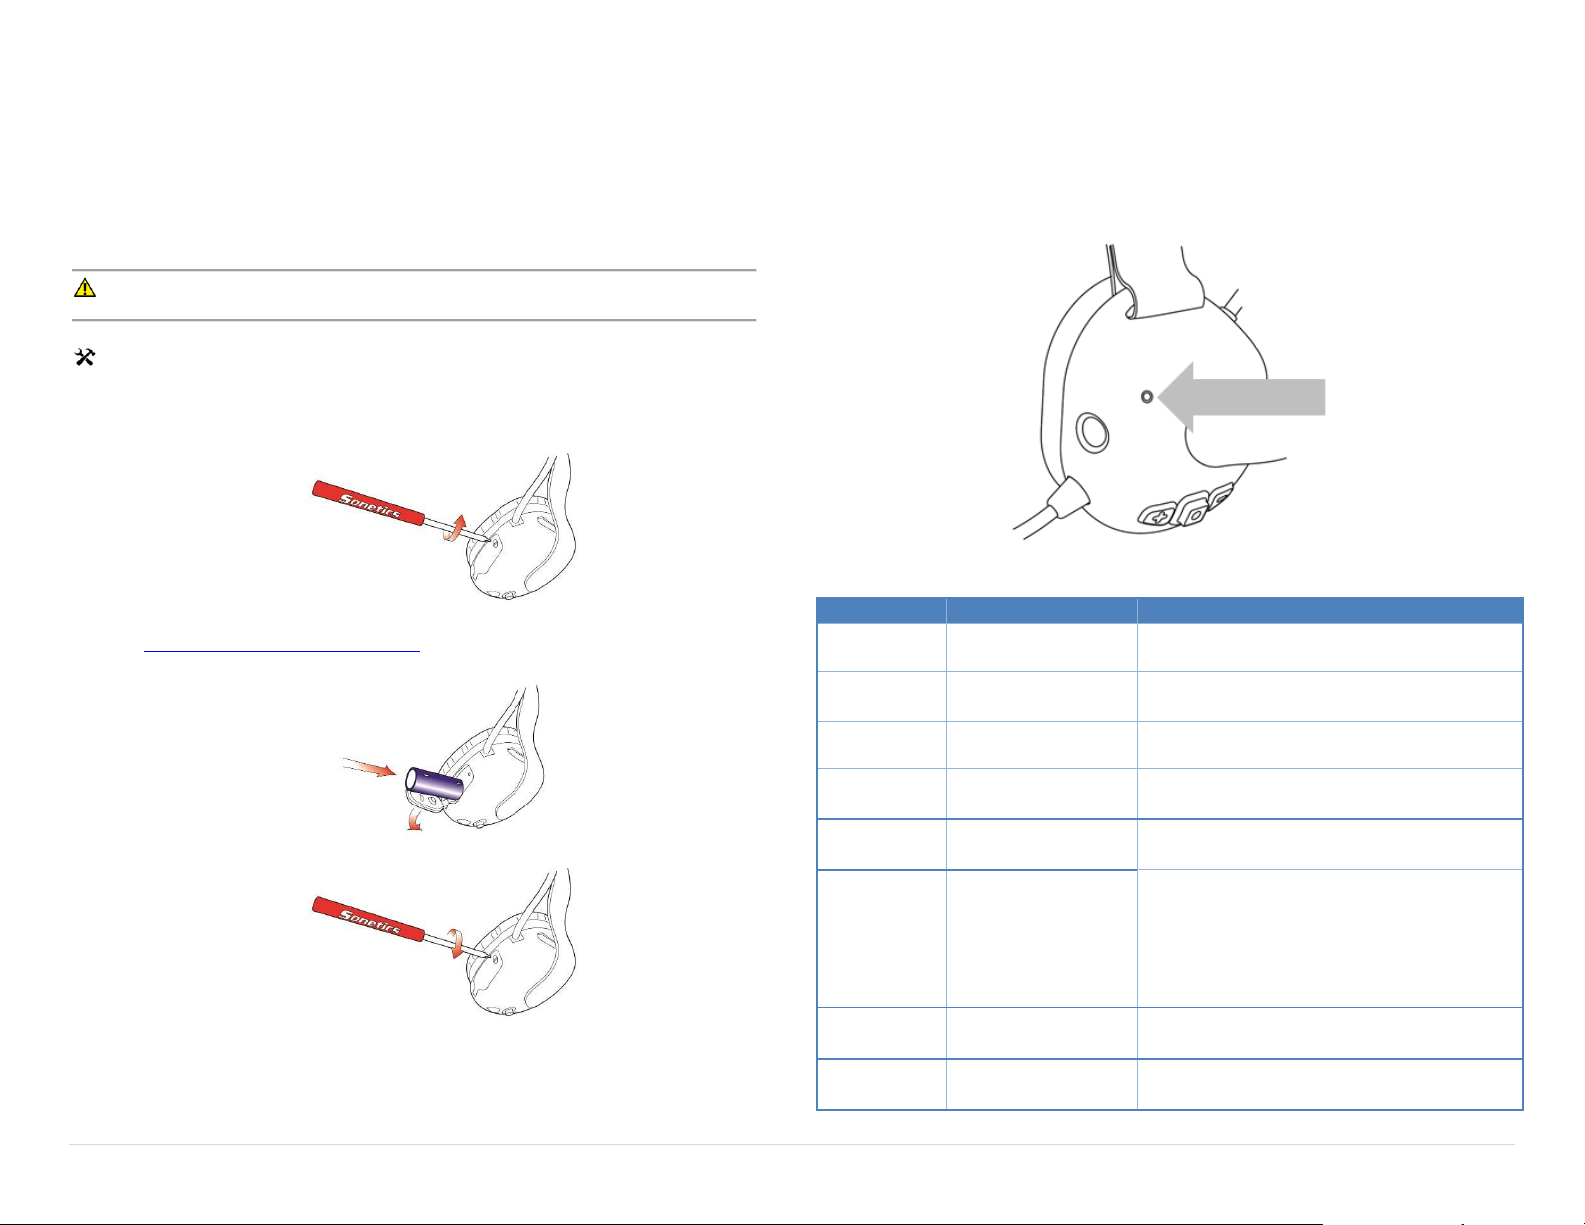
Charging
Non-Charging
Function
Red Flash
Headset On
Blue Flash
Bluetooth® Connection Established and in
progress
Red/Green
Headset in DECT pairing mode
Green Flash
DECT Connection Established and in
progress
Blue/Green
Both Bluetooth and DECT connections
Established and in progress
Flash
Led color will vary
Depending on
connection type
Battery Level
= Battery >75%
= Battery 50-75%
= Battery 25-50%
= Battery <25%
Red Solid
—————
Charging
Green Solid
—————
Fully Charged
Battery Replacement
Firecom Electronic Headsets use a Lithium Ion battery. Firecom batteries are the
only batteries that have been tested and verified to operate correctly with the
Headset. Use only Firecom approved batteries (Firecom part #320-0015-00). Use of
batteries from other sources will void your warranty.
WARNING: Use only Sonetics approved batteries.
Tools Required: Sonetics Screwdriver (Flat Head Screwdriver)
1. Pull back the right ruggedizer if the Headset has one installed.
2. Open the battery door on the right dome using the screwdriver.
3. Remove the battery, and recycle or discard per local laws. Refer to
Rechargeable Battery Information.
4. Insert the replacement battery, positive end first.
LED Indications
The Firecom Electronic Headset uses a multicolor LED indicator to give additional
information on the status of the Headset. The table below describes the behavior
while charging or in use (not all functions are available on all models).
5. Close the battery door and tighten the screw.
6. Replace the ruggedizer if installed.
9 | P a g e
Page 13
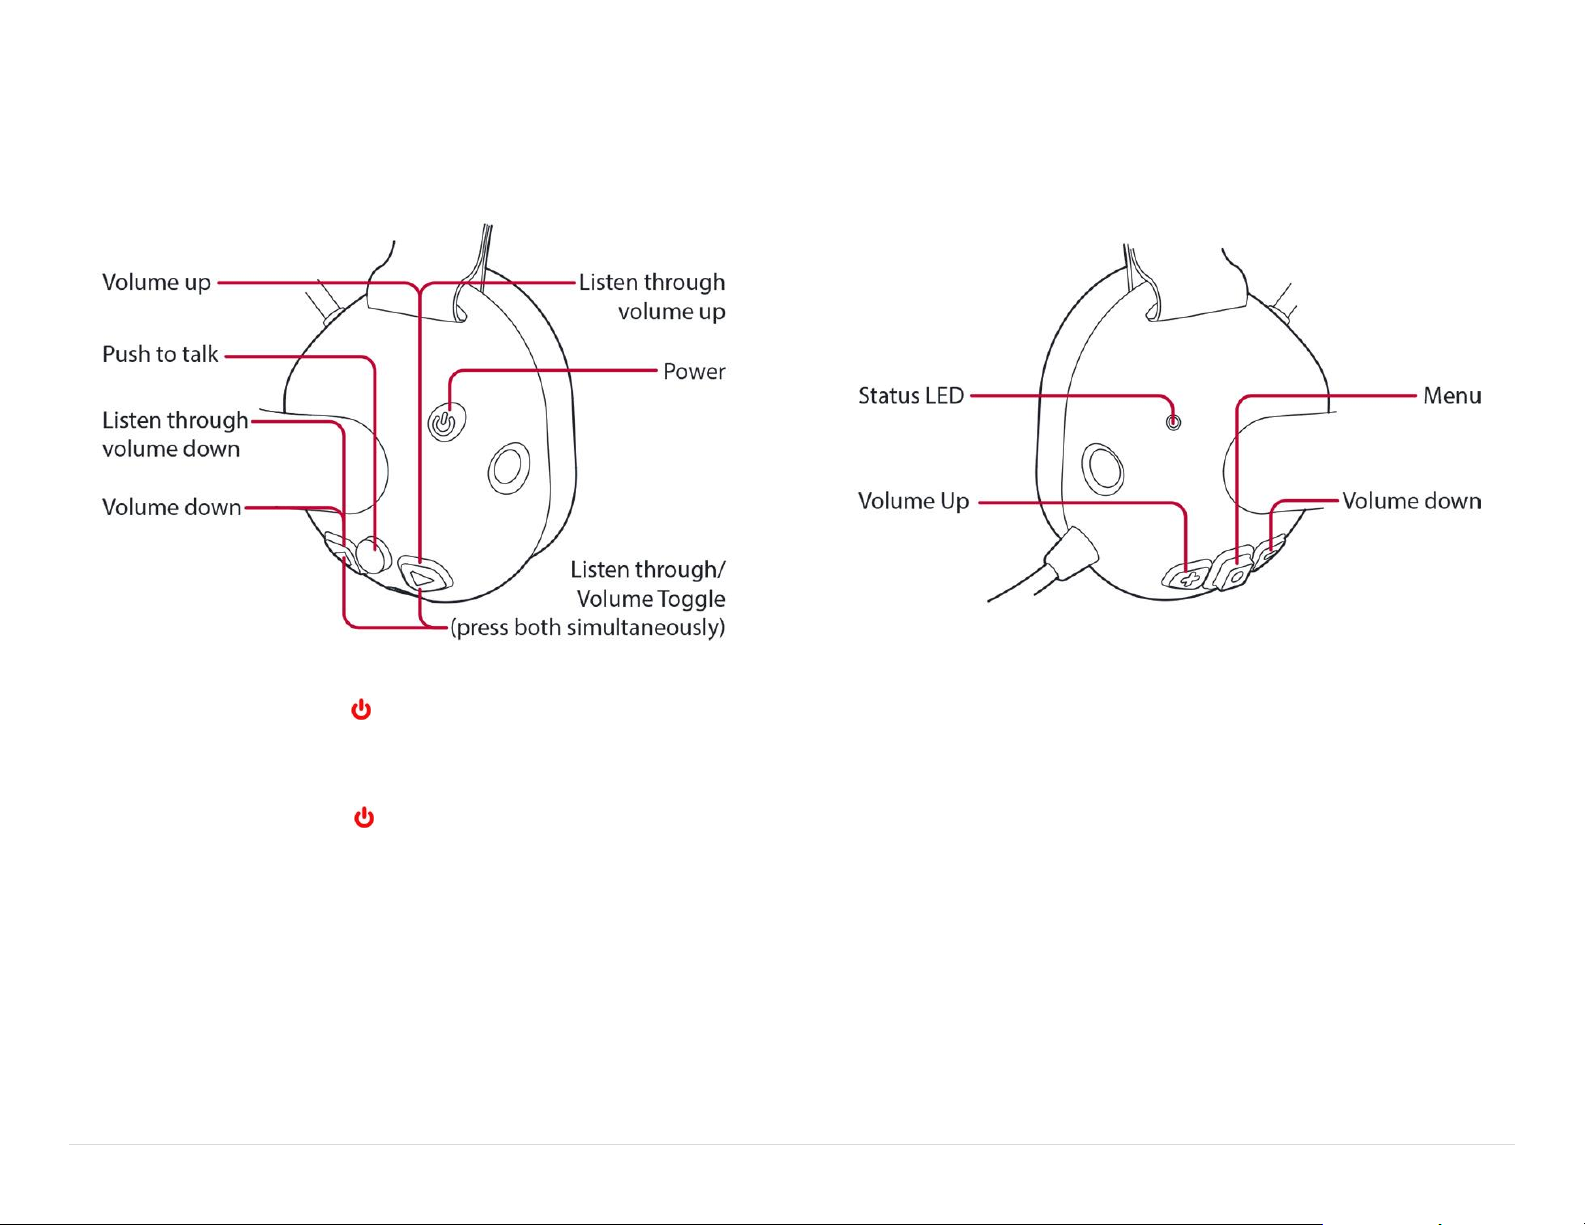
Buttons
Right Side
Settings & Operation
Left Side
Turn On
Press and briefly hold the power button. You will hear a welcome message and
the status LED will begin to flash periodically.
Turn Off
Press and briefly hold the power button. You will hear a power down message
and the status LED will turn off.
10 | P a g e
Adjusting the Main Volume
You can use either the plus and minus – buttons on the left side of the Headset,
or the forward and back arrow buttons on the right side of the Headset to
adjust the Main Volume.
Adjusting the Listen Through Volume
Press both the and buttons on the right-hand side of the Headset to toggle
between the Main Volume and Listen Through volume. A voice prompt will tell you
which is active.
When Listen Through is active, press the arrow buttons ( or ) on the right side
of the Headset to adjust the Listen Through volume setting.
Page 14

Factory Setting
Options:
“Radio VOX”:
Radio Transmit
on PTT , Hands
Free Intercom
“Radio VOX”: Radio Transmit on PTT , Hands Free Intercom
“Radio PTT”: Radio Transmit on PTT , Push to Talk Intercom
“Intercom VOX”: Hands Free Intercom only
“Intercom PTT”: Push to Talk Intercom only
“Intercom Toggle”: Toggle to Talk Intercom only
Factory Setting
Options:
“DECT Wide”
“DECT Wide" – Better sound quality.
“DECT Narrow” – Better resistance to interference.
Factory Setting
Options:
“Mic Auto 1”
“Mic On” (No Noise Gate)
“Mic Auto 1” (Highest Sensitivity Automatic Noise Gate)
“Mic Auto 2”
“Mic Auto 3” (Lowest Sensitivity Automatic Noise Gate)
“Mic 80” (Noise Gate set to 80dB Environment)
“Mic 90” (Noise Gate set to 90dB Environment)
“Mic 100” (Noise Gate set to 100dB Environment)
“Mic 110” (Noise Gate set to 110dB Environment)
"Firecom 4" (Legacy Setting – N/A to DW501, DW501BT)
"Firecom 5" (Legacy Setting – N/A to DW501, DW501BT)
"Firecom 6" (Legacy Setting – N/A to DW501, DW501BT)
Advanced Menu
The Advanced Menu is to set-up and configure the Headset for use. Caution must
be taken with these adjustments, as they change the operational characteristics of
the Headset. When in the menu system, all functions except PTT and Power are
locked out.
To Enter the Advanced Menu
1. Turn the headset off.
2. Simultaneously press and hold the forward , back , and Power
buttons until you hear “Advanced Menu”.
To Adjust Advanced Menu settings
1. Enter the Advanced Menu.
2. Repeatedly press the menu button until you hear your setting.
3. Press either the plus or minus – to cycle through the options.
To Exit the Advanced Menu
1. Press the forward , PTT , or back button or wait 30 seconds to
automatically exit.
Radio & Intercom Function
Sets the function of the PTT and Intercom.
Radio Transmit: For Radio PTT, when the Headset has a DECT connection, the PTT
will activate only the DECT Radio wireless connection. When the Headset does not
have a DECT connection, the PTT will activate the AUX Radio wired connection.
Intercom: This configures how the PTT and Noise Gate interact with each other
while a person is talking with their local wireless team. If you can hear yourself
through the side tone, others can hear you.
Version Number ("Version 1")
Indicates what firmware version your headset is running.
DECT Bandwidth ("DECT Wide")
"Radio On" or "Radio Off"
Enabling this setting makes the headset read out RSSI (Received Signal Strength
Indicator) numbers that tell you how strong the connection to The Base Station or
Comhub is. This can be used to improve system installations.
Mic Sensitivity
The Mic sensitivity may be configured into multiple modes of operation to tailor to
the user’s application.
To turn on the microphone always use “Mic ON”. This disables the Mic noise
gate completely. A whisper will be heard by all.
"Mic Auto" settings are automatic noise gates with increasing sensitivities.
"Mic XX" settings are for stable SPL environments of increasing volume.
Firecom 30XXR and 10 series intercoms require specific Mic Sensitivity settings
for correct operation. "Firecom 4", "Firecom 5", and "Firecom 6", are tailored
specifically to work with these Legacy Intercoms. Use with other mic sensitivity
settings will result in poor audio quality and clipped communications.
When the user presses the Radio PTT, any noise gate will be removed.
11 | P a g e
Page 15
Wireless Bluetooth®
To create a new Bluetooth pairing
1. Turn off the Headset, then turn on the Headset.
2. The Headset will enter Bluetooth pairing mode for 10 minutes.
3. Enter connectivity options on your Bluetooth device and search for new
devices. Once the search is complete select Sonetics-HS##. If prompted for a
password, enter four zeros (0000).
To answer or hang up a call
Quickly press and release the menu button.
Wireless DECT7
DECT7 headsets have the ability to use the Sonetics DECT, DECT6, DECT7 and IPDECT7 wireless bases for communication. Protected regional frequencies in each
region ensure interference free operation.
Pairing a DECT7 Headset
DECT7 Wireless Headsets use a semi-permanent link to a DECT7 Base Station or IPDECT7 system. No additional steps are required once a Headset has been paired.
Each time thereafter, the Headset will remember the Wireless Base Station and
automatically reconnect.
To Create a New DECT Pairing
1. Turn off the Headset.
2. Put the Wireless Base Station into Pairing Mode.
3. Hold down the PTT and power buttons to turn on the Headset.
4. Keep holding the PTT and Power buttons until the LED begins to flash
Red/Green .
5. Release the PTT button.
6. If successful, the LED will begin to flash Green .
7. If not, repeat all steps.
To erase a DECT pairing, follow the pairing sequence above without putting the
Wireless Base Station into pairing mode.
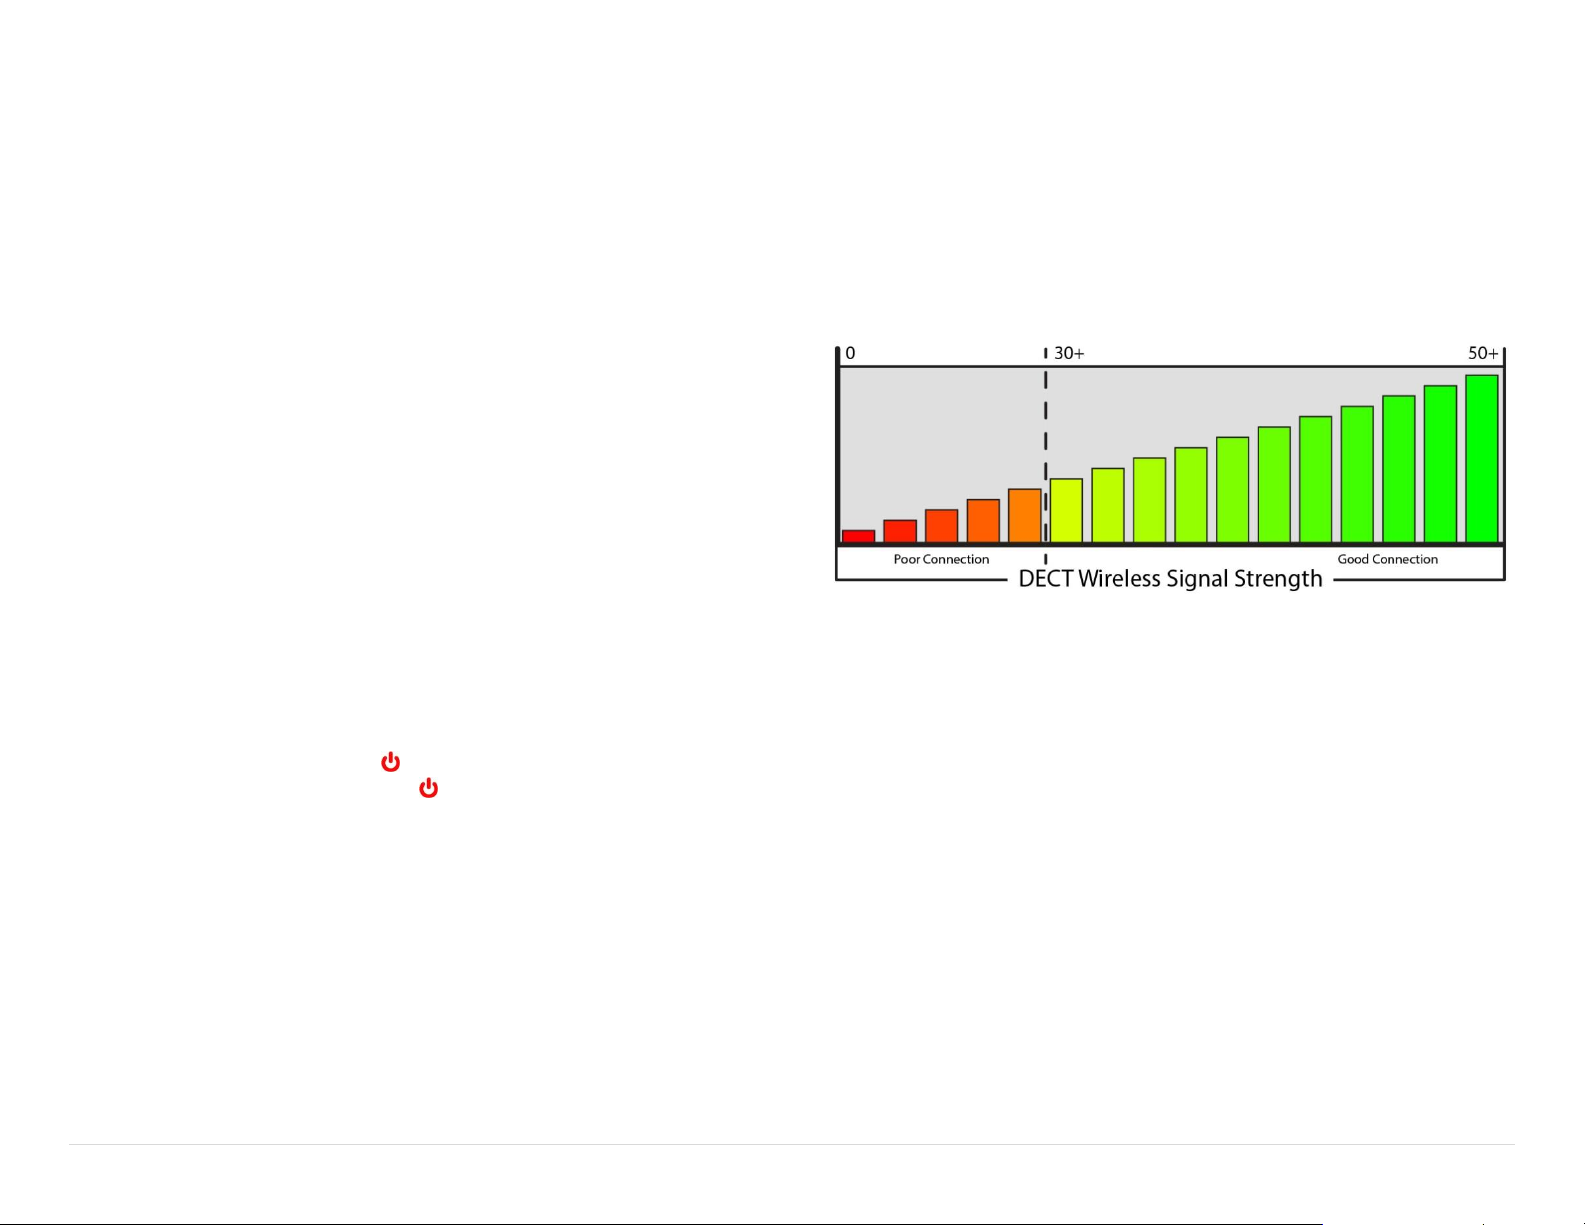
DECT Signal Strength
To use signal strength reporting
1. Make sure your headset has a DECT wireless connection.
2. Enter the Advanced Menu
3. Use the menu button to scroll through settings until you hear "Radio Off".
4. Use the or minus – buttons to change the setting to "Radio On".
5. If the headset has a DECT connection, it will announce the signal strength every
10 seconds. If no DECT connection is present, there will be no announcement.
6. To exit, cycle power on the headset.
12 | P a g e
Page 16
Action
Button
–
Power On/Off
Long
Volume Up
Volume Down
Volume Up
Volume Down
Radio PTT
Radio PTT
Main Volume / Listen Through
Toggle
Listen Through Up
Listen Through Down
Bluetooth Answer / Hang-Up
Short
Advanced Menu (available at
startup only)
Long Long
Long
DECT Pairing
Long
Long
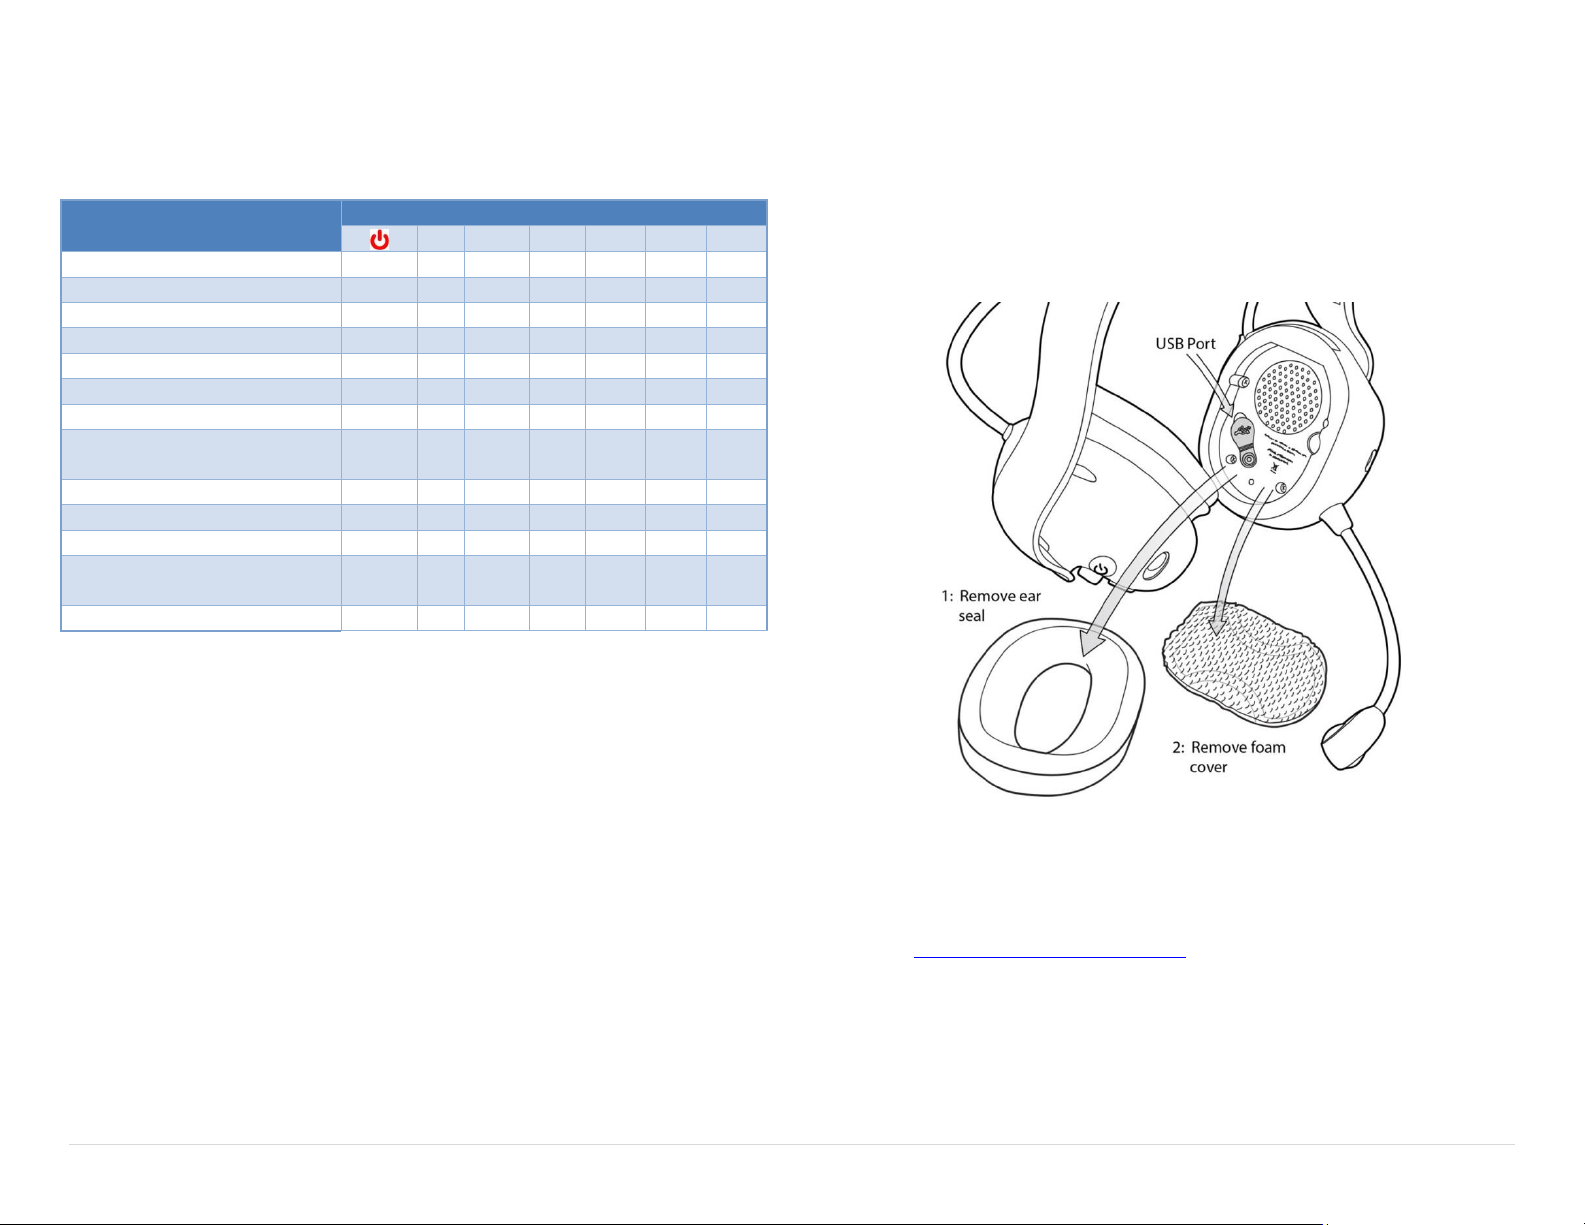
Quick Launch
Most menu items are available directly via a series of buttons. Two buttons in the
same row requires both buttons to be pressed.
= Press & Release
Short = Short Press & Release, <3 seconds
Long = Long Press, >3 seconds
PC Programming
All 500 Series Headsets have a USB port located inside the left dome. A Windows PC
with the Sonetics Configurator software installed is required to adjust headset
features. Refer to the software for additional information.
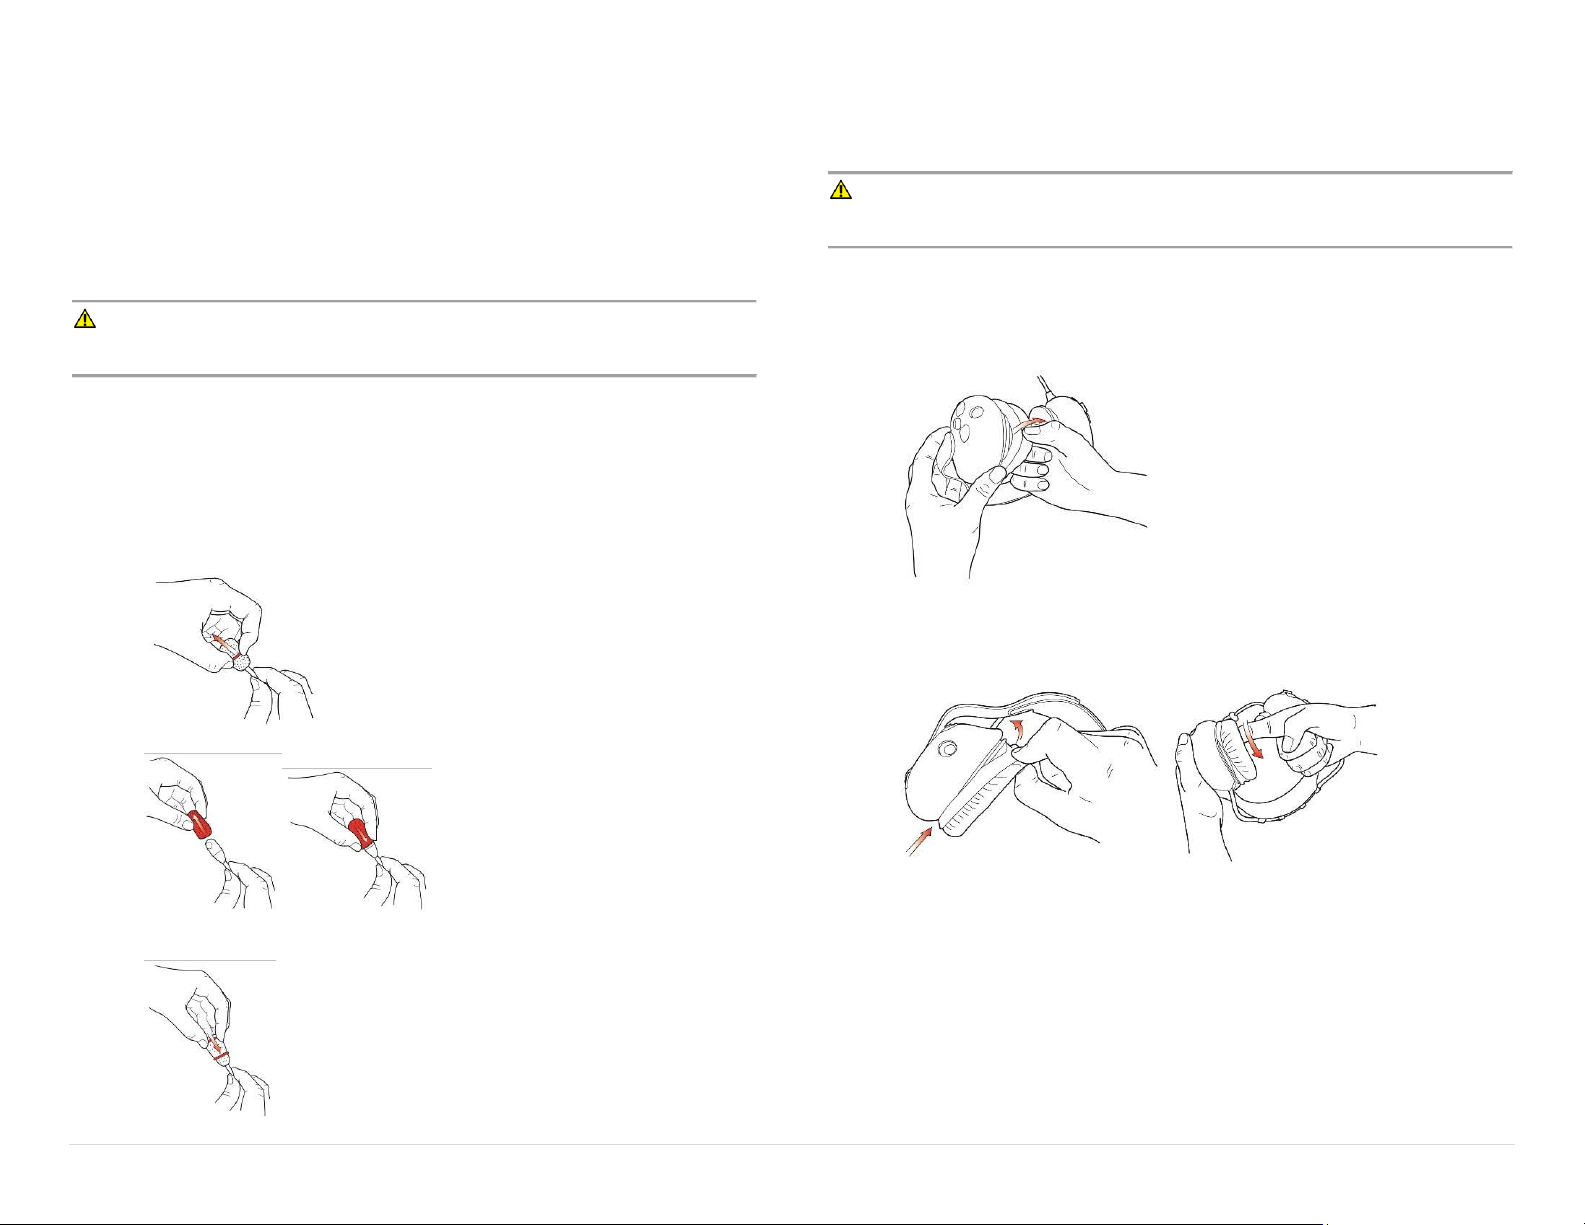
Locating the USB Port
Installation of Sonetics Configurator Software for
Windows
1. Go to www.FirecomCorp.com/software.
2. Download and Install the software for the Headset.
3. Plug in the USB cable from the Headset to the computer.
4. Open the software.
5. Follow the directions of the configurator software.
13 | P a g e
Page 17
Care and Maintenance
Regularly inspect your ear seals and mic muff for wear. Replace as needed. If your
headset sustains significant damage (holes or cracks in the ear domes, or
headband, etc., the Headset should be immediately repaired or replaced.
Clean the Headset and ear seals with a mild soap and water mixture only. The
foam mic muff may be removed and cleaned using a mild detergent, or replaced
by ordering from Firecom.
WARNING: Do not store the Headset in high temperature environments or
direct sunlight.
Mic Muff Replacement
Replace the mic muff every 3 months for optimal performance.
To replace the Mic Muff:
1. Remove the old mic muff and o-ring holding it in place.
Ear Seal Replacement
Replace the ear seals every 6 months for optimal performance and to maintain the
headset NRR.
WARNING: Worn ear seals will degrade the Headsets ability to reduce noise
and protect the users hearing.
To replace the ear seals:
1. Remove the old ear seal by pulling on the edge and peeling it over the lip
of the ear dome.
2. Starting at the bottom, place the new ear seal on the dome. Pull over the
lip of the ear dome using your finger. Do not use any sharp tool as it may
damage the ear seal and reduce hearing protection.
2. Slide the new mic muff over the microphone.
3. Slide the o-ring over the mic muff to hold it in place on the microphone as
shown.
14 | P a g e
Page 18

Troubleshooting
If you are experiencing symptoms not covered here, or are having difficulty
troubleshooting, call us or visit our website. We’re here to help.
Service Contact:
Phone: 800-527-0555, 503-684-6647, [email protected]
General Connection Issues
1. Verify the Headset is turned on.
2. Verify the battery is charged and within its useable life.
Wired Auxiliary
1. Verify the connection to the 2-way radio.
2. Verify the programming in the radio.
3. Verify the PR adaptor to the make and model of the radio.
4. Verify the headset radio settings.
Wireless Bluetooth
Disconnects, intermittent connectivity, or difficulty finding, pairing, or
connecting.
1. Verify your device and Headset model are Bluetooth compatible.
2. Check that you are in range of the Bluetooth accessory with which you are
trying to pair your device.
3. Turn on Bluetooth on your device.
4. Turn on discoverable mode on your device.
5. Make sure no previously paired devices are turned on.
6. Cycle the power on the Headset and/or the device being connected to.
7. On your device, find the Headset in the list. If your device says Not Connected,
tap the name of your Headset to attempt to connect it.
8. Fully charge both Headset and the device.
9. Delete the Headset from your device and create a new pairing.
10. Update your device to the latest Bluetooth firmware.
5. Cycle the power on the Headset and/or the Wireless Base Station.
6. Fully charge both the Headset and the Wireless Base Station (if applicable).
7. Check location of the Wireless Base Station and external antenna location. The
Wireless Base Station should not be installed inside metal enclosures or any
other location closer than 4 inches to a metal object or surface.
No audio communication and/or PTT from or to the base.
1. Ensure that power is turned on to the Wireless Headset and it is connected.
2. Ensure that the modular communication cable is connected between the
Wireless Base Station and Intercom.
3. Check the modular communication cable between the Wireless Base Station
and Intercom for continuity.
4. Ensure correct polarity of the modular plug on both ends of the modular cable.
5. Verify the Headset radio settings.
Poor quality audio, low or distorted received or transmitted audio.
1. Verify the ‘talk’ text is facing the user’s mouth on the microphone and located
within 1/8” of the user’s mouth.
2. Make sure that the volume level is properly adjusted on the Intercom. For
Digital Intercoms, set the volume level as high as possible on the Intercom
without causing distorted audio on the Headset, and then adjust the volume
control on the Headset for comfortable listening.
3. Ensure that the proper Wireless Base Station model for your Intercom is used.
4. Poor quality audio can be caused by a defective Headset. Confirm operation
with a Headset known to be functioning properly.
Audible interference from portable and mobile radios.
The wireless system is tested and proven to be immune to interferences from
portable and mobile communication equipment operated anywhere in the
frequency spectrum from 30MHz to 18GHz. However, care should be taken with
installation of communication cables between the Intercom and the Wireless Base
Station. These cables should be routed away from portable and mobile radios and
antenna cabling in order to prevent RF interference from such devices.
Wireless DECT
Disconnects, intermittent connectivity, or difficulty finding, pairing, or
connecting.
1. Verify the Headset is a Wireless DECT model.
2. Check that you are in range of the DECT Wireless Base Station.
3. Verify the Wireless Base Station and the Headset are in pairing mode.
4. The Firecom DECT7 Wireless Headset will only pair with other Firecom DECT7
Wireless Base Stations.
15 | P a g e
If a problem persists contact Firecom Service for additional help.
Page 19

Glossary
Wireless Base Station
Wireless DECT7 base unit through which Wireless DECT7 Headsets pair and link for
voice communications.
Bluetooth
Wireless standard in the 2.4GHz wireless range.
dBA
A-Weighted SPL (Sound Pressure Level) unit of measure.
DECT
Digital Enhanced Cordless Telecommunications. A wireless standard in the 1.9GHz
wireless range.
DECT7
DECT7 has all of the benefits of DECT with wider audio bandwidth and added
features such as multiple channels and broadcast mode.
Link(ing)
When a paired device re-connects to a paired device.
Pair(ing)
To create a semi-permanent wireless connection to a Base Station
PTT
Push to Talk. Typically used to describe radio transmitting.
SPL
Sound Pressure Level. Measurement of sound loudness. Measured in dBA.
16 | P a g e
Page 20

Specifications
Headset
Weights
Over Head: 15.8oz / 448g | 17.8oz / 504g with Ruggedizers
Behind Head: 16.2oz / 458g | 18.1oz / 514g with Ruggedizers
Power
Battery: 3.7V rechargeable lithium ion
Battery Life: >24 hours @ 25C
Protection: Over voltage, under voltage, over current and over
temperature protection
AC Charge source: Supplied 12VDC, 500mA wall charger
DC Charge source: 5VDC to 16VDC, 1.5A minimum
Charge Time: <4 hours for fully discharged battery
Environmental
Operating temperature: -22°F to 140°F / -30°C to 60°C
Storage temperature: -4°F to 122°F / -20°C to 50°C
Charging Temperature: 32°F to 113°F / 0°C to 45°C
IP-Rating: IP66
ISO
Conducted Transients: 7637-2
Quality Management System Control: ISO 9001:2008
MIL SPEC
Chemical Exposure: Intermittent Exposure MIL-STD 810 Method 504:
Isopropyl alcohol, Formula 409®, WD-40®, Windex®,
Bleach/Water (1:1), Mineral oil, Synthetic Sweat,
Jet A Fuel, Kerosene, Gasoline,
Deicing (Ethylene or Propylene Glycol mixtures),
Potassium-Acetate based solution, Ansulite.
Not Approved for exposure to Skydrol®.
Humidity: MIL-STD 810F and 810G
Temperature Shock: MIL-STD 810F and 810G
NFPA
NFPA1500: This device meets requirements
NRR
Behind Head NRR Rating: 20dB
Over Head NRR Rating: 20dB
Regulatory
FCC
FCC ID FHW507: V9N950325200V1
FCC ID UHW507: V9N950325200V1
FCC ID UHW505: V9N950325300V1
FCC ID UHW503: V9N950325300V1
FCC ID DW501B: V9N950325400V1
FCC Part 15: All Models
Industry Canada
IC UPN FHW507: 7895A-95032520
IC UPN UHW507: 7895A-95032520
IC UPN UHW505: 7895A-95032530
IC UPN UHW503: 7895A-95032530
IC UPN DW501B: 7895A-95032540
SAE
Conducted Immunity: J1113-11
Electrostatic Discharge: J1113-13
Radiated Emissions: CISPR 25
Radiated Immunity: ISO 11452-2
Salt Spray: J1455, Sec. 4.3
Vibration: J1455 Sec. 4.9
UL
UL1642 Standard for Lithium Batteries
UN
UN38.3 UN Transportation Testing for Lithium Batteries
17 | P a g e
Page 21

Bluetooth® Specifications
Class: Class 3 Device
Frequency Bandwidth: 2400 MHz to 2485 MHz
Maximum Output Power: 0.0 dBi (peak)
Range: Up to Bluetooth standard 33 feet (10 meters)
Version: Bluetooth 3.0 with secure simple pairing
DECT Specifications
Common DECT Specifications
Carrier Spacing: 1.724 MHz
Time Slots: 2 x 12 (up and down stream)
Channel Allocation: Dynamic
Encryption: DECT Standard Cipher with 35-bit initialization vector
Audio Bandwidth: 300 Hz to 3.4 kHz, Narrow Band, G.726 compression
50 Hz to 7 kHz, Wide Band, G.722 compression
Region 1 Specific Specifications
Authorized for use in: Canada, USA
Frequency Bandwidth: 1919.808 MHz to 1930.176 MHz
Number of Carriers: 5
Total Time Slots: 60 in G.726(narrow band) / 30 in G.722(wide band)
Average Output Power: 4 mW
Maximum Output Power: 100 mW
Range (line of sight): 1600 feet maximum
18 | P a g e
Page 22

Important Safety Information
CAUTION! Follow all warnings and instructions marked on the product or
contained in the owner’s manual.
When using this product, always follow basic safety precautions to reduce the risk
of fire, electric shock and injury to persons, including the following:
The Headset water and dust egress IP rating does not apply when the battery
door or Auxiliary input door is open. DO NOT expose this unit to rain or
moisture with either door open.
The Headset is not certified for explosive environments. Do not use the
Headset to report a gas leak in the vicinity of the leak.
There are no user serviceable parts inside the Headset. Disassembly will void
the warranty and will degrade the water sealing and hearing protection.
Use only the power adapters, power cords and batteries indicated in the
manual. If more than one type of power adapter is included in the product, the
manual specifies which adapter should be used for each component. Be sure to
use the proper adapter for each product component.
Do not place the power cord where it creates a trip hazard or where it could
become chafed and create a fire or electrical hazard.
Do not subject the unit to high temperatures or leave it in direct sunlight for an
extended period of time.
Retention of dangerous objects: The Headset may hold small objects in the
area of the earpiece. Before use, check that the earpiece area is free of staples,
pins, clips or any other small metallic objects or foreign matter.
SAVE THESE INSTRUCTIONS
General Warning for Sensitive Electronic Devices
This equipment and any radio-based electronics can potentially cause
electromagnetic based interference with other equipment and can be interfered
with other equipment. This also applies with DECT based Equipment. Due to the
very low transmission power associated with DECT the chance for interference is
small. However some specific precautions must be taken into account for sensitive
electronic equipment e.g. sensitive laboratory equipment, medical instruments or
medical implants to avoid incidental influence of equipment operated in straight
nearness to sensitive electronic equipment. You are therefore advised not to place
the DECT equipment or its antenna in close proximity to sensitive equipment by
maintaining a 20cm minimum distance between the sensitive equipment even in
standby mode. Please also consider referencing the documentation provided by us
and the manufacturer of sensitive electronic items guiding its proper usage.
General Communication Privacy Notice
Although this equipment may contain specific protocols that enhance security and
privacy of communication, privacy of communication may not be ensured when
using this equipment.
Industry Canada (I.C.) Notice (UHW503/5/7, FHW507,
DW501B)
This section applies to radio frequency equipment bearing an I.C. Equipment ID
Number (UPN).
This device if labeled with an IC UPN, complies with Industry Canada license-exempt
RSS standard(s).
Operation is subject to the following two conditions:
(1) this device may not cause interference, and
(2) this device must accept any interference, including interference that may cause
undesired operation of the device.
Ce dispositif est conforme à la norme CNR-210 d'Industrie Canada applicable aux
appareils radio exempts de licence. Son fonctionnement est sujet aux deux
conditions suivantes:
(1) le dispositif ne doit pas produire de brouillage préjudiciable, et
(2) ce dispositif doit accepter tout brouillage reçu, y compris un brouillage
susceptible de provoquer un fonctionnement indésirable.
Canada SAR Information:
This device contains a radio transmitter. This device has been shown to be capable
of compliance for localized specific absorption rate for uncontrolled environmental
/ general public exposure limits specified in RSS-102, ANSI/IEEC95.1-2002 and have
been tested in accordance with the measurement procedures specified in IEE 1528-
2003.
Déclaration d'exposition aux radiations: Cet équipement est conforme aux limites
d'exposition aux rayonnements IC établies pour un environnement non contrôlé.
Cet équipement doit être installé et utilisé avec un minimum de 20 cm de distance
entre la source de rayonnement et votre corps.
Any base station or approved base station antenna meant to be used in conjunction
with this equipment must not be used in close proximity to the body. Keep a
minimum distance of greater than 20 CM to the human body. This device and
antenna must not be co-located in conjunction with any other equipment antenna
or transmitter.
19 | P a g e
Page 23
IC Compliance Statement (for DW501)
This class A digital apparatus complies with Canada ICES-003 requirements for
unintentional radiator for Class A Digital Devices.
CET appareil numérique de la classe A est conforme à
la norme NMB-003 du Canada.
FCC Part 15 Information (UHW503/505/507, FHW507, DW501B)
This device complies with part 15 of the FCC rules. Operation is subject to the
following two conditions:
(1) This device may not cause harmful interference, and
(2) This device must accept any interference received, including interference
that may cause undesired operation.
Modifications not expressly approved by Firecom could void the user’s authority to
operate the equipment.
FCC/IC RF Exposure Warning
This product complies with FCC radiation exposure limits set forth for an
uncontrolled environment.
The Headset is designed for body-worn operation and meets FCC RF exposure
guidelines when used accessories supplied with this product. (All necessary
accessories are included in the package; any additional or optional accessories
are not required for compliance with the guidelines.) Use of other accessories
might not comply with FCC or IC RF exposure guidelines.
This product may not be collocated or operated in conjunction with any other
antenna or transmitter.
Any base station or approved base station antenna meant to be used in
conjunction with this equipment must not be used in close proximity to the body
Keep a minimum distance between human body and base station and base
antenna of at least 20 CM (8.0 inches) at all times.
This Headset device and antenna must not be co-located in conjunction with any
other equipment antenna or transmitter.
This Headset has been tested and meets the FCC RF exposure guidelines.
FCC Part 15 Information (for DW501 only)
FCC PART 15.105(a): Note: This equipment has been tested
and found to comply with the limits for a Class A digital device,
pursuant to part 15 of the FCC Rules. These limits are designed
to provide reasonable protection against harmful interference in a commercial
environment. This equipment generates, uses and can radiate radio frequency
energy and, if not installed and used in accordance with the instruction manual,
may cause harmful interference to radio communications. Operation of this
equipment in a residential area is likely to cause harmful interference in which case
the user will be required to correct the interference at his own expense.
Rechargeable Battery Information
CAUTION! Risk of explosion if battery is replaced by an incorrect type!
Dispose of used batteries according to the instructions.
Do not open or mutilate the battery.
Disconnect the battery before shipping this product.
This equipment contains a rechargeable Lithium-Ion (Li-Ion) battery (with
protection circuit). This battery is not user-serviceable.
Do not modify or attempt to open the battery cell. In case of exposure to the
cell contents, wash the affected area thoroughly and seek medical attention.
Do not expose the battery to temperatures in excess of 140° F (60° C).
Do not short-circuit the battery or expose battery to moisture
Exercise care when handling a battery near conductive materials such as
jewelry or buttons: conductive materials can short the battery, and the battery
or conductor can overheat and cause burns.
When charging this equipment, only use the charger designed to charge the
battery as specified in the owner’s manual: using any other charger may
damage the product or cause the battery to explode.
Before placing the Headset in the charger, make sure the battery is installed
and the battery cover is securely in place.
Do not place the batteries in your regular trash. All batteries must be recycled
or disposed of in an environmentally sound manner. Contact your local waste
management officials for information and regulations on the proper collection,
recycling, and disposal of batteries.
Use only the replacement batteries approved by Firecom which have internal
protection circuit, use of non-approved battery replacements may cause fire,
injury or damage product.
Always observe correct battery polarity during use and charging.
Do not place batteries in your regular trash.
All batteries must be recycled or disposed of properly.
20 | P a g e
Page 24

Frequency in Hz
Subject
125
250
500
1000
2000
3150
4000
6300
8000
Mean
16.3
15.5
19.8
27.3
31.4
39.2
40.6
41.2
38.7
Std. Dev.
2.7
1.9
2.1
2.2
2.7
3.0
3.4
2.8
3.1
Frequency in Hz
Subject
125
250
500
1000
2000
3150
4000
6300
8000
Mean
16.3
16.4
20.4
26.2
32.2
37.0
39.6
40.8
40.0
Std. Dev.
3.1
2.1
1.9
2.1
3.5
3.1
3.8
3.0
3.1
Frequency in Hz
Subject
125
250
500
1000
2000
3150
4000
6300
8000
Mean
13.8
14.3
20.3
28.5
32.4
36.9
40.7
41.3
38.2
Std. Dev.
1.7
1.6
2.2
2.7
2.4
3.2
3.4
3.8
3.1
Important NRR Information
To the user, the EPA requires the Firecom to provide the following information:
Model: NRR User Information (EPA Noise Reduction Rating)
Model (Behind Head) Attenuation Characteristics
Overall device NRR when properly fitted is: = 20dB
Model (Under Helmet) Attenuation Characteristics
Overall device NRR when properly fitted is: = 20dB
Model (Over-the-Head) Attenuation Characteristics
1) In a noisy environment, place the palms of your hands on both cups and push
the cushions towards your head and release.
2) You should not notice a significant difference in the noise level.
3) If the noise seems to lessen when you press the cups, your earmuff is probably
not fitted properly (If necessary reposition Headset and ensure hat, hair or
jewelry are not interfering with proper fit/seal of the muff pad to head.
Regularly check cushions for wear and clean them occasionally as necessary with a damp
cloth or disinfect ear seal surface with non-alcohol PPE wipes. (Do not use harsh
detergents or any solvents which may damage the ear seal over time). Check ear seal
cushions for wear. If the cushions become hard, damaged or otherwise deteriorate, they
should be replaced promptly (Contact Firecom or your authorized dealer for exact
replacement parts).
Warning: Hats, balaclavas, glasses or other items worn on the head may potentially
prevent proper sealing and reduce the level of hearing protection significantly which can
possibly cause hearing damage.
Although hearing protectors can be recommended for protection against the harmful effects
of impulsive noise, the Noise Reduction Rating (NRR) is based on the attenuation of
continuous noise and may not be an accurate indicator of the protection attainable against
impulsive noise such as gunfire.
Cautionary Note: The level of noise entering a person’s ear, when a hearing protector is
worn as directed, is closely approximated by the difference between the A-weighted
environmental noise level and the NRR.
Overall device NRR when properly fitted is: = 20dB
Notice: Improper fit of this device will reduce its effectiveness in attenuating noise (See
fitting instructions).
Important Ear Muff Fitting Instructions:
Inspect hearing protectors for dirt damage and foreign objects each time before you
place the hearing protector / Headset on your head.
Earmuffs offer excellent protection if the cups are fitted and adjusted properly. Your ears
should be completely enclosed by the ear cups.
Adjust the cups up or down to fit the headband securely at the crown of your head. The
best performance is obtained when the cushions form a tight seal against your head.
(See Fitment Section for your specific Headset type located in this User Manual)
Never attempt to physically modify/bend/overstress the headband which may
compromise NRR rating, proper fit and void product warranty.
Test the fit as follows:
21 | P a g e
NRR Example:
1. The environmental noise level as measured at the ear is 92 dBA.
2. The NRR is (value on label) decibels (dB).
3. The level of noise entering the ear is approximately equal to [92 dB(A) -NRR] dB(A)].
CAUTION: For noise environments dominated by frequencies below 500 Hz “the C weighted
environmental noise level should be used.’’
Warning: This communication Headset has been sealed by the factory to assure noise
protection rating and lock out dust and moisture and has no internal user serviceable parts
other than the batteries. Do not attempt to open or service the unit as this will potentially
reduce NRR and the ability for the device to protect your hearing. Un-authorized
disassembly, modification or servicing nullifies the warranty and may cause hearing loss or
reduction in NRR rating if the factory seals or calibration are compromised.
Page 25

Firecom Standard Limited Warranty
Firecom, a division of Sonetics Corporation, (“Firecom”) warrants to the original
purchaser of its products that products will be free from defects in materials and
workmanship under normal and proper use for the period of two years from date
of purchase.
Firecom will repair or replace, at its option, any products showing factory defects
during this warranty period, subject to the following provisions and obligations:
1. This warranty applies only to a new product sold through authorized channels of
distribution.
2. All work under warranty must be performed by Firecom.
3. All returned products must be shipped to our address, freight prepaid and Firecom
will return products to customer via ground freight. Any expedite fees or additional
freight charges will be charged to customer.
4. Any attempt to repair, service, or alter the product in any way voids this warranty.
5. This warranty does not apply in the event of accident, abuse, misuse, liquid contact,
improper installation, unauthorized repair, tampering, modification, fire,
earthquake, or damage from other external sources – including damage caused by
user-replaceable parts.
6. This warranty does not apply: (a) to consumable parts such as batteries, ear seals,
intercom bags, cables, external power supplies, parts listed as accessories to a
system, or other parts designed to diminish in function over time unless a failure is
due to a defect in materials or workmanship; (b) to cosmetic damage or to defects
caused by normal wear and tear or aging of the product; (c) to damage caused by
use with non-Firecom products; (d) to damage caused by operating the product
outside the permitted or intended uses or environments described by Firecom; (e)
to damage caused by service performed by anyone who is not a representative of
Firecom or an Firecom Authorized Service Provider; (f) to a product or part that has
been modified without the written permission of Firecom; (g) if any Firecom serial
number has been removed or defaced.
7. This warranty does not extend to any other equipment, apparatus, vehicle, aircraft,
or watercraft to which this product may be attached or connected.
THE FOREGOING IS YOUR SOLE REMEDY FOR FAILURE IN SERVICE OR DEFECTS.
SONETICS CORPORATION SHALL NOT BE LIABLE UNDER THIS OR ANY IMPLIED
WARRANTY FOR INCIDENTAL OR CONSEQUENTIAL DAMAGES, NOR FOR ANY
INSTALLATION OR REMOVAL COSTS OR OTHER SERVICE FEES. THIS WARRANTY IS
IN LIEU OF ALL OTHER WARRANTIES, EXPRESS OR IMPLIED, INCLUDING THE
WARRANTY OF MERCHANTABILITY OR FITNESS OF USE, WHICH ARE HEREBY
EXCLUDED. TO THE EXTENT THAT THIS EXCLUSION IS NOT LEGALLY ENFORCEABLE,
THE DURATION OF SUCH IMPLIED WARRANTIES SHALL BE LIMITED TO TWO YEARS
FROM DATE OF PURCHASE. NO SUIT FOR BREACH OF EXPRESS OR IMPLIED
WARRANTY MAY BE BROUGHT AFTER TWO YEARS FROM DATE OF PURCHASE.
Subject to the terms and limitations of this Firecom Standard Limited Warranty, this
warranty covers any new covered product found to be defective within the
applicable warranty period. Firecom reserves the right to examine the alleged
defective covered product to determine whether this Firecom Standard Limited
Warranty is applicable, and final determination of warranty coverage lies solely
with Firecom. If Firecom determines that warranty coverage applies, Firecom
reserves the right to either repair or replace a covered product or any part thereof,
as determined by Firecom in its sole discretion. If the product has been subjected to
conditions which exclude coverage under the warranty, customer will be so
advised. Customer may then authorize paid repair service or other disposition of
the product. Notwithstanding any other provision of this warranty, if you sell or
otherwise transfer ownership of your covered product, this Firecom Standard
Limited Warranty shall automatically terminate.
22 | P a g e
Page 26

FIRECOM – A DIVISION OF SONETICS CORPORATION
Copyright ©2015 Sonetics Corporation - All rights reserved.
The information in this document is subject to change without notice.
P/N: 600-0387-00 Rev. E
 Loading...