

Page 1
Factory Reset - config recovery!
!
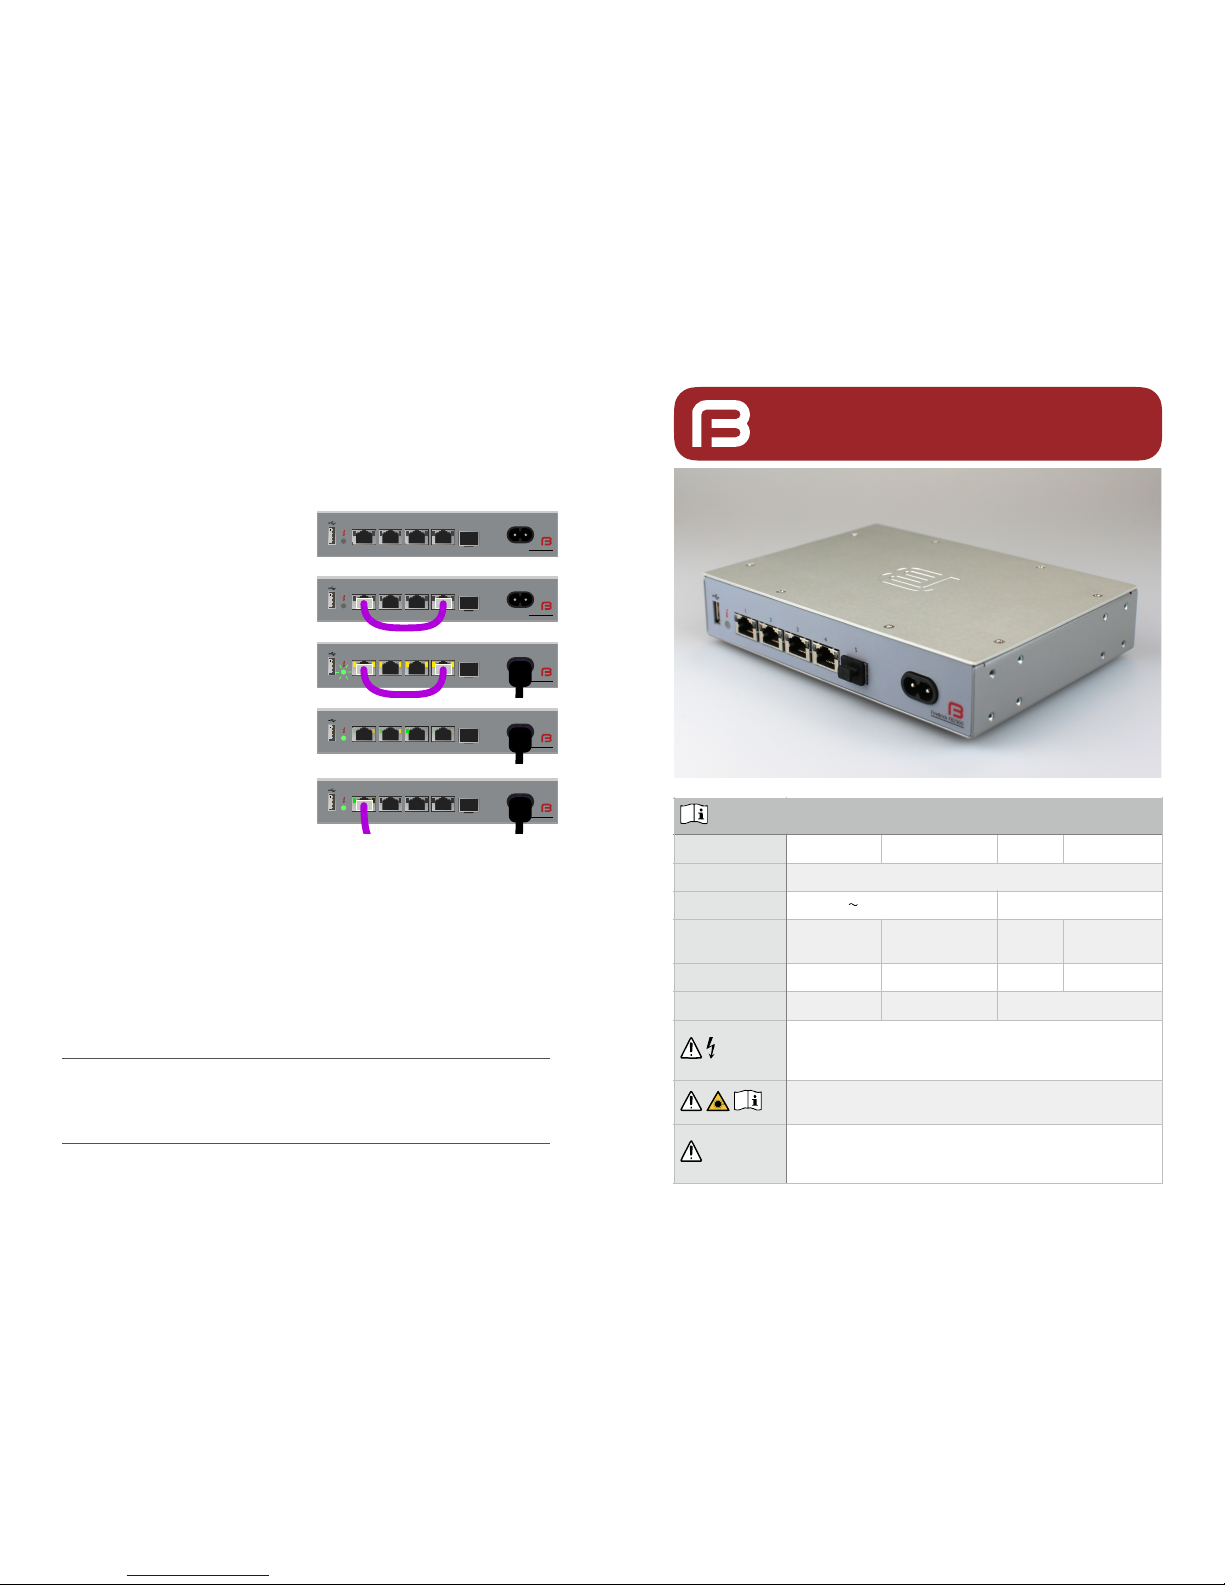
The FireBrick has a simple factory reset process to allow you to reconnect using the default IP
addresses as defined overleaf. This process can be very useful if you ever make an error in
the configuration that stops you having access to the FireBrick for any reason.!
1. Disconnect all network and power leads
and remove any SFP or USB devices.!
2. Connect a lead between port 1 and 4.
Make sure this is a full cat5 cable (all
wires).!
3. Connect power and wait a few
seconds for all port LEDs to be on
steadily. Status LED blinks. You have 40
seconds for next step.!
4. Disconnect loop, leave power
connected. Port LEDs will go green for 5
seconds to confirm, then status LED
stops flashing and port LEDs cycle.!
5. Connect network to port 1 or port 4 as
per instructions overleaf.!
Resetting using ports 1 and 4, as above, will start the FireBrick in a factory reset
configuration. Follow the instructions overleaf to access the configuration web interface.!
You can also start the FireBrick using the "last but one" configuration by using ports 1 and 3.!
This is temporary, and if you restart the FireBrick without having saved a new configuration
then it will revert to the latest saved configuration.!
In either case the web interface allows you to recover the latest saved configuration if you
have a username and password. You can edit this to correct any mistakes and save this as
the new configuration.!
Full reset!
Using ports 1 and 2 will perform a permanent full factory reset rather than a recovery mode.!
FireBrick Ltd, Enterprise Court, Downmill Road, BRACKNELL, RG12 1QS, UK company 04932284!
2018-02-01. © Copyright 2018. ISBN 978-1-912632-00-8"
Product Safety Information - Please read
Product
Manufacturer:
FireBrick
Model:
FB2900
Safety Standard
BS EN 62368-1:2014
Rated Power
Class II (double insulated)
Max humidity
Operating:
90% RH!
(non condensing)
Storage:
95% RH
Temperature
Operating:
0-50°C
Storage:
-40 to +85°C
Max Altitude
Operating:
2000m
Live parts inside. Do not open. Risk of electric shock.!
Do not insert screws more than 5mm in to body.!
(Please use screws supplied with rack/wall brackets)
Some SFP devices may emit invisible laser radiation.!
Read safety instructions provided by manufacturer.
Copper Ethernet ports are designed for connection to wiring
within same building.!
For connections between buildings use optical links.
100-240V 50-60Hz 15W
FB2900 Quick Start Guide
12345
FireBrick FB2900
i
12345
FireBrick FB2900
i
12345
FireBrick FB2900
i
12345
FireBrick FB2900
i
12345
FireBrick FB2900
i
Page 2
Getting Started!
You configure your FireBrick using a web browser - to do this, you need a local IP connection
between your computer and the FireBrick. There are several ways to get started…!
Method 1 - use the FireBrick's DHCP server to configure a computer!
If your computer is already configured (as most are) to get an IP address automatically,
connect your computer to port 1 on the FireBrick, and the FireBrick's inbuilt DHCP server
should give it an IP address. You can then access the web control pages using your browser.!
Method 2 - configure a computer with a fixed IP address!
Alternatively, you can connect a computer to port 1 and manually configure your computer to
have a fixed IP address. You can then use a browser to access the FireBrick's web pages as
follows:!
Method 3 - use an existing DHCP server to configure the FireBrick!
If your LAN has a DHCP server then do not connect port 1 to your LAN as it will clash with
your server. Instead, connect port 4 to your LAN and the FireBrick will get an IP address
automatically. Check your DHCP server to find the address allocated and access this IP
address using your web browser.!
"
FireBrick web interface!
Following these instructions you should reach the FireBrick's web control pages which
prominently displays "Configuration needed". Click the "edit configuration" link, which will
take you to the configuration setup wizard covering initial steps.!
Add a new user!
You now need to add a user with a password in order to gain full access to the
FireBrick's user interface.!
Using the wizard you can specify username, full name, and password. Or you
can skip the wizard to add a user if you prefer.!
Remove temporary subnets!
The FireBrick can have many subnets at once. The 2001:DB8::1 and 10.0.0.1
addresses are temporary and should be removed, but we recommend you add
new addresses and test they work as expected before removing these temporary
addresses. The wizard removes these, and adds the subnet(s) you specify.!
Login!
Having changed the config, using the wizard or XML editor, select “Save” and you will see a
page showing the progress of storing the new configuration in Flash memory. On this page
there is a "Login" link - click on this link and then log in using the username and password
you chose. You can then set up the rest of the FireBrick's configuration.!
Software updates!
The FireBrick is constantly being improved and new features added. Software
updates are automatic and free of charge. You can control if/when software
updates are applied in the “setup” / “system settings” section of the configuration.!
In the unlikely event of a software issue with the FireBrick, a log and stack trace
are emailed automatically to the FireBrick development team. If you do not wish
this to happen, or you wish emails to be sent somewhere else, you can change the
settings in the “setup” / “log target controls” for “fb-support”.!
FireBrick Manuals!
The comprehensive manuals, regulatory approval declarations, and further information are
available on the FireBrick web site.!
www.FireBrick.co.uk
Set PC IP
Web page
DHCP
http://my.firebrick.uk/
Set PC IP
Web page
IPv6
2001:DB8::2/64
http://[2001:DB8::1]/
IPv4
10.0.0.2 / 255.255.255.0
http://10.0.0.1/
12345
FireBrick FB2900
i
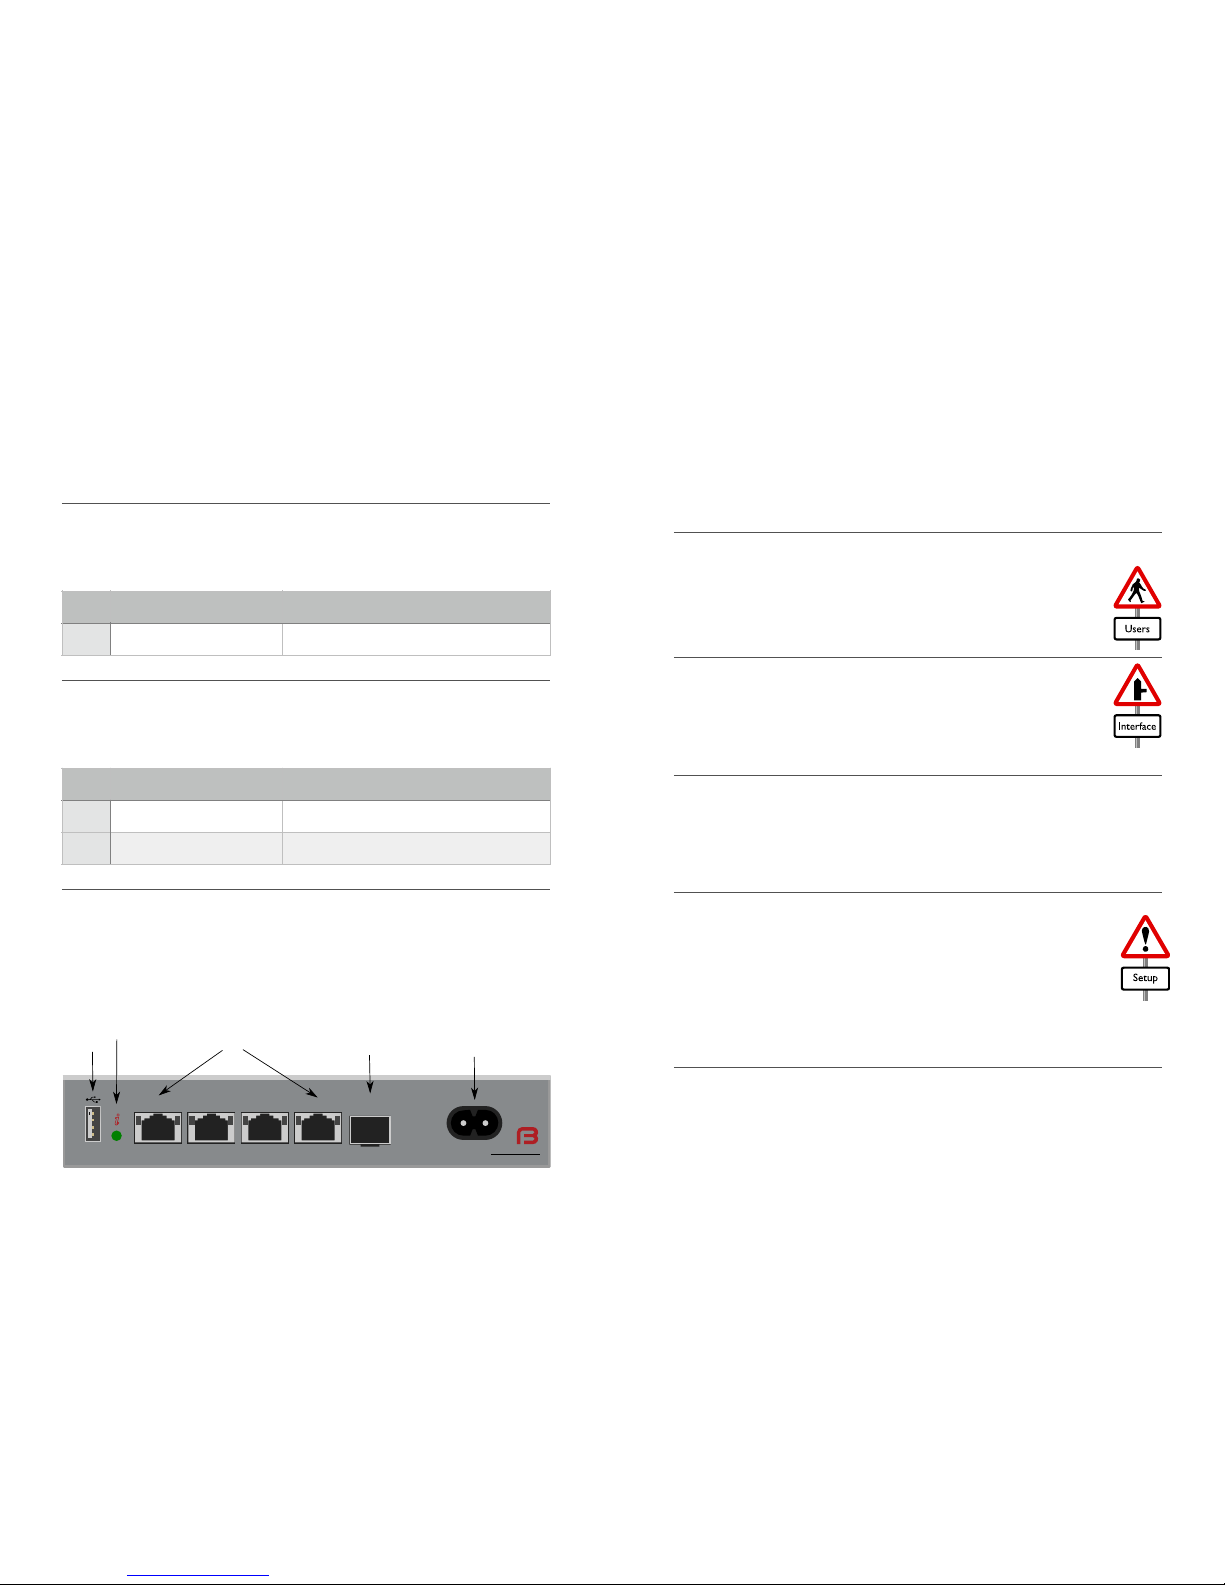
USB
Multicolour status LED
10/100/1000 Copper Ethernet
SFP Power
 Loading...