


Doc.-No.: 01/BCTroll Users Manual personal Parachute
Date: 09.03.2004 BCTroll / Firebird/ Relax Container
Issue: 0
Page: 1 of 30
TROLL
+
TROLL MDV
BASE-Canopy with
Firebird
BASE Containersystem
RELAX

Doc.-No.: 01/BCTroll Users Manual personal Parachute
Date: 09.03.2004 BCTroll / Firebird/ Relax Container
Issue: 0
Page: 2 of 30
Table of Contents Page:
1. Foreword 03
2. Warning 03
3. Technical Description 04-09
4. Packing the Troll 10-22
5. Packing the Relax 22-26
6. Extras 27
7. Service 28-30

Doc.-No.: 01/BCTroll Users Manual personal Parachute
Date: 09.03.2004 BCTroll / Firebird/ Relax Container
Issue: 0
Page: 3 of 30
Foreword:
In this manual you will find only basic packing and rigging instructions. Base jumping is extremly dangerous. Make absolutely certain Base jumping is really what you want. Make at least 200 skydives. Take first
Base jump course from a competent qualified teacher or from VDO in Germany.
VDO:
Adress: Phone: Webadress:
Verband deutscher Objektspringer
Jürgen Mühling (0049)33932-72464 www.base-jump.de
Flugplatzstr. 3
16833 Fehrbellin / Germany
Warninglabel:
Never use this system unless you have read the Manual and Warninglabel.
And have completed the ground and air training!

Doc.-No.: 01/BCTroll Users Manual personal Parachute
Date: 09.03.2004 BCTroll / Firebird/ Relax Container
Issue: 0
Page: 4 of 30
Front
Technical Description Troll 225
Mesh

Doc.-No.: 01/BCTroll Users Manual personal Parachute
Date: 09.03.2004 BCTroll / Firebird/ Relax Container
Issue: 0
Page: 5 of 30
Technical Description Troll 245
Front
Mesh

Doc.-No.: 01/BCTroll Users Manual personal Parachute
Date: 09.03.2004 BCTroll / Firebird/ Relax Container
Issue: 0
Page: 6 of 30
Technical Description Troll 265
Front
Mesh

Doc.-No.: 01/BCTroll Users Manual personal Parachute
Date: 09.03.2004 BCTroll / Firebird/ Relax Container
Issue: 0
Page: 7 of 30
Technical Description Troll 290
Front
Mesh

Doc.-No.: 01/BCTroll Users Manual personal Parachute
Date: 09.03.2004 BCTroll / Firebird/ Relax Container
Issue: 0
Page: 8 of 30
An option is our Troll MDV. The Canopy has a vented bottom Skin that improves low-Altitude
and no Slider opening Performance.
The vents reduce the Time between bottom Skin inflation and full pressurization. The vents are
made of Marquisette/Mesh Fabric used by Pilot chutes.
The Pressure inside of the Canopy is higher than on bottom Surface. The Air normaly escapes
through the vents. We added valves (sleeve type of valve) to prevent this Problem. The valves
allow the Air to enter inside the Canopy, but not to escape again.
The Glide Ratio of MDV Troll is the same than on normal, not vented Troll.
When Slider is used, it should have some „control“ during deployment. This can be obtained by
rubber banding the top of stowed Slider in a rubber band that is attached to a center „C“ line. It
is important to roll the nose of the canopy and stop tracking before deployment to prevent
hard openings.
MDV (Mono Directional Valves)

Doc.-No.: 01/BCTroll Users Manual personal Parachute
Date: 09.03.2004 BCTroll / Firebird/ Relax Container
Issue: 0
Page: 9 of 30
O p tional by all Trol l C a nop ies,
Vented bottom Skin - Vtec Troll
1. Canopy lines A,B,C,D made of Dacron 525 lb - white.
2. Control lines, Center C5+D5 ma de of Dacro n 600 lb- red or black.
Center C5+D5 are called Tailgate friendly lines (TGF).
TGF lin es black, Control lines re d.
TGF lines red, Control lines black.
Option:
Tailgate and MDV Option

Doc.-No.: 01/BCTroll Users Manual personal Parachute
Date: 09.03.2004 BCTroll / Firebird/ Relax Container
Issue: 0
Page: 10 of 30
Slider:
The Troll comes as standard with a Mesh Slider There are different ways to use a Slider. For example low altitute jumps did not need a slider. So you must remove it or do
the packjob with slider down. If you do slider down you also have to remove the steeringlines of the guiding ring on the riser.
So there are many things about BASE packing and jumping we can not explain in this
manual. So we recomend that you use the VDO in germany and their instruction Programm to be well prepared for your first jump.

Doc.-No.: 01/BCTroll Users Manual personal Parachute
Date: 09.03.2004 BCTroll / Firebird/ Relax Container
Issue: 0
Page: 11 of 30
Packing
Setting the Brakes:
1. It is important to choose the right fingertraped point
on booth steeringlines. For different altitude you need
different settings.
Low altitude: Higher Brakesetting (1), use Tailgate, no
Slider and routing the Steeringlines outside the guidingring on the riser. ( in case of a steeringlineover
malefunktion you can drop them and they are
completly released from your risers.
High altitude: Low Brakesetting (2), use slider.
2. Different to normal sportrisers is the additional loop
in picture (3). Take care to route it in the same way!
After that you can put in the toogle. And take care
that it is fixed on the velcro.
1
2
The lower part of the steeringline should be stowed
in the velcropocket next to the toogle.
3

Doc.-No.: 01/BCTroll Users Manual personal Parachute
Date: 09.03.2004 BCTroll / Firebird/ Relax Container
Issue: 0
Page: 12 of 30
Packing
Setting the Brakes:
At least close the linepocket as shown in the picture.
Start the packing:
First be shure there is no damage or dirt in the canopy. It is helpfull to fix both risers with a clamp or cord
to be shure that there is no different length between
them.
Start the packing:
The Base pack job is like a regular reserve propackjob. If you do not know how to pack a normal reserve,
ask for instruction by a certified Rigger or Baseinstructor.
For easy packing it is the best to hookup the canopy.
Flake out the inside of the canopy and place the Nose
(3cell left and 3cell right) open infront of the canopy.

Doc.-No.: 01/BCTroll Users Manual personal Parachute
Date: 09.03.2004 BCTroll / Firebird/ Relax Container
Issue: 0
Page: 13 of 30
Here you can see how to pull out the inside fabric of
the canopy. Start with A line attachement to B line attachement. Do this with both sides of the canopy.
Packing
Flake out the inside Fabric carefully all the way down
to the bottom of the canopy.
In the end all lines should stay in the middle of the
canopy. Important is to draw more attantion on the Dlines and steeringlines to avoid a lineover Malefunction.

Doc.-No.: 01/BCTroll Users Manual personal Parachute
Date: 09.03.2004 BCTroll / Firebird/ Relax Container
Issue: 0
Page: 14 of 30
Packing
Before you lay down the canopy on the ground place
the nose like in the picture. 3cells to the left and 3cells
to the right. Leave the middle cell in the center and
complete open.
Start on one side of the canopy to flake it out again,
but on the ground. It dosen‘t care wich side you start
with.
Follow the steps as shown on the picture.

Doc.-No.: 01/BCTroll Users Manual personal Parachute
Date: 09.03.2004 BCTroll / Firebird/ Relax Container
Issue: 0
Page: 15 of 30
Packing
Be carefull that the inside of the canopy stays in position. Don‘t pull to much!
It is helpfull if you fix all the lines temporary with a pullupcord or a clamp (remove all packingtools before
you finish the packjob) to keep them all in the center.
Here we are close to the middel only the tail need to
be fold on top.

Doc.-No.: 01/BCTroll Users Manual personal Parachute
Date: 09.03.2004 BCTroll / Firebird/ Relax Container
Issue: 0
Page: 16 of 30
Packing
Here you can see left side already finished. The tail is
in the middle with the linepocket on top.
Now start with the right side and do the same again.
Be more carefull not to pull or move to much the left
side. Otherwise you need to check the left side again.
Doc.-No.: 01/BCTroll Users Manual personal Parachute
Date: 09.03.2004 BCTroll / Firebird/ Relax Container
Issue: 0
Page: 17 of 30
Packing
Here it is the same technique as on page 15.

Doc.-No.: 01/BCTroll Users Manual personal Parachute
Date: 09.03.2004 BCTroll / Firebird/ Relax Container
Issue: 0
Page: 18 of 30
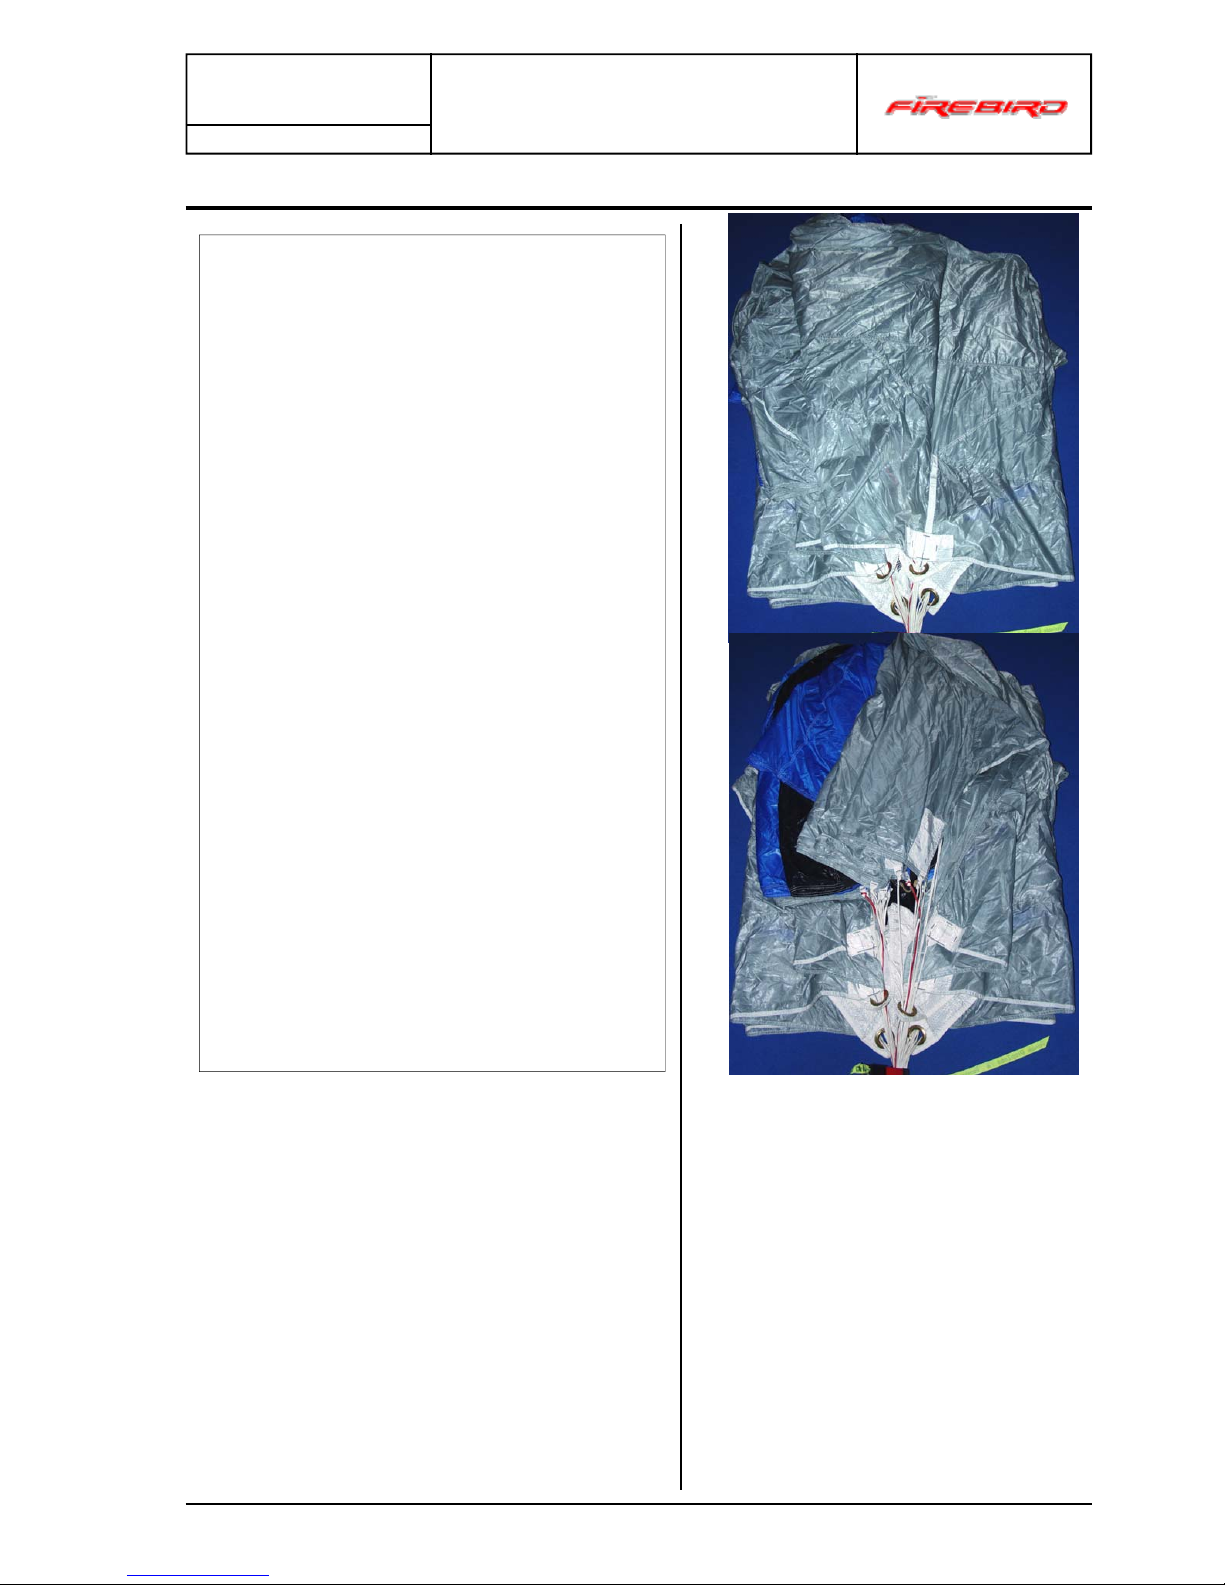
Packing
If you folded both sides of the canopy it should look
like this. The fabric is symetricly folded on both sides
and the lines are clean in the middle.
Here you can see the tailgate in use.
Here is a closeup of the tailgate. When and where to
use you need basic training by a BASE instructor.

Doc.-No.: 01/BCTroll Users Manual personal Parachute
Date: 09.03.2004 BCTroll / Firebird/ Relax Container
Issue: 0
Page: 19 of 30
Packing
Now fold the side of the packjob again in halfs to get it
tighter. It need to fit inside the container.
So check the wide of your container to see how far
you need to fold the canopy.
You have to fold both sides of the canopy. Here in the
picture is only left side. But you need to fold right side
aswell.

Doc.-No.: 01/BCTroll Users Manual personal Parachute
Date: 09.03.2004 BCTroll / Firebird/ Relax Container
Issue: 0
Page: 20 of 30
Packing
After you did that you need to put around the middle of
the tail.
And wrap it tight around the canopy. Don‘t wrap the
nose too. The nose must stay outside!
S-fold the lower part inside under the tailpocket.

Doc.-No.: 01/BCTroll Users Manual personal Parachute
Date: 09.03.2004 BCTroll / Firebird/ Relax Container
Issue: 0
Page: 21 of 30
Packing
Stow the lines with the rubberband (two times around
the lines) and put it between the tail (top surface) and
the tailpocket. Here is a small pocket were you can put
it in.
Open the tailpocket all the way.
Put in the lines like in the picture. Be carefull not to
damage the lines with the velcro.
Now just fold the nose towards the canopy but don‘t
roll them. They need to stay open.
Doc.-No.: 01/BCTroll Users Manual personal Parachute
Date: 09.03.2004 BCTroll / Firebird/ Relax Container
Issue: 0
Page: 22 of 30
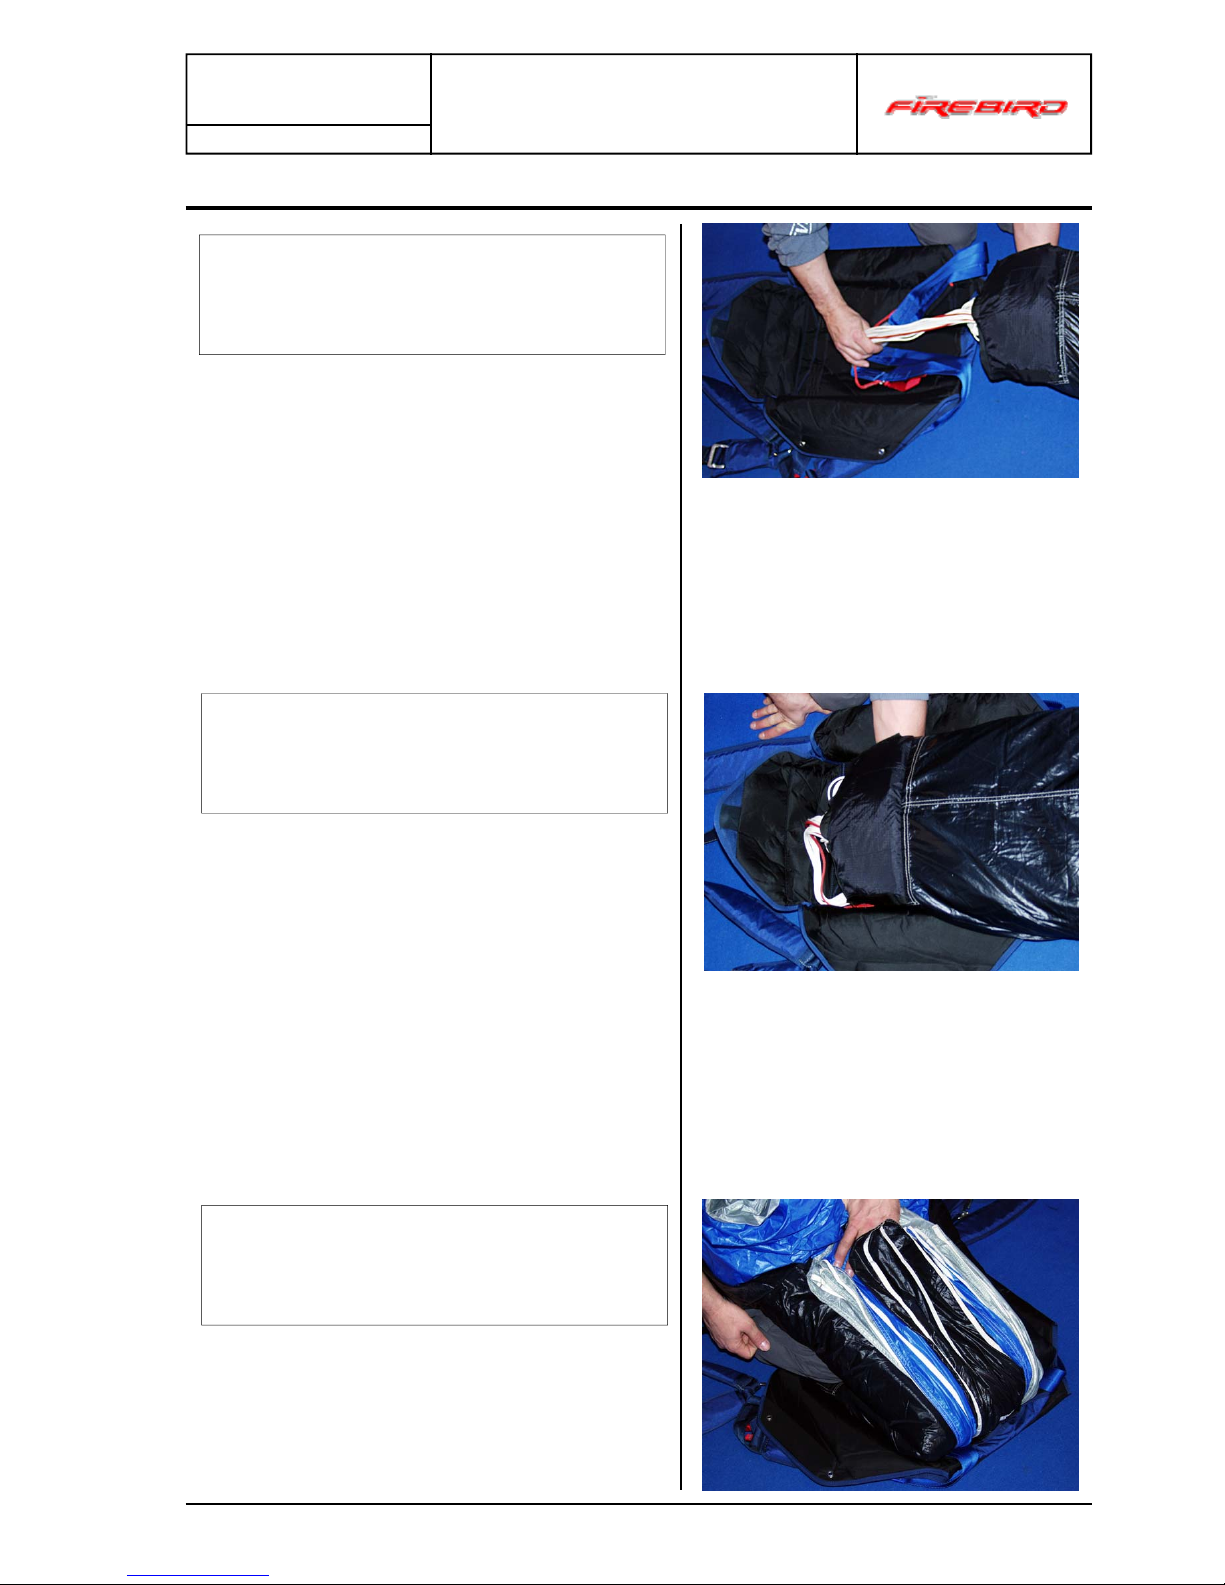
Packing
Up to here you need to follow the instructions of the
Rig manufactur wich you can find in the users manual.
If you use a RELAX follow the pictures step by step.
Prepare the container on the ground that it is easy to
lay down the canopy inside the container. The tailpocket should be next to the bottom flap of the container,
facing towards the packer.
The canopy must be folded backwards to fit in the
container. You can check the nose again that it is still
open.

Doc.-No.: 01/BCTroll Users Manual personal Parachute
Date: 09.03.2004 BCTroll / Firebird/ Relax Container
Issue: 0
Page: 23 of 30
Packing
Close the lower loop first.
Than close the second loop. Be carefull to rout the
bridle in the same way as in the picture.
Fix the small velcrosnap on the bridel between the two
pins. It is importasnt to give extra lenght to allowed the
first pin to get out easy.

Doc.-No.: 01/BCTroll Users Manual personal Parachute
Date: 09.03.2004 BCTroll / Firebird/ Relax Container
Issue: 0
Page: 24 of 30
Packing
An example to fold the hand deployment is to strech
the mesh fabric all the way upwards.
Than put it in the center of the ZeroP fabric and fold
the bridle on too.
Now quarter the ZeroP fabric to keep the mesh and
the bridle inside the handdeployment.

Doc.-No.: 01/BCTroll Users Manual personal Parachute
Date: 09.03.2004 BCTroll / Firebird/ Relax Container
Issue: 0
Page: 25 of 30
Packing
Put it in the pouch on the bottom of the container.
This picture shows how to close the risercover. It is
very easy and it protect the 3-ring Releasesystem.
Also it covers all the Hardware that your rig looks more like a backpack.

Doc.-No.: 01/BCTroll Users Manual personal Parachute
Date: 09.03.2004 BCTroll / Firebird/ Relax Container
Issue: 0
Page: 26 of 30
Packing
This picture shows how the finished packjob looks on
your back.
This is the mainriser-releasehandle. It is
fixed to the rearside of the right mainlift. It
is only for changing the canopys. It is not
made to cut away the maincanopy in a
emergency situation.
1. Frontview 2. Rearview

Doc.-No.: 01/BCTroll Users Manual personal Parachute
Date: 09.03.2004 BCTroll / Firebird/ Relax Container
Issue: 0
Page: 27 of 30
82 cm
96 cm
106 cm
Bridle 300 cm
Optional attachment points to hook up a chestreserve.
Different handdeployment sizes or a additional
Bridel must be ordered extra.
Extras:
Harness and Container
The container of polyamid fabric is integrated in the harness of
polyester webbing.
The container is closed by a metal pin for a manual deployment.
The harness is equipped with a 3-point closure and has an adjustabl e
chest strap as well as adjustable leg straps.
The parachute is attached by means of the suspension-line connector
links and main risers to the largest ring of the 3-ring release system.

Doc.-No.: 01/BCTroll Users Manual personal Parachute
Date: 09.03.2004 BCTroll / Firebird/ Relax Container
Issue: 0
Page: 28 of 30
Service
Maintenance Instructions:
Parachutes must be opened, aired, inspected and re-packed at the latest every 120 days. In
extremely hot and humid climates, an essentially shorter pack cycle is recommended.
Assembly
The parachute system may only by assembled by the manufacturer or an FAA-certified senior or master
rigger or equivalent.
Periodic Inspection Instructions
The equipment should be re-examined every 24 months.
The parachute canopy and the container system should be thoroughly examined every 50 jumps or
every 120 days after assembly, whichever comes first.
This examination is considerably more detailed than the inspection that is to be carried out each time
the parachute is packed.
Every 365 days the parachute must be opened, aired and thoroughly inspected before it is re-packed.
The inspection can be carried out according to the following directions.
The container should be examined in place that is clean, dry, well lighted and large enough that the
parachute can be completely laid out.
The following inspection sequence is systematic and meaningful:
1. Pilot Chute, Bridle
Check the pilot chute and bridle for orderly attachment on the top surface of the canopy, as well as for
damage. The parachute fabric and the reinforcement tapes, as well as their stitching, should not be
damaged. Replace old stowing rubber bands as necessary.
2. Main Risers
The main risers should not show damage in the material or on the grommets or rings. Check the
functionality of the Velcro attachment of the toggles. Soiled Velcro should be cleaned.
3. 3-Ring Sy stem
The 3-ring system must be perfect, the rings must be round and undamaged. The closing loop must
show no damage. The 3-ring system must open with the lightest pull, as soon as the cable is removed.
4. Release Device
It should be checked that the cables move freely in the housings. The Velcro fastening must be perfect
and mate well.
5. Harness, Hardware and their Stitching
An examination of the harness, hardware and their stitching can only be carried out visually. Pay
attention that the yellow signature thread running along the outside of the type-7 webbing is not
damaged and that the stitching is not broken. All metal parts must be free of corrosion and should move
freely as designed.
6. Container Material
Examine the container for possible tears, rips or fabric separation. The grommets especially should not
show sharp edges or evidence that the fabric is torn away. The loop must be in perfect condition. It is
preferable to replace the loop too early rather than too late. The inside of the container must be clean.

Doc.-No.: 01/BCTroll Users Manual personal Parachute
Date: 09.03.2004 BCTroll / Firebird/ Relax Container
Issue: 0
Page: 29 of 30
Should something unusual turn up during this inspection,
an expert such as an FAA-certified rigger should definitely
be contacted for a more exacting examination and opinion.
When in doubt—safety first!
Maintenance and Storage
The system should always be kept dry (45-70% relative humidity) and cool (10-15° Celsius, 50-60°
Fahrenheit), in a container through which light will not pass. Ultraviolet light can cause invisible
damage to the fabric through the deterioration of the nylon fibers. The parachute canopies and
container should be kept away from all types of corrosive substances such as lye, acids, fuels,
varnishes and solvents. Also storage in areas with running electrical motors (O³ - Ozone forming)
should be avoided.
Parachute canopies should be opened no later than 12 months after being packed, to air, check and
Cleaning
Basically the container should only be cleaned with fresh water. The use of brushes or rough sponges
should be avoided. After contact with salt water, the container should be rinsed with fresh water at least
three times within the first 24 hours. The removal of oil, tar or similar substances should be discussed
with the manufacturer. The equipment should not be cleaned in a washing machine.
Only dry the container by hanging it in the shade.
After cleaning the container should be re-inspected.
Alterations and Replacement
Should repairs be necessary, they should be performed by the manufacturer.
Alterations or modifications may only be carried out by the manufacturer or with his agreement. Only
official replacement parts or those approved by the manufacturer may be used.
Pre-inspection Each Time Before the Parachute is Packed
The parachute system should be inspected according to the manufacturer’s instructions. Stretch the
harness-container and the main canopy out on the ground so that the suspension lines are pulled tight.
Check that the lines are straight and untangled and that the slider is not damaged.

Doc.-No.: 01/BCTroll Users Manual personal Parachute
Date: 09.03.2004 BCTroll / Firebird/ Relax Container
Issue: 0
Page: 30 of 30
If you still have questions, please contact:
Firebird GmbH & Co KG
Am Tower 16
D-54634 Bitburg
Phone: +49 (0) 6561-949680
info@flyfirebird.com
www.flyfirebird.com
 Loading...