

F B RM OPERAT RS I S RU TI NS
OVER & UNDER SHOTGUNS (covers Max Lion. Silver Lion. Light Lion. Ultra Mag
Lion. & Black lion Competition Models. 11 & 20 GAUGE)
SAFETY RULES
PLEASE READ THIS BEFORE HANDUNGYOUR FIREARM
The following safety rules are p!aced in this manual by Heckler & Koch, Inc. as
an important I'eminder that firearms safety is your responsibility, Firearms can
be dangerous and can potentially cause serious injury, damage to property or
death, If handled improperly.
.Never point a firearm at anyone, or in any direction other than a safe one,
I.e., downrange.
. Always treat all firearms as if they are loaded.
.Keep your finger off the trigger until your sights are on the target.
.Keep your finger off the trigger while loading or unloading the shotgun.
0
Be sure of your target and the back stop beyond,
.
Never give to or take the firearm from anyone unless the action is open,
0 Be sure the ammunition you are using is factory loaded and Is not damaged
In any way,
.
Before the days shooting, make certain the firearm is totally unloaded. on
Safe and the bolt locked to the rear. Check the bore of your unloaded
shotgun for any possible obstructions.
.
Before firing any firearm \.Infam iliar to you. make use you understand how it
functions.
.Before s hooti ng be su re th e gu n is closed. The top !ever must be in th e
frame extension and not out of it.
.-li;.
Assembly Instructions
The Over-&-Under Series of shotguns are packed with the barrels and forend
separated from the stock -r"ceiver (see figure I below).
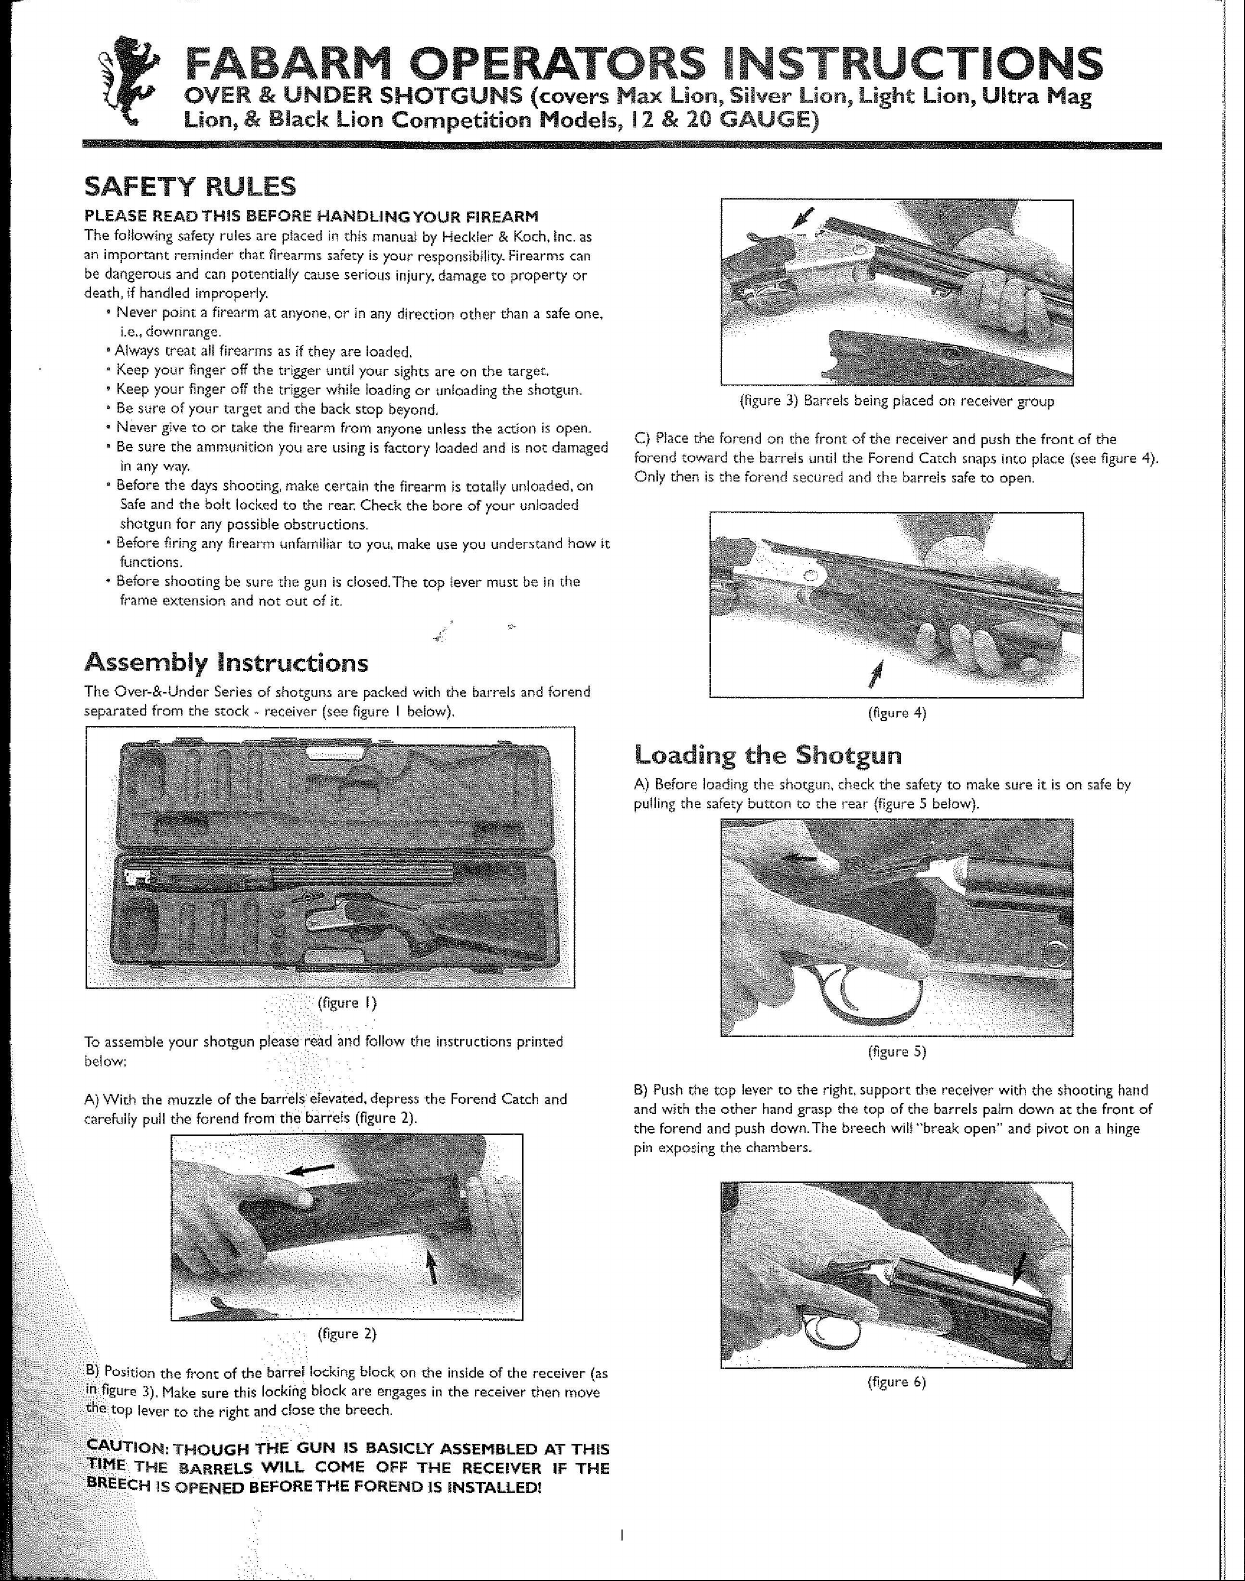
(figure 3) Barrels being piaced on receiver group
C) Place the forend on the front of the receiver and push the front of the
forend toward the barrels until the Forend Catch snaps into place (see figure 4).
Only then is the forend secured and the barrels safe to open.
(figure 4)
(figure I)
To assemble your shotgun please reid and follow the instructions printed
below:
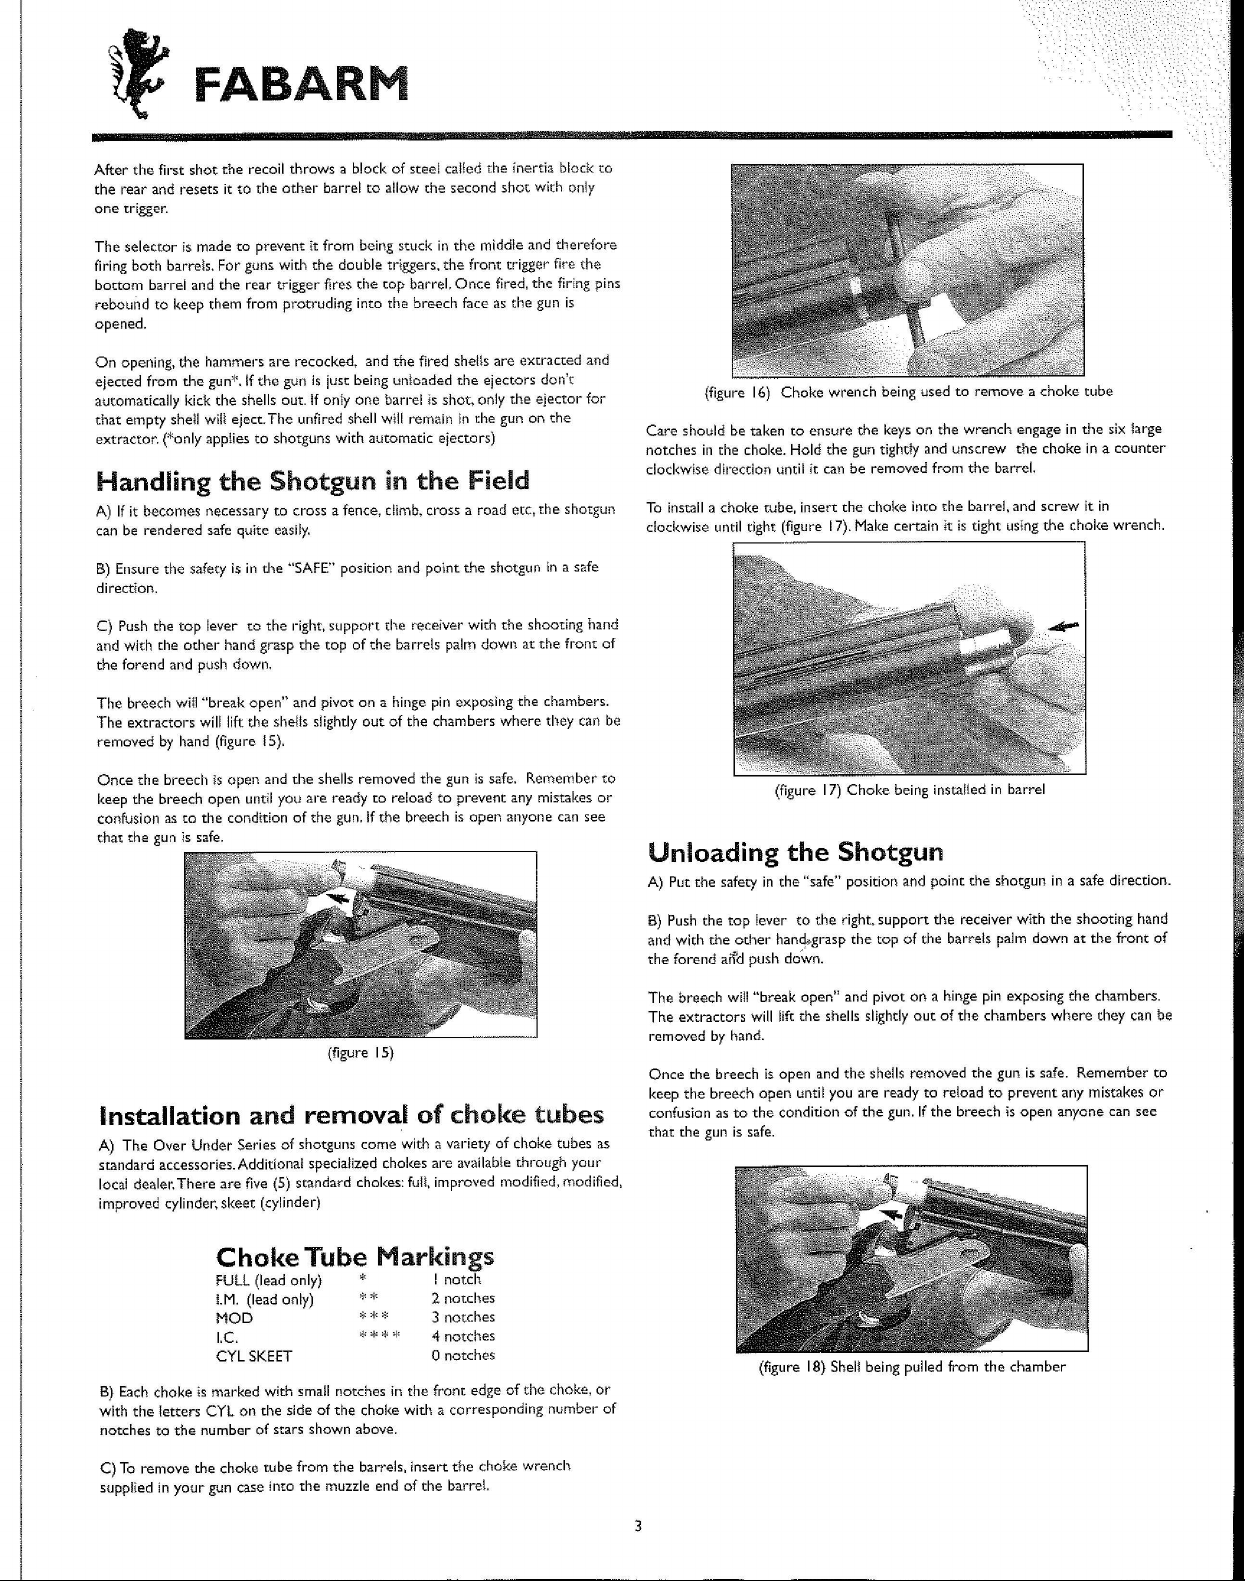
A) With the muzzle of the barrels elevated, depress the Forend Catch and
carefully pull the forend from the barre!s (figure 2).
.
loading the Shotgun
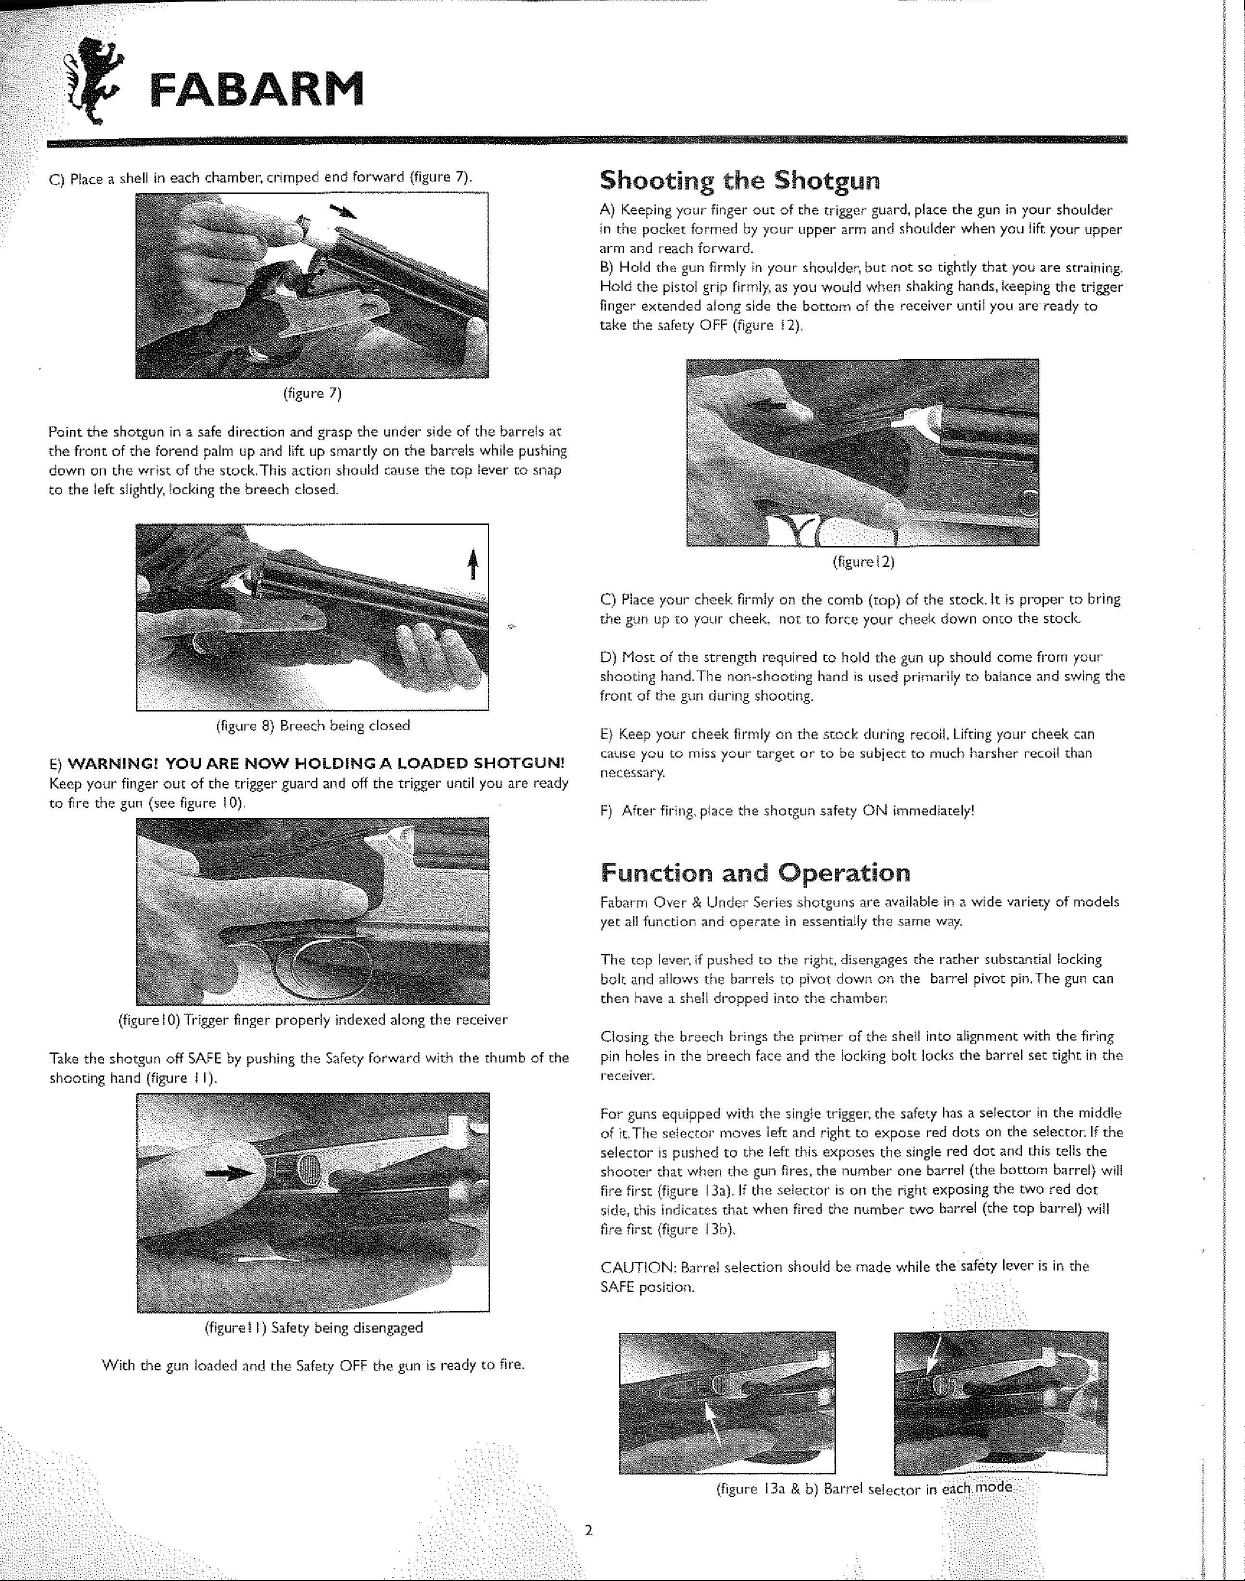
A) Before loading the shotgun. check the safety to make sure it is on safe by
pulling the safety button to the rear (figure 5 below}.
(figure
5)
B)
Push the top lever to the right, support the receiver with the shooting hand
and with th e other hand grasp the top of the barrels palm down at the front of
the forend and push down. The breech will "break open" and pivot on a hinge
pin exposing the chambers.
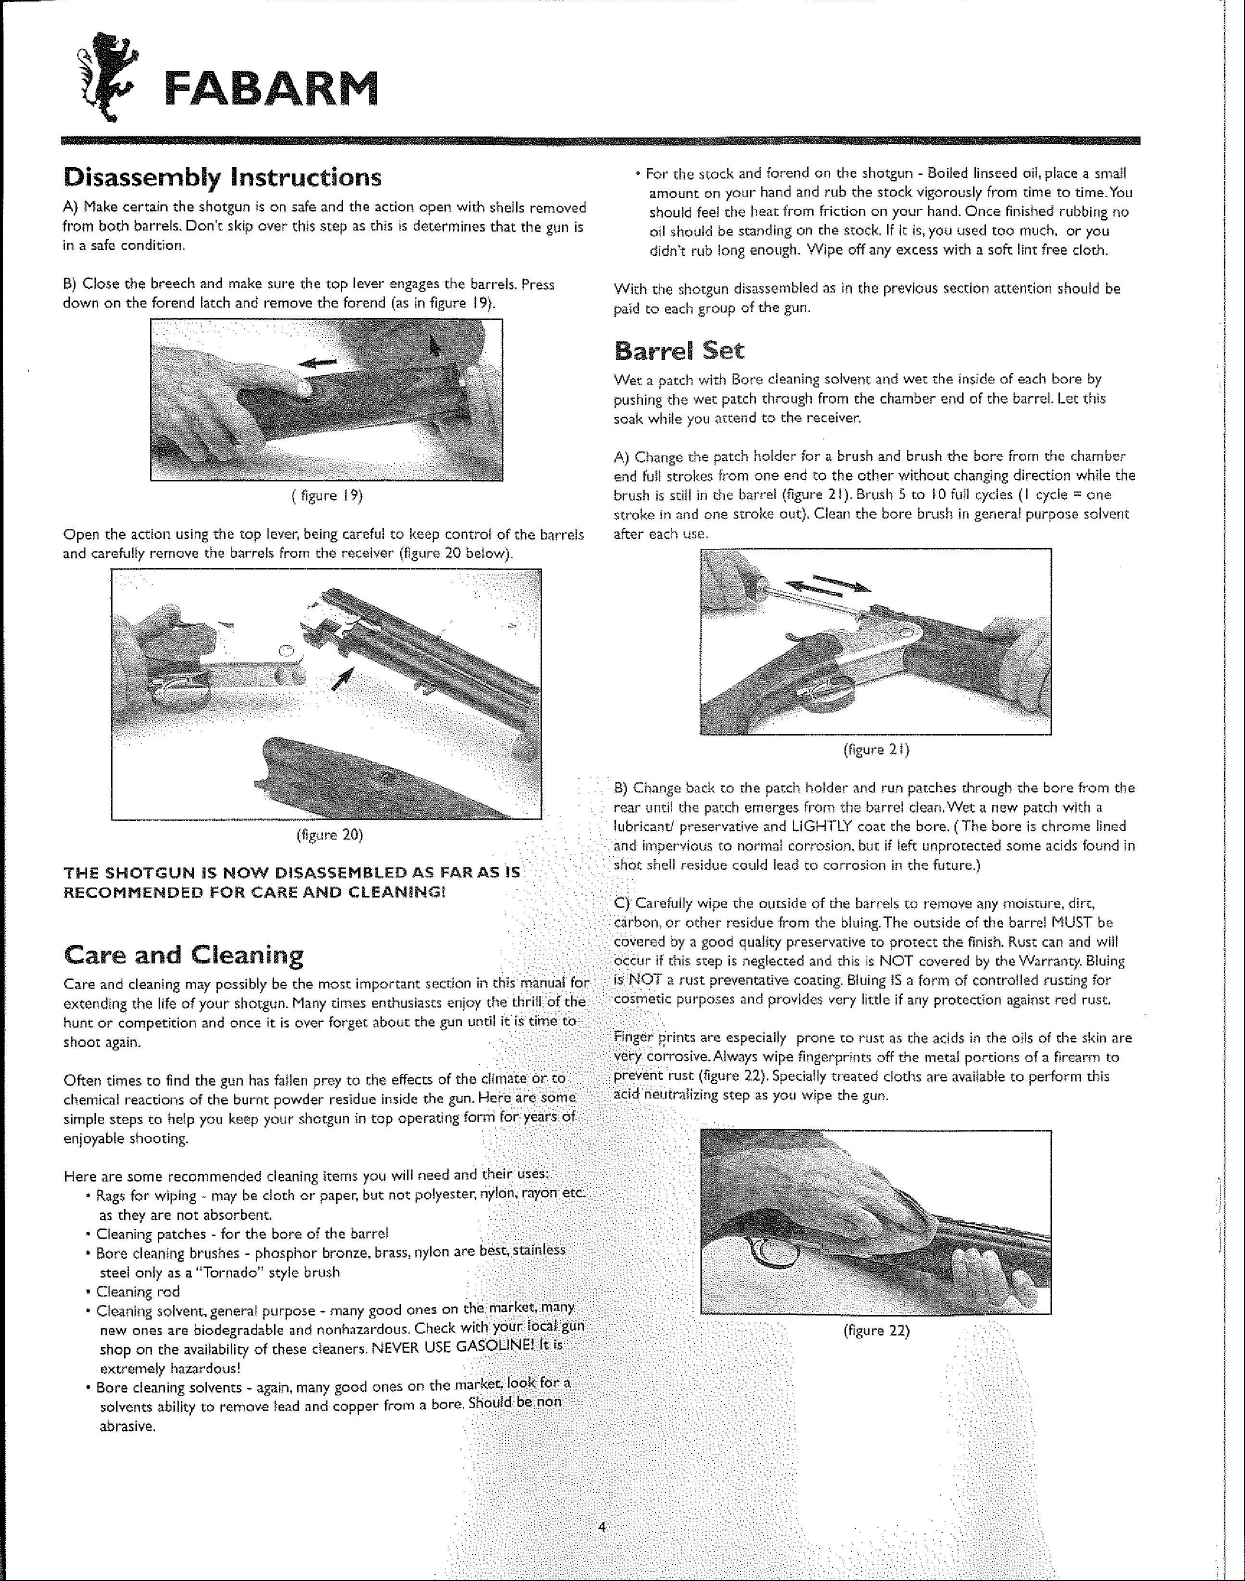
Position the front of the barrel locking block on the inside of the receiver (as
3). Make sure this locking block are engages in the receiver then move
lever to the right and close the breech.
THOUGH THE GUN IS BASICLY ASSEMBLED AT THIS
THE BARRELS WILL COME OFF THE RECEIVER IF THE
15 OPENED BEFORE THE FOREND IS INSTALLED!
(figure 6)
FABARM
C) Place a shell in each chamber, cl'imped end forward (figure 7).
(figu re 7)
Point the shotgun in a safe direction and grasp the under side of the barrels at
the front of the forend palm up and lift up smanly on the barrels while pushing
down on the wrist of the stock. This action should cause the top lever to snap
to the left slightly, locking the breech closed.
(figure 8) Breech being closed
E) WARNING! YOU ARE NOW HOLDING A LOADED SHOTGUN!
Keep your finger out of the trigger guard and off the trigger until you are ready
to fire the gun (see figure 10).
Shooting the Shotgun
A) Keeping your finger out of the trigger guard, place the gun in your shoulder
in the pocket formed by your upper arm and shoulder when you lift your upper
arm and reach fDrwal'd.
B) Hold the gun firmly in your shoulder, bUt nDt SD tightly that you are straining.
Hold the pistol grip firmly, as you would when shaking hands, keeping the tl'igger
finger extended along side the bouom of the receiver until you are ready to
take the safety OFF (figure 12).
(figure 12)
C) Place your cheek firmly on the comb (top) Df the stock. It is proper to bring
the gun up to your cheek, not to force your cheek down onto the stock.
D) Most of the strength required to hold the gun up should come from your
shooting hand. The non-shooting hand is used primarily to balance and swing the
front of the gun during shooting.
E) Keep your cheek firmly on the stock during recoil. Lifting your cheek can
cause you to miss your target or to be subject to much harsher recoil than
necessary.
F) After firing, place the shotgun safety ON immediately!
(figure 10)Trigger finger properly indexed along the receiver
Take the shotgun off SAFE by pushing the Safety forward with the thumb of the
shooting hand (figure
With the gun loaded and the Safety OFF the gun is ready to fire.
j
I).
(figure! I) Safety being disengaged
function and Operation
Fabarm Over & Under Series shotguns are available in a wide variety of models
yet all function and operate in essentially the some way.
The top lever, if pushed to the right, disengages the rather substantial locking
bolt and allows the barrels to pivot down on the barrel pivot pin. The gun can
then have a shell dropped into the chamber
Closing the breech brings the ptimer of the shell into alignment with the firing
pin holes in the breech face and the locking bolt locks the barrel set tight in the
receiver.
For guns equipped with the single trigger, the safety has a selector in the middle
of it-The selectal' moves left and right to expose red dots on the selector. If the
selector is pushed to the left thi, exposes the single red dot and this tells the
,hooter that when the gun fires, the number one barrel (the bottom barrel) will
fire first (figure 13a). If the selector is on the right exposing the two red dot
side, this indicates that when fil'ed the number two barrel (the tap barrel) will
fire first (figure 13h).
CAUTION: Bal'tel selection should be made while the safety lever is in the
SAFE position.
,
After the first shot the recoil throws a block of steel called the inertia block to
the rear and resets it to th e other barrel to allow the second shot with only
one trigger.
The selector is made to prevent it from being stuck in the middle and therefore
firing both barrels. For guns with the double triggers, the front trigger fire the
bottom barrel and the rear trigger fires the top barrel. Once fired, the firing pins
rebound to keep them from protruding into the breech face as the gun is
opened.
On opening, the hammers are recocked, and the fired shells are extracted and
ejected from the gun*. If the gun is just being unloaded the ejectors don't
automatically kick the shells out. If only one barrel is shot, only the ejector for
that em pty shell wi!! eject. The unfired shell will remai n in the gun on the
extractor. (*only applies to shotguns with automatic ejectors)
FABARM
Handling the Shotgun in the Field
A) If it becomes necessary to cross a fence, climb, cross a road etC, the shotgun
can be rendered safe quite easily.
B) Ensure the safety is in the "SAFE" position and point the shotgun in a safe
direction.
C) Push the top lever to the right, support the receiver with the shaming hand
and with the other hand grasp the top of the barrels palm down at the front of
the forend and push down.
(figure 16) Choke wrench being used to remove a choke tube
Care should be taken to ensure the keys on the wrench engage in the six large
notches in the choke. Hold the gun tightly and unscrew the choke in a counter
clockwise dil'ection until it can be removed from the barrel.
To install a choke tUbe, insert the choke into the barrel, and screw it in
clockwise until tight (figure 17). Make certain it is tight using the choke wrench.
The breech will "break open" and pivot on a hinge pin exposing the chambers.
The extractors will lift the sheHs slightly out of the chambers where they can be
removed by hand (figure 15).
Once the breech is open and the shells removed the gun is safe. Remember to
keep the breech open until you are ready to reload to prevent any mistakes or
confusion as to the condition of the gun. If the breech is open anyone can see
that the gu n is safe.
(figure 15)
Installation and removal of choke tubes
A) The Over Under Series of shotguns come with a variety of choke tubes as
standard accessories. Additional specialized chokes are available through your
local dealer. There are five (5) standard chokes: full, improved modified, modified,
improved cylinder, skeet (cylinder)
Choke Tube Markings
FULL (lead only)
I.M. (lead only)
MOD
I.c.
CYL
SKEET
B) Each choke is marked with small notches in the from edge of the choke, or
with the letters CYL on the side of the choke with a corresponding number of
notches to the number of stars shown above.
*
* *
***
* *
*
*
I notch
2 notches
3 notches
4 notches
0 notches
(figure 17) Choke being installed in barrel
Unloading the Shotgun
A) Put the safety in the "safe" position and point the shotgun in a safe direction.
B) Push the top lever to the right, support the receiver with the shooting hand
and with the other hanck.grasp the top of the barrels pai m down at the front of
the forend aifd push down.
The breech will "break open" and pivot on a hinge pin exposing the chambers.
The extractors will lift the shells slightly out of the chambers where they can be
removedbyhand.
Once the breech is open and the shells removed the gun is safe. Remember to
keep the breech open until you are ready to reload to prevent any mistakes or
confusion as to the condition of the gun. If the breech is open anyone can see
that the gun is safe.
(figure 18) Shell being pulled from the chamber
C) To remove the choke tUbe from the barrels, insert the choke wrench
supplied in your gun case intO the muzzle end of the barrel.
,
FABARM
Disassembly Instructions
A) Make certain the shotgun is on safe and the action open with shells removed
from both barrels. Don't skip over this step as this is determines that the gun is
in a safe condition.
B) Close the breech and make sure the top lever engages the barrels. Press
down on the forend latch and remove the forend (as in figure 19).
(figure 19)
Open the action using the top lever, being careful to keep control of the barrels
and carefully remove the barrels from the receiver (figure 20 below).
.For the stack and forend on the shotgun
amount on your hand and rub the stock vigorously from time to time. You
should feel the heat from friction on youl- hand. Once finished rubbing no
oil should be standing on the stock. If It is, you used too much, or you
didn't rub long enough. Wipe off any excess with a soft lint free cloth.
With the shotgun disassembled as in the previous section attention shouid be
paid to each group of the gun.
Boiled linseed oil, place a smail
-
Barrel Set
Wet a patch with Bore cleaning solvent and wet the inside of each bore by
pushing the wet patch through from the chamber end of the barrel. Let this
soak while you attend to the receiver.
A) Change the patch holder for a brush and brush the bore from the chamber
end full strokes from one end to the other without changing direction while the
brush is still in the barrel (figure 21). Brush 5 to 10 fuil cycles (I
stroke in and one stroke out). Clean the bore brush in general purpose solvent
after each use.
(figure 21)
cycle'" one
THE SHOTGUN IS NOW DISASSEMBLED AS FAR ASIS
RECOMMENDED FOR CARE AND CLEANING!
Care and Cleaning
Care and cleaning may possibly be the most important section in
extending the life of your shotgun. Many times enthusiasts enjoy the
hunt or competition and once it is over forget aboUL the gun until
shoot again.
Often times to find the gun has fallen prey to the effects of the
chemical reactions of the burnt powder residue inside the gun.
simple steps to help you keep your shotgun in top operating form
enj oyable shooti ng.
Here are some recommended cleaning items you will need and
.
Rags
for wiping. may be cloth or paper, but not polyester,
as they are not absorbent.
.Cleaning patches
.
Bore cleaning brushes
steel only as a "Tornado" style brush
. Cleaning rod
. Cleaning solvent, general purpose
new ones are biodegradable and nonhazardous. Check
shop on the availability of these cleaners.
extremely hazardous!
.Bore cIean ing solvents -
solvents abi lity to remove lead and copper from a bore.
abras ive.
for the bore of the barrel
-
phosphor bronze, brass, nylon are
-
many good ones on
-
again, many good ones on the
NEVER
USE
B) Change back to the patch holder and run patches through the bore from the
rear until the patch emerges kom the barrel clean. Wet a new patch with a
lubricant! preservative and LIGHTLY coat the bore. (The bore is chrome lined
.
and impervious to normal corrosion, but if left unprorected some acids found in
shot shell residue could lead to corrosion in the future.)
Carefully wipe the outside of the barrels to remove any moisture, dirt,
or other residue from the bluing. The outside of the ban-el MUST be
by a good quality preservative to protect the finish. Rust can and will
if chis step is neglected and this is NOT covered by the Warranty. Bluing
a rust preventative coating. Bluing IS a form of controlled rusting for
purposes and provides very little if any protection against red rust.
are especially prone to rust as the acids in the oils of the skin are
e.Always wipe fingerprints off the metal portions of a firearm to
(figure 22). Specially treated cloths are available to perform this
step as you wipe the gun.
FABARM
Stock, Receiver, and Forend Group
A) The receiver should have any residue / carbon / dirt removed with a soft
bristle brush and general purpose solvent. Care should be taken to keep the
solvent off the stock and forend wh ile cleaning the I'"ceiver. Additionally care
must be taken to avoid letting excess solvent runoff into the receiver. Air dry
the receiver or blow dry it with compl'i~ssed ai1',being careful and aware that
compressed air can be very dangerous and Is not something to play with.
"'.?ISL
--
B) If the stock and forend has dirt/debris on it, this must be cleaned off before
oil can be applied.
(figure 23)
A damp soft cloth will do the job (see figure 23 above). Make sure the cloth is
damp not wet to the point of leaving water on the stock.After the stock on the
snocgun is cleaned it can be rubbed with the boiled linseed oil (figure 24 below).
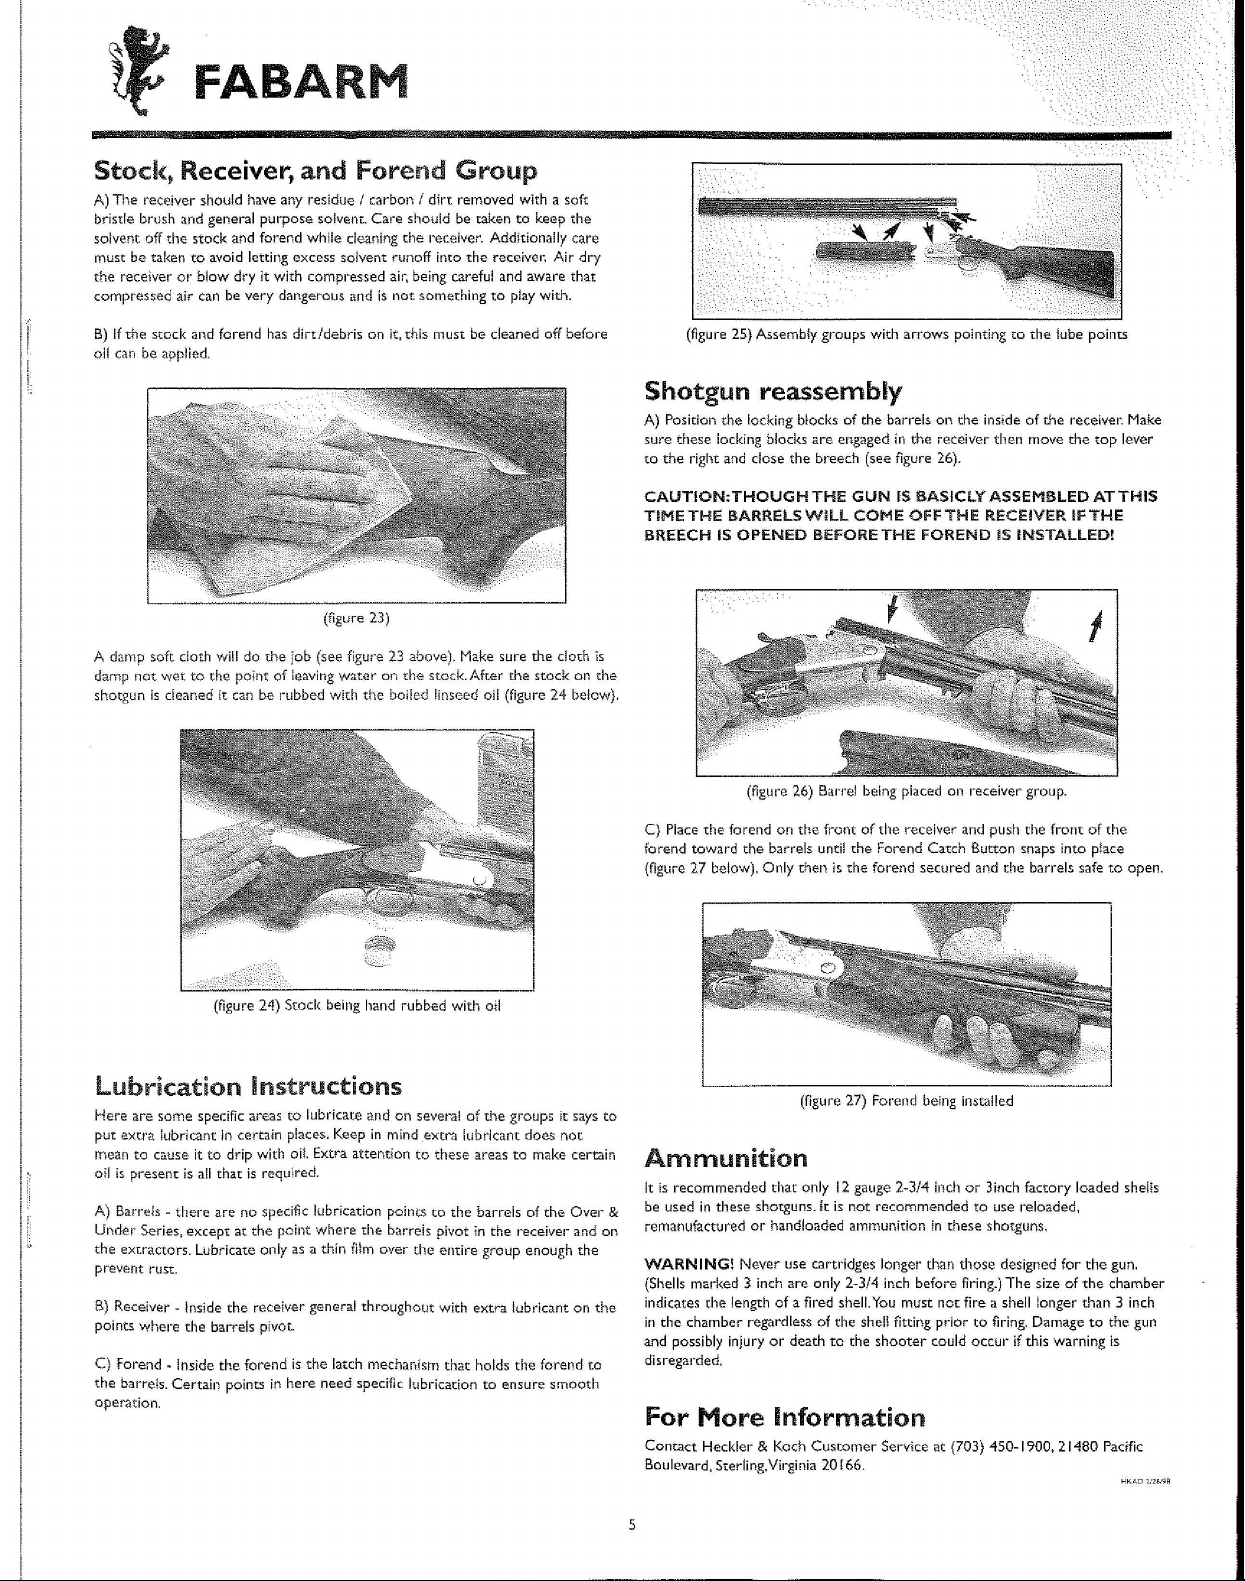
(figure 25) Assembly groups with arrows pointing to the lube points
Shotgun reassembly
A) Position the locking blocks of the barrels on the inside of the receivel~ Make
sure these locking blocks are engaged in the receiver th en move the top lever
to the right and close the breech (see figure 26).
CAUTION:THOUGHTHE GUN IS BASJCLY ASSEMBLED AT THIS
T!METHE BARRELS WILL COME OFF THE RECEIVER IFTHE
BREECH IS OPENED BEFORE THE FOREND IS INSTALLED!
(figure 26) Barrel being placed on receiver group.
C) Place the fa rend on the front of the receiver and push the front of the
fa rend toward the barrels until the Forend Catch Button snaps into place
(figure27 below).Only then is the forend secured and the barrels safe to open.
(figure 24) StOck being hand rubbed with oil
lubrication Instructions
Here are some specific areas to lubricate and on several of the groups it says to
put extra lubricant in certain places. Keep in mind extra lubricant does not
mean to cause it to drip with oi!. Extra attention to these areas to make certain
oil is present is all that is required.
A) Barrels
Under Series, except at the point where the barrels pivot in the receivel" and on
the extractors. Lubricate only as a thin film over the entire group enough the
prevent rust.
B) Receiver
points where the barrels pivot.
C) Forend .Inside the forend is the latch mechanism that holds the forend to
the barrels. Certain points in here need specific lubrication to ensure smooth
operation.
there are no specific lubrication points to the barrels of the Over &
-
Inside the receiver general throughout with extra lubricant on the
-
(figure 27) Forend being installed
Ammunition
It is recommended that only 12 gauge 2-3/4 inch or 3inch factory loaded shells
be used in th ese shotgu ns. It is not recommended to use reloaded,
remanufactured or handloaded ammunition in these shotguns.
WARNING! Never use cartridges longer than those designed for the gun.
(Shells marked 3 inch are only 2-3/4 inch before firing.) The size of the chamber
indicates the length of a fired shell.You must not fire a shell longer than 3 inch
in the chamber regardless of the shell fitting prior to firing. Damage to the gun
and possibly injury or death to the shooter could occur if this warning is
disregal'ded.
For More Information
Contact Heckler & Koch Customer Service at (703) 450-1900, 21480 Pacific
Boulevard, Sterling,Vil'ginia 20 I66.
5
HKAD
,-,'U.19~
f
FABARM
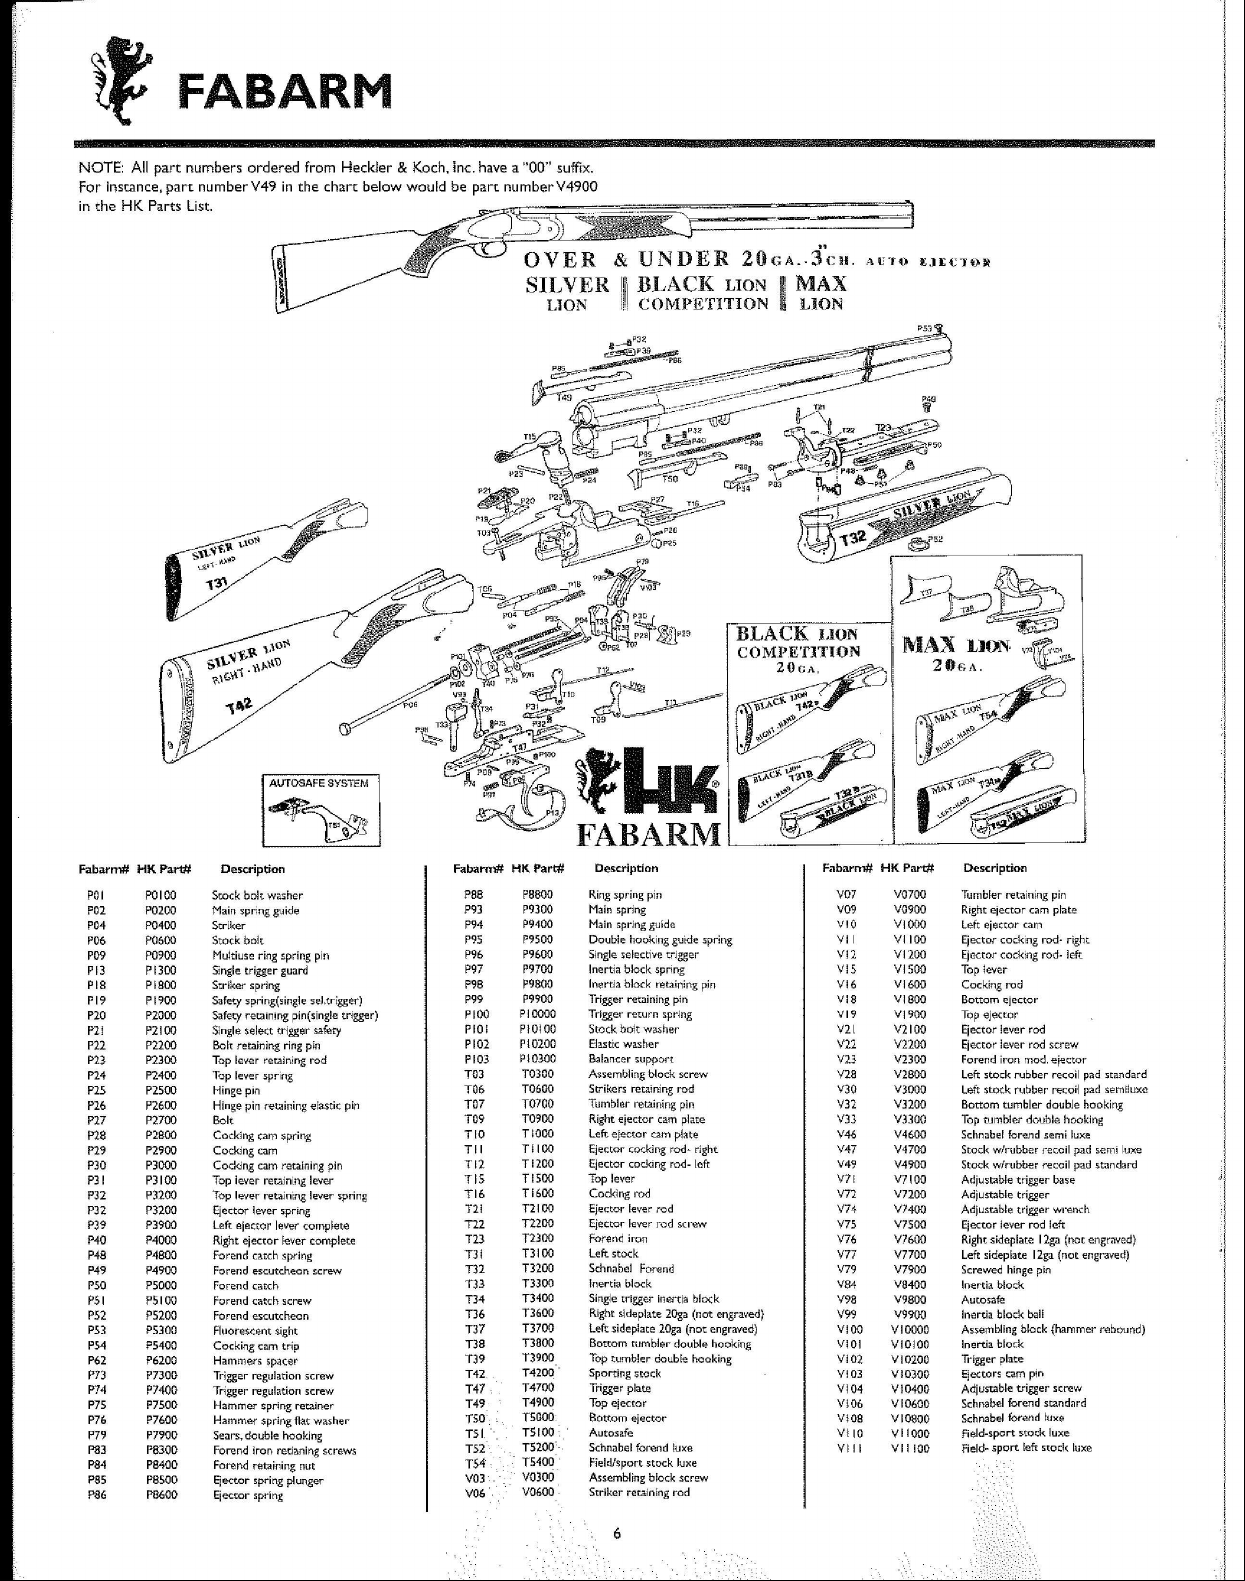
NOTE: All part numbers ordered from Heckler & Koch, Inc. have a "00" suffix.
For instance, part number V49 in the chart below would be part number V4900
in the HK Parts List.
~'-=i
'1
\'
\.\o't'i
S.\-1.~~.1l
~~~"J
\_;r.'ii-
AUTOSAFE SYSTEM
~~.
Fabarm# HK part#
POI POIOO
P02
1'0200
P04 P0400
P06
1'0600
P0900 Mukiusering
P09
PI300
PI3
PIB PI800
PI9 PI900
P20 P2000
P21 P2100
P2200
P22
P23 P2300
PH
P2400
P2S
P2500
P26 P2600
1'2700
1'27
P2BOO
P28
P29
1'2900
P30 P3000
P31 P3100
P3200
1'32
P32
1'3200
P39 P3900 Left ejectOr
NO
1'4000
?48 P4800 Forend c~tch spring
P49 P4900 Forend escutch.eon s-crew
PSO P5000 Forend couch
PSI
P5100 Forend catch screw
PS2
P5200
PS3 P5300
PS4
P5400
P62 P6200
P73
P7300
P74
P7400
P7S00
P75
P76
P7600 Hammer spring flat w~~her
P79 P7900
P83 P8300
1'8400 Forel'ld rat~ining nut
1'84
P8S00
P85
P8600
P86
Descripdon
Stock bDIt washer
Main sprlflg g\Jide
Strlker
Stack
bQIt
Single trigger guard
Striker spring
Safety spring(single seLtdgger)
Safety retaining pin(sing!e trJgg€!r)
Single $elact trigger 1i<3:fety
Bol'Cretaining ring
Top lever retairbing rod
Top lever spring
Hinge pin
Hinge pin re~ining e!3sr;i( pin T07
Bolt
CockJng cam :5pring
Cocking eam TII
Cocking eam retaining pin TI2
Top lever rer..ainlnglever
Top lever retaJntng lever spring
Ejector ~everspring
Right ejec'COr ~evercomplete
Forend escutcheon
FluQre«eot 'ight
Cocking carn trip
Hammers spac-er
Trigger regul<l.tion screw
Trigger regulation screw T47
Hammer spr~ng retainer
Sears, doubl€! hooking
Forend iron reti"'ning :;crews
Ejector spring plunger
Ejector ~pring
$pring pin
lever
complf:!te
p~n
:.,~ If
OVER & UNDER 20GA..:fcu.
SILVER
Fabatm# HK Part#
PB8 PB800
P9300
P93
P9400
P94
P9S
P9500 Double hooking gu~de spdng
P96
P9600
P97 P9700
P9800
P98
P99 P9900
PI
PlOD
PIOI PIOIOO
PI02
PI03
TO]
T06
T09
TIO
TIS
TI6
T21
T22
T23
T31
T32
T33
T34
T36
T37
T38
T39
T42
T49
TSO
TSI
TS2
TS4
V03
V06
0000
PI0200 Elasttc
PI0300 Balancer supporr
T0300
T0600
T0700
T090D
TIOOO Left €jector eam plate
TIIOO
T1200
T1500
T1600
T2100
T2200 Ejector lever rod s.crew
T230D
T3100 Left stock
T3200
T3300 Inertia block
T3400
T3600
T3700 Leftside
T3600 Bottom rumbler doubl~ hQokillg
T3900
T4200
T4700
T4900
TSOOO BottQm -ejector
TSIOO Autosafe
TS200 Schnabel forend ~uxe
T5400
V0300 Assembling b~ock screw
V0600
LION
BLACK LION
I!i'
l
I!;, COMPETITION Ii LION
m MAX
BLACK UON
COMPETJTION
20G,\,
~---- - ~---- -
De!Ocription
Ring spring pin
Main spring V09 V0900
Main sprJng guide
Single selective trJgger
Inertia block sprijng
InertJa
block retaining pin
Trigger retaining
Trigger return sprjng
Stock bok w~;>;her
Assembling block screw
Strikers retaining rod
Tumbler retaillillg pin
Right ejector
Ejector cocking rod~ dght
Ejector cockjl1g rod- left
Top lever
Cockingrod
Ejector lever rad
Forecid iron
Schnabel Forend
Singje trigger inertia bkKk
Right'idepl.te 20ga(nQtengraved)
TQPtumbler dQubl. hQQking
.
Sporting ~tod(
Trigger plate
Top ejector
Field/sport stock luxe
Striker rcrajn~ng rod
pin
washer V22 V2200
carn
plate
plate
20ga (nQt
"ngraved) VI 00
Fabarm# HK Part#
.~ U'ft) E.H:C'JOII
~~~-
.JpJ~
MAX UON
20&'\,
!
/"~
I
cy
V07 V0700
VIO
VIOOO
VII VIIOO
VI2 VI200
VIS VI500
VI600
VI6
VI8 VI800
VI9
VI900
V21
V2100
V23 V2300
V2800
Y28
V30 V3000
V32 V3200 Bottom tumbler doubje hooking
V33
V3300
V46 V4600 Schnabel foreJ1d semi luxe
V47 V4700 Stock w/rubb€r f€coil pad semi ~uxe
V49
V4900
V71
V7100
V72 V7200
V74
V7400 Adiustabl~ trigger wren(h
V7S
V7500
V76 V7600
V77 V7700
V79
V79DO
V84 V6400
V98 V9800 AutOsi3ife
V99
V9900 Inartia block bal!
VI DODO
VIOl
VIOIOO
VI02
VI0200
VI03 VI0300
VI04
YI0400
Vi06
V 10600
ViOB
V 10800
V! 10
YIIOOO
VIII VIIIOO
Tumbler ret~i\lf\lg
Right
Left ejectOr (am
Ejector cocking rodMright
Ejector cocktng rod-
Top
Cocking rod
Bottom ejectQr
TQP ojeCtQr
Ejector lever rod
Ejector lever rod screw
Forend iron mod. -ej-ectQr
Len: stock
Left $totk rubber rf;L~oiipad 1iemtJuxe
Toptumbler double hooking
Stock w/rubher -recoil pad s.tandard
Adi~slAble trigger bas~
Adjustable trigger
Ejector Jever rod !eft
Right 'ideplate 12ga (nm engraved)
Left sideplate 12ga(not engraved)
Screwed hinge pin
lo~rtia block
Assembling blQck (hammer rebQund)
Inertia blo\:;k
Trigger plate
Ejectors earn pin
Adjustable trigger screw
Schrlabel forend standard
Schnabel forend ~uxe
field-sportstQckluxe
Field~ sport !eft:s'Coc:k luxe
'''~.o,
~
Descripdon
ejector
eam plat~
1ever
rubber recoil pad standard
pin
left
tt
FABARM
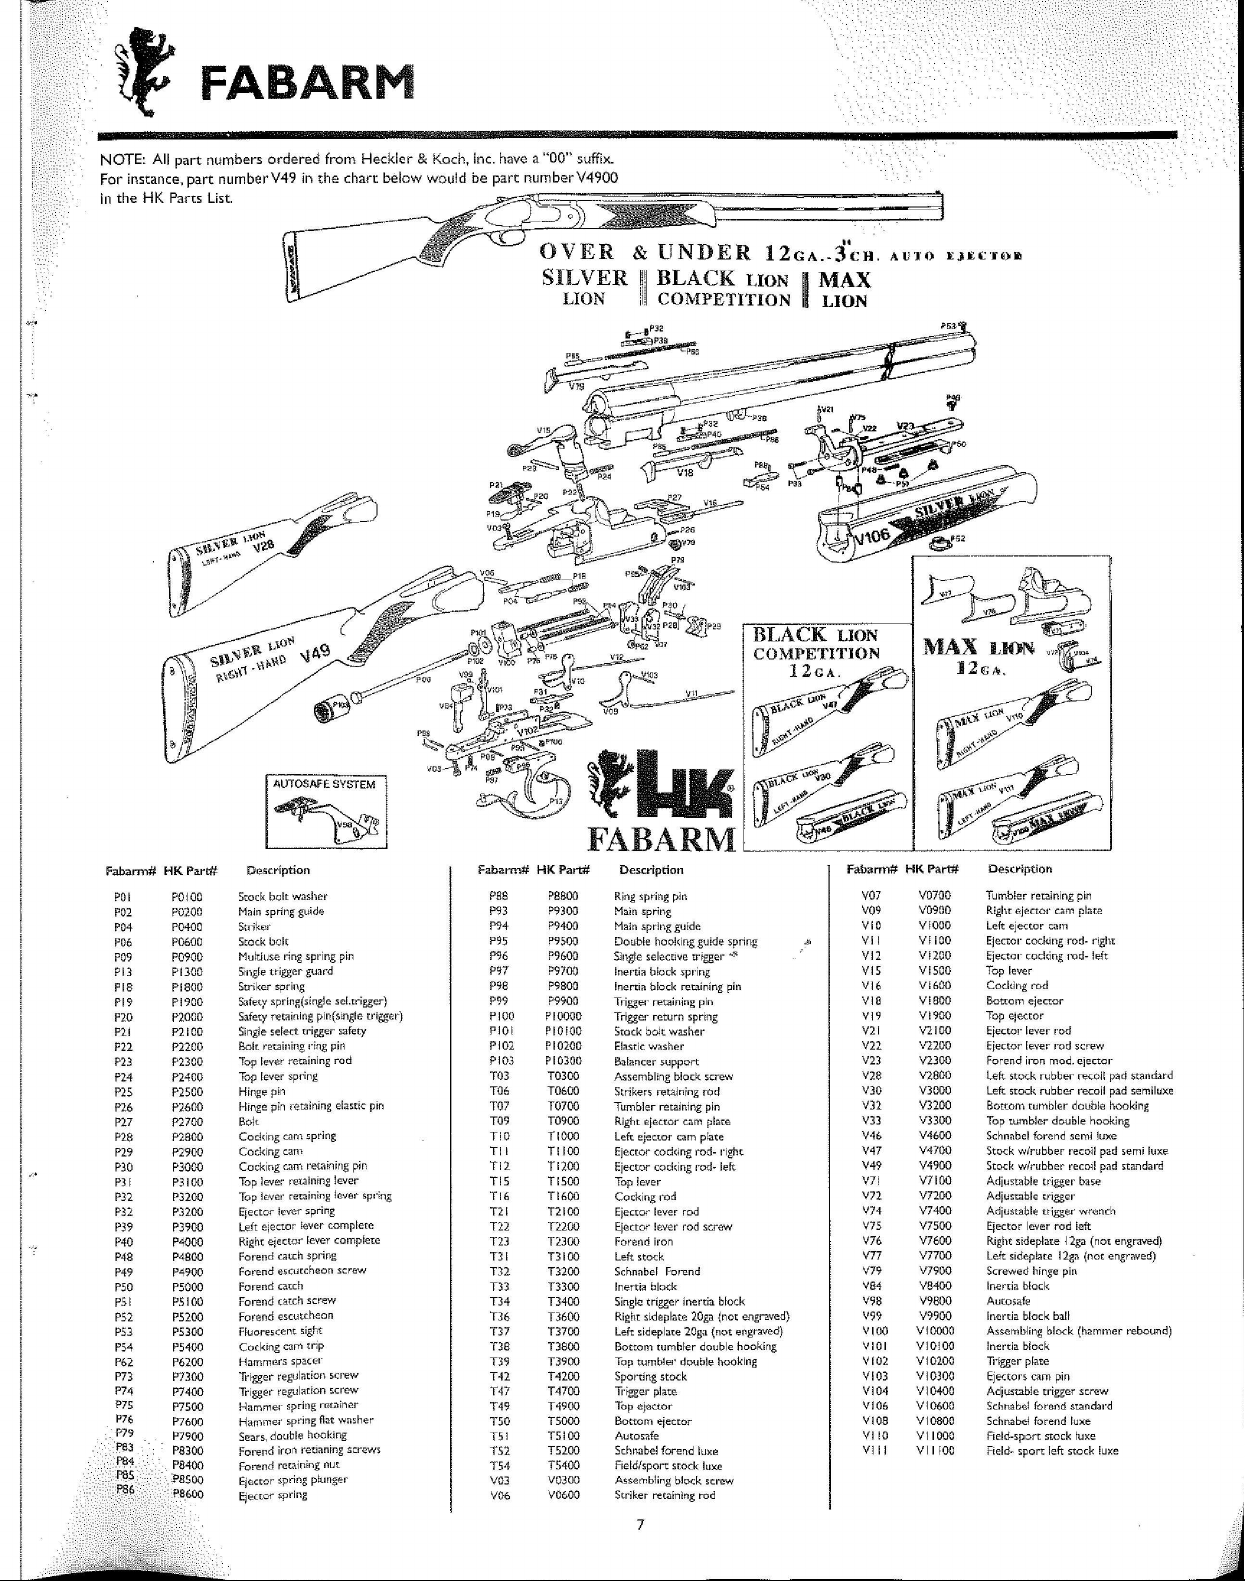
NOTE: All part numbers ordered from Heckler & Koch, Inc. have a "00" suffix.
For instance, part number V49 in the chart below would be part number V4900
in the HK Parts List.
~--:.
'I
~1
AUTOSAFE SYSTEM
OVER & UNDER 12GA..3'cH.
SILVER !II'
Pll
~.,
LION Ii! COMPETITION LION
~,
BLACK LION
I
BLACK LION
COMPETITION
II
12cA.
MAX
A Ul'O I:,JI:C'fI)1I!
MAX LION
J2{;,\.
,'"
'''~~''
II
I,
Fabarm# HK Part#
POI POIOO
P020D
P02
P0400 Str,k~l"
P04
P0600
P06
P09 P0900
PI3 PI300
PIS PISM
PI900
PI9
nODO
P20
P21 P2100
P22 P2200
P2300
P23
P24 PHOO
P2500
P2S
P2600
P26
P2700
PH
P28
P2BOO
P29 P2900
P3000
P30
P31 P3100
P32 P3200
P32 P3200
P39 P3900
P40 P4000
P48 NBOO
P49 P4900
PSO P5000
PSI PSIOO
PS200
PS2
PS300
PS3
PS400
PS4
P62
P6200
P73
P7300
P74
P7400
P75
P7S00 Hammer spring retainer T49 T4900
P76
P7600
P79
P7900
P8300
P8400
Deficription
StOck b-olt wa:;h~r
Main spring gujd€
Stock bDI,
Mu~tiLJ$ering spring pin
Sfngle trigger gUJrd P97 P9700
Str~ker spring P98 P9800
S~fe:tyspring(singJe sel.trigge:r) P99 P9900
Safety r€taining pil1(s~ngletrigger)
Sing!e selel:t rl"iggei"
Bolt retaining rrng pin
Top lev-er retaining rod
Top lever spring
Hinge p~n T06 T0600
Hinge p~n r\?:t3iningelast~{;pin
Bolt
Cocking Lam spdng
Cocking c:.an<
Cockiog C.3ntretaining pir)
Top je:ve~-retaining Jever
Top !aver retaining javBIL 1;pl'Ellg
Ejector !~vcr spring
Ldt e~ec:tOr kwer complere T22
Righr ejector lever complete
Forend Gitch sprirlg
Forend e';i(urcheon screw
Forerid catch
Forend I;:atch :sc~--ew T34
Forend es-cutt.heon
Fluorescent
Cocking earn trip
HammErs spacf;r
Trfgger t-e,gulations.crew
TriggecL ~-egul(l,[1on s.crew
H~rnme-r
Sears, double hooking
Forend iron retianing screws
Forend rct.-i.inEognut
Eje;ctor :=.pringp~ung€r
Eje(:tQi
safety PIOI
sight
5-pring fI<J:twlisher-
~pring
Fabarm# HK Part#
PBS PSBOO
P93 P9300 Ma!n spring
P<J4
P9400 Main sprJng gutde
P95
P9500
P<J6
P9600
PlOD PIOOOO
PIOIOO
PI02 PI0200
PI03 PI
T03 T0300
T07 T0700 Tumbler retaining pin
T09
TIO TIOOO
TII
TI2
TIS
TI6 TI600
121 12100
123 12300
T31 T3100 Left sto<:k
T32 T3200
T33 T3300 Inerti~ block
T36
T37 T3700
T38
T39
T42
T47 T4700
TSO
T51
TS2
TS4
V03
V06 VD600
0300
T0900
TIIOO
TI200
TISOO
T2200
T3400
T3600
T3S00
T3900
T4200
TSOOO
TSIOO
TS200 Schnabelforend
TS400 Field/sport stock luxe
V0300
FABARM
Description Fabarm# HK Part#
Ring spring pil1
Double hookillg gu!de sprillg
Single selecwle tr~gger"'f'o
Inertia b!ock .)pring
Inertia block retalrling pin
Trigger retaining pin VI8
Trigger return spdng
StOck bok washer
Elastic
w<'!sher
Bal,mcer .)upport
AssembHng block screw
Str!ker~ retainrng rod
Right ejeLtor c<:Im pl:J:t:e V33 V3300
Left ejec.1:.orcam pfate
Ejecwr cockjng rod- right
Ejector cockillg rod- left
Top lever
Cocking rod
Ejector lever rod
Ejector !e.v-errod screw
Fon;:nd iron V76 V7600
Schnabel Fo~-end
Sing~etrigger inertia block
Righr 'Idepl.to
Lofr ,idoplaro 20ga (not engraved)
Bottom tumbler
Toptumble!'double
Sport!ng
1dgger plate
Top e!t:!aor
Bottom ejectOr
AutQs<lfe
As:;emb1ing block suew
Stdker reti1in1ng
stock
7
20g. (nor ongravod)
double hooking
hooking
luxe VIII
rod
V07
V09 VD9DO
VIO VIOOO Left ejector cam
$,
VII VIIOO
VI2
VIS
VI6
VI9
V21 V2100
V22 V2200
V23 V2300
V28
V30
V32 V3200
V46 V4600 Schnabel
V47
V49
V71
vn
V74
V7S
V77 V7700
V79 V7900 Screwed
V84
V98 V9800
V99
VIOO
VIOl VIOIOO
VI02 VI 0200
VI03
VI04 VI0400
VI06 VI0600
VI OS
VIIO VI 1000
Description
V0700
Vl200
VI500
V1600
VIBOO
V1900
V2S00
V3000
V4700
V4900
V7100
vnoo
V7400
V7S00
V8400
V9900 Inertia block ball
VI
V10300
VI0800
VIIIOO Field~
Tumbler
reraining pin
Right:ejeCtor eam plat€
Ejector cocking rod- right
Ejector c:oc:kir\grod-
Top lever
Co~kjlEg md
Bottom ejeCtor
Top ejector
Ejecto1"lever rod
Eiec:tor lev-er rod :screw
Forend iron mod- ejector
Left
5to<:-krubber
Left stock rubber recoil pad semiluxe
Bottom rumbler double hooking
Top tUmbler double hooking
forend
Sto<:k w/rubber recoil pad semi luxe-
Stock wlrubber recoH pad standard
Adju~table trigger ba5=e
Adjustable crigger
Adju:;table triggar wrench
Ejector lever
Right :skieplilt€
Leftsidep!ate 12g~(not
hinge pin
Inertia block
Auto5~fl;"
As:;embjlng block (h~mmer rebound)
0000
!r1t~rtia
block
li'~gger pl;\te
Ejector~ (am pin
AdjusubJe
trigger screw
Schnabe1 (orand $ldndard
Sc:hnabdforend luxe
Field-sport stock ~uxe
sport left stock luxe
left
p3d $taridard
~-:-oH
semi !uxe
rod left
j
2ga (not el1graved)
engraved)
 Loading...