

Page 1

11/06/12 INTL
Item No.:3842
Page 2
Tel.: 0731-97488- 29, 62 oder -68
Fax: 0731-97488-64
Montag bis Donnerstag von 09.00 Uhr bis 16.00 Uhr
Freitag von 09.00 Uhr bis 14.00 Uhr
E-Mail: service@hammer.de
11. Service-Hotline und Ersatzteilbestellformular
Um Ihnen optimal helfen zu können, halten Sie bitte
Artikel-Nummer, Seriennummer, Explosionszeichnung und
Teileliste
bereit.
An
Hammer Sport AG
Abt. Kundendienst
Von-Liebig-Str. 21
89231 Neu-Ulm Ort: ................................... Datum: ...................................
Ersatzteilbestellung
(Bitte in Druckbuchstaben ausfüllen!)
Kaufdatum: ................................... Gekauft bei Firma: .......................................................
(Garantieansprüche nur in Verbindung mit einer Kopie des Kaufbeleges!)
Bitte liefern Sie mir folgende Ersatzteile (Bitte leserlich schreiben!):
Position Bezeichnung Stückzahl Bestellgrund
SERVICE-HOTLINE
Käufer:
(Name, Vorname)
(Strasse, Hausnr.)
(PLZ, Wohnort)
(Telefon, Fax)
(E-Mail-Adresse)
Lieferadresse: (wenn abweichend von Käuferadresse)
(Firma)
(Ansprechpartner)
(Strasse, Hausnr.)
(PLZ, Wohnort)
(Telefon, Fax)
(E-Mail-Adresse)
89
Art.-Nr.:3842 BIO FORCE
Serien Nr.:
Page 3
88
EXERCISE LOG
Use the chart below to record your progress. Before writing on it, make as many copies as you think you’ll need.
We suggest you keep these in a notebook. You will find it both informative and motivational to look back at what
you’ve done. This data will help you chart future fitness goals as you continue to improve.
Date ________ Date ________ Date ________ Date ________
EXERCISE
SETS
REPS
RESISTANCE
SETS
REPS
RESISTANCE
SETS
REPS
RESISTANCE
SETS
REPS
RESISTANCE
SETS
REPS
RESISTANCE
SETS
REPS
RESISTANCE
SETS
REPS
RESISTANCE
SETS
REPS
RESISTANCE
SETS
REPS
RESISTANCE
SETS
REPS
RESISTANCE
SETS
REPS
RESISTANCE
SETS
REPS
RESISTANCE
SETS
REPS
RESISTANCE
1
TABLE OF CONTENTS
Important Safety Information .............................................................2
Specifications & Parts........................................................................3
Equipment Warning/Caution Labels ...............................................4-5
Introduction ........................................................................................6
Assembly Instructions...................................................................7-21
Parts List/Exploded View............................................................22-23
Care and Storage ............................................................................24
Exercise Guidelines....................................................................25-26
Bio Force® Sport System and Workout ...........................................27
Getting Started
Pulley Positions .........................................................................28
Adjusting the Slide-N-Lock Shifter ............................................29
Adjusting the Seat and Leg Attachment....................................29
8 Week Body Transformation Plan .............................................30-39
Warm-Up & Cool Down Stretches ..............................................40-41
Bio Force
® Spor t Exercises........................................................42-82
Legs .....................................................................................44-54
Chest & Back .......................................................................55-64
Shoulders .............................................................................65-71
Arms.....................................................................................72-80
Abs & Lower Back................................................................81-82
Cardiovascular Conditioning
Progressive Cardiovascular Training Program.....................83-85
Cardio Workout Tracking Sheets...............................................86
Progress Chart.................................................................................87
Exercise Log ....................................................................................88
Page 4
87
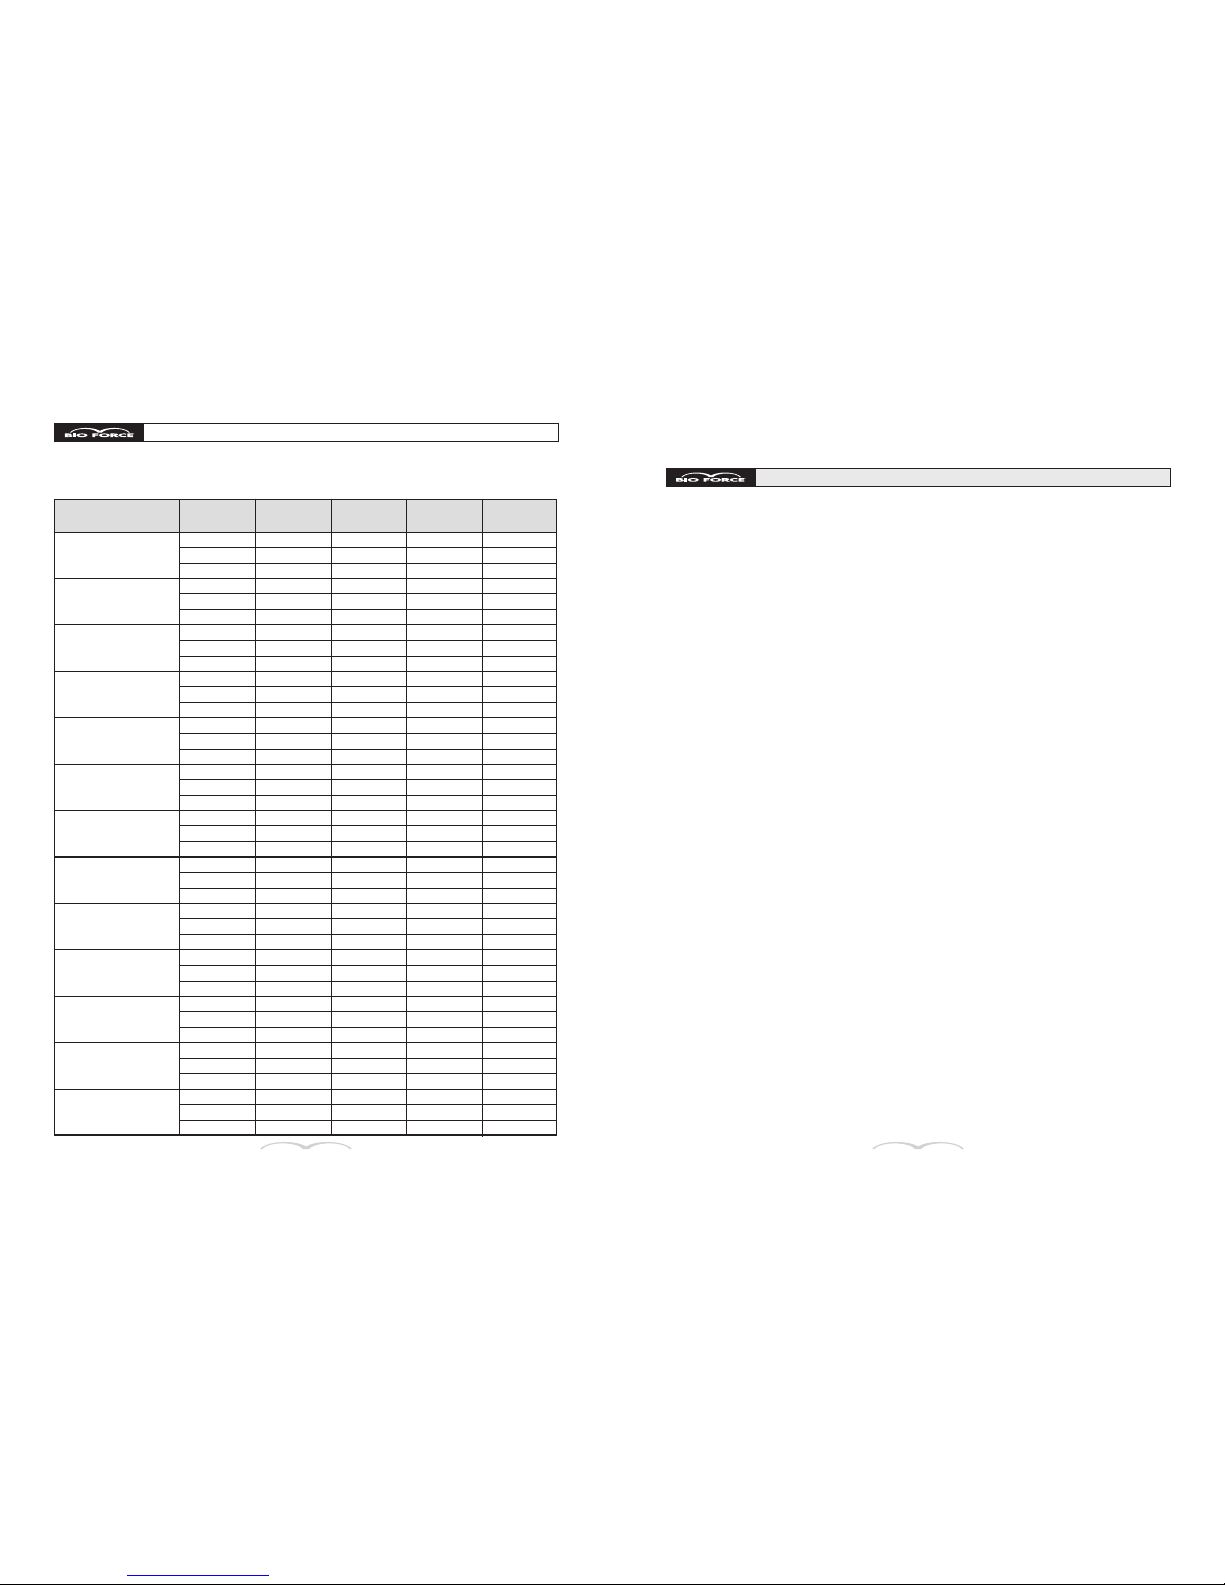
PROGRESS CHART
2
IMPORTANT SAFETY INFORMATION
1) Before starting this or any other exercise
program, consult your physician. Your physician
should assist you in determining the target heart rate
zone appropriate for your age and physical condition.
Certain exercise programs or types of equipment may
not be appropriate for all people. This is especially
important for people over the age of 35, pregnant
women, or those with pre-existing health problems
or balance impairments. If you are taking med i ca tion
which may affect your heart rate, a physician's
advice is ab so lute ly essential.
2) Start out slowly and progress sensibly.
Even if you are an experienced exerciser, start with
the beginner workout and become familiar with all
of the exercises before moving on to more advanced
workouts or exercises. For best results, perform all of
the exercises at the tempo demonstrated in the video.
3) Do not overexert yourself with this or any other
exercise program. Listen to your body and respond
to any reactions you may be having. You must learn to
distinguish “good” pain, like fatigue, from “bad” pain,
which hurts. If you experience any pain or tightness
in your chest, an irregular heartbeat, dizziness,
nausea, or shortness of breath, stop exercising at
once and consult your physician immediately.
4) Warm up before any exercise program by doing 5 to
10 minutes of aerobic activity, followed by stretching.
5) Before EACH use, visually inspect the equipment.
Never operate the equipment if the equipment is
not functioning properly.
6) USE CARE when getting on and off the equipment.
Set up and use your equipment on a solid, level,
surface. Follow the instructions demonstrated in your
video and as instructed with the exercises on pages
44 through 82 for proper exercise techniques.
7) Use this equipment ONLY for the intended use
as described in this manual. Do not modify the
equipment or use at tachments not rec om mend ed
by the manufacturer.
8) Have plenty of clearance space on all sides of
your equipment. It is important to keep children,
pets, furniture and other objects out of the way when
using your equipment.
9) Wear appropriate clothing when exercising. Workout
clothing should be comfortable and lightweight, and
should allow freedom of movement. Wear comfortable
athletic shoes made of good support with non-slip soles,
such as running or aerobic shoes.
10) THIS EQUIPMENT IS NOT FOR USE BY CHILDREN.
Parents and others in charge of children should be
aware of their responsibility because the natural
play instinct and the fondness of experimenting
of children can lead to situations and behavior
for which the training equipment is not intended.
To prevent injuries, keep this and all fitness
equipment out of the reach of children.
Follow these simple rules:
– Keep children out of rooms where you have
your exercise equipment.
– Store exercise equipment in a room that
can be locked.
– Know exactly where your children are when
you work out.
– If you have small children at home, don’t wear
headphones while you work out.
– Talk to your kids about the dangers of exercise
equipment.
11) Breathe naturally, never holding your breath during an
exercise. Avoid over training. You should be able
to carry on a conversation while exercising.
12) Cool down after an exercise session, with 5 to 10
minutes of slow walking, followed by stretching.
13) Handicapped or disabled people must have
medical approval before using this equipment and
should be under close su per vi sion when using any
exercise equipment.
14) Only one person at a time should use this
equipment.
15) DO NOT put hands, feet, or any foreign objects
on or near this equipment when in use by others.
Use caution not to pinch fingers or hands in moving
parts when setting up or using the equipment.
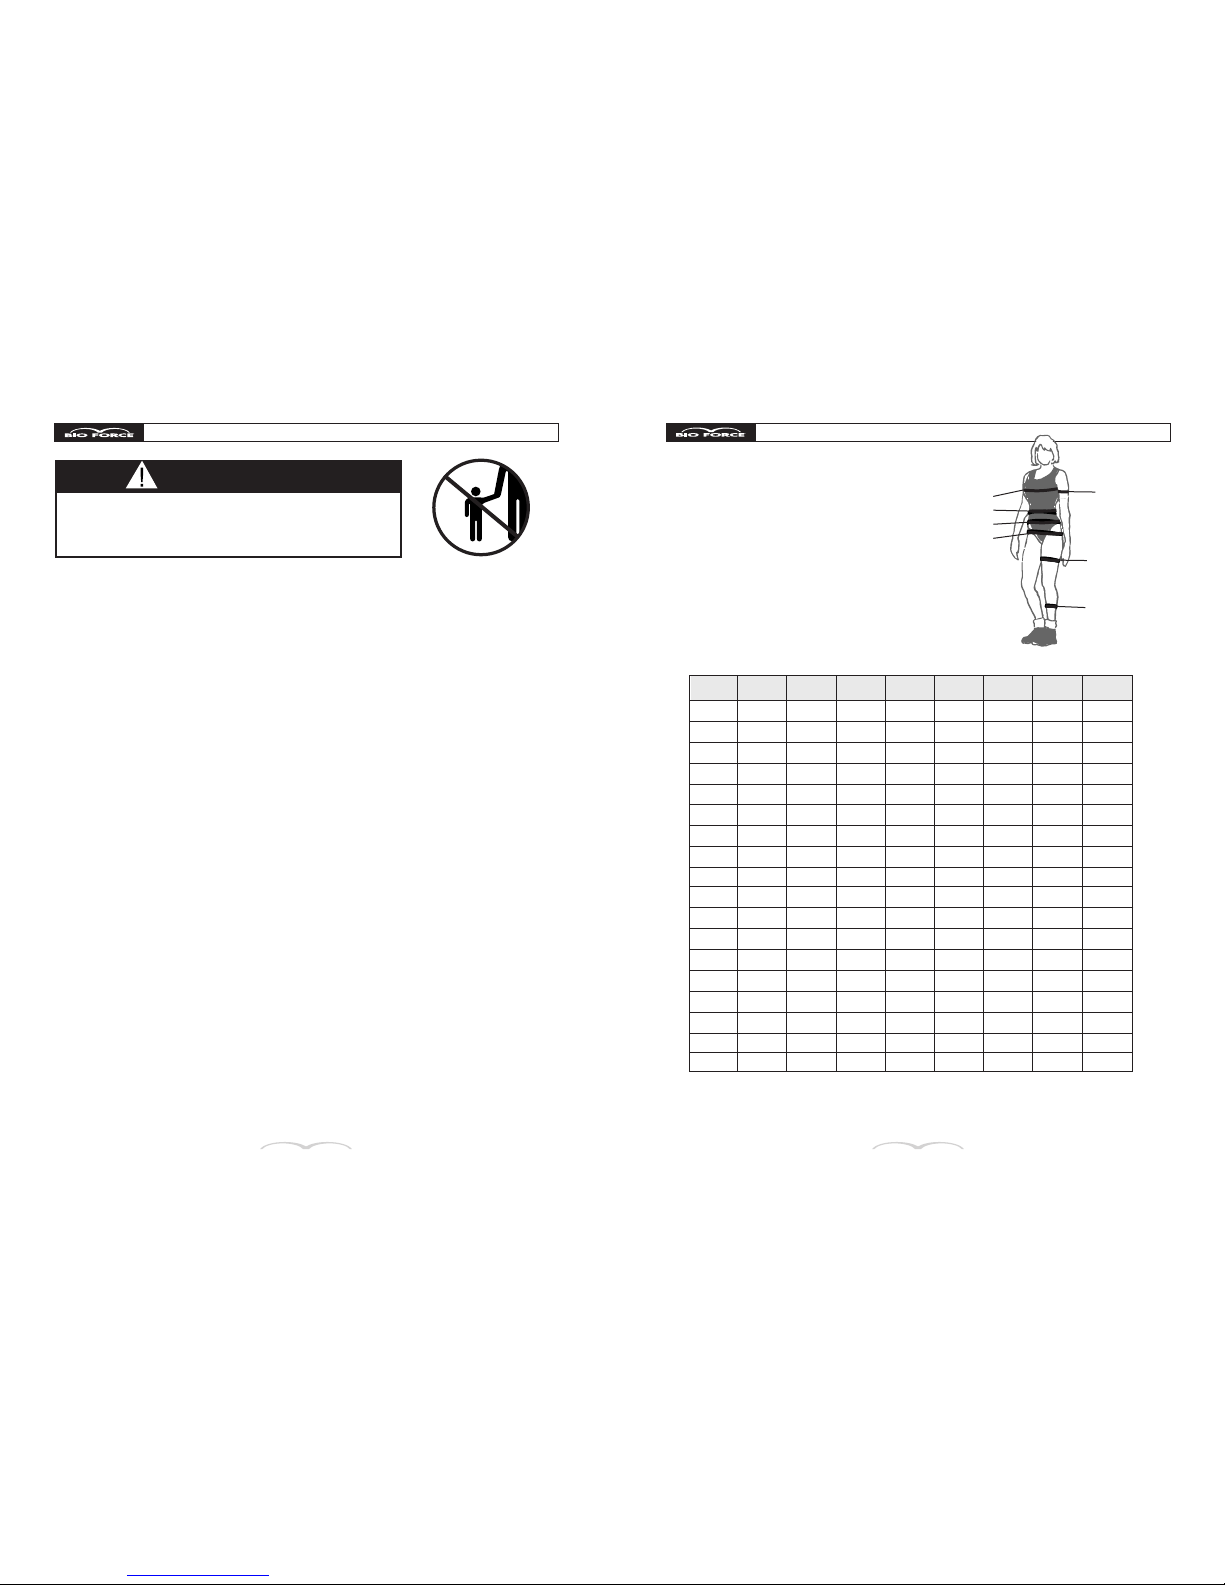
WARNING
YOU AND OTHERS CAN BE SERIOUSLY INJURED
OR KILLED IF WARNINGS ON THE EQUIPMENT, IN THIS
OWNER’S MANUAL AND VIDEO ARE NOT FOLLOWED.
Every two weeks, measure yourself and use the
chart below to record your progress. Before
writing on it, make as many copies as you think
you’ll need. We suggest you keep these in a
notebook. You will find it both informative and
motivational to look back at what you’ve done.
This data will help you chart future fitness goals
as you continue to improve.
Hips
Thighs
Calves
Abdomen
Waist
Biceps
Chest
Weight
Date
chest
waist
abdomen
hips
thighs
(L/R)
calves
(L/R)
biceps
(L/R)
Measuring Sites
Page 5
86
CARDIO WORKOUT TRACKING SHEETS
ACTIVITY DATE
HOW LONG
(minutes)
HEART RATE
HOW HARD
(RPE)*
Use these charts to
keep track of your
progress over time.
Before writing on
them, make as
many copies as
you think you’ll
need. We suggest
you keep these in
a notebook. You
will find it both
informative and
motivational to
look back at what
you’ve done.
This data will help
you chart future
fitness goals as you
continue to improve.
*RPE = rating of perceived exertion; this means you match up a numerical rating (RPE) of 1-10, with how you feel
(RPE descriptive rating in chart above). A rating of 2 -3 is equal to a warm-up or recovery level of effort; 4-5
equates to moderate to somewhat challenging; 6 -10 represents effort that is somewhat hard, to very hard.
ACTIVITY DATE
HOW LONG
(minutes)
HEART RATE
HOW HARD
(RPE)*
3
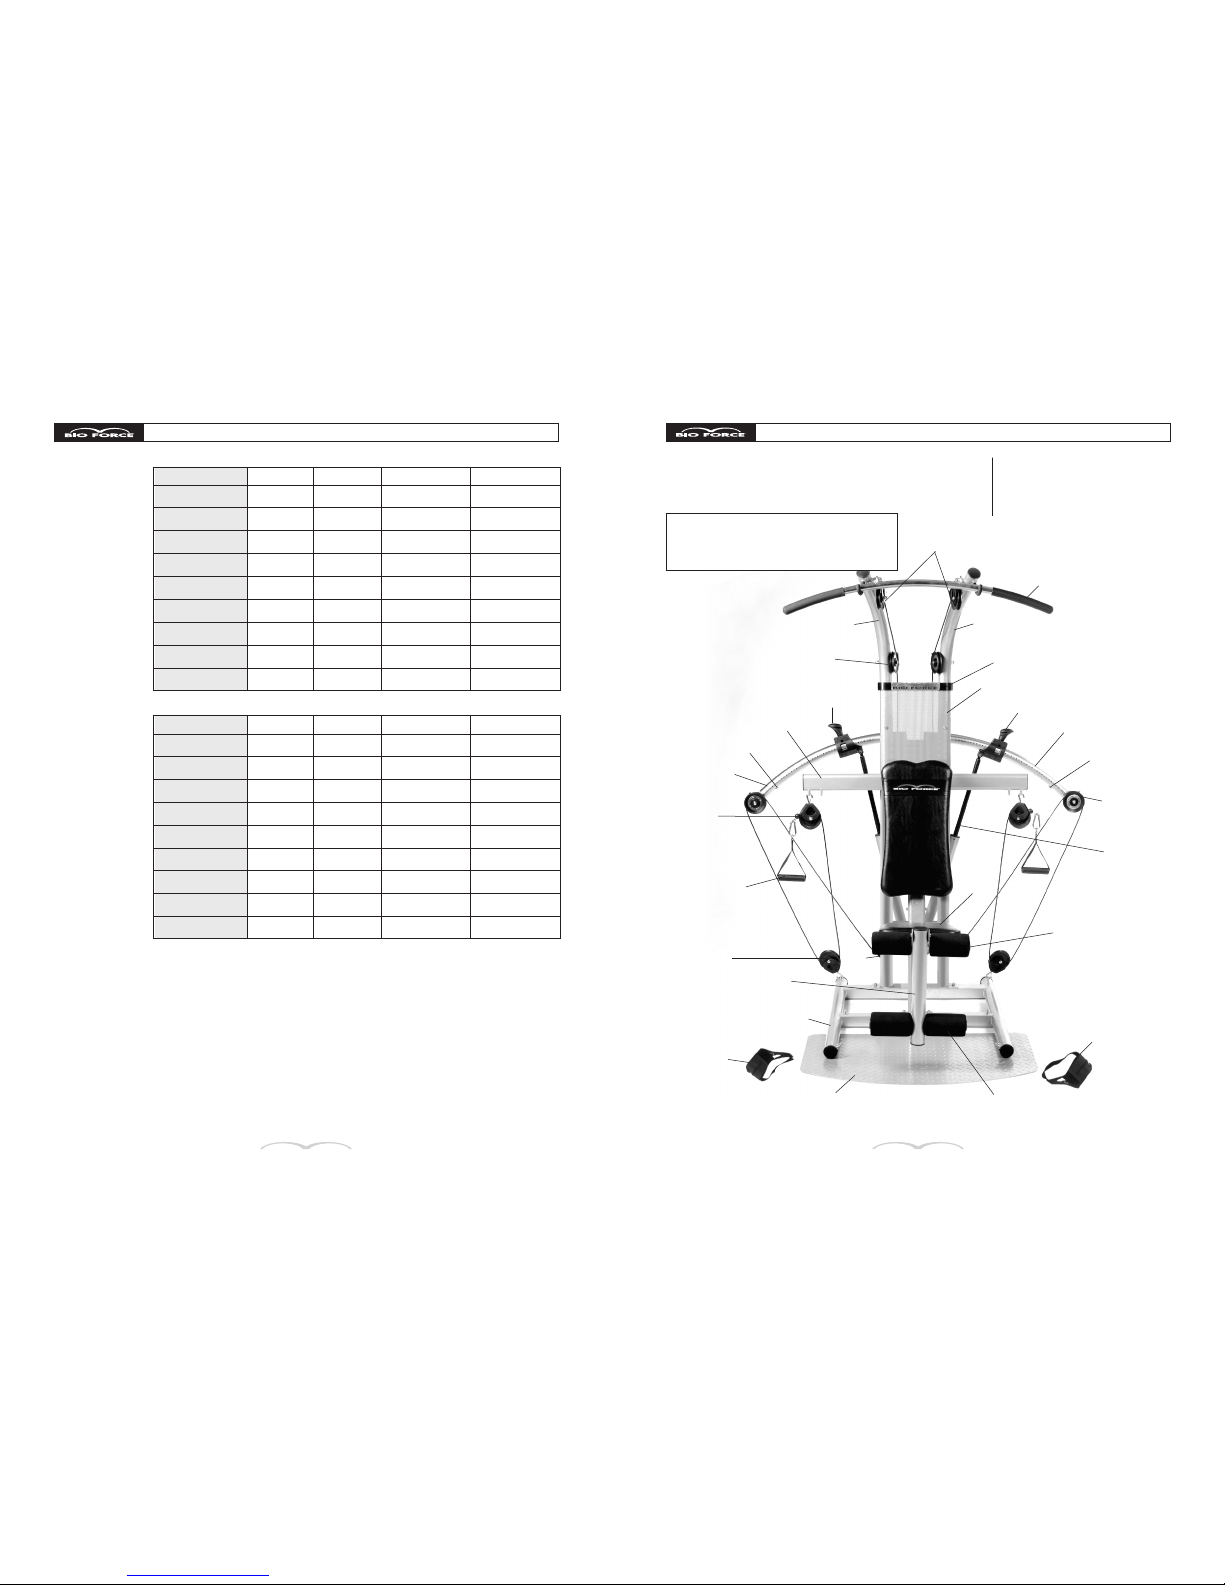
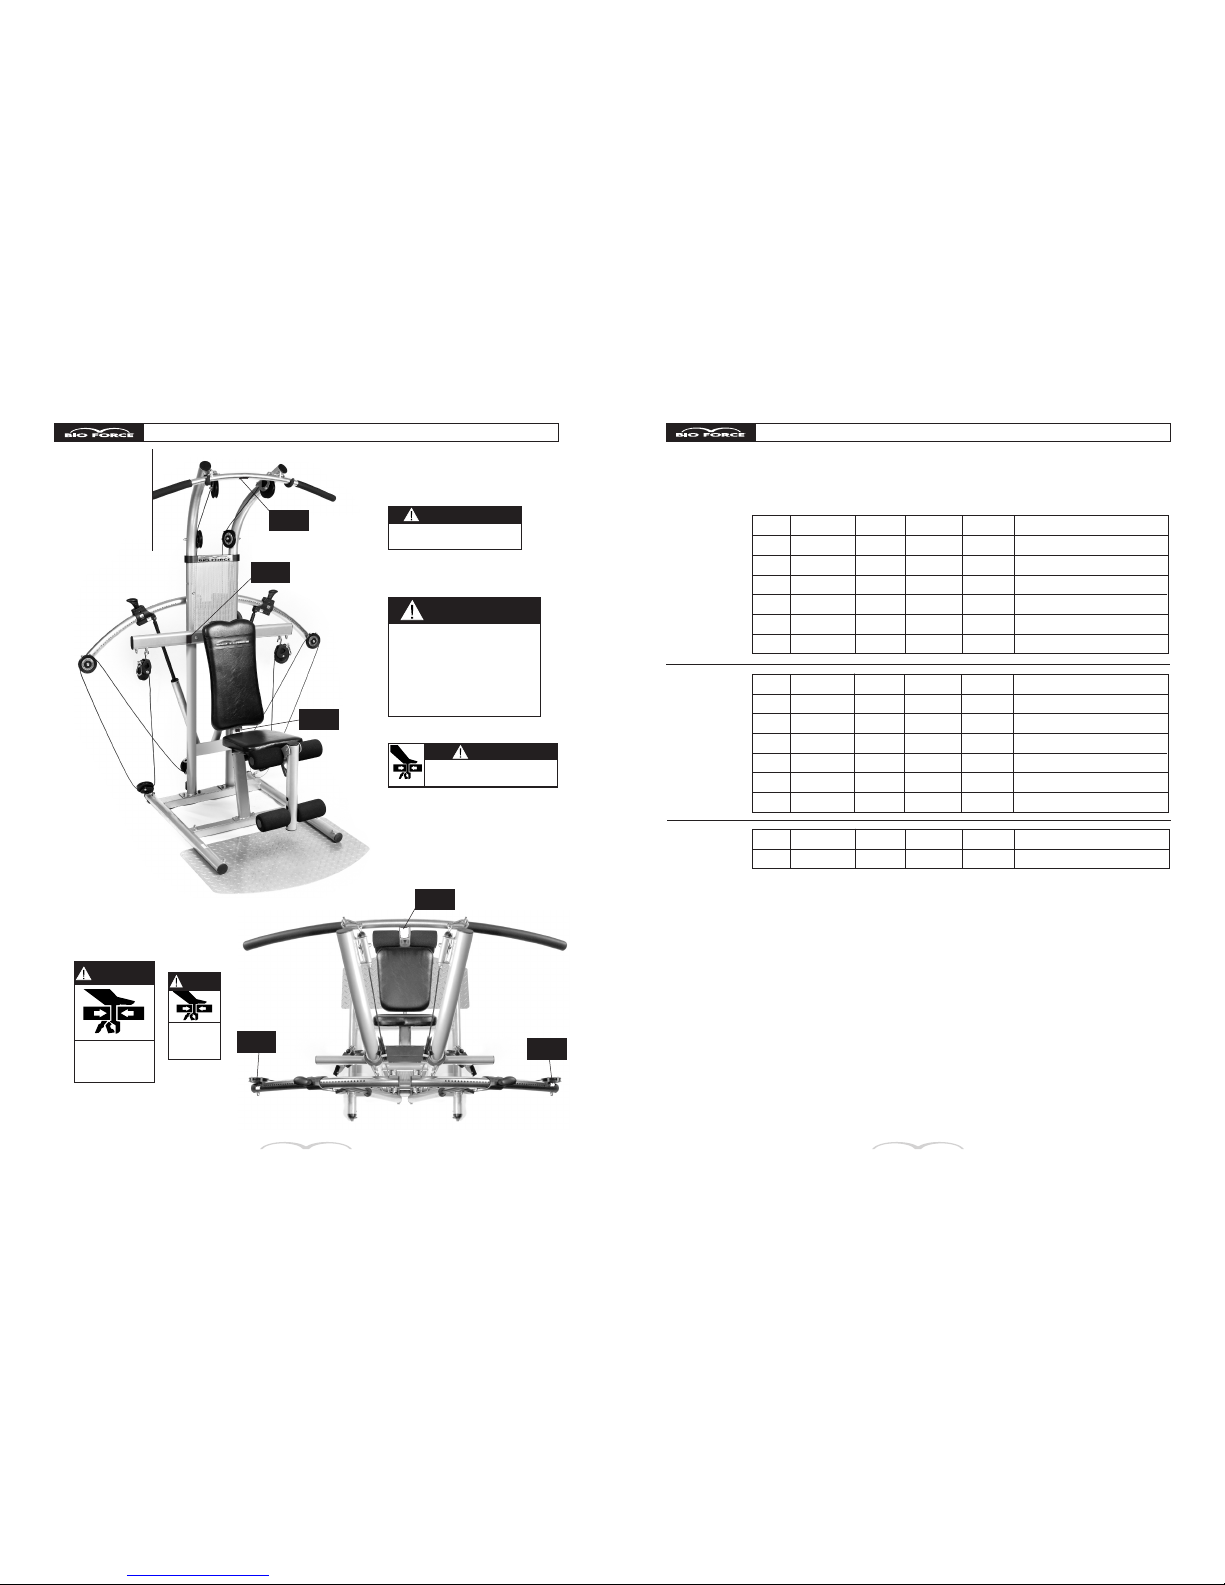
SPECIFICATIONS & PARTS
Length: 52-3/4”
Width: 65”
Height: 82”
Includes
Workout DVD
Product Weight: Approx. 151 lbs.
Maximum user weight: 300 lbs.
Assembled Approximate Specifications:
Dimensions are based on unit set up for use.
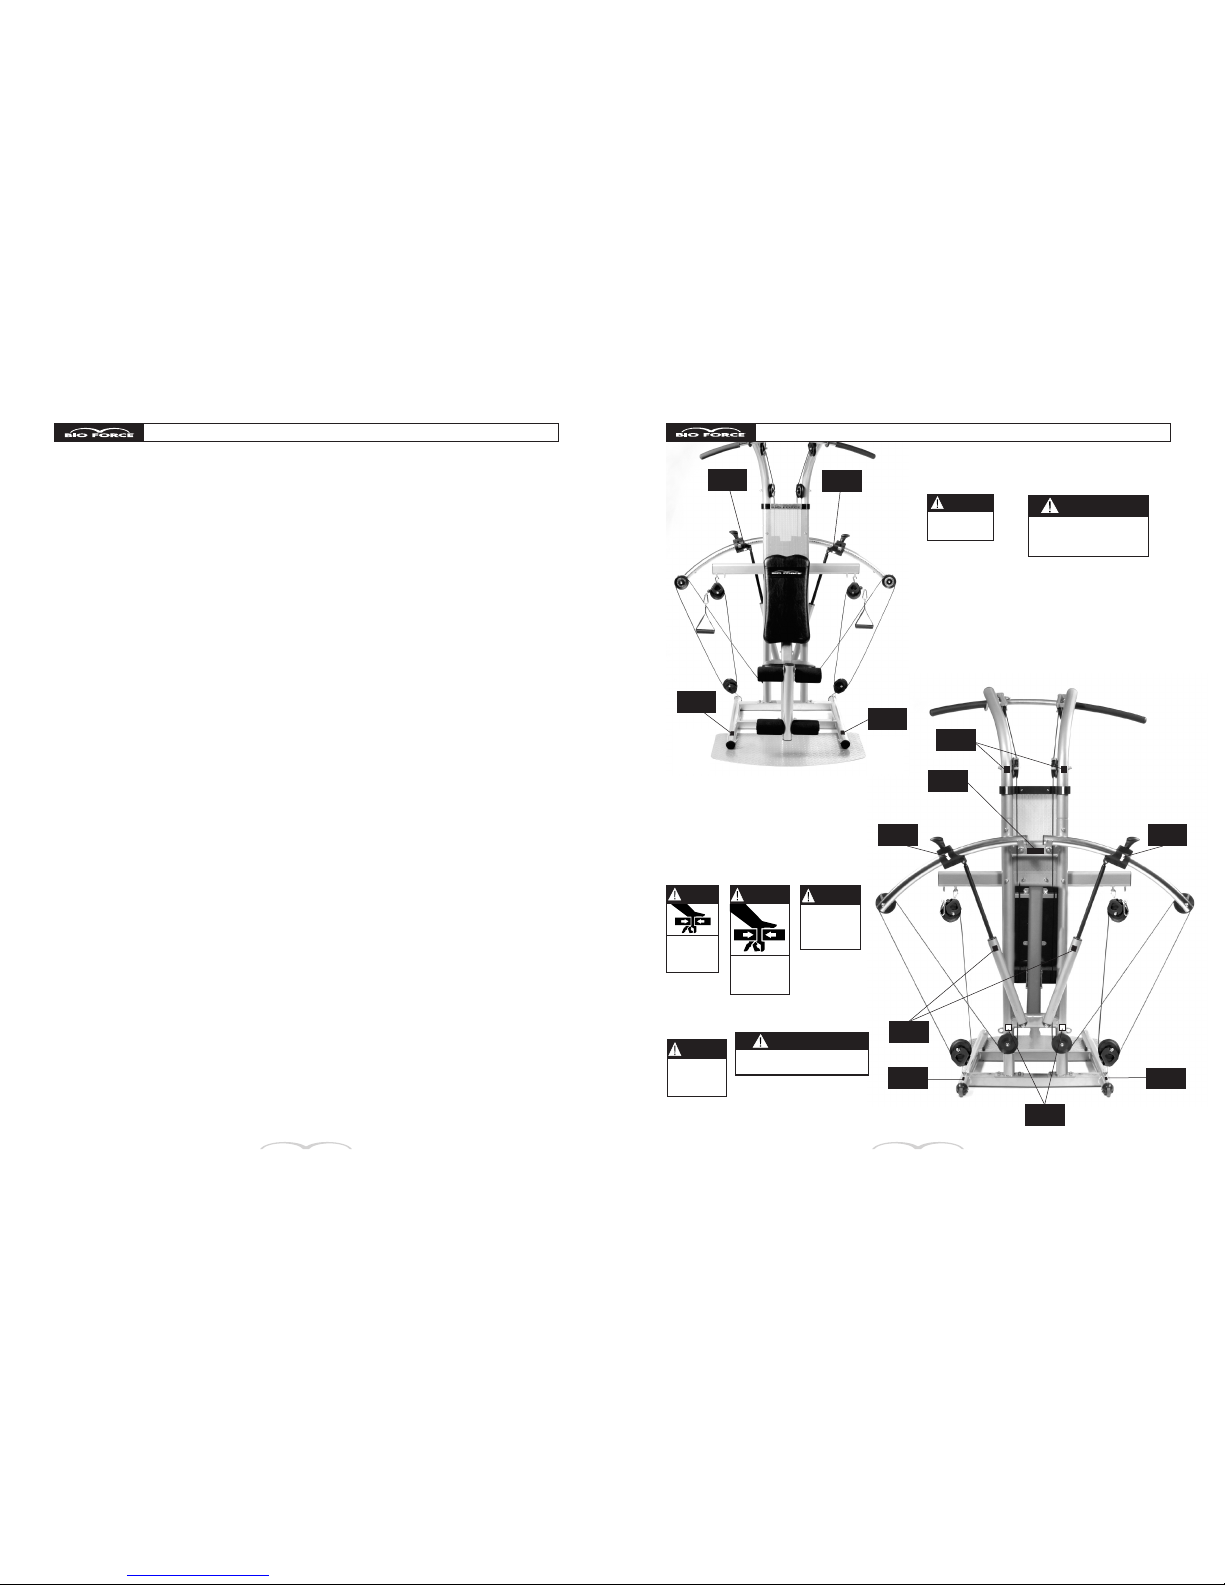
Lat Bar
BFSPORT-20
RIGHT LEFT
FRONT
Left Swing Arm
BFSPORT-06
Left Adjuster
0700026
Left Top Frame
BFSPORT-04
Foot Harness
0700025
Backrest
BFSPORT-13
Crossbar
BFSPORT-08
Stopper
0100189
Stopper
0100189
Base Plate
BFSPORT-02
Base Frame
BFSPORT-01
Leg Lift Tube
BFSPORT-14
Right Adjuster
0700027
Right Top Frame
BFSPORT-05
+ Resistance Cylinder
0600013
Right Swing Arm
BFSPORT-07
Front Top Cover Cap with Logo
0500005
Foot Harness
0700025
Lower Leg Bar
BFSPORT-16
Upper Leg Bar
BFSPORT-17
Seat
BFSPORT-12
+ Handle
BFSPORT-21
+ Pulley with Logo
0600012
NOTE:
All location references, such as front, rear, left or
right, made in these instr uctions are from the
user sitting on the exerciser and facing forward.
+ Padded Pulley
BFPRO-16
+ Padded Pulley
0600027
Chrome Pulleys
0600014
Perforated Cover
BFSPORT-10
+ Pulley with Logo
0600012
+ These parts are the same on both the
left and right side of the exerciser.
+ Pulley
0600016
Page 6
85
PROGRESSIVE CARDIOVASCULAR TRAINING PROGRAM
WEEK
HOW OFTEN
(times per week)
HOW HARD
(% heart rate)
HOW LONG
(minutes)
HOW HARD
(RPE)*
RPE DESCRIPTIVE RATING
1
2
3
4
5
6
2 - 3
2 - 3
2 - 3
2 - 3
3
3 - 4
2 - 4
2 - 4
2 - 4
2 - 4
2 - 4
2 - 4
Somewhat easy to somewhat hard
Somewhat easy to somewhat hard
Somewhat easy to somewhat hard
Somewhat easy to somewhat hard
Somewhat easy to somewhat hard
Somewhat easy to somewhat hard
5 - 15
5 - 15
10 - 17
10 - 17
15 - 20
15 - 20
40 - 50
40 - 50
40 - 50
50 - 60
50 - 60
50 - 60
The training program that follows is a progressive training program for cardiovascular conditioning.
It can be used for any aerobic activity you choose. But remember, these are only guidelines.
People with medical conditions should discuss this training program with their physician.
MOVING
BEYOND
BASE-LEVEL
FITNESS
CONDITIONING
BASE
MAINTENANCE
*RPE = rating of perceived exertion; this means you match up a numerical rating (RPE) of 1- 10, with how you feel
(RPE descriptive rating in chart above). A rating of 2 -3 is equal to a warm-up or recovery level of effort; 4-5
equates to moderate to somewhat challenging; 6 -10 represents effort that is somewhat hard, to very hard.
Smart Progression
In regard to progressing to a higher intensity level,
longer duration, or more frequent sessions, it makes
good sense to change only one of these elements at
a time. You run a higher risk of overuse injury if you
simultaneously increase more than one of these
elements. A conservative yet effective guideline is to
increase intensity or duration by no more than about
5 percent. You should adapt to this increase over a
period of a week or two, and then consider changing
one of the other variables (frequency, duration or
intensity) or further progressing the one you’ve
adapted to.
Top Aerobic Exercise
No one cardiovascular activity is better than another!
Manipulating how hard (intensity), how often (duration),
and how long (frequency) you participate in a
particular aerobic activity determines its effectiveness
or lack thereof. And of course, you have to like what
you’re doing. Choose the type of aerobic activity that
is right for you by identifying one or more types of
cardio exercise that you can see yourself sticking to,
and enjoying, for the rest of your life. Often, the best
aerobic exercise will be not one, but several activities
that are fun and feel good to your body. Excellent
cardiovascular activities include, but are not limited
to, walking, swimming, water fitness, jogging, running,
cross-country skiing, in-line skating, lateral movement
training (slide), cycling, mountain biking, and step
training.
WEEK
HOW OFTEN
(times per week)
HOW HARD
(% heart rate)
HOW LONG
(minutes)
HOW HARD
(RPE)*
RPE DESCRIPTIVE RATING
7 - 9
10 - 13
14 - 16
17 - 19
20 - 23
24 - 27
3 - 4
3 - 4
3 - 4
3 - 5
3 - 5
3 - 6
3 - 4
4 - 5
4 - 5
4 - 5
4 - 5
4 - 5
Moderate to somewhat hard
Somewhat hard to hard
Somewhat hard to hard
Somewhat hard to hard
Somewhat hard to hard
Somewhat hard to hard
20 - 25
21 - 25
26 - 30
26 - 30
31 - 35
31 - 35
60 - 65
65 - 70
65 - 70
70 - 75
70 - 75
70 - 75
WEEK
HOW OFTEN
(times per week)
HOW HARD
(% heart rate)
HOW LONG
(minutes)
HOW HARD
(RPE)*
RPE DESCRIPTIVE RATING
After 4-6
months
3 - 6
3 - 6
Easy - Moderate to somewhat hard
30 - 60
40 - 85
CRUSH HAZARD. Keep hands clear
while assembling and disassembling.
WARNING
CAUTION
Always keep the Lat Bar in its holder
when not in use.
WARNING
Failure to read and follow the safety
instructions stated in the Owner’s Manual
and Video may result in POSSIBLE
SERIOUS INJURY OR DEATH. KEEP
CHILDREN AWAY. Maximum user weight
300 lbs. Replace this label if damaged,
illegible or removed. Class HC.
WARNING LABEL 1
WARNING LABEL 2
CAUTION LABEL 1
CAUTION
LABEL 1
WARNING
LABEL 1
WARNING
LABEL 2
4
EQUIPMENT WARNING/CAUTION LABELS
CRUSH HAZARD.
Keep hands clear
while operating.
WARNING
WARNING
LABEL 3
WARNING
LABEL 5
WARNING
LABEL 5
WARNING
LABEL 3
WARNING
Keep hands
away from
pulleys and
moving parts.
WARNING
LABEL 5
(6 locations)
IMPORTANT:
Note placement
of the following
Warning/Caution
Labels on your
equipment.
Page 7
84
PROGRESSIVE CARDIOVASCULAR TRAINING PROGRAM
How hard. Aerobic intensity guidelines for healthy
adults are generally set at 60 to 85 percent of heart
rate. But, if you’re out of shape, remember that
moderate to low level and consistent cardiovascular
training – well below the standard recommendations
set forth – can result in substantial and beneficial
effects to your health and can greatly improve
cardiovascular endurance.
You can use the following calculation to determine
what percentage of your heart rate you are
working at:
% heart rate = (220 - age) x %.
Using this calculation, a 70% heart rate for a 40 year
old would be (220 - 40) x 70% or 126. Thus, this
individual would need to reach 126 beats per minute
to equal a 70% heart rate.
The above are guidelines, people with any
medical limitations should discuss this formula
with their physician.
How Often, How Long, and How Hard
The choices you make about the frequency (how often),
duration (how long), and intensity (how hard) at which
you will train, will directly influence your training results.
How often. If you want to see serious improvements
in your fitness, lose weight and develop a good
training base, you need to do cardio workouts three
to six times per week.
If you are just starting a program or out of shape,
don’t let these recommendations discourage or
mislead you. Realize that doing cardio training two
to three times per week will still result in significant
fitness improvement and health benefits. Your
long-term goal is to build up to exercising your
heart on most days of the week.
How long. How long you work out depends on your
current level of fitness. Again, if you’re just starting a
program or out of shape, don’t follow strict textbook
recommendations. Instead, start with 5 to 10 minutes
once or twice per day. You will see significant fitness
improvement. Your long-term goal is to build to a
duration of 30 to 60 minutes of cardiovascular
activity on most days of the week.
WARNING
LABEL 5
WARNING
LABEL 5
WARNING
LABEL 8
CAUTION
LABEL 2
WARNING
LABEL 6
WARNING
LABEL 6
5
EQUIPMENT WARNING/CAUTION LABELS
WARNING
Make sure that pin is
locked in place before
beginning to exercise.
WARNING
CRUSH HAZARD.
Keep hands clear
when moving
Adjuster Arms.
WARNING
LABEL 4
(2 locations)
WARNING
LABEL 6
(2 locations)
When performing standing
exercises, place feet firmly
on floor plate.
WARNING
WARNING LABEL 7
(2 locations)
WARNING
LABEL 4
WARNING
LABEL 4
WARNING
LABEL 7
WARNING
LABEL 7
When transporting for storage we
recommend two people move this unit.
CAUTION LABEL 2
WARNING
LABEL 8
(2 locations)
Contents under
pressure.
DO NOT OPEN.
Keep away from
heat and fire.
WARNING
CAUTION
WARNING
Keep hands
away from
pulleys and
moving parts.
WARNING
LABEL 5
(6 locations)
WARNING
LABEL 9
(2 locations)
DO NOT REMOVE
PULLEY from this
position after
unit is assembled.
WARNING
WARNING
LABEL 9
WARNING
LABEL 9
Page 8

83
CARDIOVASCULAR CONDITIONING
Exercise that challenges the heart is a simple part of an
exercise program – almost anyone can walk, run, treadmill, climb steps, or bike. But, creating a progressive,
time efficient and results oriented cardio program takes
a little planning. A properly designed and consistently
performed cardiovascular training program is an essential part of your program if you want to improve your
health and lose weight, or maintain a healthy lifestyle.
Training Aerobically
Aerobic exercise is the key to building a stronger heart
and can reduce your chances of heart disease, as well
as burn lots of fat and calories. Aerobic exercise is any
activity that you can keep at for several minutes or
longer and increases your heart rate. Activities that have
the potential to condition the heart typically involve the
large muscles of the hips, thighs, and buttocks.
Examples include walking, hiking, jogging, running,
cycling, in-line skating, swimming, cross-country skiing,
and stair stepping.
Benefits of Aerobic Training
Health benefits of aerobic exercise include the
following:
1. A stronger and healthier heart.
2. Increased HDL. This “good” cholesterol helps keep
your arteries unplugged and healthy.
3. Decreased total cholesterol. This is the debris in
your blood that can clog your arteries.
4. Reduced blood pressure. Even moderate
exercise can help.
5. Reduced risk for heart attack and stroke.
6. Decreased body fat and an ability to help you
reach your desirable weight. You’ll become a
better fat-burner and burn a lot of calories
every session.
7. Decreased risk for diabetes.
8. Reduced feelings of anxiety, tension, and
depression.
9. Improved sleep.
10. Higher levels of energy. Efficient delivery and
use of blood and oxygen is the key to increased
vigor and performance.
Warming Up And Cooling Down
Warming up and cooling down are essential to a
balanced and safe exercise program. A proper
warm-up and cool down can:
• Make your workouts safe and easier to do,
• Limit the risk of unnecessary stress on your heart,
• Get you ready for your activity,
• Improve your stamina and endurance (you won’t
tire as quickly),
• Decrease your risk for injury,
• Increase enjoyment of your workouts, and
• Help you stick with your health and fitness
program.
Warm-Up
To prevent injury and maximize performance, we
recommend that each workout period should start with
a warm-up. Your warm-up should gently prepare your
muscles for the coming exertion. Start by doing 5 to 10
minutes of gentle exercise that gradually increases your
heart rate and loosens up your muscles. Your warm-up
exercise should be aerobic in nature and only require
an easy, unforged range of motion. This should be
followed by 5 to 10 minutes of stretching. Refer to the
stretches found on pages 40 and 41 of this manual.
Never push yourself beyond a point of gentle tension
or strain. Keep your movements gentle, rhythmic
and controlled.
Cool Down and Stretching
Your workout should be followed by a cool down.
The cool down should consist of 5 to 10 minutes of
slow walking followed by stretching. Refer to the
stretches found on pages 40 and 41 of this manual.
Never push yourself beyond a point of gentle tension
or strain. Keep your movements gentle, rhythmic and
controlled.
6
INTRODUCTION
Congratulations!
Congratulations on your purchase of the Bio Force®Sport System! You've just taken an important step
toward your lifelong fitness goals. Whether that means building a strong defined chest, lean sexy legs
or total body sculpting, the Bio Force®Sport System can help you get the results you desire.
The Bio Force® Sport exerciser is a solid piece of equipment that uses nitrogen-charged cylinders to
give you resistance through an exercise’s entire range of motion. With over one hundred body shaping
exercises, you have everything you need to start your own total body workout program. The Bio Force®
Sport exerciser allows you to tone and firm the major muscle groups of your upper and lower body. This
is vital for everyone – regardless of age, sex, or fitness level.
To help you get started, we have included this thorough Owner’s Manual. It includes Eric Lichter’s
“8 Week Body Transformation Plan,” descriptions of all of the Bio Force® exercises and an aerobic
workout guide. You also have Eric’s Instructional Video which features tips on proper form and technique
and a Healthy Eating Plan Booklet. These tools will give you a core group of exercises, and workout and
nutrition plans to help you get results.
Be sure to read through this Owner’s Manual carefully.
If, during the course of using your system, you have any questions about the program, please contact
your local distributor. As always, you have our personal assurance that we want your complete
satisfaction. After all, your success is our success too!
IMPORTANT: This owner’s manual is the authoritative source of information about your
Bio Force
® Sport exerciser. Please read it carefully and follow all the instructions.
Page 9
MOVABLE PULLEY
POSITIONS
MOVABLE PULLEY
POSITIONS
BIO FORCE®EXERCISES
82
ABS & LOWER BACK
SIDE BEND
START: Stand facing side. Feet hip width
apart on base. Grip one handle with
inside hand.
MOTION: Flex trunk laterally, away from
handle. Pause at end of motion. Return
to starting position.
TIPS: Keep arm straight. Laterally flex
trunk, rather than pulling with arm.
Contract abdominals to stabilize spine.
Perform on both sides.
109
MUSCLE GROUPS EXERCISED: Abdominals, obliques,
lateral flexors
LEVEL OF DIFFICULTY: Intermediate
SEATED SPINAL
EXTENSION
START: Sit facing frame. Grip handles in
front of chest. Pull elbows to waist.
MOTION: Extend spine. Pause at end of
motion. Return to starting position.
TIPS: Lift ribcage and lengthen spine while
extending. Do not over extend spine.
Keep elbows in close to body. Avoid
pulling with arms. Contract abdominals
to stabilize lower back.
110
MUSCLE GROUPS EXERCISED: Spinal extensors
LEVEL OF DIFFICULTY: Intermediate
SEAT: Off
LEG LIFT: Off
ACCESSORIES:
Handles
SEAT: On/Bottom
Position
LEG LIFT: On
ACCESSORIES:
Handles
7
Occasionally our products contain components that are pre-lubricated
at the factory. We recommend that you protect flooring, or anything else
the parts may contact, with newspaper or cloth.
Make sure you have read the manual completely and locate all the parts
and tools shown on page 8.
Product will need approx. 83” when tilting for transportation. Make sure
you have proper clearance before assembling. We recommend you
assemble your equipment in the area you will be using it!
CAUTION! When transporting for storage we recommend two people
move the unit.
All nuts and bolts are installed front-to-rear – leaving the nut on the rear.
Some assemblies may require lifting by 2 people.
FRONT
REAR
TIPS
ASSEMBLY INSTRUCTIONS
RIGHT
LEFT
NOTE:
All location references, such as front, rear, left or
right, made in these instr uctions are from the
user sitting on the exerciser and facing forward.
Page 10
MOVABLE PULLEY
POSITIONS
MOVABLE PULLEY
POSITIONS
MOVABLE PULLEY
POSITIONS
BIO FORCE®EXERCISES
81
ABS & LOWER BACK
AB CRUNCH
START: Sit facing away. Grip handles at
shoulder level. Elbows point front.
MOTION: Curl spine, pulling bottom of
ribcage down toward hips. Pause at
end of motion. Return to starting
position.
TIPS: Do not pull down with arms. Focus
work in abdominal muscles. Extend
torso to upright seated position after
each repetition. Keep neck in line
with spine.
106
MUSCLE GROUPS EXERCISED: Abdominals
LEVEL OF DIFFICULTY: Beginner
OBLIQUE CRUNCH
START: Sit facing away. Grip handles at
shoulder level. Elbows point front.
MOTION: Curl spine and simultaneously
rotate torso toward one knee. Pause
at end of motion. Return to starting
position.
TIPS: Do not pull down with arms. Focus
work in abdominal muscles. Extend
torso to upright seated position after
each repetition. Keep neck in line with
spine. Perform on both sides.
107
MUSCLE GROUPS EXERCISED: Abdominals, obliques
LEVEL OF DIFFICULTY: Intermediate
STANDING TRUNK
ROTATION
START: Stand facing side. Feet hip width
apart on base. Rotate torso inward.
Grip one handle with both hands.
MOTION: Rotate trunk outward. Pause at
end of motion. Rotate inward to starting
position.
TIPS: Keep arms straight in front of torso.
Rotate trunk rather than pulling with
arms. Maintain upright posture throughout exercise. Do not round lower back
while rotating. Perform on both sides.
108
MUSCLE GROUPS EXERCISED: Abdominals, obliques
LEVEL OF DIFFICULTY: Intermediate
SEAT: On/Bottom
Position
LEG LIFT: On
ACCESSORIES:
Handles/Lat Tower
SEAT: On/Bottom
Position
LEG LIFT: On
ACCESSORIES:
Handles/Lat Tower
SEAT: Off
LEG LIFT: Off
ACCESSORIES:
Handles
x
x
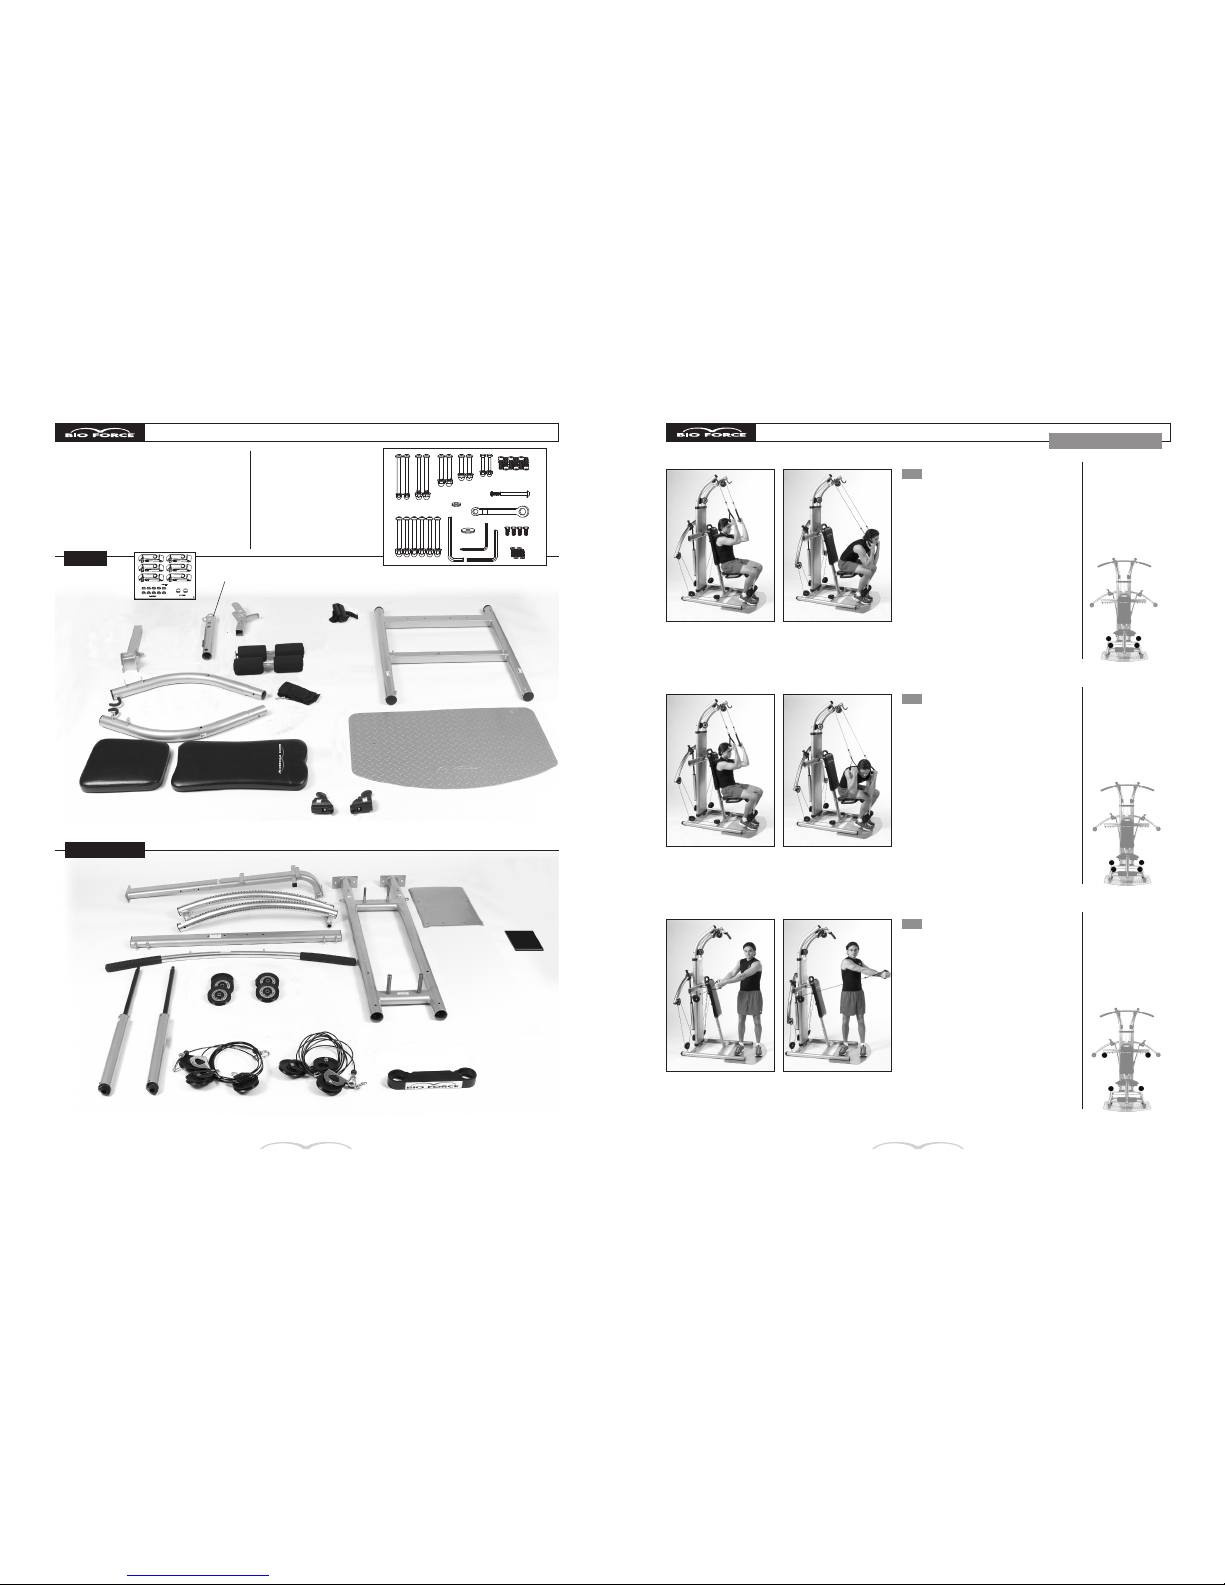
8
ASSEMBLY INSTRUCTIONS
0700025 Foot
Harness (2)
BFSPORT-29
Seat Support Frame
BFSPORT-14 Leg Lift Tube
0800051
Basic
Instructional
DVD
BFSPORT-15
Removable
Leg Tube
BFSPORT-01 Base Frame
BFSPORT-02 Base Plate
BFSPORT-13 Backrest w/Allen Bolts
BFSPORT-12
Seat w/Allen Bolts
BFSPORT-04
Left Top Frame
0700027
Right Adjuster
0700026
Left Adjuster
BFSPORT-10
Perforated Cover
BFSPORT-09 Backrest Support Frame
BFSPORT-06 Left Swing Arm
BFSPORT-07 Right Swing Arm
BFSPORT-03
Upright Frame
0500004 Top Cover Cap with Logo and
(2) M6 x 30mm Phillips Bolts - 0100160 and
(2) ST4.2 x 19mm Phillips Screws - 0100161
BFSPORT-18 Cable Assemblies**
0600012 Pulleys w/logo (4)
0600016 Pulleys (2)
BFSPORT-20
Lat Bar
BFSPORT-08 Crossbar
ASSEMBLY INSTRUCTIONS
BFSPORT-16
Lower Leg Bar
BFSPORT-17
Upper Leg Bar
0600013 Resistance Cylinders
BFSPORT-05
Right Top Frame
BOX 2
BFSPORT-22 Fastener Pack
BFSPORT-21
Handles (2)
**Important: Each Cable Assembly consists of the Cable, 1 Chrome Pulley and 2 Padded Pulleys
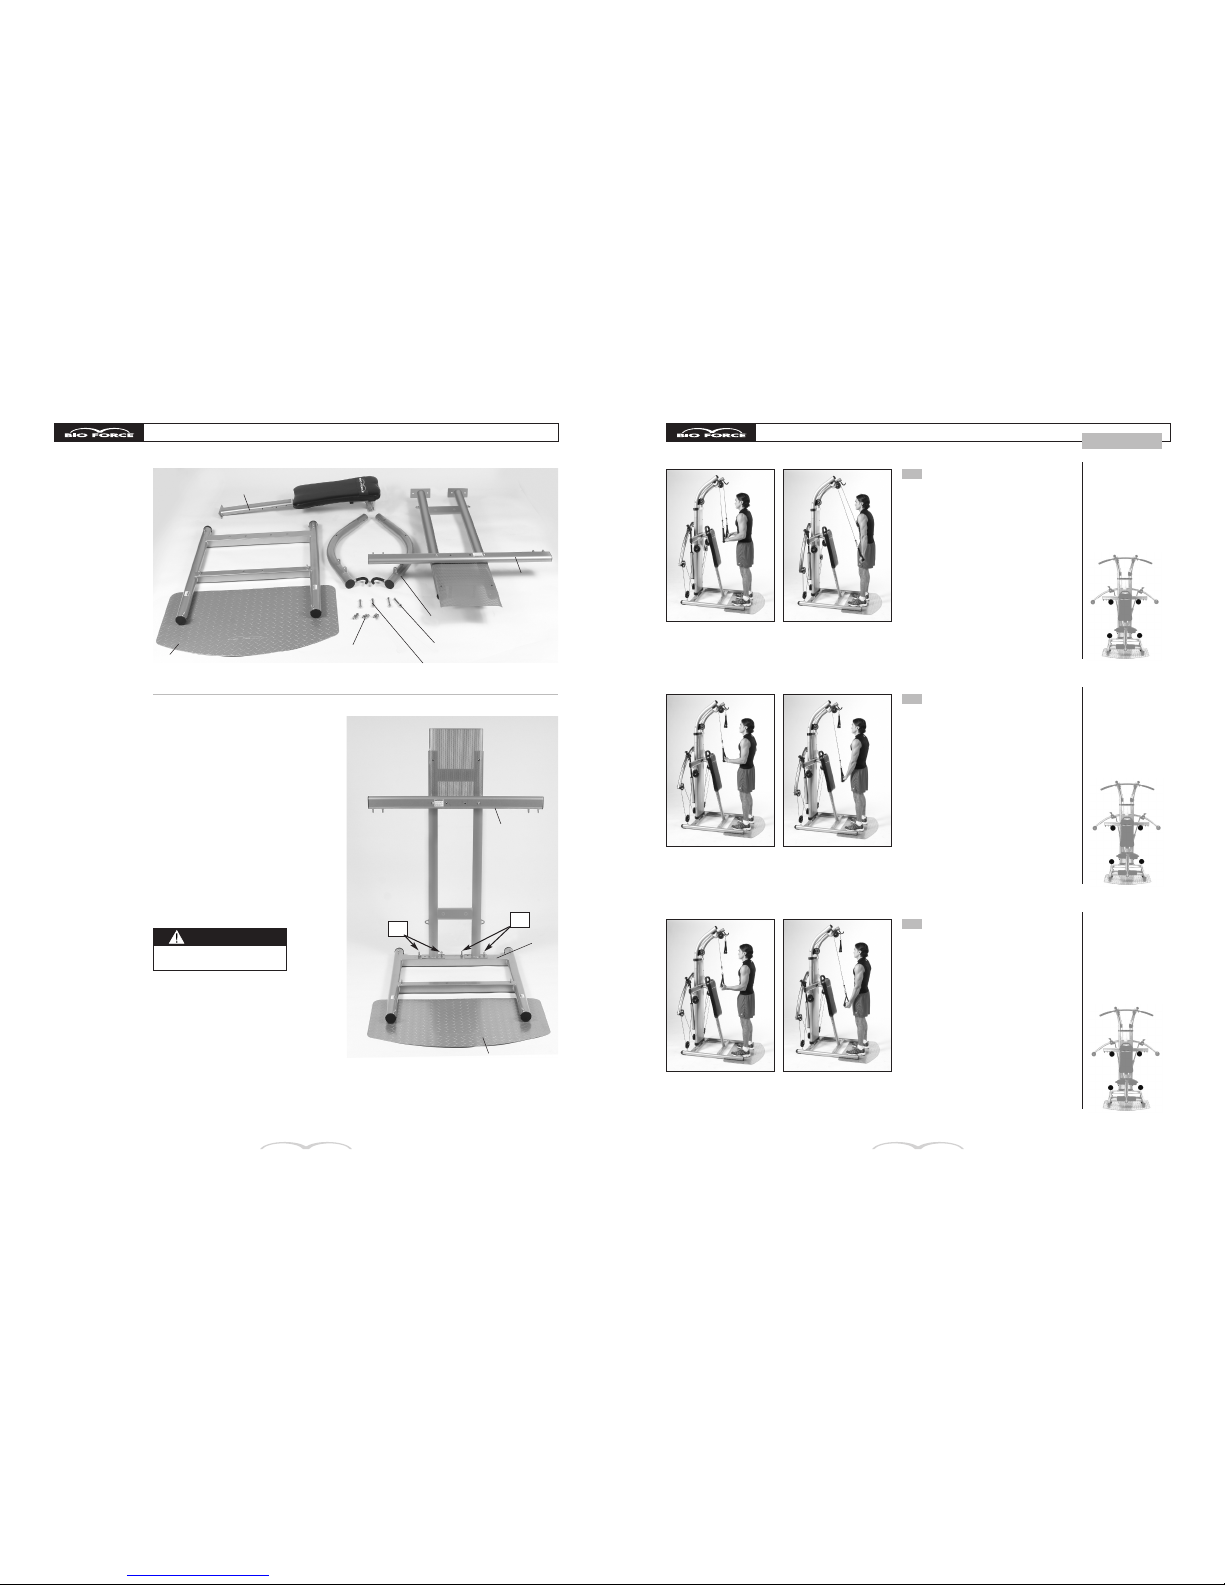
Lay Out the Parts
Lay out the parts of your Bio Force
®
Sport exerciser as shown here and on
the following pages and familiarize yourself
with part names for easier assembly.
Make sure you have all parts.
Tools provided in
Fastener Pack:
- Hex Wrench
- 5mm Allen Wrench
w/Phillips Screwdriver
- 6mm Allen Wrench
- 8mm Allen Wrench
BFPRO-34 Cable Guide
Fastener Pack
BOX 1
Page 11
9
ASSEMBLY INSTRUCTIONS
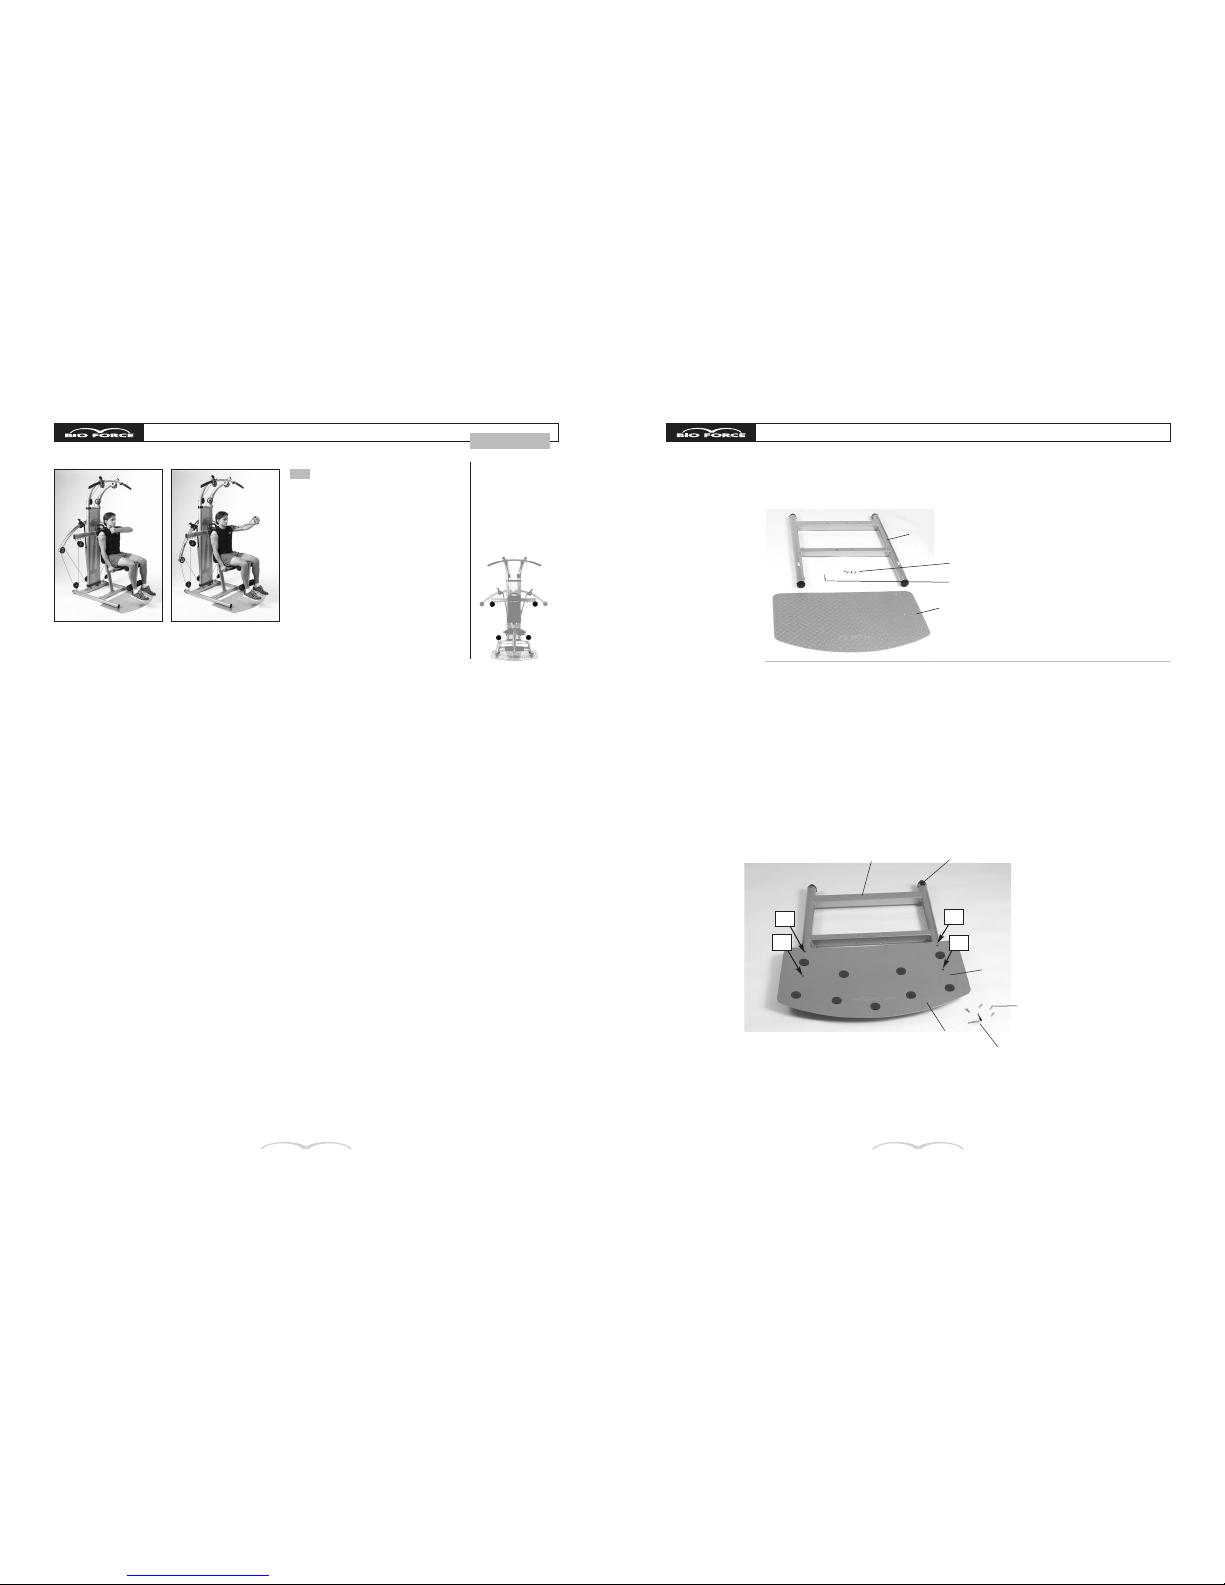
STEP 1 – Base Frame Assembly
a. Turn the Base Frame over, with the warning labels facing down.
b. Place the Base Plate on the Base Frame on the end opposite the
rollers. Make sure the curved edge of the Base Plate is facing out
with the pads up.
c. Align the holes in the Base Plate and Base Frame and secure
the parts by using 4 Allen Bolts. Tighten them with the Allen
Wrench provided.
Turn the Base Assembly right side up on the floor (warning labels
face up).
WE SUGGEST YOU ASSEMBLE THE BIO FORCE®SPORT EXERCISER
WHERE YOU ARE GOING TO BE USING IT.
1c
Parts used in
STEP 1
Base Frame
Base Plate w/Pads
Base Plate
Base Frame Assembly
1c
1c
1c
4 Allen Bolts (M8 x 25mm)
5mm Allen Wrench
Rollers
Pads
MOVABLE PULLEY
POSITIONS
BIO FORCE®EXERCISES
80
ARMS
CROSS-BODY TRICEPS
EXTENSION
START: Sit facing away. Bend one elbow
and reach across body to grip handle at
opposite shoulder.
MOTION: Extend elbow and press handle
in front of body. Pause at end of motion.
Bend elbow back to starting position.
TIPS: Keep elbow at shoulder height.
Do not bend wrist while extending
elbow. Maintain upright posture in
seated position. Contract abdominals
to stabilize torso. Perform on both sides.
105
MUSCLE GROUPS EXERCISED: Triceps
LEVEL OF DIFFICULTY: Intermediate
SEAT: On/Top
Position
LEG LIFT: On
ACCESSORIES:
Handles
5mm Allen Wrench
4 Allen Bolts (M8 x 25mm)
Page 12
MOVABLE PULLEY
POSITIONS
MOVABLE PULLEY
POSITIONS
MOVABLE PULLEY
POSITIONS
BIO FORCE®EXERCISES
79
ARMS
TWO ARM REVERSE
GRIP TRICEPS
KICKBACK
START: Stand facing frame. Grip handles
in underhand grip with palms facing up.
Bend elbows 90 degrees.
MOTION: Extend elbows and pull handles
down and back. Pause at end of motion.
Bend elbows back to starting position.
TIPS: Keep arms close to sides of body.
Do not allow wrists to bend while
pressing back. Maintain upright posture
throughout exercise. Do not lean
forward while pressing back. Contract
abdominals to stabilize torso.
102
MUSCLE GROUPS EXERCISED: Triceps
LEVEL OF DIFFICULTY: Intermediate
SEAT: Off
LEG LIFT: Off
ACCESSORIES:
Handles
TRICEPS DIPS
START: Stand facing away. Grip handles at
waist level. Bend elbows 90 degrees.
Cables behind arms.
MOTION: Extend elbows and press
handles down. Pause at end of motion.
Bend elbows back to starting position.
TIPS: Keep arms close to sides of body.
Press down and slightly forward. Maintain
upright posture throughout exercise.
Avoid rounding spine forward while
pressing down. Contract abdominals
to stabilize torso.
103
MUSCLE GROUPS EXERCISED: Triceps, anterior deltoids,
pectoralis
LEVEL OF DIFFICULTY: Beginner
SEAT: Off
LEG LIFT: Off
ACCESSORIES:
Handles/Lat Tower
Position
SINGLE ARM
TRICEPS DIPS
START: Stand facing away. Grip one
handle at waist level. Bend elbow 90
degrees. Cable behind arm.
MOTION: Extend elbow and press handle
down. Pause at end of motion. Bend
elbow back to starting position.
TIPS: Keep arm close to side of body.
Press down and slightly forward. Maintain
upright posture throughout exercise.
Avoid rounding spine forward while
pressing down. Contract abdominals to
stabilize torso. Perform on both sides.
104
MUSCLE GROUPS EXERCISED: Triceps, anterior deltoids,
pectoralis
LEVEL OF DIFFICULTY: Intermediate/Advanced
SEAT: Off
LEG LIFT: Off
ACCESSORIES:
Handles/Lat Tower
Position
10
ASSEMBLY INSTRUCTIONS
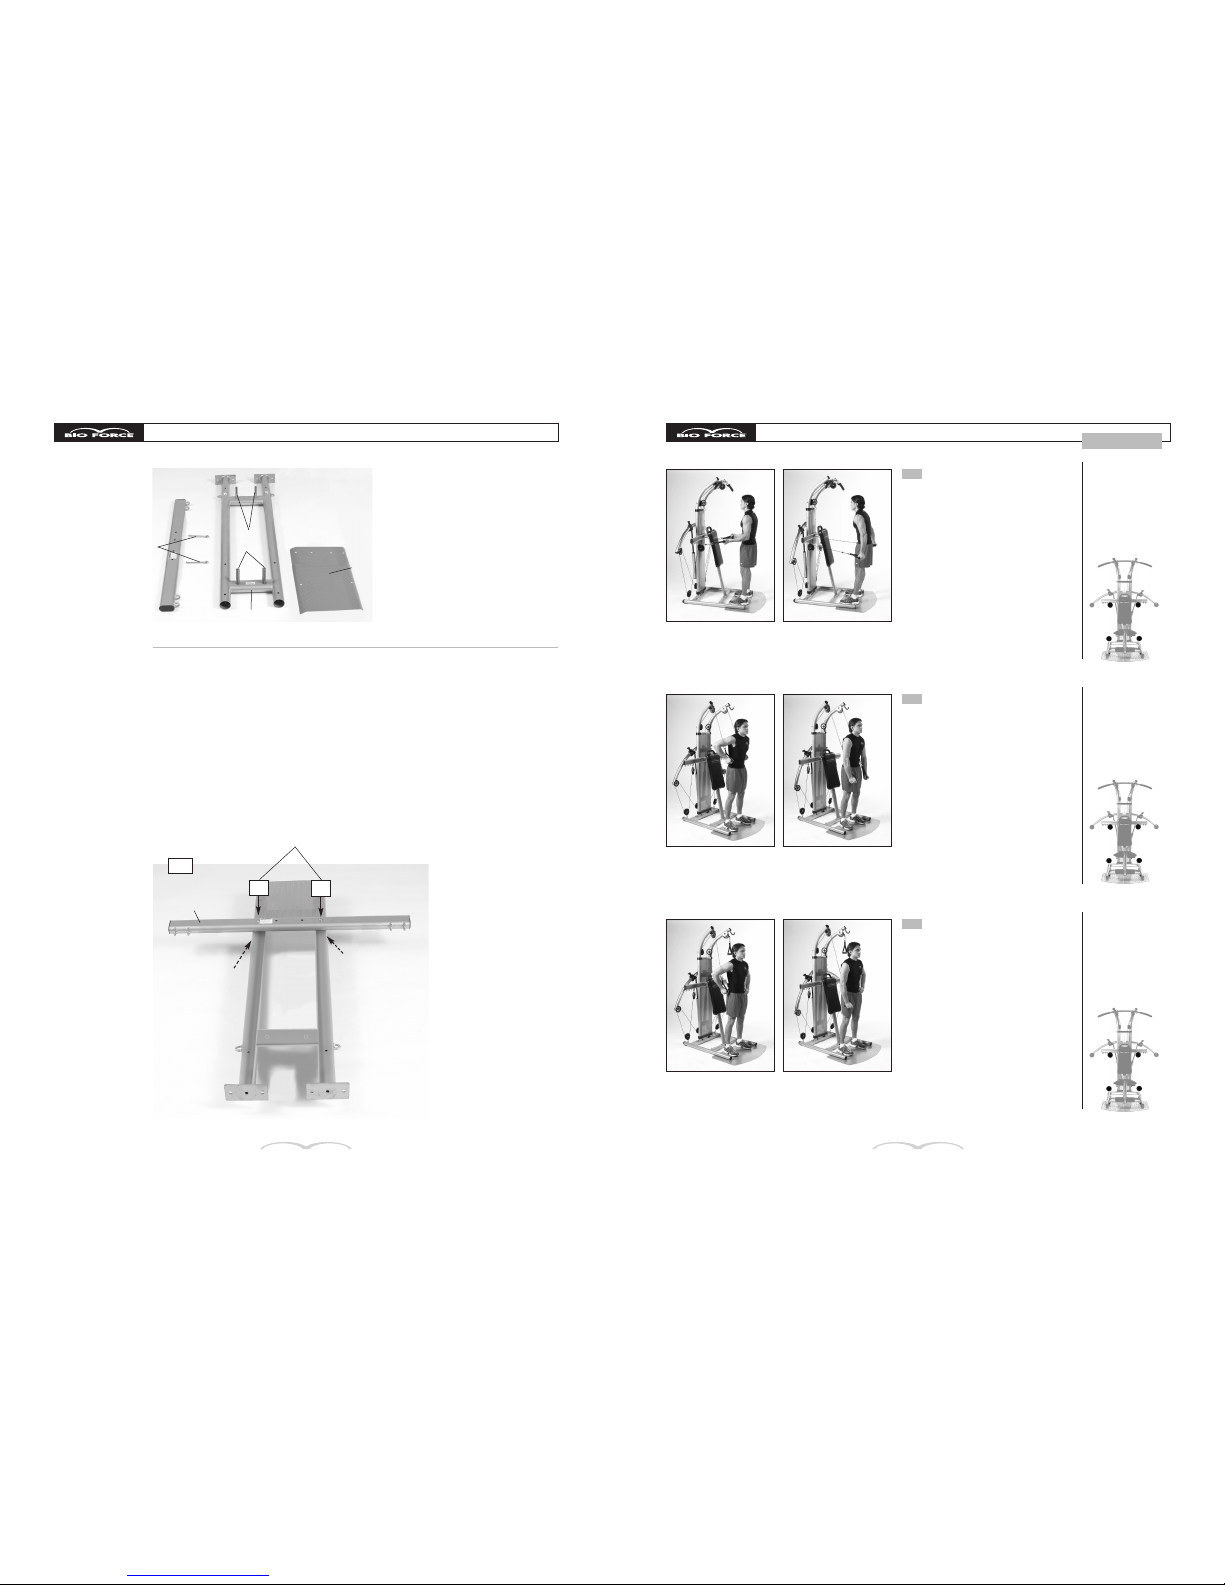
STEP 2 – Upright Frame Assembly
a. Flip the Upright Frame over so it is resting on the Support Rods,
and the warning labels facing down.
b. Lay the Perforated Cover and Crossbar in place on top of the
Frame and align the holes. You should be able to see the
warning label on the crossbar.
c. Insert 2 Allen Bolts down through the outside holes in the Crossbar,
Perforated Cover and the Upright Frame. Add Acorn Nuts on the
Bolts and hand tighten.
Note: Hand tighten bolts allowing for easier alignment of the frames
sections and Pulley Assembly. They will be secured later.
(M10 x 112mm)
Allen Bolts
M10
Acorn Nut
in back
Crossbar
Perforated
Cover
Parts used in
STEP 2
M10
Acorn Nut
in back
2 Allen Bolts
(M10 x 112mm)
Crossbar
Perforated
Cover
Upright Frame Assembly
Upright Frame
2c
2c
Support
Rods
All nuts and bolts
are installed frontto-rear – leaving
the nut on the rear.
2b-c
Page 13
MOVABLE PULLEY
POSITIONS
MOVABLE PULLEY
POSITIONS
MOVABLE PULLEY
POSITIONS
BIO FORCE®EXERCISES
78
ARMS
SINGLE ARM TRICEPS
KICKBACK
START: Stand facing frame. Grip one
handle in overhand grip with palm
facing down. Bend elbow 90 degrees.
Lean forward slightly and place other
hand on seat back.
MOTION: Extend elbow and pull handle
down and back. Pause at end of motion.
Bend elbow back to starting position.
TIPS: Keep arm close to side of body. Do
not allow wrist to bend while pressing
back. Maintain straight spine while
leaning forward. Contract abdominals
to stabilize torso. Perform on both sides.
99
MUSCLE GROUPS EXERCISED: Triceps
LEVEL OF DIFFICULTY: Beginner
SEAT: Off
LEG LIFT: Off
ACCESSORIES:
Handles
SINGLE ARM REVERSE
GRIP TRICEPS KICKBACK
START: Stand facing frame. Grip one
handle in underhand grip with palm
facing up. Bend elbow 90 degrees.
Lean forward slightly and place other
hand on seat back.
MOTION: Extend elbow and pull handle
down and back. Pause at end of motion.
Bend elbow back to starting position.
TIPS: Keep arm close to side of body.
Do not allow wrist to bend while pressing
back. Maintain straight spine while
leaning forward. Contract abdominals to
stabilize torso. Perform on both sides.
100
MUSCLE GROUPS EXERCISED: Triceps
LEVEL OF DIFFICULTY: Intermediate/Advanced
SEAT: Off
LEG LIFT: Off
ACCESSORIES:
Handles
TWO ARM TRICEPS
KICKBACK
START: Stand facing frame. Grip handles
in overhand grip with palms facing down.
Bend elbows 90 degrees.
MOTION: Extend elbows and pull handles
down and back. Pause at end of motion.
Bend elbows back to starting position.
TIPS: Keep arms close to sides of body.
Do not allow wrists to bend while
pressing back. Maintain upright posture
throughout exercise. Do not lean
forward while pressing back. Contract
abdominals to stabilize torso.
101
MUSCLE GROUPS EXERCISED: Triceps
LEVEL OF DIFFICULTY: Intermediate
SEAT: Off
LEG LIFT: Off
ACCESSORIES:
Handles
11
ASSEMBLY INSTRUCTIONS
STEP 3 – Backrest Support Frame Assembly
a. Turn the Backrest over and remove the bolts from the back.
b. Turn the Backrest Support Frame over so the Tabs are resting flat
against the Backrest. Make sure the top of the Backrest (the end
with the logo on it) is at the top end of the Backrest Support Frame
(the end with the handle) as shown below and to the right.
Secure the Backrest in place by inserting the 4 Allen Bolts you
just removed in Step 3a through the Tabs on the Backrest
Support Frame and into the Backrest. Tighten them
using the Allen Wrench provided.
5mm
Allen
Wrench
Completed Backrest Support Assembly
Parts used in
STEP 3
Backrest with Allen Bolts
(M8 x 20mm)
Backrest Support
Frame
5mm Allen Wrench
Bolts Removed
from Backrest
3a-b
3b
3b
Backrest Support
Frame
Backrest
with Allen
Bolts
BOTTOM
TOP
3b
3b
Small
Crossbar
Bracket
(Tab not visible)
(Tab not visible)
Tabs
Page 14
MOVABLE PULLEY
POSITIONS
MOVABLE PULLEY
POSITIONS
MOVABLE PULLEY
POSITIONS
BIO FORCE®EXERCISES
77
ARMS
SPLIT GRIP TRICEPS
PUSHDOWN
START: Stand facing frame. Feet hip width
apart on base. Grip handles at waist
level. Bend elbows 90 degrees.
MOTION: Extend elbows and press
handles down. Pause at end of motion.
Bend elbows back to starting position.
TIPS: Keep arms close to sides of body.
Press handles down and slightly back.
Maintain upright posture throughout
exercise. Avoid rounding spine forward
while pressing down. Contract abdominals
to stabilize torso.
96
MUSCLE GROUPS EXERCISED: Triceps
LEVEL OF DIFFICULTY: Beginner
SEAT: Off
LEG LIFT: Off
ACCESSORIES:
Handles/Lat Tower
Position
SINGLE ARM TRICEPS
PUSHDOWN
START: Stand facing frame. Feet hip
width apart on base. Grip one handle
in overhand grip with palm facing down.
Bend elbow 90 degrees.
MOTION: Extend elbow and press handle
down toward thigh. Pause at bottom of
motion. Bend elbow back to starting
position.
TIPS: Hold elbow at side of ribcage. Do
not move upper arm while extending
elbow. Maintain upright posture throughout exercise. Avoid rounding spine forward while pressing down. Contract
abdominals to stabilize torso. Perform
on both sides.
97
MUSCLE GROUPS EXERCISED: Triceps
LEVEL OF DIFFICULTY: Intermediate/Advanced
SEAT: Off
LEG LIFT: Off
ACCESSORIES:
Handles/Lat Tower
Position
SINGLE ARM REVERSE
GRIP TRICEPS
PUSHDOWN
START: Stand facing frame. Feet hip
width apart on base. Grip one handle
in underhand grip with palm facing up.
Bend elbow 90 degrees.
MOTION: Extend elbow and press handle
down toward thigh. Pause at bottom of
motion. Bend elbow back to starting
position.
TIPS: Hold elbow at side of ribcage. Do
not move upper arm while extending
elbow. Maintain upright posture throughout exercise. Avoid rounding spine forward while pressing down. Contract
abdominals to stabilize torso. Perform
on both sides.
98
MUSCLE GROUPS EXERCISED: Triceps
LEVEL OF DIFFICULTY: Intermediate/Advanced
SEAT: Off
LEG LIFT: Off
ACCESSORIES:
Handles/Lat Tower
Position
12
ASSEMBLY INSTRUCTIONS
STEP 4 – Assembling the
Main Frame Components
a. Carefully lift the Upright Frame
Assembly onto the rear cross
member of the Base Frame
Assembly making sure the
Crossbar and Perforated
Cover are facing the front.
Secure it in place with 4 Allen
Bolts with Spring Washers.
Hand tighten.
Parts used in
STEP 4
4a
4a
Upright Frame
Assembly
(Crossbar
facing front)
Upright Frame
Assembly
Backrest
Support Frame
Assembly
Base Frame
Assembly
Left and Right Top Frame
Base Frame
Assembly
Allen Bolts with
Spring Washers
(M10 x 30mm)
6 Allen Bolts with
M10 Spring Washers
(M10 x 30mm)
2 Allen Bolts with M10 Acorn Nuts
(M10 x 57mm)
2 Allen Bolts with M10 Acorn Nuts
(M10 x 72mm)
Rear Cross
Member
CAUTION
Upright Frame Assembly is heavy. Use
2 people for Main Frame Assembly.
Page 15

MOVABLE PULLEY
POSITIONS
MOVABLE PULLEY
POSITIONS
MOVABLE PULLEY
POSITIONS
BIO FORCE®EXERCISES
76
ARMS
SINGLE ARM
OVERHEAD TRICEPS
EXTENSION
START: Sit facing away. Grip one handle
behind head. Point elbow front at
shoulder height.
MOTION: Extend elbow and press handle
overhead. Pause at top of motion. Bend
elbow back to starting position.
TIPS: Keep elbow in start position
throughout exercise. Do not open
elbow to side. Maintain upright posture
in seated position. Avoid tilting or
rotating to one side while extending
arm. Contract abdominals to stabilize
torso. Perform on both sides.
93
MUSCLE GROUPS EXERCISED: Triceps
LEVEL OF DIFFICULTY: Intermediate/Advanced
SEAT: On/Top
Position
LEG LIFT: On
ACCESSORIES:
Handles
STANDING TRICEPS
PUSHDOWN
START: Stand facing frame. Feet hip width
apart on base. Grip lat bar in overhand,
shoulder width grip with palms facing
down. Bend elbows 90 degrees.
MOTION: Extend elbows and press bar
down toward thighs. Pause at bottom
of motion. Bend elbows back to starting
position.
TIPS: Hold elbows at sides of ribcage. Do
not move upper arms while extending
elbows. Maintain upright posture
throughout exercise. Avoid rounding
spine forward while pressing down.
Contract abdominals to stabilize torso.
94
MUSCLE GROUPS EXERCISED: Triceps
LEVEL OF DIFFICULTY: Beginner
SEAT: Off
LEG LIFT: Off
ACCESSORIES: Lat
Bar/Lat Tower
Position
REVERSE GRIP TRICEPS
PUSHDOWN
START: Stand facing frame. Feet hip width
apart on base. Grip lat bar in underhand,
shoulder width grip with palms facing up.
Bend elbows 90 degrees.
MOTION: Extend elbows and press bar
down toward thighs. Pause at bottom of
motion. Bend elbows back to starting
position.
TIPS: Hold elbows at sides of ribcage. Do
not move upper arms while extending
elbows. Maintain upright posture
throughout exercise. Avoid rounding
spine forward while pressing down.
Contract abdominals to stabilize torso.
95
MUSCLE GROUPS EXERCISED: Triceps
LEVEL OF DIFFICULTY: Intermediate
SEAT: Off
LEG LIFT: Off
ACCESSORIES: Lat
Bar/Lat Tower
Position
13
ASSEMBLY INSTRUCTIONS
b. Set the Backrest Support Frame Assembly in
place by aligning the holes in the bottom with
the holes in the Center Cross Member of the
Base Frame Assembly. Secure it in place with
2 Allen Bolts with Spring Washers. Hand
tighten.
c. Align the holes in the top of the Backrest
Support Frame and the center holes in
the Crossbar.
Insert 2 Allen Bolts and add Acorn Nuts.
Hand tighten.
d. With the Allen Wrench,
tighten the 6 Base Frame
Bolts at this time.
4b
4c
4b
Backrest
Support Frame
Assembly
Left and Right
Top Frames
Chrome Pulley Brackets
facing inward
4e
Base Frame
Assembly
Crossbar
Allen Bolts
(M10 x 57mm)
Allen Bolt with
Spring Washers
(M10 x 30mm)
Allen Bolt
(M10 x 72mm)
All nuts and bolts installed
front-to-rear – leaving the nut
on the rear.
Acorn
Nut
Base Frame
Assembly
4d
e. Insert the Left and Right Top Frame
into the top of the Upright Frame
with the Chrome Pulley Brackets
facing inward.
Secure them with 2 Allen Bolts
and Acorn Nuts. Hand T ighten.
Acorn
Nuts in
back
Page 16

MOVABLE PULLEY
POSITIONS
MOVABLE PULLEY
POSITIONS
MOVABLE PULLEY
POSITIONS
BIO FORCE®EXERCISES
75
ARMS
SEATED WRIST CURL
START: Sit facing away. Lean forward
and rest forearms on lower thighs. Grip
handles in underhand grip with palms
facing up and wrists extended.
MOTION: Flex wrists and curl handles
toward forearms. Pause at top of
motion. Extend wrists to starting
position.
TIPS: Lean forward with straight back.
Do not round upper or lower spine.
Avoid bending elbows or lifting
forearms while flexing wrists. Contract
abdominals to stabilize torso.
90
MUSCLE GROUPS EXERCISED: Forearm flexors
LEVEL OF DIFFICULTY: Beginner
SEAT: On/Bottom
Position
LEG LIFT: Off
ACCESSORIES:
Handles
SEATED REVERSE
WRIST CURL
START: Sit facing away. Lean forward
and rest forearms on lower thighs. Grip
handles in overhand grip with palms
facing down and wrists flexed.
MOTION: Extend wrists and curl handles
toward forearms. Pause at top of motion.
Flex wrists to starting position.
TIPS: Lean forward with straight back. Do
not round upper or lower spine. Avoid
bending elbows or lifting forearms while
extending wrists. Contract abdominals
to stabilize torso.
91
MUSCLE GROUPS EXERCISED: Forearm extensors
LEVEL OF DIFFICULTY: Beginner
SEAT: On/Bottom
Position
LEG LIFT: Off
ACCESSORIES:
Handles
SEATED OVERHEAD
TRICEPS EXTENSION
START: Sit facing away. Grip handles
behind head. Point elbows front at
shoulder height.
MOTION: Extend elbows and press
handles overhead. Pause at top of
motion. Bend elbows back to starting
position.
TIPS: Keep elbows in start position
throughout exercise. Do not open
elbows to sides. Keep wrists straight.
Maintain upright posture in seated
position. Contract abdominals to
stabilize torso.
92
MUSCLE GROUPS EXERCISED: Triceps
LEVEL OF DIFFICULTY: Intermediate
SEAT: On/Top
Position
LEG LIFT: On
ACCESSORIES:
Handles
14
ASSEMBLY INSTRUCTIONS
STEP 5 – Cover Cap Installation
a. Remove the 2 (M6 x 30mm) Phillips Bolts from the Top Cover Cap
for the Perforated Cover with the Phillips Screwdriver provided,
and separate the front & rear sections.
Note: The Cover Cap with the Bio Force®Logo goes on the
top front.
b. Place the Top Cover Cap on by sliding the groove in it over the edge
of the Perforated Cover. You may need to tap it into place.
Set the rear of the Top Cover Cap in place. Secure the two together
using the 2 (M6 x 30mm) Phillips Bolts you just removed in Step 5a
and inserting them back into the 2 center holes.
Secure the Rear Cover Cap to the Frame with 2 (ST4.2 x 19mm)
Phillips Screws, inserting into the 2 outer holes. Tighten the bolts
using the Phillips Screwdriver provided.
5b
Perforated
Cover
Cover Caps w/Phillips Bolts (M6 x 30mm)
and Phillips Screws (ST4.2 x 19mm)
Parts used in
STEP 5
Phillips Bolts (M6 x 30mm)
FRONT
---------------
REAR
Phillips Screws for Outer Holes
(ST4.2 x 19mm)
RT
Page 17

MOVABLE PULLEY
POSITIONS
MOVABLE PULLEY
POSITIONS
MOVABLE PULLEY
POSITIONS
BIO FORCE®EXERCISES
74
ARMS
CURVED BAR
BICEPS CURL
START: Stand facing frame. Feet hip width
apart on base. Grip lat bar in underhand
grip with thumbs facing outward.
MOTION: Bend elbows and curl bar toward
front of shoulders. Pause at top of
motion. Lower arms to starting position.
TIPS: Hold elbows at sides of ribcage.
Do not swing elbows forward while
curling. Maintain upright posture
throughout exercise. Avoid tilting torso
back while curling arms. Contract
abdominals to stabilize torso.
87
MUSCLE GROUPS EXERCISED: Biceps, forearm flexors
LEVEL OF DIFFICULTY: Beginner
SEAT: Off
LEG LIFT: Off
ACCESSORIES: Lat
Bar/Front Position
CURVED BAR REVERSE
BICEPS CURL
START: Stand facing frame. Feet hip width
apart on base. Grip lat bar in overhand
grip with thumbs facing inward.
MOTION: Bend elbows and curl bar toward
front of shoulders. Pause at top of
motion. Lower arms to starting position.
TIPS: Hold elbows at sides of ribcage.
Do not swing elbows forward while
curling. Maintain upright posture
throughout exercise. Avoid tilting torso
back while curling arms. Contract
abdominals to stabilize torso.
88
MUSCLE GROUPS EXERCISED: Biceps, forearm extensors
LEVEL OF DIFFICULTY: Intermediate
SEAT: Off
LEG LIFT: Off
ACCESSORIES: Lat
Bar/Front Position
SEATED
CONCENTRATION
CURL
START: Sit facing away. Lean forward
and rest one arm on inside of knee.
Grip one handle in underhand grip
with palm facing up.
MOTION: Bend elbow and curl handle
toward front of shoulder. Pause at top of
motion. Lower arm to starting position.
TIPS: Lean forward with straight back.
Do not round upper or lower spine.
Hold upper arm in stable position on leg.
Contract abdominals to stabilize torso.
Perform on both sides.
89
MUSCLE GROUPS EXERCISED: Biceps, forearm flexors
LEVEL OF DIFFICULTY: Beginner
SEAT: On/Bottom
Position
LEG LIFT: Off
ACCESSORIES:
Handles
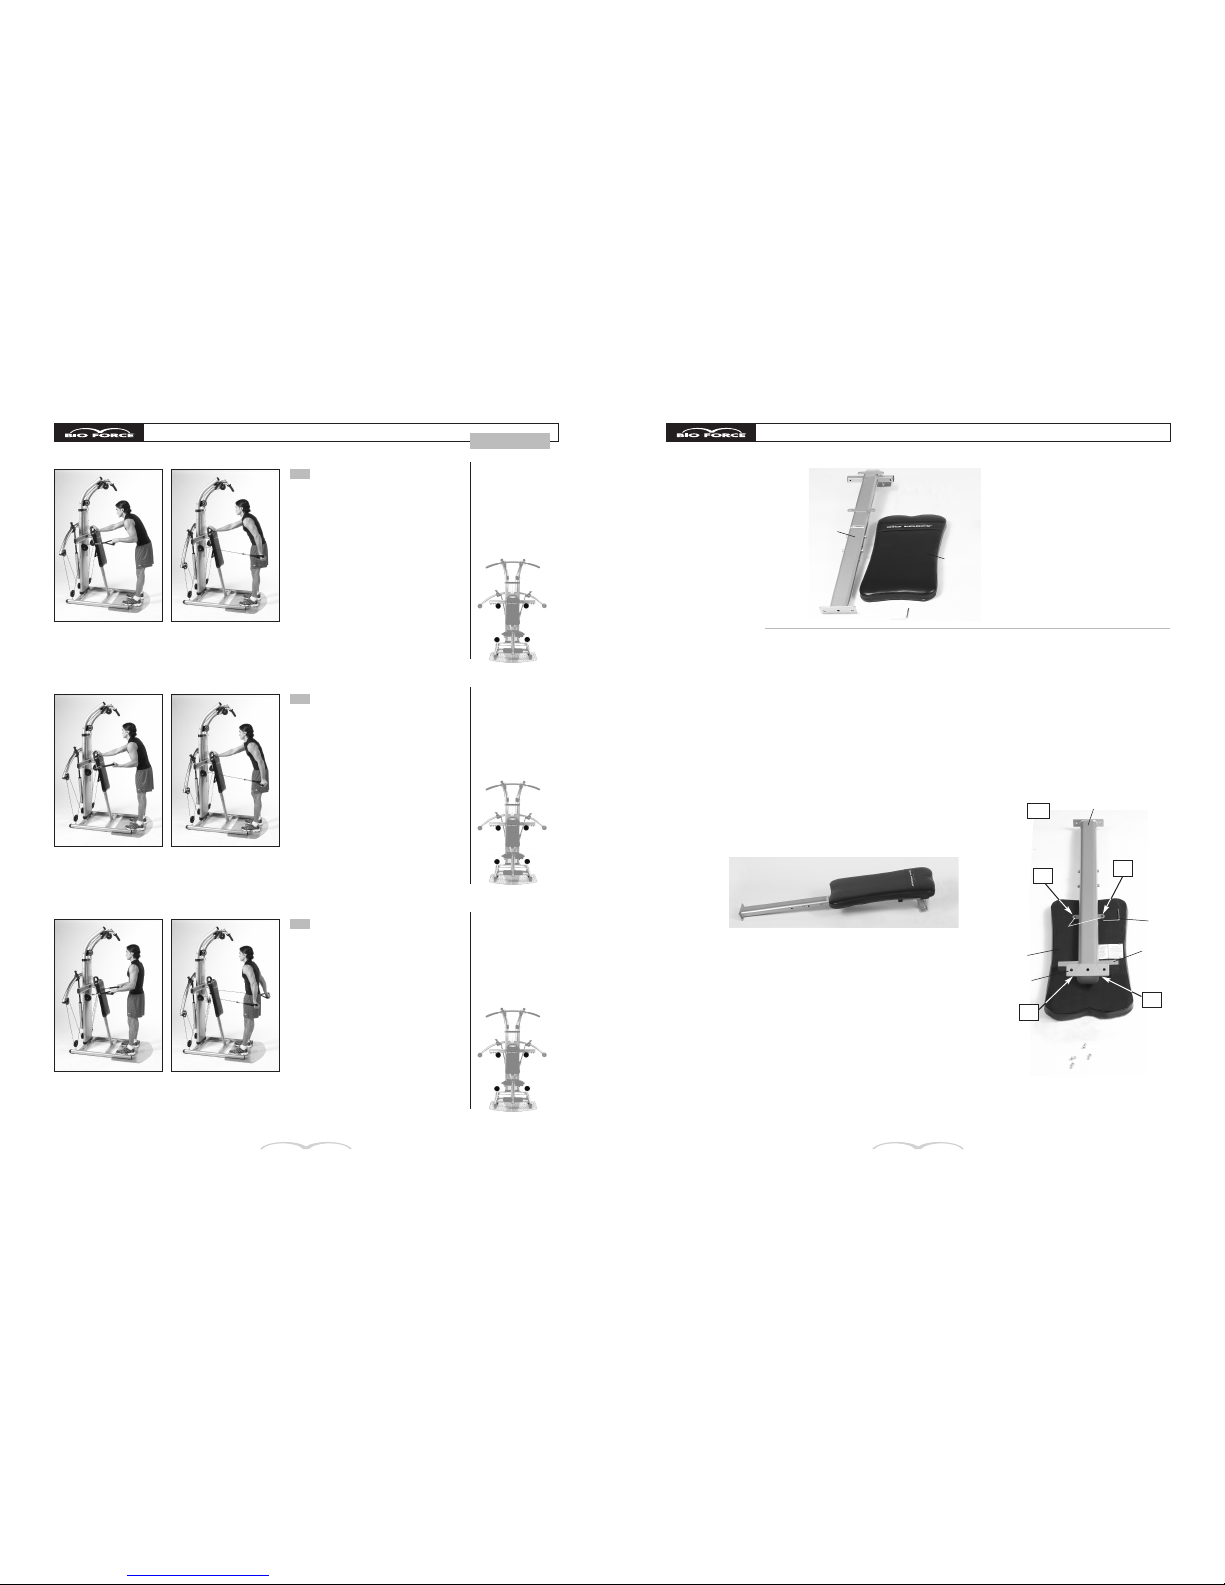
STEP 6 – Seat Assembly
a. Remove the bolts from the bottom of
the seat.
Lay the Seat Support Frame on the
bottom of the Seat making sure the
Long Hitch Pin and Bracket are
facing the same direction as the
narrow end of the Seat.
Insert the 4 Allen Bolts you just
removed from the bottom of the Seat.
Tighten using the Allen Wrench (5mm)
provided.
15
ASSEMBLY INSTRUCTIONS
Parts used in
STEP 6 & 7
b. Remove the Long Hitch Pin from the Seat Support
Frame Assembly.
Hang the Seat Assembly on the top studs of the
Backrest Support Frame.
IMPORTANT: Make sure the Bracket on the
Seat Assembly is securely over the stud.
Insert the Long Hitch Pin through the holes under
the studs to secure the Seat Assembly in place.
c. Remove the Short Hitch Pin from the Seat Support
Frame Assembly.
Slide the Removable Leg Tube into the open end of
the Seat Assembly with the Bracket as shown.
Re-insert the Short Hitch Pin through the holes in
the Seat Assembly and Removable Leg Tube.
Seat Support
Frame
6b
Seat Support
Frame
Long Hitch Pin
Long
Hitch Pin
Short
Hitch Pin
Removable
Leg Tube
Bracket
Removable Leg
Tube
Leg Lift Tube
6c
Upper and Lower Leg Bar
Assemblies
(6mm)
Allen Wrench
(5mm)
Allen Wrench
Barrel Nut (6mm) and
Allen Bolt (5mm)
Seat
Studs
Seat Assembly
Bracket
Short Hitch Pin
M8 x 20mm
Allen Bolts (4)
6a
Page 18

MOVABLE PULLEY
POSITIONS
MOVABLE PULLEY
POSITIONS
MOVABLE PULLEY
POSITIONS
BIO FORCE®EXERCISES
73
ARMS
SINGLE ARM
STANDING HAMMER
CURL
START: Stand facing away. Feet hip
width apart on base. Grip one handle in
neutral grip with thumb facing forward.
MOTION: Bend elbow and curl handle
toward front of shoulder. Pause at top of
motion. Lower arm to starting position.
TIPS: Hold elbow at side of ribcage. Do
not swing elbow forward while curling.
Maintain upright posture throughout
exercise. Avoid tilting torso to one side
while curling arm. Contract abdominals
to stabilize torso. Perform on both sides.
84
MUSCLE GROUPS EXERCISED: Biceps, forearm extensors
LEVEL OF DIFFICULTY: Intermediate/Advanced
SEAT: Off
LEG LIFT: Off
ACCESSORIES:
Handles
STANDING REVERSE
CURL
START: Stand facing away. Feet hip width
apart on base. Grip handles in overhand
grip with thumbs facing inward.
MOTION: Bend elbows and curl handles
toward front of shoulders. Pause at top
of motion. Lower arms to starting
position.
TIPS: Hold elbows at sides of ribcage.
Do not swing elbows forward while
curling. Maintain upright posture
throughout exercise. Avoid tilting torso
back while curling arms. Contract
abdominals to stabilize torso.
85
MUSCLE GROUPS EXERCISED: Biceps, forearm extensors
LEVEL OF DIFFICULTY: Intermediate
SEAT: Off
LEG LIFT: Off
ACCESSORIES:
Handles
SINGLE ARM
STANDING REVERSE
CURL
START: Stand facing away. Feet hip
width apart on base. Grip one handle in
overhand grip with thumb facing inward.
MOTION: Bend elbow and curl handle
toward front of shoulder. Pause at top of
motion. Lower arm to starting position.
TIPS: Hold elbow at side of ribcage. Do
not swing elbow forward while curling.
Maintain upright posture throughout
exercise. Avoid tilting torso to one side
while curling arm. Contract abdominals
to stabilize torso. Perform on both sides.
86
MUSCLE GROUPS EXERCISED: Biceps, forearm extensors
LEVEL OF DIFFICULTY: Intermediate/Advanced
SEAT: Off
LEG LIFT: Off
ACCESSORIES:
Handles
STEP 7 – Foot Tube Assembly
a. Place the top of the Leg Lift Tube into the Bracket on
the Removable Leg Tube.
Note: The holes, in the top of the Leg Lift Tube, have
bushings in them, and the warning label is facing the seat.
Insert the Barrel Nut through the
Removable Leg Tube and the Leg
Lift Tube. Add the Allen Bolt and
tighten it using the Allen
Wrenches (5 & 6mm) provided.
16
ASSEMBLY INSTRUCTIONS
b. Remove the Leg Bar Cap and Foam Pad from
one end of the Upper Leg Bar and insert it
through the holes in the middle of the bracket
on the Removable Leg Tube.
Replace the Foam Pad and Leg Bar Cap.
IMPORTANT: Make sure the Leg Bar Cap
is all the way on the Leg Bar.
Note: The Upper Leg Bar is longer than the
lower one.
c. Remove the Leg Bar Cap and Foam Pad from
one end of the Lower Leg Bar. Insert it through a
set of holes in the bottom of the Leg Lift Tube.
Replace the Foam Pad and Leg Bar Cap. (Twist
to remove easily.)
d.
Note: See Page 29 for appropriate Leg
Bar Adjustment.
Leg Lift
Tube
7a
Leg Lift
Tube
Upper Leg Bar
Lower Leg Bar
7c
Leg Bar Cap
7b
Removable
Leg Tube
Removable
Leg Tube
Barrel Nut with Allen Bolt
Foam
Pad
Page 19

MOVABLE PULLEY
POSITIONS
MOVABLE PULLEY
POSITIONS
MOVABLE PULLEY
POSITIONS
BIO FORCE®EXERCISES
72
ARMS
STANDING BICEPS
CURL
START: Stand facing away. Feet hip
width apart on base. Grip handles in
underhand grip with thumbs facing
outward.
MOTION: Bend elbows and curl handles
toward front of shoulders. Pause at top
of motion. Lower arms to starting
position.
TIPS: Hold elbows at sides of ribcage.
Do not swing elbows forward while
curling. Maintain upright posture
throughout exercise. Avoid tilting torso
back while curling arms. Contract
abdominals to stabilize torso.
81
MUSCLE GROUPS EXERCISED: Biceps, forearm flexors
LEVEL OF DIFFICULTY: Beginner
SEAT: Off
LEG LIFT: Off
ACCESSORIES:
Handles
SINGLE ARM
STANDING BICEPS
CURL
START: Stand facing away. Feet hip
width apart on base. Grip one handle
in underhand grip with thumb facing
outward.
MOTION: Bend elbow and curl handle
toward front of shoulder. Pause at top of
motion. Lower arm to starting position.
TIPS: Hold elbow at side of ribcage. Do
not swing elbow forward while curling.
Maintain upright posture throughout
exercise. Avoid tilting torso to one side
while curling arm. Contract abdominals
to stabilize torso. Perform on both sides.
82
MUSCLE GROUPS EXERCISED: Biceps, forearm flexors
LEVEL OF DIFFICULTY: Intermediate/Advanced
SEAT: Off
LEG LIFT: Off
ACCESSORIES:
Handles
STANDING HAMMER
CURL
START: Stand facing away. Feet hip width
apart on base. Grip handles in neutral
grip with thumbs facing forward.
MOTION: Bend elbows and curl handles
toward front of shoulders. Pause at
top of motion. Lower arms to starting
position.
TIPS: Hold elbows at sides of ribcage.
Do not swing elbows forward while
curling. Maintain upright posture
throughout exercise. Avoid tilting torso
back while curling arms. Contract
abdominals to stabilize torso.
83
MUSCLE GROUPS EXERCISED: Biceps, forearm extensors
LEVEL OF DIFFICULTY: Beginner
SEAT: Off
LEG LIFT: Off
ACCESSORIES:
Handles
17
ASSEMBLY INSTRUCTIONS
STEP 8 – Installing the Swing Arms and Cylinders
Standing behind the Bio Force®Sport exerciser
a. Take off the Stopper, With the calibration numbers to the front,
slide the Right Swing Arm onto the Support Rod on the top
cross member of the Upright Frame.
Use a Large Flat Washer and the Hex Bolt to secure the
Right Swing Arm and tighten it using the 13mm Wrench.
b. Lift the Knob on the Right Adjuster while sliding it onto the
Swing Arm. Slide it to the number 20. The numbers are
marked on the front of the Swing Arm.
The left or right will be indicated just below the Knob on the
Adjuster’s rear side and the calibration number must show
through the window in the front of the Adjuster.
Parts used in
STEP 8
8a
c. With the warning label facing out, place the bottom of
the Resistance Cylinder on the Support Rod of the
lower cross member of the Upright Frame with the top
of the Cylinder laying out to the right of the unit. Use
one of the Small Flat Washers and Hex Bolts to secure
the bottom of the Resistance Cylinder. Tighten the Bolt
with Wrench provided.
Right Adjuster
Right Adjuster
Left Adjuster
Resistance
Cylinders
Upright Frame
Assembly
Right Swing
Arm
8C
Resistance
Cylinder
Base Frame
Assembly
2 Hex Bolts (M8 x 20mm)
with 2 Large Washers
2 Hex Bolts (M8 x 20mm)
with 2 Small Washers
Wrenches
Top Cross
Member
Knob
Lower Cross
Member
Left Swing
Arm
Hex Bolts
(M8 x 49mm)
Hex Bolts
(M8 x 49mm)
Page 20

MOVABLE PULLEY
POSITIONS
MOVABLE PULLEY
POSITIONS
MOVABLE PULLEY
POSITIONS
BIO FORCE®EXERCISES
71
SHOULDERS
STRAIGHT ARM
PULL-BACK
START: Stand facing frame. Feet hip width
apart on base. Grip handles in front of
body with thumbs facing up.
MOTION: Pull arms straight back behind
body. Pause at end of motion. Return
to starting position.
TIPS: Keep elbows straight. Maintain
upright posture throughout exercise.
Do not lean or tilt forward. Keep wrists
straight while pulling back. Contract
abdominals to stabilize torso. Perform
on both sides.
78
MUSCLE GROUPS EXERCISED: Posterior deltoids, latissimus
LEVEL OF DIFFICULTY: Beginner
ROTATOR CUFF DIAGONAL EXTERNAL
ROTATION
START: Stand facing side. Grip handle
across body with outside arm. Grip
back of seat with inside hand.
MOTION: Externally rotate shoulder,
pulling arm diagonally across body.
Pause at end of motion. Retur n to
starting position.
TIPS: Keep elbow almost straight while
opening arm. Do not bend wrist. Keep
shoulders square. Do not rotate torso
to one side. Contract abdominals to
stabilize torso. Perform on both sides.
79
MUSCLE GROUPS EXERCISED: Exter nal shoulder rotators
LEVEL OF DIFFICULTY: Intermediate
ROTATOR CUFF DIAGONAL INTERNAL
ROTATION
START: Stand facing side. Grip handle
in front of body with inside arm. Place
outside hand on hip.
MOTION: Internally rotate shoulder,
pulling arm diagonally across body.
Pause at end of motion. Retur n to
starting position.
TIPS: Keep elbow almost straight while
pulling arm across body. Do not bend
wrist. Keep shoulders square. Do not
rotate torso to one side. Contract
abdominals to stabilize torso. Perform
on both sides.
80
MUSCLE GROUPS EXERCISED: Inter nal shoulder rotators
LEVEL OF DIFFICULTY: Intermediate
SEAT: Off
LEG LIFT: Off
ACCESSORIES:
Handles
SEAT: Off
LEG LIFT: Off
ACCESSORIES:
Handles
SEAT: Off
LEG LIFT: Off
ACCESSORIES:
Handles
18
ASSEMBLY INSTRUCTIONS
d. Lift the Right Swing Arm and the
Resistance Cylinder to align the top
of the Cylinder to the bottom of the
Right Adjuster. Align the two pieces
and connect with a Hex Bolt and
Acorn Nut making sure the Nut
is to the rear. Then fix the Stopper
in place.
Tighten it with the Wrenches provided.
e. Repeat Step 8a - d for the Left side.
Right
Swing Arm
Stopper
8d
8d
All nuts and bolts are
installed front-to-rear –
leaving the nut on the rear.
M8 x 49mm Hex Bolt
and M8 Acorn Nut
Parts used in
STEP 9
12 Cable Guides
10 Small Bushings
2 Large Bushings
6 Allen Bolts
(M10 x 107mm)
6 Acorn Nuts (M10)
6 Pulleys
STEP 9 – Attaching Pulleys
Page 21

MOVABLE PULLEY
POSITIONS
MOVABLE PULLEY
POSITIONS
MOVABLE PULLEY
POSITIONS
BIO FORCE®EXERCISES
70
SHOULDERS
ROTATOR CUFF - LOW
EXTERNAL ROTATION
START: Stand facing side. Bend outside
elbow 90 degrees and grip handle in
front of waist. Grip back of seat with
inside hand.
MOTION: Externally rotate arm to outside.
Pause at end of motion. Retur n to
starting position.
TIPS: Keep elbow against body while
rotating shoulder. Avoid lifting upper arm
away from torso. Keep shoulders square.
Do not rotate torso to one side. Contract
abdominals to stabilize torso. Perform on
both sides.
75
MUSCLE GROUPS EXERCISED: Exter nal shoulder rotators
LEVEL OF DIFFICULTY: Beginner
ROTATOR CUFF INTERNAL ROTATION
START: Stand facing side. Bend inside
elbow 90 degrees and grip handle
in front of waist. Place outside hand
on hip.
MOTION: Internally rotate arm across
body. Pause at end of motion. Return
to starting position.
TIPS: Keep elbow against body while
rotating shoulder. Avoid pulling upper
arm across torso. Keep shoulders
square. Do not rotate torso to one
side. Contract abdominals to stabilize
torso. Perform on both sides.
76
MUSCLE GROUPS EXERCISED: Inter nal shoulder rotators
LEVEL OF DIFFICULTY: Beginner
ROTATOR CUFF - HIGH
EXTERNAL ROTATION
START: Stand facing frame. Feet hip
width apart on base. Bend one elbow
90 degrees at shoulder. Grip handle
with palm facing down.
MOTION: Externally rotate shoulder, pulling
hand above elbow. Pause at top of
motion. Return to starting position.
TIPS: Hold elbow at shoulder height while
rotating. Keep wrist straight. Do not pull
arm back or rotate torso. Contract
abdominals to stabilize torso. Perform
on both sides.
77
MUSCLE GROUPS EXERCISED: Exter nal shoulder rotators
LEVEL OF DIFFICULTY: Intermediate
SEAT: Off
LEG LIFT: Off
ACCESSORIES:
Handles
SEAT: Off
LEG LIFT: Off
ACCESSORIES:
Handles
SEAT: Off
LEG LIFT: Off
ACCESSORIES:
Handles
19
ASSEMBLY INSTRUCTIONS
Chrome
Pulley
Pulley (2)
Shoulder Bolt
(M8 x 110mm)
Acorn Nuts (M8)
Parts used in STEP 10
a. Take the 2 Pulleys without the Bio Force®Logos, 4 Small Bushings, 4 Cable Guides and bolt them to the
bottom rear of the Frame using 2 Allen Bolts and 2 Acorn Nuts.
NOTE: Position flat side of Cable Guide away from Pulley. See photo 9a.
b. Use 4 Small Bushings, 4 Cable Guides and 2 Pulleys with Bio Force®Logos and mount them to the Top
Frame with the logos facing each other. Use the 2 Allen Bolts and 2 Acorn Nuts specified.
NOTE: Position flat side of Cable Guide away from Pulley. See photo 9b.
c. Use 2 Small Bushings, 2 Large Bushings, 4 Cable Guides and 2 Pulleys with Bio Force®Logos and mount them
near the ends of the Swing Arms - with the Logo facing out to the front and the Large Bushings between the Cable
Guide and the Swing Arms. Use the 2 Allen Bolts and 2 Acorn Nuts specified, making sure the Nut is to the rear.
NOTE: Position flat side of Cable Guide away from Pulley. See photo 9c.
Pulley
without
Logo
Bottom of the
Upright Frame
Cable
Guide
(flat side
)
Cable Guide
(flat side)
9a
9b
9c
9c
9a
Allen Bolt
(M10 x 107mm)
Acorn Nut
(M10)
Small
Bushing
Small
Bushing
NOTE: For Steps 9a-c – All Nuts and Bolts are installed
front-to-rear – leaving the Nut on the rear.
Large
Bushing
Small
Bushing
Acorn Nut
(M10)
Swing
Arm
Allen Bolt
(M10 x 107mm)
9b
Cable Guide
(flat side)
Cable
Guide
(flat side)
Cable
Guide
(flat side)
Cable
Guide
(flat side)
Small
Bushing
Small
Bushing
Pulley
Acorn Nut
(M10)
Top Frame
Allen Bolt
(M10 x 107mm)
Pulley
(continued on next page)
STEP 10 – Cable Assemblies
a. Stretch out and untangle the
Cable. Slide the Chrome Pulley
to one end of the Cable. Slide
the other 2 Pulleys to the other
end of the Cable. This will help
keep the Cable untangled
during stringing.
Page 22

MOVABLE PULLEY
POSITIONS
MOVABLE PULLEY
POSITIONS
MOVABLE PULLEY
POSITIONS
BIO FORCE®EXERCISES
69
SHOULDERS
SINGLE ARM SEATED
FRONT RAISE
START: Sit facing away. Grip one handle
with arm at side, thumb facing in.
MOTION: Raise arm in front of body.
Pause at top of motion. Lower arm
to starting position.
TIPS: Raise arm to shoulder level or
slightly higher. Keep elbow almost
straight. Do not let wrist bend while
lifting. Maintain upright posture in
seated position. Contract abdominals
to stabilize torso. Perform on both sides.
72
MUSCLE GROUPS EXERCISED: Anterior deltoids
LEVEL OF DIFFICULTY: Intermediate/Advanced
SEATED LATERAL RAISE
START: Sit facing away. Grip handles with
arms at sides, thumbs facing forward.
MOTION: Raise arms laterally. Pause at
top of motion. Lower arms to starting
position.
TIPS: Raise arms to shoulder level or
slightly higher. Keep elbows almost
straight. Do not let wrists bend while
lifting. Maintain upright posture in
seated position. Contract abdominals
to stabilize torso.
73
MUSCLE GROUPS EXERCISED: Medial deltoids
LEVEL OF DIFFICULTY: Beginner
SINGLE ARM SEATED
LATERAL RAISE
START: Sit facing away. Grip one handle
with arm at side, thumb facing forward.
MOTION: Raise arm laterally. Pause at
top of motion. Lower arm to starting
position.
TIPS: Raise arm to shoulder level or
slightly higher. Keep elbow almost
straight. Do not let wrist bend while
lifting. Maintain upright posture in
seated position. Contract abdominals
to stabilize torso. Perform on both sides.
74
MUSCLE GROUPS EXERCISED: Medial deltoids
LEVEL OF DIFFICULTY: Intermediate/Advanced
SEAT: On/Top
Position
LEG LIFT: On
ACCESSORIES:
Handles
SEAT: On/Top
Position
LEG LIFT: On
ACCESSORIES:
Handles
SEAT: On/Top
Position
LEG LIFT: On
ACCESSORIES:
Handles
20
ASSEMBLY INSTRUCTIONS
Chrome
Pulley
Stringing The Cable
Crossbar
Hooks
Bottom Pulley
Rear Base Frame
Pulley Hook
Phillips Bolt
Swing
Arm
b. Using a Shoulder Bolt and Acorn Nut, attach the Chrome
Pulley to the Bracket on the right Top Frame as shown.
Keep the Large Clip to the front and the Nut toward the
rear. The Chrome Pulley must be able to swivel.
String the Cable down over the Pulley on the Top Frame,
just above the Perforated Cover.
Note: You may need a step ladder to reach this high.
1. Guide the Cable through the Rear
Cable Guide first, then through the
Front Cable Guide. The Cable must
be to the outside of the Top and
Bottom Support Rods and to the
inside of the bottom rear Pulley.
2. Go around the bottom Pulley by
stringing the Cable through the
Front Cable Guide. Then string
the Cable through the Rear
Cable Guide.
3. String the Cable to the inside of
the Swing Arm Pulley by feeding
the Cable through the Front Cable
Guide first, then through the Rear
Cable Guide.
4. Hook the Pulley on the Cable
Assembly to the Hook at the rear
of the Base Frame Assembly by
loosening the Phillips Bolt until
the Hook on the Pulley can be
attached to the Hook at the
Rear of the Base Frame. Tighten the
Phillips Bolt to keep the Pulley from
coming off of the Hook.
5. Run the Cable up to the Crossbar
and hook the last Pulley to a hook
point on the Crossbar.
c. Repeat Steps a and b for the left side.
d. Go back and make sure the path of the
Cable appears like the photo and the
Cable is not pinched at any point.
e. IMPORTANT: Now, go back and
tighten all Bolts on the upright frame
that have only been hand tightened in
previous assembly steps. The Bolts are
shown with a ( ) in the image above.
10b
1
2
3
4
5
String Cable behind
Swing Arm - to the
outside of the Top and
Bottom Support Rod
string
behind
Cylinder
M8 x 110mm
Shoulder Bolt
M8 Acorn Nut
Large Clip
•
•
•
•
•
•
•
Rear Cable
Guide
Front Cable
Guide
Rear Cable
Guide
Rear Cable
Guide
Front Cable
Guide
Front Cable
Guide
Page 23

MOVABLE PULLEY
POSITIONS
MOVABLE PULLEY
POSITIONS
MOVABLE PULLEY
POSITIONS
BIO FORCE®EXERCISES
68
SHOULDERS
SINGLE ARM
STANDING REAR
DELTOID ROWS
START: Stand facing frame. Feet hip width
apart on base. Grip one handle in front
of body with palm facing down.
MOTION: Bend elbow and pull up and
back. Pause at top of motion. Straighten
elbow and return to starting position.
TIPS: Pull elbow slightly behind shoulder
line. Keep elbow lifted and bent at a
90 degree angle. Do not lift wrist higher
than elbow or shoulder. Contract abdominals to stabilize torso. Perform on both
sides.
69
MUSCLE GROUPS EXERCISED: Posterior deltoids
LEVEL OF DIFFICULTY: Intermediate/Advanced
REAR CABLE
CROSSOVER
START: Stand facing frame. Feet hip width
apart on base. Cross cables and grip
handles at waist level.
MOTION: Open arms to sides. Pause at
end of motion. Close arms and return
to starting position.
TIPS: Open arms until elbows are in
line with shoulders. Keep arms almost
straight throughout motion. Align wrists
with elbows. Maintain upright posture
throughout exercise. Contract
abdominals to stabilize torso.
70
MUSCLE GROUPS EXERCISED: Posterior deltoids
LEVEL OF DIFFICULTY: Beginner
SEATED FRONT RAISE
START: Sit facing away. Grip handles
with arms at sides, thumbs facing in.
MOTION: Raise arms in front of body.
Pause at top of motion. Lower arms
to starting position.
TIPS: Raise arms to shoulder level or
slightly higher. Keep elbows almost
straight. Do not let wrists bend while
lifting. Maintain upright posture in
seated position. Contract abdominals
to stabilize torso.
71
MUSCLE GROUPS EXERCISED: Anterior deltoids
LEVEL OF DIFFICULTY: Beginner
SEAT: Off
LEG LIFT: Off
ACCESSORIES:
Handles
SEAT: Off
LEG LIFT: Off
ACCESSORIES:
Handles
SEAT: On/Top
Position
LEG LIFT: On
ACCESSORIES:
Handles
21
ASSEMBLY INSTRUCTIONS
Lat Bar
Hooks
Handle
Handle
Foot Harness
Accessories
a. Attach the Lat Bar to the Large
Clips on the end of the Cables
at the Chrome Pulleys on the Top
Frame, with the warning label to
the front.
Then store the Lat Bar in the hooks
provided on the Top Frame.
b. Attach the Handles to the Large
Clips on the end of the Cables at
the Pulleys on the Crossbar.
Note: You can store the Foot
Harnesses on the hook point at
the bottom rear of the Leg Lift
Tube when the Bio Force® Sport
exerciser is not in use.
Page 24

MOVABLE PULLEY
POSITIONS
MOVABLE PULLEY
POSITIONS
MOVABLE PULLEY
POSITIONS
BIO FORCE®EXERCISES
67
SHOULDERS
STANDING LATERAL
RAISE
START: Stand facing away. Feet hip width
apart on base. Grip handles with arms
at sides, thumbs facing front.
MOTION: Raise arms laterally. Pause at
top of motion. Lower arms to starting
position.
TIPS: Raise arms to shoulder level or
slightly higher. Keep elbows almost
straight. Maintain upright posture
throughout exercise. Do not lean or
tilt backward. Keep wrists straight
while raising arms. Contract abdominals
to stabilize torso.
66
MUSCLE GROUPS EXERCISED: Medial deltoids
LEVEL OF DIFFICULTY: Beginner
SINGLE ARM
STANDING LATERAL
RAISE
START: Stand facing away. Feet hip
width apart on base. Grip one handle
with arm at side, thumb facing front.
MOTION: Raise arm laterally. Pause at
top of motion. Lower arm to starting
position.
TIPS: Raise arm to shoulder level or
slightly higher. Keep elbow almost
straight. Maintain upright posture
throughout exercise. Do not lean or
tilt backward. Keep wrist straight while
raising arm. Contract abdominals to
stabilize torso. Perform on both sides.
67
MUSCLE GROUPS EXERCISED: Medial deltoids
LEVEL OF DIFFICULTY: Intermediate/Advanced
STANDING REAR
DELTOID ROWS
START: Stand facing frame. Feet hip width
apart on base. Grip handles in front of
body with palms facing down.
MOTION: Bend elbows and pull up and
back. Pause at top of motion. Straighten
elbows and return to starting position.
TIPS: Pull elbows slightly behind shoulder
line. Keep elbows lifted and bent at a 90
degree angle. Do not lift wrists higher
than elbows or shoulders. Contract
abdominals to stabilize torso.
68
MUSCLE GROUPS EXERCISED: Posterior deltoids
LEVEL OF DIFFICULTY: Beginner
SEAT: Off
LEG LIFT: Off
ACCESSORIES:
Handles
SEAT: Off
LEG LIFT: Off
ACCESSORIES:
Handles
SEAT: Off
LEG LIFT: Off
ACCESSORIES:
Handles
22
PARTS LIST
3 BFSPORT-16 Lower Leg Bar Assembly 1
5 BFSPORT-17 Upper Leg Bar Assembly 1
6 BFSPORT-15 Removable Leg Tube 1
8 BFSPORT-29 Seat Support Frame 1
19 BFPRO-16 Padded Pulley Assembly 2
25 0100147 Lat Bar Cap 2
26 0700023 Lat Bar Grip 2
27 0100148 1" Square Tube Cap 2
28 BFSPORT-13 Backrest w/Bolts 1
29 BFSPORT-12 Seat w/Bolts 1
30 0100149 Leg Bar Cap 4
31 0700024 Foam Pad 4
34 0100151 Plastic Bushing 10
35 0100152 Bumper 3
36 0100153 Base Plate Pad 9
38
0600016 Pulley Assembly 2
40L 0100154 Left Plastic Roller Cap 1
40R 0100155 Right Plastic Roller Cap 1
41 0100156 Roller 2
43 0500006 Rear Cover Cap 2
44 0700025 Foot Harness w/Small Clip 2
45 BFSPORT-21 Handle Assembly 2
49L 0700026 Left Adjuster Assembly 1
49R 0700027 Right Adjuster Assembly 1
55 0700028 Hook Grip 2
56 0500005 Front Top Cover Cap w/ Logo 1
59 0100158 M8 x 110mm Shoulder Bolt 2
60 0100014 M10 Acorn Nut 12
63 0600012 Pulley w/Logo Assembly 4
65 0100160 M6 x 30mm Phillips Bolt 6
66 0100161 ST4.2 x 19mm Phillips Screw 10
73 0100005 M8 Acorn Nut 5
76 0100162 M8 x 49mm Hex Bolt 2
77 0600013 Resistance Cylinder 2
79 0100164 M8 x 30mm x 2t Washer 2
80 0100165 M8 x 20mm Hex Bolt 4
82 0100166 M8 x 20mm x 2t Washer 2
83 BFPRO-06 Large Clip 4
84 0100168 Small Clip 2
85 0100169 M10 x 72mm Allen Bolt 2
86 0100170 M10 x 30mm Allen Bolt 6
87 0100171 M10 Spring Washer 6
88 0100045 M8 x 45mm Allen Bolt 2
89 0100004 M8 Nylon Nut 2
92 0100172 M8 x 25mm Allen Bolt 4
93 0100173 M5 x 5mm Phillips Bolt 2
94 0100174 M10 x 112mm Allen Bolt 2
95 BFPRO-10 M8 x 20mm Allen Bolt 4
96 0100176 M10 x 57mm Allen Bolt 2
98 0100180 Short Hitch Pin w/Lanyard 1
99 0100178 M6 x 10mm Allen Bolt 2
100 0100179 M6 Spr ing Washer 2
101 0100177 Long Hitch Pin w/Lanyard 1
102 0100181 M6 Barrel Nut 1
103 0100182 M6 x 20mm Allen Bolt 1
104 0100183 13mm & 17mm Hex Wrench 2
105 0100184 8mm Allen Wrench 1
106 0100185 6mm Allen Wrench 1
107 0100186 5mm Allen Wrench
w/Phillips Screwdriver 1
110 X16472-5 Padded Pulley Assembly w/Bolt 2
111 X16472-10 M5 x 16mm Phillips Bolt 2
114 BFSPORT-18 Cable Assembly 2
115 BFPRO-19 M10 x 107mm Allen Bolt 6
116 BFPRO-35 Cable Guide A 12
117 BFPRO-36 Small Bushing 10
118 BFPRO-37 Large Bushing 2
120 0100188 Seat End Cap 4
121 0100189 Stopper 2
124 BFSPORT-20 Lat Bar Assembly 1
126 BFSPORT-02 Base Plate w/Pads 1
127 0600014 Chrome Pulley Assembly 2
129 BFSPORT-10 Perforated Cover 1
130 BFSPORT-01 Base Frame Assembly 1
131 BFSPORT-14 Leg Lift Tube Assembly 1
132 BFSPORT-09 Backrest Suppor t Frame w/Caps 1
133L BFSPORT-04 Left Top Frame Assembly 1
133R BFSPORT-05 Right Top Frame Assembly 1
134 0100146A End Cap 2
135 0100150A Round Tube Cap 6
136 0100157A Round Tube Cap 4
137 BFSPORT-08 Crossbar w/Caps 1
138L BFSPORT-06 Left Swing Arm Assembly 1
138R BFSPORT-07 Right Swing Arm Assembly 1
139 BFSPORT-03 Upr ight Frame 1
0500004 Cover Cap Assembly 1
0800051 Basic Instructional Workout DVD 1
BFPRO-34 Cable Guide Fastener Pack 1
BFSPORT-22 Fastener Pack 1
BFSPORT-24 Owner’s Manual - English 1
BFSPORT-30 Owner’s Manual - German 1
ITEM # PART # DESCRIPTION QTY
ITEM # PART # DESCRIPTION QTY
Page 25

30
100
99
99
100
86
86
132
95
27
95
94
137
86
87
88
41
89
41
88
40R
35
66
89
65
40L
65
130
135
135
36
35
66
363693
92
36
3692
36
36
36
92
93
36
92
126
134
115
87
87
101
120
8
29
28
107
106 105
104
95
98
95
6
120
30
31
3
131
135
31
30
30
26
25
56
116
124
117
117
37
59
55
135
73
6665
77
136
78
80
79
78
138R
47
81
81
81
14
66
121
60
83
83
118
63
62
38
80
80
82
46
82
46
60
38
60
44
44
84
84
45
45
115
117
117
117
117
117
116
116
116
116
116
81
116
79
78
78
80
136
66
43
60
61
117
115
116
37
85
94
96
95
27
129
134 26
25
62
63
61
60
136
136
118
116
60
60
138L
115
116
116
115
117
117
116
133R
61
63
63
60
55
135
59
73
133L
31
103
135
34
31
35
34
5
66
102
MOVABLE PULLEY
POSITIONS
MOVABLE PULLEY
POSITIONS
MOVABLE PULLEY
POSITIONS
BIO FORCE®EXERCISES
66
SHOULDERS
UPRIGHT ROW
START: Stand facing frame. Feet hip width
apart on base. Grip lat bar in front of
thighs with thumbs facing in.
MOTION: Bend elbows and pull bar up
to chest level. Pause at top of motion.
Lower bar to starting position.
TIPS: Maintain upright posture throughout
exercise. Do not lean back while lifting
bar. Lift elbows to shoulder height or
slightly higher. Keep wrists straight.
Contract abdominals to stabilize torso.
63
MUSCLE GROUPS EXERCISED: Trapezius, deltoids
LEVEL OF DIFFICULTY: Intermediate/Advanced
STANDING FRONT
RAISE
START: Stand facing away. Feet hip width
apart on base. Grip handles with arms at
sides, thumbs facing in.
MOTION: Raise arms in front of body.
Pause at top of motion. Lower arms
to starting position.
TIPS: Raise arms to nose level. Keep
elbows almost straight. Maintain upright
posture throughout exercise. Do not lean
or tilt backward. Keep wrists straight
while raising arms. Contract abdominals
to stabilize torso.
64
MUSCLE GROUPS EXERCISED: Anterior deltoids
LEVEL OF DIFFICULTY: Beginner
SINGLE ARM
STANDING FRONT
RAISE
START: Stand facing away. Feet hip width
apart on base. Grip one handle with arm
at side, thumb facing in.
MOTION: Raise arm in front of body. Pause
at top of motion. Lower arm to starting
position.
TIPS: Raise arm to nose level. Keep elbow
almost straight. Maintain upright posture
throughout exercise. Do not lean or tilt
backward. Keep wrist straight while
raising arm. Contract abdominals to
stabilize torso. Perform on both sides.
65
MUSCLE GROUPS EXERCISED: Anterior deltoids
LEVEL OF DIFFICULTY: Intermediate/Advanced
SEAT: Off
LEG LIFT: Off
ACCESSORIES: Lat
Bar/Front Position
SEAT: Off
LEG LIFT: Off
ACCESSORIES:
Handles
SEAT: Off
LEG LIFT: Off
ACCESSORIES:
Handles
23
EXPLODED VIEW
ResistanceCylinder
#77
#49L
LeftAdjuster
Assembly
#49R
RightAdjuster
Assembly
PaddedPulley Assembly
PaddedPulley Assembly
#110
#19
Cable Assembly
#114
Page 26

MOVABLE PULLEY
POSITIONS
MOVABLE PULLEY
POSITIONS
MOVABLE PULLEY
POSITIONS
BIO FORCE®EXERCISES
65
SHOULDERS
SEATED SHOULDER
PRESS
START: Sit facing away. Grip handles
with thumbs facing in. Elbows bent
90 degrees at shoulder level.
MOTION: Extend elbows and press
arms overhead. Pause at top of motion.
Bend elbows back to starting position.
TIPS: Press arms up in arcing motion
until hands almost touch. Keep elbows
and wrists in line with shoulders. Do
not lower elbows below shoulder line.
Maintain straight wrists. Contract
abdominals to stabilize torso.
60
MUSCLE GROUPS EXERCISED: Deltoids
LEVEL OF DIFFICULTY: Beginner
SINGLE ARM
SHOULDER PRESS
START: Sit facing away. Grip one handle
with thumb facing in. Elbow bent 90
degrees at shoulder level.
MOTION: Extend elbow and press arm
overhead. Pause at top of motion.
Bend elbow back to starting position.
TIPS: Press arm up in arcing motion to
midline over head. Keep elbow and wrist
in line with shoulder. Do not lower elbow
below shoulder line. Maintain straight
wrist. Contract abdominals to stabilize
torso. Perform on both sides.
61
MUSCLE GROUPS EXERCISED: Deltoids
LEVEL OF DIFFICULTY: Intermediate/Advanced
SHOULDER SHRUGS
START: Stand facing frame. Feet hip width
apart on base. Grip lat bar in front of
thighs with thumbs facing in.
MOTION: Shrug shoulders up with straight
arms. Pause at top of motion. Lower
shoulders to starting position.
TIPS: Maintain upright posture throughout
exercise. Contract triceps muscles to
stabilize arm. Do not bend elbows while
shrugging. Contract abdominals to
stabilize torso.
62
MUSCLE GROUPS EXERCISED: Trapezius
LEVEL OF DIFFICULTY: Beginner
SEAT: On/Top
Position
LEG LIFT: On
ACCESSORIES:
Handles
SEAT: On/Top
Position
LEG LIFT: On
ACCESSORIES:
Handles
SEAT: Off
LEG LIFT: Off
ACCESSORIES: Lat
Bar/Front Position
24
CARE AND STORAGE
We recommend
you use 2 people
when moving the
equipment.
• Once your equipment is assembled, make sure it is on a solid, level
surface with plenty of clearance behind and in front of your equipment.
• Store your equipment in an area away from children and high traffic areas.
• Wipe your equipment down with a soft, damp cloth frequently to prevent
accumulation of sweat and dirt.
• We recommend white lithium grease if lubrication is needed.
• Regularly check the following parts for signs of fraying or other wear: the
Handles, Ankle Cuffs, Cables, Pulleys, Large and Small Clips and Frame.
If a part needs to be replaced, do not use the equipment until it is repaired.
• Make sure the Clips and Hitch Pins are securely in place.
• Check that the Cables are traveling correctly in the groove of each Pulley.
• Make sure Chrome Pulleys pivot easily.
• Check that Leg Bar Caps are securely in Leg Bar Tubes
• Lat Bar should always be kept in the hooks at the top of the equipment.
• Periodically check bolts to be sure they are all tight.
To move for storage:
We recommend you use 2 people when moving the equipment.
Make sure nothing is in your way before moving exerciser.
Grab frame securely from behind the Bio Force
® Sport exerciser, place your
foot on the rear cross member (as shown in figure 1), tilt back until wheels
engage, roll across the floor to your desired location (figure 2).
Slowly let the front of the Bio Force
® Sport exerciser down by holding the top
of the Frame and placing your foot against the rear cross member until the
Frame Plate is on the floor.
figure 1
figure 2
When transporting for storage we
recommend two people move this unit.
CAUTION
Page 27

BIO FORCE®EXERCISES
64
CHEST & BACK
STANDING STRAIGHT
ARM PULL DOWN
START: Stand facing frame. Feet hip width
apart on base. Grip lat bar in wide grip
with palms facing down.
MOTION: Pull arms straight down toward
hips. Pause at end of motion. Raise
arms back to starting position.
TIPS: Keep arms straight throughout
exercise. Do not bend elbows while
pulling down. Maintain upright posture.
Do not lean forward or back. Contract
abdominals to stabilize torso.
59
MUSCLE GROUPS EXERCISED: Latissimus, posterior deltoid
LEVEL OF DIFFICULTY: Intermediate
SEAT: Off
LEG LIFT: Off
ACCESSORIES:
Lat Bar/Lat Tower
Position
MOVABLE PULLEY
POSITIONS
25
EXERCISE GUIDELINES
IMPORTANT:
If you are over 35 and have been inactive for
several years, you should consult your physician,
who may or may not recommend a graded
exercise test. Your physician can also assist
you in determining the Target Heart Rate Zone
appropriate for your age and physical condition.
You should also consult your physician if you
have the following:
• High blood pressure
• High cholesterol
• Asthma
• Heart trouble
• Family history of early stroke or
heart attack deaths
• Frequent dizzy spells
• Extreme breathlessness after mild exertion
• Arthritis or other bone problems
• Severe muscular, ligament or
tendon problems
• Other known or suspected disease
• If you experience any pain or tightness
in your chest, an irregular heartbeat or
shortness of breath, stop exercising
immediately. Consult your physician
before continuing.
• Pregnant
• Balance impairment
• Taking medications that affect heart rate
IMPORTANT
Please review this section before you begin exercising.
Workout Phases
Regardless of whether you are working out with your
Bio Force®Sport exerciser or doing a cardio workout,
your workout should consist of the following three
phases.
Warm-Up
To prevent injury and maximize performance, we
recommend that each workout period should start with
a warm-up. Your warm-up should gently prepare your
muscles for the coming exertion. Start by doing 5 to
10 minutes of gentle exercise (such as walking) that
gradually increases your heart rate and loosens up
your muscles. Your warm-up exercise should be
aerobic in nature and only require an easy, unforced
range of motion. This should be followed by 5 to 10
minutes of stretching. Refer to the stretches found on
pages 40 and 41 of this manual. Never push yourself
beyond a point of gentle tension or strain. Keep your
movements gentle, rhythmic and controlled.
Muscle Toning or Cardio Workout
Your warm-up should be followed by either a
workout with the Bio Force
®
Sport exerciser or a cardio
workout, depending on which workout you are doing.
Regardless of which workout you are doing, build
up as your current fitness level allows and progress
at a rate that is comfortable to you.
For the first week or so, you may feel some muscle
soreness. This is quite normal and will disappear in
a matter of days. If you experience major discomfort,
you may be on a regimen that is too advanced for you
or you may have increased your program too rapidly.
Cool Down and Stretching
Your workout should be followed by a cool down.
The cool down should consist of 5 to 10 minutes of
gentle exercise, followed by stretching. Refer to the
stretches found on pages 40 and 41 of this manual.
Never push yourself beyond a point of gentle tension
or strain. Keep your movements gentle, rhythmic
and controlled.
Page 28

BIO FORCE®EXERCISES
63
CHEST & BACK
SINGLE ARM
STANDING ROW OVERHAND POSITION
START: Stand facing frame. Rest legs
against pads. Bend knees slightly. Grip
one handle with thumb facing inward.
MOTION: Bend elbow and pull handle
toward waist. Pause at end of motion.
Extend elbow and return to starting
position.
TIPS: Keep elbow close to side while
pulling. Maintain upright posture. Do not
lean forward or back. Keep shoulders
level. Do not rotate side while pulling.
Contract abdominals to stabilize back.
Perform on both sides.
56
MUSCLE GROUPS EXERCISED: Latissimus, biceps,
posterior deltoids
LEVEL OF DIFFICULTY: Intermediate/Advanced
STANDING ROW UNDERHAND
POSITION
START: Stand facing frame. Rest legs
against pads. Bend knees slightly. Grip
handles with thumbs facing outward.
MOTION: Bend elbows and pull handles
toward waist. Pause at end of motion.
Extend elbows and return to starting
position.
TIPS: Keep elbows close to sides while
pulling. Squeeze shoulder blades together. Maintain upright posture. Do not lean
forward or back. Contract abdominals
to stabilize back.
57
MUSCLE GROUPS EXERCISED: Latissimus, biceps,
posterior deltoids
LEVEL OF DIFFICULTY: Beginner
SINGLE ARM
STANDING ROW UNDERHAND
POSITION
START: Stand facing frame. Rest legs
against pads. Bend knees slightly. Grip
one handle with thumb facing outward.
MOTION: Bend elbow and pull handle
toward waist. Pause at end of motion.
Extend elbow and return to starting
position.
TIPS: Keep elbow close to side while
pulling. Maintain upright posture. Do not
lean forward or back. Keep shoulders
level. Do not rotate side while pulling.
Contract abdominals to stabilize back.
Perform on both sides.
58
MUSCLE GROUPS EXERCISED: Latissimus, biceps,
posterior deltoids
LEVEL OF DIFFICULTY: Intermediate/Advanced
MOVABLE PULLEY
POSITIONS
MOVABLE PULLEY
POSITIONS
MOVABLE PULLEY
POSITIONS
SEAT: On/Bottom
Position
LEG LIFT: On
ACCESSORIES:
Handles
SEAT: On/Bottom
Position
LEG LIFT: On
ACCESSORIES:
Handles
SEAT: On/Bottom
Position
LEG LIFT: On
ACCESSORIES:
Handles
26
EXERCISE GUIDELINES
When to Exercise
The hour just before the evening meal is a popular time
for exercise. The late afternoon workout provides a
welcome change of pace at the end of the work day
and helps dissolve the day's worries and tensions.
Another popular time to work out is early morning,
before the work day begins. Advocates of the early start
say it makes them more alert and energetic on the job.
Among the factors you should consider in developing
your workout schedule are personal preference, job and
family responsibilities, availability of exercise facilities
and weather. It's important to schedule your workouts
for a time when there is little chance that you will have
to cancel or interrupt them because of other demands
on your time.
You should not exercise strenuously during extremely
hot, humid weather or within two hours after eating.
Heat and/or digestion both make heavy demands on
the circulatory system, and in combination with
exercise can be an over-taxing double load.
Measuring Your Heart Rate
When checking Heart Rate during a workout, take your
pulse within five seconds after interrupting exercise
because it starts to go down once you stop moving.
Count pulse for 10 seconds and multiply by six to get
the per-minute rate.
Target Heart Rate
Aerobic intensity guidelines for healthy adults are
generally set at 60 to 85 percent of heart rate. But, if
you’re out of shape, remember that moderate to low
level and consistent cardiovascular training – well below
the standard recommendations set forth – can result in
substantial and beneficial effects to your health and can
greatly improve cardiovascular endurance.
You can use the following calculation to determine what
percentage of your heart rate you are
working at:
% heart rate = (220 - age) x %.
Using this calculation, a 70% heart rate for a 40 year
old would be (220 - 40) x 70% or 126. Thus, this
individual would need to reach 126 beats per minute
to equal a 70% heart rate.
The above recommendations are guidelines.
People with any medical limitations should
discuss this formula with their physician.
Clothing
All exercise clothing should be loose-fitting to permit
freedom of movement, and should make the wearer
feel comfortable and self-assured.
Never wear rubberized or plastic clothing, garments like
this can interfere with the evaporation of perspiration
and can cause body temperature to rise to dangerous
levels.
Wear comfortable, supportive athletic shoes with
non-slip soles, such as running or aerobic shoes.
Tips to Keep You Going
1. Adopt a specific plan and write it down.
2. Keep setting realistic goals as you go
along, and remind yourself of them often.
3. Keep a log to record your progress and
make sure to keep it up-to-date. See
charts in this booklet.
4. Include weight and/or percent body fat
measures in your log. Extra pounds can
easily creep back.
5. Enlist the support and company of your
family and friends.
6. Update others on your successes.
7. Avoid injuries by pacing yourself and
including a warm up and cool down
period as part of every workout.
8. Reward yourself periodically for a job
well done!
Page 29

BIO FORCE®EXERCISES
62
CHEST & BACK
STANDING ROW NEUTRAL POSITION
START: Stand facing frame. Rest legs
against pads. Bend knees slightly. Grip
handles with thumbs facing up.
MOTION: Bend elbows and pull handles
toward waist. Pause at end of motion.
Extend elbows and return to starting
position.
TIPS: Keep elbows close to sides while
pulling. Squeeze shoulder blades together. Maintain upright posture. Do not lean
forward or back. Contract abdominals
to stabilize back.
53
MUSCLE GROUPS EXERCISED: Latissimus, biceps,
posterior deltoids
LEVEL OF DIFFICULTY: Beginner
SEAT: On/Bottom
Position
LEG LIFT: On
ACCESSORIES:
Handles
SEAT: On/Bottom
Position
LEG LIFT: On
ACCESSORIES:
Handles
SEAT: On/Bottom
Position
LEG LIFT: On
ACCESSORIES:
Handles
SINGLE ARM
STANDING ROW NEUTRAL POSITION
START: Stand facing frame. Rest legs
against pads. Bend knees slightly. Grip
one handle with thumb facing up.
MOTION: Bend elbow and pull handle
toward waist. Pause at end of motion.
Extend elbow and return to starting
position.
TIPS: Keep elbow close to side while
pulling. Maintain upright posture. Do not
lean forward or back. Keep shoulders
level. Do not rotate side while pulling.
Contract abdominals to stabilize back.
Perform on both sides.
54
MUSCLE GROUPS EXERCISED: Latissimus, biceps,
posterior deltoids
LEVEL OF DIFFICULTY: Intermediate/Advanced
STANDING ROW OVERHAND
POSITION
START: Stand facing frame. Rest legs
against pads. Bend knees slightly. Grip
handles with thumbs facing inward.
MOTION: Bend elbows and pull handles
toward waist. Pause at end of motion.
Extend elbows and return to starting
position.
TIPS: Keep elbows close to sides while
pulling. Squeeze shoulder blades together. Maintain upright posture. Do not lean
forward or back. Contract abdominals to
stabilize back.
55
MUSCLE GROUPS EXERCISED: Latissimus, biceps,
posterior deltoids
LEVEL OF DIFFICULTY: Beginner
MOVABLE PULLEY
POSITIONS
MOVABLE PULLEY
POSITIONS
MOVABLE PULLEY
POSITIONS
27
BIO FORCE®SPORT SYSTEM
The Bio Force® Sport exerciser is more than just a
strength training machine; it is a total body exercise
and nutrition system. It is a “fitness for life” plan that
goes hand in hand with an overall healthy lifestyle. This
includes regular check-ups, healthy eating habits and
exercise for the rest of your life.
Today, all fitness research recommends both
cardiovascular exercise and strength conditioning
to achieve balanced fitness. By improving your
cardiovascular fitness you will strengthen your heart
and lungs, increase your stamina and endurance,
and help with weight loss. Strength conditioning
adds lean muscle to your body, which increases
your body’s metabolism. And we all know that a
healthy eating plan is an important part of any
balanced fitness program.
The Bio Force
® Sport System is designed to help
you achieve a balanced fitness program. The system
consists of three parts:
1. Strength Conditioning. The Bio Force
® Sport
exerciser was designed to help you strengthen your
upper and lower body. We recommend that you work
out for at least 30 minutes, 3 times a week. However,
the frequency and duration of your workouts will
depend on your current fitness level and goals.
2. Cardiovascular Exercise. The Bio Force® Sport
system includes a cardio workout program. You can
achieve an effective cardio workout from a variety of
activities, such as walking, hiking, swimming and jogging. We recommend that you do a cardio workout for
at least 30 minutes, 3 times a week. You can easily
alternate days for your Bio Force® and cardio workouts.
Again, the frequency and duration of your workouts will
depend on your current fitness level and goals. Please
refer to the Cardiovascular Workout section on pages
83 and 85 to determine the workout that is appropriate
for you.
3. Nutrition. The Bio Force ® Sport system also
includes the Eating Plan booklet to provide you with
healthy eating choices.
For best results, we recommend that you begin with
Eric Lichter’s 8 Week Body Transformation Plan on
pages 30-39 of this manual.
4. Keep track of how many sets and repetitions of
each exercise you are able to do at first. You will
be surprised at how quickly you progress. In just a
few weeks you’ll probably be able to complete all
of the sets and repetitions at the resistance level
you choose.
5. Progress slowly. If you are very sore and tired after
your workout, you are working at a level that is too
hard. Great results can be obtained by working at
a level that challenges you, but doesn’t create
soreness and excessive fatigue.
6. It is important that you know how to work out
safely and properly. These safety steps are for your
benefit and you should follow them closely to
maximize the effectiveness of your workout routine.
7. You should begin to feel results within one to two
weeks of working out with your equipment. Look for
better posture and the feeling of more strength and
efficiency in your muscles.
IMPORTANT EXERCISE
AND SAFETY TIPS
1. Review this Owner’s Manual/Exercise Book
and the video completely before you begin your
exercise program. Remember to follow the
instructions exactly – they have been developed
with your health and safety in mind.
2. Perform the exercises at a slow and controlled
speed. For best results, perform all of the
exercises at the tempo demonstrated in the video.
Working at a fast pace is not recommended, and
may compromise your safety and results.
3. You may not be able to complete all of the sets
and repetitions suggested at first. When you feel
your muscles fatiguing, or are unable to work
with good form and technique, decrease your
resistance level or take a short break and rest.
BIO FORCE®SPORT WORKOUT
Page 30

BIO FORCE®EXERCISES
61
CHEST & BACK
SINGLE ARM
SEATED PULL OVER
START: Sit facing away. Feet on base.
Grip one handle with palm facing forward.
MOTION: Pull arm forward and down
until handle is at waist level. Pause at
end of motion. Raise arm back to
starting position.
TIPS: Keep arm straight throughout
exercise. Do not bend elbow while
pulling down. Maintain upright posture.
Do not tip or rotate torso. Contract
abdominals to stabilize torso. Perform
on both sides.
50
MUSCLE GROUPS EXERCISED: Latissimus, posterior deltoid
LEVEL OF DIFFICULTY: Intermediate/Advanced
SEAT: On/Bottom
Position
LEG LIFT: On
ACCESSORIES:
Handles/Lat Tower
STRAIGHT ARM
LATERAL PULL DOWN
START: Sit facing away. Feet on base.
Grip handles with palms facing
outward.
MOTION: Pull arms down laterally until
handles are at waist level. Pause at end
of motion. Raise arms back to starting
position.
TIPS: Keep arms straight throughout
exercise. Do not bend elbows while
pulling down. Maintain upright posture.
Do not round lower back. Keep
shoulders pulled down away from ears.
Contract abdominals to stabilize torso.
51
MUSCLE GROUPS EXERCISED: Latissimus
LEVEL OF DIFFICULTY: Beginner
SEAT: On/Bottom
Position
LEG LIFT: On
ACCESSORIES:
Handles/Lat Tower
SINGLE STRAIGHT ARM
LATERAL PULL DOWN
START: Sit facing away. Feet on base.
Grip one handle with palm facing
outward.
MOTION: Pull arm down laterally until
handle is at waist level. Pause at end
of motion. Raise arm back to starting
position.
TIPS: Keep arm straight throughout
exercise. Do not bend elbow while pulling
down. Maintain upright posture. Do not
tip or rotate torso. Contract abdominals
to stabilize torso. Perform on both sides.
52
MUSCLE GROUPS EXERCISED: Latissimus
LEVEL OF DIFFICULTY: Intermediate/Advanced
SEAT: On/Bottom
Position
LEG LIFT: On
ACCESSORIES:
Handles/Lat Tower
MOVABLE PULLEY
POSITIONS
MOVABLE PULLEY
POSITIONS
MOVABLE PULLEY
POSITIONS
28
GETTING STARTED ON YOUR BIO FORCE®SPORT EXERCISER
Bio Force® Sport Pulley Positions
The Bio Force® Sport exerciser uses a simple system of Cables, Pulleys and Hooks to
perform over 100 body shaping exercises. Below you will find a diagram indicating the
possible Moveable Pulley and Accessories Hooks position.
Lat Tower Hooks
(Upright Frame Hooks)
Crossbar
Hooks
Upright Frame
Side Hooks
Rear Base
Hook
Middle Base
Hook
Front Base
Hook
Leg Attachment
Hook
Slide and Lock
Adjuster
Page 31

BIO FORCE®EXERCISES
60
CHEST & BACK
NEUTRAL GRIP
PULL DOWN
START: Sit facing frame. Lean back
slightly. Grip handles in neutral
position with palms facing in.
MOTION: Bend elbows and pull handles
down to chest. Pause at bottom of
motion. Extend elbows and raise to
starting position.
TIPS: Hold leaning position throughout
exercise. Do not move torso forward
and back. Maintain straight spine while
leaning. Do not round lower back.
Contract abdominals to stabilize torso.
47
MUSCLE GROUPS EXERCISED: Latissimus, biceps
LEVEL OF DIFFICULTY: Beginner
SEAT: On/Bottom
Position
LEG LIFT: On
ACCESSORIES:
Handles/Lat Tower
SINGLE ARM
NEUTRAL GRIP
PULL DOWN
START: Sit facing frame. Lean back
slightly. Grip one handle in neutral
position with palm facing in.
MOTION: Bend elbow and pull handle
down to chest. Pause at bottom of
motion. Extend elbow and raise to
starting position.
TIPS: Hold leaning position throughout
exercise. Do not move torso forward
or back. Maintain straight spine while
leaning. Do not tip or rotate to one side.
Contract abdominals to stabilize torso.
Perform on both sides.
48
MUSCLE GROUPS EXERCISED: Latissimus, biceps
LEVEL OF DIFFICULTY: Intermediate/Advanced
SEAT: On/Bottom
Position
LEG LIFT: On
ACCESSORIES:
Handles/Lat Tower
SEATED PULL OVER
START: Sit facing away. Feet on base.
Grip handles with palms facing forward.
MOTION: Pull arms forward and down
until handles are at waist level. Pause
at end of motion. Raise arms back to
starting position.
TIPS: Keep arms straight throughout
exercise. Do not bend elbows while
pulling down. Maintain upright posture.
Do not round lower back. Keep
shoulders pulled down away from
ears. Contract abdominals to
stabilize torso.
49
MUSCLE GROUPS EXERCISED: Latissimus, posterior deltoid
LEVEL OF DIFFICULTY: Beginner
SEAT: On/Bottom
Position
LEG LIFT: On
ACCESSORIES:
Handles/Lat Tower
MOVABLE PULLEY
POSITIONS
MOVABLE PULLEY
POSITIONS
MOVABLE PULLEY
POSITIONS
29
GETTING STARTED ON YOUR BIO FORCE®SPORT EXERCISER
Your Bio Force® Sport exerciser is one serious piece of exercise equipment! We
recommend that before you start working out, you read the entire Owner’s
Manual and view the workout video that came with your equipment.
Adjusting Resistance with Slide-N-Lock
Technology
To change resistance, it just takes seconds. Simply pull up on the
Slide-N-Lock Adjuster to disengage it from its current position.
Then, keeping the Adjuster disengaged, simply slide it to the next
desired weight position and release it. Make sure the locking
mechanism has engaged into the new resistance position. To
double-check, the resistance indicator window should show “red.”
Adjusting the Seat
The Bio Force® Sport seat has two height positions. If you are
taller, you may wish to use the lower position to get the fullest
range of motion from the Lat Tower exercises. If you are shorter,
you may prefer the higher position to more easily reach the Lat
Bar. It is up to you!
If you wish to change positions, simply remove the Long Hitch
Pin, and pull up on the Seat to disengage it from the Positioning
Pins. Move it to the new position and place the Seat onto the
Positioning Pins. Once it is in place, reinsert the Long Hitch Pin
to secure. Do not use the Seat unless the Long Hitch Pin
is in place.
Adjusting the Leg Attachment
The lower Foam Pad on the Leg Lift Tube has 4 positions. These
are to accommodate user leg length and comfort.
To change the Foam Pad, simply remove the Leg Bar Cap from
one end of the Pad. Slide off the Foam Pad from that side. Now
slide the Tube and remaining Pad out of the Leg Assembly hole.
Reinsert into the new desired position. Replace the first Foam
Pad and replace the Leg Bar Cap. Make certain the Leg Bar
Cap is secured.
Resistance
Indicator
shows red
when locked
Slide-N-Lock
Adjuster
Seat
Adjustment
Long
Hitch Pin
Leg Lift Tube
Adjustment
Holes
Leg Bar Cap
Page 32

BIO FORCE®EXERCISES
59
CHEST & BACK
SINGLE ARM
OVERHAND
PULL DOWN
START: Sit facing frame. Grip one
handle with palms facing forward.
Lean back slightly.
MOTION: Bend elbow and pull handle
down to chest. Pause at bottom of
motion. Extend elbow and raise to
starting position.
TIPS: Hold leaning position throughout
exercise. Do not move torso forward
or back. Maintain straight spine while
leaning. Do not tip or rotate to one side.
Contract abdominals to stabilize torso.
Perform on both sides.
44
MUSCLE GROUPS EXERCISED: Latissimus, biceps
LEVEL OF DIFFICULTY: Intermediate/Advanced
SEAT: On/Bottom
Position
LEG LIFT: On
ACCESSORIES:
Handles/Lat Tower
REVERSE GRIP
PULL DOWN
START: Sit facing frame. Lean back slight-
ly. Grip handles in underhand position.
MOTION: Bend elbows and pull handles
down to chest. Pause at bottom of
motion. Extend elbows and raise to
starting position.
TIPS: Hold leaning position throughout
exercise. Do not move torso forward
and back. Maintain straight spine while
leaning. Do not round lower back.
Contract abdominals to stabilize torso.
45
MUSCLE GROUPS EXERCISED: Latissimus, biceps
LEVEL OF DIFFICULTY: Beginner
SEAT: On/Bottom
Position
LEG LIFT: On
ACCESSORIES:
Handles/Lat Tower
SINGLE ARM REVERSE
GRIP PULL DOWN
START: Sit facing frame. Lean back slight-
ly. Grip one handle in underhand position.
MOTION: Bend elbow and pull handle
down to chest. Pause at bottom of
motion. Extend elbow and raise to
starting position.
TIPS: Hold leaning position throughout
exercise. Do not move torso forward or
back. Maintain straight spine while leaning. Do not tip or rotate to one side.
Contract abdominals to stabilize torso.
Perform on both sides.
46
MUSCLE GROUPS EXERCISED: Latissimus, biceps
LEVEL OF DIFFICULTY: Intermediate/Advanced
SEAT: On/Bottom
Position
LEG LIFT: On
ACCESSORIES:
Handles/Lat Tower
MOVABLE PULLEY
POSITIONS
MOVABLE PULLEY
POSITIONS
MOVABLE PULLEY
POSITIONS
30
8 WEEK BODY TRANSFORMATION PLAN
In just two short months you can be on your way to achieving your fitness dreams.
That's right…just two months…eight weeks…60 days.
That is all it takes to follow my body transformation plan. And best of all, when you finish my
8 week program, you'll be hooked. You are going to feel and look better than ever. Friends,
relatives and co-workers are going to marvel at the changes in your body. And you know
what? You are going to want more!
So what have you got to lose? Step up and take the eight week challenge. I don't care how
old you are…I don't care what shape you are in…I don't care if you're an elite athlete or the
farthest you walk is from the couch to the fridge. You're going to work…You're going to
sweat…And I'm going to make sure you love every minute of it! The results you'll see
when you take the eight week challenge are going to blow you away! So get ready to get
yourself into the best shape of your life and see what you've been missing!
PLAN INTRODUCTION:
Any fitness plan has three parts: Strength Training, Proper Nutrition and Aerobic Exercise.
Each part is essential to success. If you miss anyone of the elements, you will not see the
results you are after. My 8 Week Plan contains all three. Take a look at the outlines below.
Review each part and make them a part of your life.
GETTING STARTED:
Everyone has to start somewhere…and this is it. Take a photo of yourself today in your
swimsuit. Guys - shirts off! Ladies - make it a two piece! Now is the time to make an
honest assessment of where you are…and where you want to go. Also, take your
measurements. You will find a body measurement guide at the end of this manual.
Note that we are not going to concern ourselves too much with body weight. This is
because body weight does not always tell the whole story. It is a fact that fat weighs
less than muscle, but muscle is leaner and more compact than fat. So…you can be
losing inches and getting the lean, sexy body you've always wanted, but not be losing
that much weight. That is because you are trading fat for muscle. Therefore, a better
indicator is inch loss…Even easier than that is noticing how much better your clothes fit.
Okay…so you've taken your picture and your measurements. Store them in a safe place.
In 8 weeks, you are going to be amazed at the difference!
ERIC LICHTER
Professional Trainer
Page 33

BIO FORCE®EXERCISES
58
CHEST & BACK
CLOSED GRIP
CHEST PRESS
START: Sit facing away. Grip handles with
palms facing in. Elbows bent 90 degrees
at waist level. Cables under arms.
MOTION: Extend elbows and press arms
straight forward. Pause at end of motion.
Bend elbows back to starting position.
TIPS: Press arms forward in arcing
motion. Keep elbows in line with
shoulders and wrists straight. Maintain
upright posture in seated position.
Contract abdominals to stabilize back.
41
MUSCLE GROUPS EXERCISED: Pectoralis, triceps,
anterior deltoids
LEVEL OF DIFFICULTY: Beginner
SEAT: On/Top
Position
LEG LIFT: On
ACCESSORIES:
Handles
LAT BAR PULL DOWN
START: Sit facing frame. Grip lat bar
toward outside of handles, palms
facing forward. Lean back slightly.
MOTION: Bend elbows and pull bar down
to chest. Pause at bottom of motion.
Extend elbows and raise to starting
position.
TIPS: Hold leaning position throughout
exercise. Do not move torso forward
and back. Maintain straight spine while
leaning back. Do not round lower back.
Contract abdominals to stabilize torso.
42
MUSCLE GROUPS EXERCISED: Latissimus, biceps
LEVEL OF DIFFICULTY: Beginner
SEAT: On/Top
Position
LEG LIFT: On
ACCESSORIES: Lat
Bar/Lat Tower Pos.
LAT BAR FRONT
PULL DOWN
START: Sit facing away. Feet on base.
Grip lat bar toward outside of handles,
palms facing forward.
MOTION: Bend elbows and pull bar down
to chest. Pause at bottom of motion.
Extend elbows and raise to starting
position.
TIPS: Maintain upright posture throughout
exercise. Do not round lower back. Keep
shoulders pulled down away from ears.
Contract abdominals to stabilize torso.
43
MUSCLE GROUPS EXERCISED: Latissimus, biceps
LEVEL OF DIFFICULTY: Beginner
SEAT: On/Top
Position
LEG LIFT: On
ACCESSORIES: Lat
Bar/Lat Tower Pos.
MOVABLE PULLEY
POSITIONS
MOVABLE PULLEY
POSITIONS
MOVABLE PULLEY
POSITIONS
31
8 WEEK BODY TRANSFORMATION PLAN
PART ONE:
STRENGTH TRAINING WITH THE
BIO FORCE®SPORT EXERCISER
The first part of our fitness equation is strength
training. The benefits of strength training are well
known…but just in case you forgot…here are a few
highlights, courtesy of my friend Douglas Brooks,
MS, Exercise Physiologist:
• Fat Loss, Weight Control, Weight Maintenance
One advantage resistance training offers is a
leaner body. Maintaining or increasing muscle
mass preserves your ability to bur n higher
numbers of calories. Your body is operating
at a higher metabolic rate and it's easier to
maintain or lose weight.
• Increased Metabolism
If you have a lot of muscle, your metabolism is
higher and you "burn" more calories since muscle
is metabolically active.
• Increased Calorie Burning During Resistance
Training
Any activity, including strength training, burns
calories during the activity and contributes to
fitness.
• Increased Calorie Burning After Exercise
Vigorous strength training significantly elevates
calorie burning (metabolic rate) anywhere from
30 to 60 minutes or longer after you've finished.
• Reductions in Resting Blood Pressure
If you have high blood pressure or borderline high
blood pressure, generally it's acceptable to use
moderate resistance and perform 15-20 repetitions
to fatigue. Diet and exercise can lower blood
pressure. Check with a doctor to get a specific
recommendation.
• Positive Changes in Cholesterol Profiles
HDL cholesterol (the "good guy") is raised
primarily by exercising and losing fat. Of course,
diet (i.e., proper food choices) is important to
lower harmful LDL (the "bad guy" cholesterol)
and triglycerides (fat).
• A Stronger Body That is Less Prone to Injuries
Stronger muscles increase the thickness and
strength of tendons (which connect muscles to
bones) and ligaments (which provide integrity to
joints by connecting bone-to-bone). Stronger
muscles let you perform better, and with less
chance of injury to the muscles, tendons,
ligaments and joints.
• Personal Physical Independence
Many people lose their "freedom" because they've
lost the strength to be mobile. Strong individuals
perform better and physical activity feels good to
their bodies.
• Improved Posture
Strength and flexibility are the keys to correct
body alignment. You quite possibly will look
and feel better!
• Improved Physical Image
Strength training will change how you look. If you
don't believe this, compare a runner who only
trains the cardiovascular system with an athlete
who strength trains as well as participates in
aerobic activity.
• Improved Self-Esteem
You'll feel strong, look strong and think that you're
strong. In fact, you will be strong!
Now that we've reviewed why it is important to strength
train, there is no question that you should do it! At the
end of this section you will find my 8 week workout plan
that shows you exactly how to use your Bio Force
®
Sport exerciser for the next eight weeks.
Page 34

BIO FORCE®EXERCISES
57
CHEST & BACK
INCLINE CHEST FLYE
START: Sit facing away. Grip handles with
arms open to sides. Palms facing front.
MOTION: Close and angle arms upward
to head height. Pause at end of motion.
Open and lower arms to starting position.
TIPS: Keep arms almost straight through-
out exercise. Do not bend elbows at end
of motion. Elbows and wrists in line with
shoulders. Maintain upright posture in
seated position. Contract abdominals to
stabilize back.
38
MUSCLE GROUPS EXERCISED: Pectoralis, anterior deltoids
LEVEL OF DIFFICULTY: Intermediate
SEAT: On/Top
Position
LEG LIFT: On
ACCESSORIES:
Handles
SINGLE ARM INCLINE
CHEST FLYE
START: Sit facing away. Grip one handle
with arm open to side. Palm facing front.
MOTION: Close and angle arm upward
to head height. Handle to midline of
forehead. Pause at end of motion.
Open to starting position.
TIPS: Keep arm almost straight through-
out exercise. Do not bend elbow at end
of motion. Avoid rotating torso while
pressing. Maintain upright posture in
seated position. Contract abdominals to
stabilize back. Perform on both sides.
39
MUSCLE GROUPS EXERCISED: Pectoralis, anterior deltoids
LEVEL OF DIFFICULTY: Intermediate/Advanced
SEAT: On/Top
Position
LEG LIFT: On
ACCESSORIES:
Handles
DECLINE CHEST
PRESS
START: Sit facing away with hips forward
on seat, shoulders touching backrest.
Grip handles with cables under arms.
Elbows bent 90 degrees at shoulder
level.
MOTION: Extend elbows and press arms
forward and downward. Pause at end
of motion. Bend elbows back to
starting position.
TIPS: Press arms downward to hip level.
Keep elbows in line with shoulders and
wrists straight. Maintain straight spine
position while leaning back. Do not
round lower back. Contract abdominals
to stabilize back.
40
MUSCLE GROUPS EXERCISED: Pectoralis, triceps,
anterior deltoids
LEVEL OF DIFFICULTY: Intermediate
SEAT: On/Top
Position
LEG LIFT: On
ACCESSORIES:
Handles
MOVABLE PULLEY
POSITIONS
MOVABLE PULLEY
POSITIONS
MOVABLE PULLEY
POSITIONS
32
8 WEEK BODY TRANSFORMATION PLAN
PART TWO:
PROPER NUTRITION
All of the strength training in the world can't overcome a
poor diet. If you truly want to get in the best shape of
your life, you need to give your body the right “fuel!”
Included with your Bio Force®Sport exerciser you will find
a booklet entitled “Eating Plan.” The Eating Plan included
was developed by a nutritionist. It includes a complete
and thorough diet program designed to help you eat
healthy foods and in the right portions. Review this plan
carefully and follow its recommendations for the duration
of the 8 week program.
Get to it!
All right! What are we waiting for? Now is the time to begin! Make sure
to incorporate all 3 parts of my plan into your “new you” program. In
just 8 short weeks you are going to look and feel amazing! And don't
forget to take some photos of yourself at the end of week eight…
I would love to hear about your results.
The following workout is comprised of 32 total workouts. In addition to proper eating,
you will do an aerobic workout and work out on the Bio Force
®
Sport exerciser
4 times a week, for 8 weeks. Make sure to rest in between days.
Now when you start the Bio Force
®
workout, use a light amount of resistance and
slowly progress up to heavier resistance. How do you know how much weight is
right for you? Easy…when you are exercising, your muscles should reach fatigue
at the end of the 15 reps. If they are not fatigued at the end of 15 repetitions, you
need to add more resistance…and if you can’t make it to 15 reps, you will need
to subtract resistance.
Review how to adjust the resistance with Slide-N-Lock Technology on page 29 of
this manual.
Now Let’s Get Started! Here are the 32 individual Bio Force®workouts. Each
contains a list of exercises you are to perform. The first number next to each
exercise is the number of “sets” you are to execute. The second number indicates
the numbers of “repetitions” in each set. So for the very first exercise in workout #1,
15 squats equal 1 complete set. And you are to complete three sets.
After completing your Bio Force®workout, you should finish your Body
Transformation Workout by completing 20 minutes of aerobic exercise. Refer
to the Aerobic Exercise portion of this manual for a complete list of aerobic
exercises and additional guidelines.
Also note that before and after EVERY WORKOUT you will need to perform the
general warm up, cool down, and stretching routine that is recommended in this
manual. Please refer to page 25 for the specific details to the stretching,
warm up, and cool down routines.
PART THREE:
AEROBIC EXERCISE
And last but not least - aerobic exercise. This is the
final piece of the “new you” puzzle. By elevating your
heart rate just a few times a week, you will increase
your cardiovascular endurance, burn calories and
help guarantee your success. At the end of this
manual you will find a complete section devoted to
the benefits of aerobic exercise. Refer to the Aerobic
Exercise portion of the guide for a complete rundown
of aerobic activities and guidelines. For the duration
of the 8 week program you should do 20 minutes of
aerobic exercise 4 times a week as instructed below.
8 WEEK BODY TRANSFORMATION WORKOUT
Page 35

BIO FORCE®EXERCISES
56
CHEST & BACK
SINGLE ARM
INCLINE CHEST PRESS
START: Sit facing away. Grip one handle
with palm down. Elbow bent 90 degrees
at shoulder level. Cable over arm.
MOTION: Extend elbow and press arm to
upward angle. Pause at end of motion.
Bend elbow back to starting position.
TIPS: Press arm forward and upward in
arcing motion. Handle to head height at
end of motion. Avoid rotating torso while
pressing. Maintain upright posture in
seated position. Contract abdominals to
stabilize back. Perform on both sides.
35
MUSCLE GROUPS EXERCISED: Pectoralis, triceps,
anterior deltoids
LEVEL OF DIFFICULTY: Intermediate/Advanced
SEAT: On/Top
Position
LEG LIFT: On
ACCESSORIES:
Handles
CHEST FLYE
START: Sit facing away. Grip handles with
arms open to sides. Palms facing front.
MOTION: Close arms in front of chest.
Pause at end of motion. Open arms to
starting position.
TIPS: Keep arms almost straight through-
out exercise. Do not bend elbows at end
of motion. Elbows and wrists in line with
shoulders. Maintain upright posture in
seated position. Contract abdominals to
stabilize back.
36
MUSCLE GROUPS EXERCISED: Pectoralis, anterior deltoids
LEVEL OF DIFFICULTY: Beginner
SEAT: On/Top
Position
LEG LIFT: On
ACCESSORIES:
Handles
SINGLE ARM
CHEST FLYE
START: Sit facing away. Grip one handle
with arm open to side. Palm facing front.
MOTION: Close arm in front of chest.
Handle to midline of chest. Pause at end
of motion. Open arm to starting position.
TIPS: Keep arm almost straight through-
out exercise. Do not bend elbow at end
of motion. Avoid rotating torso while
pressing. Maintain upright posture in
seated position. Contract abdominals to
stabilize back. Perform on both sides.
37
MUSCLE GROUPS EXERCISED: Pectoralis, anterior deltoids
LEVEL OF DIFFICULTY: Intermediate/Advanced
SEAT: On/Top
Position
LEG LIFT: On
ACCESSORIES:
Handles
MOVABLE PULLEY
POSITIONS
MOVABLE PULLEY
POSITIONS
MOVABLE PULLEY
POSITIONS
33
8 WEEK BODY TRANSFORMATION PLAN
WORKOUT #1 (45 sec rest between all sets)
• Squats - 3 sets of 15 reps (3 x 15)
• Seated Chest Press - 3 x 15
• Single Leg Squats - 2 x 15
• Incline Chess Press - 2 x 15
• Seated Leg Extensions - 2 x 15
• Chest Flyes - 2 x 15
• Lat Bar Pull Down (front) - 3 x 15
• Standing Triceps Pushdowns - 3 x 15
• Ab Crunch - 2 x 15 – When bent down (flexed position) hold this position for
2 seconds before releasing to a relaxed position.
• Oblique Crunch - 2 x 15 + 15 (15 reps to the left side and 15 reps to the right side)
WORKOUT #2 (45 sec rest between all sets)
• Straight Leg Dead Lifts - 3 x 15
• Seated Shoulder Press - 3 x 15
• Leg Curls - 3 x 15 + 15
• Shoulder Shrugs, Standing Lateral Raises and Standing Front Raises - 3 x 15
3 sets of 15 for each exercise (3 x 15 + 15 + 15)
• Standing Hip Flexion, Lying Hip Abduction and Adduction - 3 x 10 + 10 + 10
• Standing Biceps Curls - 3 x 15
• Calf Raises - 3 x 10 + 10 + 10 (toes in, out & straight)
• Seated Spinal Extension - 3 x 15
WORKOUT #3 (45 sec rest between all sets)
• Single Leg Squats - 3 x 15 + 15
• Single Arm Seated Chest Press - 3 x 15 + 15
• Seated Single Leg Extension - 3 x 15 + 15
• Single Arm Incline Chest Press - 3 x 15 + 15
• Standing Rows - 3 x 15
• Reverse Grip Pull Down - 2 x 15
• Seated Overhead Triceps Extension - 2 x 15
• Ab Crunch - 2 x 15 – 2 second holds at flexed position
• Oblique Crunch - 2 x 15 + 15
WORKOUT #4 (45 sec rest between all sets)
• Straight Leg Dead Lifts - 4 x 15
• Single Arm Shoulder Press - 4 x 15 + 15
• Leg Curls - 4 x 15 + 15
• Shoulder Shrugs, Standing Lateral Raises and Standing Rear Deltoids Rows - 3 x 15 + 15 + 15
• Standing Hip Flexion, Lying Hip Abduction and Adduction - 3 x 10 + 10 + 10
• Standing Biceps Curls - 3 x 15
• Calf Raises - 3 x 10 + 10 + 10 (toes in, out & straight)
• Seated Spinal Extension - 3 x 15
WORKOUT #5 (60 sec rest between all sets)
• Squats - 4 x 15
• Seated Chest Press - 4 x 15
• Single Leg Squats - 2 x 12
• Incline Chest Press - 2 x 12
• Seated Leg Extensions - 2 x 12
• Chest Flyes - 2 x 12
• Lat Bar Front Pull Down - 4 x 12
• Standing Triceps Pushdowns - 4 x 15
• Ab Crunch - 3 x 15 – 2 second holds at flexed position
• Oblique Crunch - 3 x 15 + 15
WEEK ONE
WEEK TWO
Page 36

BIO FORCE®EXERCISES
55
CHEST & BACK
SEATED CHEST PRESS
START: Sit facing away. Grip handles with
palms down. Elbows bent 90 degrees at
shoulder level. Cables under arms.
MOTION: Extend elbows and press arms
straight forward. Pause at end of motion.
Bend elbows back to starting position.
TIPS: Press arms forward in arcing
motion. Keep elbows in line with
shoulders and wrists straight. Maintain
upright posture in seated position.
Contract abdominals to stabilize back.
32
MUSCLE GROUPS EXERCISED: Pectoralis, triceps,
anterior deltoids
LEVEL OF DIFFICULTY: Beginner
SEAT: On/Top
Position
LEG LIFT: On
ACCESSORIES:
Handles
SINGLE ARM
SEATED CHEST PRESS
START: Sit facing away. Grip one handle
with palm down. Elbow bent 90 degrees
at shoulder level. Cable under arm.
MOTION: Extend elbow and press arm
straight forward. Pause at end of motion.
Bend elbow back to starting position.
TIPS: Press arm forward in arcing motion.
Keep elbow in line with shoulder and
wrist straight. Avoid rotating torso while
pressing. Maintain upright posture in
seated position. Contract abdominals to
stabilize back. Perform on both sides.
33
MUSCLE GROUPS EXERCISED: Pectoralis, triceps,
anterior deltoids
LEVEL OF DIFFICULTY: Intermediate/Advanced
SEAT: On/Top
Position
LEG LIFT: On
ACCESSORIES:
Handles
INCLINE CHEST PRESS
START: Sit facing away. Grip handles with
palms down. Elbows bent 90 degrees at
shoulder level. Cables over arms.
MOTION: Extend elbows and press arms to
upward angle. Pause at end of motion.
Bend elbows back to starting position.
TIPS: Press arms forward and upward in
arcing motion. Handles to head height at
end of motion. Keep wrists straight.
Maintain upright posture in seated
position. Contract abdominals to
stabilize back.
34
MUSCLE GROUPS EXERCISED: Pectoralis, triceps,
anterior deltoids
LEVEL OF DIFFICULTY: Intermediate
SEAT: On/Top
Position
LEG LIFT: On
ACCESSORIES:
Handles
MOVABLE PULLEY
POSITIONS
MOVABLE PULLEY
POSITIONS
MOVABLE PULLEY
POSITIONS
34
8 WEEK BODY TRANSFORMATION PLAN
WORKOUT #6 (60 sec rest between all sets)
• Straight Leg Dead Lifts - 4 x 15
• Seated Shoulder Press - 4 x 15
• Leg Curls - 4 x 15 + 15
• Shoulder Shrugs, Standing Lateral Raises and Standing Front Raises - 4 x 15 + 15 + 15
• Standing Hip Flexion, Lying Hip Abduction and Adduction - 3 x 10 + 10 + 10
• Standing Biceps Curls - 4 x 15
• Calf Raises - 4 x 10 + 10 + 10 (toes in, out & straight)
• Seated Spinal Extension - 4 x 15
WORKOUT #7 (60 sec rest between all sets)
• Single Leg Squats - 4 x 15 + 15
• Single Arm Seated Chest Press - 4 x 15 + 15
• Seated Single Leg Extension - 2 x 15 + 15
• Single Arm Incline Chest Press - 2 x 15 + 15
• Standing Rows - 4 x 15
• Reverse Grip Pull Down - 4 x 15
• Seated Overhead Triceps Extension - 4 x 15
• Ab Crunch - 3 x 15 – 2 second holds at flexed position
• Oblique Crunch - 3 x 15 + 15
WORKOUT #8 (60 sec rest between all sets)
• Straight Leg Dead Lifts - 4 x 15
• Single Arm Seated Shoulder Press - 4 x 15 + 15
• Leg Curls - 4 x 15 + 15
• Shoulder Shrugs, Standing Lateral Raises and Standing Rear Deltoids - 4 x 15+15+15
• Standing Hip Flexion, Lying Hip Abduction and Adduction - 4 x 10 + 10 + 10
• Standing Biceps Curls - 4 x 15
• Calf Raises - 3 x 10 + 10 + 10 (toes in, out & straight)
• Seated Spinal Extension - 4 x 15
WORKOUT #9 (60 sec rest between all sets)
• Squats - 4 x 12
• Seated Chest Press - 4 x 12
• Single Leg Squats - 2 x 12
• Incline Chest Press - 2 x 12
• Seated Leg Extensions - 2 x 12
• Chest Flyes - 2 x 12
• Lying Hip Extension - 3 x 10 + 10
• Lat Bar Front Pull Down - 4 x 12
• Standing Triceps Pushdowns - 4 x 12
• Ab Crunch - 3 x 12 – 3 second holds at flexed position
• Oblique Crunch - 3 x 12 + 12
WORKOUT #10 (60 sec rest between all sets)
• Straight Leg Dead Lifts - 4 x 12
• Seated Shoulder Press - 4 x 12
• Leg Curls - 4 x 12 + 12
• Shoulder Shrugs, Standing Lateral Raises and Standing Front Raises - 4 x 12 + 12 + 12
• Standing Hip Flexion, Lying Hip Abduction and Adduction - 4 x 8 + 8 + 8
• Standing Biceps Curls - 4 x 12
• Calf Raises - 4 x 10 + 10 + 10 (toes in, out & straight)
• Seated Spinal Extension - 4 x 12
WEEK THREE
Page 37

BIO FORCE®EXERCISES
LEGS
54
MOVABLE PULLEY
POSITIONS
SEATED ANKLE
INVERSION
START: Sit facing side. Foot harness/cuff
on inside ankle, other foot on floor. Grip
edge of seat. Lift leg off floor and rotate
ankle so toes face outward.
MOTION: Rotate ankle until toes face
inward. Pause at end of motion. Rotate
ankle back to starting position.
TIPS: Sit up straight with abdominals con-
tracted. Do not bend lower back. Keep
rotating foot about 6 inches off floor.
Perform on both sides
MUSCLE GROUPS EXERCISED: Ankle inverters
LEVEL OF DIFFICULTY: Beginner
SEAT: On/Top
Position
LEG LIFT: On
ACCESSORIES: Foot
harness/Ankle cuff
31
35
8 WEEK BODY TRANSFORMATION PLAN
WORKOUT #11 (60 sec rest between all sets)
• Single Leg Squats - 4 x 12 + 12
• Single Arm Seated Chest Press - 4 x 12 + 12
• Seated Single Leg Extension - 2 x 12 + 12
• Single Arm Incline Chest Press - 2 x 12 + 12
• Standing Rows - 4 x 12
• Reverse Grip Pull Down - 4 x 12
• Seated Overhead Triceps Extension - 4 x 12
• Ab Crunch - 2 x 12 – 2 second holds at flexed position
• Oblique Crunch - 2 x 12 + 12
• Standing Trunk Rotation - 2 x 12 + 12
WORKOUT #12 (60 sec rest between all sets)
• Straight Leg Dead Lifts - 4 x 12
• Single Arm Shoulder Press - 4 x 12 +12
• Leg Curls - 4 x 12 +12
• Shoulder Shrugs, Standing Lateral Raises and Standing Rear Deltoids Rows - 4 x 12 + 12 + 12
• Standing Hip Flexion, Lying Hip Abduction and Adduction - 3 x 10 + 10 + 10
•
Single Arm
Standing Rows - 4 x 12
• Standing Biceps Curls - 4 x 12
• Calf Raises - 4 x 10 + 10 + 10 (toes in, out & straight)
• Seated Spinal Extension - 4 x 12
WORKOUT #13 (60 sec rest between all sets)
• Squats - 4 x 12
• Seated Chest Press - 4 x 12
• Single Leg Squat - 2 x 12+12
• Seated Leg Extensions - 2 x 12
• Chest Flyes - 2 x 12
• Lat Bar Pull Down (front) - 4 x 12
• Standing Triceps Pushdowns - 4 x 12
• Ab Crunch - 4 x 12 – 4 second holds at flexed position
• Oblique Crunch - 2 x 12 + 12
WORKOUT #14 (60 sec rest between all sets)
• Straight Leg Dead Lifts - 4 x 12
• Seated Shoulder Press - 4 x 12
• Leg Curls - 4 x 12 + 12
• Shoulder Shrugs, Standing Lateral Raises and Standing Front Raises - 4 x 10 + 10 + 10
• Standing Hip Flexion, Lying Hip Abduction and Adduction - 4 x 10 + 10 + 10
• Standing Biceps Curls - 4 x 12
• Calf Raises - 4 x 10 + 10 + 10 (toes in, out & straight)
• Seated Spinal Extension - 4 x 12
WORKOUT #15 (60 sec rest between all sets)
• Single Leg Squats - 4 x 12 + 12
• Single Arm Seated Chest Press - 4 x 12 + 12
• Seated Single Leg Extension - 2 x 12 + 12
• Single Arm Incline Chest Press - 2 x 12 + 12
• Standing Rows - 4 x 12
• Reverse Grip Pull Down - 4 x 12
• Seated Overhead Tricep Extension - 4 x 12
• Closed Grip Chest Press - 2 x 12
• Ab Crunch - 2 x 12 – 3 second holds at flexed position
• Oblique Crunch - 2 x 12 + 12
• Standing Trunk Rotation - 2 x 12 + 12
WEEK FOUR
Page 38

MOVABLE PULLEY
POSITIONS
MOVABLE PULLEY
POSITIONS
MOVABLE PULLEY
POSITIONS
BIO FORCE®EXERCISES
LEGS
53
SEATED SINGLE LEG
ABDUCTION
START: Sit facing side. Foot harness/cuff
on outside ankle, other foot on floor. Lift
leg parallel to floor. Grip top of seat.
MOTION: Open leg to the side, toes
facing up. Pause at end of motion.
Return to starting position.
TIPS: Sit up straight with abdominals con-
tracted. Do not bend lower back. Keep
knees and toes pointing upward as leg
abducts. Perform on both sides.
28
MUSCLE GROUPS EXERCISED: Hip abductors
LEVEL OF DIFFICULTY: Intermediate/Advanced
SEAT: On/Bottom
Position
LEG LIFT: Off
ACCESSORIES: Foot
harness/Ankle cuff
SEATED SINGLE LEG
ADDUCTION
START: Sit facing away. Foot harness/cuff
on one ankle, other foot on floor. Grip
seat. Open leg to the side, parallel
with floor.
MOTION: Pull leg into midline of body.
Pause at end of motion. Open leg to
starting position.
TIPS: Sit up straight with abdominals con-
tracted. Do not bend lower back. Keep
knees and toes pointing upward as leg
adducts. Perform on both sides.
29
MUSCLE GROUPS EXERCISED: Hip adductors
LEVEL OF DIFFICULTY: Intermediate/Advanced
SEAT: On/Bottom
Position
LEG LIFT: Off
ACCESSORIES: Foot
harness/Ankle cuff
SEATED ANKLE
EVERSION
START: Sit facing side. Foot harness/cuff
on outside ankle, other foot on floor. Grip
edge of seat. Lift leg off floor and rotate
ankle so toes face inward.
MOTION: Rotate ankle until toes face
outward. Pause at end of motion. Rotate
ankle back to starting position.
TIPS: Sit up straight with abdominals con-
tracted. Do not bend lower back. Keep
rotating foot about 6 inches off floor.
Perform on both sides.
30
MUSCLE GROUPS EXERCISED: Ankle everters
LEVEL OF DIFFICULTY: Beginner
SEAT: On/Top
Position
LEG LIFT: On
ACCESSORIES: Foot
harness/Ankle cuff
36
8 WEEK BODY TRANSFORMATION PLAN
NOTE: Starting with Workout #16 of the program you will notice that you are to complete “SUPER SETS.”
What is a “Super Set?” It is simply a combination of two different exercises performed one right after the
other without any rest. So for example, in Workout #16 you are to perform a Super Set consisting of
Standing Biceps Curls and Standing Hammer Curls. You will do 4 sets of Biceps Curls (12 reps each)
and then immediately begin performing 4 sets of the Standing Hammer Curl (8 reps each.)
WORKOUT #16 (60 sec rest between all sets)
• Straight Leg Dead Lifts - 4 x 12
• Single Arm Shoulder Press - 4 x 12 + 12
• Leg Curls - 4 x 12 + 12
• Shoulder Shrugs, Standing Lateral Raises and Standing Rear Deltoid Rows - 4 x 10 + 10 + 10
• Standing Hip Flexion, Lying Hip Abduction and Adduction - 4 x 10 + 10 + 10
• SUPER SET • Standing Biceps Curls - 4 x 12
• Standing Hammer Curls - 4 x 8
• Calf Raises - 4 x 10 +10 +10 (toes in, out & straight)
• Seated Spinal Extension - 4 x 12
WORKOUT #17 (60 sec rest between all sets)
• SUPER SET • Squats - 5 x 8
• Single Leg Squats - 5 x 8
• SUPER SET • Seated Chest Press - 5 x 8
• Chest Flyes - 5 x 8
• SUPER SET • Seated Leg Extensions - 2 x 8
• Standing Hip Abduction - 2 x 8
• SUPER SET • Lat Bar Front Pull Down - 5 x 8
• Standing Triceps Pushdowns - 5 x 8
• Closed Grip Chest Press - 5 x 8
• Ab Crunch - 4 x 10 – 4 second holds at flexed position
• Oblique Crunch w/Twists - 4 x 10 + 10
WORKOUT #18 (60 sec rest between all sets)
• Straight Leg Dead Lifts - 5 x 8
• Seated Shoulder Press - 5 x 8
• Leg Curls - 5 x 8 + 8
• Shoulder Shrugs, Standing Lateral Raises and Standing Front Raises - 5 x 8 + 8 + 8
• Standing Hip Flexion, Lying Hip Abduction and Adduction - 5 x 8 + 8 + 8
• Standing Biceps Curls - 5 x 8
• Calf Raises - 5 x 8 + 8 + 8 (toes in, out & straight)
• Seated Spinal Extension - 5 x 8
WORKOUT #19 (60 sec rest between all sets)
• SUPER SET • Squats - 5 x 8
• Single Leg Squats - 5 x 8 + 8
• SUPER SET • Seated Chest Press - 5 x 8
• Single Arm Seated Chest Press - 5 x 8 + 8
• SUPER SET • Seated Leg Extension - 2 x 8
• Leg Curls - 2 x 8
• SUPER SET • Single Arm Incline Chest Press - 2 x 8 + 8
• Single Arm Standing Rows - 2 x 8 + 8
• SUPER SET • Reverse Grip Pull Down - 5 x 8
• Standing Triceps Pushdowns - 5 x 8
• Ab Crunch - 3 x 10 – 4 second holds - while flexed
• Oblique Crunch - 2 x 10 + 10
WEEK FIVE
Page 39

MOVABLE PULLEY
POSITIONS
MOVABLE PULLEY
POSITIONS
MOVABLE PULLEY
POSITIONS
BIO FORCE®EXERCISES
LEGS
52
LYING HIP ROTATION
START: Lie on back facing away, shoulders
on base. Foot harnesses/cuffs on ankles.
Grip base of frame. Lift legs 6 inches
off floor.
MOTION: Open both legs to the side.
Continue in upward circular motion
until legs are over hips. Lower to starting
position. Reverse direction of motion.
TIPS: Keep legs straight while moving
in circular pattern. Do not excessively
arch back off floor. Contract abdominals
to stabilize back. Perform in both
directions.
25
MUSCLE GROUPS
EXERCISED:
Gluteals,
hamstrings,
hip adductors,
hip flexors,
abdominals
LEVEL OF
DIFFICULTY:
Intermediate/
Advanced
SEAT: Off
LEG LIFT: Off
ACCESSORIES:
Foot harness/
Ankle cuff
SINGLE LEG
LYING HIP ROTATION
START: Lie on back facing away, shoulders
on base. Foot harnesses/cuffs on ankles.
Grip base of frame. Lift legs 6 inches
off floor.
MOTION: Open one leg to the side.
Continue in upward circular motion
until leg is over hip. Lower to starting
position. Reverse direction of motion.
TIPS: Keep leg straight while moving in
circular pattern. Do not excessively arch
back off floor. Contract abdominals to
stabilize back. Perform in both
directions. Perform on both sides.
26
MUSCLE GROUPS
EXERCISED:
Gluteals,
hamstrings,
hip adductors,
hip flexors,
abdominals
LEVEL OF
DIFFICULTY:
Advanced
SEAT: Off
LEG LIFT: Off
ACCESSORIES:
Foot harness/
Ankle cuff
SEATED SINGLE
LEG PRESS
START: Sit facing away. Foot harness/cuff
on one ankle, other foot on floor. Bend
knee and lift foot to seat height.
Grip seat.
MOTION: Extend knee until leg is straight
and parallel to floor. Pause at end of
movement. Bend knee to starting
position.
TIPS: Sit up straight with abdominals
contracted. Keep knees and toes
pointing upward. Press leg forward.
Do not allow leg to open to the side.
Perform on both sides.
27
MUSCLE GROUPS EXERCISED: Gluteals, quadriceps,
hamstrings
LEVEL OF DIFFICULTY: Beginner
SEAT: On/Bottom
Position
LEG LIFT: Off
ACCESSORIES: Foot
harness/Ankle cuff
37
8 WEEK BODY TRANSFORMATION PLAN
WORKOUT #20 (60 sec rest between all sets)
• Straight Leg Dead Lifts - 5 x 8
• Single Arm Shoulder Press - 5 x 8 + 8
• Leg Curls - 5 x 8 + 8
• Shoulder Shrugs, Standing Lateral Raises and Standing Rear Deltoid Rows - 5 x 8 + 8 + 8
• Standing Hip Flexion, Lying Hip Abduction and Adduction - 3 x 8 + 8 + 8
• Standing Biceps Curls - 5 x 8
• Calf Raises - 5 x 8 + 8 + 8 (toes in, out & straight)
• Seated Spinal Extension - 5 x 8
WORKOUT #21 (60 sec rest between all sets)
• SUPER SET • Single Leg Squats - 5 x 8 + 8
• Squats - 5 x 8
• Squats - 1 x ? – Do one set for 45 seconds doing as many as possible without stopping
• SUPER SET • Single Arm Seated Chest Press - 5 x 8
• Seated Chest Press - 5 x 8
• Seated Chest Press - 1 x ? – Do one set for 45 seconds doing as many as possible without stopping
• Seated Leg Extensions - 2 x 8
• SUPER SET • Chest Flyes - 5 x 8
• Lat Bar Front Pull Down - 2 x 8
• Lat Bar Pull Downs - 1 x ? – Do one set for 45 seconds doing as many as possible without stopping
• Ab Crunch - 4 x 10 – 5 second holds - while flexed
• Oblique Crunch - 2 x 10 + 10
• Standing Trunk Rotation - 2 x 12 + 12
WORKOUT #22 (60 sec rest between all sets)
• Straight Leg Dead Lifts - 5 x 8
• Seated Shoulder Press - 5 x 8
• Leg Curls - 5 x 8 + 8
• Shoulder Shrugs, Standing Lateral Raises and Standing Front Raises - 5 x 8 + 8 + 8
• Standing Hip Flexion, Lying Hip Abduction and Adduction -5 x 8 + 8 + 8
• Standing Biceps Curls - 5 x 8
• Calf Raises - 5 x 8 + 8 + 8 (toes in, out & straight)
• Seated Spinal Extension - 5 x 8
WORKOUT #23 (60 sec rest between all sets)
• SUPER SET • Single Leg Squats - 4 x 8, 1 x 12
• Squats - 4 x 8, 1 x 12
• SUPER SET • Single Arm Seated Chest Press - 4 x 8 + 8, 1 x 12 + 12
• Seated Chest Press - 4 x 8, 1 x 12
• SUPER SET • Seated Leg Extension - 2 x 8 + 8, 1 x 12 + 12
• Leg Curls - 2 x 8, 1 x 12
• SUPER SET • Incline Chest Press - 1 x 8, 1 x 12
• Standing Rows - 1 x 8, 1 x 12
• SUPER SET • Reverse Grip Pull Down - 3 x 8, 1 x 12
• Seated Overhead Triceps Extension - 3 x 8, 1 x 12
• Closed Grip Chest Press - 3 x 8, 1 x 12
• SUPER SET • Ab Crunch - 3 x 8, 1 x 12 – 4 second holds at flexed position
• Oblique Crunch - 3 x 8 + 8, 1 x 12 + 12
WEEK SIX
Page 40

MOVABLE PULLEY
POSITIONS
MOVABLE PULLEY
POSITIONS
MOVABLE PULLEY
POSITIONS
BIO FORCE®EXERCISES
LEGS
51
LYING SINGLE
LEG PRESS
START: Lie on back facing away, shoulders
on base. Foot harnesses/cuffs on ankles.
Grip base of frame. Bend hip and knee
of one leg.
MOTION: Extend hip and knee until leg
is straight. Pause at end of motion.
Return to starting position.
TIPS: Keep knee in line with shoulder
throughout exercise. Do not excessively
arch back off floor as leg extends.
Contract abdominals to stabilize back.
Perform on both sides.
22
MUSCLE GROUPS EXERCISED: Gluteals, quadriceps,
hamstrings, abdominals
LEVEL OF DIFFICULTY: Beginner
SEAT: Off
LEG LIFT: Off
ACCESSORIES:
Foot harness/
Ankle cuff
SCISSOR KICKS
START: Lie on back facing away, shoulders
on base. Foot harnesses/cuffs on ankles.
Grip base of frame. Lift one leg perpendicular to floor.
MOTION: Lower leg straight down to floor.
Simultaneously lift other leg. Continue
alternating legs in “scissor” motion.
TIPS: Keep legs straight while lifting
and lowering. Do not allow legs to open
to the side. Keep knees in line with
shoulders throughout exercise. Do not
excessively arch back off floor. Contract
abdominals to stabilize back.
23
MUSCLE GROUPS EXERCISED: Gluteals, hamstrings
LEVEL OF DIFFICULTY: Beginner
SEAT: Off
LEG LIFT: Off
ACCESSORIES:
Foot harness/
Ankle cuff
FLUTTER KICKS
START: Lie on back facing away, shoulders
on base. Foot harnesses/cuffs on ankles.
Grip base of frame. Lift one leg 12 inches
off floor.
MOTION: Lower leg straight down to floor.
Simultaneously lift other leg 12 inches off
floor. Continue alternating legs in small
“flutter” motion.
TIPS: Keep legs straight while lifting and
lowering. Do not allow legs to open to
the side. Keep knees in line with
shoulders throughout exercise. Do not
excessively arch back off floor. Contract
abdominals to stabilize back.
24
MUSCLE GROUPS EXERCISED: Gluteals, hamstrings,
abdominals
LEVEL OF DIFFICULTY: Intermediate
SEAT: Off
LEG LIFT: Off
ACCESSORIES:
Foot harness/
Ankle cuff
38
8 WEEK BODY TRANSFORMATION PLAN
WORKOUT #24 (60 sec rest between all sets)
• Straight Leg Dead Lifts - 3 x 8, 1 x 12
• Single Arm Shoulder Press - 3 x 8 + 8, 1 x 12 + 12
• Leg Curls - 1 x 8 + 8, 3 x 6 + 6
• Shoulder Shrugs, Standing Lateral Raises and Standing Rear Deltoid Rows 3 x 8 + 8 + 8, 1 x 12 + 12 + 12
• Standing Hip Flexion, Lying Hip Abduction and Adduction - 3 x 8 + 8 + 8, 1 x 12 + 12 + 12
• SUPER SET • Standing Biceps Curls - 3 x 8, 1 x 12
• Standing Hammer Curls - 3 x 8, 1 x 12
• Calf Raises - 3 x 8 + 8 + 8, 1 x 12 + 12 + 12 (toes in, out & straight)
• Seated Spinal Extension - 3 x 8, 1 x 12
WORKOUT #25 (60 sec rest between all sets)
• SUPER SET • Single Leg Squats - 2 x 10 + 10, 2 x 15 + 15, 1 x 20 + 20
• Squats - 2 x 10, 2 x 15, 1 x 20
• SUPER SET • Single Arm Seated Chest Press - 2 x 10 + 10, 2 x 15 + 15, 1 x 20 + 20
• Seated Chest Press - 2 x 10, 2 x 15, 1 x 20
• SUPER SET • Seated Leg Extensions - 1 x 10, 1 x 15, 1 x 20
• Leg Curls - 1 x 10, 1 x 15, 1 x 20
• SUPER SET • Chest Flyes - 2 x 10, 2 x 15, 1 x 20
• Lat Bar Front Pull Down - 2 x 10, 2 x 15, 1 x 20
• SUPER SET • Closed Grip Chest Press - 2 x 10, 2 x 15, 1 x 20
• Seated Overhead Triceps Extension - 2 x 10, 2 x 15, 1 x 20
• SUPER SET • Ab Crunch - 2 x 10 , 2 x 15, 1 x 20 – 5 second holds at flexed position
• Oblique Crunch - 2 x 10 + 10, 2 x 15 + 15, 1 x 20 + 20
WORKOUT #26 (60 sec rest between all sets)
• Straight Leg Dead Lifts - 2 x 10, 2 x 15, 1 x 20
• Seated Shoulder Press - 2 x 10, 2 x 15, 1 x 20
• Leg Curls - 2 x 10 + 10, 2 x 15 + 15, 1 x 20 + 20
• Shoulder Shrugs, Standing Lateral Raises and Standing Front Raises - 2 x 10 + 10 + 10,
2 x 15 + 15 + 15, 1 x 20 + 20 + 20
• Standing Hip Flexion, Lying Hip Abduction and Adduction - 2 x 10 + 10 + 10,
2 x 15 + 15 + 15, 1 x 20 + 20 + 20
• Standing Biceps Curls - 2 x 10, 2 x 15, 1 x 20
• Calf Raises - 2 x 10 + 10 + 10, 2 x 15 + 15 + 15, 1 x 20 + 20 + 20 (toes in, out & straight)
• Seated Spinal Extension - 2 x 10 + 10, 2 x 15 + 15, 1 x 20 + 20
WORKOUT #27 (60 sec rest between all sets)
• Single Leg Squats - 2 x 10, 2 x 15, 2 x 20
• Single Arm Seated Chest Press - 2 x 10 + 10, 2 x 15 + 15, 2 x 20 + 20
• Seated Single Leg Extension - 1 x 10 + 10, 1 x 15 + 15, 1 x 20 + 20
• Single Arm Incline Chest Press - 1 x 10 + 10, 1 x 15 + 15, 1 x 20 + 20
• SUPER SET • Standing Rows - 2 x 10, 2 x 15, 2 x 20
• Reverse Grip Pull Down - 2 x 10, 2 x 15, 2 x 20
• SUPER SET • Seated Overhead Triceps Extension - 2 x 10, 2 x 15, 2 x 20
• Closed Grip Chest Press - 2 x 10, 2 x 15, 2 x 20
• SUPER SET • Ab Crunch - 2 x 10, 2 x 15, 2 x 20 – 4 second holds at flexed position
• Oblique Crunch - 2 x 10 + 10, 2 x 15 + 15, 2 x 20 + 20
WEEK SEVEN
Page 41

WORKOUT #28 (60 sec rest between all sets)
• Straight Leg Dead Lifts - 2 x 10, 2 x 15, 2 x 20
• Single Arm Shoulder Press - 2 x 10 + 10, 2 x 15 + 15, 2 x 20 + 20
• Leg Curls - 2 x 10 + 10, 2 x 15 + 15, 2 x 20 + 20
• Single Arm Shoulder Shrugs, Standing Lateral Raises and Standing Rear Deltoid Row 2 x 10 + 10, 2 x 15 + 15, 2 x 20 + 20
• Standing Hip Flexion, Lying Hip Abduction and Adduction - 2 x 10 + 10 + 10, 2 x 15 + 15 + 15,
2 x 20 + 20 + 20
• Standing Biceps Curls - 2 x 10, 2 x 15, 2 x 20
• Calf Raises - 2 x 10 + 10 + 10, 2 x 15 + 15 + 15, 2 x 20 + 20 + 20 (toes in, out & straight)
• Seated Spinal Extension - 2 x 10, 2 x 15, 2 x 20
WORKOUT #29 (60 sec rest between all sets)
• Squats - 1 x 15, 1 x 10, 1 x 8, 1 x 6, x 15
• Seated Chest Press - 1 x 15, 1 x 10, 1 x 8, 1 x 6, 1 x 15
• Seated Leg Extensions - 1 x 15, 1 x 10, 1 x 8, 1 x 6, 1 x 15
• Chest Flyes - 1 x 15, 1 x 10, 1 x 8, 1 x 6, 1 x 15
• Lat Bar Front Pull Down - 1 x 15, 1 x 10, 1 x 8, 1 x 6, 1 x 15
• Standing Triceps Pushdowns - 1 x 15, 1 x 10, 1 x 8, 1 x 6, 1 x 15
• Ab Crunch - 1 x 15, 1 x 10, 1 x 8, 1 x 6, 1 x 15
• Oblique Crunch - 1 x 15 + 15, 1 x 10 + 10, 1 x 8 + 8, 1 x 6 + 6, 1 x 15 + 15
WORKOUT #30 (60 sec rest between all sets)
• Straight Leg Dead Lifts - 1 x 15, 1 x 10, 1 x 8, 1 x 6, 1 x 15
• Seated Shoulder Press - 1 x 15, 1 x 10, 1 x 8, 1 x 6, 1 x 15
• Leg Curls - 1 x 15 + 15, 1 x 10 + 10, 1 x 8 + 8, 1 x 6 + 6, 1 x 15 + 15
• Shoulder Shrugs, Standing Lateral Raises and Standing Front Raises - 1 x 15 + 15 + 15,
1 x 10 + 10 + 10, 1 x 8 + 8 + 8, 1 x 6 + 6 + 6, 1 x 15 + 15 + 15
• Standing Hip Flexion, Lying Hip Abduction and Adduction - 1 x 15 + 15 + 15, 1 x 10 + 10 + 10,
1 x 8 + 8 + 8, 1 x 6 + 6 + 6, 1 x 15 + 15 + 15
• Standing Biceps Curls - 1 x 15, 1 x 10, 1 x 8, 1 x 6, 1 x 15
• Calf Raises - 1 x 15 + 15 + 15, 1 x 10 + 10 + 10, 1 x 8 + 8 + 8, 1 x 6 + 6 + 6, 1 x 15 + 15 + 15
(toes in, out & straight)
• Seated Spinal Extension - 1 x 15 + 15, 1 x 10 + 10, 1 x 8 + 8, 1 x 6 + 6, 1 x 15 + 15
WORKOUT #31 (60 sec rest between all sets)
• Single Leg Squats - 2 x 15 + 15, 2 x 10 + 10, 2 x 8 + 8, 2 x 6 + 6, 1 x 15 + 15
• Single Arm Seated Chest Press - 2 x 15 + 15, 2 x 10 + 10, 2 x 8 + 8, 2 x 6 + 6, 1 x 15 + 15
• Seated Single Leg Extension - 2 x 15 + 15, 2 x 10 + 10, 2 x 8 + 8, 2 x 6 + 6, 1 x 15 + 15
• Single Arm Incline Chest Press - 2 x 15 + 15, 2 x 10 + 10, 2 x 8 + 8, 2 x 6 + 6, 1 x 15 + 15
• Reverse Grip Pull Down - 2 x 15, 2 x 10, 2 x 8, 2 x 6, 1 x 15
• Seated Overhead Triceps Extension - 2 x 15, 2 x 10, 2 x 8, 2 x 6, 1 x 15
• Ab Crunch - 2 x 15, 2 x 10, 2 x 8, 2 x 6, 1 x 15
• Standing Trunk Rotation - 2 x 15 + 15, 2 x 10 + 10, 2 x 8 + 8, 2 x 6 + 6, 1 x 15 + 15
WORKOUT #32 (60 sec rest between all sets)
• Straight Leg Dead Lifts - 2 x 15, 2 x 10, 2 x 8, 2 x 6, 1 x 15
• Single Arm Shoulder Press - 2 x 15 + 15, 2 x 10 + 10, 2 x 8 + 8, 2 x 6 + 6, 1 x 15 + 15
• Leg Curls - 2 x 15 + 15, 2 x 10 + 10, 2 x 8 + 8, 2 x 6 + 6, 1 x 15 + 15
• Standing Hip Flexion, Lying Hip Abduction and Adduction - 1 x 15 + 15 + 15, 1 x 10 + 10 + 10,
1 x 8 + 8 + 8, 1 x 6 + 6 + 6, 1 x 15 + 15 + 15
• Standing Biceps Curls - 2 x 15, 2 x 10, 2 x 8, 2 x 6, 1 x 15
• Calf Raises - 1 x 15 + 15 + 15, 1 x 10 + 10 + 10, 1 x 8 + 8 + 8, 1 x 6 + 6 + 6, 1 x 15 + 15 + 15
(toes in, out & straight)
• Seated Spinal Extension - 2 x 15, 2 x 10, 2 x 8, 2 x 6, 1 x 15
MOVABLE PULLEY
POSITIONS
MOVABLE PULLEY
POSITIONS
MOVABLE PULLEY
POSITIONS
BIO FORCE®EXERCISES
LEGS
50
LYING HIP
ABDUCTION/
ADDUCTION
START: Lie on back facing away, shoulders
on base. Foot harnesses/cuffs on ankles.
Grip base of frame. Lift legs 6 inches
off floor.
MOTION: Open both legs to the side.
Pause at end of motion. Close legs
back to starting position.
TIPS: Keep both legs straight and lifted
off floor while opening and closing.
Do not excessively arch back off floor.
Contract abdominals to stabilize back.
Modify by lowering one leg to floor and
performing on one side.
19
MUSCLE GROUPS EXERCISED: Hip adductors, hip flexors,
abdominals
LEVEL OF DIFFICULTY: Intermediate/Advanced
SEAT: Off
LEG LIFT: Off
ACCESSORIES:
Foot harness/
Ankle cuff
LYING SINGLE LEG
ABDUCTION/
ADDUCTION
START: Lie on back facing away, shoulders
on base. Foot harnesses/cuffs on ankles.
Grip base of frame. Lift legs 6 inches
off floor.
MOTION: Open one leg to the side. Pause
at end of motion. Close leg back to
starting position.
TIPS: Keep non-moving leg straight and
lifted off floor while opening and closing
other leg. Do not excessively arch back
off floor. Contract abdominals to stabilize
back. Modify by lowering non-moving leg
to floor. Perform on both sides.
20
MUSCLE GROUPS EXERCISED: Hip adductors, hip flexors,
abdominals
LEVEL OF DIFFICULTY: Advanced
SEAT: Off
LEG LIFT: Off
ACCESSORIES:
Foot harness/
Ankle cuff
LYING DOUBLE
LEG PRESS
START: Lie on back facing away, shoulders
on base. Foot harnesses/cuffs on ankles.
Grip base of frame. Bend hips and
knees.
MOTION: Extend hips and knees until legs
are straight. Pause at end of motion.
Return to starting position.
TIPS: Keep knees in line with shoulders
throughout exercise. Do not excessively
arch back off floor as legs extend.
Contract abdominals to stabilize back.
21
MUSCLE GROUPS EXERCISED: Gluteals, quadriceps,
hamstrings, abdominals
LEVEL OF DIFFICULTY: Intermediate/Advanced
SEAT: Off
LEG LIFT: Off
ACCESSORIES:
Foot harness/
Ankle cuff
39
8 WEEK BODY TRANSFORMATION PLAN
WEEK EIGHT
Page 42

MOVABLE PULLEY
POSITIONS
MOVABLE PULLEY
POSITIONS
MOVABLE PULLEY
POSITIONS
BIO FORCE®EXERCISES
LEGS
49
STANDING HIP
ABDUCTION
START: Stand facing side. Foot harness/
cuff on outside ankle, inside foot on
base. Grip the top of the backrest.
MOTION: Lift leg to side, toes facing front.
Pause at end of motion. Lower to
starting position.
TIPS: Keep leg straight while lifting. Lift leg
directly to side. Avoid angling leg front or
back, or lifting toes. Maintain upright
body position. Do not tip body as leg lifts.
Contract abdominals to stabilize back.
Perform on both sides.
16
MUSCLE GROUPS EXERCISED: Hip abductors
LEVEL OF DIFFICULTY: Beginner
SEAT: Off
LEG LIFT: Off
ACCESSORIES:
Foot harness/
Ankle cuff
STANDING HIP
ADDUCTION
START: Stand facing side. Foot harness/
cuff on inside ankle, outside foot on
base. Grip the top of the backrest.
MOTION: Pull inside leg across supporting
leg, toes facing front. Pause at end of
motion. Return to starting position.
TIPS: Pull working leg in front of
supporting leg. Maintain upright body
position. Do not tip body as leg pulls
across. Contract abdominals to stabilize
back. Perform on both sides.
17
MUSCLE GROUPS EXERCISED: Hip adductors
LEVEL OF DIFFICULTY: Beginner
SEAT: Off
LEG LIFT: Off
ACCESSORIES:
Foot harness/
Ankle cuff
LYING HIP
EXTENSION
START: Lie on back facing away, shoulders
on base. Foot harnesses/cuffs on
ankles. Grip base of frame. Lift one
leg perpendicular to floor.
MOTION: Lower leg straight down to floor.
Pause at end of motion. Slowly raise to
starting position.
TIPS: Keep leg straight while lifting and
lowering. Do not allow leg to open to the
side. Keep knee in line with shoulder
throughout exercise. Do not excessively
arch back off floor. Contract abdominals
to stabilize back. Perform on both sides.
18
MUSCLE GROUPS EXERCISED: Gluteals, hamstrings
LEVEL OF DIFFICULTY: Beginner
SEAT: Off
LEG LIFT: Off
ACCESSORIES:
Foot harness/
Ankle cuff
40
WARM-UP AND COOL DOWN STRETCHES
When performing these stretches, your movements should be slow and smooth,
with no bouncing or jerking. Move into the stretch until you feel a slight tension,
not pain, in the muscle and hold the stretch for 20 to 30 seconds. Breathe
slowly and rhythmically. Be sure not to hold your breath. Remember that all
stretches must be done for both sides of your body.
1. Quadriceps Stretch
Stand close to a wall, chair or other solid object. Use one hand to assist
your balance. Bend the opposite knee and lift your heel towards your
buttocks. Reach back and grasp the top of your foot with the same side
hand. Keeping your inner thighs close together, slowly pull your foot
towards your buttocks until you feel a gentle stretch in the front of your
thigh. You do not have to touch your buttocks with your heel. Stop
pulling when you feel the stretch. Keep your kneecap pointing straight
down and keep your knees close together. (Do not let the lifted knee
swing outward.)
Hold for 20 to 30 seconds. Repeat for the other leg.
2. Calf and Achilles Stretch
Stand approximately one arms length away from a wall or chair with
your feet hip-width apart. Keeping your toes pointed forward, move
one leg in close to the chair while extending the other leg behind you.
Bending the leg closest to the chair and keeping the other leg straight,
place your hands on the chair. Keep the heel of the back leg on the
ground and move your hips forward. Slowly lean forward from the
ankle, keeping your back leg straight until you feel a stretch in
your calf muscles.
Hold for 20 to 30 seconds. Repeat for the opposite leg.
3. Overhead/Triceps Stretch
Stand with your feet shoulder width apart and your knees slightly bent.
Lift one arm overhead and bend your elbow, reaching down behind
your head with your hand toward the opposite shoulder blade. Walk
your fingertips down your back as far as you can. Hold this position.
Reach up with your opposite hand and grasp your flexed elbow. Gently
assist the stretch by pulling on the elbow.
Hold for 20 to 30 seconds. Repeat for the opposite arm.
Page 43

MOVABLE PULLEY
POSITIONS
MOVABLE PULLEY
POSITIONS
MOVABLE PULLEY
POSITIONS
BIO FORCE®EXERCISES
LEGS
48
STANDING LEG PRESS
START: Stand facing frame. Foot harness/
cuff on one ankle, other foot on base.
Grip the top of the backrest with
both hands. Bend hip and knee
of working leg.
MOTION: Extend hip and knee. Press leg
straight back behind body. Pause
at end of motion. Flex hip and knee
back to starting position.
TIPS: Keep arms straight to stabilize torso.
Maintain forward lean with straight back.
Contract abdominals to stabilize back.
Perform on both sides.
13
MUSCLE GROUPS EXERCISED: Gluteals, hamstrings,
quadriceps
LEVEL OF DIFFICULTY: Beginner
SEAT: Off
LEG LIFT: Off
ACCESSORIES:
Foot harness/
Ankle cuff
STANDING HIP
FLEXION
START: Stand facing away. Foot harness/
cuff on one ankle, other foot on base.
Place hands on hips.
MOTION: Flex hip and raise leg until thigh is
parallel to floor. Pause at top of motion.
Lower to starting position.
TIPS: Maintain upright body position.
Do not lean forward or back as leg lifts.
Contract abdominals to stabilize back.
Perform on both sides.
14
MUSCLE GROUPS EXERCISED: Hip flexors
LEVEL OF DIFFICULTY: Advanced
SEAT: Off
LEG LIFT: Off
ACCESSORIES:
Foot harness/
Ankle cuff
STANDING HIP
EXTENSION
START: Stand facing frame. Foot harness/
cuff on one ankle, other foot on base.
Grip the top of the backrest with both
hands. Bend knee 90 degrees in front
of body.
MOTION: Extend hip. Pull thigh in line with
or slightly behind standing leg. Pause
at end of motion. Return to starting
position.
TIPS: Keep knee bent while extending hip.
Maintain forward lean with straight back.
Keep arms straight to stabilize torso.
Contract abdominals to stabilize
back. Perform on both sides.
15
MUSCLE GROUPS EXERCISED: Gluteals, hamstrings
LEVEL OF DIFFICULTY: Beginner
SEAT: Off
LEG LIFT: Off
ACCESSORIES:
Foot harness/
Ankle cuff
41
WARM-UP AND COOL DOWN STRETCHES
4. Back Stretch
Stand with your legs shoulder width apart and your knees slightly
bent. Bend forward from your waist with your arms extending loosely
in front of your body. Gently bend from the waist flexing your body
as far forward as it will go.
Hold for 20 to 30 seconds. Straighten up and repeat.
5. Standing Hamstrings Stretch
Stand with your legs hip-width apart. Extend one leg out in front
of you and keep that foot flat against the ground. W ith your hands
resting lightly on your thighs, bend your back leg and lean forward
slightly from your hips until you feel a stretch in the back of your
thigh. Be sure to lean forward from the hip joint rather than
bending at your waist.
Hold for 20 to 30 seconds. Repeat for the opposite leg.
6. Buttocks and Hips Stretch
Lay flat on your back with your hips relaxed against the floor. Bend
one leg at the knee. Keeping both shoulders flat on the floor, gently
grasp the bent knee with your hands and pull it over your body
and towards the ground. You should feel a stretch in your hips,
abdominals and lower back.
Hold for 20 to 30 seconds and release. Repeat for opposite side.
7. Inner Thigh Stretch
Sit on the floor and bend your legs so that the soles of your feet
are together. Place your elbows on your knees. Lean forward from
the waist and press down lightly on the inside of your knees. You
should feel a stretch in the muscles of your inside thigh.
Hold for 20 to 30 seconds and release.
8. Arm Pullback
Stand with your feet shoulder width apart and toes pointing forward and
with your knees slightly bent. Let your arms hang relaxed on either side
of your body. Expand your chest and pull your shoulders back. Bend
your elbows slightly and clasp your hands behind your back. Slowly
straighten your arms as you lift your hands upward. Raise your hands
upward until you feel mild tension in your shoulder and chest region.
Hold for 20 to 30 seconds. Lower your arms to their original position
and bend your elbows. Release your hands and return them to
your sides.
Page 44

MOVABLE PULLEY
POSITIONS
MOVABLE PULLEY
POSITIONS
MOVABLE PULLEY
POSITIONS
BIO FORCE®EXERCISES
LEGS
47
EVERSION CALF
RAISES
START: Stand facing frame. Feet hip
width apart on base. Toes facing
outward. Grip handles at sides of body.
MOTION: Raise heels, bending at balls
of feet. Pause at top of movement.
Lower heels to starting position.
TIPS: Keep arms and legs straight.
Contract abdominals to stabilize back.
Maintain upright position of torso. Do
not lean or bend forward or back.
10
MUSCLE GROUPS EXERCISED: Gastrocnemius, soleus
LEVEL OF DIFFICULTY: Intermediate/Advanced
SEAT: Off
LEG LIFT: Off
ACCESSORIES:
Handles
INVERSION CALF
RAISES
START: Stand facing frame. Feet hip width
apart on base. Toes facing inward. Grip
handles at sides of body.
MOTION: Raise heels, bending at balls
of feet. Pause at top of movement.
Lower heels to starting position.
TIPS: Keep arms and legs straight.
Contract abdominals to stabilize back.
Maintain upright position of torso. Do
not lean or bend forward or back.
11
MUSCLE GROUPS EXERCISED: Gastrocnemius, soleus
LEVEL OF DIFFICULTY: Intermediate/Advanced
SEAT: Off
LEG LIFT: Off
ACCESSORIES:
Handles
SINGLE LEG
KICK BACK
START: Stand facing frame. Foot
harness/cuff on one ankle, other foot
on base. Lean forward from hips. Grip
the top of the backrest with both hands.
MOTION: Extend hip. Pull leg straight back
behind body. Pause at end of motion.
Lower to starting position.
TIPS: Keep leg straight while lifting.
Maintain forward lean with straight
back. Keep arms straight to stabilize
torso. Contract abdominals to stabilize
back. Perform on both sides.
12
MUSCLE GROUPS EXERCISED: Gluteals, hamstrings
LEVEL OF DIFFICULTY: Beginner
SEAT: Off
LEG LIFT: Off
ACCESSORIES:
Foot harness/
Ankle cuff
42
BIO FORCE®EXERCISE INDEX
1. Squat
2. Single Leg Squat
3. Reverse Lunge
4. Seated Leg Extension
5. Seated Single Leg Extension
6. Straight Leg Dead Lift
7. Straight Bar Dead Lift
8. Leg Curls
9. Calf Raises
10. Eversion Calf Raises
11. Inversion Calf Raises
12. Single Leg Kick Back
13. Standing Leg Press
14. Standing Hip Flexion
15. Standing Hip Extension
16. Standing Hip Abduction
17. Standing Hip Adduction
18. Lying Hip Extension
19. Lying Hip Abduction/Adduction
20. Lying Single Leg Abduction/Adduction
21. Lying Double Leg Press
22. Lying Single Leg Press
23. Scissor Kicks
24. Flutter Kicks
25. Lying Hip Rotation
26. Single Leg Lying Hip Rotation
27. Seated Single Leg Press
28. Seated Single Leg Abduction
29. Seated Single Leg Adduction
30. Seated Ankle Eversion
31. Seated Ankle Inversion
LEGS
Developing Your Bio Force®Workout
The choices you make about the frequency (how often), the duration (how long), and
intensity (how hard) at which you will workout, will directly influence your results.
Before beginning any workouts on the Bio Force® Spor t exerciser, you should first
determine your current fitness level. The following are guidelines that you can use to
determine your fitness level, but remember these are just guidelines. You must always
listen to your body. Start out at a level that is comfortable to you and progress sensibly.
Beginner – No previous exercise experience, or have not exercised in a long time.
Intermediate – Have been performing exercises regularly for three months or more.
Advanced – Have been performing exercises regularly for six months or more.
Note: The unit shown in the following exercise photos may differ slightly from the
unit you purchased.
Page 45

MOVABLE PULLEY
POSITIONS
MOVABLE PULLEY
POSITIONS
MOVABLE PULLEY
POSITIONS
BIO FORCE®EXERCISES
LEGS
46
STRAIGHT BAR
DEAD LIFT
START: Stand facing frame. Feet hip
width apart on base with knees bent.
Bend forward at hips and grip lat bar
in front of shins.
MOTION: Extend hips and back. Stand
upright, pulling bar to front thighs. Bend
knees and hips and lower to starting
position.
TIPS: Keep arms and back straight with
chest and head lifted. Hinge up and
down from hips. Do not round lower
back. Contract abdominals to stabilize
back. Bend forward until a slight stretch
is felt in hamstrings.
7
MUSCLE GROUPS EXERCISED: Hamstrings, lumbar spinal
extensors, gluteals
LEVEL OF DIFFICULTY: Intermediate/Advanced
SEAT: Off
LEG LIFT: Off
ACCESSORIES: Lat
Bar/Front Position
LEG CURLS
START: Stand facing frame. One thigh
against top leg bar pad. Same side ankle
under bottom leg pad. Grip the top of the
backrest with same side arm.
MOTION: Flex knee until lower pad is near
buttocks. Pause at top of movement.
Lower to starting position.
TIPS: Lean slightly forward with entire
body. Keep back straight while curling
leg. Contract abdominals to stabilize
back. Do not lift thigh away from upper
leg bar pad. Perform on both sides.
8
MUSCLE GROUPS EXERCISED: Hamstrings
LEVEL OF DIFFICULTY: Beginner
SEAT: On/Top
Position
LEG LIFT: On
ACCESSORIES:
None
CALF RAISES
START: Stand facing frame. Feet hip width
apart on base. Toes facing forward. Grip
handles at sides of body.
MOTION: Raise heels, bending at balls
of feet. Pause at top of movement.
Lower heels to starting position.
TIPS: Keep arms and legs straight.
Contract abdominals to stabilize back.
Maintain upright position of torso. Do
not lean or bend forward or back.
9
MUSCLE GROUPS EXERCISED: Gastrocnemius, soleus
LEVEL OF DIFFICULTY: Beginner
SEAT: Off
LEG LIFT: Off
ACCESSORIES:
Handles
x
x
43
BIO FORCE®EXERCISE INDEX
CHEST & BACK
32. Seated Chest Press
33. Single Arm Seated Chest Press
34. Incline Chest Press
35. Single Arm Incline Chest Press
36. Chest Flye
37. Single Arm Chest Flye
38. Incline Chest Flye
39. Single Arm Incline Chest Flye
40. Decline Chest Press
41. Closed Grip Chest Press
42. Lat Bar Pull Down
43. Lat Bar Front Pull Down
44. Single Arm Overhand Pull Down
45. Reverse Grip Pull Down
46. Single Arm Reverse Grip Pull Down
47. Neutral Grip Pull Down
48. Single Arm Neutral Grip Pull Down
49. Seated Pull Over
50. Single Arm Seated Pull Over
51. Straight Arm Lateral Pull Down
52. Single Straight Arm Lateral Pull Down
53. Standing Row - Neutral Position
54. Single Arm Standing Row - Neutral Position
55. Standing Row - Overhand Position
56. Single Arm Standing Row - Overhand Position
57. Standing Row - Underhand Position
58. Single Arm Standing Row - Underhand Position
59. Standing Straight Arm Pull Down
60. Seated Shoulder Press
61. Single Arm Shoulder Press
62. Shoulder Shrugs
63. Upright Row
64. Standing Front Raise
65. Single Arm Standing Front Raise
66. Standing Lateral Raise
67. Single Arm Standing Lateral Raise
68. Standing Rear Deltoid Rows
69. Single Arm Standing Rear Deltoid Rows
70. Rear Cable Crossover
71. Seated Front Raise
SHOULDERS
ARMS
72. Single Arm Seated Front Raise
73. Seated Lateral Raise
74. Single Arm Seated Lateral Raise
75. Rotator Cuff - Low External Rotation
76. Rotator Cuff - Internal Rotation
77. Rotator Cuff - High External Rotation
78. Straight Arm Pull-Back
79. Rotator Cuff - Diagonal External Rotation
80. Rotator Cuff - Diagonal Internal Rotation
81. Standing Biceps Curl
82. Single Arm Standing Biceps Curl
83. Standing Hammer Curl
84. Single Arm Standing Hammer Curl
85. Standing Reverse Curl
86. Single Arm Standing Reverse Curl
87. Curved Bar Biceps Curl
88. Curved Bar Reverse Biceps Curl
89. Seated Concentration Curl
90. Seated Wrist Curl
91. Seated Reverse Wrist Curl
92. Seated Overhead Triceps Extension
93. Single Arm Overhead Triceps Extension
94. Standing Triceps Pushdown
95. Reverse Grip Triceps Pushdown
96. Split Grip Triceps Pushdown
97. Single Arm Triceps Pushdown
98. Single Arm Reverse Grip Triceps Pushdown
99. Single Arm Triceps Kickback
100. Single Arm Reverse Grip Triceps Kickback
101. Two Arm Triceps Kickback
102. Two Arm Reverse Grip Triceps Kickback
103. Triceps Dips
104. Single Arm Triceps Dips
105. Cross-Body Triceps Extension
106. Ab Crunch
107. Oblique Crunch
108. Standing Trunk Rotation
109. Side Bend
110. Seated Spinal Extension
ABS & LOWER BACK
Page 46

MOVABLE PULLEY
POSITIONS
MOVABLE PULLEY
POSITIONS
MOVABLE PULLEY
POSITIONS
BIO FORCE®EXERCISES
LEGS
45
MOVABLE PULLEY
POSITIONS
MOVABLE PULLEY
POSITIONS
MOVABLE PULLEY
POSITIONS
BIO FORCE®EXERCISES
LEGS
44
SQUAT
START: Stand facing frame. Feet hip width
apart on base. Grip handles at shoulders.
MOTION: Flex knees, hips and ankles.
Lower until thighs are parallel to floor
or slightly higher. Press up to starting
position.
TIPS: Keep knees in line with toes. Center
weight over arches, not toes or heels.
Lift chest and keep back straight as
hips lower. Keep head lifted and in line
with spine. Contract abdominals to
stabilize back.
1
MUSCLE GROUPS EXERCISED: Gluteals, hamstrings,
quadriceps
LEVEL OF DIFFICULTY: Beginner
SEAT: Off
LEG LIFT: Off
ACCESSORIES:
Handles
SINGLE LEG SQUAT
START: Stand facing frame. Split-leg
stance with back heel lifted. Grip
handles at shoulders.
MOTION: Flex knees, hips and ankles.
Lower until front thigh is parallel to floor
or slightly higher. Press up to starting
position.
TIPS: Keep weight on front leg and front
knee in line with toes. Align shoulders
over hips. Lift chest and keep back
straight while lowering. Contract
abdominals to stabilize back.
Perform on both sides.
2
MUSCLE GROUPS EXERCISED: Gluteals, hamstrings,
quadriceps
LEVEL OF DIFFICULTY: Intermediate/Advanced
SEAT: Off
LEG LIFT: Off
ACCESSORIES:
Handles
REVERSE LUNGE
START: Stand facing frame. Feet hip width
apart on base. Grip handles in front of
shoulders.
MOTION: Step back with one leg into
lunge position. Lower until front thigh
is parallel to floor or slightly higher.
Press back up to starting position.
TIPS: Keep weight on front leg and front
knee in line with toes. Lift chest and keep
back straight while lowering. Contract
abdominals to stabilize back. Perform
on both sides.
3
MUSCLE GROUPS EXERCISED: Gluteals, hamstrings,
quadriceps
LEVEL OF DIFFICULTY: Intermediate/Advanced
SEAT: Off
LEG LIFT: Off
ACCESSORIES:
Handles
SEATED LEG EXTENSION
START: Sit facing away. Knees over top
leg pads. Ankles under bottom leg bar
pads. Grip seat.
MOTION: Extend knees until legs are
straight. Pause at top of movement.
Lower to starting position.
TIPS: Sit up straight with abdominals
contracted. Do not lean back against
seat. Keep knee caps aligned with
movement point of bar.
4
MUSCLE GROUPS EXERCISED: Quadriceps
LEVEL OF DIFFICULTY: Beginner
SEATED SINGLE LEG
EXTENSION
START: Sit facing away. Knees over top leg
bar pads. Ankles under bottom leg bar
pads. Grip seat.
MOTION: Extend one knee until leg is
straight. Pause at top of movement.
Lower to starting position.
TIPS: Sit up straight with abdominals
contracted. Do not lean back against
seat. Keep knee caps aligned with
movement point of bar. Perform on
both sides.
5
MUSCLE GROUPS EXERCISED: Quadriceps
LEVEL OF DIFFICULTY: Intermediate/Advanced
SEAT: On/Top
Position
LEG LIFT: On
ACCESSORIES:
None
STRAIGHT LEG
DEAD LIFT
START: Stand facing away. Feet hip
width apart on base. Bend at hips
and grip handles between legs.
MOTION: Extend hips and back. Stand
upright, pulling handles up to front of
pelvis. Bend at hips and lower to
starting position.
TIPS: Keep arms and legs straight.
Hinge up and down from hips. Do
not round lower back or bend knees.
Contract abdominals to stabilize back.
Bend forward until chest is parallel to
floor or slightly higher and a slight
stretch is felt in hamstrings.
6
MUSCLE GROUPS EXERCISED: Hamstrings, lumbar spinal
extensors
LEVEL OF DIFFICULTY: Intermediate/Advanced
SEAT: Off
LEG LIFT: Off
ACCESSORIES:
Handles
SEAT: On/Top
Position
LEG LIFT: On
ACCESSORIES:
None
x
x
 Loading...