

Page 1
SOLVENT RECYCLING SYSTEM
TABLE OF CONTENTS
LS-JRE OPERATION &
INSTRUCTION MANUAL
Now with
adjustable
temperature
control!
Description Page
Introduction 1
Safety Precautions 1
Installation / Set-up 1
Supplied Parts & Accessories 1
Choosing a Location 2
Electrical Connections 2
Plumbing Connections 3
Operating the LSJr. 3
Troubleshooting 6
Common Spare Parts 7
Warranty 7
Appendix (Electrical Schematic) 8
Specifications 8
Part Number J102902
Page 2
INTRODUCTION
This “LS-JrE” solvent recycling system is designed to safely recycle contaminated solvents on-site using a thermal distillation
process. When properly installed and operated, the LS-Jr provides long, trouble-free service, and can typically recover five gallons
of solvent in eight hours. The LS-Jr is capable of processing most solvents with boiling points between 100°F and 320°F. If your
solvent’s boiling point is between 320°F and 500°F, the optional LS-JrVac must be used. Consult the LS-JrVac manual for further
information.
SAFETY PRECAUTIONS
WARNING: FAILURE TO FOLLOW THESE PRECAUTIONS COULD RESULT IN SERIOUS INJURY OR DEATH.
• Installation location and area must conform to requirements set by National Electric Code Class 1, Division 1, Group D for
hazardous locations.
• Remove any ignition sources from the area such as flames (cigarettes, torches, furnace), or sparks (grinders, non-explo-
sionproof electrical switches and outlets, etc.).
• Follow National Fire Protection Association guidelines for control of static electricity (NFPA 77, Recommended Practice on
Static Electricity). This applies to the installation area, equipment, and all transfer and receiving containers.
• Ventilate all vapors from the processing area and distillation equipment according to National Fire Protection Association
guidelines (NFPA 91, Standard for the Installation of Blower and Exhaust Systems for Dust, Stock, and Vapor Removal or
Conveying).
• Follow the National Fire Protection Association recommendations for safe storage and use of flammable and combustible
liquids (NFPA 30, Flammable and Combustible Liquids Code).
• Electrical wiring should be performed by a qualified electrician and must conform to National Electric Code Class 1, Division
1, Group D requirements for explosion-proof equipment. Use only electricals labeled explosion proof (boxes, receptacles,
hard conduit, etc.) for the installation and in the area.
• Obtain approval of the installation from your insurance and/or fire inspector prior to operation.
• Verify proper water flow before operation to prevent accumulation of hazardous vapors.
• Wear proper eye and skin protection when handling solvents.
• Never process reactive solvents such as gasoline, ethers, nitrocellulose, etc.
• Never open a hot still.
INSTALLATION & SET-UP
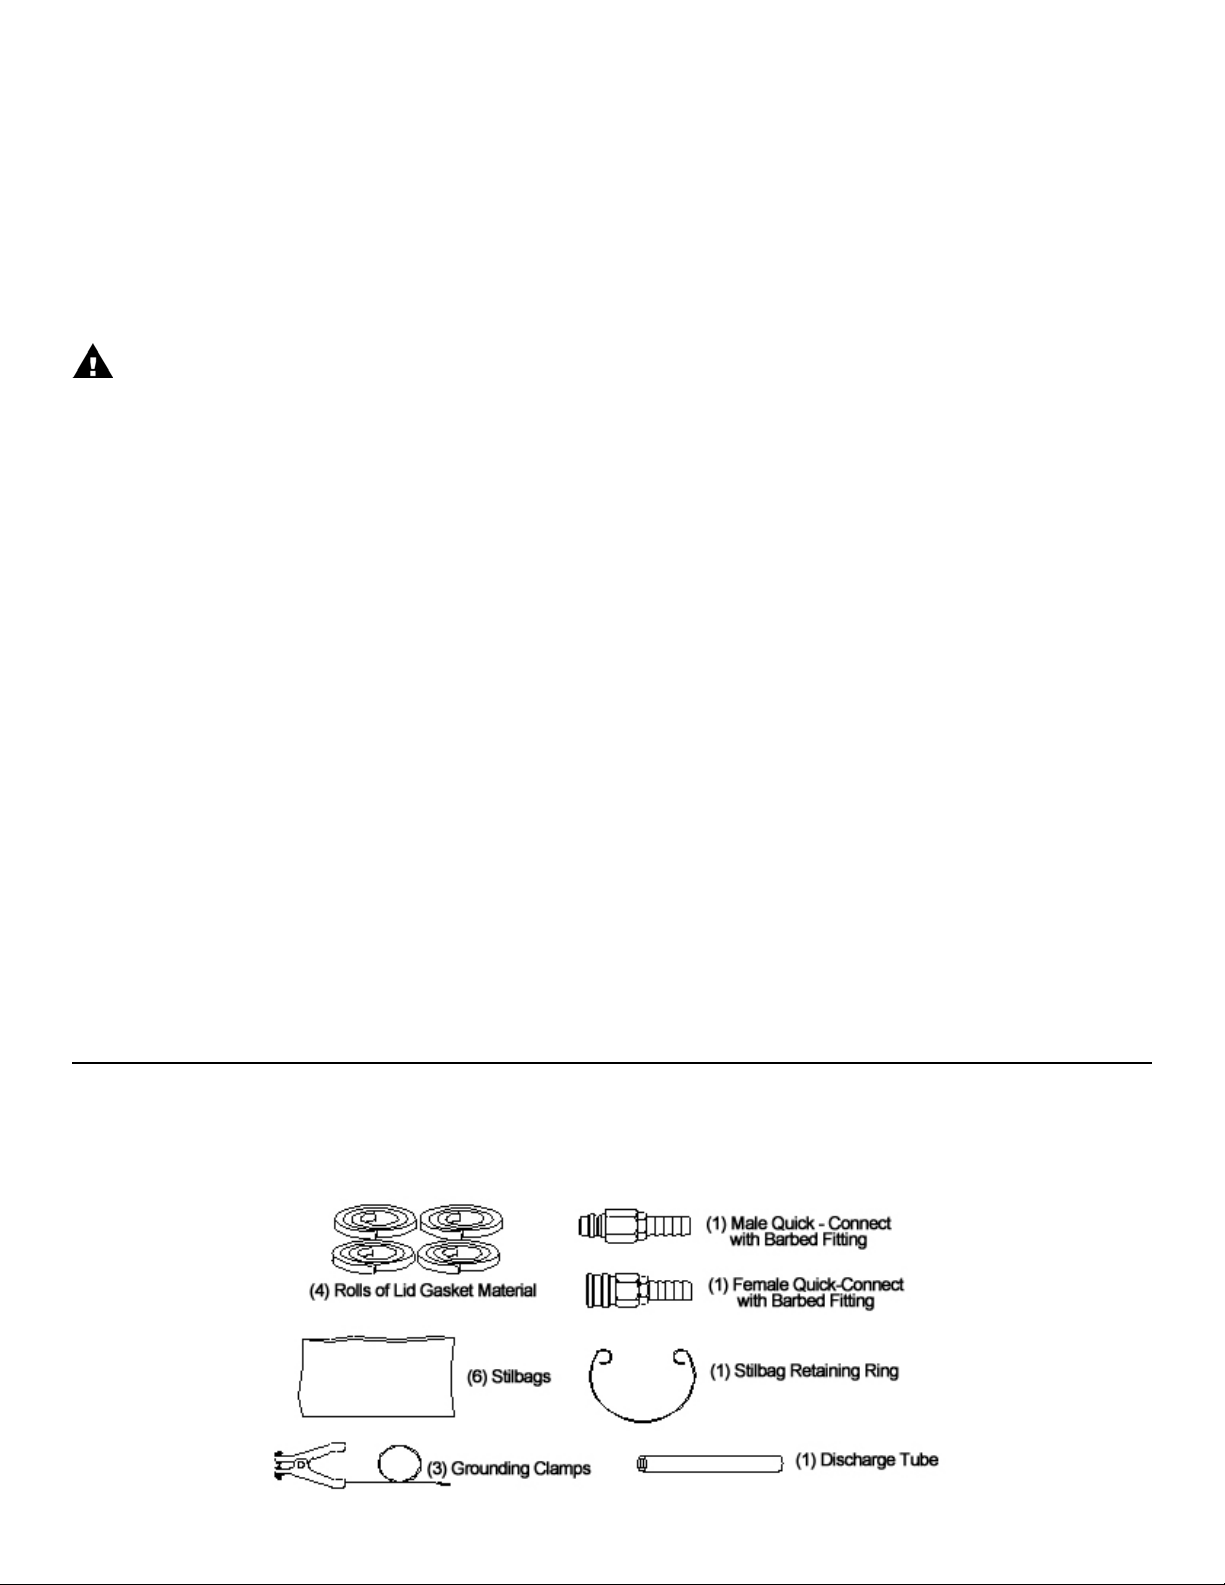
SUPPLIED PARTS AND ACCESSORIES
The following is a checklist of the items supplied with the LS-Jr. Be certain that you have everything you need for proper installation
and operation. In addition to these supplied items, you will need to provide your own electricals, plumbing fixtures, and receiving
vessel.
2
Page 3
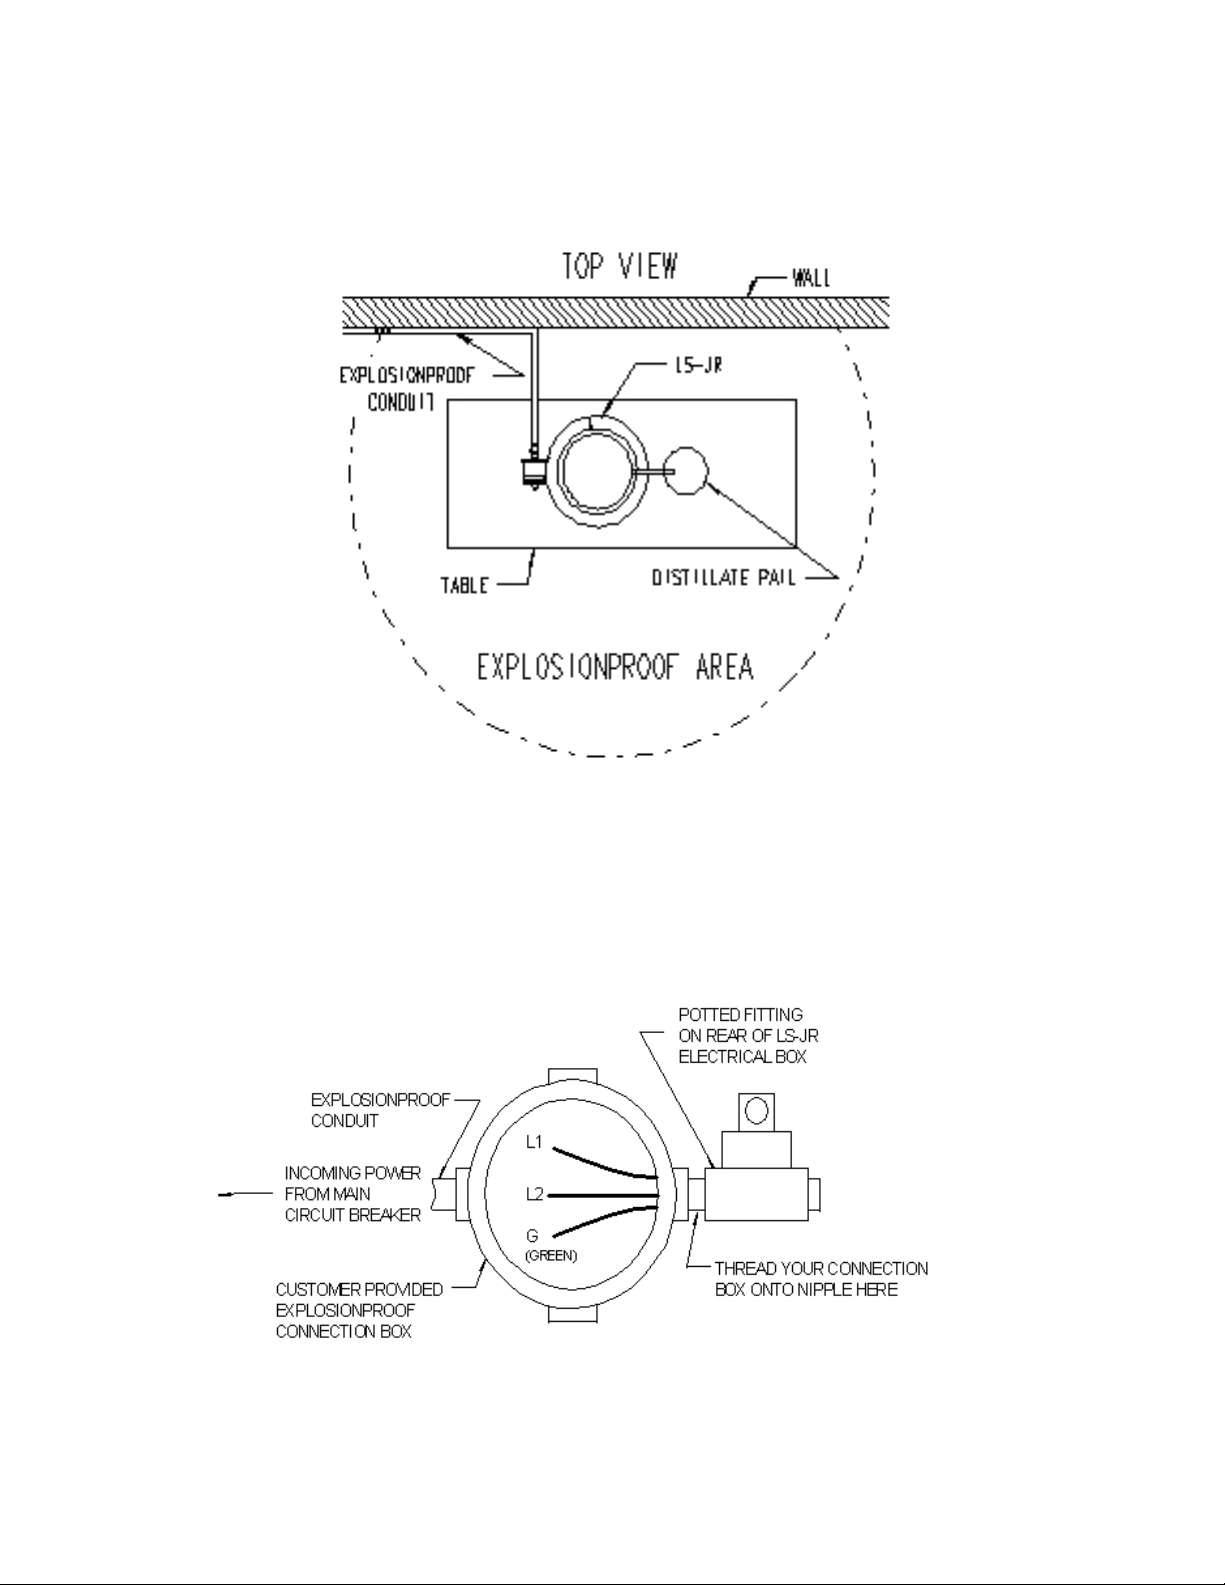
CHOOSING A LOCATION:
Be sure that the unit is installed on a level table. Remember, the LS-Jr must be located in an explosion-proof area. Consult NFPA
guidelines for specific details and requirements on ventilation, structures, lighting and other electricals, earth-grounding, and size of
explosion-proof area
ELECTRICAL CONNECTIONS
The LS-Jr requires a 220 volt, 1 phase, 5 amp electrical service with ground. Electrical connections must be performed by a qualified electrician and in accordance with the National Electric Code for Class 1, Division 1, Group D installations. Use only explosionproof electrical components.
After installation, check the unit’s ground. The resistance between the LS-Jr and earth-ground must be less than one ohm (1Ω). If it
is not, a separate ground must be installed from the unit to earth for prevention of static electricity sparks. Use the grounding block
provided on the right side of the LS-Jr.
3
Page 4

PLUMBING CONNECTIONS
WARNING: WATER FLOW MUST BE VERIFIED BEFORE OPERATION TO PREVENT ACCUMULATION OF DANGEROUS VAPORS.
A continuous cooling water supply is required to condense the solvent vapors back into liquid form. This water can be from the tap
or from a closed-loop recirculating system (such as the FTI “Little Cooler”). Water flow requirements are 1/8 to 1/4 gallons per minute at a temperature no higher than 80°F. If your solvent’s boiling point is lower than 150°F, colder water may be required. Check
the solvent’s MSDS, or consult the factory if unsure.
Connections for the water supply are located on the back of the LS-Jr lid. As you are facing the rear of the unit, the left hose (with
female quick-connect) is marked water inlet. The right hose (with male quick-connect) is marked water outlet. Use the supplied
quick-connects and your flexible hose (e.g., a garden hose 1/4 inch ID or larger) and hose clamps to bring the water supply to the
LS-Jr and back out to a drain. Regulate the water supply with valves to control on/off and flow rate. If a closed-loop recirculating
system is used instead of tap water, consult that system’s instructions for its specific plumbing details.
OPERATING THE LS-JR.
The LS-Jr requires minimal operator involvement. Once set up and started, the unit can operate virtually unattended until the process is complete.
NOTE: Only process neutral solvents with a pH between 6 and 9. Solvents outside of this safe pH range can cause damage to your
LS-Jr that is not covered under its warranty. Some solvents can become acidic once heated. It’s a good idea to periodically test
both the dirty solvent as well as the distillate to verify a safe pH. If your pH is not in the “safe zone”, it must be neutralized. Consult
your solvent supplier for recommendations.
The following steps serve as guidelines for safe operation of the LS-Jr.:
1. Install a Stilgasket (lid gasket material) for each batch of solvent processed. A Stilgasket is a special solvent-resistant material
used to provide a seal between the LS-Jr’s lid and its boiling chamber.
• To install a Stilgasket:
• Start by making a clean, 45° angled cut on the end of the Stilgasket.
• Begin to peel away the backing from the adhesive side of the gasket.
• Firmly position the Stilgasket into the gasket groove on the top lip of the boiling chamber.
• Continue to position the Stilgasket around the perimeter of the boiling vessel, peeling away short sections of the adhesive’s
backing as you go.
• Carefully trim the excess from the end of the Stilgasket to tightly match the angle of the starting point
NOTE: DO NOT USE A STILGASKET FOR MORE THAN ONE BATCH.
4
Page 5

2. Line the boiling chamber with a Stilbag for easy waste residue removal.
To install a Stilbag:
• Unroll the Stilbag and expand it open.
• Insert into the boiling chamber, and flatten along the bottom and sides to prevent any air pockets.
• Install the Stilbag retaining ring. Compress the ring by placing your thumb and finger into the loops and squeezing them
together. Place the ring inside the Stilbag and allow it to expand into the groove on the inside of the boiling chamber, hold ing the Stilbag in place.
• Re-adjust the Stilbag if needed in order to get a close fit to the boiling chamber and to eliminate any air pockets.
3. Ground the fill pail (or pump), receiving vessel, and the LS-Jr’s lid to prevent static electricity sparks from occurring (due to flow-
ing liquids). Attach the provided grounding clamps to the grounding block located on the right side of the LS-Jr.
CAUTION: ALWAYS WEAR SAFETY GOGGLES, PROTECTIVE CLOTHING, AND GLOVES WHEN HANDLING SOLVENTS.
4. Carefully pour or pump the dirty solvent into the boiling chamber. The LS-Jr can process up to five gallons per batch. Do not
overfill. Avoid splashing solvent onto the outside of the LS-Jr to prevent damage to the protective paint and to prevent getting
the electrical box wet.
5. Set the LS-Jr’s lid in place on top of the boiling chamber. Place the lid between the alignment blocks, being careful not to
damage or move the Stilgasket previously installed.
6. Install the distillate discharge tube onto the barbed fitting coming out of the right side of the LS-Jr’s lid.
Insert the other end into your grounded receiving container.
7. Turn on the condensing water supply and adjust flow to 1/8 to 1/4 gallons per minute.
8. Set the cycle temp dial. Adjust the temperature approximately 50ºF - 100ºF above the boiling point of
the solvent being processed.
NOTE: If using a vacuum attachment, the boiling point of the solvent will decrease. Determine the “new”
boiling point by referring to a “Solvent Boiling Points Under Vacuum” chart (refer to the vacuum attachment’s
manual). Adjust the temperature approximately 50ºF - 100ºF above the boiling point under vacuum.
9. Pull the stop/start switch to the “start” position. After approximately 1 to 1 1/2 hours, clean solvent
should begin to drip from the Discharge Tube.
10. The process is complete when the distillate stops flowing (typically in about 8 hours). Push the unit’s
stop/start switch to the “stop” position.
5
Page 6

11. Keep the condenser water flowing for an additional 1/2 hour after turning off the LS-Jr. This is to recondense any remaining
vapors from the boiling chamber.
12. Allow the LS-Jr to cool down below 100°F before attempting to remove the lid. This takes approximately 8 hours (over night).
13. Disconnect the hoses from the LS-Jr lid. Using the handles, slowly lift and remove the lid from the top of the boiling chamber.
Set the lid down on a clean, flat surface.
14. Wearing proper eye and skin protection, remove the Stilbag retaining ring and carefully lift out the residue-filled Stilbag. Dis-
pose of residue according to local regulations.
NOTE: Do not attempt to re-use the Stilbag. It is designed only for one batch.
15. Clean out the inside of the LS-Jr’s boiling chamber using a soft, damp cloth. If necessary, a little bit of clean solvent can help
loosen residues. For baked-on residues, use the optional plastic Stilscraper or other plastic utensil.
NOTE: Do not use metal tools to scrape the boiling chamber. Scratching the non-stick coating voids the warranty.
TROUBLESHOOTING
The following are a few tips for diagnosing some problems you may experience during the use of your LS-Jr. If the following suggestions do not pinpoint the cause of your problem, contact FTI’s toll-free “Service Hotline” from 8 a.m. to 5 p.m. EST.
1-800-888-3743
WARNING: ANY ELECTRICAL TESTS PERFORMED ON THIS UNIT MUST BE PERFORMED BY A QUALIFIED ELECTRICIAN.
WARNING: BEFORE PERFORMING ELECTRICAL TESTS, UNIT MUST BE REMOVED FROM THE HAZARDOUS AREA.
PROBLEM: No distillate (clean solvent) is being produced.
POSSIBLE CAUSES:
• No power to the unit. Check main circuit breaker and/or electrical supply to the unit.
• Boiling point of solvent is too high (consult the solvent’s MSDS). Use an LS-JrVac attachment for solvents with boiling
points between 300° and 500°F.
• Unit is not level. Install the LS-Jr on an even, level surface.
• Temperature control circuit needs reset. Push the start/stop switch to the “stop” position for a minimum of five (5) seconds
to reset.
• Cooling water flow is insufficient or not cool enough. Verify proper cooling water supply (refer to “Plumbing Connections”
section of this manual).
• Solids content in dirty solvent too high. Process less contaminated solvent.
PROBLEM: A batch takes longer than 8 hours to process.
POSSIBLE CAUSES:
• Boiling point of solvent is too high (consult the solvent’s MSDS). Use an LS-JrVac attachment for solvents with boiling
points between 300° and 500°F.
• Solids content in dirty solvent too high. Process less contaminated solvent.
PROBLEM: Distillate appears dirty or discolored.
POSSIBLE CAUSES:
• Over-filled boiling vessel. Limit each batch to 5 gallons or less.
• Violent boil or “bumping” from water in the dirty solvent. Eliminate water from the waste solvent.
• Unsafe pH. Distilled solvent appears green or blue. Neutralize the solvent to a pH between 6 and 9 (refer to the “Operating
the LS-Jr” section of this manual).
6
Page 7

PROBLEM: Lid pops up.
POSSIBLE CAUSES:
• Discharge hose is submersed in the distilled solvent. Prevent the distillate from filling up to the hose’s level in the receiving
pail.
• Condenser clogged with residue. Clean the condenser and all distillate plumbing.
• Air pocket under the Stilbag. Reinstall a Stilbag correctly (refer to the “Operating the LS-Jr” section of this manual.
PROBLEM: Water contaminating the clean, distilled solvent.
POSSIBLE CAUSES:
• Water in dirty solvent (feed material). Eliminate source of water contamination from the feed material.
• Acid or caustic corrosion in the condenser from an unsafe pH. Neutralize the solvent to a pH between 6 and 9 (refer to the
“Operating the LS-Jr” section of this manual).
• Water was left to freeze in the condenser. Locate the LS-Jr in an area above 32°F.
COMMON SPARE PARTS
PART NUMBER DESCRIPTION PART NUMBER DESCRIPTION
M101828 Stilbags - Reg. (per dozen) J101167 Condenser (standard)
M101829 Stilbags - Hi-temp (per dozen) A100551 Condenser Kit (includes hoses)
M101055 Stilbag Retaining Ring A102085 Condenser (stainless steel)
A100552 Lid Gasket (four 50’ rolls) M100931 Discharge Hose
A100422 Grounding Clamp/cable J102457 On/off Switch contact block
J102261 Water Quick-connects Male J102795 Temperature Control Board
J100038 Water Quick Connect Female
WARRANTY
Finish Thompson, Inc (manufacturer) warrants this product to be free of defects in materials and workmanship for a period of 3 years
plus a lifetime warranty on the LS Heater, with the exception of the PTFE vessel coating which carries a 1 year warranty, from date
of purchase by original purchaser. If a warranted defect, which is determined by manufacturer’s inspection, occurs within this period,
it will be repaired or replaced at the manufacturer’s option, provided (1) the product is submitted with proof of purchase date and (2)
transportation charges are prepaid to the manufacturer. Liability under this warranty is expressly limited to repairing or replacing the
product of parts thereof and is in lieu of any other warranties, either expressed or implied. This warranty does apply only to normal
wear of the product or components. This warranty does not apply to products or parts broken due to, in whole or in part, accident,
overload, abuse, chemical attack, tampering, or alteration. The manufacturer accepts no responsibility for product damage or personal injuries sustained when the product is modified in any way. If this warranty does not apply, the purchaser shall bear all cost for
labor, material and transportation.
Manufacturer shall not be liable for incidental or consequential damages including, but not limited to process down time, transportation costs, costs associated with replacement or substitution products, labor costs, product installation or removal costs, or loss of
profit. In any and all events, manufacturer’s liability shall not exceed the purchase price of the product and/or accessories.
CHEMICAL REACTION DISCLAIMER
The user must exercise primary responsibility in selecting the product’s materials of construction, which are compatible with the
fluid(s) that come(s) in contact with the product. The user may consult Finish Thompson, Inc. (manufacturer) and a manufacturer’s
representative/distributor agent to seek a recommendation of the product’s material of construction that offers the optimum available chemical compatibility.
7
Page 8

APPENDIX
SPECIFICATIONS
MODEL: LS-Jr E
DIMENSIONS: 29” wide x 24” deep x 19” tall
SHIPPING WT: 220 lb.
ELECTRICAL
REQUIREMENTS: 220 volts, 1 Ph, 50/60 Hz, 5 amps
COOLING WATER
REQUIREMENTS: 1/8 - 1/4 GPM
SOLVENT
BOILING RANGE: 100°F - 320°F (w/o JetVac)
200°F - 500°F (with JetVac)
MAX. OPERATING
TEMPERATURE: 392°F
Tech Service Hot Line 1-800-888-3743
Part Number J102902, Rev. 13
Lit. ID No. FT03-885H
 Loading...