

Page 1
installation
instructions
206 wembly Road.
New Windsor, NY 12553
Phone: 7 18.602.60 60
Fax: 7 18.963.20 82
info@nextures.com
www.nextures.com
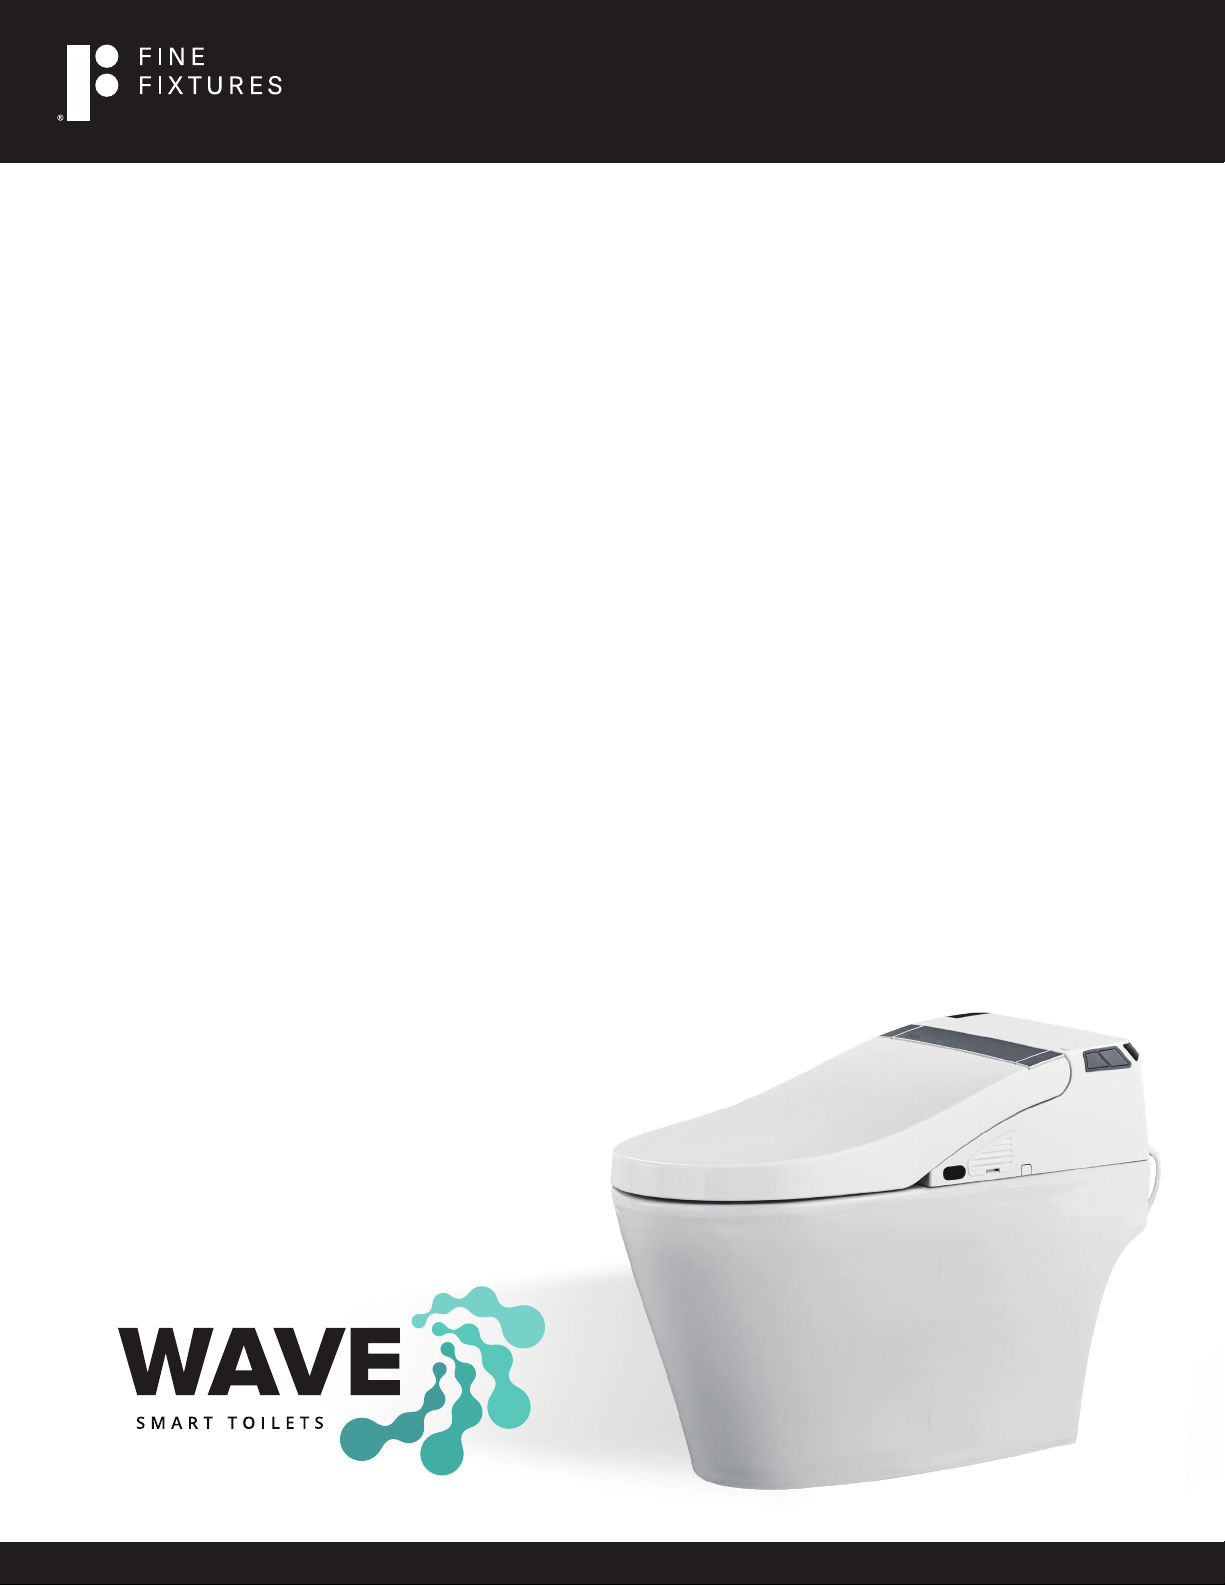
WAV E ™
One-Piece Elongated
Smart Toilet
With Integrated Bidet
#st1w
F O R A LIFE O F S TYLE
TM
Page 2

Content
206 wembly Road.
New Windsor, NY 12553
Phone: 7 18.602.60 60
Fax: 7 18.963.20 82
info@nextures.com
www.nextures.com
important safeguards
technical specification
installation
list of materials
dimensions/technical data
parts identification
installation of ceramic toilet
previous preparation
auto lid open/close
maintenance others
daily maintenance
1. main unit care and maintenace
2. spray nozzle maintenance and care
3
5
6
7
8
9
11
12
13
emergency troubleshooting
1.electricity and water supply cut-off
2.failure of remote control
3.when the product is left unused for long time
function keys description
troubleshooting guide
2
OTHER TOOLS MAY BE REQUIRED
F O R A LIFE O F S TYLE
14
15
16
TM
Page 3
Important Safty Guards
READ ALL INSTRUCTIONS BEFORE UNPACKING THE PRODUCT
When using electrical products, especially when children are present,
basic safety precautions should always be followed, including the following:
206 wembly Road.
New Windsor, NY 12553
Phone: 7 18.602.60 60
Fax: 7 18.963.20 82
info@nextures.com
www.nextures.com
The appliance is not to be used by persons (including
children) with reduced physical, sensory or mental
capabilities, or lack of experience and knowledge,
unless they have been given supervision or instruction.
Children being supervised not to play with the appliance.
This appliance can be used by children from 8 years and
older and people with reduced physical, sensory or
mental capabilities or lack of experience and knowledge
if they have been given supervision or instruction
concerning use of the appliance in a safe way and
understand the hazards involved.
Children shall not play with the appliance.
Cleaning and user maintenance shall not be made by
children without supervision.
DANGER!
1. Do not use while bathing.
2. Do not place or store product where it can
fall or be pulled into a tub or sink.
3. Do not place in or drop into water or
other liquid.
4. Do not reach for a product that has fallen
into water. Unplug immediately.
5. Do not wash the main unit or electrical
plug with water or detergent.
6. Do not handle the electrical plug with wet
hands.
7. Do not put a hand or other staff over the
outlet of air dryer or block the outlet of air
dryer.
8. Never disassemble,repair or modify this
product.
9. During installation, disassembly, repaire
and maintenance of the product,the power
plug must be switched off and water supply
be shut off.
To reduce the risk
of electrocution:
CAUTION!
1. Close supervision is necessary when this product is used by, on, or
near children or invalids.
2. Use this product only for its intended use as described in this
manual book. Do not use attachments not recommended by the
manufacturer.
3. Never operate this product if it has a damaged cord or plug, if it’s
not working properly, if it has been dropped or damaged, or dropped
into water.
4. Keep the cord away from heated surfaces.
5. Never use while sleeping or drowsy.
6. Never drop or insert any object into any opening or hose.
7. Do not use outdoors or operate where aerosol (spray) products are
being used or where oxygen is being administered.
8. Connect this product to a properly grounded outlet only.
See Grounding Instructions.
9. Do not throw cigarettes and other burning stuff into toilet,
otherwise it might cause fire.
10. This product is electric appliance, it must be placed far away
from water. Please don’t drench urine and other liquid to it.
11. It is prohibited to use other electric appliances in the same socket.
12. It is forbidden to use the power extension or unstable loose outlet.
13. The old aging water supply hose can not be used, otherwise it
might cause leakage, fire or electrical shock.Installation of the bidet
seat should include specified components and new water supply hose.
To reduce the risk of burns,
fire, or injury to persons.
3
F O R A LIFE O F S TYLE
TM
Page 4
Important Safty Instructions
Indicates that failure to follow
CAUTION!
1. Do not install or use this product in wet places as steam room etc.
2. It is recommended to use Tamper-Resistant Self-Test GFCI Outlet.
110V-120V, 50/60Hz 15A. Power plug must be equipped with ground
fault circuit interrupter.
3. When it thunders, it is strongly recommended to unplug.
4. Do not stand on ceramic toilet.
5. Ceramic toilet must install floor fixing bolt.
6. Do not stand on product unit, seat and cover.
7. This product is equipped with soft-closing seal cover. Heavy
pressing, pushing or leaning against the seat cover when using the
product, may damage the soft-closing damper.
8. Do not use sharp detergent, toilet cleanser and scrubbing brush to
clean the product.
the instruction may cause body
injury or property damage
GROUNDING
INSTRUCTIONS
This product should be grounded.
In the case of an electrical short
circuit, grounding reduces the
risk of electric shock by providing
an escape wire for the electric
current. This product is provided
with a cord having a grounding
wire with a grounding plug. The
plug must be plugged into an
outlet that is professionally
installed and grounded.
206 wembly Road.
New Windsor, NY 12553
Phone: 7 18.602.60 60
Fax: 7 18.963.20 82
info@nextures.com
www.nextures.com
9. Exposure to direct sunlight is prohibited.
10. Only use tap water or potable water; otherwise it may cause
chafing.
11. Do not connect water supply to heater outlet. Make sure inlet
water temperature at 37-95 F°.
12. When the room temperature is under zero degree, please dry up
the water tank, to avoid freezing.
13. Raise rest room temperature to prevent the toilet from damage
due to freezing.
14. When move the product from cold or wet environment into
normal room temperature, wait for 2 hours until the condensation
water is fully volatilized. Doing so can prevent the product from
electrical short-circuit.
15. When not using the product over 3 days, drain the water out of
the container and unplug from the wall outlet.
16. Stop using the product and shut off the power when product
malfunctions.
DANGER – Improper use of the grounding
plug can result in a risk of electric shock.
If repair or replacement of the cord or plug
is necessary, do not connect the grounding
wire to either flat blade terminal. The cable
with insulation having an outer surface that
is green with or without yellow stripes is the
grounding wire.
This product is factory equipped with a
specific electric cord and plug to permit
connection to a proper electrical circuit.
Make sure that the product is connected
to an outlet having the same configuration
as the plug. No adapter should be used with
this product. Do not modify the plug provided
if it will not fit the outlet, have the proper
outlet installed by a qualified electrician.
If the product must be reconnected for use
on a different type of electric circuit, the
reconnection should be made by qualified
service personnel.
4
F O R A LIFE O F S TYLE
TM
Page 5

Technical Specification
206 wembly Road.
New Windsor, NY 12553
Phone: 7 18.602.60 60
Fax: 7 18.963.20 82
info@nextures.com
www.nextures.com
Main Unit
Toilet
Cleaning
device
Rating pressure
Rating power
Water pressure range
Electrical wire
Flush volume
Flushing mode
Hole distance
Outlet outside diameter
Drainage method
Heating power
Water temperature
Water volume
Cleansing mode
Spray cleansing location
Water pressure protector
Anti-fouling device
Safety device
Warm wind speed
110V-120V,50/60Hz
1200W-1400W
Minimum water pressure 0.07MPa (20L/min. flow).
Maximum water pressure 0.8MPa (Hydrostatic pressure).
length is about 1.8m
1.6/1.1Gpf(6.0/4.1Lpf)
Siphonic jet
305mm
88mm
Down-drain
1200W
6 different level adjustment
5 different level adjustment
Rear cleaning/Rear massage,Front cleansing for ladies
5 different level adjustment
Pressure stabilizer, Automatic pressure discharging
Speedy water discharge device, Automatic cleansing nozzle, Anti-syphon
device, Anti-backflow device, Filter device
Temperature sensor, fail safe device, Bimetallic thermostat, Temperature
fuse, Grounding protection, Leakage protector
Over 4 M/S
Deodorization
Heated
5
Drying
device
Seat
Caring
device
Warm wind temperature
Heating power
Safety device
Deodorization Method
Surface temperature
Heating power
Open and close device
Heated burning protection
Safety device
Night light assembly
User ID setting
Automatic flushing
Auto lid open/ close
(optional)
6 different level adjustment
250W
Temperature sensor, Bimetallic thermostat, temperature fuse
Activated carbon or photocatalyst absorption
6 different level adjustment
50W
Quiet soft-closing device,Auto open and close
The seat temperature will automatically lower down to level 1 in 10 minutes
after using
Seat sensor, Temperature sensor, Bimetallic thermostat, Temperature fuse
Intelligent, often in the off state
To avoid disturbance from remote controls by multi-user
Toilet will automatically flush as user walks away from bowl
Intelligent lid open/close or by remote controller
F O R A LIFE O F S TYLE
TM
Page 6
List of materials
206 wembly Road.
New Windsor, NY 12553
Phone: 7 18.602.60 60
Fax: 7 18.963.20 82
info@nextures.com
www.nextures.com
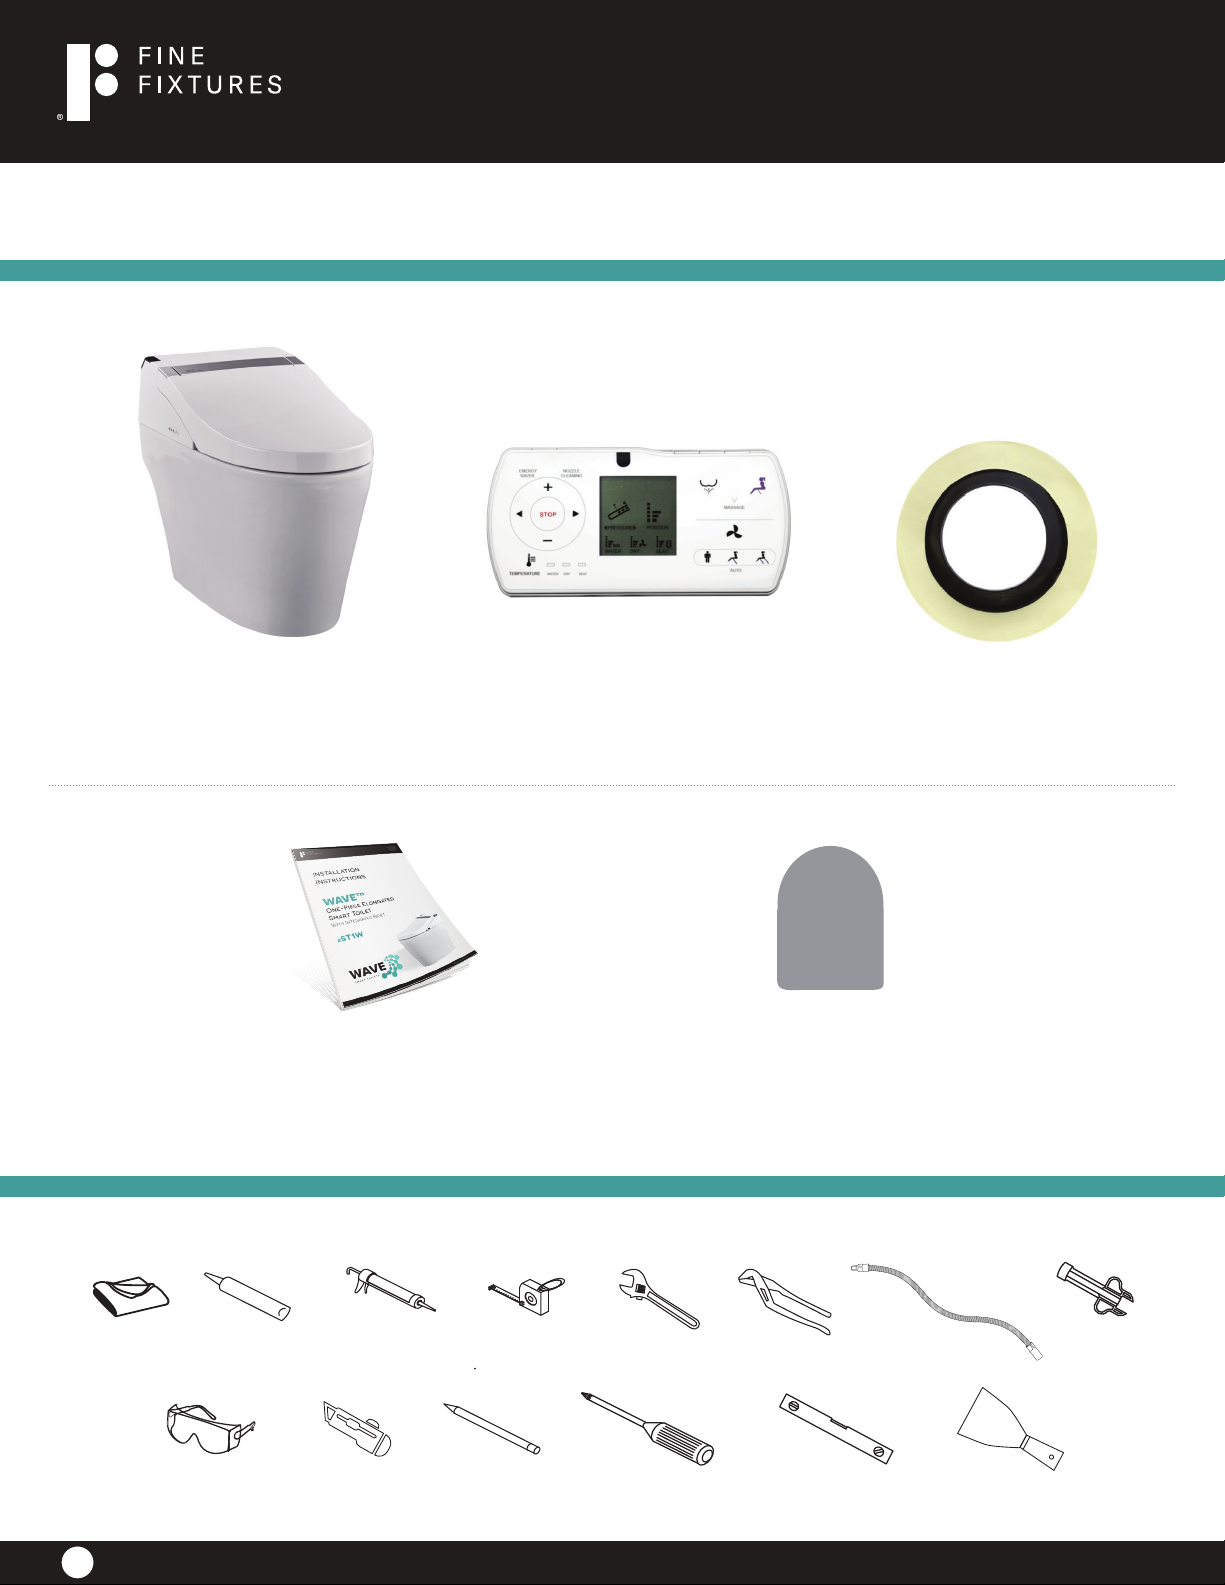
Remote controller componentsMain Unit Sealing Flange
Installation Manual
Installation Cardboard
Tools Required For Installation
6
Soft Cloth
or Blanket
Silicone Silicone/
Caulk Gun
Tape
Measure
Pencil/MarkerSafety Glass Knife
Adjustable
Wrench
Philips
Screwdriver
Channel
Lock Pliers
Level Putty Knife
Adjustable
Socket Extension
F O R A LIFE O F S TYLE
Hand
Wrench
TM
Page 7
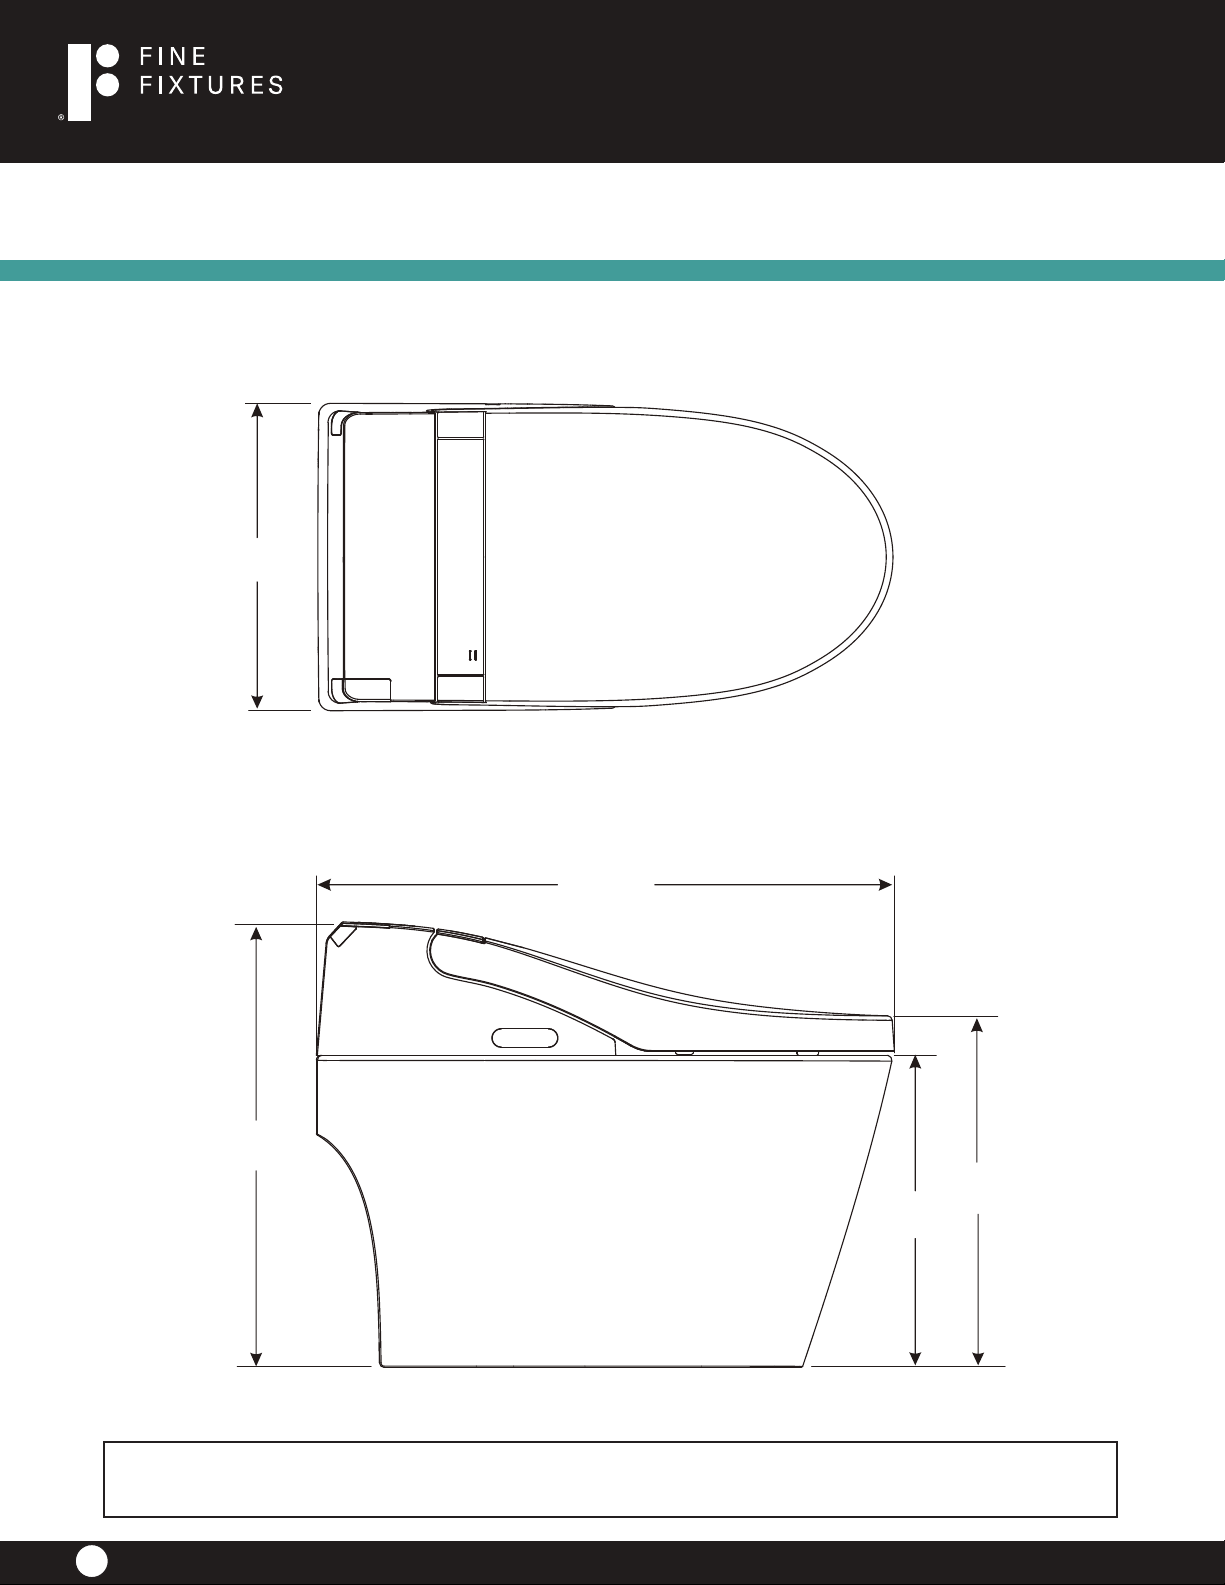
TOILET SEAT ADJUSTMENT
Dimensions/technical Data
15 ⅜”
206 wembly Road.
New Windsor, NY 12553
Phone: 7 18.602.60 60
Fax: 7 18.963.20 82
info@nextures.com
www.nextures.com
22 ⅝”
28 ¾”
17 ⅞”
16”
ATTENTION! Dimensions may vary by up to 3/8". It is highly recommended to pull
all dimensions of actual model for installation and measuring purposes.
7
F O R A LIFE O F S TYLE
TM
Page 8
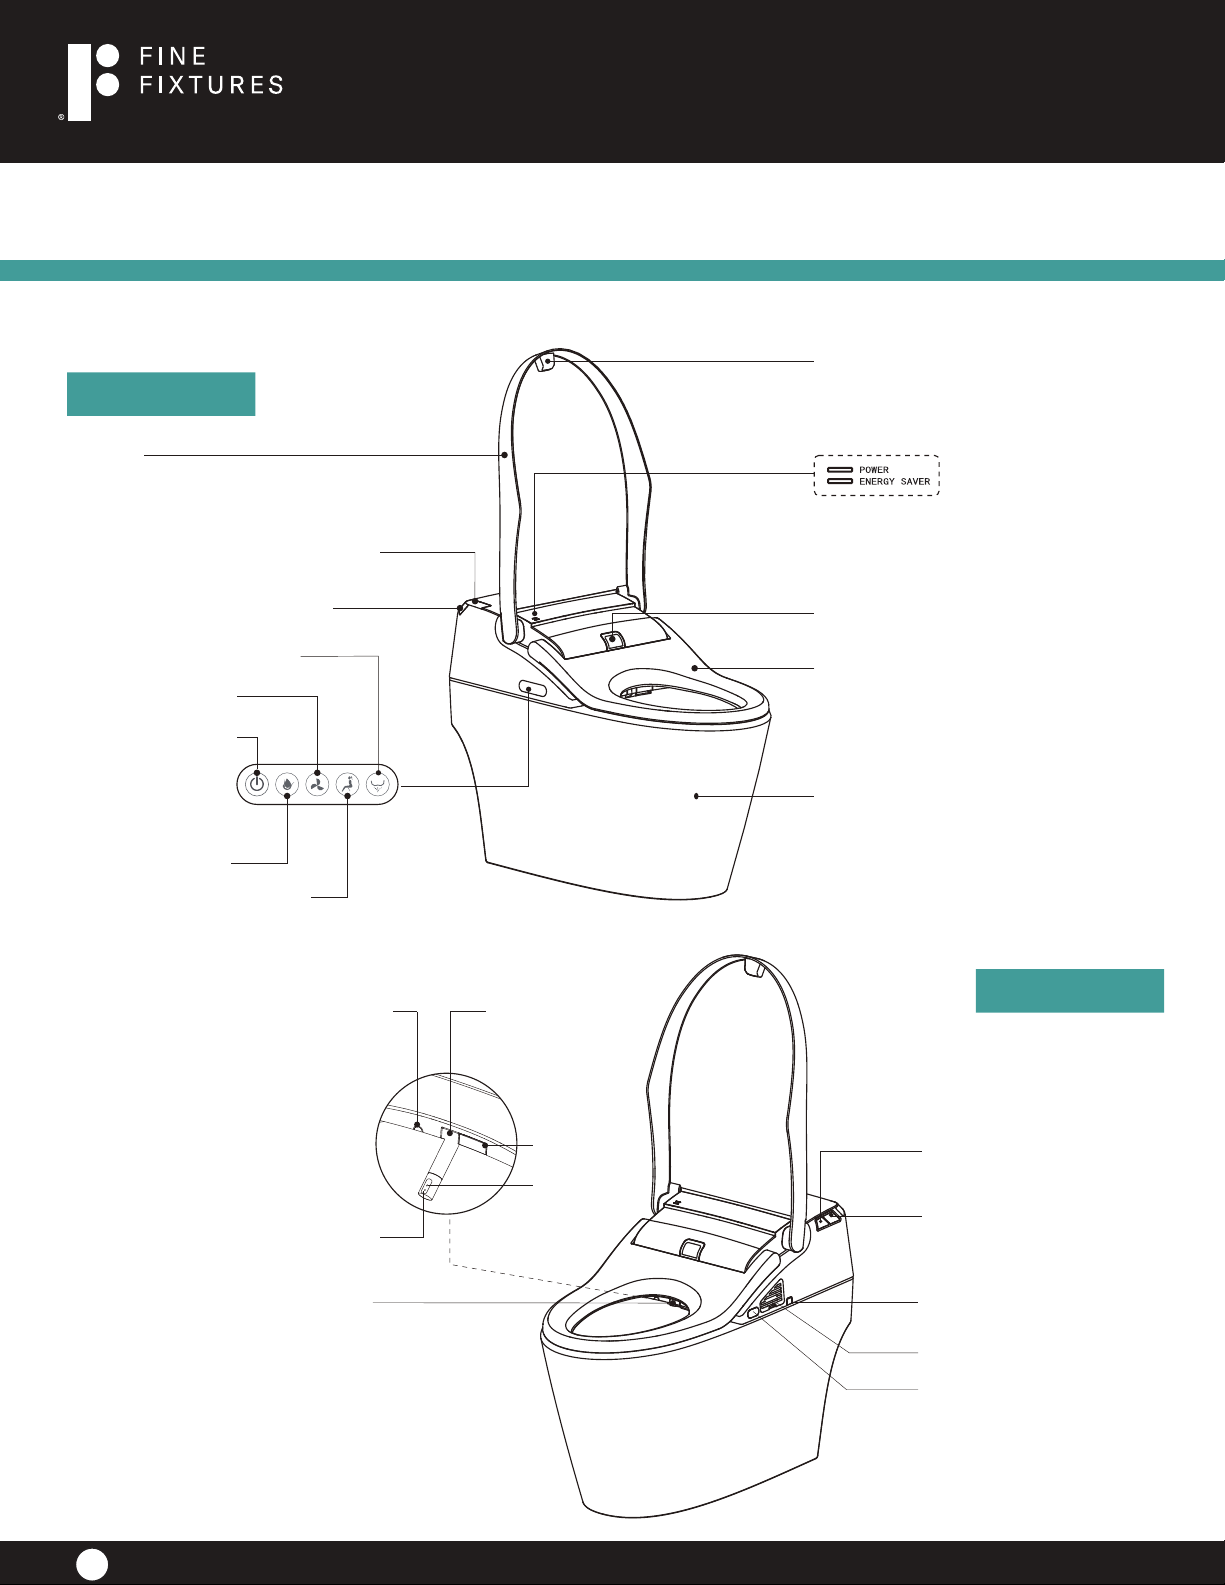
Parts identification
Left side
Lid
Human body sensing window
Bumper
Power indicator
Energy saving indicator
206 wembly Road.
New Windsor, NY 12553
Phone: 7 18.602.60 60
Fax: 7 18.963.20 82
info@nextures.com
www.nextures.com
Remote sensing window
Rear cleaning button
Drying button
Power button
Flush button
Front cleaning button
Water discharging
Front cleaning
Nozzle baffle
Drying baffle
Rear
cleaning
Human body
sensing window
Seat
Ceramic toilet
Right side
Half flush button
Full flush button
Spray nozzle
Main unit disassembly
button
Deodorization window
Remote sensing window
8
F O R A LIFE O F S TYLE
TM
Page 9
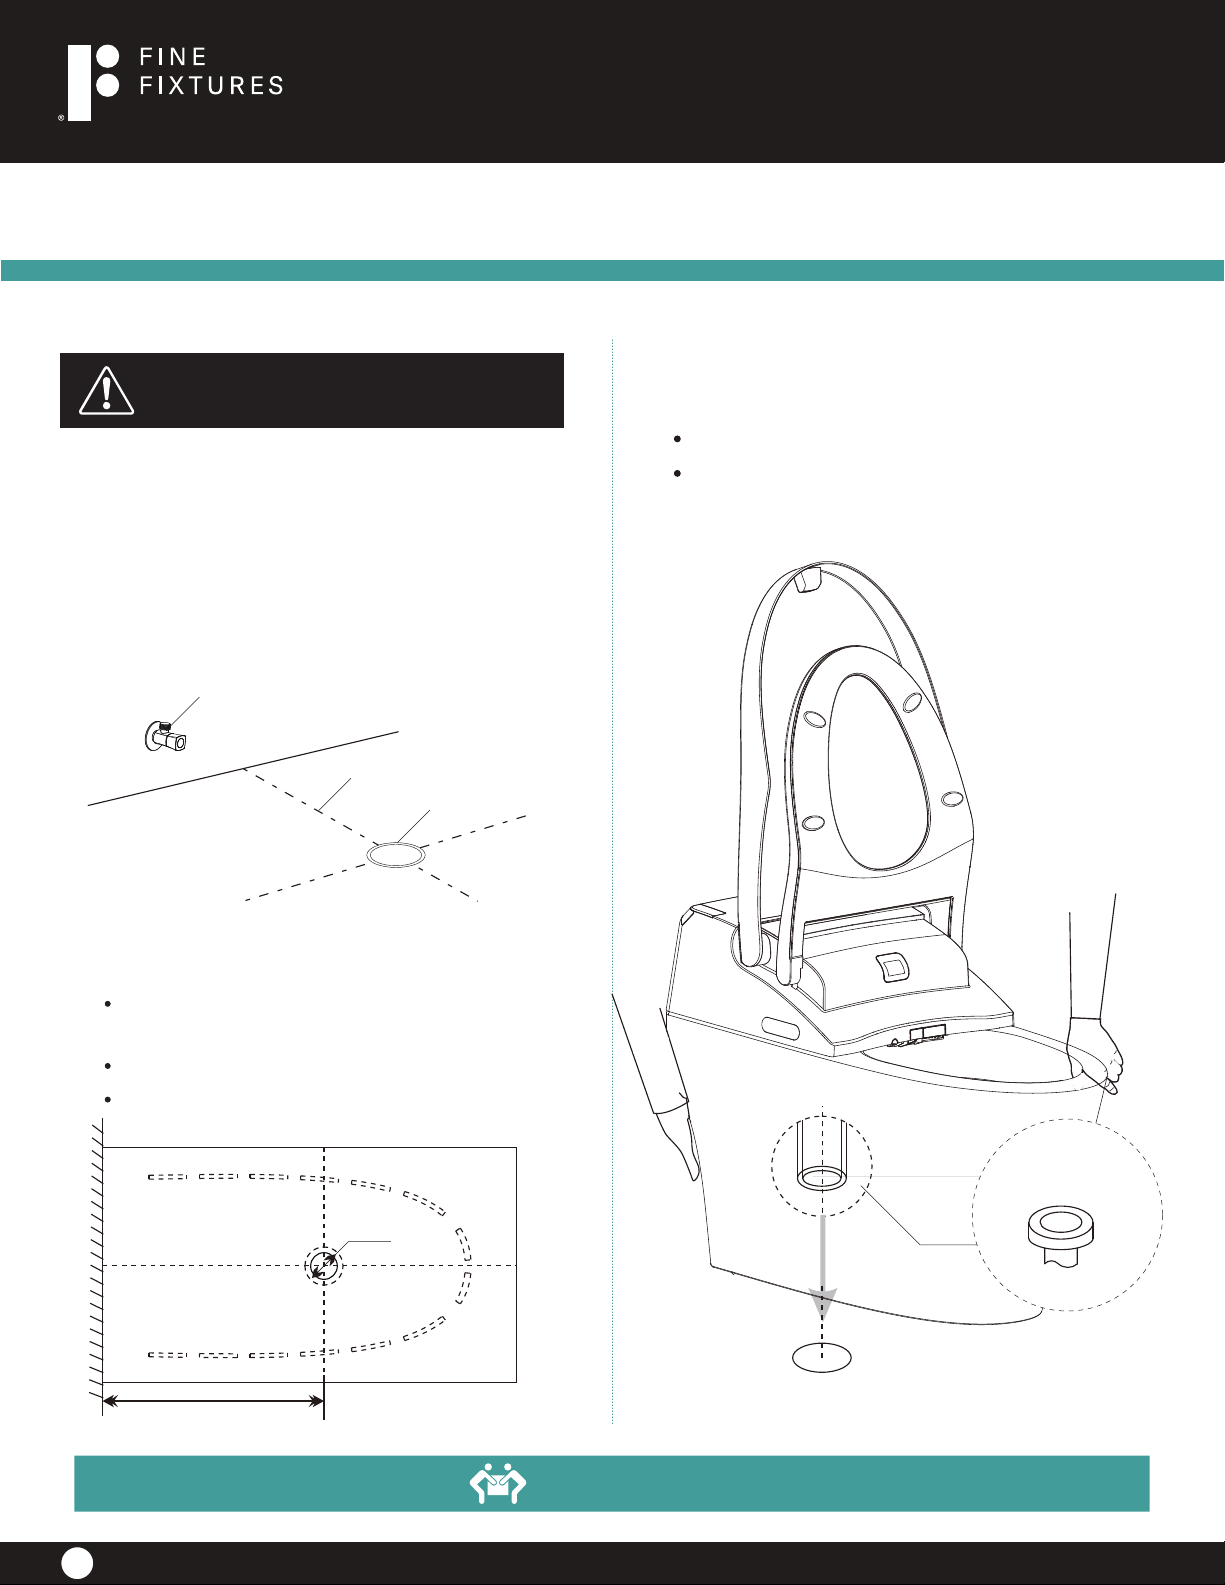
Installation of ceramic toilet
206 wembly Road.
New Windsor, NY 12553
Phone: 7 18.602.60 60
Fax: 7 18.963.20 82
info@nextures.com
www.nextures.com
IMPORTANT!
Shut off main water supply prior to installation!
1. Water Supply Angle
Valve Installation
Draw drain outlet centerline on the floor,
Install angle valve at proper position on wall
according to dimension of toilet.
Angle valve
Line
Drain outlet
3. Ceramic toilet installtion
Install sealing flange into drain outlet;
Install ceramic toilet on corresponding
position according to contour line.
2. Cardboard installation
Align cardboard with the centerline of
drain outlet.
Draw contour line according to cardboard;
Please mark the position of floor fixing bolts.
2 3/4”
15 3/4”
CAUTION!
Toilet drain outlet
sealing flange
2 PEOPLE ARE REQUIRED TO LIFT AND DURING
ENTIRE INSTALLATION OF THIS PRODUCT
9
F O R A LIFE O F S TYLE
TM
Page 10
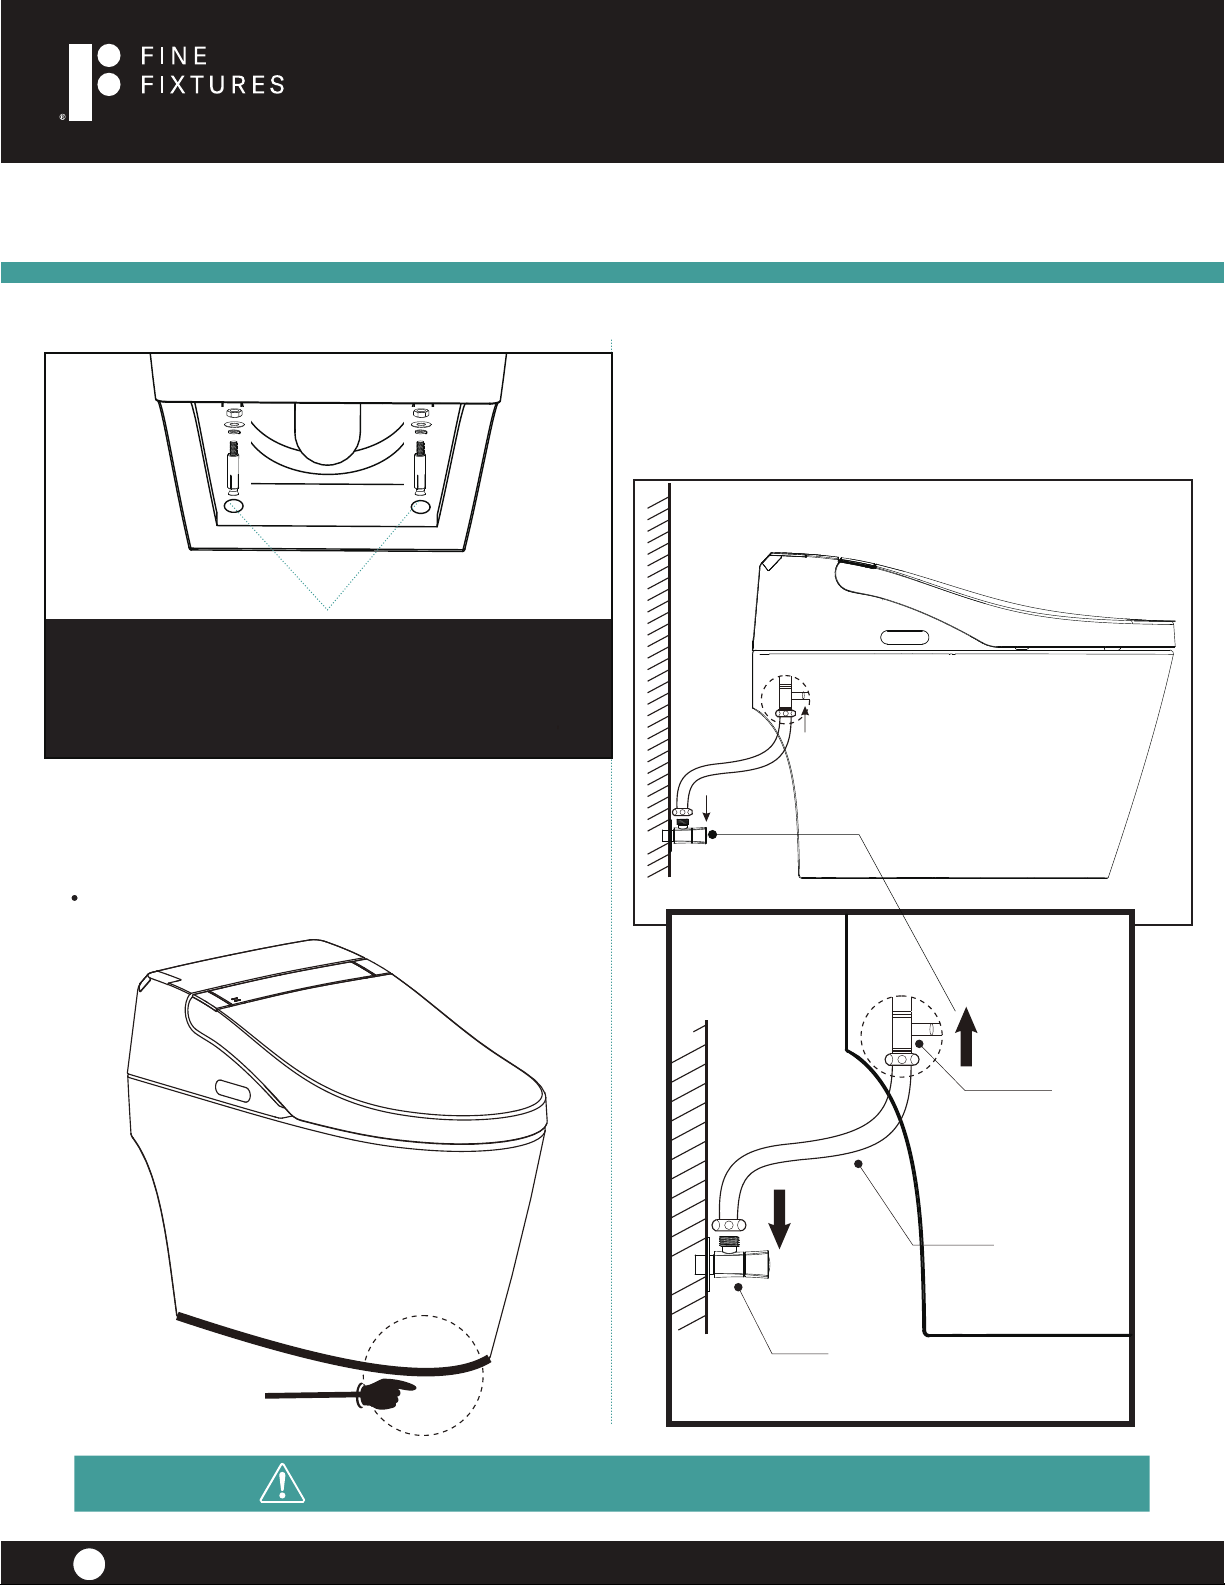
Installation of ceramic toilet
5. Installation of hose
Connect water inlet and angle valve by
new hose.
206 wembly Road.
New Windsor, NY 12553
Phone: 7 18.602.60 60
Fax: 7 18.963.20 82
info@nextures.com
www.nextures.com
Note: Recommend strongly to install floor fixing bolt!
It can make product more stable to avoid damage of
toilet or personal injury because of shifting or turning
over by misusing (squat or stand on toilet).
4. Glass cement application
Glue the edge of toilet bottom with seal silicone.
Water Inlet
Seal Silicone
NOTE!
10
New Hose
Angle Valve
PLEASE CLEAN THE DRAIN OUTLET;
PLEASE MAKE SURE CERAMIC TOILET OUTLET SITS PERFECTLY ON DRAIN OUTLET.
F O R A LIFE O F S TYLE
TM
Page 11
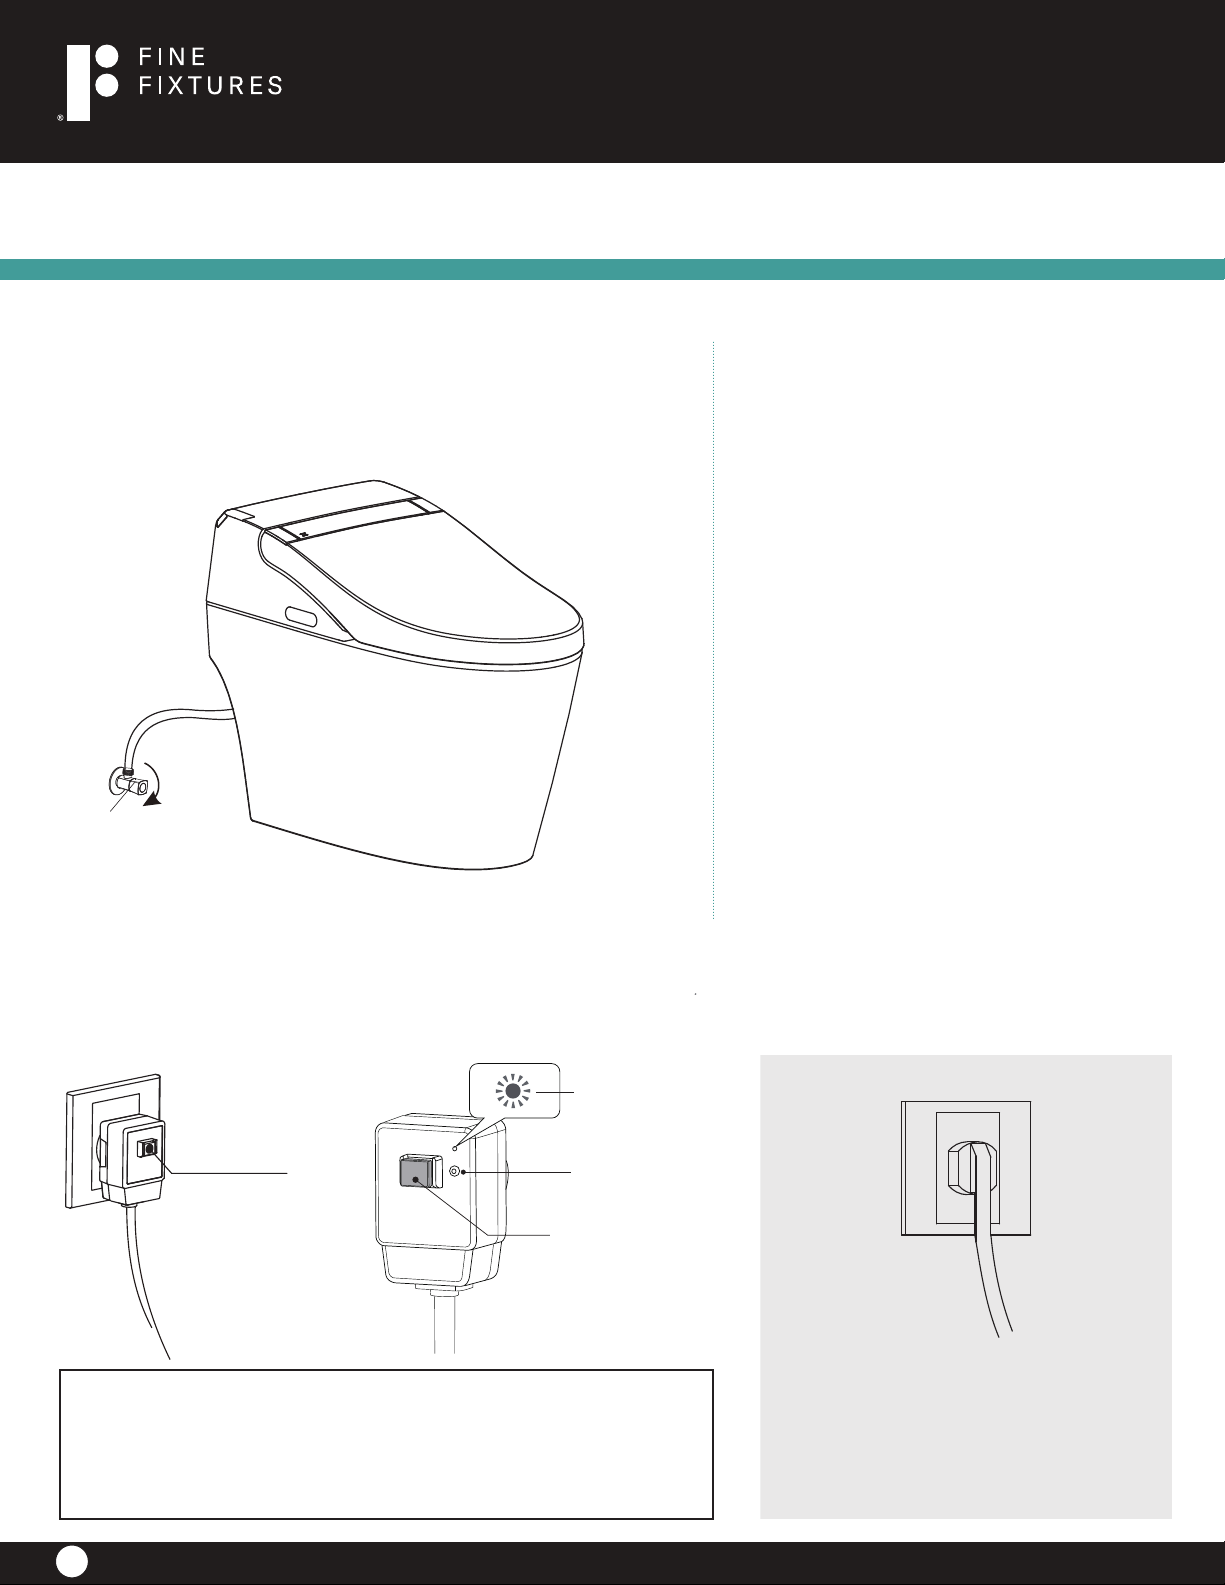
Previous Preparateion
206 wembly Road.
New Windsor, NY 12553
Phone: 7 18.602.60 60
Fax: 7 18.963.20 82
info@nextures.com
www.nextures.com
1. Turn on the angle valve
Check thread connection, Make sure no leakage is found.
Angle valve
3. Self Inspection
1. The main unit buzzer rings first
"click", power indicator (POWER)
and Energy-conservation indicator
(ENERGY SAVER) flash.
Power indicator lights on and
Energy-conservation indicator
gets off to start self-inspection.
2 . The main unit buzzer rings
second "click" to indicate finish of
self-inspection, power indictator
lights on, and Energy-conservation
indicator keeps off.
3. Start function mode for normal
usage.
2. Switch the power supply
Insert electric leakage protection plug
into power socket.
Press
protection
switch
If it’s an electric leakage protection plug, press protection switch,
indicator light is on which means there is electricity. Press electric
leakage test button prior to usage, protection switch bounces to
show that protection function works normally.
Indicator light
Electric leakage
test button
Protection switch
If it’s not an electric leakage
protection plug, insert
power plug into power
socket directly.
11
F O R A LIFE O F S TYLE
TM
Page 12
New Windsor, NY 12553
ENERGY SAVER
POWER
info@nextures.com
www.nextures.com
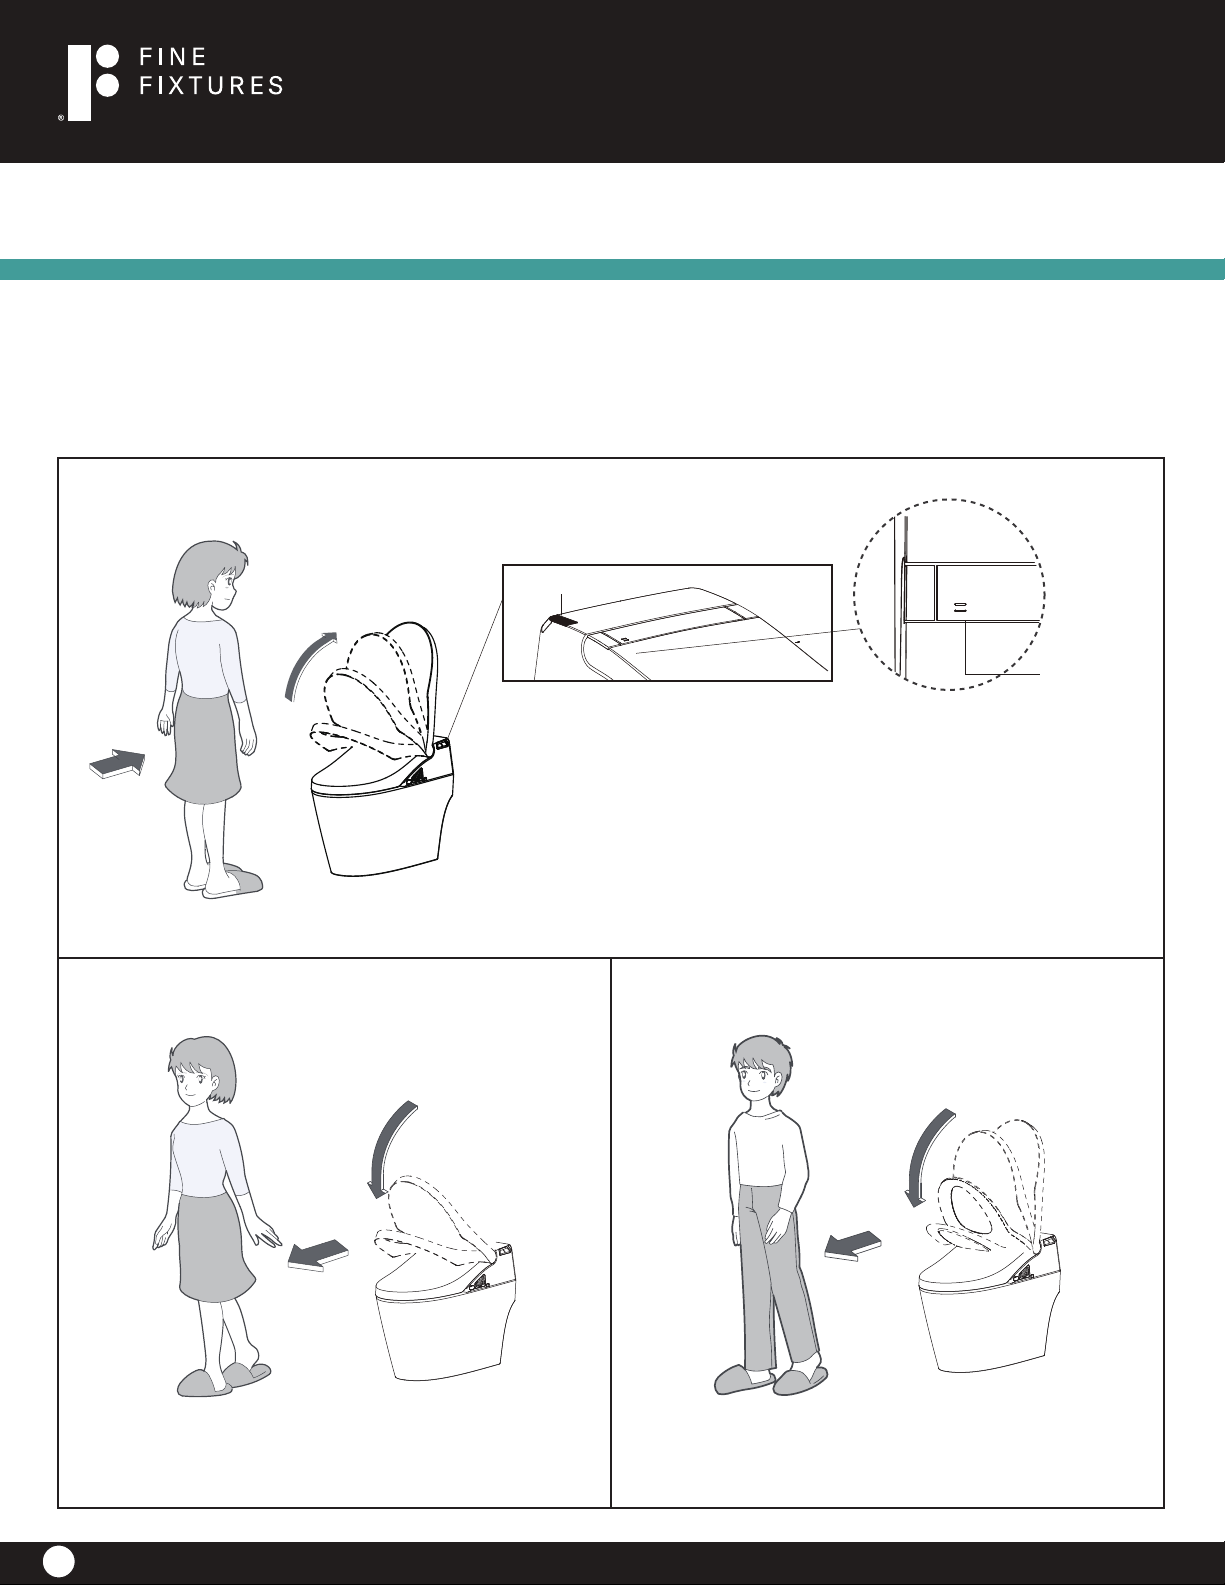
Auto Lid Open/close
If you purchase the intelligent toilet with auto lid open/close function, the product can
achieve the function of auto lid open/close. The factory default of this function is on closed
situation, so please start the auto lid open/close function by using remote controler.
1. When user close to the toilet
Human body sensing window
206 wembly Road.
Phone: 7 18.602.60 60
Fax: 7 18.963.20 82
POWER
ENERGY SAVER
1. When user is close to the seat, and the human body sensing window
detects the action of user, the power and energy-conservation indicator
lights on, and then the seat cover opens automatically.
2. In summer, when the room temperature is above 86F°, the temperature
dierence between user and surrounding will become smaller, so the
sensing window may not detect the action, please use controller to
open/close the seat cover.
2. Using toilet 3. When men stand to use toilet
The seat cover closes automatically 60 seconds later after
user leaves.
12
1. Open the seat by remote controller or hand.
2. The lid will be closed 60 seconds later after user leaves.
OTHER TOOLS MAY BE REQUIRED
F O R A LIFE O F S TYLE
TM
Page 13
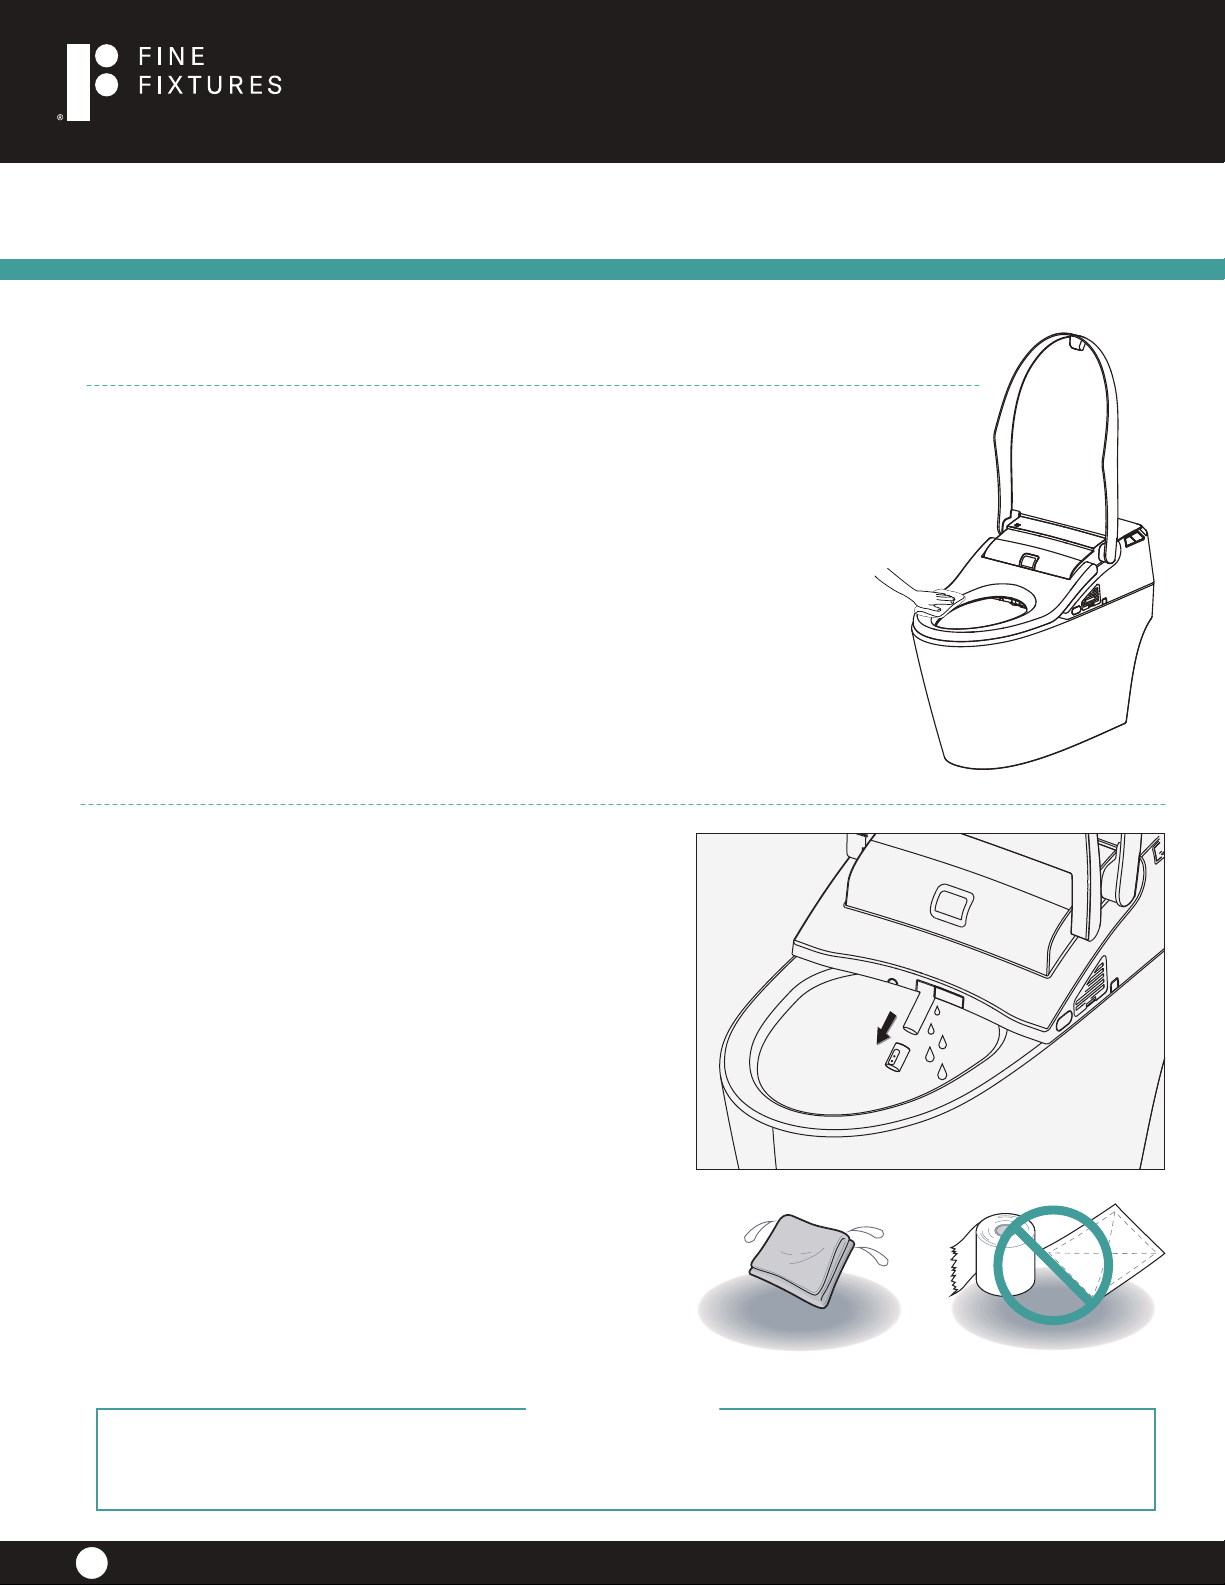
Daily Maintenance
Main unit care and maintenace
1. Shut off power supply at maintenance.
2. Turn the seat upward open, press down the button located on the
right side of main unit and pull out the seat. Wipe the stain with a
soft damp cloth.
206 wembly Road.
New Windsor, NY 12553
Phone: 7 18.602.60 60
Fax: 7 18.963.20 82
info@nextures.com
www.nextures.com
3. Safety self-inspection the product after cleaning, reconnect the
toilet with the power supply.
Spray nozzle maintenance and care
1. Nozzle self-cleaning Press: “nozzle cleaning”
button and nozzle will move forward and self-clean.
2. Spray nozzle disassemble When the wand moves
forward, the nozzle can be disassembled to clean.
3.Use soft cloth or soft brush to clean Do not pull or
push the wand,
4.Nozzle assembly: Re-install the nozzle to the wand
and press "nozzle cleaning" button, then the nozzle
will move back to the original position. to avoid
damage.
IMPORTANT!
DO NOT USE: Abrasive cleaners such as: acid, ammonia, bleach, and simmilar solutions. Use of such solutions may cause corrosion,
finish peeling, and/or dull the surface.
DO NOT USE: Abrasive sponges or cloth. Never use steel, wool, or wired brushes that will permanently scratch the surface.
13
F O R A LIFE O F S TYLE
TM
Page 14
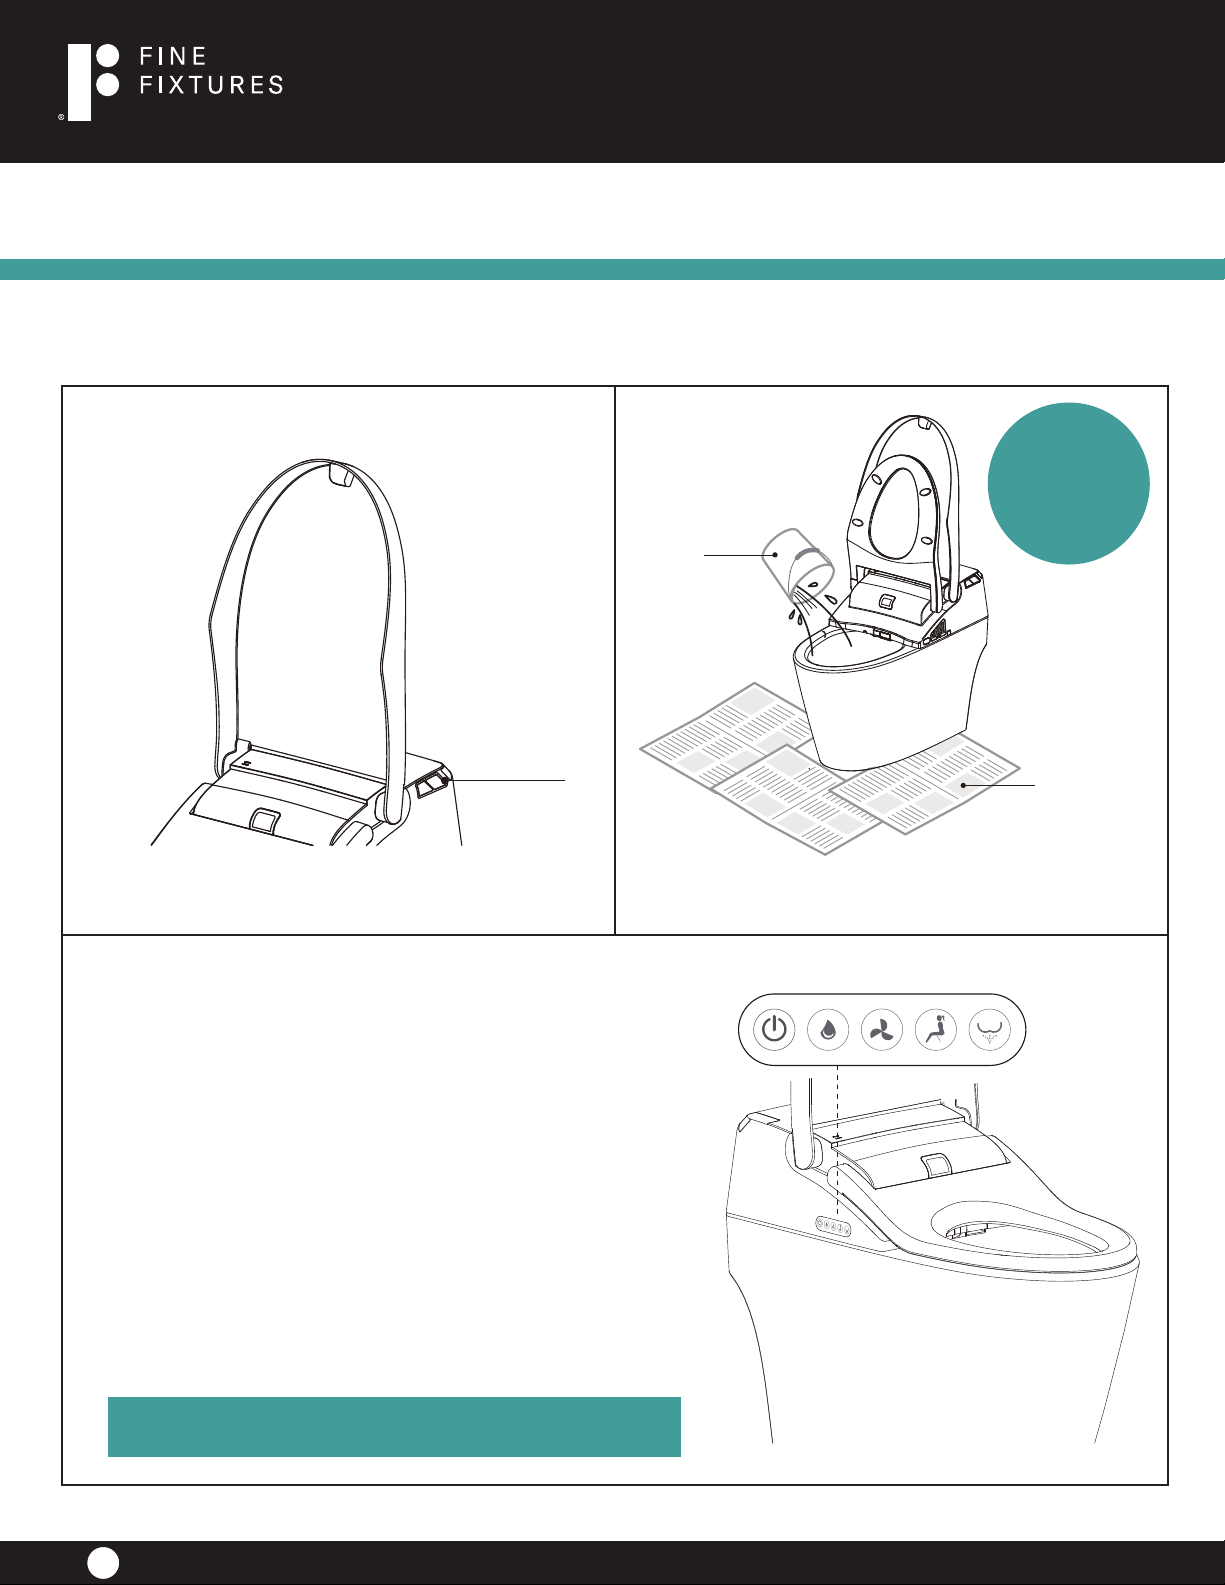
Emergency Troubleshooting
Electricity and water supply cut-off
206 wembly Road.
New Windsor, NY 12553
Phone: 7 18.602.60 60
Fax: 7 18.963.20 82
info@nextures.com
www.nextures.com
1. Power failure 2. Water failure
Barrel
Operation
panel
Manually press button of full/half ush to perform
the toilet ushing.
Put around 8L water into a barrel and ush the bowl of
ceramic.
3. Failure of remote control
Note:
Avoid water
spilling
from bowl.
Newspaper
1. Operate the panels on ebidet seat to perform.
2. Battery replacement
• Press the “power” button on panel and electricity indicator will turn o.
• Take remote control from hanger.
• Open battery cover to replace battery and put back to
hanger.
• Press the “power” button again and electricity indicator
will turn on.
Remarks: When replacing the battery, the automatic function and
timing function will be cancelled and need to be reset.
14
F O R A LIFE O F S TYLE
TM
Page 15
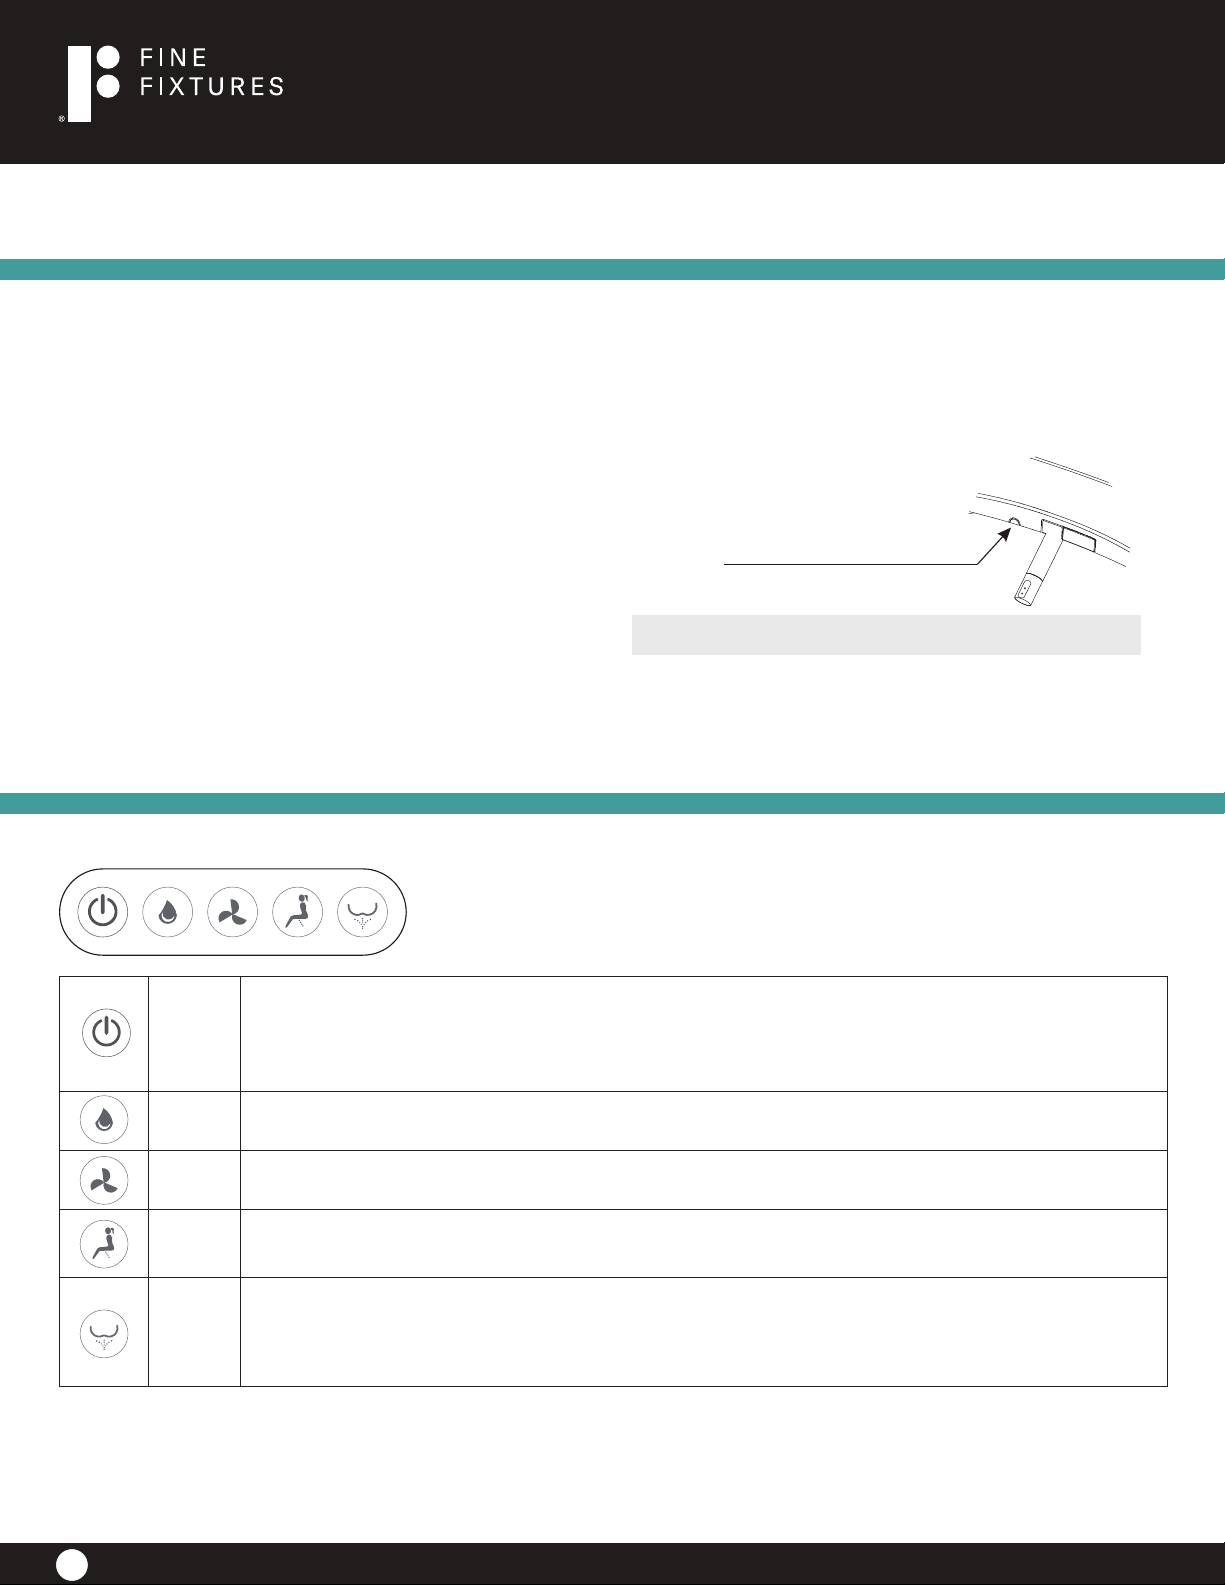
Emergency Troubleshooting
4. When the product is left unused for long time
Especially in winter season, the water inside the tank should be discharged to avoid freezing.
To discharge water:
1. Turn off the water supply angle valve
2. Cut off the electricity
3. Discharge water
Slightly press inward the
discharging button to
discharge water.
206 wembly Road.
New Windsor, NY 12553
Phone: 7 18.602.60 60
Fax: 7 18.963.20 82
info@nextures.com
www.nextures.com
4. Handle the remaining water in bowl
It is suggested to put some antifreeze into water inside the bowl.
Note: Before water discharging, the power must be cut off!
Illustration Of Main Unit Keys
1. Long press "power" button to enter standby mode; and then quick press "power" button to restore
Power
Flush
Dry
Front
functional mode.
2. When people sit, press "power" button to stop the function of rear, front cleaning or drying. When no one
sits, press "power" button to switch between function mode and power save mode.
Press "flush" button to activate full flushing.
Press "dry" button, warm wind will come out. After a circle or user leaves the seat, it will automatically stop.
Press "front cleaning" button, the water will come out to clean the front portion of body. It will automatically
stop after a circle of cleaning. If press "stop" or "power" button when using, the function will stop immediately.
1. Press " rear cleaning" button, the water will come out to clean the rear portion of body. It will automatically
Rear
stop after a circle of cleaning. If press "stop" or "power" button when using, the function will stop immediately.
2. When no one uses, press "rear cleaning" button, then the wand will stretch out to clean the nozzle and
spray lance.
Remark:
1. When main unit is in functional mode, the light of Power goes on; When in energy save function, the light of Power goes off, and energy
saver lights on; When in standby mode, both lights are off.
2. The default setting of all function is on middle level, after using controller, shift to the level setted last time.
15
F O R A LIFE O F S TYLE
TM
Page 16
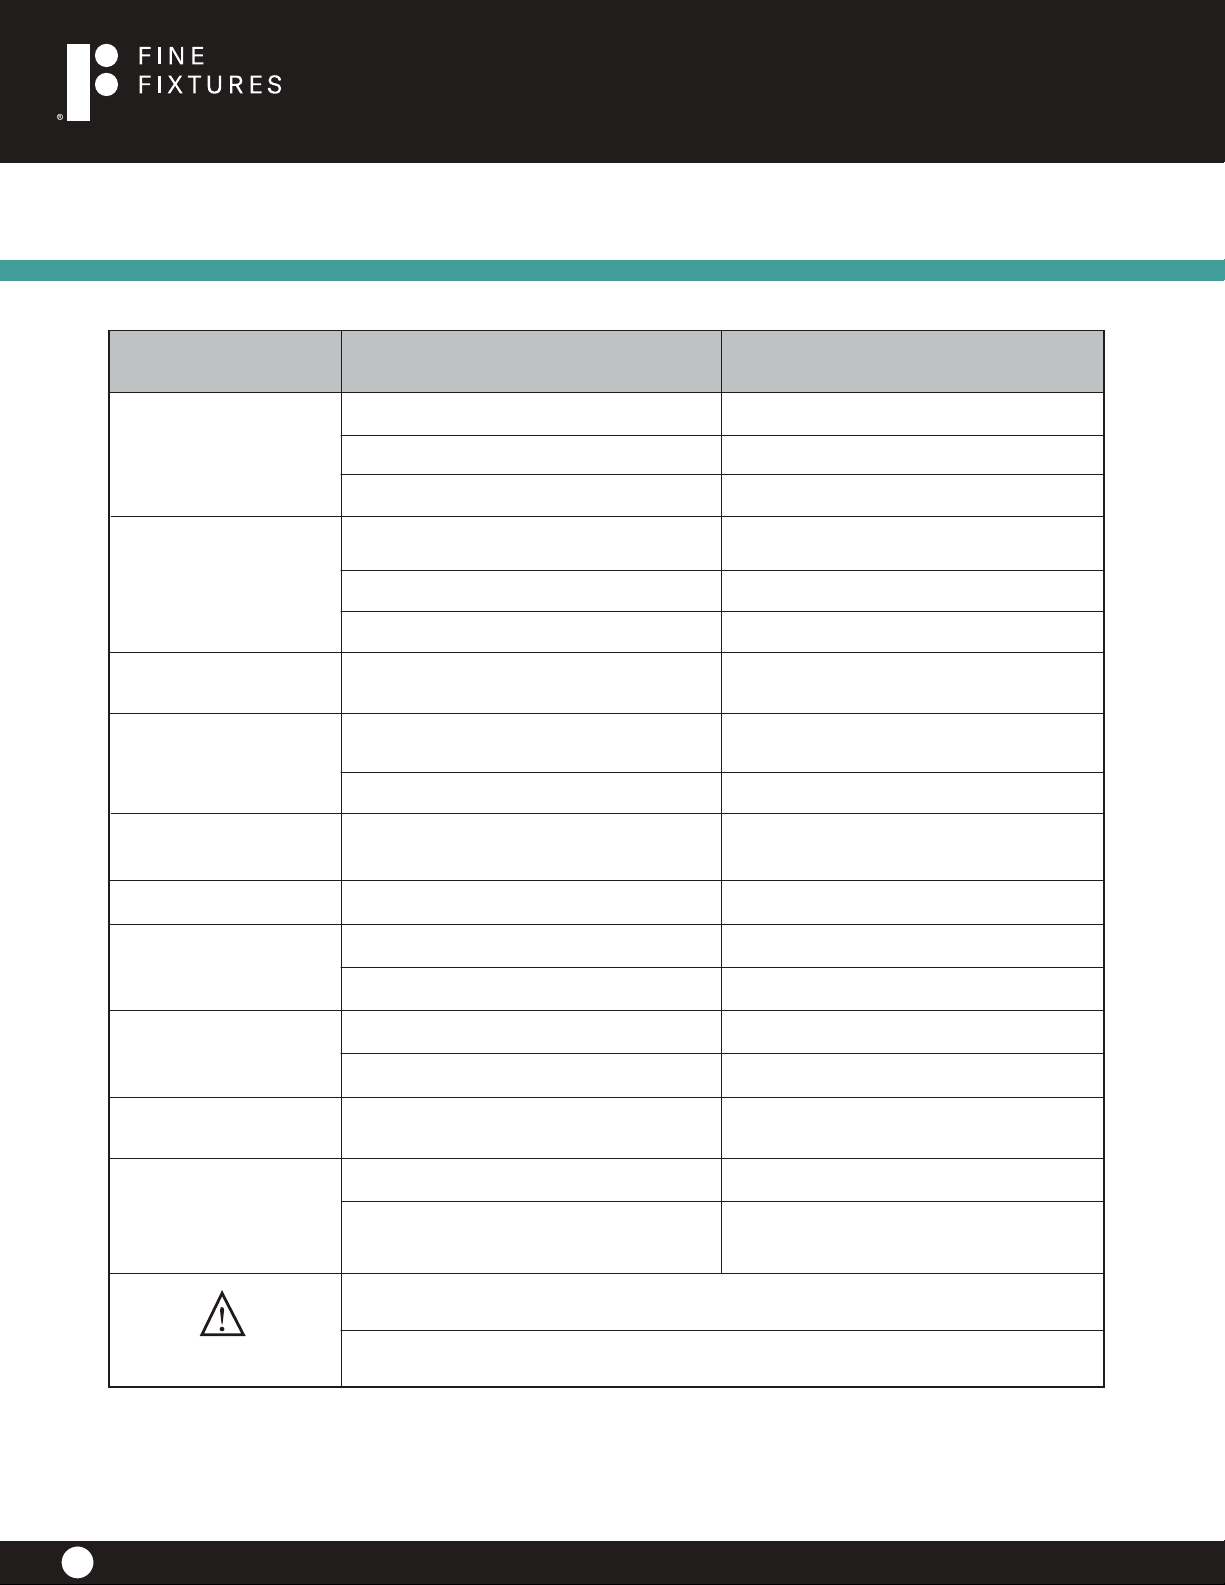
Troubleshooting Guide
206 wembly Road.
New Windsor, NY 12553
Phone: 7 18.602.60 60
Fax: 7 18.963.20 82
info@nextures.com
www.nextures.com
Problem Cause
Water supply hose buckling causes block
No flushing
Poor flushing
The water isn’t hot
Seat temperature
Fill valve is off
Water supply is cut off
Water supply hose buckling causes
partial block
Fill valve is not fully turned on
Filter is dirty and causes block
The water temperature is setted on
normal temperature level
The seat temperature is setted on normal
temperaturelevel
is not hot
In standby mode
Wind temperature
is not hot
No wind out
The wind temperature is setted on normal
temperaturelevel
In standby mode or power save mode
Solution
Solve the buckling
Turn on the fill valve
Connect water supply and wait for the water
Solve the buckling
Turn on the fill valve fully
Clean the filter
Reset the water temperature
Reset the seat temperature
Shift to function mode for 3 minutes
Reset the wind temperature
Shift to function mode to use dry function
spray wand
cannot retracted
Spray wand
cannot stretch out
Power off
Get stuck by impurities
Power off Push back the wand lightly & wait for power
Do not sit in sensing area
Push back the wand lightly & wait for power
Clear away the impurities
Sit right in the sensing area
Controller cannot
display
Malfunction of
deodorization
Caution
Reverse the polarity of battery
User doesn't reach the sensing area in seat
Deodorization function keeps working
after user leaves
If the problems cannot be solved as per above methods, please shut-off the power,
and contact service providers for maintenance.
If the leakage circuit breacker often trips off, it means the products has electricity
leakage, so please shut-off the power, and contact service provider for maintenance.
Reload the battery
Adjust to reach the sensing area
It's a normal phenomenon if deodorization
function keeps working after user leaves
to ensure eliminating smell entirely
Retain these installation instructions for future reference!
Thank you for using Fine Fixtures!
16
F O R A LIFE O F S TYLE
TM
 Loading...