

Page 1
THERMOSTAT 1T.91
ENGLISH
IB1T91 - 07/19 - Finder S.p.A. con unico socio - 10040 ALMESE (TO) - ITALY
Page 2

INDEX
Page
DIMENSIONS
INSTALLATION 2
POWER ON THE DISPLAY 6
THERMOSTAT OFF 6
DESCRIPTION OF KEYS AND SYMBOLS 7
DAY OR NIGHT TEMPERATURE SETTING 8
OFF STATE & FROST PROTECTION FUNCTION 9
SUMMER/WINTER SETTING 9
LOCK/UNLOCK THERMOSTAT 10
TECHNICAL FEATURES 11
2
1
Page 3
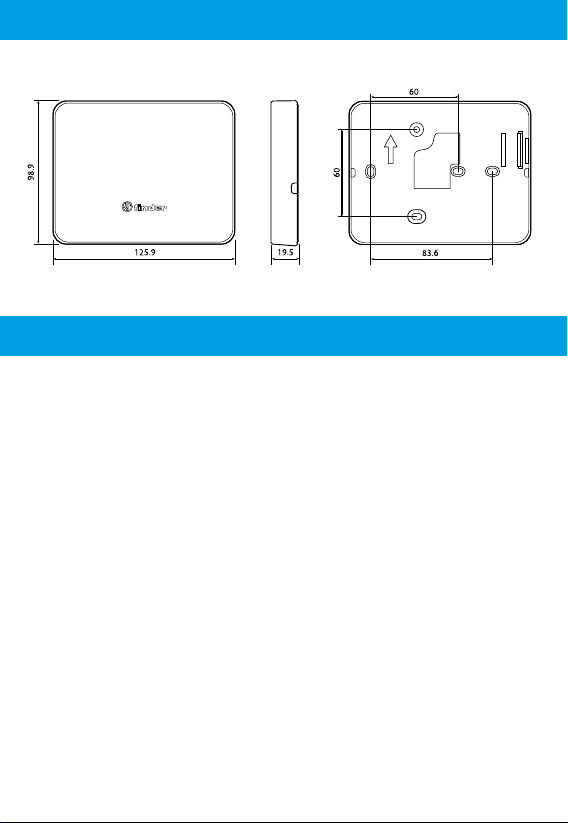
DIMENSIONS
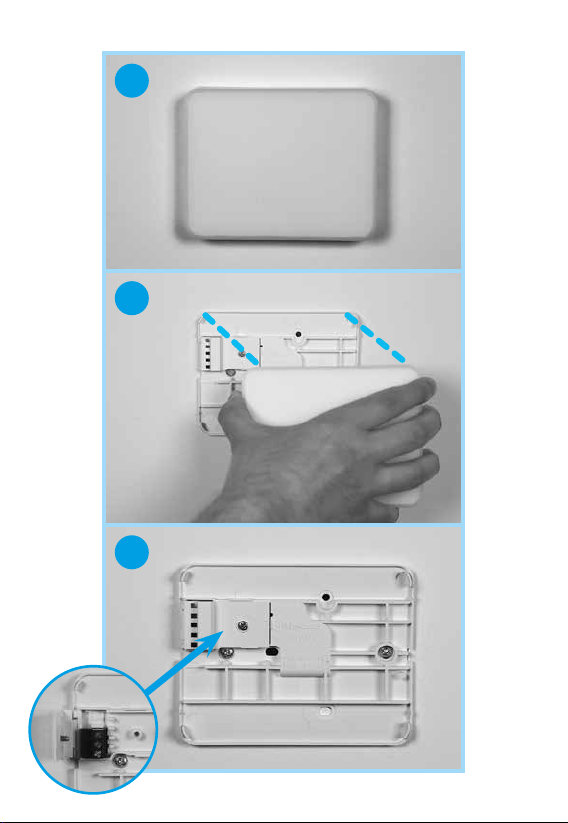
INSTALLATION
SAFETY REQUIREMENTS
The installation and assembly of electrical equipment must be performed
by expert personnel.
Before connecting the thermostat make sure that the load (pumps, valves,
boiler, etc ...) are not powered-up and are within the rating of the contact.
POSITIONING
Install the thermostat away from heat sources (radiators, direct sunlight,
kitchens) and doors/windows. Mount about 1.5 meters above oor level.
FIXING
Use screws 3.5 mm. Maximum head thickness 3 mm.
When fastening, take care not to over tighten the screws to avoid distorting
the base.
NOTE
Use only a damp cloth for cleaning.
2
Page 4
1
2
3
3
Page 5

+ +– –
4
Page 6

Insert the batteries into the battery compartment, respecting the indicated
polarities.
CAUTION Incorrect positioning of the batteries (polarity inversion) can
damage the thermostat.
The thermostat is provided with 2 battery thresholds: the rst threshold
indicates that the batteries are low and must be replaced. In this condition,
the display in the o state and a ashing battery icon will show every 5 sec.
After touching the Finder button and turning on the display, the battery icon
will continue to ash.
At the second threshold the thermostat turns o, the output relay will be set
to OFF and it will no longer be possible to make any further adjustments.
In this condition the ashing battery icon can be seen every 5 seconds (until
the batteries completely run out).
5
Page 7

Touching the word “Finder” to turn on the thermostat results in BAT and OFF
alternating on the display.
POWER ON THE DISPLAY
THERMOSTAT OFF
6
Page 8

DESCRIPTION OF KEYS AND SYMBOLS
Switch on display/conrm
Press for 2“ to save and exit
Thermostat switching on/o
Press for 3“ to access the settings
Change mode DAY/NIGHT
Thermostat lock/unlock
Increase
Decreases
Low battery
Output ON (SUMMER setting)
Day setting
Night setting
Output ON (WINTER setting)
Degree centigrade
7
Page 9

DAY OR NIGHT TEMPERATURE SETTING
Example: Daytime temperature setting
Example: Night temperature setting
1
2
1
2
8
Page 10

OFF STATE & FROST PROTECTION FUNCTION
When the chronothermostat is o, the display will show the word OFF.
But in this condition the frost protection function remains active.
If the room temperature falls below the frost protection temperature, the
ame
icon will appear together with the word OFF
SUMMER / WINTER SETTING
3”
1
2
9
Page 11

LOCK/UNLOCK THERMOSTAT
Thermostat lock
3”
2
Thermostat unlock
3”
2
Caution
By entering an incorrect PIN code, the thermostat will display Err for an
instant and then re-presents the locked display. After entering the wrong
PIN 3 times, the thermostat will remain locked for 20 seconds with Err
displayed (the display will turn o after 5 seconds to preserve the batteries).
This procedure repeats for any further attempt to enter the wrong PIN.
NOTE
Removing the batteries will not cancel the lock.
If you forget your PIN, use code 513 to unlock the product
1
1
10
Page 12

TECHNICAL FEATURES
Power supply: 2 alkaline batteries 1.5 V type AA (life approx. 2 years)
Temperature adjustment WINTER/SUMMER - NIGHT/DAY: (+5…+37)°C
Resolution: 0.1°C
Accuracy: +/– 0.5°C at 20°C
Dierential: 0.2°C - Self-regulating
Operating modes: Summer - Winter - Day - Night
Degree of protection: IP20
PIN lock: Yes, 3 digits
Output: 5 A 250 V AC volt-free changeover contact
Mounting: Wall
DEFAULT PARAMETERS
Season set Winter
Frost protection
Fixed at 5°C
11
 Loading...