

Page 1
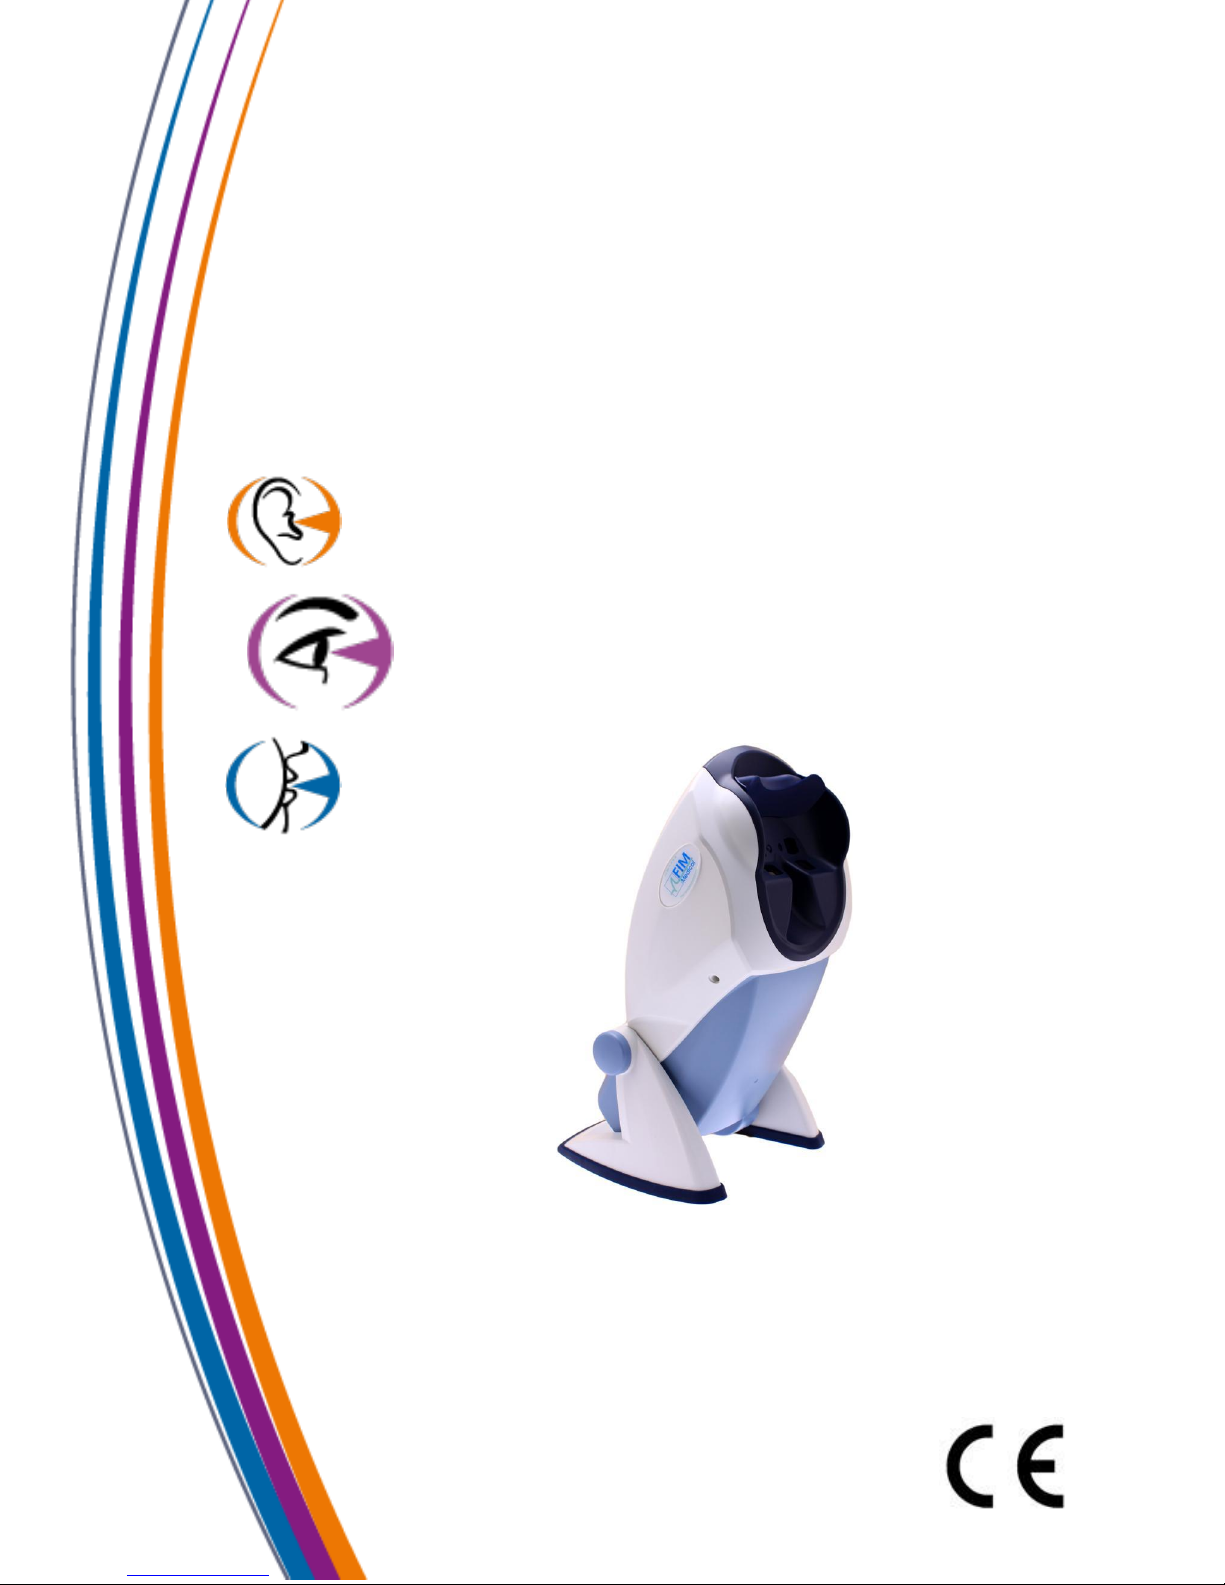
User Manual
Visiolite®
Essential
Modulus
Master and Master-GT
V04.02.00
March 2018
Page 2

Ce document est la propriété de la Société FIM MEDICAL. Il ne peut être reproduit ou communiqué sans son autorisation.
This document is the property of FIM MEDICAL. Its contents cannot be reproduced or divulged without the company's approval
Page 2 / 74
V04.02.00
March 2018
Contents
1. Introduction ___________________________________________________________________ 6
1.1. List of supplied elements __________________________________________________________ 7
1.2. Presentation _____________________________________________________________________ 7
1.3. Technical features ________________________________________________________________ 9
1.4. Visiolite® range models __________________________________________________________ 10
1.5. Serial number labels _____________________________________________________________ 11
2. Safety ________________________________________________________________________ 12
2.1. General _________________________________________________________________________ 13
2.2. Operator ________________________________________________________________________ 14
2.3. Medical contraindications ________________________________________________________ 14
2.4. Precautions before tests _________________________________________________________ 16
2.5. Interpretation of results __________________________________________________________ 16
3. Equipment and Installation ____________________________________________________ 17
3.1. Installation procedure ____________________________________________________________ 18
3.1.1. Opening the box _______________________________________________________________________ 18
3.1.2. Nomenclature _________________________________________________________________________ 18
3.1.3. Connection ____________________________________________________________________________ 20
3.2. Operating systems _______________________________________________________________ 21
3.3. Software Installation (computerised version) ______________________________________ 21
3.3.1. PC connection _________________________________________________________________________ 22
3.3.2. Uninstallation __________________________________________________________________________ 22
3.3.3. First run _______________________________________________________________________________ 22
3.3.1. Test before use ________________________________________________________________________ 23
3.4. Procedure to stop the device _____________________________________________________ 23
3.4.1. Software version _______________________________________________________________________ 23
3.4.2. Essential remote control version _________________________________________________________ 23
3.4.3. LCD remote control version _____________________________________________________________ 23
3.5. Backup/restore __________________________________________________________________ 23
3.5.1. Presentation ___________________________________________________________________________ 23
3.5.2. Backup _______________________________________________________________________________ 23
3.5.3. Restore _______________________________________________________________________________ 24
4. Use __________________________________________________________________________ 26
4.1. Raise/lower Visiolite® body ______________________________________________________ 27
4.2. Software use ____________________________________________________________________ 27
4.2.1. Description of menus ___________________________________________________________________ 27
Page 3

Ce document est la propriété de la Société FIM MEDICAL. Il ne peut être reproduit ou communiqué sans son autorisation.
This document is the property of FIM MEDICAL. Its contents cannot be reproduced or divulged without the company's approval
Page 3 / 74
V04.02.00
March 2018
4.2.2. Manual mode __________________________________________________________________________ 28
4.2.3. Automatic mode _______________________________________________________________________ 32
4.2.4. Settings _______________________________________________________________________________ 32
4.2.5. Database _____________________________________________________________________________ 39
4.3. Essential remote control use _____________________________________________________ 41
4.3.1. Begin a test ___________________________________________________________________________ 41
4.3.2. Binocular and monocular mode __________________________________________________________ 42
4.3.3. Visual field ____________________________________________________________________________ 42
4.3.4. Standby _______________________________________________________________________________ 42
4.3.5. Essential remote control response forms __________________________________________________ 42
4.4. Master model LCD screen remote control use ______________________________________ 43
4.4.1. Keys _________________________________________________________________________________ 44
4.4.2. Forehead presence ____________________________________________________________________ 44
4.4.3. Begin a test ___________________________________________________________________________ 44
4.4.4. Choose a mode ________________________________________________________________________ 45
4.4.5. Perform a test _________________________________________________________________________ 45
4.4.6. Visual field ____________________________________________________________________________ 45
4.4.7. Standby _______________________________________________________________________________ 45
4.4.8. Remote control response form ___________________________________________________________ 45
5. Tests Description _____________________________________________________________ 47
5.1. Visual acuity test ________________________________________________________________ 48
5.2. Contrast sensitivity test __________________________________________________________ 50
5.2.1. Purpose ______________________________________________________________________________ 50
5.2.2. Patient instructions _____________________________________________________________________ 50
5.3. Duochrome test _________________________________________________________________ 51
5.3.1. Purpose ______________________________________________________________________________ 51
5.3.2. Definition ______________________________________________________________________________ 51
5.3.3. Patient instructions _____________________________________________________________________ 51
5.3.4. Expected responses ____________________________________________________________________ 51
5.3.5. Perception example ____________________________________________________________________ 51
5.4. Astigmatism test ________________________________________________________________ 52
5.4.1. Purpose ______________________________________________________________________________ 52
5.4.2. Definition ______________________________________________________________________________ 52
5.4.3. Prerequisite ___________________________________________________________________________ 52
5.4.4. Patient instructions _____________________________________________________________________ 52
5.4.5. Expected responses ____________________________________________________________________ 52
5.4.6. Perception example ____________________________________________________________________ 53
5.5. Phorias test _____________________________________________________________________ 54
5.5.1. Purpose ______________________________________________________________________________ 54
5.5.2. Interpretation limits _____________________________________________________________________ 54
5.5.3. Definition ______________________________________________________________________________ 54
5.5.4. Patient instructions _____________________________________________________________________ 54
5.5.5. Expected responses ____________________________________________________________________ 54
5.6. Depth perception test ____________________________________________________________ 56
5.6.1. Purpose ______________________________________________________________________________ 56
Page 4

Ce document est la propriété de la Société FIM MEDICAL. Il ne peut être reproduit ou communiqué sans son autorisation.
This document is the property of FIM MEDICAL. Its contents cannot be reproduced or divulged without the company's approval
Page 4 / 74
V04.02.00
March 2018
5.6.2. Interpretation limits _____________________________________________________________________ 56
5.6.3. Definition ______________________________________________________________________________ 56
5.6.4. Patient instructions _____________________________________________________________________ 56
5.7. Fusion test ______________________________________________________________________ 57
5.7.1. Purpose ______________________________________________________________________________ 57
5.7.2. Definition ______________________________________________________________________________ 57
5.7.3. Patient instructions _____________________________________________________________________ 57
5.7.4. Expected responses ____________________________________________________________________ 57
5.8. Age-related macular degeneration (ARMD) / Amsler grid ____________________________ 58
5.8.1. Purpose ______________________________________________________________________________ 58
5.8.2. Definition ______________________________________________________________________________ 58
5.8.3. Prerequisite ___________________________________________________________________________ 58
5.8.4. Patient instructions _____________________________________________________________________ 58
5.8.5. Expected responses ____________________________________________________________________ 58
5.8.6. Perception examples ___________________________________________________________________ 58
5.9. Colour perception test ___________________________________________________________ 59
5.9.1. Purpose ______________________________________________________________________________ 59
5.9.2. Definition ______________________________________________________________________________ 59
5.9.3. Prerequisite ___________________________________________________________________________ 59
5.9.4. Patient instructions _____________________________________________________________________ 60
5.9.5. Interpretation limits _____________________________________________________________________ 60
5.10. External and central visual field test _____________________________________________ 61
Definitions ______________________________________________________________________________________ 61
5.10.1. External visual field ____________________________________________________________________ 61
5.10.2. Central visual field _____________________________________________________________________ 62
5.10.3. Patient instructions _____________________________________________________________________ 62
5.10.4. Significance of stimuli in the test window __________________________________________________ 63
5.10.5. Results _______________________________________________________________________________ 63
5.10.6. Limits _________________________________________________________________________________ 63
5.11. Glare sensitivity test (Master-GT version) ________________________________________ 64
5.11.1. Purpose ______________________________________________________________________________ 64
5.11.2. Principle ______________________________________________________________________________ 65
5.11.3. Operator and patient instructions_________________________________________________________ 65
5.12. Glare resistance test (Master-GT version) ________________________________________ 65
5.12.1. Purpose ______________________________________________________________________________ 65
5.12.2. Principle ______________________________________________________________________________ 65
5.12.3. Patient instructions _____________________________________________________________________ 65
6. Cleaning and Maintenance ____________________________________________________ 68
6.1. Removable forehead rest cleaning ________________________________________________ 69
6.1.1. Remove forehead rest __________________________________________________________________ 69
6.1.2. Replace forehead rest __________________________________________________________________ 69
6.2. Clean the housing _______________________________________________________________ 69
6.3. Clean the lenses _________________________________________________________________ 69
6.4. Clean the peripheral field holes ___________________________________________________ 69
Page 5

Ce document est la propriété de la Société FIM MEDICAL. Il ne peut être reproduit ou communiqué sans son autorisation.
This document is the property of FIM MEDICAL. Its contents cannot be reproduced or divulged without the company's approval
Page 5 / 74
V04.02.00
March 2018
6.5. Annual service __________________________________________________________________ 70
6.6. Guarantee _______________________________________________________________________ 70
7. What To Do If? _______________________________________________________________ 71
7.1. No noise when switched on ______________________________________________________ 72
7.2. Normal switch-on noise but screen light remains grey ______________________________ 72
7.3. Error message appears at recording ______________________________________________ 72
7.3.1. “Identification incomplete” _______________________________________________________________ 72
7.3.2. “Operation must use updateable query” ___________________________________________________ 72
7.4. Patient identification file found but not the tests ___________________________________ 72
7.5. Visiolite® light does not come on _________________________________________________ 72
7.6. Glare and motor drive seem weak _________________________________________________ 72
Page 6

Ce document est la propriété de la Société FIM MEDICAL. Il ne peut être reproduit ou communiqué sans son autorisation.
This document is the property of FIM MEDICAL. Its contents cannot be reproduced or divulged without the company's approval
Page 6 / 74
V04.02.00
March 2018
1. Introduction
Page 7

Ce document est la propriété de la Société FIM MEDICAL. Il ne peut être reproduit ou communiqué sans son autorisation.
This document is the property of FIM MEDICAL. Its contents cannot be reproduced or divulged without the company's approval
Page 7 / 74
V04.02.00
March 2018
1.1. List of supplied elements
The following elements should be found inside the packaging:
Visiolite®
External medical power plug IEC60601 (reference: GTM41060-2512 GLOBTEK manufacturing, UL
certification: E175861)
USB lead (for computerised versions only)
Visiolite® software installation CD with user manual included (for computerised versions only)
Driver remote control (for remote control versions only)
Cloth for cleaning lenses
Forehead rest
Response forms CD (for remote control versions only)
Information sheet
1.2. Presentation
We recommend reading these instructions thoroughly before use.
This user manual is intended for Visiolite® operators, whatever the chosen model (Essential, Modulus, Master or
Master-GT).
Only a practitioner can direct a patient to an ophthalmologist in order to confirm the Visiolite® results obtained.
The ophthalmologist will perform further tests to prescribe visual correction or surgical intervention.
The Visiolite® is a screening device designed by FIM MEDICAL for the exploration of visual function. The
Visiolite® currently operates with two driving modes, depending on the model (refer § 1.4):
Remote control version
Computerised version
Designed for maximum ergonomics, the Visiolite® is equipped with a detector that detects the position of the
patient’s forehead. Once the patient is correctly positioned, the test begins.
The Visiolite® is designed to progressively adapt the patient to different light levels depending on the type of
test performed. Tests can be performed on three light levels:
High photopic
Low photopic
Mesopic
Depending on the version, the practitioner can parameter sequences in order to define which tests are to be
performed systematically, depending on needs. The Visiolite® is equipped with several optical effects and
mirrors to perform near (33cm/13inches), intermediate (60cm/23.6inches) and far (5m/16.4ft) vision tests.
Tests can also be performed in monocular or binocular vision. For computerised versions, results are recorded
directly onto the computer. For remote control versions, results are recorded on response forms.
Innovative solutions have considerably reduced the weight of the device and expanded the range of available
tests requiring no operator manipulation of the device. The device also integrates the latest high technology: a
lighting principle that preserves slide quality over time.
Page 8

Ce document est la propriété de la Société FIM MEDICAL. Il ne peut être reproduit ou communiqué sans son autorisation.
This document is the property of FIM MEDICAL. Its contents cannot be reproduced or divulged without the company's approval
Page 8 / 74
V04.02.00
March 2018
The Visiolite® offers the following assets:
Compact size
Light-weight equipment
Portability
Ergonomic use
Quick testing
Programming and automation to create test sequences according to patient risk
Elimination of yellowing of slides
Optimization of computer connectivity
Option of performing several visual acuity tests to avoid voluntary or involuntary memorizing of
optotypes
Device set-up for vehicle-driver tests
Performing visual tests with corrective or progressive lenses
Performing tests in low photopic light for photo-sensitive patients
Creating/modifying test sequences
Performing far, near and intermediate vision tests
Page 9
Ce document est la propriété de la Société FIM MEDICAL. Il ne peut être reproduit ou communiqué sans son autorisation.
This document is the property of FIM MEDICAL. Its contents cannot be reproduced or divulged without the company's approval
Page 9 / 74
V04.02.00
March 2018
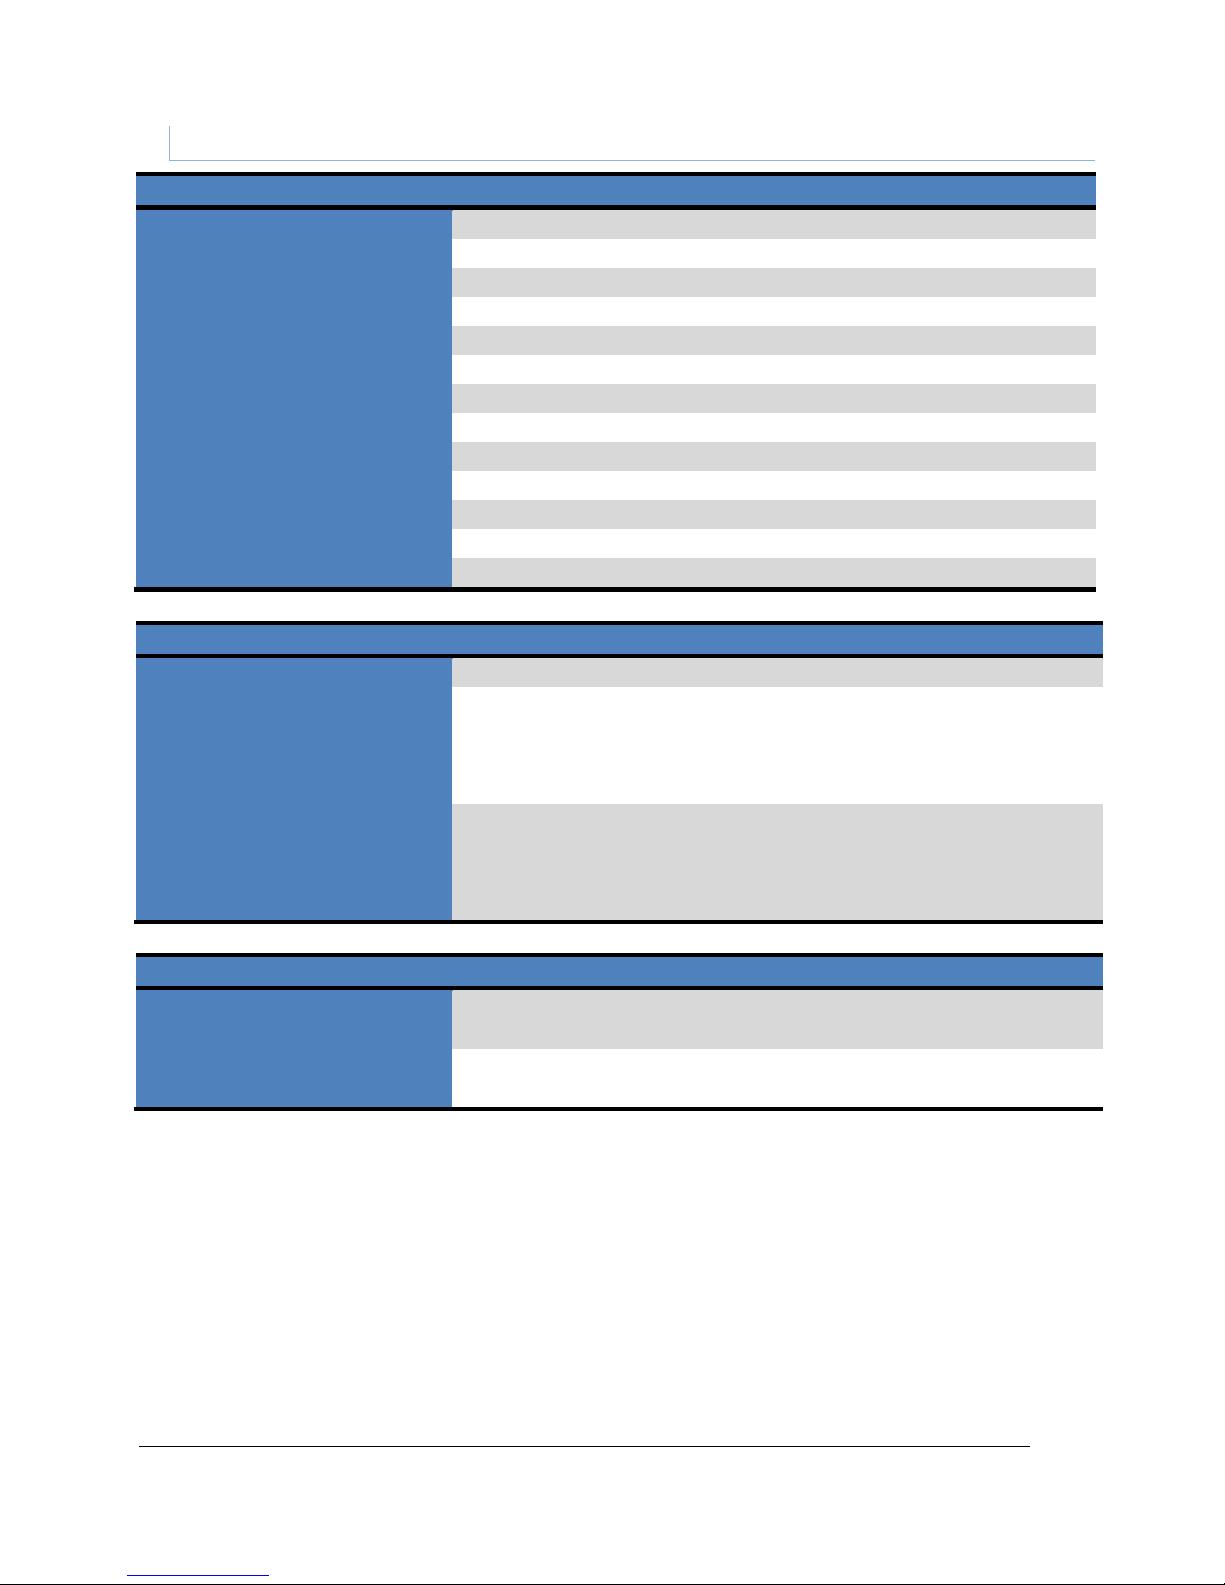
1.3. Technical features
Technical features
Storage temperature
0 - 50°C (32 - 122°F)
Operating temperature
15 - 35°C (59 - 95°F)
Humidity
75% maximum
Altitude of operation
< 2000m (6561.7ft)
External power plug
Input: 100-240VAC 50-60Hz 0.6A Output: 12VDC 2.08A (medical class)
Power supply
12VDC from an external power medical supply (refer § 1.1)
Power absorbed
24W
Standard
EN 60601-1, EN 60601-1-2
Medical class
Class I
Applied part
Type B
Marking
CE
Dimensions
50x27x25 cm (19.7x10.6x9.8 inches)
Weight
4.850 kg (10.7lb)
Optical features
Lighting system
16 white LEDs and diffuser system
Lenses
Far vision: (5.0 ± 0.1)m (16.4 ± 0.3)ft
Intermediate vision: (60.0 ± 0.5)cm (23.6 ± 0.2)inches
Near vision: (33.00 ± 0.25)cm (13.0 ± 0.1)inches
Hyperopia lenses: +1 dioptre
Lighting conditions (nominal
values)
High photopic (160 candelas)
Low photopic (80 candelas)
Dusk mesopic (3 candelas)
Conform to NF EN ISO 8596 standard
Test features
Reactivity
Time between 2 neighbouring tests: 700ms
Time to pass from one slide to another: 1 sec
Average test time
Routine test: 3 mins
In-depth test: 5 mins
Page 10

Ce document est la propriété de la Société FIM MEDICAL. Il ne peut être reproduit ou communiqué sans son autorisation.
This document is the property of FIM MEDICAL. Its contents cannot be reproduced or divulged without the company's approval
Page 10 / 74
V04.02.00
March 2018
1.4. Visiolite® range models
ACUITY TESTS
ESSENTIAL
MODULUS
MASTER
Landolt rings
• • •
Numbers
• •
Letters
• • •
Low vision letters
• •
SUPPLEMENTARY TESTS
Astigmatism
• • •
Red/green duochrome
• • •
Depth perception
• •
Vertical and horizontal
phorias
• • •
Fusion
•
Ishihara type colours test
• • •
Amsler grid
• •
Contrast sensitivity
•
Hyperopia test (+1dioptre)
• • •
Horizontal et vertical visual
field
• • •
Glare sensitivity
•
(GT option)
Glare resistance
(educational test)
•
(GT option)
DISTANCES
Far vision 5m/16.4ft
• • •
Intermediate vision
60cm/23.6inches
•
•
Near vision
33cm/13.0inches
• • •
LIGHTING
High photopic
• • •
Low photopic
• •
Mesopic (night vision)
•
•
DRIVER MODE
Computer
• •
Remote control
•
•
Page 11
Ce document est la propriété de la Société FIM MEDICAL. Il ne peut être reproduit ou communiqué sans son autorisation.
This document is the property of FIM MEDICAL. Its contents cannot be reproduced or divulged without the company's approval
Page 11 / 74
V04.02.00
March 2018
1.5. Serial number labels
Serial number labels display the following information:
CE marking Directive 93/42/EEC
Type B applied part
The device should not be discarded with general household waste. Return it to the
manufacturer for disposal
Consult the accompanying documents
SN
Serial number
Manufacturer identification
Page 12

Ce document est la propriété de la Société FIM MEDICAL. Il ne peut être reproduit ou communiqué sans son autorisation.
This document is the property of FIM MEDICAL. Its contents cannot be reproduced or divulged without the company's approval
Page 12 / 74
V04.02.00
March 2018
2. Safety
Page 13

Ce document est la propriété de la Société FIM MEDICAL. Il ne peut être reproduit ou communiqué sans son autorisation.
This document is the property of FIM MEDICAL. Its contents cannot be reproduced or divulged without the company's approval
Page 13 / 74
V04.02.00
March 2018
2.1. General
CAUTION:
Never dismantle or interfere with the device without the authorisation of the manufacturer. Only
FIM MEDICAL After Sales Service and trained distributors are qualified to work on the equipment
The Visiolite® should be returned regularly for annual maintenance to FIM MEDICAL After Sales or
your distributor
Use only the leads and power plugs supplied by FIM MEDICAL
It is highly recommended to store and transport the Visiolite® at a temperature of 0 -40°C (32 -
104°F). If a change in atmospheric conditions occurs, wait a while until there is no condensation on
the optics before using the device
Do not expose the device to vibrations or excessive shocks
Do not wet the device. Protect it from all liquid projections. Never wash the Visiolite® under running
water or spray directly with liquids
If accidentally damaged (fall or shock), send the device to FIM MEDICAL After Sales Service, or to
your distributor, if trained by FIM MEDICAL for maintenance
If the device no longer maintains a stable position, or has degraded, return it to FIM MEDICAL After
Sales Service, or to your distributor, if trained by FIM MEDICAL for maintenance
If any elements of the device degrade, the device should be returned for checking, to FIM MEDICAL
After Sales Service, or to your distributor, if trained by FIM MEDICAL for maintenance
Repetitive visual defects appearing in every patient should signal a possible problem with the device
The device should not be used in the presence of anaesthetic gases
The Visiolite® remote controls should only be used with the device, and vice-versa
If the device or its accessories degrade visibly, contact FIM MEDICAL After Sales Service or your
distributor
The device should sit on a flat and stable surface
If a multi-adaptor is used, no other electrical device or multi-adaptor should be connected to the
device
The device should be positioned so as to leave the power plug free, in case of emergency
Page 14

Ce document est la propriété de la Société FIM MEDICAL. Il ne peut être reproduit ou communiqué sans son autorisation.
This document is the property of FIM MEDICAL. Its contents cannot be reproduced or divulged without the company's approval
Page 14 / 74
V04.02.00
March 2018
2.2. Operator
The Visiolite® is reserved for the use of health professionals.
For computerised versions, the operator must be trained in the basic rules of computers and shall take all
precautions against the risk of software pirating, disclosure of confidential data, viral attacks or incorrect
handling.
Particular care shall be taken to back up recorded data as often as possible, on a reliable support. FIM MEDICAL
recommends daily back up.
As a reminder to operators, the Visiolite® software is delivered with a licence contract stating the software
conditions of use. This licence is granted for the installation and use at one work station. All new installations
require the purchase of extra licences.
2.3. Medical contraindications
Patients suffering from the following medical contraindications are not permitted to perform vision tests:
General contraindications: photosensitive persons should not perform screening tests in high photopic
Contraindications related to glare: all photosensitising medication
All persons performing the glare test must be informed of the risks related to certain photosensitising
medication. Ensure the patient does not suffer from the following pathologies (non-exhaustive list):
albinism
cystinosis
keratoconjunctivitis
surgery
inflammation
traumatism
Ensure the patient has not undergone refractive surgery less than three months previously.
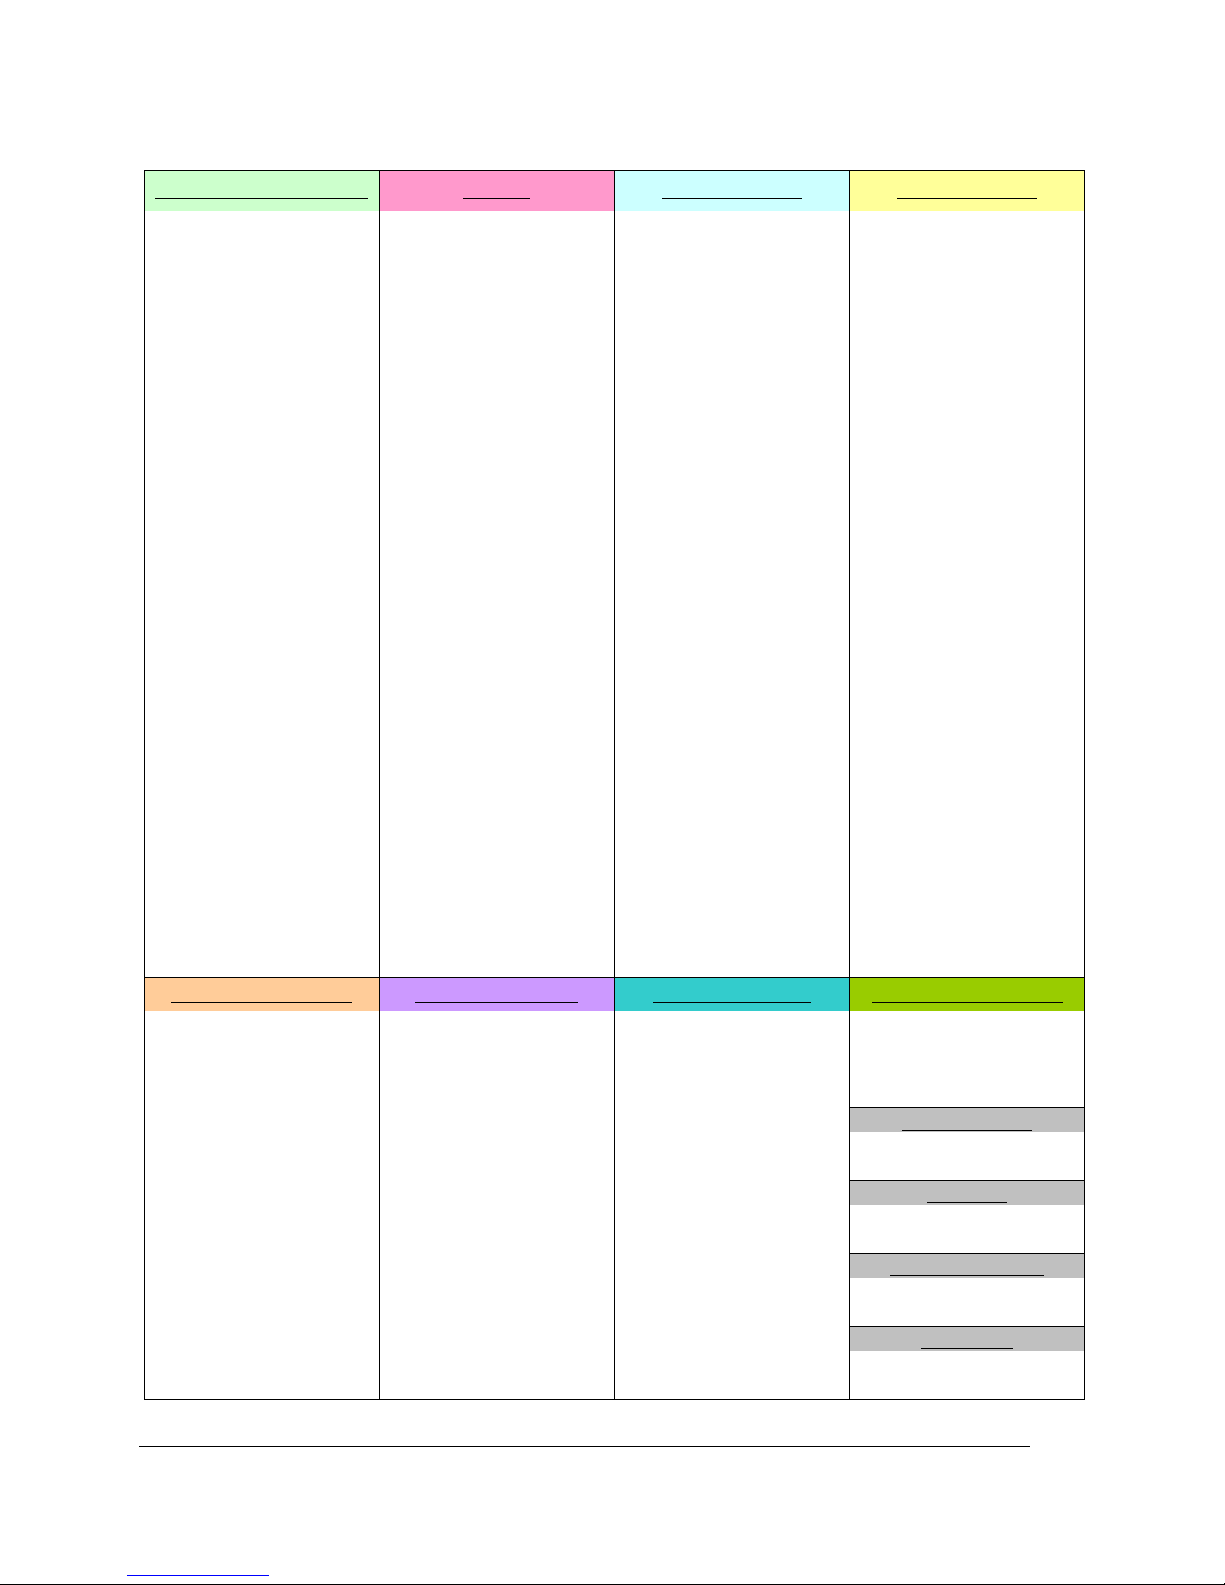
Example of list (non-exhaustive) of photosensitising medications in France (see next page).
Page 15
Ce document est la propriété de la Société FIM MEDICAL. Il ne peut être reproduit ou communiqué sans son autorisation.
This document is the property of FIM MEDICAL. Its contents cannot be reproduced or divulged without the company's approval
Page 15 / 74
V04.02.00
March 2018
Non-steroidal anti-inflammatories
Antibiotics
Cardiology - Angiology
Neurology - Psychiatry
Acide tiaprofénique
Artotec (Diclofenac)
Cyclines
Antiarrhythmic
Neuroleptics
Brexin
Doxy (Doxycycline)
Amiodarone
Largactil
Butazolidine
Doxycycline
Bi-tildiem (Diltiazem)
Modecate
Cycladol
Granudoxy (Doxycycline)
Corbionax (genAmiodarone)
Moditen
Diclofenac
Lysocline
Cordarone (Amiodarone)
Neuleptil
Feldene
Mestacine (Minocycline)
Deltazen (Diltiazem)
Nozinan
Ketoprofene
Minocycline
Diacor (Diltiazem)
Tercian
Ketum (ketoprofene)
Minolis (Minocycline)
Dilrene (Diltiazem)
Trilifan
Indocid (Indométhacine)
Mynocine
Diltiazem
Zyprexa
Indocollyre (Indométhacine)
SpanorGén (Doxycycline)
Monotildiem (Diltiazem)
Inflaced
Tetralysal
Serecor
Antidepressants
Mobic
Tolexine (Doxycycline)
Tildiem (Diltiazem)
Floxyfral (Flutamide)
Nabucox
Vibramycine (Doxycycline)
Naprosyne (Naproxène)
Antihypertensives
Hypnotics
Nifluril Gélule
Macrolides
Co-renitec
Noctran
Piroxicam (ketoprofene)
Disulone
Furosemide
Theralene
Profenid (ketoprofene)
Pediazole
Korec (Quinaprilchlorhyd.)
Proxalyoc (Piroxicam)
Zithromax
Koretic (Quinaprilchlorhyd.)
Sedatives
Surgam
Lasilix (Furosemide)
Mépronizine (Méprobamate)
Topfena (ketoprofene)
Quinolones
Logimax
Tegretol
Voldal
Ciflox
Logroton
Voltarene (Diclofenac)
Decalogiflox
Moducren
XenidGén (Diclofenac)
Enoxor
Moduretic
Zofora
Logiflox
Moex
Monoflocet (Ofloxacine)
Piportyl
Negram Forte
Prestole
Noroxine
Prinzide
Pipram fort
Renitec
Uniflox
Sulphamides
Adiazine
Allergology (anti-histamines)
Metabolism and Nutrition
Infectiology, Parasitology
Cancerology and Haematology
Algotropyl (Promethazine)
Oral Antidiabetics
Antituberculosis drugs
Eulexine (Flutamide)
Istamyl
Amarel
Adiazine (Sulfamide)
Flutamide
Fluisedal (Promethazine)
Daonil
Rifater (Rifampicine)
Prostadirex (Flutamide)
Phenergan (Promethazine)
Hémidaonil
Primalan
Minidiab
Antimalarials
Otorhinolaryngology
RhinathiolPromethazine
Quinimax (Pipotiazine)
Oflocet (Ofloxacine)
Theralene
Hypolipidemics
Quinine
Toplexil
Lipanor
Savarine
Gynaecology
Apaisyl
Lodales
Duphaston (Dydrogestérone)
Zocor
Antileprosy drugs
Lamprene (Clofazimine)
Gastroenterohepatology
Disulone
Dipentum
Systemic antivirals
Rheumatology
Cymevan
Neuriplege
Zelitrex
Quinisedine
Page 16

Ce document est la propriété de la Société FIM MEDICAL. Il ne peut être reproduit ou communiqué sans son autorisation.
This document is the property of FIM MEDICAL. Its contents cannot be reproduced or divulged without the company's approval
Page 16 / 74
V04.02.00
March 2018
2.4. Precautions before tests
The device operates on the basis of binocular fusion. The operator must ensure the patient has adequate fusion
to perform the test. Before all tests, the operator should ask the patient if he or she generally wears glasses or
contact lenses. Photosensitive patients may perform the tests in low photopic, for more comfort during the
tests.
The patient should be placed in an environment adapted to tests. Ensure there is no intense lighting that may
reflect on the Visiolite® optics, particularly for the glare test, where strong lateral light sources would disrupt the
test. Do not place the device near a window. For the glare test, the user must inform the patient of the test
procedure. During the test, always explain to the patient which optotypes he or she is in the process of studying
(eg: number of lines, letters, etc.).
The medical personnel must ensure the patient is calm when performing the test and that he or she has
understood the aim of the screening. The operator controls the Visiolite® back-lighting, which progressively
increases in intensity to enable the patient to become accustomed to the light levels. The operator may drive
the Visiolite® in low photopic for patient comfort. The operator should ensure the patient leaves the room
safely after performing the glare test (no visual problems, headache or fatigue).
2.5. Interpretation of results
Patient results should al ways be accompanied by an explanation from the practitioner
The Visiolite® may not be used for medical treatment. It can under no circumstances be used as the
basis for medication prescriptions, pre- or post-surgical diagnoses, or any other type of prescription
The Visiolite® may not be used to determine the aptitude of an individual to perform a certain task. This
can only be established by the doctor responsible for the tests, in conjunction with other medical
expertise
The Visiolite® is a screening device for visual problems. Only an ophthalmologist is qualified to confirm
Visiolite® results, in conjunction with other tests, to prescribe correction or surgical intervention
Page 17

Ce document est la propriété de la Société FIM MEDICAL. Il ne peut être reproduit ou communiqué sans son autorisation.
This document is the property of FIM MEDICAL. Its contents cannot be reproduced or divulged without the company's approval
Page 17 / 74
V04.02.00
March 2018
3. Equipment and Installation
Page 18
Ce document est la propriété de la Société FIM MEDICAL. Il ne peut être reproduit ou communiqué sans son autorisation.
This document is the property of FIM MEDICAL. Its contents cannot be reproduced or divulged without the company's approval
Page 18 / 74
V04.02.00
March 2018
3.1. Installation procedure
3.1.1. Opening the box
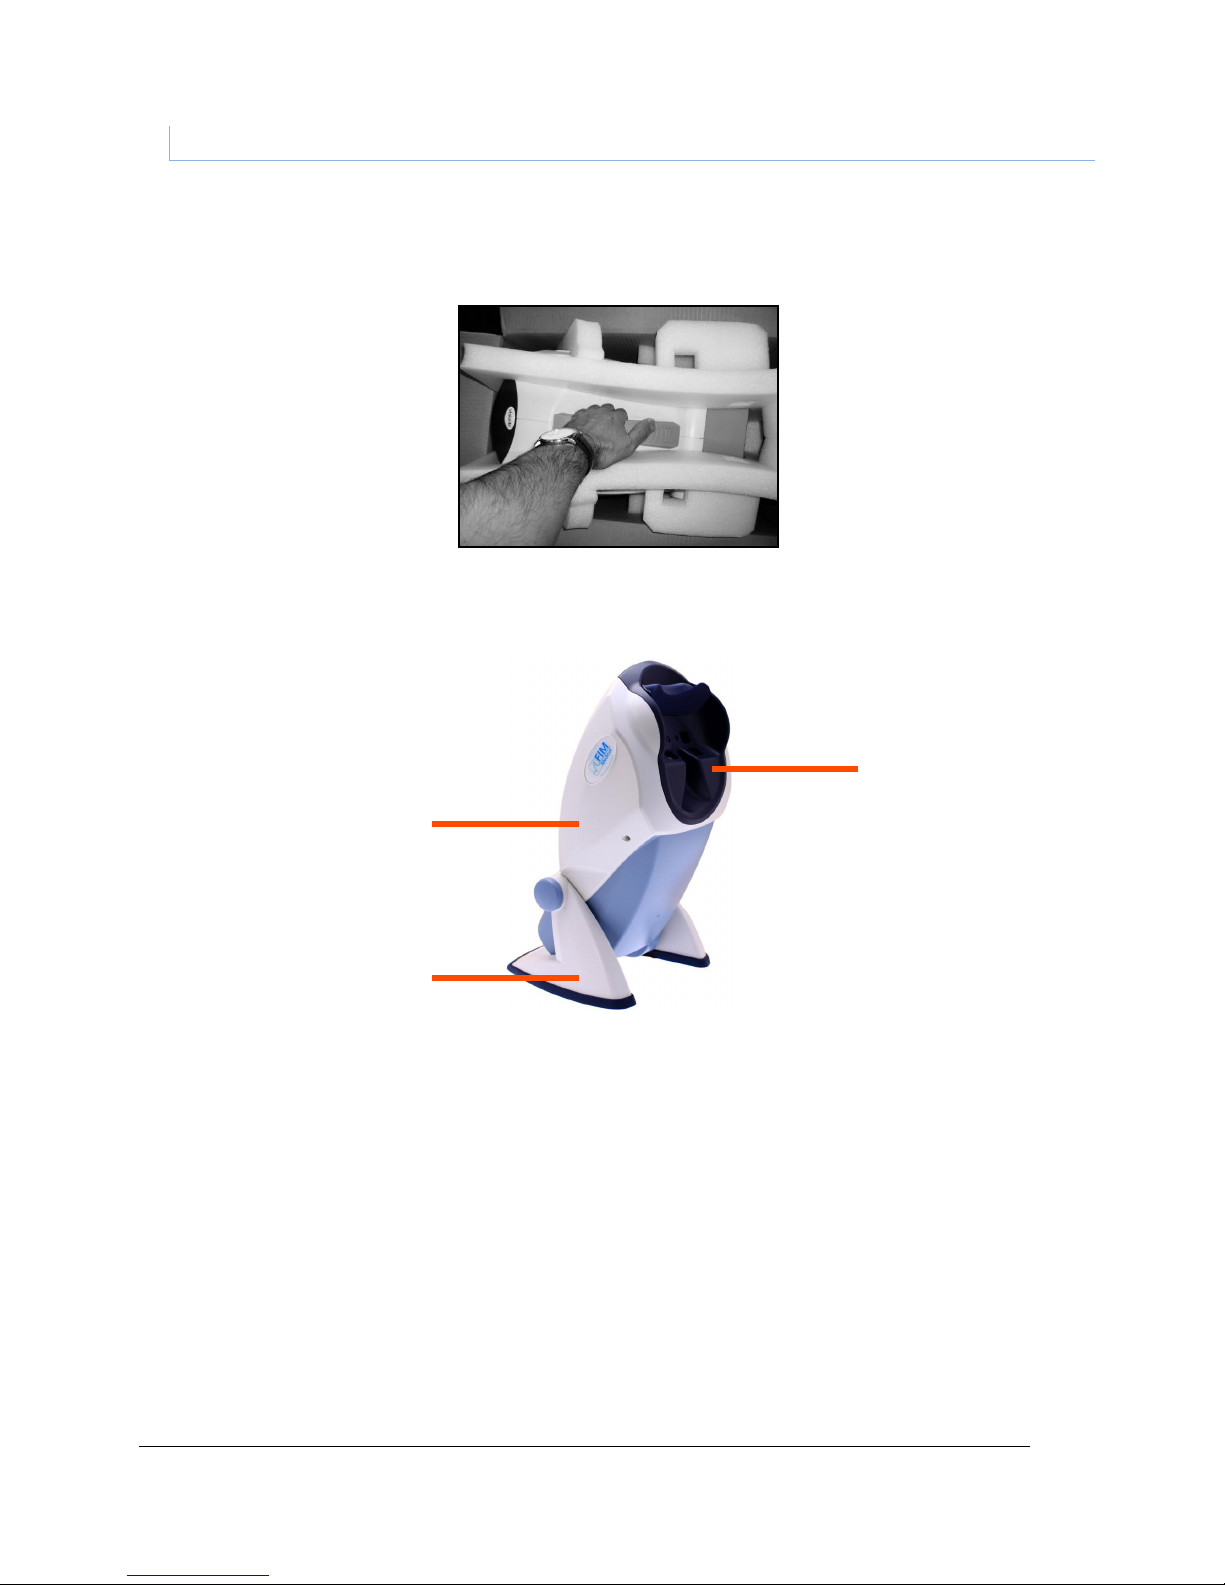
After removing the compartment containing the accessories, lift the Visiolite® by the handle as indicated below.
We strongly advise conserving all the original packaging of the Visiolite® for maintenance operations.
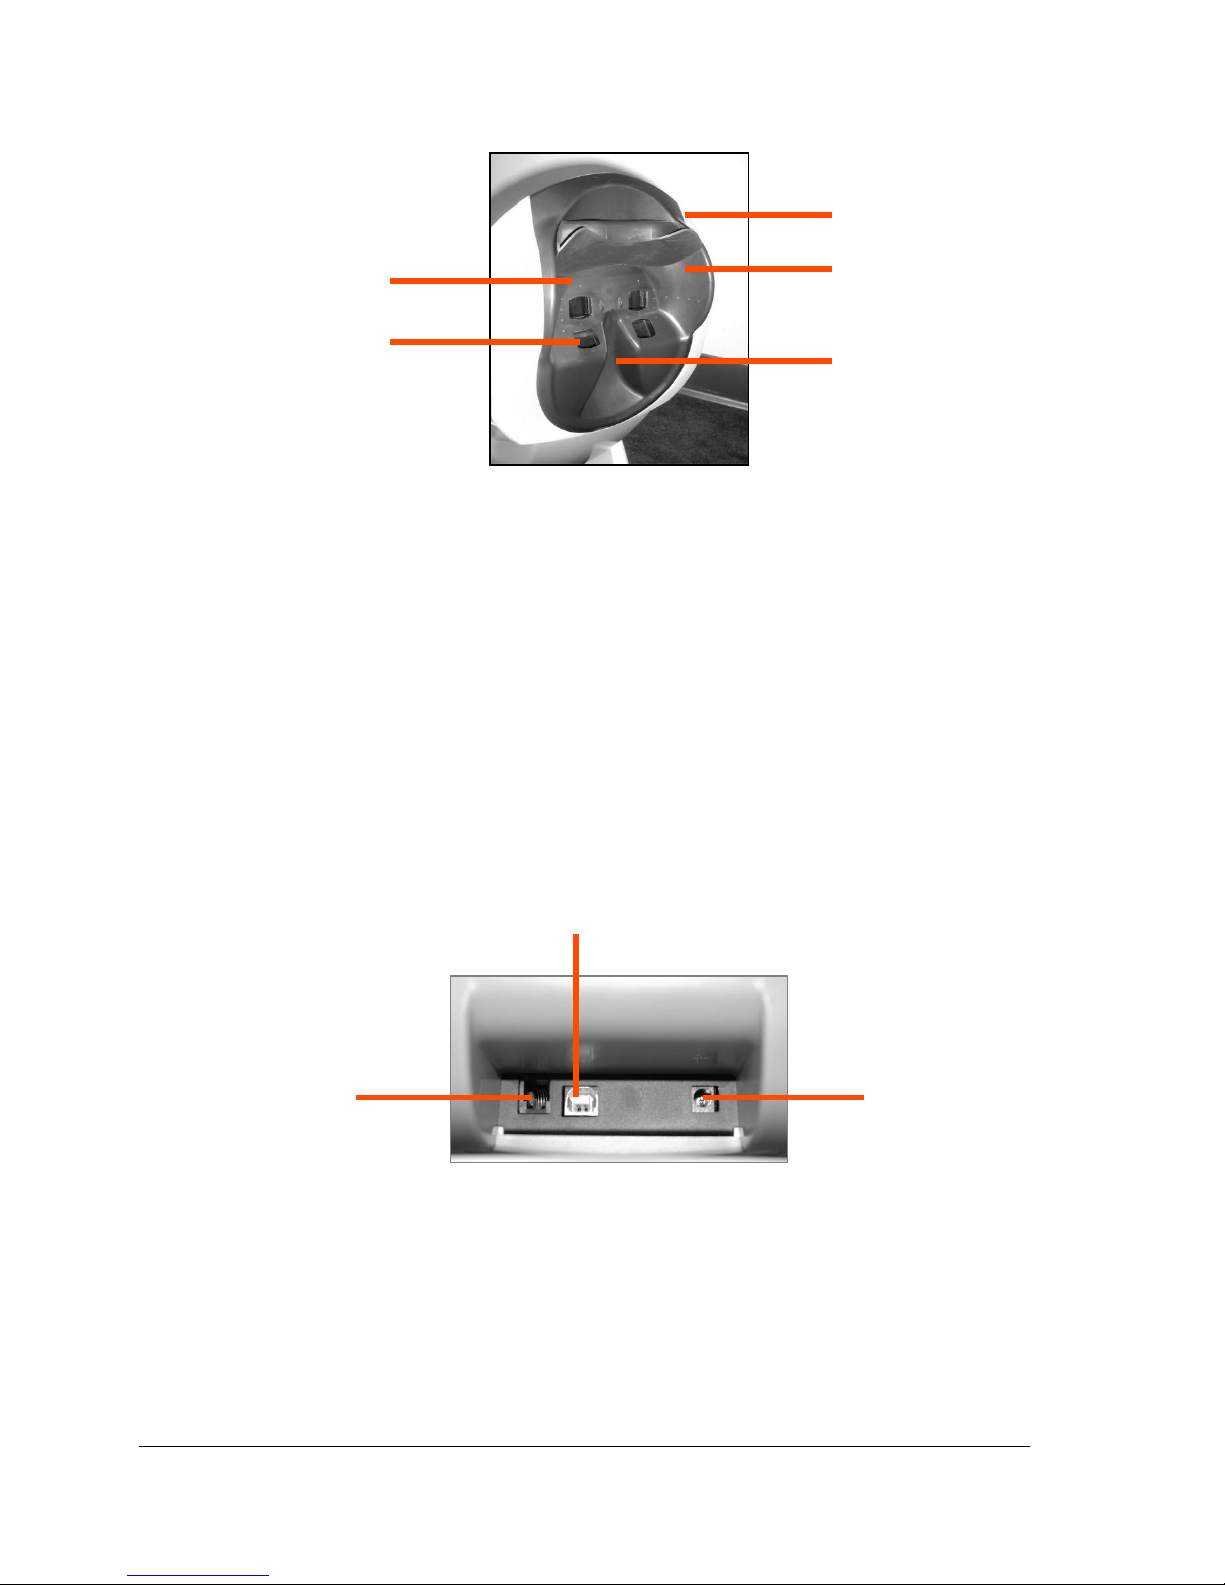
3.1.2. Nomenclature
1 Body
The Visiolite® body contains all the functional elements.
2 Mask
Far and near vision lenses are integrated into the mask, which is adapted to the average patient morphology.
3 Base
The Visiolite® base is ballasted to ensure stability of the instrument whatever the inclination of the body.
The elastomer gum coating prevents the Visiolite® slipping, and avoids scratching the table surface.
2 1 3
Page 19
Ce document est la propriété de la Société FIM MEDICAL. Il ne peut être reproduit ou communiqué sans son autorisation.
This document is the property of FIM MEDICAL. Its contents cannot be reproduced or divulged without the company's approval
Page 19 / 74
V04.02.00
March 2018
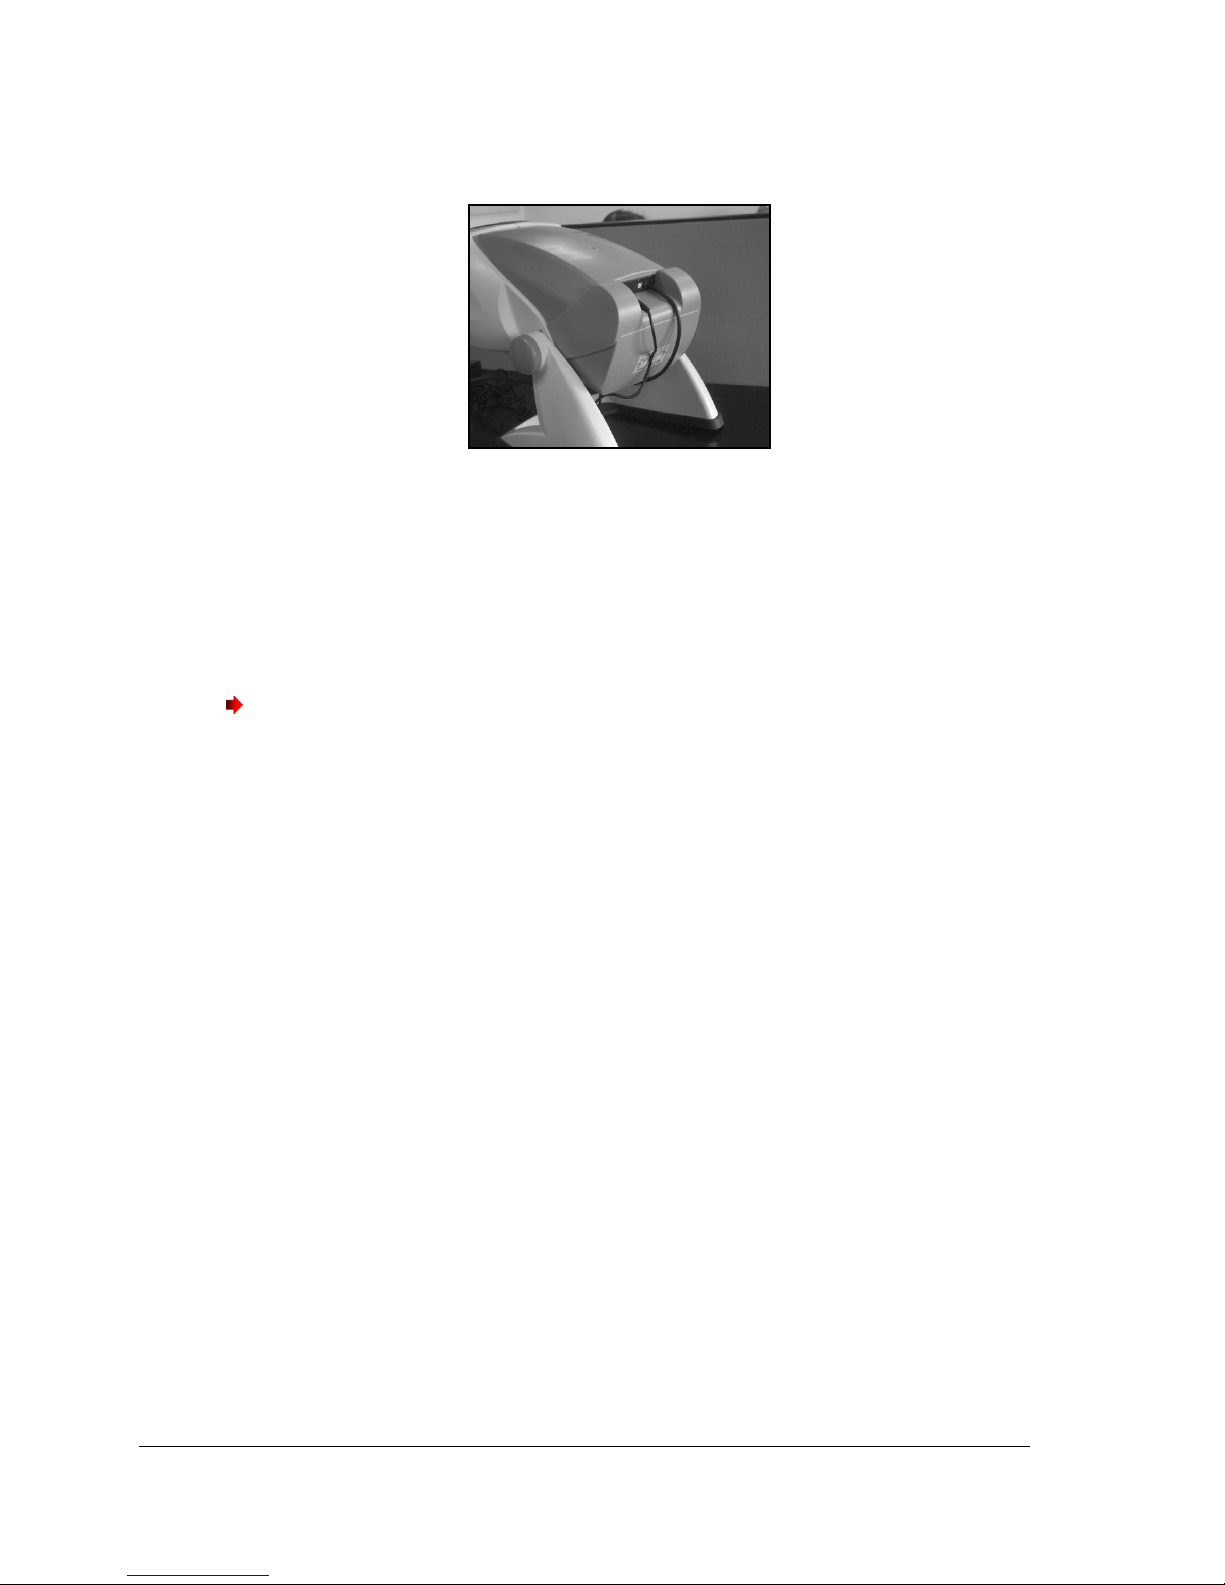
Face mask
1 Far vision lenses
2 Near vision lenses
3 Removable forehead rest piece
A removable elastomer piece is positioned on the forehead rest. An electro-sensitive sensor indicates the
patient’s forehead is in contact with the forehead rest, via a Visiolite® light display. When the forehead is
correctly positioned on the forehead rest, the patient should not feel any discomfort.
4 Peripheral field
A number of small holes are visible around the lenses. These light guides are for the visual peripheral field test.
5 Nose position
Back – Connection support
1RS232 connector lead or remote control
2 USB lead
3 Power supply
1
2
3 2 1
Page 20
Ce document est la propriété de la Société FIM MEDICAL. Il ne peut être reproduit ou communiqué sans son autorisation.
This document is the property of FIM MEDICAL. Its contents cannot be reproduced or divulged without the company's approval
Page 20 / 74
V04.02.00
March 2018
3.1.3. Connection
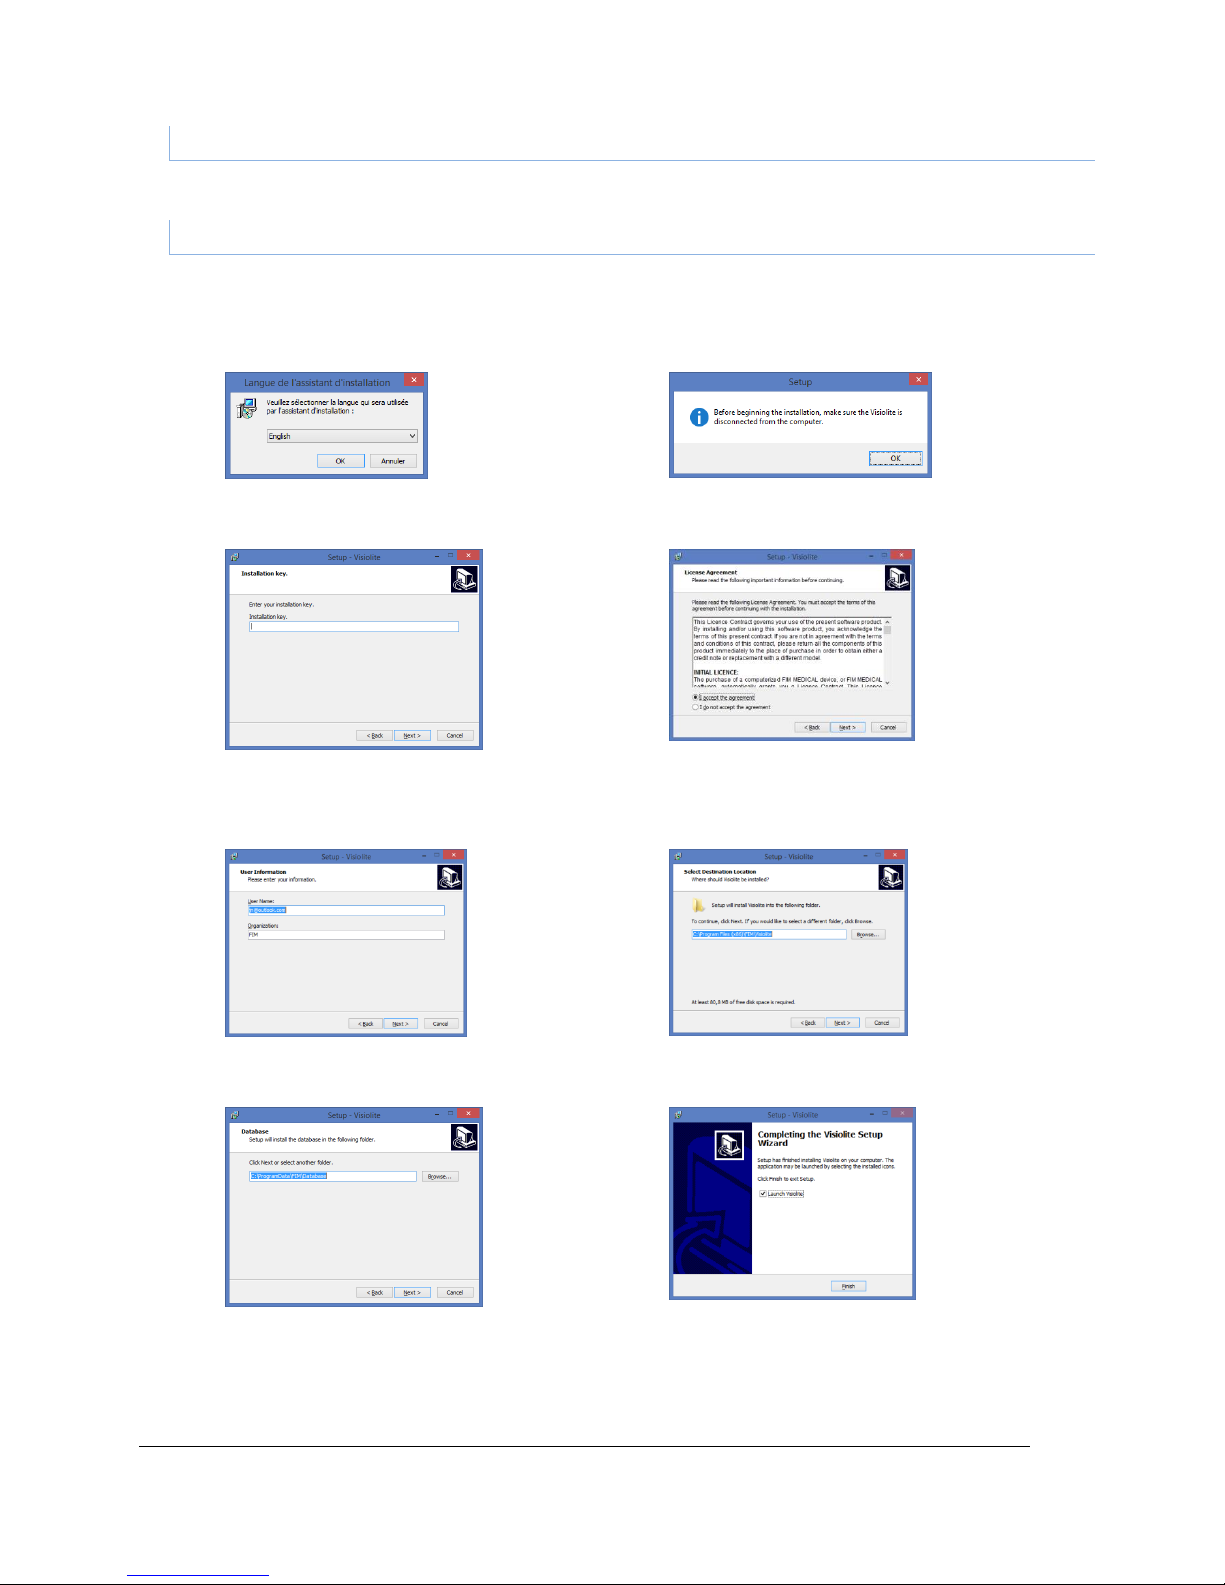
Incline the device to the connection position.
Thread the leads via the back of the Visiolite® between the base and the body.
Firstly connect the control leads (USB lead or remote control) then the mains adaptor lead.
Reposition the Visiolite® to work mode, taking care not to jam the leads.
Plug the mains adaptor into the wall socket.
Caution, for computerised versions:
Do not connect the Visiolite® to the computer before the software is installed (refer § 3.2).
Page 21
Ce document est la propriété de la Société FIM MEDICAL. Il ne peut être reproduit ou communiqué sans son autorisation.
This document is the property of FIM MEDICAL. Its contents cannot be reproduced or divulged without the company's approval
Page 21 / 74
V04.02.00
March 2018
3.2. Operating systems
Windows XP, Windows Vista, Windows 7, Windows 8
3.3. Software Installation (computerised version)
For computerised versions, the operator must have administration rights on the workstation.
From the CD Rom root directory, run the “SetupVisiolite.exe” file; not necessary if it is set-up for automatic
running.
1. Temporary Welcome Screen
2. Recommendation Screen
3. Enter serial number
from the back of the CD jacket
4. License agreement
5. User information
6. Enter software installation destination
7. Enter database destination
8. Validate Finish
Page 22
Ce document est la propriété de la Société FIM MEDICAL. Il ne peut être reproduit ou communiqué sans son autorisation.
This document is the property of FIM MEDICAL. Its contents cannot be reproduced or divulged without the company's approval
Page 22 / 74
V04.02.00
March 2018
An icon is placed on the Windows desktop to run the software
3.3.1. PC connection
After installation, use the USB lead to connect the Visiolite® to the PC. If installation is correct, the device should
immediately be recognised.
If not, disconnect the Visiolite® and manually run drivers installations found on the CD in “Drivers” directory.
Double click on CP210xVCPInstaller.exe and follow the instructions.
Then connect the Visiolite® which should be immediately recognised by the operating system.
3.3.2. Uninstallation
To uninstall Visiolite® go to the “Start” menu, “Control Panel”, “Add/Remove program”. Uninstall the Visiolite®
software and the drivers “Silicon laboratories CP210x USB to UART bridge”.
Caution: Before uninstalling the driver, ensure that no software is using it.
3.3.3. First run
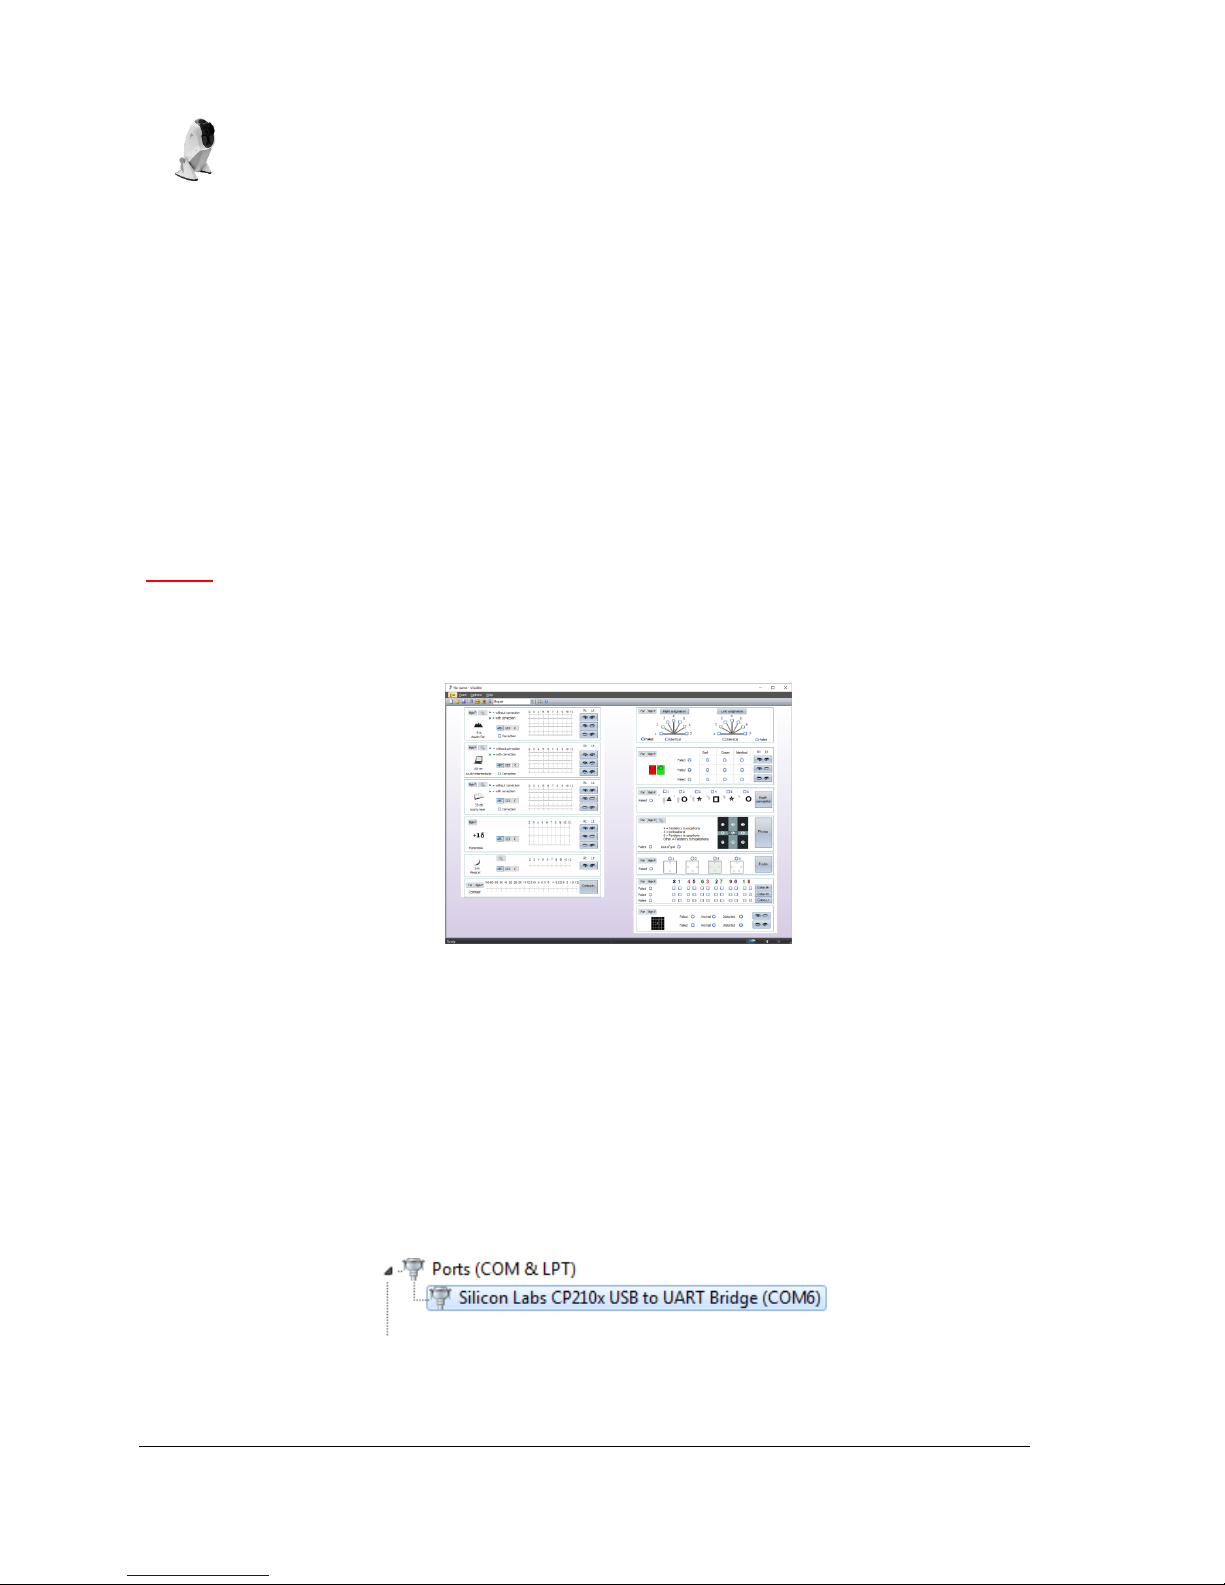
The following screen appears:
A light on the bottom right of the screen indicates whether the Visiolite® is correctly connected:
Grey light: no connection
Red light: searching
Green light: connection established
If there is a connection problem, the light goes to grey again: check in Windows Device Manager that the device
has, in fact, been recognised. This appears in the Ports section (COM and LPT) under the name Silicon
Laboratories CPS10x USB to UART Bridge.
Page 23

Ce document est la propriété de la Société FIM MEDICAL. Il ne peut être reproduit ou communiqué sans son autorisation.
This document is the property of FIM MEDICAL. Its contents cannot be reproduced or divulged without the company's approval
Page 23 / 74
V04.02.00
March 2018
3.3.1. Test before use
Check that the Visiolite® is driven by the software and the tests displayed are those desired.
Initially a small red or green symbol representing a head appears at the bottom right of the screen:
Green if the patient’s forehead is correctly positioned against the forehead rest
Otherwise grey
Tests are exposed only if the forehead is detected by the sensor.
Click on any key and check that the Visiolite® motor starts and displays the correct test.
3.4. Procedure to stop the device
3.4.1. Software version
To stop the Visiolite® safely, close the software and disconnect by unplugging the power plug at the back of the
device.
3.4.2. Essential remote control version
To stop the Visiolite® safely, wait a moment until the device goes on standby (remote-control LEDs off). Then
unplug the leads.
3.4.3. LCD remote control version
To stop the Visiolite® safely, press on the “Distance” key for 3 secs. The device and the remote control will
switch off. Then unplug the leads.
3.5. Backup/restore
3.5.1. Presentation
The backup/restore function protects users against loss of data and configurations in the event of a computer
breakdown.
This function also accelerates and facilitates use in a pool of several Visiolite® devices.
3.5.2. Backup
Backup enables recovery of all the elements required for Visiolite® function. Elements backed up:
Data base
Configuration files
Sequences
Instructions
Scoring
Executable files
Page 24
Ce document est la propriété de la Société FIM MEDICAL. Il ne peut être reproduit ou communiqué sans son autorisation.
This document is the property of FIM MEDICAL. Its contents cannot be reproduced or divulged without the company's approval
Page 24 / 74
V04.02.00
March 2018
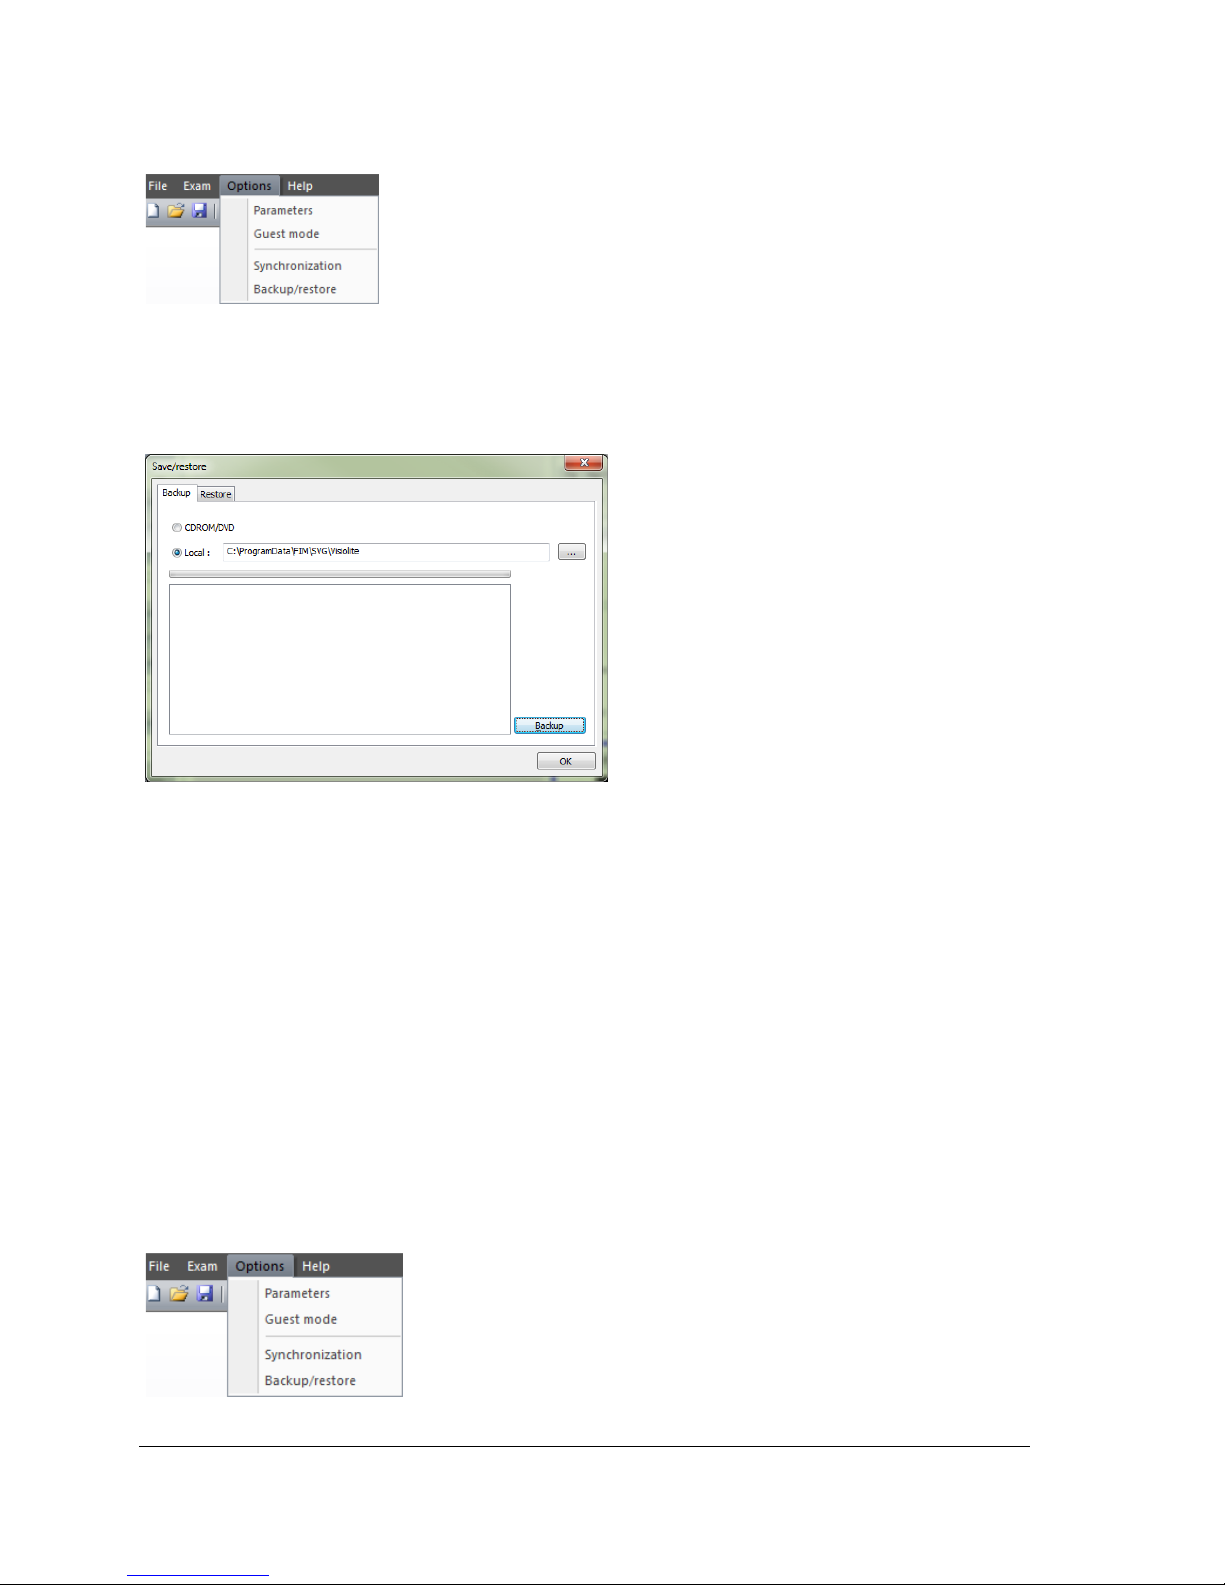
To backup, go to the Options menu then Backup/restore.
Choose backup mode:
In a directory
On a CD/DVD (caution: the Windows burning tool must be installed)
Click on Backup.
3.5.3. Restore
Restore enables recovery of the backed up files of all the elements required for the Visiolite® software.
Elements restored:
Database
Configuration files
Sequences
Instructions
Scoring
Executable files (except executable Visiolite itself).
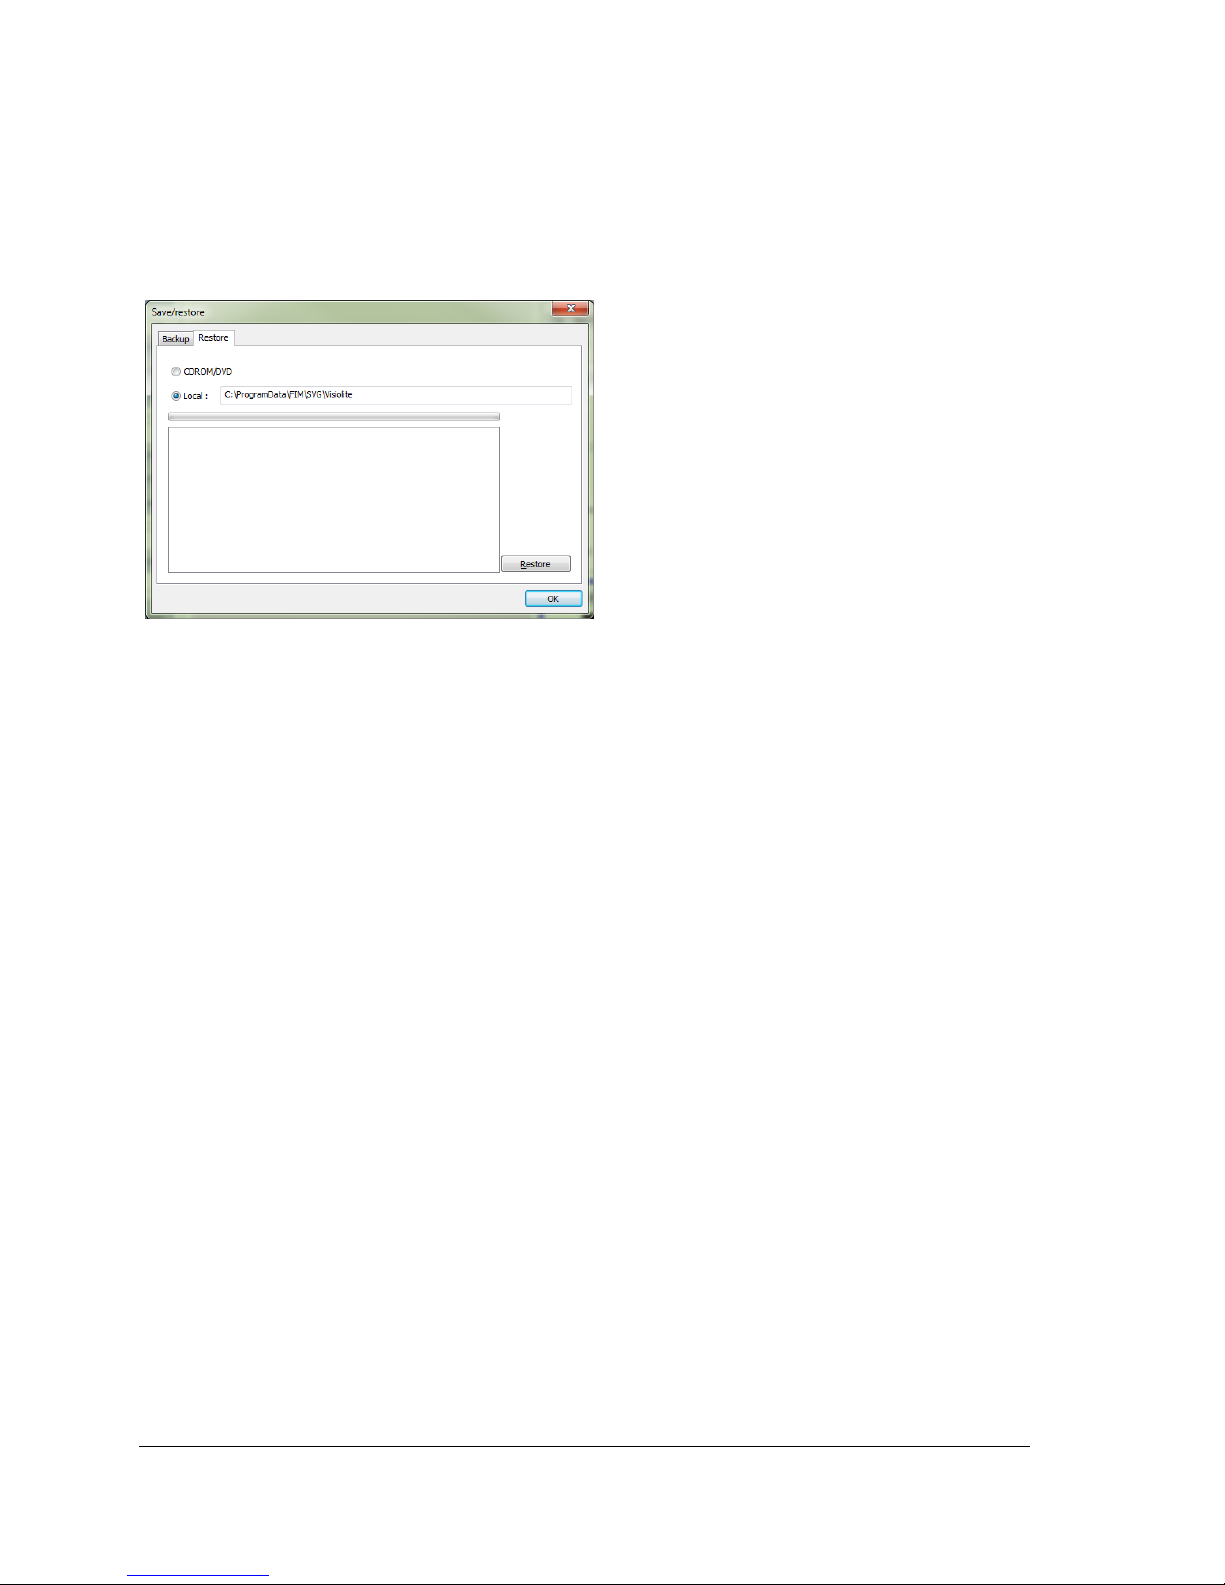
To perform a restore, go to the Options menu then Backup/restore.
Page 25
Ce document est la propriété de la Société FIM MEDICAL. Il ne peut être reproduit ou communiqué sans son autorisation.
This document is the property of FIM MEDICAL. Its contents cannot be reproduced or divulged without the company's approval
Page 25 / 74
V04.02.00
March 2018
Click on the Restore tab.
Choose backup mode:
Then a directory
Then a CD/DVD
Click on Restore.
Page 26

Ce document est la propriété de la Société FIM MEDICAL. Il ne peut être reproduit ou communiqué sans son autorisation.
This document is the property of FIM MEDICAL. Its contents cannot be reproduced or divulged without the company's approval
Page 26 / 74
V04.02.00
March 2018
4. Use
Page 27
Ce document est la propriété de la Société FIM MEDICAL. Il ne peut être reproduit ou communiqué sans son autorisation.
This document is the property of FIM MEDICAL. Its contents cannot be reproduced or divulged without the company's approval
Page 27 / 74
V04.02.00
March 2018
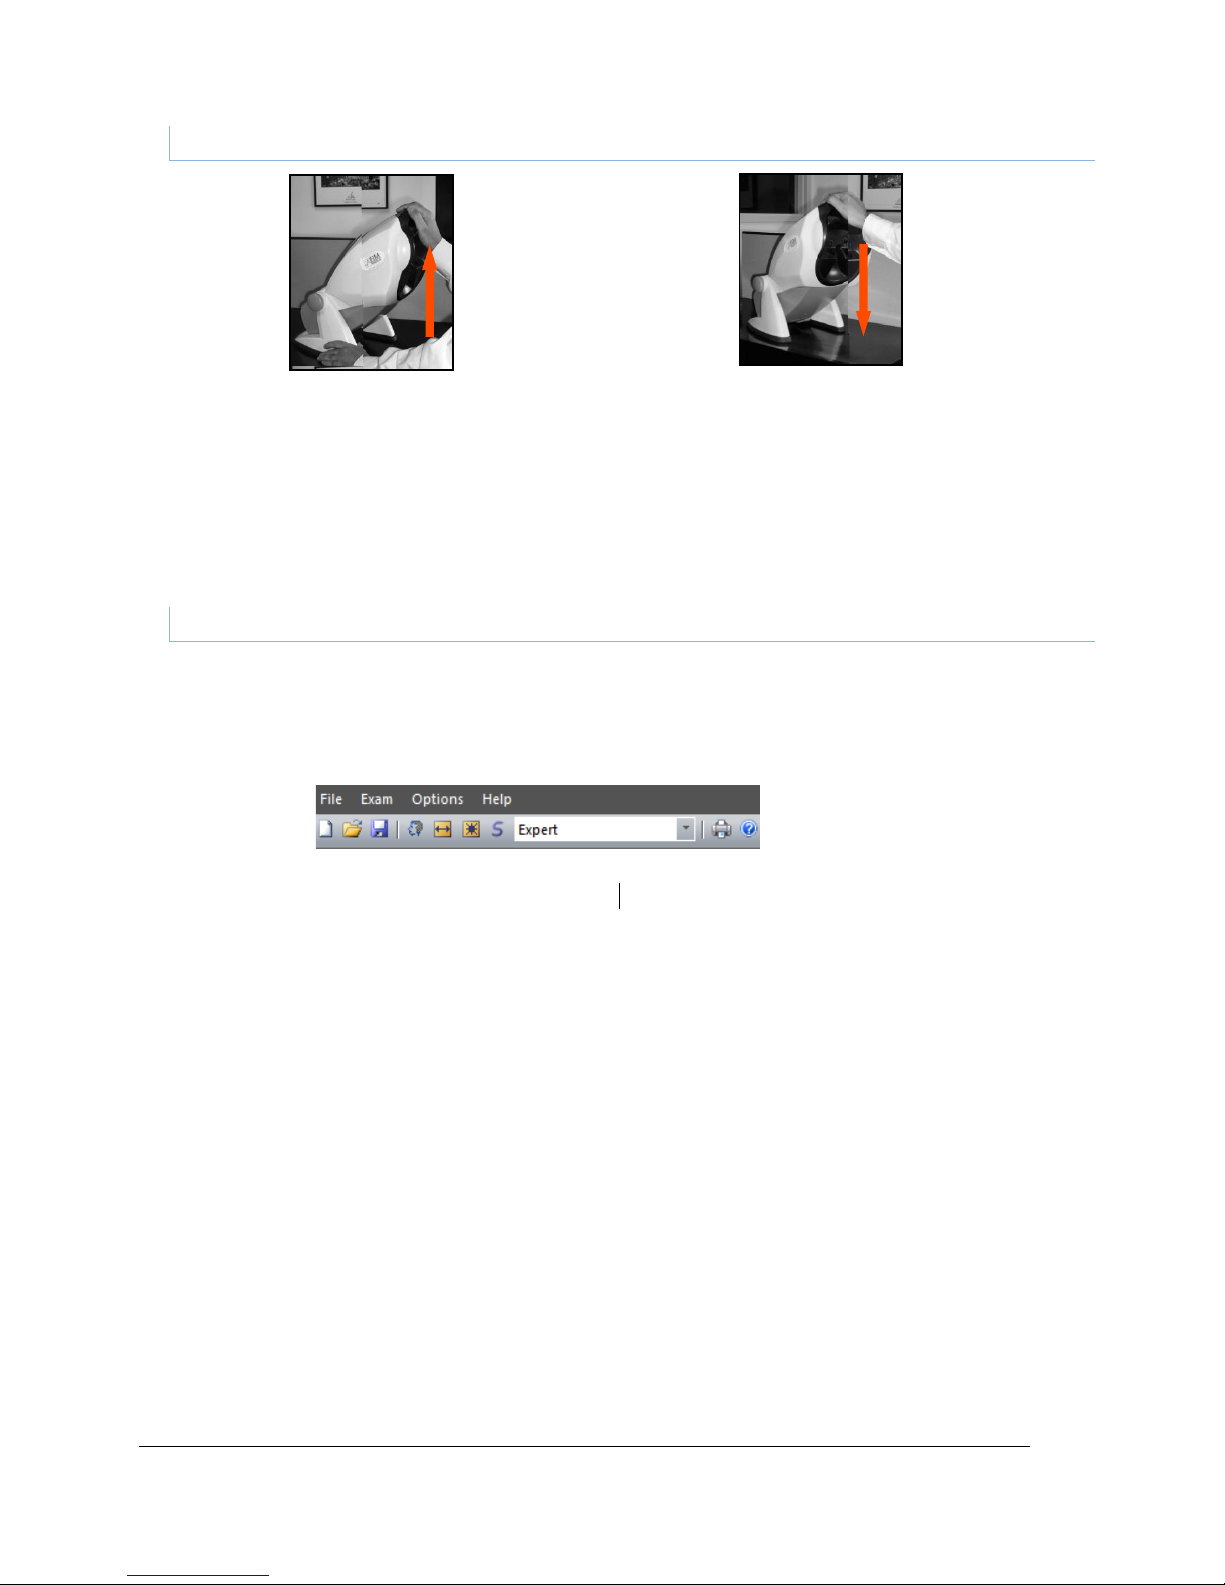
4.1. Raise/lower Visiolite® body
Hold the base of the Visiolite® with
one hand.
With the other hand, raise the body of
the device without forcing.
Press gently on the upper part of the
Visiolite®.
Comment: It is recommended to place the patient’s hands on the test table and avoid placing the fingers into
the inclination system.
4.2. Software use
4.2.1. Description of menus
4.2.1.1. Tool bar
Use the tool bar to run the other software functions.
1 2 3 4 5 6 7 8 9
1 New file
2 Open
3 Record
4 Identification
5 Positioning
6 Light
7 Run a sequence
8 List of sequences
9 Print
Page 28
Ce document est la propriété de la Société FIM MEDICAL. Il ne peut être reproduit ou communiqué sans son autorisation.
This document is the property of FIM MEDICAL. Its contents cannot be reproduced or divulged without the company's approval
Page 28 / 74
V04.02.00
March 2018
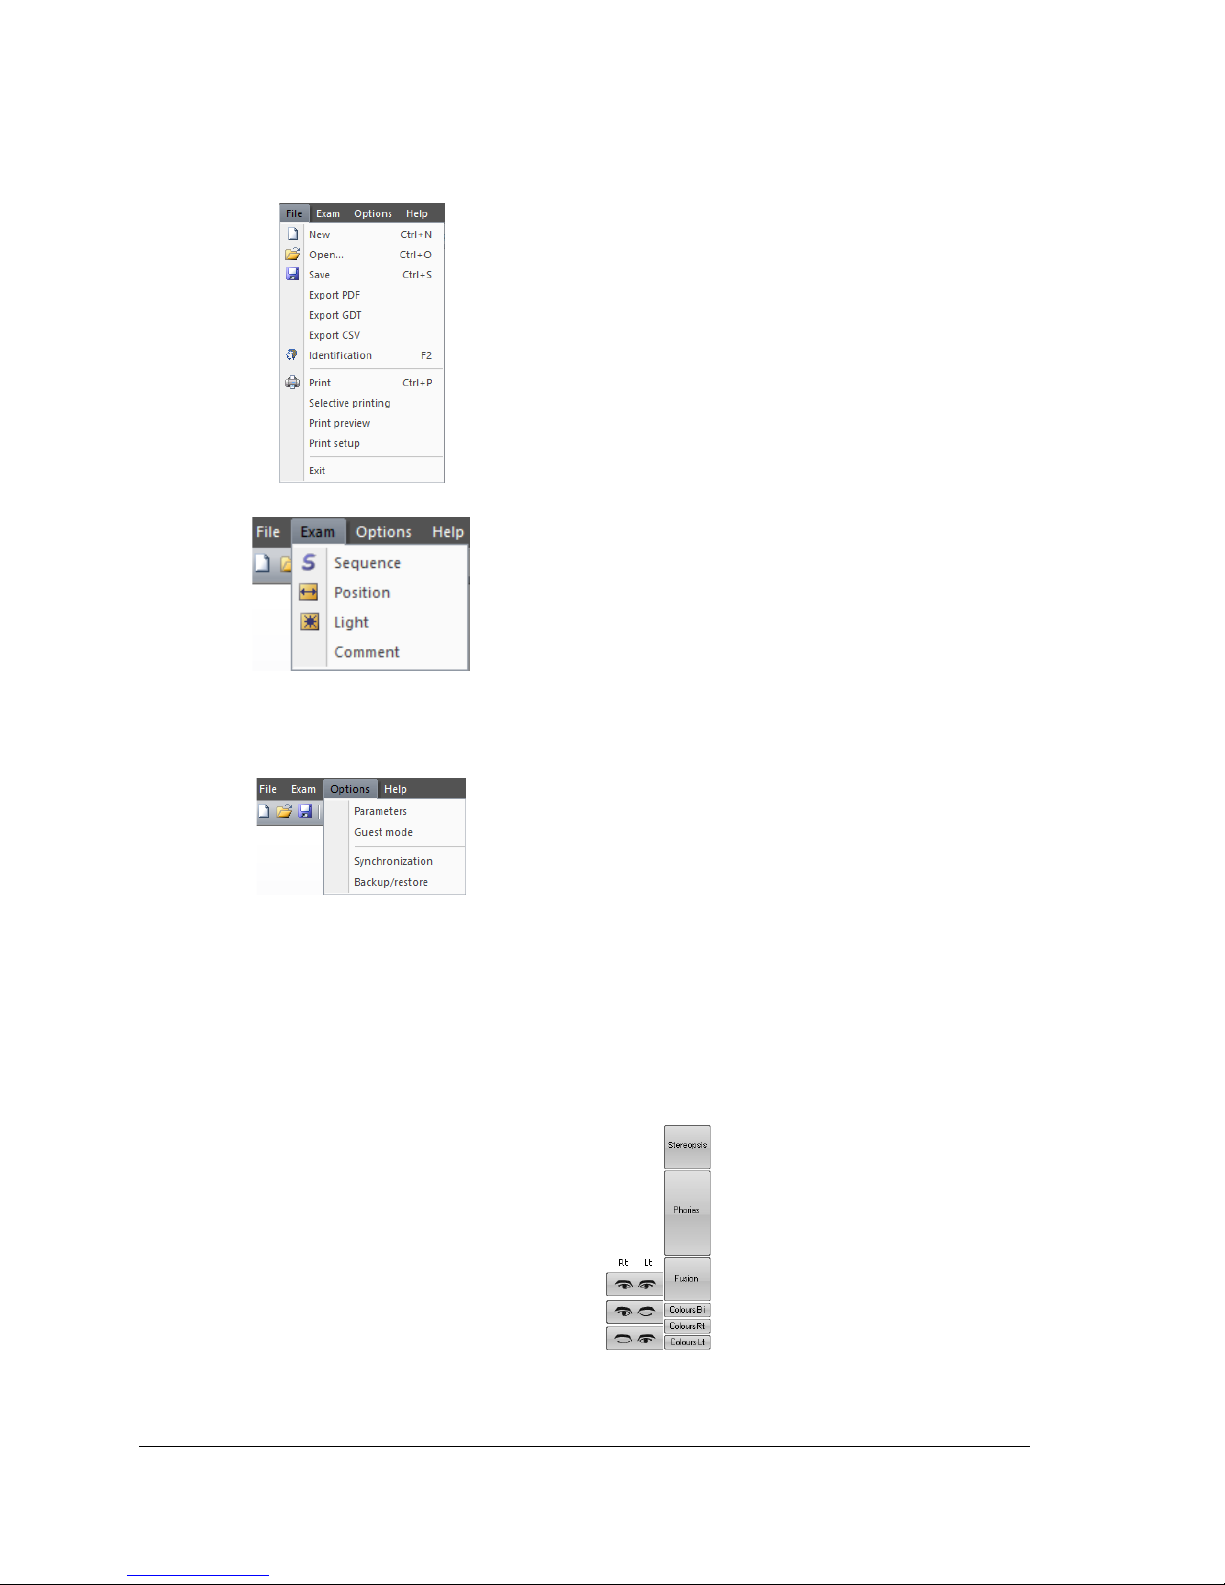
4.2.1.2. Menu bar
Use the drop-down menus to perform other actions not available from the main screen.
Functio ns:
- Manage a test
- Access identification
- Export
- Print
Functions:
- Run the chose n sequence
- Positioning of patient
- Light
- Add a comment
Comments can be input by the operator and printed and recorded
with the test in the database.
Functio ns:
- Parameters
- Configuration of guest mode
- Synchronization
- Backup/restore
Use guest mode to parameter interfacing of the Visiolite® with
external software, in order to exchange data.
4.2.2. Manual mode
The Visiolite® can be driven from the main screen. Use the command keys to choose a test and input patient
response.
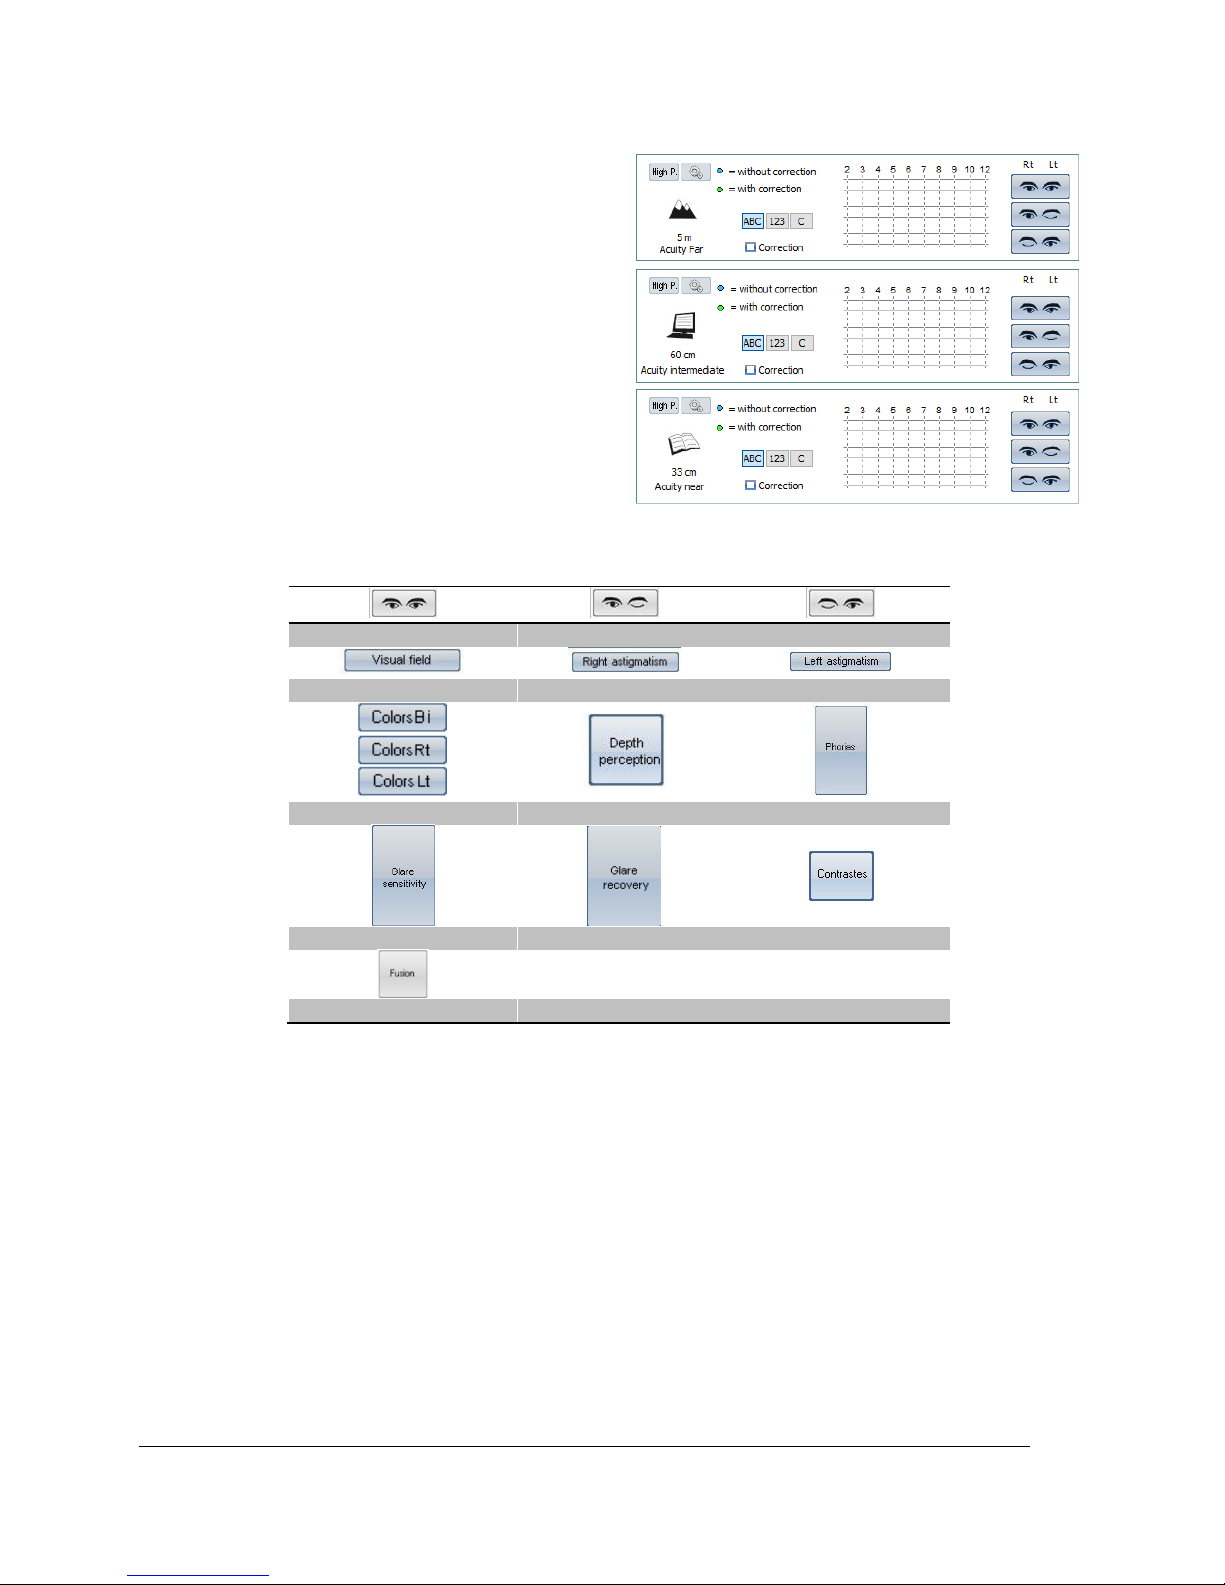
Command Keys
Page 29
Ce document est la propriété de la Société FIM MEDICAL. Il ne peut être reproduit ou communiqué sans son autorisation.
This document is the property of FIM MEDICAL. Its contents cannot be reproduced or divulged without the company's approval
Page 29 / 74
V04.02.00
March 2018
4.2.2.1. Choice of distance
Far Vision
Intermediate Vision
Near Vision
4.2.2.2. Command keys
Binocular acuity
Right eye acuity
Left eye acuity
Visual field
Right eye astigmatism
Left eye astigmatism
Colours test
Depth perception test
Phorias test
Glare sensitivity test
Central glare test
Contrast sensitivity
Fusion test
4.2.2.3. Patient response
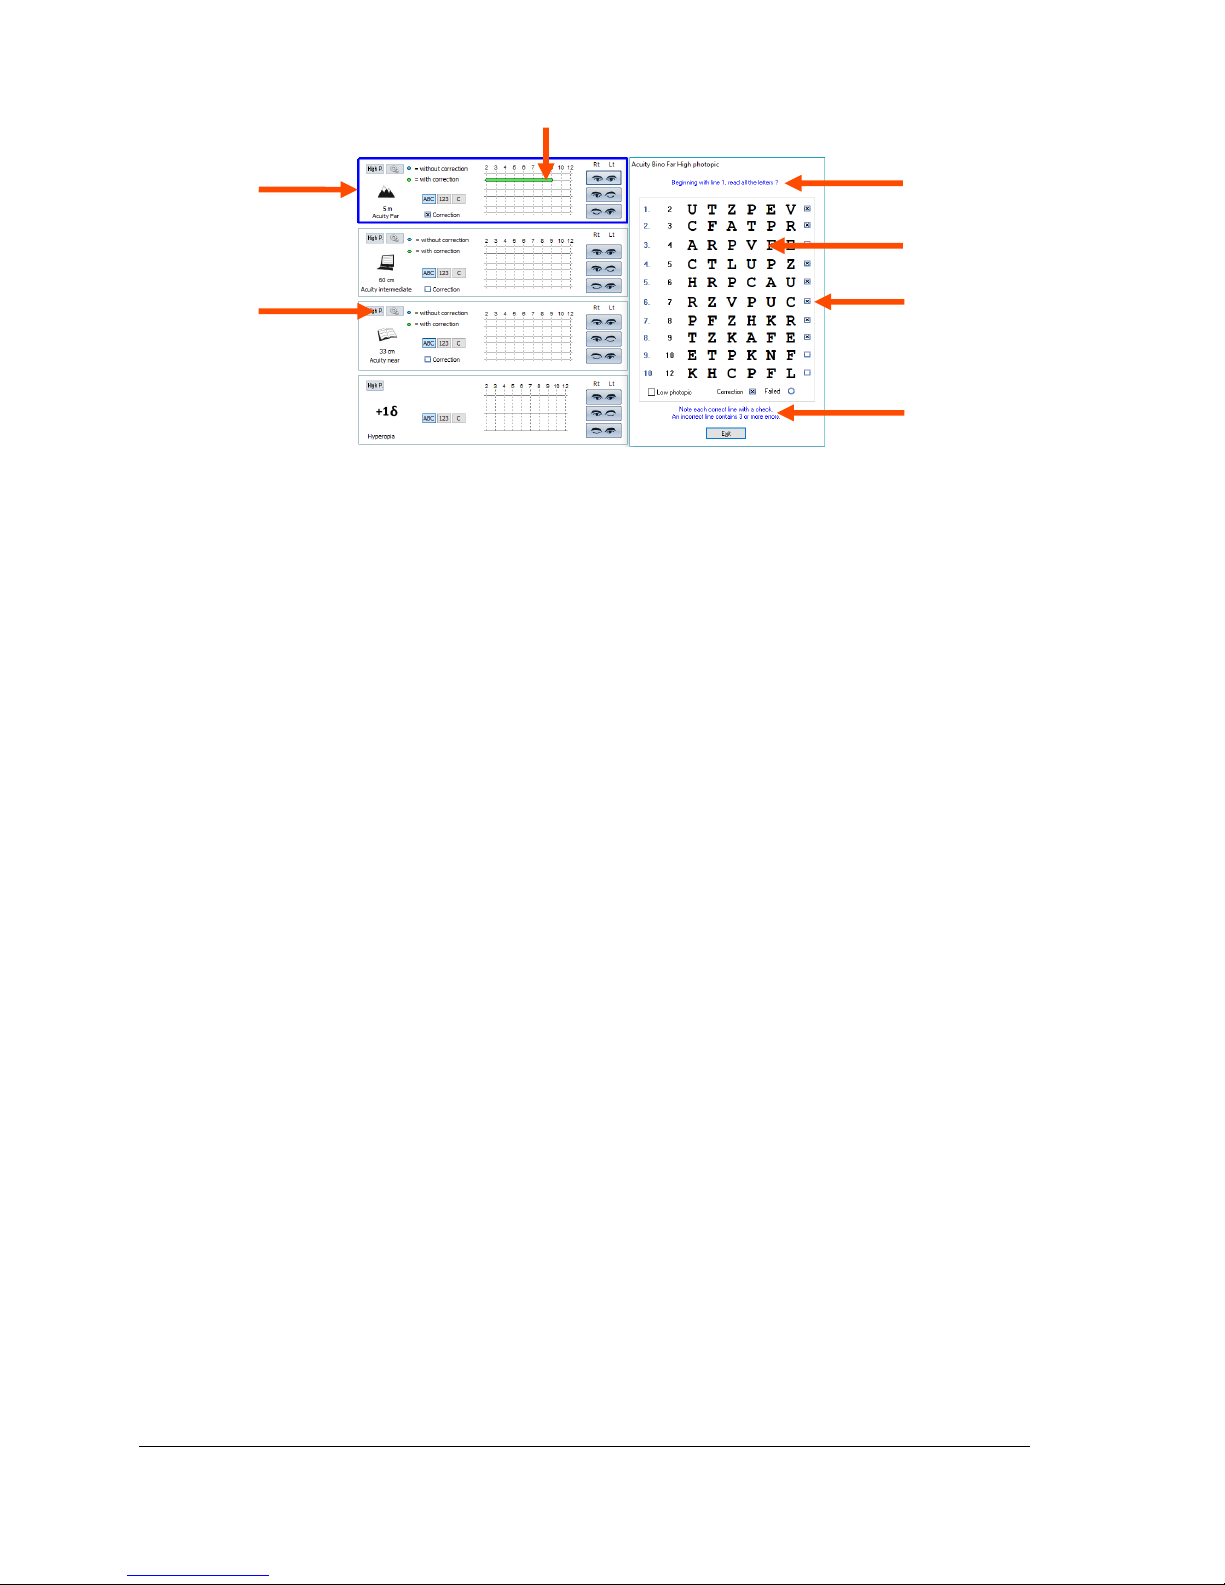
As soon as the command key is pressed, the device positions itself on the corresponding test and a window
appears, to input patient responses.
Example with visual acuity:
Page 30
Ce document est la propriété de la Société FIM MEDICAL. Il ne peut être reproduit ou communiqué sans son autorisation.
This document is the property of FIM MEDICAL. Its contents cannot be reproduced or divulged without the company's approval
Page 30 / 74
V04.02.00
March 2018
1 Test choice
2 Lighting choice
High Ph. – daylight
Low Ph. – low daylight
Mesopic Ph. – dusk li ght
3 Patient response
4 Patient instruction
5 Expected responses
6 Checkboxes
7 Operator instruction
In this example, the operator reads the instructions to the patient. The window gives the expected responses
and the operator checks the boxes when the line of letters has been read.
4.2.2.4. Grey areas
Grey areas give an indication of the optimum response but cannot in any case determine normality or aptitude
for a specific occupation or to perform a certain task.
These areas cannot be used for an individual’s interest or for discrimination purposes.
Only the conclusions of the doctor responsible, in conjunction with other medical expertise, and depending on
the task, can establish aptitude.
As this is a screening test, the results cannot in any case be used for medical treatment, pre-or post-surgical
diagnosis, or for any sort of prescription.
4.2.2.5. Peripheral field
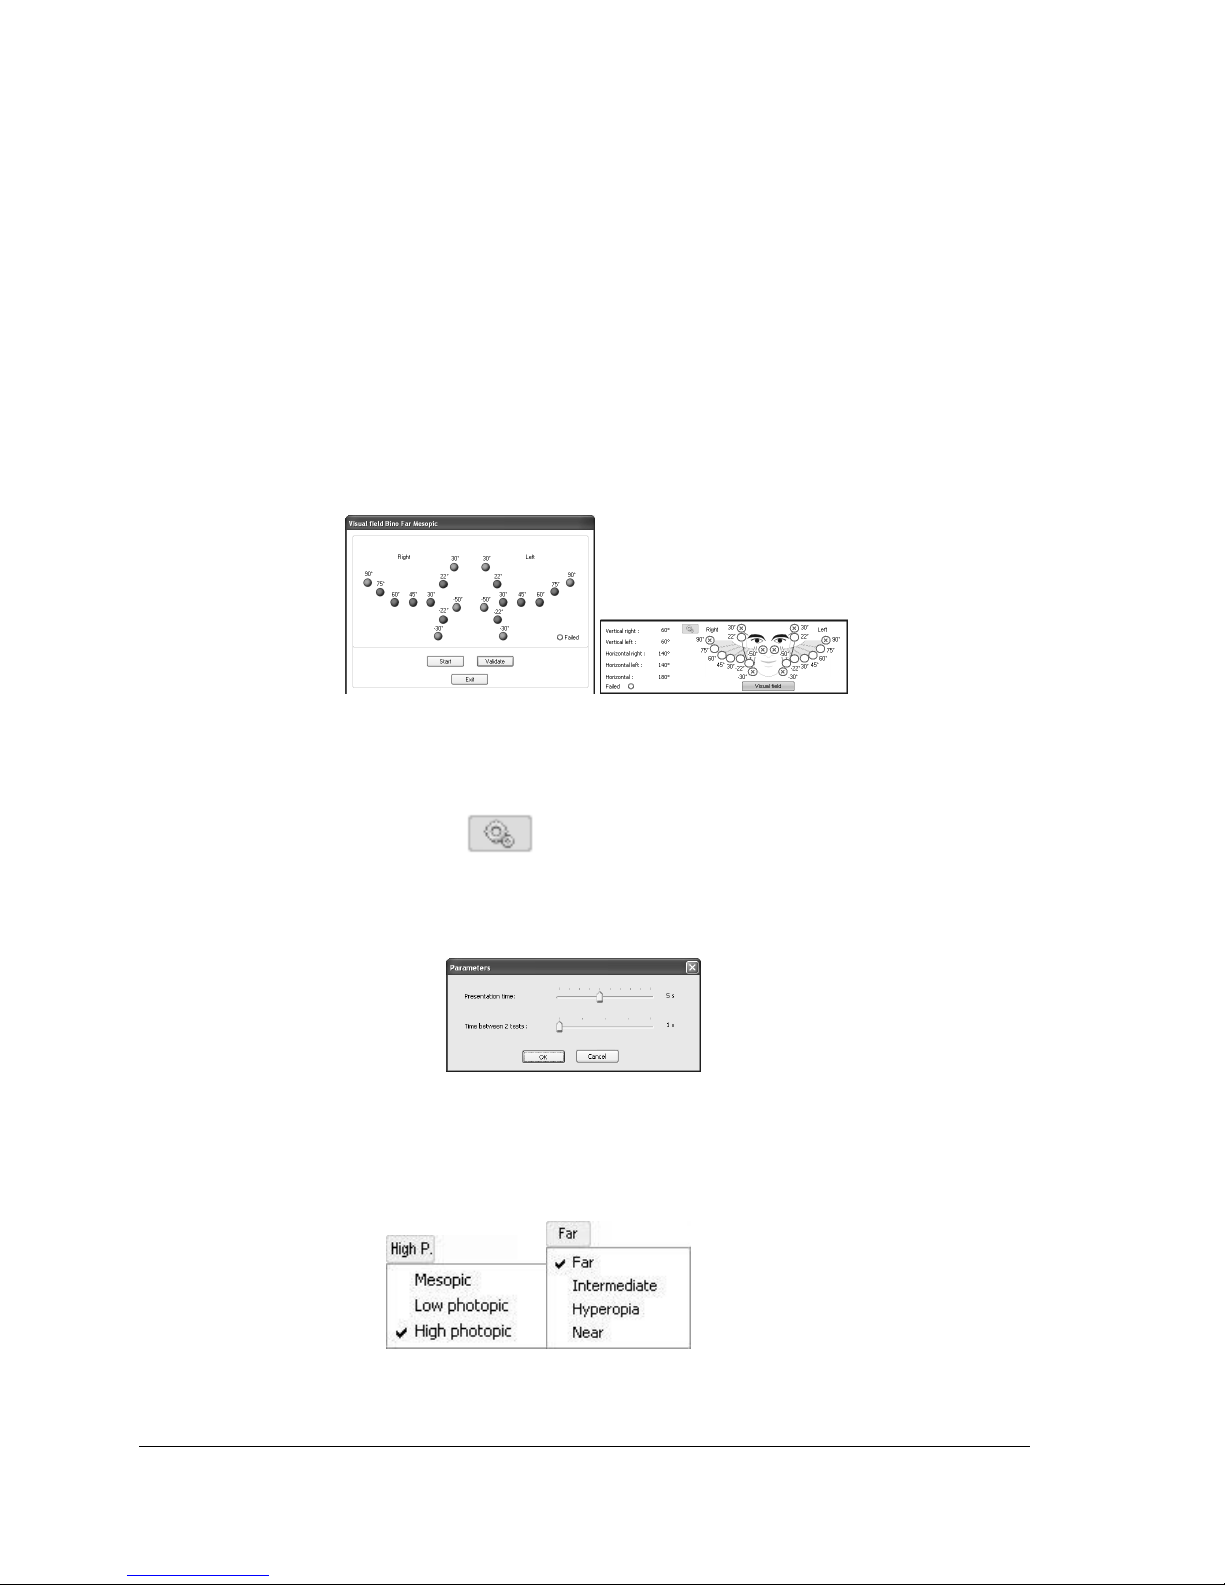
Ask the patient to focus on the central dot.
Peripheral field stimuli can be scanned manually or semi-automatically.
In both cases, the operator must have the patient response before proceeding to the following stimulus.
4.2.2.5.1. Manual mode
Click on the desired stimulus and wait for the patient response.
3
2
1
4
5
6
7
Page 31
Ce document est la propriété de la Société FIM MEDICAL. Il ne peut être reproduit ou communiqué sans son autorisation.
This document is the property of FIM MEDICAL. Its contents cannot be reproduced or divulged without the company's approval
Page 31 / 74
V04.02.00
March 2018
If the patient responds correctly, click “Validate”.
If the patient does not respond correctly, the stimulus flashes during a time configured in visual field settings,
then goes to red.
The angles tested will appear on the response form.
4.2.2.5.2. Semi-automatic mode
Click “Start”.
The program activates the stimuli from the outside to the inside of the field, until the limits can be defined.
When the patient responds correctly, click “Validate” or press on the space bar.
Presentation time of the luminous stimulation, as well as the time between two tests can be configured as
follows:
Click the Parameters key
Set the time
4.2.2.6. Settings
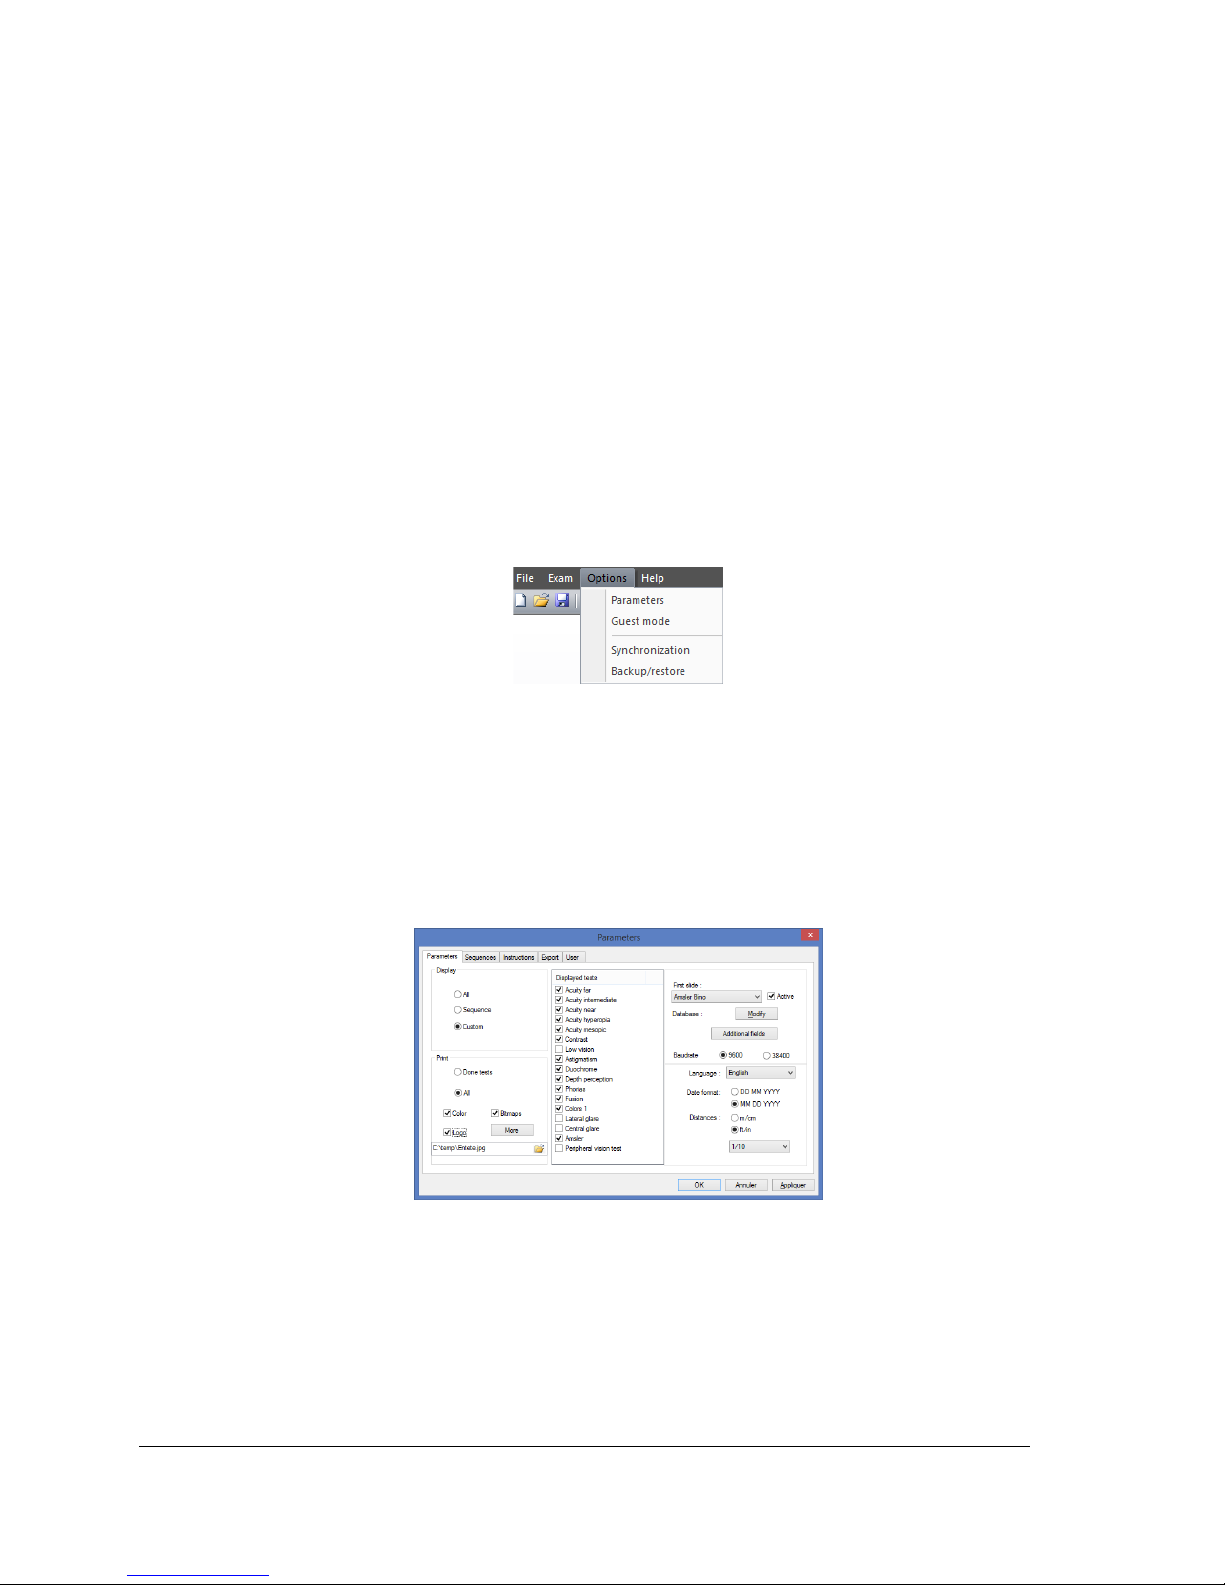
For all tests, lighting and optical mode can be adjusted by clicking on the following keys:
Page 32
Ce document est la propriété de la Société FIM MEDICAL. Il ne peut être reproduit ou communiqué sans son autorisation.
This document is the property of FIM MEDICAL. Its contents cannot be reproduced or divulged without the company's approval
Page 32 / 74
V04.02.00
March 2018
4.2.3. Automatic mode
The Visiolite® software can pre-program tests.
4.2.3.1. Use of sequences
To use a sequence, proceed as follows:
Choose the desired sequence in the list of sequences in the tool bar.
Click “S” on the tool bar or press the keyboard “Space” bar.
Use the space bar to go from test to test.
4.2.4. Settings
The software can be configured as follows:
Click “Options” menu.
Click “Parameters”.
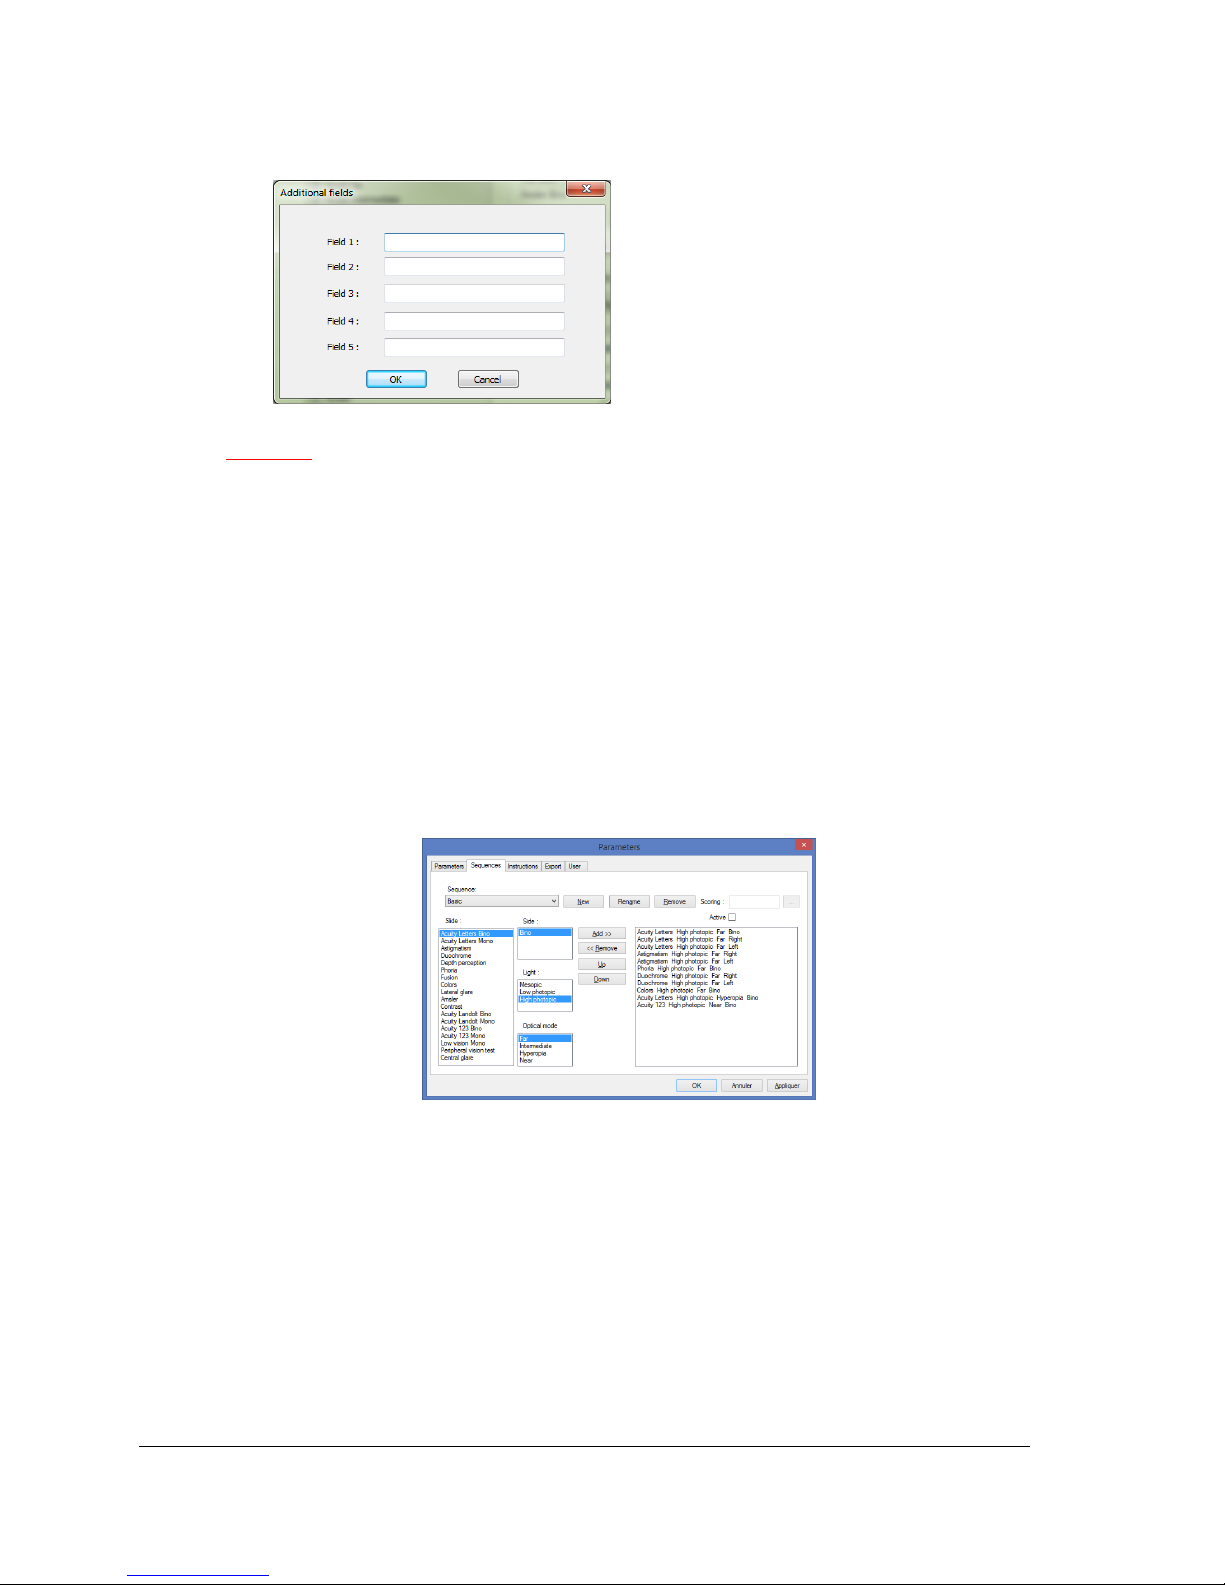
4.2.4.1. Display and print parameters
Click “Parameters” tab.
The following window appears:
Parameter display and print modes.
Choose the first test to appear when the software is run.
If necessary, change the data base path.
Page 33
Ce document est la propriété de la Société FIM MEDICAL. Il ne peut être reproduit ou communiqué sans son autorisation.
This document is the property of FIM MEDICAL. Its contents cannot be reproduced or divulged without the company's approval
Page 33 / 74
V04.02.00
March 2018
Add additional fields required for identification in the database.
1. Click on the button to open the window to add fields.
2. Click on the OK button to validate and close the window.
CAUTION: Choice of fields is definitive. A backup performed with these fields should always be opened
with these same fields. The name can be changed but it cannot be destroyed.
Choice of distances unit (m/cm or ft/in)
Choice of type of visual acuity:
1. Tenth
2. Snellen 16.4ft
3. Snellen 6m
4.2.4.2. Sequences setting
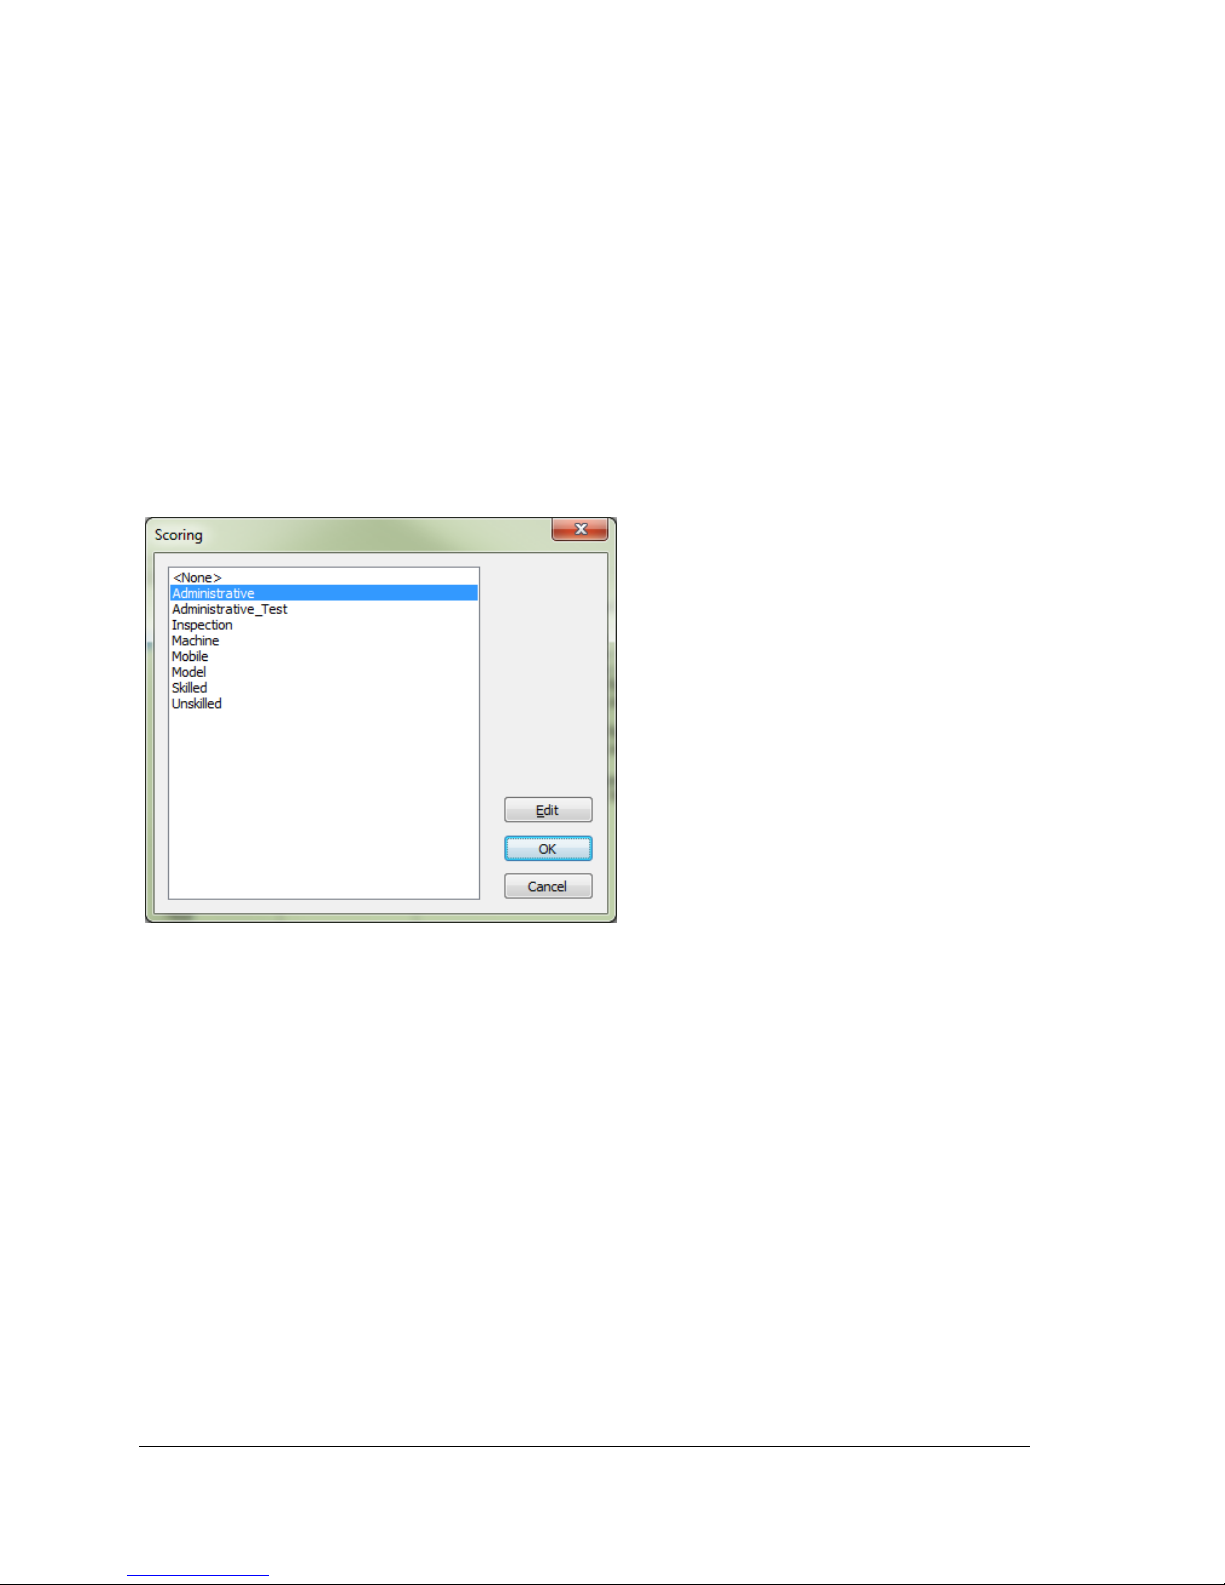
Click “Sequences” tab.
The following screen appears:
Firstly, create a new sequence by clicking “New”.
The name of this list can be modified at any time by clicking “Rename”.
Unwanted sequences can also be deleted.
The left-hand column named “Slide” contains a list of tests the Visiolite® can perform.
Use the lists “side”, “light” and “optical mode” to set the parameters for each test.
Use “Add” or “Remove” to choose the tests you wish to program in each sequence.
Page 34
Ce document est la propriété de la Société FIM MEDICAL. Il ne peut être reproduit ou communiqué sans son autorisation.
This document is the property of FIM MEDICAL. Its contents cannot be reproduced or divulged without the company's approval
Page 34 / 74
V04.02.00
March 2018
“Up” or “Down” keys set the order of tests to be performed.
The right-hand column indicates the tests list and order of the created sequence.
Once established, click “OK” so that the sequence appears in the scroll-down list, accessible from the tool bar.
4.2.4.2.1. Scoring:
For each sequence, an active Scoring can be added. Scoring fixes the minimum and maximum limits for one or
several tests, defined by either the user or by default in the software.
To choose a Scoring, select the sequence chosen in the scrolling list.
Then click on the Active box.
Click on the … button to choose the Scoring.
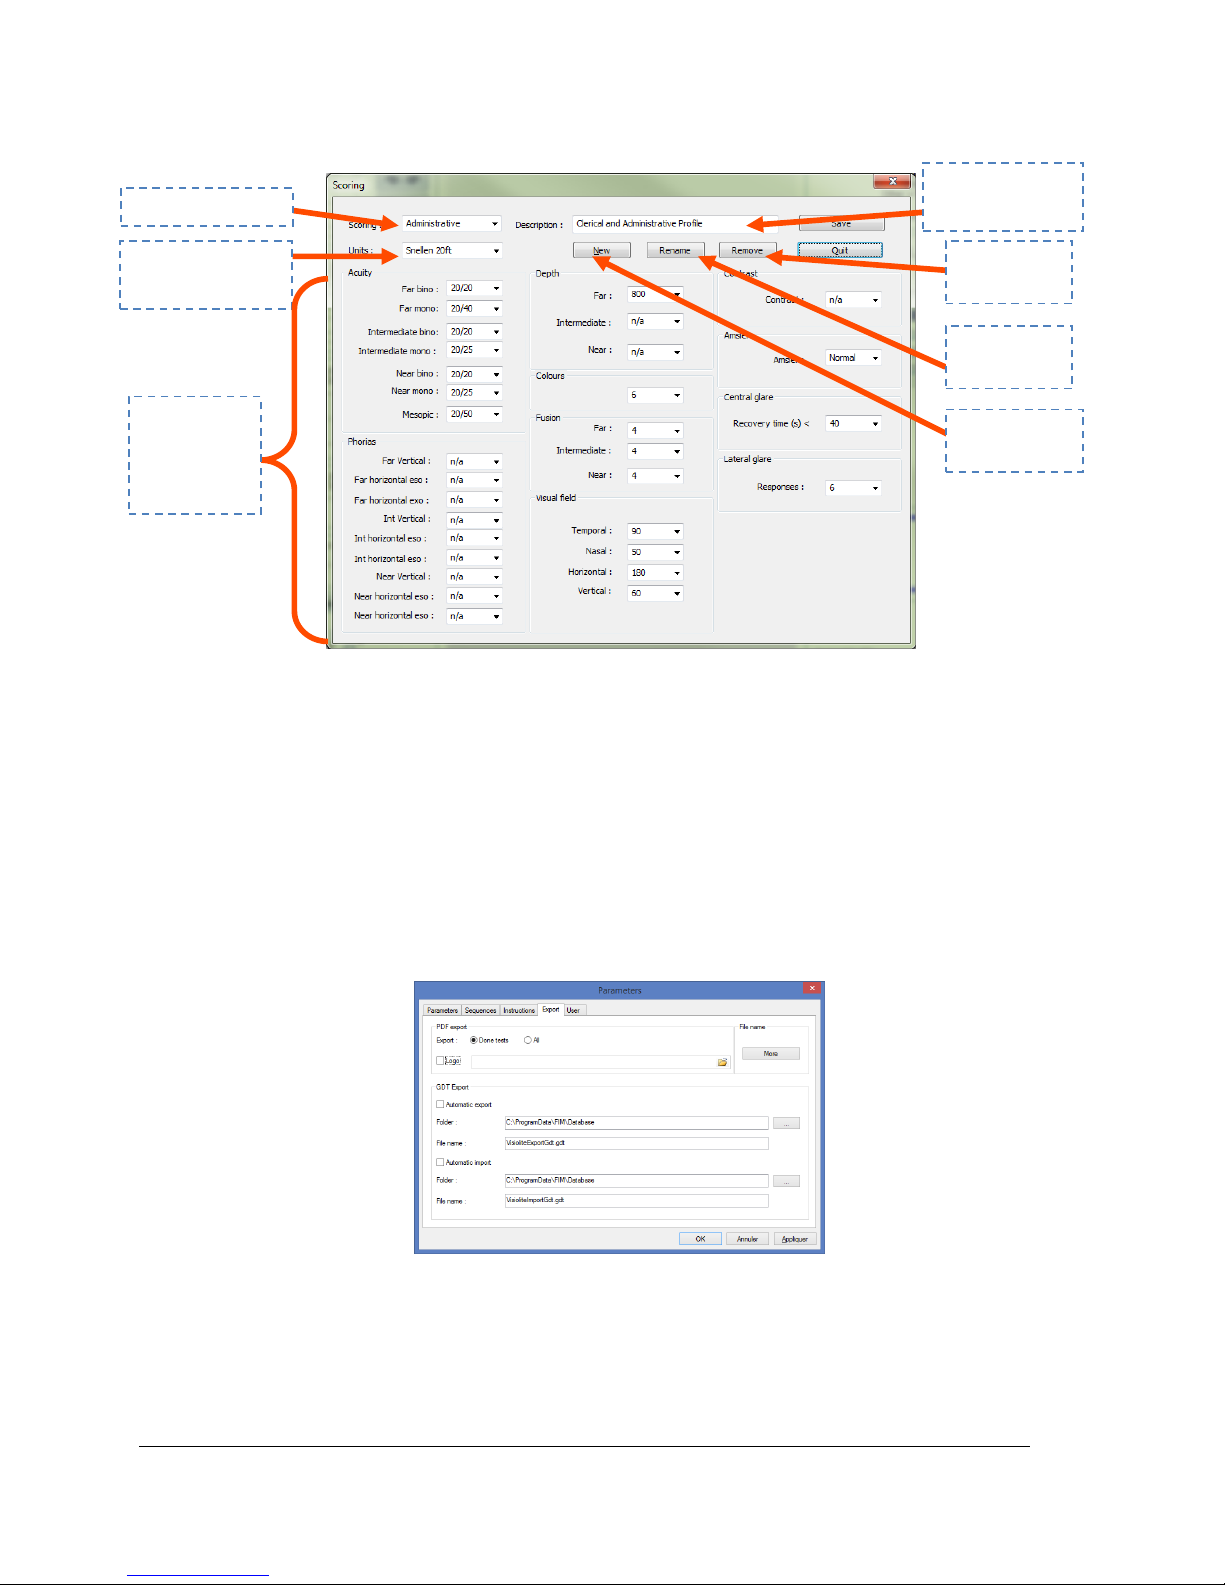
Use this window to create or edit Scoring.
Page 35
Ce document est la propriété de la Société FIM MEDICAL. Il ne peut être reproduit ou communiqué sans son autorisation.
This document is the property of FIM MEDICAL. Its contents cannot be reproduced or divulged without the company's approval
Page 35 / 74
V04.02.00
March 2018
To edit, create or delete a Scoring, click on the Edit button, which opens the Scoring management console.
Use the OK button to validate the screen.
4.2.4.3. Export settings
4.2.4.3.1. Presentation
Export mode exists in several formats to create a file readable by software other than the Visiolite®. Possible
exports:
PDF (Adobe® format)
GDT (Specific format)
CSV (Export compatible with Excel)
List of Scorings
Scale of
measurement
Description of
Scoring
Removal of
Rename
New Scoring
Definition
of Scoring
for each
Page 36
Ce document est la propriété de la Société FIM MEDICAL. Il ne peut être reproduit ou communiqué sans son autorisation.
This document is the property of FIM MEDICAL. Its contents cannot be reproduced or divulged without the company's approval
Page 36 / 74
V04.02.00
March 2018
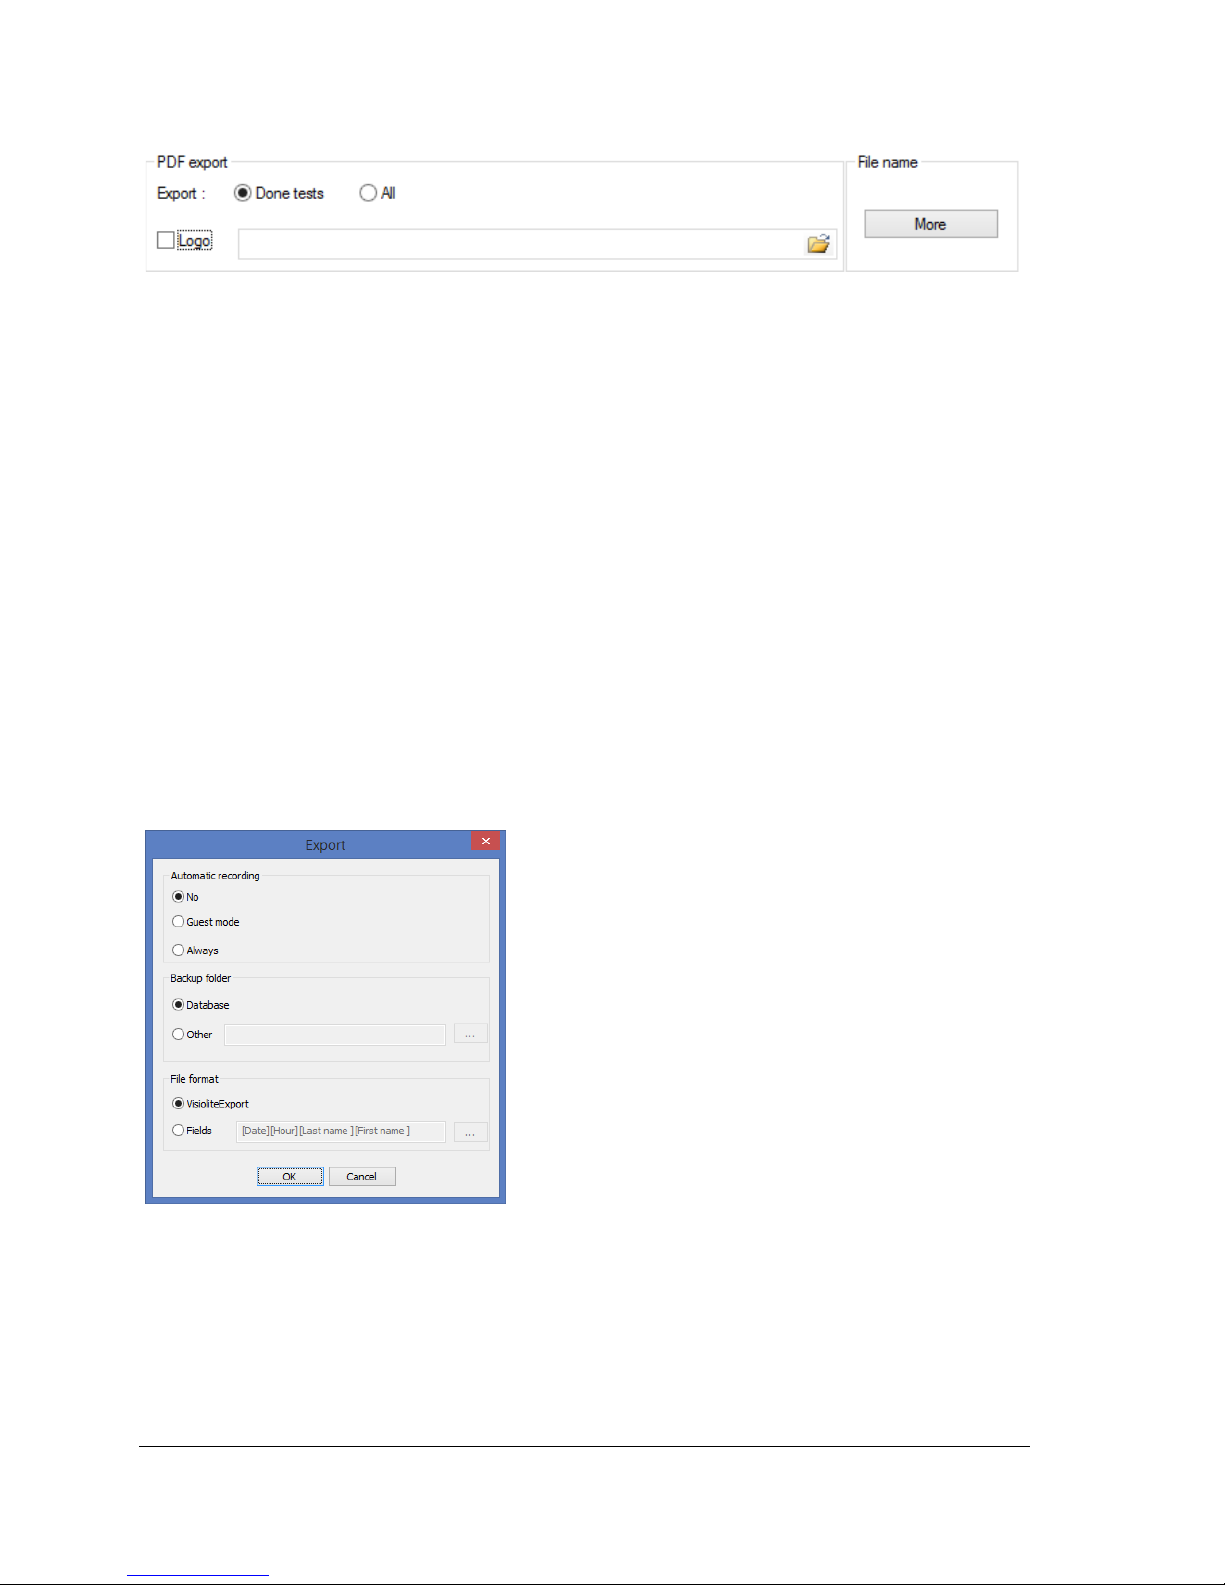
4.2.4.3.2. PDF export
For PDF export, configure only what the software exports:
Tests done
All the tests
The logo that will appear on the PDF file can also be chosen (e.g. your company logo).
Click on the Advanced button to open a window to parameter:
Automatic recording (defined if the recording in PDF is done at the same time as another, standard
recording)
The backup folder (define the PDF file recording folder)
Name of the file (define the file name: possibility of using global variables such as:
o [First name ]
o [Last name ]
o [Date]
o [Time]
o [ID]
Page 37
Ce document est la propriété de la Société FIM MEDICAL. Il ne peut être reproduit ou communiqué sans son autorisation.
This document is the property of FIM MEDICAL. Its contents cannot be reproduced or divulged without the company's approval
Page 37 / 74
V04.02.00
March 2018
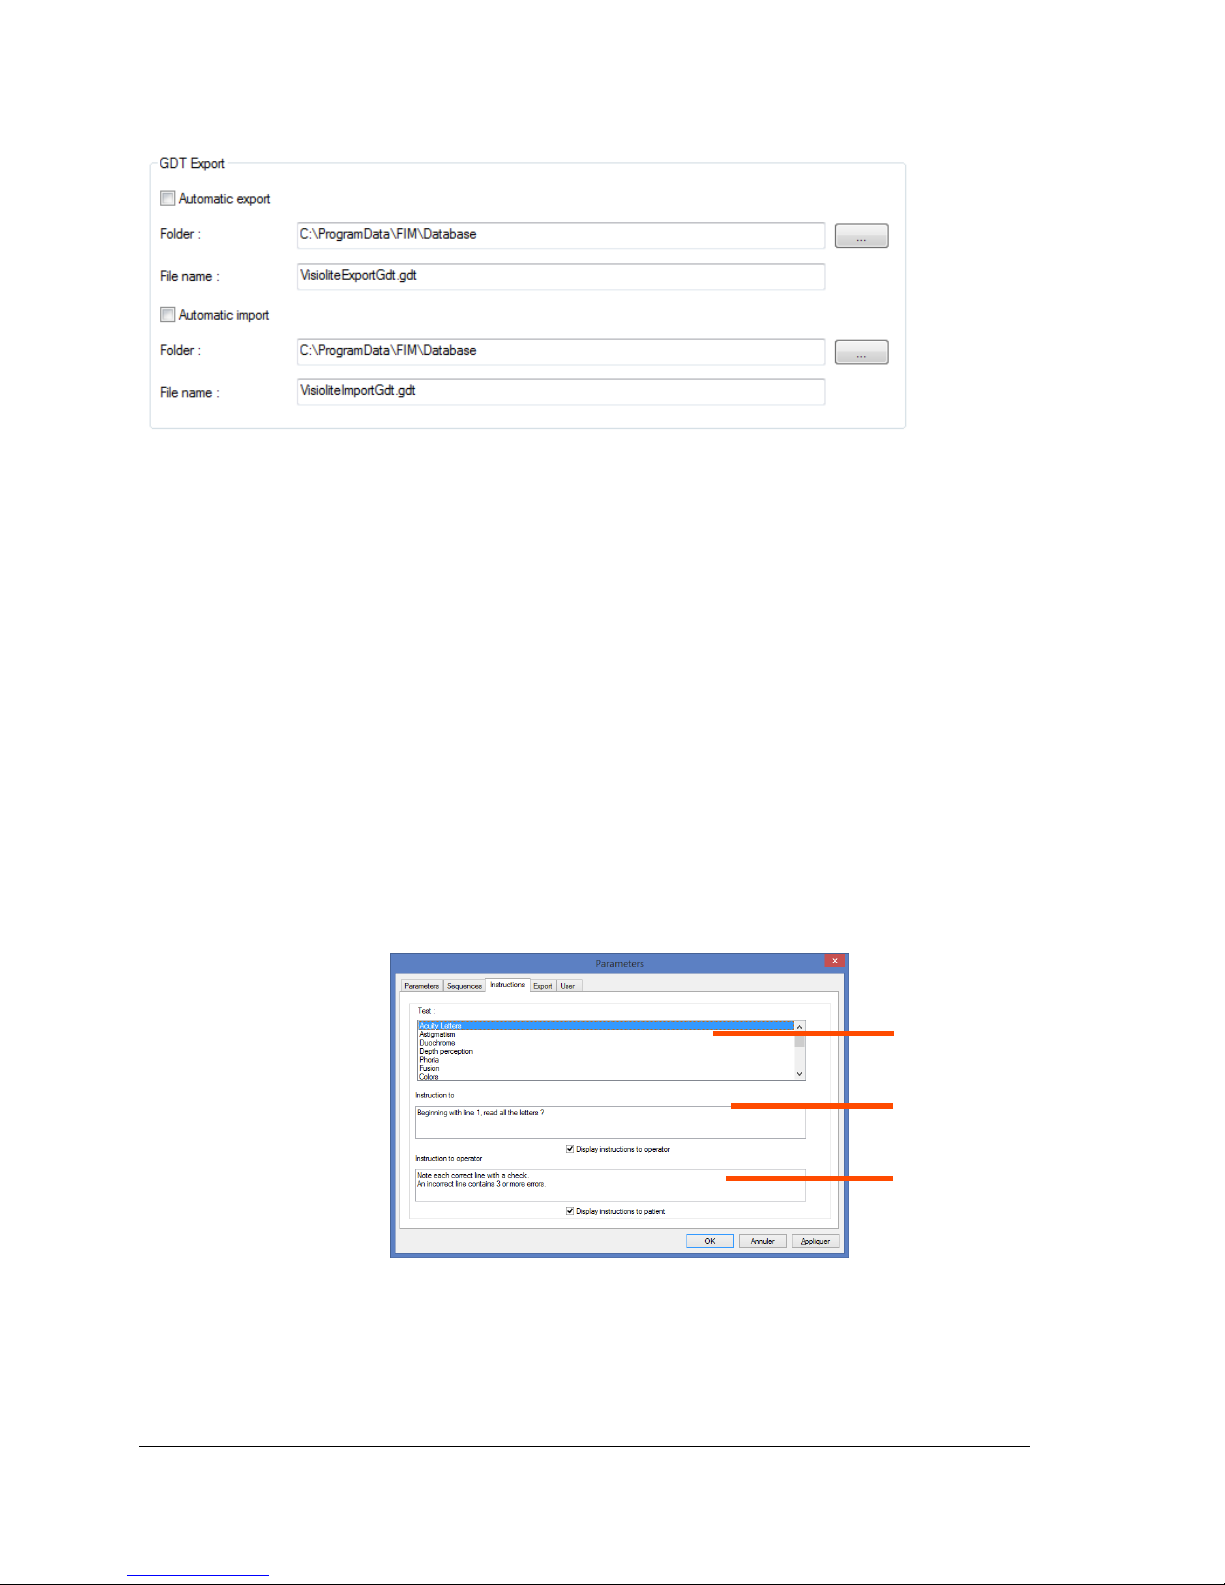
4.2.4.3.3. GDT export
GDT export is an export in a specific format. In the configuration of this format, you can choose:
If the export is done automatically
The folder of the exported file
The name of the GDT file exported
If the import is done automatically
The folder of the imported file
The name of the imported GDT file
Note: Do not begin to configure an export if you are not sure of the format used.
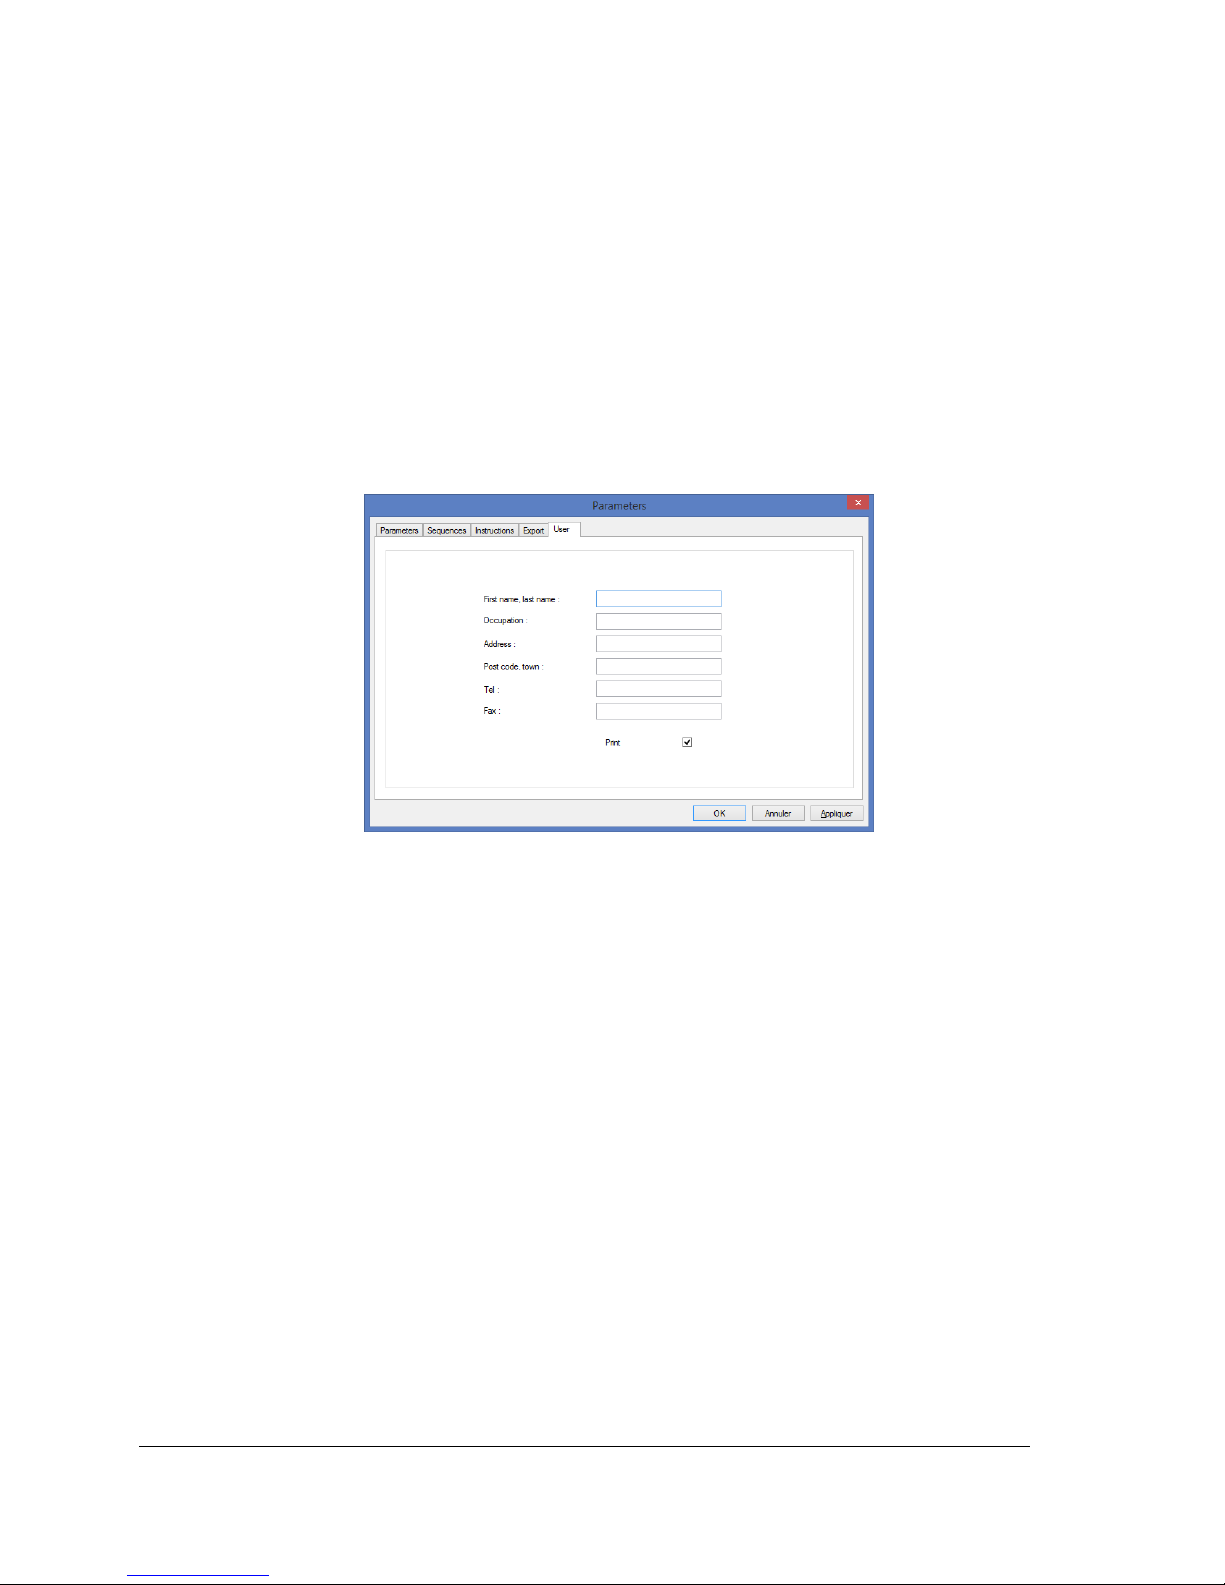
4.2.4.4. Instructions setting
Each test window has two instruction fields: one for the patient and one for the operator. These instructions can
be modified.
Click “Instructions “tab.
The following window appears:
1 Tests
2 Patient instruction
3 Operator instruction
Select a test from the top window then set the operator and patient instructions.
2 1 3
Page 38
Ce document est la propriété de la Société FIM MEDICAL. Il ne peut être reproduit ou communiqué sans son autorisation.
This document is the property of FIM MEDICAL. Its contents cannot be reproduced or divulged without the company's approval
Page 38 / 74
V04.02.00
March 2018
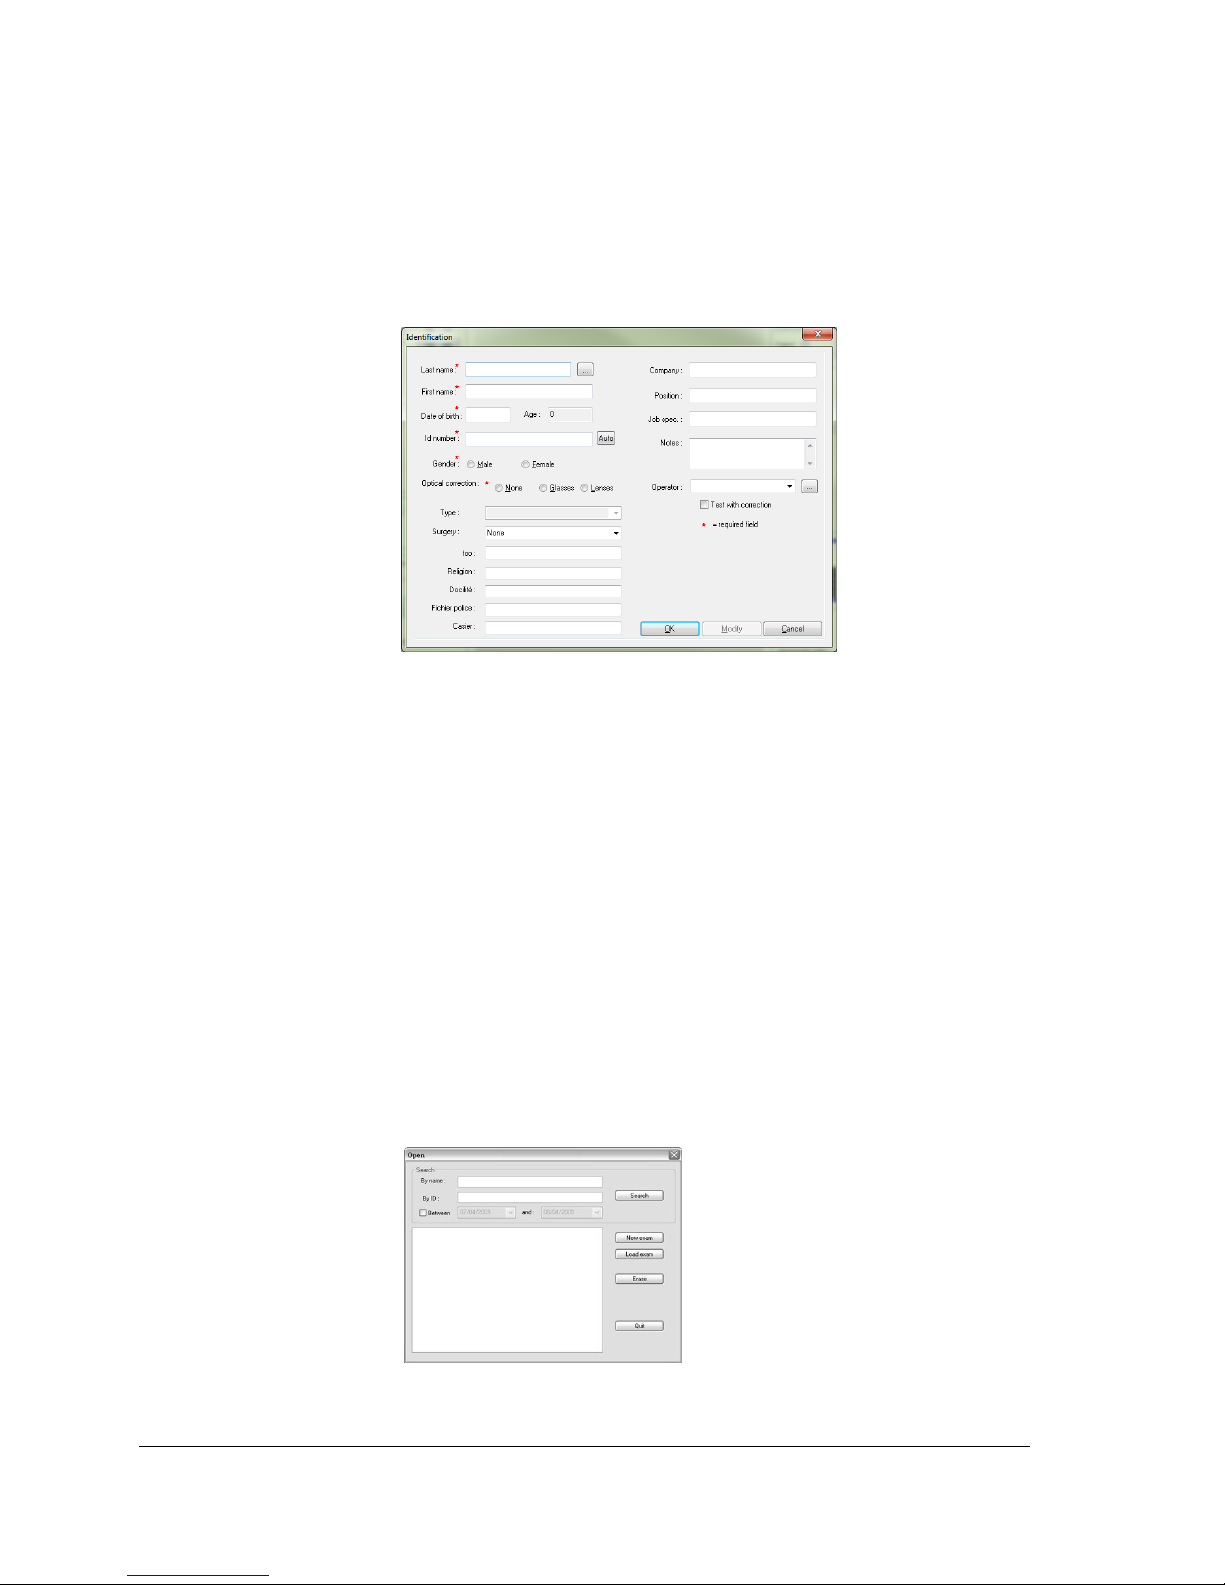
4.2.4.5. Operator setting
Select the “User” tab to fill the user information. These fields can be printed out.
Relevant fields:
First name, last name
Occupation
Address
Post code, town
Telephone number
Fax number
Page 39
Ce document est la propriété de la Société FIM MEDICAL. Il ne peut être reproduit ou communiqué sans son autorisation.
This document is the property of FIM MEDICAL. Its contents cannot be reproduced or divulged without the company's approval
Page 39 / 74
V04.02.00
March 2018
4.2.5. Database
Patient data (first name, last name …) as well as the tests are stored in a database.
4.2.5.1. Patient identification
Click “Identification” key.
The following window appears:
Fields with a red asterisk are required for recording.
Note: Additional fields created during configuration of the software are placed in this window. Up to five
additional fields may be added.
4.2.5.2. Recording
Use “Record” to store the test in progress if all the required fields have been filled in.
If the operator attempts to exit the software without recording a test, an alert appears.
4.2.5.3. Recover a file
To locate patient data already recorded, proceed as follows:
Click “Open”.
The following screen appears:
In the “Name” box, type the first letters of the patient’s surname.
Page 40
Ce document est la propriété de la Société FIM MEDICAL. Il ne peut être reproduit ou communiqué sans son autorisation.
This document is the property of FIM MEDICAL. Its contents cannot be reproduced or divulged without the company's approval
Page 40 / 74
V04.02.00
March 2018
Click “Search”.
The list of names starting with these letters appears.
Select the patient.
Click “New exam”.
The identification screen is automatically completed.
Patient search can also be carried out by identification number or by recording date.
4.2.5.4. Recall a test
To view a previous test, or to print it, the operator can recall a file (refer § 4.2.5.3). Proceed as seen previously: a
small + sign is displayed beside the patient surname, indicating that tests were recorded. Click on the + sign.
A list of dates and times is displayed.
Double click on one of the dates, or click “Load exam” to display the test performed.
4.2.5.5. Print
Simply click “Print” to print out test results.
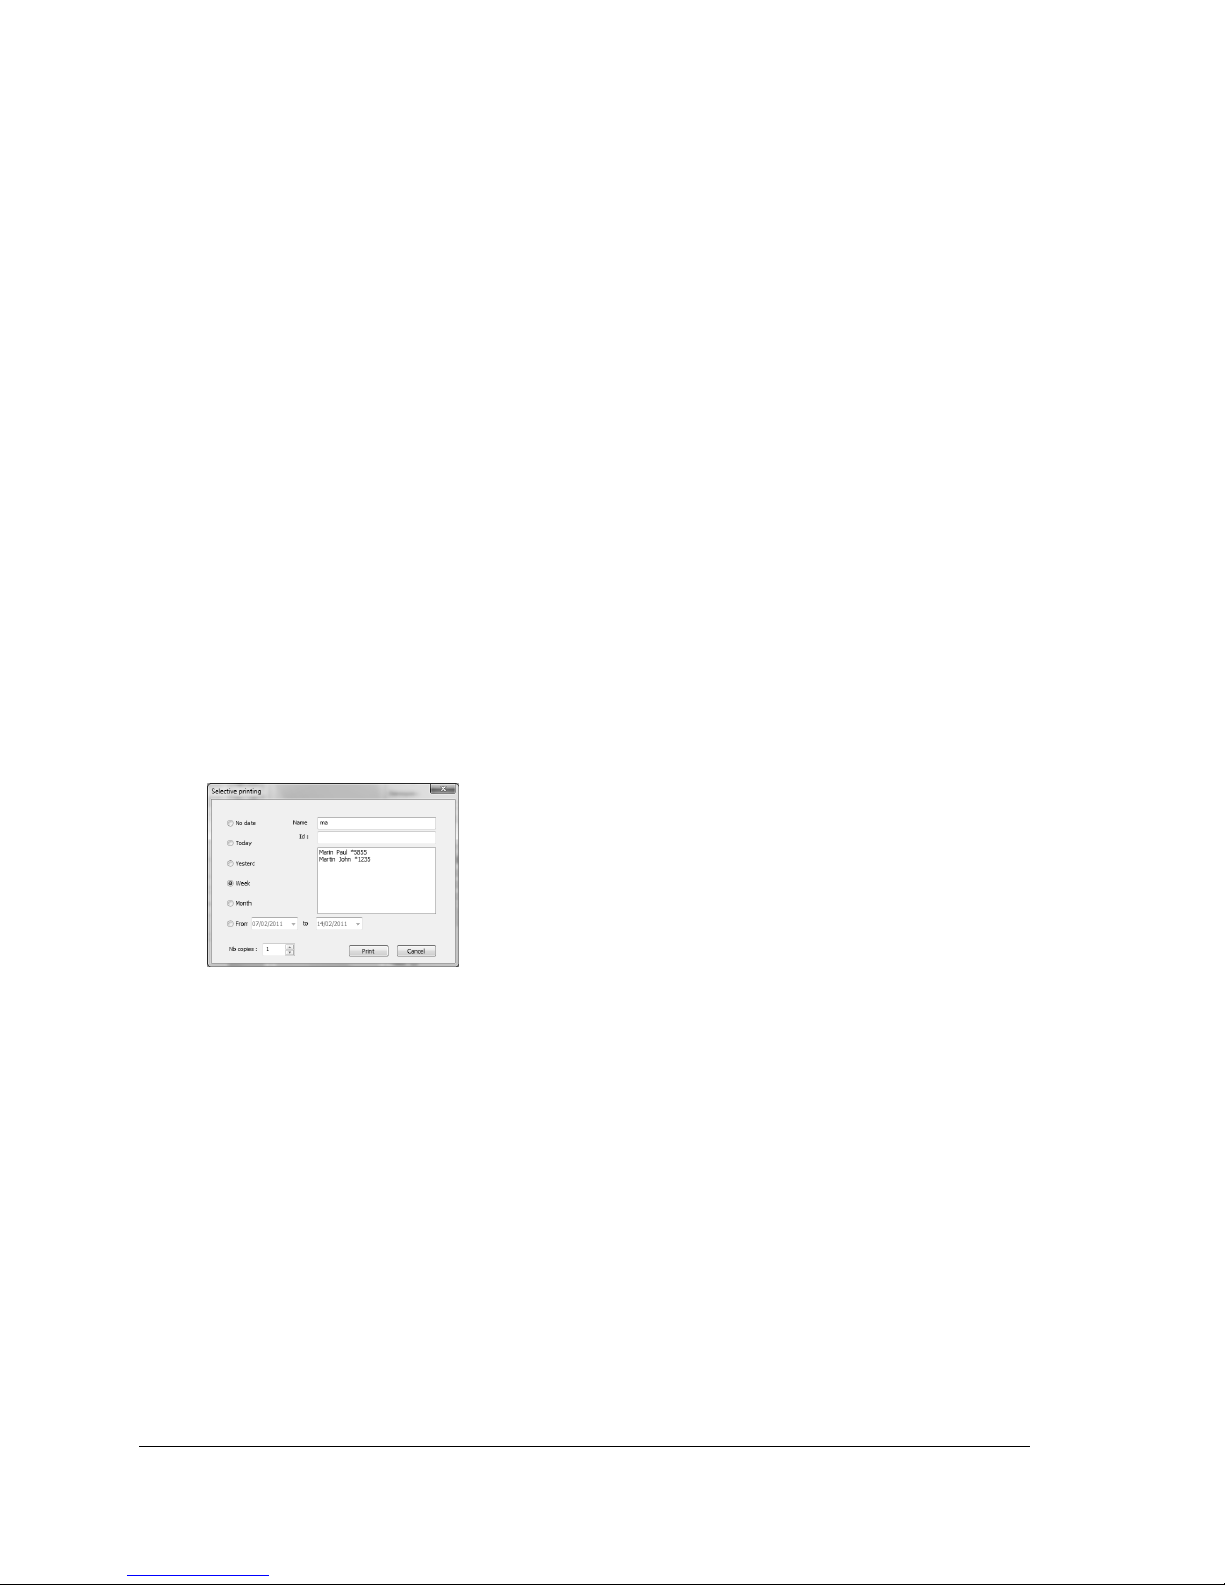
4.2.5.6. Selective printing
Use selective printing (File menu, Selective printing) to print tests according to the following criteria:
- No criteria
- Today
- Yesterday
- Week
- Month
- Manual selection
Page 41
Ce document est la propriété de la Société FIM MEDICAL. Il ne peut être reproduit ou communiqué sans son autorisation.
This document is the property of FIM MEDICAL. Its contents cannot be reproduced or divulged without the company's approval
Page 41 / 74
V04.02.00
March 2018
4.3. Essential remote control use
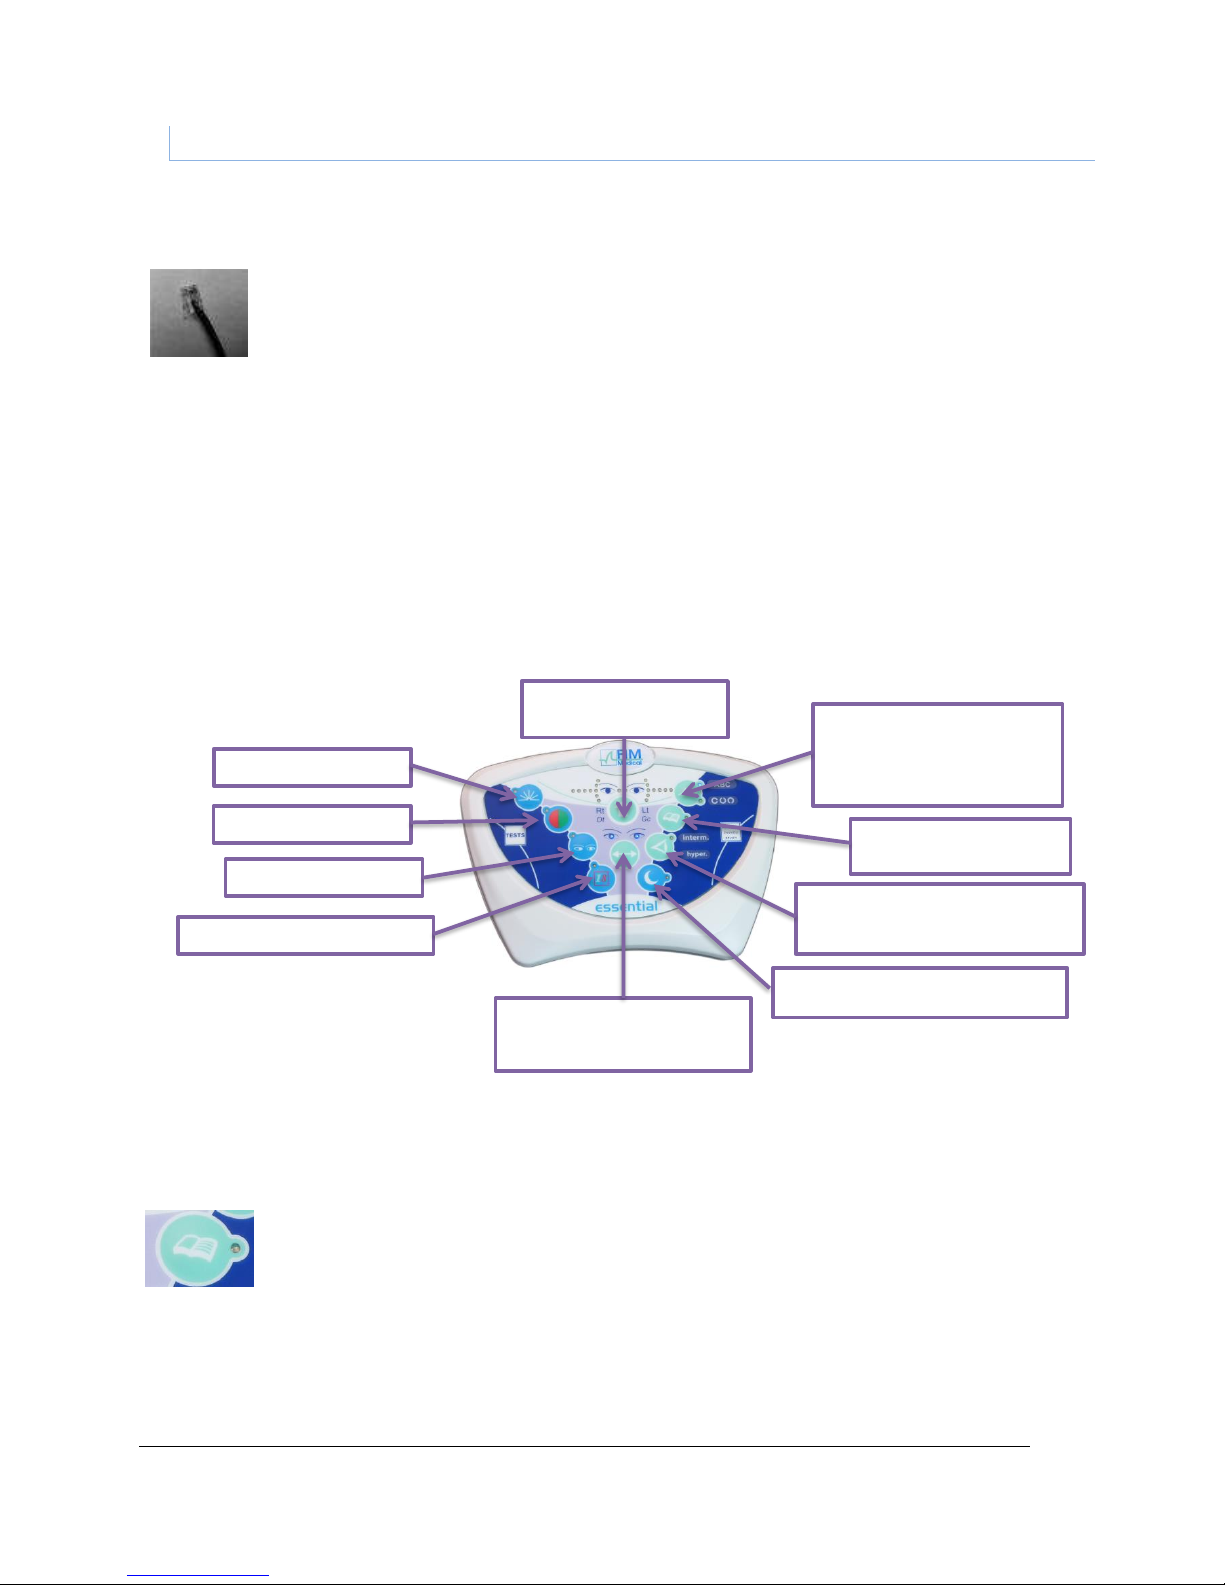
The Visiolite® Essential remote control is ergonomic and very user-friendly. Each key of the remote control
corresponds to a test, and each key is associated with a light for the test displayed in the Visiolite®.
The remote control lead connector is an RJ11type. Click the connector into the intended socket.
To unplug the lead, push down on the tongue and slowly pull out the lead. The Essential remote
control should not be connected to the Visiolite® Essential.
Reminder: The Essential remote control should only be connected to the Visiolite® Essential.
As soon as the RJ11 lead and the mains are connected, the Visiolite® initialises in a few seconds, and
automatically positions itself on the far vision (5m) visual acuity test in binocular mode. The Visiolite® is ready to
use.
The right side of the remote control is for visual acuity tests. The left part is for extra tests.
4.3.1. Begin a test
To begin a test, simply click on the test you would like to perform.
Example: visual acuity test in near vision (33 cm).
One press on this key positions the Visiolite® on the near vision acuity chart. A light beside the key
lights up to confirm your test choice.
Astigmatism test
Duochrome test
Phorias test
Ishihara-type colours test
Far vision (5m). One press for
letters visual acuity chart. A second
press for Landolt rings chart.
Near vision 33cm; letters
acuity chart
One press for 60cm intermediate vision. A
second press for hyperopia test
Dusk vision; letters acuity chart
One press to go from binocular
mode to left or right monocular
Peripheral field test. One
press for an angle
Page 42
Ce document est la propriété de la Société FIM MEDICAL. Il ne peut être reproduit ou communiqué sans son autorisation.
This document is the property of FIM MEDICAL. Its contents cannot be reproduced or divulged without the company's approval
Page 42 / 74
V04.02.00
March 2018
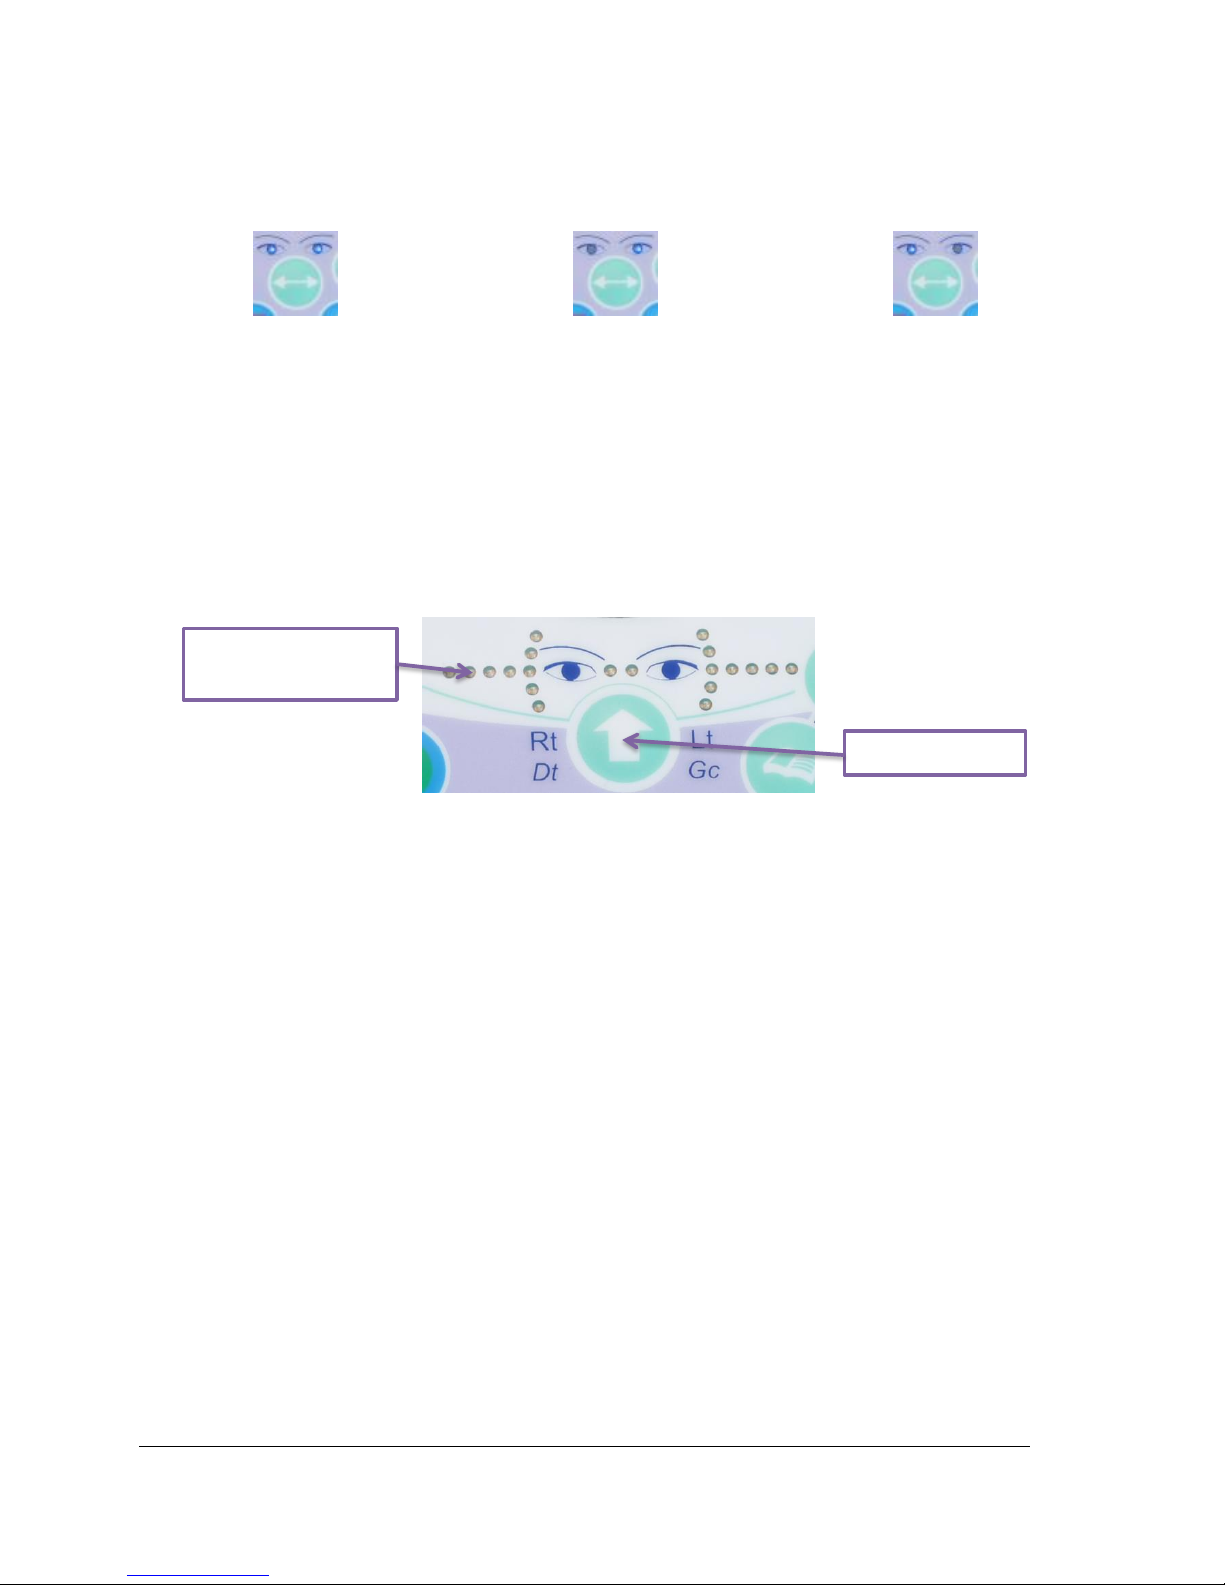
4.3.2. Binocular and monocular mode
At any moment the test allows, you can switch from binocular mode to monocular mode by clicking on the
following key:
Binocular
Left monocular
Right monocular
The lights above the keys indicate the mode selected.
4.3.3. Visual field
To begin a visual field test, press on the key indicated below. A first light representing an angle lights up. Then
each press tests the next angles, which is represented by a light. As such, the horizontal and vertical fields are
tested. The test begins by testing the extremities.
4.3.4. Standby
After several minutes without use, the Visiolite® remote control goes on standby mode. To reactivate, press any
remote control key, or touch the Visiolite® forehead rest.
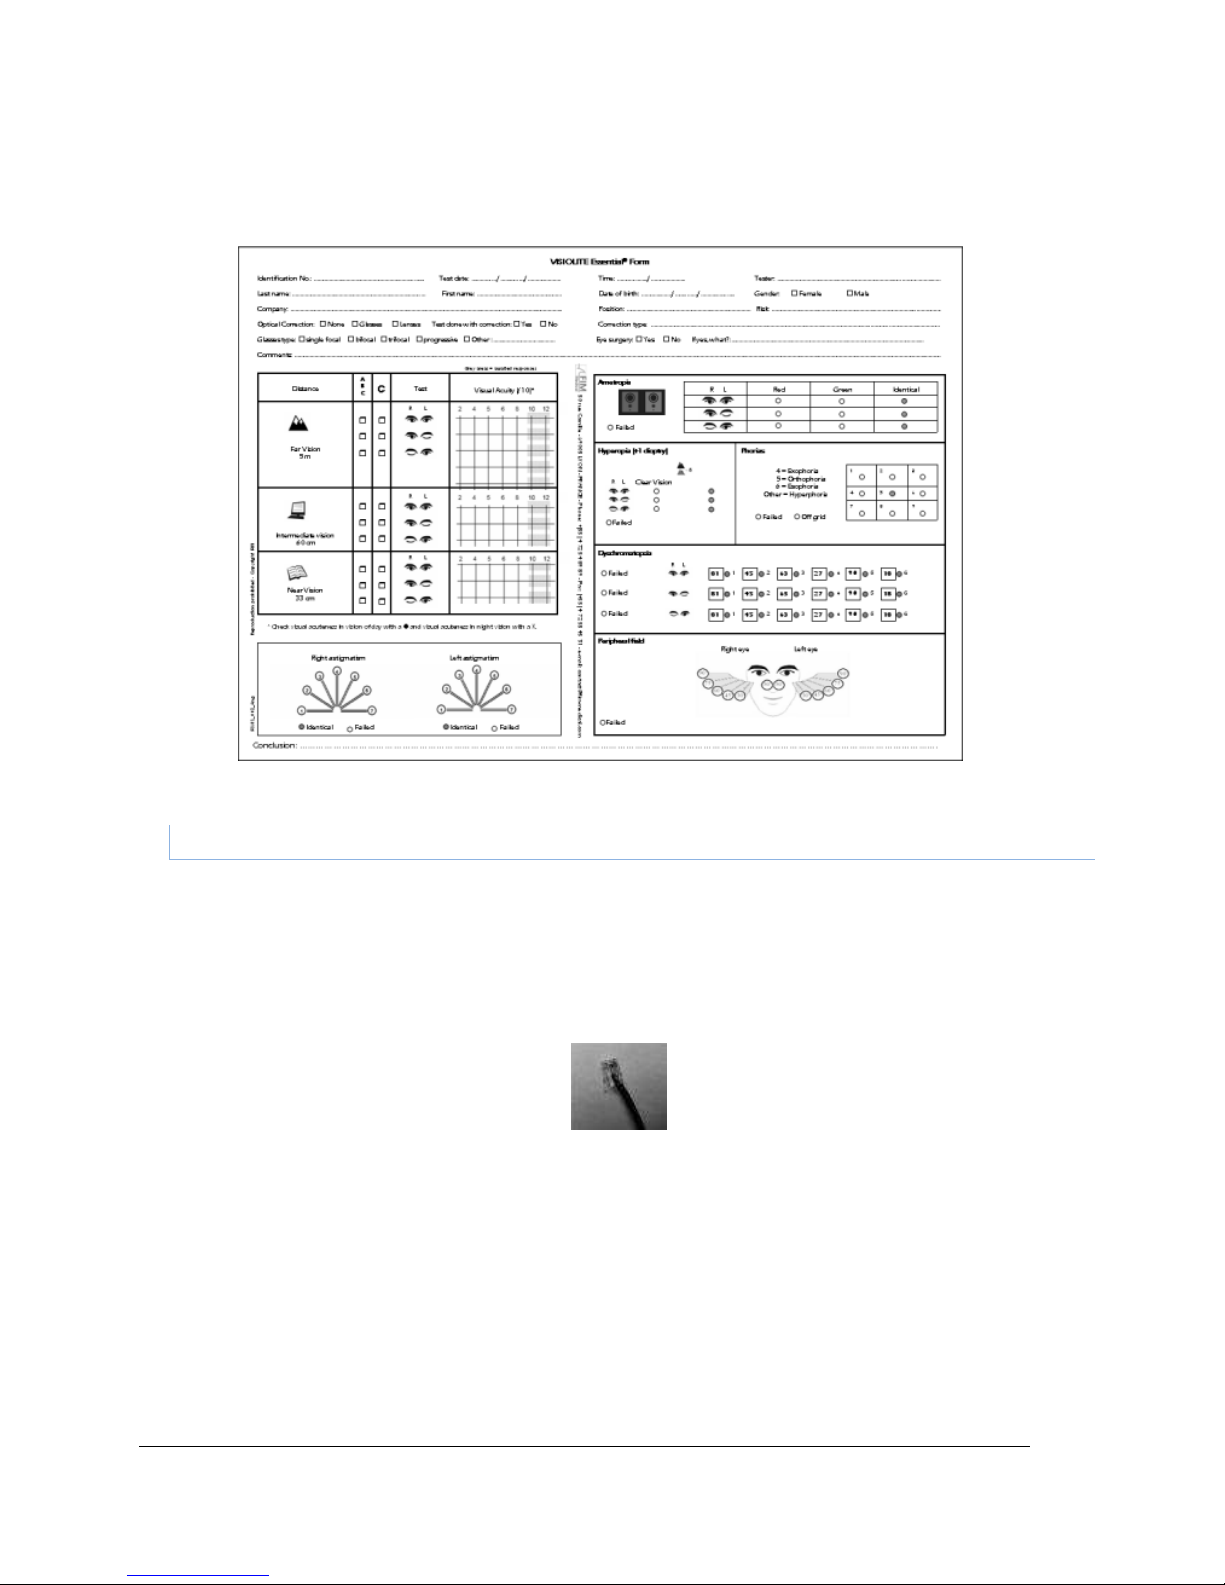
4.3.5. Essential remote control response forms
The form is required to note the results given by the patient. This is only supplied with the remote control, on
the CD-ROM supplied with the Visiolite®, and can be printed as required.
If a copy is given to the patient or a third party, photocopy the original.
The form is composed of three parts:
Patient identification
Doctor conclusions and comments
Tables or boxes to check according to patient response
The grey areas on the response form indicate the optimum response but cannot in any case determine
normality or aptitude for a specific occupation or to perform a certain task. These areas cannot be used for an
individual’s interest or for discrimination purposes.
Only the conclusions of the doctor responsible, in conjunction with other medical expertise, can establish
aptitude. As this is a screening test, the results cannot in any case be used for medical treatment, pre-or post-
Lights for each angle
Visual field
Page 43
Ce document est la propriété de la Société FIM MEDICAL. Il ne peut être reproduit ou communiqué sans son autorisation.
This document is the property of FIM MEDICAL. Its contents cannot be reproduced or divulged without the company's approval
Page 43 / 74
V04.02.00
March 2018
surgical diagnosis, or for any sort of prescription.
The response form gives the operator the expected response, and also to adapt the questions to ask the patient,
depending on the type of test.
4.4. Master model LCD screen remote control use
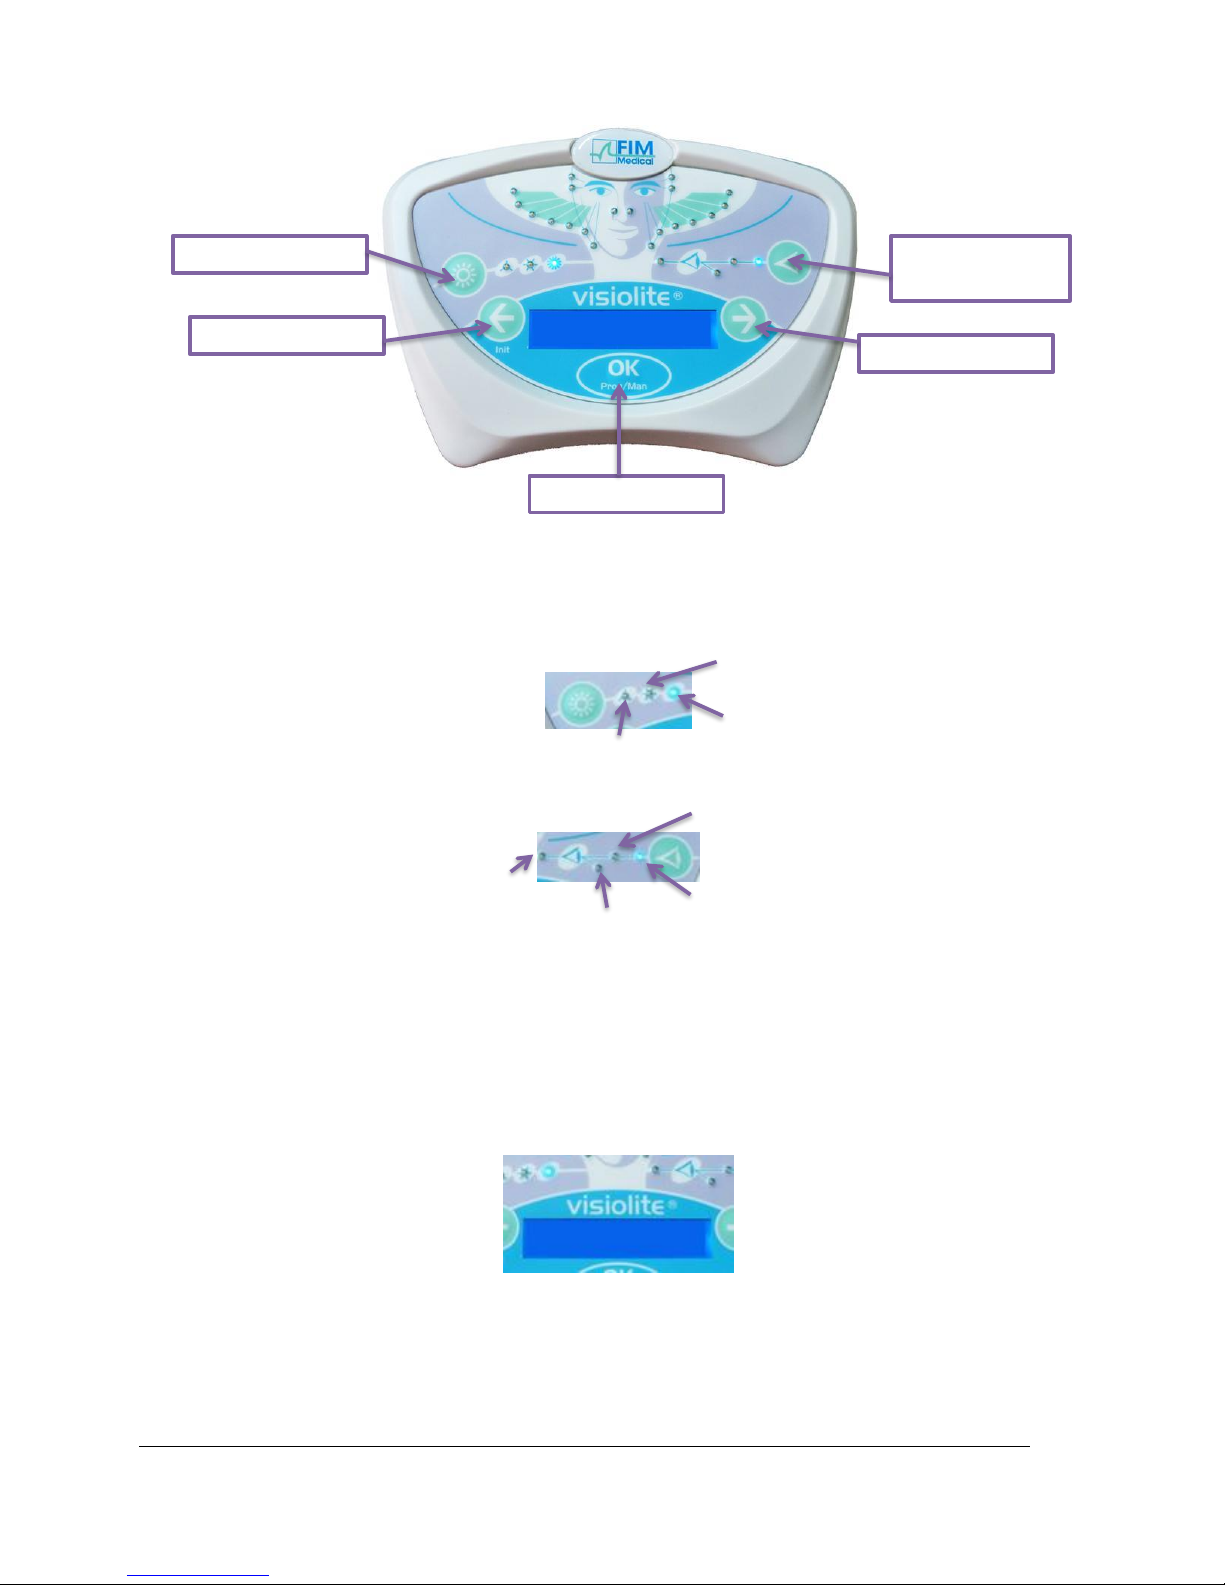
The Visiolite® LCD remote control has a micro-controller to choose from 7 operating modes.
The remote control lead connector is an RJ11 type; insert it into the intended socket. To unplug the lead, push
down on the tongue and slowly pull out the lead.
Reminder: the remote control should only be connected to the Visiolite®.
As soon as the RJ11 plug and the mains are connected, the remote control LCD screen lights up and displays a
mode of use for the Visiolite®. The Visiolite® is ready for operation after a few seconds of initialisation.
Page 44
Ce document est la propriété de la Société FIM MEDICAL. Il ne peut être reproduit ou communiqué sans son autorisation.
This document is the property of FIM MEDICAL. Its contents cannot be reproduced or divulged without the company's approval
Page 44 / 74
V04.02.00
March 2018
4.4.1. Keys
At any time during a test, lighting and distance may be modified:
Lighting
Distance
4.4.2. Forehead presence
A blinking light indicates the patient’s forehead is not in contact with the forehead rest.
4.4.3. Begin a test
As soon as it is switched on, the last mode used appears.
Use MANUAL mode to scroll through all the tests proposed. However, no patient profile would justify a test as
complete as this. It is thus preferable to use programmed tests.
Choice of lighting
Left scrolling
Right scrolling
Choice of test
distance
Ok selection
Low photopic
High photopic
Mesopic dusk light
Intermediate
Far
Near
Hyperopia
MANUAL MODE
OK
Page 45
Ce document est la propriété de la Société FIM MEDICAL. Il ne peut être reproduit ou communiqué sans son autorisation.
This document is the property of FIM MEDICAL. Its contents cannot be reproduced or divulged without the company's approval
Page 45 / 74
V04.02.00
March 2018
4.4.4. Choose a mode
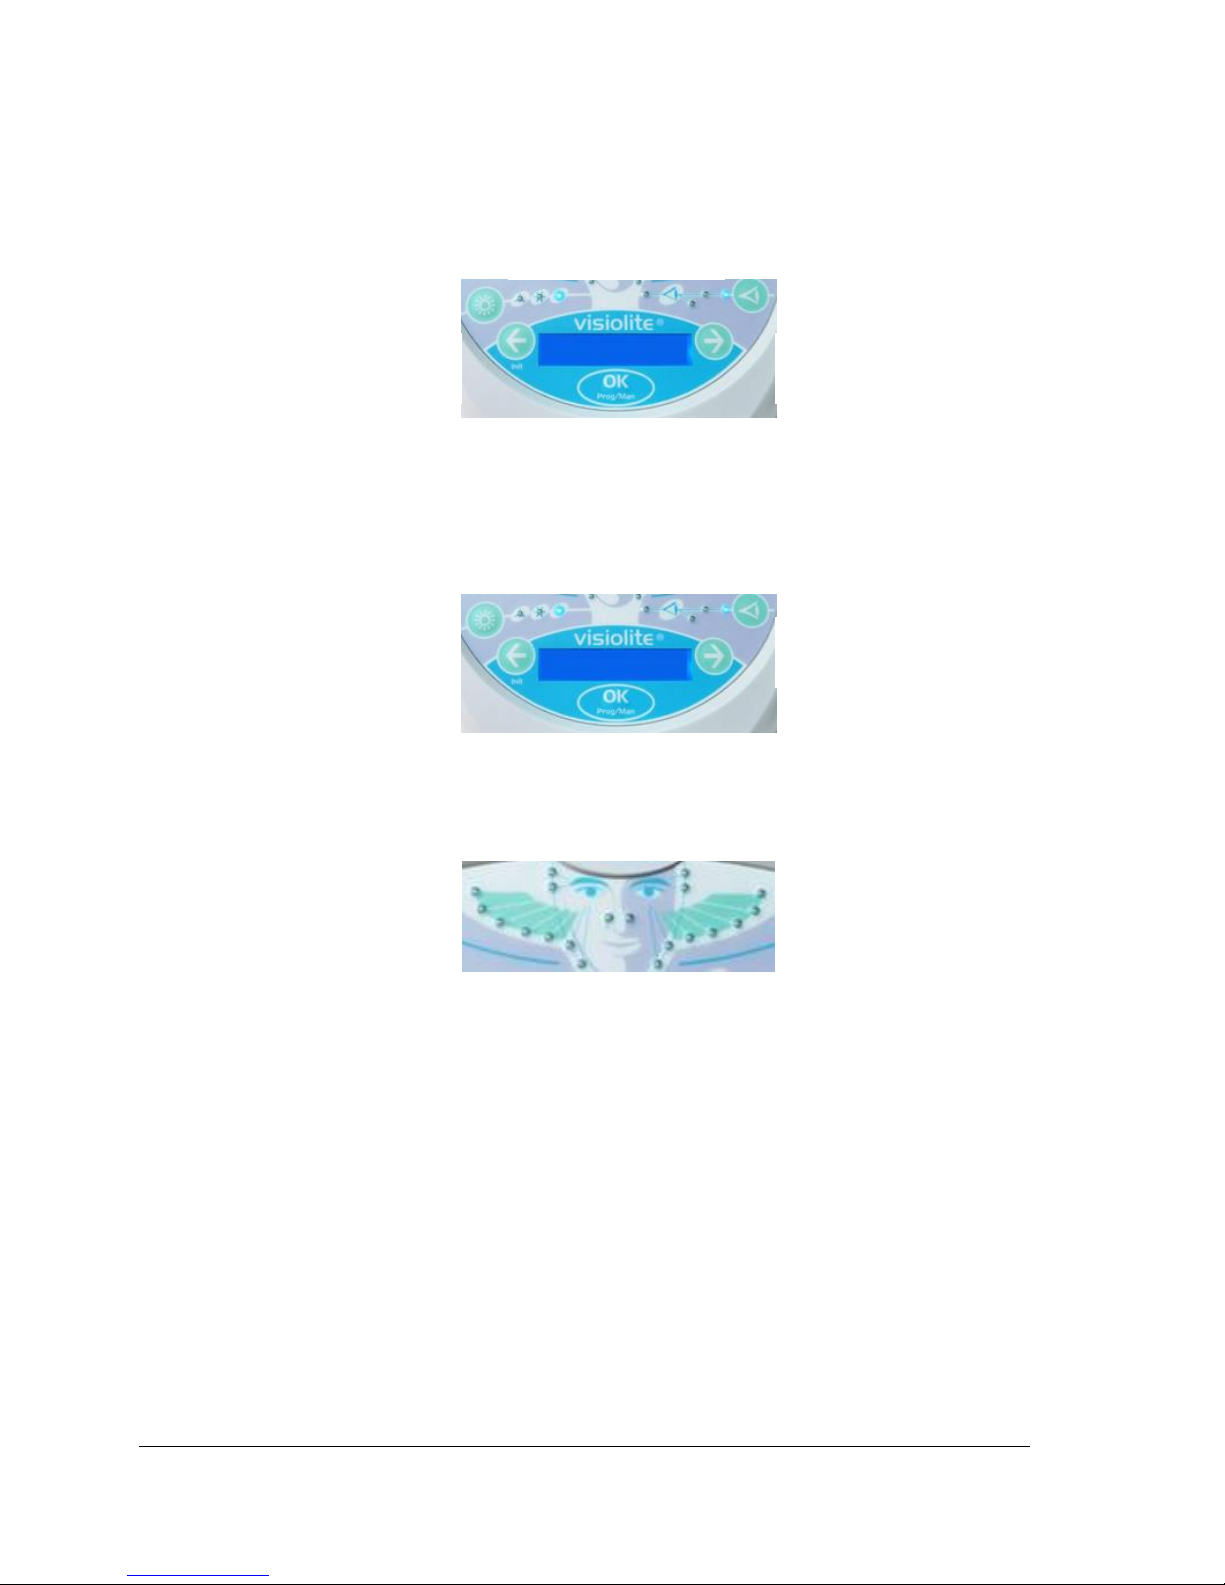
To scroll through the tests of the selected mode, use the left and right arrows. Go from one mode to another
by pressing on the right or left arr
ow.
To select the displayed mode, click “OK”.
4.4.5. Perform a test
Once the mode is chosen, go from one test to another with the right key, which displays the following test.
Return to the previous test by pressing on the left key.
4.4.6. Visual field
When the remote control displays the visual field test, press “OK”.
Use the right and left arrows to change
lighting. To exit the test, press “OK” again.
20 horizontal and vertical visual field LEDs
4.4.7. Standby
After several minutes without use, the Visiolite® remote control goes on standby mode. To reactivate, press any
remote control key, or touch the Visiolite® forehead rest.
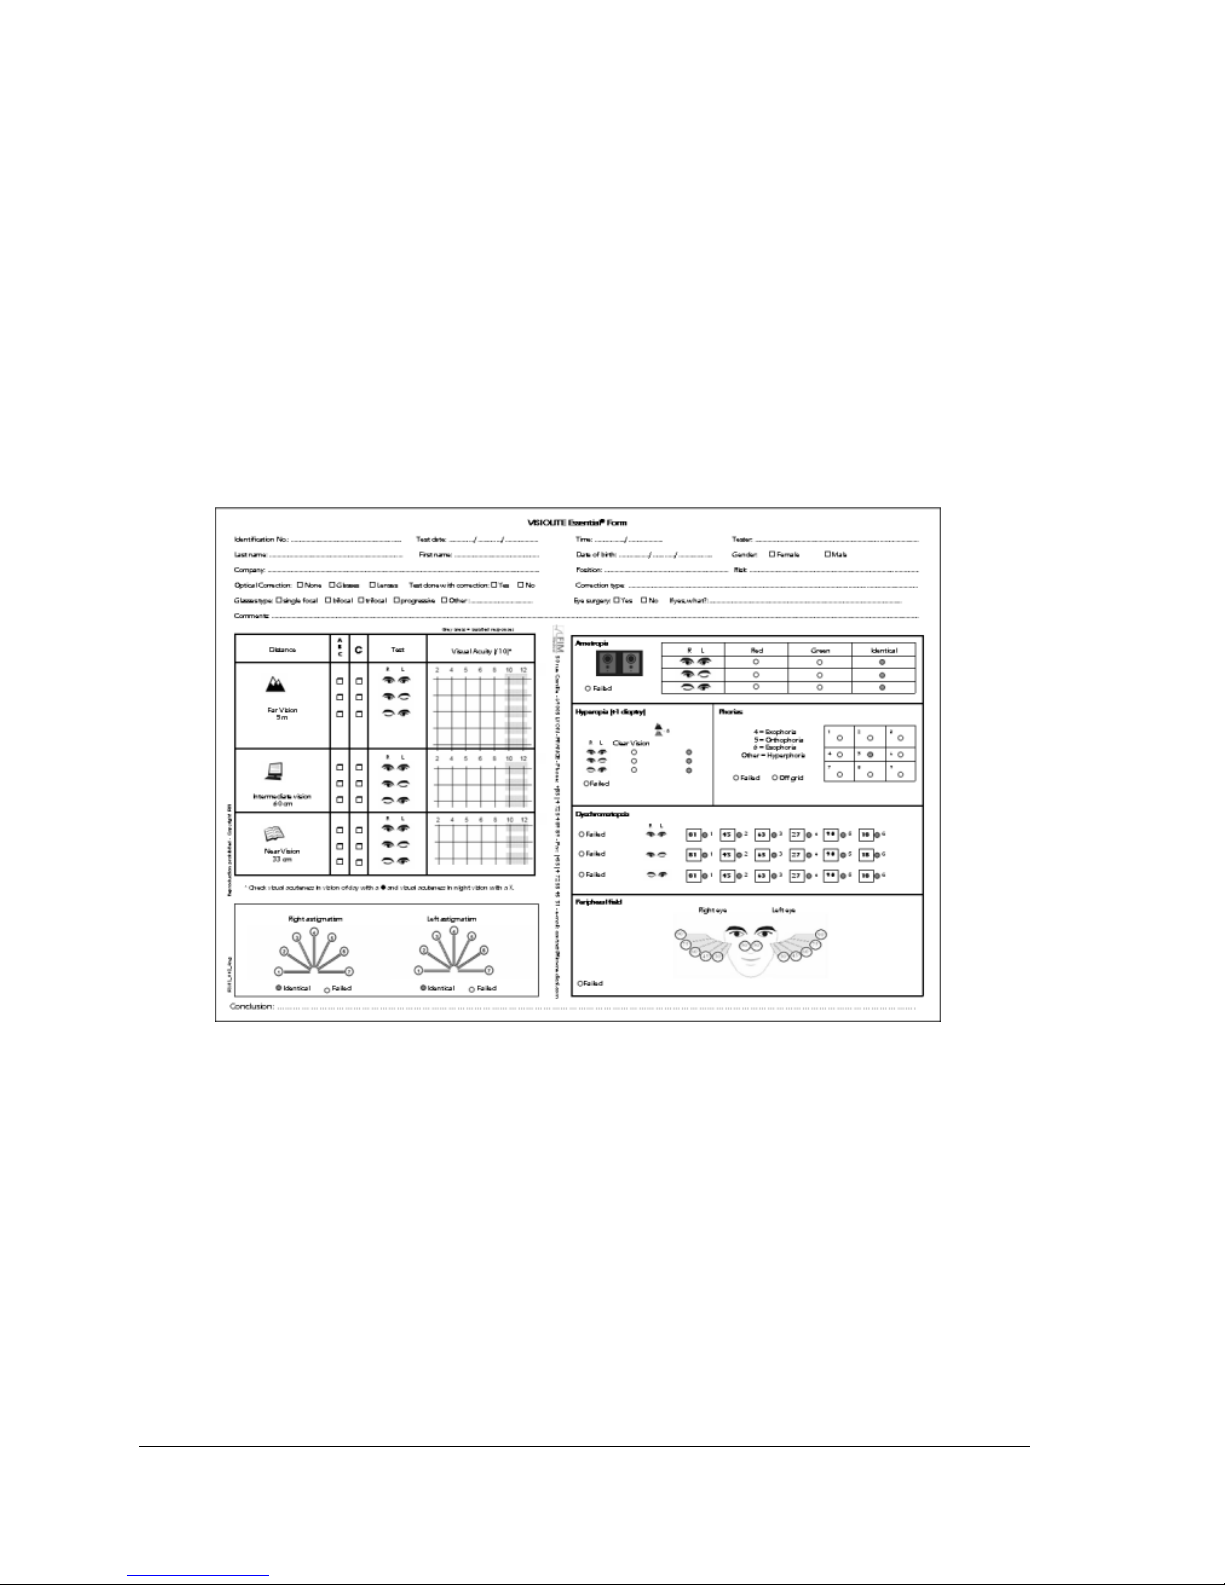
4.4.8. Remote control response form
The form is required to note the results given by the patient. This is only supplied with the remote control, on
the CD-ROM supplied with the Visiolite®, and can be printed as required.
If a copy is given to the patient or a third party, photocopy the original.
The form is composed of three parts:
Patient identification
Doctor conclusions and comments
Tables or boxes to check according to patient response
Mode in progress
“MANUAL”
Right key / next
mode
Left key / previous
mode
Left key / previous
test
Right key / next
test
MANUAL
ABC BI Acuity
EXPERT
ABC BI Acuity
Page 46
Ce document est la propriété de la Société FIM MEDICAL. Il ne peut être reproduit ou communiqué sans son autorisation.
This document is the property of FIM MEDICAL. Its contents cannot be reproduced or divulged without the company's approval
Page 46 / 74
V04.02.00
March 2018
The grey areas on the response form indicate the optimum response but cannot in any case determine
normality or aptitude for a specific occupation or to perform a certain task. These areas cannot be used for an
individual’s interest or for discrimination purposes.
Only the conclusions of the doctor responsible, in conjunction with other medical expertise, can establish
aptitude. As this is a screening test, the results cannot in any case be used for medical treatment, pre-or postsurgical diagnosis, or for any sort of prescription.
The response form gives the operator the expected response, but also to adapt the questions to ask the patient,
depending on the type of test.
Page 47

Ce document est la propriété de la Société FIM MEDICAL. Il ne peut être reproduit ou communiqué sans son autorisation.
This document is the property of FIM MEDICAL. Its contents cannot be reproduced or divulged without the company's approval
Page 47 / 74
V04.02.00
March 2018
5. Tests Description
Page 48

Ce document est la propriété de la Société FIM MEDICAL. Il ne peut être reproduit ou communiqué sans son autorisation.
This document is the property of FIM MEDICAL. Its contents cannot be reproduced or divulged without the company's approval
Page 48 / 74
V04.02.00
March 2018
5.1. Visual acuity test
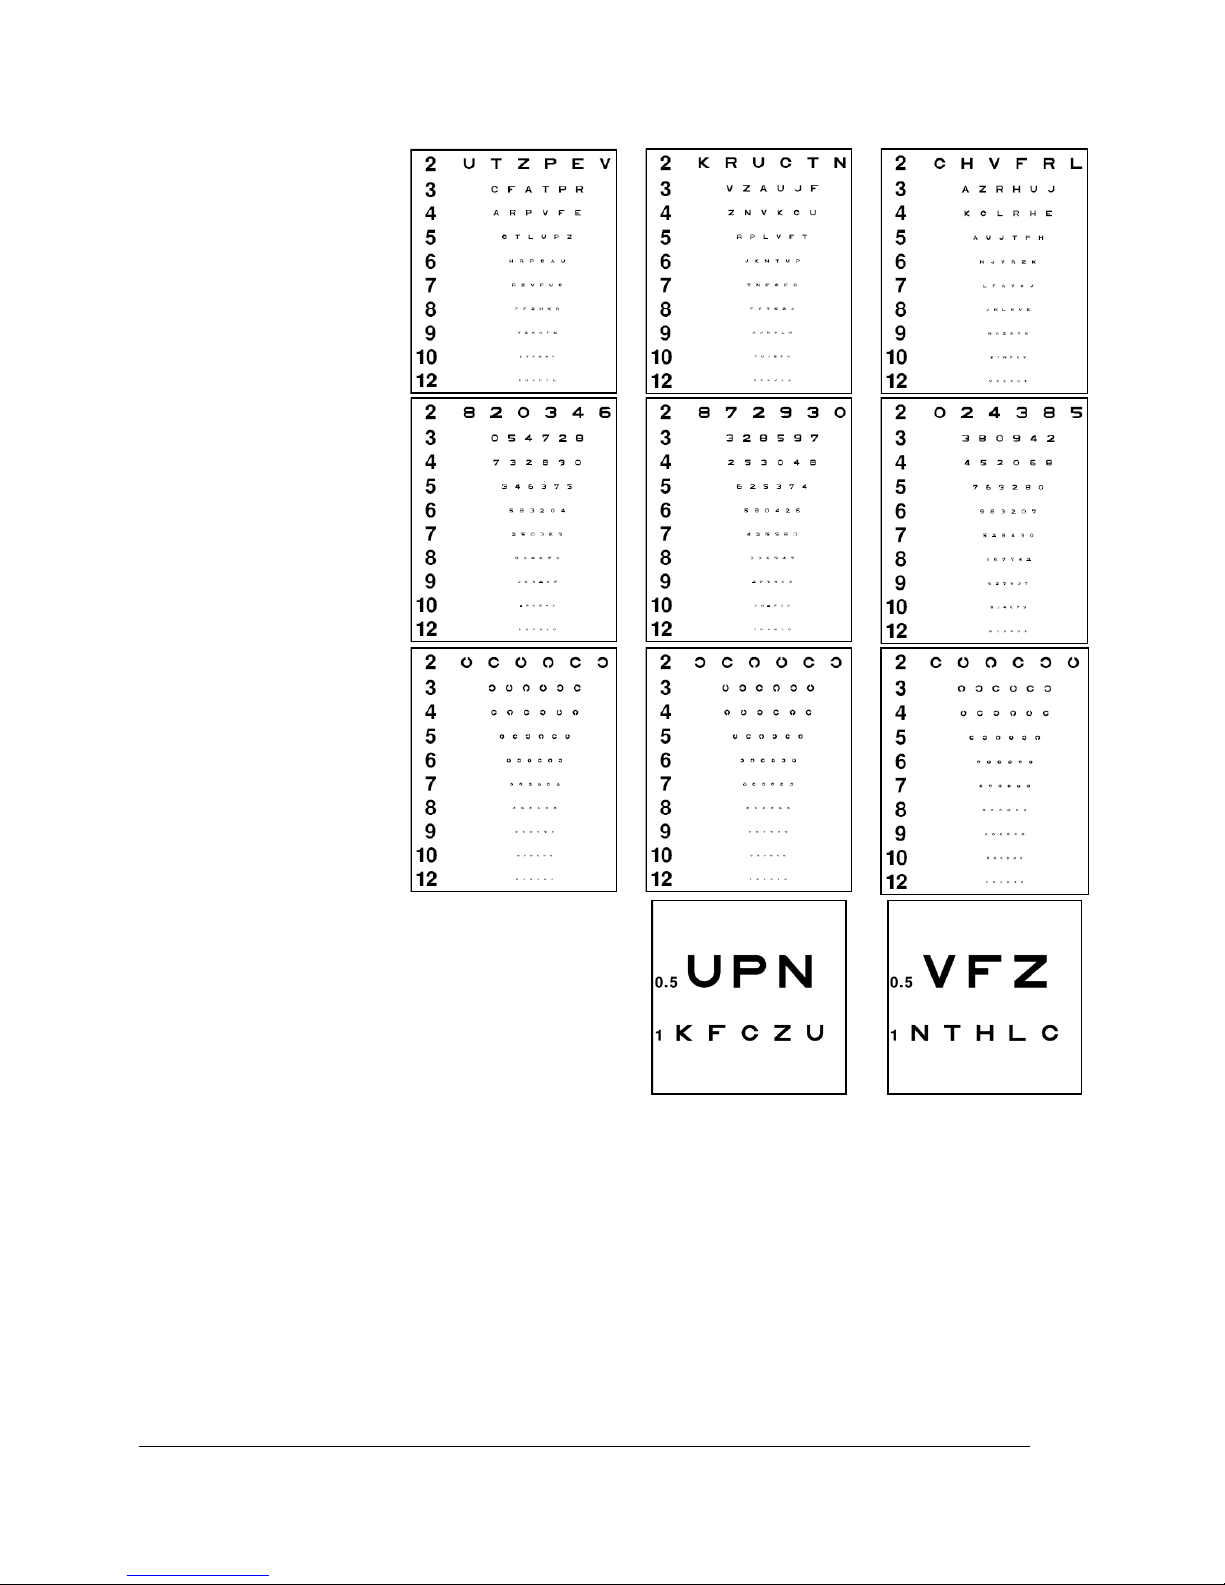
Visual acuity is a criterion for quality of vision; the power of the eye to distinguish detail.
Visual acuity is determined by the identification of black symbols on a white background, called optotypes.
The Visiolite® uses several different visual acuity charts that:
Vary the optotypes so as to avoid voluntary or involuntary memorisation
Test illiterate persons
Test persons who only recognise numbers
Test morphoscopic vision (recognition of shapes)
Test the power of separation (recognition of a detail)
Test low vision (less than 1/10th)
Different charts test binocular and monocular vision.
The choice and shape of symbols is rigorously defined to increase efficiency of optotype identification.
An acuity test, or chart, contains several levels of visual acuity (several lines).
A level of visual acuity is represented by 6 distinct optotypes grouped on the same line.
The different levels of acuity presented constitute the acuity scale.
A number corresponding to the level of visual acuity expressed in tenths: 2, 3, 4, 5, 6, 7, 8, 9, 10, 12 (depending
on the equipment) is represented on the left of each line
.
A level of visual acuity is validated when 4 of the 6 optotypes of this acuity are correctly identified.
Page 49
Ce document est la propriété de la Société FIM MEDICAL. Il ne peut être reproduit ou communiqué sans son autorisation.
This document is the property of FIM MEDICAL. Its contents cannot be reproduced or divulged without the company's approval
Page 49 / 74
V04.02.00
March 2018
Binocular Acuity
Monocular Acuity 1
Monocular Acuity 2
Letters
Numbers
Landolt
Low vision
Specific aptitude
test for vehicle
driving
Page 50
Ce document est la propriété de la Société FIM MEDICAL. Il ne peut être reproduit ou communiqué sans son autorisation.
This document is the property of FIM MEDICAL. Its contents cannot be reproduced or divulged without the company's approval
Page 50 / 74
V04.02.00
March 2018
5.2. Contrast sensitivity test
Contrast sensitivity test
5.2.1. Purpose
Demonstrates a decrease in contrast sensitivity. Contrast sensitivity is typically a retinal function and a
decrease can indicate an alteration of the retina. It is also decreased in certain diseases such as cataracts
and chronic glaucoma.
Decrease in contrast sensitivity is physiological in night vision.
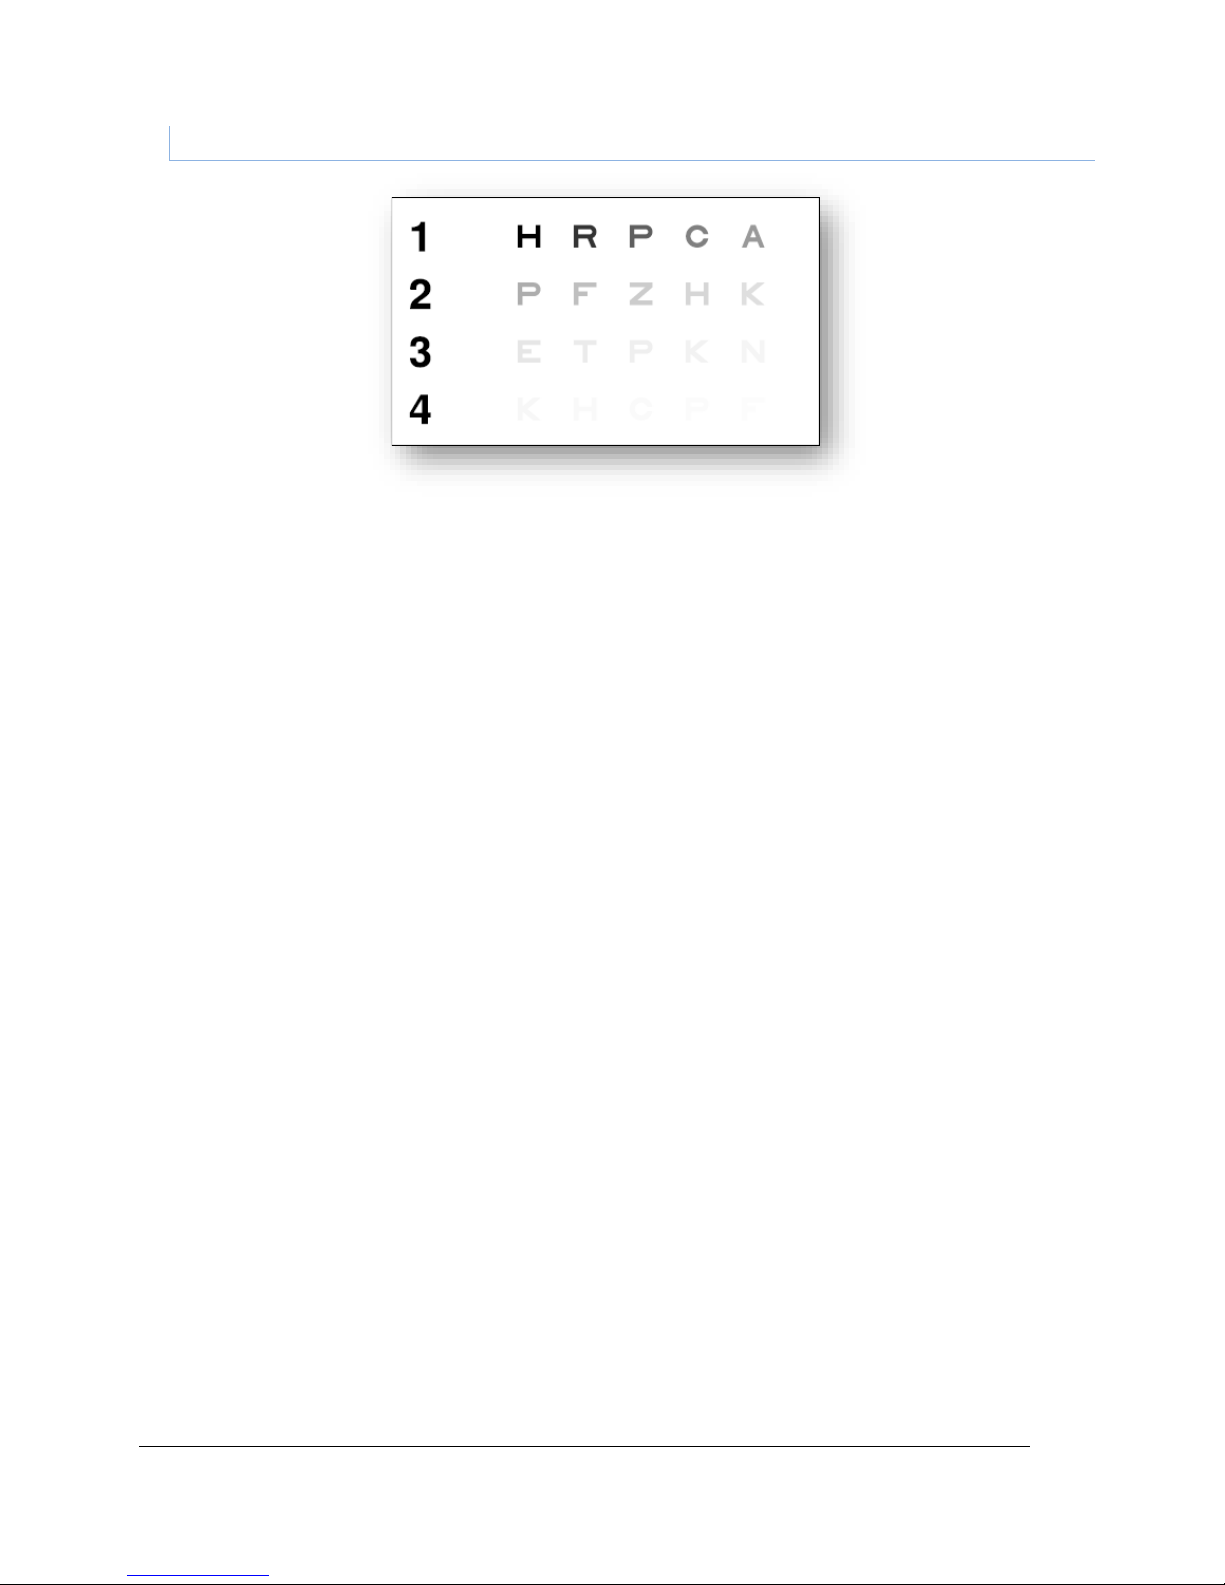
The acuity level of this test is constant (3.2 /10). Only the contrast decreases with each letter, from 100
to 1.2 %.
5.2.2. Patient instructions
“From the first line, read all the letters”.
Check the response
Page 51
Ce document est la propriété de la Société FIM MEDICAL. Il ne peut être reproduit ou communiqué sans son autorisation.
This document is the property of FIM MEDICAL. Its contents cannot be reproduced or divulged without the company's approval
Page 51 / 74
V04.02.00
March 2018
5.3. Duochrome test
Red Green
5.3.1. Purpose
Demonstrates a deficiency of far, intermediate or near vision.
5.3.2. Definition
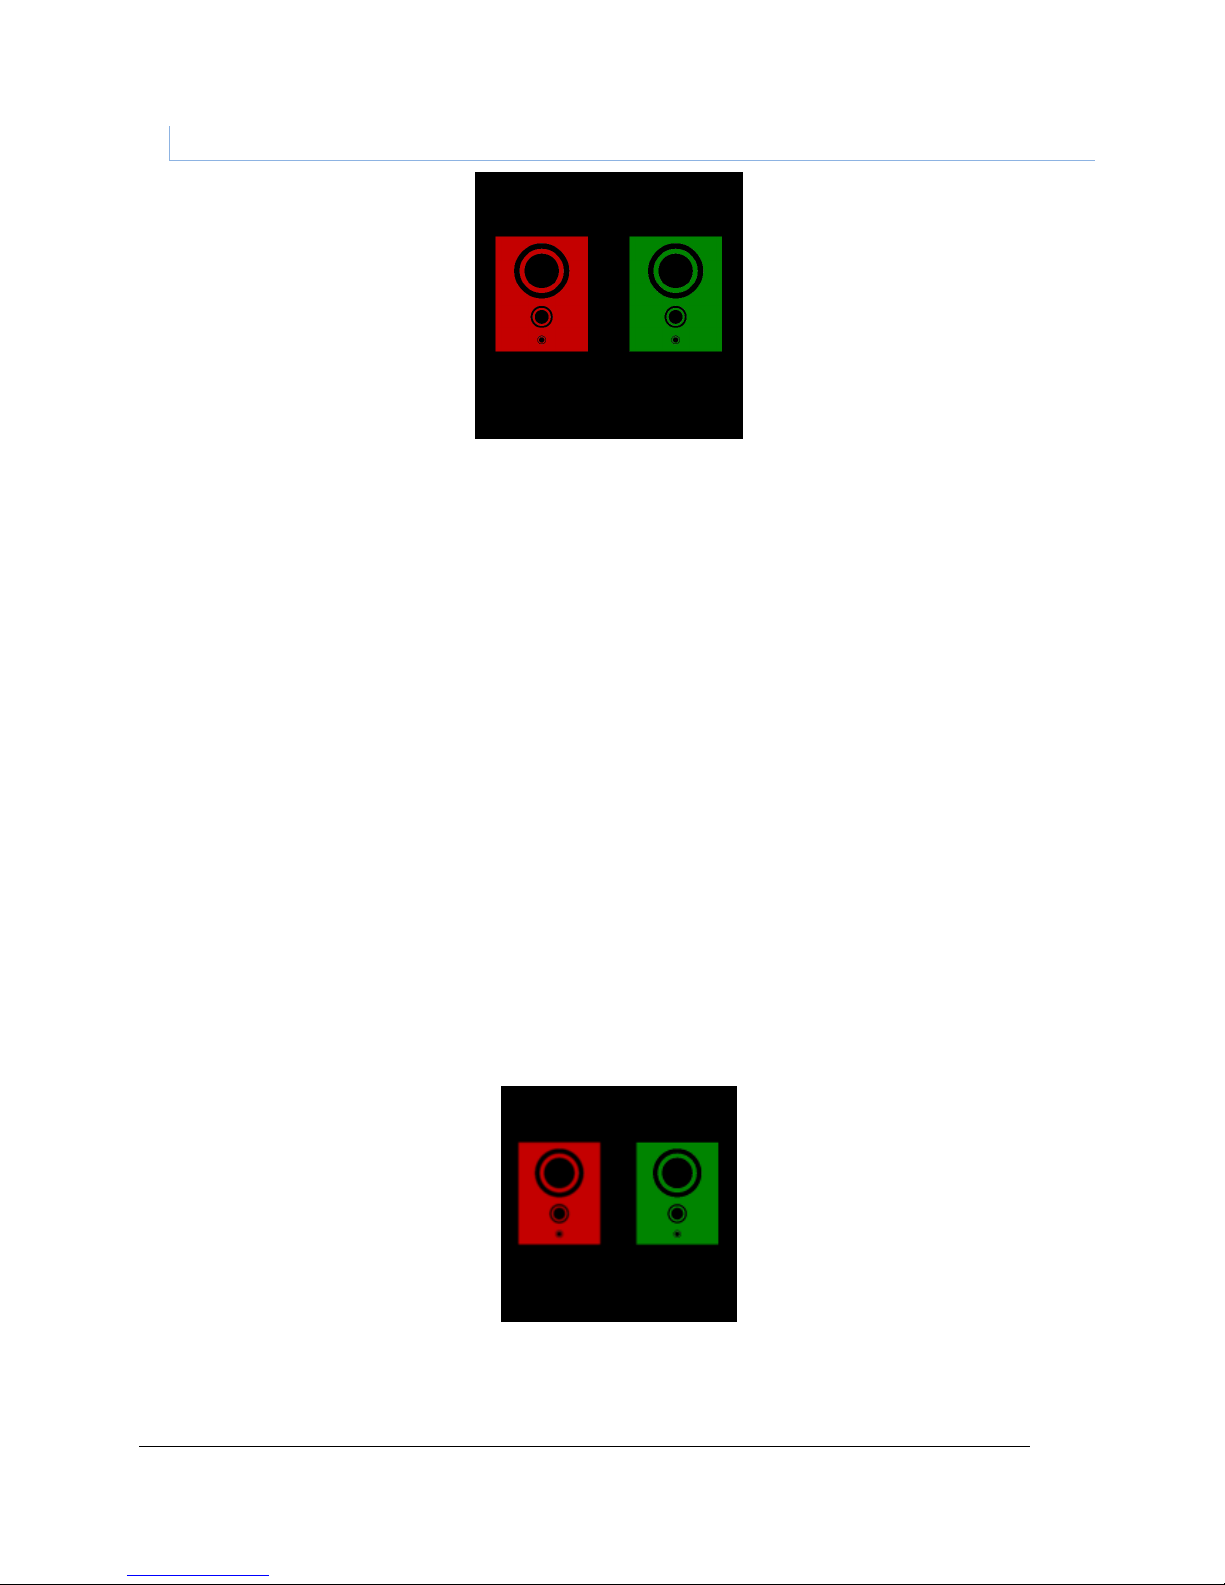
Black shapes are presented on both red and green backgrounds.
Clearer vision (or blacker) on a red or green background indicates ametropia.
5.3.3. Patient instructions
“Are the black circles clearer, or blacker, in the green or the red, or are they the same?”
Note the response on the response form.
5.3.4. Expected responses
Similar perception on both backgrounds indicates normal far vision
Clearer, or blacker, vision on the red background indicates a myopic tendency
Clearer, or blacker, vision on the green background indicates a hyperopic tendency or presbyopia of
near vision. If this is noted with far vision, a hyperopia test is indicated
5.3.5. Perception example
Page 52

Ce document est la propriété de la Société FIM MEDICAL. Il ne peut être reproduit ou communiqué sans son autorisation.
This document is the property of FIM MEDICAL. Its contents cannot be reproduced or divulged without the company's approval
Page 52 / 74
V04.02.00
March 2018
5.4. Astigmatism test
5.4.1. Purpose
Astigmatism is an important source of eye strain, particularly in intense conditions or poor lighting (screen work
or night driving with glare from oncoming vehicle lights).
5.4.2. Definition
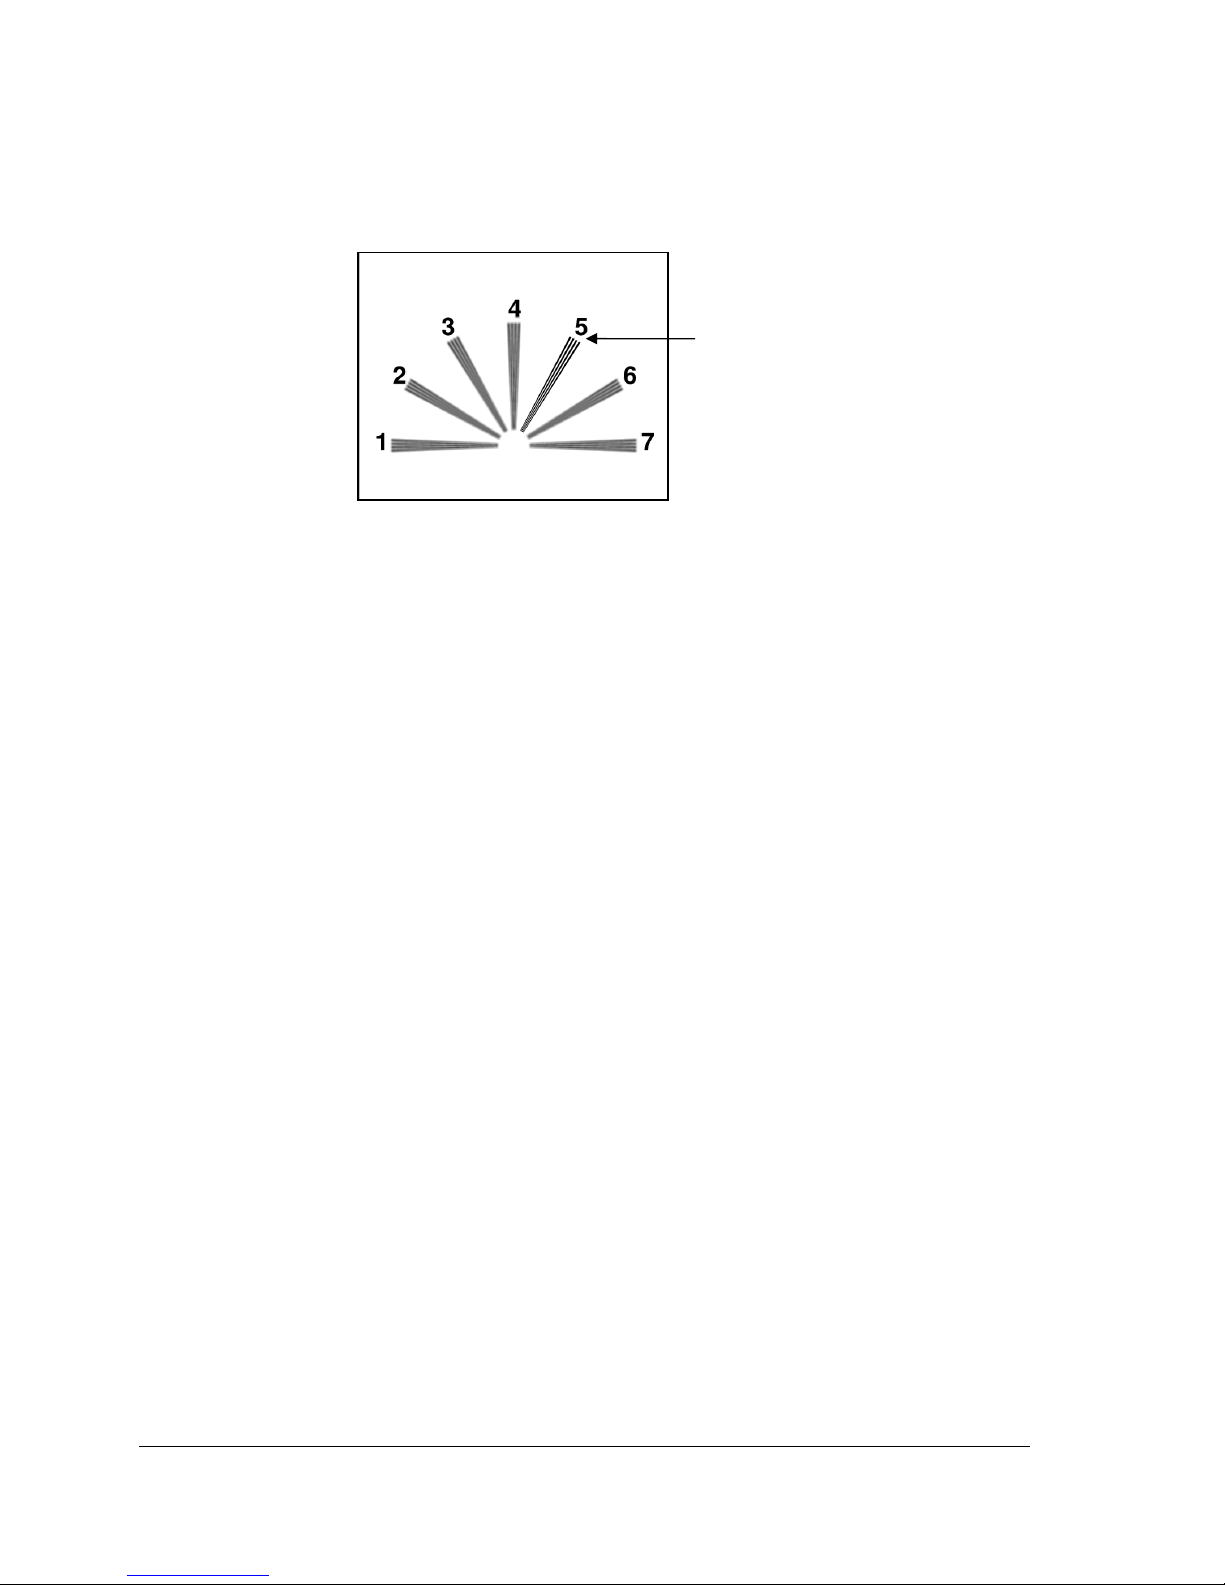
The astigmatism test is composed of an astigmatic dial with 7 branches numbered from 1 to 7.
5.4.3. Prerequisite
This test should be performed in monocular mode.
The operator should look at each of the branches consecutively.
5.4.4. Patient instructions
Are some of the lines blacker or clearer?”
Note the responses on the response form.
5.4.5. Expected responses
If the patient perceives some branches less clear, or greyer, than others, the eye is probably astigmatic.
Normally all the branches should be perceived in the same way. A branch that is clearer in direction 4 indicates
vertical or direct astigmatism. On the contrary, if the branches are clearer in directions 1 and 7, this indicates
horizontal or inverse astigmatism. These directions indicate different optical strength in the particular meridian,
as the corneal astigmatism is toric, rather than perfectly spherical.
A ‘clearer in directions 1, 4 and 7’ response is thus impossible, and the Visiolite® operator is alerted by a
question mark. Generally, in these cases, after repeating the test with clear instructions, the response would be
interpreted as ‘identical’.
“Oblique” astigmatism also exists and is more difficult to correct, sometimes persisting despite correction. In
this case, the response would be given in either the 2 or 3 meridian, or the 5 and 6. A simultaneous response: 2,
3, 5, 6 is impossible.
Sometimes a meridian astigmatism is only detected by varying focal length. Astigmatism could thus be tested in
near vision, or after addition of the hyperopia lens in far vision. Of course, detection for astigmatism in near or
intermediate vision is useless, if it is present in far vision.
Lastly, this device only screens “regular” astigmatisms. Other, “irregular” astigmatisms, notably on corneal scars,
are screened by ophthalmologists.
Page 53
Ce document est la propriété de la Société FIM MEDICAL. Il ne peut être reproduit ou communiqué sans son autorisation.
This document is the property of FIM MEDICAL. Its contents cannot be reproduced or divulged without the company's approval
Page 53 / 74
V04.02.00
March 2018
5.4.6. Perception example
Branch seen more
clearly
Page 54
Ce document est la propriété de la Société FIM MEDICAL. Il ne peut être reproduit ou communiqué sans son autorisation.
This document is the property of FIM MEDICAL. Its contents cannot be reproduced or divulged without the company's approval
Page 54 / 74
V04.02.00
March 2018
5.5. Phorias test
5.5.1. Purpose
The phorias test checks parallelism of the ocular axes at physiological rest.
All phorias (heterophoria) translate as eye strain (asthenopia), notably in intense conditions (screen work).
Eventually heterophoria, coupled with fatigue, can become diplopia (double vision). This test is particularly
interesting for screening latent heterophorias.
5.5.2. Interpretation limits
This test is only significant when visual acuity in the right and left eyes is practically identical. This test cannot be
interpreted if there are large differences in acuity between the two eyes. In this case, the heterophoria would
not be due to eye strain, as the better eye takes over and becomes dominant.
5.5.3. Definition
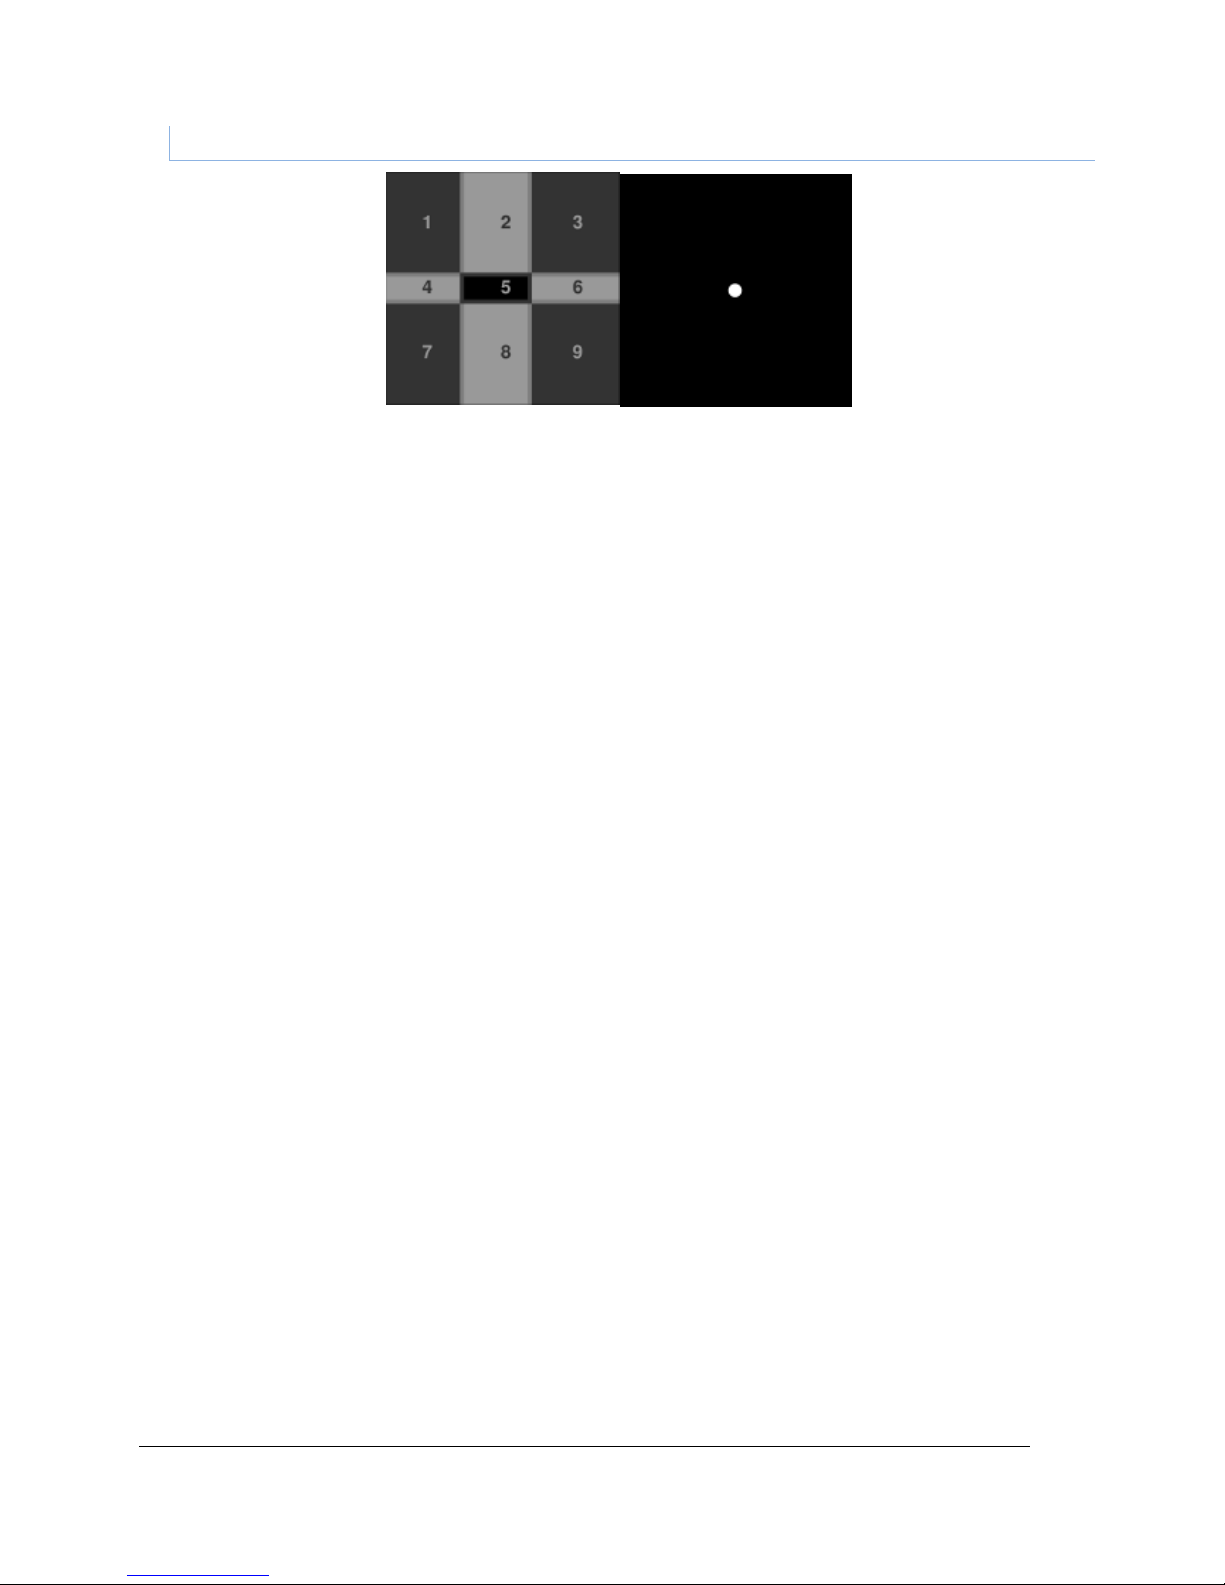
A grid containing 9 areas numbered from 1 to 9 is presented to the left eye, while a white dot is presented to
the right eye. Without neutralization of one of the images by the brain, the two images should superimpose.
Localization of the white dot on one of the numbered zones of the grid qualifies the type of phoria of the
patient:
5.5.4. Patient instructions
“In which direction is the dot moving?”
Note the area number on the response form.
5.5.5. Expected responses
The white dot is seen in:
Area 5: the ocular axes are parallel (orthophoria)
Area 4: the ocular axes have a tendency to diverge horizontally (exophoria)
Area 6: the ocular axes have a tendency to converge horizontally (esophoria)
Page 55
Ce document est la propriété de la Société FIM MEDICAL. Il ne peut être reproduit ou communiqué sans son autorisation.
This document is the property of FIM MEDICAL. Its contents cannot be reproduced or divulged without the company's approval
Page 55 / 74
V04.02.00
March 2018
Area 2 or 8: the ocular axes have a tendency to diverge vertically (hyperphoria)
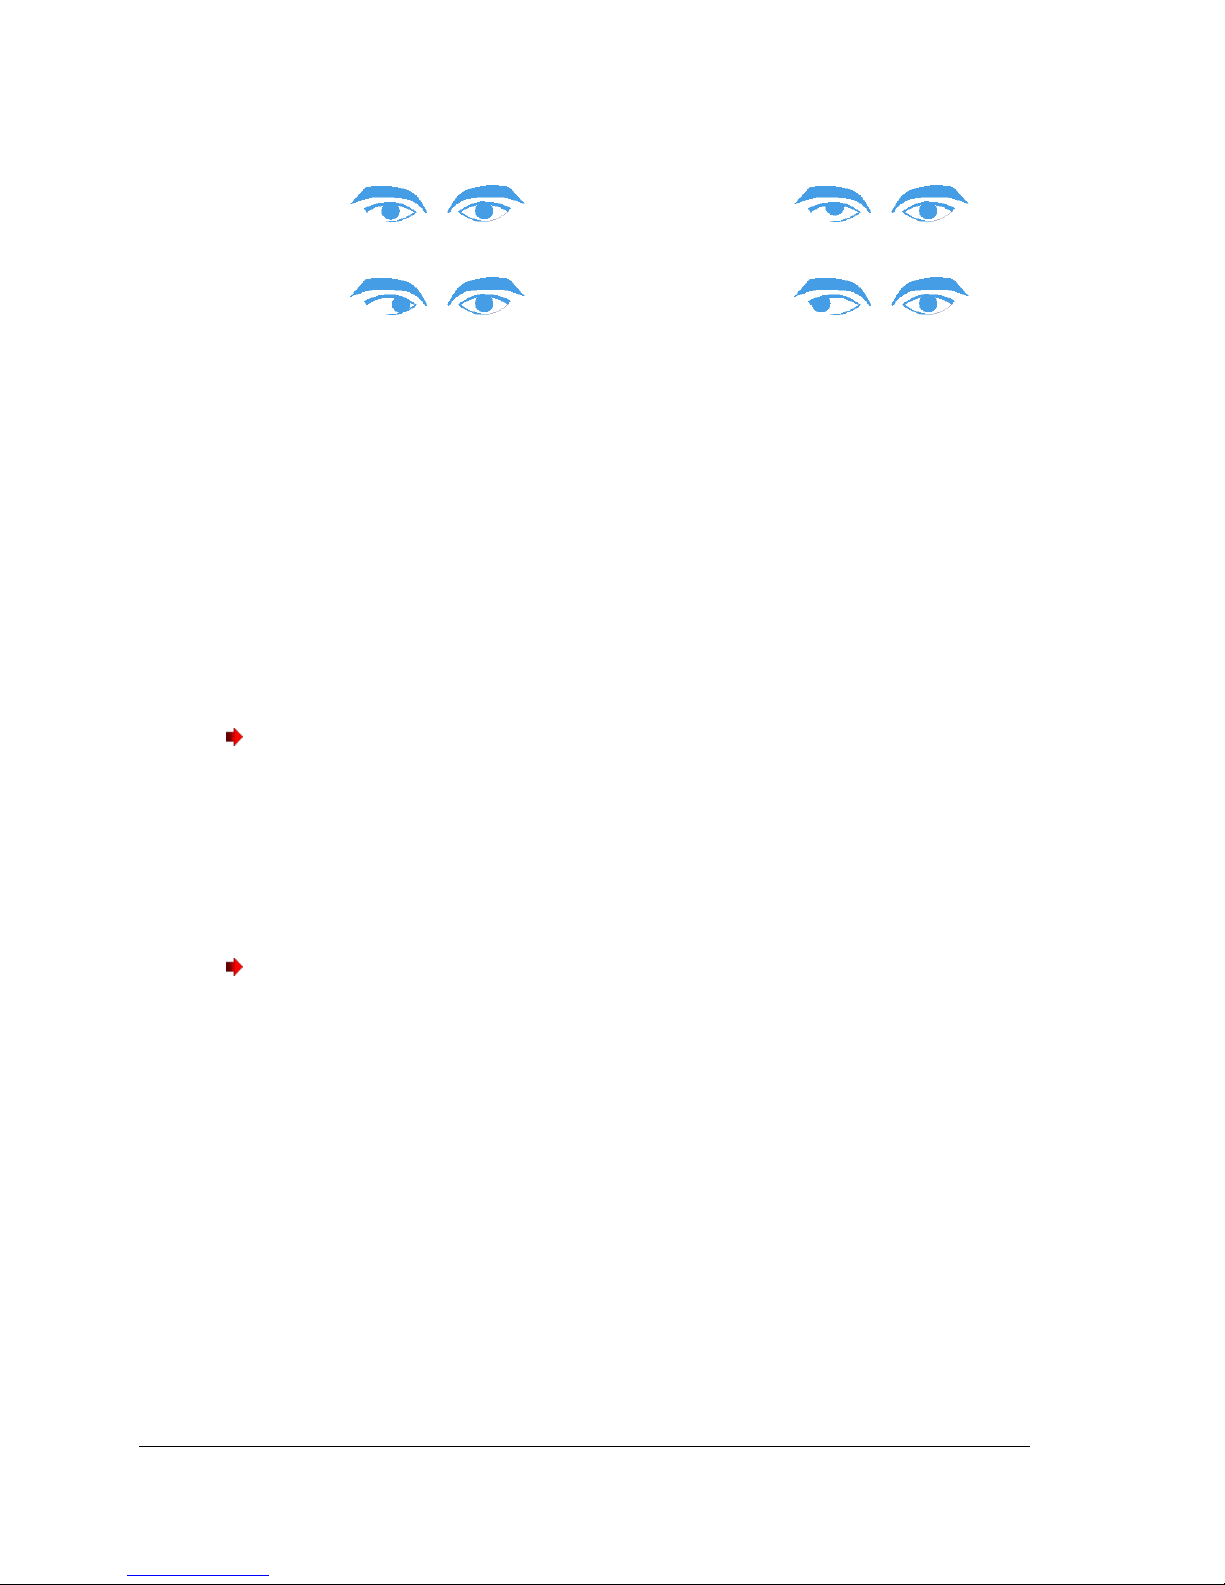
Orthophoria
Hyperphoria
Esophoria
Exophoria
If the white dot or the grid is not perceived, the brain has neutralised one of the images.
If the dot is perceived outside of the grid, the heterophoria is over 9 dioptres.
With this test, the Visiolite® can completely dissociate the two eyes, indirectly performing a well-known test, the
cover test, but more easily and accurately. As such, when the patient attempts to dissociate the dot and the
grid, their convergence function will be used. The dot will move in the opposite direction to that of the
heterophoria. This direction is noted.
The yellow arrows can be used to
(1)
: drag-and-drop the arrow in the grid. A right-pointing arrow indicates initial
movement of the dot (and thus of the eyeball) from inside to out— ESOPHORIA. A left-pointing arrow indicates
initial movement of the dot from outside to inside— EXOPHORIA.
Caution
Dot movement is often fleeting, or non-existent (orthophoria): the questions should prepare the patient to
indicate the movements of the dot in relation to the grid as soon as the test is presented and before the dot
comes to rest
(2)
.
To render this test more sensitive, the Visiolite® presents the grid and the dot successively, with a slight time
difference.
Caution
This test cannot be interpreted if there is an important difference between the two eyes. Also, ensure the
patient does not close an eye during the test.
(1)Tick “dynamic phorias” option in the set-up parameters so that the arrows appear.
(2)When the dot does not move, simply click on the area where it is seen in the grid.
Page 56
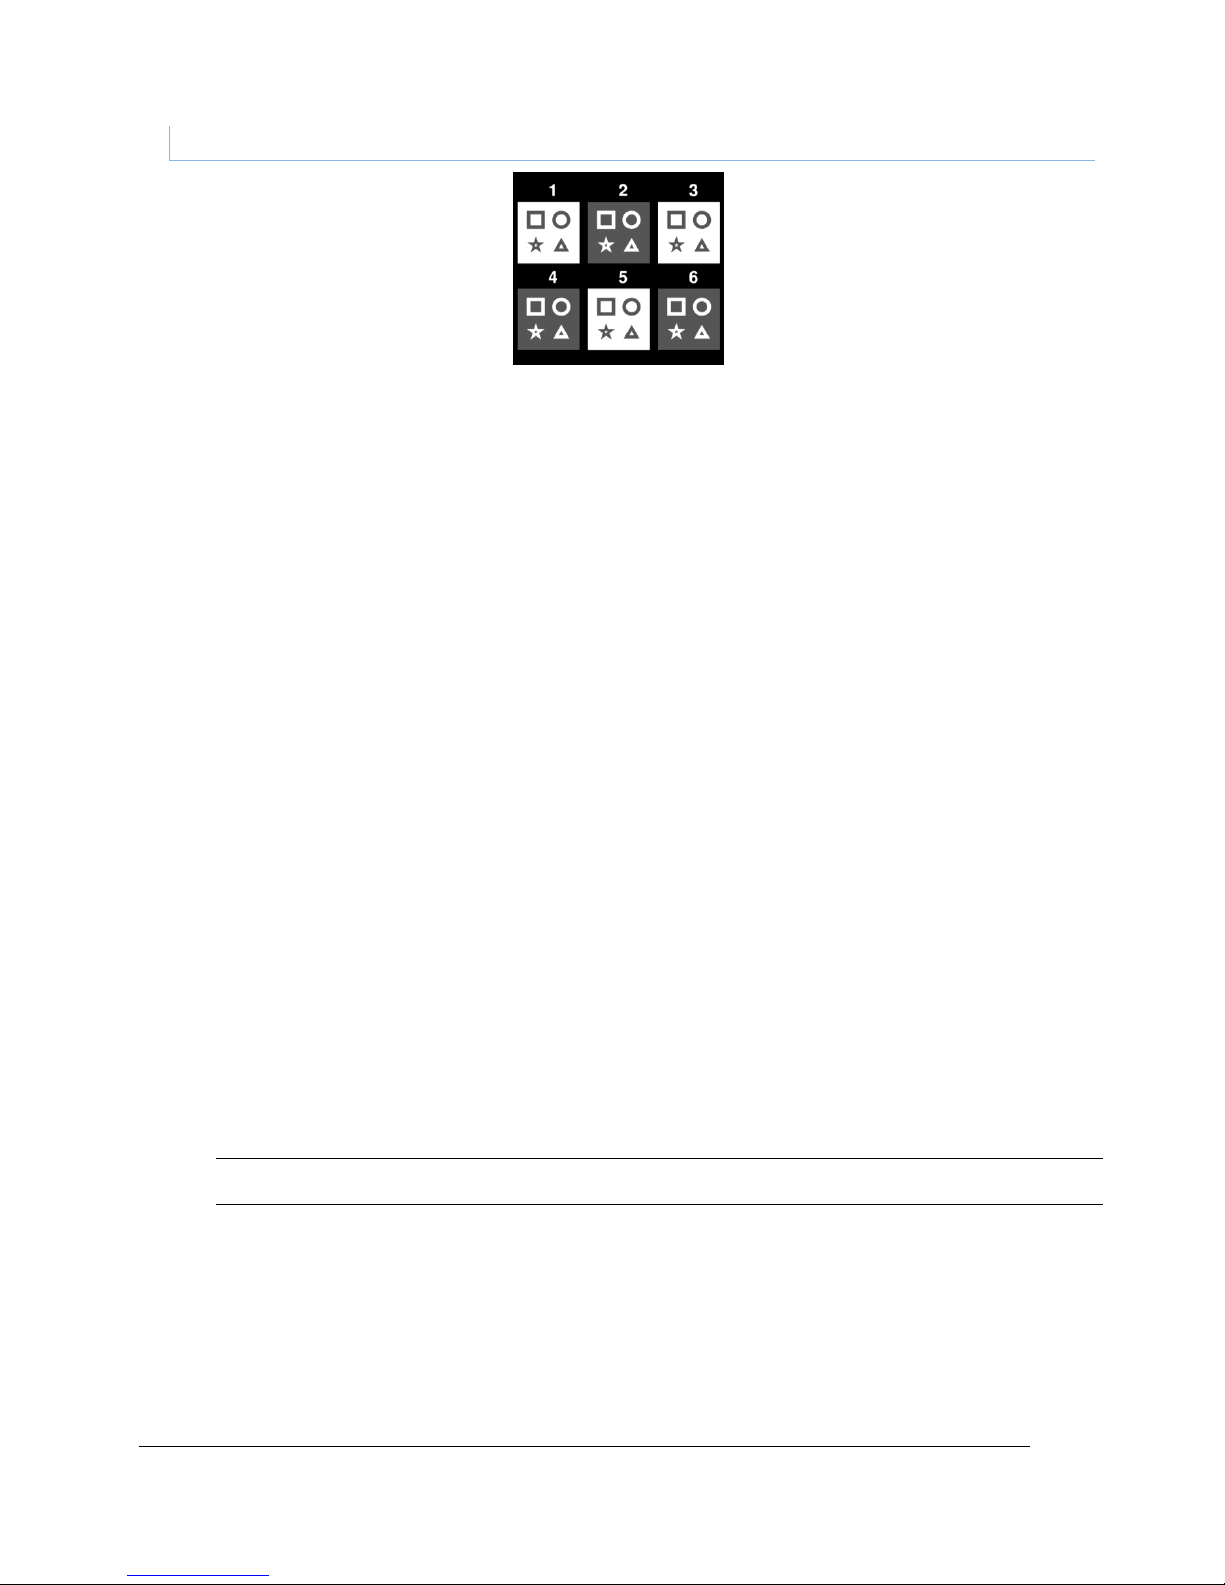
Ce document est la propriété de la Société FIM MEDICAL. Il ne peut être reproduit ou communiqué sans son autorisation.
This document is the property of FIM MEDICAL. Its contents cannot be reproduced or divulged without the company's approval
Page 56 / 74
V04.02.00
March 2018
5.6. Depth perception test
5.6.1. Purpose
To qualify depth perception acuity.
This test can be useful, for example, for forklift operators who require precise docking of loads, or for
perception of distances in vehicle driving.
5.6.2. Interpretation limits
Depth perception results from the brain integrating two slightly differently-positioned images. This test is only
possible if both eyes have identical, or nearly identical, visual acuity and normal convergence (at least normal
fusion). This test is impossible when there is an important difference in acuity between the two eyes, or
disparity of fixation. However, total absence of depth perception acuity cannot be deduced so easily.
Physiologically, even with low acuity in one eye, even to the point of simple light perception, and normal acuity
in the other eye, depth perception vision is made through cerebral compensation. In theory, only one-eyed
individuals cannot have depth perception vision.
5.6.3. Definition
Depth perception is screened with 6 separate, numbered boxes. Each box contains 4 shapes: a square, a circle, a
star and a triangle.
For each box, one of the shapes has a binocular horizontal disparity, expressed in arcseconds (1 arcsecond =
1°/3600). This causes a stereoscopic parallax in relation to the three other shapes in the box. Consequently, this
shape should be perceived by the patient in front of, or behind, the three other shapes. The value of binocular
disparity is different for each box: large for the first box and decreasing by half for each consecutive box.
Normal depth perception acuity should perceive the disparities of all the tests.
Box
1 2 3 4 5
6
Disparity
(in arcseconds)
1600"
800"
400"
200"
100"
50"
Expected responses
Triangle
Circle
Star
Square
Star
Circle
5.6.4. Patient instructions
“Certain shapes seem to be behind or in front of the others; give the answer for groups 1 to 6”.
Note responses on the response form.
Page 57
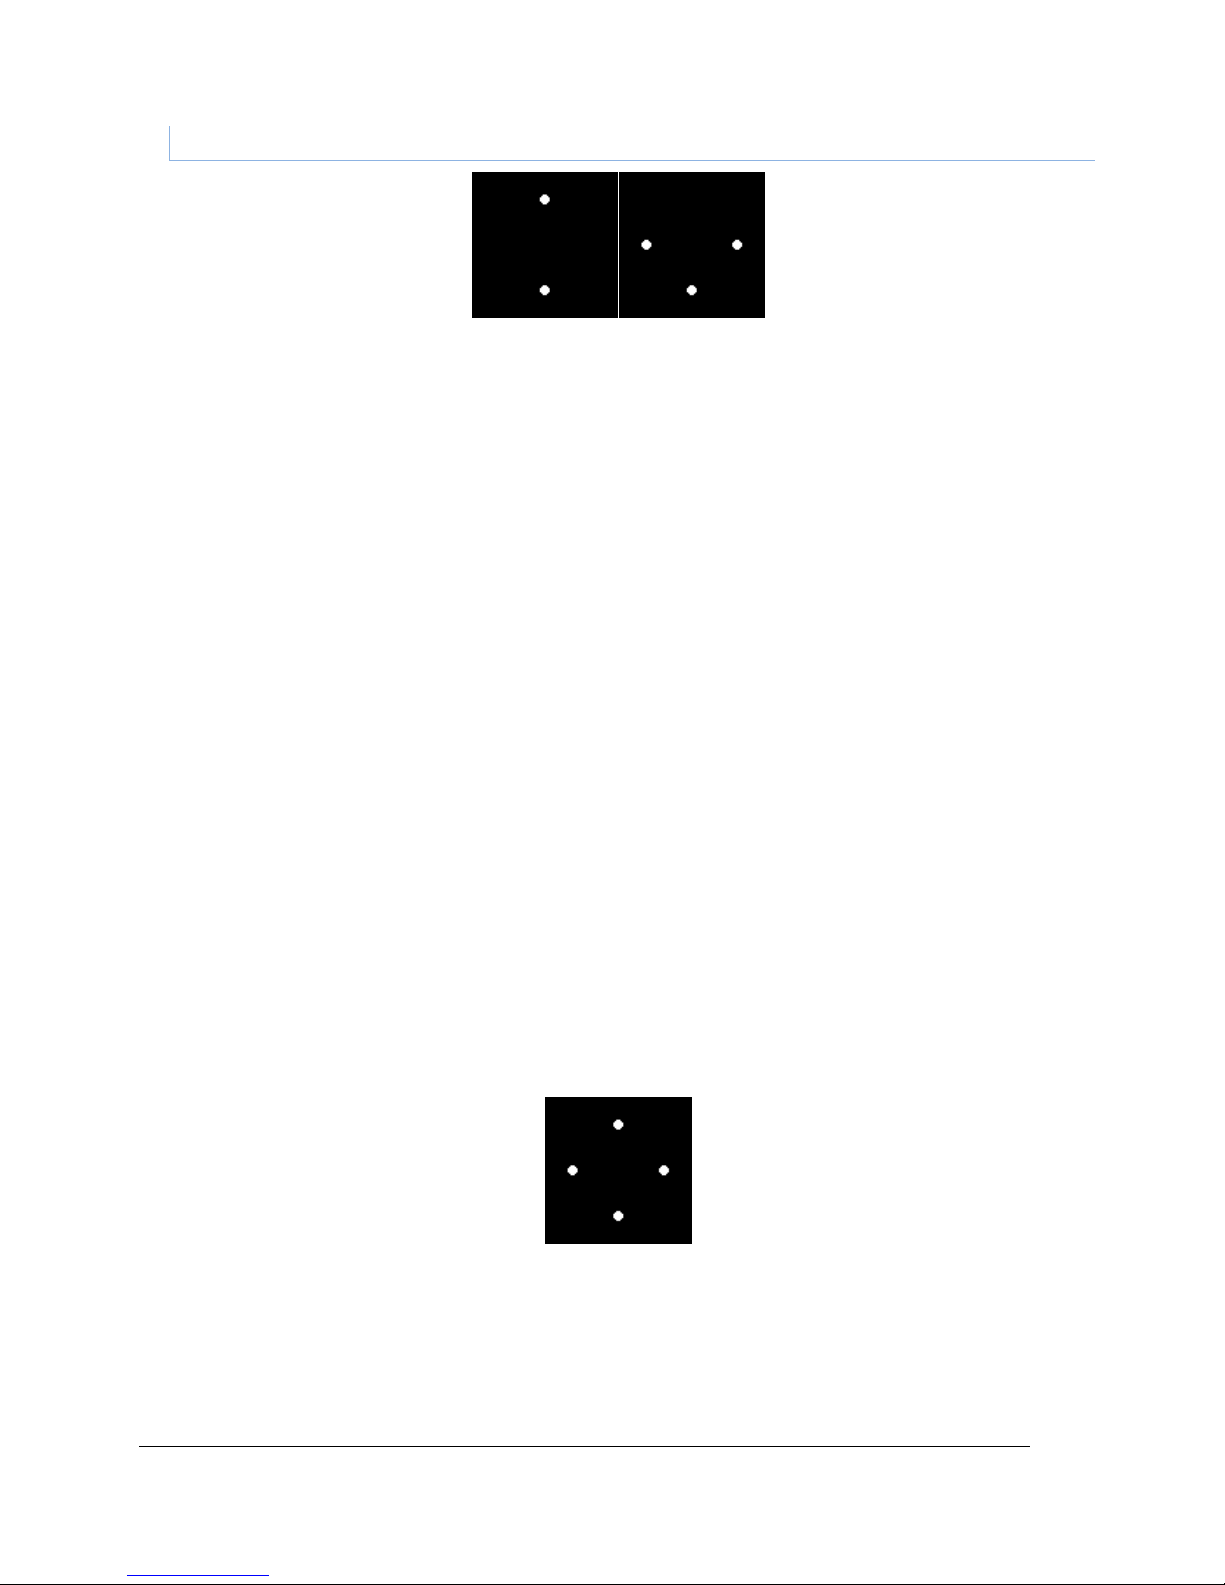
Ce document est la propriété de la Société FIM MEDICAL. Il ne peut être reproduit ou communiqué sans son autorisation.
This document is the property of FIM MEDICAL. Its contents cannot be reproduced or divulged without the company's approval
Page 57 / 74
V04.02.00
March 2018
5.7. Fusion test
5.7.1. Purpose
To check binocular vision.
Fusion is the ultimate phase in binocular vision. As for phorias, fusion requires good visual acuity in each eye. In
the case of phoria anomaly, fusion can be obtained by stimulating the oculomotor muscles, which will correct
the phorias. Failure of this test signifies anatomical impossibility of convergence, which is found in extreme
cases of strabismus.
A fusion problem (which can range from fixation disparity to suppression of one of the two images) can be an
important source of eye strain during screen work. The patient should see four dots for the test to be successful.
5.7.2. Definition
A group of white dots is presented to the patient with different patterns for each eye.
5.7.3. Patient instructions
“How many white dots can you see?”
Note the response on the response form.
5.7.4. Expected responses
4 points perceived indicates fusion: t he brain correctly superimposes the two images
coming from eac h of the eyes
2 point s perceive d indicates suppression : the brain neu tralises the image coming from the
right eye
3 point s perceive d indicates suppression : the brain neu tralises the image coming from the
left eye
5 points perceived indicates diplopia : the brain is unable to correctly superimpose the two
images coming f rom each eye
Normal perception
Page 58
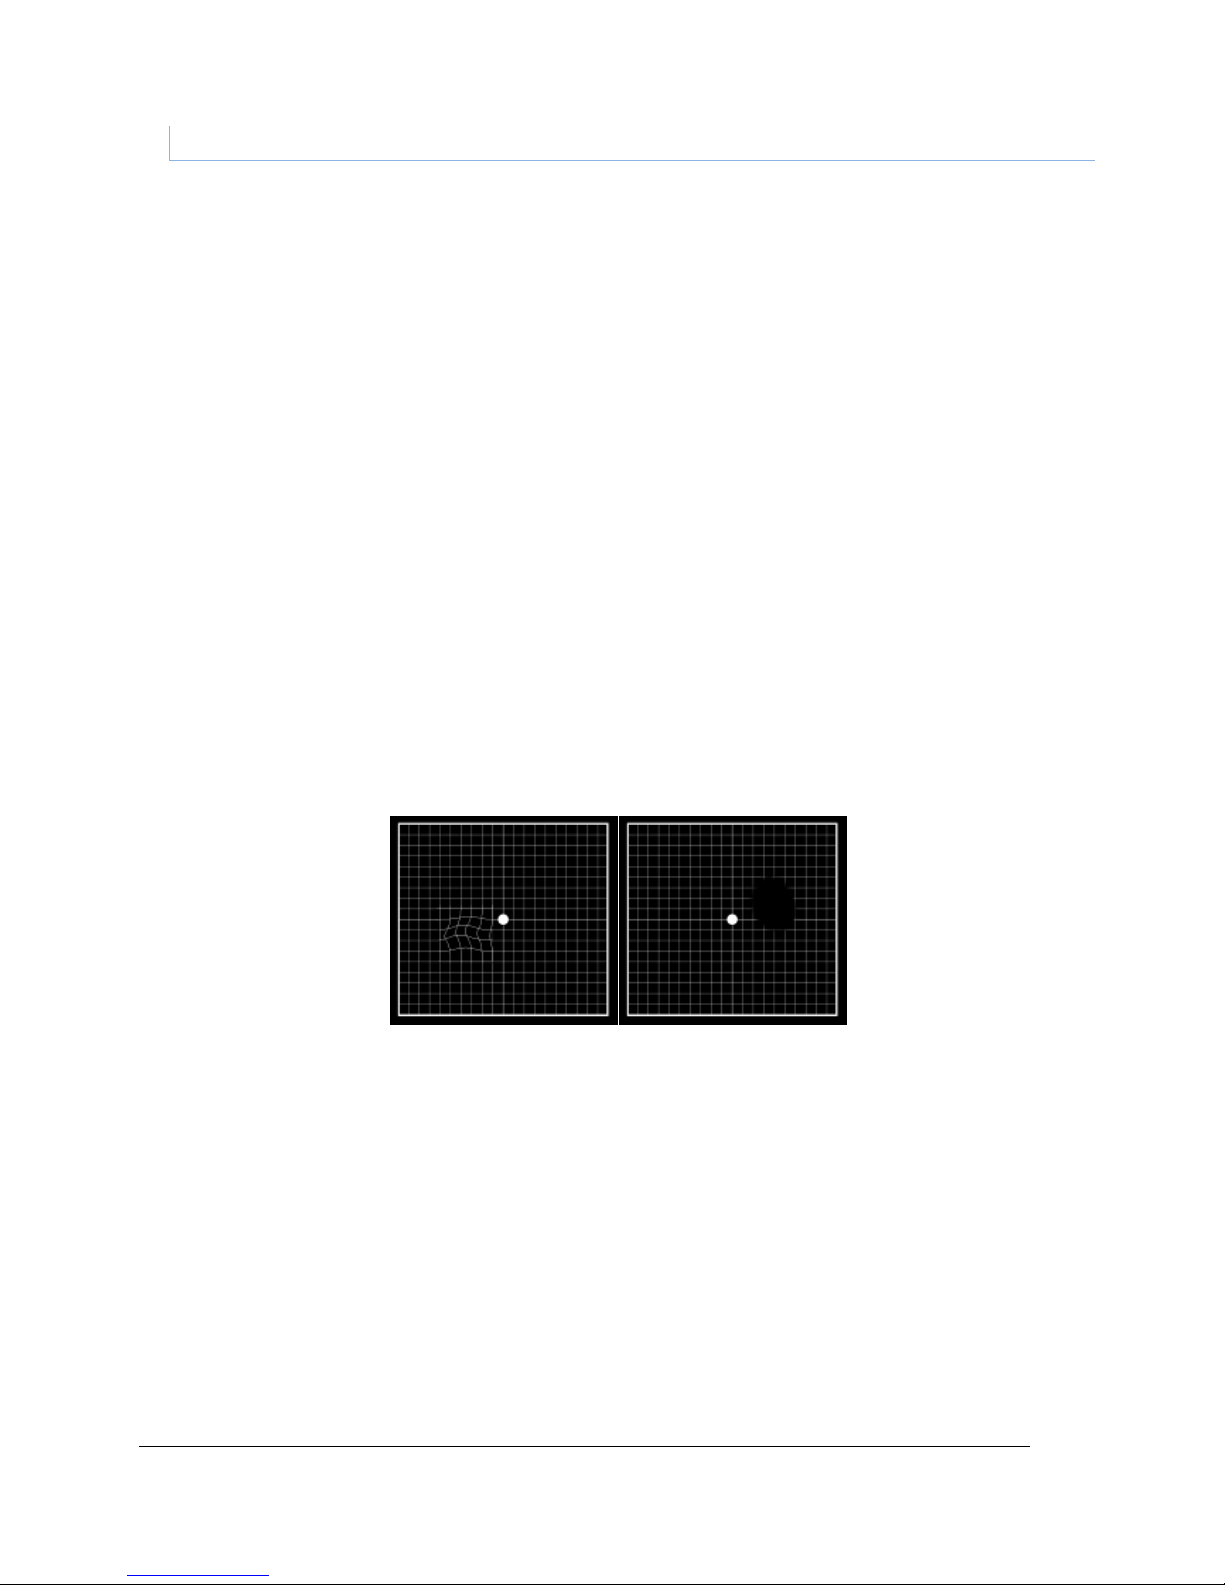
Ce document est la propriété de la Société FIM MEDICAL. Il ne peut être reproduit ou communiqué sans son autorisation.
This document is the property of FIM MEDICAL. Its contents cannot be reproduced or divulged without the company's approval
Page 58 / 74
V04.02.00
March 2018
5.8. Age-related macular degeneration (ARMD) / Amsler grid
5.8.1. Purpose
Screening for central visual field deficiency.
5.8.2. Definition
The test is composed of a grid on a black background with a central white dot.
The user should focus on the central white dot.
5.8.3. Prerequisite
This test must be performed in monocular mode.
5.8.4. Patient instructions
“Are the horizontal and vertical lines perfectly straight?”
“Are any of the areas deformed?”
“Do any holes or black areas appear inside the grid?”
Note the response on the response form.
5.8.5. Expected responses
Distortion of lines, or metamorphopsia, could be associated with age-related macular degeneration
An area in which the lines disappear is associated with macular scotoma (blind spot)
5.8.6. Perception examples
Page 59

Ce document est la propriété de la Société FIM MEDICAL. Il ne peut être reproduit ou communiqué sans son autorisation.
This document is the property of FIM MEDICAL. Its contents cannot be reproduced or divulged without the company's approval
Page 59 / 74
V04.02.00
March 2018
5.9. Colour perception test
5.9.1. Purpose
Chromatic deficiency screening. As well as exploration of congenital dyschromatopsias (as in the Ishihara-type
tables), this test offers the possibility of exploring acquired dyschromatopsias.
These tests are particular in that they screen problems of colour vision in shaded areas and in the blue-yellow
axis. These areas are not explored with the classical Ishihara test, which only explores the red-green axis,
essentially affected in congenital deficiencies of colour vision.
The blue-yellow axis is predominantly affected in acquired dyschromatopsias, in particular those of toxic origin,
of which this is an early sign. Moreover, this test is more sensitive due to the presentation of shades of colours
close to neutral, allowing for device luminosity, calibrated for this type of test (high photopic mode).
5.9.2. Definition
The test presented is a pseudo-isochromatic of the Ishihara type.
Colour perception is checked using 6 distinctly numbered boxes.
Each box, or plate is composed of a matrix of dots of variable height, shade and colour.
Areas of similarly-colored dots are defined to form numbers. A number composed of two digits appears in each
box. Colours are chosen so that an abnormality in the perception of colours makes it difficult to recognise
certain numbers.
The total tests present 12 lines of chromatic confusion in the three axes:
Protan (red)
Deutan (green)
Tritan ( blue-yellow)
In all the six numbers presented, each number indicates a line of confusion.
E.g: within the number 81, failure to recognise the digit 8 indicates a tritan (blue) type deficiency, characteristic
when the cones of the superficial layer of the retina are affected.
Failure to recognise the digit 1 indicates a deficiency of the deutan (green) type, which may be seen when the
deep layers of the cones of the retina are affected, as the “4” of 45 tends to indicate a deficiency of the protan
(red) type, when the same deep layers are affected.
These screening findings are summarized in the table on the following page.
5.9.3. Prerequisite
This test should be performed in high photopic mode. However, if the patient tested is blinded (blue-eyed
people are subject), it can be performed in medium photopic mode, but never in low photopic mode.
Important note
Page 60
Ce document est la propriété de la Société FIM MEDICAL. Il ne peut être reproduit ou communiqué sans son autorisation.
This document is the property of FIM MEDICAL. Its contents cannot be reproduced or divulged without the company's approval
Page 60 / 74
V04.02.00
March 2018
The test should be performed in MONOCULAR vision. It requires acuity of at least 8/10. If acuity is lower, any
abnormality of colour vision should be confirmed in intermediate or near vision (if the patient has a better
acuity at these distances).
5.9.4. Patient instructions
“Read the colored numbers in each box”.
Note the response on the response form.
Reading grid expressed in terms of tendency:
Box 1
Box 2
Box 3
Box 4
Box 5
Box 6
8 1 4 5 6 3 2 7 9 0 1
8
tritan
deutan
protan
tritan
deutan
protan
tritan
deutan
protan
tritan
deutan
protan
5.9.5. Interpretation limits
Responses do not constitute a formal diagnosis, merely a trend.
All types of abnormality can be present in the same patient, each abnormality expressed more or less
completely.
As such, for example, expression of a protan type deficiency can range from a simple abnormality with
confusion of shades in the red-green axis (protanomaly) to complete blindness to the colour red (protanopsia).
Responses are expressed as tendencies and conclusions are not drawn on one test only.
Only the repetition of tests during successive examinations can confirm or invalidate this tendency, in particular
with exposure to solvents, or in the presence of a progressive pathology such as diabetes.
This test should be interpreted with caution in patients over 40 years of age, for who colour vision can be
altered normally.
Page 61
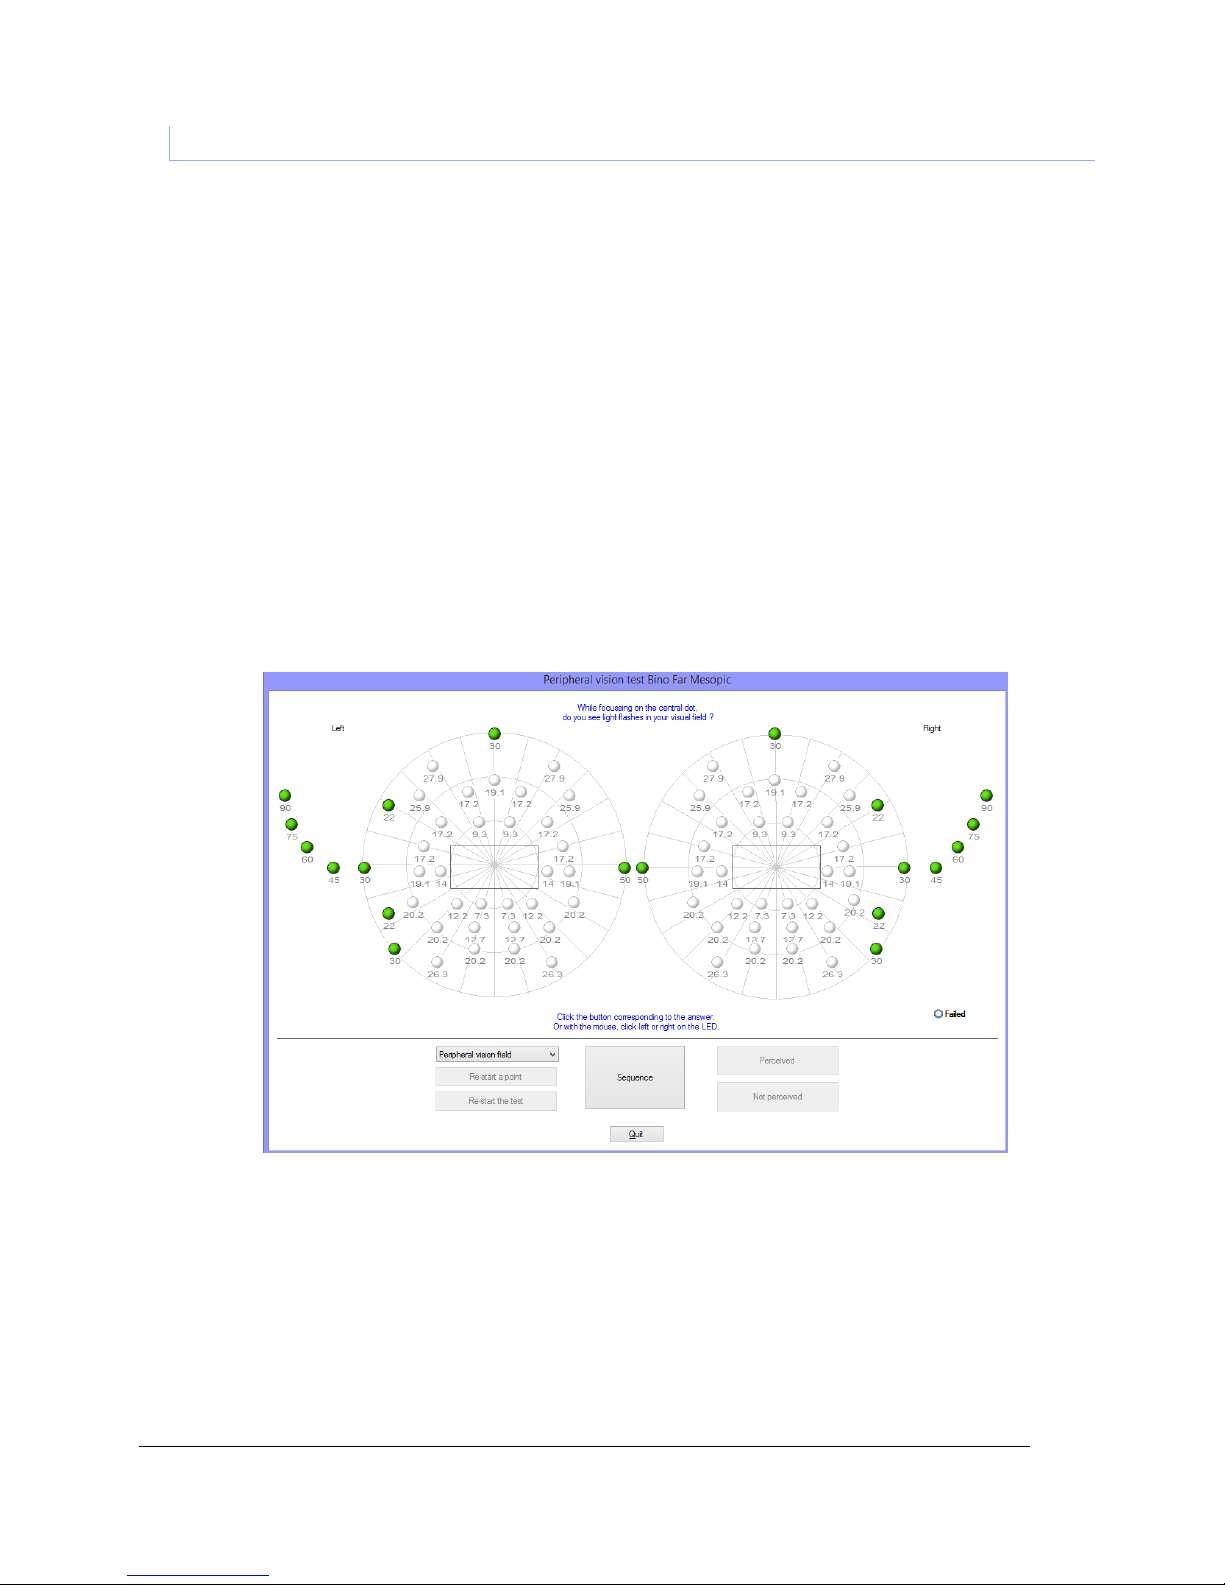
Ce document est la propriété de la Société FIM MEDICAL. Il ne peut être reproduit ou communiqué sans son autorisation.
This document is the property of FIM MEDICAL. Its contents cannot be reproduced or divulged without the company's approval
Page 61 / 74
V04.02.00
March 2018
5.10. External and central visual field test
The Visiolite offers two types of visual field tests: external and central visual fields.
Definitions
5.10.1. External visual field
Area from temporal horizontal field to nasal horizontal field for each eye, and from left temporal to right
temporal for both eyes. Area of vertical field.
Horizontal field features
Angles tested on temporal side
90°, 75°, 60°, 45°, 30°
Angles tested on nasal side
50°
Total for one eye
140°
Total binocular
180°
Vertical field features
Angles tested
30°, 22°, -22°, -30°.
Arrangement of external field stimuli
5.10.1.1. Purpose
Measures aptitude for vehicle or engine driving. An evaluation of the amplitude of the horizontal and vertical
visual field is required by certain laws (road rules).
5.10.1.2. Use in manual mode
Select the test from the list.
Click on the stimulus to test.
Click the «detected» or «not detected» button depending on whether the patient detects the stimulus or not.
Page 62
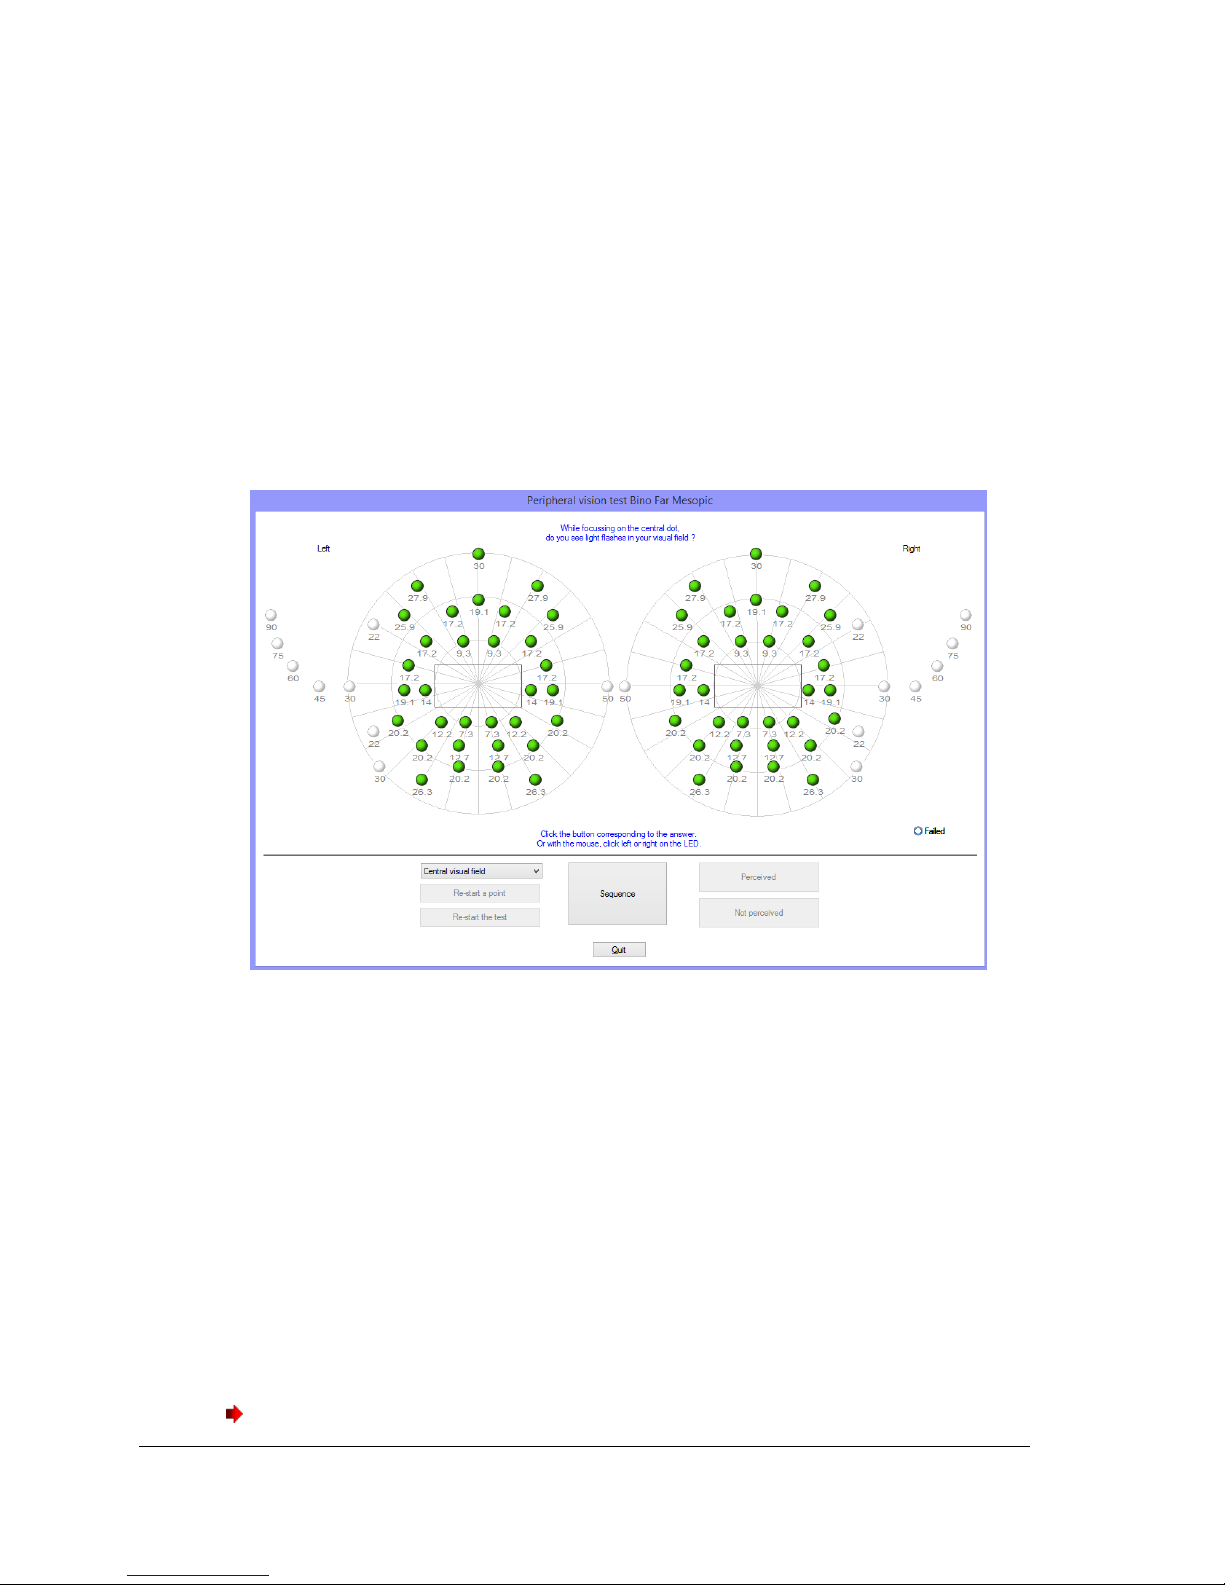
Ce document est la propriété de la Société FIM MEDICAL. Il ne peut être reproduit ou communiqué sans son autorisation.
This document is the property of FIM MEDICAL. Its contents cannot be reproduced or divulged without the company's approval
Page 62 / 74
V04.02.00
March 2018
5.10.1.3. Use in automatic mode
Select the test from the list, then click «sequence» to run the automatism.
When the patient responds, click the «detected» button.
If the patient does not detect the stimulus, click the «not detected» button.
NB: The sequence of the external field test is semi-random. The programme tests firstly the points furthest from
the eye, then closest to it. The test stops when the visual field area of each eye is measured.
5.10.2. Central visual field
Detects visual defects in a given radius (10°, 20°, 30°).
Arrangement of central field stimuli
5.10.2.1. Purpose
Measures aptitude for vehicle or engine driving. An evaluation of the amplitude of the integrity of the central
visual field is required by certain laws (road rules).
5.10.2.2. Use
Select the test from the list and click «sequence» to run the automatism.
When the patient responds, click the «detected» button.
If the patient does not detect the stimulus, click the «not detected» button.
5.10.3. Patient instructions
“While focussing on the central dot, do you see light flashes in your visual field?”
Note the response on the response form.
Caution: if the patient wears glasses, the frames may alter the visual field.
Page 63
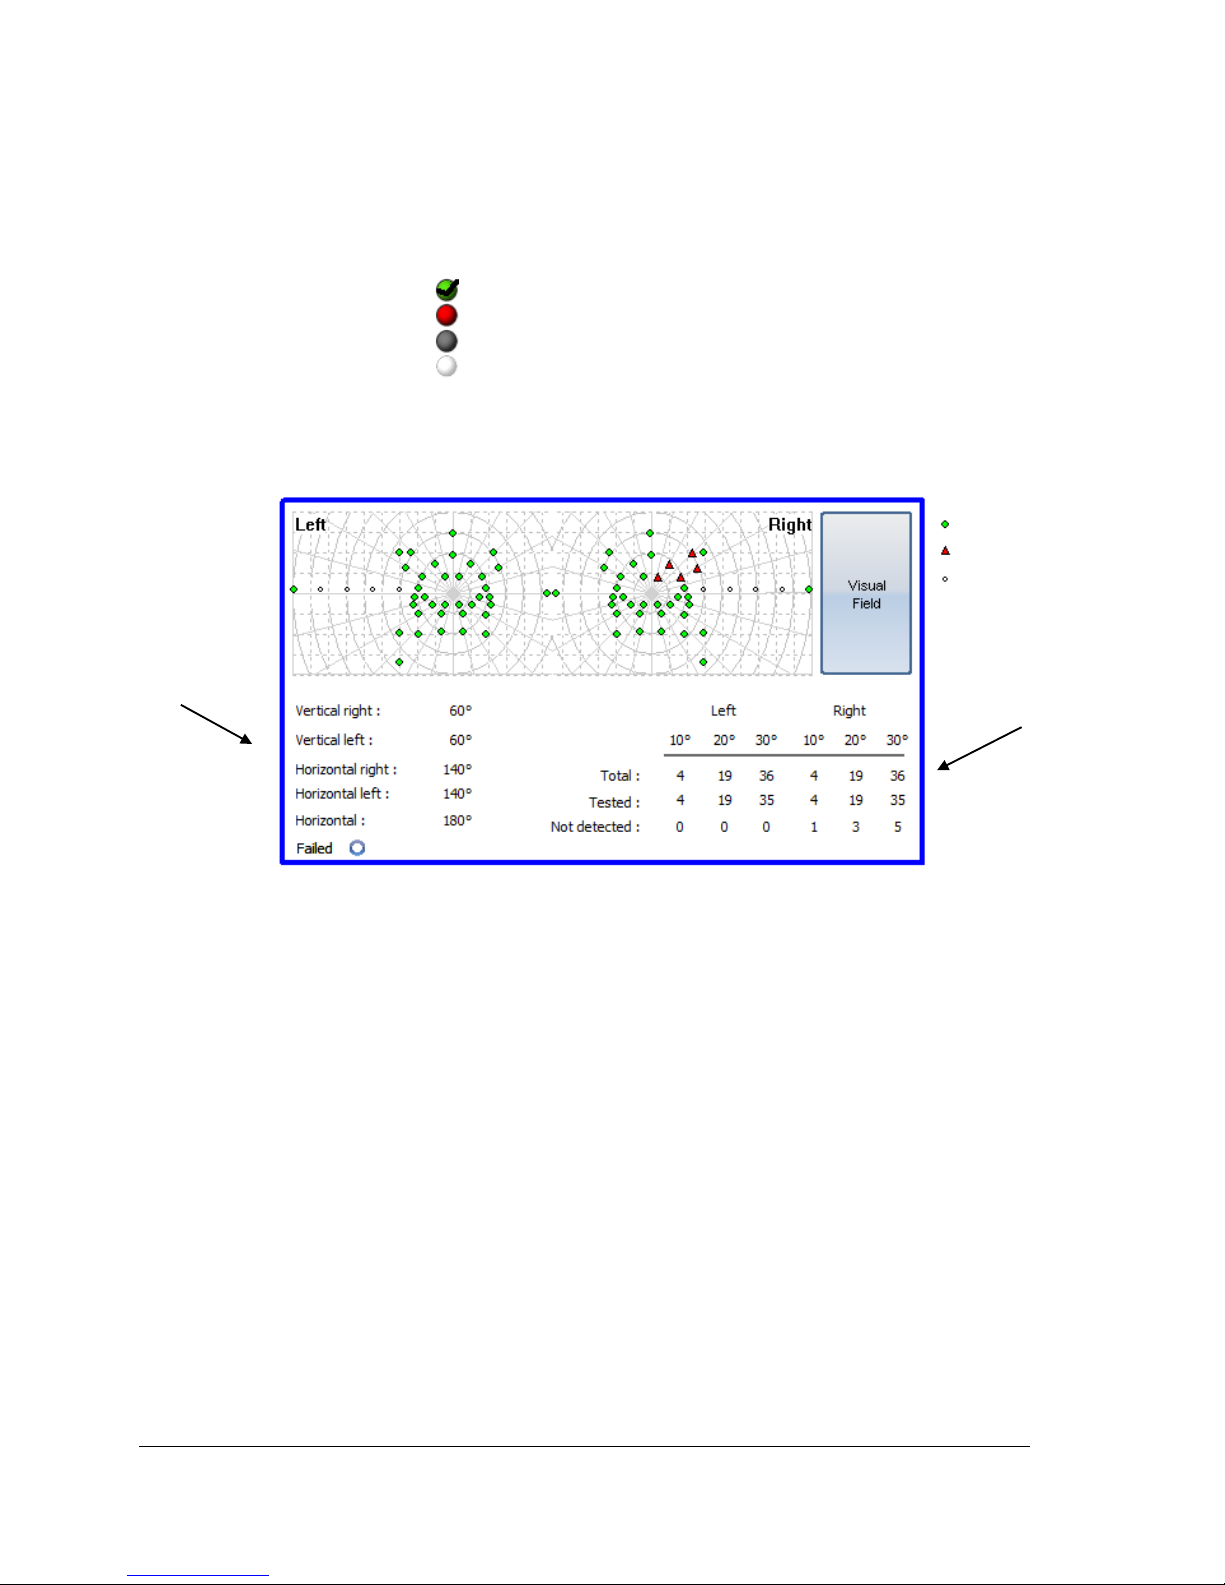
Ce document est la propriété de la Société FIM MEDICAL. Il ne peut être reproduit ou communiqué sans son autorisation.
This document is the property of FIM MEDICAL. Its contents cannot be reproduced or divulged without the company's approval
Page 63 / 74
V04.02.00
March 2018
5.10.4. Significance of stimuli in the test window
Detected
Not detected
Not tested
Not part of the sequence
5.10.5. Results
5.10.6. Limits
This test is not intended to completely explore the visual field.
Its main aim is to determine certain aptitudes; it does not serve to establish a diagnosis even if, in certain cases,
screening is successful. Specialist diagnostic tests exist for this purpose (Goldman perimeter, etc …).
An abnormal result should be interpreted with care, particularly for the nasal visual field (the shape of the nose
could impede visibility of the light signal). In the lateral visual field, the patient’s glasses frames may be a
hindrance.
External visual field
Central visual field
Detected
Not detected
Not tested
Page 64
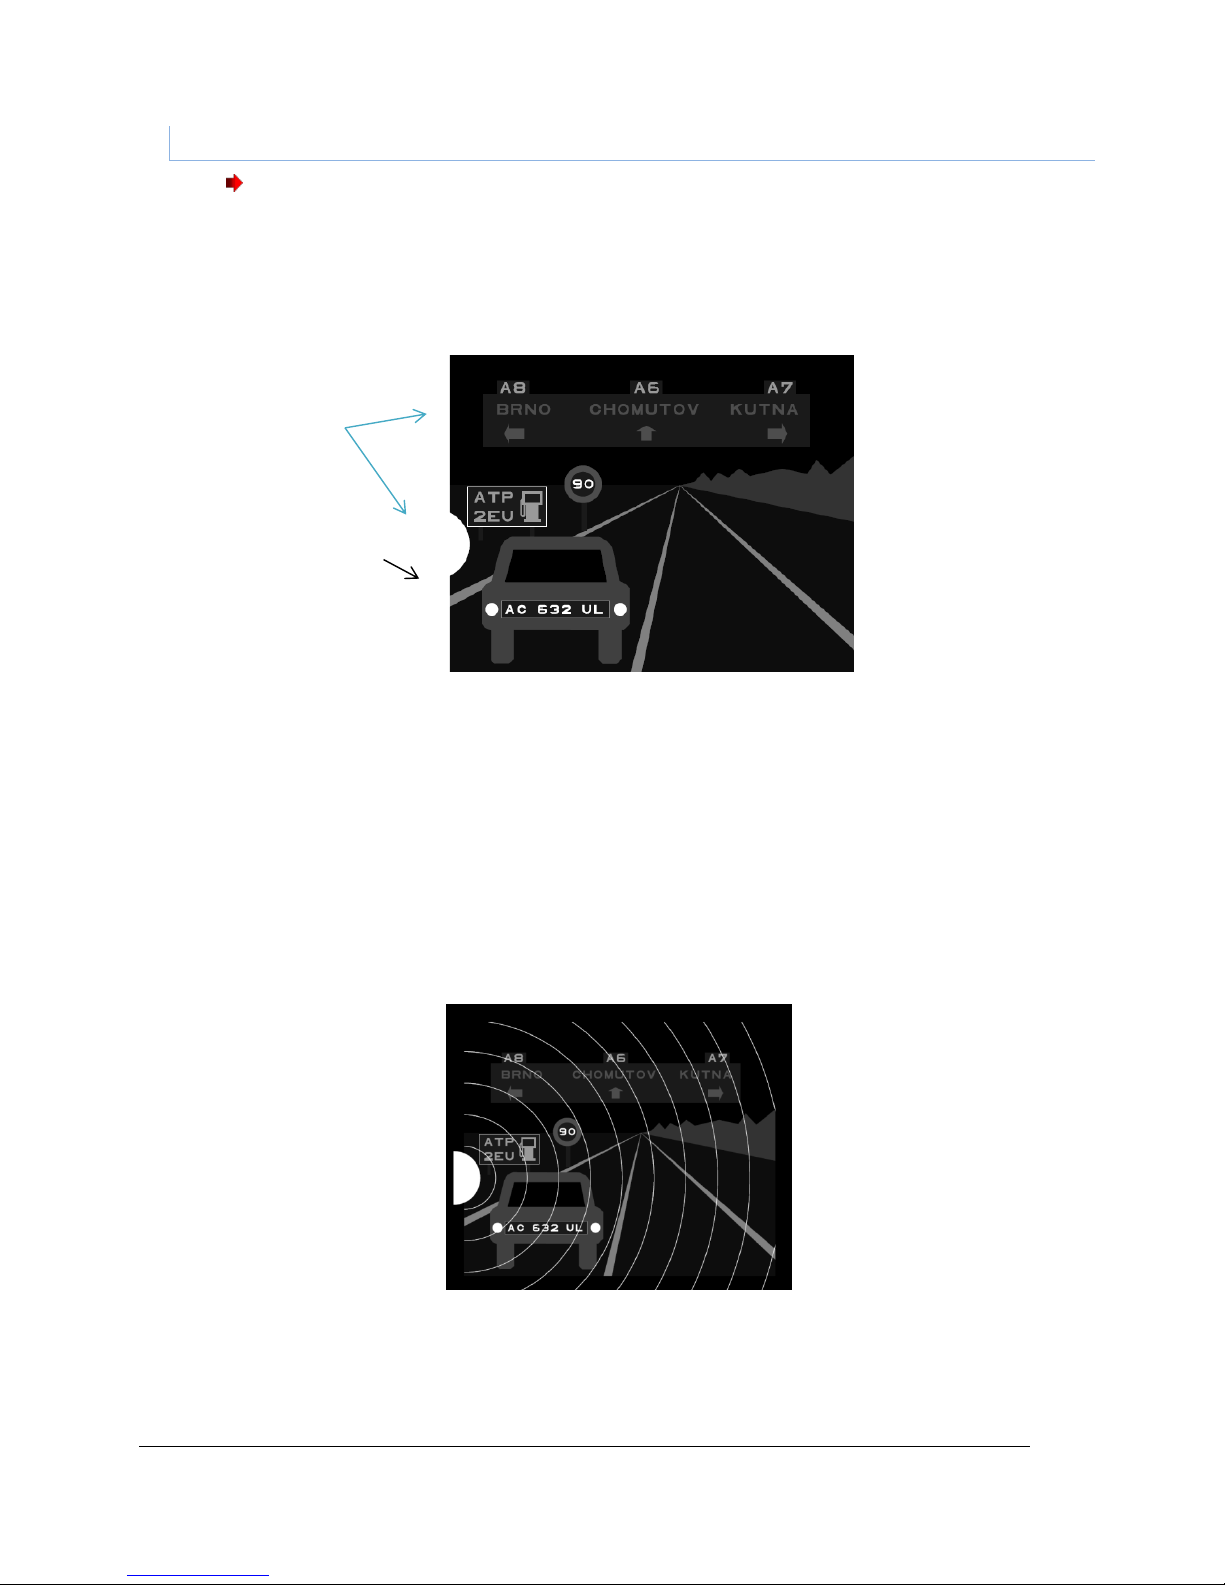
Ce document est la propriété de la Société FIM MEDICAL. Il ne peut être reproduit ou communiqué sans son autorisation.
This document is the property of FIM MEDICAL. Its contents cannot be reproduced or divulged without the company's approval
Page 64 / 74
V04.02.00
March 2018
5.11. Glare sensitivity test (Master-GT version)
Caution: The glare sensitivity test may hold risks for the patient. Don’t forget to take into account
any medical contraindications (refer § 2.3).
5.11.1. Purpose
The glare sensitivity test provides rapid screening by simulating the disturbance caused by lights when passing a
vehicle at night.
Glare sensitivity test
The optotypes are designed so that the patient is not able to guess the words without reading them. Words
chosen are either:
random letters
or names of Czech Republic towns
The size of characters is acuity: 3.2/10 and 4/10 so as not to render this test more difficult.
The positioning of objects in the driving scene is important. These are positioned in several places with different
contrasts, so as to simulate the difficulties in vehicle-driving conditions.
Different angles of positioning of objects to identify
Glare source
Objects to
read
Page 65
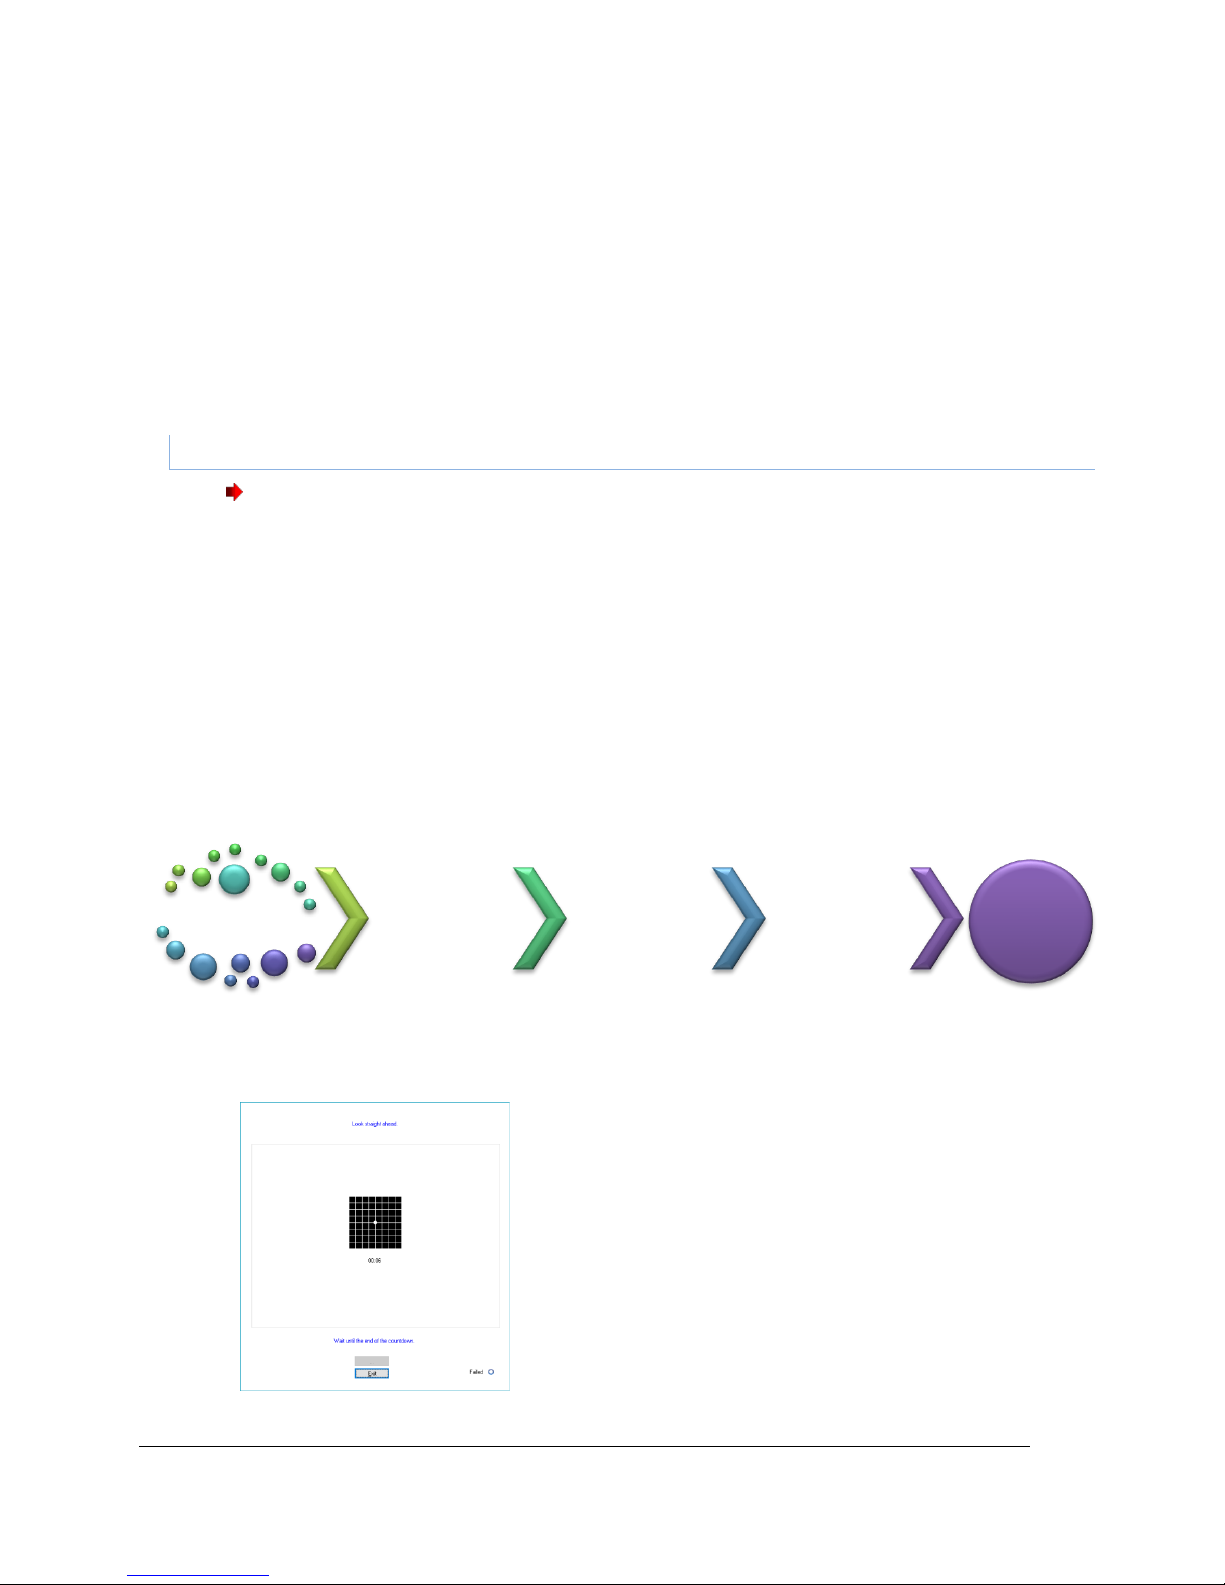
Ce document est la propriété de la Société FIM MEDICAL. Il ne peut être reproduit ou communiqué sans son autorisation.
This document is the property of FIM MEDICAL. Its contents cannot be reproduced or divulged without the company's approval
Page 65 / 74
V04.02.00
March 2018
5.11.2. Principle
A driving scene composed of different objects and different contrasts is displayed.
The glare source comes from the left-hand side of the scene. The patient names the objects seen closest to the
light source and the operator notes the responses.
5.11.3. Operator and patient instructions
“Name each element that you see in the scene”.
Click on the objects seen
5.12. Glare resistance test (Master-GT version)
Caution: The glare resistance test may hold risks for the patient. Don’t forget to take into account
any medical contraindications (refer § 2.3).
5.12.1. Purpose
The glare resistance test is only for information. It is secondary to the sensitivity test presented in § 0. This test
measures the recovery time of the patient’s vision when submitted to a high source of light.
5.12.2. Principle
This test requires a precise protocol, integrated in this option. After a few seconds of adaptation, the software
presents firstly a visual acuity test based on the “Binocular Mesopic Letters”. The patient is blinded for 10
seconds. The device then displays a visual acuity test based on the “Binocular Mesopic Numbers”. The aim is to
measure the recovery time of the patient’s visual acuity.
5.12.3. Patient instructions
Instructions are given by the software over the course of the test. Series of screens displayed by the Visiolite®:
Patient adaptation in mesopic light over ten seconds.
Mesopic
Adaptation
Binocular
numbers visual
acuity in mesopic
light
Glare
Binocular letters
visual acuity in
mesopic light
Results
Page 66
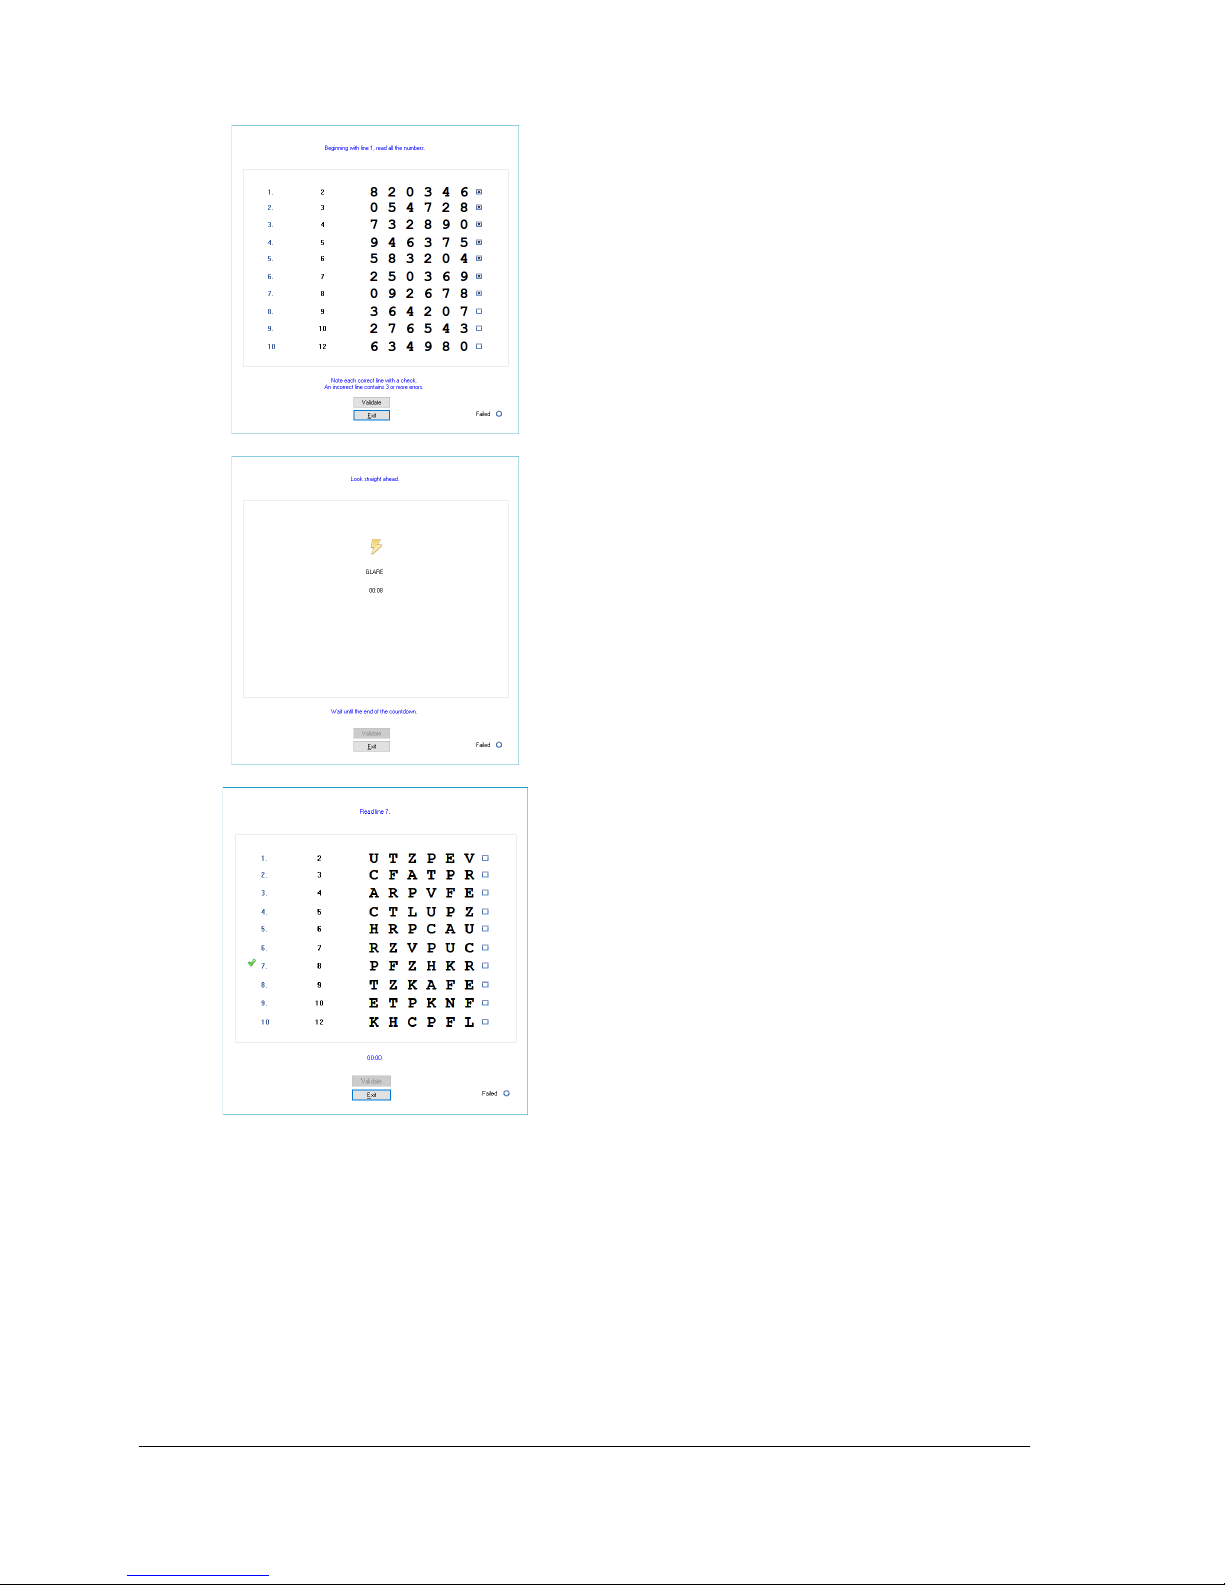
Ce document est la propriété de la Société FIM MEDICAL. Il ne peut être reproduit ou communiqué sans son autorisation.
This document is the property of FIM MEDICAL. Its contents cannot be reproduced or divulged without the company's approval
Page 66 / 74
V04.02.00
March 2018
Measurement of visual acuity in mesopic light after
period of patient adaptation.
The operator notes the best patient acuity.
Note: If the patient demonstrates difficulty with a line,
it is preferable to directly choose the line above.
The Amsler grid is used on the patient so as to induce
a scotoma. The glare lasts for 10 seconds.
The operator should insist that the patient focus on
the central circle.
Final test phase.
The patient’s visual acuity is evaluated on the basis of
numbers presented in mesopic light. The aim is to
measure the recovery time and to avoid memorization
of the first test performed.
The operator notes the best acuity.
Note: Do not continue longer than two minutes.
Page 67

Ce document est la propriété de la Société FIM MEDICAL. Il ne peut être reproduit ou communiqué sans son autorisation.
This document is the property of FIM MEDICAL. Its contents cannot be reproduced or divulged without the company's approval
Page 67 / 74
V04.02.00
March 2018
Results.
Page 68

Ce document est la propriété de la Société FIM MEDICAL. Il ne peut être reproduit ou communiqué sans son autorisation.
This document is the property of FIM MEDICAL. Its contents cannot be reproduced or divulged without the company's approval
Page 68 / 74
V04.02.00
March 2018
6. Cleaning and Maintenance
Page 69

Ce document est la propriété de la Société FIM MEDICAL. Il ne peut être reproduit ou communiqué sans son autorisation.
This document is the property of FIM MEDICAL. Its contents cannot be reproduced or divulged without the company's approval
Page 69 / 74
V04.02.00
March 2018
6.1. Removable forehead rest cleaning
For hygienic measures, all the Visiolite® surfaces in contact with the skin (housing, mask, forehead rest) should
be disinfected after each test. The removable forehead rest should systematically be cleaned after each use with
a damp cloth and a bactericide solution. FIM MEDICAL recommends the use of Bactinyl® 5M.
If the forehead rest is damaged (ripped, etc…), contact your distributor or FIM MEDICAL for a replacement.
Caution: Never sterilise the Visiolite® or its accessories.
Caution: Never wash the Visiolite® under running water or directly spray it with any sort of liquid.
6.1.1. Remove forehead rest
Simply pull it off.
6.1.2. Replace forehead rest
Press on it.
Clips located at the bottom.
6.2. Clean the housing
The Visiolite® housing can be cleaned with a damp cloth and a bactericide solution. FIM MEDICAL recommends
the use of Bactinyl® 5M.
6.3. Clean the lenses
To avoid scratches, the external surface of the lenses should be regularly cleaned with a soft wipe used for
glasses.
Do not press down on the lenses.
Caution: DO NOT use a bactericide solution to clean the lenses, as this will remove the anti-
reflective coating.
6.4. Clean the peripheral field holes
Do not clean.
Remove dust with a soft cloth.
Page 70

Ce document est la propriété de la Société FIM MEDICAL. Il ne peut être reproduit ou communiqué sans son autorisation.
This document is the property of FIM MEDICAL. Its contents cannot be reproduced or divulged without the company's approval
Page 70 / 74
V04.02.00
March 2018
6.5. Annual service
Different forms of maintenance to keep the Visiolite® in an optimal operational state are recommended.
During annual servicing, the following operations are performed by FIM MEDICAL After Sales Service, or by your
distributor (if trained by FIM MEDICAL personnel for maintenance):
Checking device general functions
Cleaning optics
Checking and cleaning tests band
Checking and minor repairs of mechanical and electronic elements
Checking and calibration of central and lateral LEDs (only for Master-GT version)
This maintenance can be requested by the customer or by FIM MEDICAL if preventive operations are deemed
necessary for correct functioning of the device.
6.6. Guarantee
Within the framework of the contractual guarantee of one year, only repairs are covered. The guarantee is only
applicable if normal and usual conditions of use are respected. During annual servicing, a certain number of
preventive operations are performed; breakdowns following annual service are not covered by the guarantee.
Page 71

Ce document est la propriété de la Société FIM MEDICAL. Il ne peut être reproduit ou communiqué sans son autorisation.
This document is the property of FIM MEDICAL. Its contents cannot be reproduced or divulged without the company's approval
Page 71 / 74
V04.02.00
March 2018
7. What To Do If?
Page 72

Ce document est la propriété de la Société FIM MEDICAL. Il ne peut être reproduit ou communiqué sans son autorisation.
This document is the property of FIM MEDICAL. Its contents cannot be reproduced or divulged without the company's approval
Page 72 / 74
V04.02.00
March 2018
7.1. No noise when switched on
Check it is plugged into the power supply.
Check the light on the power plug is on.
7.2. Normal switch-on noise but screen light remains grey
Check USB connection and driver installation.
7.3. Error message appears at recording
7.3.1. “Identification incomplete”
Fields marked with a red asterisk in the identification panel are compulsory for recording.
7.3.2. “Operation must use updateable query”
This message is due to a problem of writing access rights on that computer. The administrator must give all tree
structure rights, where the data base is found, to the operator.
7.4. Patient identification file found but not the tests
Click “+” on the left of the patient’s name in the “Open” dialogue box.
7.5. Visiolite® light does not come on
Check power supply connection.
Check the patient’s forehead position on the forehead rest.
7.6. Glare and motor drive seem weak
Check you are using the recommended power plug.
Page 73

Ce document est la propriété de la Société FIM MEDICAL. Il ne peut être reproduit ou communiqué sans son autorisation.
This document is the property of FIM MEDICAL. Its contents cannot be reproduced or divulged without the company's approval
Page 73 / 74
V04.02.00
March 2018
Page 74
Ce document est la propriété de la Société FIM MEDICAL. Il ne peut être reproduit ou communiqué sans son autorisation.
This document is the property of FIM MEDICAL. Its contents cannot be reproduced or divulged without the company's approval
Page 74 / 74
V04.02.00
March 2018
FIM MEDICAL
51 rue Antoine Primat - 69100 Villeurbanne - FRANCE
Tel: +33 04 72 34 89 89 - Fax: +33 04 72 33 43 51
[email protected] / www.fim-medical.com
Thank you for reading this manual.
If you require further information please don’t
hesitate to contact us.
 Loading...