

V1.0

1.Product Introduction
Camera
Touch Screen
Status LED
5-way Joystick
MIC 2
Silicon Pad
Roll Axis
Pitch Axis
Yaw Axis
MIC 1
Power/Shutter Button
Micro SD Card Slot
Lanyard Hole
1/4" Thread
Back Cover
USB-C Port
1
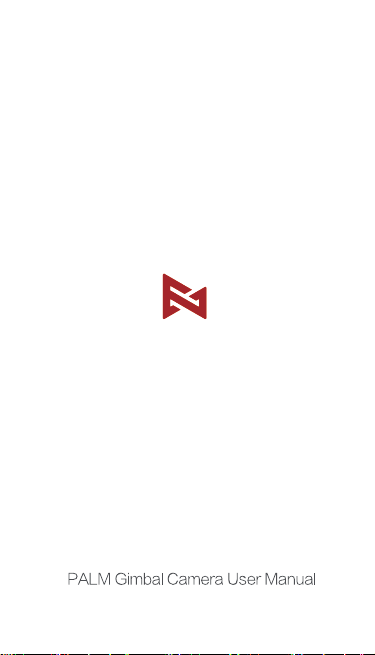
2.Charging
To charge PALM, please connect a 5V 2A USB adapter (not included) to the USB-C
port with the provided USB cable. The status LED is off when the battery is fully charged.
USB-C Cable
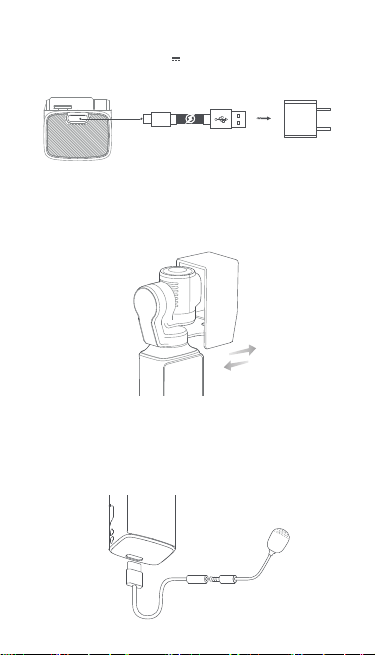
3.Equiping and Removing Gimbal Cover
1.Please equip and remove the gimbal cover as shown when the camera is turned off.
The cover must be removed before turning on the camera.
2.When the PALM is turned off, its gimbal automatically stays in right angle for 8
seconds so as to easily equip the cover.
Remark:Gimbal is the key for precise control. To avoid damaging the gimbal, please be
gentle while equipping or removing
(Not included)
4.The equipment of external MIC
1.Please use the type-C to 3.5mm adapter to connect the PALM with external MIC
2.Please refer to the following description to connect the base with MIC.
MIC(Not included)
(The type-C to 3.5mm cable sold separately)
2
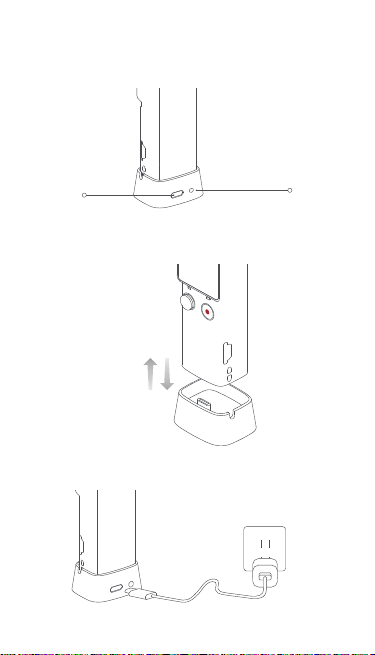
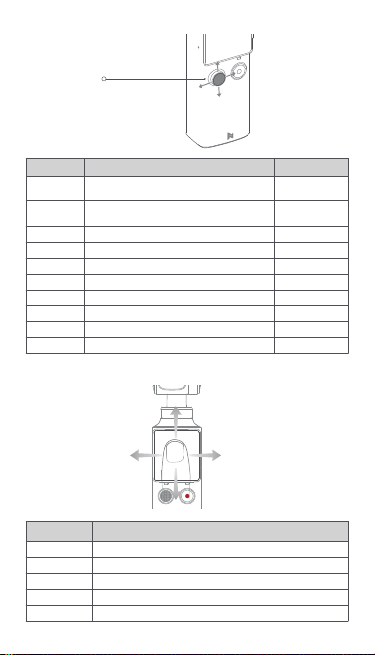
5.Equiping and Removing the Base
1.Equiping with the base to steady the PALM. And base with 3.5mm standard
port makes it easier to connect with external MIC.
USB-C Port
2.Please equip and remove the base as shown.
3.Please charge the PALM via base as shown.
(The base sold separately)
3
MIC Port
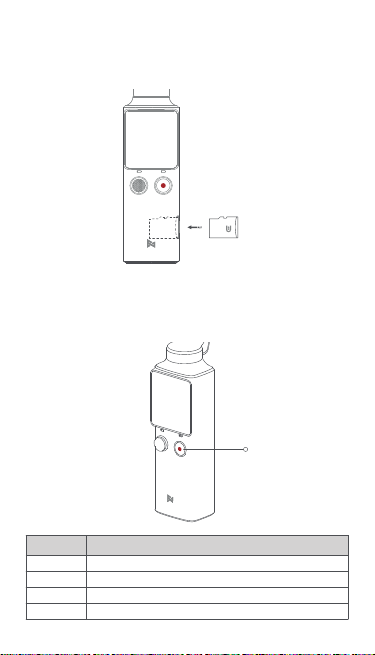
6.Inserting the MicroSD Card
Please insert the MicroSD Card as shown. It is recommended to use a micro
SD card with or over a UHS-3 Speed Grade rating(not included).
SD
7.Operations
1.Power/Shutter Button
Power/Shutter Button
Status
Long press Turn on or turn off the PALM
Short press
Double click
Triple click
Take a capture according to current shooting mode
To recenter the gimbal
To switch the camera 180° & Turn on / turn off Face Tracking
Instruction
4
2. 5-way Joystick
5-way Joystic k
Status
Short press
the button
Long press
the button
Move up
Move down
Move left
Move right
Move up
Move down
Move left
Move right
To mark the video
To switch the mode of 5-way joystick
To control the gimbal camera move up
To control the gimbal camera move down
To control the gimbal camera move left
To control the gimbal camera move right
ZOOM +
ZOOM -
EV -
EV +
Instruction Remarks
3.Touch Screen
Instruction Status
Swipe right To switch shooting mode
Swipe left
Swipe down
Swipe up
Double click
To switch shooting mode
To enter setting mode
To enter media library
Turn on / turn off Face Tracking
5
Cording the video
Preview status
Mode 1
Mode 1
Mode 1
Mode 1
Mode 2
Mode 2
Mode 2
Mode 2

4.Status LED
Status LED
Status Instruction
Green light is on Normal
Green light flashes
Red light is on
Red light flashes
Red and green light
alternatively flash
Recording
Low battery or the gimbal is abnormal
System is abnormal
Firmware is updating
5.Operating the Touch Screen
5.1 Preview Page
The touch screen displays preview page when the FIMI PALM is powered on.
Information about icons on preview page is as follows:
Show current sho oting mode, tap to enter paramete r settings.
Show batter y level.
Tap to adjust professional ca mera settings .
Tap to view Micro SD Card status and enter stor age settings.
6

5.2 Switching to Shooting Mode
When in preview page, swipe left or right to switch to the different shooting mode.
Five shooting modes are available:
【Panorama】【Photo】【Video】【Slow-motion】【Time lapse】
5.3 Adjust Secondary Parameter
When in preview page, click the shooting mode icon on the top left corner to adjust
secondary parameter or to switch shooting mode.
Video
·Click the top left video camera icon to enter to the secondary parameter setting
page.
·Scroll to select items or parameter.
·These items can be adjusted: 【Output】【Pic-Quality】【Color】【MIC】
·Swipe left or press the power button to exit setting page.
2.7K 30
Output
2.7K 30
Pic-Qua
7

Slow-motion
·Click the top left slow-motion camera icon to enter the secondary parameter
setting page.
·Scroll to select items or parameter.
·These items can be adjusted: 【Speed】【Pic-Quality】【Color】
·Swipe left or press the power button to exit setting page.
Speed
Pic-Qua
Photo
·Click the top left photo icon to enter the secondary
parameter setting page.
·Scroll to select items or parameter.
·These items can be adjusted: 【HDR】【Long-Exposure】【Ratio】
【Timing 】【Night shot】
· Swipe left or press the power button to exit setting page.
HDR
Long-Exp
Panorama
·Click the top left panorama icon to select different parameter modes:
【3x3】【1x4】【4x1】
·Composed panorama photo needs to be viewed on APP.
8

Time-lapse
·Click the top left time-lapse icon to switch between:
【Time-lapse】【Motion-lapse】
·1s | 5min | 00:05 means the shooting interval is 1 second and takes
5mins to shoot a time-lapsed video with the total length of 5 seconds
·Click the icon on the bottom left to adjust shooting interval and shooting
length.
· When in 【Motion-lapse】 mode, please click “+” to select an object via
screen or joystick. It is available to choose 2 to 9 objects. And then press
power button to take the video.
Interval
9

5.4 Pro Setting
When in preview page, please click icon in the bottom right ,to set the
parameters for 【Shutter】【ISO】【 White Balance】
·Swipe left and right or click icon in the top left to switch items and scroll the
parameter bar to adjust. Click a blank space to exit the setting mode.
·Click the icon of “Auto” to set all parameters as auto mode.
·Long press the screen to reset all parameters.
Auto
5.5 Media Library
When in preview page, swipe up to enter to the media library to review videos and
photos.
·Swipe left or right to view next photos and videos.
·Swipe up again to delete files.
·Click the icon of in the bottom left to like the file.
·Click the icon of in the top left to view files in different categories.
·Swipe down or press the power button to exit the media library.
10

5.6 Setting Mode and Shortcut Key
When in preview page, swipe down to enter to the menu settings.
5.6.1 Shortcut Key
Click to turn on or turn off WIFI.
Click to turn off and lock the screen.
Click to change the size of preview page.
Click to adjust screen brightness.
WiFi Lock
Display Brightness
5.6.2 Gimbal Setting
Click to switch four different gimbal modes.
·【Pitch Lock】: The pitch axis and roll axis are locked in this mode. The
pan axis follows.
·【 Lock】: Three axis are locked in this mode.
·【Follow】: Roll axis locked while pan and pitch axis follows.
·【FPV】: Three axis follow.
11

Pitch Lock FollowLock
5.6.3 Multiple Frames
When in video mode, click to select different frames.
Ultra Wide Narrow Superscope
5.6.4 Camera Settings
·Photo Format: Click to switch between 【JPG】 and 【JPG+DNG】
·Metering Mode: Click to select 【Center metering】【Average metering】
and 【Spot metering】The Palm defaults at 【Center metering】
·Video Output: Click to switch between【NTSC 】and【 PAL】 The Palm
defaults at 【NTSC】
·Video Codec: Click to switch between 【H.264】and 【HEVC】 The Palm
defaults at 【H.264】
·LDC: Click to turn off or turn on distortion correction. Distortion
correction is on by default.
Camera Settings
12

5.6.5 Gimbal Settings
·【Joystick speed】: Adjust moving speed of the gimbal while controlling
the joystick and speed up the gimbal from rate “1 to 10”.
·【Follow speed】: Aims to adjust the moving speed of the gimbal while
moving the Palm. Speed up from “0 to 10”. Slower speed is applicable
to taking smooth video while faster speed for technical shooting (sports
mode).
·Gimbal calibration: Gimbal calibration can solve issues like gimbal
drifting and horizontal problem caused by environment and temperature.
Click the “start” and follow relevant notices to make calibration.
·Adjust horizon: Place the palm horizontal and adjust the gimbal horizon
manually.
Gimbal Settings
5.6.6 System Settings
·【Power Off】: Timer for the Palm to turn off automatically when not in
used.
·【Lock screen】: Time the Palm to lock the screen, it will not interfere
while shooting. Click the screen to unlock.
·【Boot video】: The palm takes video automatically and all parameters
are set the same as your last used.
Min Min
Power O Lock Screen
Boot Video
Beep
13

·【Format】: Show information of micro SD card including remaining
storage, available photo left. Or set to hide these info. Click to finish
relevant settings or format the SD card.
Spare
Total
Format
·【Device info】: Check camera version, gimbal version, device
model, serial number and battery information.
Space Left
Format
Device Info
14

·【Language】: Switch device language.
Language
·【Reset device】: Click to reset the Palm.
Reset Device
15

6.Downloading APP
Please scan the QR code or search
for downloading the FIMI PLAY APP
in APP Store or Google Play
7.Maintenance and Calibration
1.The PALM enters the self-check when it is powering.
2.Gimbal camera is a high-precision control device. Please do not drop it or
have it hit by external force. And please ensure that the gimbal doesn't be
blocked by outside forces when it is moving. Otherwise, the machine might be
damaged and be led to abnormal operations.
3. Do not place the battery near heat. Lithium battery's capacity reduces
significantly in low temperature conditions. Please do not use the PALM
if the temperature is below 0 celsius degree.
8.Basic Specification
Name: PALM Gimbal Camera
Model: YTXJ03FM
Dismensions: 30.5*22.7*127.0mm
Net Weight: 120g(accessories are not included)
Precision Control: ± 0.005°
Rolling Angle: YAW: -240°~ + 60° ROLL: ±45° PITCH: ±90°
Battery Capacity: 1000 mAh
Rated Power: 2.5 W
Rated Voltage: 7.4V
Operating Temperature: 0℃~40℃
Wireless Connectivity: Wi-Fi IEEE 802.11b/g/n
Bluetooth: Supports up to bluetooth 4.0
More certificate information please go to device information of setting
This device complies with Part 15 of the FCC Rules. Operation is subject to
the
following two conditions:
(1) this device may not cause harmful interference, and
this device must accept any interference received, including interference
(2)
that
may cause undesired operation.
16

Any Changes or modifications not expressly approved by the party responsible
for compliance could void the user's authority to operate the equipment.
Note: This equipment has been tested and found to comply with the limits for a
Class B digital device, pursuant to part 15 of the FCC Rules. These limits are
designed to provide reasonable protection against harmful interference in a
residential installation. This equipment generates uses and can radiate radio
frequency energy and, if not installed and used in accordance with the instructions,
may cause harmful interference to radio communications. However, there is no
guarantee that interference will not occur in a particular installation. If this equipment
does cause harmful interference to radio or television reception, which can be
determined by turning the equipment off and on, the user is encouraged to try to
correct the interference by one or more of the following measures:
-Reorient or relocate the receiving antenna.
-Increase the separation between the equipment and receiver.
Connect the equipment into an outlet on a circuit different from that to which the
-
receiver is connected.
-Consult the dealer or an experienced radio/TV technician for help.
The device has been evaluated to meet general RF exposure requirement. The
device can be used in portable exposure condition without restriction.
Manufacturer: Beijing Fimi Technology Co., Ltd. (a Mi Ecosystem company)
Address: 218, Level 2, Building Complex 1 Jia, Qing He Yong Tai Park, Haidian
District, Beijing
Official website:www.fimi.com
Online service:support@fimi.com
TEL: 400-661-0908
17
 Loading...