

Fimco LG-2500-304 Owner's Manual
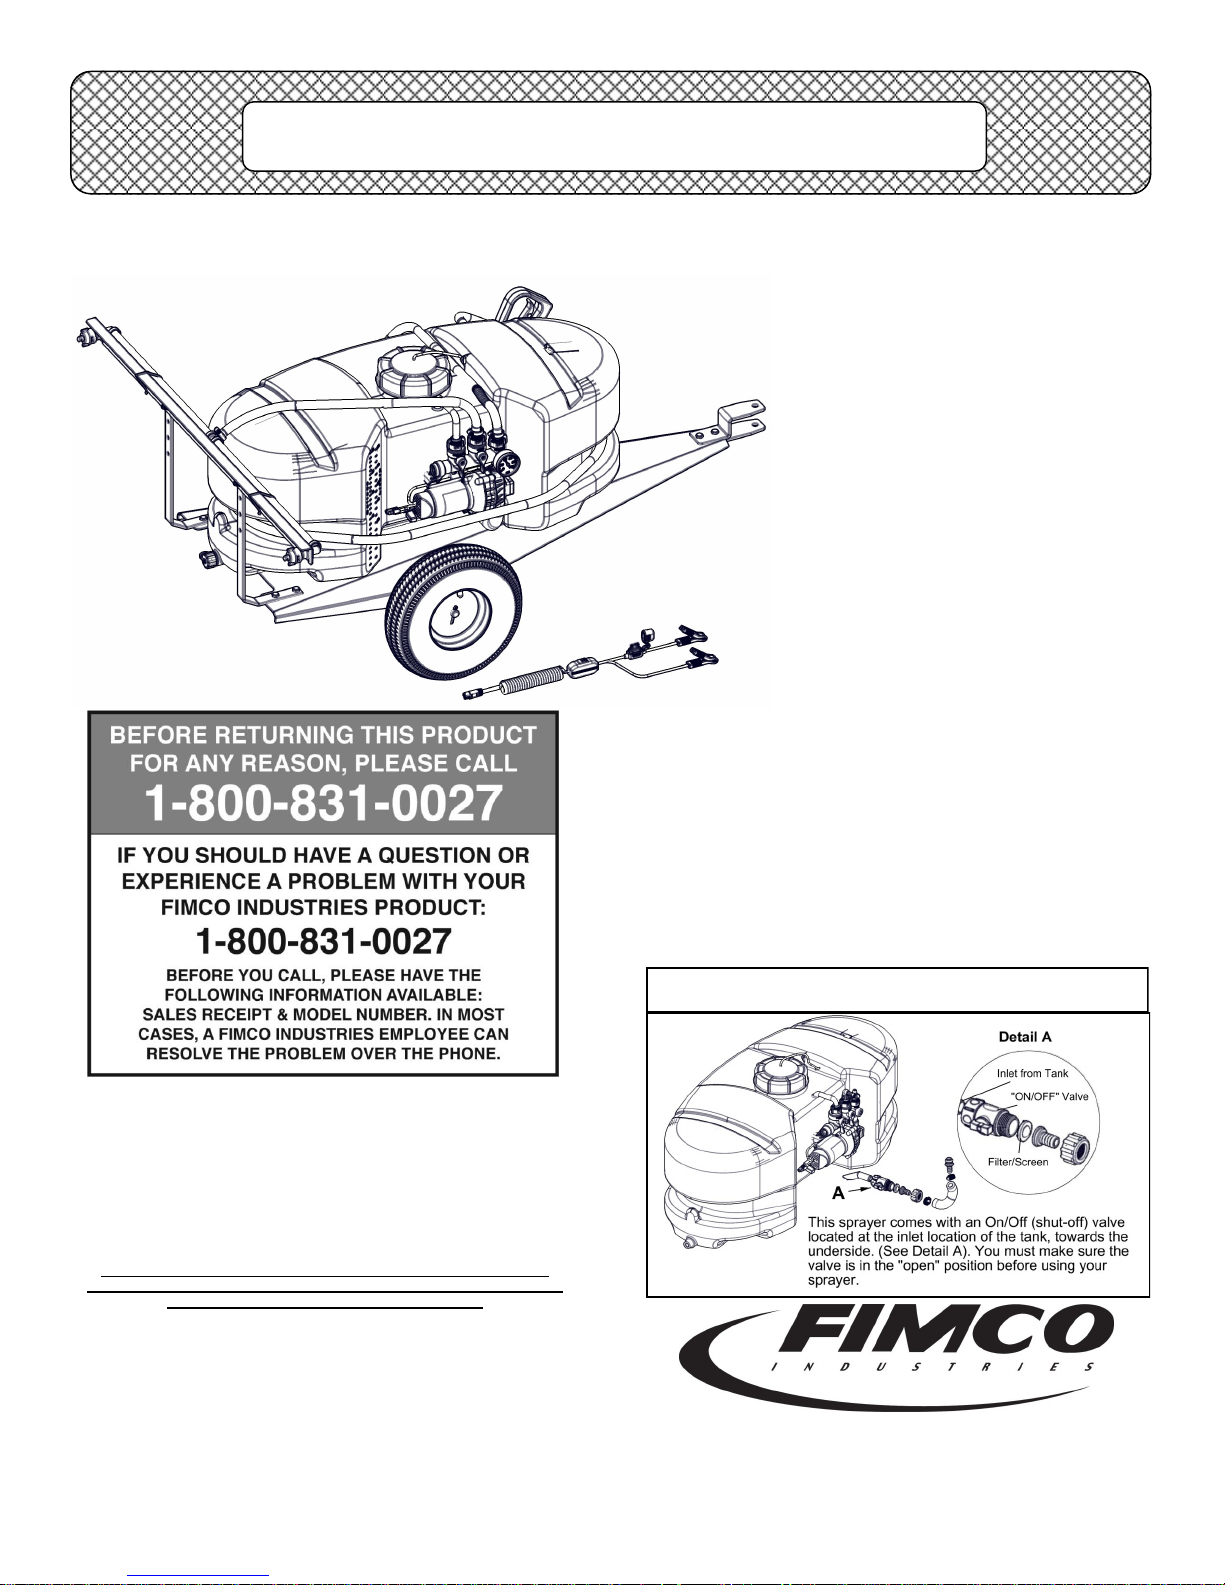
OWNER’S MANUAL
Model: LG-2500-304 (5301440)
(25 Gallon Lawn & Garden Trailer Sprayer)
Technical Specifications
25 Gallon Corrosion-Resistant
Polyethylene Tank
12 Volt Diaphragm Pump,
2.1 g.p.m.—60 psi
Deluxe Pistol Grip Handgun
15 Ft. Handgun Hose (3/8” I.D.)
25 Ft. max. vertical throw,
35 Ft. horizontal throw
Low Profile Trailer & tank
4.10/3.50 x 6” Pneumatic Tires
2-Nozzle Boom Assembly
(80” Spray Coverage)
Pressure Gauge
Adjustable Pressure
General Information
Thank you for purchasing this product. The purpose of this
manual is to assist you in operating and maintaining your lawn
& garden/ATV sprayer. Please read it carefully, as it furnishes
information which will help you achieve years of trouble-free
operation.
Warranty
Products are warranted for one year from date of purchase
against manufacturer or workmanship defects for home owner
www.fimcoindustries.com or call: TOLL FREE @ 1-800-831-0027
Our Technical Support Representatives will be happy to help you.
To obtain prompt, efficient service, always remember to give the
Part descriptions and numbers can be obtained from the illustrated
usage and 90 days for commercial usage.
For technical assistance, visit our website @
following information…
Correct Part Description and/or part number
Model #/Serial # of your sprayer
parts list section(s) of this manual.
Assembly Instructions
Make sure the contents of the sprayer’s carton match the
items shown on page 2 of the manual.
Follow the steps on pages 3 & 4 to properly assemble
the sprayer.
After assembly is complete and before testing your
sprayer, make sure you connect the electrical hook-up to
the end of your pump and clip the clips to a fully charged
battery. The red wire must be connected to the positive
(+) and the black wire should be connected to the negative (-).
The drain plug assembly should already be attached to
the tank
***IMPORTANT REMINDER***
www.fimcoindustries.com
1000 FIMCO Lane, P.O. Box 1700, North Sioux City, SD 57049
Toll Free Phone: 800-831-0027 : Toll Free Fax: 800-494-0440
[5004813 (06/15)]
Page 1
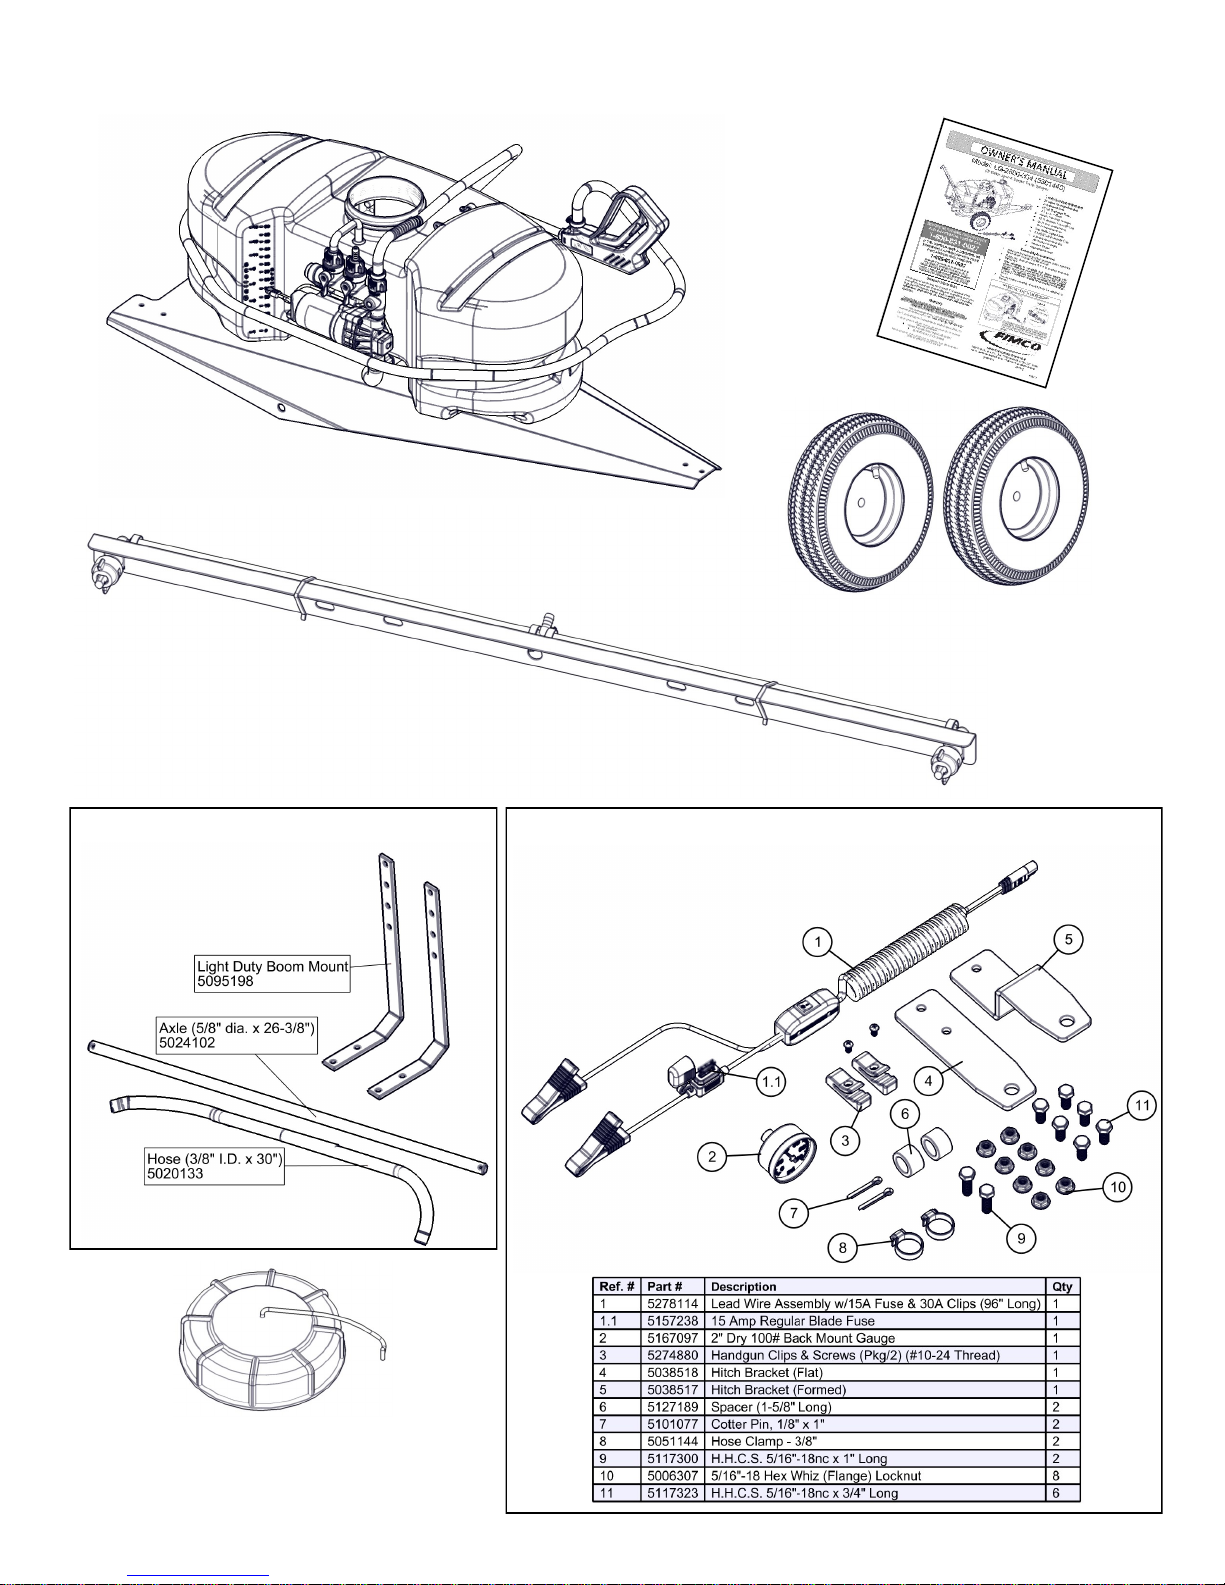
Contents of your sprayer’s carton (LG-2500-304):
Tank/Frame Pre-Assembly
Owner’s
Manual
(2) Tires/Wheels (#5021102)
2-Nozzle Boom Assembly (#5277774)
25/30 Gallon
Trailer Bracket Kit
#5277789
Contents of Parts Bag #5278317
Tank Lid & Lanyard
(#5058188)
Page 2
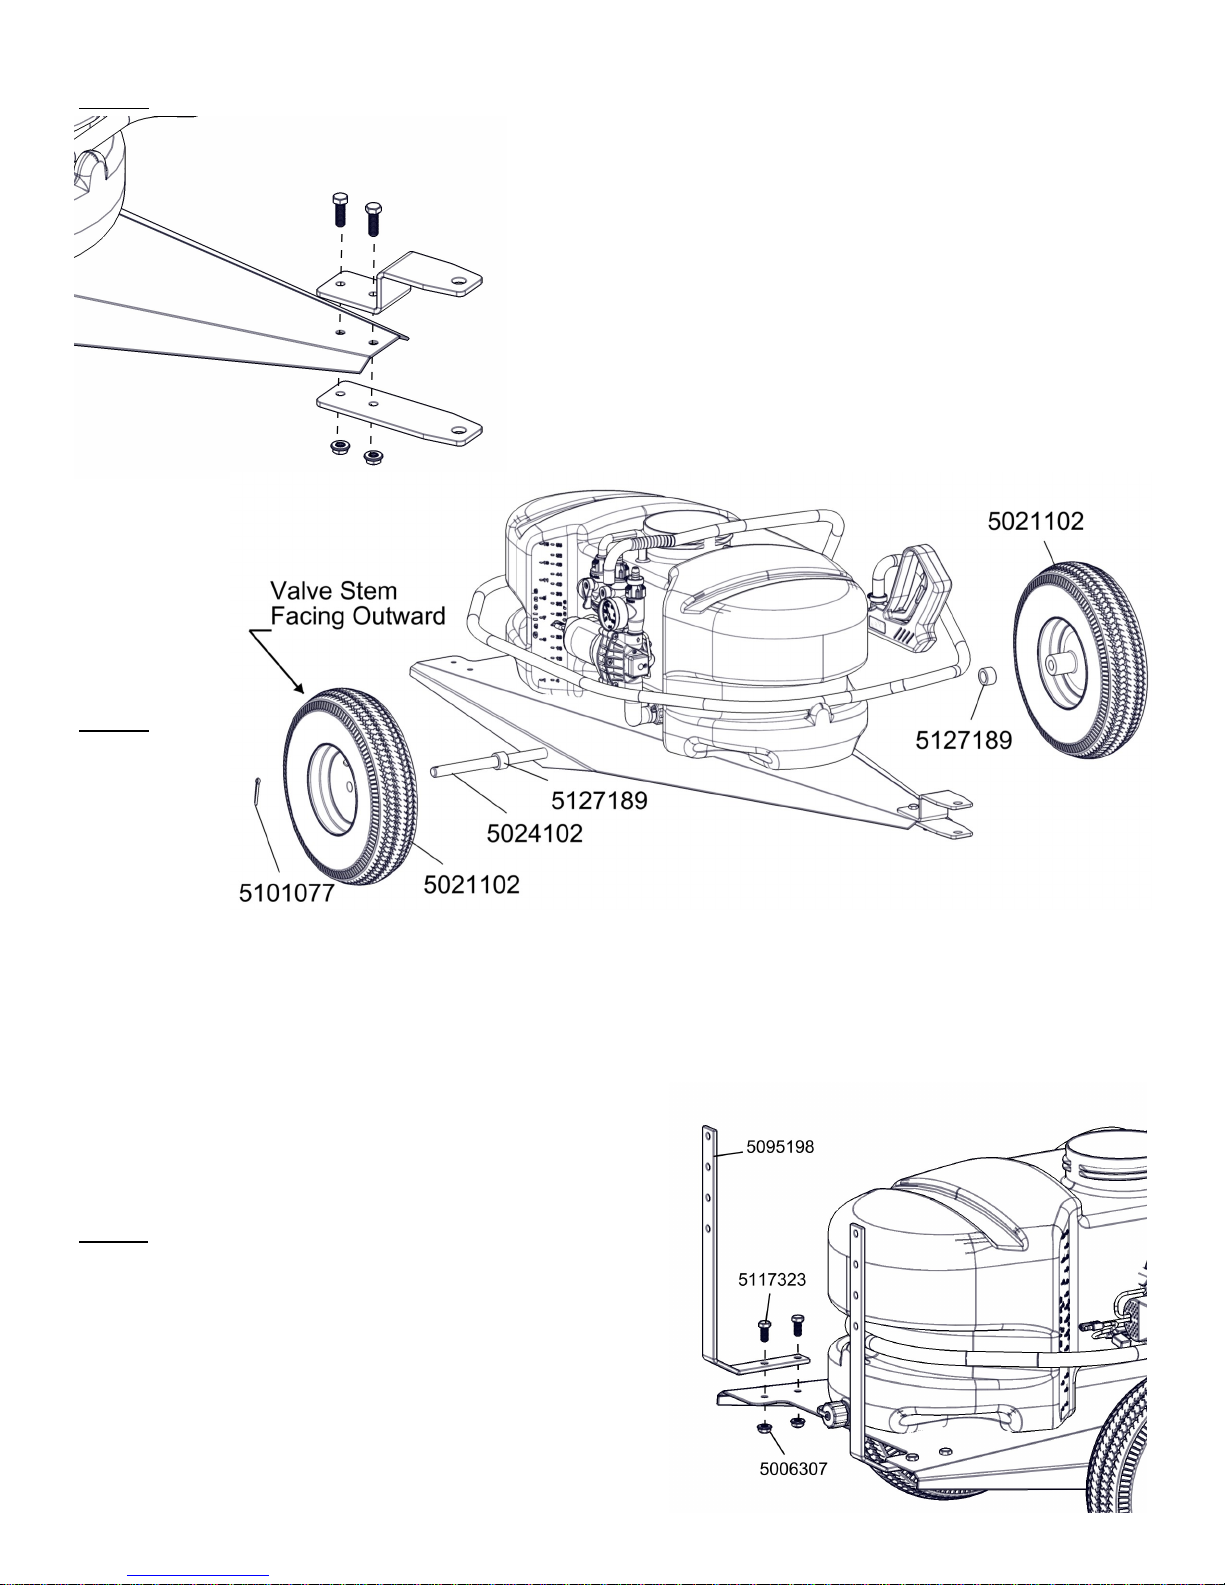
Step 1
Assembly Procedure (LG-2500-304)
Remove the hitch brackets, both at (5038518) and formed (5038517) from the
parts bag. The at one is to be placed under the frame and the formed one gets
placed on top of the frame.
Bolt them together, ‘sandwiching’ the frame between both of the brackets.
Using a 1/2” socket or wrench, ghten the 1” long bolts (5117300) securely.
Use the 5/16” whiz nuts (5006307) with the bolts.
They should grab ghtly against the frame as you ghten the bolts down.
Step 2
Remove the axle (5024102) and (2) wheels (5021102) from the carton. Remove the (2) wheel spacers (5127189) and (2) coer pins
(5101077) from the parts bag. Slide the axle through the hole in one side of the frame and through the corresponding hole on the
other side of the frame. You may need to maneuver (squeeze) the frame slightly while doing this to get the axle through both
holes. Center the axle about the frame as best as possible. Slide the wheel spacers onto the axle. Now slide the wheels over the
axle and up against the wheel spacer. Make sure the valve stems of the wheels are facing outward. Retain the wheel on the axle
with coer pins. Place the pins through the holes at the end of the axle. Using a needle nose pliers or similar tool, bend the pins so
theyat they will not slip out and the wheel will be retained on the axle.
Step 3
Locate the (2) boom mounng brackets (5095198). These two
brackets mount to the rear of the frame with (2) bolts (5117323)
and (2) whiz nuts (5006307). (Each Bracket)
Using a 1/2” socket or wrench, ghten the hardware securely.
The whiz nuts will grab ghtly against the frame as you ghten
the bolts down.
Page 3
 Loading...