

Page 1
Page 2

Page 3
TR22/RS ● TR22/RG ● TR32/RS
AB22/AT ● TR22/TS ● TR32/TN
TRITACARNE E GRATTUGIA
1 INFORMAZIONI GENERALI
Scopo del manuale……………………………….
Identificazione Costruttore e macchina………...
Descrizione delle macchine...…………………...
Caratteristiche tecniche………………………….
Dimensioni d’ ingombro………………………….
Dispositivi di sicurezza…………………………...
Informazioni sulla sicurezza………………….….
2 INFORMAZIONI SULL’ INSTALLAZIONE
Imballo e disimballo………………………………
Zona d’ installazione……………………………..
Collegamento elettrico…………………………...
INDICE
3 INFORMAZIONI SULL’ USO E LA PULIZIA
Descrizione dei comandi………………………….
4
Uso della grattugia………………………………...
4
Uso del tritacarne…..……………………………..
5
Smontaggio gruppo macinazione……………….
6
Consigli d’ uso……………………………………..
6
Pulizia a fine giornata….………………………….
7
Lunga inattività della macchina………………….
7
4 RICERCA GUASTI, RICICLAGGIO
Premessa…………………………………………..
8
Inconvenienti, cause, rimedi……………………..
8
Smaltimento e riciclaggio…………………………
8
ALLEGATI
Schema di montaggio gruppo tritacarne unger
Catalogo ricambi
Schema elettrico
9
9
9
10
10
10
10
11
11
11
Page 4

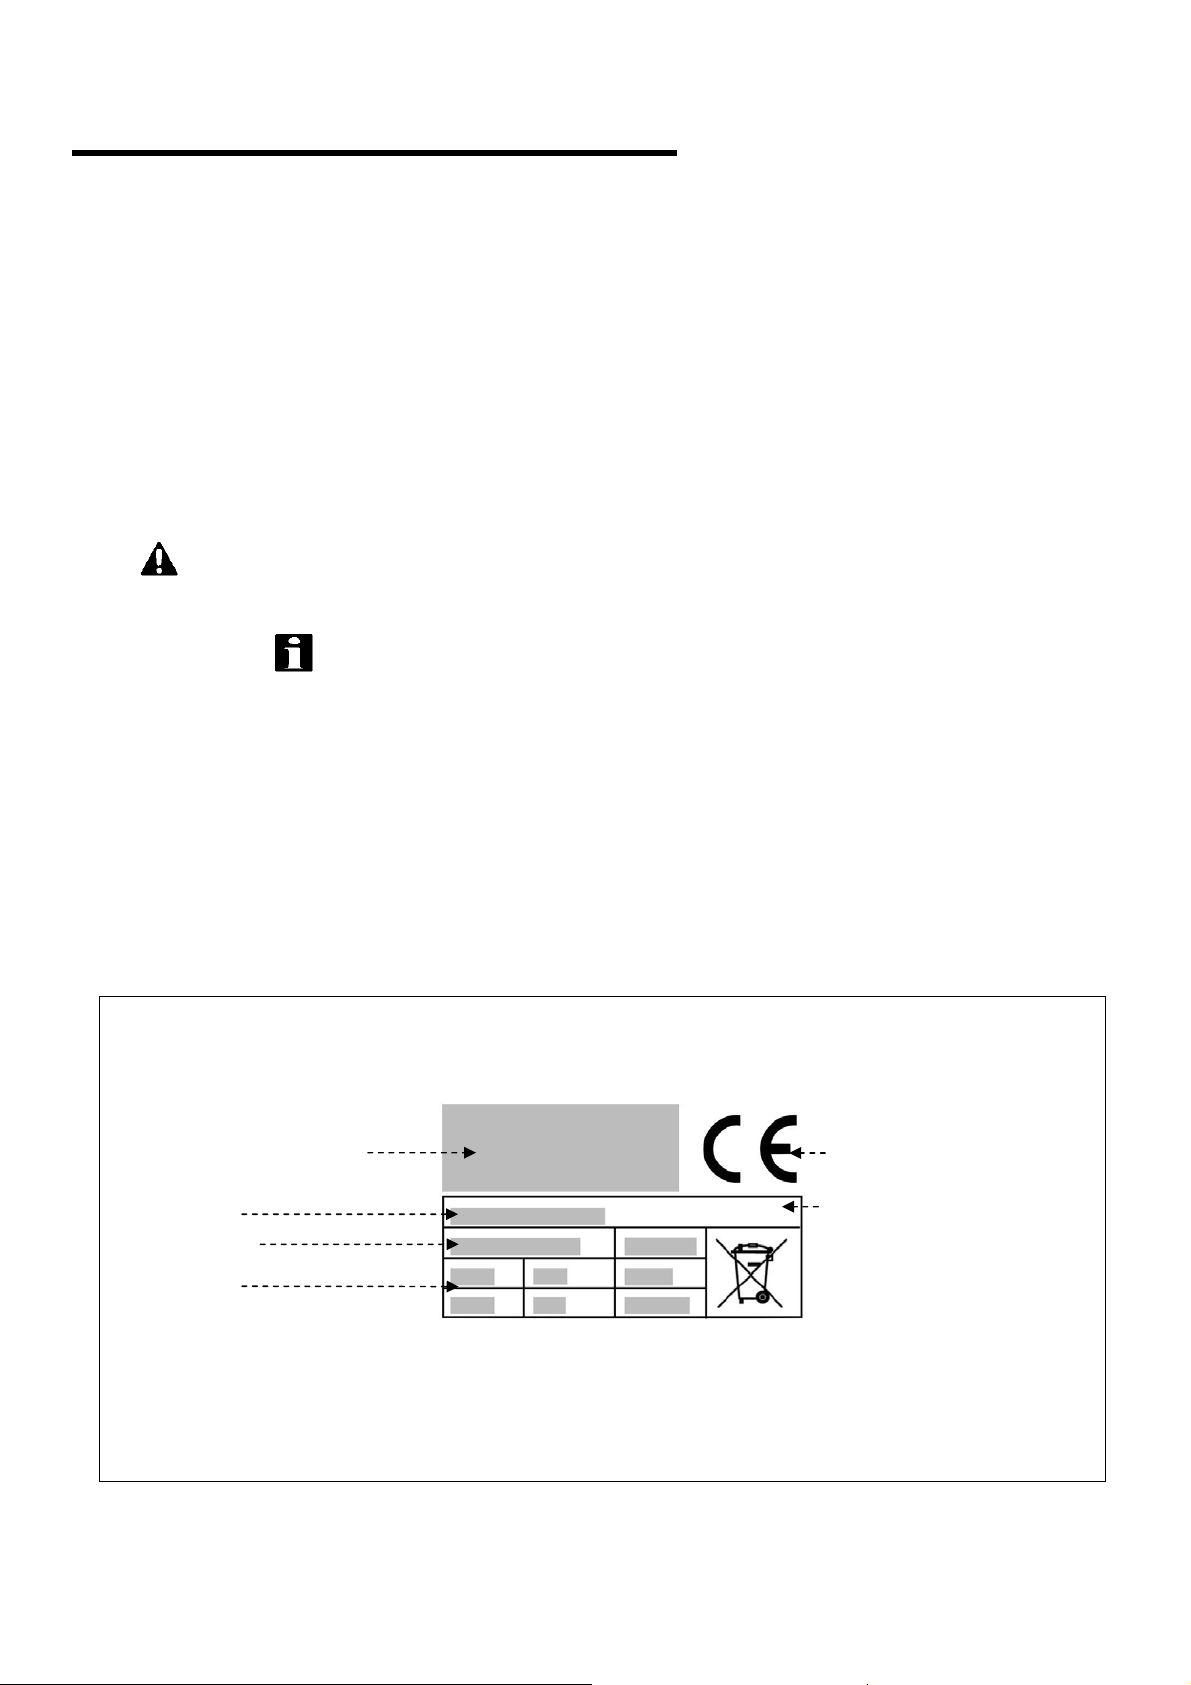
INFORMAZIONI
Scopo del manuale
Questo manuale è stato redatto dal Costruttore ed è parte integrante del corredo della macchina. Egli, in
fase di progettazione e costruzione, ha posto particolare attenzione agli aspetti che possono provocare rischi
alla sicurezza e alla salute delle persone che interagiscono con la macchina. Oltre al rispetto delle leggi
vigenti in materia, egli ha adottato tutte le “regole della buona tecnica di costruzione”. Scopo di queste
informazioni è quello di sensibilizzare gli utenti a porre particolare attenzione per prevenire qualsiasi rischio.
La prudenza è comunque insostituibile. La sicurezza è anche nelle mani di tutti gli operatori che
interagiscono con la macchina. Conservare questo manuale in un luogo appropriato, al fine di averlo sempre
a portata di mano per la sua consultazione. Per mettere in evidenza alcune parti del testo, sono stati inseriti i
seguenti simboli:
PERICOLO – ATTENZIONE: indica i pericoli che possono provocare gravi lesioni; è
necessario prestare attenzione.
INFORMAZIONI: indicazioni tecniche di particolare importanza.
Al presente manuale vengono allegati:
- Il certificato di garanzia in cui sono riportate le condizioni di garanzia dettate dal Costruttore.
- I documenti che attestano la conformità alle leggi vigenti in materia di sicurezza e salute delle persone.
Per qualsiasi richiesta di Assistenza tecnica, informazioni e ordini di ricambi, contattare il Rivenditore
autorizzato.
Identificazione Costruttore e macchina
GENERALI
1
Identificazione Costruttore
Numero di matricola
Modello macchina
Dati tecnici
Marcatura di conformità
Anno di costruzione
Page 5
INFORMAZIONI
GENERALI
1
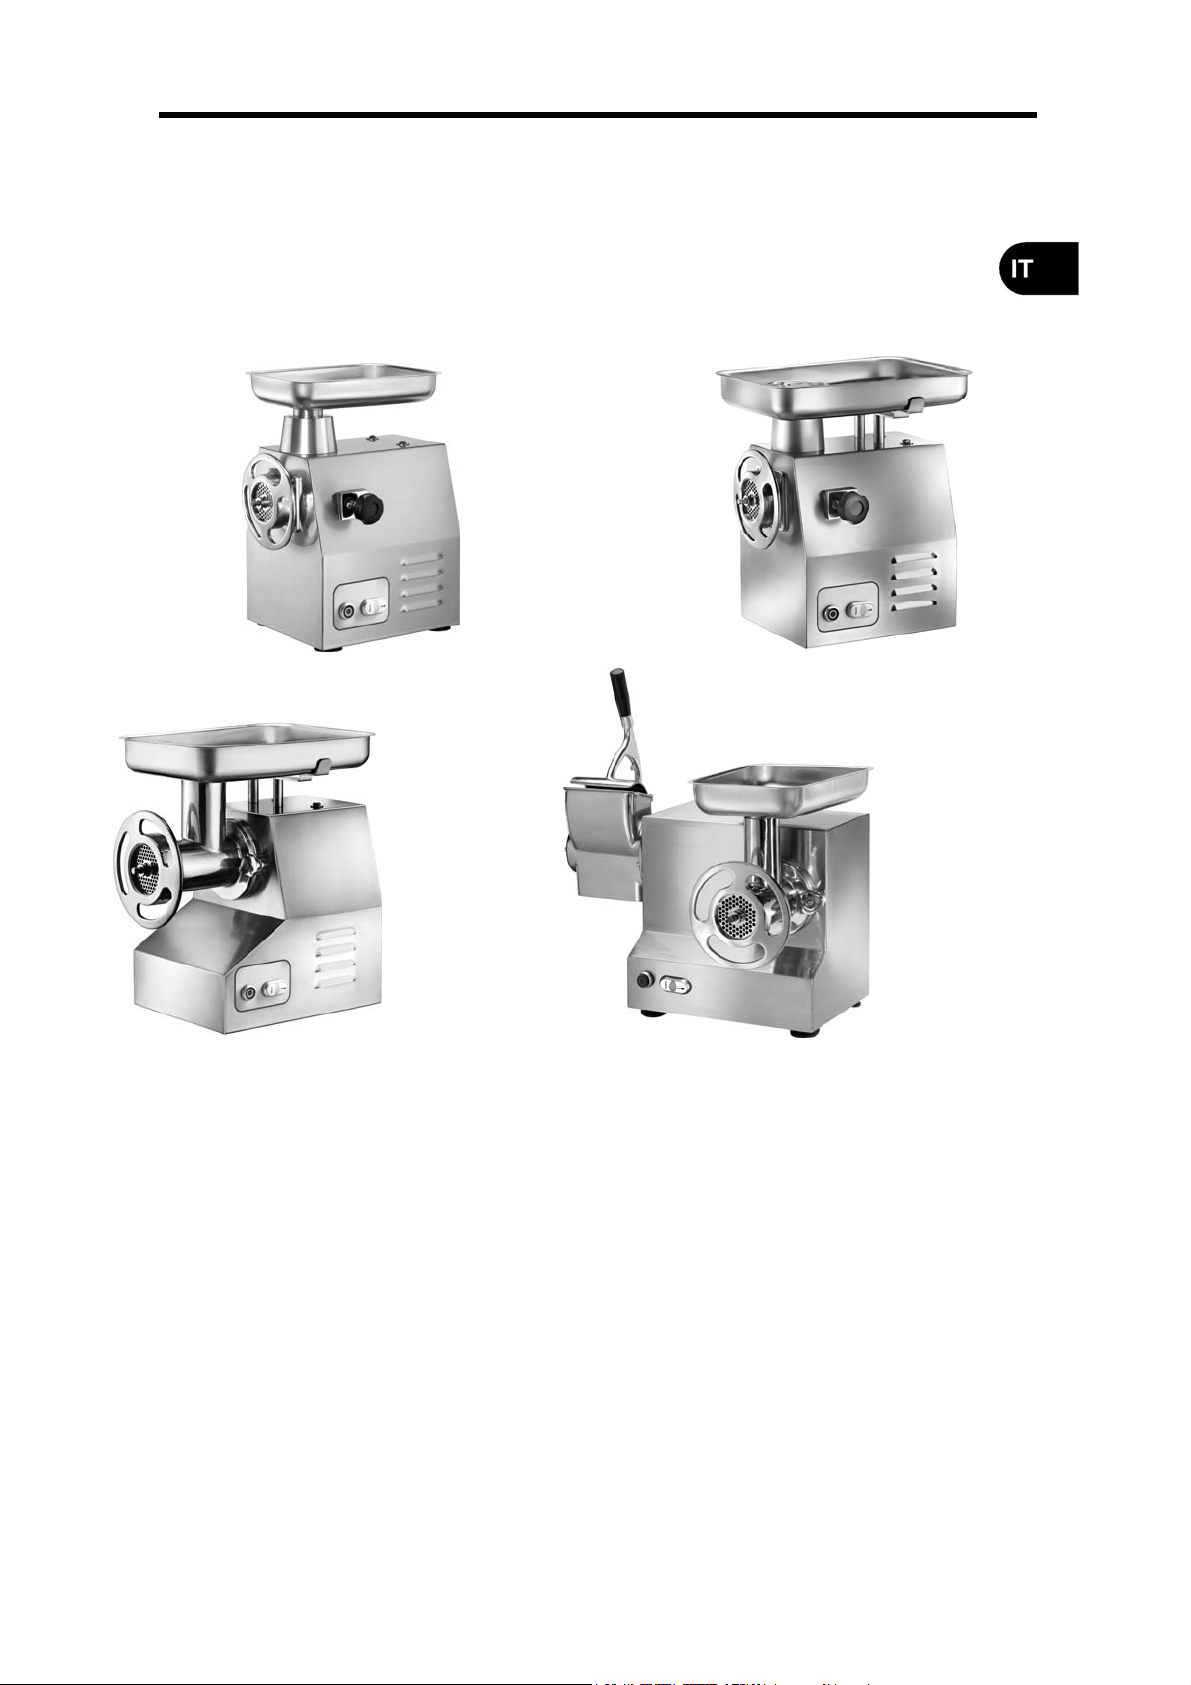
Descrizione delle macchine
Abbinato tritacarne-grattugia:
L’abbinato tritacarne-grattugia è una macchina di tipo professionale per la ristorazione colletiva (ristoranti,
alberghi, comunità, macellerie, mense colletive, ecc.) per la lavorazione di carne e formaggi. Il tritacarne
mediante l’ applicazione di diverse piastre grigliate consente di ottenere macinati di carne di svariate
tipologie. La grattugia è in grado di lavorare prodotti quali: formaggi stagionati, biscotti, pane secco, frutta
secca, ecc.
La gamma è composta da 1 modello:
AB22/AT (mod. 22 versione con gruppo tritacarne completamente estraibile)
La macchina è realizzata con struttura in acciaio inox e alluminio, facile da pulire.
E’ provvista di dispositivi di sicurezza in conformità alle Direttive Europee.
Tritacarne:
Il tritacarne è una macchina di tipo professionale per la ristorazione colletiva (ristoranti, alberghi, comunità,
macellerie, mense colletive, ecc.) per la lavorazione di carne. Il tritacarne mediante l’ applicazione di diverse
piastre grigliate consente di ottenere macinati di carne di svariate tipologie.
La gamma è composta da 5 diversi modelli:
TR22/RS (mod.22 versione base)
TR22/RG (mod.22 versione con ingresso carne maggiorato)
TR32/RS (mod.32 versione base)
TR22/TS (mod.22 versione con gruppo tritacarne completamente estraibile)
TR32/TN (mod.32 versione con gruppo tritacarne completamente estraibile)
La macchina è realizzata con struttura in acciaio inox e alluminio, facile da pulire.
E’ provvista di dispositivi di sicurezza in conformità alle Direttive Europee.
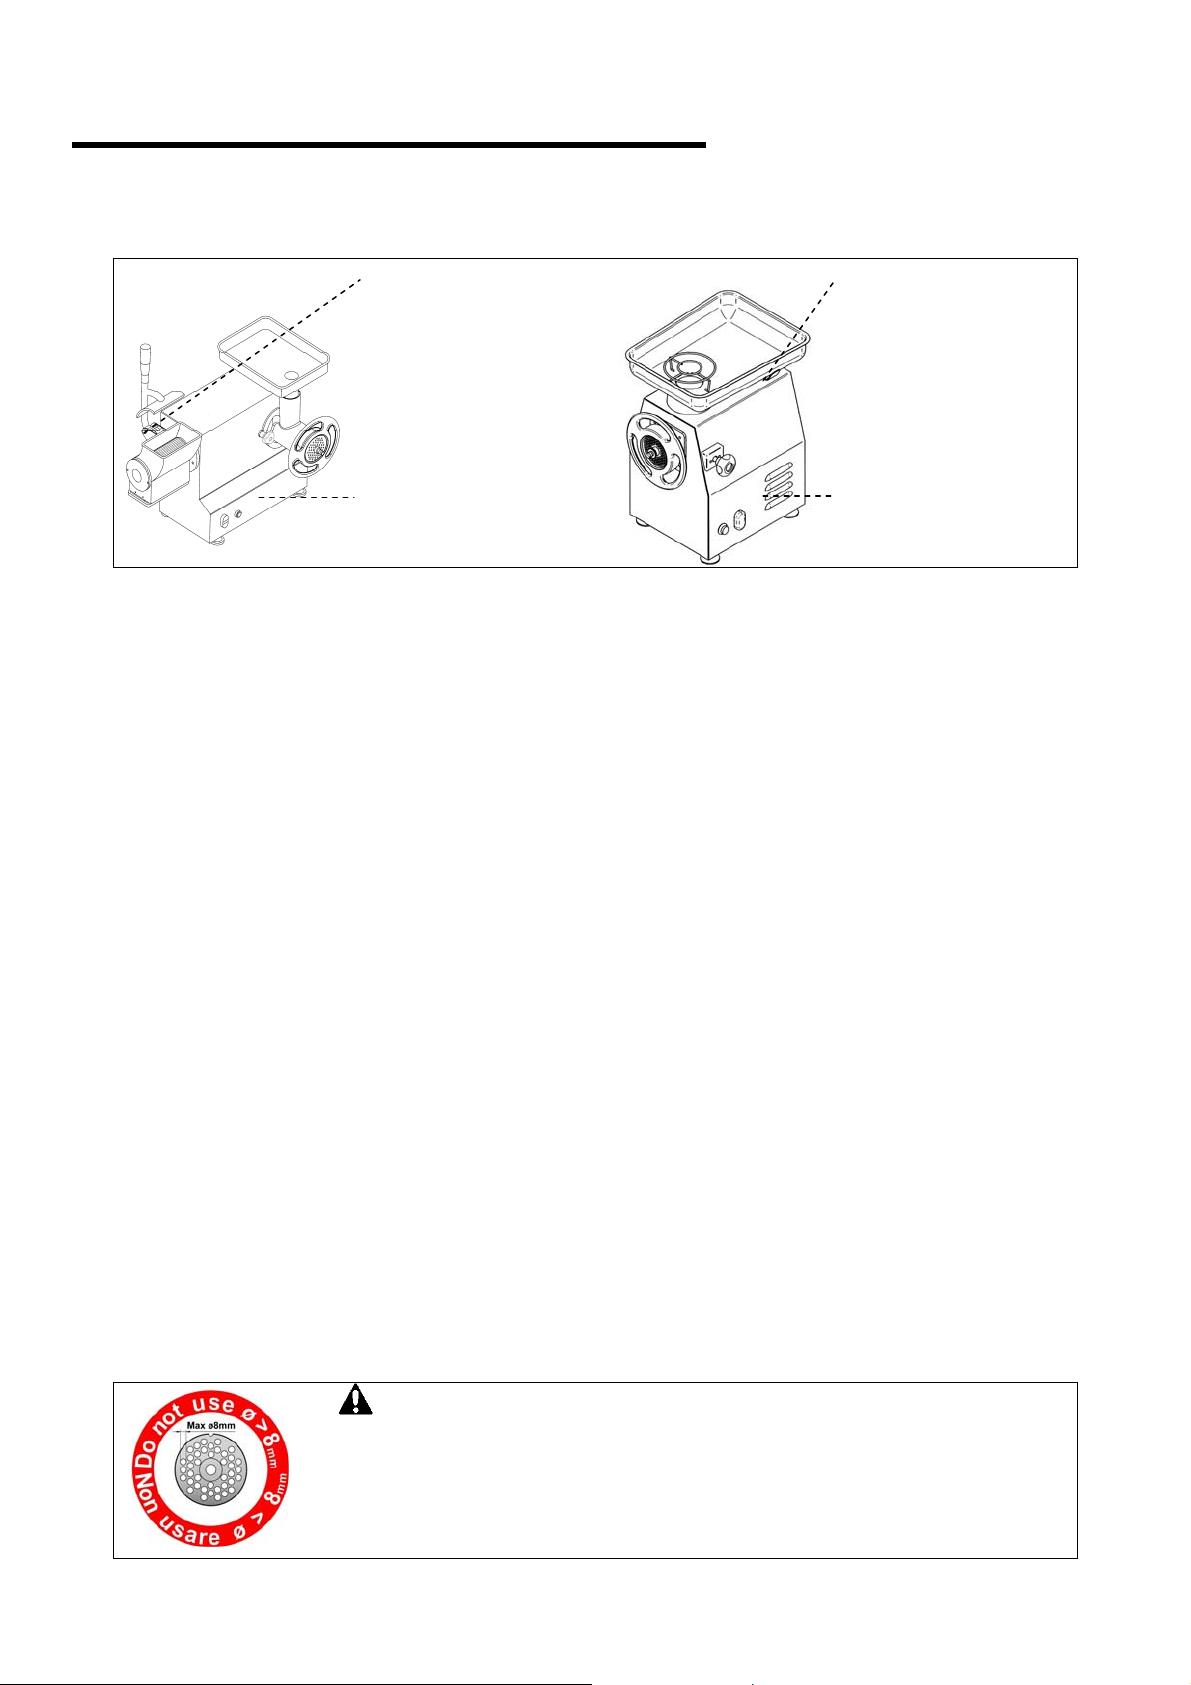
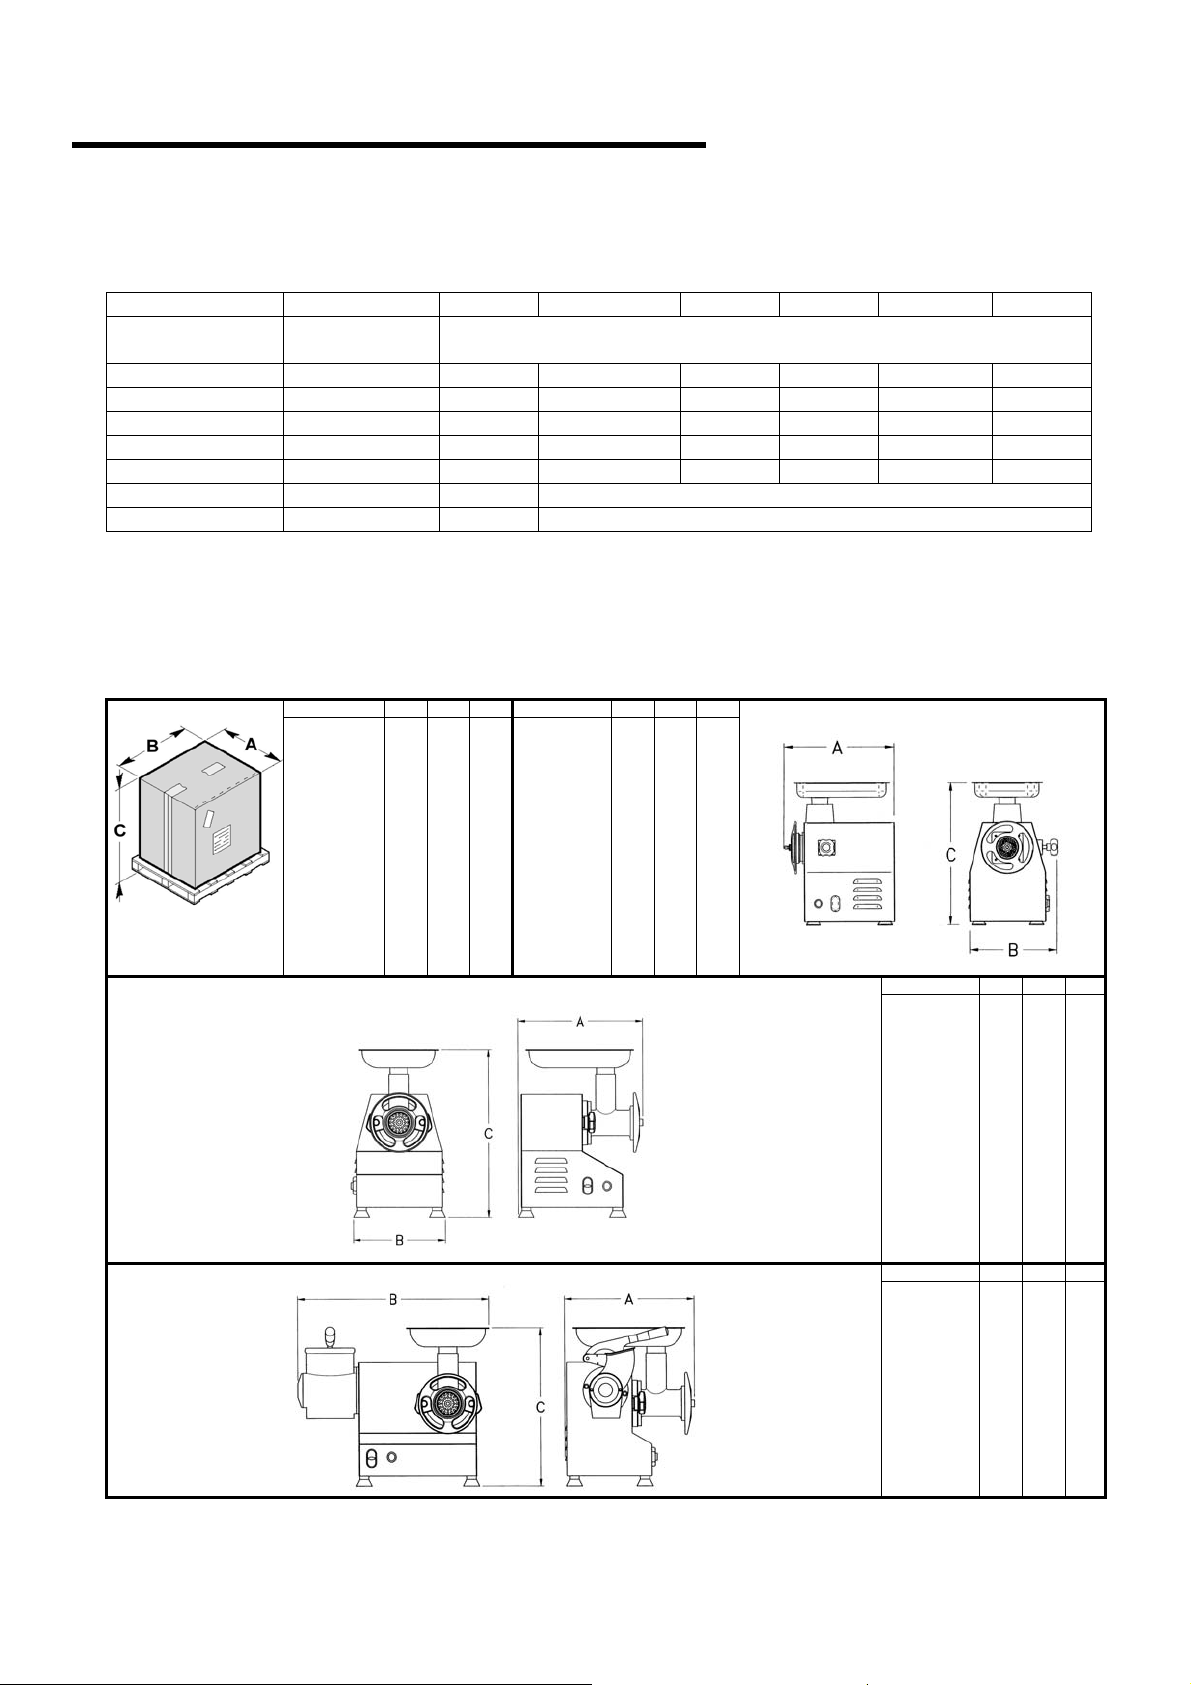
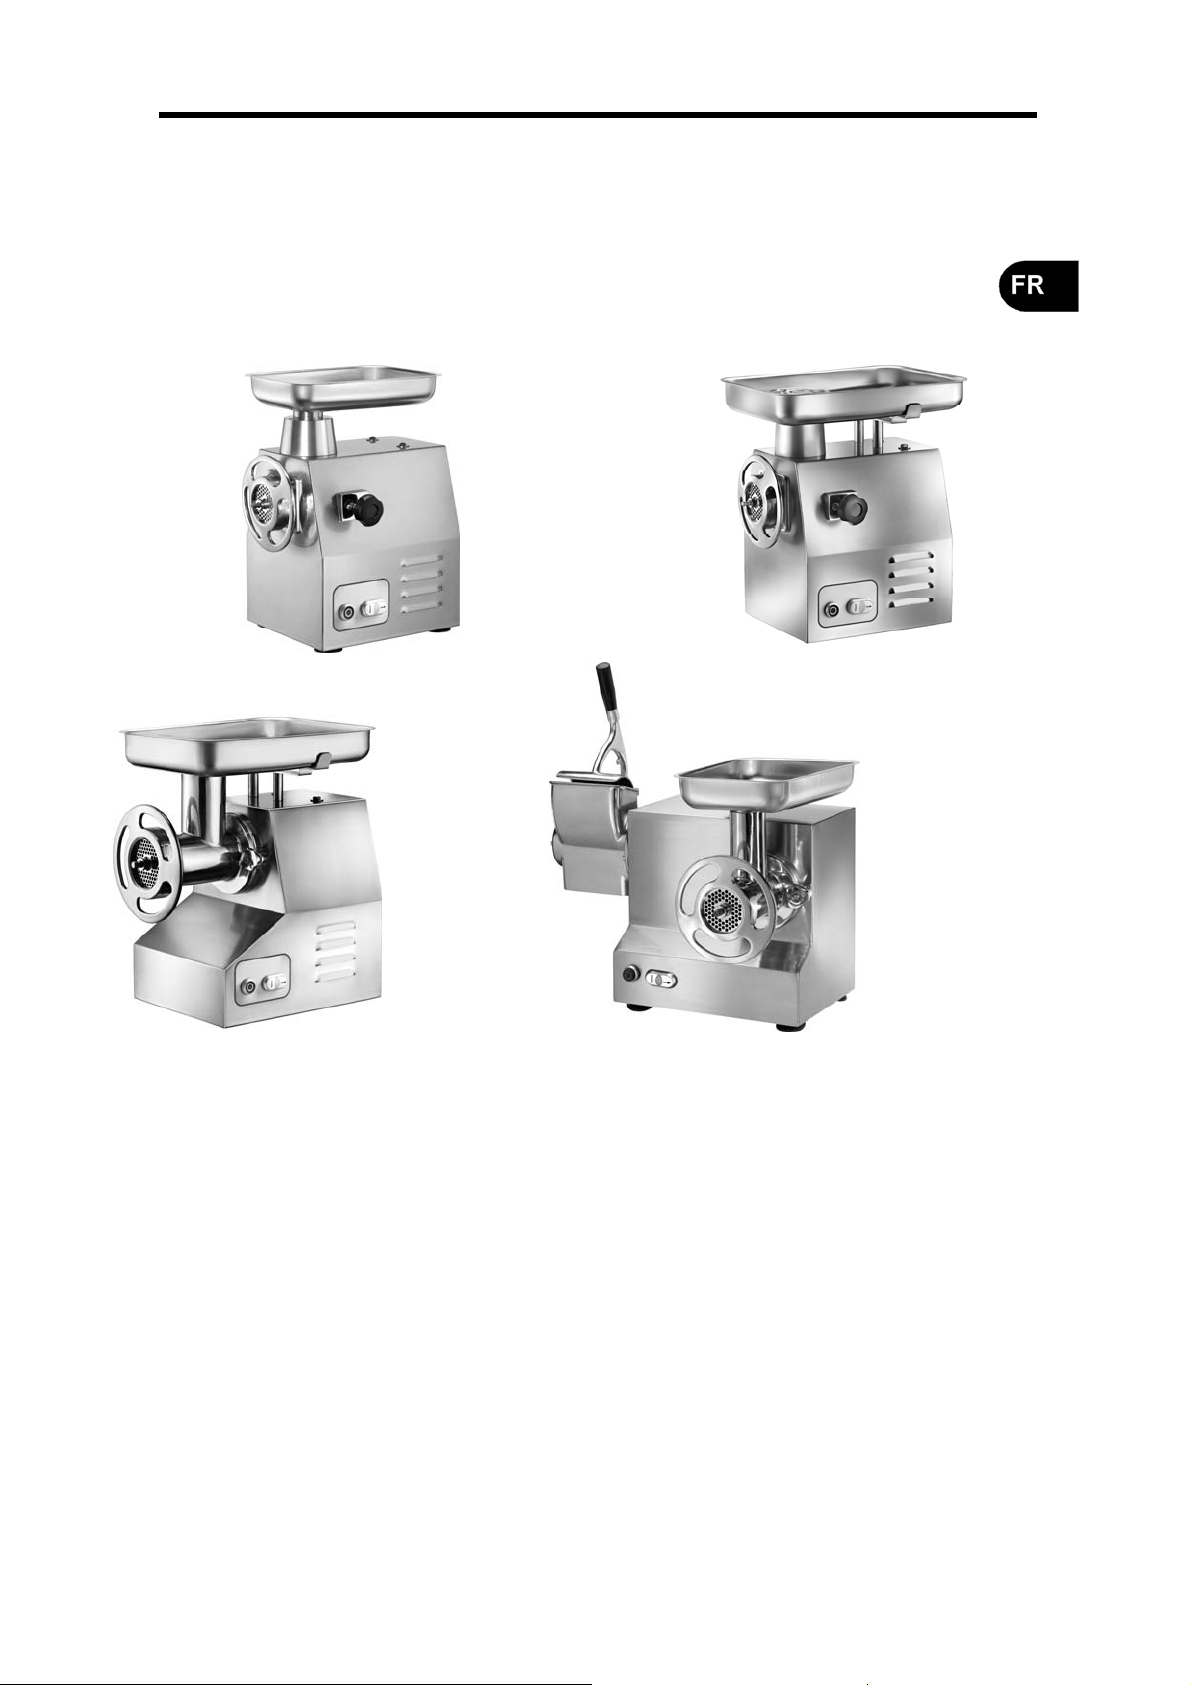
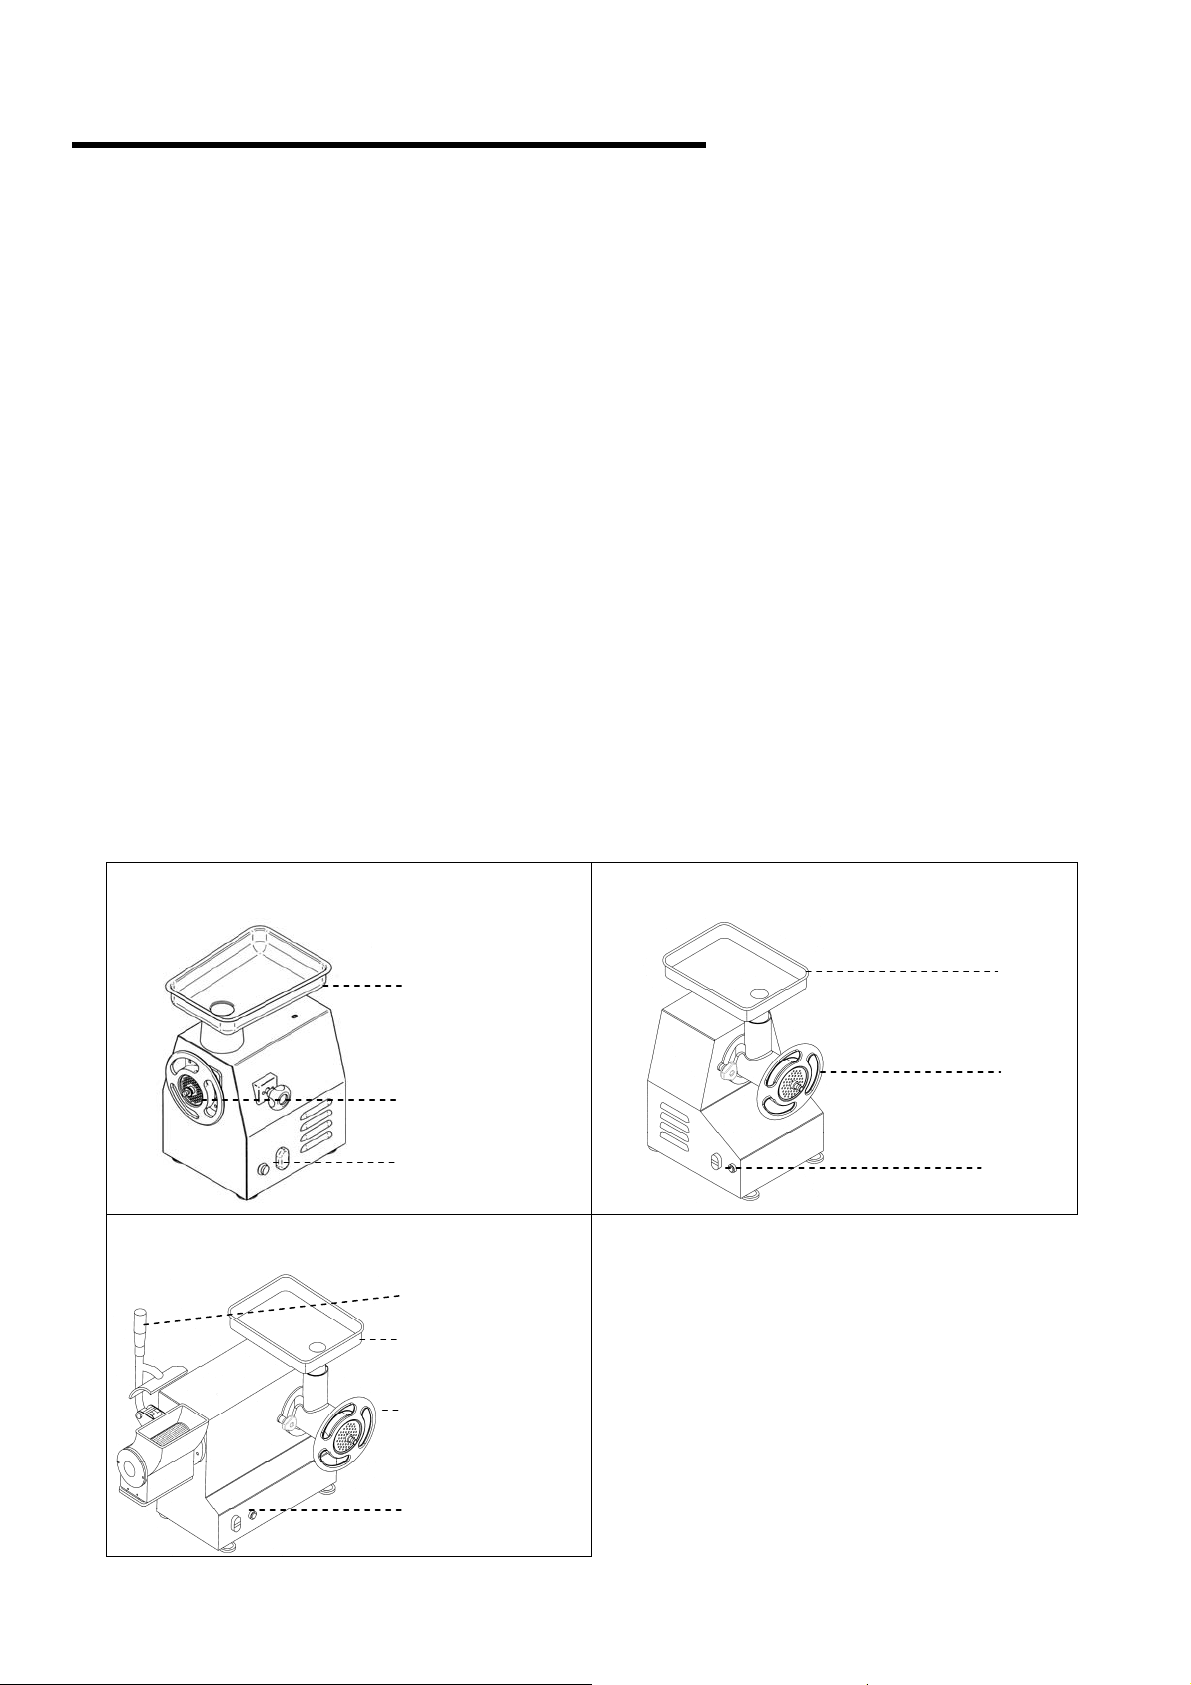
MOD.TR22/RS-22/RG-32/RS MOD.TR22/TS-32/TN
Tramoggia
Volantino
Quadro comandi
Tramoggia
Volantino
Quadro comandi
MOD.AB22/AT
Leva grattugia
Tramoggia
Volantino
Quadro comandi
Page 6
INFORMAZIONI
GENERALI
1
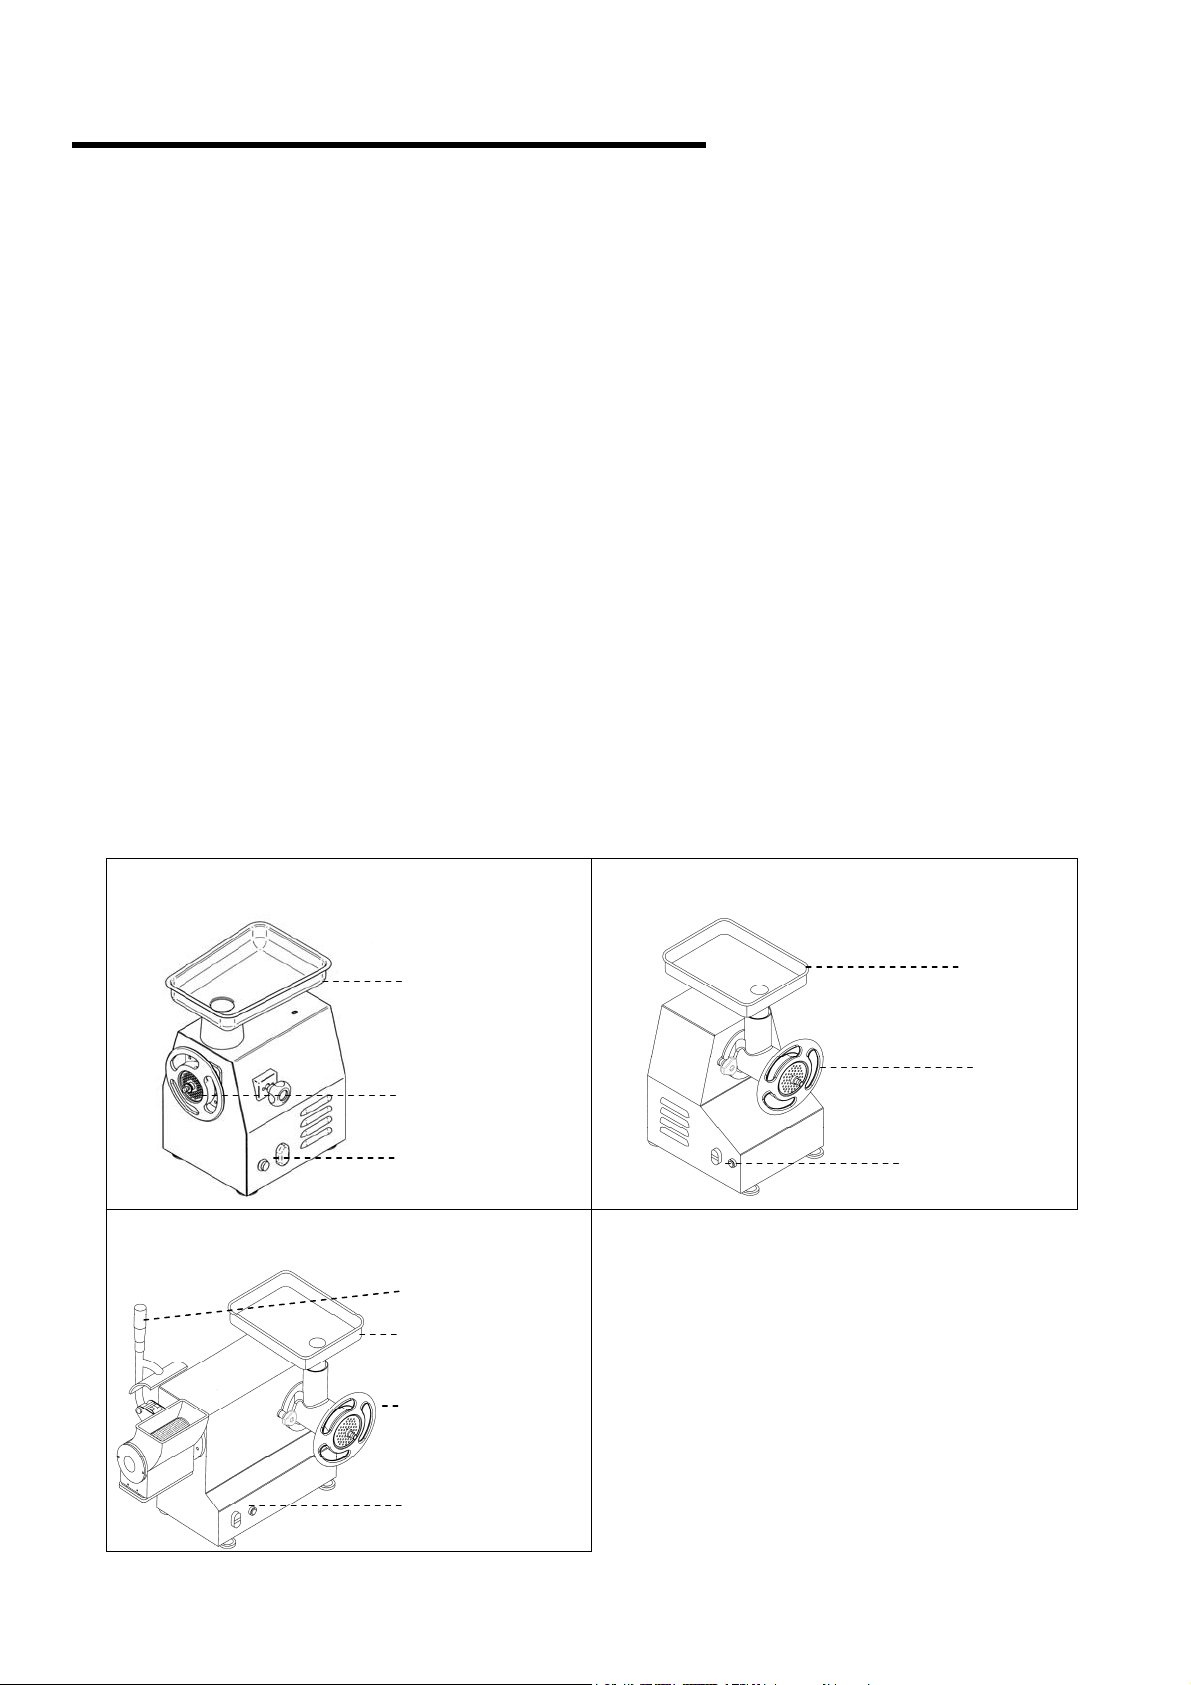
Caratteristiche tecniche
Descrizioni Unità di misura TR22/RS TR22/RG TR32/RS TR22/TS TR32/TN AB22/AT
Alimentazione di
energia elettrica
V Hz Ph
230V 50Hz 1Ph
230/400V 50Hz 3Ph
Potenza kW (HP) 1.1 (1.5) 1.1 (1.5) 2.2 (3) 1.1 (1.5) 2.2 (3) 1.1 (1.5)
Produzione oraria
tritacarne
Produzione oraria
grattugia
kg 300 300 500 300 500 300
kg / / / / / 40
Peso netto kg 32 33,5 43/53 31 42/52 39
Peso con imballo kg 38 39,5 49/59 37 48/58 45
Livello di
rumorosità
< 70 dB(A)
Installazione Su banco
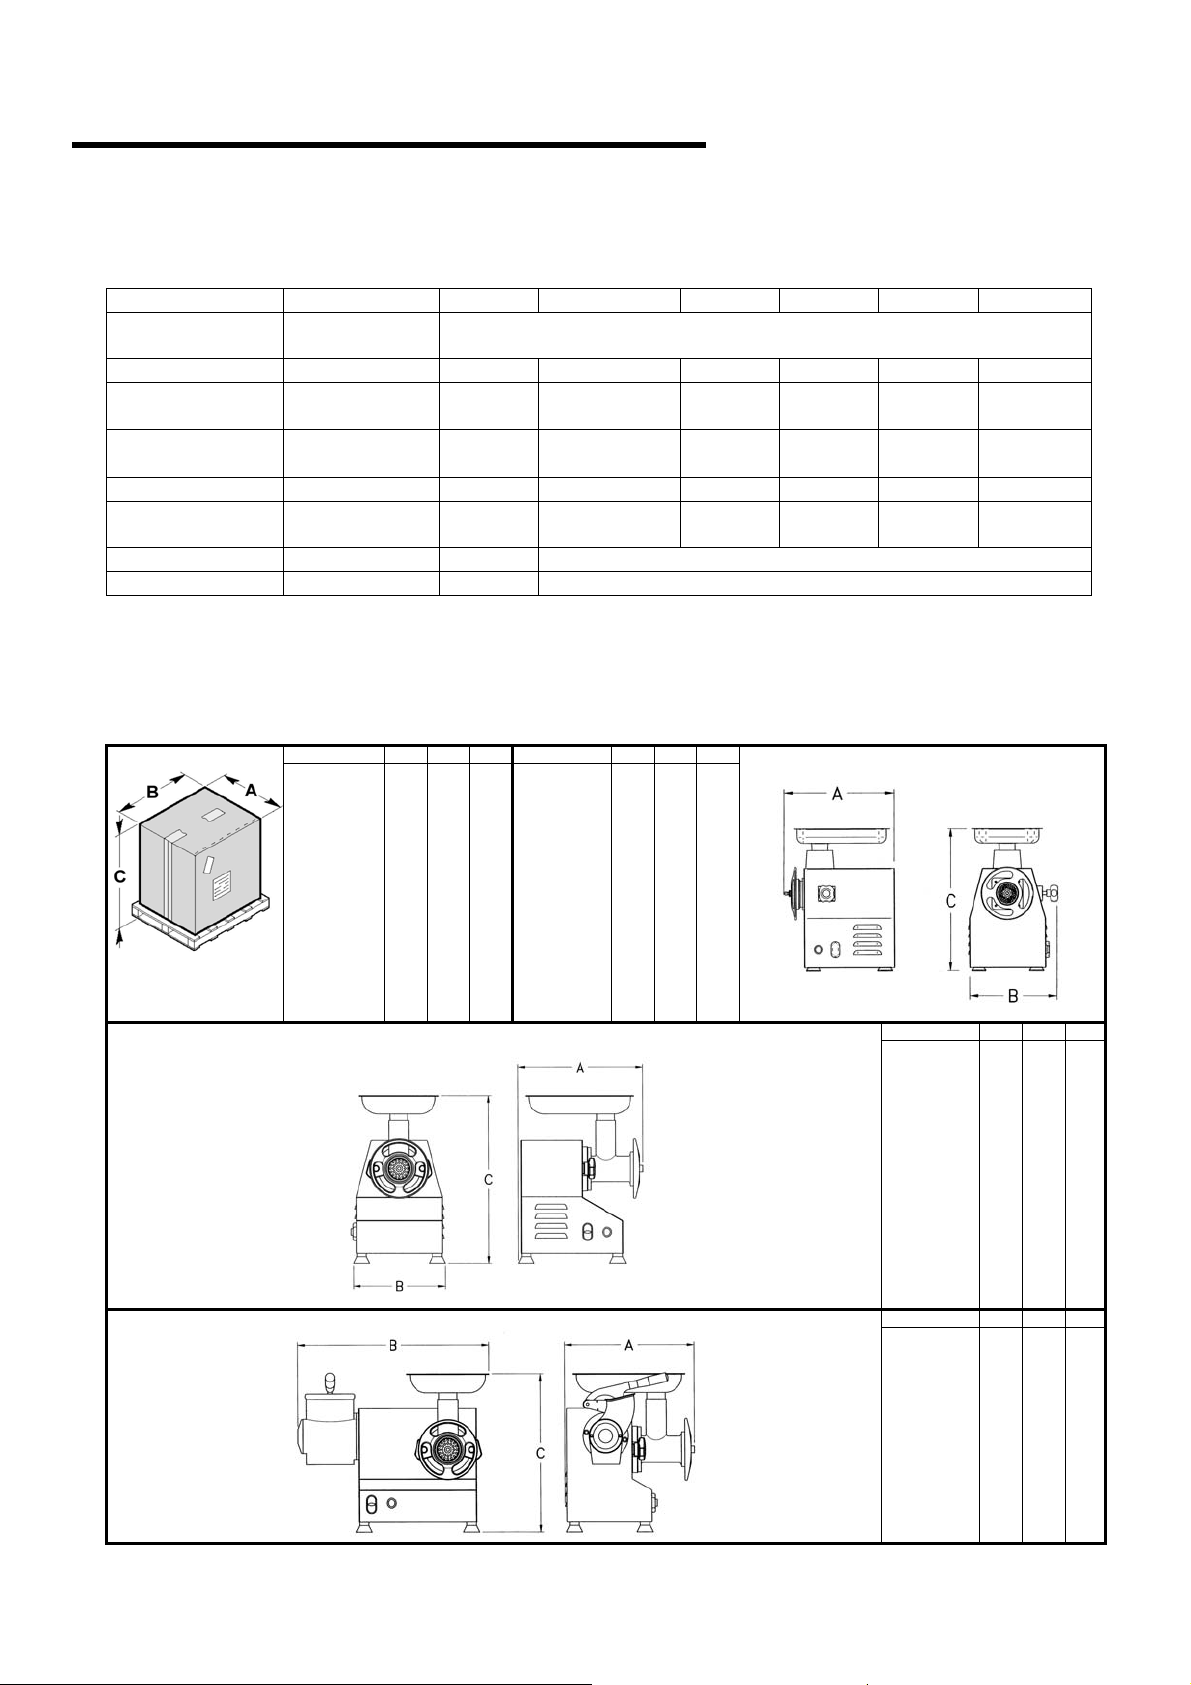
Dimensioni d’ ingombro
mm. A B C mm. A B C
700
570
TR22/RS
TR22/RG
TR22/TS
TR32/RS
TR32/TS
AB22/AT
420
420
420
420
420
450
700
570
570
570
570
700
TR22/RS
700
TR22/RG
700
TR32/RS
700
720
mm. A B C
410
410
490
310
310
340
520
490
530
TR22/TS
TR32/TN
mm. A B C
AB22/AT 430 540 480
420
520
300
320
520
550
Page 7
INFORMAZIONI
GENERALI
Dispositivi di sicurezza
Microinterruttore: arresta la
macchina quando si alza la leva
della grattugia. Alla successiva
chiusura della leva, riavviare la
macchina premendo il pulsante
I (solo AB22/AT)
Teleruttore: in caso di
mancanza accidentale di
corrente, richiede il riavvio
volontario della macchina
Microinterruttore: arresta la
macchina quando si estrae la
tramoggia dalla bocca
d’ingresso tritacarne. Dopo il
reinserimento della tramoggia,
riavviare la macchina premendo
il pulsante I (solo TR22/RG-
32/RS-32/TN)
Teleruttore: in caso di
mancanza accidentale di
corrente, richiede il riavvio
volontario della macchina
Informazioni sulla sicurezza
• È di basilare importanza consultare attentamente questo manuale prima di procedere alle operazioni di
installazione e uso. La costante osservanza delle indicazioni contenute nel manuale garantisce la
sicurezza dell’ uomo e della macchina.
• Non manomettere per nessuna ragione i dispositivi di sicurezza.
• Si raccomanda il rispetto rigoroso delle norme di sicurezza sul lavoro emanate dagli enti preposti in ogni
nazione.
• Il costruttore declina ogni responsabilità per danni a persone o cose, conseguenti l’ inosservanza delle
norme di sicurezza.
• La corretta dislocazione della macchina, l’ illuminazione e la pulizia dell’ ambiente, sono condizioni
importanti ai fini della sicurezza personale.
• Non esporre la macchina agli agenti atmosferici.
• L’ allacciamento a la messa in opera della macchina devono essere eseguiti solo da personale tecnico
specializzato.
• Verificare che le caratteristiche dell’ impianto dove va installata la macchina corrispondano ai dati
stampigliati sulla targa.
• Accertarsi che la macchina sia collegata ad un impianto di messa a terra.
• La zona di lavoro attorno alla macchina deve sempre essere mantenuta pulita e asciutta.
• Utilizzare gli indumenti previsti dalle norme antinfortunistiche sul lavoro.
• Questa macchina deve essere destinata solo all’ uso previsto; ogni altro uso è da considerarsi improprio
e quindi pericoloso.
• Verificare l’ idoneità e il peso dei prodotti da lavorare; non sovraccaricare la macchina oltre la sua
capacità.
• È vietato introdurre oggetti, utensili, mani o altro all’ interno delle parti pericolose.
• Tenere la macchina fuori dalla portata dei bambini.
• Staccare la spina dalla presa di corrente quando la macchina non viene utilizzata.
• In caso di guasti e/o inconvenienti d’ uso, non effettuare personalmente le riparazioni ma rivolgersi al
Rivenditore autorizzato.
• Richiedere ricambi originali.
• Prima di procedere alla pulizia della macchina, scollegare l’ alimentazione elettrica staccando la spina.
• Per la pulizia non utilizzare getti d’ acqua ad alta pressione.
PERICOLO – ATTENZIONE: E’ severamente vietato utilizzare
piastre con fori aventi un diametro maggiore di 8mm ed uno spessore
totale inferiore a 5mm.Si raccomanda di sostituire la piastra, qualora
l’usura determini uno spessore inferiore ai 5mm. Il costruttore declina
ogni responsabilità per qualsiasi danno, a cose o persone, derivanti
dall’inosservanza delle suddette disposizioni.
1
Page 8

INFORMAZIONI
SULL’ INSTALLAZIONE
2
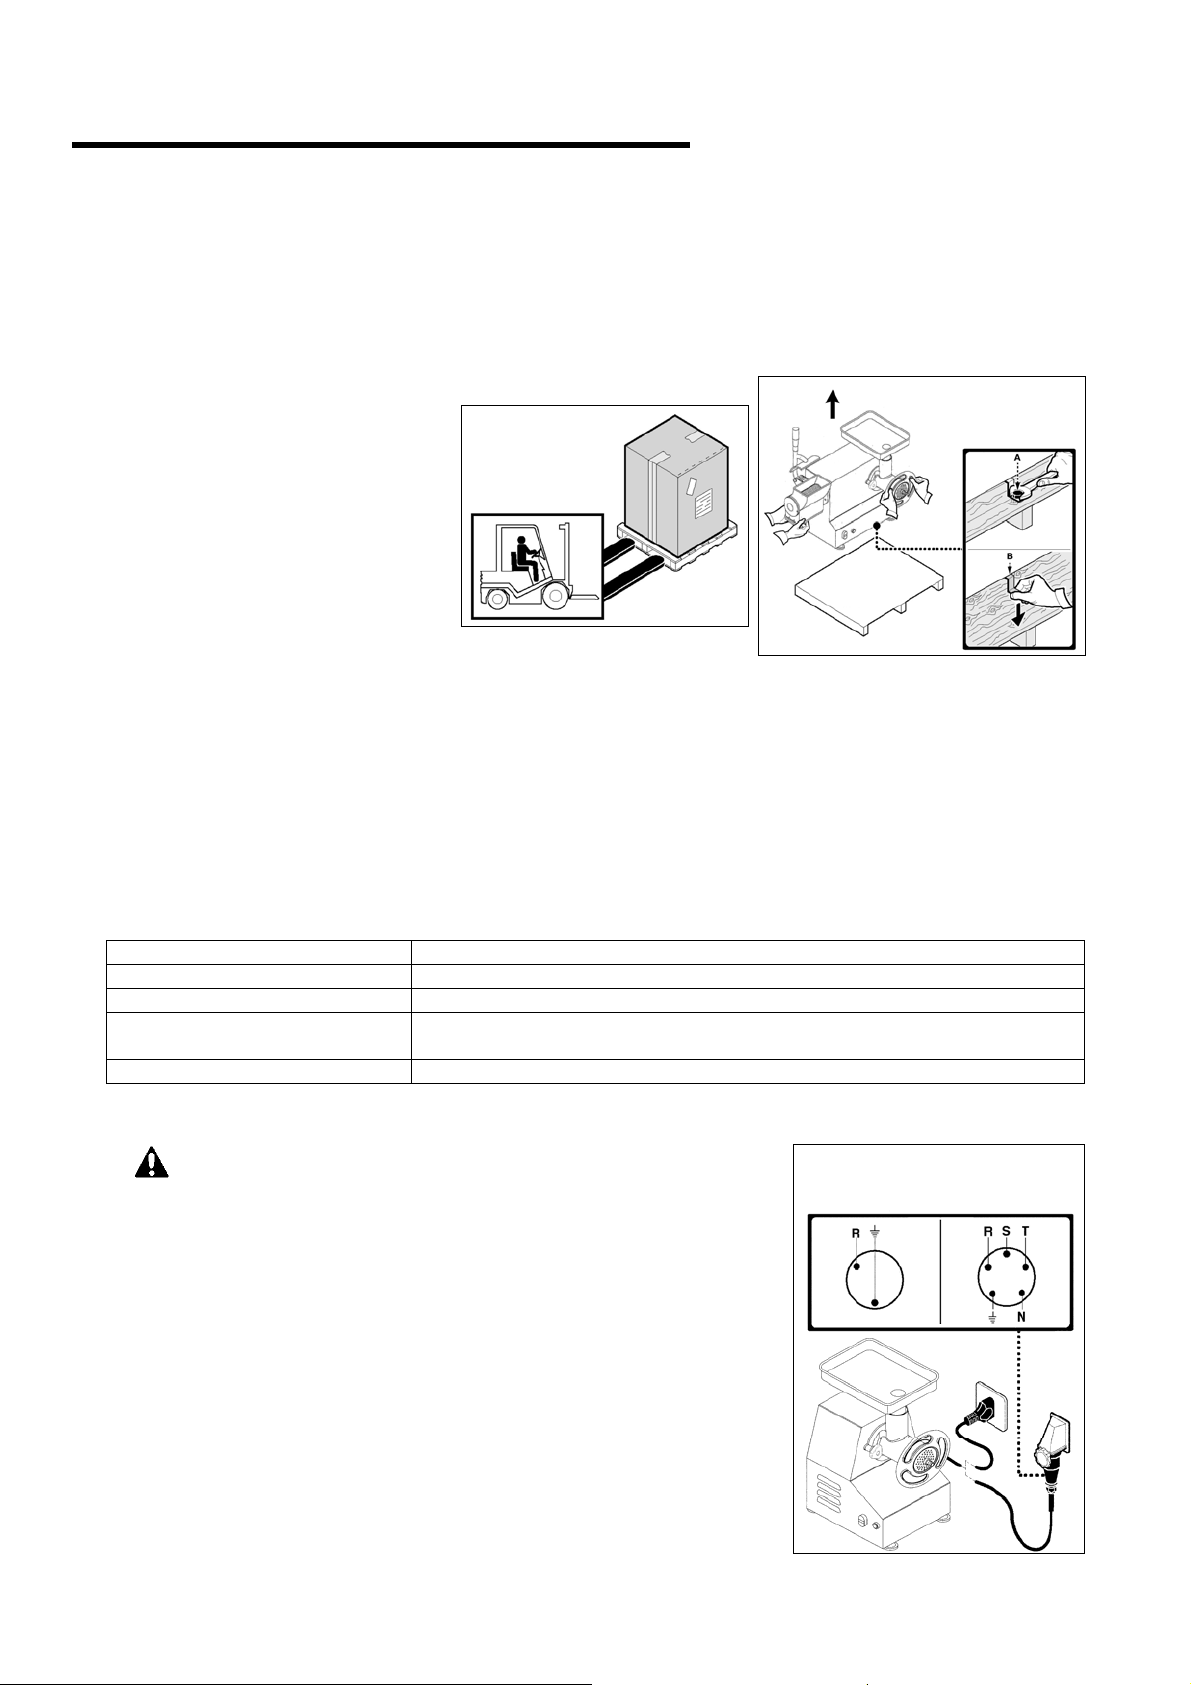
Imballo e disimballo
La macchina è imballata in cartone
con l’ inserimento di poliestere
espanso per garantire la perfetta
integrità durante il trasporto.
• Movimentare l’ imballo
rispettando le istruzioni.
• Aprire l’ imballo e verificare l’
integrità di tutti i componenti.
Conservare l’ imballo per futuri
traslochi.
• Svitare le viti A e sollevare la
macchina dal pallet.
• Rimuovere le staffe B.
• Effettuare il sollevamento della
macchina come indicato e
posizionarla nella zona adibita
all’ installazione.
Zona d’ installazione
La zona prestabilita dovrà essere adeguatamente illuminata e dovrà disporre di presa di distribuzione dell’
energia elettrica. Il piano di appoggio deve essere sufficientemente ampio, ben livellato e asciutto. L’
installazione deve avvenire in ambienti con atmosfera non esplosiva. In ogni modo, l’ installazione deve
essere eseguita tenendo conto anche delle leggi vigenti in materia di sicurezza sul lavoro.
Tabella Condizioni ambientali
Descrizioni Valori
Temperatura di funzionamento 0÷35 °C (32÷95 °F)
Temperatura di magazzinaggio -15 a +65 °C (da –6.8 a +149 °F)
Umidità relativa
Polverosità ambientale Inferiore a 0.03 g/m³
Collegamento elettrico
PERICOLO – ATTENZIONE: Il collegamento elettrico alla rete di
alimentazione deve essere eseguito da personale specializzato.
Accertarsi della perfetta efficienza dell’ impianto di messa a terra dello
stabilimento. Verificare che la tensione di linea (V) e la frequenza (Hz)
corrispondano a quelli della macchina (Vedere la targhetta di identificazione
e lo schema elettrico). La macchina è dotata di cavo elettrico al quale
collegare una spina multipolare. La spina è da collegare ad un interruttore a
muro provvisto di differenziale.
Collegamento trifase
Avviare la macchina per pochi attimi e verificare che la rotazione dell’
utensile sia corretta. Nel caso in cui la rotazione non sia corretta, togliere
tensione ed invertire due delle tre fasi nella spina.
Massima 80% con temperatura ambiente di 20 °C
Massima 50% con temperatura ambiente tra 20÷60 °C
Collegamento Collegamento
monofase trifase
230V – 1Ph 230/400V – 3Ph
Page 9

INFORMAZIONI SULL’ USO
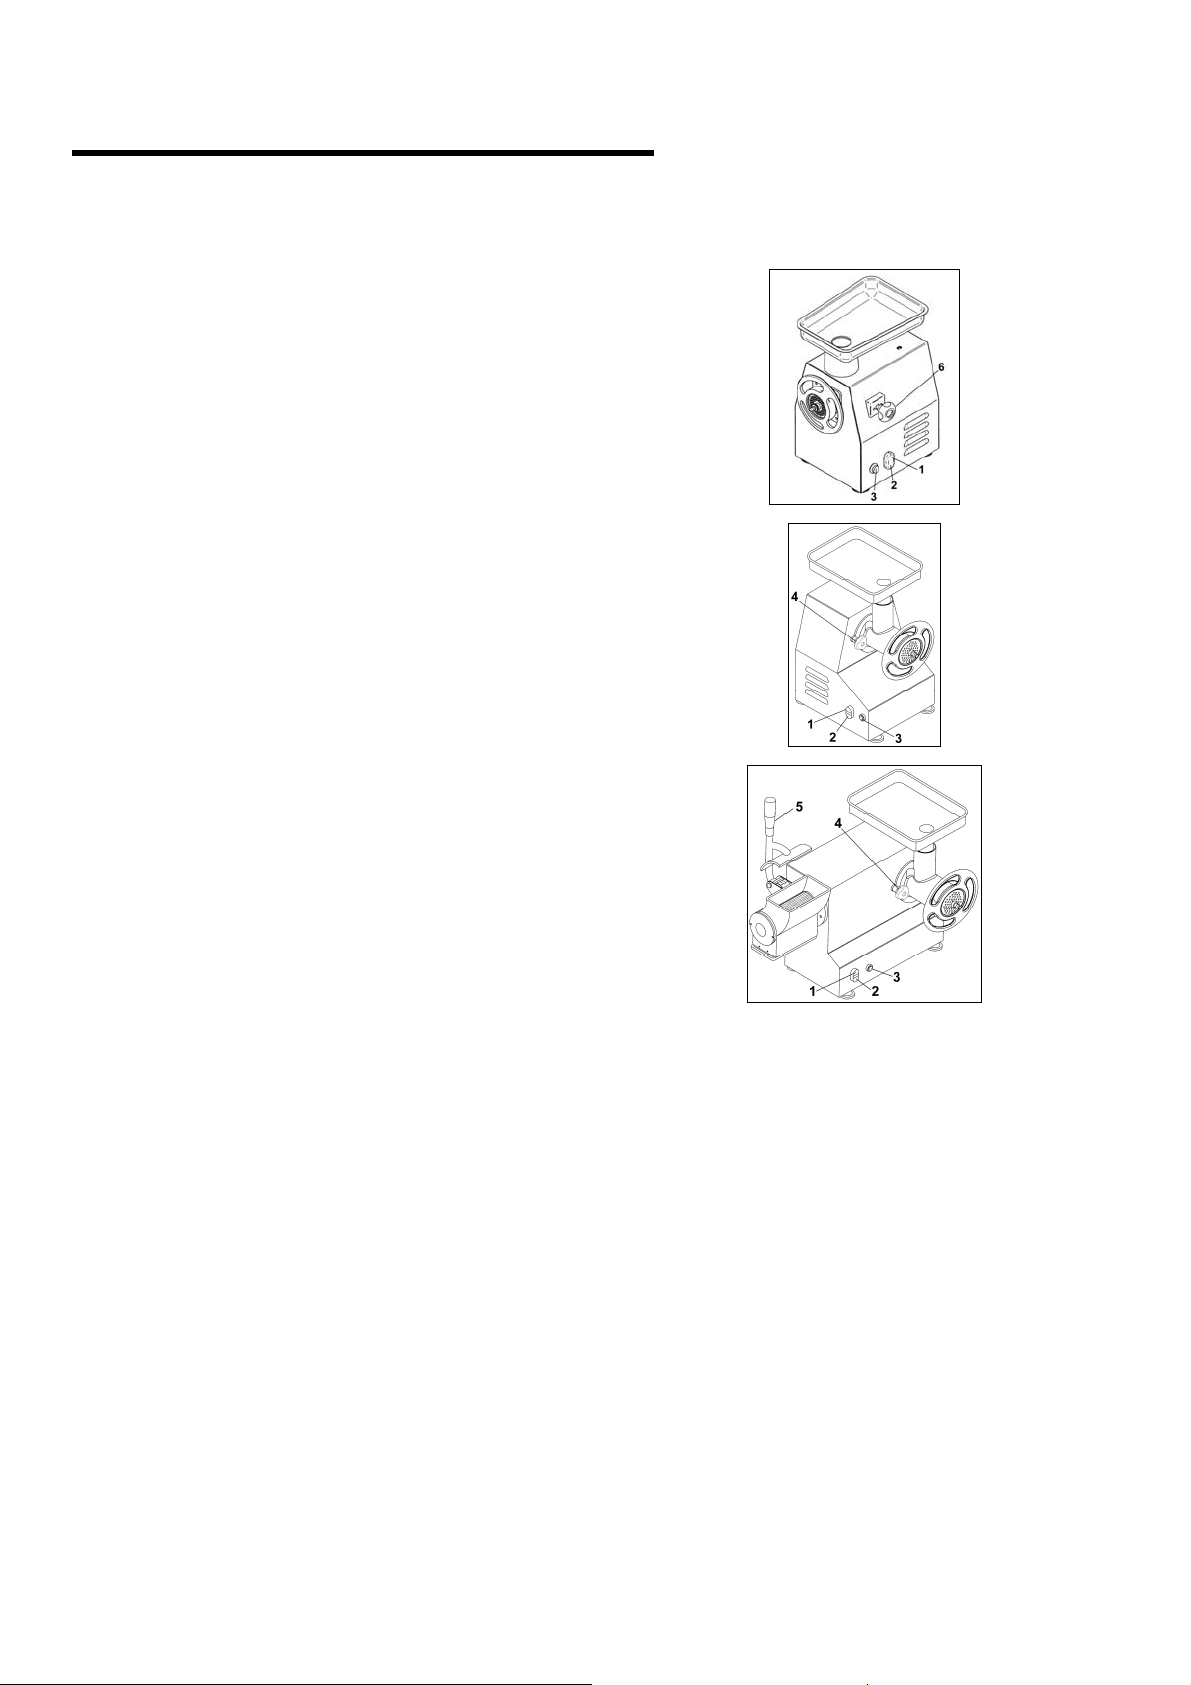
Descrizione dei comandi
1) Pulsante di marcia avanti ”I”
Premere il pulsante per avviare la macchina. L’ avvio è
abilitato solo con la leva grattugia abbassata nella versione
abbinato.
2) Pulsante di marcia indietro ”Δ
Premere il pulsante per invertire il senso di rotazione della
macchina. L’ avvio è abilitato solo con la leva grattugia
abbassata nelle versioni abbinati.
3) Pulsante di arresto “0”
Premere il pulsante per arrestare la macchina.
4) Pomelli bloccaggio corpo tritacarne
Avvitare i pomelli per bloccare il corpo tritacarne, oppure
svitarli per sbloccare il corpo stesso.
E LA PULIZIA
3
5) Leva grattugia
Premere la leva verso il basso per grattugiare il prodotto da
lavorare.
6) Pomello bloccaggio corpo tritacarne
Avvitare il pomello per bloccare il corpo tritacarne, oppure
svitarlo per sbloccare il corpo stesso.
Uso della grattugia
• Nei modelli abbinati grattugia-tritacarne smontare i gruppi macinazione prima di utilizzare la grattugia.
• Alzare la leva grattugia e immettre il prodotto all’ interno della bocca grattugia.
• Abbassare la leva grattugia e premere il pulsante di avviamento “I”.
• Premere progressivamente la leva fino all’esaurimento del prodotto.
• Al termine della lavorazione sollevare la leva ed immettere altro prodotto nella bocca grattugia; riabbassare la
leva ed azionare il pulsante di avviamento “I” (l’ avviamento avviene solo se la leva grattugia è abbassata).
• Per arrestare la macchina premere il pulsante di arresto “0” o sollevare la leva grattugia.
• Alla fine del ciclo di lavoro pulire il rullo grattugiando un pezzo di pane duro oppure con l’ apposito pennello.
Uso del tritacarne
• Nei modelli abbinati grattugia-tritacarne abbassare la leva grattugia.
• Serrare i pomelli di bloccaggio del corpo tritacarne.
• Serrare leggermente, senza bloccarlo, il volantino presente sulla bocca d’ uscita del tritacarne.
• Avviare la macchina premendo il pulsante di start “I” (nei modelli abbinati l’ avviamento avviene solo se la leva
grattugia è abbassata).
• Introdurre il prodotto all’interno della bocca superiore del tritacarne e comprimere quest’ ultimo con il pestello
in dotazione.
• Al termine della lavorazione premere il pulsante di arresto “0”.
• Alla fine del ciclo di lavoro smontare il gruppo macinazione e lavarlo con detergenti idonei in acqua calda o in
lavastoviglie.
Page 10
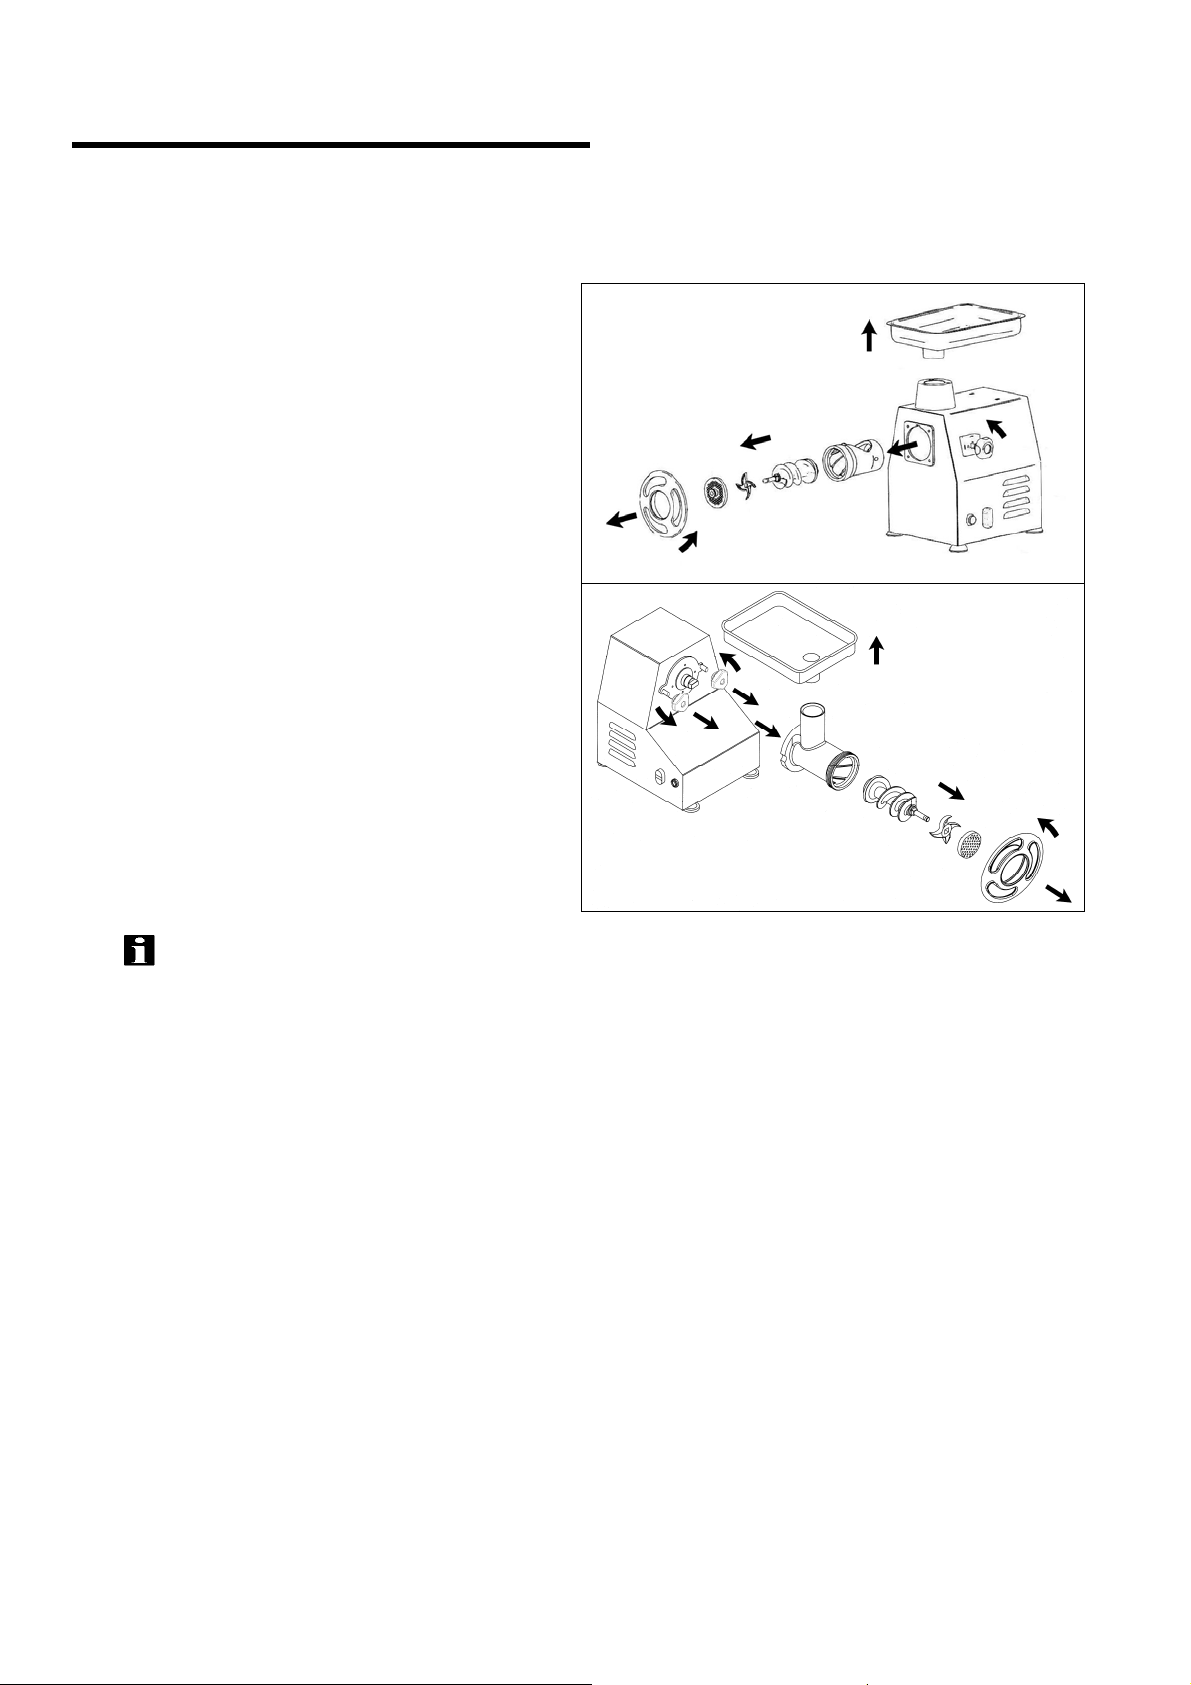
Smontaggio gruppo macinazione
• Estrarre la tramoggia dalla bocca superiore.
• Ruotare in senso antiorario il volantino.
• Estarre in successione:
- la piastra forata
- il coltello
- la coclea
• Svitare il pomello di bloccaggio ed estrarre il
corpo tritacarne.
• Eseguire le operazioni inverse per rimontare il
gruppo macinazione.
• Estrarre la tramoggia dalla bocca superiore.
• Ruotare in senso antiorario il volantino.
• Estarre in successione:
- la piastra forata
- il coltello
- la coclea
• Svitare i pomelli di bloccaggio ed estrarre il
corpo tritacarne.
• Eseguire le operazioni inverse per rimontare il
gruppo macinazione.
INFORMAZIONI SULL’ USO
E LA PULIZIA
3
INFORMAZIONI: Prima di ogni ciclo di lavoro verificare che le parti amovibili siano serrate
solidalmente alla macchina.
Consigli d’ uso
Il gruppo macinazione completamente estraibile (solo mod.TR22/TS-TR32/TN-AB22/AT) permette di
collocare quest’ultimo in frigoriferi e similari, anche con residui di prodotto al suo interno. Questa
caratteristica della macchina consente di utilizzare il tritacarne in diversi momenti della giornata senza dover
lavare e pulire i vari compenenti dopo l’ utilizzo, secondo quanto prescritto dalle normative igieniche vigenti.
Pulizia a fine giornata
• A fine giornata staccare la spina dalla presa di corrente.
• Eseguire un’ accurata pulizia utilizzando prodotti neutri.
• Pulire le parti esterne della macchina con spugna umida.
• Non utilizzare pagliette metalliche e detersivi abrasivi.
• Smontare il gruppo macinazione e lavarlo con detergenti idonei in acqua calda o in lavastoviglie.
Lunga inattività della macchina
Dovendo lasciare ferma la macchina per lunghi periodi, disinserire l’ interruttore generale a muro, effettuare
una pulizia generale della macchina e ricoprirla con un telo onde proteggerla dalla polvere.
Page 11
RICERCA GUASTI,
RICICLAGGIO
Premessa
In caso di guasti o malfunzionamenti, scollegare l’ interruttore generale a muro e contattare il Servizio
Assistenza del vostro Rivenditore. Evitare di smontare le parti interne della macchina.
Il costruttore declina ogni responsabilità per eventuali manomissioni!
Inconvenienti, cause, rimedi
Inconveniente
Interruttore generale disinserito
La macchina non si avvia
Mancanza di tensione sulla linea di
alimentazione
Fusibile di protezione bruciato
Causa
Inserire l’ interruttore generale su “I”
Contattare Servizio Assistenza del vostro
Rivenditore
Contattare Servizio Assistenza del vostro
Rivenditore
Rimedio
Smaltimento e riciclaggio
4
La presenza del bidoncino barrato sulla targhetta dati dell’apparecchiatura indica che essa al termine della
propria vita utile dovrà seguire per il suo smaltimento e riciclaggio quanto previsto dalla Direttiva Europea. La
Direttiva prevede la raccolta separata delle apparecchiature elettriche ed elettroniche attraverso un sistema
di raccolta denominato RAEE. All’atto dell’acquisto di un nuovo apparecchio l’utilizzatore è obbligato a non
smaltire l’apparecchio come rifiuto urbano, ma bensì dovrà riconsegnarlo, in ragione di uno contro uno, al
rivenditore o distributore. Il rivenditore provvederà al suo smaltimento seguendo le procedure previste dal
sistema di raccolta dei RAEE. Nel caso del solo smaltimento dell’apparecchiatura, sul territorio italiano,
contattare il produttore, il quale fornirà le informazioni adeguate circa lo smaltimento della macchina presso il
centro di raccolta più vicino all’utente. Gli utilizzatori che risiedono al di fuori del territorio italiano dovranno
contattare i Ministeri dell’Ambiente del loro Paese, i quali forniranno le informazioni necessarie ad un corretto
smaltimento. Il mancato rispetto delle procedure di smaltimento può produrre effetti novici a danno
dell’ambiente e delle persone. Pertanto lo smaltimento abusivo, totale o parziale, delle apparecchiature,
porterà a sanzioni amministrative da parte delle Autorità Competenti nei riguardi delle utenze negligenti o
inadempienti.
Page 12

Page 13
TR22/RS ● TR22/RG ● TR32/RS
AB22/AT ● TR22/TS ● TR32/TN
MEAT MINCER AND GRATER
1 GENERAL INFORMATION
Purpose of this manual………………….……….
Manufacturer and machine Identification……....
Machine description...………………….………...
Specifications………………………….………….
Overall dimensions……………………………….
Safety devices…………………………………….
Safety information………….………………….….
2 INSTALLATION
Packing and unpacking………..…………………
Installation area……….…………………………..
Electric connection…..…………………………...
CONTENTS
3 OPERATION AND CLEANING
Control descriptions……………………………….
4
Using the grater……………………………….…..
4
Using the mincer…..………………………………
5
Dismantling the mincing set……………………...
6
Recommendations for use……………………….
6
End-day cleaning…...….………………………….
7
Long periods of inactivity……...………………….
7
4 TROUBLESHOOTING, RECYCLING
Foreword….………………………………………..
8
Troubles, causes and remedies..………………..
8
Disposal and recycling……………………………
8
ANNEXES
Unger mincing set assembly diagram
Spare parts catalogue
Electrical wiring diagram
9
9
9
10
10
10
10
11
11
11
Page 14
GENERAL
Purpose of this manual
This manual has been written by the Manufacturer to make an integral part of the machine standard
equipment. During the design and construction phases, special care has been devoted to any aspects which
might endanger the safety and health of the people interacting with the machine. In addition to the applicable
safety legislation, all “good construction practice” rules have been adopted. The purpose of these information
notes is to make machine users aware that special care should be applied to prevent any risks. The biggest
asset to this end, however, is precaution. Safety is also the responsability of all the operators who interact
with the machine. Keep this manual in a suitable place, where it can be conveniently reached for
consultation. In order to highlight some parts of the text, the following symbols have been used:
DANGER – CAUTION: it indicates hazards likely to cause severe injury ; caution is
requested.
INFORMATION: technical indications of special interest.
This manual comes with the following annexes:
- a guarantee certificate containing the guarantee conditions prescribed by the Manufacturer.
- documents certifying compliance with the applicable safety and personal health legislation in force.
To request After-sales service, submit inquiries or dorder spare parts, contact your Authorised dealer.
Manufacturer and machine Identification
INFORMATION
1
Manufacturer Identification
Serial number
Machine model
Specifications
Mark of Compliance
Year of construction
Page 15

INFORMATION
GENERAL
1
Machine description
Combined mincer - grater:
The combined mincer-grater is a professional machine designed for processing meat and cheese for mass
catering purposes (restaurants, hotels, community centres, butcher’s shops, refectories, etc.). By using the
mincer with a series of different mincing plates, different kinds of minced meat can be obtained. The grater
can process products such as seasoned cheese, biscuits, dry bread, dried fruit, etc. The range is composed
of 1 model:
AB22/AT (mod.22 version with completely removable mincer set)
The machine has an easy-to-clean aluminium and stainless steel structure.
The machine’s safety devices conform to European Directives.
Mincer:
The mincer is a professional machine designed for processing meat for mass catering purposes (restaurants,
hotels, community centres, butchers, collective refectories). The application of different mincer plates makes
it possible to obtain various types of minced meat.
The product range includes 5 models:
TR22/RS (mod.22 base version)
TR22/RG (mod.22 version with upper mouth of mincer largest)
TR32/RS (mod.32 base version)
TR22/TS (mod.22 version with completely removable mincer set)
TR32/TN (mod.32 version with completely removable mincer set)
The machine has an easy-to-clean aluminium and stainless steel structure.
The machine’s safety devices conform to European Directives.
MOD.TR22/RS-22/RG-32/RS MOD.TR22/TS-32/TN
Hopper
Hopper
Handwheel
Control panel
Handwheel
Control panel
MOD.AB22/AT
Grater lever
Hopper
Handwheel
Control panel
Page 16
INFORMATION
GENERAL
1
Specifications
Description Unit of measure TR22/RS TR22/RG TR32/RS TR22/TS TR32/TN AB22/AT
Electric power
input
V Hz Ph
230V 50Hz 1Ph
230/400V 50Hz 3Ph
Power kW (HP) 1.1 (1.5) 1.1 (1.5) 2.2 (3) 1.1 (1.5) 2.2 (3) 1.1 (1.5)
Mincer output kg 300 300 500 300 500 300
Grater output kg / / / / / 40
Net weight kg 32 33,5 43/53 31 42/52 39
Packaged weight kg 38 39,5 49/59 37 48/58 45
Noise < 70 dB(A)
Installation On the table
Overall dimensions
mm. A B C mm. A B C
TR22/RS
TR22/RG
TR32/RS
TR22/TS
TR32/TS
AB22/AT
420
420
420
420
420
450
700
570
700
570
570
570
570
700
TR22/RS
700
TR22/RG
700
TR32/RS
700
720
mm. A B C
410
410
490
310
310
340
520
490
530
TR22/TS
TR32/TN
mm. A B C
AB22/AT 430 540 480
420
520
300
320
520
550
Page 17

INFORMATION
GENERAL
1
Safety devices
Microswitch: stops the
machine when the grater lever
is lifted. When the lever is
lowered, restart the machine by
pressing the I button (only
AB22/AT)
Remote control switch: can
be used to restart the machine
when the electricity supply is
switched off accidentally
Microswitch: stops the
machine when the hopper is
removed. When the hopper is
reinserted, restart the machine
by pressing the I button (only
TR22/RG-32/RS-32/TN)
Remote control switch: can
be used to restart the machine
when the electricity supply is
switched off accidentally
Safety information
• It is of the greatest importance to carefully read this manual before carrying out installation and use
operations. Consistent compliance with the instructions contained in this manual will guarantee personal
and machine safety.
• Do not tamper with the safety devices for any reason.
• We recommend that industrial safety regulations issued nationally by the appointed organisms be strictly
respected.
• The manufacturer declines all responsability for injures to persons or damages to property, resulting from
failure to comply with these safety rules.
• Correct machine setting, lighting and workshop cleanness are pre-conditions for personal safety.
• Do not expose the machine to atmospheric agents.
• The machine connection and start-up should only be executed by skilled engineers.
• Check that the plant mains ratings correspond to the specifications printed on the machine data plate.
• Make sure that the machine is connected to a grounding system.
• The work area around the machine should always be kept clean and dry.
• Wear the work attire prescribed by the industrial accident-prevention regulations.
• This machine should always be used for its recommended uses ; any other use is deemed improper and
therefore dangerous.
• Check the suitability and weight of the products to work ; do not overload the machine to exceed its
capacity.
• It is forbidden to introduce any objects, tools or hands in the dangerous parts.
• Keep the machine out of children’ s reach.
• Unplug the machine from the mains when not in use.
• In the event of breakdowns and/or malfunctioning, do not carry out any repair yourselves, apply to your
Authorised dealer.
• Order original spare parts only.
• Before carrying out machine cleaning, unplug it from the power mains.
• Do not clean with high-pressure water jets.
DANGER – CAUTION: Using plates with hole diameters over 8mm
and with total thickness under 5 mm is strictly prohibited.
Should wear cause plate thickness to drop under 5 mm, we recommend
you replace it. The manufacturer is not liable for any personal or property
damages due to failure to observe these instructions.
Page 18
INSTALLATION
2
Packing and unpacking
The machine will come packaged in
a carton with foamed polyester
inserts to guarantee perfect safety
during transport.
• Handle the carton in compliance
with the instructions.
• Remove screws A and lift
machine from pallet.
• Remove bars B.
• Open the carton and make sure
that all components are intact.
Keep the carton for any future
machine removal.
• Lift the machine according to the
instructions and place it in its
selected setting for installation.
Installation area
The selected machine work setting must be sufficiently lit and have an electric power outlet. The worktop must be
sufficiently large, perfectly level and dry. The machine should be installed in non-explosive environments. In any
case, installation should be carried out by taking into account any applicable industrial safety regulations in force.
Environmental Condition Table
Descriptions Values
Working temperature 0÷35 °C (32÷95 °F)
Storage temperature -15 to +65 °C (from –6.8 to +149 °F)
Relative humidity
Ambient dust Lower than 0.03 g/m³
Electric connection
DANGER – CAUTION: Electric connection to the power
mains should be executed by skilled engineers.
Check for the perfect effeciency of the plant grounding system. Make sure
that the line voltage (V) and frequency (Hz) correspond to the machine
ratings (refer to the machine identification plate and wiring diagram). The
machine comes equipped with an electric cable to which a multipolar plug
should be connected. Plug the machine into a main wall switch with
differential.
Three-phase connection
Start the machine for just a few seconds and check that the beater turns in
the right direction. If this is not the case, disconnect power and exchange
two of the three phase wires in the plug.
Maximum 80% at an ambient temperature of 20 °C
Maximum 50% at an ambient temperature of 20÷60 °C
Single-phase Three-phase
Connection connection
230V – 1Ph 230/400V – 3Ph
Page 19
OPERATION AND
Control descriptions
1) Forward gear button “I”
Press the button to start the machine. In the combined
versions, start-up is only enabled when the grater lever is
lowered.
2) Reverse gear button “Δ
Press the button to invert the direction of machine rotation.
In combined versions, start-up is only enabled when the
grater lever is lowered.
3) Stop button “0”
Press the button to stop the machine.
4) Mincer body blocking knobs
Screw down the knobs to block or screw off to unblock the
mincer body.
CLEANING
3
5) Grater lever
Press the lever down to grate the product to be processed.
6) Mincer body blocking knob
Screw down the knob to block or screw off to unblock the
mincer body.
Using the grater
• In combined mincer-grater models, remove the mincer set before using the grater.
• Lift the grater lever and place the product to be processed inside the grater mouth.
• Lower the grater lever and press the start button “I” (the machine will only start if the grater lever is
lowered).
• Gradually press the lever until the product is finished.
• At the end of processing lift the lever and introduce more product into the grater mouth; lower the lever
once more and press start button “I” (the machine will only start if the grater lever is lowered).
• In order to stop the machine, press the stop button “0” or lift the grater lever.
• At the end of the work cycle, grate a piece of hard bread or use the appropriate brush to clean the roller.
Using the mincer
• In combined grater-mincer versions, lower the grater lever.
• Tighten the mincer body-blocking knobs.
• Tighten the handwheel on the output mouth of the mincer without blocking.
• Start-up the machine by pressing start button “I” (in combined models start-up is only possible if the
grater lever is lowered).
• Place the product inside the upper mincer mouth and press it down using the pestle supplied.
• At the end of the work session press the stop button “0”.
• At the end of the work cycle remove the mincer set and wash using suitable detergents in hot water or in
the dishwasher.
Page 20

Dismantling the mincer set
• Remove the hopper from the upper mouth.
• Turn the handwheel anti-clockwise.
• Extract
- the mincing plate;
- the blade;
- and the volute in sequence
• Screw off the mincer body-blocking knob and
extract mincer body.
• Perform operations in reverse order to
reassemble mincer group.
• Remove the hopper from the upper mouth.
• Turn the handwheel anti-clockwise.
• Extract
- the mincing plate;
- the blade;
- and the volute in sequence
• Screw off the mincer body-blocking knobs and
extract mincer body.
• Perform operations in reverse order to
reassemble mincer group.
OPERATION AND
CLEANING
3
INFORMATION: Prior to each work cycle ensure that the removable parts are properly fixed
to the machine.
Recommendations for use
The completely extractable mincing (only mod.TR22/TS-TR32/TN-AB22/AT) permits the user to place it in
refrigerators and other similar devices, even when it contains residual product. This feature makes it
possible to use the mincer at different times of the day without having to wash and clean the various
components after use, in conformity with hygiene laws currently in force.
End-of-day cleaning
• At the end of the working day remove the plug from the power socket.
• Clean thoroughly using neutral products.
• Wash the outer part of the machine using a damp sponge.
• Do not use steel wool or abrasive pads.
• Dismantle the mincer set and wash using suitable detergents in hot water or in the dishwasher.
Long periods of inactivity
If the machine is to be left idle for long periods of time, turn off the main wall switch, thoroughly clean the
machine and cover it with a sheet to protect it from dust.
Page 21
TROUBLESHOOTING
RECYCLING
4
Foreword
In the event of breakdowns or malfunctioning, turn off the main wall switch and contact your local Dealer’s
After-sales service. Do not disassemble any internal machine parts.
The Manufacturer declines all responsability for any tampering !
Troubles, causes and remedies
Trouble
Main switch is off
The machine will not start
No voltage input to power line
Logic board protective fuse is blown
Cause
Remedy
Turn the main switch on to “I”
Apply to your local Dealer’s Aftersale service
Apply to your local Dealer’s Aftersale service
Disposal and recycling
The markings illustrated here (barred garbage bin), on the utensil data plate, indicates that at the end of its
working life, the utensil must be disposed of and recycled according to European Directive. The Directive
provides for the separate collection of electric and electronic equipment by a collection system called RAEE.
Upon purchasing a new utensil, the user must not dispose of the utensil as urban waste but must return it, in
a one-to-one exchange, to the dealer or distributor. The dealer may dispose of the utensil following the
procedures set by the RAEE collection system. In the event the user disposes of the utensil without
purchasing a new one, in Italy contact the manufacturer who will provide suitable information on machine
disposal at the collection centre closest to the user. Users who do not reside in Italy must contact the Ministry
of the Environment in their countries who will provide information necessary for correct disposal. Failure to
observe the disposal procedure may cause harmful effects on the environment and people. Therefore, total
or partial illicit utensil disposal by users is punishable by local authorities.
Page 22

Page 23
TR22/RS ● TR22/RG ● TR32/RS
AB22/AT ● TR22/TS ● TR32/TN
HACHE-VIANDE ET RAPE
1 INFORMATIONS GENERALES
But du manuel…………………………………….
Identification du Constructeur et de la machine.
Description des machines...………………….….
Caractéristiques techniques……………………..
Dimensions d’ encombrement…………………..
Dispositifs de sécurité……………………………
Informations sur la sécurité……………………...
2 INFORMATIONS SUR L’ INSTALLATION
Emballage et déballage………………………….
Zone d’ installation………………………………..
Branchement électrique………………………….
INDEX
3 INFORMATIONS SUR L’UTILISATION ET
4
LE NETTOYAGE
Description des commandes……………………..
4
Utilisation de la râpe……………………………....
5
Utilisation du hache-viande………………………
6
Démontage groupe hachoir………………………
6
Conseils d’utilisation………………………………
7
Nettoyage en fin de journée……………………...
7
Inactivité prolungée de la machine………………
4 RECHERCHE DES PANNES, RECYCLAGE
Avant-propos………………………………………
8
Inconvénients, causes, remèdes………………...
8
Élimination et recyclage…………………………..
8
ANNEXES
Schéma de montage groupe hache-viande unger
Catalogue pièces de rechange
Schéma électrique
9
9
9
10
10
10
10
11
11
11
Page 24

INFORMATIONS
But du manuel
Ce manuel fait partie intégrante de la fourniture de la machine et il a été rédigé par le Constructeur qui,
pendant la phase de projet et de construction, a prête très attention aux aspectes qui peuvent entraîner des
risques pour la sécurité et la santé des personnes qui travaillent avec la machine. Le Constructeur a
respecté non seulement les lois en vigueur en la matière mais toutes les “règles de la bonne technique de
construction”. Le but de ces informations est celui de sensibiliser les utilisateurs pour qu’ ils prêtent très
attention à la prévention de tout risque. En tout cas, la prudence est irremplaçable. La sécurité est aussi
dans les mains de tous les opérateurs qui travaillent avec la machine. Conserver ce manuel dans un lieu
convenable, pour pouvoir toujours le consulter. Pour mettre en évidence certaines parties du texte, les
symboles suivants ont été insérés:
DANGER – ATTENTION: il indique les dangers qui peuvent provoquer des lésions
graves; il faut prêter attention.
INFORMATIONS: indications techniques très importantes.
Annexes de ce manuel :
- Le bulletin de garantie dans lequel toutes les conditions de garantie prévues par le Constructeur sont
indiquées.
- Les documents qui attestent la conformité aux lois en vigueur en matière de sécurité et de santé des
personnes.
Pour toute demande d’ Assistance technique, d’ informations et pour des commandes de pièces détachées,
s’ adresser au Revendeur agréé.
Identification du Constructeur et de la machine
GÉNÉRALES
1
Identification du Constructeur
Numèro de série
Modèle de la machine
Données techniques
Marque de conformité
Année de fabrication
Page 25
INFORMATIONS
GÉNÉRALES
1
Description des machines
Combiné hache-viande/râpe:
Le combiné hache-viande/râpe est une machine de type professionnel pour la restauration collective
(restaurants, hôtels, communautés, boucheries, cantines collectives, etc.) pour le traitement de la viande et
des fromages. Le hache-viande, grâce à l’application de différentes grilles, permet d’obtenir différents types
de viandes hachées. La râpe est en mesure de traiter les produits tels que: fromages faits, biscuits, pain sec,
fruits secs, etc.
La gamme est composée de 1 seul modèle:
AB22/AT (mod.22 version avec groupe hachoir complètement démontable)
La machine est réalisée avec structure en aluminium et acier inox, facile à nettoyer.
Elle est pourvue de dispositifs de sécurité en conformité aux Directives Européennes.
Hache-viande:
Le hache-viande est une machine de type professionnel pour la restauration collective (restaurants, hôtels,
communautés, boucheries, cantines collectives, etc.) pour le traitement de la viande. Le hache-viande grâce
à l’application de différentes grilles permet d’obtenir différents types de viandes hachées.
La gamme est composée de 5 modèles différents:
TR22/RS (mod.22 version base)
TR22/RG (mod.22 version avec entré de la viande augmentée)
TR32/RS (mod.32 version base)
TR22/TS (mod.22 version avec groupe hachoir complètement démontable)
TR32/TN (mod.32 version avec groupe hachoir complètement démontable)
La machine est réalisée avec structure en aluminium et acier inox, facile à nettoyer.
Elle est pourvue de dispositifs de sécurité en conformité aux Directives Européennes.
MOD.TR22/RS-22/RG-32/RS MOD.TR22/TS-32/TN
Trémie
Volant
Table de
commande
Trémie
Volant
Table de
commande
MOD.AB22/AT
Levier râpe
Trémie
Volant
Table de
commande
Page 26
INFORMATIONS
GÉNÉRALES
1
Caractéristiques techniques
Descriptions Unité de mesure TR22/RS TR/22RG TR32/RS TR22/TS TR32/TN AB22/AT
Alimentation en
énergie
V Hz Ph
230V 50Hz 1Ph
230/400V 50Hz 3Ph
Puissance kW (HP) 1.1 (1.5) 1.1 (1.5) 2.2 (3) 1.1 (1.5) 2.2 (3) 1.1 (1.5)
Production par heure
du hache-viande
Production par heure
de la râpe
kg 300 300 500 300 500 300
kg / / / / / 40
Poids net kg 32 33,5 43/53 31 42/52 39
Poids avec
emballage
kg 38 39,5 49/59 37 48/58 45
Niveau de bruit < 70 dB(A)
Installation Sur table
Dimensions d’ encombrement
mm. A B C mm. A B C
TR22/RS
TR22/RG
TR32/RS
TR22/TS
TR32/TS
AB22/AT
420
420
420
420
420
450
700
570
700
570
570
570
570
700
TR22/RS
700
TR22/RG
700
TR32/RS
700
720
mm. A B C
410
410
490
310
310
340
520
490
530
TR22/TS
TR32/TN
mm. A B C
AB22/AT 430 540 480
420
520
300
320
520
550
Page 27

INFORMATIONS
GÉNÉRALES
1
Dispositifs de sécurité
Minirupteur: arrête la machine
lorsque l’on soulève le levier de
la râpe. Lors de la fermeture
successive du levier, remettre
en route la machine en
appuyant sur le bouton I
(seulement AB22/AT)
Télérupteur: au cas où le
courant vienne à manquer
accidentellement, il nécessite la
remise en route volontaire de la
machine
Minirupteur: arrête la machine
lorsque l’on extraire
la Trémie de l’ouverture
supérieure du hache-viande.
Lors de la réintroduction de la
trémie, remettre en route la
machine en appuyant sur le
bouton I (seulement TR22/RG-
32/RS-32/TN)
Télérupteur: au cas où le
courant vienne à manquer
accidentellement, il nécessite la
remise en route volontaire de la
machine
Informations sur la sécurité
• Il est très important de consulter attentivement ce manuel avant de procéder aux opérations d’ installation et d’
emploi. L’ observation constante des indications contenues dans le manuel garantit la sécurité de l’ homme et
de la machine.
• N’ altérer pour aucune raison les dispositifs de sécurité.
• Il est recommandé de respecter rigoureusement les normes de sécurité dans le lieu de travail promulguées par
les organismes responsables dans chaque pays.
• Le constructeur décline toute responsabilité pour des dommages aux personnes ou aux choses, dérivant de l’
inobservation des normes de sécurité.
• L’ emplacement correct de la machine, l’ éclairage et le nettoyage de la zone, sont des conditions importantes
pour la sécurité personelle.
• Ne pas exposer la machine aux agents atmosphériques.
• Le branchement et le démarrage de la machine ne doivent être exécutés que par du personnel technique
spécialisé.
• Vérifier si le caractéristiques de l’ installation sur laquelle doit être branchée la machine correspondent aux
données estampillées sur la plaquette.
• S’ assurer que la machine est branchée sur une installation de mise à la terre.
• La zone de travail autour de la machine doit toujours être propre et sèche.
• Utiliser les vêtements prévus à cet effet par les normes pour la prévention des accidents dans le lieu de travail.
• Cette machine doit être utilisée seulement pour le but prévu; tout usage différent est à considérer comme
impropre et par conséquent dangereux.
• Vérifier l’ aptitude et le poids des produits à travailler; ne pas surcharger la machine audelà de sa capacité.
• Il est interdit d’ introduire des objets, des outils, des mains ou autre chose à l’ intérieur des parties dangereuses.
• Tenir la machine hors de portée des enfants.
• Débrancher la fiche de la prise de courant quand la machine n’ est pas utilisée.
• En cas de panne et/ou de mauvais fonctionnement, ne pas effectuer le réparations personnellement, au
contraire s’ adresser au Revendeur agréé.
• Demander des pièces détachées originales.
• Avant de procéder au nettoyage de la machine, déconnecter l’ alimentation électrique en débranchant la fiche.
• Pour le nettoyage ne pas utiliser les jets d’ eau à haute pression.
DANGER – ATTENTION: Il est formellement interdit d’utiliser des
plaques présentant des trous de diamètre supérieur à 8mm et une
épaisseur totale inférieure à 5mm. Il est recommandé de remplacer la
plaque si l'usure engendre une épaisseur inférieure à 5mm. Le
constructeur décline toute responsabilité pour tout dommage aux choses
ou aux personnes dérivant de la non observation des susdites dispositions.
Page 28

INFORMATIONS SUR
L’ INSTALLATION
2
Emballage et déballage
La machine est emballée dans du
carton avec l’ insertion de polyester
expansé pour assurer son intégrité
parfaite pendant le transport.
• Manutentionner l’ emballage en
respectant les instructions.
• Ouvrir l’ emballage et verifier l’
intégrité de tout les composants.
Garder l’ emballage pour des
déménagements futurs.
• Dévisser les vis A et soulever la
machine de la palette.
• Enlever les brides B.
• Effectuer le levage de la machine
comme il est indiqué et la placer
dans la zone destinée à l’
installation.
Zone d’ installation
La zone préétablie devra être dûment éclairée et devra avoir une prise de courant électrique. Le plan d’
appui doit être suffisamment ample, bien nivelé et sec. L’ installation ne doit pas être exécutée dans des
lieux avec une atmosphère explosive. En tous cas, l’ installation doit être exécutée en tenant compte aussi
des lois en vigueur en matière de sécurité dans le lieu de travail.
Tableau Conditions ambiantes
Descriptions Valeurs
Température de fonctionnement 0÷35 °C (32÷95 °F)
Température de magasinage -15 à +65 °C (de –6.8 à +149 °F)
Humidité relative
Poussière ambiante Inférieure a 0.03 g/m³
Branchement électrique
DANGER – ATTENTION: Le branchement électrique sur le
réseau d’ alimentation doit être exécuté par du personnel spécialisé.
S’ assurer que l’ installation de mise à la terre de l’ usine fonctionne
parfaitement. Vérifier que la tension de ligne (V) et la fréquence (Hz)
correspondent à celles de la machine (Voir la plaquette d’ identification et le
schéma de câblage). La machine est dotée d’ un câble électrique sur lequel
il faut brancher une fiche multipolaire. La fiche est branchée sur un
interrupteur général mural doté d’ un différentiel.
Branchement triphasé
Démarrer la machine pendant quelques secondes et vérifier si la rotation de
l’ accessoire est correcte. Si la rotation n’ est pas correcte, déconnecter la
tension et inverser deux des trois phases de la fiche.
Maximum 80% avec température ambiante de 20 °C
Maximum 50% avec température ambiante entre 20 et 60 °C
Branchement Branchement
monophasé triphasé
230V – 1Ph 230/400V – 3Ph
Page 29

INFORMATION SUR L’
EMPLOI ET LE NETTOYAGE
Description des commandes
1) Bouton de marche avant “I”
Appuyer sur le bouton pour mettre en route la machine. La
mise en route n’est possible qu’avec le levier râpe abaissé
dans les versions combinés.
2) Bouton de marche arrière “Δ
Appuyer sur le bouton pour inverser le sens de rotation de
la machine. La mise en route n’est possible qu’avec le
levier râpe abaissé dans les versions combinés.
3) Bouton d’arrêt “0”
Appuyer sur le bouton pour arrêter la machine.
4) Poignées blocage corps hache-viande
Visser les poignées pour bloquer le corps hache-viande, ou
desserrer pour débloquer ce même corps.
3
5) Levier râpe
Appuyer sur le levier vers le bas pour râper le produit à
traiter.
6) Poignée blocage corps hache-viande
Visser la poignée pour bloquer le corps hache-viande, ou
desserrer pour débloquer ce même corps.
Utilisation de la râpe
• Dans les modèles combinés râpe/hache-viande démonter les groupes hachoir avant d’utiliser la râpe.
• Soulever le levier râpe et introduire le produit à l’intérieur de l’ouverture râpe.
• Abaisser le levier râpe et appuyer sur le bouton de mise en route “I”.
• Appuyer progressivement sur le levier jusqu’à ce que le produit soit épuisé.
• Au terme du traitement soulever le levier et introduire un autre produit dans l’ouverture râpe; abaisser de
nouveau le levier et actionner le bouton de mise en route “I” (la mise en route a lieu uniquement si le levier râpe
est abaissé).
• Pour arrêter la machine appuyer sur le bouton d’arrêt “0” ou soulever le levier râpe.
• A la fin du cycle nettoyer le rouleau en râpant un morceau de pain dur ou bien avec le pinceau conçu à cet effet.
Utilisation du hache-viande
• Dans les modèles combinés râpe/hache-viande abaisser le levier râpe.
• Serrer les poignées de blocage corps hache-viande.
• Serrer légèrement, sans le bloquer, le volant présent sur l’ouverture de sortie du hache-viande.
• Mettre en route la machine en appuyant sur le bouton de start “I” (dans les modèles combinés la mise en route
se fait uniquement si le levier râpe est abaissé).
• Introduire le produit à l’intérieur de l’ouverture supérieure du hache-viande et comprimer ce dernier avec le
poussoir en dotation.
• Au terme du traitement appuyer sur le bouton d’arrêt “0”.
• A la fin du cycle de traitement démonter le groupe hachoir et le laver avec des détergents adéquats dans l’eau
chaude ou dans le lave-vaisselle.
Page 30

Démontage groupe hachoir
• Extraire la trémie de l’ouverture supérieure.
• Tourner en sens anti-horaire le volant.
• Extraire en succession:
- la grille percée
- le couteau
- la vis spirale transporteuse
• Desserer la poignée de blocage corps hache-
viande et extraire alors le corps hache-viande.
• Effectuer les opérations inverses pour remonter
le groupe hachoir.
• Extraire la trémie de l’ouverture supérieure.
• Tourner en sens anti-horaire le volant.
• Extraire en succession:
- la grille percée
- le couteau
- la vis spirale transporteuse
• Desserer les poignées de blocage corps hache-
viande et extraire alors le corps hache-viande.
• Effectuer les opérations inverses pour remonter
le groupe hachoir.
INFORMATION SUR L’
EMPLOI ET LE NETTOYAGE
3
INFORMATIONS: Avant chaque cycle de traitement vérifier que les parties démontables
soient correctement serrées sur la machine.
Conseils d’utilisation
Le groupe hachoir entièrement démontable (seulement mod.TR22/TS-TR32/TN-AB22/AT) peut être placé
en réfrigérateurs ou appareils similaires, même s’il contient des résidus de produit. Cette caractéristique de
la machine permet d’utiliser le hache-viande à différents moments de la journée sans devoir laver et nettoyer
les différents composants après l’utilisation, selon les prescriptions des normes d’hygiène en vigueur.
Nettoyage en fin de journée
• En fin de journée ôter la fiche de la prise de courant.
• Effectuer un nettoyage soigneux en utilisant des produits neutres.
• Nettoyer les parties externes de la machine avec une éponge humide.
• Ne pas utiliser les paillettes métalliques et les détergents abrasifs.
• Démonter le groupe hachoir et le laver avec des détergents adéquats dans l’eau chaude ou dans le
lave-vaisselle.
Inactivité prolongée de la machine
Si la machine ne travaille pas pendant de longues périodes, déconnecter l’ interrupteur général mural,
effectuer un nettoyage général de la machine et la couvrir au moyen d’ une housse pour la protéger contre la
poussière.
Page 31

RECHERCHE DES
PANNES, RECYCLAGE
4
Avant-propos
En cas de pannes ou de mauvais fonctionnement, déconnecter l’ interrupteur général mural et contacter le
Service d’ Assistance de votre Revendeur. Éviter de démonter les parties internes de la machine.
Le Constructeur décline toute responsabilité pour des altérations éventuelles!
Inconvénients, causes, remèdes
Inconvénient
Interrupteur général déconnecté
La machine ne démarre pas
Manque de tension sur la ligne d’
alimentation
Fusible de sécurité carte électronique
sauté
Cause
Remède
Connecter l’ interrupteur général sur “I”
Contacter le Service d’ Assistance de
votre Revendeur
Contacter le Service d’ Assistance de
votre Revendeur
Élimination et recyclage
La présence de ce symbole, comme ci-dessus (poubelle barrée), sur l’étiquette, indique que l’appareil, au
terme de sa durée de vie devra suivre pour son élimination et son recyclage, les indications prévues à ce
sujet par les Directives Européennes. La Directive prévoit le ramassage séparé des appareils électriques et
électroniques par le biais d’un système de ramassage appelé RAEE. Au moment de l'achat de l'appareil
l'utilisateur est obligé à ne pas éliminer l'appareil comme déchets habituels, mais il devra le ramener, en
raison d'un échange, au revendeur ou au distributeur. Le revendeur se fera charge de son élimination en
suivant les procédures prévues par le système de ramassage.. Dans le cas de l’élimination de l’appareil, sur
le territoire français, contacter le Ministère de l’Environnement ou le revendeur, ce dernier fournira les
informations nécessaires pour l’élimination de l’appareil auprès du centre de ramassage le plus près. Les
utilisateurs résidents en dehors du territoire italien devront contacter le Ministère de l’Environnement de leurs
Pays, lesquels fourniront les informations nécessaires pour une correcte élimination. Le non respect des
normes d’élimination peut avoir des effets nocifs sur l'environnement et sur les personnes. Par conséquent
l’élimination abusive, totale ou partielle, des appareils de la part des utilisateurs, donnera lieu à des
sanctions de la part des Autorités compétentes.
Page 32

Page 33

TR22/RS ● TR22/RG ● TR32/RS
AB22/AT ● TR22/TS ● TR32/TN
1 ALLGEMEINE HINWEISE
Zweck des Handbuchs…………………………..
Hersteller- und Maschinenkennzeichnung…….
Beschreibung der Maschinen...………………...
Technische Eigenschaften..……………………..
Abmessungen………………...…………………..
Schutzvorrichtungen……………………………..
Sicherheitsinformationen………………………...
2 AUFSTELLUNG
Verpackung und Auspacken…………………….
Aufstellbereich…..………………………………..
Elektrischer Anschluss..………………………….
FLEISCHWOLF UND REIBE
INHALT
3 GEBRAUCH UND REINIGUNG
Beschreibung der Bedienelemente……….……..
4
Bedienung der Reibe……………………………..
4
Bedienung des Fleischwolfes …..……….………
5
Ausbau der Mahlgruppe………………………….
6
Gebrauchshinweise……………………………….
6
Reinigung am Ende eines Tages.……………….
7
Längerer Maschinenstillstand……………………
7
4 STÖRUNGSSUCHE, WIEDERVERWERTUNG
Voraussetzung…………………………………….
8
Störung, Ursache, Behebung……….…………...
8
Entsorgung und Wiederverwertung……………..
8
ANLAGEN
Ungersystem Fleischwolfgruppen-Montageplan
ErsatzteilKatalog
Schaltplan
9
9
9
10
10
10
10
11
11
11
Page 34

A
LLGEMEINE
Zweck des Handbuchs
Dieses vom Hersteller verfasste Handbuch ist integrierender Bestandteil der Maschinenausrüstung. Bei der
Planungs- und Konstruktionsphase wurde vom Hersteller besonderer Wert auf die Aspekte gelegt, die zu
Gesundheitsschäden der mit der Maschine in Berührung kommenden Personen oder zu Sicherheitsrisiken
derselben führen könnten. Neben der Einhaltung der einschlägigen Bestimmungen wendete er alle "Regeln
der guten Bautechnik" an. Um jede Art von Risiko zu vermeiden, sollen die Benutzer mit diesen
Informationen dafür empfänglich gemacht werden, besonders achtsam zu sein. Vorsicht bleibt in jedem Fall
unersetzbar. Die Sicherheit liegt ebenfalls in den Händen der mit der Maschine in Berührung kommenden
Bediener. Dieses Handbuch ist an einem zugänglichen Ort aufzubewahren, damit es zum Nachschlagen
immer schnell zur Hand ist. Um einige Textabschnitte besonders hervorzuheben, wurden folgende Symbole
eingesetzt:
GEFAHR - ACHTUNG: weist auf Gefahren hin, die zu schweren Verletzungen führen
können ; es ist erforderlich Vorsicht walten zu lassen.
INFORMATIONEN: technische Hinweise von besonderer Bedeutung.
Dem vorliegenden Handbuch werden folgende Schriftstücke beigelegt :
- der Garantieschein, der die vom Hersteller festgelegten Garantiebestimmungen enthält.
- die Schriftstücke, welche die Konformität der einschlägigen Bestimmungen für Personensicherheit und
Gesundheit bescheinigen.
Für Kundendienst- und Informationsanfragen oder Ersatzteilbestellungen können Sie sich an den
autorisierten Händler wenden.
Hersteller- und Maschinenkennzeichnung
HINWEISE
1
Herstellerkennzeichnung
Seriennummer
Modellbezeichnung
Technische Eigenschaften
Konformitätskenn-zeichnung
Baujahr
Page 35

A
Beschreibung der Maschinen
Kombigerät Fleischwolf-Reibe:
Bei der Kombination Fleischwolf-Reibe handelt es sich um eine Profimaschine für Restaurationsbetriebe
aller Art (Restaurants, Hotels, Gemeinschaftsanlagen, Metzgereien, Großküchen usw.), in denen Fleisch und
Käse verarbeitet werden. In den Fleischwolf können verschiedene Lochscheiben eingesetzt werden, was die
Herstellung unterschiedlicher Hackfleischtypen ermöglicht. Die Reibe ist in der Lage, Produkte zu
verarbeiten wie: abgelagerten Käse, Kekse, trockenes Brot, Trockenobst usw.
Die Produktpalette besteht aus 1 Modell:
AB22/AT (Mod. 22 Version mit komplett ausziehbarer Fleischwolf-Gruppe)
Die Maschine ist mit einem leicht zu reinigenden Gehäuse aus Aluminium und Inox-Stahl ausgeführt.
Ausstattung mit Sicherheitseinrichtungen in Übereinstimmung mit den Europarichtlinien.
Fleischwolf:
Der Fleischwolf ist eine Profimaschine für Restaurationsbetriebe aller Art (Restaurants, Hotels,
Gemeinschaftsanlagen, Metzgereien, Großküchen usw.), in denen Fleisch verarbeitet wird. In den
Fleischwolf können verschiedene Lochscheiben eingesetzt werden, was die Herstellung unterschiedlicher
Hackfleischtypen ermöglicht
Die Produktpalette besteht aus 5 verschiedenen Modellen:
TR22/RS (Mod. 22 Basis Version)
TR22/RG (Mod. 22 Version mit vegrößertem Fleischeingang)
TR32/RS (Mod. 32 Basis Version)
TR22/TS (Mod. 22 Version mit komplett ausziehbarer Fleischwolf-Gruppe)
TR32/TN (Mod. 32 Version mit komplett ausziehbarer Fleischwolf-Gruppe)
Die Maschine ist mit einem leicht zu reinigenden Gehäuse aus Aluminium und Inox-Stahl ausgeführt .
Ausstattung mit Sicherheitseinrichtungen in Übereinstimmung mit den Europarichtlinien.
LLGEMEINE
HINWEISE
1
MOD.TR22/RS-22/RG-32/RS MOD.TR22/TS-32/TN
Trichter
Handrad
Schalttafel
Trichter
Handrad
Schalttafel
MOD.AB22/AT
Reiben-Hebel
Trichter
Handrad
Schalttafel
Page 36

A
LLGEMEINE
HINWEISE
1
Technische Eigenschaften
Beschreibung Maßeinheit TR22/RS TR22/RG TR32/RS TR22/TS TR32/TN AB22/AT
Stromversorgung V Hz Ph
230V 50Hz 1Ph
230/400V 50Hz 3Ph
Leistung kW (HP) 1.1 (1.5) 1.1 (1.5) 2.2 (3) 1.1 (1.5) 2.2 (3) 1.1 (1.5)
Stundenleistung de
Hackfleiscmaschine
Stundenleistung des
Reibeisens
kg 300 300 500 300 500 300
kg / / / / / 40
Nettogewicht kg 32 33,5 43/53 31 42/52 39
Gewicht mit
Verpackung
kg 38 39,5 49/59 37 48/58 45
Lärmpegel < 70 dB(A)
Aufstellen Auf der Arbeitsfläche
Abmessungen
mm. A B C mm. A B C
TR22/RS
TR22/RG
TR32/RS
TR22/TS
TR32/TS
AB22/AT
420
420
420
420
420
450
700
570
700
570
570
570
570
700
TR22/RS
700
TR22/RG
700
TR32/RS
700
720
mm. A B C
410
410
490
310
310
340
520
490
530
TR22/TS
TR32/TN
mm. A B C
AB22/AT 430 540 480
420
520
300
320
520
550
Page 37

A
LLGEMEINE
HINWEISE
1
Schutzvorrichtungen
Mikroschalter: schaltet die
Maschine ab, wenn der
Käsereibenhebel hochgestellt
wird. Beim anschließenden
Schließen des Hebels starten
Sie die Maschine durch
Drücken des Tasters I (nur
AB22/AT)
Fernschalter: Erfordert im Fall
plötzlichen Stromausfalls den
bewussten Neustart der
Maschine
Mikroschalter: schaltet die
Maschine ab, wenn der Trichter
vom Einfuehrungsmund des
Fleischwolfes ausgezogen wird.
Nach Wiedereinfuehrung des
Trichters , die Maschine durch
Drücken des Tasters I
einschalten (nur TR22/RG32/RS-32/TN)
Fernschalter: Erfordert im Fall
plötzlichen Stromausfalls den
bewussten Neustart der
Maschine
Sicherheitsinformationen
• Es ist vin äußerster Wichtigkeit, dass das vorliegende Handbuch vor Beginn der Aufstell- und
Gebrauchsvorgänge aufmerksam gelesen wird. Durch die strenge Einhaltung der in diesem Handbuch
enthaltenen Bestimmungen wird die Sicherheit von Mensch und Maschine gewährleistet.
• Die Schutzvorrichtungen unter keinen Umständen entfernen oder beschädigen.
• Es wird empfohlen, die von den dafür zuständigen Stellen erlassenen Vorschriften zur Sicherheit am
Arbeitsplatz strengstens einzuhalten.
• Der Hesteller übernimmt keinerlei Haftung für Personen- oder Sachschäden, die durch die
Nichteinhaltung der Sicherheitsvorschriften verursacht wurden.
• Die korrekte Maschinenverlagerung, Beleuchtung und Reinigung des Aufstellungsraumes stellen
wichtige Faktoren für die persönliche Sicherheit dar.
• Die Maschine nicht den Witterungsverhältnissen aussetzen.
• Der Anschluss und die Inbetriebnahme der Maschine dürfen nur von qualifiziertem Fachpersonal
vorgenommen werden.
• Überprüfen, dass die Kennwerte der Anlage, wo die Maschine installiert wird, mit denen des
Datenschilds übereinstimmen.
• Sicherstellen, dass die Maschine an eine Erdungsvorrichtung angeschlossen ist.
• Den Arbeitsbereich um die Maschine herum immer sauber und trocken halten.
• Die von den Unfallverhütungsvorschriften am Arbeitsplatz vorgesehene Kleidung tragen.
• Diese Maschine darf nur für den für sie bestimmten Verwendungszweck gebraucht werden ; jeder
andere Gebrauch wird als unsachgemäß angesehen und ist gefährlich.
• Die zu bearbeitenden Erzeugnisse auf Eignung und Gewicht überprüfen ; die Maschine nicht über ihre
Kapazität hinaus füllen.
• Es ist verboten Gegenstände, Werkzeuge, Hände oder ähnliche Gegenstände ins Innere der sich
gefährlichen Maschinenteile einzuführen.
• Die Maschine für Kinder unzugänglich aufbewahren.
• Bei Nichtgebrauch der Maschine den Stecker aus der Steckdose ziehen.
• Bei Betriebsstörungen und/oder Gebrauchsschwierigkeiten die Reparaturen nicht selbst ausführen,
sondern sich an den autorisierten Händler wenden.
• Nur Originalersatzteile verwenden.
• Bevor mit der Reinigung der Maschine begonnen wird, die Spannungsversorgung durch Herausziehen
des Steckers unterbrechen.
• Zur Reinigung keinen Hochdruckwasserstrahl verwenden.
GEFAHR – ACHTUNG: Es ist strengstens verboten, Scheiben mit Löchern mit
einem größeren Durchmesser als 8 mm und Scheiben mit einer Gesamtstärke von
weniger als 5 mm zu verwenden. Wir empfehlen, die Scheibe auszuwechseln, wenn
der Verschleiß eine Scheibenstärke von weniger als 5 mm verursacht. Der Hersteller
übernimmt keinerlei Haftung für Schäden an Sachen oder Personen, die durch die
Nichtbeachtung der oben genannten Anweisungen verursacht werden.
Page 38

AUFSTELLUNG
2
Verpackung und Auspacken
Damit die Unversehrtheit der Maschine
während des Transports gewährleistet ist,
wurde sie in einem mit Schaumpolystereinsatz
verstärkten Karton verpackt.
• Die Verpackung gemäß den
Anweisungen bewegen.
• Die Verpackung öffnen und alle
Komponenten auf ihre Unversehrtheit
überprüfen. Verpackung für spätere
Umzüge aufbewahren.
• Die Schrauben A abschrauben und die
Maschine von der Palette heben.
• Die Bügel B entfernen.
• Die Maschine den Anweisungen gemäß
heben und in den für die Aufstellung
vorgesehenen Bereich positionieren.
Aufstellbereich
Der dafür vorgesehene Bereich muss über eine geeignete Beleuchtung und über eine Steckdose zur
Stromversorgung verfügen. Die Auflagefläche muss ausreichend breit, gut nivelliert und trocken sein. Die
Aufstellung muss in einer nicht explosionsfähigen Umgebung erfolgen. Das Aufstellen muss in jedem Fall
auch unter Berücksichtigung der auf dem Gebiet der Sicherheit am Arbeitsplatz geltenden Gesetze erfolgen.
Tabelle der Umgebungsbedingungen
Beschreibung Werte
Betriebstemperatur 0÷35 °C (32÷95 °F)
Lagertemperatur -15 bis +65 °C (von –6.8 bis +149 °F)
Relative Feuchtigkeit
Umweltstaub Geringer als 0.03 g/m³
Elektrischer Anschluss
GEFAHR – ACHTUNG: Der elektrische Anschluss an das
Versorgungsnetz muss von Fachpersonal ausgeführt werden.
Volle Funktionstüchtigkeit der Erdungsvorrichtung der Anlage sicherstellen.
Überprüfen, dass Leitungsspannung (V) und Frequenz (Hz) mit denen der
Maschine übereinstimmen (Siehe Kennschild und Leitungsplan). Die
Maschine ist mit einem elektrischen Kabel ausgerüstet, das mit einem
mehrpoligen Stecker verbunden werden muss. Der Stecker ist an einen mit
einem Differential ausgerüsteten Wand-Netzschalter anzuschließen.
Dreiphasenanschluss
Maschine für wenige Augenblicke in Gang setzen und überprüfen, dass die
Werkzeugumdrehung korrekt ist. Falls die Umdrehung nicht korrekt sein
sollte, die Spannung ausschalten und zwei der drei Phasen im Stecker
umkehren.
Maximal 80% bei einer Umgebungstemperatur von 20 °C
Maximal 50% bei einer Umgebungstemperatur zwischen 20÷60 °C
Einphasenanschluss Dreiphasenanschluss
230V – 1Ph 230/400V – 3Ph
Page 39

Beschreibung der Bedienelemente
1) Vorwärtslauf-Taster „I“
Drücken Sie den Taster zum Starten der Maschine. Bei
den Kombiversionen ist der Start nur bei gesenktem
Reiben-Hebel freigeschaltet.
2) Rückwärtslauf-Taster „Γ
Drücken Sie den Taster, um den Drehsinn der Maschine
umzukehren. Bei den Kombiversionen ist der Start nur bei
gesenktem Reiben-Hebel freigeschaltet.
3) Stopp-Taster „0“
Drücken Sie den Taster zum Abschalten der Maschine.
4) Knöpfe für Mahlsatzblockierung
Die Knöpfe anschrauben um den Mahlsatz zu blockieren,
oder die abschrauben um den zu lösen.
5) Reiben-Hebel
Drücken Sie den Hebel nach unten, um das zu
verarbeitende Produkt zu reiben.
GEBRAUCH UND
REINIGUNG
3
6) Knopf für Mahlsatzt
Den Knopf anschrauben um den Mahlsatz zu blockieren,
oder den abschrauben um den Mahlsatz zu lösen.
Bedienung der Reibe
• Montieren Sie bei den Kombimodellen Fleischwolf-Reibe die Mahlgruppen vor dem Einsatz der Reibe ab.
• Stellen Sie den Reiben-Hebel hoch und geben Sie das Produkt in die Reiben-Einfüllöffnung.
• Senken Sie den Reiben-Hebel und drücken Sie den Start-Taster “I”.
• Drücken Sie den Hebel solange, bis das Produkt vollständig verarbeitet ist.
• Am Ende des Arbeitsgangs stellen Sie den Hebel hoch und geben weiteres Produkt in die Reiben-Einfüllöffnung.
Senken Sie den Hebel und betätigen Sie den Start-Taster “I” (Der Start erfolgt nur bei gesenktem Reiben-Hebel).
• Zum Abschalten der Maschine drücken Sie den Stopp-Taster “0” oder stellen den Reibenhebel hoch.
• Am Ende des Arbeitszyklus reinigen Sie die Walze, indem Sie ein Stücke harten Brotes reiben oder verwenden Sie
den dazu vorgesehenen Pinsel.
Bedienung des Fleischwolfes
• Senken Sie bei den Kombimodellen Fleischwolf-Reibe den Reiben-Hebel.
• Die Knöpfe der Mahlsatzblockierung anziehen .
• Ziehen Sie, ohne dieses vollständig zu blockieren, das Handrad auf der Fleischwolf-Austrittsöffnung leicht an.
• Drücken Sie den Taster “I” zum Starten der Maschine. (Bei den Kombiversionen ist der Start nur bei gesenktem
Reiben-Hebel freigeschaltet).
• Geben Sie das Produkt in die obere Einfüllöffnung des Fleischwolfes und drücken Sie dieses unter Verwendung des
mitgelieferten Stößels zusammen.
• Am Ende des Arbeitsganges drücken Sie die Stopp-Taste “0”.
• Am Ende des Arbeitszyklus bauen Sie die Mahlgruppe aus und waschen diese mit geeigneten Spülmitteln in
warmem Wasser oder in der Spülmaschine.
Page 40

Ausbau der Mahlgruppe
• Ziehen Sie den Trichter von der oberen
Einflüllöffnung ab.
• Drehen Sie das Handrad im
Gegenuhrzeigersinn.
• Ziehen Sie nacheinander heraus :
- Lochscheibe
- Messer
- Förderschnecke
• Den Blockierungknopf abschrauben und den
Mahlsatz herausziehen.
• Zum Wiedereinbau der Mahlgruppe führen Sie
die genannten Schritte in umgekehrter
Reihenfolge aus.
GEBRAUCH UND
REINIGUNG
3
INFORMATIONEN: Vor jedem Arbeitszyklus ist sicherzustellen, dass alle abnehmbaren Teile
fest mit der Maschine verbunden sind.
Gebrauchshinweise
Die Mahlgruppe ist komplett herausziehbar (nur mod.TR22/TS-TR32/TN-AB22/AT) und kann in
Kühlschränken oder ähnlichen Einrichtungen, auch mit Produktresten in ihrem Innern, abgestellt werden.
Diese Eigenschaft der Maschine erlaubt den Einsatz des Fleischwolfes zu verschiedenen Zeitpunkten des
Arbeitstages, ohne dass die verschiedenen Komponenten nach der Benutzung gewaschen und gereinigt
werden müssen, wie es ansonsten den geltenden Hygienevorschriften entspräche.
Reinigung am Ende eines Tages
• Ziehen Sie am Ende des Arbeitstages den Netzstecker.
• Führen Sie eine sorgfältige Reinigung unter Verwendung neutraler Produkte durch.
• Reinigen Sie die Außenseite der Maschine mit einem feuchten Schwamm.
• Verwenden Sie keine Stahlwolle oder Scheuermittel.
• Bauen Sie die Mahlgruppe aus und waschen diese mit geeigneten Spülmitteln in warmem Wasser oder
in der Spülmaschine.
Längerer Maschinenstillstand
Wenn die Maschine über einen längeren Zeitraum stillstehen soll, den Wand-Netzschalter abschalten, eine
allgemeine Maschinenreinigung vornehmen und sie zum Schutz vor Staub mit einem Tuch abdecken.
Page 41

STÖRUNGSSUCHE,
WIEDERVERWERTUNG
4
Voraussetzung
Bei Pannen oder Störungen den Wand-Netzschalter abschalten und den Kundendienst Ihres Händlers
verständigen. Die inneren Maschinenteile auf keinen Fall abmontieren.
Der Hersteller lehnt jede Haftung für eventuelle Verletzungen ab !
Störung, Ursache, Behebung
Störung
Netzschalter abgeschaltet
Die Maschine läuft nicht
Versorgungsleitung steht nicht unter
Spannung
Schmelzsicherung der Elektronikkarte
durchgebrannt
Ursache
Behebung
Netzschalter auf “I” stellen
Kundendienst Ihres Händlers
verständigen
Kundendienst Ihres Händlers
verständigen
Entsorgung und Wiederverwertung
Wenn das hier dargestellte Symbol (durchgestrichene Abfalltonne) auf dem Typenschild eines Gerätes
wiedergegeben ist, bedeutet dies, dass es am Ende seiner Lebensdauer entsprechend der europäischen
Richtlinie zu entsorgen und wiederzuverwerten ist. Die Richtlinie sieht eine getrennte Sammlung von Elektround Elektronik-Altgeräten entsprechend dem sogenannten WEEE-System vor. Beim Kauf eines neuen
Geräts verpflichtet sich der Nutzer, dieses nicht als unsortierten Siedlungsabfall zu entsorgen, sondern dem
Händler oder Verteiler im Verhältnis eins zu eins zurückzuerstatten. Der Händler sorgt für die Entsorgung
des Geräts unter Einhaltung der vom WEEE-System vorgesehenen Vorgehensweise. Wenn das Gerät in
Italien zu entsorgen ist, den Hersteller direkt kontakterien. Nutzer außerhalb Italiens erhalten beim
Umweltministerium des jeweiligen Landes Aufschluss über die zweckmäßige Entsorgung des Geräts. Die
Nichteinhaltung der Entsorgungsvorschriften kann schädliche Auswirkungen zu Lasten von Mensch und
Umwelt mit sich bringen. Deshalb wird die auch nur teilweise unbefugte Entsorgung der Geräte seitens von
Nutzern durch die zuständigen Behörden mit Bußen bestraft.
Page 42

Page 43

TR22/RS ● TR22/RG ● TR32/RS
AB22/AT ● TR22/TS ● TR32/TN
PICADORA DE CARNE Y RALLADORA
1 INFORMACIONES GENERALES
Finalidad del manual…………………….……….
Identificación Fabricante y máquina……………
Descripción de las máquinas.............................
Características técnicas………………………….
Dimensiones totales……………………………...
Dispositivos de seguridad……………………….
Informaciones sobre la seguridad………………
2 INFORMACIONES SOBRE LA INSTALACIÓN
Embalaje y desembalaje ………..………………
Zona de instalación…………………………..…..
Conexión eléctrica …..…………………………...
ÍNDICE
3 INFORMACIONES SOBRE EL USO Y LA
4
LIMPIEZA
Descripción de los mandos…………………...….
4
Uso del rallador……………………………………
5
Uso de la picadora de carne.....................……
6
Desmontado del grupo de trituración…..............
6
Consejos para el uso……………………………..
7
Limpieza al final de la jornada…………………...
7
Inactividad de la máquina durante mucho tiempo..
4 BÚSQUEDA AVERÍAS, RECICLAJE
Preliminares………………………………………..
8
Defectos, causas, remedios……………………...
8
Eliminación y reciclaje…………………………….
8
ANEXOS
Esquema de montaje grupo picadora de carne
unger
Catalogo de repuestos
Esquema electrico
9
9
9
10
10
10
10
11
11
11
Page 44

INFORMACIONES
Finalidad del manual
Este manual ha sido redactado por el Fabricante y es parte integrante de la dotación de la máquina. Durante
la fase de proyecto y fabricación, él ha prestado especial atención a aquellos aspectos que podrían causar
riesgos para la seguridad y la salud de las personas que interactúan con la máquina. Además del respeto de
las leyes vigentes en materia, él ha observado todas las “normas dela buena técnica de fabricación”. La
finalidad de estas informaciones es sensibilizar los usuarios para que pongan especial atención a la
prevención de cualquier riesgo. De todas formas, la prudencia es insustituible. Así mismo, la seguridad está
en las manos de todos los operadores que interactúan con la máquina. Guardar este manual en un lugar
adecuado, con el fin de tenerlo siempre al alcance de la mano para poder consultarlo. Con el fin de poner en
evidencia algunas partes del texto, se han introducido los siguientes símbolos:
PELIGRO - ATENCIÓN: indica los peligros que pueden causar graves lesiones ; es
necesario prestar atención.
INFORMACIONES: indicaciones técnicas de gran importancia.
Al presente manual se adjuntan:
- el certificado de garantía donde se indican las condiciones de garantía impuestas por el Fabricante.
- los documentos que certifican la conformidad con las leyes vigentes en materia de seguridad y salud de
las personas.
Por cualquier solicitud de Asistencia Técnica, informaciones y pedidos de piezas de recambio, dirigirse a su
Revendedor Autorizado.
Identificación Fabricante y máquina
GENERALES
1
Identificación Fabricante
Número de serie
Modelo máquina
Datos técnicos
Marca de conformidad
Año de fabricación
Page 45

INFORMACIONES
GENERALES
1
Descripción de las máquinas
Combinación picadora de carne –rallador:
La combinación picadora de carne-rallador es una máquina de tipo profesional para restauración colectiva
(restaurantes, hoteles, comunidades, carnicerías, cantinas colectivas, etc.) para elaborar la carne y los
quesos. La picadora de carne, utilizando placas con diferentes tipos de perforaciones, permite triturar la
carne de diversas formas. El rallador puede trabajar con los siguientes productos: quesos estacionados,
bizcochos, pan seco, fruta seca, etc.
La gama se compone de 1 modelo:
AB22/AT (mod.22 versión con grupo trituradora de carne completamente extraíble)
La estructura de la máquina es de aluminio y acero inoxidable, fácil de limpiar.
Posee dispositivos de seguridad conformes con las Directivas Europeas.
Picadora de carne:
La picadora de carne es una máquina de tipo profesional que se emplea en la restauración colectiva
(restaurantes, hoteles, comunidades, carnicerías, cantinas colectivas, etc.) para la elaboración de la carne.
La picadora de carne, utilizando placas con diferentes tipos de perforaciones, permite triturar la carne de
diversas formas.
La gama se compone de 5 modelos diferentes:
TR22/RS (mod.22 versión base)
TR22/RG (mod.22 versión con entrada carne incrementada)
TR32/RS (mod.32 versión base)
TR22/TS (mod.22 versión con grupo trituradora de carne completamente extraíble)
TR32/TN (mod.32 versión con grupo trituradora de carne completamente extraíble)
La estructura de la máquina es de aluminio y acero inoxidable, fácil de limpiar.
Posee dispositivos de seguridad conformes con las Directivas Europeas.
MOD.TR22/RS-22/RG-32/RS MOD.TR22/TS-32/TN
Tolva
Volante
Cuadro de
mandos
Cuadro de mandos
Tolva
Volante
MOD.AB22/AT
Palanca rallador
Tolva
Volante
Cuadro de
mandos
Page 46

INFORMACIONES
GENERALES
1
Características técnicas
Descripciones Unidad de medida TR22/RS TR22/RG TR32/RS TR22/TS TR32/TN AB22/AT
Alimentación de
energía eléctrica
Potencia kW (HP) 1.1 (1.5) 1.1 (1.5) 2.2 (3) 1.1 (1.5) 2.2 (3) 1.1 (1.5)
Próduccion horaria
de la picadora de
carne
Próduccion horaria
del rallador
Peso neto kg 32 33,5 43/53 31 42/52 39
Peso con embalaje kg 38 39,5 49/59 37 48/58 45
Nivel de ruido < 70 dB(A)
Instalación En el banco
V Hz Ph
kg 300 300 500 300 500 300
kg / / / / / 40
230V 50Hz 1Ph
230/400V 50Hz 3Ph
Dimensiones totales
mm. A B C mm. A B C
TR22/RS
TR22/RG
TR32/RS
TR22/TS
TR32/TS
AB22/AT
420
420
420
420
420
450
700
570
700
570
570
570
570
700
TR22/RS
700
TR22/RG
700
TR32/RS
700
720
mm. A B C
410
410
490
310
310
340
520
490
530
TR22/TS
TR32/TN
mm. A B C
AB22/AT 430 540 480
420
520
300
320
520
550
Page 47

INFORMACIONES
GENERALES
1
Dispositivos de seguridad
Microinterruptor: la máquina
se detiene cuando se levanta la
palanca del rallador. Cuando se
cierra nuevamente con la
palanca, se puede volver a
poner en marcha la máquina
accionando el pulsador I (sólo
AB22/AT)
Telerruptor: en caso de corte
de corriente accidental, solicita
la puesta en marcha voluntaria
de la máquina
Microinterruptor: la máquina
se detiene cuando se arranca
la tolva de la boca de entrada
de la picadora. Después la
readaptación de la tolva, se
puede volver a poner en
marcha la máquina accionando
el pulsador I (sólo TR22/RG32/RS-32/TN)
Telerruptor: en caso de corte
de corriente accidental, solicita
la puesta en marcha voluntaria
de la máquina
Informaciones sobre la seguridad
• Antes de realizar cualquier operación de instalación y uso, es muy importante consultar atentamente
este maual. El constante respeto de las indicaciones contenidas en el manual, garantiza la seguridad
tanto de la persona como de la máquina.
• Por ninguna razón efectuar operaciones de inadecuado mantenimiento en los dispositivos de seguridad.
• Se recomienda respetar estrictamente las normas de seguridad en el trabajo promulgadas por los
organismos encargados en cada País.
• El fabricante declina toda responsabilidad debida a daños a personas o cosas causados por la
inobservancia de las normas de seguridad.
• El correcto posicionamiento de la máquina, la iluminación y la limpieza del lugar, son condiciones muy
importantes por lo que se refiere a la seguridad personal.
• No exponer la máquina a los agentes atmosféricos.
• La conexión y la puesta en función de la máquina deben ser realizadas exclusivamente por personal
técnico especializado.
• Verificar que las características de la instalación donde se monta la máquina correspondan a los datos
troquelados en la placa.
• Averiguar que la máquina está conectada a una instalación de puesta a tierra.
• La zona de trabajo alrededor de la máquina debe siempre mantenerse limpia y seca.
• Utilizar las prendas previstas por las normas para la prevención de los accidentes en el trabajo.
• Esta máquina debe destinarse solamente para los usos previstos ; cualquier otro empleo debe
considerarse improprio y, por consiguiente, peligroso.
• Verificar la idoneidad y el peso de los productos para elaborar ; no sobrecargar la máquina más de su
capacidad.
• Está prohibido introducir objetos, accesorios, manos u otro en las partes peligrose.
• Guardar la máquina fuera del alcance de los niños.
• Al no utilizar la máquina, desenchufarla.
• En caso de averías y/o inconvenientes durante el uso, no realizar personalmente las reparaciones sino
dirigirse al Revendedor Autorizado.
• Pedir recambios originales.
• Antes de realizar cualquier operación de limpieza de la máquina, desconectar la alimentación eléctrica
sacando el enchufe de la toma.
• Para la limpieza, no utilizar chorros de agua de alta presión.
PELIGRO - ATENCIÓN: Queda terminantemente prohibido utilizar
placas con orificios que presenten un diámetro mayor que 8 mm y un
espesor total inferior a 5 mm. Se recomiendo sustituir la placa en cuanto
alcance un espesor inferior a 5 mm debido al uso. El constructor declina
toda responsabilidad por cualquier daño, material o personal, derivado
del incumplimiento de dichas disposiciones.
Page 48

INFORMACIONES SOBRE
LA INSTALACIÓN
2
Embalaje y desembalaje
La máquina está embalada en cartón con
la introducción de espuma de poliestireno
para garantizar su perfecta integridad
durante el traslado.
• Mover el embalaje según las
instrucciones.
• Abrir el embalaje y verificar la
integridad de todos los componentes.
Guardar el embalaje para eventuales
y futuros traslados.
• Quitar los tornillos A y levantar la
máquina de la paleta.
• Quitar los estribos B.
• Levantar la máquina tal como se
indica y posicionarla en la zona
destinada a la instalación.
Zona de instalación
La zona pre-stablecida deberá ser adecuadamente iluminada y disponer de una toma de distribución de la
energía eléctrica. El plano de apoyo deberá ser suficientemente amplio, bien nivelado y seco. La instalación
deberá efectuarse en lugares con atmósfera no explosiva. De todas formas, la instalación deberá realizarse
también en el respeto de las leyes vigentes en materia de seguridad en el trabajo.
Tabla Condiciones Ambientales
Descripciones Valores
Temperatura de funcionamiento 0÷35 °C (32÷95 °F)
Temperatura de almacenaje -15 a +65 °C (de –6.8 a +149 °F)
Humedad relativa
Cantidad de polvo en el ambiente Inferior a 0.03 g/m³
Conexión eléctrica
PELIGRO - ATENCIÓN: La conexión eléctrica a la red de
alimentación debe ser realizada por personal especializado.
Verificar el buen estado de la instalación puesta a tierra del
establecimiento. Verificar que la tensión de línea (V) y la frecuencia (Hz)
correspondan a las de la máquina (Ver la placa de identificación y el
esquema eléctrico). La máquina está dotada de un cable eléctrico donde
hay que conectar un enchufe multipolar. El enchufe debe conectarse a un
interruptor general de pared provisto de diferencial.
Conexión trifásica
Hacer funcionar la máquina durante unos segundos y verificar que la
rotación del accesorio sea correcta. En caso contrario, quitar la tensión e
invertir dos de las tres fases en el enchufe.
Máxima 80% con temperatura ambiente de 20 °C
Máxima 50% con temperatura ambiente entre 20÷60 °C
Conexión monofásica Conexión trifásica
230V – 1Ph 230/400V – 3Ph
Page 49

INFORMACIONES SOBRE
EL USO Y LA LIMPIEZA
Descripción de los mandos
1) Pulsador de marcha adelante “I”
Accionar el pulsador para poner en marcha la máquina. La
puesta en marcha se habilita solamente con la palanca
rallador baja en las versiones combinadas.
2) Pulsador de marcha atrás “Δ
Apretar el pulsador para invertir el sentido de rotación de la
máquina. La puesta en marcha se habilita solamente con la
palanca rallador baja en las versiones combinadas.
3) Pulsador de parada “0”
Apretar el pulsador para parar la máquina.
4) Pomos bloqueo cuerpo picadora de carne
Atornillar los pomos para bloquear el cuerpo de la picadora
o bien destornillar para desbloquear el cuerpo mismo.
3
5) Palanca rallador
Accionar la palanca hacia abajo para rallar el producto a
elaborar.
6) Pomo bloqueo cuerpo picadora de carne
Atornillar el pomo para bloquear el cuerpo de la picadora o
bien destornillar para desbloquear el cuerpo mismo.
Uso del rallador
• En los modelos combinados rallador-picadora de carne desmontar los grupos de trituración antes de utilizar el
rallador.
• Levantar la palanca del rallador y colocar el producto dentro de la boca del rallador.
• Bajar la palanca del rallador y apretar el pulsador de puesta en marcha “I”.
• Apretar progresivamente la palanca hasta que se haya consumido el producto.
• Al terminar la elaboración levantar la palanca e introducir más producto por la boca del rallador; bajar la palanca y
accionar el pulsador de puesta en marcha “I” (la puesta en marcha se produce solamente cuando la palanca del
rallador está baja).
• Para detener la máquina apretar el pulsador de parada “0” y levantar la palanca del rallador.
• Al finalizar el ciclo de trabajo, limpiar el rodillo con el pincel o bien rallar un trozo de pan duro.
Uso de la picadora de carne
• En los modelos combinados rallador-picadora de carne bajar la palanca del rallador.
• Apretar los pomos para bloquear el cuerpo de la picadora de carne.
• Ajustar levemente, sin bloquear, el volante que se encuentra en la boca de salida de la picadora de carne.
• Poner en marcha la máquina apretando el pulsador start “I” (en los modelos combinados la puesta en marcha se
produce solamente si la palanca rallador está bajada).
• Introducir el producto en la boca superior de la picadora de carne y comprimirlo con el majadero en dotación.
• Al terminar la elaboración apretar el pulsador de parada “0”.
• Al finalizar el ciclo de trabajo desmontar el grupo de trituración y lavarlo con los detergentes adecuados
y con agua caliente o en el lavaplatos.
Page 50

Desmotado del grupo de trituración
• Extraer la tolva de la boca superior.
• Girar el volante en sentido antihorario
• Extraer en el siguiente orden:
- la placa perforada
- la cuchilla
- la cóclea
• Destornillar el pomo para desbloquear el
cuerpo picadora de carne y extraer el cuerpo
mismo.
• Para volver a montar el grupo de trituración
realizar las operaciones inversas.
• Extraer la tolva de la boca superior.
• Girar el volante en sentido antihorario
• Extraer en el siguiente orden:
- la placa perforada
- la cuchilla
- la cóclea
• Destornillar los pomos para desbloquear el
cuerpo picadora de carne y extraer el cuerpo
mismo.
• Para volver a montar el grupo de trituración
realizar las operaciones inversas.
INFORMACIONES SOBRE
EL USO Y LA LIMPIEZA
3
INFORMACIÓN: Antes de cada ciclo de trabajo comprobar que las partes amovibles se
encuentren bien ajustadas a la máquina.
Consejos para el uso
El grupo de trituración, por su característica de ser completamente extraíble (sólo mod.TR22/TS-TR32/TNAB2/AT), puede ser colocado en el frigorífico o lugar similar, incluso con residuos de producto en su interior.
Esta característica de la máquina permite el uso de la picadora de carne en momentos diversos de la
jornada, sin por ello tener que lavar y limpiar los distintos componentes después de su uso, según lo
prescripto por la normativa vigente sobre higiene.
Limpieza al final de la jornada
• Al final de la jornada desconectar el enchufe de la toma de corriente.
• Realizar una limpieza cuidadosa utilizando productos neutros.
• Limpiar las partes externas de la máquina con una esponja húmeda.
• No utilizar esponjas metálicas o detergentes abrasivos.
• Desmontar el grupo de trituración y lavarlo con los detergentes adecuados con agua caliente o en el
lavaplatos.
Inactividad de la máquina durante mucho tiempo
En caso de que nose utilice la máquina durante mucho tiempo, desactivar el interruptor general de pared,
efectuar una limpieza general de la máquina y cubrirla con una tela para protegerla del polvo.
Page 51

BÚSQUEDA AVERÍAS,
RECICLAJE
4
Preliminares
En caso de averías o funcionamientos incorrectos, le aconsejamos desactivar el interruptor general de
pared y dirigirse al Servicio de Asistencia de su Revendedor. No desmontar las partes internas de la
máquina.
¡El Fabricante declina toda responsabilidad debida a eventuales operaciones de inadecuado mantenimiento!
Defectos, causas, remedios
Defecto
Interruptor general desactivado
La máquina no se pone
en marcha
Falta de tensión en la línea de
alimentación
Fusible de protección de la ficha
electrónica interrumpido
Causa
Remedio
Llevar el interruptor general a la
posición “I”
Dirigirse al Servicio de Asistencia de
su Revendedor
Dirigirse al Servicio de Asistencia de
su Revendedor
Eliminación y reciclaje
La presencia de los símbolos aquí reproducidos (contenedor de basura tachado), en la placa de datos del
aparato, indica al final de su vida útil, éste deberá ser desguazado y reciclado según cuanto previsto por la
Directiva Europea. La Directiva prevé la recolección separada de los aparatos eléctricos y electrónicos por
medio de un sistema de recolección denominado RAEE. En el momento de la compra de un nuevo aparato
el usuario está obligado a no eliminar el aparato como basura urbana, sino que deber entregarlo, como
intercambio del nuevo, al revendedor o distribuidor. El revendedor se encargará de su desguace siguiendo
los procedimientos previstos por el sistema de recolección de los RAEE. En caso de tratarse de desguace,
exclusivamente en el territorio italiano, contactar el productor, el cual le dará la información adecuada sobre
la eliminación de la máquina en el centro de recolección más cercano al usuario. Los usuarios que residen
fuera del territorio italiano deberán contactar los Ministerios del Medio ambiente de su país, los cuales
suministrarán la información necesaria para una eliminación correcta. El no respeto de los procedimientos
de eliminación puede provocar efectos nocivos que dañan el medioambiente y las personas. Por lo tanto la
eliminación clandestina, total o parcial, de los aparatos por parte de los usuarios, implicará sanciones por
parte de las Autoridades Competentes.
Page 52

Page 53

TR22/RS ● TR22/RG ● TR32/RS
AB22/AT ● TR22/TS ● TR32/TN
MOEDOR DE CARNE E RALADOR
1 INFORMAÇÕES GERAIS
Finalidade do manual…………………………....
Identificação do Construtor e da máquina.........
Descrição das máquinas...………………….…...
Características técnicas.....................................
Dimensões de estorvo.......................................
Dispositivos de segurança.................................
Informações sobre a segurança .......................
2 INFORMAÇÕES SOBRE A INSTALAÇÃO
Embalagem e desembalagem...........................
Zona de instalação...…......................................
Ligação eléctrica................................................
ÍNDICE
3 INFORMAÇÕES SOBRE O USO E A
4
LIMPEZA
Descrição dos comandos...................................
4
Uso do ralador......………………………………...
5
Uso do moedor de carne….....…………………..
6
Desmontagem grupo moedura......................….
6
Conselhos para o uso ........................................
7
Limpeza diária ..................................................
7
Longo período de inactividade da máquina........
4 PROCURA DE AVARIAS, RECICLAGEM
Premissa.............................................................
8
Inconvenientes, causas, soluções......................
8
Desactivação e reciclagem ................................
8
ANEXOS
Esquema de montagem grupo moedor de
carne unger
Catálogo de peças sobressalentes
Esquema eléctrico
9
9
9
10
10
10
10
11
11
11
Page 54

INFORMAÇÕES
Finalidade do manual
O presente manual foi redigido pelo Construtor e é parte integrante da dotação da máquina. O construtor,
em fase de projecto e construção, focalizou a própria atenção nas situações que pudessem ser fonte de
risco para a segurança e para a saúde das pessoas que entrem em contacto com a máquina. Para além da
observância das leis em vigor em matéria, adoptou todas as “regras de boa técnica de construção”.
Finalidade destas informações é a de sensibilizar o utilizador para que preste muita atenção de modo a
prevenir qualquer tipo de risco.
De qualquer maneira, a prudência é insubstituível. A segurança está também nas mãos de quem utiliza a
máquina. Guarde este manual num lugar próprio de modo a tê-lo sempre ao alcance quando for necessário.
Para evidenciar algumas partes do texto, foram inseridos os seguintes símbolos:
PERIGO – ATENÇÃO: indica os perigos que podem provocar graves lesões; é necessário
prestar muita atenção.
INFORMAÇÕES: indicações técnicas de particular importância.
Anexa-se a este manual:
- O certificado de garantia onde figuram as condições de garantia indicadas pelo Construtor.
- Os documentos que atestam a conformidade com as leis em vigor em matéria de segurança e saúde
das pessoas.
Para qualquer pedido de Assistência técnica, informações e peças sobresselentes, contacte o Revendedor
autorizado.
Identificação do Construtor e da máquina
GERAIS
1
Identificação do Construtor
Número de matrícula
Modelo máquina
Dados técnicos
Marca de conformidade
Ano de construção
Page 55

INFORMAÇÕES
GERAIS
1
Descrição das máquinas
Combinado moedor de carne - ralador:
O combinado moedor de carne - ralador é uma máquina de tipo profissional para a restauração colectiva
(restaurantes, hotéis, comunidades, talhos, refeitórios colectivos, etc.) para a laboração de carnes e queijos.
O moedor de carne, mediante diferentes discos furados, permite obter o picado de carne de diversos tipos.
O ralador pode trabalhar vários produtos, como queijos curados, biscoitos, pão seco, fruta seca, etc..
A série é constituída por um só modelo:
AB22/AT (mod.22 versão com grupo de moer carne totalmente extraível)
A máquina possui uma estrutura em alumínio e aço inox, de fácil limpeza.
Possui dispositivos de segurança em conformidade com as Directivas Europeias.
Moedor de carne:
O moedor de carne é uma máquina de tipo profissional para a restauração colectiva (restaurantes, hotéis,
comunidades, talhos, refeitórios colectivos, etc.) para a laboração da carne. O moedor de carne, com a
aplicação de diferentes discos furados permite obter picados de carne de vários tipos.
A gama é constituída de 5 modelos diferentes:
TR22/RS (mod.22 versão base)
TR22/RG (mod.22 versão com entrada carne aumentada)
TR32/RS (mod.32 versão base)
TR22/TS (mod.22 versão com grupo de moer carne totalmente extraível)
TR32/TN (mod.32 versão com grupo de moer carne totalmente extraível)
A máquina possui uma estrutura em alumínio e aço inox, de fácil limpeza.
Possui dispositivos de segurança em conformidade com as Directivas Europeias.
MOD.TR22/RS-22/RG-32/RS MOD.TR22/TS-32/TN
Tremonha
Volante
Quadro comandos
Tremonha
Volante
Quadro comandos
MOD.AB22/AT
Alavanca do
ralador
Tremonha
Volante
Quadro comandos
Page 56

INFORMAÇÕES
GERAIS
1
Características técnicas
Descrição Unidade de
medida
Alimentação de
energia eléctrica
V Hz Ph
TR22/RS TR22/RG TR32/RS TR22/TS TR32/TN AB22/AT
230V 50Hz 1Ph
230/400V 50Hz 3Ph
Potência kW (HP) 1.1 (1.5) 1.1 (1.5) 2.2 (3) 1.1 (1.5) 2.2 (3) 1.1 (1.5)
Produção horária
moedor de carne
Produção horária
ralador
kg 300 300 500 300 500 300
kg / / / / / 40
Peso líquido kg 32 33,5 43/53 31 42/52 39
Peso com
embalagem
kg 38 39,5 49/59 37 48/58 45
Nível de ruído < 70 dB(A)
Instalação No banco
Dimensões de estorvo
mm. A B C mm. A B C
TR22/RS
TR22/RG
TR32/RS
TR22/TS
TR32/TS
AB22/AT
420
420
420
420
420
450
700
570
700
570
570
570
570
700
TR22/RS
700
TR22/RG
700
TR32/RS
700
720
mm. A B C
410
410
490
310
310
340
520
490
530
TR22/TS
TR32/TN
mm. A B C
AB22/AT 430 540 480
420
520
300
320
520
550
Page 57

Dispositivos de segurança
Microinterruptor: pára a
máquina quando se levanta a
alavanca do ralador. Ao voltar a
abaixar a alavanca, a máquina
recomeça a funcionar premindo
o botão I (só AB22/AT)
Telerruptor: no caso de
interrupção acidental de
corrente, é necessário voltar a
pôr novamente a máquina a
funcionar
INFORMAÇÕES
GERAIS
Microinterruptor: pára a
máquina quando se retira a
tremonha da boca superior.
Após o reposicionamento da
tremonha, a máquina
recomeça a funcionar premindo
o botão I (só TR22/RG-32/RS32/TN)
Telerruptor: no caso de
interrupção acidental de
corrente, é necessário voltar a
pôr novamente a máquina a
funcionar
1
Informações sobre a segurança
• É muito importante a leitura cuidadosa deste manual antes de proceder às operações de instalação e
uso. O cumprimento das indicações contidas no manual garante a segurança do indivíduo e da
máquina.
• Nunca altere os dispositivos de segurança.
• Recomenda-se o respeito rigoroso das normas de segurança no trabalho indicadas pelas entidades de
cada país.
• O construtor declina qualquer responsabilidade sobre danos a pessoas ou coisas causados pela
inobservância das normas de segurança.
• A correcta posição da máquina, a iluminação e a limpeza do ambiente de trabalho, são condições
importantes para a segurança pessoal.
• Não exponha a máquina aos agentes atmosféricos.
• A ligação e o funcionamento da máquina devem ser realizados exclusivamente por pessoal técnico
especializado.
• Controle que as características da instalação onde a máquina será colocada correspondam aos dados
indicados na chapa de identificação.
• Certifique-se que a máquina seja ligada a uma instalação com tomada de terra.
• A área de trabalho à volta da máquina deve estar sempre limpa e seca.
• Utilize roupas indicadas pelas normas de segurança no trabalho.
• A máquina deve ser utilizada exclusivamente para o uso previsto; qualquer outro uso deve ser
considerado impróprio e portanto perigoso.
• Verifique o estado e o peso dos produtos a serem trabalhados; não sobrecarregue a máquina
excedendo a sua capacidade.
• É proibido introduzir objectos, utensílios, mãos ou outras coisas no interior das partes perigosas.
• Mantenha a máquina fora do alcance das crianças.
• Desligue a ficha da tomada de corrente quando a máquina não é utilizada.
• No caso de avarias e/ou inconvenientes de uso, não efectue pessoalmente as reparações mas contacte
o Revendedor autorizado.
• Use sempre peças sobresselentes originais.
• Antes de proceder à limpeza da máquina, desligue a alimentação eléctrica retirando a ficha da tomada.
• Para a limpeza não utilize jactos de água de alta pressão.
PERIGO – ATENÇÃO: É rigorosamente proibido utilizar discos com
furos com um diâmetro maior de 8mm e uma espessura total inferior a
5mm. Recomenda-se a substituição do disco, quando, por desgaste, a sua
espessura resulta inferior a 5mm. O construtor declina qualquer
responsabilidade por qualquer dano a coisas ou a pessoas, provocados pela
inobservância das referidas disposições.
Page 58

INFORMAÇÕES
SOBRE A INSTALAÇÃO
2
Embalagem e desembalagem
A máquina está embalada numa
caixa de cartão com protecções de
poliester expanso que garante a
perfeita integridade durante o
transporte.
• Manuseie a embalagem
respeitando as instruções.
• Abra a embalagem e verifique a
integridade de todos os
componentes. Conserve-a para
um futuro transporte.
• Desaparafuse os parafusos A e
levante a máquina da palete.
• Retire as braçadeiras B.
• Levante a máquina como
indicado e coloque-a na zona
escolhida para a instalação.
Zona de instalação
A zona escolhida deve estar bem iluminada e terá que dispor de tomadas eléctricas. O plano de apoio deve
ser suficientemente amplo, bem nivelado e seco. A instalação deve ser efectuada em ambientes com
atmosfera não explosiva, tendo em conta também as leis em vigor em matéria de segurança no trabalho.
Tabela Condições ambientais
Descrição Valores
Temperatura de funcionamento 0÷35 °C (32÷95 °F)
Temperatura de armazenagem -15 a +65 °C (de –6.8 a +149 °F)
Humidade relativa
Poeira do ambiente Inferior a 0.03 g/m³
Máxima 80% com temperatura ambiente de 20 °C
Máxima 50% com temperatura ambiente entre 20÷60 °C
Ligação eléctrica
PERIGO – ATENÇÃO: A ligação eléctrica à rede de
alimentação deve ser efectuada por pessoal especializado.
Verifique a eficiência da instalação de ligação à terra do estabelecimento.
Verifique que a tensão de linha (V) e a frequência (Hz) correspondam aos
da máquina (veja a chapa de identificação e o esquema eléctrico). A
máquina possui um cabo eléctrico que deve ser ligado a uma ficha
multipolar que por sua vez deve ser ligada a um interruptor de parede
dotado de diferencial.
Ligação trifásica
Ponha a máquina a funcionar durante alguns segundos e verifique a
correcta rotação do utensílio. Em caso contrário, desligue a tensão e
inverta duas das três fases na ficha.
Ligação Ligação
Monofásica trifásica
230V – 1Ph 230/400V – 3Ph
Page 59

INFORMAÇÕES PARA O
Descrição dos comandos
1) Botão de marcha em frente “I”
Prima o botão para pôr a máquina a funcionar. O
funcionamento, nas versões combinadas, realiza-se só com
a alavanca do ralador abaixada.
2) Botão de marcha atrás “Δ
Prima o botão para inverter o sentido de rotação da
máquina. O funcionamento, nas versões combinadas,
realiza-se só com a alavanca do ralador abaixada.
3) Botão de paragem “0”
Prima o botão para parar a máquina.
4) Manípulos de bloqueio do corpo do moedor
Para bloquear o corpo do moedor de carne parafuse os
manípulos; para desbloqueá-lo desaparafuse os manípulos.
USO E A LIMPEZA
3
5) Alavanca do ralador
Prima a alavanca para baixo para ralar o produto.
6) Manípulo de bloqueio do corpo do moedor
Para bloquear o corpo do moedor de carne parafuse o
manípulo; para desbloqueá-lo desaparafuse o manípulo.
Uso do ralador
• Nos modelos combinados ralador - moedor de carne, desmonte o grupo de moedura antes de utilizar o
ralador.
• Levante a alavanca do ralador e introduza o produto na boca do ralador.
• Abaixe a alavanca do ralador e prima o botão de arranque “I”.
• Prima progressivamente a alavanca até acabar o produto.
• No fim da laboração levante a alavanca e introduza outro produto na boca do ralador; abaixe novamente
a alavanca e prima o botão de arranque “I” (o funcionamento verifica-se só se a alavanca do ralador
estiver abaixada).
• Para parar a máquina prima o botão de paragem “0” ou levante a alavanca do ralador.
• No fim do ciclo de trabalho limpe o cilindro ralando um pedaço de pão duro ou use o pincel em dotação.
Uso do moedor de carne
• Nos modelos combinados ralador - moedor de carne, abaixe a alavanca do ralador.
• Aperte os manípulos de bloqueio do corpo do moedor.
• Aperte ligeiramente, sem bloqueá-lo, o volante que se encontra na boca de saída do moedor de carne.
• Ponha em movimento a máquina premindo o botão de arranque “I” (nos modelos combinados o
funcionamento processa-se só quando a alavanca do ralador estiver abaixada).
• Introduza o produto na boca superior do moedor e prima-o com o almofariz em dotação.
• Ao terminar a laboração prima o botão de paragem “0”.
• No fim do ciclo de trabalho desmonte o grupo de moedura e lave-o com detergentes apropriados em
água quente ou na máquina de lavar a louça.
Page 60

Desmontagem do grupo moedor
• Retire a tremonha da boca superior.
• Rode em sentido anti-horário o volante.
• Retire em sucessão:
- o disco furado
- a faca
- a cóclea
• Desaparafuse o manípulo para desbloquear o
corpo do moedor de carne e depois retire o
corpo moedor.
• Para montar o grupo moedor execute as
operações em sucessão inversa.
• Retire a tremonha da boca superior.
• Rode em sentido anti-horário o volante.
• Retire em sucessão:
- o disco furado
- a faca
- a cóclea
• Desaparafuse os manípulos para desbloquear
o corpo do moedor de carne e depois retire o
corpo moedor.
• Para montar o grupo moedor execute as
operações em sucessão inversa.
INFORMAÇÕES PARA O USO
E A LIMPEZA
3
INFORMAÇÕES: Antes de cada ciclo de trabalho verifique que as partes amovíveis estejam
bem apertadas e fixas com a máquina.
Conselhos para o uso
O grupo moedor completamente extraível (só mod.TR22/TS-TR32/TN-AB22/AT) pode ser posto no
frigorífico ou aparelhos similares, mesmo com resíduos de produto no seu interior. Esta característica da
máquina permite utilizar o moedor de carne em diversos momentos do dia, sem que seja necessário lavar e
limpar os vários componentes depois do uso, segundo quanto prescrito pelas norma de higiene em vigor.
Limpeza diária
• No fim do dia retire a ficha da tomada de corrente.
• Faça uma cuidadosa limpeza utilizando produtos neutros.
• Limpe as partes internas da máquina com uma esponja húmida.
• Não utilize palha-de-aço e detergentes abrasivos.
• Desmonte o grupo moedor e lave-o com detergentes adequados em água quente ou na máquina de
lavar a louça .
Longo período de inactividade da máquina
Devendo deixar a máquina parada por um longo período de tempo, desligue o interruptor geral, efectue uma
limpeza geral da máquina e cubra-a com uma lona para protegê-la contra a poeira.
Page 61

PROCURA DE AVARIAS,
RECICLAGEM
4
Premissa
Em caso de avarias ou mau funcionamento, desligue o interruptor geral e contacte o Serviço de Assistência
do vosso Revendedor. Não desmonte as partes internas da máquina.
O construtor declina qualquer responsabilidade contra eventuais intervenções não autorizadas!
Inconvenientes, causas, soluções
Inconveniente
Interruptor geral desligado
A máquina não funciona
Falta de tensão na linha de alimentação
Fusível de protecção queimado
Causa
Posicione o interruptor geral no “I”
Contacte o Serviço Assistência do seu
Revendedor
Contacte o Serviço Assistência do seu
Revendedor
Solução
Desactivação e reciclagem
A presença dos símbolos indicados (contentor do lixo barrado) na chapa de dados do aparelho, significa
que no fim da própria vida útil a desactivação e reciclagem deverão ser feitas conforme as prescrições
contidas na Directiva Europeia. A Directiva prevê a recolha separada das aparelhagens eléctricas e
electrónicas através de um sistema de recolha denominado RAEE. No momento da compra de um novo
aparelho, o utilizador é obrigado a não eliminar o aparelho como lixo urbano, mas deverá entregá-lo, na
razão de um contra um, ao revendedor ou distribuidor. O revendedor ocupar-se-á da sua eliminação
seguindo os processos previstos pelo sistema de recolha dos RAEE. No caso de eliminação do aparelho no
território italiano, contacte o produtor, que fornecerá todas as informações necessárias para a eliminação da
máquina junto do centro de recolha mais próximo do utilizador. Os utilizadores que residem fora do território
italiano deverão contactar os Ministérios do Ambiente do próprio País, que fornecerão as informações
necessárias para uma correcta eliminação. A inobservância dos procedimentos de eliminação pode
prejudicar o ambiente e as pessoas. Portanto, a eliminação abusiva, total ou parcial, das aparelhagens por
parte dos utilizadores, são objecto de coima por parte das Autoridades Competentes.
Page 62

Page 63

TR22/RS ● TR22/RG ● TR32/RS
AB22/AT ● TR22/TS ● TR32/TN
МЯСОРУБКА И ТЕРКА
1 ОБЩИЕ ИНФОРМАЦИИ
Цель инструкций………………………………...
Идентификация Изготовителя и машины..…
Описание машины...………..........………….…
Технические характеристики………………….
Габариты......................………………………….
Устройства безопасности……………………...
Информации по безопасности…………….….
2 ИНФОРМАЦИИ ПО УСТАНОВКЕ
Упаковка и распаковка………………………….
Зона установки.........................………………..
Электрическое подсоединение…………….…
ИНДЕКС
3 ИНФОРМАЦИИ ПО ИСПОЛЬЗОВАНИЮ
4
И ОЧИСТКА
Описание команд.........………………………….
4
Использование терки……………………………
5
Использование мясорубки……………….…..
6
Демонтаж узла рубки мяса
6
7
Советы по применению.………………………...
7
Очистка в конце рабочего дня.………………...
Долгое неиспользование машины…………….
4 ПОИСК НЕИСПРАВНОСТЕЙ И
8
ПОВТОРНОЕ ИСПОЛЬЗОВАНИЕ
8
Введение…………………………………………..
8
Неполадки, причины, исправления.…………..
Уничтожение и повторное использование.….
ПРИЛОЖЕНИЯ
Схема сборки узла мясорубки unger
Каталог запчастей
Электрическая схема
……........………….
9
9
9
10
10
10
10
11
11
11
Page 64

ОБЩИЕ
Цель инструкций
Данные инструкции, являющиеся неотделимой частью машины, выполнены изготовителем, чтобы преподнести
необходимую информацию всем, имеющим разрешение на работу с машиной на весь период её действия:
покупатели, проектировщики установки, пользователи, опытные операторы и специализированные техники.
Помимо того, что должна быть применена хорошая техника использования, получатели информации должны
внимательно прочитать их и безотказно применить
предотвращение любого риска. Осторожность никогда не заменима. Безопасность находится в руках
операторов, имеющих дело с машиной. Хранить данные инструкции на всём протяжении работоспособности
машины в знакомом месте и свободно доступном, чтобы всегда иметь его под рукой для консультации. Чтобы
выделить некоторые части
приняты символы, значение которых далее описано:
ОПАСНОСТЬ – ВНИМАНИЕ: указывает ситуации сильной опасности, которые,
если не замечены вовремя; необходимо придать особое внимание.
текста особой важности или чтобы указать некоторые важные спецификации, были
. Цель данных инструкций – это привлечь особое внимание на
ИНФОРМАЦИИ
1
ИНФОРМАЦИИ: технические указания особой важности.
К настоящим инструкциям прилагается:
- Сертификат гарантий, в котором указаны все гарантийные условия, продиктованные Изготовителем.
- Документы, подтверждающие соответствие действующим законам по технике безопасности и здоровью на
рабочих местах.
По любому вопросу Технической помощи, информации и заказов запчастей – обратиться к Продавцу, имеющему
разрешение.
Идентификация Изготовителя и машины
Идентификация Производителя
Паспортный номер
Модель машины
Тех.данные
Маркировка соответствия
Год изготовления
Page 65

Описание машины
Комбинированная мясорубка-терка:
Комбинированная мясорубка-терка это машина для профессионального использования на
предприятиях общественного питания (ресторанты, гостинницы, сообщества, столовые и т. д.),
применяемая для переработки мяса и сыров. Использование в мясорубке разнообразных решеток
позволяет получить многочисленные типологии мясного фарша. Терка способна перерабатывать
такие продукты как твердые сыры, печенье, сухой хлеб, сухофрукты
Ассортимент состоит из 1 модели:
AB22/AT (мод.22 версия со полносъемным узлом мясорубки)
Каркас машины изготовлен из аллюминия и нержавеющей стали. Машина легко чистится.
Установленные предохранительные устройства соответствуют Европейским Нормам.
Мясорубка:
Данная мясорубка - это машина для профессионального использования на предприятиях
общественного питания (ресторанты, гостинницы, сообщества, столовые и т. д.), применяемая для
переработки мяса. Использование в мясорубке разнообразных решеток позволяет получить
многочисленные типологии мясного фарша
Ассортимент представлен 5 различными моделями:
TR22/RS (мод.22 базовое исполнение)
TR22/RG (мод.22 вариант с увеличенным отверстием для подачи мяса
TR32/RS (мод.32 базовое исполнение)
TR22/TS (мод.22 версия со полносъемным узлом мясорубки)
TR32/TN (мод.32 версия со полносъемным узлом мясорубки)
Каркас машины изготовлен из аллюминия и нержавеющей стали. Машина легко чистится.
Установленные предохранительные устройства соответствуют Европейским Нормам.
ИНФОРМАЦИИ
и т. д.
)
ОБЩИЕ
1
МОД.TR22/RS-22/RG-32/RS МОД.TR22/TS-32/TN
воронкой
Маховичек
воронкой
Маховичек
Щит управления
МОД.AB22/AT
Рычаг терки
воронкой
Маховичек
Щит управления
Щит управления
Page 66

ИНФОРМАЦИИ
ОБЩИЕ
1
Технические характеристики
Описания Ед. измерения TR22/RS TR22/RG TR32/RS TR22/TS TR32/TN AB22/AT
Питание
электроэнергией
Мощность
Вт Гц Ф
к вольт (HP)
1.1 (1.5) 1.1 (1.5) 2.2 (3) 1.1 (1.5) 2.2 (3) 1.1 (1.5)
230V 50Hz 1Ph
230/400V 50Hz 3Ph
Почасовая
производительность
кг
300 300 500 300 500 300
мясорубки
Почасовая
производительность
кг
/ / / / / 40
терки
Чистый вес
Вес с упаковкой
кг
кг
32 33,5 43/53 31 42/52 39
38 39,5 49/59 37 48/58 45
Уровень шума < 70 дВ(A)
Установка На cтоле
Габариты
mm. A B C mm. A B C
TR22/RS
TR22/RG
TR32/RS
TR22/TS
TR32/TS
AB22/AT
420
420
420
420
420
450
700
570
700
570
570
570
570
700
TR22/RS
700
TR22/RG
700
TR32/RS
700
720
mm. A B C
410
410
490
310
310
340
520
490
530
TR22/TS
TR32/TN
mm. A B C
AB22/AT 430 540 480
420
520
300
320
520
550
Page 67

Устройства безопасности
Микровыключатель:
останавливает машину, если
рычаг терки поднят. После
опускания рычага
перезапустить машину, нажав
на кнопку I (только AB22/AT)
Телевыключатель: в случае
непредвиденного отключения
электроэнергии, требует
сознательный перезапуск
машины
ИНФОРМАЦИИ
ОБЩИЕ
1
Микровыключатель:
останавливает машину при
извлечении бункера из
входного отверстия
мясорубки. После установки
бункера перезапустить
машину нажатием клавиши I
(только TR22/RG-32/RS32/TN)
Телевыключатель: в случае
непредвиденного отключения
электроэнергии, требует
сознательный перезапуск
машины
Информации по технике безопасности
• Особой важностью является консультация данных инструкций перед тем, как приступить к
операциям установки и использованию. Постоянное исполнение указаний, содержащихся в
данных инструкциях, гарантирует безопасность человеку и машине.
• Не изменять, по никакой причине, устройства безопасности.
• Рекомендуется строгое выполнение норм безопасности на рабочих местах, выпущенных
соответствующими органами каждого отдельного государства
• Изготовитель отклоняет любую отвественность за повреждения людям или вещам, полученным в
результате не выдерживания норм безопасности.
• Правильное расположение машины, освещение и чистота окружающей среды – это важные
условия для безопасности человека на рабочем месте.
• Не подвергать машину атмосферным агентам.
• Подсоединение и введение в эксплуатацию машины должны быть
специализированным технически персоналом.
• Проверить, чтобы характеристики установки, где будет расположена машина, соответствовали
данным, вынесенным на табличке.
• Убедиться, чтобы машина была подсоединена к установке заземления.
• Зона работы вокруг машины должна всегда содержаться чистой и сухой.
• Использовать предусмотренную нормами техники безопасности одежду.
• Эта машина должна быть
использована только по назначению; каждое другое назначение
считается не правильным, а значит, опасным.
• Проверить соответствие и вес продуктов для обработки; не перегружать машину свех её
способностей.
• Запрещается вводить предметы, инструменты, руки или другое внутрь опасных деталей.
• Содержать машины вне доступности детей.
• Отключать от питания током, когда
машина не используется.
• В случае неполадок и/или неисправностей при использовании, не исправлять самим, но
обращаться к Продавцу, имеющему на это разрешение.
• Запрашивать всегда только оригинальные запчасти.
• Прежде, чем приступить к очистке машины, отключить электропитание, вынимая штепсель из
розетки.
• Для очистки не пользоваться водяной струёй высокого давления
ОПАСНОСТЬ - ВНИМАНИЕ: Строго запрещается использовать
решетки с отверстиями, диаметр которых превышает 8 мм, или
толщиной меньше 5 мм. Обеспечить замену решетки, если в
результате износа ее толщина станет меньше 5 мм. Производитель не
несет какой-либо ответственности за любой вред, нанесенный людям
или имуществу в результате несоблюдения указанных выше
предписаний.
.
выполнены только
.
Page 68

ИНФОРМАЦИИ
ПО УСТАНОВКЕ
2
Упаковка и распаковка
Машина упакована в картоне с
вставками из полиэстера, чтобы
гарантировать полное сохранение
во время транспортировки.
• Перемещать упаковку,
выдерживая инструкции.
• Открыть упаковку и проверить
целостность всех компонентов.
Сохранить упаковку для
будущих перевозок.
• Развинтить винты A и поднять
машину с поддона.
• Удалить стяжки B.
• Поднять машину, как указано и
расположить её в зоне,
предусмотренной для
установки.
Зона установки
Предусмотренная зона должна быть соответствующе освещена и должна иметь точкой
распределения электрического тока. Место расположения должно быть значительно широким,
ровным и сухим. Установка должна происходить в среде с невзрывной атмосферой. В любом случае,
должна быть выполнена, учитывая действующие нормы техники безопасности на рабочих местах.
Таблица условий среды
Описания Величины
Температура функционирования 0÷35 °C (32÷95 °F)
Температура складирования -15 a +65 °C (da –6.8 a +149 °F)
Удельная влажность
Запылённость среды Ниже 0.03 г/м³
Электрическое подсоединение
ОПАСНОСТЬ - ВНИМАНИЕ: Электрическое соединение к сети
питания должно быть выполнено специализированным персоналом.
Убедиться в прекрасной эффективности установки заземления завода.
Проверить, чтобы напряжение на линии (Вт) и частота (Гц)
соответствовали напряжению и частоте машины (Смотреть табличку
идентификации и электросхему). Машина снабжена электрическим
кабелем, к которому подсоединить мультиполярный штепсель. Штепсель
соединить к выключателю на стене, снабжённому диференциалом.
Трёхфазное соединение
Запустить машину на несколько секунд и проверить, чтобы вращение
инструмента было правильным. В случае, если вращение – неправильно,
снять напряжение и поменять местами две из трёх фаз в штепселе.
Максимум 80% при температуре окружающей среды 20 °C
Максимум 50% при температуре окружающей среды 20÷60 °C
Соединение Соединение
монофазное трёхфазное
230Вт – 1Ф 230/400Вт– 3Ф
Page 69

ИНФОРМАЦИИ ПО
ИСПОЛЬЗОВАНИЮ И
3
ОЧИСТКЕ
Описание команд управления
1) Кнопка хода вперед “I”
Нажать на кнопку для запуска машины. В
комбинированных моделях запуск производится только
при условии опущенного рычага терки
2) Кнопка обратного хода “Î”
Нажать на кнопку для реверсирования направления
вращения машины. В комбинированных моделях запуск
производится только при условии опущенного рычага
терки
3) Кнопка остановки “0”
Нажать кнопку для остановки машины
4) Ручки фиксации корпуса мясорубки
Закрутить ручки для закрепления корпуса мясорубки,
или открутить - для освобождения корпуса
5) Рычаг терки
Нажать на рычаг сверху
перерабатываемого продукта
6) Ручка фиксации корпуса мясорубки
Закрутить ручку для закрепления корпуса мясорубки,
или открутить - для освобождения корпуса
вниз для натирания
Применение терки
• В комбинированных моделях терки-мясорубки перед тем, как использовать терку, снять узлы мясорубки.
• Поднять рычаг терки и поместить продукт в загрузочную горловину терки.
• Опустить рычаг терки и нажать кнопку пуска “I”.
• Постепенно нажимать на рычаг до тех пор, пока продукт не закончится.
• По завершению переработки поднять
рычаг и нажать на кнопку пуска “I” (запуск машины произойдет только при условии опущенного рычага терки).
• Для остановки машины нажать на кнопку остановки “0” или поднять рычаг терки.
• По завершению рабочего цикла почистить цилиндр, потерев на нем кусок черствого хлеба или
щетки.
рычаг, перезаправить продуктом загрузочную горловину терки, вновь опустить
с помощью специальной
Применение мясорубки
• В комбинированных моделях терки-мясорубки опустить рычаг терки.
• Закрутить ручки фиксации корпуса мясорубки.
• Слегка затянуть маховичек, не блокируя его, на выходе мясорубки.
• Запустить машину нажатием на кнопку пуска “I” (в комбинированных моделях запуск производится только при условии
опущенного рычага терки).
• Поместить продукт внутрь загрузочной горловины и
• По завершению операции нажать на кнопку остановки “0”.
• По завершению рабочего цикла снять узел мясорубки и вымыть его, используя соответствующие моющие средства, в
горячей воде или в посудомоечной машине.
надавить на него толкателем, входящим в комплектацию.
Page 70

Демонтаж узла мясорубки
• Вынуть воронку из верхней горловины.
• Повернуть маховичек против часовой
стрелки.
• Снять в приведенной последовательности:
- решетку с отверстиями
- нож
- шнек
• Открутить ручку фиксации и извлечь корпус
мясорубки.
• Для обратной установки узла рубки мяса
произвести вышеуказанные операции в
обратном порядке.
• Вынуть воронку из верхней горловины.
• Повернуть маховичек против часовой
стрелки.
• Снять в приведенной последовательности:
- решетку с отверстиями
- нож
- шнек
• Открутить ручки фиксации и извлечь корпус
мясорубки.
• Для обратной установки узла рубки мяса
произвести вышеуказанные операции в
обратном порядке.
ИНФОРМАЦИИ ПО
ИСПОЛЬЗОВАНИЮ И
ОЧИСТКЕ
3
ИНФОРМАЦИЯ: Перед началом каждого рабочего цикла удостовериться в прочном
закреплении съемных частей на машине.
Рекомендации по применению
Благодаря применению полносъемного узла мясорубки возможно помещение узла (только
Мод.TR22/TS-TR32/TN-AB22/AT), в том числе и с остатками продукта, в холодильники или в другие
подобные аппараты. Эта особенность машины позволяет использование мясорубки в различные
моменты в течение дня без необходимости мыть различные компоненты после каждого
использования, как предусмотренно действующими санитарно-гигиеническими нормативами.
Очистка в конце дня
• В конце рабочего дня вытащить вилку из розетки электрического питания.
• Произвести аккуратную чистку с использованием нейтральных чистящих средств.
• Почистить внешние части машины влажной губкой.
• Не использовать металлические мочалки и абразивные чистящие средства.
• Снять узел мясорубки и вымыть его, используя соответствующие моющие средства, в горячей
воде или
в посудомоечной машине.
Длительное простаивание машины
Если придётся оставлять на долгое время машину без деятельности, отключить главный
выключатель на стене, произвести общую очистку машины и покрыть её полотном во избежании
попадания пыли.
Page 71

ПОИСК
НЕИПРАВНОСТЕЙ,
4
ПОВТОРНОЕ
ПРИМЕНЕНИЕ
Введение
В случае неполадок или неисправностей, отключить общий выключатель на стене и вызвать Сервис
Технической Помощи вашего Продавца. Избегать демонтаж внутренних деталей машины.
Изготовитель отклоняет любую ответственность за возможное вмешательство без
разрешения!
Неполадки, причины, исправления
Неполадка
Не включен общий выключатель
Машина не запускается
Недостаток напряжения на линии
питания
Защитный предохранитель перегорел
Причина
Уничтожение и повторное применение
Поставить общий выключатель на “I”
Вызвать Сервис Технической
Помощи вашего Продавца
Вызвать
Помощи вашего Продавца
Сервис Технической
Исправление
Наличие данного символа (перечеркнутый мусорный контейнер) на паспортной табличке прибора
означает, что по завершению своего срока службы прибор подлежит утилизации и переработке в
соответствии с европейской директивой. Директива предусматривает раздельный сбор отработанной
электрической и электронной аппаратуры по системе RAEE. В момент приобретения нового прибора
пользователь обязуется не утилизировать прибор в качестве
соотношении один к одному) продавцу или дистрибьютору. Продавец должен обеспечить утилизацию
прибора в соответствии с методами, предусмотренными системой RAEE. В случае утилизации
оборудования на территории Италии обратиться к производителю, который предоставит информацию
по утилизации прибора в ближайшем к пользователю центру сбора отходов. Пользователи,
находящиеся за
среды своей страны для получения информации о порядке утилизации. Несоблюдение методов
утилизации может причинить вред окружающей среде и здоровью людей. Ввиду этого, в случае
полного или частичного несоблюдения правил в области утилизации оборудования пользователь
несет ответственность в соответствии с законом.
пределами Италии, должны обратиться в Министерство по охране окружающей
бытовых отходов, а сдать его (в
Page 72

SCHEMA DI MONTAGGIO GRUPPO TRITACARNE UNGER • UNGER MINCER SET ASSEMBLY
DIAGRAM • SCHEMA DE MONTAGE GROUPE HACHE-VIANDE UNGER • MONTAGEPLAN ZUR
UNGER FLEISCHWOLF-GRUPPE • ESQUEMA DE MONTAGEM GRUPO MOEDOR DE CARNE UNGER •
ESQUEMA DE MONTAJE GRUPO TRITURADORA DE CARNE UNGER • СХЕМА МОНТАЖА УЗЛА
МЯСОРУБКИ УНГЕР
Sistema unger
standard
A)
- Corpo
tritacarne
B)
- Coclea
C)
- Piastra
sgrossatrice
0
D)
- Coltello
E)
- Piastra ø8
F)
- Piastra ø4.5
G)
- Volantino
Standard unger
system
A)
- Mincer body
B)
- Volute
C)
- Rougher
plate 0
D)
- Blade
E)
- Plate ø8
F)
- Plate ø4.5
G)
- Handwheel
Système unger
standard
A)
- Corps hache-
viande
B)
- Vis spirale
transporteuse
C)
- Grille
dégrossisseu
se 0
D)
- Couteau
E)
- Grille ø8
F)
- Grille ø4.5
G)
- Volant
Standard
Ungersystem
A)
- Fleischwolfkö
rper
B)
- Schnecke
C)
- GrobLochscheibe
0
D)
- Messer
E)
- Lochscheibe
ø8
F)
- Lochscheibe
ø4.5
G)
- Handrad
Sistema unger
estándar
A)
- Cuerpo
picadora de
carne
B)
- Cóclea
C)
- Placa para
desbastar 0
D)
- Cuchilla
E)
- Placa ø8
F)
- Placa ø 4.5
G)
- Volante
Nella versione unger del tritacarne è
severamente vietato utilizzare, nella parte
esterna (F), piastre con fori aventi un
diametro maggiore di 8mm ed uno
spessore totale inferiore a 5mm.
Using plates with hole diameters over
8mm and with total thickness under 5
mm is strictly prohibited on the outer
part (F) of the meat grinder unger
Dans la version unger du hache-viande il
est formellement interdit d’utiliser, dans
la partie extérieure (F), des plaques avec
des trous ayant un diamètre supérieur à
8mm et une épaisseur totale inférieure à
Bei der Unger-Version des Fleischwolfs
ist es strengstens verboten, am Außenteil
(F) Scheiben mit Löchern mit einem
größeren Durchmesser al 8 mm und
Scheiben mit einer Gesamtstärke von
weniger als 5 mm zu verwenden.
En la versión Unger de la trituradora,
queda terminantemente prohibido
utilizar en la parte externa (F) placas con
orificios que presenten un diámetro
mayor que 8 mm y un espesor total
Na versão unger do picador de carne é
rigorosamente proibido utilizar, na parte
exterior (F), discos com furos com um
diâmetro maior de 8 mm e uma espessura
В мясорубке модели Унгер строго
запрещается использовать в наружной
части (F) решетки с отверстиями,
диаметр которых превышает 8 мм, или
Sistema unger
standard
A)
- Corpo
moedor de
carne
B)
- Cóclea
C)
- Disco
desengrossa
dor 0
D)
- Faca
E)
- Disco ø8
F)
- Disco ø4.5
G)
- Volante
version.
5mm.
inferior a 5 mm.
total inferior a 5mm.
толщиной меньше 5 мм.
Стандартная
система унгер
A)
- Корпус
мясорубки
B)
- Шнек
C)
- Решетка
размельчите
льная 0
D)
- Нож
E)
- Решетка ø8
F)
- Решетка
ø4.5
G)
- Маховичек
Page 73

ERSATZTEILKATALOG • CATALOGO DE REPUESTOS • CATÁLOGO DE PEÇAS SOBRESSALENTES • КАТАЛОГ ЗАПЧАСТЕЙ
CATALOGO PARTI DI RICAMBIO • SPARE PARTS CATALOGUE • CATALOGUE PIÈCES DE RECHANGE •
AB.22/AT
Page 74

ERSATZTEILKATALOG • CATALOGO DE REPUESTOS • CATÁLOGO DE PEÇAS SOBRESSALENTES • КАТАЛОГ ЗАПЧАСТЕЙ
CATALOGO PARTI DI RICAMBIO • SPARE PARTS CATALOGUE • CATALOGUE PIÈCES DE RECHANGE •
TR.22/TS
Page 75

ERSATZTEILKATALOG • CATALOGO DE REPUESTOS • CATÁLOGO DE PEÇAS SOBRESSALENTES • КАТАЛОГ ЗАПЧАСТЕЙ
CATALOGO PARTI DI RICAMBIO • SPARE PARTS CATALOGUE • CATALOGUE PIÈCES DE RECHANGE •
TR.22/RS
Page 76

ERSATZTEILKATALOG • CATALOGO DE REPUESTOS • CATÁLOGO DE PEÇAS SOBRESSALENTES • КАТАЛОГ ЗАПЧАСТЕЙ
CATALOGO PARTI DI RICAMBIO • SPARE PARTS CATALOGUE • CATALOGUE PIÈCES DE RECHANGE •
TR.22/RG
Page 77

ERSATZTEILKATALOG • CATALOGO DE REPUESTOS • CATÁLOGO DE PEÇAS SOBRESSALENTES • КАТАЛОГ ЗАПЧАСТЕЙ
CATALOGO PARTI DI RICAMBIO • SPARE PARTS CATALOGUE • CATALOGUE PIÈCES DE RECHANGE •
TR.32/TN
Page 78

ERSATZTEILKATALOG • CATALOGO DE REPUESTOS • CATÁLOGO DE PEÇAS SOBRESSALENTES • КАТАЛОГ ЗАПЧАСТЕЙ
CATALOGO PARTI DI RICAMBIO • SPARE PARTS CATALOGUE • CATALOGUE PIÈCES DE RECHANGE •
TR.32/RS
Page 79

SCHEMA ELETTRICO • ELECTRICAL WIRING DIAGRAM • SCHÉMA ÉLECTRIQUE • SCHALTPLAN •
ESQUEMA ELECTRICO • ESQUEMA ELÉCTRICO • ЭЛЕКТРИЧЕСКАЯ СХЕМА
AB22AT TR22/TS-RS-RG TR32/TN-RS
(1 Phase)
Page 80

SCHEMA ELETTRICO • ELECTRICAL WIRING DIAGRAM • SCHÉMA ÉLECTRIQUE • SCHALTPLAN •
ESQUEMA ELECTRICO • ESQUEMA ELÉCTRICO • ЭЛЕКТРИЧЕСКАЯ СХЕМА
AB22AT TR22/TS-RS-RG TR32/TN-RS
(3 Phase)
Page 81

CONDIZIONI DI GARANZIA
- La garanzia ha durata 12 mesi ed è subordinata alla presentazione di una copia di idoneo documento
fiscale o fattura comprovante la data di acquisto.
- Il prodotto è garantito contro vizi e difetti dei materiali, di fabbricazione e assemblaggio per 12 mesi
dalla data della fattura di acquisto. La garanzia consiste nella sostituzione o riparazione delle parti
componenti il prodotto che risultino difettose. Essa non comprende in alcun caso la sostituzione del
prodotto a seguito di intervento per guasto.
- La garanzia è quindi limitata alla sostituzione o riparazione gratuita delle parti che, a giudizio del
costruttore, siano risultate mal funzionanti. Non rientrano in essa i materiali di consumo e gli utensili.
- Le prestazioni in garanzia saranno rese dal rivenditore presso cui è stato effettuato l’acquisto del
prodotto, oppure in alternativa dalla casa costruttrice, restando inteso che il relativo trasporto avrà
luogo a cura, spese e rischio del cliente.
- La garanzia decade qualora il prodotto sia stato manomesso o riparato da personale non autorizzato.
- La presente garanzia sostituisce ed esclude ogni altra garanzia dovuta dal rivenditore per legge o
contratto e definisce tutti i diritti del cliente in ordine a vizi e difetti e/o mancanza di qualità in ordine
ai prodotti acquistati.
- Per ogni eventuale controversia legale è riconosciuto competente il Foro di residenza del costruttore.
CONDITIONS DE LA GARANTIE
- La garantie a une durée de 12 mois et elle est subordonnée à la présentation d’une copie du
document fiscal approprié ou de la facture prouvant la date d’achat.
- Le produit est garanti contre les vices et défauts de matière première, de fabrication et d’assemblage
pendant 12 mois à compter de la date indiquée sur la facture lors de l’achat. La garantie consiste à
remplacer ou réparer les parties qui constituent le produit et résultent défectueuses. Elle n’inclut en
aucun cas le remplacement du produit suite à une intervention pour panne.
- La garantie se limite donc au remplacement ou à la réparation gratuite des parties qui, selon
l’évaluation du constructeur, font preuve de dysfonctionnements. Les matériaux de consommation et
les outils ne sont pas couverts.
- Les prestations sous garantie seront effectuées par le revendeur chez lequel l’achat a été effectué ou,
en alternative, par la maison constructrice, restant entendu que le port est pris en charge par le client,
ceci incluant l’organisation, les frais et les risques relatifs.
- La garantie est annulée en cas d’altération ou de réparation du produit par du personnel non agréé.
- La présente garantie remplace et exclut toute autre garantie due par le revendeur en vertu de la loi ou
du contrat et définit tous les droits du client en ce qui concerne les vices et les défauts et/ou le manque
de qualité en ce qui concerne les produits achetés.
- Pour tout litige juridique est reconnue tribunal compétent de la résidence du fabricant.
CONDICIONES DE GARANTÍA
- La garantía tiene una duración de 12 meses y está subordinada a la presentación de una copia de un
documento fiscal válido o de una factura que pruebe la fecha de compra.
- El producto está garantizado contra vicios y defectos de los materiales, de fabricación y de
ensamblaje, por un plazo de 12 meses a partir de la fecha de la factura de compra.La garantía consiste
en la sustitución o reparación de las partes componentes del producto que resulten defectuosas. La
misma no comprende, en ningún, caso la sustitución del producto posterior a una intervención por
avería.
- La garantía se limita a la sustitución o reparación gratuita de las partes que, a juicio del fabricante no
funcionen correctamente. No entran dentro de la misma los materiales de consumo y las
herramientas.
- Las prestaciones bajo garantía serán realizadas por el revendedor al que se ha realizado la compra
del producto, o bien por la Casa Fabricante, dejando sobreentendido que el transporte, riesgos y
gastos quedará a cargo del cliente.
- La garantía caduca si el producto ha sido forzado o reparado por personal no autorizado.
- La presente garantía sustituye y excluye cualquier otra garantía debida por el revendedor por ley o
contrato y define todos los derechos del cliente con respecto a las imperfecciones, defectos y/o
faltantes en cantidad del pedido de los productos comprados.
- Para cualquier controversia jurídica es reconocida Tribunal competente de residencia de los
fabricantes.
УСЛОВИЯ ГАРАНТИИ
- Настоящая гарантия действительна в течение 12 месяцев и обусловлена предъявлением
настоящего сертификата вместе с соответствующим документом о покупке или фактурой,
подтверждающей дату покупки.
- На изделие предоставляется гарантия против изъянов и дефектов материалов, изготовления
и сборки в течение срока, указанного в настоящем сертификате. Гарантия заключается в
проведении замены или ремонта
дефективных частей, составляющих изделие. Гарантия не
включает в себя замену изделия в результате ремонта вследствие поломки.
- Таким образом, гарантия ограничивается бесплатным проведением замены или ремонта
частей, которые по усмотрению производителя считаются неисправными. Гарантия не
распространяется на расходные материалы и инструменты.
- Гарантийные услуги оказываются дилером, у которого была совершена покупка,
или, в
качестве альтернативы, фирмой-производителем, причем подразумевается, что
транспортировка организуется и выполняется за счет клиента и под его ответственностью.
- Гарантия утрачивается в случае неправильного обращения с изделием или ремонта,
проведенного неуполномоченным персоналом.
- Настоящая гарантия заменяет собой и исключает любую другую гарантию, полученную от
дилера по закону или по контракту
, и определяет все права клиента в отношении изъянов и
дефектов и/или недостатка качества приобретенных изделий.
- При возникновении любых разногласий юридического характера компетентным считается
суд г. Римини – Италия – Е
Для любой правовой спор является признанным компетентным
судом жительства изготовителя.
JÒTÀLLÀSI FELTÈTELEK
- A jótállás időtartama 12 hónap. A jótállás a vásárlás napját igazoló számla vagy blokk (annak
másolatának) felmutatása ellenében vehető igénybe.
- A jótállás az anyaghibából, gyártási ill. összeszerelési hibából eredő meghibásodásokra terjed ki,
a számlán feltűntetett vásárlás napjától számított 12 hónapig. A jòtàllàs àll a termèk hibàs
rèszeinek cserèjèből vagy ezek kijavitàsàbòl. Nem foglalja viszont magàban az egèsz termèk
cserèjèt a hiba javìtàsa következtèben.
-A jòtàllàs kizàròlag a hibàs rèszek dìjmentes javitàsàra, cserèjère korlàtozott, amik a gyàrtò
elbìràlàsa alapjàn rèszben vagy egyàltalàn nem működnek. Nem èrvènyes anyagkopàsra ès
felszerelèsekre.
-A jòtàllàs belüli szolgàltatàst az eladò vegzi, ahol törtènt a termèk vàsàrlàsa, vagy pedig kivànsàg
szerint a gyàrtò cèg, de ebben az esetben az àru szàllìtàsi költsège ès biztonsàga, kockàzata a
vàsàrlòt terheli.
-A jòtàllàs èrvènyèt veszti ha a termèken nem hozzàèrtő ès nem meghatalmazott szemèly
bàrmilyen beavatkozàst vègzett.
-Ez a jòtàllàs helyettesìt ès kizàr minden màs jòtàllàst amire a gyàrtò köteles egy szerződès vagy
jog alapjàn ès meghatàrozza a vàsàrlò minden jogàt a vàsàrolt termèkek hibàival, hiànyossàgaival,
minősèg hiànyàval szemben viszonyitva.
-
Minden olyan jogvita elismert illetékes bíróság lakóhelye a gyártótól.
WARRANTY CONDITIONS
- The warranty has duration of 12 months and is subject to the presentation of a copy of a suitable
fiscal document or invoice proving the purchase date.
- The product is guaranteed against flaws and defects of the materials,manufacturing and
assembly for 12 months from the date of the purchase invoice. The warranty consists in the
replacement or repair of defective product components. It does not include the replacement of the
product after breakdown repairs for any reason.
- Therefore the warranty is limited to the free replacement or repair of parts which, in the
manufacturer’s opinion, malfunction. Consumable materials and tools are not included.
- Warranty services are rendered by the dealer where the product was purchased or, alternately,
by the manufacturer, it being understood that the relevant transport will be at the customer’s full
liability and expense.
- The warranty is invalidated if the product was tampered with or repaired by unauthorised
personnel.
- This warranty substitutes and excludes any other warranty due by the dealer by law or contract
and defines all the customer’s rights regarding purchased product defects and faults and/or quality
deficiencies.
- Any legal controversy will be submitted to the manufacturer’s Court of residence.
GARANTIEBEDINGUNGEN
- Die Garantiezeit beträgt 12 Monate und hängt von der Vorlage einer Kopie eines geeigneten
Steuerdokuments oder einer Rechnung, die das Kaufdatum belegt.
- Die Garantie bezieht sich auf Mängel und Fehler in Bezug auf die Materialien, die Herstellung und
die Montage und gilt 12 Monate ab dem Rechnungsdatum. Die Garantieleistung besteht in der
Auswechselung der fehlerhaften Produktkomponenten. Die Garantie umfasst in keinem Fall die
Auswechselung des Produkts infolge eines Eingriffs wegen Defekt.
- Die Garantie ist mithin beschränkt auf die kostenlose Auswechselung oder Reparatur der Teile, die
nach dem Urteil des Herstellers fehlerhaft arbeiten. Verbrauchsmaterialien und Werkzeuge sind von
dieser Garantie nicht abgedeckt.
- Die Garantie wird von dem Wiederverkäufer geleistet, bei dem das Produkt gekauft wurde oder als
Alternative von der Herstellerfirma. Dabei versteht sich, dass der entsprechende Transport in der
Verantwortung sowie auf Kosten und Risiko des Kunden erfolgt.
- Die Garantie verfällt, sobald das Produkt von unbefugtem Personal manipuliert oder repariert wird.
- Diese Garantie ersetzt und schließt jede weitere vom Wiederverkäufer von Gesetzes oder Vertrags
wegen geschuldete Garantie und definiert alle Kundenrechte hinsichtlich Qualitätsfehler oder –
mängel an den gekauften Produkten.
- Für Rechtsstreitigkeiten erkannt wird zuständigen Gericht des Wohnsitzes des Herstellers.
CONDIÇÕES DE GARANTIA
-A garantia tem a duração de 12 meses e está subordinada à apresentação de uma cópia de idóneo
documento fiscal ou fatura comprovante da data da compra.
- O produto está garantido contra vícios e defeito dos materiais , de fabricação e montagem ou por
12 meses da data da fatura de compra. A garantia consiste na substituição ou reparação das partes que
constituem o produto que resultem defeituosas. A garantia não prevê a substituição do produto devido
a intervenção por avaria.
- A garantia limita-se, portanto, à substituição ou reparação gratuita das partes que, a juízo do
construtor, não funcionem bem. Não reentram na mesma os consumíveis e os utensílios.
- As prestações sob garantia serão de competência do revendedor no qual foi efectuada a compra do
produto ou, em alternativa, pela firma construtora, ficando assente que o relativo transporte, despesas
e riscos são a cargo do cliente.
- A garantia decai se o produto for alterado ou reparado por pessoal não autorizado.
- A presente garantia substitui e exclui qualquer outra garantia devida pelo revendedor por lei ou por
contrato e define todos os direitos do cliente em relação a vícios e defeitos e/ou falta de qualidade
relativamente aos produtos comprados.
- Para qualquer litígio jurídico é reconhecida Tribunal competente da residência do fabricante.
GARANTIVILLKOR
- Garantin varar i 12 månader och gäller på villkor att kunden kan visa upp ett kvitto eller
faktura som bevis på inköpsdatum.
- Produkten garanteras mot eventuella fel och defekter i materialet, fabrikationsfel och
monteringsfel i 12 månader från inköpsdatumet. Garantin består i byte eller reparation av
delarna som produkten består av och som eventuellt är defekta. Den täcker aldrig byte av
produkten efter eventuella försök till reparationer.
- Garantin är således begränsad till ersättning eller gratis reparation av delarna som
fungerar dåligt, enligt tillverkaren. Detta gäller inte förbruksartiklar och verktyg.
- Garantiprestationerna ska ges av återförsäljaren som sålt produkten till kunden, eller av
tillverkaren, förutsatt att kunden står för transportkostnaderna och eventuella risker.
- Garantin förfaller om produkten manipuleras eller repareras av personal som inte är
auktoriserad för detta.
- Denna garanti ersätter och utesluter varje annan garanti från återförsäljaren, enligt lag
eller kontrakt, och anger alla kundens rättigheter vad gäller fel och defekter och/eller
avsaknad av kvalitet i de produkter som inhandlats.
- För varje tvist är erkänd behörig domstol där tillverkaren.
ΟΡΟΙ ΕΓΓΥΗΣΗΣ
- Η εγγύηση έχει διάρκεια 12 μήνες και υπόκειτα ι στην προσκόμιση αντιγράφου του κατάλληλου φορολογικού
εγγράφου ή τιμολογίου που αναγράφει την ημερομηνία αγοράς.
- Το προϊόν είναι εγγυημένο για ατέλειες και ελαττώματα υλικών, κατασκευής και συναρμολόγησης για 12
μήνες από την ημερομηνία έκδοσης του τιμολογίου. Η εγγύηση καλύπτει την αντικατάσταση ή
μερών του προϊόντος που παρουσιάζουν τα ελαττώματα. Για κανένα λόγο, δεν προβλέπει την ολική
αντικατάσταση του προϊόντος σε περίπτωση τεχνικής επέμβασης επισκευής.
- Συνεπώς, η εγγύηση καλύπτει μόνο τη δωρεάν αντικατάσταση ή επισκευή των μερών που, κατά την κρίση του
κατασκευαστή, αποδείχτηκε ότι παρουσιάζουν προβλήματα λειτουργίας. Δεν καλύπτει
τα εργαλεία.
- Οι υπηρεσίες τεχνικής υποστήριξης που καλύπτονται από την εγγύηση παρέχονται από τον πωλητή του
προϊόντος ή, εναλλακτικά, από την κατασκευάστρια εταιρεία. Εννοείται ότι η μεταφορά του προϊόντος θα γίνει με
φροντίδα, δαπάνη και ανάληψη κινδύνου του πελάτη.
- Η εγγύηση παύει να ισχύει σε περίπτωση
τεχνικούς.
- Η παρούσα εγγύηση αντικαθιστά και ακυρώνει όλες τις προηγούμενες εγγυήσεις που ενδεχομένως παρείχε ο
πωλητής, με βάση το νόμο ή κάποιο συμβόλαιο, και καθορίζει όλα τα δικαιώματα του πελάτη όσον αφορά τα
ελαττώματα και/ή την έλλειψη αναμενόμενης ποιότητας των
- Για κάθε νομική διαφορά αναγνωρίζεται αρμόδιο δικαστήριο της κατοικίας του κατασκευαστή.
που το προϊόν παραβιαστεί ή επισκευαστεί από μη εξουσιοδοτημένους
προϊόντων που αποκτήθηκαν.
την επισκευή των
τα αναλώσιμα υλικά και
Page 82

Page 83

Page 84

Via Sandro Pertini, 29
47826 Villa Verucchio – Rimini (Italy)
e-mail:mail@fimarspa.it
http://www.fimarspa.it
Page 85

Page 86

 Loading...