

Page 1
uso e manutenzione
IT
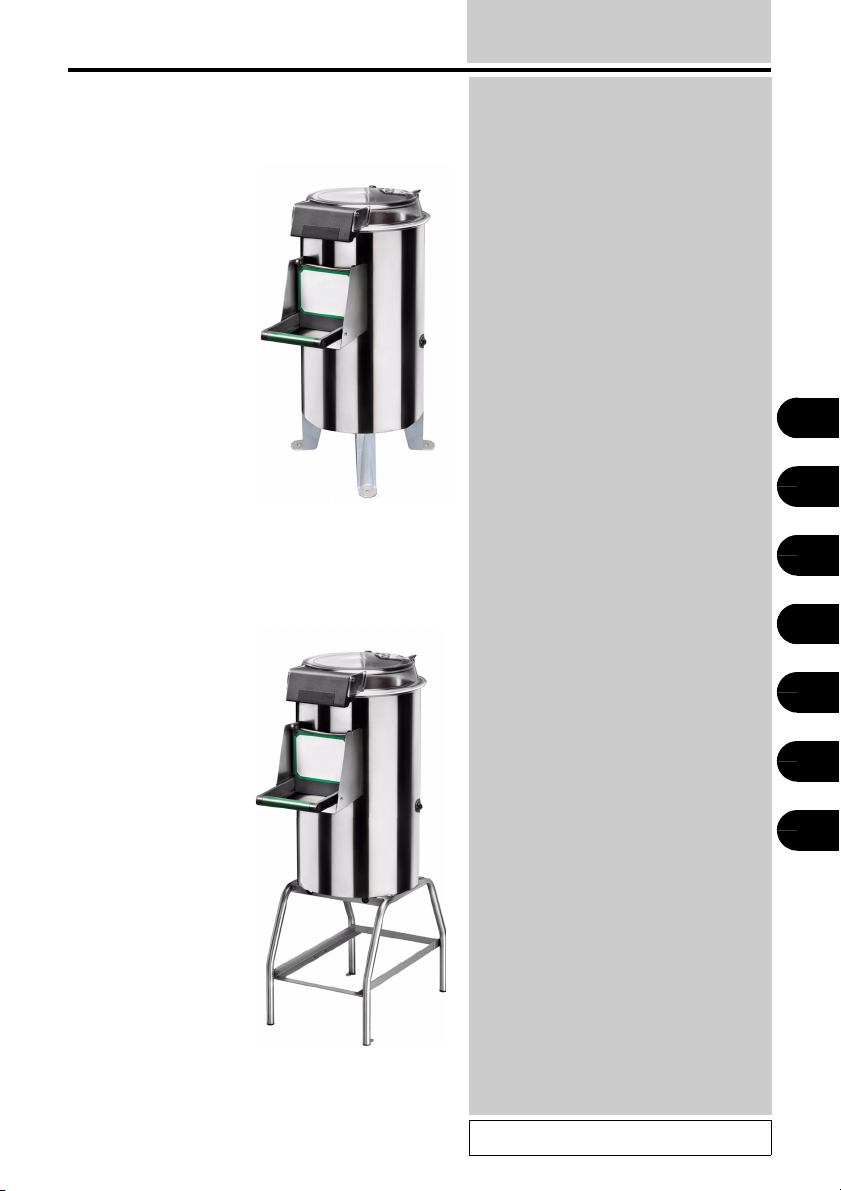
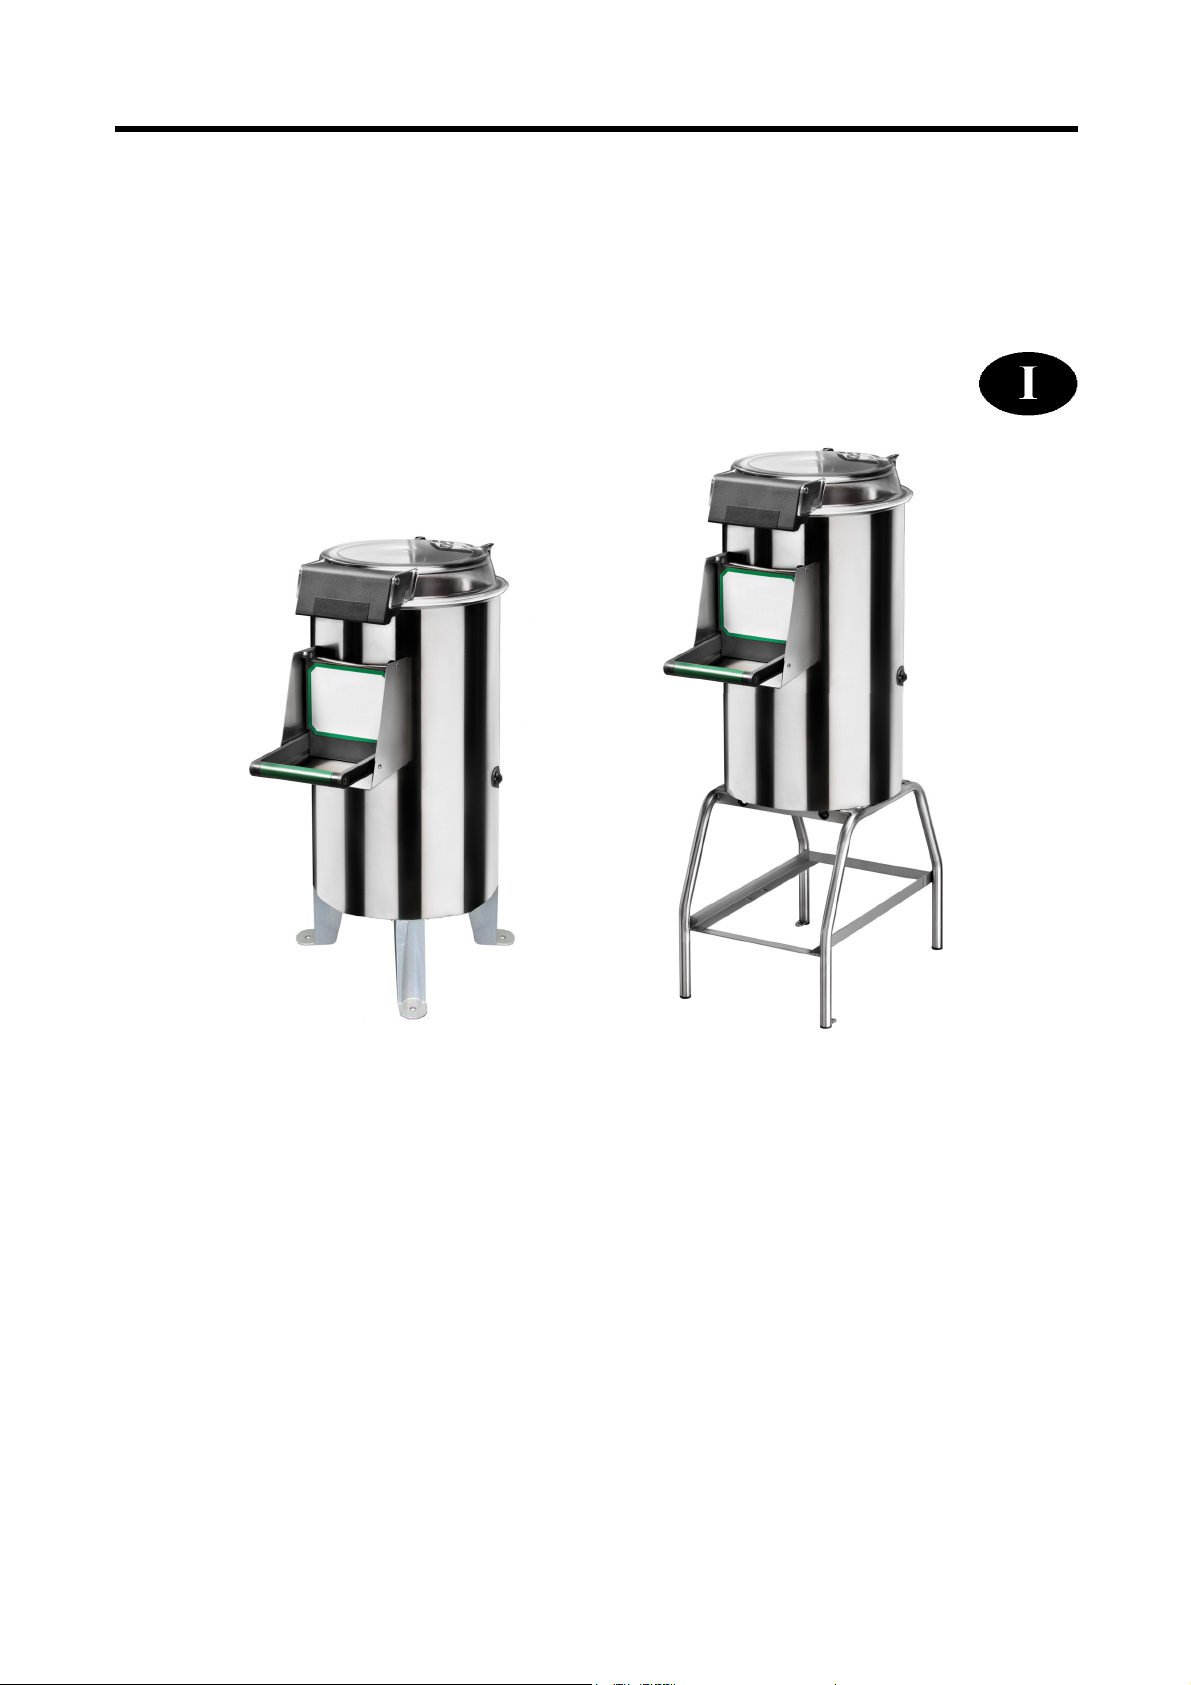
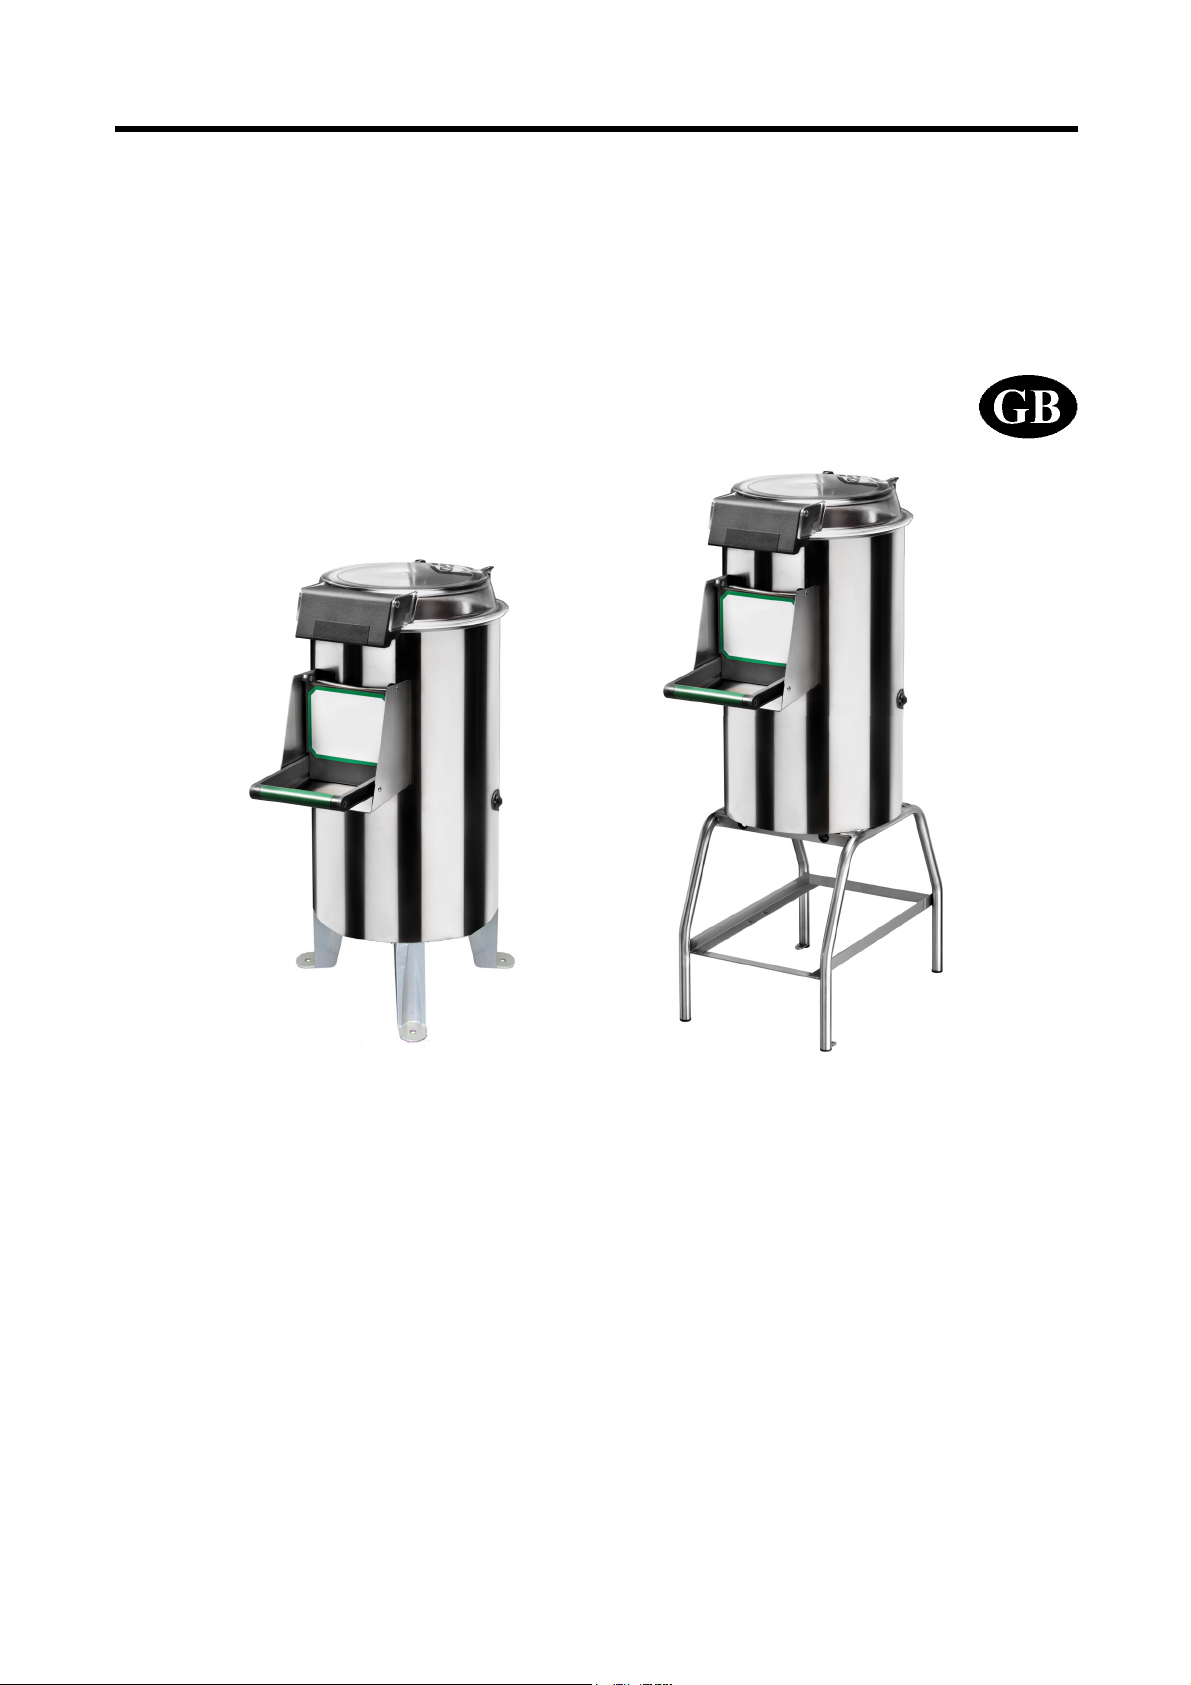
PPN 5X-10X-18X-25X
LCN 5X-10X-18X
use and maintenance
emploi et entretien
Benutz und Wartungsanleitung
uso y mantenimiento
uso e manutenção
использованиe и техобслуживаниe
GB
FR
DE
ES
PT
PY
PPF 5X-10X-18X-25X
LCF 5X-10X-18X
MOD057V02
Page 2

Page 3
PPN/PPF5X-10X-18X-25X
LCN/LCF5X-10X-18X
PELAPATATE E LAVACOZZE
INDICE
1 INFORMAZIONI GENERALI
Descrizione della macchina……………………..
Caratteristiche tecniche………………………….
Dimensioni d’ingombro…………………………..
2 INFORMAZIONI SULL’ INSTALLAZIONE
Imballo e disimballo………………………………
Zona d’installazione……………………………..
Collegamento elettrico…………………………...
Allacciamento idraulico…………………………..
3 INFORMAZIONI SULL’ USO E LA PULIZIA
4
Uso della macchina …………..…………………..
4
Accessori a richiesta……..……………………….
5
ALLEGATI
7
Schema elettrico
7
7
7
8
9
Page 4

INFORMAZIONI
GENERALI
1
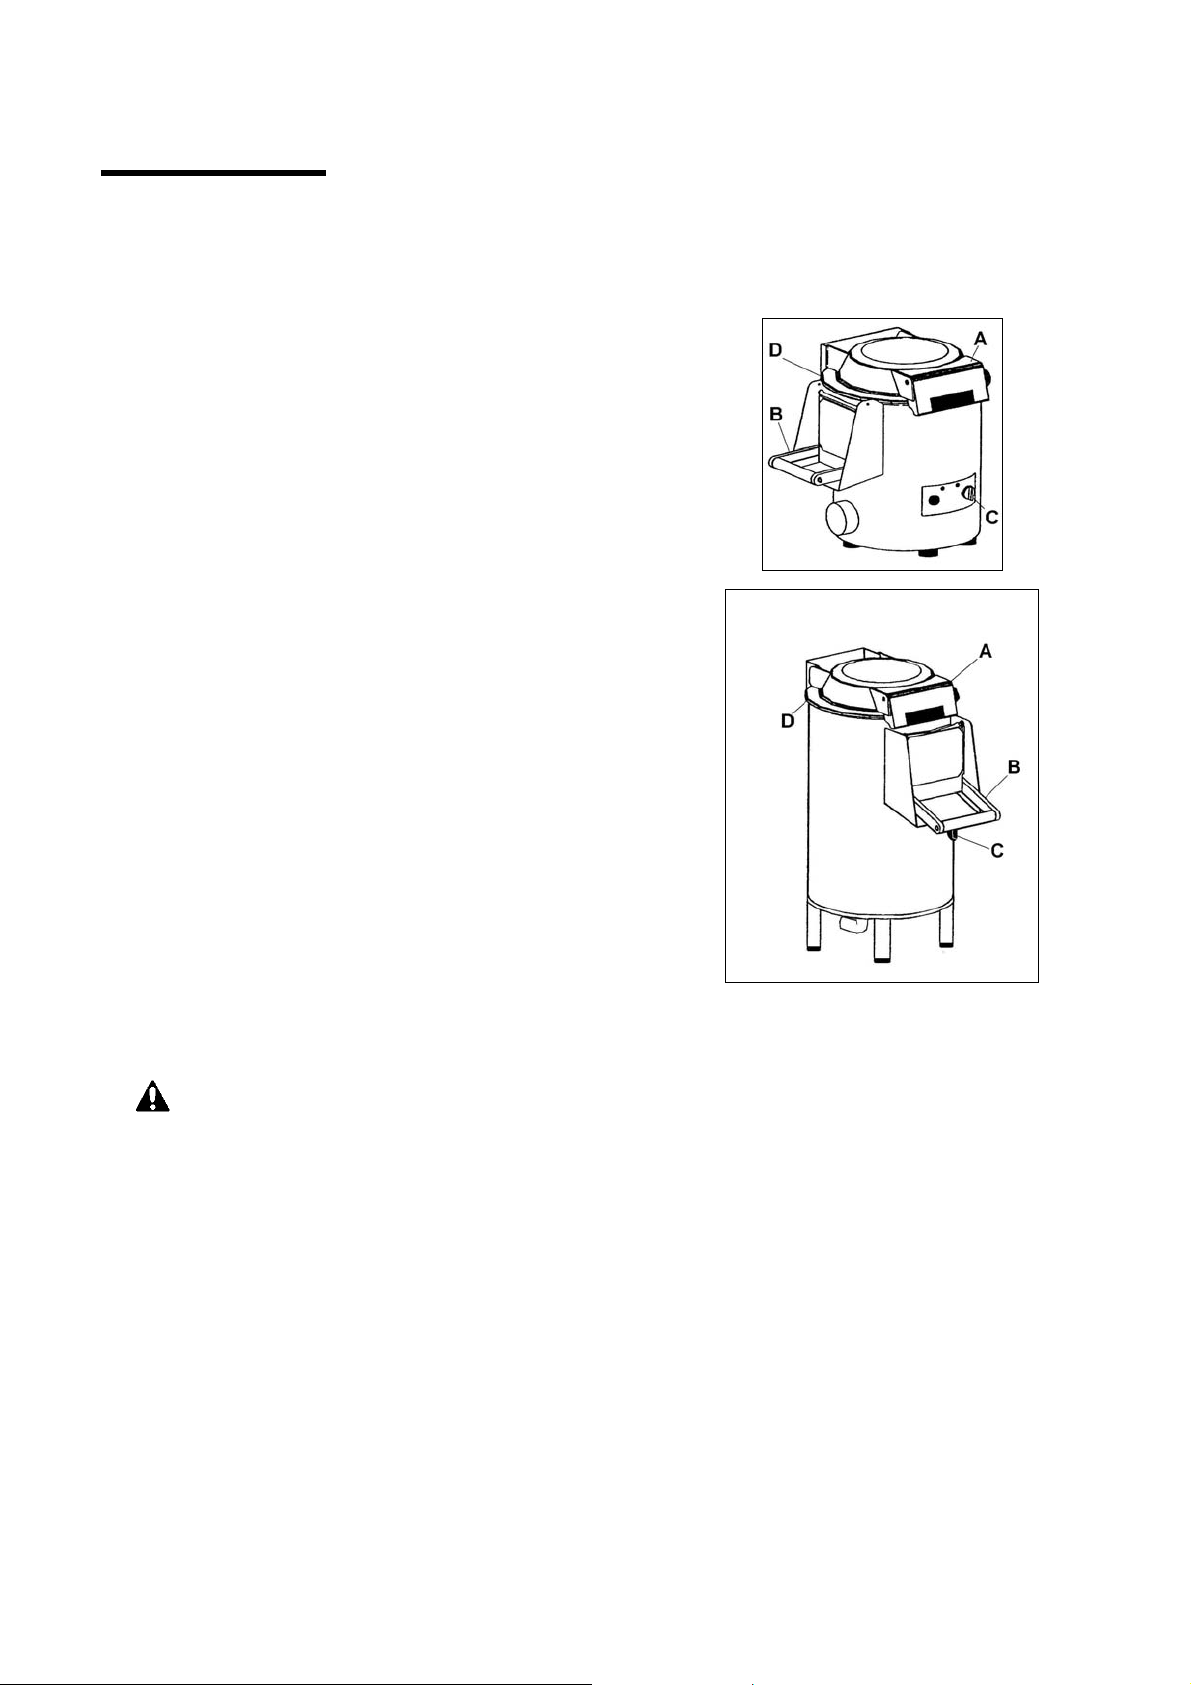
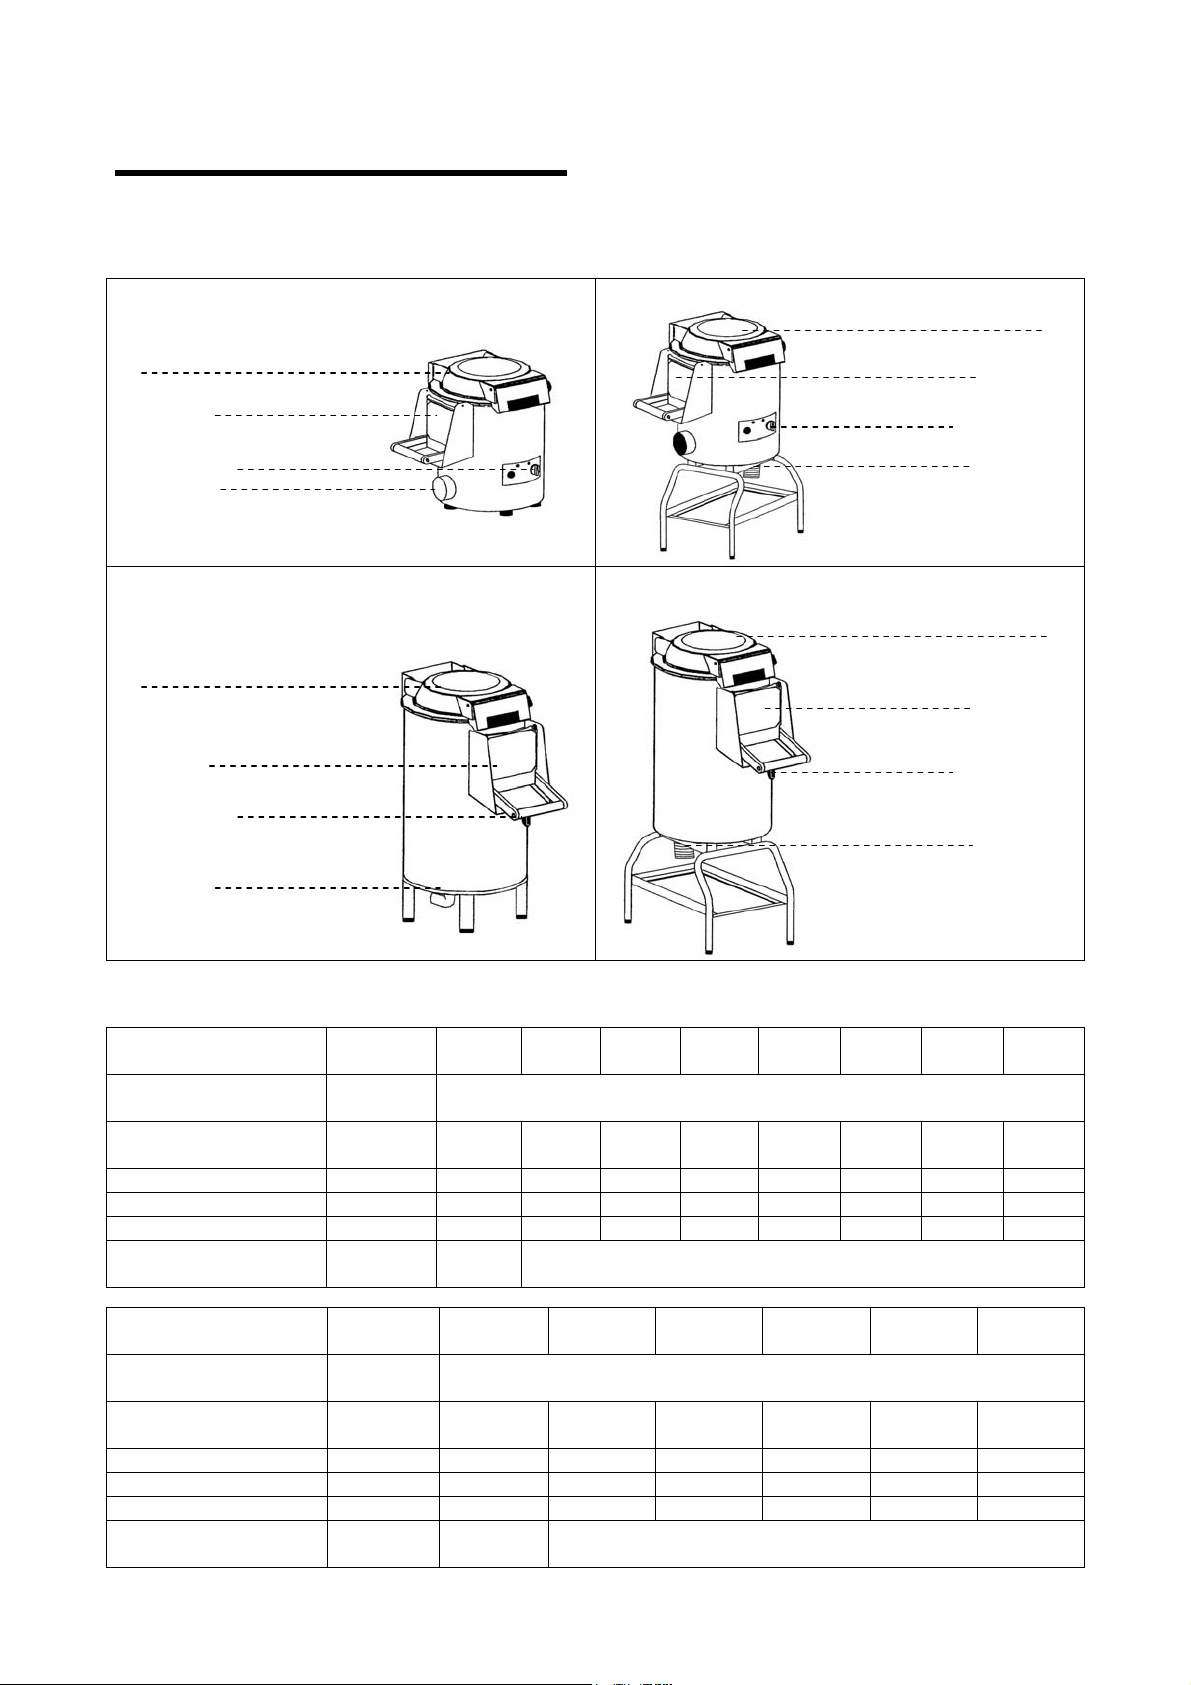
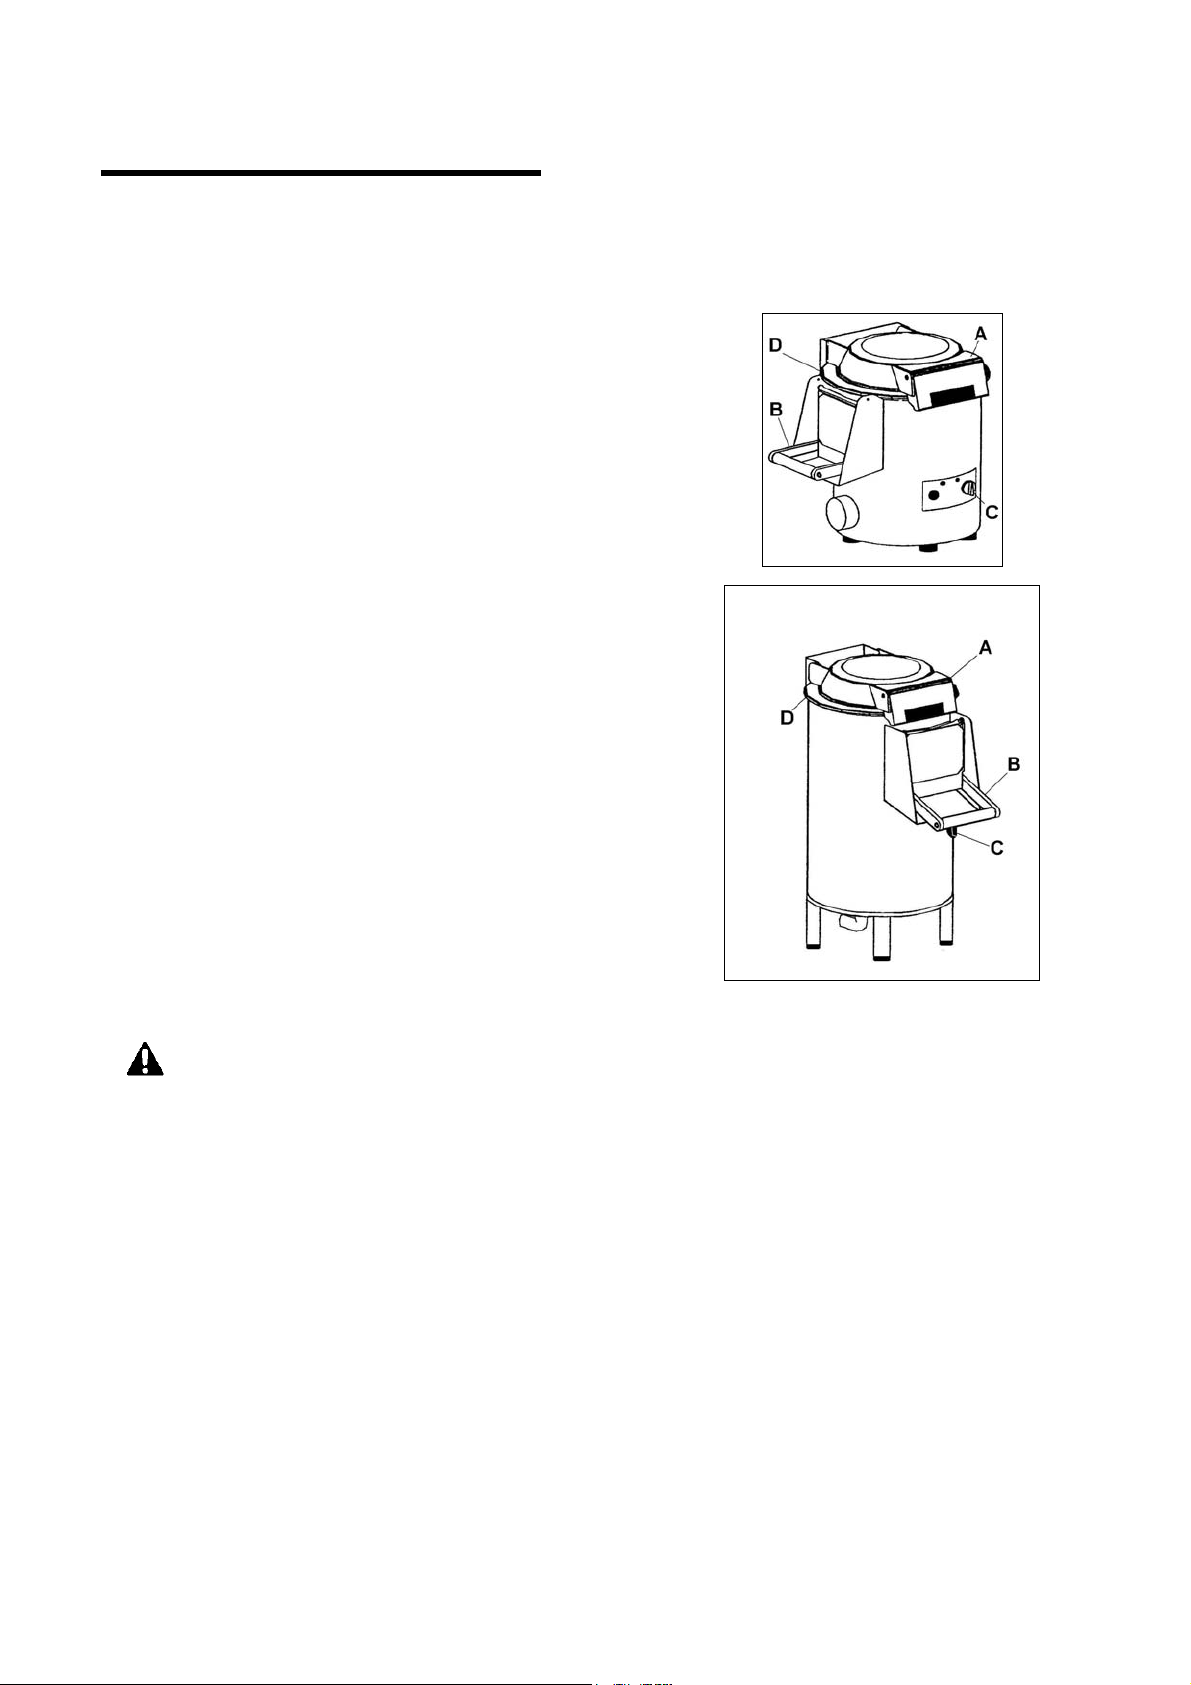
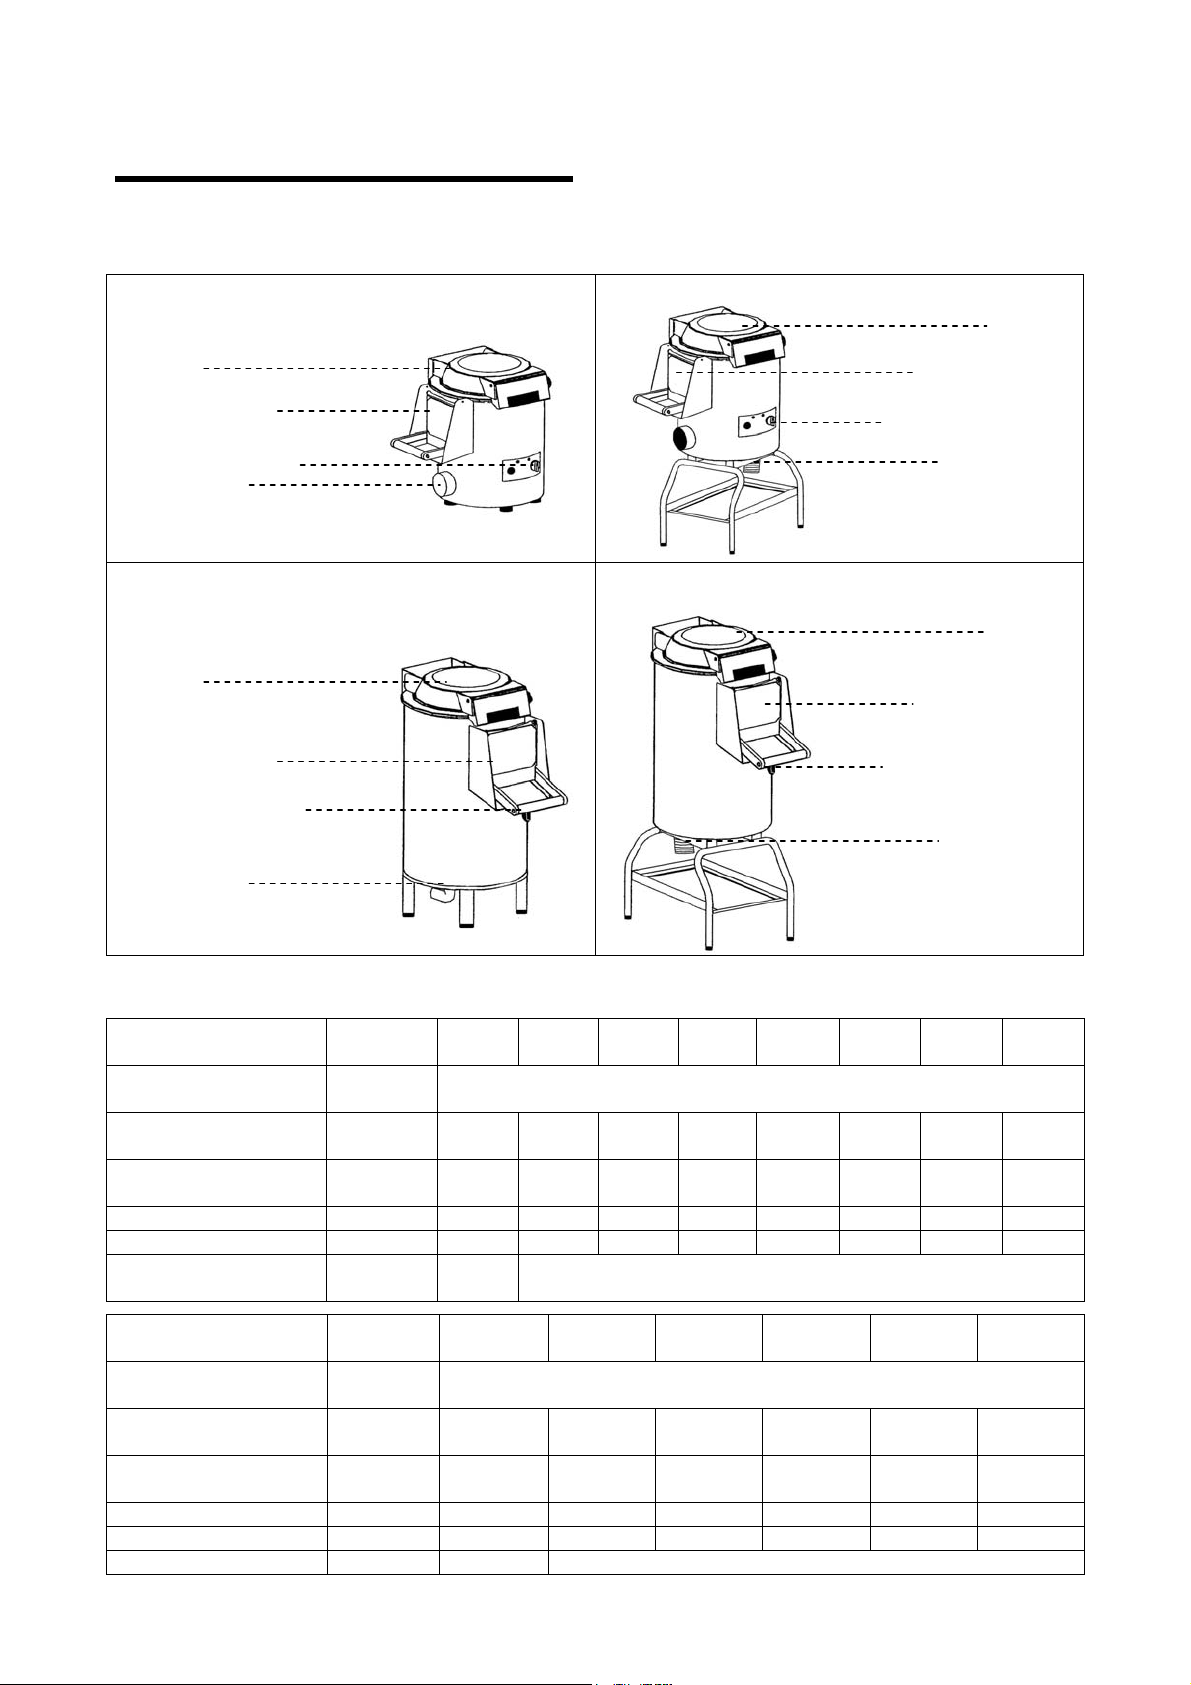
Descrizione della macchina
MOD.PPN-LCN5 MOD.PPF-LCF5
Coperchio
Sportello scarico
Pannello comandi
Scarico acqua
MOD.PPN/LCN10-18-PPN25 MOD.PPF/LCF10-18-PPF25
Coperchio
Sportello scarico
Pannello comandi
Scarico acqua
Coperchio
Sportello scarico
Pannello comandi
Scarico acqua
Coperchio
Sportello scarico
Pannello comandi
Scarico acqua
Caratteristiche tecniche
Descrizioni
Alimentazione di
energia elettrica
Potenza kW (HP)
Carico patate kg 5 5 10 10 18 18 25 25
Peso netto kg 26 28 37 36 43 42 70 70
Peso con imballo kg 36 38 47 46 53 52 88 88
Installazione
Descrizioni
Alimentazione di
energia elettrica
Potenza kW (HP)
Carico cozze kg 5 5 10 10 18 18
Peso netto kg 26 28 37 36 43 42
Peso con imballo kg 36 38 47 46 53 52
Installazione Da banco A terra
Unità di
misura
V Hz Ph
Unità di
misura
V Hz Ph
PPN5 PPF5 PPN10 PPF10 PPN18 PPF18 PPN25 PPF25
230V 50Hz 1Ph
230/400V 50Hz 3/3Ph+N
0.37
(0.5)
Da
banco
0.37
(0.5)
0.75
(1)
0.75
(1)
1.1
(1.5)
A terra
1.1
(1.5)
1.1
(1.5)
1.1
(1.5)
LCN5 LCF5 LCN10 LCF10 LCN18 LCF18
230V 50Hz 1Ph
230/400V 50Hz 3/3Ph+N
0.26
(0.35)
0.26
(0.35)
0.55
(0.75)
0.55
(0.75)
0.9
(1.2)
0.9
(1.2)
4
Page 5

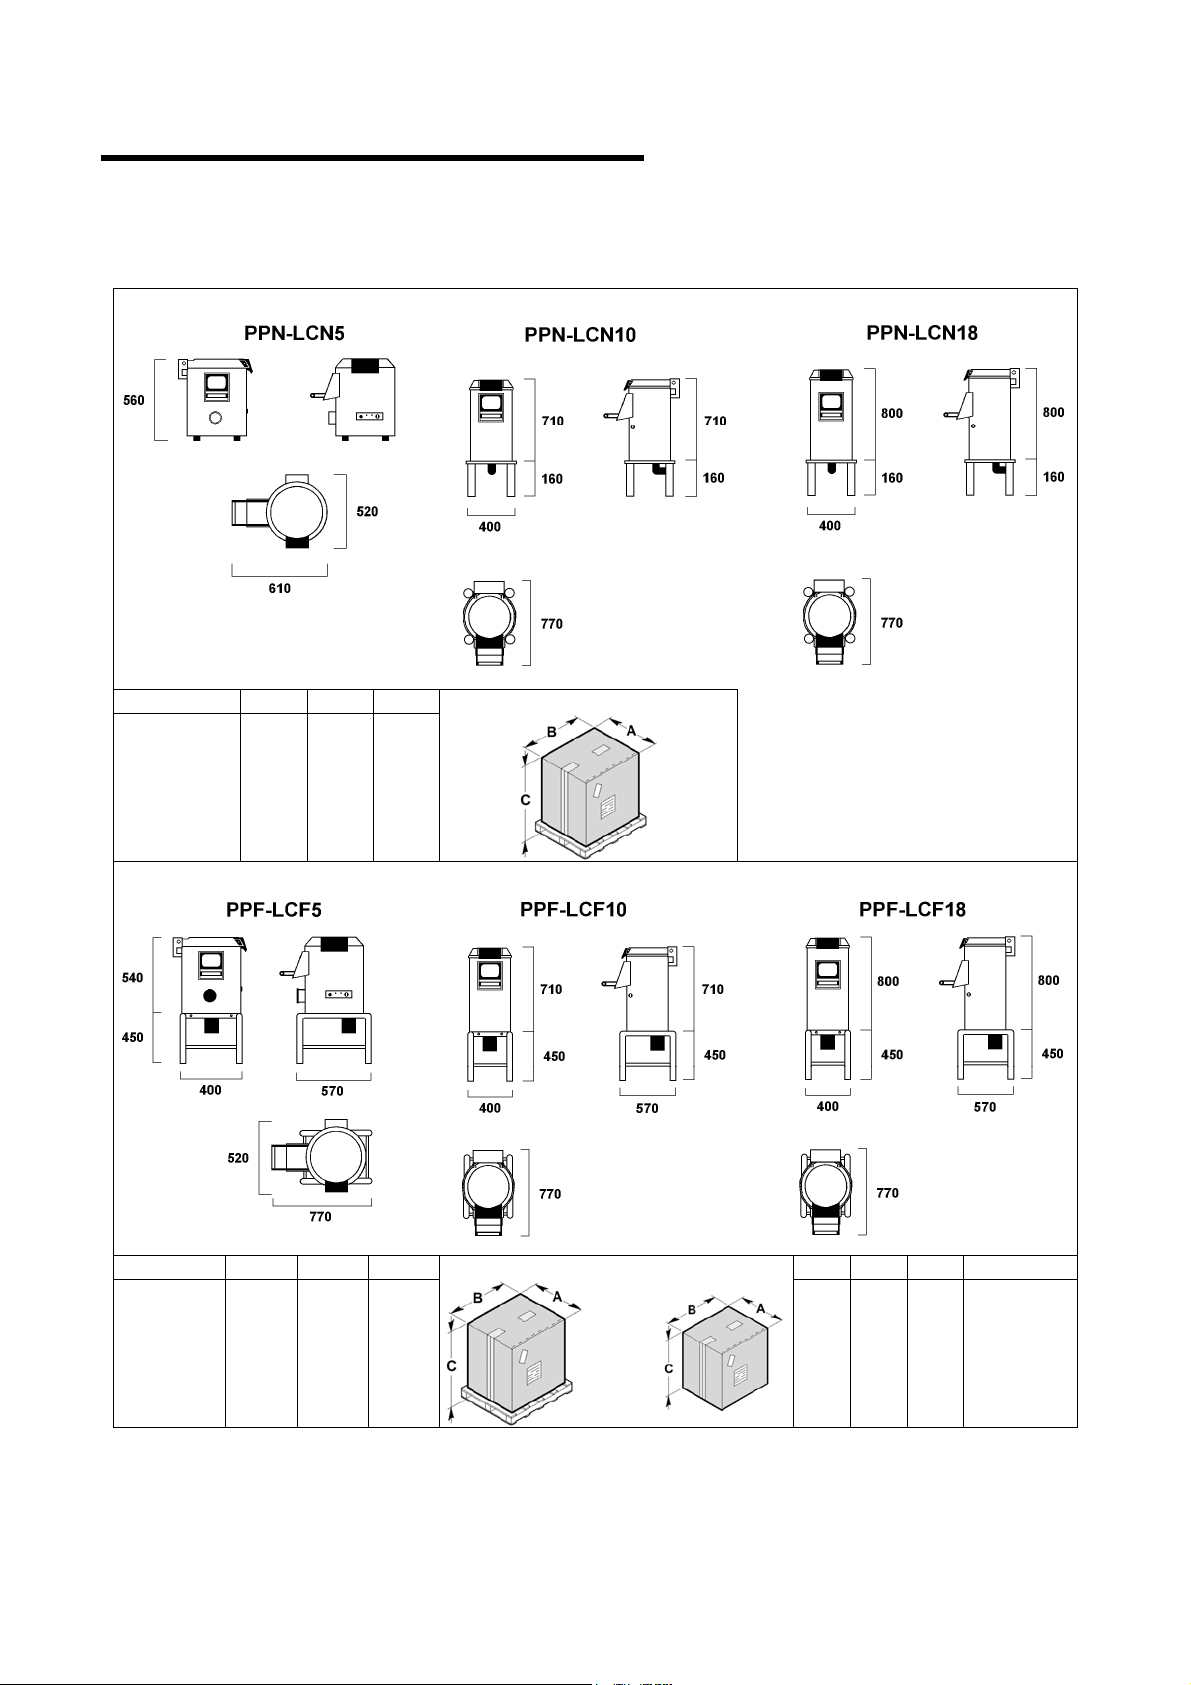
Dimensioni d’ingombro
INFORMAZIONI
GENERALI
1
mm
PPN-LCN5
PPN-LCN10
PPN-LCN18
mm
PPF-LCF5
PPF-LCF10
PPF-LCF18
A B C
500
550
550
750
850
850
920
1120
1120
A B C
500
550
550
750
850
850
920
1120
1120
A B C
mm
390 580 470
ACCI
+
5
Page 6

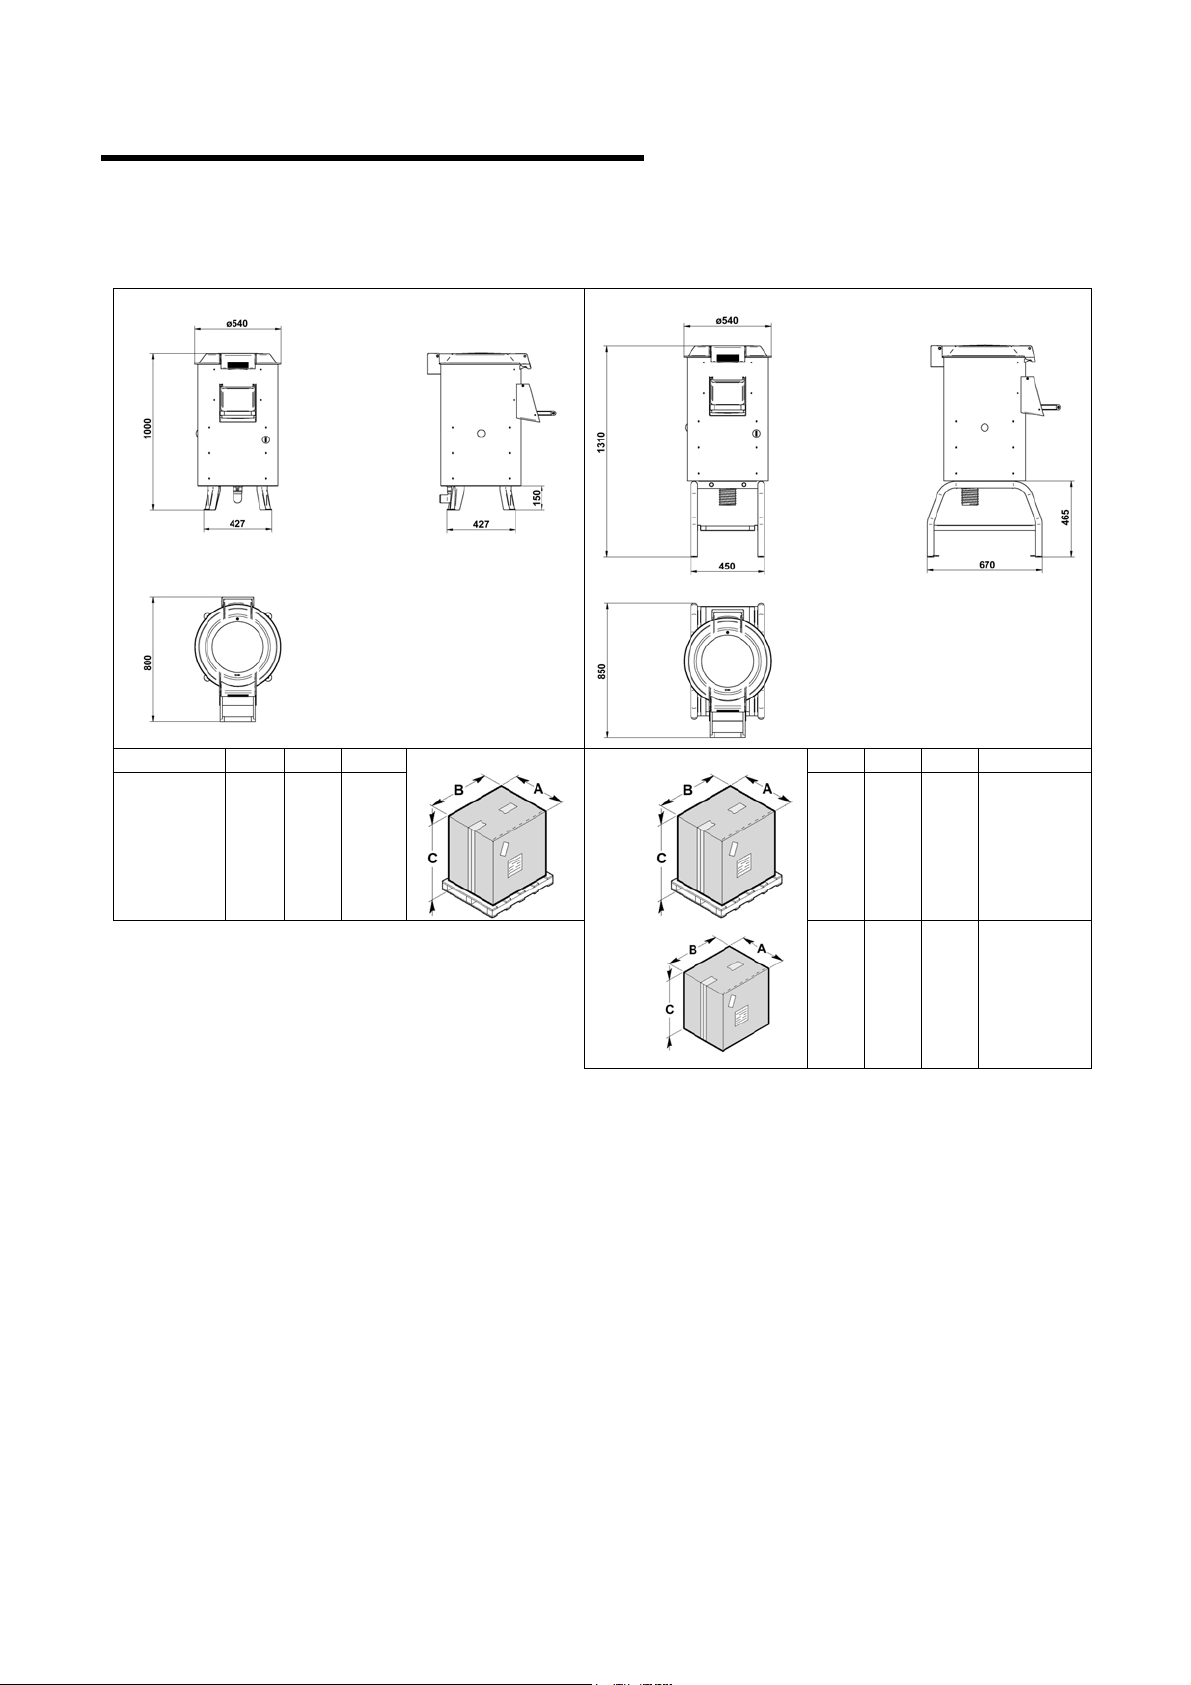
Dimensioni d’ingombro
PPN25
INFORMAZIONI
GENERALI
PPF25
1
PPN25
mm
A B C
600 1050 1230
A B C
600 1050 1230
450 680 500
mm
PPF25
ACCB
6
Page 7
INFORMAZIONI
SULL’ INSTALLAZIONE
2
Imballo e disimballo
La macchina è imballata in un cartone con l’inserimento di poliestere espanso per
garantire la perfetta integrità durante il trasporto.
• Movimentare l’imballo rispettando le istruzioni.
• Aprire l’imballo e verificare l’integrità di tutti i componenti. Conservare l’imballo
per futuri traslochi.
• Effettuare il sollevamento della macchina come indicato e posizionarla nella
zona adibita all’ installazione.
Zona d’installazione
La zona prestabilita dove essere adeguatamente illuminata e dove disporre di una presa di distribuzione
d’energia elettrica. Il piano d’appoggio deve essere sufficientemente ampio, ben livellato ed asciutto.
L’installazione deve avvenire in ambienti con atmosfera non esplosiva. In ogni modo, l’installazione deve
essere eseguita tenendo conto anche delle leggi vigenti in materia di sicurezza sul lavoro.
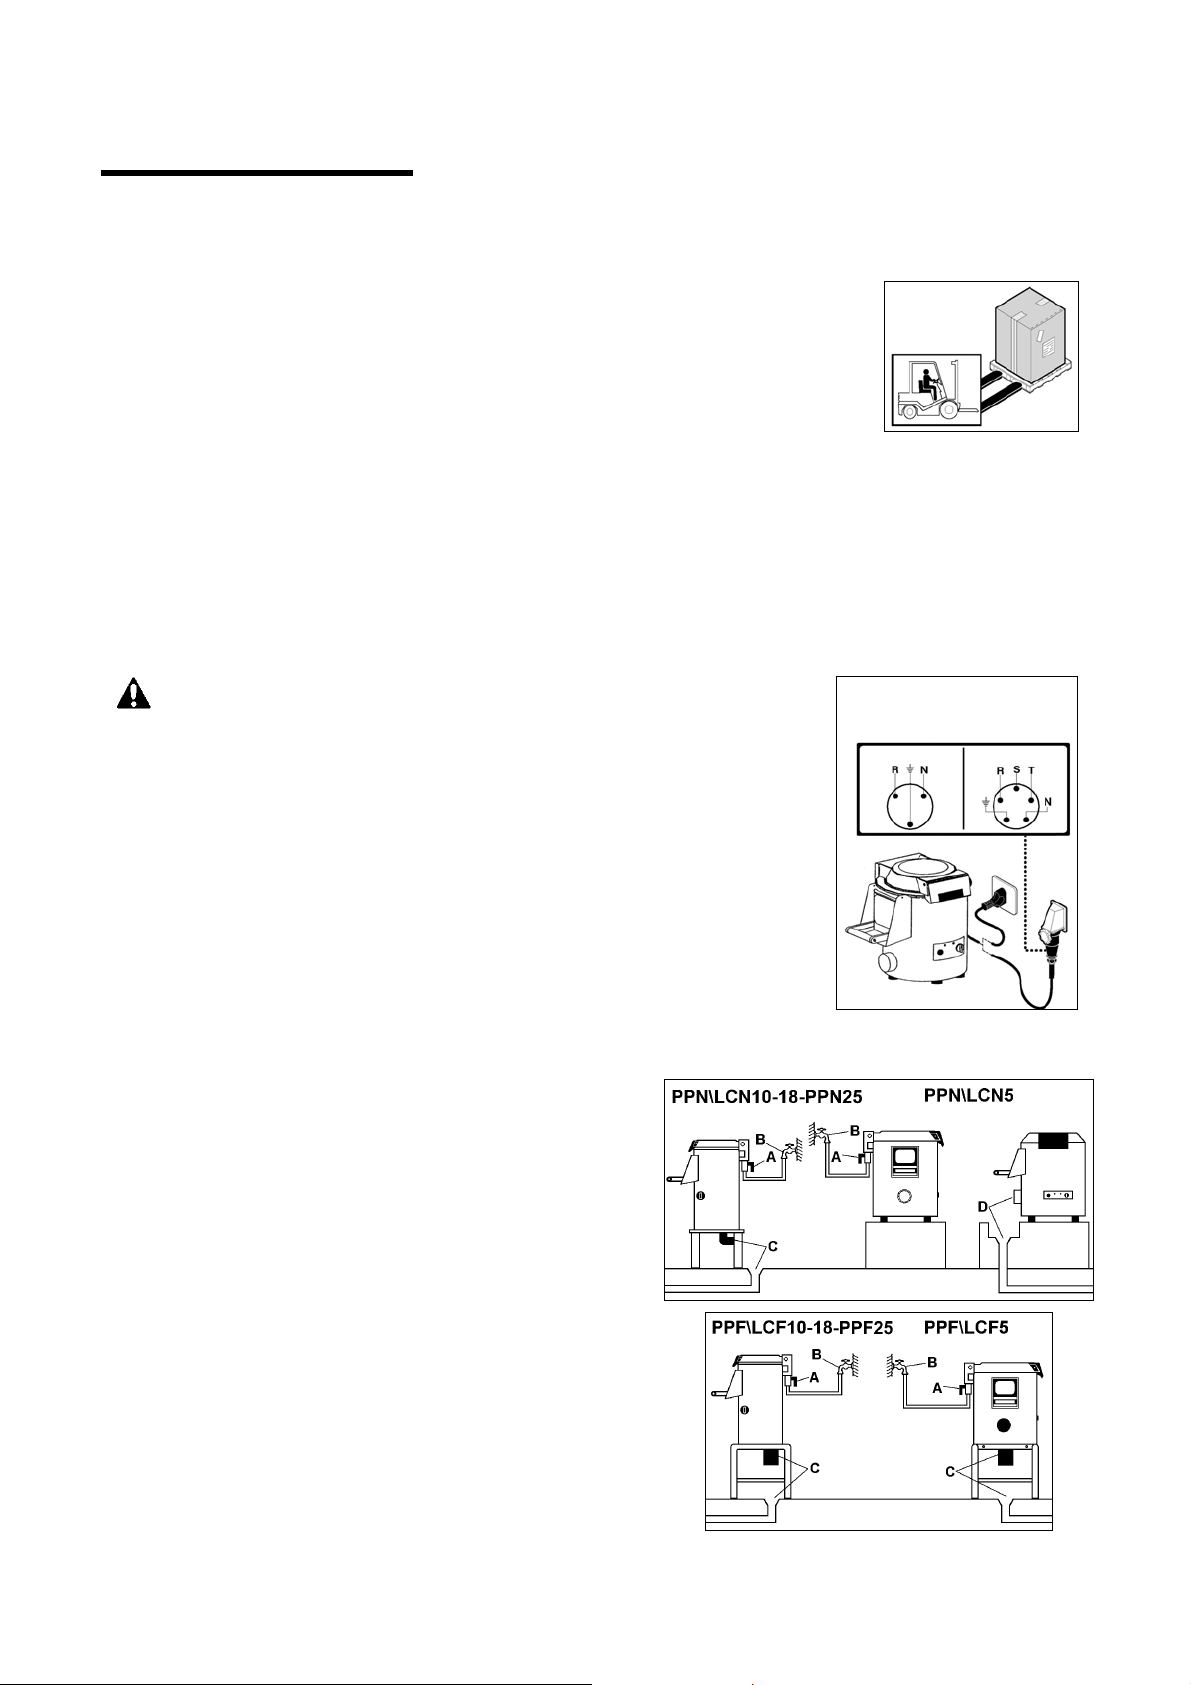
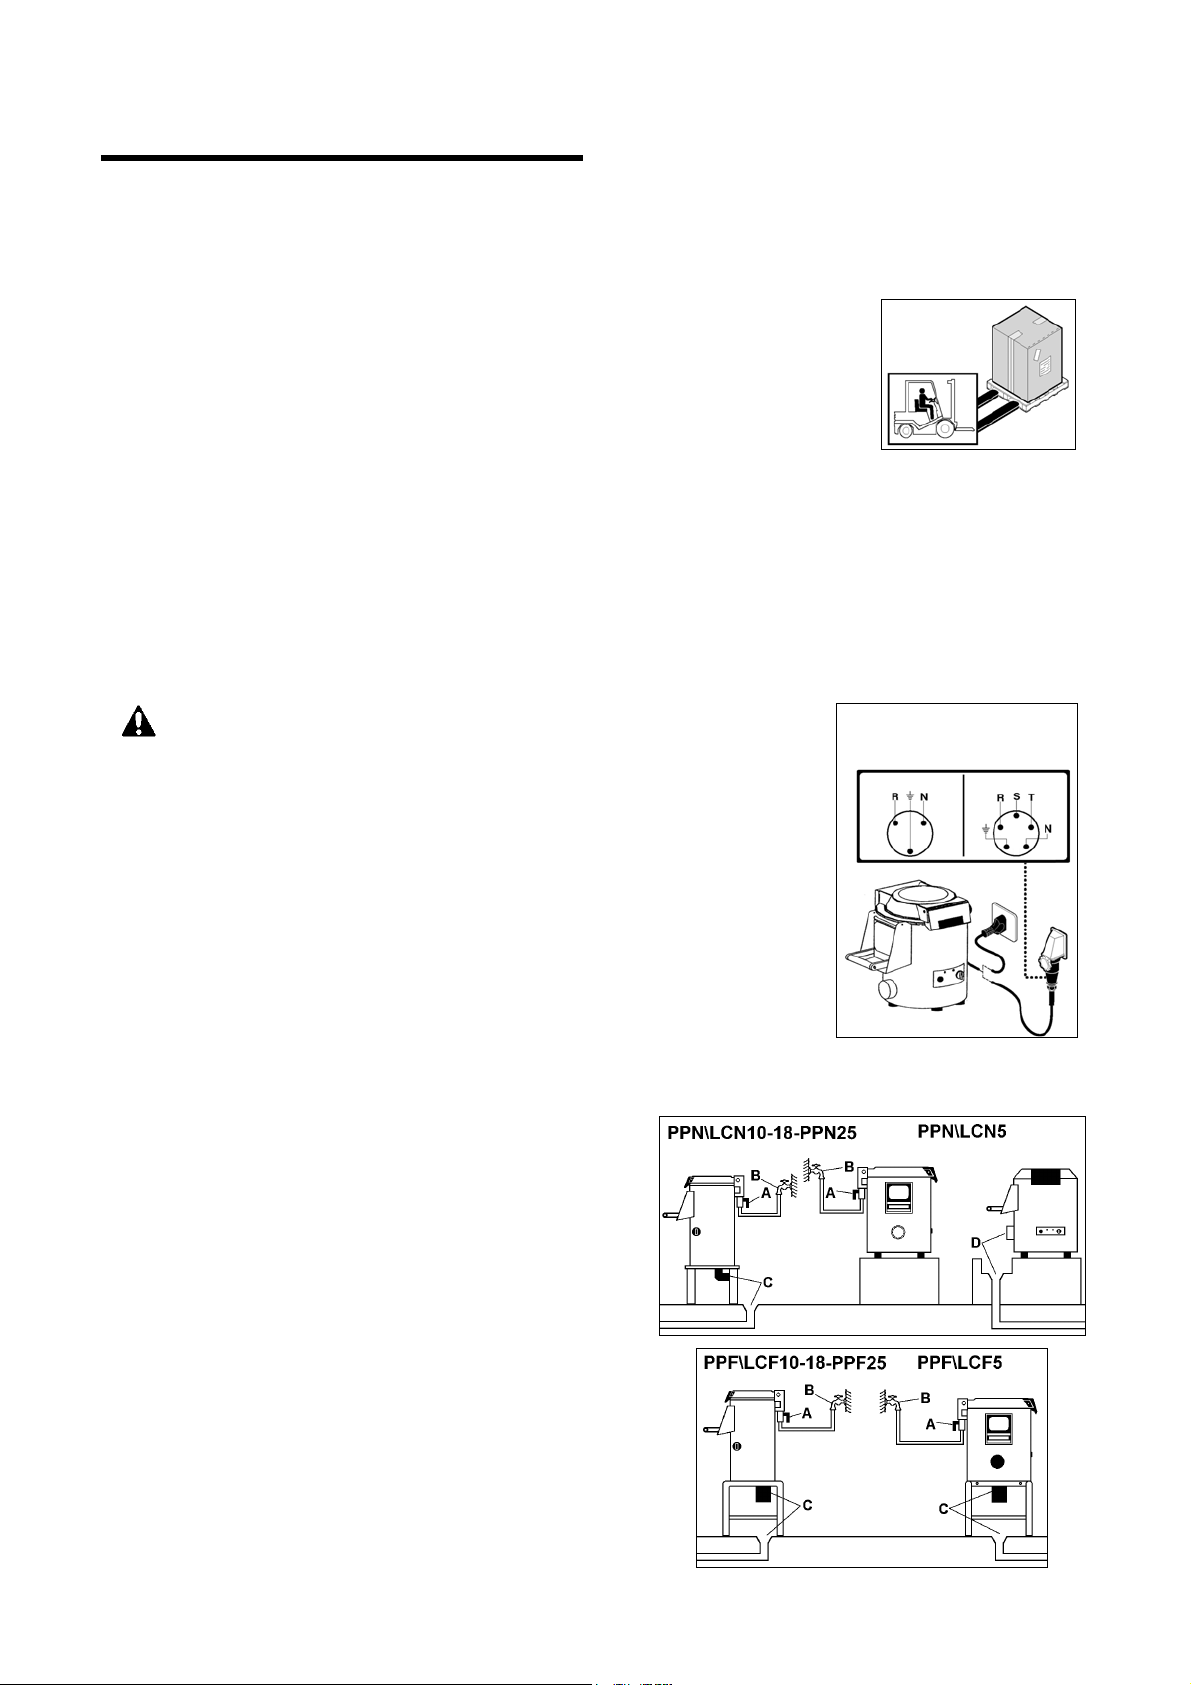
Collegamento elettrico
Collegamento Collegamento
PERICOLO – ATTENZIONE: Il collegamento elettrico alla rete
di alimentazione deve essere eseguito da personale specializzato.
Accertarsi della perfetta efficienza dell’ impianto di messa a terra dello
stabilimento. Verificare che la tensione di linea (V) e la frequenza (Hz)
corrispondano a quelli della macchina (Vedere la targhetta di identificazione e lo
schema elettrico). La macchina è dotata di cavo elettrico al quale collegare una
spina multipolare. La spina è da collegare ad un interruttore a muro provvisto di
differenziale.
Collegamento trifase
Avviare la macchina per pochi attimi e verificare che la rotazione dell’ utensile
sia corretta. Nel caso in cui la rotazione non sia corretta, togliere tensione ed
invertire due delle tre fasi nella spina.
Monofase trifase
230V 230/400V
1Ph 3Ph/3Ph+N
Allacciamento idraulico
Effettuare il collegamento alla rete idrica tramite il tubo
flessibile in dotazione (1500mm.) con attacchi da ¾”
procedendo nel seguente modo:
-Allacciarsi all’ingresso acqua A sul retro dell’apparecchio.
-Collegare l’altra estremità del tubo flessibile alla rete
idrica.Un rubinetto B di intercettazione dovrà essere
installato a monte dell’apparecchio, sulla tubazione di
alimentazione dell’acqua.
-Lo scarico C dovrà essere in pendenza per favorire
l’evacuazione delle scorie; la tubazione di scarico dovrà
avere un ø50mm. per i modelli PPN\LCN10-18-PPN25 e
ø90mm. per i PPF\LCF5-10-18-PPF25. Il modello
PPN\LCN5, essendo un apparecchio da banco, dovrà
scaricare D in un lavandino o similare posto alla sua
sinistra.
7
Page 8
INFORMAZIONI SULL’ USO
Uso della macchina
Aprire il coperchio trasparente tirando la maniglia A fino allo
scatto di apertura.
Inserire il piattello prescelto e caricare la vasca con il prodotto
da trattare.
Richiudere il coperchio bloccandolo ed accertarsi del
bloccaggio dello sportello di scarico B.
Inserire l’interruttore generale a muro.
Avviare l’apparecchio ruotando la manopola C del timer sul
tempo desiderato per il ciclo di lavoro.
Verificare l’ingresso dell’acqua di lavaggio: agendo
manualmente sul rubinetto D posto sulla macchina.
Al termine del ciclo impostato la macchina si fermerà
automaticamente.
Interrompere l’immissione dell’acqua agendo sul rubinetto D.
Per scaricare il prodotto trattato aprire lo sportello di scarico B
dopo aver posizionato un raccoglitore sotto lo scarico stesso,
ruotare il timer C per consentire la rotazione a secco del
piattello e tenere con l’altra mano lo sportello di scarico in
modo da controllare la fuoriuscita del prodotto senza venirne a
contatto.
E LA PULIZIA
3
PERICOLO – ATTENZIONE: Non introdurre mai la mano attraverso lo sportello di
scarico per favorire la fuoriuscita del prodotto.
8
Page 9
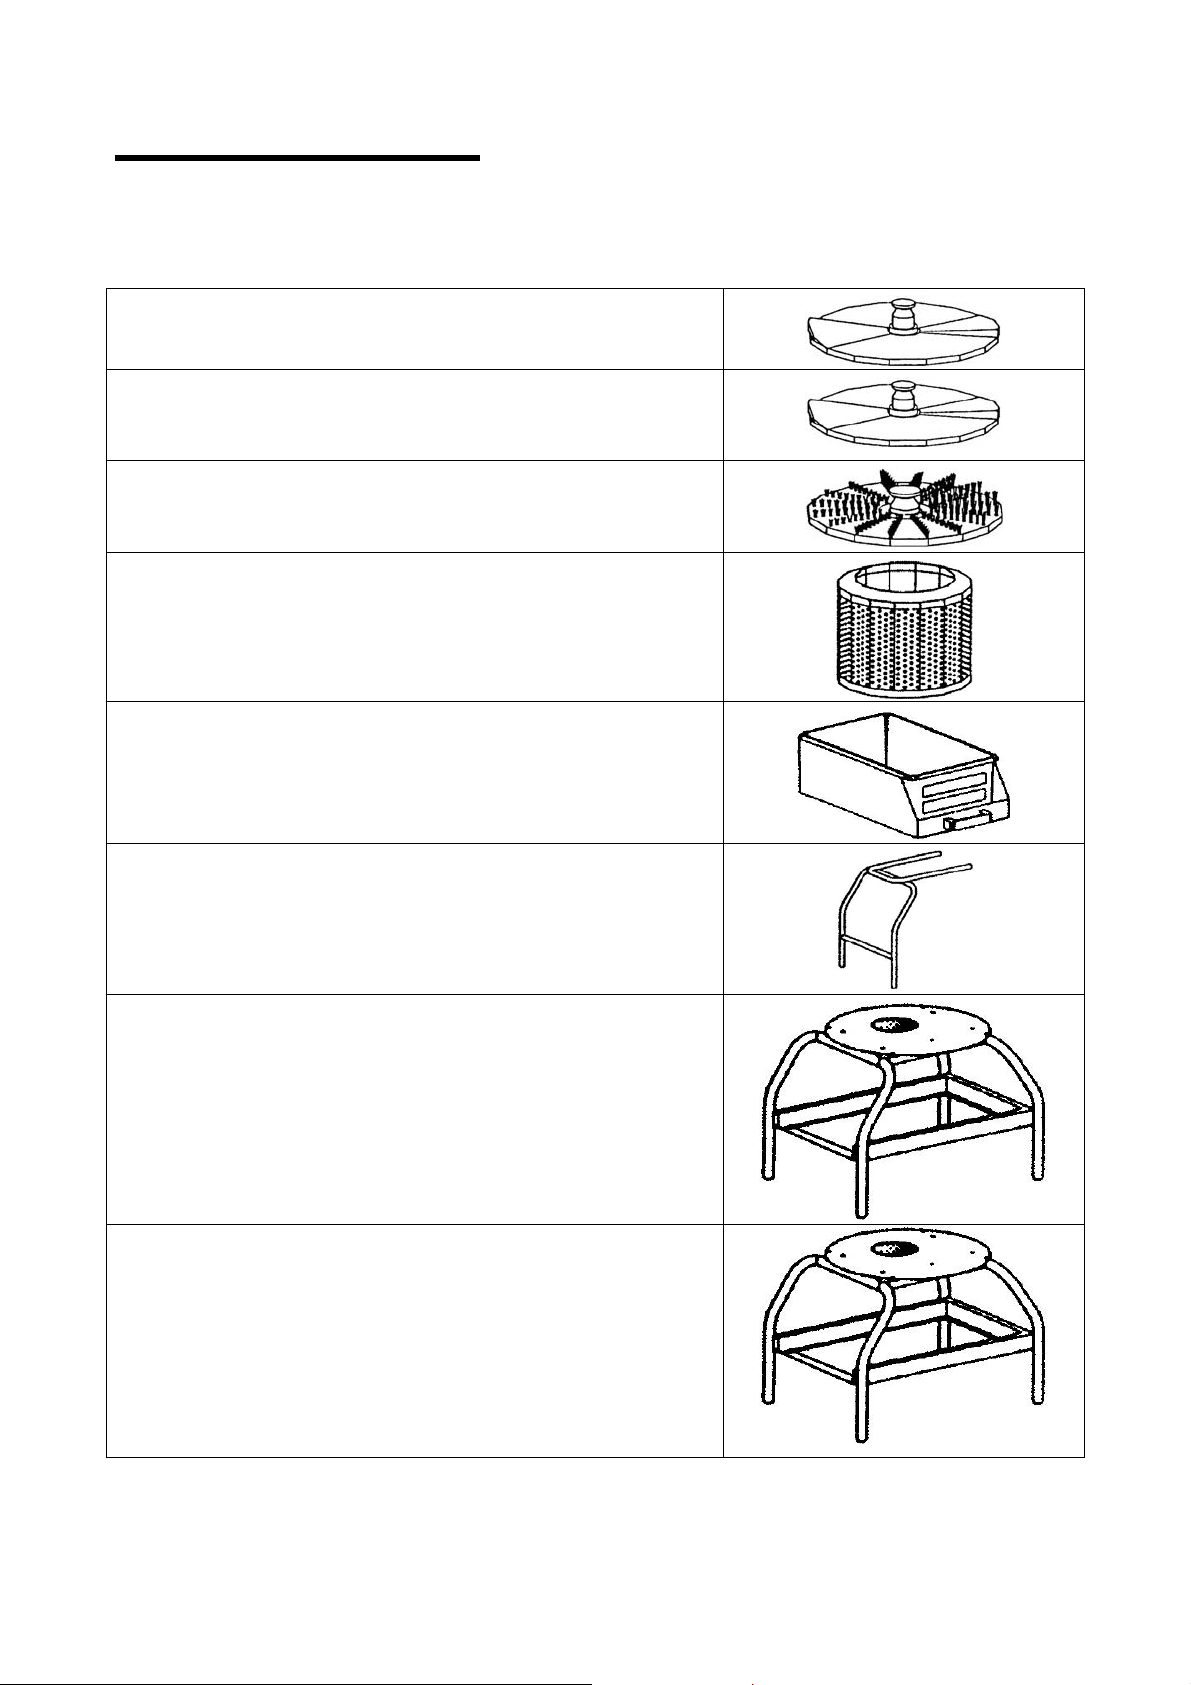
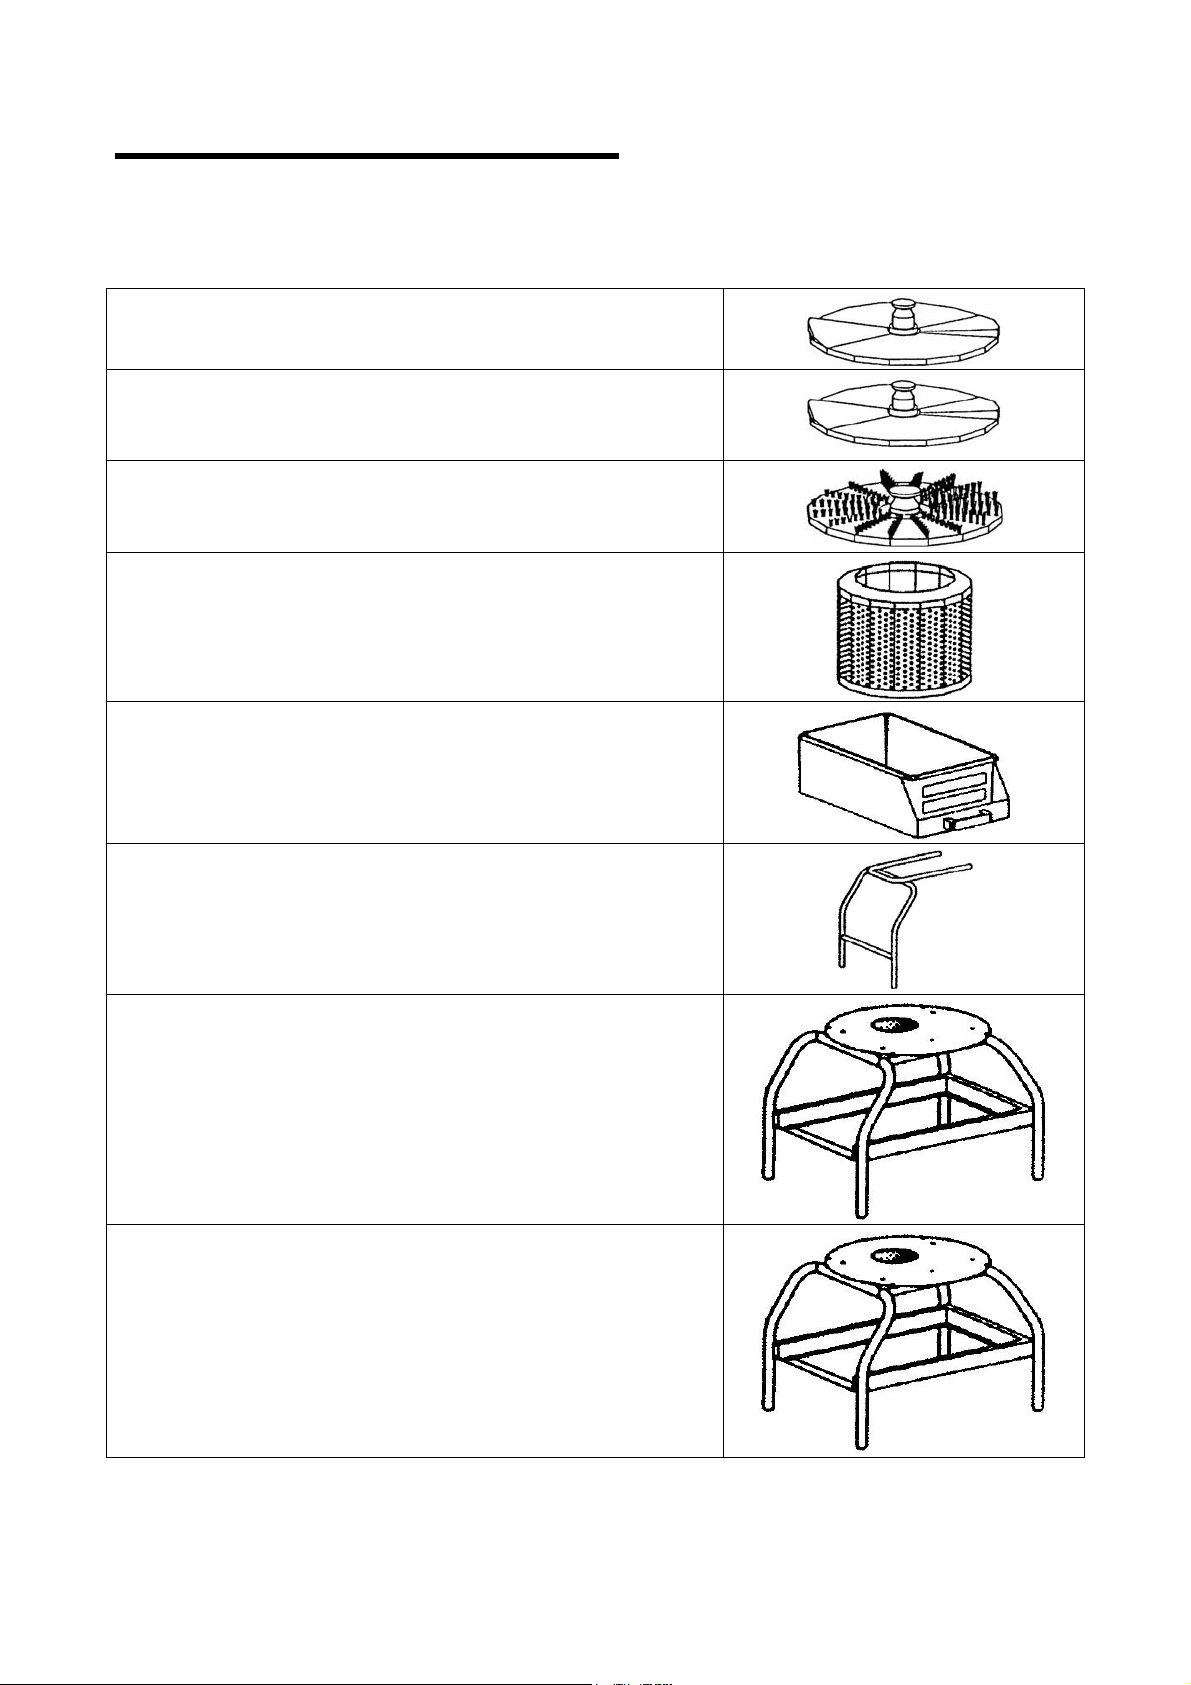
Accessori a richiesta
PTA-PAB: pelare tuberi con il piattello abrasivo
(solo mod.PPN\PPF5-10-18)
PTB: pelare tuberi con il piattello abrasivo
(solo mod.PPN\PPF25)
PPC: pulire cozze e similari con il piattello a spazzole
(solo mod.LCN\LCF5-10-18)
CCV: centrifugare verdure in foglia con il cestello
(solo mod.PPN\PPF10-18-25)
INFORMAZIONI SULL’ USO
E LA PULIZIA
3
CCF: raccogliere scorie
(solo mod.PPF\LCF5-10-18-PPF25)
SB: supportare bacinella per scarico
(solo mod.PPF\LCF5-10-18)
CI: modificare mod.PPN\LCN5-10-18 in mod.PPF\LCF5-10-18
CB: modificare mod.PPN25 in mod.PPF25
9
Page 10

Page 11

PPN/PPF5X-10X-18X-25X
LCN/LCF5X-10X-18X
POTATO PEELER AND MUSSEL WASHER
CONTENTS
1 GENERAL INFORMATION
Machine description………………………………
Specification………………………………………
Overall dimensions……………………………….
2 INSTALLATION
Packing and unpacking………..…………………
Installation area……….…………………………..
Electric connection…..…………………………...
Connection to water supply...……………………
3 OPERATION AND CLEANING
4
Use of the machine………………………………..
4
Optional accessory gadgets…..………………….
5
ANNEXES
7
Electrical wiring diagram
7
7
7
8
9
Page 12
INFORMATION
GENERAL
1
Machine description
MOD.PPN-LCN5 MOD.PPF-LCF5
Outlet door
Lid
Control board
Water drain
Lid
Outlet door
Control board
Water drain
MOD.PPN/LCN10-18-PPN25 MOD.PPF/LCF10-18-PPF25
Lid
Outlet door
Control board
Lid
Outlet door
Control board
Water drain
Water drain
Specifications
Description
Electric power input V Hz Ph
Power kW (HP)
Potatoes load kg 5 5 10 10 18 18 25 25
Net weight kg 26 28 37 36 43 42 70 70
Packaged weight kg 36 38 47 46 53 52 88 88
Installation
Description
Electric power input V Hz Ph
Power kW (HP)
Potatoes load kg 5 5 10 10 18 18
Net weight kg 26 28 37 36 43 42
Packaged weight kg 36 38 47 46 53 52
Installation
Unit of
measure
Unit of
measure
PPN5 PPF5 PPN10 PPF10 PPN18 PPF18 PPN25 PPF25
230V 50Hz 1Ph
230/400V 50Hz 3/3Ph+N
0.37
(0.5)
On the
table
0.37
(0.5)
0.75
(1)
0.75
(1)
1.1
(1.5)
On the floor
1.1
(1.5)
1.1
(1.5)
1.1
(1.5)
LCN5 LCF5 LCN10 LCF10 LCN18 LCF18
230V 50Hz 1Ph
230/400V 50Hz 3/3Ph+N
0.26
(0.35)
On the
table
0.26
(0.35)
0.55
(0.75)
0.55
(0.75)
On the floor
0.9
(1.2)
0.9
(1.2)
4
1
Page 13
Overall dimensions
INFORMATION
GENERAL
1
mm
PPN-LCN5
PPN-LCN10
PPN-LCN18
mm
PPF-LCF5
PPF-LCF10
PPF-LCF18
A B C
500
550
550
750
850
850
920
1120
1120
A B C
500
550
550
750
850
850
920
1120
1120
A B C
mm
390 580 470
ACCI
+
5
1
Page 14
Overall dimensions
PPN25
INFORMATION
GENERAL
1
PPF25
PPN25
mm
A B C
600 1050 1230
A B C
600 1050 1230
450 680 500
mm
PPF25
ACCB
6
1
Page 15
Packing and unpacking
The machine will come packaged in a carton with foamed polyester inserts to
guarantee perfect safety during transport.
• Handle the carton in compliance with the instructions.
• Open the carton and make sure that all components are intact. Keep the carton
for any future machine removal.
• Lift the machine according to the instructions and place it in its selected setting
for installation.
INSTALLATION
2
Installation area
The selected machine work setting must be sufficiently lit and have an electric power outlet. The worktop
must be sufficiently large, perfectly level and dry. The machine should be installed in non-explosive
environments. In any case, installation should be carried out by taking into account any applicable industrial
safety regulations in force.
Electric connection
Single-phase Three-phase
DANGER – CAUTION: Electric connection to the power mains
Check for the perfect effeciency of the plant grounding system. Make sure that
the line voltage (V) and frequency (Hz) correspond to the machine ratings (refer
to the machine identification plate and wiring diagram). The machine comes
equipped with an electric cable with plug. Plug the machine into a main wall
switch with differential.
Three-phase connection
Start the machine for just a few seconds and check that the beater turns in the
right direction. If this is not the case, disconnect power and exchange two of the
three phase wires in the plug.
should be executed by skilled engineers.
connection connection
230V 230/400V
1Ph 3Ph/3Ph+N
Connection to water supply
Connect to water supply by means of the supplied hose
(1500mm.) and ¾” couplings. Proceed as follows:
-Connect hose to inlet A on the machine back side.
-Connect the other end of the hose to water supply. A water
trap B is to be installed on the water supply pipe before the
machine.
-Incline the water drain C to facilitate scrap draining; the
underground draining pipe must be ø50mm. for models
PPN\LCN10-18-PPN25 and ø90mm. for models PPF\LCF510-18-PPF25. The model PPN\LCN5 is a table-top machine
in order to drain D into a washbasin or similar, placed on
the left of the machine.
7
1
Page 16
OPERATION AND
Use of the machine
Open the transparent lid by pulling the handle A until it clicks
open.
Put the disk in and load the tank with the product to be
processed.
Lock the lid and make sure the outlet door B is locked.
Switch the wall master switch on.
Start the appliance by turning the timer knob C on the required
working-cycle time length.
Make sure rinsing water flowing in, the tap D located on the
machine must be turned on manually.
The machine will automatically stop on ending the set cycle.
Turn off the water tap D.
In order to let the processed product out open the outlet door B
after putting a container undermeath it. Then turning the timer
konb C to allow the on-empty rotation of the disk. Meanwhile
hold the outlet door so as to check the product comig out
without touching it.
CLEANING
3
DANGER – CAUTION: never put your hand inside the outlet door to help the product
come out.
8
1
Page 17
Optional accessory gadgets
PTA-PAB: peeling tubers with scraping disk
(only mod.PPN\PPF5-10-18)
PTB: peeling tubers with scraping disk
(only mod.PPN\PPF25)
PPC: cleaning mussels and shellfish with brushes disk
(only mod.LCN\LCF5-10-18)
CCV: centrifuging leafy vegetables with basket
(only mod.PPN\PPF10-18-25)
OPERATION AND
CLEANING
3
CCF: Collecting slags
(only mod.PPF\LCF5-10-18-PPF25)
SB: supporting discharge container
(only mod.PPF\LCF5-10-18)
CI: Changing mod.PPN\LCN5-10-18 in mod.PPF\LCF5-10-18
CB: Changing mod.PPN25 in mod.PPF25
9
1
Page 18

Page 19
PPN/PPF5X-10X-18X-25X
LCN/LCF5X-10X-18X
POTATO PEELER AND MUSSEL WASHER
CONTENTS
1 GENERAL INFORMATION
Machine description………………………………
Specification………………………………………
Overall dimensions……………………………….
2 INSTALLATION
Packing and unpacking………..…………………
Installation area……….…………………………..
Electric connection…..…………………………...
Connection to water supply...……………………
3 OPERATION AND CLEANING
4
Use of the machine………………………………..
4
Optional accessory gadgets…..………………….
5
ANNEXES
7
Electrical wiring diagram
7
7
7
8
9
Page 20
INFORMATIONS
Description de la machine
GÉNÉRALES
1
MOD.PPN-LCN5 MOD.PPF-LCF5
Couvercle
Porte d’èvacuation
Panneau commandes
Evacuation eau
MOD.PPN/LCN10-18-PPN25 MOD.PPF/LCF10-18-PPF25
Couvercle
Porte d’èvacuation
Panneau commandes
Panneau commandes
Couvercle
Porte d’èvacuation
Evacuation eau
Couvercle
Porte d’èvacuation
Panneau commandes
Evacuation eau
Evacuation eau
Caractéristiques techniques
Descriptions Unité de
mesure
Alimentation en
énergie
V Hz Ph
Puissance kW (HP)
Chargement pommes
de terre
kg 5 5 10 10 18 18 25 25
PPN5 PPF5 PPN10 PPF10 PPN18 PPF18 PPN25 PPF25
230V 50Hz 1Ph
230/400V 50Hz 3/3Ph+N
0.37
(0.5)
0.37
(0.5)
0.75
(1)
0.75
(1)
1.1
(1.5)
1.1
(1.5)
1.1
(1.5)
1.1
(1.5)
Poids net kg 26 28 37 36 43 42 70 70
Poids avec emballage kg 36 38 47 46 53 52 88 88
Installation
Descriptions Unité de
mesure
Alimentation en
énergie
V Hz Ph
Puissance kW (HP)
Chargement pommes
de terre
kg 5 5 10 10 18 18
Sur
table
Sur le sol
LCN5 LCF5 LCN10 LCF10 LCN18 LCF18
230V 50Hz 1Ph
230/400V 50Hz 3/3Ph+N
0.26
(0.35)
0.26
(0.35)
0.55
(0.75)
0.55
(0.75)
0.9
(1.2)
0.9
(1.2)
Poids net kg 26 28 37 36 43 42
Poids avec emballage kg 36 38 47 46 53 52
Installation Sur table Sur le sol
4
2
Page 21

Dimensions d’ encombrement
INFORMATIONS
GÉNÉRALES
1
mm
PPN-LCN5
PPN-LCN10
PPN-LCN18
mm
PPF-LCF5
PPF-LCF10
PPF-LCF18
A B C
500
550
550
750
850
850
920
1120
1120
A B C
500
550
550
750
850
850
920
1120
1120
A B C
mm
390 580 470
ACCI
+
5
2
Page 22

Dimensions d’ encombrement
mm
A B C
PPN25
INFORMATIONS
GÉNÉRALES
PPF25
A B C
1
mm
PPN25
600 1050 1230
600 1050 1230
450 680 500
PPF25
ACCB
6
2
Page 23

INFORMATIONS SUR
Emballage et déballage
La machine est emballée dans du carton avec l’ insertion de polyester expansé
pour assurer son intégrité parfaite pendant le transport.
• Manutentionner l’ emballage en respectant les instructions.
• Ouvrir l’ emballage et verifier l’ intégrité de tout les composants. Garder l’
emballage pour des déménagements futurs.
• Effectuer le levage de la machine comme il est indiqué et la placer dans la zone
destinée à l’ installation.
L’ INSTALLATION
2
Zone d’ installation
La zone préétablie devra être dûment éclairée et devra avoir une prise de courant électrique. Le plan d’ appui
doit être suffisamment ample, bien nivelé et sec. L’ installation ne doit pas être exécutée dans des lieux avec
une atmosphère explosive. En tous cas, l’ installation doit être exécutée en tenant compte aussi des lois en
vigueur en matière de sécurité dans le lieu de travail.
Branchement électrique
Branchement Branchement
DANGER – ATTENTION: Le branchement électrique sur le
réseau d’ alimentation doit être exécuté par du personnel spécialisé.
S’ assurer que l’ installation de mise à la terre de l’ usine fonctionne
parfaitement. Vérifier que la tension de ligne (V) et la fréquence (Hz)
correspondent à celles de la machine (Voir la plaquette d’ identification et le
schéma de câblage). La machine est dotée d’ un câble électrique avec fiche. La
fiche est branchée sur un interrupteur général mural doté d’ un différentiel.
Branchement triphasé
Démarrer la machine pendant quelques secondes et vérifier si la rotation de l’
accessoire est correcte. Si la rotation n’ est pas correcte, déconnecter la tension
et inverser deux des trois phases de la fiche.
monophasé triphasé
230V 230/400V
1Ph 3Ph/3Ph+N
Branchement hydraulique
Effectuer la connexion au réseau hydrique au moyen du
tuyau flexible (1500mm.) en dotation avec raccords de ¾”
selon les instructions suivantes:
-Raccorder le tuyau a l’entrée de l’eau A sur le côté
postérieur de l’appareil.
-Rattacher l’autre extrémité du tuyau fexible au réseau
hydrique. Un robinet B d’interception devra être installé
avant l’appareil sur le tuyau d’alimentation.
-Le tuyau de décharge C devra être en pente pour favoriser
l’évacuation des déchets; les conduites de décharge sous
le plancher doivent avoir un ø50mm. pour les modeles
PPN\LCN10-18-PPN25 et ø90mm. pour les modeles
PPF\LCF5-10-18-PPF25. Le model PPN\LCN5, est un
appareil de table qui doit décharger D dans en lavabo ou
semblable placé à sa guache.
7
2
Page 24

INFORMATION SUR L’ EMPLOI
ET LE NETTOYAGE
Utilisation de la machine
Ouvrir le couvercle transparent en tirant le manche A jusqu’au
déclanchement d’ouverture.
Insérer le disque et charger le récipient avec le produit à
traiter.
Refermer le couvercle en le bloquant et s’assurer de
l’enclenchement de la porte d’évacuation B.
Brancher l’interrupteur général au mur.
Mettre en marche l’appareil en tournant le bouton du
temporisateur C sur le temp désiré pour le cycle de traitement.
Vérifier l’entrée de l’eau de lavage et agir manuellement sur le
robinet D placé sur la machine.
A la fin du cycle programmé la machine s’arrêtera
automatiquement.
Il faut interrompre l’entrée de l’eau à l’intérieur de l’appareil en
tournant le robinet D.
Pour enlever le produit traité ouvrir la porte d’evacuation B
après avoir placé un bassin en-dessous de la bouche
d’évacuation. Ensuite tourner le bouton du temporisateur C
pour permettre la rotation à sec du disque et tenir avec l’autre
main la porte d’évacuation de façon à contrôler l’évacuation du
produit sans venir en contact.
3
DANGER – ATTENTION: n’introduisez la main à travers la porte d’évacuation pour
faciliter la sortie du produit.
8
2
Page 25

INFORMATION SUR L’ EMPLOI
Accessoires sur demande
PTA-PAB: éplucher les tubercules avec le disque abrasif
(seulement mod.PPN\PPF5-10-18)
PTB: éplucher les tubercules avec le disque abrasif
(seulement mod.PPN\PPF25)
PPC: nettoyer les moules et semblables avec le disque à brosses
(seulement mod.LCN\LCF5-10-18)
CCV: centrifuger les légumes à feuille moyennant le panier
(seulement mod.PPN\PPF10-18-25)
ET LE NETTOYAGE
3
CCF: ramasser déchetes
(seulement mod.PPF\LCF5-10-18-PPF25)
SB: soutenir la bassin de décharge
(seulement mod.PPF\LCF5-10-18)
CI: modifier mod.PPN\LCN5-10-18 en mod.PPF\LCF5-10-18
CB: modifier mod.PPN25 en mod.PPF25
9
2
Page 26

Page 27

PPN/PPF5X-10X-18X-25X
LCN/LCF5X-10X-18X
KARTOFFELSCHÄLER UND MUSCHELWASCH-MASCHINE
INHALT
1 ALLGEMEINE HINWEISE
Beschreibung der Maschine……....…………….
Technische Eigenschaften..……………………..
Abmessungen………………...…………………..
2 AUFSTELLUNG
Verpackung und Auspacken…………………….
Aufstellbereich…..………………………………..
Elektrischer Anschluss..………………………….
Wasseranschluß……..……………………………
3 GEBRAUCH UND REINIGUNG
4
Bedienung der Maschine…………………………
4
Zubehöre auf bestellung………………………….
5
ANLAGEN
7
Schaltplan
7
7
7
8
9
Page 28

ALLGEMEINE
HINWEISE
1
Beschreibung der Maschine
MOD.PPN-LCN5 MOD.PPF-LCF5
Deckel
Auslaßtürchen
Schalttafel
Auslaßöffnung
MOD.PPN/LCN10-18-PPN25 MOD.PPF/LCF10-18-PPF25
Deckel
Auslaßtürchen
Schalttafel
Auslaßöffnung
Deckel
Auslaßtürchen
Schalttafel
Auslaßöffnung
Deckel
Auslaßtürchen
Schalttafel
Auslaßöffnung
Technische Eigenschaften
Beschreibung Maßeinheit PPN5 PPF5 PPN10 PPF10 PPN18 PPF18 PPN25 PPF25
Stromversorgung V Hz Ph
Leistung kW (HP)
0.37
(0.5)
0.37
(0.5)
Kartoffelnbeladung kg 5 5 10 10 18 18 25 25
Nettogewicht kg 26 28 37 36 43 42 70 70
Gewicht mit Verpackung kg 36 38 47 46 53 52 88 88
Auf der
Aufstellen
Arbeits-
fläche
Beschreibung Maßeinheit LCN5 LCF5 LCN10 LCF10 LCN18 LCF18
Stromversorgung V Hz Ph
Leistung kW (HP)
0.26
(0.35)
0.26
(0.35)
Kartoffelnbeladung kg 5 5 10 10 18 18
Nettogewicht kg 26 28 37 36 43 42
Gewicht mit Verpackung kg 36 38 47 46 53 52
Aufstellen
Auf der
Arbeits-fläche
230V 50Hz 1Ph
230/400V 50Hz 3/3Ph+N
0.75
(1)
0.75
(1)
1.1
(1.5)
Auf der Erde
230V 50Hz 1Ph
230/400V 50Hz 3/3Ph+N
0.55
(0.75)
0.55
(0.75)
Auf der Erde
1.1
(1.5)
0.9
(1.2)
1.1
(1.5)
1.1
(1.5)
0.9
(1.2)
4
2
Page 29

Abmessungen
ALLGEMEINE
HINWEISE
1
mm
PPN-LCN5
PPN-LCN10
PPN-LCN18
mm
PPF-LCF5
PPF-LCF10
PPF-LCF18
A B C
500
550
550
750
850
850
920
1120
1120
A B C
500
550
550
750
850
850
920
1120
1120
A B C
mm
390 580 470
ACCI
+
5
2
Page 30

Abmessungen
PPN25
ALLGEMEINE
HINWEISE
PPF25
1
PPN25
mm
A B C
600 1050 1230
600 1050 1230
450 680 500
A B C
mm
PPF25
ACCB
6
3
Page 31

Verpackung und Auspacken
Damit die Unversehrtheit der Maschine während des Transports gewährleistet ist,
wurde sie in einem mit Schaumpolystereinsatz verstärkten Karton verpackt.
• Die Verpackung gemäß den Anweisungen bewegen.
• Die Verpackung öffnen und alle Komponenten auf ihre Unversehrtheit
überprüfen. Verpackung für spätere Umzüge aufbewahren.
• Die Maschine den Anweisungen gemäß heben und in den für die Aufstellung
vorgesehenen Bereich positionieren.
AUFSTELLUNG
2
Aufstellbereich
Der dafür vorgesehene Bereich muss über eine geeignete Beleuchtung und über eine Steckdose zur
Stromversorgung verfügen. Die Auflagefläche muss ausreichend breit, gut nivelliert und trocken sein. Die
Aufstellung muss in einer nicht explosionsfähigen Umgebung erfolgen. Das Aufstellen muss in jedem Fall
auch unter Berücksichtigung der auf dem Gebiet der Sicherheit am Arbeitsplatz geltenden Gesetze erfolgen.
Elektrischer Anschluss
Einphasen- Dreiphasen-
GEFAHR - ACHTUNG: Der elektrische Anschluss an das
Versorgungsnetz muss von Fachpersonal ausgeführt werden.
Volle Funktionstüchtigkeit der Erdungsvorrichtung der Anlage sicherstellen.
Überprüfen, dass Leitungsspannung (V) und Frequenz (Hz) mit denen der
Maschine übereinstimmen (Siehe Kennschild und Leitungsplan). Die Maschine
ist mit einem elektrischen Kabel mit Stecker ausgerüstet. Der Stecker ist an
einen mit einem Differential ausgerüsteten Wand-Netzschalter anzuschließen.
Dreiphasenanschluss
Maschine für wenige Augenblicke in Gang setzen und überprüfen, dass die
Werkzeugumdrehung korrekt ist. Falls die Umdrehung nicht korrekt sein sollte,
die Spannung ausschalten und zwei der drei Phasen im Stecker umkehren.
anschluss anschluss
230V 230/400V
1Ph 3Ph/3Ph+N
Wasseranschluß
Den Wassernetzanschluß mittels des in der Ausstattung
vorhandenen Schlauches mit ¾” Anschlussen vornehmen.
Folgendermaßen vorgehen:
-Am Wasserinfluß A an der Rückseite des Gerätes
anschließen.
-Das andere Schlauchende mit dem Wassernetz verbiden.
Ein Zuflußwasserhahn B muß stromaufwärts vom Gerät,
auf der Speisewasserleitung installiert werden.
-Der Abfluß C muß geneigt sein, um so die
Schlackenentleerung zu erleichtern; die Bodenleitung muß
einen Durchmesser von ø50mm. (fur mod.PPN\LCN10-18PPN25) und von ø90mm. (fur mod.PPF\LCF5-10-18PPF25) haben. Das Modell PPN\LCN5 ein Tischgerät ist
und deshalb muss in einem Waschbekken D oder in etwas
Ähnlich auslassen, das an der linken Seite gestellt sein soll.
7
3
Page 32

GEBRAUCH UND
Bedienung der Maschine
Den durchsichtigen Deckel öffnen und den Handgriff A ziehen
bis zum Erhöffnungschnellen..
Die Schälplatte stellen und die Wanne mit dem Produkt zu
verarbeiten aufladen.
Den Deckel schliessen und blockieren; kontrollieren sie dass
die Auslasstür B auch blockiert ist.
Den Haupschalter auf der wand Einschalten.
Die Maschine einschalten durch drehung des Timerhandgriff C
uaf der gewünschten arbeitzeit.
Um die Waschwassereintritt zu prüfen soll man manuell
handeln auf dem hahn D der sich auf der Maschine befindet.
Am ende des Arbeitzyklus die Maschine automatisch
stehenbleibt.
Unterbrechen sie die Wassereintritt durch hahn D.
Um das verarbeitetes Produkt zu ausladenein behälter unten
die Auslasstür stellen und Auslasstür B öffnen, des
Timerhandgriff C drehen so dass der Schälplatte dreht sich.
Mit der anderen Hand die Auslasstür halten und die ausgang
den Produkt kontrollieren um kein kontakt zu haben.
REINIGUNG
3
GEFAHR - ACHTUNG: Nie die Hand zur Entnahme des Produkts in die Öffnung geben.
8
3
Page 33

Zubehöre auf Bestellung
PTA-PAB: Knollengemüse schälen mit der Schleifscheibe
(nur mod.PPN\PPF5-10-18)
PTB: Knollengemüse schälen mit der Schleifscheibe
(nur mod.PPN\PPF25)
PPC: Muscheln und gleichartiges putzen mit der Bürstenscheibe
(nur mod.LCN\LCF5-10-18)
CCV: Blattgemüse zentrifugieren mit der Trommel
(nur mod.PPN\PPF10-18-25)
GEBRAUCH UND
REINIGUNG
3
CCF: Abfälle sammeln
(nur mod.PPF\LCF5-10-18-PPF25)
SB: Ausladenbehälter tragen
(nur mod.PPF\LCF5-10-18)
CI: Mod.PPN\LCN5-10-18 in Mod.PPF\LCF5-10-18 Ändern
CB: Mod.PPN25 in Mod.PPF25 Ändern
9
3
Page 34

Page 35

PPN/PPF5X-10X-18X-25X
LCN/LCF5X-10X-18X
PELA-PATATAS Y LAVA-MEJILLONES
1 INFORMACIONES GENERALES
Descripción de la máquina………………………
Características técnicas………………………….
Dimensiones totales……………………………...
2 INFORMACIONES SOBRE LA INSTALACIÓN
Embalaje y desembalaje ………..………………
Zona de instalación…………………………..……
Conexión eléctrica …..…………………………...
Conexión hidràulica....…………………………...
ÍNDICE
3 INFORMACIONES SOBRE EL USO Y LA
4
LIMPIEZA
4
Uso de la máquina……………..………..………..
5
Accessorios a petición……………………………
ANEXOS
7
Esquema electrico
7
7
7
8
9
Page 36

INFORMACIONES
GENERALES
1
Descripción de la máquina
MOD.PPN-LCN5 MOD.PPF-LCF5
Tapa
Portillo de evacuación
Panel de control
Evacuación agua
MOD.PPN/LCN10-18-PPN25 MOD.PPF/LCF10-18-PPF25
Tapa
Portillo de evacuación
Panel de control
Portillo de evacuación
Portillo de evacuación
Evacuación agua
Tapa
Panel de control
Evacuación agua
Tapa
Panel de control
Evacuación agua
Características técnicas
Descripciones
Alimentación de
energía eléctrica
Potencia kW (HP)
Carga patatas kg 5 5 10 10 18 18 25 25
Peso neto kg 26 28 37 36 43 42 70 70
Peso con embalaje kg 36 38 47 46 53 52 88 88
Instalación
Descripciones
Alimentación de
energía eléctrica
Potencia kW (HP)
Carga patatas kg 5 5 10 10 18 18
Peso neto kg 26 28 37 36 43 42
Peso con embalaje kg 36 38 47 46 53 52
Ins tal aci ón En el banco En el pis o
Unidad de
medida
V Hz Ph
Unidad de
medida
V Hz Ph
PPN5 PPF5 PPN10 PPF10 PPN18 PPF18 PPN25 PPF25
230V 50Hz 1Ph
230/400V 50Hz 3/3Ph+N
0.37
(0.5)
En el
banco
0.37
(0.5)
0.75
(1)
0.75
(1)
1.1
(1.5)
En el piso
1.1
(1.5)
1.1
(1.5)
1.1
(1.5)
LCN5 LCF5 LCN10 LCF10 LCN18 LCF18
230V 50Hz 1Ph
230/400V 50Hz 3/3Ph+N
0.26
(0.35)
0.26
(0.35)
0.55
(0.75)
0.55
(0.75)
0.9
(1.2)
0.9
(1.2)
4
3
Page 37

Dimensiones totales
INFORMACIONES
GENERALES
1
mm
PPN-LCN5
PPN-LCN10
PPN-LCN18
mm
PPF-LCF5
PPF-LCF10
PPF-LCF18
A B C
500
550
550
750
850
850
920
1120
1120
A B C
500
550
550
750
850
850
920
1120
1120
A B C
mm
390 580 470
ACCI
+
5
3
Page 38

Dimensiones totales
PPN25
INFORMACIONES
GENERALES
PPF25
1
PPN25
мм
A B C
600 1050 1230
6
3
A B C
600 1050 1230
450 680 500
мм
PPF25
ACCB
Page 39

INFORMACIONES SOBRE
LA INSTALACIÓN
2
Embalaje y desembalaje
La máquina está embalada en cartón con la introducción de espuma de poliestireno
para garantizar su perfecta integridad durante el traslado.
• Mover el embalaje según las instrucciones.
• Abrir el embalaje y verificar la integridad de todos los componentes. Guardar el
embalaje para eventuales y futuros traslados.
• Levantar la máquina tal como se indica y posicionarla en la zona destinada a la
instalación.
Zona de instalación
La zona pre-stablecida deberá ser adecuadamente iluminada y disponer de una toma de distribución de la
energía eléctrica. El plano de apoyo deberá ser suficientemente amplio, bien nivelado y seco. La instalación
deberá efectuarse en lugares con atmósfera no explosiva. De todas formas, la instalación deberá realizarse
también en el respeto de las leyes vigentes en materia de seguridad en el trabajo.
Conexión eléctrica
Conexión Conexión
PELIGRO - ATENCIÓN: La conexión eléctrica a la red de
alimentación debe ser realizada por personal especializado.
Verificar el buen estado de la instalación puesta a tierra del establecimiento.
Verificar que la tensión de línea (V) y la frecuencia (Hz) correspondan a las de la
máquina (Ver la placa de identificación y el esquema eléctrico). La máquina está
dotada de un cable eléctrico con enchufe. El enchufe debe conectarse a un
interruptor general de pared provisto de diferencial.
Conexión trifásica
Hacer funcionar la máquina durante unos segundos y verificar que la rotación
del accesorio sea correcta. En caso contrario, quitar la tensión e invertir dos de
las tres fases en el enchufe.
monofásica trifásica
230V 230/400V
1Ph 3Ph/3Ph+N
Conexiòn hidràulica
Efectuar la instalación a la red hìdrica a través del tubo
elàstico (1500mm.) en dotación con enlaces de ¾”
procediendo de la siguiente manera:
-Conectarse a la entrada del agua A en la parte posterior
del aparato.
-Conectar la otra extremidad del tubo elàstico a la red
hìdrica. Un grifo B d’interceptación tendrá que ser instalado
a monte del aparato, en la tuberìa de alimentación del
agua.
-El tubo de evacuación del agua C tendrá que ser inclinada
para favorecer la evacuación de las escorias; la tuberìa de
descarga bajo el piso tiene que tener un ø50mm. para los
modelos PPN\LCN10-18-PPN25 y ø90mm. para los
modelos PPF\LCF5-10-18-PPF25. El modelo PPN\LCN5,
es un aparato para el banco, tendrá descargar D en un
lavabo o similar posicionado a izquierda.
7
3
Page 40

INFORMACIONES SOBRE
EL USO Y LA LIMPIEZA
Uso de la máquina
Abrir la tapa trasparente tirando la manilla A hasta que el
resorte de abertura no se abra.
Inserir el platillo y cargar el contenidor con el producto por
tratar.
Cerrar la tapa bloqueandola y asegurarse de el bloqueo del
portillo de evacuación B.
Inserir el interruptor general de pared.
Para poner en marcha el aparato gire la manopla del
temporizador C sobre el tiempo deseado para el ciclo de
trabajo.
Controlar la entrada del agua durante el lavado y intervenir
manualmente en el grifo D colocado sobre la máquina.
Al final del ciclo impuesto la máquina se parará
automáticamente.
Interrumpir la entrada del agua girando el grifo D.
Para descargar el producto tratado abrir el portillo de
evacuación B después de haber posicionado un contenidor
bajo la boca de evacuación, luego girar la manopla del
temporizador C para permitir la rotación a seco de el platillo y
sujetar con la otra mano el portillo de evacuación de manera
tal que se pueda controlar con éste.
3
PELIGRO - ATENCIÓN: Non introducir nunca la mano a través del portillo de
evacuación para favorecer la sobre salida del producto.
8
4
Page 41

INFORMACIONES SOBRE
Accesorios a petición
PTA-PAB: pelar tubérculos con el platillo abrasivo
(sòlo mod.PPN\PPF5-10-18)
PTB: pelar tubérculos con el platillo abrasivo
(sòlo mod.PPN\PPF25)
PPC: limpiar mejillones y derivados con el platillo con cepillos
(sòlo mod.LCN\LCF5-10-18)
CCV: centrifugar verduras con hojas con el cesto
(sòlo mod.PPN\PPF10-18-25)
EL USO Y LA LIMPIEZA
3
CCF: Recorger escorias
(sòlo mod.PPF\LCF5-10-18-PPF25)
SB: mantener la cubeta de descarga
(sòlo mod.PPF\LCF5-10-18)
CI: modificar mod.PPN\LCN5-10-18 en mod.PPF\LCF5-10-18
CB: modificar mod.PPN25 en mod.PPF25
9
4
Page 42

Page 43

PPN/PPF5X-10X-18X-25X
LCN/LCF5X-10X-18X
DESCASCADORA DE BATATAS E LAVA MEXILHÃO
ÍNDICE
1 INFORMAÇÕES GERAIS
Descrição da máquina.............…......................
Características técnicas………………………....
Dimensões de estorvo ..................……………..
2 INFORMAÇÕES SOBRE A INSTALAÇÃO
Embalagem e desembalagem..…………………
Zona de instalação...……………………………..
Ligação eléctrica................……………………...
Ligação hidráulica .......…………………………..
3 INFORMAÇÕES SOBRE O USO E A
4
LIMPEZA
4
Uso da máquina..... …………..…………………..
5
Acessórios a pedido………………………………
ANEXOS
7
Esquema eléctrico
7
7
7
8
9
Page 44

INFORMAÇÕES
GERAIS
1
Descrição da máquina
MOD.PPN-LCN5 MOD.PPF-LCF5
Tampa
Postigo de descarga
Painel dos comandos
Descarga água
MOD.PPN/LCN10-18-PPN25 MOD.PPF/LCF10-18-PPF25
Tampa
Postigo de descarga
Painel dos comandos
Postigo de descarga
Painel dos comandos
Postigo de descarga
Painel dos comandos
Descarga água
Tampa
Descarga água
Tampa
Descarga água
Características técnicas
Descrição
Alimentação de
energia eléctrica
Potência kW (HP)
Carga mexilhãoes kg 5 5 10 10 18 18 25 25
Peso líquido kg 26 28 37 36 43 42 70 70
Peso com embalagem kg 36 38 47 46 53 52 88 88
Instalação
Descrição
Alimentação de
energia eléctrica
Potência kW (HP)
Carga mexilhãoes kg 5 5 10 10 18 18
Peso líquido kg 26 28 37 36 43 42
Peso com embalagem kg 36 38 47 46 53 52
Instalação No banco Na terra
Unidade
de medida
V Hz Ph
Unidade de
medida
V Hz Ph
PPN5 PPF5 PPN10 PPF10 PPN18 PPF18 PPN25 PPF25
230V 50Hz 1Ph
230/400V 50Hz 3/3Ph+N
0.37
(0.5)
No
banco
LCN5 LCF5 LCN10 LCF10 LCN18 LCF18
0.26
(0.35)
0.37
(0.5)
0.26
(0.35)
44
0.75
(1)
0.75
(1)
230V 50Hz 1Ph
230/400V 50Hz 3/3Ph+N
0.55
(0.75)
1.1
(1.5)
Na terra
0.55
(0.75)
1.1
(1.5)
0.9
(1.2)
1.1
(1.5)
1.1
(1.5)
0.9
(1.2)
Page 45

Dimensões de estorvo
INFORMAÇÕES
GERAIS
1
mm
PPN-LCN5
PPN-LCN10
PPN-LCN18
mm
PPF-LCF5
PPF-LCF10
PPF-LCF18
A B C
500
550
550
750
850
850
920
1120
1120
A B C
500
550
550
750
850
850
920
1120
1120
A B C
mm
390 580 470
ACCI
+
45
Page 46

Dimensões de estorvo
PPN25
INFORMAÇÕES
GERAIS
PPF25
1
PPN25
мм
A B C
600 1050 1230
46
A B C
600 1050 1230
450 680 500
мм
PPF25
ACCB
Page 47

INFORMAÇÕES
SOBRE A INSTALAÇÃO
2
Embalagem e desembalagem
A máquina está embalada numa caixa de cartão com protecções de poliester
expanso para garantir a perfeita integridade durante o transporte.
• Manuseie a embalagem respeitando as instruções.
• Abra a embalagem e verifique a integridade de todos os componentes.
Conserve-a para um futuro transporte.
• Levante a máquina como indicado e coloque-a na zona escolhida para a
instalação.
Zona de instalação
A zona escolhida deve estar bem iluminada e terá que dispor de tomadas eléctricas. O plano de apoio deve
ser suficientemente amplo, bem nivelado e seco. A instalação deve ser efectuada em ambientes com
atmosfera não explosiva, tendo em conta também as leis em vigor em matéria de segurança no trabalho.
Ligação eléctrica
Ligação Ligação
PERIGO – ATENÇÃO: A ligação eléctrica à rede de alimentação
Verifique a eficiência da instalação de ligação à terra do estabelecimento.
Verifique que a tensão de linha (V) e a frequência (Hz) correspondam aos da
máquina (veja a chapa de identificação e o esquema eléctrico). A máquina
possui um cabo eléctrico que deve ser ligado a uma ficha multipolar que por sua
vez deve ser ligada a um interruptor de parede dotado de diferencial.
Ligação trifásica
Ponha a máquina a funcionar durante alguns segundos e verifique a correcta
rotação do utensílio. Em caso contrário, desligue a tensão e inverta duas das
três fases na ficha.
deve ser efectuada por pessoal especializado.
Monofásica trifásica
230V 230/400V
1Ph 3Ph/3Ph+N
Ligação hidráulica
Predisponha a ligação à rede hídrica por meio do tubo
flexível (1500mm.) no equipamento base com junçãoes de
¾” procedendo como indicado em seguida:
-Fixe uma extremidade do tubo flexívelna ponto de entrada
da água A na parte posterior do aparelho.
-Ligue a outra extremidade do tubo flexível à rede hídrica.
Uma torneira B de interceptação deverá ser instalada antes
da água no aparelho, na tubulação de alimentação da
água.
-A descarga da água C deverá ser colocada numa posição
inclinada para favorecer a evacuação das escorias; a
tubulação de descarga sob o pavimento deve ter um
ø50mm. para os modelos PPN\LCN10-18-PPN25 e
ø90mm. para os modelos PPF\LCF5-10-18-PPF25. O
modelo PPN\LCN5, como aparelho no banco, deverá
descarregar D em um lavatory ou análogos colocado
esquerdo da máquina.
47
Page 48

INFORMAÇÕES SOBRE O USO
Uso da máquina
Abra a tampa trasparente puxando a pega A até ao disparo de
abertura.
Posicione o disco e carregue o tanque com o producto que
deve ser preparado.
Volte a fechar a tampa bloqueando-a e asseguere-se que o
postigo de descarga B esteja bloqueado.
Ligue o interruptor geral de parade.
Coloque em funcionamento o aparelho rodando o botão do
temporizador C.
Verifique a entrada da água de lavagem e deve intervir
manualmente na torneira D instalada na parte posterior da
máquina.
Uma vez concluído o ciclo pré-ajustado, a máquina
interromperá automáticamente a sua marcha.
Interromper a imissão de água rodando a torneira D.
Para descarregar o producto preparado abra o postigo de
descarga B depois de ter colocado um recipiente de colheita
sob o mesmo postigo, em seguida rodar o botão do
temporizador C para permitir a rotação a seco do disco e, com
a outra mão, segure o postigo de descarga de forma a
controlar a saída do producto sem entrar em contacto com o
mesmo.
E A LIMPEZA
3
PERIGO – ATENÇÃO: Não enfie nunca a mão dentro do postigo de descarga para
facilitar a saída do producto.
48
Page 49

INFORMAÇÕES SOBRE O USO
Acessórios a pedido
PTA-PAB: descascar tubérculos com o disco abrasivo
(só mod.PPN\PPF5-10-18)
PTB: descascar tubérculos com o disco abrasivo
(só mod.PPN\PPF25)
PPC: limpar mexilhãoes e análogos com o disco de escovas
(só mod.LCN\LCF5-10-18)
CCV: centrifugar verduras de folha com o cesto
(só mod.PPN\PPF10-18-25)
E A LIMPEZA
3
CCF: recolhimento escorias
(só mod.PPF\LCF5-10-18-PPF25)
SB: sustentação a cubeta de descarga
(só mod.PPF\LCF5-10-18)
CI: modifique mod.PPN\LCN5-10-18 em mod.PPF\LCF5-10-18
CB: modifique mod.PPN25 em mod.PPF25
49
Page 50

Page 51

PPN/PPF5X-10X-18X-25X
LCN/LCF5X-10X-18X
КАРТОФЕЛЕЧИСТКА И ОЧИСТИТЕЛЬ МИДИЙ
СОДЕРЖАНИЕ
1 ОБЩАЯ ИНФОРМАЦИЯ
Описание машины ……………………………...
Технические характеристики …………………
Габаритные размеры …………………………..
2 ИНФОРМАЦИЯ ПО УСТАНОВКЕ
Упаковка и распаковка …………………………
Зона установки ………………………………….
Подключение к электросети ……………….…
Подключение к сети водоснабжения ………..
3 ИНФОРМАЦИЯ ПО ПРИМЕНЕНИЮ И
4
ЧИСТКЕ
4
Эксплуатация машины …………..……………..
5
Дополнительные принадлежности ……..…….
ПРИЛОЖЕНИЯ
7
Электрическая схема
7
7
7
8
9
Page 52

ОБЩАЯ
ИНФОРМАЦИЯ
1
Описание машины
МОД.PPN-LCN5 МОД.PPF-LCF5
Крышка
Дверка выгрузки
Панель управления
Спуск воды
МОД.PPN/LCN10-18-PPN25 МОД.PPF/LCF10-18-PPF25
Крышка
Дверка выгрузки
Панель управления
Спуск воды
Крышка
Дверка выгрузки
Панель управления
Спуск воды
Крышка
Дверка выгрузки
Панель управления
Спуск воды
Технические характеристики
Описание
Электрическое
питание
Мощность кВт (л.с.)
Загрузка картофеля кг 5 5 10 10 18 18 25 25
Вес нетто кг 26 28 37 36 43 42 70 70
Вес с упаковкой кг 36 38 47 46 53 52 88 88
Установка
Описание
Электрическое
питание
Мощность кВт (л.с.)
Загрузка картофеля кг 5 5 10 10 18 18
Вес нетто кг 26 28 37 36 43 42
Вес с упаковкой кг 36 38 47 46 53 52
Установка На столе На полу
Единица
измерения
В Гц Ф
Единица
измерения
В Гц Ф
PPN5 PPF5 PPN10 PPF10 PPN18 PPF18 PPN25 PPF25
230В 50Гц 1Ф
230/400В 50 Гц 3Ф
0.37
(0.5)
На
столе
0.37
(0.5)
0.75
(1)
0.75
(1)
1.1
(1.5)
На полу
1.1
(1.5)
1.1
(1.5)
1.1
(1.5)
LCN5 LCF5 LCN10 LCF10 LCN18 LCF18
230В 50Гц 1Ф
230/400В 50 Гц 3Ф
0.26
(0.35)
0.26
(0.35)
0.55
(0.75)
0.55
(0.75)
0.9
(1.2)
0.9
(1.2)
4
5
Page 53

Габаритные размеры
ОБЩАЯ
ИНФОРМАЦИЯ
1
mm
PPN-LCN5
PPN-LCN10
PPN-LCN18
мм
PPF-LCF5
PPF-LCF10
PPF-LCF18
A B C
500
550
550
750
850
850
920
1120
1120
A B C
500
550
550
750
850
850
920
1120
1120
A B C
мм
390 580 470
ACCI
+
5
5
Page 54

Габаритные размеры
PPN25
ОБЩАЯ
ИНФОРМАЦИЯ
PPF25
1
PPN25
мм
A B C
600 1050 1230
6
5
A B C
600 1050 1230
450 680 500
мм
PPF25
ACCB
Page 55

ИНФОРМАЦИЯ
ПО УСТАНОВКЕ
2
Упаковка и распаковка
Машина упакована в картонную упаковку с наполнением из пенопласта для обеспечения
целостности машины во время ее транспортировки
• Производить перемещение упакованного оборудования в соответствии с инструкциями.
• При открытии упаковки удостовериться в целостности каждого компонента.
Сохранить упаковку на случай дальнейших перевозок..
• Произвести подъем машины в соответствии с предоставленными указаниями и
тить ее в зону, предназначенную для установки.
помес
Зона установки
Выбранная зона должна быть достаточно освещенной и располагать электрическим разъемом.
Опорная поверхность должна быть достаточно широкой, ровной и сухой. В установочной зоне должна
присутствовать невзрывоопасная атмосфера. Установка должна проводиться в соответствии с
действующим законодательством по безопасности на рабочих местах.
Таблица Условий внешней среды
Описание Значения
Рабочая температура 0÷35 °C (32÷95 °F)
Температура хранения от -15 до +65 °C (от –6.8 до +149 °F)
Относительная влажность
Содержание пыли в помещении Менее 0.03 г/м³
Макс 80% при температуре окружающей среды 20 °C
Макс 50% при температуре окружающей среды 20÷60 °C
Подключение к электросети
Подсоединение Подсоединение
ОПАСНОСТЬ – ВНИМАНИЕ: подключение к сети
электропитания должно производиться специализированным
Убедиться в полной исправности системы заземления в помещении.
Убедиться в том, что напряжение линии (В) и частота (Гц) соответствуют
характеристикам машины (См. идентификационную табличку и схему
электрической цепи). Машина оснащена электрокабелем для
подсоединения к многополярному штепселю. Штепсель подсоединяется к
настенному выключателю, оснащенному дифференциалом.
Трехфазное подсоединение
Включить машину на несколько секунд для проверки правильности
вращения частей прибора. Если вращение неправильное, отключите
напряжение и поменяйте местами две из трех фаз штепселя.
персоналом.
однофазное трехфазное
230В 230/400В
1Ф 3Ф/3Ф+Н
Подключение к сети водоснабжения
Выполнить подключение к сети водоснабжения с
помощью гибкого шланга, входящего в комплектацию
(1500мм.) с разъемами ¾” , действуя следующим
образом:
-Подсоединиться ко входу воды A с задней стороны
прибора.
-Подсоединить другой конец гибкого шланга к сети
водоснабжения. Отсекающий кран B должен быть
установлен выше прибора на трубопроводе
водоснабжения.
-Слив C должен находиться под наклоном для
способствования удалению отходов; сливной
трубопровод должен иметь ø50мм для моделей
PPN\LCN10-18-PPN25 и ø90мм для PPF\LCF5-10-18PPF25. В настольной модели PPN\LCN5 слив
производится D в ванну или раковину, помещенную
слева от машины.
7
5
Page 56

ИНФОРМАЦИЯ ПО
ПРИМЕНЕНИЮ И
Эксплуатация машины
Открыть прозрачную крышку, потянув рукоятку A до
щелчка открытия.
Вставить нужный диск и загрузить обрабатываемый
продукт в резервуар
Закрыть и заблокировать крышку и проверить блокировку
дверки
Включить главный выключатель на стене.
Включить машину, установив ручку C таймера требуемое
время для рабочего цикла.
Проверить вход промывочной воды в следует повернуть
кран D на машине.
По завершению заданного рабочего цикла машина
автоматически остановится.
Oтключить подачу воды с помощью крана D.
Для выгрузки обрабатываемого продукта следует открыть
дверку выгр
емкость для сбора, затем, установив ручку C таймера,
чтобы позволить вращение диска вхолостую, держать при
этом другой рукой дверку выгрузки, чтобы контролировать
выход продукта, не соприкасаясь с ним.
выгрузки B.
узки B, предварительно разместив под ней
ЧИСТКЕ
3
ОПАСНОСТЬ – ВНИМАНИЕ: Запрещается помещать руку в проем выгрузки в
попытке облегчить выход продукта.
8
5
Page 57

Дополнительные принадлежности
PTA-PAB: для очистки корнеплодов абразивным диском
(только мод.PPN\PPF5-10-18)
PTB: для очистки корнеплодов абразивным диском
(только мод.PPN\PPF25)
PPC: для чистки мидий и моллюсков диском со щетками
(только мод.LCN\LCF5-10-18)
CCV: для мойки в центрифужном барабане листьев овощей
(только мод.PPN\PPF10-18-25)
ИНФОРМАЦИЯ ПО
ПРИМЕНЕНИЮ И
ЧИСТКЕ
3
CCF: для сбора отходов
(только мод.PPF\LCF5-10-18-PPF25)
SB: для поддержки ванны для выгрузки
(только мод.PPF\LCF5-10-18)
CI: для модификации мод.PPN\LCN5-10-18 в мод.PPF\LCF5-1018
CB: для модификации мод.PPN25 в мод.PPF25
9
5
Page 58

SCHEMA ELETTRICO • ELECTRICAL WIRING DIAGRAM •
SCHÉMA ÉLECTRIQUE • SCHALTPLAN • ESQUEMA ELECTRICO •
ESQUEMA ELÉCTRICO • ЭЛЕКТРИЧЕСКАЯ СХЕМА
(1 phase)
58
Page 59

SCHEMA ELETTRICO • ELECTRICAL WIRING DIAGRAM •
SCHÉMA ÉLECTRIQUE • SCHALTPLAN • ESQUEMA ELECTRICO •
ESQUEMA ELÉCTRICO • ЭЛЕКТРИЧЕСКАЯ СХЕМА
(3 phase)
59
Page 60

Page 61

Page 62

Via Sandro Pertini, 29
47826 Villa Verucchio – Rimini (Italy)
e-mail: mail@fimarspa.it
http://www.fimarspa.it
62
Page 63

Page 64

 Loading...