

Page 1
ORIGINAL INSTRUCTION DOC. 10050552 - Ver. AA - 12-2014
PROFESSIONAL VACUUM CLEANERS
IT MANUALE USO E MANUTENZIONE
EN USE AND MAINTENANCE MANUAL
ES MANUAL DE USO Y MANTENIMIENTO
FR MANUEL D’UTILISATION ET D’ENTRETIEN
DE BEDIENUNGS- UND WARTUNGSANLEITUNG
NO BRUKS- OG VEDLIKEHOLDSHÅNDBOK
SV MANUAL FÖR ANVÄNDNING OCH UNDERHÅLL
FI KÄYTTÖ- JA HUOLTOKÄSIKIRJA
DA BRUGS- OG VEDLIGEHOLDELSESMANUAL
NL HANDLEIDING VOOR HET GEBRUIK
EN HET ONDERHOUD
PL INSTRUKCJAUŻYTKOWANIAIKONSERWACJI
CS NÁVODKPOUŽITÍAÚDRŽBĚ
SK NÁVODNAPOUŽÍVANIEAÚDRŽBU
HU HASZNÁLATIÉSKARBANTARTÁSIÚTMUTATÓ
SL PRIROČNIKZAUPORABOINVZDRŽEVANJE
RO MANUALDEUTILIZAREŞIÎNTREŢINERE
HR PRIRUČNIKZAUPORABUIODRŽAVANJE
BG РЪКОВОДСТВОЗАУПОТРЕБАИПОДДРЪЖКА
EL ΕΓΧΕΙΡΙΔΙΟΧΡΗΣΗΣΚΑΙΣΥΝΤΗΡΗΣΗΣ
PT MANUAL DE USO E MANUTENÇÃO
LT NAUDOJIMOIRTECHNINĖSPRIEŽIŪROSVADOVAS
LV LIETOŠANASUNTEHNISKĀS
APKOPESROKASGRĀMATA
ET KASUTUS- JA HOOLDUSJUHEND
FV9
Page 2

1
IT
EN
ITALIANO .................................................................................................................................2
ENGLISH ................................................................................................................................12
ESPAÑOL ............................................................................................................................... 22
FRANÇAIS .............................................................................................................................32
DEUTSCH ..............................................................................................................................42
NORSK ...................................................................................................................................52
SVENSKA ...............................................................................................................................62
SUOMI ....................................................................................................................................72
DANSK ...................................................................................................................................82
NEDERLANDS ....................................................................................................................... 92
POLSKI.................................................................................................................................102
ČESKY ................................................................................................................................. 112
SLOVENSKY ........................................................................................................................122
OLASZ ..................................................................................................................................132
SLOVENŠČINA ....................................................................................................................142
ROMÂNĂ ..............................................................................................................................152
HRVATSKI ............................................................................................................................162
ИТАЛИАНСКИ .....................................................................................................................172
ΕΛΛΗΝΙΚΑ............................................................................................................................182
PORTUGUÊS .......................................................................................................................192
LIETUVIŲ .............................................................................................................................202
LATVIEŠU VALODA .............................................................................................................212
EESTI ...................................................................................................................................222
ESDENO SVFIDANLPL FRSKHUSLROHRBGELPTLTLVET CS
Page 3

12
EN
ENGLISH
SYMBOLS USED IN THE MANUAL .................................................................................. 13
PURPOSE AND CONTENT OF THE MANUAL ................................................................. 13
TARGET GROUP ............................................................................................................... 13
STORING THE USE AND MAINTENANCE MANUAL ....................................................... 13
ON DELIVERY OF THE APPLIANCE ................................................................................ 13
INTRODUCTORY COMMENT ........................................................................................... 13
IDENTIFICATION DATA ..................................................................................................... 13
TECHNICAL DESCRIPTION .............................................................................................. 14
INTENDED USE ................................................................................................................. 14
SAFETY .............................................................................................................................. 14
SERIAL NUMBER PLATE .................................................................................................. 14
TECHNICAL DATA .............................................................................................................14
GENERAL SAFETY REGULATIONS ................................................................................. 15
PREPARING TO WORK..................................................................................................... 18
WORK ................................................................................................................................ 18
AT THE END OF THE WORK ............................................................................................ 18
MAINTENANCE ................................................................................................................. 19
TROUBLESHOOTING ....................................................................................................... 19
THE APPLIANCE DOES NOT SWITCH ON ................................................................ 19
DUST COMING OUT DURING VACUUMING .............................................................. 19
THE VACUUM CAPACITY IS INSUFFICIENT.............................................................. 19
DISPOSAL .......................................................................................................................... 20
CHOOSING AND USING THE ACCESSORIES ................................................................ 20
EC DECLARATION OF CONFORMITY ............................................................................. 21
CONTENTS
Page 4
13
EN
Covered place symbol:
the operations preceded by this symbol must always be carried out in a dry, covered area.
Open book symbol with an "i"
Indicates the need to consult the instruction manual.
The descriptions contained in this document are not binding. The company therefore reserves the right to make any modications at any time
to elements, details, or accessory supply, as considered necessary for reasons of improvement or manufacturing/commercial requirements.
The reproduction, even partial, of the text and drawings contained in this document is prohibited by law.
The company reserves the right to make any technical and/or supply modications. The images are shown as a reference only, and
are not binding as to the actual design and/or equipment.
Open book symbol:
Tells the operator to read the manual before using the appliance.
Disposal symbol:
carefully read the sections marked with this symbol for disposing of the appliance.
IDENTIFICATION DATA
For technical assistance or to request replacement parts, always
give the model, the version and serial number written on the serial
number plate.
PURPOSE AND CONTENT OF THE MANUAL
SYMBOLS USED IN THE MANUAL
TARGET GROUP
STORING THE USE AND MAINTENANCE MANUAL
ON DELIVERY OF THE APPLIANCE
INTRODUCTORY COMMENT
The aim of this manual is to provide customers with all the information
needed to use the appliance in the safest, most appropriate and
most autonomous way. It includes information concerning technical
aspects, safety, operation, appliance downtime, maintenance, spare
parts and scrapping. Operators and qualied technicians must read
This manual is aimed at operators and qualied technicians
responsible for appliance maintenance. Operators must not perform
operations that should be carried out by qualied technicians. FIMAP
The Use and Maintenance Manual must be stored in its special
pouch close to the appliance, protected from liquids and anything
When the machine is delivered to the customer, an immediate
check must be performed to ensure all the material mentioned in
the shipping documents has been received, in addition to verifying
that the equipment has not been damaged during transportation. If
Any type of equipment can only work properly and effectively if used
correctly and kept in full working order by performing the maintenance
operations described in the attached documentation. You should
therefore read this instruction manual carefully, consulting it again
if issues arise while using the machine. If necessary, remember that
the instructions in this manual carefully before carrying out any
operation on the appliance. If in doubt about the correct interpretation
of instructions, contact your nearest Customer Service Centre to
obtain the necessary clarications.
SpA cannot be held liable for damages resulting from failure to
comply with this prohibition.
else that could compromise its legibility.
this is the case, the carrier must ascertain the extent of the damage
at once, informing our customer service ofce. It is only by prompt
action of this type that the missing material can be obtained, and
compensation for damage successfully claimed.
our assistance service (organised in collaboration with our dealers)
is always available for advice or direct intervention.
Page 5
14
EN
TECHNICAL DESCRIPTION
INTENDED USE
SAFETY
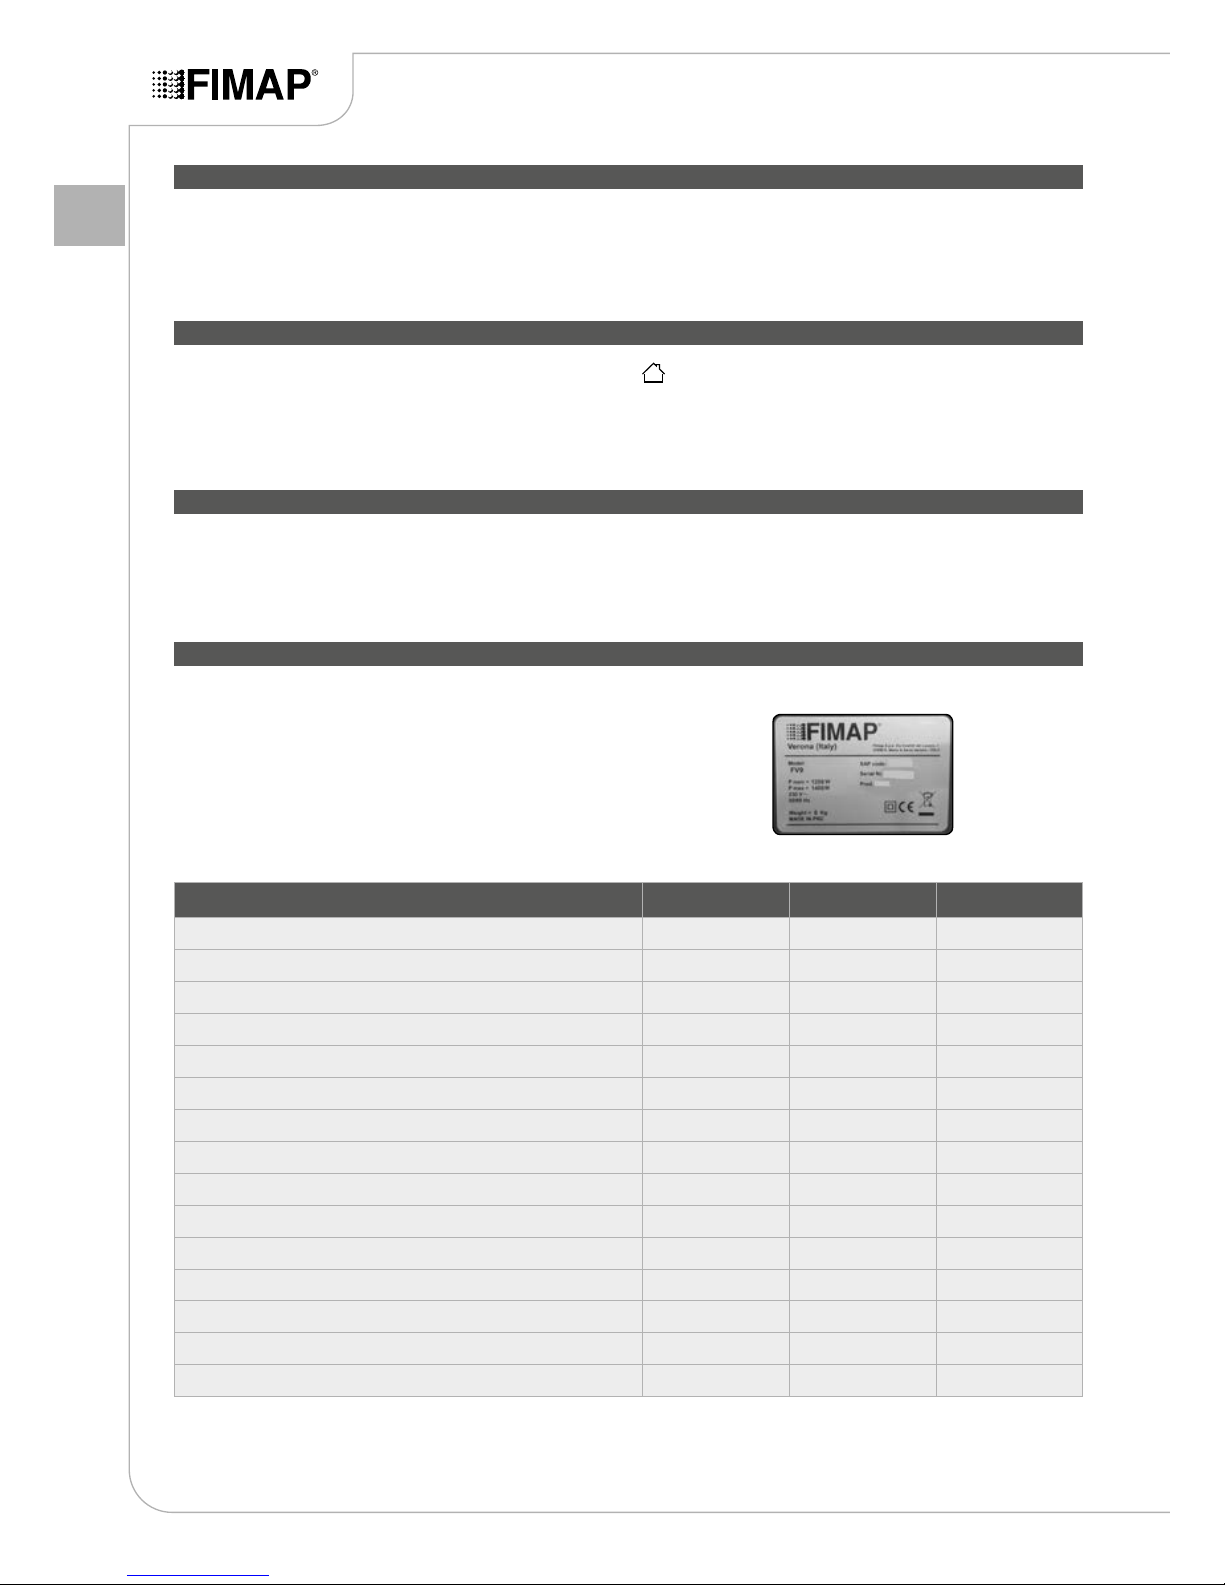
SERIAL NUMBER PLATE
The FV9 is a vacuum cleaner which uses the vacuum created in
the collection tank by the fan (enabled by the electric motor) to pick
up dust and dry solid elements measuring up to 2cm at ambient
temperature, as the accessories brush against the oor and
This appliance is designed and built to be used by a qualied
operator to clean (by vacuuming solid, dry elements) smooth,
compactooringinthecommercial,residentialandindustrialsectors,
in proven safety conditions.
Operator cooperation is paramount for accident prevention. No
accident prevention programme can be effective without the full
co-operation of the operator who is directly responsible for machine
operation. The majority of occupational accidents that happen both
in the workplace or whilst moving are caused by failure to respect
The serial number plate is located at the rear of the vacuum
cleaner, and indicates the general characteristics of the appliance,
in particular the appliance's serial number. The serial number is a
very important piece of information and should always be provided
together with any request for assistance or to purchase spare parts.
The appliance is only suitable for use in indoor - or at least
covered - areas. The appliance is not suitable for use in the
rain, or under jets of water.
IT IS FORBIDDEN to use the appliance for picking up dangerous
dustsorinammableliquidsinplaceswithanexplosiveatmosphere.
In addition, it is not suitable as a means of transport for people or
objects.
the most basic safety rules. An attentive, careful operator is most
effective guarantee against accidents and is fundamental in order to
implement any prevention programme.
furnishings. The vacuum hose channels the air into the collection
tank, where the dust and solid residues are trapped by lters. The
appliance must only be used for this purpose.
TECHNICAL DATA UM FV9 230V FV9 110V
Power supply voltage V 230 110
Frequency Hz 60 50
Rated power W 1200 1200
Type of vacuum cleaner Dry Dry
Number of vacuum motors 1 1
Vacuum kPa 21 21
Air ow rate m3/h 114 114
Collection tank capacity l 4 4
Barrel material Polyethylene Polyethylene
Length of power supply cable m 15 15
Dry weight kg 7 7
Dimensions (L x H x W) cm 25x57x23 25x57x23
Accessories diameter mm 35 35
Sound pressure level (ISO 11201) dB (A) 72 72
Uncertainty KpA dB (A) 2 2
Page 6

15
EN
The regulations below must be
carefully followed in order to
avoid harm to the operator and
damage to the appliance.
WARNING:
• Carefully read the warnings
contained in this booklet
and take care of it for further
consultations.
• Since the packaging elements
(plastic bags, staples, etc.) are
a source of danger they should
not be left within the reach of
children, disabled persons, etc.
• This appliance should only use
for the purpose for which it was
constructed, namely: cleaning
inert surfaces, the aspiration of
solid non-ammable and non-
explosive substances. Any other
use is considered incorrect and
hence dangerous.
• When the appliance is operating
do not bring it close to delicate
organs like ears, mouth, eyes,
etc.
• This appliance should
not be used by people
(including children) with
physical, sensory or mental
disabilities, or by people with
little experience or know-how,
unless they are controlled
or have been instructed in
the use of the appliance by
people responsible for their
safety. Children must be
supervised to ensure they do
not play with the appliance.
• Carefully read the labels on the
appliance. Do not cover them
for any reason and replace them
immediately if they become
damaged.
• The appliance must be only
used by authorised, trained
personnel.
• The appliance is not suitable
for cleaning rough or uneven
oors. Do not use the appliance
on slopes.
• It is necessary to make sure that
the power supply cable or the
extension cable do not suffer
any damage caused by the
vehicle wheels when moving,
by crushing, tearing or the like.
Protect the cable from heat, oil
and sharp edges. Regularly
check the power cable for any
damage such as the formation
of cracks, or ageing. If you
notice any damage, the cable
must be replaced before using
the machine. If you notice any
damage to the power cable,
contact an authorised technical
assistance centre immediately.
• In the event of danger,
immediately remove the plug
from the mains socket.
• For maintenance work, switch
off the appliance using the main
GENERAL SAFETY REGULATIONS
Page 7

16
EN
switch and remove the power
cable plug from the main switch.
• When using the appliance, pay
attention to other people and
especially to children.
• Only use the accessories
supplied with the appliance or
those specied in the instruction
manual, the use of other
accessories can compromise
the safety of the appliance.
• When the appliance is not
being used, it should not be
left connected to the mains
power supply. Before doing
any maintenance work on the
appliance pull out the plug from
the mains. Do not immerse the
appliance in water, do not use
solvents. The manufacturer
cannot be held liable for any
damage to persons, animal or
objects deriving from improper
and unreasonable use, and in
any event not complying with
the instructions mentioned
above. For scrapping, follow
the regulations in force in the
country. Do not use the vacuum
cleaner with the power cable
twisted around the lid.
• Before connecting the appliance
to the electricity socket, make
sure the electrical information on
the plate corresponds to that of
the mains supply. The appliance
must only be powered with a
voltage equal to that shown on
the serial number plate.
ATTENTION:
• The appliance must not be
used or kept outdoors, in damp
conditions or directly exposed to
rain.
• The storage temperature must
be between -25C and +55C.
• Conditions of use: room
temperature between 0°C and
40°C, with relative humidity
between 30 and 95%.
• The power supply cable outlet
must have an earth connection
in compliance with the regulatory
standards.
• The appliance does not cause
harmful vibrations.
• Never vacuum gas, liquids
or explosive or inammable
powders, nor non-diluted acids
and solvents! These include
gasoline, paint thinners and fuel
oil (which, when mixed with the
vacuum air, can form explosive
vapours or mixtures), and also
non-diluted acids and solvents,
acetones, aluminium and
magnesium powders. These
substances may also corrode
the materials used to construct
the appliance.
• If the appliance is used in
dangerous areas (for example,
gas stations), the relative
safety standards should be
observed. The appliance must
never be used in environments
with a potentially explosive
Page 8

17
EN
atmosphere.
• Do not place any liquid
containers on the appliance.
• In the event of a re, use a
powder extinguisher. Do not use
water.
• Do not knock against shelving
or scaffolding, where there
is a danger of falling objects.
The operator must always be
equipped with the appropriate
safety devices (gloves, shoes,
helmet, goggles, etc.).
• If the appliance does not work
properly, check this is not caused
by failure to carry out routine
maintenance. Otherwise, ask
for intervention of the authorised
technical assistance centre.
• If you need to replace any
components, request the
ORIGINAL spare parts from
an Authorised dealer and/or
Retailer.
• Restore all electrical connections
after any maintenance
interventions.
• Before using the appliance,
check that all the hatches and
covers are positioned as shown
in this Use and Maintenance
Manual. Do not remove the
guards that can only be removed
with the aid of tools, except for
maintenance work (see the
relevant paragraphs).
• Do not wash the appliance
with direct water jets or with
pressurised water, nor with
corrosive substances.
• Have the appliance checked
by an authorised technical
assistance centre every year.
• When disposing of consumable
materials, observe the laws and
regulations in force. When, after
years of valuable work, your
appliance needs to be nally
decommissioned, dispose of
the materials contained in it
appropriately, bearing in mind
that the appliance is made of
fully recyclable materials.
Page 9
18
EN
PREPARING TO WORK
WORK
AT THE END OF THE WORK
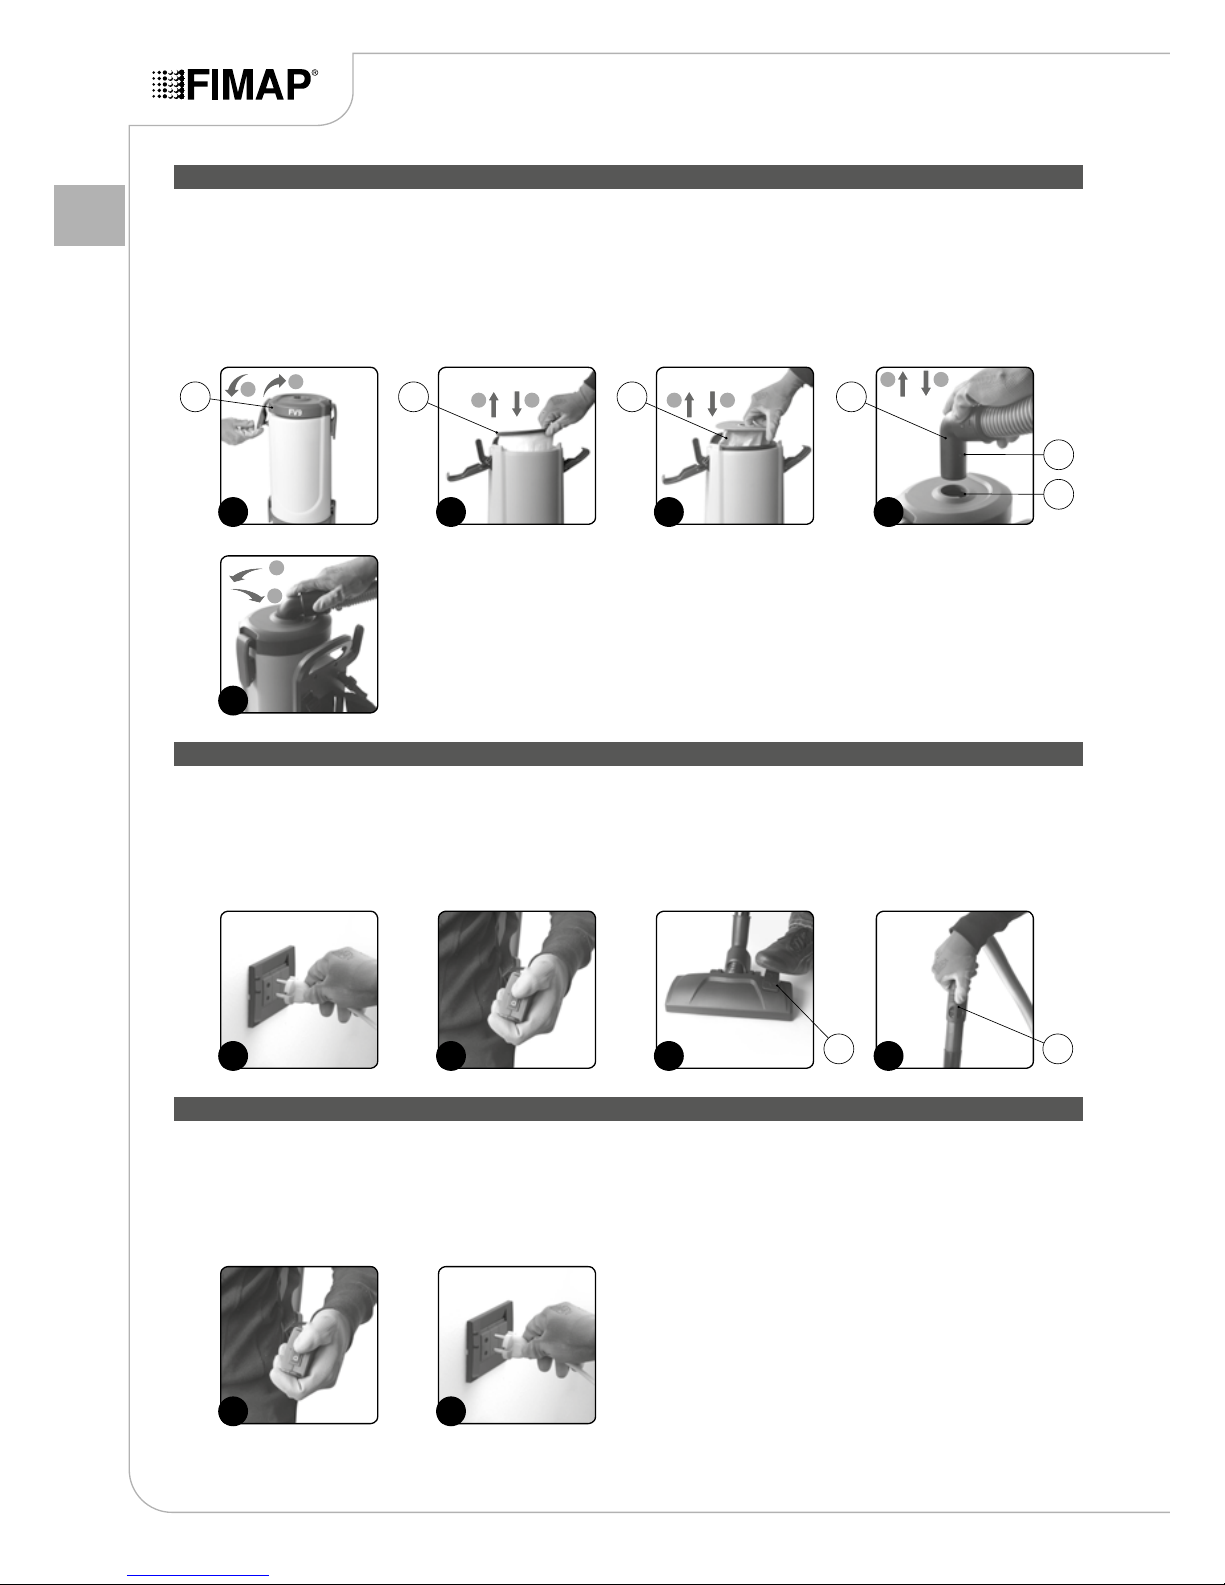
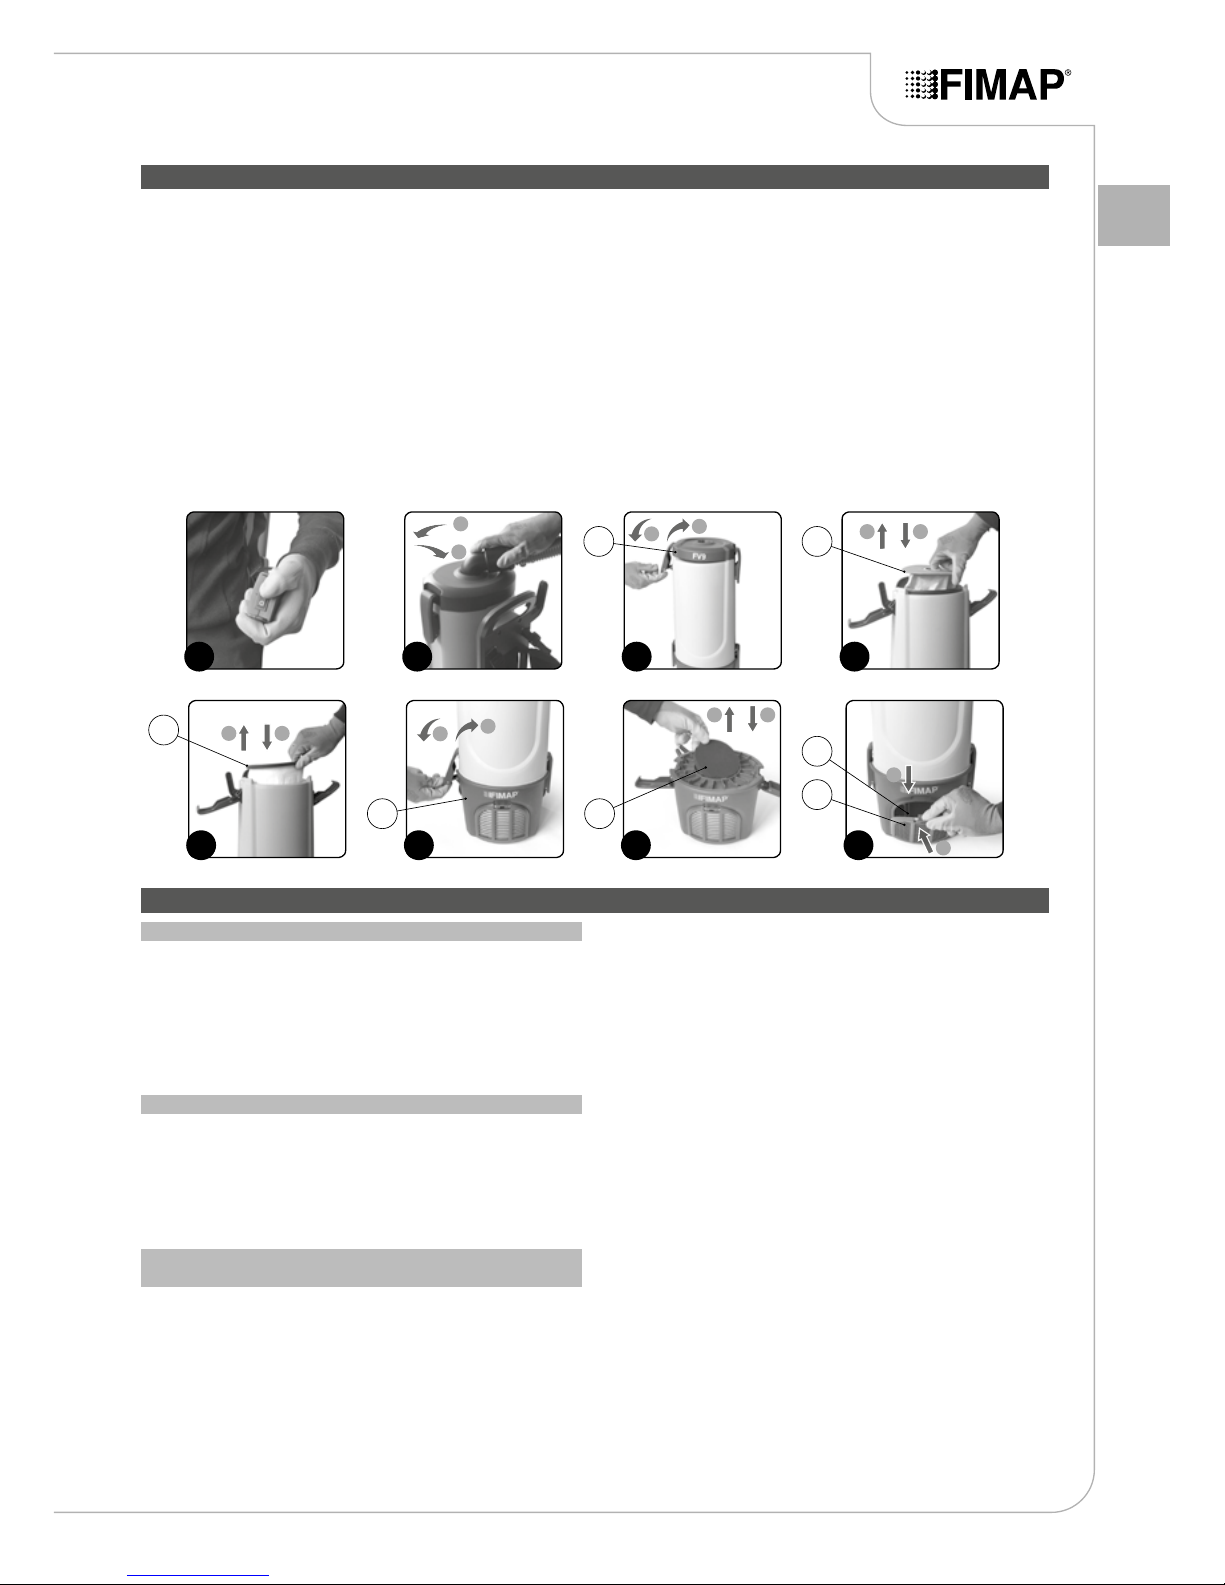
1. Remove the lid (1) from the vacuum tank by releasing the hooks
on the sides of the tank itself (Arrow A in Fig. 1).
2. Check the fabric lter (2) is correctly positioned (Fig. 2)and that
the collection bag (3) is correctly inserted inside it (Fig. 3).
3. Fix the lid on the collection tank (Arrow B in Fig. 1)and lock it in
place with the hooks on the sides of the tank itself.
4. Insert the nozzle (4) on the vacuum hose in the hole on the
vacuum tank lid (Arrow A in Fig. 4), making sure the blocking pin
(5) is correctly inserted in the slot (6) (Fig. 4).
1. Insert the plug of the power supply cable in the mains socket
(Fig.6).
2. Switch on the machine by bringing the main switch to “I” (Fig.7).
3. Set the switch (7) in the brush to “HARD SURFACE” or “CARPET”
(Fig. 8).
4. Proceed with the vacuuming.
1. Switch off the machine by bringing the main switch to “0” (Fig.10).
2. Pull the power cable plug out of the mains socket. To avoid
damaging the power cable, disconnect the plug from the mains
socket by pulling directly on the plug rather than on the cable
(Fig. 11).
3. Take the appliance to the designated place for emptying the tank.
4. Position the appliance on a at surface in an enclosed place;
5. Hook the vacuum nozzle to the lid by rotating it clockwise (Arrow
A in Fig. 5).
6. Select the accessory and extension most suitable for the task to
be carried out. Insert the extension and accessory in the vacuum
hose.
If the vacuuming capacity is excessive, shift the lever (8) on the
vacuum hose handle (Fig. 9)while the accessory is in contact with
the oor.
there must be no objects near the appliance that could either
damage it, or be damaged through contact with it. If you decide
to hang the appliance on supports, make sure they are able to
sustain its volume and weight.
1
6
10
5
2
7
11
3
8
4
9
A
B
A
A A
A
B B
B
B
1 2 3 4
5
6
7 8
Page 10
19
EN
MAINTENANCE
1. Make sure the main switch is in the "0" position; if it isn't, press
the button (Fig. 12).
2. Remove the vacuum nozzle from the lid by rotating it anti-
clockwise (Arrow B in Fig. 13).
3. Remove the lid (1) from the vacuum tank by releasing the hooks
on the sides of the tank itself (Arrow A in Fig. 14).
4. If necessary, replace the collection bag (3) (Arrow A in Fig. 15).
5. Remove the fabric lter (2) from the appliance (Arrow A in Fig.
16)and clean it with neutral detergent and warm water (attention:
wait for it to dry before putting it back in the appliance).
6. Place the lid (1) on the vacuum tank (Arrow B in Fig. 14) and
x it in place by means of the hooks on the sides of tank itself.
7. Remove the vacuum motor support (9) from the appliance by
releasing the hooks on the sides of the tank itself (Arrow B in
Fig. 17).
8. Remove the vacuum motor lter (10) from the appliance (Arrow
A in Fig. 18)and clean it with neutral detergent and warm water
(attention: wait for it to dry before putting it back in the appliance).
9. Place the vacuum motor support (9) below the vacuum tank and
x it in place by means of the hooks on the sides of tank itself
(Arrow A in Fig. 17).
10. Remove the protection grille (11) from the front of the tank (Arrow
A in Fig. 19).
11. Remove the exhaust air lter (12) from the appliance and clean
it with neutral detergent and warm water (attention: wait for it to
dry before putting it back in the appliance).
Place the protection grille on the front of the appliance and push it to
x it to the tank (Arrow B in Fig. 19).
TROUBLESHOOTING
Iftheappliancedoesnotswitchon,proceedasfollows:
1. Place the main switch on “I”.
2. Check the plug on the power cable of the appliance has been
well inserted in the mains socket. If it hasn't, connect it properly.
3. Make sure that the electrical specications of the appliance
correspond to the electrical specicationsofthe power supply
network, check the technical information on the serial number
plate.
If dust emerges while you are using the appliance, check the
following:
1. Check the vacuum hose is properly connected to the nozzle on
the collection tank lid (if it isn't, insert it correctly).
2. Check that the vacuum hose is connected properly to the
accessory that is being used, if it is disconnected, connect it
Ifthevacuumcapacityisinsufcient,proceedasfollows:
1. Check the vacuum hose is properly connected to the nozzle on
the collection tank lid (if it isn't, insert it correctly).
2. Check that the vacuum hose is connected properly to the
accessory that is being used, if it is disconnected, connect it
correctly.
3. Check that there is nothing obstructing the vacuum hose, if there
is, remove it.
4. Check that there is nothing obstructing the vacuum chamber of
the accessory being used, if there is, remove it.
5. Make sure the collection bag isn't full (replace it if necessary).
THE APPLIANCE DOES NOT SWITCH ON
DUST COMING OUT DURING VACUUMING
THE VACUUM CAPACITY IS INSUFFICIENT
4. Make sure the power cable isn't damaged. If it isn't in perfect
condition, do not use the appliance and contact an authorised
assistance centre immediately.
correctly.
3. Make sure the collection bag isn't full (replace it if necessary).
4. Check the collection bag is correctly positioned.
5. Check that the collection tank lid is properly positioned.
6. Makesurethefabriclterisn'tdirtyordamaged(cleanorreplace
it as necessary).
7. Makesurethevacuummotorlterisn'tdirtyordamaged(cleanor
replace it as necessary).
8. Makesure theexhaustairlterisn't dirtyordamaged(cleanor
replace it as necessary).
9. Check that the collection tank lid is properly positioned.
12
17 18 19
14 15
A
A
A
A
A
B
B
B
B
B
1 3
12
11
16
A B
2
9 10
13
B
A
Page 11
20
EN
To dispose of the appliance, take it to a demolition centre or an
authorised collection centre.
Before scrapping the machine, it is necessary to remove and
separate out the following materials, then send them to the
appropriate collection centres in accordance with the environmental
hygiene regulations currently in force:
• Felt
• Electric and electronic parts*
• Plastic parts
• Metallic parts
(*) In particular, contact your local distributor when scrapping electric
and electronic parts.
DISPOSAL
CHOOSING AND USING THE ACCESSORIES
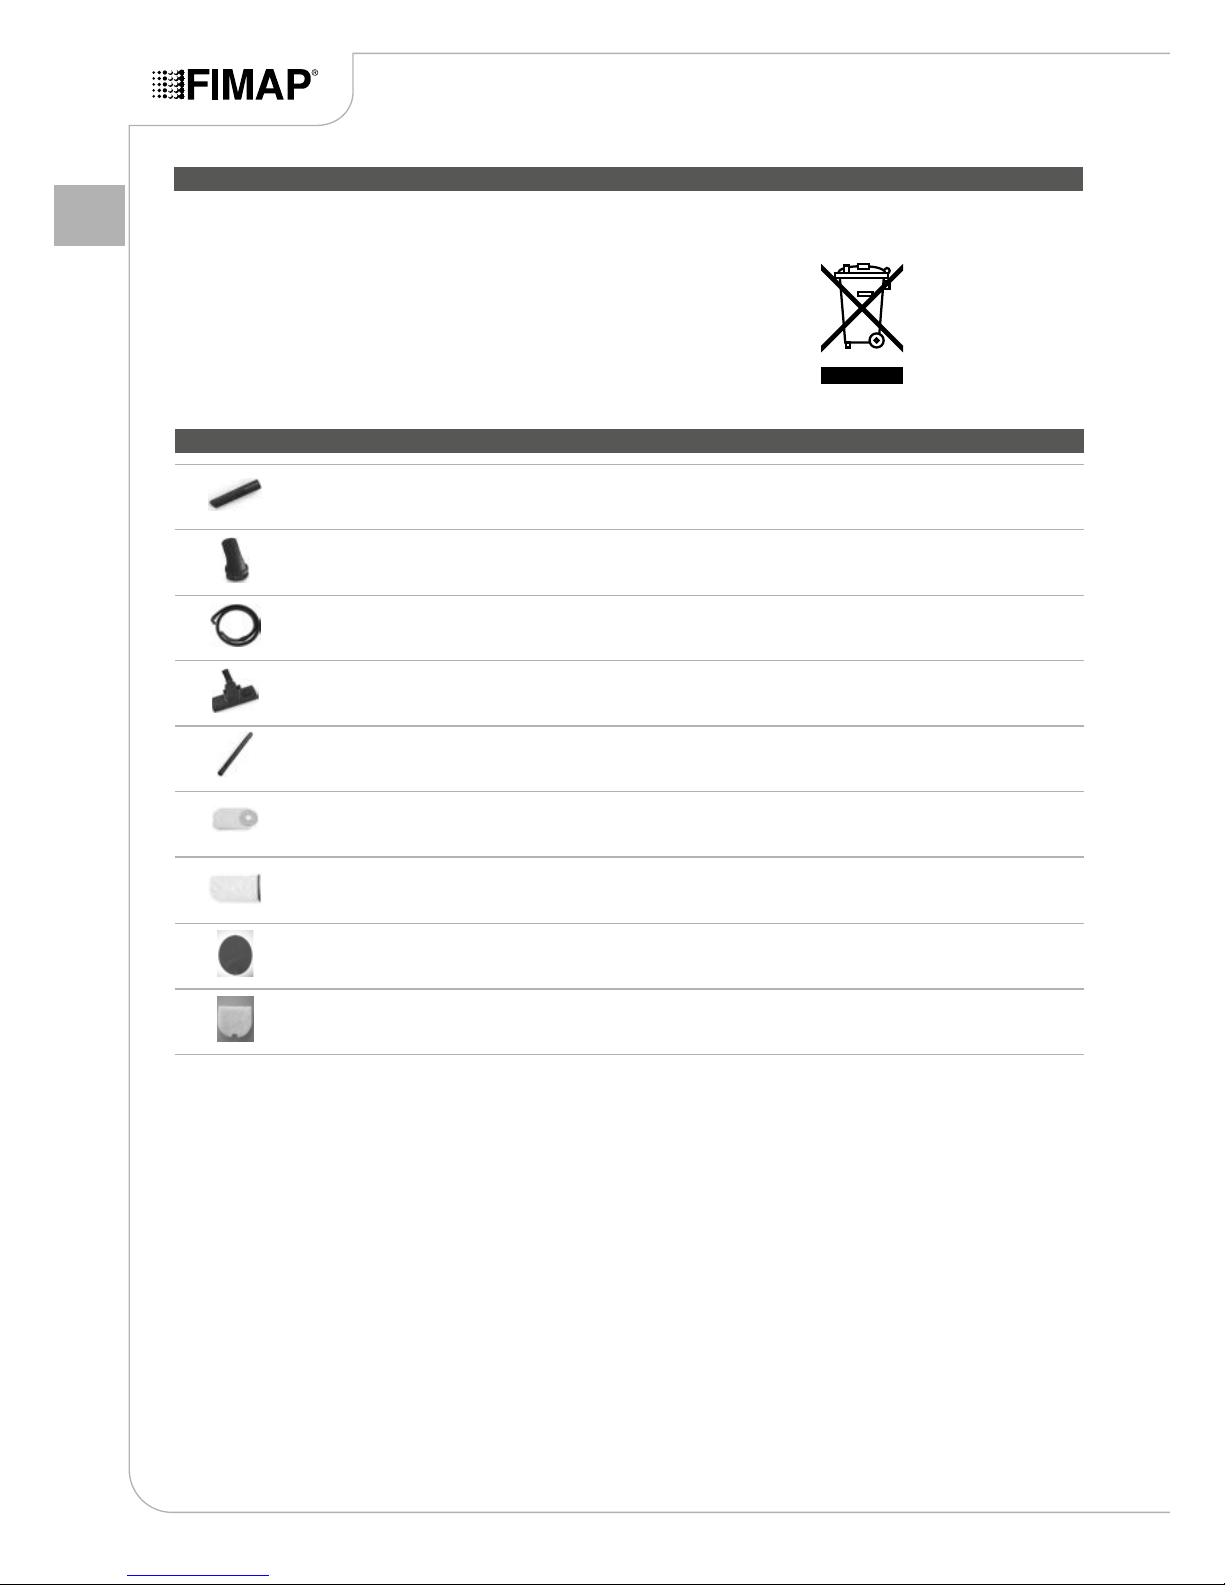
Brush with bristles:
for vacuuming solid waste on hard or soft surfaces.
Flexible vacuum hose:
for connecting the extensions to the collection tank.
Exhaust air lter:
used to purify the air and safeguard the health of the operator and other people nearby.
Flat lance:
when you need to vacuum in ssures or very narrow gaps.
Fabric lter:
for collecting dry solid waste. It must always be used.
Paper lter/collection bag (disposable):
for collecting solid waste. Facilitates waste disposal.
Brush with bristles:
for removing solid waste from surfaces where you want to not only vacuum but also dust.
Vacuum motor lter:
used to purify the air and safeguard the health of the operator and other people nearby.
Plastic extensions:
a pair of plastic pipes for supporting the accessories and control handles. Ideal for vacuuming on vertical or high surfaces.
Page 12
21
EN
The undersigned manufacturer:
FIMAP S.p.A.
Via Invalidi del Lavoro n.1
37059 Santa Maria di Zevio (VR)
declares under its sole responsibility that the products
VACUUM CLEANERS mod. FV9 230V – FV9 110V
comply with the requirements of the following Directives:
• 2004/108/EC EMC
• 2006/42/EC MD
• 2011/65/UE RoHS
• 2009/125/EC Ecodesign
• 2013/666/EU Ecodesign for vacuum
They also comply with the following standards:
• EN 60335-1: Household and similar electrical appliances - Safety.
Part 1: Generic standards.
• EN 60335-2-69. Safety of household and similar electrical
appliances - Part 2: Particular regulations for wet and dry oor
cleaning appliances, including motor-equipped brushes, for
industrial and commercial use
• EN 61000-3-2: Electromagnetic compatibility (EMC) - Part 3-2:
Limits – Limits for harmonic current emissions (equipment with
input current <= 16 A per phase)
• EN 61000-3-3: Electromagnetic compatibility (EMC) - Part 3-3:
Limits – Restriction of voltage variations,voltage uctuations and
icker in low voltage power supply systems for devices with a
rated current <= 16 per phase and not subject to conditional
connection
EC DECLARATION OF CONFORMITY
• EN 55014-1: Electromagnetic compatibility - Regulations for
household appliances, electrical devices and similar equipment
- Part 1: Emission
• EN 55014-2: Electromagnetic compatibility - Requirements for
household appliances, electrical devices and similar equipment
- Part 2: Immunity - Regulation for product family
• EN 62233: Household and similar electrical appliances -
Electromagnetic elds - Methods for evaluation and measurement
The person authorised to compile the technical le:
Mr. Giancarlo Ruffo
Via Invalidi del Lavoro n.1
37059 Santa Maria di Zevio (VR) - ITALY
Santa Maria di Zevio, 06/10/2014
FIMAP S.p.A.
Legal representative
Giancarlo Ruffo
 Loading...