

Page 1
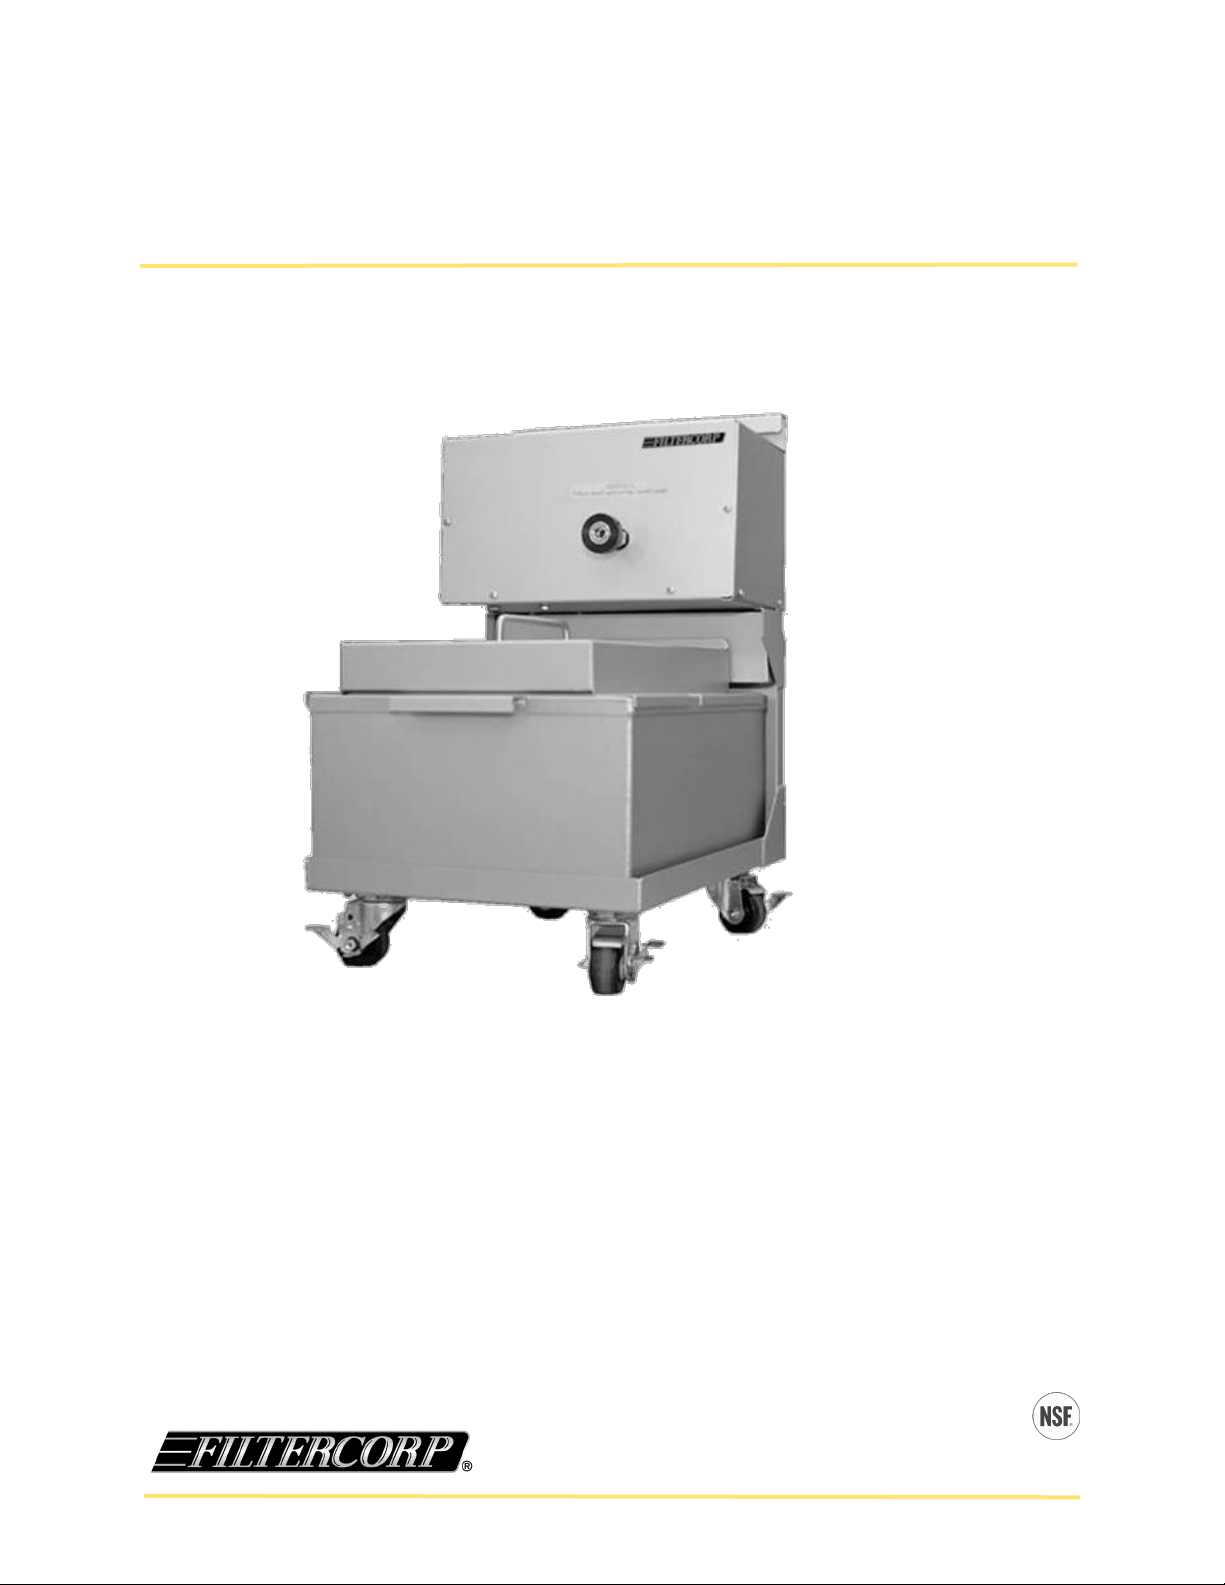
MODEL LSMODEL LSMODEL LS
ANODIZED ALUMINIUM PORTABLE VACUUM FILTER MACHINEANODIZED ALUMINIUM PORTABLE VACUUM FILTER MACHINEANODIZED ALUMINIUM PORTABLE VACUUM FILTER MACHINE
Getting even more from your frying program
-
-1 1 1 SERIESSERIESSERIES
-
USER MANUAL
Anodized Aluminum
MODELS: LS-1-60
LS-1-100
Retain this manual for future reference.
Innovative • Convenient • Reliable
FILTERCORP • 9805 NE 116th Street, PMB A200 • Kirkland, WA 98034 • Phone: 800 -473-4526 • Fax: 425-820-2816 • www.filtercorp.com
SM
Page 2

TO OUR VALUED CUSTOMERSTO OUR VALUED CUSTOMERSTO OUR VALUED CUSTOMERS
Thank you for purchasing a Filtercorp portable cooking oil filter. Filtercorp is a
leading manufacturer of premium quality cooking oil filter equipment. We are proud
of our reputation for quality and our commitment to customer satisfaction.
To get the maximum benefit this equipment can deliver, please read this User Manual
and Instruction Sheet and watch the FRYING OIL MANAGEMENT DVD that was
included with this appliance. Ensure anyone using this equipment is familiar with
the information in this Manual and Instruction sheet and in the DVD.
We are here to help support you should you need help. Our technical support center is
staffed by experienced technicians eager to help you. Our Customer Service
number is (800)473-4526, and we are available 8:00 am (pst) to 4:00 pm (pst).
Sincerely,
Robin D. Bernard
President
Innovative • Convenient • Reliable
FILTERCORP • 9805 NE 116th Street, PMB A200 • Kirkland, WA 98034 • Phone: 800 -473-4526 • Fax: 425-820-2816 • www.filtercorp.com
SM
Page 3

TABLE OF CONTENTS TABLE OF CONTENTS TABLE OF CONTENTS
–
–User manualUser manualUser manual
–
Introduction Page 4
Description & Construction Page 5
Safety & Installation Page 6
Operating Instructions Page 7-8
Frying Oil Maintenance Page 9
Equipment Specifications Page 10
Dimensions & Detail Drawings Page 11-12
Troubleshooting Page 13
Frying Oil Accessories/Safety Equipment Page 14
Limited Warranty Page 15
Warranty Registration Page 16
Innovative • Convenient • Reliable
FILTERCORP • 9805 NE 116th Street, PMB A200 • Kirkland, WA 98034 • Phone: 800 -473-4526 • Fax: 425-820-2816 • www.filtercorp.com
SM
Page 4

INTRODUCTIONINTRODUCTIONINTRODUCTION
Please read all sections of this manual and retain for future reference.
The LS-1 Portable Filter is designed to remove food and other solids from the
cooking oil used in your deep fat fryer.
For best results use SuperSorb®CarbonPads.
The LS-1 Filter rolls easily for use wherever it is needed and can easily be stored
out of the way. The low profile allows the unit to roll directly under the drain
valve outlet extension pipe on the fryer. This design makes it easier to drain the
fryer.
! ATTENTION
This product has been certified as commercial cooking equipment and is
intended for professional use only and is to be operated by qualified
personnel only.
A Filtercorp Authorized Service Center (FASC) should perform maintenance
and repairs. Installation or repairs by unqualified personnel may void the
manufacturer’s warranty.
! WARNING
Improper installation, adjustment, alteration, and/or maintenance can cause
property damage, injury or death. Read the installation, operating and maintenance instructions thoroughly before installing, servicing or troubleshooting
this equipment.
Do not use LS-1 Filter to transport hot cooking oil to discard storage.
! NOTICE
If, during the warranty period, the customer uses a part for this Filtercorp
equipment other than an unmodified new or recycled part purchased directly
from Filtercorp, or any of its Authorized Service Centers, and/or the part being
used is modified from its original configuration, this warranty will be void.
Further, Filtercorp and its affiliates will not be liable for any claims, damages or expenses incurred by the customer which arise directly or indirectly,
in whole or in part, due to the installation of any modified part and/or part received from an unauthorized service center.
If, during this warranty period, the customer uses this equipment for purposes other than to filter cooking oil, this warranty will be void.
Innovative • Convenient • Reliable
FILTERCORP • 9805 NE 116th Street, PMB A200 • Kirkland, WA 98034 • Phone: 800 -473-4526 • Fax: 425-820-2816 • www.filtercorp.com
SM
Page 5

DESCRIPTION & CONSTRUCTIONDESCRIPTION & CONSTRUCTIONDESCRIPTION & CONSTRUCTION
The LS-1 is a portable filter machine for filtering hot cooking oil in the restaurant
industry. The LS-1 comes in two sizes – the LS-1-60 with a 60 lb. oil capacity and
the LS-1-100 with a 100 lb. oil capacity. It has been designed to utilize Filtercorp’s
SuperSorb® CarbonPad.
The SuperSorb® CarbonPad is widely acknowledged to be the finest filtration
system for cooking oils, giving the operator significant savings in oil usage and the
best food quality results.
The LS-1 includes features to make the filtration of hot cooking oil as easy and effective as possible. Included are a removable pan for ease of clean up and a sturdy
frame for long life and durability.
Frame Anodized Aluminum Construction
Pan Welded Anodized Aluminum construction with integrated
handles for easy removal and cleaning.
Motor Rugged 1/3 Horsepower UL and NSF approved motor and
gear pump designed for long life.
Electrical Controls All electrical controls are UL approved and designed to give
reliable performance.
Hoses Half inch diameter, Teflon lined, covered hoses having UL and
NSF approvals.
Nozzle Filtercorp’s uniquely designed stainless nozzle is designed to
reduce splashing while providing a spray that helps in washing
the walls of the fryer during filtering.
Innovative • Convenient • Reliable
FILTERCORP • 9805 NE 116th Street, PMB A200 • Kirkland, WA 98034 • Phone: 800 -473-4526 • Fax: 425-820-2816 • www.filtercorp.com
SM
Page 6

SAFETY & INSTALLATIONSAFETY & INSTALLATIONSAFETY & INSTALLATION
Product SafetyProduct Safety
Safety is of utmost importance when working with heated cooking oils. Throughout
this manual you will see the word WARNING which means there is potential danger
of equipment damage or personal injury.
Read all instructions thoroughly before installing or operating this equipment.
Inspection and SetupInspection and Setup
1. Your LS-1 will arrive crated for shipping.
2. Before removing the LS-1 from the crate, inspect the crate for damage.
If damage is seen, please contact the delivering carrier.
3. After inspecting, remove the LS-1 from the crate. You will find that the filter is
already completely assembled. Simply hook up the hoses and plug in the
electrical cord.
4. Check to make sure the following items are included in the crate:
Return hose assembly
Unifit (pad-holder) assembly
Carton of 10-day supply SuperSorb
12-foot, 110 v, 3-prong electrical power cord
Frying Oil Management DVD
3” pad scraper
Monthly Frying Oil Log (Wall Chart)
Frying Oil Maintenance Tips
5. You are now ready to filter. WARNING – Always follow the operating
instructions in this manual when operating the filter.
Note: The LS-1 is equipped with a 12-foot oil-proof electrical power cord with
ground. WARNING – This ground is to protect the operator from electrical
shock in the event of an equipment malfunction. DO NOT remove or tamper
with the ground feature!
®
CarbonPads
Innovative • Convenient • Reliable
FILTERCORP • 9805 NE 116th Street, PMB A200 • Kirkland, WA 98034 • Phone: 800 -473-4526 • Fax: 425-820-2816 • www.filtercorp.com
SM
Page 7

OPERATING INSTRUCTIONSOPERATING INSTRUCTIONSOPERATING INSTRUCTIONS
The LS-1 has been designed to operate very simply. It is designed as a one-way filter
having a simple on/off switch to engage the motor. The quick-disconnect fitting allows
for only one-way hook up of hoses.
1. Put a SuperSorb®CarbonPad into the Unifit® PadHolder. (The Frying Oil Man-
agement DVD shows step by step installation) Place the Unifit® PadHolder into
the bottom of the filter pan. WARNING – Always wear splash goggles or face
shield, protective gloves, and appropriate protective safety wear. (See Accessory Section of this manual).
2. Check fryer vat capacity and oil volume to ensure cooking oil does not overfill the
pan. WARNING – The LS-1-60 can hold 60 lbs of cooking oil and the LS-1-
100 can hold 100 lbs of cooking oil. Do Not try to filter a fryer with a larger
capacity than the LS-1 Filter.
3. Attach the drain extension of the fryer to the fryer drain. WARNING – The end
of the drain as well as other parts of the fryer and filter may be hot! Use
protective gloves.
4. Roll the LS-1 to the fryer; making sure the fryer drain extension drains into the
pan. WARNING – Always position the filter so that the filter pan is in the
proper position beneath the drain. This will prevent heated cooking oil
from splashing on the floor. Plug in the LS-1 electrical cord.
5. Open the fryer drain valve slowly, draining the cooking oil from the fryer into the
filter pan.
6. Make sure the return hose is hooked up and the nozzle is placed into the fryer.
Push the on/off switch to “on” position.
7. As the cooking oil is filtered through the SuperSorb® CarbonPad and returned
to the fryer, use the nozzle with returning oil to wash down the sides of the fryer.
Innovative • Convenient • Reliable
FILTERCORP • 9805 NE 116th Street, PMB A200 • Kirkland, WA 98034 • Phone: 800 -473-4526 • Fax: 425-820-2816 • www.filtercorp.com
SM
Page 8

OPERATING INSTRUCTIONS (cont.)OPERATING INSTRUCTIONS (cont.)OPERATING INSTRUCTIONS (cont.)
8. Once the sides of the fryer are washed down and the bottom of the fryer is clean
of all food debris, close the fryer drain valve. Pump all remaining oil from the
LS-1 filter back into the fryer. Push the on/off switch to the off position.
WARNING – Never attempt to remove or disconnect hoses when the filter
motor is operating.
9. Filter cycle is now complete. Move to the next fryer vat and repeat the process
– Steps 2 – 8.
10. When finished with filtering the final fryer vat, continue to pump a small amount
of air through the pump/motor assembly to ensure cooking oil is not left in the
hoses or pump.
11. Cleaning (CAUTION—Wait for Filter to cool before cleaning!):
Unplug the main power cord
Disconnect inlet suction tube at lower quick-disconnect ring
Remove unifit pad holder assembly
Discard used CarbonPad into trash bin
Disconnect the return hose from upper quick-disconnect ring
Prior to storing hose drain excess cooking oil from hose by holding nozzle
of filter hose over fryer and lifting opposite end of return hose
Clean the inside of the pan and wipe dry. CAUTION—During cleaning
DO NOT pump water with the filter pump.
Innovative • Convenient • Reliable
FILTERCORP • 9805 NE 116th Street, PMB A200 • Kirkland, WA 98034 • Phone: 800 -473-4526 • Fax: 425-820-2816 • www.filtercorp.com
SM
Page 9

FRYING OIL MAINTENANCEFRYING OIL MAINTENANCEFRYING OIL MAINTENANCE
Cooking
1. Cooking temperature not to exceed 360F/185C. Preferably less than 350F/175C.
2. Never turn fryer temperature up, before or during a busy period.
3. Turn fryers down or off when not in use. Cover fryers not in use.
4. Never load baskets over a fryer. Never salt food over a fryer.
5. Cook similar foods in the same fryer and separate food types if possible.
6. Skim the fryers often.
7. Add make-up oil often. Do not allow the fryer to be under-filled. Do not over-fill
fryers.
8. Never cascade, or downstream oil. Never add old cooking oil to new cooking oil.
Filtering
1. Filter each and every day. (Each day of filtering missed, cuts 1 to 2 days of oil-life.)
2. Use a new SuperSorb® CarbonPad each day.
3. It is preferable to filter at the close of business, or after peak periods.
4. Ensure that no water is in the filter pan before inserting a SuperSorb® CarbonPad.
5. Turn fryer off, however, filter while cooking oil is still hot (not less than 280° F).
6. If there are multiple fryers being used, filter the newest cooking oil first, oldest
cooking oil last.
7. After draining cooking oil into the filter, wait 2-3 minutes before turning on the
pump. Use this time to clean the fryer. Use the LS-1 return hose to rinse debris
from the fryer.
8. After rinsing the fryer check to make sure fry pot is clean of all debris. Then close
the drain valve and re-fill fryer.
9. After filtering, allow filter to cool, then clean the filter pan, but never use soap.
Avoid kinking the hoses. Dry completely before setting up with a new SuperSorb®
CarbonPad.
Discarding
1. Discard only on the basis of a quality standard. Food quality is the best quality
index, but test kits that have been evaluated against food quality may be used.
2. If there are multiple fryers being used, discard only the fry pot that misses the
quality mark.
3. Discard cooking oil on a quality standard, not operational ease or by the day of the
week.
4. Have a manager or a trained person make the discard decision
Innovative • Convenient • Reliable
FILTERCORP • 9805 NE 116th Street, PMB A200 • Kirkland, WA 98034 • Phone: 800 -473-4526 • Fax: 425-820-2816 • www.filtercorp.com
SM
Page 10

EQUIPMENT SPECIFICATIONSEQUIPMENT SPECIFICATIONSEQUIPMENT SPECIFICATIONS
Dimensions for LS-1-60
Weight
Overall Dimensions
Pan Height
Total Pan Capacity
Oil Capacity
Pump/Motor
Electrical Plug
Material
Weight
Overall Dimensions
Pan Height
Total Pan Capacity
Pump Motor
Electrical Plug
Material
64 Lbs.
16.75” wide x 23.75” deep x 27.25” high
11.75”
1.63 cubic feet or 12.1 gallons
60 Lbs. of oil or 7.7 gallons
Haight 5E Hot Oil Hub Mount Pump, Capacity: 4.6 GPM at
1750 RPM, 1/3 HP, Capacitor Start, Rotary Gear, Positive Displacement Pump, 115 Volt, 6.2 Amperes, 60-Cycle Motor
Standard 3 wire, 110 Volt Plug-In Cord (12 feet in length)
0.090 Anodized Aluminum
Dimensions for LS-1-100
83.5 Lbs.
16.75” wide x 33.5” deep x 27.25” high
11.75”
2.52 cubic feet or 18.7 gallons
115 Lbs. of oil or 14.7 gallons
Haight 5E Hot Oil Hub Mount Pump, Capacity: 4.6 GPM at
1750 RPM, 1/3 HP, Capacitor Start, Rotary Gear, Positive
Displacement Pump, 115 volt, 6.2 Amperes, 60-Cycle Motor
Standard 3 wire, 110 Volt Plug-In Cord (12 feet in length)
0.090 Anodized Aluminum
Innovative • Convenient • Reliable
FILTERCORP • 9805 NE 116th Street, PMB A200 • Kirkland, WA 98034 • Phone: 800 -473-4526 • Fax: 425-820-2816 • www.filtercorp.com
SM
Page 11
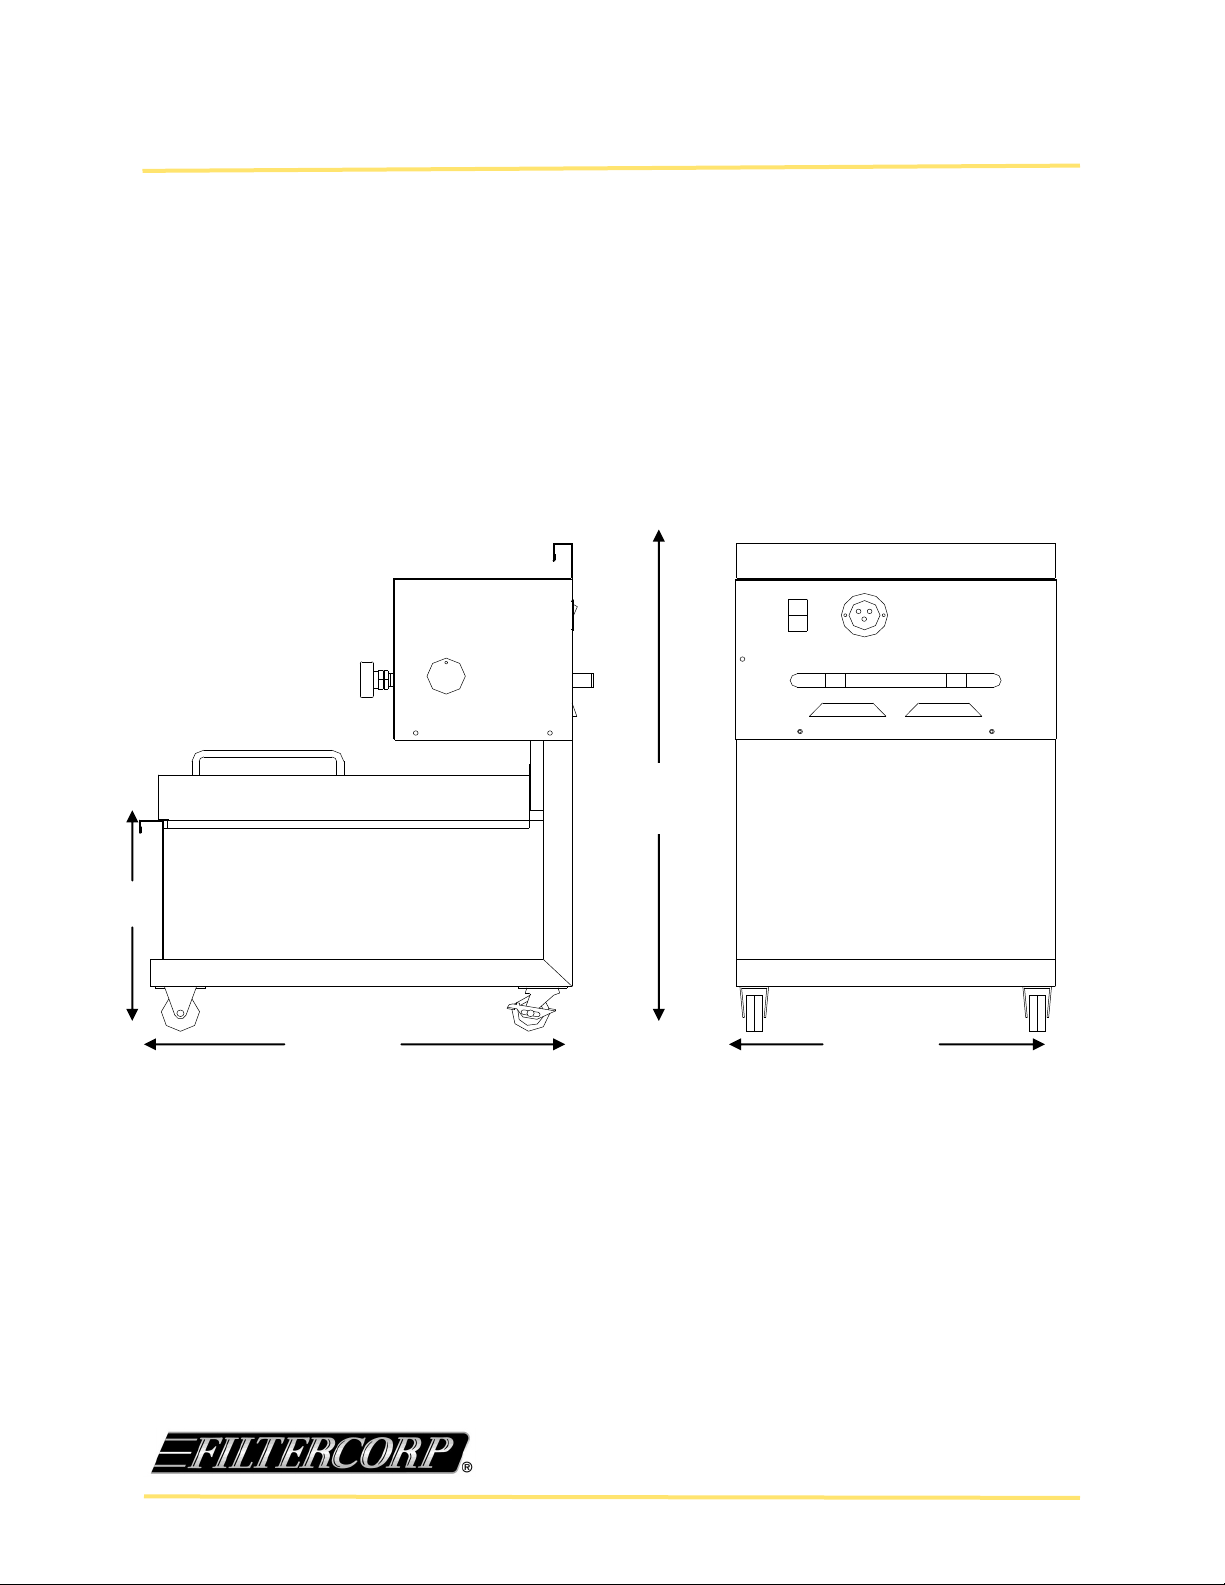
DIMENSIONS & DETAIL DRAWINGDIMENSIONS & DETAIL DRAWINGDIMENSIONS & DETAIL DRAWING
LS-1-60
12.5‖
27.25‖
23.75‖ 16.75‖
Innovative • Convenient • Reliable
FILTERCORP • 9805 NE 116th Street, PMB A200 • Kirkland, WA 98034 • Phone: 800 -473-4526 • Fax: 425-820-2816 • www.filtercorp.com
SM
Page 12
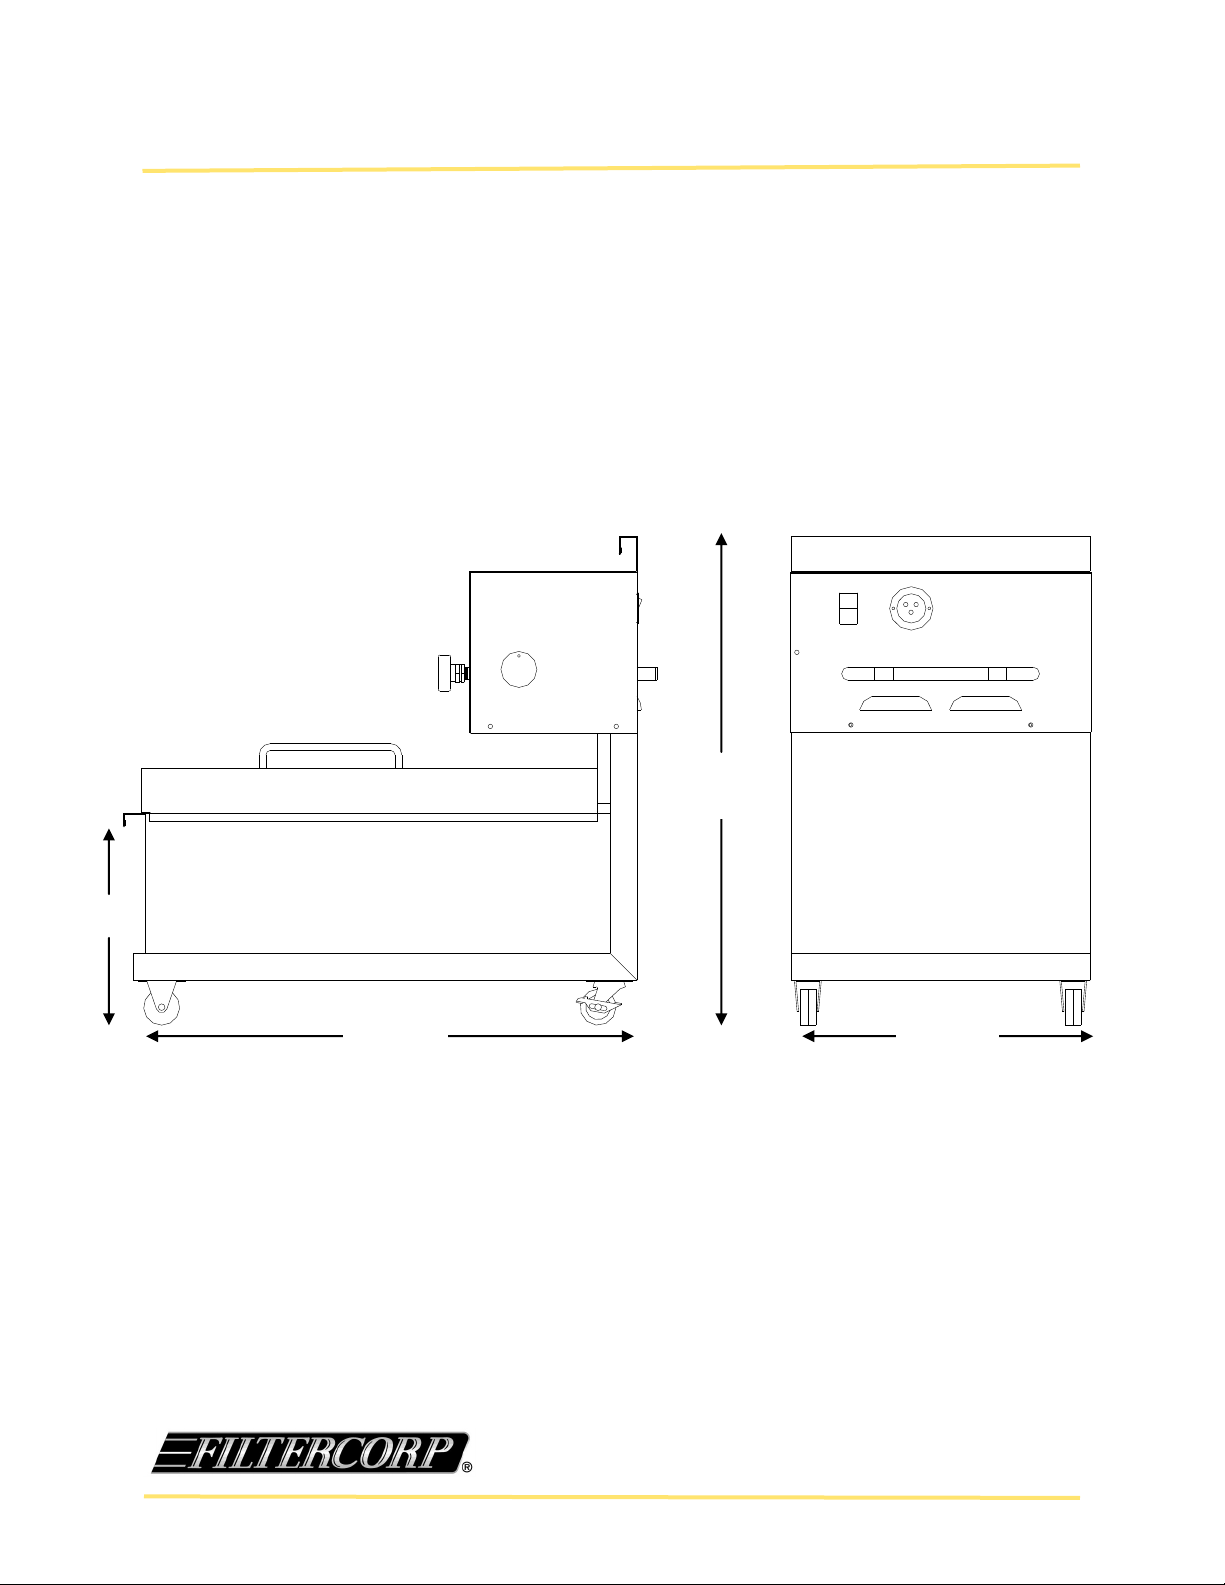
DIMENSIONS & DETAIL DRAWINGDIMENSIONS & DETAIL DRAWINGDIMENSIONS & DETAIL DRAWING
LS-1-100
12.5‖
27.50‖
33.5‖ 16.75‖
Innovative • Convenient • Reliable
FILTERCORP • 9805 NE 116th Street, PMB A200 • Kirkland, WA 98034 • Phone: 800 -473-4526 • Fax: 425-820-2816 • www.filtercorp.com
SM
Page 13

TROUBLESHOOTINGTROUBLESHOOTINGTROUBLESHOOTING
PROBLEM POSSIBLE CAUSE SOLUTION
Unit will not turn on A) Power cord is not plugged in
B) Power Breaker is tripped
C) Motor is overloaded
Motor runs but will not
pump
Hoses leak at the
connections
A) Hose or pump is blocked A) Disconnect & clean hoses with
A) Loose connections A) Check to ensure all hose
A) Check both filter connection
and power outlet
B) Check to ensure the power
outlet breaker in your building
is on and hasn’t been tripped
C) Let motor cool down. Slide
open the reset button cover on
the side of the LS-1 pump/
motor box. Press reset
button. Retry the power
switch.
Warning: make sure the
power switch is in the ―off‖
position before pressing the
reset button.
warm water to loosen
solidified shortening.
Drain & dry completely.
connections are properly
attached and locked
For additional information, please contact your nearest Authorized Service Agency.
Innovative • Convenient • Reliable
FILTERCORP • 9805 NE 116th Street, PMB A200 • Kirkland, WA 98034 • Phone: 800 -473-4526 • Fax: 425-820-2816 • www.filtercorp.com
SM
Page 14

FRYING OIL ACCESSORIES/SAFETY KITFRYING OIL ACCESSORIES/SAFETY KITFRYING OIL ACCESSORIES/SAFETY KIT
FILTERING APRON KIT
PART #3070
Authentic proprietary BurnGuard materials and construction make up this
state-of-the-art safety kit for filtering hot oils. Specially formulated to provide superior
protection against the penetration of liquids and insulation from heat.
Twenty times more durable than conventional garments
Non-toxic
Machine washable
Comfortable design
The kit consists of a 42-inch apron (Part #3074), a pair of 18 inch five finger gloves
(Part #3075), a pair of 18-inch shin guards (Part #3076), and a hard protective face
shield (Part #3078).
Note: Items can be ordered separately.
Innovative • Convenient • Reliable
FILTERCORP • 9805 NE 116th Street, PMB A200 • Kirkland, WA 98034 • Phone: 800 -473-4526 • Fax: 425-820-2816 • www.filtercorp.com
SM
Page 15

Professional Restaurant Equipment
ORIGINAL EQUIPMENT WARRANTY
Filtercorp warrants its new product(s) to be free from defects in material and workmanship for a period of
the lesser of: (i) two (2) years from date of original installation, or (ii) thirty (30) months from the date of
shipment from the factory, provided that proof of installation date is supplied to Filtercorp prior to work
being performed.
This Warranty shall be subject to the following conditions and limitations:
1. This warranty is limited to an original commercial
user (“OCU”) purchasing new Professional
Restaurant Equipment (“Equipment”) for use with
Filtercorp filter media.
2. Filtercorp’s obligation under this warranty is
limited to repair or replacement of the defective
Equipment (or any part of such Equipment) and
the labor for such repair or replacement.
Filtercorp shall not be liable for any defect unless
it has received written notice of such defect within
30 days of the date that the OCU learns of such
defective equipment.
3. Filtercorp’s warranty obligation as to labor costs is
limited to the normal labor charges incurred for
such repair or replacement for work done at an
authorized Filtercorp service agency. Additionally,
for warranty work performed within ninety days
after the Equipment is installed, Filtercorp shall be
responsible for the normal labor charges for such
work provided that it is performed within fifty (50)
miles from an office of an authorized Filtercorp
agency and performed by an authorized Filtercorp
agency. OCR is solely responsible for any labor
charges for such work on Equipment that is
installed outside the continental United States.
4. Filtercorp shall have no obligation as to any
Equipment which have been misapplied, abused,
used in a manner other than its intended and
normal service, subjected to harsh or improper
chemical action or poor water quality, or which
has had unauthorized modifications or serviced by
unauthorized service personnel, damaged by
flood, fire or acts of God or other causes, or which
has the serial number removed or altered.
5. Adjustments such as calibrations, leveling,
tightening of fasteners or utility connections
normally associated with original installation, are
the responsibility of the dealer or installer and not
that of Filtercorp.
6. Filtercorp shall have no liability for the cost of part
(s), labor or travel time to replace fuses or to reset
circuit breakers resulting in whole or part from the
Equipment or its operation. These costs are the
responsibility of the OCU.
It is the policy of Filtercorp that its products are subject to continual improvement. The Company reserves the right to alter the design of any of its products without prior notification. In such circumstances
the Equipment described above may differ in certain respects from the one supplied. Filtercorp assumes no responsibility to up-date any delivered or in-service Equipment and, furthermore, Filtercorp
shall not have any obligation to modify the product or Equipment instructions or this warranty regarding
Equipment already shipped or installed.
7. Filtercorp shall have no obligation as to any
Equipment damage or failure relating to or
resulting from its use for any purpose other than
as a filter machine used to filter edible cooking oils
and fats using Filtercorp filtering media.
8. Certain parts of the Equipment have different
warranty periods, which are set forth below:
a. High temperature pick-up and return
hoses – ninety (90) days from date of
installation.
b. Rubber seals, power cord, and gaskets –
ninety (90) days from date of installation.
c. Frame – Five (5) years from date of
shipment from the factory.
d. Casters – One (1) full year; two (2) year
partial from date of installation.
9. OCU’s exclusive remedy on a claim of any kind
relating to the Equipment whether in contract or in
tort or under any other legal theory, and whether
arising out of warranties, representations,
instructions, installations or defects from any
cause shall be limited to repair or replacement of
the defective Equipment.
10. In no event shall Filtercorp be liable, whether in
contract or in tort, or under any other legal theory,
for loss of use, revenue or profit, or for incidental,
indirect, or special or consequential damages or
for any other loss or claim arising from or relating
to the Equipment.
11. This warranty is exclusive and in lieu of all of other
warranties, express or implied or statutory,
including but not limited to, implied warranties of
merchantability or fitness for a particular purpose
or usage of trade, and constitutes the only
warranty of Filtercorp with respect to the
Equipment.
12. Any claims or disputes arising from or related to
the Equipment or under this document shall be
governed by the laws of the State of Washington,
and the venue of any such claims or disputes shall
be in courts located in King County Washington,
and the OCU expressly consents to the personal
and subject matter jurisdiction of such courts.
Innovative • Convenient • Reliable SM
FILTERCORP • 9805 NE 116th Street, PMB A200 • Kirkland, WA 98034 • Phone: 800 -473-4526 • Fax: 425-820-2816 • www.filtercorp.com
Page 16

WARRANTY REGISTRATIONWARRANTY REGISTRATIONWARRANTY REGISTRATION
Warranty Registration for Filtercorp LS-1 Series Portable Filter
Model Number:
Serial Number:
Store Name:
Store Number:
Address:
City:
State:
Telephone:
Date of Purchase:
Dealer or Rep Purchased From:
Dealer Invoice Number:
Zip:
IMPORTANT!
Please complete the Warranty Registration and return to Filtercorp.
FILTERCORP
9805 NE 116th Street
PMB A-200
Kirkland, WA
98034
Fax: 425-820-2816
Innovative • Convenient • Reliable
FILTERCORP • 9805 NE 116th Street, PMB A200 • Kirkland, WA 98034 • Phone: 800 -473-4526 • Fax: 425-820-2816 • www.filtercorp.com
SM
Page 17

MODEL LSMODEL LSMODEL LS
PORTABLE VACUUM FILTER MACHINEPORTABLE VACUUM FILTER MACHINEPORTABLE VACUUM FILTER MACHINE
Getting even more from your frying program
-
-1 1 1 SERIESSERIESSERIES
-
SERVICE MANUAL
MODELS: LS-1-60
LS-1-85
LS-1-100
Retain this manual for future reference.
Innovative • Convenient • Reliable
FILTERCORP • 9805 NE 116th Street, PMB A200 • Kirkland, WA 98034 • Phone: 800 -473-4526 • Fax: 425-820-2816 • www.filtercorp.com
SM
Page 18

TO OUR VALUED SERVICE PARTNERSTO OUR VALUED SERVICE PARTNERSTO OUR VALUED SERVICE PARTNERS
Filtercorp is a leading manufacturer of premium quality cooking oil filter equipment.
We are proud of our reputation for quality and our commitment to customer
satisfaction.
We have set high standards for ourselves along with our network of independent Parts
Distributors and Service Agencies. As an Authorized Parts Distributor or
Authorized Service Agency we are counting on you to represent our company in a
professional manner. We are here to help support you should you need help. Our
Technical Support Center is staffed by experienced technicians eager to help you.
Our Technical assistance and Service parts ordering number is (800) 473-4526
x150 and we are available 8:00 am (CST) to 5:00 pm (CST).
This Service Manual, and the User Manual that precedes it, are designed to provide
you with the information needed to properly diagnose and repair the LS-1 Portable
Cooking Oil Filter. We are proud of this appliance as we believe it offers a terrific
filtering experience. Your understanding of the design and function of this
appliance is an important part of the repair process.
If you need help, please contact us.
Sincerely,
Robin D. Bernard
President
Innovative • Convenient • Reliable
FILTERCORP • 9805 NE 116th Street, PMB A200 • Kirkland, WA 98034 • Phone: 800 -473-4526 • Fax: 425-820-2816 • www.filtercorp.com
SM
Page 19

TABLE OF CONTENTS TABLE OF CONTENTS TABLE OF CONTENTS Service manualService manualService manual
Note to Service Technicians / Reported Trou-
Page 20
bles
Wiring Diagram Page 21
Pump Installation view Page 22
Pump Cleaning & Seal Replacement Page 23
Parts Listings Pages 24-27
Innovative • Convenient • Reliable
FILTERCORP • 9805 NE 116th Street, PMB A200 • Kirkland, WA 98034 • Phone: 800 -473-4526 • Fax: 425-820-2816 • www.filtercorp.com
SM
Page 20

NOTE TO SERVICE TECHNICIANSNOTE TO SERVICE TECHNICIANSNOTE TO SERVICE TECHNICIANS
This manual is not a stand alone document. You must read
and become familiar with the content of the User Manual
and Instruction sheet (LS-1 Portable Filter Procedures) to
effectively troubleshoot and repair this equipment.
REPORTED TROUBLESREPORTED TROUBLESREPORTED TROUBLES
1. The pump operates, but does not pump oil. This is often diagnosed as a bad
pump but usually is caused by a block or crimp in the pick-up hose. To test the
pump, remove the pick-up hose quick disconnect and put your finger on the
pump intake. If it pulls a good vacuum, the pump is good. The pick-up hose
may be kinked such that it permits a small amount of flow (when you test the
hose, water flows through it) but not enough to operate effectively.
2. Water should never be run through the pump. Water will cause corrosion with-
in 24 hours. The corrosion will lock up the pump. If water is accidentally
pumped, immediately flush the pump with hot cooking oil.
3. Pumps that do not rotate can often be adjusted to correct the problem instead
of replacing the pump.. See page 23 step 13.
4. A quick disconnect that won’t connect is usually caused by particles inside the
quick disconnect. Using the filter system without a filter pad causes the particles to circulate and become lodged in the quick disconnects and the pump.
Innovative • Convenient • Reliable
FILTERCORP • 9805 NE 116th Street, PMB A200 • Kirkland, WA 98034 • Phone: 800 -473-4526 • Fax: 425-820-2816 • www.filtercorp.com
SM
Page 21
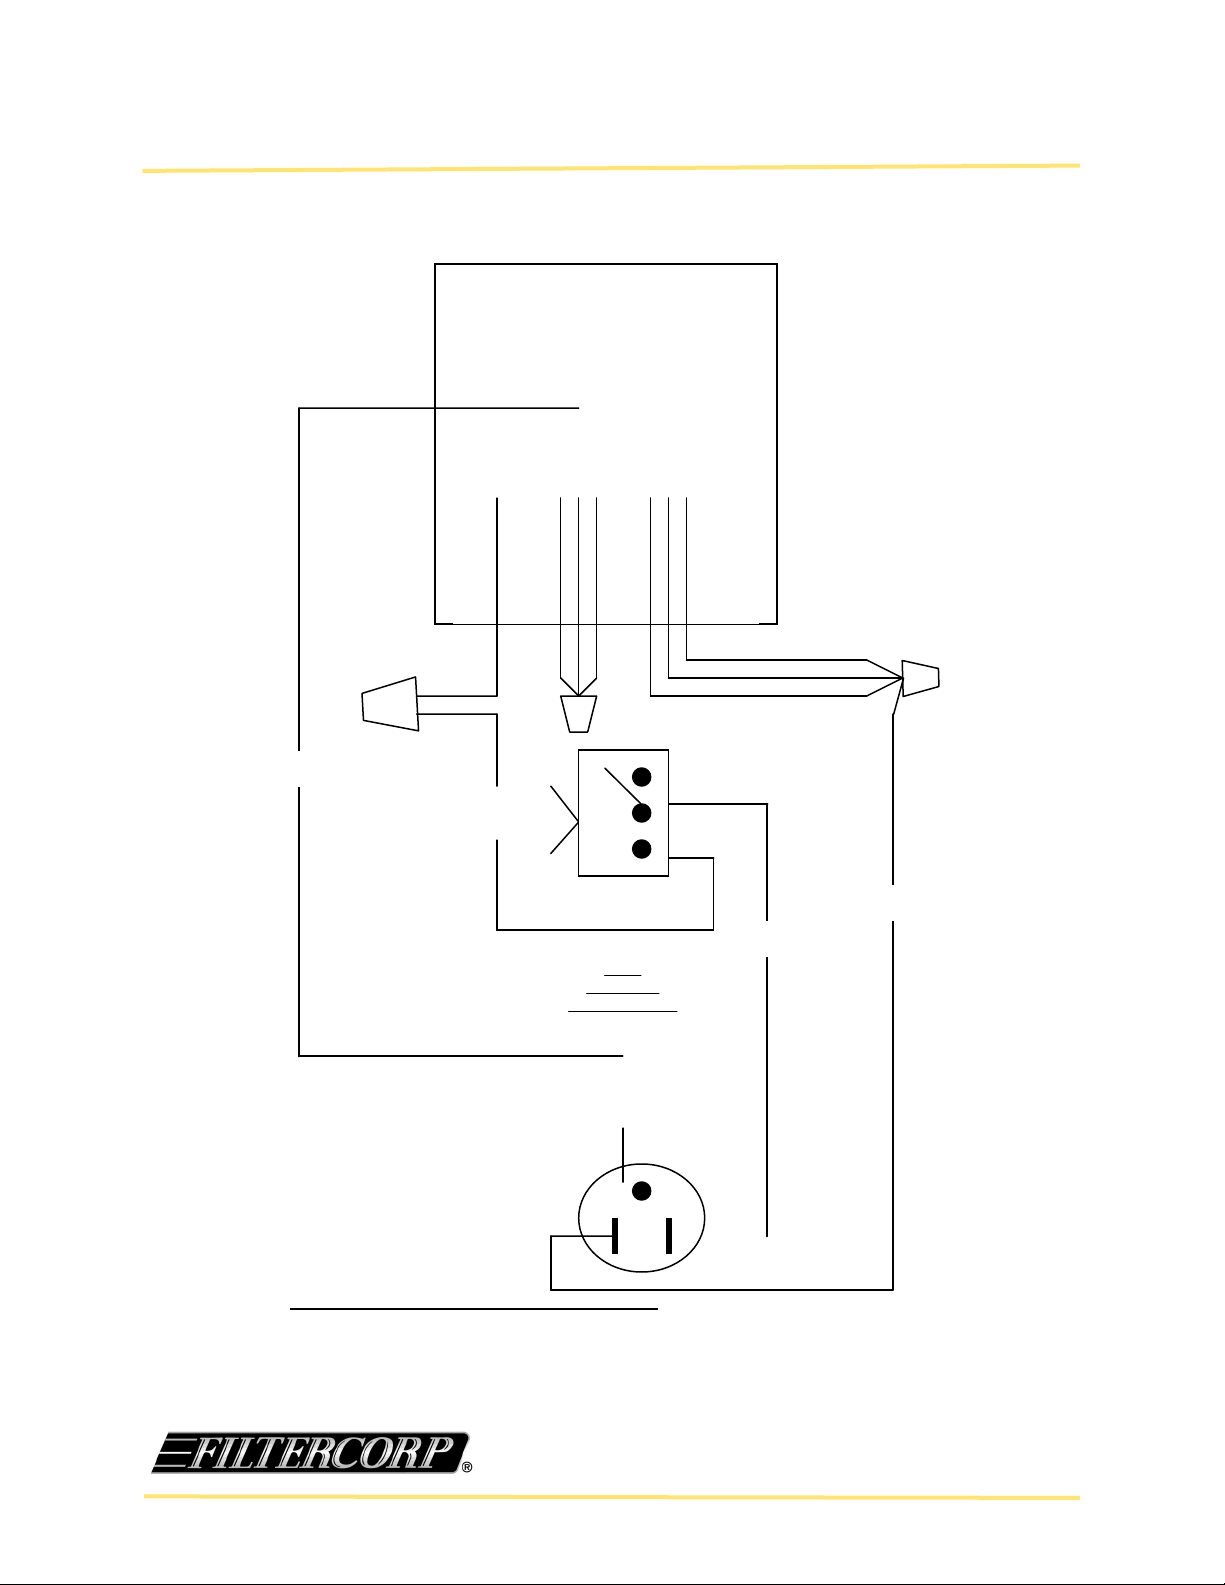
WIRING DIAGRAM FOR HAIGHT PUMPWIRING DIAGRAM FOR HAIGHT PUMPWIRING DIAGRAM FOR HAIGHT PUMP
Pump Motor/
C.W. Rotation
G
P1 P2 T3 T5 T2 T4 T8
3
Wired For Clock Wise Rotation (C.W.)
1 # WN1-Switch Bottom-Red
2 # WN2-Receptical Left—White
3 # Motor Ground Screw—Cassis-Green
4 # Chassis-Top Receptacle Ground-Green
5 # Switch Middle—Receptacele
Right-Black
Note: To change Motor Rotation Switch T5 & T8
WN 1
On
Off
4
On
WN 2
Off
2
5
Innovative • Convenient • Reliable
FILTERCORP • 9805 NE 116th Street, PMB A200 • Kirkland, WA 98034 • Phone: 800 -473-4526 • Fax: 425-820-2816 • www.filtercorp.com
SM
Page 22
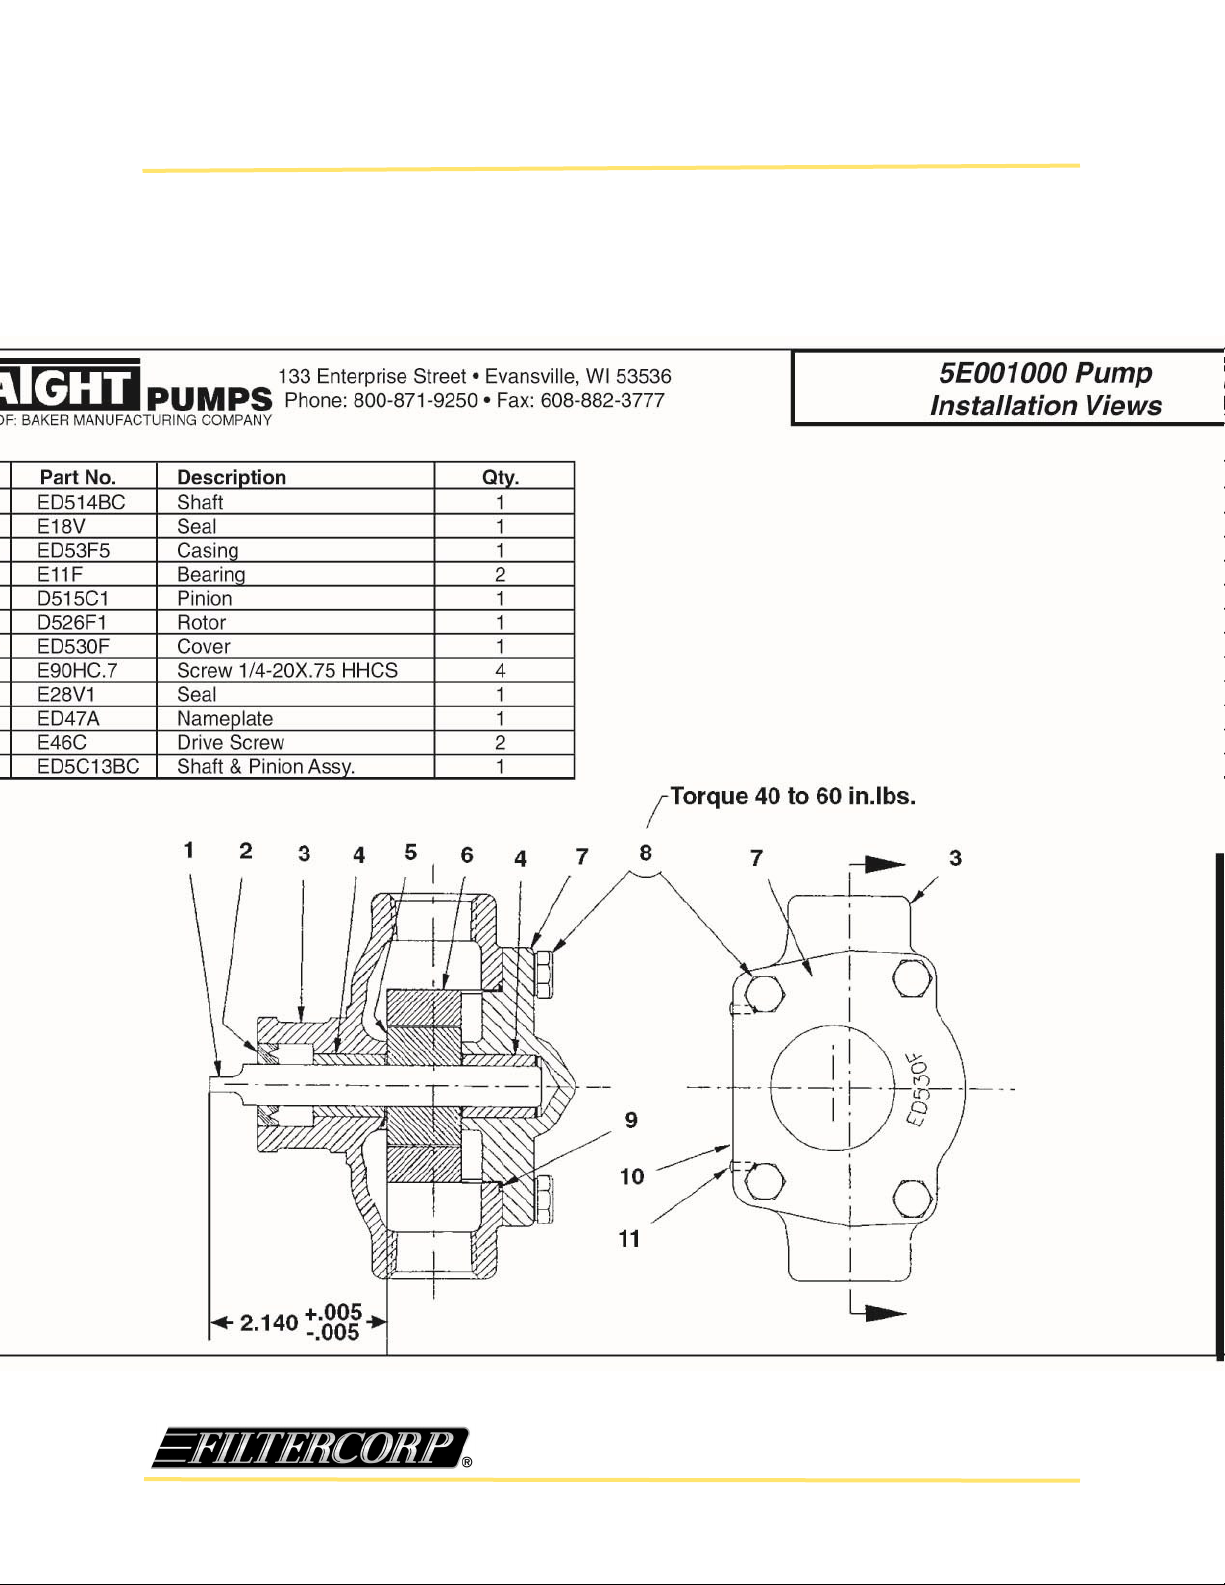
INSTALLATION VIEW FOR HAIGHT PUMPINSTALLATION VIEW FOR HAIGHT PUMPINSTALLATION VIEW FOR HAIGHT PUMP
FILTERCORP • 9805 NE 116th Street, PMB A200 • Kirkland, WA 98034 • Phone: 800 -473-4526 • Fax: 425-820-2816 • www.filtercorp.com
Page 23

PUMP CLEANING & SEAL REPLACEMENTPUMP CLEANING & SEAL REPLACEMENTPUMP CLEANING & SEAL REPLACEMENT
Refer to drawing # 5E001000 for component reference numbers. Procedure assumes
the pump and motor assembly has been removed from the Filter/Fryer system.
Step # 1. Loosen and remove the four cover bolts (#8).
Step # 2 Loosen the 3 set screws on the motor hub, and remove pump from motor.
Step # 3. Remove pump cover (#7). Hint: Grasping the pump head on the sides and strik-
ing the shaft on a wood surface, will aid in cover removal.
Step # 4. Remove rotor (#6) and shaft and pinion assembly (#1 & #5). Hint: Mark the rotor
and pinion with a magic marker before removal to insure that it is reinstalled in
the same orientation to prevent possible binding.)
Step # 5 Pry the shaft seal (#2) out of the housing. Remove the cover o-ring (#9) from
the cover.
Step # 6. Clean rotor, housing, cover and shaft and pinion assembly in warm soapy wa-
ter. Be sure that all debris is cleaned away from gear teeth. Inspect for excessive wear or damage.
Step # 7 Press new shaft lip seal into the housing, the lip should be facing into the pump.
This is a press fit so you will need a press, vice or other mechanical assistance
for installation. Be sure to protect all machined surfaces from damage.
Step # 8 Install new cover o-ring on the cover. Hint: Gently stretch the o-ring and drop
into place, never “roll” the o-ring this can result in a twisted condition that will
leak.
Step # 9. Lubricate the shaft and pinion assembly, rotor, housing and cover with clean
cooking oil.
Step # 10. With a rotating motion, carefully slide shaft and pinion assembly back into pump
housing. Turning the shaft and pinion during installation will reduce damage to
the pump’s lip seal.
Step # 11. Install rotor into pump casing, aligning the marks you made in step # 4
Step # 12. Install pump cover, with seal, into pump housing.
Step #13. Install cover bolts tightening them alternately in a criss-cross pattern until snug.
Ensure the shaft turns freely during the tightening process. If the shaft starts to
bind, wiggle the cover to adjust the crescent location relative to the gears. Complete tightening with same pattern to 40 to 60 inch pounds. Test pump to insure
the shaft turns freely.
Step # 14 Install the pump back onto the motor, rotating the pump so the pump shaft and
motor shaft become properly engaged. The pump hub end must be fully inserted into the mating motor hub for proper shaft engagement.
Step # 15 Rotate the pump to the desired location and tighten the three mounting set
screws.
Innovative • Convenient • Reliable
FILTERCORP • 9805 NE 116th Street, PMB A200 • Kirkland, WA 98034 • Phone: 800 -473-4526 • Fax: 425-820-2816 • www.filtercorp.com
SM
Page 24
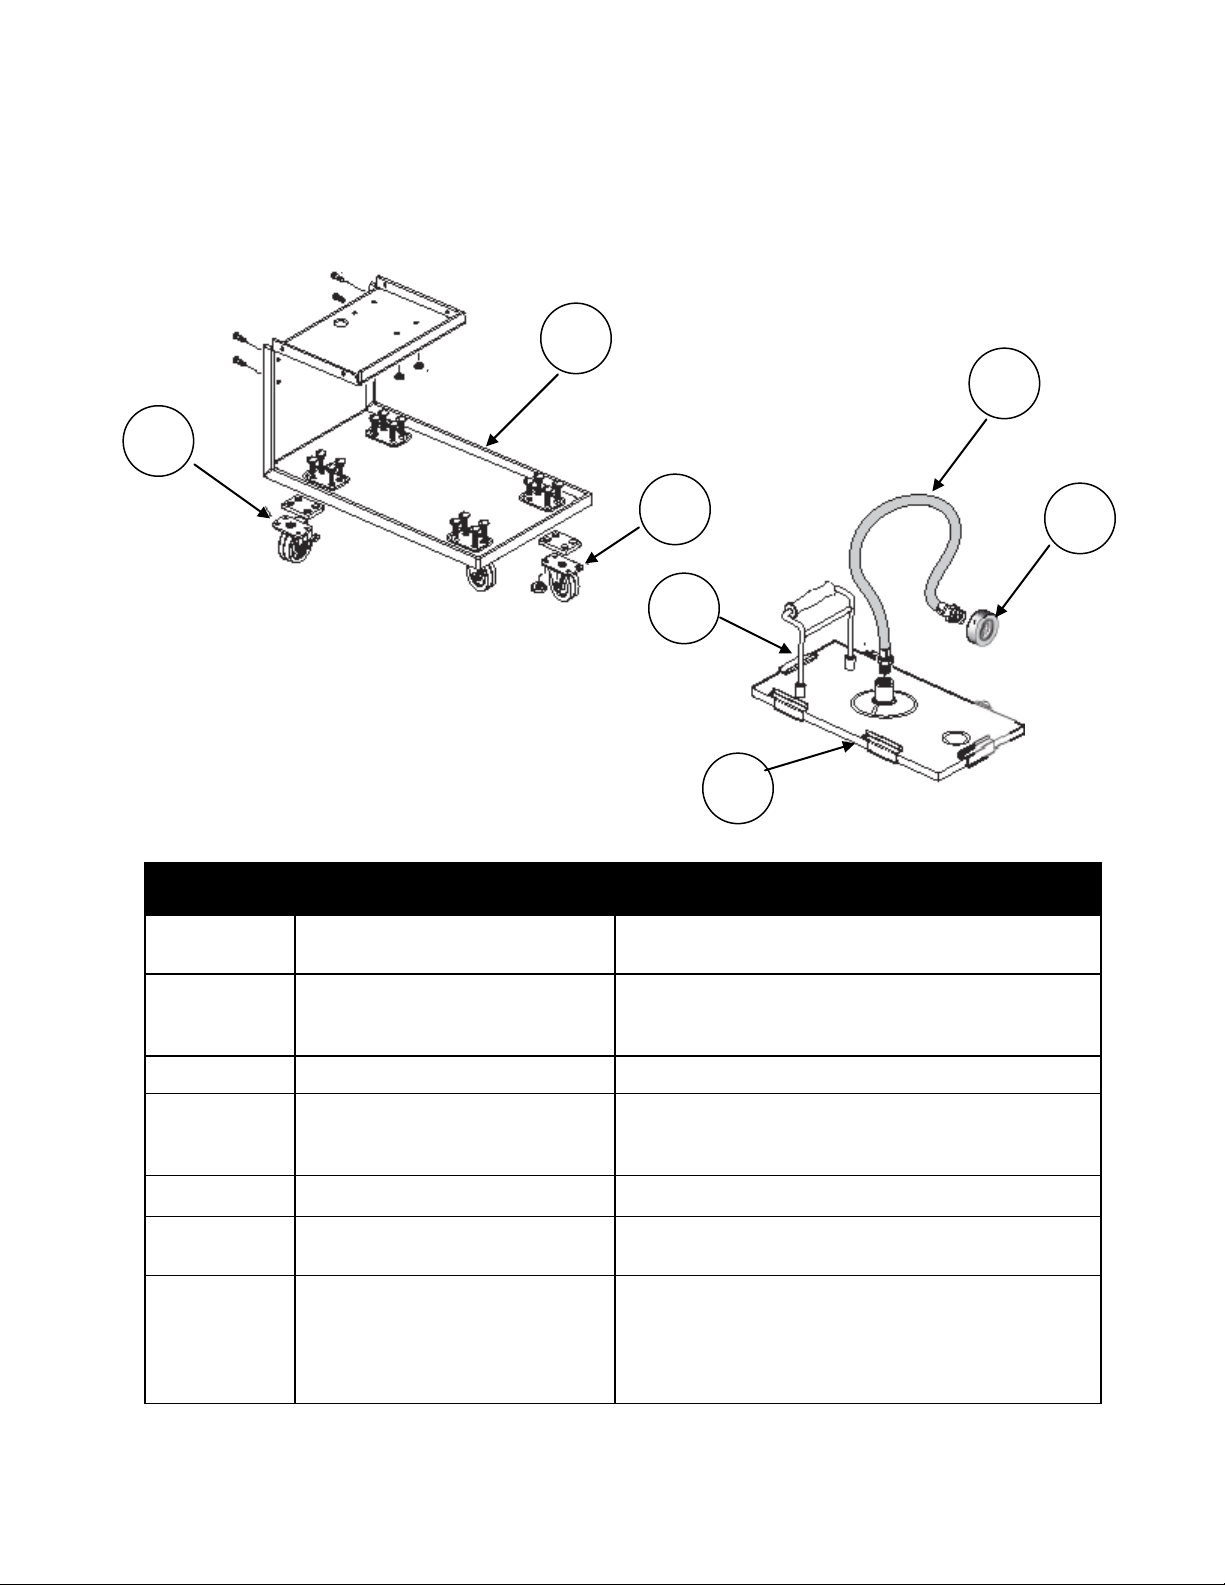
Parts Listing
Parts Listing
2
1
Item
1 848-04
Part Number
861
3
4
7
Description
2.5”Caster (Swivel with Brake), Aluminum Units
2” Rear Caster (Swivel with Brake)
5
6
2 845-01AL
No Longer Available
846-07
3 860 2” Front Caster (Rigid)
4 1005
1063
1075
5 1064 Pick Up Hose—3/8” x 21” L w/3/8” male fittings
6 1012
1012A
7 1001-8
1001-16H
1001-40H
1001-45H
100-95H
FILTERCORP • 9805 NE 116th Street, PMB A200 • Kirkland, WA 98034 • Phone: 800 -473-4526 • Fax: 425-820-2816 • www.filtercorp.com
Quick Disconnect Fitting, Snaptite, 3/8” Female, NPT
Filter Base/Frame (LS-1-60)
Filter Base/Frame (LS-1-85)
Filter Base/Frame(LS-1-100)
8” Standard Safety Handle
7” Safety Handle (Short)
5.75” Safety Handle (Extra Short)
Safety Donut for Part #1012
Unifit Padholder Base
Unifit Padholder Base (F-16)
Unifit Padholder Base (F-40)
Unifit Padholder Base (F-45)
Unifit Padholder Base
Page 25
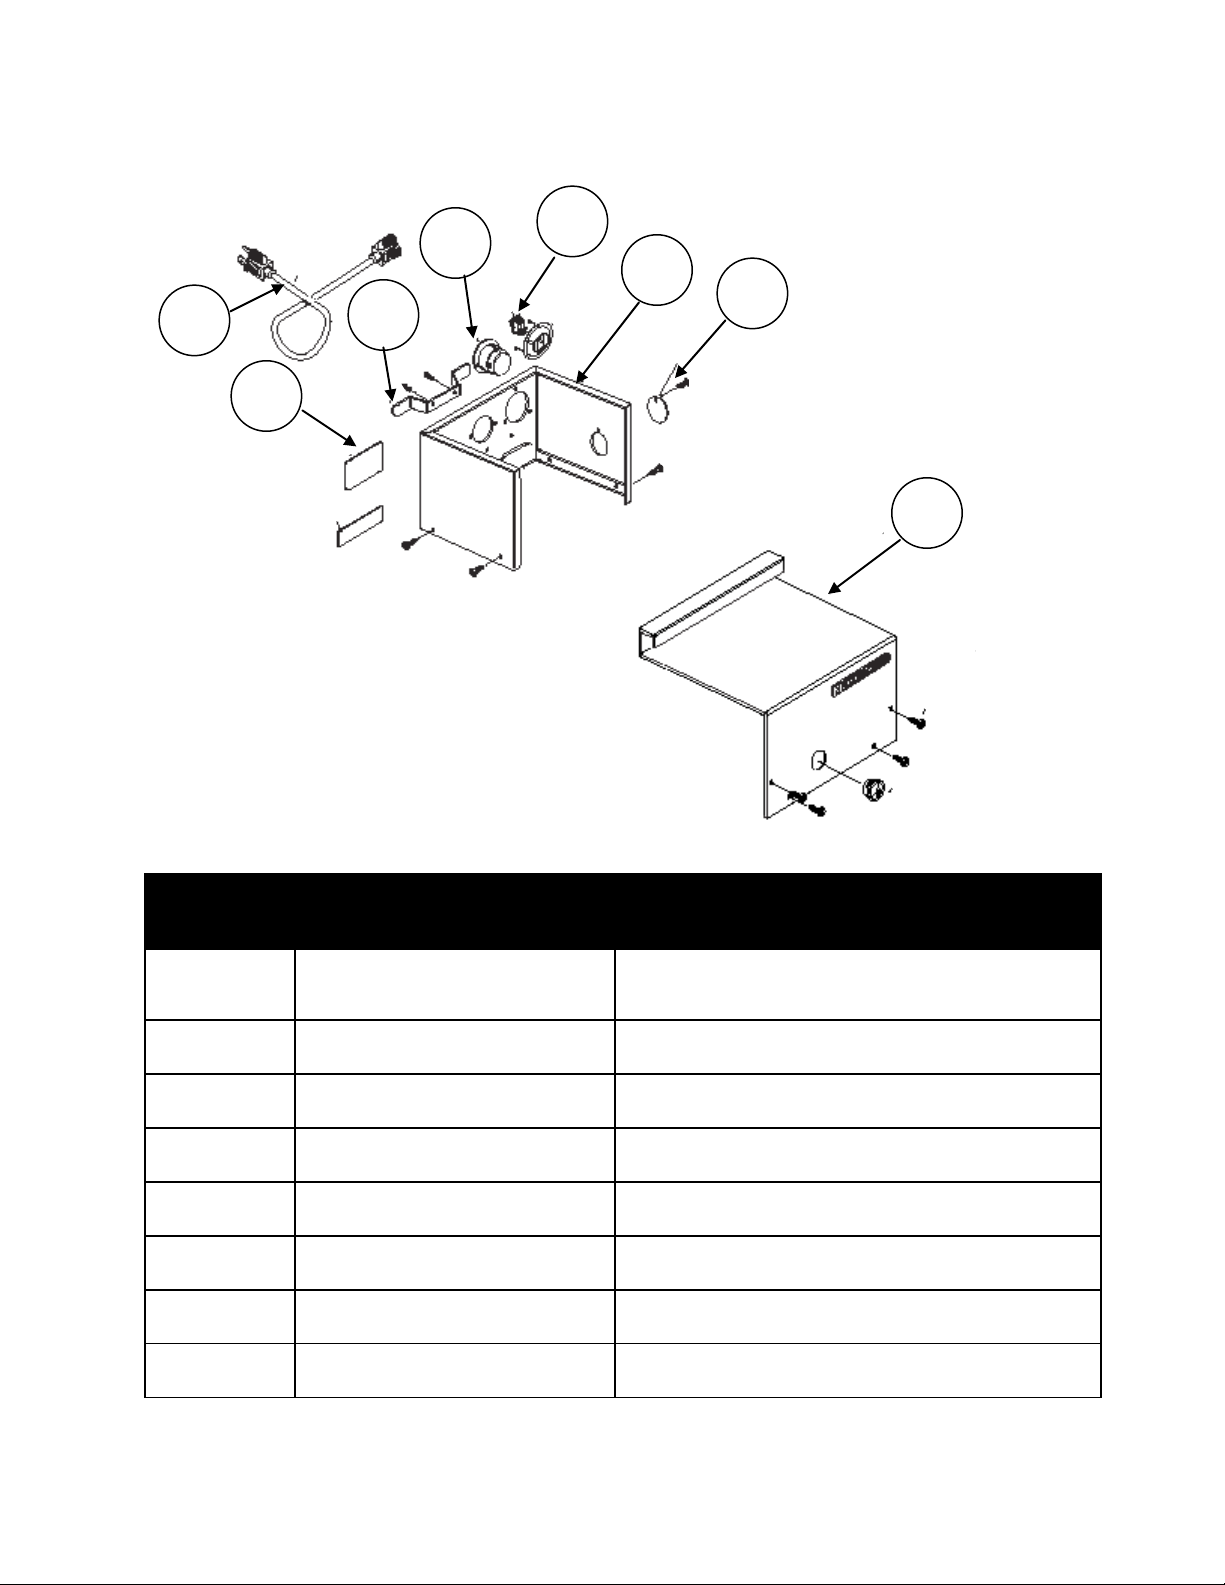
Parts Listing Parts Listing
3
5
4
2
6
7
Item
1
Part Number
Description
8
1 Identification Plate
2 847-08 Cord Wrap
3 870 Electrical Power Cord—12 ft., 110 volt, 3 prong
4 847-62Kit Receptacle—Female
5 847-01 On-Off Switch
6 847-07 Rear Panel
7 847-09 Reset Button Cover
8 847-06 Front Cover
FILTERCORP • 9805 NE 116th Street, PMB A200 • Kirkland, WA 98034 • Phone: 800 -473-4526 • Fax: 425-820-2816 • www.filtercorp.com
Page 26
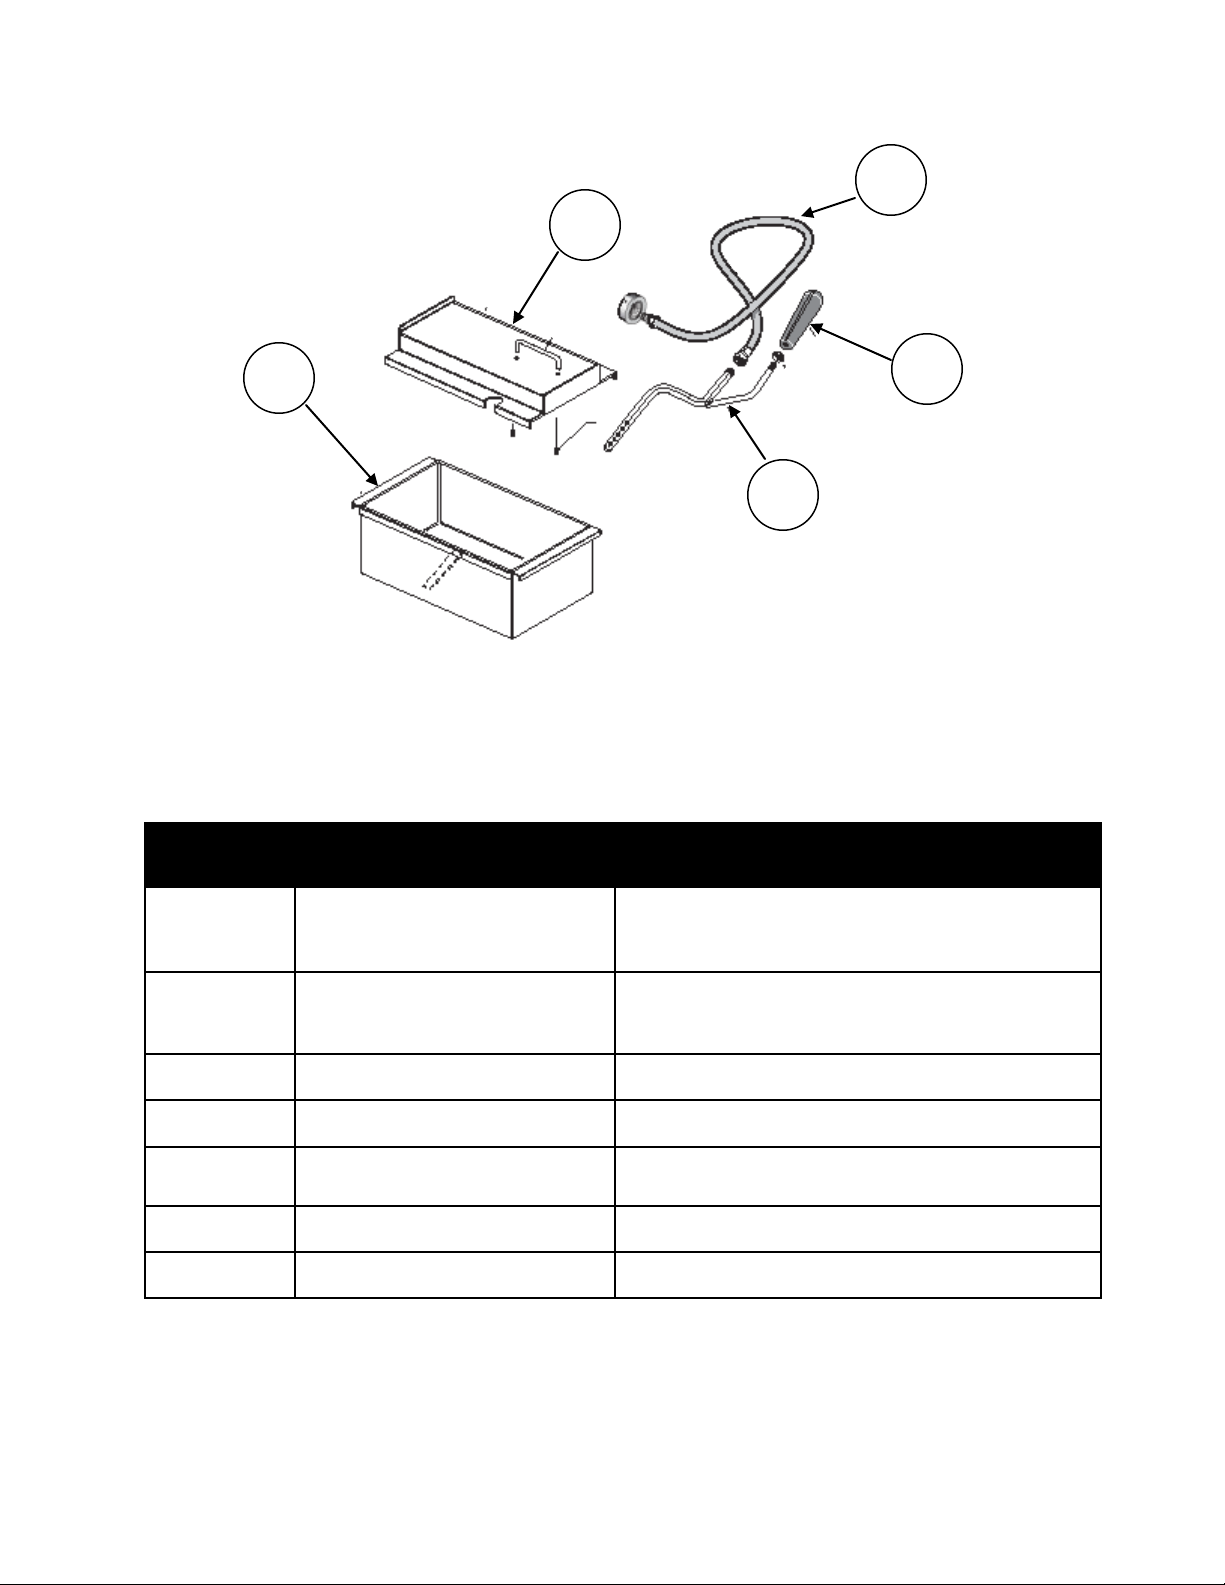
Parts Listing Parts Listing
3
2
Item
1
Part Number
5
Description
4
1 845-05AL
846-05
846-09
2 845-02AL
846-02
846-08
3 855 62” Drain Hose
4 856XW Nozzle Handle
5 856
856AL
FILTERCORP • 9805 NE 116th Street, PMB A200 • Kirkland, WA 98034 • Phone: 800 -473-4526 • Fax: 425-820-2816 • www.filtercorp.com
60# Bucket/Pan (LS-1-60)
85# Bucket//Pan (LS-1-85)
100# Bucket/Pan (LS-1-100)
Bucket Cover (LS-1-60)
Bucket Cover (LS-1-85)
Bucket Cover (LS-1-100)
Hand Nozzle w/Shower Spray
Hand Nozzle w/Shower Spray AL
Page 27
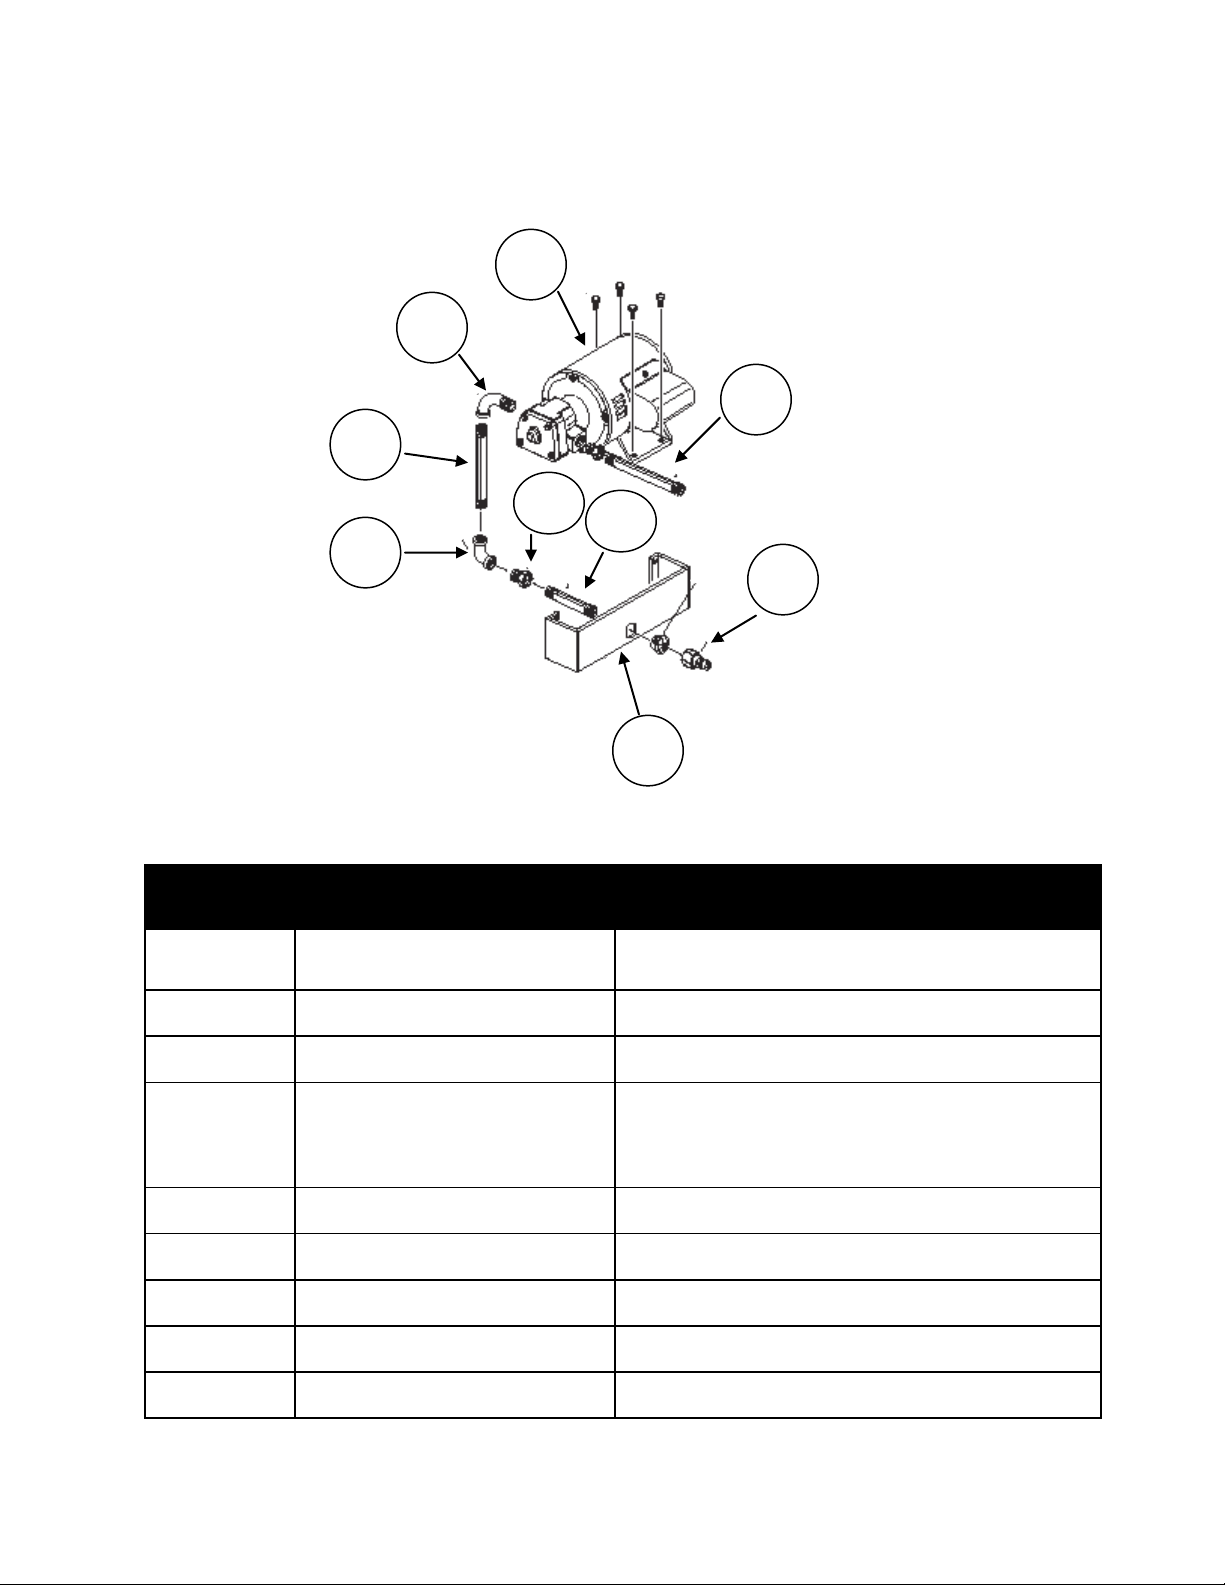
Parts Listing Parts Listing
4
Item
2
1
Part Number
3
5
6
7
9
8
Description
1 867 Elbow—galv. 1/2”, 90 degree elbow, NPT
2 869 Pipe Nipple—galv., 3/8” x 7”, NPT
3 866 Pipe Elbow—galv., 1/2”, 90 degree street elbow, NPT
4
-
-
-
5 869 Pipe Nipple—galv., 3/8” x 7”, NPT
6 868 Hex Bushing—galv. 1/2” x 3/8”, NPT
7 865 Pipe Nipple—galv. 3/8” x 2”, NPT
8 1015 Quick Disconnect Fitting 3/8” Male NPT
9 847-05 Bottom Panel
FILTERCORP • 9805 NE 116th Street, PMB A200 • Kirkland, WA 98034 • Phone: 800 -473-4526 • Fax: 425-820-2816 • www.filtercorp.com
850PM
850A
850PP
850M
Pump/Motor Assembly—S23C, 110 volts, 60 cycle
Pump rebuild kit
Pump only
Motor only
 Loading...